
Hull.io offers developers a complete platform to add social features to their apps quickly and easily.
Don't wanna be here? Send us removal request.
Statistics
We looked inside some of the posts by hullapp and here's what we found interesting.
Average Info
Notes Per Post
65
Likes Per Post
48
Reblog Per Post
11
Reply Per Post
0
Time Between Posts
24 days
Number of Posts By Type
Text
17
Last Seen Tumblr Blogs


Fun Fact
When “GIF” was named word of the year in 2012, Oxford Dictionaries U.S.A. credited Tumblr for pushing the word.
Text
For Shopify Merchants and Experts, Hull is Social Login done right
Here are a few of the not-so-obvious things we learned when building our Social Login app for Shopify. If you are thinking about building a Shopify App, or adding Social Login to your store, read this short post.
A few weeks ago, we were having a discussion with Ryan Foster about the Shopify Platform. After several conversations, we discovered there was a pressing need for a better, frictionless checkout experience that would also increase conversion. We decided to package our best-of-breed User Identity management platform as a 1-click Shopify App providing social login. Here's what we learned.
Shopify's API makes things easy
The App API is actually very simple and enjoyable. In one day, we had a working solution that a few beta-testers could use. It's very well documented and works perfectly.
Devil is in the details, and that's where we met him
We struggled working with user identities. A very powerful, yet restricted feature makes this easy. Known as Multipass Login, it provides a way to share user identities across the store and their app. Unfortunately, it's a "Plus" feature, which means nearly no merchant has access to it. (Help us ask Shopify to release it to all merchants on this Shopify Multipass Petition.)
Restricting our product to Plus accounts was a no-no. We needed to share user identities with Shopify, and we needed to do it for all shops.
So, we jumped through many hoops, learned and coded a great amount to deliver a Social Login that works for every Shopify merchant. We worked hard to deliver, and here's what makes Hull's Social Login unique:
Creating a great experience for existing customers is paramount, but really hard
You want existing customers to be able to signup with their Facebook or other social media accounts. Doing this without Multipass was HARD, but we ended up building an elegant flow that lets them do this. If their email matches what’s already in your system, we let them continue the signup process without being stuck in a dead-end.
Most social login apps throw an error message, or worse, do nothing and fail silently.
Promoting a seamless experience is your goal and when either of the above happens, it is really bad because the customer, unable to complete the purchase, simply leaves.
Other apps create bogus email addresses, which messes up your customer list with duplicate and bogus accounts, and prevents you from messaging them. It’s also bad for your customers since they neither receive order confirmations nor recognize the email address that was generated.
Burying Social Login so deep in the customer signup page that existing customers will never find it could be a potential solution, but we’re not sure that’s what you want.
How to test if your Social Login is done correctly
Create a new user account by signing up via email and password (use the same email address as your Facebook account).
After you create the account, log out and try to sign up via your Social Login app’s Facebook button.
See if it works correctly, and whether you were able to log in or not. Is the email the correct email address?
New Customer Signups have hidden limitations
For new users, Social Login apps work as advertised, except when the customer wants to sign up using Twitter or Instagram. These accounts are not associated with an email address, and in order to create a customer account on Shopify you need one.
As discussed above, most of the existing apps just create a bogus email address, which not only leads to confusion, as customers can’t recognize their email, but the experience is also worse than what they encounter when creating accounts the traditional way.
Moreover, all the bad data points render customer lists unmanageable, and create massive unsolvable problems.
How to test if your Social Login is done correctly
Log in to your shop with a Twitter account and see what email address is associated with your new account signup.
Preconfigured Social Media accounts are a Bad Thing
As a merchant, you might like the convenience of having preconfigured Social Media provider accounts. Though this saves you time during the initial app installation process, it violates the privacy policies of Facebook and other social media providers. This is not something that your traditional app provider states during their onboarding process.
Am I violating privacy policies using a preconfigured Social Media app?
As a user, when you see the Facebook or Twitter app screen, does it state your shop name or the name of the app provider? If yes, then you’re violating privacy policies.
Apps without privacy policies or with invalid ones are banned. When this happens, your login breaks. You also lose the ability to access your customer’s profile, and your customers will not be able to log in to your shop. Simple as that.
More importantly, as a merchant, you have a responsibility to protect your customers from letting third party providers capture their identity.
If you use your own app and have a good amount of traffic, make sure you create a Privacy Policy to avoid getting banned. Here is a link to a free generator for Facebook app privacy policies.
Who we are and why are we so passionate about this:
At Hull, our mission is to build amazing forward thinking products that are fast, reliable and have the flexibility to extend and integrate with other services.
For Shopify, we allow merchants to better target, personalize and reach customers with information and offerings they care about while driving significant increases in sales and revenue.
We do this by providing a unified view of your customer identities across platforms (mobile, web and social media), tracking customer actions and delivering great customer insights.
Here is a link to our app on the Shopify app store in case you want to learn more.
If you have any questions, feel free to drop us a quick note at [email protected].
0 notes
Text
The New Hull: Auto-batching, Angular.js, Ember & Backbone.js compatible, smaller than ever
After talking with hundreds of developers, we identified several needs that our previous library didn't address. In response we have built a more powerful and simpler library.
We focused on 3 major aspects:
Easy integration with all major frameworks
Huge performance improvements
Getting our code off your lawn
Today it's ready for primetime. We strongly encourage you to update your apps! Keep reading and find out why...
Easy integration with all major frameworks
Your tools, your rules.

We now maintain a minimal build of the library called hull.api.js, tuned specifically at performing API calls and integrating seamlessly into your stack.
No matter what your app uses, Ember.js, AngularJS, Backbone.js, React, Polymer or anything else, with the release of hull.api.js, we handle your social features, but you have full control.
Read all about it here
Auto-batching = Huge performance improvements
With the new Hull.js, your app just got 10x faster without you rewriting anything.

Up until now, building bigger apps meant doing hundreds of API calls. Not anymore. Our new library auto-batches requests. No matter if you do 2 or 100 API calls, you will get super-fast responses and minimal overhead.
Lighter and faster, pure and simple.
The best part? It's completely automated. Just update the library and it'll work!
We get off your lawn
Overall, the library has been slimmed down, with lighter tools ("Au revoir, EasyXDM!") and better encapsulation.
We worked hard to make everything much lighter. For instance hull.api.js weighs less than 10k. Your apps are going to love it.
When using the full version of hull.js, you will never have to deal with concurrent versions of requirejs or Handlebars ever again, as we no longer expose them in the public space.
That's not all, folks!
That's just from the client-side front, we have a ton of new APIs, login methods and great features we'll tell you about really soon. (hint: read about them here)
If you want to have a better overview of what we've been working on lately, we encourage you to view the CHANGELOG.md file in the Github repository. For now it contains only the major changes towards the now-released 0.8.0 version, but starting today, we will enforce to follow the rules dictated in CONTRIBUTING.md. We encourage you to submit pull requests to make our library even better. The more we are, the better!
Best Regards,
Xavier & the Hull team.
1 note
·
View note
Text
Introducing private organizations
You can now make your organizations private, meaning only approved users will be able to access to your organization's content (comments, likes, reviews, images...).
Users will still be able to log in to your apps but they will not see your content until you approve them.
By default this option is disabled. You can enable it by unchecking "Allow anonymous visitors to see organization data" in your organization's settings.
To approve a user, go to your organization's users section, click the user to open the side panel, and click the "approve" button.
As always, we’d love to hear your thoughts, please let us know what you think!
0 notes
Text
How to link multiple Social Accounts to the same User
Logging people in with just one provider sometimes is not enough.
If your app needs to integrate with multiple services like Twitter, Facebook or LinkedIn, you probably want to let your users connect these different identities to their profile.
Great news, hull lets you do that pretty easily.
The easy way
Our login/link@hull component handles all the UI and authentication flow to let your already registered users link their other identities.
Just add it to your app and you should be good to go :
<div data-hull-component='login/link@hull'></div>
The custom way
To log users in, you already have the "login" action that can be used in all your components.
Here is an example of a component to log users in via Facebook :
{{#if loggedIn}} Hello {{me.name}} {{else}} <a data-hull-action="login" data-hull-provider="facebook"> Sign in with Facebook </a> {{/if}}
Now that our user is authenticated, let say that we want to let him link his Twitter account :
{{#if loggedIn}} <p>Hello {{me.name}}</p> {{#if loggedIn.twitter}} <p> Your twitter account {{loggedIn.twitter.login}} is already linked, <a data-hull-action="unlinkIdentity" data-hull-provider="twitter"> Unlink it </a> </p>. {{else}} <p> Click <a data-hull-action="linkIdentity" data-hull-provider="twitter"> here </a> to link your Twitter account. </p> {{/if}} <p> <a data-hull-action="logout" data-hull-provider="facebook"> Logout </a> {{/if}}</p> {{else}} <a data-hull-action="login" data-hull-provider="facebook"> Login with Facebook </a> {{/if}}
As you can see, the linkIdentity and unlinkIdentity actions work the same way our login and logout actions. Except that you only display them when the user is already loggedIn to let her/him link additional identities.
How does it work ?
All User accounts in Hull have at least ONE identity connected. The first identity used when they created their User account is the main_identity and CANNOT be unlinked.
The name of this main identity is available via the main_identity property under the actual User object.
{ id: 'xxxx', name: 'User Name' email: '[email protected]', main_identity: 'facebook', identities: [...], ... }
Any additional identity linked via the linkIdentity method will appear inside the User's identities array. Those additional identities CAN be unlinked by the User himself via the unlinkIdentity action.
Authenticating via an additional identity
Once an identity is linked to a User, it CAN be used for authentication.
On our previous example, the main identity for your users will be their Facebook account. If a User adds a link to his Twitter account, he will be able to use either of those accounts to actually log in to your app.
Trying to link an identity that is already linked to another User
If the User tries to link an identity already linked to another User, the authentication flow will fail, and a hull.auth.failure event will be emitted.
To capture that error and display a message, you must listen to that event and display an error message in your component. (The login/link@hull component already does that, but if you build your own component, make sure that you handle this edge case).
Example:
Hull.component('my_identities', { initialize: function() { this.sandbox.on('hull.auth.failure', function() { alert("Too bad ! This identity is already taken by another User."); }); } });
Limitations
If someone creates two separate User accounts, say one with Facebook and one with Twitter. Those main_identities will always be linked to their original User account.
Hull currently does not provide a way to unlink them. It means that there is no way to merge those two User accounts down the road.
Questions / Feedback ?
Dealing with multiple identities is always tricky and we tried to be as flexible as possible. Let us know if you have more specific use cases !
1 note
·
View note
Text
What single sign on really is, and why you should care.
Single sign-on is a term you see quite often, but represents a very misunderstood feature. As it's name says, it allows a user to perform only a "single sign-on" across multiple web apps and sites.
This is something you need to build when you own multiple web properties, and you want people to log in only once and be recognized across all of them.
Let's say you're a movie studio. You release 30 movies a year, and for each of those, you let users log in and engage with the movies, with games, quizzes, contests, comments, friends activities, so they can have fun, win points, and receive personalized rewards based on their past history.
These movies, as it is the norm, each have their own domain. For example, Universal Pictures released The Bourne Legacy on http://www.thebournelegacy.com/ and Fast & Furious 6 on http://www.thefastandthefurious.com/
Single sign-on allows visitors who log in to one movie's web site to also be logged in on the second seamlessly, and stay connected to any future Universal Pictures movie.
For a social application or a brand having a main web site, a blog, and an ecommerce site, or a loyalty program, this is invaluable, since they can offer a consistent experience across domains
Taking it one step further, by combining Single Sign-On with Social Login.
Social login is the ability for a user to log using any social media website who provides authentication as a service.
Studies show that 77% of users prefer social login, which makes for a much lower friction, and increases seamless engagement.
Let's face it, no one likes the idea of creating an account with every single web app, fill out always different forms, open up their webmail to confirm an email that might not come immediately, and then have to remember yet another login and password. Most users just leave.
The best known examples of Social Login are Facebook or Twitter, but many others offer it too such as Foursquare, Google Plus, Tumblr, Instagram..., the list goes on.
I'm giving up control, but what am I gaining?
Time and engagement.
Social Networks allow users to use their identity on their platform to log in to your web property. This saves you a lot of development time compared to building your own login system.
You on the other hand, don't lose much, since a user is still created on your end. The Network just gives you the identity of the user once he has accepted your app. Think of it as them just replacing the login and password part. You still get to do anything you want after that.
It's not all roses.
Most networks use OAuth which is a protocol making this process almost standard. The Open Source community or sometimes the networks themselves provide libraries to help.
Unfortunately, all of them require that you to set up a database, and store the user data and access tokens they will provide when the user logs in.
And they all do it differently.
Once you have done this, you also need to spend time on the client side to set up a proper and elegant workflow that logs your users in without having them jumping through hoops. This is where most companies fail.
Lastly, Social Login is not tied to Single Sign-on. If you want to combine those, you need to do a lot more work.
You need a central identity repository able to share identity with each of your web sites, and an advanced architecture that will handle the communication seamlessly.
Almost no company does this, because it's so complicated.
But if you pull this off, the upside is huge.
Imagine if users could login with a single click, no account to create, and then were seamlessly recognized on every single of your web properties.
This is a very elegant and powerful offering, which greatly improves engagement for your community.
Your company is now able to build a unified user identity across all your brands or properties, and personalize the experience for each user, resulting in a much higher engagement
This is your engagement strategy on steroïds.
hull offers a best-of-breed, very optimized combination of social login and single sign-on.
With just a single line of HTML, your users are offered the fastest, simplest and most elegant authentication system available, which recognizes them across all your web properties.
And it takes less than 10 minutes to implement.
You as a company get to customize the experience exactly as you see fit, and make no compromise in design, workflow or data capture strategy.
One of our clients, Universal Pictures in France, is using our single sign-on on all their web properties, and since then, their engagement numbers have gone through the roof.
Go ahead, try it now, for free. Let us know how we can help!
— Romain @rdardour
1 note
·
View note
Text
How to make Trello even faster
At hull, we love Trello, use it daily, but it's UI is slow.
To be more precise, the App is responsive and super fast, but the UI framerate is low when dragging things around. At least on my Macbook Air, and that always bothered me a bit.
Usually, first thing I do for daily web apps: I make a Fluid app. Then, as I'm a tinkerer at heart, I always use Userstyles to adapt the UI a bit.
This morning, geeking around, I happened to force 3d acceleration while searching for fun things to do, and saw the result was really good in a useful way. Trello became much snappier.
Of course this could be expected but I never saw anyone relating this to Trello, so here I am doing so.
Doing it is trivial. Go to your fluid app's "Window > Userstyles", and do this:

Here is the code for you to copy and paste.
body .list{ -webkit-transform:translate3d(0,0,0) !important; }
This makes Trello smooth like silk.
— Romain @rdardour
2 notes
·
View notes
Text
2 ways to log users in with hull and your own login system
Hey everyone,
Today we're introducing a new feature called "Bring your own users".
In a nutshell, it allows the developers to use your own login system along with hull.io.
Remember the blog post about entities, where you could use any uniquely defined object into hull.io ? This is pretty much the same here with users.
This tutorial comes with a Node.js demo we have built on Express and our home-made library hull-node.
We'll consider two use-cases:
You already have a user-base: use your existing users, and let hull.js create hull users that match yours on the fly.
You use hull.io to log users in: Use hull's easy login system, and access your user's identities server-side with one of our libs.
You have an existing user-base
In this scenario, you already have your own user collection, with their own properties and IDs, and you would like your users to be recognized when they use hull.io.
Remember how you instantiate hull.js in your browser? It's as simple as
Hull.init({ appId: 'MY_APP_ID', appSecret: 'MY_APP_SECRET' });
To log one of your users on to hull.io, all you have to do is add a single property userHash to the previous call. Before we see how to build the corresponding value, let's see what it will look like:
Hull.init({ appId: 'MY_APP_ID', appSecret: 'MY_APP_SECRET', userHash: 'MY_USER_HASH' });
Explaining the user hash
The value for the userHash property is a signed JSON object describing your users. In our demo, it is created here (note that req.user has been populated with passport.js, feel free to use your own).
req.user is a serialization of the authenticated user, and it must at least contain two fields: id and email.
It is generated as follows (server-side example for node.js) :
var hull = require('hull'); var mySerializedUser = {id: 1234, email: '[email protected]'}; var signedHash = hull.utils.signUserData(mySerializedUser, 'YOUR_APP_SECRET');
All you have to do then is append signedHash to your view where Hull.init() is called. Your user will be automatically identified in all hull.io services.
Your app uses hull.io to login your users
Your users login through hull.io to one of the authentication providers configured for your app.
After they log in, we set a cookie that can be retrieved on your server.
We provide utility functions for many languages (see our documentation for details) that will do the work for you.
In this demo, we use a connect/express middleware provided with our node library. Insert the following snippet in your app :
var hull = require('hull'); hull.conf({ appId: "YOUR_APP_ID", orgUrl: "YOUR_ORG_URL", appSecret: "YOUR_APP_SECRET" }); var authMiddleware = hull.middleware(function(userId, done) { User.getOrFetch(userId, done); }); app.get('/user', authMiddleware, function (req, res, next) { res.json(req.hull.user); });
What happened here?
hull.conf configures the module with the correct credentials. In the previous example, we didn't use hull.conf because we passed directly the appSecret. That would not have been necessary if we used hull.conf.
The middleware is generated with hull.middleware function. The function we pass as an argument is a deserializer, it is used for you to retrieve a full-blown user from the id hidden in the cookie.
The middleware is inserted in the requests. If a user is found, the req object is added a hull.userId property containing the id. If the deserializer is provided, a hull.user is also added which will contain the user found during its execution.
Installing the libraries.
Easy, we use modern tools.
Installing the Ruby Library
gem install hullio or Download the Ruby Library
Installing the PHP Library:
composer install hull or Download the PHP Library
Installing the Node library:
npm install hull or Download the Node Library
Summary
You now are able to sync hull.io users and your app's users. Alongside the utils we've seen today, all of our language-specific libraries include an HTTP client for hull.io's REST APIs, so you can read and write freely and integrate hull to your !
Don't forget to check out the demo for the full example.
If you have any questions, email us or ping us on Twitter @hull, we're always here to help.
– Xavier (@xcambar)
2 notes
·
View notes
Text
Standards aren't defined, they're built
Today, Yehuda Katz published The Future of The Web, talking about the way standards are currently implemented, and introducing the The Extensible Web manifesto.
This pushed me to finish an article I've had for a long time under wraps, which clarifies our core beliefs at hull.io
Empowering developers is the right thing to do
Standards bodies try to come up with generic solutions to problems, but too often they lack real world feedback, even if they know the problem inside-out.
The crux of that is that when you publish a standard, you need to keep by it, and not change it unless it's flawed. This often results in overarchitecturing a solution to the widest problem possible.
This is hardly compatible with the fast-paced iterations and immediate problem solving developers practice every day.
As a consequence, every standard defined this way is bound to fail at some point, either by being unadapted, too complex because too far from actual problems, or utterly late to the game.
Historically, the standards that end up being adopted are de-facto standards
No single company can build every feature or service, nor will they.
Companies build products or services to solve the problems of communities. They call them a Market, and sell to them.
While there is an infinite number of problems to solve, not all are monetizable.
This makes many underserved or not served at all. Companies have to make choices and work on what makes them grow.
Another factor for companies is that interfacing with competition or making their products easily swappable can work against them, so they tend to cultivate walled gardens whenever possible.
Net result: Decision by commitee is doomed on the web, so are purely market-driven endeavours
They're always too slow, too closed, settle after the battle and after people have built their own ad-hoc solutions to the real-life problems they encounter.
Standards aren't defined, they're built by communities.
This is why we at hull.io decided not to try to come up with a set of rules and formats, nor conform to a pre-existing standard, but rather to build a proof of concept, a set of sane guidelines, offer it to the world and let every developer play with it.
This makes our components, more naïve, simpler, and easier to implement. The conscious choice we made is that initially, we don't try to solve every problem.
We know for a fact that Standards will emerge from usage.
Wether we are right or wrong in our implementation is irrelevant. We ultimately want the problem solved, wether we do it or not. Our only job is to come up with solutions the fastest possible and submit them to real-world usage.
And in fact this has proven true. Web Components, as they're currently defined are quite close to the architecture we've been offering for this past year.
From this situation, there is only one correct course of action:
From now on, we will work to close the gap with Web Components
We think Polymer, and Web Components are the future. We think the basic concepts we put in place in hull.io and helped advocate in Aura, and are similar.
To this statements comes a clear conclusion. From now on, we will work to leverage Web Components in hull.io, contribute back with our real-world experience, to the benefit of the community.
0 notes
Text
Tutorial: Inline recommandation a la Medium
Welcome, ladies and gentlemen!
Today, we're showing you the basics of the hull.io Javascript API client.
To demo this, we built an extensively documented and very simple recommendation tool for your Markdown documents where users will be able to upvote segments of a document, packaged as a jQuery plugin.
As usual with our demos and tutorials,
A live demo is running on GitHub Pages
The full code is available on GitHub,
The annotated source code is available.
The essentials
Hull.data.api lets you perform any API call to hull.io. The function always returns a promise, and the resolved value is the raw payload returned by the server as a response.
Hull.data.api.model is a function that does basically the same as Hull.data.api but the resolved value will be a Backbone.Model instance.
The property Hull.me, that represents the current user when logged in, is an example of those Backbone models.
Passing a base64-encoded data preceded by a ~ as the ID of an object retrieves (or creates lazily) a custom object in your app, called an entity, which you can use as any other native object in hull.io. As an example, it is an easy way to bind your own data model to hull.io's objects.
Getting more information
We highly encourage you to read both the README file and the code of the projects, both being extensively documented so you won't get lost.
We also couldn't recommend you enough to read through our API documentation as well as the documentation of hull.js when you will want to know the innermost technical details of hull.io.
If you need any human-delivered information, we will cheerfully answer you both on Twitter @hull (mine is below) or by mail at [email protected].
But for now, check out the demo!
See you around at hull.io,
— Xavier, @xcambar
2 notes
·
View notes
Text
Tutorial: User Registration
For this tutorial, we'll create a registration workflow. It's a two-step process:
Log the user in with his/her Facebook account
Let him/her fill a form to complete his profile
Here's a live demo.
The code for this project can be found on GitHub.
What you will need
A hull.io application. Create one if you haven’t already.
An authentication provider linked to your app, so users can log in. Here we will use Facebook but you can use any other supported by hull. See our documentation for more details.
An HTTP server, to serve the files included in this repository. If you're not sure how to do it, check out our guide.
Step 1 - Bootstrap your app
First, create an index.html. Add jQuery, and hull.js to your page. For the sake of this tutorial, we will also use Twitter Bootstrap, though it is not mandatory.
<link href="//netdna.bootstrapcdn.com/twitter-bootstrap/2.3.1/css/bootstrap-combined.min.css"> <script src="//ajax.googleapis.com/ajax/libs/jquery/2.0.0/jquery.min.js" type="text/javascript"></script> <script src="//hull-js.s3.amazonaws.com/0.4.4/hull.js" type="text/javascript"></script>
Now initialize hull.
<script type="text/javascript"> Hull.init({ appId: 'APPLICATION_ID', orgUrl: 'ORGANIZATION_URL' }); </script>
Replace APPLICATION_ID and ORGANIZATION_URL with the correct values from your admin.
Step 2 - Create the wrapper widget
Depending on the user being logged in or not, we want to display a form (if logged in) or a login button (resp. if not logged in).
For this we create a wrapper widget. Insert the following code in your HTML document:
<script type="text/javascript"> Hull.widget('wrapper', { templates: ['intro'] }); </script> <script type="text/x-template"> {{#if loggedIn}} <p>Hello {{me.name}} – <a href="#" data-hull-action="logout">Logout</a></p> <div data-hull-widget="registration@hull"></div> {{else}} <p>Hello visitor</p> <div data-hull-widget="login_button@hull"></div> {{/if}} </script>
By the way, Congrats! You've just created your first widget! Let's add it to our HTML document.
<div data-hull-widget="wrapper"></div>
Refresh your browser, you should see the sign in button.
Step 3 - Update the template when the user logs in.
As you can see, clicking on the sign in button doesn't show the form. To fix this, we need to set a refreshEvents property to refresh (re-render) the widget when the user is updated (logged in/out, changed properties).
Here's our updated wrapper widget:
<script type="text/javascript"> Hull.widget('wrapper', { templates: ['intro'], refreshEvents: ['model.hull.me.change'] }); </script>
Here we set refreshEvents property to ['model.hull.me.change']. This is for the widget to refresh itself every time the current user changes.
Now, clicking on the sign in button should show a form that contains two fields (name and email).
These are the default fields for this widget, but you probably want to know more about your user.
Step 4 - Customize the form
What about asking the user his/her gender, website and agreement to the "terms"?
For this, we need to build an admin page containing the admin/registration widget. It will let us change the form's fields, We will put it in a new HTML document that we call admin.html
Since it contains your App Secret, you will want to keep this page private. You can for example keep it on your local machine, or protect it with a password.
<html> <head> <title>Hull Registration Admin</title> <link rel="stylesheet" href="//netdna.bootstrapcdn.com/twitter-bootstrap/2.3.1/css/bootstrap-combined.min.css"> <script src="//ajax.googleapis.com/ajax/libs/jquery/2.0.0/jquery.min.js"></script> <script src="//hull-js.s3.amazonaws.com/0.4.4/hull.js"></script> <script> Hull.init({ appId: 'APPLICATION_ID', appSecret: 'APPLICATION_SECRET', orgUrl: 'ORGANIZATION_URL' }); </script> </head> <body> <div data-hull-widget="admin/registration@hull"></div> </body> </html>
Replace APPLICATION_ID, APPLICATION_SECRET and ORGANIZATION_URL with the correct values which you can find in your admin.
Open this new file in your browser and fill the textarea with:
[ { "name": "gender", "type": "select", "label": "Gender", "options": [ { "value": "mr", "label": "Mr." }, { "value": "mrs", "label": "Mrs." }, { "value": "ms", "label": "Ms." } ], "error": "Please choose a gender", "required": true }, { "name": "name", "type": "text", "label": "Name", "placeholder": "Your name", "error": "Please enter your name", "required": true }, { "name": "email", "type": "email", "label": "Email", "placeholder": "[email protected]", "error": "Please enter a valid email adress", "required": true }, { "name": "website", "type": "url", "label": "Website", "placeholder": "http://website.com", "error": "Please enter a valid URL" }, { "name": "terms", "type": "checkbox", "checkboxLabel": "I agree to the terms", "error": "You need to agree to the rules to participate", "required": true } ]
"name": the name of the field. this will be the key in the user profile.
"type": the type of the <input />. You can use HTML5 input type.
"label": the label of the field. It will be visible by the user.
"placeholder": the value of the input placeholder attribute.
"error": the error message that will be displayed if the field validation fails.
"required": boolean value that indicates whether the field is required or not.
Go back to your index.html you should see the website field.
Now that you know how to save information in the user profile, you probably want to list your users and their profile informations.
Step 5 - Listing users
In your admin.html add the admin/users widget.
<div data-hull-widget="admin/registration@hull"></div> <div data-hull-widget="admin/users@hull"></div>
Refresh your browser and you're done.
Conclusion
What did we learn here?
Creating a widget.
Customizing a registration form.
Saving informations in the user profile.
Listing users.
3 notes
·
View notes
Text
Tutorial: Commenting in Tumblr
This article is the first of a new series of tutorials to help you get along with Hull.
In this post we will see how to add comments to your Tumblr blog 1.
Prerequisites
An account on Hull.io. If you don't have one yet, signup to get a beta invite, or play our Instant Win to get one right now.
An organization and application. Create one if you haven't already.
An authentication provider linked to your app, so users can log in. See our documentation for more details.
Your blog domain must be whitelisted in your Hull application. This can be configured in the administration.
Now add comments to your Tumblr blog as follows.
Add the necessary script tags
Add the hull.js library to your page. If your theme doesn't come with jQuery, include it too.
<script src="//ajax.googleapis.com/ajax/libs/jquery/1.8.3/jquery.min.js" type="text/javascript"></script> <script src="https://hull-js.s3.amazonaws.com/0.4.0/hull.js" type="text/javascript"></script>
Initialize Hull
<script type="text/javascript"> Hull.init({ appId : "YOUR_APP_ID", orgUrl: "YOUR_ORGANIZATION_URL" }); </script>
Replace YOUR_APP_ID and YOUR_ORGANIZATION_URL with the correct values, which you can find in the admin.
Add a comments widget
Add the following snippet to your theme where you want comments to be located in your page.
<div data-hull-widget="comments@hull" data-hull-uid="{ShortURL}"></div>
{ShortURL} is Tumblr-specific, it returns a unique URL to the post and acts as an ID.
There you go, your Tumblr blog has comments!
Customize the template
If the base design of the widget doesn't fit your theme, you can customize it by adding a simple <script> tag:
<script type="text/x-template" data-hull-template="comments/comments"> Insert your Handlebars (http://handlebarsjs.com) template here! </script>
The default markup of the comments widget is available in the documentation so you can use it as a reference.
Enjoy!
— Xavier @xcambar
We know that Tumblr can easily integrate Disqus comments. Though you may have some reasons for a change... ↩︎
2 notes
·
View notes
Text
Reconciling SVG and Icon Fonts
EDIT Updated article to reflect the latest version of fontcustom
(Thanks @kaishin for the cool title)
Hey fellas,
If you're a cutting edge designer, you already work right in the browser. You need to iterate a lot to get to something that feels right. Icon Fonts until then were absolutely not adapted to this process.
In this first article on SVG, I'll explain how to set up a powerful design workflow, going from Sketch (my new favorite SVG editing app), all the way to the browser as Icon Fonts, all automated.
What you'll get with this tutorial :
Edit a bunch of SVG files in Sketch, see them update live in your browser, already compiled as an Icon Font.

Supporting Technologies :
SVG is becoming the web's darling since Retina displays are spreading. They're standard, light, infinitely scalable and really fit the current Flat design aesthetic.
Icon fonts are sort of the "Sprites for Vector". They're fashionable right now for their small weight, despite being a real pain to handle in an iterative design process.
Tools used :
Sketch: An amazing app from Bohemian Coding, allowing you to easily create and edit SVG files among several other qualities.
Fontcustom: A cool tool by Joshua Gross and Yifei Zhang, offering you to monitor a folder of SVGs and automatically build a set of font files with the right css file to describe the glyphs
Middleman + Sprockets + Livereload : Because it's the coolest ruby setup for static sites. If you're doing Sinatra or Rails, instructions should be the same.
Prerequisites
First, install the prerequisites for fontcustom with brew on a mac:
brew install fontforge ttfautohint
If you use a non-ruby stack, then Font Custom is available standalone with :
gem install fontcustom
Otherwise, read on, it gets really cool.
Set up Middleman :
Create your middleman project (if it's not already done)
Initialize
middleman init YOUR_PROJECT
Edit your Gemfile
Add the fontcustom gem, with a specific branch. That's because master currently has a nasty bug in the watcher causing infinite reloads with Livereload.
In your Gemfile:
source :rubygems gem 'middleman' gem 'middleman-sprockets' # The best asset pipeline gem 'middleman-livereload' # Save a file, see your browser reload gem 'fontcustom'
Then in terminal :
bundle install
In config.rb:
Throttle Livereload to give fontcustom time to rebuild stuff and avoid double refreshes.
activate :livereload, :grace_period => 2
Start Working.
Add SVG files
Put your SVGs in a folder under sources/images. Choose any folder name. You'll use it later. I chose myfont for this example
sources/images/myfont/
Each SVG file you'll put there will be included in the final font. Their name will define the CSS class you use to display it.
For example, if you create a spaceship.svg file, then you can display it with :
<i class="icon-spaceship"></i>
Create the fontcustom config file
Create a new file in config/fontcustom.yml with the following content:
## # FONTCUSTOM CONFIG # # Include this file along with your vectors or pass it to any command with: # --config=path/to/config.yml # -c path/to/containing/dir/ # # Run `fontcustom help` to learn about various options ## output: source/stylesheets/ templates: [ bootstrap-scss, scss ] # Here are all the file formats you can generate you can use: # templates: [ scss, preview, relative/path/from/INPUT, relative/path/from/PWD ] file_hash: false # font_name: my-font #css_prefix: glyph- #debug: true #verbose: false
Open a terminal, launch middleman
middleman
Open http://localhost:4567 And let it run, so it live-reloads your site.
Open another terminal window, launch fontcustom
One Shot :
fontcustom compile source/images/icons/ -o source/stylesheets/ -t scss -h false
Watcher :
fontcustom watch source/images/icons/ -o source/stylesheets/ -t scss -h false
And let it run. What did we just launch ?
We told fontcustom to :
watch input_folder Watch for changes in source/images/myfont
-o output_folder Output a font set to source/stylesheets
-t scss Output our stylesheet as a scss partial.
Whenever a svg file will change, Font Custom will rebuild a uniquely named font files set.
It will also build a file named _fontcustom.scss in the sources/styesheets folder which you can import as a partial in your Sass stylesheets
Add the stylesheet to your css
@import "_fontcustom";
That's all there is to it.
The Result:
Change in Sketch => Reload Browser.
Whenever you save a file in Sketch, it will trigger a Font Custom rebuild, which will trigger a CSS change, which will in turn trigger a Livereload refresh, displaying the updated Icon Font.
Ain't that sweet ?
In part Two of our SVG tips, we'll show you how to dissect them and go crazy with their components.
In yet another post, we'll show you how to do the same thing with Sprites and Photoshop
— Romain @romain
45 notes
·
View notes
Text
Discover our interactive playground
Everyone agrees to say that the best way to discover and learn something new is to take action. We thought we should provide a playground to allow our visitors (and our users at the same time) to try our product online. Quickly and easily.
We've created a beautiful page that'll allow yourself to write code and see the result immediately. But that's not all, we provide a list of code samples to show you some typical instances.
These snippets make it easy to learn how to use hull in the real world.
I'm sure you can't wait to play with it so take a look at the playground and as always, don’t hesitate to reach out to us if you have feedback. By the way, I hope you'll be a little curious and find our little easter egg :-)
Visit the playground
— Victor @_victa
0 notes
Text
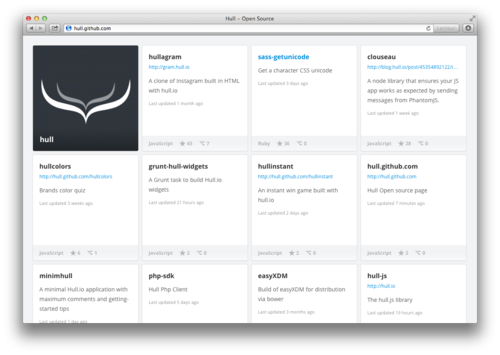
How to build your own Twitter-like "Open Source" page.
We started releasing a bunch of open source projects lately and wanted to give them a little more visibility, make them more discoverable.
Twitter has a great "Open Source" page on Github that served as an inspiration for this project.
Obviously, we did not want to have to maintain it manually so the requirements were :
it had to fetch its data from Github's APIs
it had to be done in Javascript, since Github Pages are not dynamic
Victor started designing the page and at the same time I was working on a demo for AuraJS based on Github' APIs. We immediately thought it was a good idea to combine our efforts and create this page as a pure AuraJS app that would serve both purposes.
The app is very simple, it uses an aura-github extension that allows our Widgets to talk directly to Github's API, and 2 Aura widgets :
user to load and display a user's profile. (In our case, hull's organization)
repos to load and display a list of repos.
The result is here : hull.github.io
And here is a screenshot of what it looks like.
The beauty of using aura widgets to do it is that now the whole app is contained in those widgets, and to embed them, we just have to insert this snippet of HTML.
<header data-aura-widget="user" data-aura-org="hull"></header> <ul data-aura-widget="repos" data-aura-org="hull"></ul>
The project itself is obviously open sourced here. You can fork it, improve it and use it to show off your open source skills.
We are also going to release soon a more comprehensive collection of AuraJS powered Github Widgets, deliciously ready for public consumption.
Stay tuned.
Comments ? Questions? : Discuss on hacker news
-- Stephane
2 notes
·
View notes
Text
Breadth vs Depth
Reading Jared Erondu’s post about Brevity in design, I thought the point was clearly made, but incomplete. Any form of expressions gains from brievity, and I think it is the consequence of something deeper : Breadth.
Jared says :
[…] brevity is finding the best way to perform an action in the fewest steps without losing efficiency or the message
It’s not how much you say, but how well you say it.
Brevity is a consequence of having a larger palette of tools to communicate a message.
Whether you are Designing, Coding or Writing, a richer language will let you be clearer in communicating your message. Brievity is the consequence
In Writing, language mastery allows to use the precise words that convey most meaning. Doing this allows to be Briefer, coming back to Jared’s point.
In UX design, language is made of UI patterns. It offers clearer vessels to guide users. More experienced designers are able to use better UI paradigms for a given objective, hence minimizing the steps.
In Graphic design, language is colors, typography, shapes, pictures, textures, whitespace (The distinction between Graphic design and UX design is not that clear, no need for trolling here.). Getting them right tiggers the right emotional responses with less clutter.
In Code, your language is… well a language, but also design patterns. The single largest reason for verbose code is lack of knowledge of the less obvious methods and patterns. Better coders know how to express the ideas with less workarounds.
Depth is the palliative for lack of breadth
The first reflex when expressing an idea in any medium is to add more depth to your message, so to be able to convey the message fully.
This results in a verbose and messy message, which lacks clarity and requires too much investment from the recipient (note I’m using this word instead of reader, since we’re not limiting to writing)
Only then comes a need to clarify the message, by removing things, to lighten the cognitive burden.
But doing this without injecting breadth will only reduce meaning, and alter the initial message.
Brievity is not an end in itself.
Brievity is key, but can only be attained by improving language breadth, otherwise you risk losing meaning.
— Romain
2 notes
·
View notes
Text
Hullstache: Mustachify yourself!
Hi there,
We've already told you about our hooks, (remember?)
As we were all brainstorming for a solid use case that could demonstrate the utter power of hooks, an idea came out of the blue:
What about making a automatic Mustache-making-thingy and send you the result by email ?
We think we've got something here...
It responds to events originating from hooks (login / update user)
it sends emails (pretty impossible for client-side, so hooks are required)
It's stupid enough you can have fun with it
Head to Hullstache, login with a Facebook account and check your inbox!
If you have any questions about Hull, what we're doing or why mustaches matter, visit hull.io or ping us @hull.
—Xavier @xcambar
2 notes
·
View notes
Text
Back to Basics: Easily deploy to Github Pages
Github Pages are awesome. You can easily deploy your site or app, considering you use Jekyll.
... Stop, WHAT ? What if I don't use Jekyll ? How to deploy really easily to Github Pages?
That's what this post is all about: deploy on github pages made easy.
Honesty disclaimer
There are a bunch of tools that prepackage the deployment process to Github Pages. But I needed a barebones solution, usable everywhere, by everyone, on every project, and it had to be dead-simple.
Pre-requisites:
As we all are conscious developers, let's consider you already have:
A Github project, obviously, with a git url that we aill reference as %GIT_URL%
a build process (because you care), building your app into:
a specific build directory, containing all the resources to run your app, called %BUILD_DIR%. This directory MUST NOT be in a git repo, or it must be .gitignore'd.
Deploy to Github Pages
Here's the trick, in its raw version:
cd %BUILD_DIR% git init git add -A git remote add origin %GIT_URL% git commit -m "Generated at $(date)" git push -f origin master:gh-pages rm -fr .git
Tedious ? Naaa, just use tools
Pretty obviously, this script is not made to be used as is. I provide it in its raw version so you can embed it in the tooling of your choosing, whether it is:
a simple zsh script
grunt
a good ol' Ant
or anything in between
HTH!
— Xavier @xcambar
0 notes