#4K Video Downloader Crack
Explore tagged Tumblr posts
Visit Tumblr Blog
Explore Tumblr blogs with no restrictions, modern design and the best experience.
Last Seen Tumblr Blogs


Fun Fact
Tumblr has a low social media market share in South America.
Text

i told my friend i would find him some beginner’s giffing tutorials, but all the one’s i could find were either years out of date, used a method that made me go “huh”, or incorporated ready-made actions. all perfectly fine, but if i’m sending someone a tutorial i’d rather it be one for a method i understand enough to help with.
so, here is a beginner’s guide to giffing, as told by cleo, a neurotic, detailed, and organization happy individual. there will be many pictures.
this tutorial will strictly cover the gif making portion of the process, from getting your screencaps to importing in photoshop, resizing/cropping, and sharpening. i was going to briefly go over colouring, but tumblr only allows 30 images and i ran out of space, so i'll have to do a separate colouring tutorial (which also means i can go into more detail, yay).
downloading the videos, whether direct downloads or t*rrents, is also another tutorial. but make sure you’re using at least 1080p, and the bigger the file the better. a single episode of a ~45 minute show should ideally be 2gb at minimum. a full length movie should ideally be at least 5gb. imo 2160p/4k files are not really necessary; the quality increase is negligible, and it takes a lot longer to screencap them. if you do use 2160p/4k files, try and make sure it is not HDR, as those videos are often washed out and require a different screencapping program to fix.
Programs
I am using a cracked version photoshop 2022, but whichever version you use should be pretty much the same
Actions. not a program but a function inside photoshop, where you essentially record a series of steps, and then you can simple play that action when needed and those steps will repeat, which saves considerable time when giffing. I will note which parts of the tutorial are best saved as actions, and explain how to create actions at the end.
For screencapping i use kmplayer it’s free and very simple to use
not at all a necessary program, but i use freecommander instead of the regular windows file explorer as i find the dual panels very helpful when moving the frames around
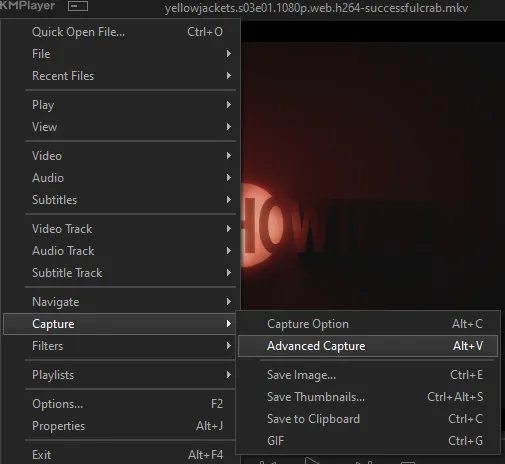
Screencapping
there are many programs you can use to get the screencaps from a video, a lot are basically the same, some are better suited for particular video file types. kmplayer is a very simple program to use, but afaik the capture function only works on mkv. files (the only other file type i’ve tried is mp4, which plays but does not capture)
once you open your video file in kmplayer, we’re going to open the advanced capture window, found under capture→advanced capture, or alt+v
the window should look like this
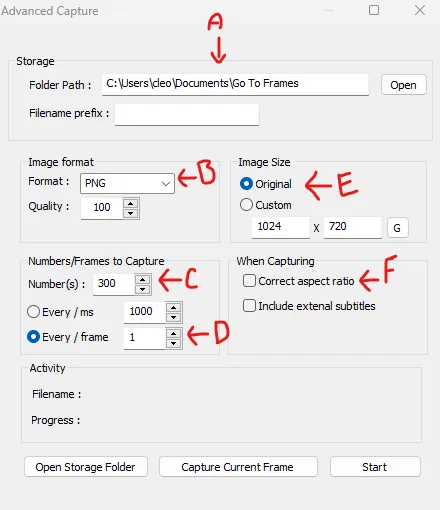
A-this is where all your screencaps will save to. i recommend making a specific folder for all your screencaps
B-make sure this is set to png for best quality
C-this is the number of screencaps you want to take, guesstimate how many you will need, keeping in mind that most videos are approx. 25 frames per second, and you should always cap a bit more than you think just in case
D-make sure “every/frame” is selected and set to 1
E-make sure “original” is selected, resizing will be done in photoshop
F-make sure “correct aspect ratio” is unselected
go to the part of the video you want to gif, and pause it just slightly before that part starts, then select ‘start’. the screencaps will start to save to the file, no need to play the video, and will automatically stop once it has capped the number of frames you have chosen
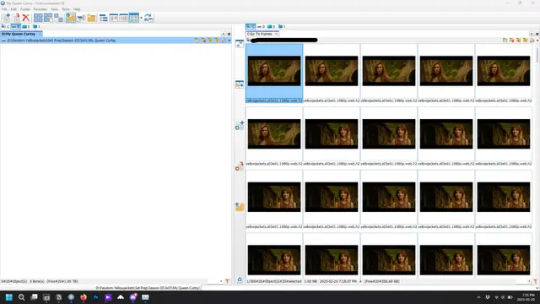
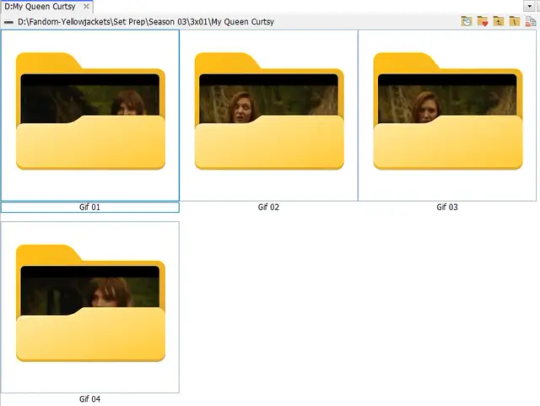
and here is how they look inside freecommander. i have already made a folder for this gifset, which is on the left. now you’re going to make a folder for each individual gif. i’ve decided this one will have four gifs, so create four folders (i just label them gif 01, gif 02, etc) and then move the frames for each gif into their respective folder
while you can always delete frames once the gif is made if it’s too big, i prefer to make sure i have the correct number of frames before i start. the gif limit on tumblr is 10mb, so it’s good to look at the scene/shots you’re giffing and decide approx. what dimensions your gif will be. full size gifs have a width of 540px and your choice of height. if you go for a square gif (540x540) you can usually fit 40-50 frames. if you’re planning for a smaller height (such as 540x400) you can usually fit more around 50-60 frames.
and here are the caps inside the folders. another reason i like freecommander is it’s ability to “multi-rename” files. the default file explorer can do so as well, but you have to do each folder individually and you can’t customize the new names as much. either way, i prefer to rename the files to each gif just to scratch my organization itch.
Introduction to Photoshop
NOTE: i have changed many of my keyboard shortcuts in photoshop to ones i prefer, so any you see listed in the menus of these screenshots are likely not the original shortcuts. you can see and change them yourself under edit→keyboard shortcuts

quick run-down of the photoshop interface. i have adjusted placement of some things from the default so this isn’t exactly how your photoshop will look when you open it, but everything is labelled, either on top or by hovering over the element. once you’re more familiar and have your process down i would recommend adjusting the workspace to suit your process.
A-your main tools and colour selector. almost all the tools have either several tools in one, or have alternate options which can be accessed by right-clicking the tool. you can also hover over each tool to get a pop-up with a quick explanation of the tool
B-additional “windows” such as history, properties, actions etc. can be opened from the window menu at the top and moved around with click-and-drag. history and properties should already be there by default, but probably on the right hand side instead. each window opens and closes with a click
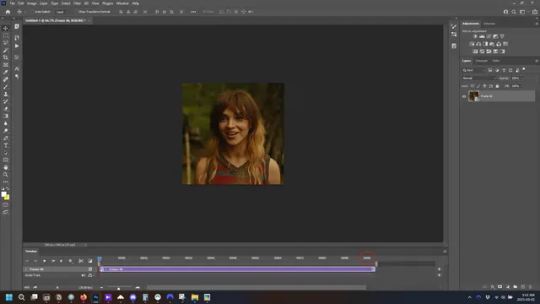
C-the timeline window where the gif is made. the white square is a single frame of a gif, and on the row below is the play controls. this will not be there by default and will need to be opened from the window menu
D-adjustment layers for colouring
E-layers box. this is where the screencaps will show, along with adjustment layers, text layers, etc.
Opening Screencaps in Photoshop
go to file → open navigate to the folder for your first gif, select the first screencap, and check the image sequencing, and click open

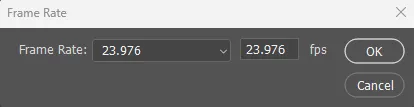
a window will open labelled frame rate. set it to 23.976 and select ok
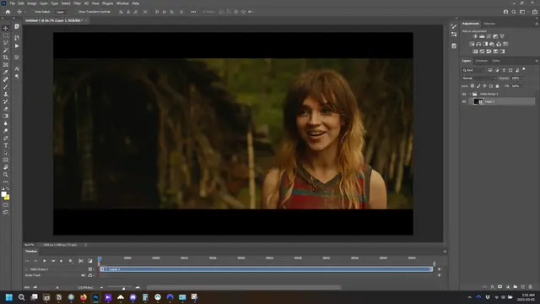
the screencaps will open in the timeline view, seen as the blue panel line at the bottom, and the screencaps are combined into video layer in the layer panel on the right.
Creating Frames
technically, you could go right into your cropping/resizing and sharpening from here, however if you do that directly then you have to keep the screencaps in the folders you have, otherwise if you save and re-open the gif it won’t move.
this next part should be made into an action.
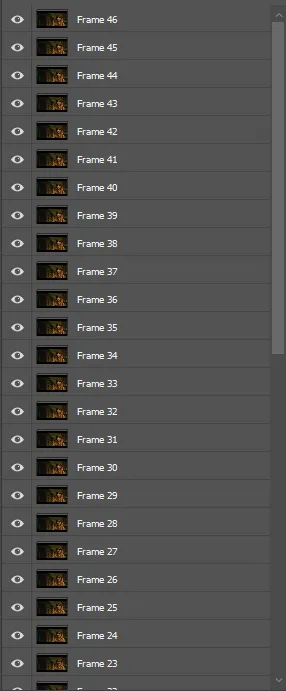
at the top right of the timeline window, click four vertical lines to open the menu and select convert frames → flatten frames into clips. depending on how long the gif is, this can take a minute.

the layers panel should now look like this, each frame of the gif is now its own layer.
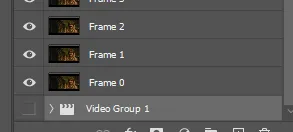
the very bottom layer will be the video group. this can be deleted as we’ve made the frames from it
in same timeline menu as before, right under “flatten frames into clips”, select “convert to frame animation” and the screen should now look like this. this will be the end of this action.
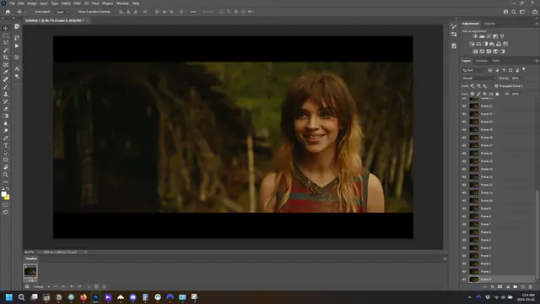
Cropping and Resizing
with widescreen footage, sometimes it’s just shorter than 1080p, but most of the time it will have the black bars on the top and bottom, and frustratingly, they’re not always the same size. it’s good to save the most common sizes as actions.
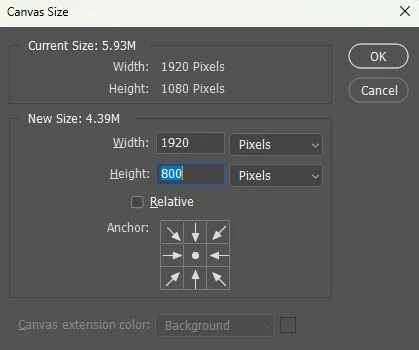
to find the size of the actual screen you turn on the rulers under view→rulers and check the height. then open your canvas size dialogue box under image→canvas size and change the height, making sure pixels are selected in the dropdown. yellowjackets is what i call “xtra wide” which is 800px. “normal” widescreen is 960px.
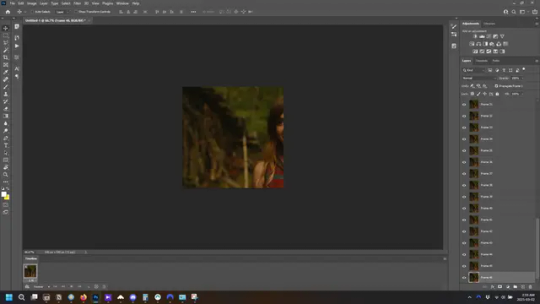
next we’re going to resize the caps. i also make actions for this, one for each potential gif size. open the image size dialogue box under image→image size and change the height of the image to your desired height plus 4 pixels. these extra pixels are to prevent a line at the top and/or bottom of your completed gif. now re-open the canvas size box, change the width to 540px, and the height to the desired, removing those 4 extra pixels. i have set this one to 540x540. this is where you would end the resizing action.
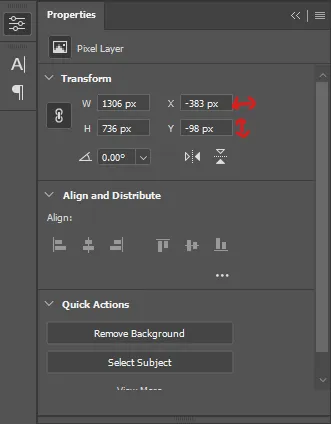
and as you can see she is off-screen. select the top layer, hold down shift and select the bottom layer to select them all, and with the move tool (the very top one) activated, click and drag to move it left to right as needed to centre the figure/s. as you move it a box will appear telling you how far you are moving it in any direction. make sure you are only moving it left or right, not up or down. to be certain of that, open the properties tab.
the y axis is your up/down, x is left/right. for this gif the y needs to stay at -98. you can also manually change the x axis number instead of dragging the image. also helpful for making sure multiple gifs of the same shot are all positioned the same.
the layer are currently ordered with the 1st at the top and the last at the bottom. with all layers still selected, go to layers→arrange→reverse. the last layer will be on top now. if there is movement in your gif, check if you need to alter the position again to make sure the movement properly centred. but once you are satisfied with the position, the layers should be in “reverse” position, of last layer on top. this is to ensure that the gif plays forwards.
Converting Gif
this should also be made into an action, going through sharpening process
in the timeline menu, select “make frames from layers”
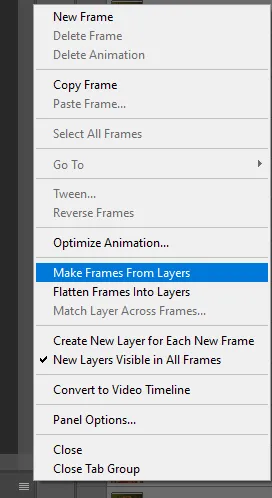
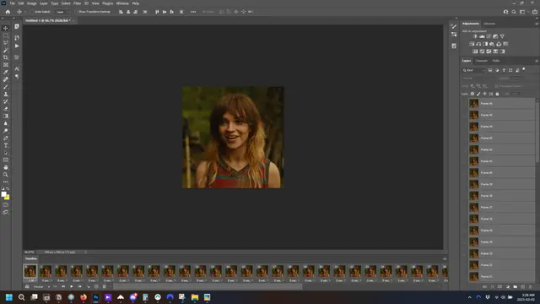
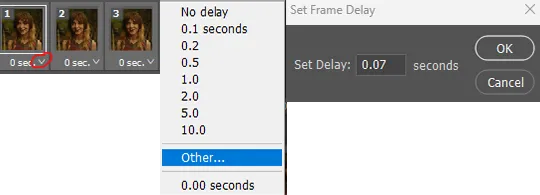
the frames are now populated in animation window. in timeline, click select all frames. go to any of the frames on the bottom and click the little arrow beneath it, select other, and enter 0.07 seconds. this is not a necessary step, as we will have to adjust the frame rate at the end, most likely to 0.05, but if we don’t change the frame rate here, then when we play the gif while working on it to check how it looks, it will play very fast.
in the same menu at the right of the timeline box, select “convert to video timeline”
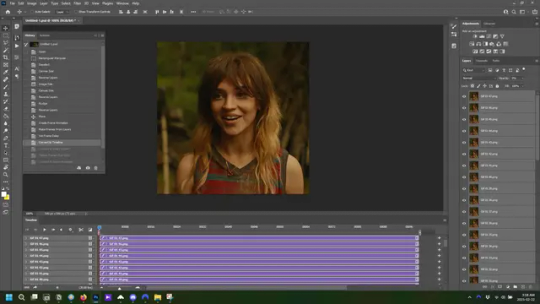
then, making sure all layers in the panel on the right are selected, go to filter→convert for smart filters. this turns all the layers into a single smart object.
but if you look where i’ve circled, it says the gif is 99 frames long*, when in fact there are only 47. if you are making regular “scene” gifs, basic colouring and maybe a caption, this is fine and does not need to be fixed, it will play at the same speed. if you want to change it to display (approx.**) the correct number of frames, go to the timeline menu on the right, select “set timeline frame rate” and change it from 30 to 15
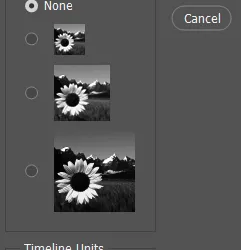
*if it does not list a frame number by 4 digits but instead says 5f, 10f, 15f, etc. go to the timeline menu on the right, select panel options, and change timeline units to “frame number”
**the reason why this is only approximate is because the actual frame rate is not a a whole number, so when changing the frame rate it isn’t a 1:1, and 47 frames becomes 50 frames. the extra frames are removed at the very end, but if you are not doing any edits that require working frame by frame, there’s no need to change the frame rate here at all
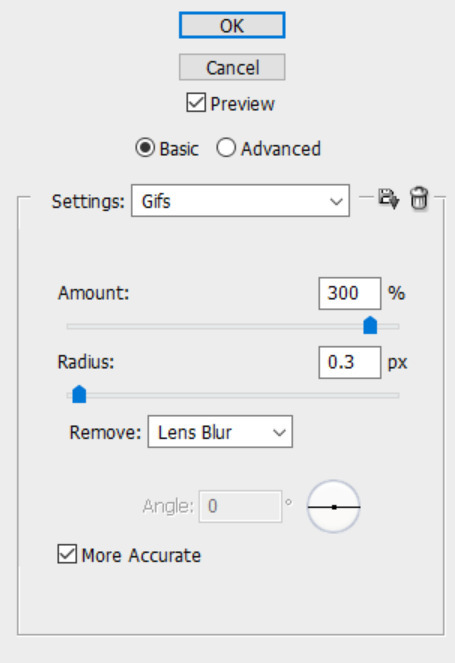
Sharpening
this is, as it sounds, making the gif look sharper. to start go to filter→sharpen→smart sharpen and this window opens. play around with the dials to see what each ones does. the below settings are good for most high quality footage.
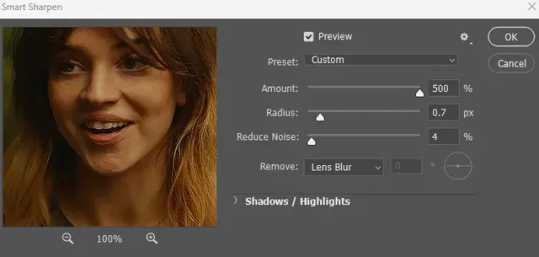
Amount-basically, how sharp do you want it
Radius-hard to explain, but this essentially sets how deep the lines of the sharpness are
Reduce Noise-smooths the pixels
once you click okay your single layer should look like this.
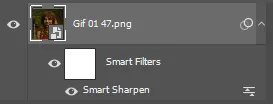
you’re going to then right click the layer and select duplicate layer. with the top layer selected, go to filters→blur→gaussian blur and set the radius to 1.0 pixels.
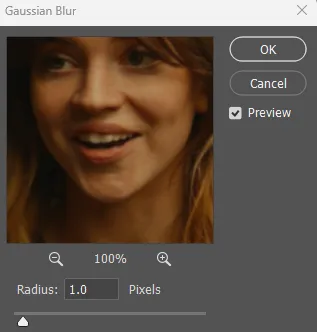
then change the opacity of the top layer to 10%. this is to essentially soften the sharpening a bit, as if it’s too sharp it can make the colouring wonky. this opacity level can also be changed depending on need.
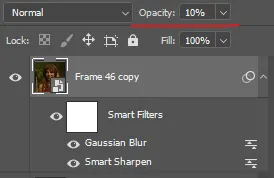
finally, select both layers, right click, and click “group from layers”. your gif is now fully made and sharpened.
Colouring
yeah. ran out of image space. but this is where you would do your colouring and add a caption or any other text.
Converting & Exporting
when all your colouring is done, you’re ready to start saving your gif. you can do it directly from your current file, but that means essentially losing your colouring, as all those layers will be merged together. i am someone who likes to save my psd’s (photoshop files), at least until i’ve posted the gifs, in case i need to fix something in the colouring. if you’d like to keep yours as well, open the history tab and select the first icon at the bottom “create new document from current state”. this will open a copy of the file in a new tab. save the original file and you can close it, continuing all work on the copy file.

select your all your layers, convert them into a smart object from filter->convert for smart filters, then follow the same steps from Creating Frames above. once you're back in frame animation, select Create Frames From Layers, and once again set the frame animation speed.
most people set the speed to 0.05. i personally set it to 0.05 or 0.06 depending on the length of the gif. check how it looks at 0.05, if it seems too fast, try 0.06.
now to save. go to file->export->save for web (legacy). the number is the lower left corner is your gif size, it needs to be under 10mb or else you'll have to delete some frames.

the right panel is your save options. the preset dropdown has some built-in settings, but you won't use them because (at least on my version) the presets only go up to 128 colours, instead of the full 256. the 3 i've highlighted in green are the only one's you'll adjust as needed. the settings below i use for i'd say 90% of my gifs. i'll sometimes change the adaptive dropdown to one of the other options, ocaissionaly the diffusion, and rarely the no transparency dither, but play around with them and see how they change the look of the gif.

when you're satisfied with the look of your gif, click save at the bottom right of the window.
voilà! you now have a gif.
Actions
this is your actions panel. the triangle on the left side is the button to open it. remember, if it's not already there, go to windows->actions to open it.
the buttons on the bottom, left to right, are stop recording, record action, play action, new folder, new action, and delete.

as you can see, i have different folders for my resizing, sharpening, captions, saving, and my 1 step (temporary) actions. to run an action is very simple; click the action, and click play.
to create an action, click the new action button, a box will pop up, give the action a name, and click record. the record button at the bottom of the action window will turn red. now perform all the steps you want it to record, and click stop recording. keep in mind it will record every single thing you do, including in other open files, so if the action you plan to record will have a lot of steps, it might help to write them down first.
to modify an action, select the step in the action above where you'd like the new step to be, hit record, perform the step, stop recording. select the step you'd like to delete, and click the delete button.
steps within the actions can be clicked and dragged, both within that action and moved to other actions. actions can also be moved between folders.
288 notes
·
View notes
Note
How do you make your gifs such high quality?
first of all, thank you! my giffing method is definitely not the most HQ way to do it, other gifmakers are out there making beautiful stuff from like super-ultra-4k episode downloads, but my method is easy and low effort (and low storage space on my computer since i only record clips rather than downloading entire episodes) while still looking pretty good even if not AS good as others, so i'm content with it haha i will share it below!
required tools (this is the only way i've ever made gifs in my entire life, so if you don't have these tools then unfortunately i can't be of much assistance):
high-quality video source (the highest quality you can get is best, but i myself am content to use just Normal HQ rather than going the extra mile to obtain The Most HQ Version Ever Possible)
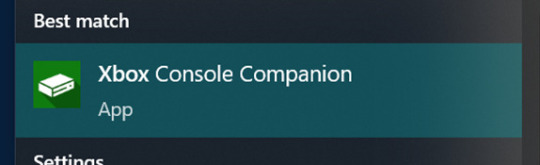
screenrecording app (i use the free windows xbox app)
photoshop (i use version CS5)
general knowledge of gifmaking and photoshop. i'm giving a broad overview rather than detailed step-by-step, under the assumption that you're already a gifmaker yourself!
quality of source material is always the biggest contributor to gif quality, in my experience. this is where the super-ultra-4k downloads come into play for other people, but for me, i keep it simple: all i do is screenrecord the show i'm watching using the free windows xbox app
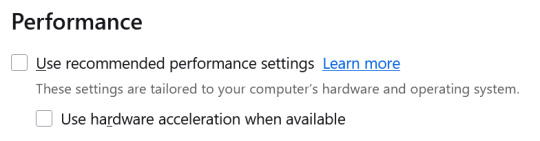
so for WOT for example, i will have the episode up in prime video player and screenrecord it directly from there. unfortunately, they've cracked down on screenrecording & screenshotting, but so far i've been able to get around it by using firefox and unchecking the below firefox browser settings, which are checked off by default. the downside of this method is that without this setting, the picture gets a bit choppy here and there and i might have certain portions of a gif that are unusable because the picture jumped too drastically between one frame and the next, but for the most part it's Fine (i must again emphasize that i follow the Low Effort Giffing Method haha)
next i go into photoshop. i've always used the "import video frames to layers" method for giffing, wherein you select that option in photoshop, pull up the video you're using, and highlight the portion of the video you want to turn into a gif, and then photoshop converts it into individual frames for you (i get the sense that the screencapping method is more popular, but it seems so confusing to me, so i've never tried it!)
the downside of using the "import video frames to layers" method instead of the screencapping method is that it might pull in the occasional duplicate frame, so you have to diligently click through every single frame and delete any dupes, otherwise the gif will look laggy in some places.
for the frame speed, i usually set it at 0.06 seconds (but will make it slower if it's a really tiny gif with a very small number of frames, such that the normal speed makes it look too fast, though this is more of a concern for giffing miniscule shots from trailers rather than normal shots from full episodes!)
once my frames are all set, i click "convert to timeline animation", select all the frames, and do "layer->smart objects->convert to smart object". this makes it so that all the individual frames are condensed into 1 single photoshop layer (while still displaying properly as a series of individual frames in the gif itself; if you convert to smart object BEFORE converting to timeline animation then it will make it so that only the first frame is visible for the whole gif, which we don't want), and that way i can apply sharpening and coloring layers in bulk instead of having to do it frame by frame.
i won't get deep into coloring here since that's less relevant to the picture quality of a gif, but i generally take somewhat of a "less is more" approach to coloring, because i find that the image quality does get pixelated if i alter the shot's natural colors, brightness, and contrast TOO drastically. for example, here is the below gif with and without coloring (but with sharpening for both) - you can see that it's pretty similar, i just enhanced what was already there by increasing the brightness, increasing the vibrance, doing a bit of color manipulation to make it more warm-toned and less green-toned (personal preference), and adding a touch of contrast (though not much since this is already a naturally-shadowy scene; contrast is finicky depending on the original lighting of a shot, sometimes i increase it a little, sometimes i increase it a lot, and sometimes i decrease it). definitely NOT my favorite example of my coloring, good god how i hate white tower interior lighting haha but it was the most recent psd i still had on hand and it gets the point across!

next, these are my sharpening settings (using photoshop's "smart sharpen" filter, applied onto the smart object i just created). the one on the left is my usual setting for gifs, which is a more dramatic sharpening, and the one on the right is my milder sharpening settings, which i tend to use for screencaps/still images. for the more dramatic sharpening, i might sometimes play around with it or decrease the % amount if i'm feeling that it looks too harsh on a particular gif.

for an example, here is that same gif with and without sharpening (but with coloring for both). i used the lefthand more dramatic sharpening settings, although i ended up decreasing to 200% because the 300% looked a little too harsh on this particular gif. but most of the time 300% looks fine to me.

these are the settings i use when saving it as a gif. don't really know what half of them mean, i probably just pulled them off some tutorial years ago!

also, dimensions! the proper tumblr dimensions are:
1 gif across: 540px width, any height
2 gifs across: 268px width each, any height
3 gifs across: 177/178px width each, any height (technically, the right and left gifs should be 177 and the center gif should be 178)
max filesize for tumblr is 10MB
after saving the gif, i open the new gif that was created and readjust the frame speed to 0.06 seconds because converting to timeline animation and then saving will cause the speed to slow down, for whatever reason. so gotta make sure to open the final gif and resave it with the correct speed so that it doesn't turn out too slow.
potentially important tumblr-specific trick! this was years ago that i first heard it so i have NO idea if it's still relevant, but i always do it for every gif just in case: make 1 frame a different speed than all the others, and this (maybe) will prevent tumblr from compressing the gif and decreasing the quality, or something like that. i don't fully remember the purpose of the trick and no clue if it still works or is still needed, but regardless, i always set the entire gif at 0.06 seconds except for one frame, which i instead change to either 0.07 or 0.05. it's not noticeable at all, and it helps avoid tumblr wrecking the quality (if that's still a thing and i'm not just making up random stuff).
25 notes
·
View notes
Text
Graphics tutorial requested by anonymous
All made with adobe photoshop 2023 (you can find free downloads of cracked versions on here occasionally, photopea.com is also good I've heard) I'm assuming basic knowledge of photoshop/similar editing platforms and their tools, but you can always message me or comment if you are confused about anything!
Also, I used keyboard shortcuts sometimes to change the size of a brush or toggle the brush options, I'm not going to annotate this because it's a lot but here is a resource for basic photoshop keyboard shortcuts
Firstly, the sizing of your edit matters! Max sizing for best quality on Tumblr is 1280 x 1920. If you want to put to put two images next to each other sizing should be 640 x 960.
Next, always try to find the highest quality picture of whatever you're using. Good resources include taylorpictures.net, 4k Taylor Swift, and if I can't find them here I do a google image search of my photo to see if any other websites have a bigger/hq file.
This video is a couple clips I screen recorded for you to see my process and demonstrate a few different tools I use regularly. I added timestamps for you to follow along as you read the rest of this.
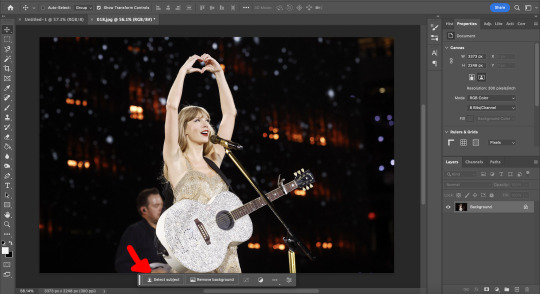
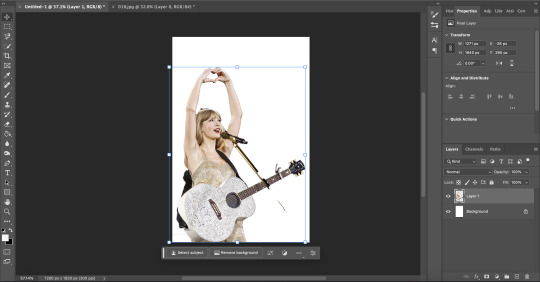
Here's a photo of my workspace I am working with and what I will do first is cut out Taylor from this photo and move her to my correctly sized canvas. There are multiple ways to cut out an image in photoshop, the easiest I've found is the select subject function and using the quick selection tool (see toolbar beneath the photo). Other tools include the magic wand tool, lasso tool, and quick selection tool which I will show later.
Now you will see that my selection isn't perfect, so I will use the quick selection tool to fix a few areas that I'd like to manually select/correct. This isn't totally necessary at this stage as you can always perfect your cutout in the next few steps, but it does help save some time.
This is where I'll use the quick selection tool to either subtract or add to my selection. There are keyboard shortcuts to toggle between + and - to make this quicker.
See my screen recording of the process from 0:00-1:07
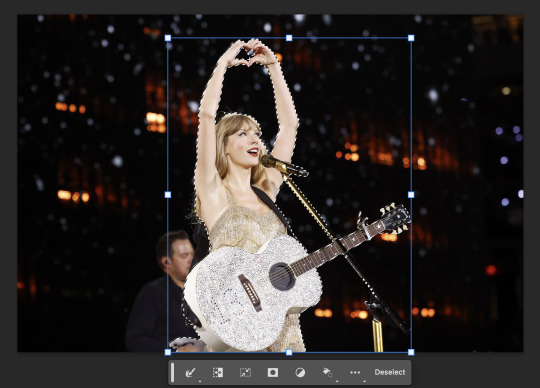
Now that we have our image selected and cut out, I copy and paste it to my canvas I want to work with (size 1280 x 1920) and this is what I've got:
As you can see there's a few spots that need cleaning up in order to make our cutout perfect. You can do this with the eraser tool, magic wand, quick selection, or lasso tool.
See my screen recording of the process from: 1:08-3:50
Now that we're happy with our cutout, we can play around with it in any ways we want! Typically you're gonna do things like change the background color/texture, add elements with the square/circle tool to create what you're looking for, overlay elements and/or textures, and finally recolor it to your preferences.
This part is where you can try new techniques and play around to find what you like. I recorded some of my process of playing with different ideas and elements until I got to something I was happy with! The video explains the tools I was using as well
See my screen recording of the process from: 3:51 - the end
I hope this helps you with creating graphics in the future! The fun thing about photoshop is there are multiple ways to get what you want done. I showed you my way but there's plenty of other techniques and methods out there to try if you're unable to achieve what you want!
Best of luck and feel free to reach out to me if you are struggling/have questions! <3
#Tessa talks#requested#my tutorials#this took forever pls share!!!#photoshop tutorial#graphics tutorial#photoshop
46 notes
·
View notes
Note
Hi! I just recently decided to start making gifsets, do you have any tips for begginers on best ways to render, best programs to use?
btw i love your blog, already followed you on my main account and your memes always crack me up auhuahsuuah
hi! happy to have you here :)
i only started making gifs in december, so i'd still consider myself an amateur gifmaker, but i can share some of the amazing tutorials i used to get started!
this incredibly comprehensive 'gifmaking for beginners' tutorial details every step of the process, from downloading source videos to exporting the gifs once they're complete.
the tutorial is for making gifs in photoshop, which is the program i use as well. i use 4K Video Downloader to download videos from youtube in 1080p and MPlayer OSX Extended video player to parse the video into frames. both are linked in the tutorial above!
once you have the basics down, you may want to play around with sharpening settings, coloring techniques, and other effects. here are some resources i've used in the past:
sharpening gifs
using the camera raw filter to help define facial features
making black and white gifs
fonts you can import to photoshop
adding grain/noise to gifs
applying color gradients to gifs
i hope this helps! a lot of it is experimentation and trial and error as you develop your own style. if anyone has other resources or tips they'd recommend, feel free to add them below!
34 notes
·
View notes
Text
0 notes
Text
0 notes
Text
AVS Video Editor Crack Plus Activation Key 2025 Latest
AVS Video Editor is an easy-to-use video editing software developed by AVS4YOU, designed for beginners and intermediate users who want to create and edit videos without the complexity of professional-grade programs. It provides a user-friendly interface, essential editing tools, and a rich set of effects, making it a great choice for home users, YouTubers, educators, and small businesses.This software supports a wide range of video formats, including MP4, AVI, MOV, MKV, WMV, and FLV, and allows users to edit videos in HD and 4K resolution.
Download Now
0 notes
Text
4K Stogram pro crack free 2025 Download
DOWNLOAD LINK
4K Stogram is a popular Instagram downloader that allows users to download and back up Instagram photos, videos, and stories. The software provides a simple, user-friendly interface for accessing and downloading Instagram content to your computer. Whether you're a photographer, content creator, or just a regular user, 4K Stogram makes it easy to download posts and media from Instagram profiles, hashtags, or locations.
Key Features of 4K Stogram:
Download Instagram Photos, Videos, and Stories:
4K Stogram allows users to download photos, videos, and Instagram Stories from any public Instagram account, hashtag, or location. You can save media from personal and business profiles to your device for offline viewing.
1 note
·
View note
Text
0 notes
Text
Bandicam Crack Full Version Download 2025 [Latest]
DOWNLOAD LINK
Bandicam is a popular screen recording and video capture software that is widely used for creating tutorials, gameplay videos, recording presentations, and more. Known for its high-performance recording capabilities, Bandicam allows users to capture both high-quality video and audio with minimal system impact, making it a favorite choice for gamers, streamers, and content creators.
Key Features of Bandicam:
High-Quality Screen Recording:
Bandicam allows you to record the full screen or select specific regions, such as a part of your screen or a custom-shaped area.
You can record in 1080p HD and 4K UHD (Ultra High Definition), ensuring excellent video quality for your recordings.
0 notes
Text
DVDFab Player Ultra With Crack Free Download [2025]
DOWNLOAD LINK
DVDFab Player Ultra is a versatile multimedia player designed to play DVDs, Blu-rays, 4K Ultra HD videos, and various digital media formats. It is developed by DVDFab, a company well-known for creating software solutions for DVD, Blu-ray, and video file management. DVDFab Player Ultra is primarily targeted at users who want a high-quality, all-in-one media player for playing both physical discs and digital video content.
Here’s a detailed overview of DVDFab Player Ultra, its features, use cases, and benefits:
Key Features of DVDFab Player Ultra:
Playback of Blu-ray, DVD, and 4K Ultra HD Blu-ray Discs:
DVDFab Player Ultra supports playback of DVDs, Blu-rays, and 4K Ultra HD Blu-ray discs, making it a great choice for users who still have physical media collections. It ensures smooth playback of these high-definition formats, including support for menus, subtitles, and multiple audio tracks.
0 notes
Text
0 notes
Text
0 notes
Text
0 notes