#AudioRecorder
Explore tagged Tumblr posts
Visit Tumblr Blog
Explore Tumblr blogs with no restrictions, modern design and the best experience.
Last Seen Tumblr Blogs


Fun Fact
Tumblr was created by web developers David Karp and Marco Arment.
Text

TLV320ADCx140 4-Channel microphone I2S ADC 4-Channel microphone I2S ADC 🎤🔊🔧
We saw this TLV320 4-channel microphone ADC in an Echo Dot teardown
and thought it looked like a handy I2S chip. You can have 4 PDM or analog microphones for input, and data comes out on a single stereo I2S channel with time division multiplexing. Four inputs are better than 2 when using microphones for voice array/location projects. This chip doesn't need MCLK, so it would probably work better with a Raspberry Pi! The chip comes in a few flavors, with 106, 120, or 122 dB SNR (you pay more for the 122!) TLV320ADC5140 (as used in the Echo Dot) is in stock at DigiKey
and we'll probably use that one.
#adafruit#TLV320ADC#I2S#ADC#microphonearray#electronicsdesign#audioprocessing#raspberrypi#embeddedengineering#audiodevelopment#digitalaudio#hardwarehacking#techcommunity#pdm#micpreamp#soundengineering#audiorecording#audiotechnology#makersgonnamake
6 notes
·
View notes
Text
Reliable Phone Recording Solutions with AR & AQ Series by DCS Networks
youtube
DCS Networks, Singapore’s trusted telecom solutions provider, offers powerful Phone Recording systems tailored to your business needs. The AR100 is a compact, single-line voice logger for analogue lines, featuring SD card storage and user-friendly controls for playback, search, and configuration. Unlike traditional HDD-based models, it’s sleek, efficient, and easy to manage. For businesses needing multi-line capabilities, the AQ Series delivers robust all-in-one Phone Recording solutions with support for various interfaces, automatic/manual recording, call announcements, encrypted files, and complete record management.
AR100 – Simple & Efficient Single-line analogue logging with SD card storage and a built-in interface for quick access.
AQ Series – Scalable & Secure Multi-channel recording with encryption, auto/manual modes, and announcement options.
Smart Storage Options Choose between SD cards or encrypted file systems based on your business needs.
📞 Call DCS Networks at (65) 65001200 to find the right phone recording system.
#PhoneRecording#PhoneRecordingSingapore#SingaporeBusiness#AudioRecording#VoiceOverSingapore#SingaporeCreatives#ContentCreationSG#DigitalMediaSG#SoundRecording#RecordingStudioSG#FilmmakingSingapore#MediaProduction#VideoProduction#CreativeContent#SGContentCreators#SingaporeTech#SingaporeArtists#LocalArtistsSG#SGInnovatorsc#Youtube
0 notes
Text
🎙️ Ever had a moment you had to capture on your iPhone
whether it was a brilliant idea, an important interview, or your own voice memo—and weren’t sure how?
Don’t worry, I’ve just explored every way you can record audio on any iPhone model, and it’s simpler than you think 👇
📱 Works on all models – from iPhone 6 to iPhone 15 🗂️ Use the built-in Voice Memos app 🎧 External mics? Yes, they make a difference! 📲 Bonus: How to share/edit your audio like a pro
Recording crystal-clear audio isn’t just for creators anymore. 💬 Curious what you use audio recording for? Podcasts? Notes? Interviews? Drop it in the comments!
#iPhoneTips#VoiceRecording#ProductivityHacks#iOSGuide#iPhoneFeatures#ContentCreation#AudioRecording#TechTips
0 notes
Video
youtube
Here's My Fake Shure SM7b Story
In today's video I'm sharing a story about a fake Shure SM7b. Seems like these fakes are steadily on the rise. I recently picked up a SM7b and was not happy with it from the start. Turns out the item might be a fake. I had no idea these existed. Learn my story and then watch this video I watched to determine if your's is a fake!
Watch Julian Krause’s video:
CAUTION: Fake Shure SM7Bs on the rise! What’s the deal??? - (How to spot a fake)
#youtube#sm7b#shuremic#fakemic#shuresm7b#shuremicrophones#shuremics#musicrecording#recordingmusic#audiorecording#musicproductiontips#electronicmusicproducer
0 notes
Text

BM 800 Studio Microphone – PC Karaoke Condenser Mic with Shock Mount and Stand
Enhance your karaoke nights and studio recordings with the BM 800 condenser microphone, designed for PC and professional use. This versatile mic delivers high-quality sound for singing, podcasting, or streaming. It comes with a shock mount to minimize vibrations and a sturdy stand for easy placement. Ideal for creating a home studio or upgrading your audio setup, this mic is compatible with most PCs and recording software. Perfect for vocal enthusiasts, gamers, and podcasters looking for a reliable and affordable solution.
BM 800 condenser microphone for PC, featuring a shock mount and stand, ideal for karaoke, studio recordings, and podcasting.
#BM800Microphone #KaraokeMic #StudioMic #PCMicrophone #ShockMountMic #PodcastGear #HomeStudioTools #CondensateurMicrophone #AudioRecording #TechForCreators
#BM800Microphone#KaraokeMic#StudioMic#PCMicrophone#ShockMountMic#PodcastGear#HomeStudioTools#CondensateurMicrophone#AudioRecording#TechForCreators
1 note
·
View note
Text
Create, Record, and Share Stunning Presentations with Ease
Recording a PowerPoint presentation with audio can make your slides more engaging and effective. By adding your voice to the presentation, you can explain the content in more detail, which is especially helpful for remote or recorded presentations. Many tools allow you to record directly within PowerPoint, making it easy to create professional presentations with voiceovers for better communication.

0 notes
Text
Beginner’s Guide to Recording Professional Voiceovers for YouTube Videos
If you're creating YouTube content, adding high-quality voiceovers can significantly enhance your videos’ professionalism and appeal. Whether it's for tutorials, vlogs, or product reviews, a crisp, clear voiceover helps communicate your message effectively and keeps your audience engaged. In this beginner’s guide, we’ll cover everything you need to know to record professional-sounding voiceovers for your YouTube videos—even from home.
Why Voiceover Quality Matters
Your voiceover is a key element in capturing and holding your audience’s attention. Poor sound quality—whether it's from background noise, distortion, or muffled vocals—can quickly turn viewers away. High-quality voiceovers ensure that your message is clear, professional, and easy to listen to, making your content stand out.
Step-by-Step Guide to Recording Professional Voiceovers
1. **Choose the Right Microphone**
The microphone you use plays a big role in the quality of your voiceover recordings. Here are three common types of microphones to consider:
- **USB Microphones**: These are user-friendly, plug-and-play devices perfect for beginners. Simply connect them to your computer via USB, and you’re ready to record. Popular choices include the Blue Yeti and Audio-Technica AT2020USB+.
- **XLR Microphones**: For higher sound quality, XLR microphones offer more professional results. However, they require an audio interface to connect to your computer. The Shure SM7B and Rode NT1-A are excellent options for more serious creators.
- **Lavalier Microphones**: If you prefer a less intrusive setup, lavalier (clip-on) microphones can capture clear voice recordings for videos where you move around or record on-camera.
For beginners, a USB microphone is a great choice due to its ease of use and affordability.
2. **Set Up Your Recording Environment**
To achieve clean and professional voiceovers, you need to minimize unwanted background noise. You don’t need a full recording studio, but some simple steps can make a big difference:
- **Quiet space**: Choose a room that is quiet, away from household noise, traffic, or other distractions. Close windows and doors to block out external sounds.
- **Acoustic treatment**: If possible, add soft furnishings or sound-absorbing materials (like foam panels or blankets) to reduce echo and room reverb. Even a closet full of clothes can work as an effective sound booth!
- **Turn off devices**: Make sure to turn off or silence any electronic devices, such as fans, phones, or computers, that could create background noise.
3. **Position Your Microphone Correctly**
The placement of your microphone impacts the clarity and tone of your voice recording. Here’s how to position it for optimal results:
- **Distance**: Place the microphone about 6-12 inches away from your mouth. If you’re using a pop filter (recommended to reduce plosive sounds like "p" and "b"), position the filter between the mic and your mouth.
- **Angle**: Slightly angle the microphone to avoid directly facing it. This helps minimize breath and mouth sounds that can ruin a clean recording.
- **Pop Filter**: Use a pop filter to reduce popping noises from plosive sounds, especially if you’re using a condenser microphone.
4. **Select Recording Software (DAW)**
A DAW (Digital Audio Workstation) is the software you’ll use to record, edit, and enhance your voiceover. There are many options, but here are some beginner-friendly ones:
- **Audacity**: Free and simple to use, Audacity is a popular DAW for voiceover recordings. It has all the basic features you need to record, edit, and clean up your audio.
- **Adobe Audition**: A more advanced (and paid) option, Adobe Audition offers a range of professional tools for recording and editing voiceovers.
- **GarageBand**: If you’re on a Mac, GarageBand is a free and intuitive choice with solid audio recording features.
Choose a DAW that fits your needs and experience level.
5. **Recording Your Voiceover**
Now that your setup is ready, it’s time to hit record. Here are a few tips to ensure your voiceover sounds professional:
- **Warm-up**: Warm up your voice before recording to reduce strain and improve clarity. Simple exercises like humming, lip trills, or reading a paragraph out loud can help loosen your vocal cords.
- **Speak clearly**: Articulate your words clearly and maintain a natural tone. Speak as if you’re talking to a friend, but with added clarity and intention.
- **Stay consistent**: Try to maintain consistent volume levels throughout your recording. Speak at a moderate pace, avoiding the temptation to rush through sentences.
6. **Edit and Enhance Your Recording**
After recording your voiceover, editing is the next step to make it sound professional. Here’s what to focus on:
- **Noise reduction**: Use your DAW’s noise reduction tools to remove any background noise that may have been picked up during recording.
- **EQ**: Equalization (EQ) can help shape the tone of your voice by adjusting frequencies. Boost the low-mid frequencies for warmth and clarity while cutting any harsh high-end or low-end noise.
- **Compression**: Compression helps level out the dynamic range of your voice, ensuring that quiet parts are heard clearly and loud parts don’t clip or distort.
- **De-essing**: De-essing reduces harsh "s" sounds that can become distracting in a recording. Most DAWs have a built-in de-esser effect.
- **Add a limiter**: A limiter ensures that the loudest parts of your recording don’t exceed a set volume threshold, preventing distortion.
7. **Export and Sync with Video**
Once your voiceover is edited and polished, export the file in a high-quality format such as WAV or MP3. Next, sync the voiceover with your video in your video editing software, ensuring that the timing aligns perfectly with your visuals.
Additional Tips for Professional Voiceovers
- **Practice makes perfect**: Like any skill, recording voiceovers takes practice. Don’t worry if your first recordings aren’t perfect—keep refining your technique.
- **Use headphones**: When editing, always use headphones to hear every detail of your recording. This helps you catch any small errors or imperfections you might miss on speakers.
- **Stay hydrated**: Drink plenty of water before and during your recording session to keep your voice clear and prevent vocal fatigue.
Conclusion
Recording professional voiceovers for your YouTube videos doesn’t require an expensive studio—just the right tools, setup, and technique. By choosing a quality microphone, setting up your recording space, and mastering a few editing basics, you can achieve studio-quality voiceovers that will elevate your content and keep your audience engaged.
With these tips, you’ll be well on your way to producing clear, captivating voiceovers that enhance your YouTube videos and take your content to the next level!
0 notes
Text
Top-Notch Recording Studio Soundproofing Services
Do you want to build the best possible space for recording? We can make it real. Our soundproofing services for recording studios will guarantee learning acoustics and forget noise spillages. From acoustic foam panels, bass traps, and floating floors, we can make your place a professional studio. Our tailor-made solutions are the road to offer perfect pitch on podcasts or record music or voice-overs. Get in touch with us now to talk to us about your dream recording studio design.
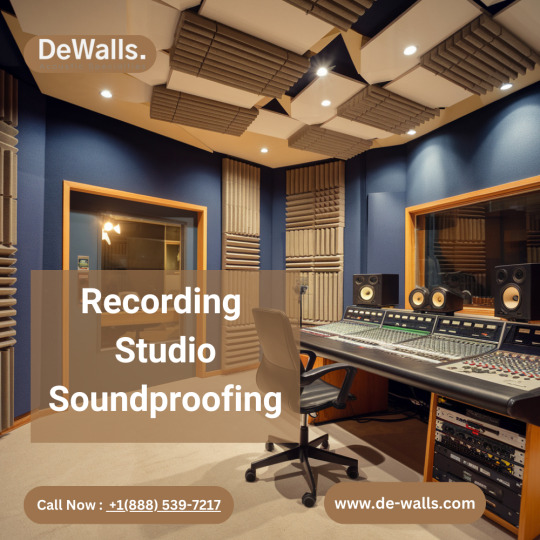
#RecordingStudio#Soundproofing#AcousticTreatment#StudioSetup#MusicProduction#ProAudio#SoundQuality#StudioDesign#audiorecording#diysoundproofing#noisereduction#podcastservices
0 notes
Text
youtube
🎶 Synido TempoPad 16 Review: Affordable & Powerful! 🎶
Are you looking for a budget-friendly yet powerful MIDI input and control device? Look no further! 👀 The Synido TempoPad 16 delivers pro-level performance without breaking the bank. 🎛️✨
Whether you're producing, performing, or just getting started, this device has features that make creating music easier and more intuitive. 🎹🔥
👉 Watch my full review here: https://youtu.be/FnGXm14z6jU
#performing#harrison#audioequipment#soundengineering#audiorecording#professionalaudio#audiogear#recordingstudio#musicproduction#audioquality#audiotech#youtubevideo#gamechanger#n22#akg#Youtube
0 notes
Text
youtube
🎶 Synido TempoPad 16 Review: Affordable & Powerful! 🎶
Are you looking for a budget-friendly yet powerful MIDI input and control device? Look no further! 👀 The Synido TempoPad 16 delivers pro-level performance without breaking the bank. 🎛️✨
Whether you're producing, performing, or just getting started, this device has features that make creating music easier and more intuitive. 🎹🔥
👉 Watch my full review here: https://youtu.be/FnGXm14z6jU
#harrison#audioequipment#soundengineering#audiorecording#professionalaudio#audiogear#recordingstudio#musicproduction#audioquality#audiotech#youtubevideo#gamechanger#n22#akg#Youtube
0 notes
Text
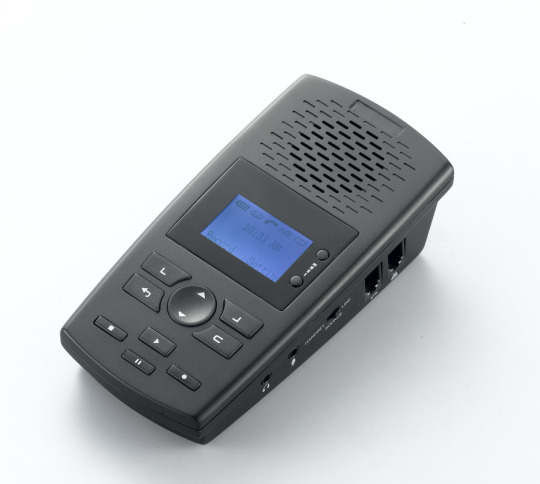
Phone Recording Solutions with Artech Systems by DCS Networks Singapore
In industries where communication clarity and compliance are crucial, having an efficient phone recording system isn’t a luxury it’s a necessity. That’s where DCS Networks Singapore steps in, offering advanced Artech phone recording systems tailored to businesses of all sizes.
For small-scale recording needs, the Artech AR100 is a perfect fit. This compact single-line voice logger supports analog phone lines and sets itself apart with SD card storage making it a practical, plug-and-play solution without the need for a hard drive. All operations from configuration to playback can be handled directly on the device, giving users a simple and effective tool for managing call records.
Need to scale up? The Artech AQ8 handles up to 8 phone lines with ease. This multi-line recording system supports various interfaces, allowing both automatic and manual recording, customizable recording announcements, and complete call logs. With robust file encryption, you can ensure sensitive data stays secure. Whether you're managing a customer service team, legal practice, or financial services firm, the AQ series delivers dependable, centralized call logging.
For mid-sized setups, the CL6102 offers dual-line analog recording, ideal for monitoring specific extensions or team leads. Its playback functionality via LAN or remote P2P technology adds flexibility for administrators to review calls from anywhere, ensuring quality control and training capabilities remain uninterrupted.
At DCS Networks, we understand that businesses need scalable, secure, and user-friendly solutions. Our Artech phone recording systems empower organizations to meet regulatory compliance, settle disputes, and enhance service quality all while keeping operations smooth and data secure.
Contact DCS Networks Singapore today to find the right phone recording solution for your business. Whether it’s one line or eight, we’ve got you covered with Artech’s proven technology and our local support expertise.
#PhoneRecording#ArtechSystems#Singapore#AudioRecording#VoiceTechnology#SoundEngineering#TechInSG#RecordingSolutions#SingaporeTech#MediaProduction#ProfessionalRecording#TechInnovation#AudioQuality#CreativeSolutions#VoiceOvers#SingaporeBusiness#SoundTechnology#DigitalRecording#TechServices
0 notes
Text

🎤 Excited to share my latest blog post: "Everything You Need to Know About Recording Microphones"! 🎧 Whether you're a beginner or a pro, I've got tips on choosing the right mic, setup advice, and troubleshooting common issues. Check it out! 📝✨
0 notes
Text
Enhancing Business Efficiency with Phone Recording: A Must-Have Tool from Dcs Networks

In today’s fast-paced business environment, effective communication is key to success. Whether it’s coordinating with clients, managing customer service, or conducting internal meetings, every conversation holds value. However, the challenge lies in capturing and analyzing these conversations accurately. This is where Phone Recording comes into play, a vital tool that ensures no crucial information is lost. At Dcs Networks, we understand the importance of reliable phone recording solutions that not only enhance communication but also drive business efficiency. For more information contact us: (65) 6500 1200.
0 notes
Text
Record Presentation with Audio using Flonnect Screen Recorder
To create an engaging presentation, you can easily Record Presentation with Audio to add narration and explanations. This helps bring your slides to life, making it easier for viewers to follow along. Whether it’s for a business pitch or an educational lecture, adding audio ensures your message is clear and impactful.

0 notes
Text
Best Microphone Placement Tips for Optimal Sound
Proper microphone placement is crucial to capturing high-quality audio, whether you’re recording in a studio, performing live, or giving a speech. The placement of your microphone can significantly impact the clarity, warmth, and overall sound of your voice or instrument. Below are some essential tips for best microphone placement tips to achieve the best possible results.
1. **Understand the Microphone Type**
- **Dynamic Microphones**: These are great for live performances because they’re durable and less sensitive to background noise. Place them close to the sound source.
- **Condenser Microphones**: These are more sensitive and better for studio recordings. They can capture more detail but require careful placement to avoid picking up unwanted noise.
- **Ribbon Microphones**: Known for their warm, natural sound, these are typically used in studio settings. They are delicate, so handle and place them with care.
2. **Distance from the Sound Source**
- **Vocals**: Place the microphone 6-12 inches from the vocalist’s mouth. Closer placement increases bass response (the proximity effect), which can add warmth but might need balancing with EQ.
- **Instruments**: For string instruments, place the microphone about 6 inches away, aiming it at where the sound resonates most (e.g., the sound hole of a guitar). For brass and woodwinds, place the microphone about 1-2 feet away from the bell or sound source.
3. **Angle and Position**
- **Vocals**: Angle the microphone slightly off-axis (not directly in front of the mouth) to reduce plosive sounds (like “p” and “b” sounds). This also helps in reducing sibilance (harsh “s” sounds).
- **Acoustic Guitar**: Position the microphone near the 12th fret, about 6 inches away, and angle it slightly toward the sound hole for a balanced tone.
- **Drums**: For the snare drum, place the microphone just above the rim, angled towards the center. For the kick drum, position the microphone inside the drum, near the beater, or outside, just in front of the resonant head, depending on the desired sound.
4. **Avoiding Reflections and Feedback**
- **Live Performances**: Keep microphones away from speakers and monitor wedges to prevent feedback. Angle the microphone away from reflective surfaces like walls or hard floors to reduce unwanted echoes.
- **Studio Settings**: Use acoustic treatments like foam panels or bass traps around the microphone to reduce reflections and improve the clarity of the recording.
5. **Use Pop Filters and Windscreens**
- **Pop Filters**: Place a pop filter 2-4 inches in front of the microphone when recording vocals. This reduces plosive sounds and helps maintain a consistent distance between the singer and the microphone.
- **Windscreens**: For outdoor recordings, use a windscreen to reduce wind noise. Position it securely over the microphone, ensuring it doesn’t touch the microphone diaphragm.
6. **Experiment with Placement**
- **Sweet Spot**: Every room and every sound source is different. Don’t be afraid to experiment with microphone placement to find the “sweet spot” where the sound is most balanced and clear.
- **Room Sound**: Consider how much of the room’s natural reverb you want in the recording. Moving the microphone closer to the sound source reduces room noise, while placing it further away can capture more of the room’s ambiance.
7. **Monitor Your Sound**
- **Headphones**: Always monitor your sound with high-quality headphones during setup. This allows you to hear any issues in real-time and adjust the microphone placement accordingly.
- **Sound Check**: Perform a thorough sound check before recording or going live. Walk around the space with your microphone to identify any problem areas, and adjust the placement as needed.
Conclusion
The way you place your microphone can make a significant difference in the quality of your sound. By understanding the type of microphone you’re using, considering distance and angle, and taking the environment into account, you can optimize your microphone placement for any situation. Whether you’re aiming for crisp, clear vocals or a rich, full instrument sound, these tips will help you capture the best possible audio.
#MicrophonePlacement#SoundQuality#AudioTips#RecordingStudio#SoundEngineering#OptimalSound#MusicProduction#PodcastingTips#HomeStudio#AudioRecording
0 notes
Text

🎶 Elevate Your Entertainment Space with Professional Home Theater Acoustics! 🎬🔊 Looking for perfect audio at home? Here's our Home Theater Acoustics service, which is able to answer your question! We pay more attention to sound insulation, speaker placement, and acoustic treatments tailor-made by ourselves for personal space than any other service provider. You be the master of your personal audio situation; turn the sound up as high as you can, and the sound won't come back as echoes or anything else—just a great, pure audio that will make your movie nights, gaming experiences, and such things even more enjoyable! Call us today +1(888) 539-7217
Book Now
#acoustictreatment#soundproofingsolutions#audiorecording#HomeTheaterAcoustics#MovieNightVibes#SurroundSoundBliss#AudioEnthusiast#HomeEntertainment#ImmersiveAudio#AcousticDesign#TheaterRoomInspo
0 notes