#Automatic Autofocus Mode
Explore tagged Tumblr posts
Visit Tumblr Blog
Explore Tumblr blogs with no restrictions, modern design and the best experience.
Last Seen Tumblr Blogs


Fun Fact
Total funding amounts to $125.3M.
Text
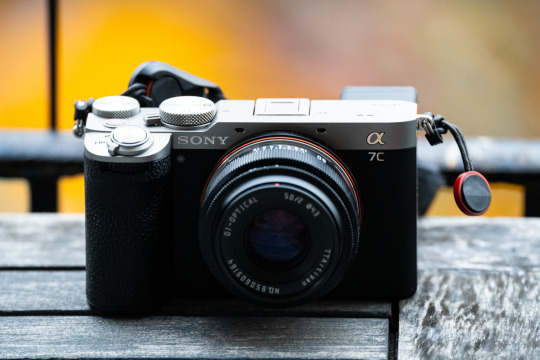
Sony A7CII Thoughts After Two Months
PROS:
The A7C was already one of my favorite cameras of all time and this improves on it a lot more than I thought when just seeing the specs. The added front dial alone makes it many times easier to control than the older model, and lets me use my typical Sony setup that I’ve grown accustomed to (aperture on front dial, shutter speed on rear dial, and ISO on the scroll wheel).
This is the quickest operating Sony camera I’ve owned. I think they kind of lulled me into forgetting how fast cameras can be going from off to on and taking photos. The A7RII was slow as heck with each subsequent model I’ve owned getting faster and faster (A7III to A7C to A7RIV). This new Sony is at a level of speed that makes it hard to go back to using the A7RIV which I still own (for now).
The autofocus is superb. I still haven’t really put it through its paces since I got the camera in the winter and the lack of light plus uncooperative weather has made it tricky to go out and shoot, but from what I have shot it’s nearly flawless. It’s way better than any camera I’ve owned before. It also has some really neat autofocusing modes, like the ability to focus on the eyes of birds. I’m not really around birds close up all that often but it worked really well at an exotic bird place in Jersey I went to recently.
The camera is 33 megapixels, which is a nice compromise between feeling like it’s sometimes too much (61) or too little (24).
The in-body image stabilization is really good. It’s certainly the best I’ve used in any camera so far…although to be fair I’ve never used a Nikon/Canon/Fuji/Olympus body with IBIS, only Ricoh (GRIII), Panasonic (GX7 and GX85), and Sony.
It can lower the shutter when switching lenses so dust doesn’t get in there. Not gonna lie it seems kind of dangerous and something that could potentially damage the shutter, but so far it’s kept the dust out.
CONS:
The viewfinder isn’t great. I’ve never really been an EVF snob since I’ve been shooting on mirrorless EVFs for over a decade now (I had a V1 back in 2013), but going from the A7RIV to this makes it kind of stick out. I also recently handled an A7RV, which really blows it out the water. With autofocus lenses it’s no problem, but using manual focus lenses is more difficult. On the plus side, it automatically goes into peaking mode when you manually focus, even when using adapted lenses or lenses without electrical contacts.
The camera only has one card slot. Not a huge dealbreaker considering every other camera I own aside from my A7RIV is the same in that regard. A second slot even if it was a micro would have been great though. A nice thing about the A7RIV is that I’ve never left home without a memory card because even if I forget one there’s always another in there.
No joystick. Again, not completely necessary but it’s nice to have. Most of my subjects aren’t humans (or animals, or other things that the camera can instinctively detect) so there are plenty of times I want to position the focus point myself.
Slow flash sync and shutter speed. This camera is like the A7C before it in that it only flash syncs up to 1/160. It also only shoots up to 1/4000.
Still don't love the flip screen because it makes quick waist-level shooting a pain in the ass. I wish they went with the A7RV style screen.
Speaking of, all the new perks on this camera make me want to use it a ton more than my A7RIV, but it also makes me want to get an A7RV. Maybe I'll sell my X100V since the prices are nuts right now...
SAMPLE PHOTOS:

Sony 85mm f/1.8 | ISO: 250, f/2.8, 1/125 sec

Sony Zeiss 55mm f/1.8 | ISO 100, f/1.8, 1/160 sec

Sony 85mm f/1.8 | ISO 5000, f/1.8, 1/50 sec

Tamron 20-40mm f/2.8 @ 20mm | ISO 3200, f/2.8, 1/125 sec

Sony Zeiss 55mm f/1.8 | ISO 100, f/2, 1/160 sec

Sony Zeiss 55mm f/1.8 | ISO 12800, f/2, 1/50 sec

Sony Zeiss 55mm f/1.8 | ISO 100, f/2.2, 1/640 sec

Tamron 20-40mm f/2.8 @ 32mm | ISO 320, f/2.8, 1/20 sec

Sony Zeiss 55mm f/1.8 | ISO 100, f/1.8, 1/500 sec

Tamron 20-40mm f/2.8 @ 37mm | ISO 800, f/2.8, 1/40 sec

Sony 24mm f/1.4 GM w/ K&F Concept Black Diffusion 1/4 Filter | ISO 8000, f/1.4, 1/50 sec

Sony Zeiss 55mm f/1.8 | ISO 250, f/1.8, 1/125 sec

Sony Zeiss 55mm f/1.8 | ISO 250, f/2, 1/125 sec

Tamron 20-40mm f/2.8 @ 20mm | ISO 400, f/2.8, 1/40 sec
Sony 24mm f/1.4 GM | ISO 8000, f/1.6, 1/50 sec

Tamron 20-40mm f/2.8 @ 20mm | ISO 100, f/2.8, 1/320 sec
10 notes
·
View notes
Text
Life and Pictures: Entry #1
Starting as a Beginner: Exploring Photography Gear

In our first entry, we’re focusing on a crucial aspect for beginners: choosing and using the right gear. Whether you’re intrigued by the convenience of smartphones or the versatility of a DSLR, understanding your options can help you get started on the right foot. Let’s break down some popular choices and tips for getting the most out of your equipment.
1. Smartphones: Your Everyday Camera

Description:
Type: Point-and-shoot camera Characteristics: Light, convenient, user-friendly Suitable for: Casual users, beginners, and anyone who wants to capture spontaneous moments without carrying additional equipment.
Why Start with a Smartphone?
Always With You: Smartphones are incredibly convenient, making it easy to capture moments on the go. User-Friendly: Modern smartphones come with automatic settings that adjust for lighting and focus, making them perfect for beginners. Built-In Editing Tools: Many smartphones have robust editing features and apps, allowing you to tweak your photos directly on your device.
Tips for Smartphone Photography:
Use Grid Lines: Enable grid lines on your camera app to help you apply the rule of thirds, enhancing the composition of your shots. Tap to Focus: Tap the screen to focus on your subject. You can also adjust the exposure by sliding your finger up or down. Explore Apps: Play around with different photography apps to enhance your photos. Apps like Snapseed, VSCO, or Adobe Lightroom Mobile offer powerful editing tools.
Smartphones are equipped with built-in cameras that are perfect for everyday use. They are designed to be simple and intuitive, making them ideal for capturing quick and spontaneous shots. With the added benefit of editing apps, you can enhance your photos directly on your device.
Beginner Guide to Smartphone Photography:
youtube
2. Compact Cameras: Simple and Versatile

Description:
Type: Point-and-shoot camera Characteristics: Light, versatile, higher image quality than smartphones, better zoom capabilities Suitable for: Beginners and enthusiasts who want better image quality and more control over settings without the bulk of larger cameras.
Why Choose a Compact Camera?
Better Quality: Higher resolution and image quality than most smartphones. Zoom Capabilities: Optical zoom allows for better quality images than digital zoom. Manual Controls: More control over settings like aperture, shutter speed, and ISO.
Getting Started with Compact Cameras:
Learn the Basics: Familiarize yourself with aperture, shutter speed, and ISO. Use Auto Mode: Start with auto mode and gradually experiment with manual settings. Keep It Simple: Begin with the built-in lens; as you gain experience, you can explore more advanced settings.
Compact cameras, also known as point-and-shoot cameras, are lightweight and easy to carry. They offer better image quality than smartphones and come with manual control options, making them a great choice for those looking to improve their photography skills.
Beginner Guide to Compact Camera Photography:
youtube
3. DSLR Cameras: A Step Up in Quality

Description:
Type: Professional camera Characteristics: Larger, heavier, interchangeable lenses, superior image quality, advanced features Suitable for: Serious enthusiasts and professional photographers who require high performance, versatility, and superior image quality.
Why Choose a DSLR?
Exceptional Image Quality: DSLRs feature larger sensors, resulting in superior image quality, especially in low light. Interchangeable Lenses: The ability to switch lenses allows you to tailor your gear to your specific needs, from wide-angle shots to macro photography. Advanced Features: DSLRs offer advanced features like fast autofocus, multiple focus points, and high burst rates, making them ideal for capturing fast-moving subjects.
Tips for DSLR Beginners:
Learn Your Camera: Take time to understand the different settings and how they affect your photos. Manuals and online tutorials can be incredibly helpful. Practice with Different Lenses: Start with the standard kit lens, but explore other lenses as you become more comfortable. A prime lens can be a great way to experiment with depth of field. Join a Photography Community: Engaging with other photographers can provide valuable insights and feedback. Consider joining local clubs or online forums to share your work and learn from others.
DSLR cameras are known for their excellent image quality and flexibility due to their interchangeable lenses. They offer a wide range of manual controls and advanced features, making them suitable for various types of photography, from portraits to landscapes.
Beginner Guide to DSLR Camera Photography:
youtube
4. Mirrorless Cameras: The Modern Alternative

Description:
Type: Professional camera Characteristics: Light, compact, interchangeable lenses, electronic viewfinder, silent shooting Suitable for: Enthusiasts and professionals who want high performance and quality in a more portable package compared to DSLRs.
Why Go for a Mirrorless Camera?
Compact and Lightweight: Mirrorless cameras are smaller and lighter than DSLRs, making them more portable without sacrificing performance. High-Quality Images: They offer similar image quality to DSLRs, thanks to their large sensors and advanced technology. Electronic Viewfinder: Many mirrorless cameras feature an electronic viewfinder that displays your settings in real time, helping you visualize the final image.
Tips for Using Mirrorless Cameras:
Explore the Features: Mirrorless cameras often come with innovative features like 4K video recording and high-speed continuous shooting. Take time to explore these functions. Invest in Good Lenses: The quality of your lenses significantly impacts your photos. Start with a versatile zoom lens and consider adding prime lenses as you progress. Stay Updated: The technology in mirrorless cameras is continually evolving. Keep an eye on new models and firmware updates to make the most of your gear.
Mirrorless cameras combine the image quality and flexibility of DSLRs with a more compact and lightweight design. They use electronic viewfinders, allowing you to see exposure adjustments in real-time, and are known for their silent shooting capabilities.
Beginner Guide to Mirrorless Camera Photography:
youtube
5. Vintage Film Cameras: The Nostalgic Touch

Description:
Type: Professional camera (vintage/analog) Characteristics: Heavy, manual settings, unique aesthetic, requires film Suitable for: Enthusiasts and professionals who appreciate the classic film photography process and aesthetic, and those who want to learn the fundamentals of photography.
Why Try a Vintage Film Camera?
Unique Aesthetic: Film cameras offer a distinct look and feel, with a unique color rendition and grain structure that digital cameras often lack. Learning Experience: Shooting with film encourages a deeper understanding of exposure and composition, as you have fewer chances to correct mistakes. Tactile Experience: The process of loading film, taking pictures, and developing prints adds a tactile, hands-on dimension to photography.
Tips for Shooting with Film Cameras:
Choose the Right Film: Different films have different characteristics. Start with a versatile ISO 400 film, and explore different types as you gain experience. Develop Your Own Film: If you’re up for a challenge, try developing your own film at home. It’s a rewarding process that enhances your connection to the art. Embrace the Learning Curve: Film photography has a steeper learning curve, but the rewards are worth it. Take your time and enjoy the process of discovering what works best for you.
Vintage film cameras offer a nostalgic feel and a unique aesthetic that digital cameras can’t replicate. They require manual settings and film, which teaches discipline and a deeper understanding of photography basics. These cameras are appreciated by those who enjoy the tactile process and classic look of film photography.
Beginner Guide to Using Vintage Film Cameras:
youtube
Starting with photography gear can be both exciting and daunting, but remember, the best camera is the one you have with you. Whether you begin with a smartphone, compact digital camera, DSLR camera, mirrorless camera, or vintage film camera, the key is to explore, experiment, and find what inspires you.
Happy shooting, and may your journey through the world of photography be as fulfilling and creative as possible!
#photography#original photographers#blackandwhitephotography#photographers on tumblr#film photography#photo#photoblog#photographer#life#lifestyle#perspective#leisure#hobbies#hobby#picture#nature#life experiences#my experiences#self expression#expressionism#abstract expressionist art#freedom of expression#35mm#35mm film#35mm photography#youtube
2 notes
·
View notes
Text
Meet Fujifilm's New X100VI Digital Camera
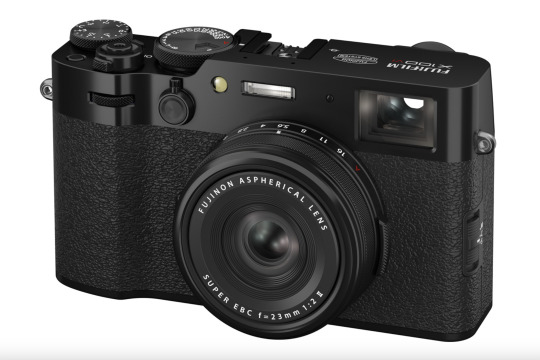
While some might argue that a majority of consumer-grade photography nowadays is now mostly achieved through the use of smartphones, it goes without saying that there's still a sizeable population of enthusiasts and professionals who'd still rather get their photography done via a dedicated camera. This has resulted in some rather impressive hardware from the biggest names in the industry, including Fujifilm. With that in mind, the company recently unveiled the launch of the Fujifilm X100VI digital camera, which boasts some pretty cool features. The camera is the latest addition in Fujifilm’s X Series line of digital cameras, and Fujifilm says that the new model offers exceptional image quality, in addition to its compact size and lightweight profile, as well as Fujifilm’s colour reproduction quality. Camera Design and Features Fujifilm says that the top and bottom of the X100VI's body is built from aluminium which is pressed and machined for sharp edges, while the surface is finely blasted for a smooth texture in addition to the anodised aluminium on its surface. The camera also features an LCD monitor for media viewing and playback which can be stored in a fully flat position, and also comes with touch support. Additionally, the control buttons on the back have been moved to a position that is easy to operate with the right hand. As the sixth-generation model in the X100 Series, the X100VI comes with the new 40.2 megapixel X-Trans CMOS 5 HR sensor, as well as a high-speed X-Processor 5 image processing engine. The camera also includes a newly-developed in-body image stabilisation function, with up to 6.0 stops. Fujifilm says that this is the first time that this feature has been incorporated in an X100 Series product, without a considerable increase in size and weight. Going back to the camera's hardware, the 40-megapixel CMOS 5 HR sensor inside is designed to allow more light to be captured in comparison to its predecessors, as well as native ISO 125 support. The X100VI also comes with a total of 20 "Film Simulation" modes, including a new ‘REALA ACE’ mode with a wide range of different tones. The camera also incorporates an autofocus prediction algorithm for reliable focusing that works even on moving subjects, with subject detection autofocus to accurately track a range of subjects. Fujifilm says that its developed using deep-learning AI technology, allowing it to detect wildlife, vehicles, and more. Other Details The X100VI also includes an ‘Advanced Hybrid Viewfinder’ that lets users switch between the optical viewfinder (OVF) and the electronic viewfinder (EVF). The latter is equipped with a high-resolution OLED panel with around 3.69 million dots for a clear visual user experience. The camera comes with a built-in ‘Electronic Range Finder’ (ERF) function allows a small EVF to be simultaneously displayed on the OVF, which can allow photographers to capture a subject in the OVF and subsequently magnify the in-focus area in the smaller EVF, making it convenient for snapshots and such. For video recording, there's built-in support for 6.2K resolution 30P movie recording that also supports tracking AF function during recording. One of the X100VI's most handy features comes in the form of Frame.io Camera to Cloud support, allowing users to wirelessly connect to an active internet connection, authenticate to Frame.io, and automatically upload photos and videos online right after creation, speeding up a user's workflow process. Pricing and Availability The X100VI will be sold in Black and Silver models, and will be available in the UK from 28 February 2024 from authorised retailers and the Fujifilm House of Photography in London starting at £1,599 including VAT. There will also be a special edition of the camera to celebrate Fujifilm’s 90th anniversary year, which will be available starting on 6th April at £1,934. The limited-edition models are individually numbered and delivered in a special box with strap, soft release button and history cards. The camera body is engraved with the original Fujifilm corporate brand logo from 1934, along with the unique serial number. Read the full article
3 notes
·
View notes
Text
Vlog Camera, Camera Stabilizer, Wireless Microphone, and Gimbal: Crafting Professional Vlogs
Vlogging has taken Singapore by storm, from vibrant street scenes in Chinatown to serene shots at Marina Bay. To create content that stands out, a vlog camera, camera stabilizer, wireless microphone, and gimbal are essential tools that deliver professional-grade visuals and audio without needing a film crew. These devices offer portability, ease of use, and high performance, making them perfect for beginners and seasoned creators alike. In this post, we’ll explore why a vlog camera, camera stabilizer, wireless microphone, and gimbal are must-haves, their key benefits, and how to pick the right ones, all in a friendly, engaging tone packed with actionable insights. Let’s dive into creating vlogs that captivate your audience!

The Heart of Vlogging: Vlog Camera
A vlog camera is the cornerstone of your setup, capturing high-quality footage that brings your story to life. Compact cameras like the Sony ZV-1 or Canon PowerShot G7 X Mark III are designed for vlogging, offering 4K video, flip-out screens, and wide-angle lenses for dynamic shots. The Sony ZV-1, for instance, features a 20.1MP sensor and real-time autofocus, perfect for filming on Singapore’s bustling streets. Priced at S$800–1,200, these cameras balance affordability and performance.
A vlog camera’s lightweight design and intuitive controls make it ideal for solo creators. A Reddit user in Singapore shared, “My Sony ZV-1 vlog camera makes shooting in crowded markets so easy—the autofocus locks on perfectly!” Features like built-in ND filters or background defocus modes enhance versatility, ensuring your vlogs look polished whether you’re filming a food review or a travel diary.
Smooth Footage with a Camera Stabilizer
Shaky videos can distract viewers, but a camera stabilizer ensures smooth, cinematic footage. Also known as a gimbal, a camera stabilizer uses 3-axis stabilization to eliminate jitters, even during fast movements. Models like the Zhiyun Smooth 5 or DJI Osmo Mobile 6 support smartphones or compact cameras up to 300g, with features like gesture control or timelapse modes. The DJI Osmo Mobile 6, priced at S$200–350, offers ActiveTrack 6.0 for automatic subject tracking, ideal for solo vlogging in Singapore’s Sentosa.
A Shopee Singapore reviewer noted, “My camera stabilizer transformed my vlogs—smooth shots even while walking!” Easy to set up via apps, camera stabilizers are portable and user-friendly, making them essential for creators who want professional results without complex gear. Pairing a camera stabilizer with a vlog camera ensures your footage looks effortless and engaging.
Crystal-Clear Audio with a Wireless Microphone
Great audio is just as crucial as visuals, and a wireless microphone delivers clear, professional sound without cables. Models like the Rode Wireless Go II or Hollyland Lark M2 clip onto clothing for hands-free recording, with ranges up to 200 meters and 10–40 hours of battery life. The Hollyland Lark M2, priced at S$150–300, offers noise cancellation, perfect for vlogging in noisy areas like Singapore’s Clarke Quay.
A wireless microphone syncs easily with a vlog camera or smartphone, ensuring your voice stands out. An X user shared, “My wireless microphone makes my vlogs sound studio-quality, even in windy conditions!” Lightweight and compact, these mics are ideal for travel vlogs or interviews, letting you move freely while capturing every word clearly, enhancing viewer engagement.
The Versatility of a Gimbal
A gimbal, often used interchangeably with camera stabilizer, refers to any stabilization device, including those for smartphones, cameras, or integrated systems like gimbal cameras. Gimbals like the Insta360 Flow or Moza Mini-P, priced at S$150–400, offer 3-axis stabilization, AI tracking, and built-in tripods for versatile shooting. The Insta360 Flow, for example, supports smartphones and folds to pocket size, perfect for vlogging on the go in Singapore’s Gardens by the Bay.
An X user raved, “My gimbal makes my vlog footage look cinematic—no shaky shots!” Gimbals are easy to balance and control via apps, making them accessible for beginners. When paired with a wireless microphone and vlog camera, a gimbal creates a powerful, portable setup for professional-grade content creation.
Choosing the Right Tools
Selecting the best vlog camera, camera stabilizer, wireless microphone, or gimbal depends on your needs:
Vlog Camera: Choose 4K cameras with flip-out screens, like the Canon G7 X Mark III, for sharp visuals. Ensure compact size for portability (under 400g).
Camera Stabilizer: Opt for 3-axis models like Zhiyun Smooth 5, supporting your device’s weight. Look for AI tracking and 8–12-hour battery life.
Wireless Microphone: Select models with 100–200m range and noise cancellation, like Rode Wireless Go II, compatible with your vlog camera or gimbal.
Gimbal: Choose versatile gimbals like DJI Osmo Mobile 6 for smartphones or cameras, with foldable designs for travel.
Incorporating These into Your Workflow
Set up your vlog camera with a camera stabilizer or gimbal by balancing your device and calibrating via an app for smooth footage. Clip a wireless microphone to your shirt, sync it to your vlog camera, and test audio levels before shooting. For Singapore’s humid climate, store gear in a dry bag and charge batteries fully, as advised on Reddit. Use a gimbal’s tracking features for solo shots or a wireless microphone for interviews to streamline your workflow.
These tools shine in Singapore’s vibrant settings, from food vlogs in Haw Par Villa to travel videos in Merlion Park. X users report pro-level results, with one saying, “My vlog camera, gimbal, and wireless mic make my content pop!” Their portability and ease make them perfect for creators on the move.
Why These Tools Are Worth It
A vlog camera, camera stabilizer, wireless microphone, and gimbal are investments in captivating storytelling. They deliver sharp visuals, smooth footage, and clear audio, transforming your vlogs into professional content. As one creator shared, “These tools make my Singapore vlogs look and sound amazing—my subscribers love it!”
Explore brands like Sony, DJI, Rode, or Insta360 at Singapore’s retailers or platforms like Lazada and Shopee. With their quality and ease, these tools empower you to create standout vlogs. Ready to shine as a creator?
0 notes
Text
How is the New Canon EOS R50V Changing the Game for Content Creators?
If you're serious about content creation, you’ll get all the creative freedom you need from a video-first interchangeable lens camera from Canon Abu Dhabi. Canon’s latest mirrorless release— the EOS R50V — is built with that in mind. This compact powerhouse brings more control to your creative process with advanced video features like intuitive autofocus and customisable colour settings.
Tailored for flexibility and control
Whether you’re streaming from home or capturing stories on the move, the Canon EOS R50V adapts to your style. It supports Canon Log 3, letting you record footage with a broader dynamic range — ideal for colour grading and mood adjustments during editing. Just be sure to pair it with your choice of Canon lenses to shoot any scene, whether sweeping wide shots or detailed close-ups.
Creative features that give you more options
The Canon EOS R50V lets you create dramatic effects using slow and fast motion modes or shape your footage with adjustable picture styles and filters. For further depth, use the Canon Log 3 recording. It will give you more control over colour tone and contrast in post-production.
Designed for vlogging and solo shooting
Solo creators will appreciate how easy it is to film with the EOS R50V. Its vari-angle touchscreen makes setting up a breeze, and the front-facing record button means you can start filming right away. The camera’s subject detection autofocus keeps you sharp, while the vertical tripod mount makes it simple to capture mobile-friendly content. For smoother footage, pair the R50V with the RF-S14-30MM F4-6.3 IS STM PZ lens and enable Movie Digital IS — great for handheld vlogs as well as walking shots.
Professional results, built-in
Inside the R50V is a 24MP sensor with Canon’s Dual Pixel CMOS Autofocus that delivers sharp, detailed 4K video — oversampled from 6K. Capture smooth, slow motion in Full HD at up to 120p with audio, or record in 10-bit 4:2:2 for more colour data and editing flexibility. Whether you're creating cinematic sequences or social media clips, the R50V ensures your footage looks polished.
Shoot with precision, edit with confidence.
Take control of your visual style using manual focus and exposure settings. Adjust audio levels while recording and use built-in aspect markers to frame for multiple platforms at once. Attach the RF-S14-30MM F4-6.3 IS STM PZ lens to zoom remotely and fine-tune your shot even while recording.
Seamless shooting and sharing
The EOS R50V keeps your workflow simple. Use Wi-Fi or Bluetooth to transfer content directly to your phone or laptop, or connect your camera via USB. Want to go live? Hit the LIVE button to start streaming in seconds. You can even charge the camera while it transfers files automatically — even when it’s powered off.
See the EOS R50V up close at National Store.
Visit National Store, an authorised Canon distributor in Abu Dhabi, to try the EOS R50V in person. Their knowledgeable team can walk you through its features so you can decide if it’s right for your content creation needs. Check their website for more Canon store locations in Abu Dhabi.
0 notes
Text
Price: [price_with_discount] (as of [price_update_date] - Details) [ad_1] Cleverly weaving proven technology with a vintage aesthetic, X-T30 II has much to offer stills photographers and videographers of all levels. The 26.1MP back-illuminated X-Trans sensor and X-Processor 4 imaging engine combine to deliver exceptional performance, with autofocusing down to -7EV in just 0.02 secs – and detail-packed results full of vibrant color. Pick up and start creating in seconds by flicking over to the Advanced SR Auto mode, or take more control over your output. X-T30 II has the features and functions to fit your creative style and mood, including the ability to share your work in seconds, via Wi-Fi or Bluetooth. Assured Image Quality X-T30 II uses Fujifilm’s fourth-generation X-Trans CMOS 4 back-illuminated sensor, designed to minimize noise, while also extending sensitivity to ISO 160. The unique structure of the X-Trans color filter array also minimizes moiré and false colors, without the need for an optical low pass filter – ensuring the best possible image quality, packed with detail and vibrant, true-to-life color. Incredible Focusing in All Conditions Never miss a moment, thanks to the X-Processor 4 quad-core CPU inside X-T30 II. It offers fast, accurate autofocusing in as little as 0.02 secs on any subject, but significant enhancements have been made to the original X-T30’s ability to track moving subjects, optimizing autofocus for both stills and its powerful 4K/30p video capabilities. Low light focusing performance has also been expanded from the original X-T30 model, down to -7EV (with XF50mmF1.0 R WR attached) for even greater versatility. Advanced Video and Imaging Controls A truly versatile imaging device, X-T30 II offers the ability to record 4K video at 30 frames-per- second, or 240fps at 1080p, to create 10x super slow-motion effects. Filmmakers needing extreme color fidelity can record 10-bit, 4:2:2 color through the camera’s HDMI port, F-Log internally, or video using any one of X-T30 II’s 18 Film Simulation modes. Alongside these, X-T30 II makes it easy to define your own distinctive visual style on still images – offering in-camera control over film grain texture, color depth, clarity, sharpness, and highlight and shadow tones. In Touch With Your Creativity From the dial-based operation, and compact, lightweight body, to the latest-generation Fujifilm APS-C sensor, X-T30 II lights up the imagination and inspires creativity – fusing cutting edge, convenient features with a vintage aesthetic charm. The three-inch, two-way tilting screen, for example, offers impressive touchscreen functionality, making it easy to get high-quality results in challenging conditions. For those who want to focus purely on light and composition, the Advanced SR Auto mode – easily activated with a lever on the camera’s top plate – automatically chooses the optimum settings from 58 presets. Made for Sharing X-T30 II is primed for sharing. Use Bluetooth or Wi-Fi to share your memories with friends and family on social media, by connecting and downloading images to the FUJIFILM Camera Remote App – or instantly connect and print your favorites from any compatible FUJIFILM INSTAX Smartphone printer. [ad_2]
0 notes
Text
Understanding the Latest Trends in Camera Technology

Introduction
Camera technology has improved dramatically in recent years, altering how we capture and share memories. From smartphones to professional DSLR cameras, technological advancements are constantly boosting image quality, low-light performance, and user-friendliness. With the rise of AI-driven advancements and computational photography, the industry is changing at a rapid rate. This article investigates the most recent advances in camera technology and how they are influencing the future of photography and videography.
AI and Computational Photography
One of the most significant advances in camera technology is the incorporation of artificial intelligence. AI-powered cameras can automatically modify settings, detect scenes, and improve photographs in real time. Computational photography, which uses software algorithms to increase image quality, is increasingly widespread on smartphones. Portrait mode, night mode, and HDR processing have made it easier for users to capture professional-quality photographs without a deep understanding of manual settings.
Mirrorless cameras with enhanced sensors
Another significant movement in photography technology is the transition from standard DSLR cameras to mirrorless systems. Mirrorless cameras are lighter, more compact, and have better autofocus capabilities than DSLRs. Furthermore, advances in sensor technology, such as backside-illuminated (BSI) and stacked CMOS sensors, have considerably enhanced image resolution and low-light capability. These advancements allow photographers to capture beautiful details even under difficult lighting circumstances.
Smart Connectivity and Cloud Integration.
Modern cameras come with smart networking options such as Wi-Fi, Bluetooth, and cloud integration. Users can rapidly transmit photographs and videos to their devices or web sites. Some cameras also provide remote control via smartphone apps, allowing photographers to shoot photos from a variety of angles. Cloud-based storage solutions are increasingly gaining popularity, ensuring that customers never lose their valuable memories.
Conclusion
The fast advancement of camera technology has made photography and videography more accessible, efficient, and creative. Cameras are becoming more capable than ever, thanks to AI improvements, enhanced sensors, high-resolution video, and smart connection. Whether you are a professional photographer or a casual user, these advances will allow you to easily shoot breathtaking photos. As technology advances, we can expect even more innovative developments in the field of photography.
0 notes
Text
Hey everyone, if you've followed my setup for a while, you know I've been rocking the original XGIMI Horizon projector since back in 2021. Got it with the early bird deal, and honestly, that 1080p projector has been a workhorse, used nearly every single night on my 100-inch screen. It served me well, but I was itching for that 4K goodness. Enter the XGIMI Horizon S Pro. I've spent some quality time with it, and here are my thoughts on this 4K, 1800 ISO lumen, Harman Kardon-equipped upgrade. (First Impressions & Design) Right out of the box, the Horizon S Pro looks premium. It’s got this sleek design that genuinely looks good just sitting there. A cool feature is the integrated stand – it feels really solid and lets you tilt the projector up or down quite a bit. Plus, when you turn it on, the lens cover automatically slides up, which is a nice touch to keep dust off. The back panel houses the essentials: power button, an HDMI port (with eARC support), and two USB 2.0 ports. The power brick even matches the projector's color! One slightly quirky but useful feature is the base – it rotates like a lazy susan, making small adjustments easy. It definitely has some heft to it, which speaks to the build quality. (Setup: Smooth Sailing with ISA 5.0) Setting up the Horizon S Pro was ridiculously simple, thanks mainly to XGIMI's ISA 5.0 (Intelligent Screen Adaption) technology. It runs Android TV 11.0, so the interface is familiar if you've used Android TV before. The magic really happens when you move the projector. Point it roughly at your screen, and the uninterrupted auto keystone correction and autofocus just work. Within seconds, I had a perfectly square, sharp image without fiddling with menus. You can turn these features off if you have a permanent setup and prefer manual control (which includes digital zoom, screen shift, etc.), but for quick setups or moving it around, it's fantastic. (Picture Quality: 4K Brightness That Shines) Okay, the main event: picture quality. This is a 4K UHD (3840 x 2160) projector using DLP tech and XGIMI's Dual Light 2.0 source, rated at 1800 ISO lumens. I tested it on my 100-inch screen from about 9 feet away. Even during the day with some sunlight sneaking past my blinds, the image was impressively bright and watchable. I measured around 590 lux near the center, dropping a bit towards the corners, which is pretty solid performance. Colors looked vibrant and accurate straight out of the box (it supports HDR10, HLG, and Dolby Vision). I tried the different picture modes (including Game Mode and Dolby Vision modes) but found the standard settings quite pleasing. Close up, the 4K resolution is evident – no visible pixels, just sharp, clean detail. Nighttime viewing, as expected, is where it truly excels, offering that immersive, cinematic feel that's hard to beat. For a projector, the brightness holds up surprisingly well in less-than-ideal lighting conditions. (Sound: Harman Kardon Steps Up) Built-in projector speakers are often an afterthought, but the dual 12W Harman Kardon speakers in the Horizon S Pro are genuinely good. Compared to my old Horizon, the difference is night and day. There's actual bass presence, which adds a lot of punch to movies and music. Dialogue clarity is excellent, and the overall sound profile is well-balanced. I cranked the volume pretty high, and there was no noticeable distortion. Honestly, while I have a soundbar, the onboard audio here is good enough that I might not even bother hooking it up for casual viewing. It supports DTS-Virtual:X and various Dolby formats too. (Performance: Quiet and Cool Operator) One of the biggest annoyances with some projectors is fan noise, especially during quiet movie scenes. I'm happy to report the Horizon S Pro is impressively quiet. Even running at max brightness for a while, the fan noise was minimal. I measured it at around 41.5 dB standing right next to it (in a room with ~37 dB ambient noise). From viewing distance, it's barely audible.
This seems linked to how cool it runs. Using a thermal camera, I saw temps staying mostly below 40°C, even the hottest spots were around 37°C. That's great thermal management. (Pros and Cons) Pros: Excellent 4K picture quality – sharp and detailed. Impressive brightness (1800 ISO lumens), handles some ambient light well. Fantastic built-in Harman Kardon speakers with good bass. Super quiet operation, stays cool. Very effective and fast auto keystone and autofocus (ISA 5.0). Premium design and build quality with integrated stand. Supports Dolby Vision, HDR10, HLG. Built-in Android TV 11.0 is convenient. Cons: Digital zoom only (no optical zoom). Auto screen features might need disabling for fixed installations if minor adjustments occur. Price point is an investment (though competitive for its features). (Conclusion: A Definite Upgrade) Coming from the already solid original XGIMI Horizon, the Horizon S Pro feels like a significant and worthwhile upgrade across the board. The jump to a bright, sharp 4K image, the drastically improved and genuinely usable built-in audio, and the incredibly quiet operation make it a fantastic all-in-one home cinema solution. The ease of setup with the ISA 5.0 features is just icing on the cake. If you're in the market for a high-performance, user-friendly 4K projector that looks as good as it performs, the XGIMI Horizon S Pro should absolutely be on your shortlist. It handles movies, TV shows, and likely gaming (thanks to the low latency mode) beautifully, delivering that big-screen experience without the usual projector hassles.
0 notes
Link
1 note
·
View note
Text
2nd Blog
Photography Tips for Beginners: A Guide to Capturing Stunning Images
Photography is an art form that allows you to freeze moments in time, capturing emotions, beauty, and stories through the lens of a camera. Whether you’re an aspiring photographer or just someone with a keen interest in learning more about photography, getting started can feel overwhelming. However, by mastering a few essential techniques and understanding the basics of photography, you can quickly improve your skills and start creating stunning images.
1. Understand Your Camera
Before you can take beautiful photos, it's important to become familiar with your camera, whether it’s a DSLR, mirrorless camera, or even a smartphone. Take the time to read your camera's manual and explore its settings. Most cameras offer automatic modes, but if you want full control over your photos, try to understand the key settings:
Aperture: This controls the amount of light entering the camera. A wider aperture (lower f-number) will give you a shallow depth of field, which is great for portrait shots with a blurred background. A smaller aperture (higher f-number) allows more of the scene to be in focus, which is ideal for landscape photography.
Shutter Speed: The amount of time the camera's sensor is exposed to light. Faster shutter speeds (e.g., 1/1000) are great for freezing motion, while slower shutter speeds (e.g., 1/30) create a blur effect, which can add artistic flair to moving subjects.
ISO: This controls the sensitivity of the camera’s sensor to light. Higher ISO values are useful in low-light conditions, but they can introduce noise (grain) into your images, so it’s a good idea to use the lowest ISO setting possible while still getting a properly exposed shot.
2. Composition is Key
One of the most important skills in photography is composition, which refers to how the elements in your photo are arranged. A well-composed image draws the viewer’s attention to the main subject and creates a sense of balance.
Rule of Thirds: Imagine your image divided into nine equal sections by two horizontal and two vertical lines. Place important elements of your image along these lines or at their intersections. This creates a more balanced, dynamic composition.
Leading Lines: Use natural or architectural lines in your environment to lead the viewer’s eye towards your subject. Roads, rivers, fences, or even shadows can serve as leading lines.
Framing: Use objects in the scene to frame your subject, such as doorways, windows, or branches. Framing creates a sense of depth and can focus the viewer's attention on the subject.
3. Lighting is Everything
Lighting is one of the most crucial aspects of photography. The way light interacts with your subject can make a significant difference in the mood and overall quality of your image.
Golden Hour: The best time to capture soft, warm light is during the golden hour—just after sunrise or before sunset. The light is diffused and creates long shadows, giving your photos a magical, almost ethereal quality.
Natural vs. Artificial Light: While natural light (e.g., sunlight) often produces the most flattering results, you can also experiment with artificial lighting like lamps, flash, or studio lights to create specific moods or effects.
Avoid Harsh Midday Sun: The midday sun can create harsh shadows and blown-out highlights, so it’s often better to shoot during early morning or late afternoon. If shooting in direct sunlight is unavoidable, use a diffuser or shoot in the shade.
4. Focus on Your Subject
Sharp focus on your subject is essential for high-quality photos. Most cameras have an autofocus system, but it's also helpful to know how to manually focus, especially when shooting in tricky lighting situations.
Portraits: Focus on the subject’s eyes to ensure they are sharp, as this is where the viewer’s gaze will be naturally drawn.
Depth of Field: A shallow depth of field (achieved by using a wide aperture) can isolate your subject from the background, creating a pleasing bokeh effect that makes your subject stand out. Conversely, a deep depth of field ensures that everything in the frame remains sharp, which is ideal for landscapes.
5. Post-Processing: Enhance, Don’t Overdo It
Once you’ve taken your photos, the work isn’t over. Post-processing, or editing, is a crucial step in photography. However, it’s important not to overdo it. Simple adjustments to exposure, contrast, and color balance can make a huge difference in the final result.
Exposure: Adjusting exposure can help brighten or darken your image if it’s too light or too dark. Be mindful of blown-out highlights and loss of detail in shadows.
Cropping: If your composition isn’t quite right, cropping can help improve the framing. However, avoid cropping too much as it can reduce image resolution and quality.
Sharpening and Noise Reduction: Sometimes, images can appear soft or noisy after shooting, especially in low-light situations. Use sharpening tools sparingly, and reduce noise to maintain the image's quality.
6. Practice and Experiment
The best way to improve your photography skills is through practice and experimentation. Don’t be afraid to try new techniques, shoot in different lighting conditions, or explore unfamiliar genres. As you shoot more, you’ll develop your unique style and gain a better understanding of your creative vision.
Start by shooting simple subjects—flowers, food, or even everyday objects around your home—and gradually challenge yourself with more complex compositions and scenes. Experiment with different focal lengths, angles, and perspectives to create diverse images.


0 notes
Text
Choose the Right Fiber Laser Cutting Machine

Selecting the right fiber laser cutting machine is crucial for maximizing efficiency, precision, and profitability in your production processes. Here’s a guide on how to choose the best fiber laser cutting machine based on your needs:
1. Understand Your Cutting Requirements
Determine which materials you'll be cutting (steel, stainless steel, aluminum, copper, etc.). Fiber lasers are versatile and can cut a wide range of metals but perform differently on different materials. Fiber lasers can cut materials of varying thicknesses, so choose a machine with appropriate power. For example:
Thin Materials (up to 1mm): A machine with lower power (500W - 1kW) is suitable.
Medium Thickness (1mm to 6mm): Machines with power between 1kW and 3kW work best.
Thick Materials (6mm and above): Higher-power lasers (4kW to 12kW) are needed to cut thicker materials effectively.
If your production requires high-speed cutting or precise cuts, choose a machine that offers high accuracy and fast processing capabilities.
2. Consider Power Requirements
The power of the fiber laser (measured in watts, W) directly impacts cutting speed and material thickness. Higher power allows for faster cutting and the ability to handle thicker materials. Fiber lasers are generally more energy-efficient than CO2 lasers. Still, ensure the laser power matches your typical cutting needs to optimize energy consumption.
3. Choose the Right Size and Working Area
The cutting bed size should accommodate the largest material size you intend to process. Common sizes include 1.5m x 3m and 2m x 4m. If you're working with large sheets or cutting larger components, opt for a machine with a larger bed size. Some fiber laser cutting machine come with automatic loading and unloading systems, which can improve productivity and reduce labor costs.
4. Look at the Cutting Head and Focus Mechanism
The cutting head is an essential component that influences the precision and quality of your cuts. Look for a machine with:
Autofocus Cutting Head: This allows for automatic adjustments of the focus to adapt to different material thicknesses and types.
Focusing Lenses: Choose machines that use high-quality lenses and offer easy access for maintenance.
5. Consider Maintenance and Serviceability
Fiber lasers require less maintenance than CO2 lasers, but regular upkeep is still necessary to ensure performance. Make sure the machine is easy to maintain and repair. Consider the availability of support from the manufacturer or dealer. Choose a company that offers good customer service, technical support, and training.
6. Assess the Control System and Software Compatibility
The laser cutter should have a reliable CNC control system that’s compatible with your existing CAD/CAM software. A user-friendly interface allows for more intuitive operation and quick setup. Check for software that can easily handle different file types, optimize cutting paths, and improve overall workflow efficiency. Integration with your production management system can also streamline processes.
7. Evaluate Build Quality and Reliability
A robust machine frame ensures better accuracy and reduces vibration, leading to more precise cuts. Research the manufacturer’s reputation and reviews to ensure that the machine is durable and built to high-quality standards.
8. Budget and Total Cost of Ownership (TCO)
Compare the prices of different machines, but keep in mind that the cheapest option may not always be the best in terms of long-term value. Factor in the cost of consumables (nozzles, lenses), maintenance, and power consumption when calculating the total cost of ownership. Consider the machine’s potential to increase productivity and reduce downtime. A higher upfront cost might be justifiable if it provides long-term cost savings and efficiency.
9. Laser Type (Single or Multi-mode Fiber)
Single-mode Fiber Laser, Offers better beam quality and precision, ideal for fine cutting and high-precision tasks.Generally cheaper and suitable for cutting thicker materials at faster speeds but may not offer the same precision as a single-mode laser.
10. Safety Features
Ensure the machine includes safety features like proper shielding, emergency stop buttons, and smoke extraction systems to maintain a safe working environment.
Conclusion
When selecting the right fiber laser cutting machine from Supreme Technologies, focus on matching the machine's capabilities with your specific cutting requirements, including material type, thickness, cutting speed, and precision. Consider the total cost of ownership, including energy efficiency and maintenance, and ensure that you have access to strong after-sales support and service. By carefully assessing these factors, you can find the machine that best suits your needs, ensuring maximum productivity and value.
0 notes
Text
You can tell that I have ADHD because I can't fucking focus!
This post talks around focus but never actually discusses it.
"Focus" is adjusting the lens so that your subject is "sharp" - DSLRs offer both automatic and manual focus, and there are various modes and settings that will track objects in motion or fix on a single item to keep that object in focus.
This is going to sound weird but in my opinion "focus" has a lot to do with personal taste. My favorite lens is a 1.8 prime lens that produces a *tiny* depth of field, so I like it when very narrow strips of an image are in focus. This is because I like taking photos of small things from close up.
Different photographers use different types of focus for different reasons. I think it is much more a matter of taste than of technique, which is why I didn't think much of it in the technical post, though ISO, exposure speed, focal length, and your aperture cal all impact the way your camera focuses. That one I think you really do just need to feel out on your own, and if your camera isn't getting shots you like with the autofocus on, don't be afraid to switch to manual.
So you know absolutely positively nothing about photography
Cellphone cameras are fucking great. I love them. I love the ability to take photos whenever and wherever at basically zero cost.
Point-and-shoot cameras have always been awesome and accessible devices.
This is not a post shit-talking "basic" cameras. This is a post for people who have only ever used basic cameras who want to know at least slightly more about photography.
Because, the thing is, a remarkable amount of photography is math. And if you don't know it's math, it looks like a mystery. And you may be standing there snapping a photo with your phone that looks pretty good, but your friend with a DSLR looked at the sky, twisted a dial, and took three steps to the left and they took a photo of the same subject that looks like it belongs on a magazine cover.
How did they do that?
Probably math.
If you've come into possession of a DSLR camera and are disappointed that the photos you're taking aren't looking like the photos you thought came from DSLRs, I'm here to tell you about the math you may not know about.
What is a photograph?
At its most basic, a photograph is the result of light on a sensor. Let's consider a pinhole camera for a moment. A pinhole camera is a lightproof box with a piece of photographic paper on one side and a tiny hole in the other.
When you create a photo with a pinhole camera, you're using pretty much all of the math you would in a big fancy camera, just in a cruder form they are:
The sensitivity of the paper, film, or camera sensor to light (this is your "ISO" if you're using a digital camera or film). Light sensitivity can be easily changed on a digital camera, but on chemical-treated paper or film the sensitivity is predetermined and cannot be changed. If you want to change the ISO on an analog camera, you need to change the medium that's being exposed.
An opening to let light in - your F-stop, or aperture. The F-stop of a photo is how wide open the lens is to let light onto your film or sensor. In a pinhole camera, you have something that is theoretically a very very large F-stop because you have a very, very tiny opening to let light through (F-stops run in reverse - the bigger the number, the smaller the opening).
Exposure - your exposure is the amount of time you leave your sensor open to the light. The majority of photos you see in the world have exposure times that are measured in tiny fractions of a second, sometimes in thousandths of a second. If you're using photo paper in your pinhole camera, you may have an exposure time of minutes rather than tiny portions of a second, but your photo exposure will still depend on how long you want to leave your "lens" open.
Focal length - your focal length is a description of the relationship of the distance between the light source and the light sensor. You can manipulate this in a pinhole camera by making the camera longer or shorter. A larger focal length means a narrower field of view - it zooms in on the subject.
A pinhole camera is the simplest camera that lets you, the photographer, control all of the elements of a photo. This is, functionally, fully manual photography.
So what's the difference between all that and a cellphone camera?
Point-and-shoot cameras like those on cellphones give the user more limited control over these settings. For instance, think of a disposable camera. On a disposable camera, the photographer has control over one setting - the ISO of the film, which they can select at purchase. They can't control how wide the lens opens or how long it stays open, and the only way they can compensate for lighting that is a poor match to the ISO is flash.
Cellphone cameras are very much like a standard point-and-shoot. By default, users point their cameras, then shoot a photo. Many cellphones have a "pro" mode that will allow the user to emulate different ISOs or f-stops, but the sensors in cellphone cameras aren't as good as the ones in camera-cameras, and the lenses are very limited as well. Some cellphone cameras and point-and-shoot digital cameras WILL allow users to set longer exposures, and many cellphone cameras have multiple lenses which does allow for some lens effects, but they don't give a huge amount of control to the user.
Okay so let's say I've got my new shiny camera, what do I need to know?
For best results, you want your ISO to match the light you're shooting in. Low ISO is for bright light, high ISO is for low light. If you wanted to take snapshots of your family outdoors at disneyland in the summer, you'd buy 100 ISO film. When I used to shoot football games at night in oddly lit stadiums, I'd use 1600 ISO film. If you have a DSLR camera, there's a setting somewhere in there that tells you how to set the ISO. If you are shooting in relatively low light and the photos are turning out darker than you'd like *but* things are moving too quickly to use a longer exposure, you can bump up your ISO for brighter, sharper images but they will be more noisy and grainy than ones shot at a lower ISO. If you want clean, smooth, crisp images, your goal should be to shoot with the lowest ISO possible.
The Aperture of your camera lens determines your F-Stop. This acts like the pupils of your eyes. When it's really really bright out, your pupils shrink down to let in less light. When it's darker out, your pupils get bigger to let in more light. If you are shooting in low light, you want a low F-Stop, which means that your camera's lens is open really wide. If you are shooting in a bright environment, you want a higher F-Stop, which will mean the opening is very small. Since your F-stop interacts with the focal length of your lens, you will find that zooming in with the lens often makes images darker. To shoot clear images from far away, you need to be very conscious of your F-stop, your ISO, and ambient lighting conditions.
Exposure describes the length of time you set the camera to leave the aperture open. In many DSLRs this can span from 1/3200th of a second to infinitely long (the "bulb" setting means "aperture is open until you close it.") If you want sharp images of frozen motion, you want the fastest speed that you can get. Sports photography and photography of things like insects or milk crowns often use extremely short exposures to get sharp images. If you want blurry images you want slower speeds. If you want to take a photo in a low-light environment and capture motion within that environment - for instance, taking photos of cars on a freeway at night - you want slower speeds (if you want to do this in a brighter environment, like taking photos of a stream in the daytime, you want slower speeds and a specific kind of lens filter called a neutral density filter). When exposures are set to be longer than about 1/60th of a second, images with motion start to look blurry.
Focal Length determines the field of view of your subject. If you have a lens with variable focal lengths, this is called a zoom lens. A longer focal length zooms you in and a shorter focal length zooms you out. Lenses with fixed focal lengths are called prime lenses, and can't zoom in or out.
Depth of Field - your depth of field is a combination of the interaction of your focal length, your distance from your subject, and your F-stop. The depth of field describes the relative amount of space in a photograph that is in focus. A long depth of field means that much of the image plane is in focus. A short depth of field means that a narrow portion of the image plane is in focus. A low F-stop produces a narrow depth of field. A long focal length produces a narrow depth of field.
You can think of your camera as a tool that measures time and space. Your ISO and Exposures are measurements of time (how quickly the sensor senses the light, how long the sensor is exposed to the light), the F-Stop and the focal length are measurements of space (how wide the aperture of the camera is, how far the lens is from the sensor).
The pre-set modes on your camera, the ones on the dial that show a person running, flower, or a cloud, or a lady with a hat - these are generic settings that combine an ISO, exposure time, and f-stop that are likely to work well for outdoor action shots, landscape photography, cloudy light, and portraits. When you're using those pre-set modes, you control the focal length and not much else.
When you understand that the running person/action mode means low-ish ISO combined with high shutter speeds, you can start just setting your own ISO and shutter speed when you're shooting sports. When you know that portrait mode sets you up for low-ish f-stops, relatively quick shutter speeds, and mid-range ISOs, you can just start setting those things on your own so you can have more control.
"What about light metering?"
Since your camera is a machine that records light, light metering is pretty important. The light meter of your camera will tell you if your settings are "correct" for the amount of that the light sensor senses. In most modern cameras there is a light metering display on the bottom edge of the viewfinder that goes from negative to positive; if the meter shows that you are in the negative it means that your photo will be under-exposed (too little light will get to the sensor and the image will appear dark), if the meter shows that you are in the positive it means that your photo will be over-exposed (too much light will get to the sensor and the image will appear too bright - "blown out"). The way to correct for under or over exposure is to change the length of the exposure, making it longer for underexposed images and shorter for overexposed images.
What the light meter is doing is thinking about all of your settings and the lighting for you. It looks at the ISO, focal length, f-stop, light hitting the sensor, and planned exposure time and tells you what that combination of settings is likely to produce - something too bright, or something too dark.
When you are more experienced with photography, you get good at juggling these things on the fly and messing around with them more, which is how you can do the magic of looking at the sky, twisting a dial, taking three steps to the left, and knocking it out of the park with a picture.
It only looks like magic because you're doing a ton of math under the hood that is extremely non-obvious to people who are new to photography.
Anyway, here is a good guide to depth of field and what goes into it.
Here is a basic photography textbook that explains the principles that I've gone over here in a lot more detail with a lot better explanations. It's a film photography textbook, but one of the cool things about photography is that a lot of stuff from the analog era is still relevant in the digital area, and the basics haven't changed.
However all of that is about the *technical* aspects of photography. Photography isn't just a record of exposure time and focal length, so here's a basic photo composition textbook that talks about the artistic principles of photography.
2K notes
·
View notes
Text
Best Camera for Professional Photography Beginners
Choosing the best camera as a beginner in professional photography can be challenging with so many options available in the market. The right camera will not only help you learn and grow but will also set a strong foundation for your photography career. Here, we break down the top cameras that are perfect for beginner photographers who want to pursue professional photography.

1. Canon EOS Rebel T7 / EOS 2000D
Affordable and User-Friendly: This camera is an ideal choice for beginners due to its affordable price and easy-to-use features.
Key Features:
24.1 MP APS-C sensor for detailed image quality.
Built-in Wi-Fi for quick sharing and remote control.
Full HD video recording capability.
Why It’s Great for Beginners:
Simple menu navigation and auto modes help new users start shooting without technical difficulties.
2. Nikon D3500
Compact and Durable: This camera is lightweight, making it easy to carry during long shoots or while traveling.
Key Features:
24.2 MP APS-C sensor for sharp and vibrant images.
Long battery life, perfect for extended shooting sessions.
Guide mode that provides step-by-step instructions for beginners.
Why It’s Great for Beginners:
Excellent value for money and intuitive design, which ensures smooth learning.
3. Sony Alpha a6000
Mirrorless Marvel: A compact and powerful mirrorless camera that offers great performance at an entry-level price.
Key Features:
24.3 MP APS-C sensor for high-resolution photos.
Fast autofocus system with 179 phase-detection points.
Continuous shooting at 11 fps to capture fast-moving subjects.
Why It’s Great for Beginners:
Lightweight and easy to handle, perfect for travel and street photography.
4. Fujifilm X-T200
Retro Design with Modern Features: This camera is a blend of style and performance.
Key Features:
24.2 MP APS-C sensor for excellent image quality.
Vari-angle touchscreen for flexible shooting angles.
4K video recording for high-quality video content.
Why It’s Great for Beginners:
User-friendly interface and film simulation modes that help create unique photography styles.
5. Canon EOS M50 Mark II
Versatile and Adaptable: A mirrorless camera that offers a mix of ease and advanced features.
Key Features:
24.1 MP APS-C sensor and Dual Pixel CMOS AF for accurate focus.
Eye-detection AF for sharper portraits.
4K video recording for professional-quality videos.
Why It’s Great for Beginners:
Compact, easy to carry, and equipped with powerful automatic modes.
6. Nikon Z50
Solid Mirrorless Option: A beginner-friendly mirrorless camera that delivers high performance.
Key Features:
20.9 MP APS-C sensor for great image quality.
209-point hybrid AF system for accurate focus.
4K video recording with no crop, suitable for vlogging.
Why It’s Great for Beginners:
Easy-to-use interface and deep grip for comfort during long shoots.
7. Panasonic Lumix GX85 / GX80
Budget Mirrorless Choice: This camera is perfect for beginners looking for a more affordable mirrorless option.
Key Features:
16 MP Micro Four Thirds sensor with no low-pass filter for crisp images.
Dual I.S. (Image Stabilization) for handheld shooting.
4K video recording and 4K photo mode.
Why It’s Great for Beginners:
Compact size, great for street photography and travel.
8. Olympus OM-D E-M10 Mark IV
Perfect for Travel: A lightweight and stylish mirrorless camera with impressive features.
Key Features:
20 MP Micro Four Thirds sensor.
In-body image stabilization for smooth photos and videos.
Flip-down touchscreen for selfies and vlogging.
Why It’s Great for Beginners:
Excellent build quality, easy-to-understand controls, and a good range of automatic shooting modes.
Important Points to Consider When Choosing a Camera for Beginners
Budget: Start with a camera that fits your budget without compromising too much on essential features.
Ease of Use: Ensure the camera has simple controls and easy navigation, especially if you’re new to photography.
Lens Compatibility: Choose a camera with a wide range of compatible lenses for future upgrades.
Portability: A lightweight and compact camera is more convenient for carrying around, especially for travel photography.
Video Capabilities: If you plan to create video content, look for cameras with at least Full HD or 4K video recording options.
Conclusion
Selecting the best camera for beginner photographers can make a significant difference in your photography journey. Whether you choose a DSLR or a mirrorless camera, the key is to start with one that matches your learning style and photography goals. The options above, from the Canon EOS Rebel T7 to the Olympus OM-D E-M10 Mark IV, offer excellent features and user-friendly experiences that can help you take the first step toward becoming a skilled photographer.
For any photography services contact us ( Farazdak Studio ) today through our website.
Originally published at https://farazdakstudio.blogspot.com on November 16, 2024.
#best photographer in new delhi#camera#camera for photography#best camera for photography#best camera
0 notes
Text
Unleash Creativity with the Canon PowerShot G7 X Mark III Compact Camera
Whether you intend to use it for vlogging, video conferencing, or live streaming, you need a reliable camera that’s easy to carry and will show you in the best light anywhere. One of the best options you will find at a trusted camera store in Dubai is the Canon PowerShot G7 X Mark III. It’s designed specifically for posting content online with its 1.0-type sensor. And despite its compact and portable design, it takes 20.1-megapixel photos and outstanding 4K videos — perfect for communicating clearly and creatively with your audience.
Better than your smartphone
Today’s smartphones may have advanced imaging technology, but nothing compares to shooting with an actual camera like the Canon PowerShot G7 X Mark III. It lets you capture captivating videos in 4K clarity and report fast-moving subjects in slow motion with up to 120 fps of fast frame rates.
In addition, this vlogger-friendly camera can accommodate an external mic and provide live streaming capabilities in stunning quality. These features make for the perfect alternative to a webcam for gaming and video conferencing.
Taking content creation to the next level
The PowerShot G7 X Mark III inspires creativity anywhere. The 20.1-megapixel sensor delivers outstanding results, whether taking selfies or shooting panoramas, portraits, and food. The shallow depth-of-field lets you focus on your subject, even when shooting in low light.
With the updated firmware, you have the new automatic movie mode that fine-tunes auto exposure and autofocus. Video aspect markers, Zebra display, and level display offer advanced control. Just be sure to get the PowerShot G7 X Mark III from an authorised camera shop in Dubai so its system is up-to-date.
Reliable connectivity
If you can’t wait to upload and share your content, connect the PowerShot G7 X Mark III with your tablet or smartphone via Bluetooth and do it on the spot. You can also shoot or film remotely with the Canon Camera Connect app.
Capture the action with precision.
Canon’s technology simplifies capturing fast-moving subjects like athletes and wildlife. The PowerShot G7 X Mark III has a fast DIGIC 8 processor that can take photos up to 30fps, even in RAW. This offers more flexibility during post-production.
Get this camera today.
National Store is the best camera shop in Dubai for getting the Canon PowerShot G7 Mark III. They are the authorised distributor of Canon in the UAE, providing reliable services and sales for the brand. Visit their website to find the nearest branch in your area.
0 notes
Text
Week 2
Compare jpeg to RAW. Set your camera to record both a large RAW + a large JPEG file simultaneously, and take three different photographs, varying the light situation and the proximity of subjectmatter. Process the RAW files and compare these to the JPEG files, ensuring that you are examining these at 100%. Write a brief account of the differences in the three instances. Note also the sizes of these images: what is the maximum size these can be printed out at 300dpi


What I find the difference between RAWs vs JPEGs is a couple of things.
When zooming into the images between JPEGs vs RAWs, RAWs has more fine detail compared to JPEGs.
When unedited, RAWs have a very flat look to them.
Much easier to pull highlights/shadows and tweak colours to your desired tastes compared to JPEGs.
2. Shooting modes – Manual Select an outdoor daylight situation with middle-ground and distant elements. Take the same photograph, using a tripod, in the following ways: a) shoot programmed auto setting b) shoot shutter speed priority at 100 ISO c) Shoot aperture priority at 100 ISO d) Shoot using the manual setting to obtain the maximum amount of detail across the image.

From Top to Bottom No. 1 - No. 4
Settings:
Photo #1: F/5.0, iso 100, 1/200
Photo #2: F/2.8, iso 100, 1/1000
Photo #3: F/2.5, iso 100, 1/1000
Photo #4: F/8.0, iso 200, 1/200
Shooting on these automatic modes, I notice that these automatic modes tend to not stop the apeature down/ not stop down enough. It was only during the manual mode (Photo #4) when I was able to stop the apeature down from F/2.5 to f/8 to get everything in focus.
3. White balance Why might you not ‘correct’ white balance? Shoot, using a tripod, a house (from outside) with its lights on at twighlight:
a) autowhite balance

Colour Temp: 5500K
b) setting the temperature using the K colour temperature setting (try three different Kelvin temperatures)


From Warm to Cold temp photos
#1: 8400K
#2: 6300K
#3: 4350K
4. HDR imaging
Set up your camera on a tripod in a variable light situation; a situation with both shadow and sun-lit areas. Set your camera’s drive mode to continuous shoot, and select Auto Exposure Bracketing with 1 stop increments. Hold down the shutter release button until you have heard it take the three exposures in a row. Repeat this process (same photograph) with the Auto Exposure Bracketing with 2 stop increments.
Then use either Lightroom’s HDR and Photoshop’s HDR to combine these files. Notice the many decisions you make at this point and how easily the photograph starts to look unconvincing. Your aim in this excercise is to produce an HDR composite image that you find ‘convincing’ as a photograph and to write a brief account of your reasoning i.e. what you consider to be a ‘convincing’ HDR photograph and to compare this HDR image to the ‘correct’ exposure image (the first shot in the burst of three).


Sadly my camera doesn't have a built in HDR stacking feauture, so I had to take each shot carefully ensuring that each shot gets the shadows, midtones and the highlights. For lightroom HDR stacking to work, you need a minimum of 3 photos.

HDR should only be used when absolutely necesary, such as this area where there is a difference between the highlight areas and the shadow areas. This turned out pretty good I feel.
5.
Explore release modes such as the self-timer and continous high speed.
For my Camera, continious high speed shooting can be set through the menu, or for me, I've set it up as a custom button on my camera for easier accessibility, espeically when I am on the fly shooting and don't have time going through the menus.

In the manual for the Sony A7iii, it explains different burst speeds that can be used depending on what is important to the user. I personally always keep it on HI+ (10fps), as the autofocus tracking on Sony cameras are fantastic.
Self-timer on the A7iii can be accessed in the same selection area as the drive mode. Located all the way in the bottom, you can pick from 2s, 5s and 10s.
0 notes
Text
Panasonic Announces the Lumix GH7

Not too long ago, Panasonic announced the launch of the Lumix S9, one of its most advanced mirrorless cameras to date. While it does come with impressive video capabilities (as most mirrorless cameras do nowadays), it is geared more towards still photography, aimed at both professionals and folks just starting out with their content creation journey. CHECK OUT: Meet the Panasonic Lumix S9 With that being said though, Panasonic recently unveiled the latest addition to its Lumix lineup with the new GH7 - Panasonic says that it's the latest flagship model of its mirrorless G-series cameras, and based on its specs sheet we're not surprised. In contrast to the S9, the GH7 is supposedly designed to better accommodate the growing demand for professional-grade video content, while at the same time keeping costs at a minimum compared to a full-fledged production setup. The Lumix GH7 packs a powerful imaging pipeline for both videos and photos - there's a 25.2MP BSI CMOS sensor that works with fast response times, and rich gradation thanks to a 13+ stop dynamic range boost. The camera also supports high-speed, high-precision PDAF autofocus. Additionally, the GH7 further enhances its video capabilities with real-time autofocus recognition, which works with large vehicles in motion such as airplanes and trains. Panasonic also says that it's improved the camera's image stabilization with features such as perspective distortion correction and a High mode in Active I.S. which should make for some steady and sharp footage. As for its dedicated video capture and production capabilities, there's a lot that the GH7 offers. For one, users can record 5.7K 30p footage in ProRes 422 HQ or even ProRes RAW HQ for better editing flexibility. For audio capture, there's also support for 32-bit float recording, although users will need to use the separately sold DMW-XLR2 microphone adapter. The GH7 likewise comes with REAL TIME LUT capabilities, which is another welcome feature as users can easily load custom colour profiles and apply unique looks directly from the camera. The GH7 also adds a bit more in the way of third-party software support - for example, it can easily integrate with Adobe's Frame.io, which gives users features such as automatic uploads, backup and sharing, and even collaborative editing of footage directly from the camera. The GH7 likewise comes with compatibility for Open Gate recording, which offers flexibility when framing shots for different use cases. In terms of its build and design, the GH7 prioritizes both performance and usability with its heat dissipation system, which packs a cooling fan that allows for extended video recording sessions. There's also a built-in monitor that can tilt without obstructing HDMI or USB cables, giving users a clear view during operation. Panasonic adds that it's designed camera to be weather-sealed for dust and splash resistance, and can withstand freezing temperatures down to -10°C (14°F). With that being said, we don't exactly encourage people to go dunking the GH7 under water. As for availability, interested buyers looking to get their hands on the new Lumix GH7 can expect the camera to arrive at the end of July 2024, priced starting at £1999.99. Read the full article
0 notes