#Click to Continue > by Savings Addon
Explore tagged Tumblr posts
Visit Tumblr Blog
Explore Tumblr blogs with no restrictions, modern design and the best experience.
Last Seen Tumblr Blogs


Fun Fact
There were a total of 171.5 billion posts on Tumblr in 2019.
Text
A Brief Guide on Uploading ChoiceScript Demos to Itch.io
Since Dashingdon is shutting down, and there will be a lot of folks wanting to host their ChoiceScript demos elsewhere, I thought it'd be a good idea to provide a brief guide on how to do so for itch.io.
This is for Windows in the folder actions, but it shouldn't be too difficult for folks to translate for Mac. This also assumes you haven't changed any of the files within your game folder other than those found under 'scenes'.
Within your game folder, locate the 'web' subfolder, right click it and select 'Send to' then 'Compressed (zipped) folder. Name your newly compressed file something sensible, and I recommend moving it to a new folder outside of your game files, just to keep everything neat and tidy.

2. Assuming you already have an itch.io account, navigate to your dashboard, and click the 'Create New Project' button.

3. Name your project as you like, and under 'Kind of project', select the 'HTML' option.

4. Set the 'Pricing' to 'No Payments', you cannot use ChoiceScript for profit unless it is with the Choice of Games or Hosted Games publishing labels. No one wants to get in trouble unnecessarily here.
5. In the Uploads section, upload your newly zipped file we made in step one. After it's finished uploading, you'll be given one drop down and two tick boxes. You need to tick the 'This file will be played in the browser' option.

6. I've found so far that 'Viewport dimensions' work quite well for desktop at 1080 x 640. Either use these numbers or experiment and find what works best for you.
7. You must tick the 'Enable scrollbars' option for your game to display properly, otherwise options, text and buttons can be clipped off the bottom of the viewport.

8. Continue filling out the rest of the form, or skip it for now and scroll all the way to the bottom to the 'Visibility & access' section. Here make sure you have 'Draft' selected. This prevents others from finding your game until you're ready, and I always recommend play testing things before you make your work public.
9. Finally, hit the 'Save' button, then go and have a look at your creation by hitting the 'View page' link. And there you go! When you're ready for public release, just change the option in section 8 to 'Public'.
---
A few things to bear in mind about hosting on itch.io:
There isn't currently any way for your readers to save their game. I'm sure someone could write in a plugin similar to Dashingdon's at some point, but as for right now, this isn't available. See addition/edit below.
Make sure you properly tag your game with the 'choicescript' and 'interactive-fiction' tags. There are an awful lot of games on itch.io and it's easy to get lost in the crowd. Make sure folks can find you by having the right tags.
I hope this brief guide was useful to folks.
Best of luck to you with your writing!
---
Addition/Edit:
Thanks to @hpowellsmith for bringing this to my attention. You can add save functionality to your game by using this addon:
The ChoiceScript Save Plugin
Just tried it out on my own game and it works perfectly.
Rather than run through the addon author's own tutorial here, I'll just forward you to the Readme on their Github page.
One small note I would add is when it asks you to make the two small additions to your index file, make sure you right click the file and open it with your coding program, don't double-click it as this will just open it in an internet browser, and it won't give you the access to what you need to change.
716 notes
·
View notes
Text
I was asked by @x-littlemoth how I do my VGP and I explained the basics here! This is a continuation of that tutorial with my own personal methods! For this tutorial you'll need this mod (in addition to the ones mentioned in the last post):
CharLi This is an excellent lighting mod that allows you to spawn individual lights and adjust their color, brightness, rotation, etc.
And here are some other mods I recommend, though they aren't necessary!:
Additional Portrait Presets I can explain more about why adjusting FOV or rotating the camera 90 degrees is useful below, but these presets save you the effort of tweaking yourself! Photomode Expression Megapack No tutorial needed, this just adds extra facial expressions you can select in photomode! Works exactly the same as the vanilla one and doesn't replace anything.
Appearance Creator Mod (ACM) I won't cover this one here because there is already a wonderful tutorial by PinkyDude who explained it way better than I ever could which you can check out right here! Briefly, this allows you to swap/toggle clothes, accessories, etc. on NPCs.
If you'd like any additional suggestions for pose mods, clothing mods, etc. or wants to know any mods I'm using I am very WCIF (where can I find) friendly so anyone can free to ask me any time! Additionally, if anyone would like a tutorial on my editing process, I pretty much just use my phone and a free app (and sometimes a paid app but that's not necessary) feel free to ask, I'd be happy to share :)
Let's get into the tutorial under the cut! ^^
Okay, let's continue editing our photo of Viktor and V using CharLi! So, open your CET menu and look for the CharLi menu and open it up. First thing I tend to do is go over to the settings tab (the gear) and shut off chromatic aberration and volumetric fog. This is all up to personal taste though, so do what looks best to you! Now, return to the main tab (click the light bulb) and let's spawn a light! Personally I always prefer to start with 1x as the others tend to be way too bright for most scenes. Play around with choosing whichever type of light you like.
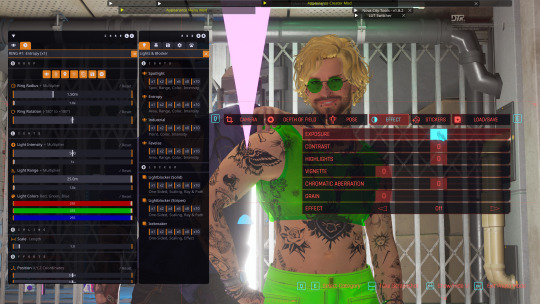
In the end, I went with the type called Favelas as my main light source. Go ahead and play around a bit with the rotation, intensity, and other sliders.
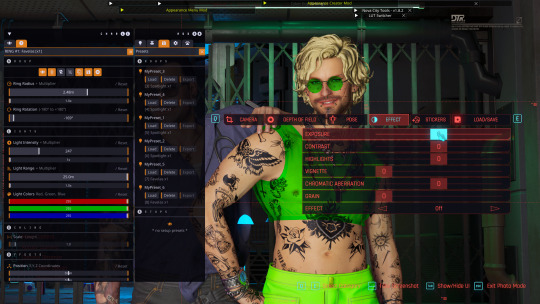
Here's what I ended up settling on! I try to make sure that the character's aren't washed out or too dark and I try to make my first light light the characters fairly evenly. Now, for depth and flavor, let's add a second light! This time I chose spotlight and I adjusted the colors until I achieved a relatively blue color.
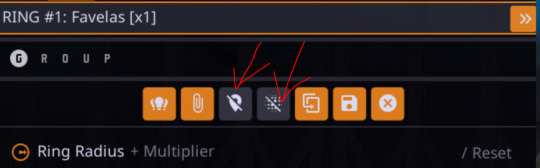
One last thing, for each of your lights go ahead and toggle these two badboys off. That will hide both the physical light object and the pink tracker so they don't clutter up your photo.
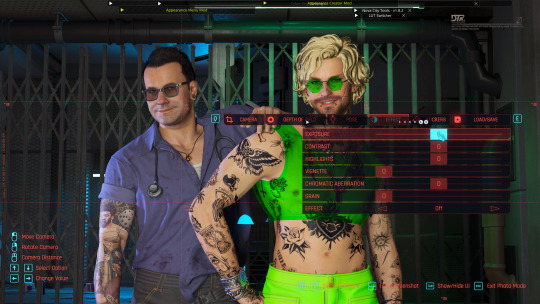
Adjusting the angles a bit more to my own tastes, here's what I'm left with without any external editing!

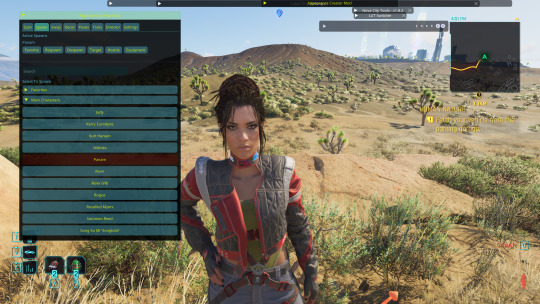
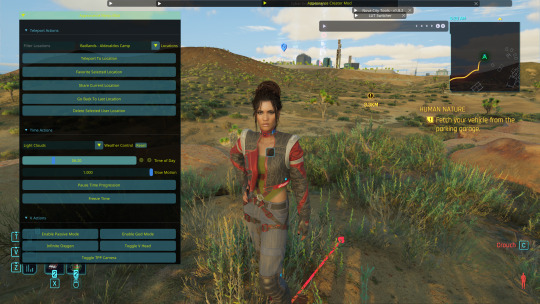
Now, let's try and outdoor photo! Following the steps in the last tutorial, I am going to teleport to my location of choice (I am using a teleportation preset found in PinkyDude's Roadtrip Through The Badlands AMM location addon). While here, I switch my Nibbles replacer to Fem because I'm gonna take some pics with Panam! Now that I'm here, I notice that the lighting out here could be better! I tend to adjust my weather and lighting outside of photomode because it doesn't always shift correctly in it. To make sure everyone is lit correctly, I tend to pick the character with the darkest skin or clothing that will be in my scene and spawn them from the spawn tab. I'll choose Panam, of course!
Note: Going to the tools section and selecting freeze target can help keep your spawned companion from walking away but I forgot to do that here lol For weather conditions, I like to choose light clouds. This makes the sky look nice and it also softs harsh shadows. This is up to personal taste and the mood of your scene though! Additionally, if you want more weather states and deeper control, you can use the Nova City mod. For now, let's just play with the vanilla weather settings.
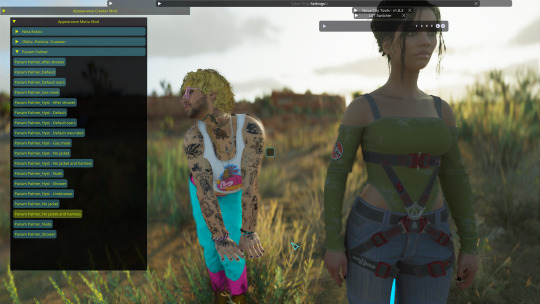
I tend to prefer the look of early morning the best, but again this up to taste! I would definitely recommend avoiding middle of the day though as the harsh lighting can greatly overexpose your image while also muting colors. Now that we've got all that set up, let's banish her just like we did Viktor in the first tutorial. Unlike Viktor, this Panam clone won't respawn (the real Panam is safe and sound, this won't affect her). Now let's return to photomode (and ignore my boy's goofy Us Cracks pose). Follow the steps to set up your replacer just like in the first tutorial. Now that I have my replacer swapped out to Panam, I am going to remove her jacket using one of the built-in presets (for swapping outfits with ones not listed in AMM see the AMC tutorial linked above). To do this I am going to go to tools > target replacer > scan and then scroll to the drop-down and list and pick the one I want to use. Let's keep the harness but remove her jacket!
From here, choose whatever poses you like, set up CharLi however you wish, and now let's try taking a portrait shot! This is where those presets come in handy. If you downloaded them, go ahead and flip through to the portrait ones at the end and select the one you like best. Otherwise, let's set this up ourselves! To do this, I will go to Camera tab in photomode and set my rotation to either 90 or -90 degrees. This allows you to fit more into the shot while also allowing your portrait to be higher quality because it fills up the whole screen instead of being a tinier image with a lot of empty space on the sides. Next, I'm going to adjust the field of view. The lower the field of view, the less your image is distorted. While distortion can be nice for some styles and atmospheres, I tend to prefer a lower FOV for my portraits. I tend to prefer to set my FOV lower then 20 but higher than 10. Here I've chosen 15!
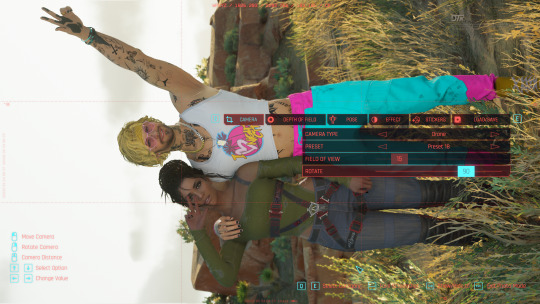
Now you can play around with the angles and take your photo! Here's the unedited one I got in the end:

If you have any questions definitely feel free to ask! This is certainly not the only or even the "best" way to do it, this is just my personal way :) Have fun!
21 notes
·
View notes
Text
10 Methods Of Facebook Reels Download by Triveni World
10 Methods Of Facebook Reels Download by Triveni World
Facebook Reels Download are now a popular way of sharing short, funny videos to the world. Whether it is funny clips, tutorials, or motivational videos, you might want to Facebook Reels Download and watch or share offline. But Facebook does not provide a direct download. So, how do you Facebook Reels Download? Let us know!

Why Facebook Reels Download
Facebook Reels Download is useful to:
Offline Viewing: Watch your favorite Reels without the internet.
Content Generation: Leverage videos as a content bank and resource for future content.
Sharing: Share Reels effortlessly between apps.
Educational Uses: Bookmark useful tutorial videos for later use.
10 Ways to Facebook Reels Download
1. Facebook Reels Download online
There are certain third-party websites where you download Facebook Reels by simply copying the video's URL.
Steps:
Open Facebook and find the Reel you wish to download.
Press the three-dot menu (⋮) and press Copy Link.
Go to a web downloader like SaveFrom.net, SnapSave, or FBdown.net.
Paste the link you copied into the provided field.
Click on Download and choose the video quality.
This content is saved locally on your own device.
2. Using Screen Recording
Or if you prefer not to employ third-party programs, screen recording is an easy method to capture Reels.
Steps:
On Android:
Swipe down and select Screen Recorder from Quick Settings.
Play the Reel and capture.
Save the recorded video.
On iPhone:
Swipe down and select Screen Recording.
Open Facebook and view the Reel.
Complete the recording upon completion.

3. Via Browser Extensions
There are also Chrome and Firefox browser extensions through which you can download Facebook Reels.
Steps:
Download a Facebook video downloader addon (e.g., Video Downloader Plus).
Open Facebook and view the Reel.
The plugin will recognize the video and provide a download.
Click Download and download the video.
4. Downloading from Telegram Bots
There are some Telegram bots that offer Facebook Reels for download straight away.
Steps:
Get a Facebook video download bot on Telegram.
Paste the Reel link into the bot chat.
The bot will execute and give a download link.
Click here to download the video.
5. Use Facebook Reel-Specific Apps
It can also be downloaded with apps like FastSave, Facebook Video Downloader, or Snaptube.
Steps:
Install a popular app from the Play Store/App Store.
Copy and paste the Reel link into the app.
Click on Download to download the video.

6. Using the Facebook Lite App
A few users have also stated that Facebook Lite also temporarily caches video and it can be recovered.
Steps:
Open Facebook Lite and watch the Reel.
Clear your phone's temporary files folder.
Locate the cached video and save it to another folder.
7. Using Shortcuts on iPhone
iOS. Facebook Reels Download can be automated using the Shortcuts app.
Steps:
Download a Facebook Reel downloader shortcut.
Open the Reel and click on Share > Shortcuts.
Click on the shortcut to download and save the video.
8. File Manager Application Availability
Certain Android file managers are able to record cached video once played.
Steps:
Play the Reel while keeping the File Manager open.
Continue with cached videos.
Copy the file to a directory for ease.
9. Asking the Creator for the Reel
If you need the Reel for personal use, it would be best to contact the creator.
Steps:
Contact the Reel creator via DM or comments.
Request permission to download or acquire a copy.
If granted, download the file sent by the creator.
10. Desktop Video Download Software
Programs like 4K Video Downloader or JDownloader have sophisticated video download programs.
Steps:
Install a desktop video downloader.
Copy the Reel link and paste it into the software.
Select the resolution you want and save the file.
Is Facebook Reels Legal to Download?
It is okay to Facebook Reels Download for personal use but never for sharing or business purposes. Always get the consent of the creator before using their content.

Conclusion
With these 10 ways to Facebook Reels Download by Triveni World, you will never be late in downloading your favorite videos. Whether you are using online tools, apps, screen recording, or Telegram bots, choose the one most suitable to you. Want more tech tips? Stay tuned for more Triveni World tutorials!???? Need a tutorial on editing downloaded Reels????? Let me know!
0 notes
Text
FUBO.TV/Associate

Fubo television is a famous US real time feature that gives a broad choice of content which incorporates Programs, sports and motion pictures. Notwithstanding, it's simply accessible to clients in three nations: the US, Canada, and Spain. This is because of the way that fubo.tv/interface forces area limitations on its customizing to guarantee consistence the permitting understanding.
The positive aspect is that Fubo TV's geo-blocks can be circumvented easily to stream it from anywhere in the world. You should simply associate with a compelling VPN with a large number of servers situated in the US and you'll be capable appreciate Fubo.tv/connect. Not just that nonetheless, a dependable VPN can permit real time on any help. Encryption of your information further safeguards your online identity.
HOW Would YOU Initiate FUBO ON television?
The means underneath will empower Roku for your TV
Send off Fubo Application on Your television.
You will be approached to include the code that will interface your record.
Begin any Web program on your PC
To join your code, visit fubo.tv/associate
Input the Code that is displayed on your television Screen.
Hit, Registers Gadget, and Submit.
The registration of your device is probably successful.
Observe live gushing on Fubo through your TV
How would I make a record for FuboTV?
To enable Fubo TV on your smart TV and to activate it, visit the webpage for your Fubo account. Follow the means underneath to enroll a record on fubo.tv/associate:
On your device, open a web browser and enter fubo.tv in the URL bar.
Go to the sign-in page, and snap to the "make a record" button.
Fill out the field with your zip code and account information.
Then, at that point, pick the enrollment plan you need to join and afterward click on the following button.
Then, at that point, you can continue with the charging system to lay out a record.
How can I make changes to my account?
Through My Account, you can make any changes to your subscription, regardless of whether you need more space for your DVR or access to more channels.
What might you could you want to see change?
Modify your Basic Plan • From the "My Account" screen, select "Subscriptions and Billing."
Click on "Oversee Plan".
After that, click the + next to the plan you want to change. The + will turn into an X. • Check your changes to see if you need to pay an immediate fee to change the subscription. To save your changes, navigate to "Update Your Subscription."
Click "YES UPDATE Membership" to affirm the adjustment of your membership.
Add/Eliminate Extra Things
Pick "Deal with Extra Addons" on the "My Record" screen.
To remove an Add-On, click the checkmark next to the Add-On you want to remove. • Select the plus next to the Add-On.
Check your changes to see if you need to pay a fee right away to change the subscription. To save your changes, go to "Update Subscriber Subscription."
To confirm the modification to your subscription, click "YES UPDATE YOUR Subscription."
What is the system for the preliminary? function?
Just for new clients:
As a new customer, fubo.tv/roku-connect will give you a chance to test the service for free.
For a preliminary to be proposed to attempt it, join utilizing a credit or check card.
The principal installment is expected at the finish of the time for testing for nothing.
The exact renewal fee will be charged when you renew. Assuming that you join on January 1 at 9:00 am and you get seven days of preliminary for nothing the charge will be charged on January 8 at 9:00 am.
You can cancel your subscription at any time within seven days to avoid paying the monthly fee.
Customers who are no longer customers can sign up for the free trial. • New customers cannot take advantage of the free trial offer.
When a customer reboots, they will be charged for the attempt to reactivate their account.
Bit by bit guidelines to sign-in to your Fubo account
Begin the Fubo television application on your gadget and snap on the sign-in symbol.
A code for enactment will be shown in your presentation.
To access the fubo.tv/firetv sign-in page, you must open your computer's web browser.
Next, enter the code into the box and click the "Submit" button.
Enter the actuation number inside the time furthest reaches of 5 mins as the code is substantial for 5 minutes.
If the code runs out, you'll have to check your television again to see when it runs out.
0 notes
Text
Pvr itpv simple client settings u.s.

#Pvr itpv simple client settings u.s. install
“IPTV Simple” –> “Configure IPTV Simple automatically…”.
If your channels still do not appear in the “TV” section of Kodi you can perform the following steps in the IPTV Manager settings: This is done in the “TV Integration” section by choosing “Select channels to enable”.ĭon’t forget to save your settings by clicking the “OK” buttons. Once IPTV Manager is installed, go back to the Catch-up TV & More settings to select the channels you want to appear in the Kodi TV section. To do this, go to the Catch-up TV & More settings in the “TV Integration” section and choose “Install IPTV Manager add-on”.
#Pvr itpv simple client settings u.s. install
It is first necessary to install IPTV Manager. The first thing to do is to create the accounts necessaries directly on the websites of concerned channels.įinally, it is required to fill your credentials in the parameters of the addon.Īccess the settings of the add-on by pressing the left arrow on your keyboard or remote control.įinally, go to the “Accounts” tab and fill in your username and password for the desired channels.ĭo not forget to confirm with the “OK” button to save your settings. Some channels require to have a user account to access their service. Just follow this tutorial before continuing here. If you have not already done so, it is necessary to proceed with the installation of Catch-up TV & More in order to take advantage of this feature. One place to group the channels of other PVR and video addons (TNT, Satellite, …)Ī preview of the final result once you have followed this tutorial:.Organize different channels into groups.Take full advantage of the TV guide managed by Kodi.This feature has several advantages (non-exhaustive list): This feature uses the IPTV Manager addon as well as the PVR IPTV Simple. Since version 0.2.30 of the addon it is possible to access the different live TV streams offered in Catch-up TV & More directly from the Kodi “Live TV” feature. ⚠️ This feature is only available on Kodi Leia (18) version and above.
4 notes
·
View notes
Text
How to Mine Ergo Coins On PC (Step-by-Step Guide) 2021
I wrote this article on July 17th, 2017, at the time; one Ergo coin was worth $14.88. (10-09-21). The equivalent of $100 in Ergo coins will be worth $1287.14 in 2026. That is really significant! You're completely broke. While you learn about Ergo coin mining using your PC in this article, you can also be certain that it will provide answers to your mining questions and how this can help you get some money in your pockets.
My ERG is .832, and I'm well aware that it's quite low. So earning potential depends on the CPU and GPU within your desktop or laptop.
If you are looking to generate a lot of money, consider making your mining rig larger. I'm hoping that I've been clear about it. So, before we talk about mining Ergo coins, we need to learn how to do it easily.
How to Mine Ergo Coins on PC in 2021
To get started, you'll need to set up a wallet for sending and receiving cryptocurrency. A mining pool is the second stage of the process, which involves connecting your PC.
And that's all there is to it! For the safety of your computer, the third step is to monitor the GPU temperature.
How to mine Ergo on a PC:
Create a wallet
Get involved in a mining pool.
Begin generating ERGs and keeping an eye on the GPU temperature.
It's time to start with the first step, so let's begin.
1. Make a Yoroi Wallet.
Just like a conventional wallet, a crypto wallet stores your money. Digital wallets allow you to use digital money, like bitcoin, to transfer and receive funds. Moreover, they aid you in checking your balance, finding and sharing your wallet address for your transaction.
One should look for a crypto wallet that is lightweight and safe. Yoroi Wallet offers both of these qualities, and it is a relief. I choose it because of that. I'm going to provide you some information about it and explain why you should utilize it.
Why Use Yoroi Wallet?
The Yoroi Cardano wallet is both a browser extension and a mobile app. The Yoroi Wallet is unlike other wallets in that it does not sync or download the blockchain. Furthermore, you may see and pay bills when you access your wallet.
Additionally, Yoroi is a lightweight (HD) wallet for Ada (cryptocurrency) that runs as a Chrome addon.
You may use Yoroi on any device supporting Chrome and Google Chrome extensions. In addition, Yoroi is compatible with many operating systems, including Linux, Mac OS, and Windows. It is also possible to share your wallet's contents with someone else.
The installation process for Yoroi is concise and thus requires just a tiny amount of bandwidth. In addition, Yoroi is an extremely lightweight wallet that doesn't need you to download the entire blockchain, which saves you on bandwidth.
If you're thinking of mining with Ergo or another cryptocurrency, you'll want to get a Yoroi. We need to get started with installation right now.
How to Make Yoroi Wallet?
1. Visit yoroi-wallet.com and click ‘Download' from the options on the page.
2. You may choose from the list below. Chrome, Edge, Firefox, Android, and iOS are all available. And everyone is well taken care of because of it.
3. If you're using Google Chrome like me, I recommend adding it to your Chrome browser. It'll be an add-on to your browser. Make sure you're ready before proceeding with the ‘Add extension' option.
4. Navigate to the Yoroi logo on the Google Chrome extension's toolbar. You will be able to continue after you choose your language and agree to the terms and conditions. Now choose the ‘Simple' wallet.
5. You may skip the next option, or you can enable the option to enable Cardano payment URLs. After this, you will be able to set up your hardware wallet, restore an existing one, and create a new one.
6. If you wish to mine Ergo coins, choose ‘Ergo.' Then, click on ‘Create Wallet'.
7. Enter your wallet details here. Once you've established your own recovery phrase, do so. However, remember to use it afterward for any secure transactions you make.
Hooray! You have created Yoroi's brand-new wallet. Now is the moment to plug your computer into a mining pool. It's best if we do it immediately.
2. Set Up Nanopool for Mining
For every coin, you have two choices for mining:
Mining rig or Miner
Mining pool
Mining rigs and miners cost a fortune. I've written this article to use a PC to mine Ergo Coins. In this case, I will choose the second choice. So what exactly is a mining pool?
What are mining pools?
Many obstacles complicate the challenge of solo mining. As a result, miners have developed a strategy to improve the odds of discovering fresh deposits by pooling the hash power of individual miners.
Suppose you can, a picture of a handful of small-scale miners combining their computer power to pool it. Then, honestly, they could make the same production levels as big farms do or perhaps beat them.
When these miners participate in pools, they each receive less since the pool members split the benefits. However, even if the return is modest and constant, we should still appreciate it, given that alone miner has a hard time mining even a single block.
Mining pools that ensure payments are prompt and on time are more attractive and profitable. Nanonpool has an important role to play.
Why use NanoPool?
The specialty of Nanopool is cryptocurrencies, which are exclusive of use to video graphic cards. However, you may use it for mining at present:
Ethereum (ETH)
Ethereum Classic (ETC)
ZCash (ZEC)
Monero (XMR)
Raven (RVN)
Conflux (CFX)
Ergo (ERGO)
You may concurrently mine two different currencies using the pool. Nanopool uses powerful video cards and GPUs to mine digital currencies with huge farms.
Mining Ergo Coins on Nanopool
1. Visit nanopool.org and choose a cryptocurrency of your liking.
2. To start mining, click on the Quick Start button.
3. Get the miner as a zip file.
4. Extract the archive into any location on your PC. And then set up the minor.
5. Open the file and enter your wallet address in the place of the existing wallet address. Save the data in this format.
6. Save the ‘configure ergo' file after entering the mining rig information.
7. Go ahead and run the ‘nanominer' program now and wait a moment.
Here is how you mine Ergo coins on PC without the need for full-fledged mining equipment.
3. Use MSI Afterburner to monitor the temperature.
You must monitor temperatures in hardware. You risk ruining your computer if you don't take the appropriate steps. For that, the MSI Afterburner utility is a fantastic help.
What is MSI Afterburner, and why is it the best choice?
Afterburner is a free, third-party utility that MSI has created. Those that have GPUs utilize it to manage them. In addition, you may alter your GPU, VRAM, voltage, and other aspects of your graphics card via overclocking.
MSI Afterburner is a popular tool for enthusiasts since it serves a wide range of functions. For example, it's possible to monitor GPUs, VRAM, and temperatures using it.
But are you able to check the CPU temperature using MSI Afterburner? I'm happy to say yes. MSI Afterburner has no ties to the central processing unit. It may also be used to track the temperature of the CPU and GPU settings.
Monitoring GPU Temps with MSI Afterburner
You may get the MSI Afterburner file from MSI's website. First, unzip the download, double-click the executable file, and follow the on-screen instructions to complete the installation.
After the installation, run MSI Afterburner. To check GPU temperature and performance, go to the ‘General' page. The ideal GPU mining temperature is 70 degrees Celsius. However, I still think you should maintain it at the lowest level feasible.
Final Thoughts on How to Mine Ergo Coins on a PC
Now more than ever, mining cryptocurrency is simple. The mining pool Nanopool allows you to mine the Ergo currencies that have a crypto-like quality. The procedure includes three fundamental actions:
Create a wallet for yourself (using yoroi-wallet.com)
Mining pools provide entrance to cryptocurrency (on Nanopool)
Stay on top of the temperature (using MSI Afterburner)
That's the crux of the matter! After 48 hours, I've earned around .832 Ergo coins. It's true that it's tiny if you think so.
It's better to create something than to produce nothing, isn't it? Your total Ergo Coin amount may be increased if you have a higher powerful PC than I have.
#ergo coins#cryptocurrency#cryptomining#ergomining#howtominecrypto#minecryptofromhome#how to mine ergo coins#mine ergo coins from home
1 note
·
View note
Text
neo’s quick guide to browser privacy
so i keep seeing a post circulating with info on how to keep browsing provacy and avoid targetted ads and comapnies saving your data, but unfortunately the commenters a known freaks el em ayo. they also just dont explain the addons very well, or how to set them up properly. so, as an official paranoid(tm), here’s my info on how to keep yourself safer while browsing, and to avoid companies tracking your internet habits.
first of all, use firefox.
i’m not kidding. drop chrome. chrome is terrible. many of these addons work for chrome, but really what are you doing using google chrome if you want privacy? that shit is sent right to google. firefox is also very heavily privacy and safety focused, and has many tools to help you manage your browser time. also, all of the addons i will mention here work on the mobile version of firefox! and, yes, you should be setting them up on your phone too.
make sure to remove any other ad blockers you might have on firefox before installing any of the following addons, as they might conflict with these.
trackmenot
(installation link here)
trackmenot is a very helpful addon that will generate randomised searches through various search engines. this means that your actual searches will be lost in the fog of so much other search data, making it extremely difficult and even outright impossible to track your search trends, thereby avoiding many targeted ads.
it takes a little to get it optimally set up, but i am here to help!
first step after installing it, go to your addons page in firefox. if you dont know what that is, here’s a pic to show you where it is:
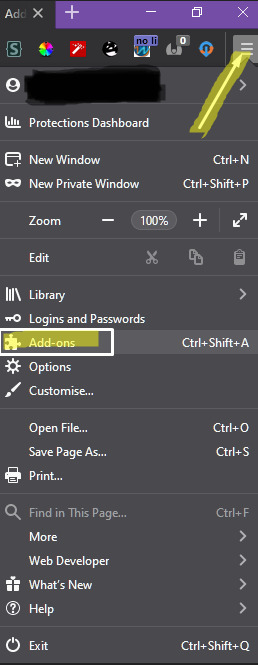
click the three horizontal lines in the top right of the browser, and then click add-ons in the drop down menu.
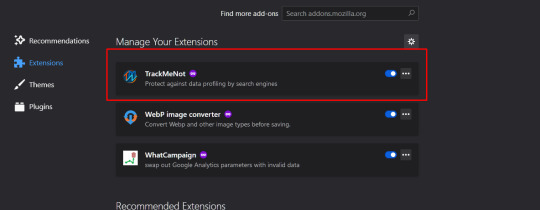
on your addons page, find trackmenot, and click it.
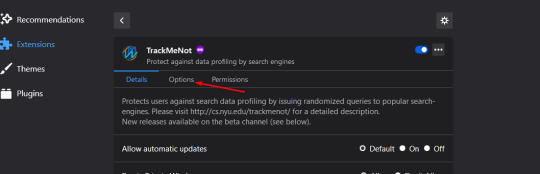
then click ‘options’....
on the next page, make sure your boxes look like mine do:
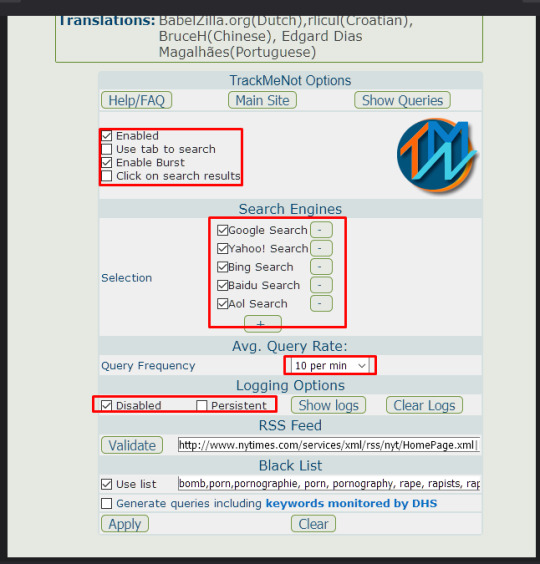
now you want to add an rss feed for the addon to use. you can add whatever you like, but i reccomend the following just to get you started:
http://www.nytimes.com/services/xml/rss/nyt/HomePage.xml|http://rss.cnn.com/rss/cnn_topstories.rss|http://rss.msnbc.msn.com/id/3032091/device/rss/rss.xml|http://www.theregister.co.uk/headlines.rss
you want to put a | between each rss url. once youre done, click ‘validate’.
you will also want to use a blacklist so that it doesn’t accidentally search anything fucked up or that might get you flagged by the fbi or sth. here is the blacklist that i use:
rape,rapists,ddlg,cgl,mdlb,raping,raped,lolicon,loli,cp,child porn,pthc,jbhc,shota,shotacon,gore,bestiality,beastiality,zoophilia,pedophilia,
make sure to seperate any words with a comma, and that the ‘use list’ box is checked. then click ‘apply’ and youre done! phew! thankfully the others dont take as much setting up.
-
whatcampaign
(installation link here)
what this does is find any links that contain google analytics parameters in them- which is what google uses to track link clicks and internet movement- and changes them to ones that do not have the analytics in them. now you can click links without fear of Big G knowing what you’re doing.
-
privacypossum
(installation link here)
this addon blocks cookies, headers and other code in pages that track your activity, and falsifies information to browser fingerprinters to prevent trackers from knowing the specifcs of you and your browser. many websites use headers with embedded code and other fingerprinting methods to load the rest of the code on the page, and many other addons (such as privacybadger) simply block these outright, making the webpage not work properly unless disabled. privacypossum avoids this issue bu simply falsifying your data, meaning you can load websites without having to worry that they know who you are.
-
adnauseum
(installation link here)
unlike other adblockers, adnauseum will, in fact, click ads. but before you scroll by, let me explain. many websites need ads to be able to continue being up, they rely on ad revenue and clicks. but nobody wants to click ads, nobody wants to see ads. so what do we do? adnauseum addresses both sides of this, blocking any and all ads that you may see, and in the process, registers clicks on them. all of them. similarly to trackmenot, by blindly clicking every single ad, the amount of data generated creates too much noise to be useful to ad companies.
an alternative to this if you have issues with adnauseum is ublock origin.
-
anonymox + vpns
this is an extension that acts as a vpn for your browser (and browser ONLY), allowing you to hide your ip address. you can turn it on and off as you like, and swap to various different locations. bear in mind that this will make pages load a lot slower, so i only use it on sites that i do not trust, or when i need to access something that is blocked in my region.
this will not protect you when downloading or torrenting, for that you need an actual vpn.
a paid vpn that i personally use is surfshark. a free one that i have used in the past is tunnelbear.
-
advanced tip: DOH (dns over https)
so what the heck does THAT mean?
this page has a much more in depth, with pictures explanation of what this means, and how firefox deals with it.
firefox has its own in built DOH protocol, however, it relies on cloudflare. if you do not trust cloudflare, i reccomend the DOH protocol by projektoni, the guys behind whatcampaign. follow the instructions on this page to get it set up.
15 notes
·
View notes
Text
Clip Converter And Megadede
Overview: Clip Converter
Clip Converter is a free application that helps you to convert online video, convert and even download any audio and even helps you to record. It comes many downloadable formats likewise AVI,MP4,3GP,MPEG, WMV, MKV, WMA, MP3,FLV,AAC, AC3 etc., and it includes services from YouTube, Vimeo and many more. This amazing free and fast application lets you to binge your favorite YouTube videos via offline through your PC, TV or any other gadgets. It even gives you the option where you can drag your file into its conversion page directly. Clip Converter supports Browser AddOnfor Chrome, Firefox and even Safari. The addon option adds a button on YouTube pages, so you can easily convert and download the files directly. This makes the Clip Converter app more efficient.
How to Use Clip Converter?
1. First Copy the YouTube URL from YouTube and then paste that URL under the option ‘Video URL' and then click Continue.
2. Now, select the desired format in which you want to convert the file.
3. Press ‘Start' to start the Clip Converter.
It can take a few minutes but after the conversion is finished you can easily download the converted file.
• Features:
1. Clip Converter costs nothing.
2. The app is compatible across all the Operating Software and Web browsers.
3. Very much User-Friendly.
4. It saves Ttime
5. It does not require a Registration.
6. You do not need to install any extra software on your computer.
Overview: Megadede
Megadede lets you to watch several series and movies directly on your Android device. You can download any movie and series through this application very easily and conveniently. Binge and download any latest movies and series for free through this application. Megadede lets you to access huge directory of multimedia content just for free. The entire catalog of the Megadede is entirely free. All the contents are well defined and ordered including all the latest movies and series in proper HD. You can just search online and you will easily access to one of its link through which you can watch the content very easily. Use the search engine box or follow one of any genre link to access any content. You can even use the ‘category’ option to select directly any movies or series. In order to access all your favorite movies and series you just need to register for free in megadede and click on the play button. The application is available for Android, iOS, Windows and Mac.
• Some Amazing Features
Exclusive content – You can access amazing exclusive content that you will not find anywhere else. Megadede offers mostly all the latest movies and series.
Personalized List – Add your favorite movies and series through this application of your favorite channels, TV shows, and movies.
Watch Offline – This application lets you to watch anything offline and you can access anything offline after downloading it.
Megadede is an amazing user-friendly app which lets you do amazing things.
1 note
·
View note
Text
World conqueror 3 mod apk unlimited all

World conqueror 3 mod apk unlimited all how to#
World conqueror 3 mod apk unlimited all mod apk#
World conqueror 3 mod apk unlimited all apk#
The final step will be to open your World Conqueror 4 Mod, and then select it. When you have completed this step, the app will be displayed in a window on your screen. When you are done, click on it and then press the “Open” button. From there, you should click on the option which states “World Conqueror Mod Maker”. You should then select the “Mods” icon which will appear at the top of your game’s menu and then choose it. After you have installed the mod, you should then be able to go into the game’s main menu and click on the “Play Now” button.
World conqueror 3 mod apk unlimited all how to#
They will provide you with detailed instructions on how to install and run the World Conqueror 4 Mod. If you would like additional information, you can check out the links provided. This is done by downloading and installing various addons and also making sure that you do not uninstall any of the other addons which you may have installed. When you have installed the app and run it, the first thing that will occur is that the game will update, allowing you to experience all the new features that were introduced in the game. Just follow the steps listed above and you can enjoy playing the game as if nothing had happened. When you download the World Conqueror 4 Mod, you will find a link which allows you to install the mod and run it from your PC. and you will not have to worry about having to constantly worry about any issues. This will make your World of Warcraft experience even more enjoyable. The tool will then begin to update your game and then you will be able to enjoy playing the game without any problems. Once you have installed the app, you should then be able to access the tool from your desktop and select “World Conqueror”.
World conqueror 3 mod apk unlimited all apk#
After the installation is complete, the tool will then allow you to run the Apk file from your desktop. Once you have saved the file onto your PC, the tool will begin to download and install the Apk tool and all the addons that are required to install it. After that, the tool will automatically begin working to download and install the World Conqueror 4 Mod. You should then save the Apk file onto your desktop. Once you have downloaded the Apk maker, it is time to install the tool. However, to get the application and get the mod-extractor, you need to download one called the World Conqueror Mod Maker. You should not use the mod-extractor on an infected computer as it will infect the system. To install Apk, you need to download a mod-extractor which is an application designed to download and install mod-extensions onto your PC. However, before you can play you will have to install the World Conqueror 4 Mod onto your computer. Once you have created your character, the next step will be to click the “Play Now” button, allowing you to start playing the game. This will allow you to create a new character and use their default race and class. If you decide that you want to go into your own faction, you will then need to use the “Create New Faction” feature on the main menu of the game. If you do not want to play that particular faction you can switch to another one and you will be able to continue playing as if nothing had happened. By creating your faction you can play as any character of that faction.
World conqueror 3 mod apk unlimited all mod apk#
The World Conqueror 4 Mod Apk is a mod for the popular game World of Warcraft, allowing you to create your own faction and begin playing in the game.
0 notes
Text
Minecraft xbox 360 modding tool download

Minecraft xbox 360 modding tool download how to#
Minecraft xbox 360 modding tool download zip file#
Minecraft xbox 360 modding tool download update#
Minecraft xbox 360 modding tool download mods#
Minecraft xbox 360 modding tool download zip#
It also provides more advanced tools such as Avatar Award Unlocker, Game Adder, and Achievement Unlocker. Horizon contains numerous handy tools, currently featuring 23 different game save editors ranging from Super Meat Boy to Halo: Reach. Increase your gamerscore, unlock all your avatar awards, unlock in game items, get on top of leaderboards, get infinite health, change an avatar's colors, the possibilities are endless! It enables you to do things that would either take a long time or do things that aren't even available normally. Horizon is a tool that modifies files saved to the Xbox 360's memory. The program is updated frequently with the latest and greatest tools, making the possibilities endless, and modding for you, a cinch. With a few clicks you can unlock those achievements and avatar awards for games you just can't beat while using Horizons incredible user interface, built with the casual gamer in mind. In seconds you can achieve 100% completion along with unlimited health, endless ammunition, bank loads of cash, and so much more for your favorite games. It will take a while.Horizon is the most up-to-date and innovative Xbox 360 modding tool on the market.
Minecraft xbox 360 modding tool download zip#
Head inside the zip file, and select everything, and copy. Press the Start button, and wait for it to download.Īfter it downloads, open the Local Storage folder. Make sure that it starts with Local Storage! For example, Local Storage/mod.zip. Paste the direct download link, and name the file in the bottom input bar. Head to Download From Link, and go to Xbox One Smartglass on the computer. In this section you will find game save editors for the xbox 360. Horizon easily lets you extract and inject content in to your Xbox 360 hard drives.
Minecraft xbox 360 modding tool download how to#
In this video i show you how to use the newest mod tool for minecraft xbox 360 edition using a usb. Download: Download Horizon Ver.2.7.6.7 Below is a screenshot of the Horizon interface, you can easily browse the content on your Xbox 360s internal hard drive, or external USB hard drives which have been formatted for use with the Xbox 360. With it you are able to easily unlock game achievements, give yourself max gold, infinite ammo and stuff like that. Horizon is a tool that will certainly come in handy for Xbox 360 users who want to mod their profile as well as a very large number of games. zip and go to the next step.Īfter you have a zip file, host he file on a file hoster (eg. Minecraft Xbox 360 Modding Tool / Over 130+ tools for modding games like call of duty, fifa, and forza motorsport. Review by Alexandru Chirila on June 14, 2017. If both are labeled, great! If they aren't labeled, label them. If the contents are two folders, check if they are labeled as behavior and resource. Remember to label the folders as resource or behavior. mcpacks, unzip the file, and follow the instructions for. zip section.Ĭhange the file extension from. If the contents of the zip is a single folder, continue to the next step.Ĭhange the file extension from. Xbox is Microsofts game console, and besides a large catalog of games, it offers some interesting. If you want to softmod Xbox games, download Horizon for free, an easy and affordable modding tool. With Horizon you can create modifications for Xbox games. This is an incredible mod that will allow you to edit mob health This can be used on maps or to just fool around with on your friends Register or Signin to view external links. 8/10 (392 votes) - Download Horizon Free.
Minecraft xbox 360 modding tool download mods#
Zip the file again, and make sure that there is a single folder inside the zip, and the addon is inside the folder. Minecraft Xbox 360 Mega-Thread All mods w/ downloads TU11+ Posted: Sat 10:08 pm.
Minecraft xbox 360 modding tool download zip file#
If the contents have a manifest.json, unzip the zip file into a folder. There are multiple file extensions of the mods. Some examples are 7z and WinRAR.įirst, download the addon on a computer. Any program that can ZIP and UnZIP files Īny archiver will do. Downloading mods manually can be risky and is very time-consuming. Instantly get more hours of additional playtime from your gameseven ones you thought you were done with. Download now to maximize your gaming experience. Xbox app is needed to paste the download link. Horizon is the 1 all-in-one modding tool in the world. My Files Explorer will open the Packages folder. MC Addons Manager makes the management of your Minecraft Bedrock Edition addons easier.įile Downloader will download the addons. You will need the following programs to follow along with this tutorial: This tutorial will cover installing addons on the Xbox One. This tutorial is meant for people who have Bedrock Edition on their Xbox One.
Minecraft xbox 360 modding tool download update#
Please update this page to reflect recent updates or newly available information.
0 notes
Text
Menumeters yosemite

#Menumeters yosemite how to#
#Menumeters yosemite password#
#Menumeters yosemite windows 7#
#Menumeters yosemite windows#
I was hoping I could customize my favorites by creating my own icons files I have in Internet Explorer. So far, I really like the overall look of the interface, and I like the ability to create to look and work the way I want it. How to change icons in my favorites toolbar? Enter the desired name, and select update. The network name can be changed in the field "name of the wireless network.Select the AirPort base station and then, select change.You can change the name of the network using AirPort Utility as follows: I would change the name of my network and I don't know how or where to do this. I use OS X 10.11.4 and utility Airport 6.3.6. And once this is done, have what I would do with my extreme and Express to continue them to work? Any help would be appreciated. How can I change the name of my wireless network? If you do not already have an icon to use, save it to your computer If this does not work, or otherwise, is not available in your version installed, you may need to nuke the user settings directory.īasically, what I tried to do is change the icon for bookmarked on my desktop for a web-link the link is for the Droid Air (I also have the addon of Firefox on my phone) to transfer files but the icon is quite bad and easy to miss a white icon with a green paper airplane I tried for several hours if you have knowledge on the subject, you can tell me please share
#Menumeters yosemite windows#
If you use a major version 4.0.x of SQL Developer, the menu bar to try window > Windows reset to factory settings. If this isn't the right forum, please direct me to the right. That's what I used to redirect the spool. Which would affect DBMS output Sql developer? trying to write off all the possibilities I changed the coil to redirect to my local folder in sqlplus a few days back. Y at - it a setting I could have turned off without knowing?
#Menumeters yosemite how to#
But is no longer.Īnyone can shed light on how to bring this window? I go to the view menu and selecting the menu option out Dbms. I used the window out of DBMS until a few days back and it stops suddenly appear. I'm not able to get the DBMS output window appears.
#Menumeters yosemite password#
Go to view available wireless networks, find yours, click connection and enter the new password when you are prompted.Īlternatively, instead of removing your network in the list of preferred networks, you can click 'Properties' and then change the key in the tab "Association." I suggest that you remove the network and let Windows find just in case something other that the key has been changed (for example, the type of encryption or algorithm).ĭBMS output window popping up in sql developer.
Assuming you use Windows to configure your wireless network card, find the SSID of your router (network name) in the list of preferred networks and 'delete '.
If you are not looking to the display shown in the screenshot or the box at the top to "Use Windows to configure my wireless network" is unchecked, STOP: you use a 3 rd-party utility to configure your wireless adapter and you need to figure out how to use that yourself or at least identification.
Right-click on the icon for your wireless adapter and select Properties.
Open network connections (start > run > ncpa.cpl > OK).
What version of XP, including service pack (if of course, start > run > winver > OK)? I can not find the screen on my XP machine, which allows me to change the key.
#Menumeters yosemite windows 7#
He's changed on my router and my iPad & Windows 7 laptop computer can connect to it. I needed to change the key for my wireless network. Key change for an existing XP wireless network
0 notes
Text
Extension - Markdown Editor Online
Markdown Editor Online is a free, lightweight and adaptable app for your browser.
The Markdown Editor Online is an online editor for markdown that used to be known as "Markdown Editor Online" (a lite markup language with plain text formatting syntax).
With this program, you may alter any "MD" file's code right within the built-in markdown editor. You can also compile the code and view the completed document in the app (side or bottom sections depending on window size). After you've compiled a markdown program, click Print to print it as a PDF (via print UI). Please note that this software is based on CodeMirror (codemirror.net) and markdown-it (github.com/markdown-it/markdown-it) open source JavaScript libraries.
To change the settings for this program, open a markdown document and modify the code in the left editor. Then, update the top toolbar settings and compile. As you type in the editor, keep in mind that the add-on continuously compiles your work. Lastly, you can choose to save your final markdown code or generate a PDF of your completed project.
Visit the website at: https://worldaddons.com/
More contact:
Email: [email protected]
Quora: https://www.quora.com/profile/World-Addons/
Reddit: https://www.reddit.com/user/worldaddons
Tumblr: https://www.tumblr.com/blog/worldaddons
Scoop.it: https://www.scoop.it/u/world-addons
Soundcloud: https://soundcloud.com/world-addons
Instagram: https://www.instagram.com/world_addons/
Twitter: https://twitter.com/AddonsWorld
Pinterest: https://www.pinterest.com/worldaddons
0 notes
Text
The Raincity Weightlifting Classic 2021

Full details coming soon - but save the date & start prepping!
This is an event that we prepared pre-covid but then obviously didn’t happen...
During the summer we run the Raincity Classic - a partner in house competition. During the winter we’ll run the Raincity Weightlifting Classic - an in house weightlifting competition!
This event is open to any and all Raincity athletes who want to test their max lifts under a little more pressure than usual!
Details will be on the event page: www.rncty.ca/events
Want to prepare? Join the [OLY] Barbell Club Program while it’s free!
The [OLY] Raincity Barbell Club program & classes are currently free & included with all [FF] memberships & we just started a new Olympic Lifting block - so now’s a great time to hop in and try it out!
You can either reserve [FF] Access and come complete it on your own, or come join coach James for his Sunday AM [OLY] Barbell Club class!
www.rncty.ca/barbell
Not sure if you’re ready for the barbell club program? Contact [email protected] or ask your questions in the #athletes-barbell group in slack (click here to join).
It Won’t be Free Forever... With the time and effort it takes to develop these additional programs we will soon bring in the program addon options: a nominal fee (~$25 / month) that include access to specialty programs their classes.
100% of the additional fees for addon programs will go to the coach writing / running them. Other than this program we will never take anything away from your current FF membership - the new addon program allows us to add more variety of group program options from our coaches - and we’ve got some cool ones in the works!
Note: Athletes who actively follow the program prior to it going private will get access to discounted options to continue with it - so start now :)
0 notes
Text
Pathfinder: The Six-Legend Soul Available Now! Complete the “War for the Crown” Adventure Path

The long and difficult battle to decide the fate of Taldor comes to an end today with the release of The Six-Legend Soul on Roll20! This is the final chapter of Paizo’s War for the Crown Adventure Path, as events from the past now appear to threaten the future. Whether the nation can escape the grip of its own history will be up to the heroes of this story as they fight for the fate of the crown!
GODS SAVE THE QUEEN
As the heroes return to Taldor, they discover that strange seeds have finally borne fruit - conspiracy has laid their patron low. They must now face the cunning secret society, the Immaculate Circle, and put an end to its immortal machinations, finding new enemies along their path. To finally set the world right and end the War for the Crown, the heroes must confront not one but six of Taldor’s greatest emperors, resurrected from the past! Can the heroes survive, or will Taldor’s past sins forever define its future?
This volume of Pathfinder Adventure Path concludes the War for the Crown Adventure Path and includes:
“The Six-Legend Soul,” a mind-bending Pathfinder RPG adventure for 16th-level characters, by Amber E. Scott, converted in its entirety for Roll20.
Over 70 monsters with complete character sheets, one-click actions, and associated token art.
5 beautiful maps laid out with information, creatures, and support for Dynamic Lighting and Advanced Fog of War.
Ways to continue your campaign, including a system to determine Eutropia’s legacy based on decisions made by your heroes, by Crystal Frasier.
A look at six of Taldor’s most famous emperors, including the legendary spirits they provide to mediums and feats useful for any hero, by Lyz Liddell.
An overview of the resolute Ulfen Guard, by Ron Lundeen.
A bestiary of powerful and dangerous creatures, including the terrifying phylacator kyton and the hubris-grown bramble throne, by Kate Baker, Jay Erickson, Tom Hansen, Aerick Lim, and Nathan Reinecke.
This product functions as an addon. It is intended to be added to your Crownfall (War for the Crown 1 of 6) adventure module.
--
Products in this series:
Crownfall (War for the Crown 1 of 6)
Songbird, Scion, Saboteur (War for the Crown 2 of 6)
The Twilight Child (War for the Crown 3 of 6)
City in the Lion's Eye (War for the Crown 4 of 6)
The Reaper's Right Hand (War for the Crown 5 of 6)
The Six-Legend Soul (War for the Crown 6 of 6)
© 2018. Pathfinder, their respective logos, the Paizo golem, all Paizo titles, the Pathfinder Roleplaying Game rules, and Paizo’s character names and distinctive likenesses are property and copyright of Paizo, Inc. in the United States and other countries.
#roll20#roll20 marketplace#paizo#pathfinder#war for the crown#wftc#wftc6#adventure path#the six-legend soul#six legend soul
1 note
·
View note
Text
Intel Graphics Driver Update 530

AuthorMessageMichael E. Volunteer tester Send message Joined: 25 Jun 16 Posts: 8 Credit: 4,831,884 RAC: 30
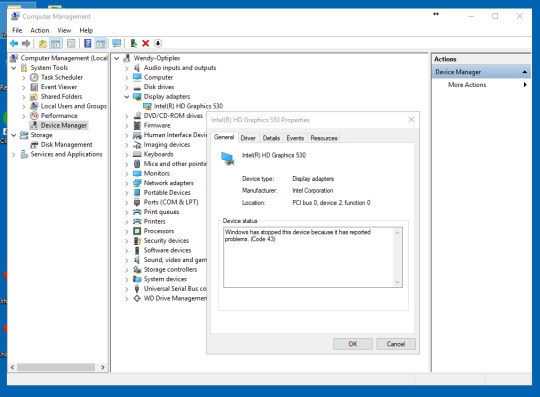
The computer manufacturer for my desktop system requested that I update the driver for my Intel HD Graphics 530. The new driver version is 23.20.16.4849 and dated 10/27/2017. I accepted the update :-(. A bunch of GPU work units had a computation error. I see in the Advanced view the Task tab shows state change from 'Waiting to process' to 'Postponed'. I can no longer process GPU work units. Any suggestions on rolling back to a previous graphics driver version? The CPU is Intel Core i5-6400. CPU processing is working fine. I process seti@home and seti@home beta work units for the GPU. Regards, Mike (aka Michael E.)
Grant (SSSF) Volunteer tester Send message Joined: 19 Aug 99 Posts: 13125 Credit: 208,696,464 RAC: 304
Any suggestions on rolling back to a previous graphics driver version?
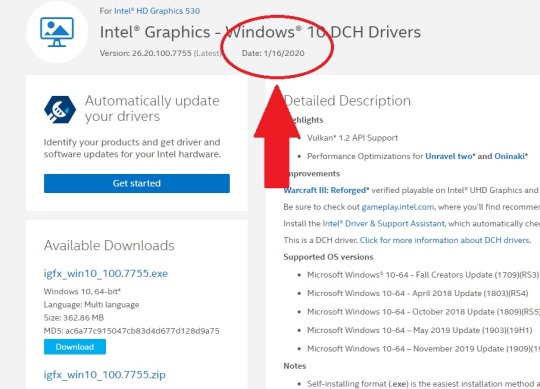
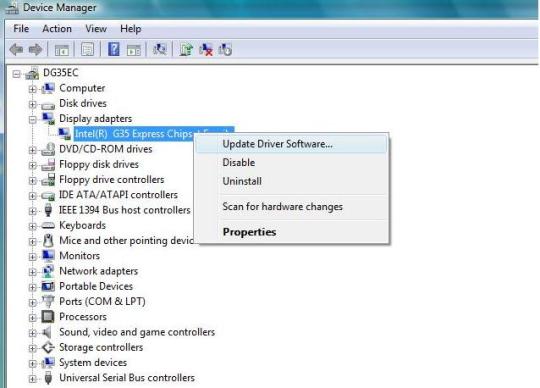
In Device Manager, under Display Adaptors, right click on the Intel graphics and select Properties. Can you select 'Roll Back' driver there? If not, got to Intel's page for HD Graphics 530 & download a copy of an older driver and install it. NB- for Seti, not using the IGPU (internal GPU) generally results in better work output (more WUs processed per hour). The effect on CPU processing times, and the longer iGPU processing times (compared to a discreet GPU) generally result in less work being done than if you don't use the iGPU at all.Grant Darwin NT
Michael E. Volunteer tester Send message Joined: 25 Jun 16 Posts: 8 Credit: 4,831,884 RAC: 30
Thank you Grant. Grant's guess was correct - the OS is Windows 10 64-bit. In the Device Manager > Properties > Driver tab, , the roll back driver button is dimmed. I cannot install drivers from intel.com because I am using a manufacturer's graphics driver. The processor is Intel Core i5-6400 and that processor lists support for the OpenCL 2.0 API. Maybe I could install an OpenCL SDK? What OpenCL level does seti@home use? I will continue poking around. In the BOINC Task tab (Advanced view), has anyone seen the Status state of Postponed before: Mike
Grant (SSSF) Volunteer tester Send message Joined: 19 Aug 99 Posts: 13125 Credit: 208,696,464 RAC: 304
I cannot install drivers from intel.com because I am using a manufacturer's graphics driver.
Shouldn't make any difference. With addon cards, it's always best to use the GPU chip manufacturer's drivers. Same with iGPUs. Unfortunately the drivers for Intel iGPUs aren't as good as they could be, particularly when it comes to computation. So either download an older copy from your manufacturer's web site, or from Intel's. Intel's would be the better option. Try the current driver, or the earlier driver (Win7/8.1 one should work, or get the earlier manufacturer's Win10 driver) (download & save, then Install).Grant Darwin NT
Michael E. Volunteer tester Send message Joined: 25 Jun 16 Posts: 8 Credit: 4,831,884 RAC: 30
Grant: Thanks for the links. It does not let me install the driver - I get a dialog that states: Clicking the Yes button directs you to: https://www.intel.com/content/www/us/en/support/articles/000005469/graphics-drivers.html Should I consider installing a 'generic graphics driver'? - see https://www.intel.com/content/www/us/en/support/articles/000005629/graphics-drivers.html. This still might be an OpenCL issue,. Sixth generation Intel CPUs support OpenCL 2.0 and seventh-generation Intel CPUs support 2.1 .
Grant (SSSF) Volunteer tester Send message Joined: 19 Aug 99 Posts: 13125 Credit: 208,696,464 RAC: 304
Should I consider installing a 'generic graphics driver'? - see https://www.intel.com/content/www/us/en/support/articles/000005629/graphics-drivers.html.
Yep, that's basically what you've been trying to do.
This still might be an OpenCL issue,. Sixth generation Intel CPUs support OpenCL 2.0 and seventh-generation Intel CPUs support 2.1 .
OpenCL 1.1 is all that's needed for the OpenCL application, however there have been several Win10 updates for Nvidia GPUs that broke the OpenCL support, and installing divers from Nvidia was the best method for fixing it. As to why your system is locked down so tightly as to what driver it will support, I've no idea. Looks like you might have to go to the manufacturer's web site and download an older Intel HD driver from them. With luck, it will let you install that.Grant Darwin NT
Wiggo Send message Joined: 24 Jan 00 Posts: 20479 Credit: 261,360,520 RAC: 489
Yes some manufacturers are &^%$# when they limit driver selection to what they supply. You may just have to go to the manufacturers' website and try all their drivers, but as Grant explained earlier, you'd do better just crunching SETI on your CPU alone as the iGPU shares its cache with the CPU's and this where computing using the iGPU falls apart big time. If you want to do GPU processing then get a proper GPU to do it on (you'll get around manufacturer's driver limitations this way) or just do CPU processing (no cost for better results). Cheers.
Kissagogo27 Send message Joined: 6 Nov 99 Posts: 703 Credit: 8,032,827 RAC: 62
i have to manualy update intel driver with some secret tricks like here
‎10-09-2017 08:47 AM RE: XPS 13 9343 Intel HD Graphics driver update fails Eureka! I found the below-linked thread on the German Dell community forum, where it was suggested to extract/unpack the driver EXE file and install the driver manually from the INF file. It worked for me,. I now have Intel HD Graphics 5500 driver version 20.19.15.4531 installed. The INF file to look for in the extracted files, Graphics directory, is igdlh64.inf.
from here:https://www.dell.com/community/General/XPS-13-9343-Intel-HD-Graphics-driver-update-fails/m-p/5137288#M923877 unpack with Zip or 7zip ;)
Richard Haselgrove Volunteer tester Send message Joined: 4 Jul 99 Posts: 14299 Credit: 200,643,578 RAC: 874
As an aside (though not directly related to the OEM problem in this thread), it might be worth referring readers back to my message 1914455. TL;DR - Microsoft Windows 10 drivers for HD 530 are now good to go, with OpenCL support.
Michael E. Volunteer tester Send message Joined: 25 Jun 16 Posts: 8 Credit: 4,831,884 RAC: 30
Thanks to all those who helped. I forgot about the shared cache memory with an integrated GPU. I was able to eventually find a Intel HD Graphics 530 driver on the OEM's web site and reinstall that driver. I had to click a Detect button on their web site and follow just the right steps in the GUI. The driver version appears to be the same as the one I had installed a few days earlier, so maybe it was a bad install? Or the original download file was corrupt? So I am back crunching Intel GPU work units.
DRIVER VERSION: 15.60.0.4849
This package contains the driver for the Intel HD Graphics. A graphics or video driver is the software that enables communication between the graphics card and the operating system, games, and applications. The update addresses the Intel security advisory INTEL-SA-00189.
Intel HD Graphics Driver for Windows 10 (64-bit) - ThinkPad. Drivers & Software Knowledge Base & Guides How-tos & Solutions Warranty Lookup.
Intel Driver&Support Assistants scan my notebook had update for Intel HD Graphic 530. I download and install driver, at the end of installation.
(Windows* Driver Store Version 23.20.16.4849)
DATE: November 06, 2017
SUMMARY:
HDR Launch Driver
Windows* Mixed Reality† Launch Driver
Here are some of the benefits for developers in driver 15.60.0.4849:
WDDM 2.3 driver.
Fall Creators Update features supported on Intel® 7th gen and newer processor graphics including HDR and Mixed Reality.
Support for Wide Color Gamut
Enables 10-bit HDR playback over HDMI
Enables video processing and video decode acceleration in DirectX* 12.
Support for DXIL*, including DirectX* 12 Shader model 6.0 and 6.1. This allows applications to use shaders compiled with the LLVM-based HLSL compiler from Microsoft*. In particular, it supports Wave Intrinsics, allowing fast sharing of data within SIMD execution.
Improved memory usage in OpenCL* applications
Intel Graphics Driver Update 530 Drivers
Netflix* HDR and YouTube* HDR are available for the first-time ever on the PC, on Intel® Graphics!
This driver enables the Microsoft Windows® 10 Fall Creators Update, thereby providing support for users to experience HDR playback & streaming on systems with Intel® UHD Graphics 620 and Intel® HD Graphics 620 or better, enjoyed on HDR capable external monitors and TVs. For more info please see the whitepaper here.
Escape the everyday to a world even beyond your imagination! With Windows* Mixed Reality†, you can explore new worlds, travel to top destinations, play exciting games, lose yourself in the best movies and entertainment and more. With a headset and a Windows* PC powered by a 7th Gen Intel® Core™ i5 processor with Intel® HD Graphics 620 or better, you can go places you’ve always dreamed - without even leaving home!
This new WDDM 2.3 driver also provides security fixes, support for Wide Color Gamut, enables 10-bit HDR playback over HDMI, and enables video processing and video decode acceleration in DirectX* 12. For a full list of Microsoft Windows® 10 Fall Creators update features, please see here.
Experience the magic of The LEGO* Ninjago* Movie Video Game on processors with Intel® HD Graphics 620 or better.
Battle singing Orcs and score legendary goals while enjoying performance optimizations and playability improvements in the newly released Middle-earth: Shadow of War* and Pro Evolution Soccer 2018 on Intel® Iris® Pro Graphics. Take on The Cabal* and keep the enemy in your sights in these newly released, fast action-packed sequels to legendary favorites, Destiny 2*, Call of Duty: WWII*, and Divinity: Original Sin 2* on Intel® Iris® Pro Graphics.
System requirements for camtasia 2018 mac. Check out the all new look and feel of gameplay.intel.com, where you’ll find recommended game settings for many of your favorite PC games.
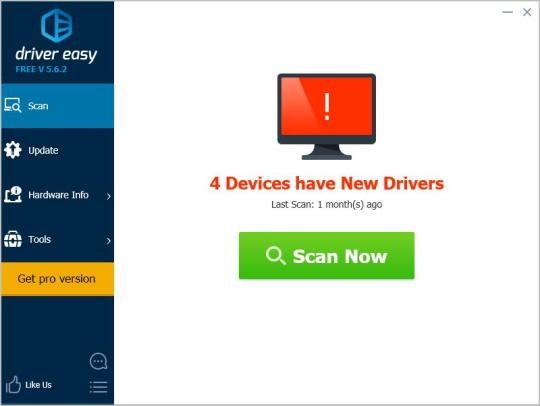
Install the Intel® Driver & Support Assistant (previously called Intel® Driver Update Utility), which now automatically checks for drivers on a regular basis and can provide notifications when new drivers are available.
†Windows Mixed Reality requires a compatible Windows® 10 PC and headset, plus the Windows® 10 Fall Creators Update; PC requirements may vary for available apps and content.
This document provides information about Intel’s Graphics Driver for:
8th Generation Intel® Core processors with Intel® UHD Graphics 610, 620, 630.
7th Generation Intel® Core processors, related Pentium®/ Celeron® Processors, and Intel® Xeon processors, with Intel® Iris® Plus Graphics 640, 650 and Intel® HD Graphics 610, 615, 620, 630, P630.
6th Generation Intel® Core processors, Intel Core™ M, and related Pentium® processors, with Intel® Iris® Graphics 540, Intel® Iris® Graphics 550, Intel® Iris® Pro Graphics 580, and Intel® HD Graphics 510, 515, 520, 530.
Intel® Xeon® processor E3-1500M v5 family with Intel® HD Graphics P530
Pentium®/ Celeron® Processors with Intel® HD Graphics 500, 505
CONTENTS OF THE PACKAGE:
Intel Hd 620 Driver Update
Intel® Graphics Driver
Intel® Display Audio Driver (upgraded to v10.24.00.01)
Intel® Media SDK Runtime
Intel® OpenCL* Driver
Intel® Graphics Control Panel
Vulkan* Runtime Installer
Operating System Support
On 8th Generation Intel® Core processors, 7th Generation Intel® Core processors, 6th Generation Intel® Core and Intel® Mobile Xeon processors and related Pentium/Celeron:
Microsoft Windows® 10 64-bit
NEW FEATURES:
Microsoft Windows® 10 Fall Creators update features, found here.
Support for DXIL*, including DirectX* 12 Shader model 6.0 and 6.1. This allows applications to use shaders compiled with the LLVM-based HLSL compiler from Microsoft*. In particular, it supports Wave Intrinsics, allowing fast sharing of data within SIMD execution.
KEY ISSUES FIXED:
Graphical anomalies may be observed in Divinity: Original Sin 2*, Pro Evolution Soccer 2018*, Blu-ray* playback via Cyberlink PowerDVD*
Intermittent crashes or hangs may be observed in DOTA 2* (Vulkan* version), when switching to a lower resolution on an embedded display panel
Performance optimizations and playability improvements in Middle-earth: Shadow of War*
Improved memory usage in OpenCL* applications
Security improvements
SUPPORTED PRODUCTS:
HARDWARE
All platforms with the following configurations are supported:
Intel® Graphics1 How to clean your mac from junk for free online.
DirectX*2
OpenGL*
OpenCL*
Vulkan*
8th Generation Intel® Core™ processors with Intel® UHD Graphics 610/620/630
12
4.5
2.1
1.0.61
Yes
7th Generation Intel® Core™ processors with Intel® Iris® Plus Graphics 640/650
12
4.5
2.1
1.0.61
Yes
7th Generation Intel® Core™ processors with Intel® HD Graphics 610/615/620/630
12
4.5
2.1
1.0.61
Yes
Intel® Xeon® processor E3-1500M v5 family with Intel® HD Graphics P630
12
4.5
2.1
1.0.61
Yes
Pentium Processors with Intel® HD Graphics 610
12
4.5
2.1
1.0.61
Yes
6th Generation Intel® Core™ processors with Intel® Iris® Pro Graphics 580
12
4.5
2.0
1.0.61
Yes
6th Generation Intel® Core™ processors with Intel® Iris® Graphics 540/550
12
4.5
2.0
1.0.61
Yes
6th Generation Intel® Core™ processors with Intel® HD Graphics 520/530
12
4.5
2.0
1.0.61
Yes
Intel® Xeon® processor E3-1500M v5 family with Intel® HD Graphics P530
12
4.5
2.0
1.0.61
Yes
Intel® Xeon® processor E3-1500M v5 family with Intel® Iris Pro Graphics P580
12
4.5
2.0
1.0.61
Yes
Intel® Core™ M processors with Intel® HD Graphics 515
12
4.5
2.0
1.0.61
Yes
Pentium® and Celeron® Processors with Intel® HD Graphics 500/505
12
4.5
1.2
1.0.61
App to mix songs together mac. Yes
Pentium Processors with Intel® HD Graphics 510
12
4.5
1.2
1.0.61
Yes
Note:
Intel Graphics Driver Update 530 Windows 10
If you are uncertain of which Intel® processor is in your computer, Intel® recommends using the Intel Processor Identification Utility or Install the Intel® Driver & Support Assistant (previously called Intel® Driver Update Utility) to identify your Intel® processor.
In the Intel® Iris® and HD Graphics Control Panel (under Options > Options menu > Information Center), the ’Installed DirectX* version’ refers to the operating system’s DirectX version. The Information Center’s ‘Supported DirectX* Version’ refers to the Intel® Graphics Driver’s supported DirectX version. The DirectX 12 API is supported but some optional features may not be available. Applications using the DirectX 12 API should query for feature support before using specific hardware features. Please note that DirectX12 is only supported on Windows 10© and DirectX11.3 support is also available on supported Microsoft* operating systems.
KNOWN ISSUES
Graphics anomalies may be observed in Assassin’s Creed® Syndicate, Titanfall® 2 (6th Gen Intel® Core™ Only), Paragon*, Elex* and other games
Intermittent crashes or hangs may occur in Forza Motorsport 7* (if run on systems with less than 12GB RAM), The Surge*, Tom Clancy’s The Division* (DX12*), The Guild 3*, SiSoft Sandra Benchmark*, Rise of the Tomb Raider*, Handbrake* (during AVC/HEVC transcode), or during playback of 3D video
Long load times may be observed for some tracks in Forza Motorsport 7*
Bezel value may not correctly increment/decrement when using bezel correction in collage mode
More on Intel® Core™ processors
For more information on the Intel® Core™ processor family, Intel® Xeon® processor E3 family, and 8th Generation Intel® Core processors, please visit:
Work and play in high resolution with Intel® UHD Graphics, Iris® Graphics, Iris® Plus Graphics, and Iris® Pro Graphics. Watch captivating 4K Ultra HD (UHD) video on up to three screens, edit photos and videos like a pro, and immerse yourself in vividly rendered, seamless 3D gameplay - all with the added power boost of an Intel® Core™ processor. Intel® Graphics bring stunning visuals to thinner and lighter portable devices, like laptops, 2 in 1s, and desktop computers.
We continuously strive to improve the quality of our products to better serve our users and appreciate feedback on any issues you discover and suggestions for future driver releases. If you have an issue to submit, please follow the guidance found here Default level information for reporting Graphics issues.
*Other names and brands may be claimed as the property of others.
0 notes