#ClickThePhoto
Explore tagged Tumblr posts
Visit Tumblr Blog
Explore Tumblr blogs with no restrictions, modern design and the best experience.
Last Seen Tumblr Blogs


Fun Fact
US Tumblr user growth rate is estimated to slow down to 4.1%.
Text
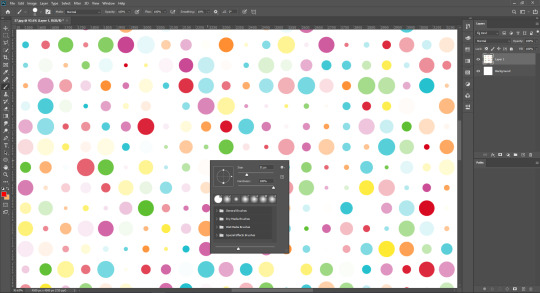
How to Make Perler Bead Patterns in Photoshop
Pixel art has a unique charm that appeals to both creativity and nostalgia. Perler beads, also known as Hama beads or fuse beads, are small plastic beads that can be arranged on a pegboard to create intricate designs. If you're a fan of both pixel art and crafting, combining the two to make Perler bead patterns using Photoshop can be a rewarding and enjoyable experience. In this tutorial, we'll guide you through the process of creating your own Perler bead patterns using the powerful tools of Adobe Photoshop.
Understanding Perler Bead Patterns
Before we dive into Photoshop, let's briefly understand the basics of Perler bead patterns. These patterns are essentially pixel art representations that can be transformed into physical creations using beads. Each pixel in the pattern corresponds to a bead on the pegboard. The challenge lies in translating your creative vision into a pattern that can be replicated with beads.
Read More
Gathering Your Materials
Adobe Photoshop: Any version from CS6 to the latest Creative Cloud will work. Pixel Grid: This can be a physical pixel grid or a digital one. It helps you visualize your design on a pixel level. Reference Image: An image or idea that you want to recreate in Perler beads. Perler Bead Pegboard: The pegboard will serve as the base for your design. Step-by-Step Guide
1. Setting Up Your Canvas
Open Photoshop and create a new document. Choose the dimensions for your pattern; remember that each pixel will correspond to one bead. For instance, if you want your finished Perler pattern to be 20 beads wide and 15 beads tall, create a canvas of 20x15 pixels.
2. Enabling the Grid
In Photoshop, you can enable a grid that mimics the layout of your Perler bead pegboard. Go to "View" in the menu and select "Show" followed by "Grid." This will overlay a grid onto your canvas, making it easier to align your design accurately.
3. Importing Your Reference Image
Import your reference image onto the canvas. This could be a picture of a character, an object, or anything you'd like to turn into a Perler bead creation. Make sure your reference image is appropriately sized to fit your canvas.
4. Pixelating the Image
With the reference image on your canvas, it's time to start pixelating it. Zoom in to see individual pixels clearly. Using the Pencil tool, manually fill in each pixel of the image with the color that corresponds to the bead you plan to use. Remember that Perler beads come in a limited range of colors, so try to match your colors as closely as possible.
5. Adding Details
Creating complex patterns might involve using different shades of a single color to add depth and detail. Experiment with dithering techniques (using different colors close to each other to create the illusion of a third color) to achieve the desired effects.
6. Exporting the Pattern
Once you're satisfied with your Perler bead pattern, it's time to prepare it for crafting. Zoom out to ensure the entire design is visible and fits within your desired dimensions. Then, save the image in a format that you can easily reference during crafting, such as JPEG or PNG.
7. Crafting Your Perler Bead Pattern
With your pattern ready, you can now use it as a guide to arrange the beads on the pegboard. Each bead should be placed according to the corresponding pixel in your pattern. This is where the alignment provided by the grid becomes incredibly useful.
8. Fusing the Beads
Once your pattern is complete on the pegboard, carefully move it to an ironing board. Place a sheet of ironing paper or parchment paper over the beads and, using an iron on a medium heat setting, gently melt the beads together. This will fuse the beads into a solid piece while maintaining their individual colors.
9. Finishing Touches
After the fused bead creation cools down, remove it from the pegboard and admire your handiwork. You can trim any excess paper and display your Perler bead masterpiece as a keychain, magnet, or even framed art.
Learn More: Image Color Correction Services
Tips and Tricks for Perfect Perler Bead Patterns
Creating intricate Perler bead patterns can be both fun and challenging. Here are some additional tips and tricks to help you achieve the best results:
Choose the Right Image: Not all images translate well into Perler bead patterns. Images with clear lines, distinct colors, and minimal shading work best. Start with simpler designs as you get familiar with the process.
Color Selection: Perler beads come in a limited palette of colors. While Photoshop allows you to use any color, try to stick to colors that closely match the available bead colors. This ensures that your final creation looks like your design.
Zoom and Grid: Zoom in on your canvas to work on individual pixels, and use the grid to maintain accuracy. This step is crucial for ensuring your beads align perfectly when it's time to craft.
Dithering: Experiment with dithering techniques to create shading and gradients. By placing beads of different colors close to each other, you can achieve smoother transitions between shades.
Pixel Preview Mode: Photoshop has a Pixel Preview mode that shows you how your design will look when displayed at a smaller size. This mode can help you catch any pixelation issues or errors in your design.
Save Multiple Versions: As you work on your design, save different versions of your pattern. This way, if you make a mistake or want to experiment with different color combinations, you won't lose your progress.
Test Before Ironing: Before ironing your beads together, test a small section of your design to make sure the colors fuse correctly and the beads hold their shape.
Ironing Tips: When ironing your Perler bead creation, move the iron in a circular motion to evenly melt the beads. Avoid pressing too hard, as this can cause beads to warp or melt unevenly.
Finishing: After ironing, allow your creation to cool completely before removing it from the pegboard. If you plan to turn it into a keychain or magnet, attach the necessary hardware using a strong adhesive.
Exploring Advanced Techniques
Once you've mastered the basics, you can explore more advanced techniques to elevate your Perler bead patterns:
Pixel Brushes: Use custom pixel brushes in Photoshop to speed up the pixelating process. These brushes automatically fill in squares of color as you paint, making your design process faster and more efficient.
Layer Effects: Experiment with layer effects like gradients and patterns to add depth and texture to your designs. These effects can give your Perler bead patterns a unique and professional look.
Combining Techniques: Combine Perler bead art with other crafting techniques. For example, you could create a 3D effect by layering fused Perler bead patterns on top of each other, creating a multi-dimensional artwork.
Conclusion
Creating Perler bead patterns using Photoshop is a creative journey that merges the digital world with the tangible joy of crafting. From pixelating your design to meticulously placing each bead on the pegboard, the process allows you to express your artistic vision in a unique and tactile way. Whether you're a pixel art enthusiast, a crafting aficionado, or someone looking for a new creative outlet, Perler bead patterns offer a delightful and rewarding experience. So, unleash your imagination, let your creativity flow, and embark on a crafting adventure that combines the best of both pixel art and hands-on creativity. Your Perler bead masterpiece awaits!
4 notes
·
View notes
Text

Cut out your subject from any image and make it stand with our clipping path services.
#clippingpath#bestclippingpath#imageclippingpath#photoclippingpath#clipping#path#clippingpathservices#cutout#cutoutservice#clickthephoto
2 notes
·
View notes
Text

✨ Transform Your Images with Click The Photo! ✨ We offer professional photo editing services to elevate your visuals: 📸 Background Removal 🧴 Product Retouching 📢 Social Media Ad Design
📩 Get started with your free trial today! 🔗 clickthephoto.com
0 notes
Text


✨ Elevate your beauty to perfection with our expert "Fashion Model Photo Retouching" service ✨— Where every detail shines and every image tells a story. Flawless skin, enhanced features, and magazine-ready edits, tailored to highlight your unique allure."
To learn more about us please visit: Our official website: www.clickthephoto.com Or mail us at: [email protected]
#photoeditingservices#fashionmodelphotoeditings#fashionmodelretouching#fashionmodelretouchingservice#retouchingserviceprovider#ukbangladeshbasedcompany#clickthephotobd#clickthephoto#imageeditingservices#imageretouchingservices
0 notes
Text
How to Swap Eyes in Photoshop
If you work with Photoshop a lot then you’re probably doing a lot of photo editing, from color correction to skin smoothing and other things.
#photoshop #photoretouchingservice #clickthephoto #photoeditingservice
0 notes
Text
How to Swap Eyes in Photoshop
If you work with Photoshop a lot then you’re probably doing a lot of photo editing, from color correction to skin smoothing and other things.
#photoshop #photoretouchingservice #clickthephoto #photoeditingservice
0 notes
Text
How To Outline Drawings - Easy Process
Drawing is a timeless form of expression, and outlining is an essential step that brings your creations to life. Whether you're a seasoned artist or just starting on your artistic journey, mastering the art of outlining can significantly enhance your drawings. In this guide, we'll explore an easy and comprehensive process to outline drawings effectively.
Read More
I. Understanding the Basics of Outlining:
Before diving into the process, it's crucial to understand the basics of outlining. Outlines serve as the framework for your drawings, defining shapes, edges, and contours. A well-executed outline adds depth and clarity to your artwork, making it visually appealing and easy to comprehend.
II. Selecting the Right Tools:
Having the right tools at your disposal is the first step to successful outlining. Here are some essential tools you'll need:
Pencils: Start with a light pencil for the initial sketch and a darker pencil for the final outline.
Eraser: A good quality eraser is essential for correcting mistakes and refining your outlines.
Paper: Choose a smooth, high-quality paper that complements your drawing style.
Ruler: A ruler helps in creating straight and precise lines, especially useful in technical drawings.
III. Preparing Your Sketch:
Begin by sketching the basic shapes and forms of your drawing lightly. This serves as a foundation for the final outline. Take your time during this stage to ensure accuracy and proportionality in your composition.
IV. Defining Lines and Contours:

Once your sketch is in place, identify the key lines and contours that will make up your outline. Consider the light source and shadows to create depth in your drawing. Start outlining with a lighter pencil, gradually building up to the desired intensity.
V. Emphasizing Detail:
Detail is what makes your drawing unique and captivating. Pay attention to intricate elements, such as facial features, textures, or patterns, as you refine your outline. Use varying line weights to add dimension and interest to your artwork.
VI. Correcting Mistakes:
It's perfectly normal to make mistakes during the outlining process. Use your eraser to correct any inaccuracies or adjust lines as needed. Take your time to ensure precision, as a well-crafted outline significantly contributes to the overall quality of your drawing.
VII. Experimenting with Line Styles:
Explore different line styles to add character to your outlines. Experiment with solid lines, dashed lines, or hatching to create visual interest. The variety in line styles can convey different textures and moods in your artwork.
Learn More: Product Photo Editing Service
VIII. Finalizing the Outline:
Once you're satisfied with the outline, go over it with a darker pencil or a fine liner to make it more defined. Be confident in your strokes, and don't be afraid to let the lines flow smoothly. This final step brings your drawing to its polished form.
IX. Additional Tips for Success:
Practice Regularly: Like any skill, outlining improves with practice. Set aside time regularly to hone your outlining technique and experiment with new styles.
Observe and Learn: Study the work of artists you admire. Analyze their outlining techniques and incorporate elements that resonate with your style into your own drawings.
Seek Feedback: Share your drawings with fellow artists or mentors to receive constructive feedback. Gaining according to others' viewpoints can assist you with distinguishing regions for development.
X. Exploring Digital Outlining Techniques:
In addition to traditional methods, digital tools provide a whole new dimension to the outlining process. Many artists now use graphic tablets and drawing software to create digital artwork. Here are some tips for digital outlining:
Digital Brushes: Experiment with different digital brushes to achieve various line textures and styles. Many drawing software options offer a wide array of brushes that can mimic traditional tools like pencils, pens, and brushes.
Layering: Take advantage of layering features in digital software. Separate your sketch from your outline, allowing you to refine each element independently. This makes it easier to correct mistakes and make adjustments without affecting the entire drawing.
Undo Function: Digital platforms often provide an undo function, allowing you to reverse any mistakes quickly. This feature can be a valuable asset during the outlining process, enabling you to explore different options without fear of permanent errors.
XI. Troubleshooting Common Outlining Challenges:
Even with a well-defined process, artists may encounter challenges during the outlining phase. Here's how to troubleshoot common issues:
Shaky Lines: If you struggle with shaky lines, try resting your hand on the drawing surface or using a stabilizing feature available in some digital drawing programs.
Inconsistent Line Quality: Achieving consistent line quality can be challenging. Practice drawing lines of varying lengths and thicknesses to build control and confidence.
Overworking the Outline: Avoid overworking your outline, as too many lines can clutter your drawing. Focus on the essential details, allowing negative space to contribute to the overall composition.
XII. Showcasing Your Outlined Masterpiece:
Once your drawing is outlined to perfection, consider showcasing it in various ways:
Photography: Capture your artwork using a high-quality camera or smartphone. Pay attention to lighting to ensure the details of your outline are well-captured.
Scanning: If working with traditional media, consider scanning your drawing for digital use. This allows for easy sharing on social media platforms or incorporating your artwork into digital projects.
Framing: Frame your drawings for display in your home or at art exhibitions. A well-chosen frame can enhance the overall presentation of your outlined masterpiece.
Conclusion:
Mastering the art of outlining drawings is a fulfilling journey that enhances your artistic capabilities. By understanding the basics, selecting the right tools, and following a systematic process, you can create outlines that breathe life into your creations. Embrace the joy of experimentation, learn from your experiences, and watch as your drawing skills evolve and flourish.
0 notes
Text

Colours are a crucial part of any visual. Our colour correction services can make even the most bland looking images gorgeous. Watch our previous works at our website and see for yourself.
Contact us at [email protected] DM or WhatsApp: +880 155 066 6660
Visit our website- www.clickthephoto.com
#clickthephoto#bestclippingpath#retouching#photo retouching#jewelry retouching service#color correction
0 notes
Text

Your passion is capturing moments — ours is perfecting them. ✨ Let Click The Photo handle your editing needs, so you can focus on what you do best: shooting unforgettable images.
#weddingphotographer#productphotography#onlinestore#PhotoEditing#PhotographerSupport#RetouchingServices#ClickThePhoto#PortraitEditing#EventPhotography#PhotoEnhancement#FreePhotoEdit#PhotographyBusiness
0 notes
Text

Benefits of E-Commerce & Product Photo Retouching:
1. Enhances Visual Appeal – Retouching improves product images, making them look professional and attractive to potential customers.
2.Boosts Sales – High-quality, polished photos increase buyer confidence, leading to higher conversion rates.
3. Builds Brand Image – Consistent, flawless product visuals strengthen brand credibility and professionalism.
4. Removes Flaws & Distractions – Eliminates imperfections, shadows, or blemishes, ensuring a clean and focused presentation.
5. Improves Marketing Effectiveness – Retouched images perform better in ads, social media, and eCommerce platforms, driving engagement.
To learn more please visit:
Official website: www.clickthephoto.com
#photoretouchingservice#photoeditingservice#productphotoediting#highendretouching#clickthephoto#affordablephotoretouchingservice
0 notes
Text

How to Swap Eyes in Photoshop If you work with Photoshop a lot then you’re probably doing a lot of photo editing, from color correction to skin smoothing and other things. https://clickthephoto.com/how-to-swap-eyes-in-photoshop/
0 notes
Text
How to Swap Eyes in Photoshop
If you work with Photoshop a lot then you’re probably doing a lot of photo editing, from color correction to skin smoothing and other things.
https://clickthephoto.com/how-to-swap-eyes-in-photoshop/
0 notes
Text
✨ Transform Your Photos with Professional Editing!
Hey Tumblr fam! I'm Laboni Chandni from Click The Photo — a leading photo & video editing studio based in Bangladesh 🇧🇩.
We’re a team of 60+ expert editors delivering: 🎯 High-quality retouching 📸 Bulk photo & video editing ⏱️ Fast turnaround ✅ 100% quality guaranteed
Perfect for: 📷 Photographers 🛒 E-commerce stores 📽️ Creators & studios
Let’s bring your visuals to life! 📧 [email protected] 📱 +8801332852554 (Call / WhatsApp) 💌 [email protected] 🌐 clickthephoto.com
#PhotoEditing#VideoEditing#TumblrCreators#VisualArt#Retouching#CreativeServices#ClickThePhoto#EcommerceSupport#OutsourceEditing
1 note
·
View note
Text
🌸 Shubho Noboborsho! 🌸 May this Bengali New Year bring joy, peace, and success into your life. Let’s welcome new beginnings with hope and happiness, leaving behind the old. Warm wishes to you and your family from the Click The Photo team! ❤️📸
#ShubhoNoboborsho#PohelaBoishakh#BanglaNewYear#Noboborsho2025#ClickThePhoto#NewBeginnings#BoishakhCelebration#TraditionAndJoy#BengaliCulture
1 note
·
View note
Text
https://clickthephoto.com/image-masking-services/
✨ Transform your images with precision! ✨ Our High-Quality Photoshop Image Masking Service ensures every detail stands out — perfect for product photos, model shots, and complex backgrounds. Handled by professionals, delivered with perfection. 💼🖌️
#ImageMasking#PhotoshopMasking#ProfessionalImageEditing#HighQualityEditing#PhotoRetouchingService#ImageEditingExperts#PhotoshopExperts#CutOutImage#EcommerceImageEditing#PhotoshopServices#ProductPhotoEditing#ModelImageEditing#BackgroundRemoval#ClippingPathService#FashionPhotoEditing#EditLikeAPro#PhotoshopPerfection#MaskingMasters#FlawlessEditing#CreativeEditingStudio#ClickThePhoto
0 notes
Text
https://clickthephoto.com/neck-joint-service/
#NeckJointService#GhostMannequin#ApparelEditing#PhotoEditing#EcommercePhotos#ProductPhotography#Retouching#ClickThePhoto#ProfessionalEditing#InvisibleMannequin#marketing
0 notes