#Cricut software app
Explore tagged Tumblr posts
Visit Tumblr Blog
Explore Tumblr blogs with no restrictions, modern design and the best experience.
Last Seen Tumblr Blogs


Fun Fact
Tumblr has 16.74 million mobile monthly users in the US.
Text
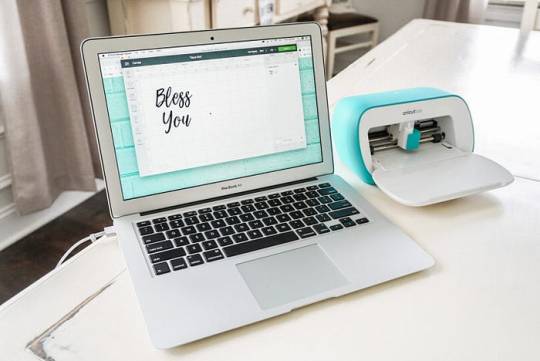
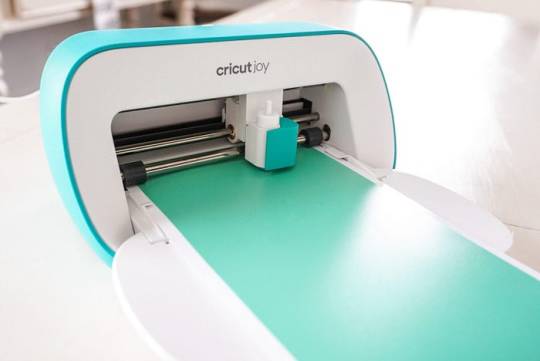
7 Easy Beginner Cricut Projects to Get Started in 2024

Are you finding some ideas for easy beginner Cricut projects? If so, you are in the right place! In this blog, I am basically going to discuss the 7 free Cricut projects for beginners. If you are excited to explore, you must read this write-up once.
I came up with a few Cricut project ideas because of my sister. She insisted I use my Cricut machine setup to create wall decals to decorate her room. She was very excited about her new personal room decor, so all she wanted was a wall decal. During the making process, I recommended a simple design, as it suits most walls. Also, I didn’t want to work on any complex project😅, so I made one I mentioned in this blog.
In addition, I have also created some other projects like coasters, T-shirts and more. To explore, look into this post.
1. Wooden Coaster
Love personalized coasters for gifting someone? This could be a great idea if you want easy beginner Cricut projects. I tried this to show you all because it is very easy to create, and any novice in crafting can make this coaster without any hassle. All you need is wooden slices and some vinyl in your desired color. Just add the first letter of anyone’s name and choose some stylish font. Next, send the design to Cricut, and it will do its work!
2. Customized T-Shirt
When it comes to customized T-shirts, I am always ahead in making one. I have gifted many family members, including friends, a personalized shirt. So, you can also do the same. You must be prepared with some supplies you will need to create this shirt. The supplies include a blank shirt, an iron-on vinyl sheet, and a Cricut machine with accessories. After that, create the design you want to add to your shirt and let your Cricut handle the rest of the task!
3. Earrings
Would you believe me if I told you I made this earring using veneer wood? Yes, it’s true, and I cut these veneers using my Cricut machine. That’s what your Cricut can do😉! And you won’t even realize it—you will have something so beautiful. This wooden earring was a gift for my sister on her 22nd birthday. In order to make these easy beginner Cricut projects, you will need a piece of veneer wood with a recommended thickness and a Cricut cutting machine.
4. Mug
Is someone’s birthday approaching? If it’s a child’s birthday, you can try the design I have done in mine. It is easy to create on Cricut Design Space app. However, you can find numerous ready-made mug designs on the Cricut app for free; you can still create them as they require simple shapes and text. But when working on mugs, having a Cricut Mug Press is a must. Make sure you have one at least.
5. Keychain
I have many keychains, all personalized for every family member. There is a different keychain for a car’s key, a room’s key, and so on. And any of them belonging to a particular person has a first letter printed. Some of them are engraved keychains, which can be done on a Cricut machine. Yes, that is true—Cricut can engrave acrylic, wood, etc. What are you waiting for? Let’s get started with such easy beginner Cricut projects.
6. Wish Card
A wish card can be the best way to wish someone good wishes on their anniversary, birthday, and other special occasions. This project is so easy to create on your Cricut Joy without hassle. So, bring your Cricut Joy and start enthusiastically creating crafts. Use things like the Cricut card mat and its basic toolset to support your project’s crafting.
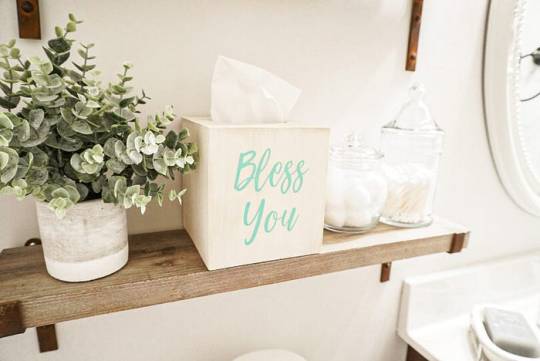
7. Wall Decals
Want to decorate your home? Here’s one of the best wall decals I made using my Cricut Maker 3 Setup. This one is my favorite. It doesn’t have many intricate designs, which makes it look complex, so I thought I’d try this simple design. The benefit of such a simple design is that you don’t waste hours creating these easy beginner Cricut projects.
FAQs
What are free Cricut projects for beginners?
For beginners, you will need something easy to create and less time-consuming for crafts. However, if you are looking for such projects which are also free, you should look into the following list:
Stickers
Coasters
Jewelry
Apparel
Wall decals
Mugs/tumblers
Canister/jar labels
Banners
Cards
Tea towel
What cardstock projects can I make with Cricut?
Using material like cardstock paper, you can easily create several projects. However, I have mentioned some of the easiest projects you can try making on your Cricut. Find the project list given below:
Gift card holder
Canvas wall art
Paper heart envelope
Heart box
Cake toppers
Paper star lanterns
Shadow boxes
Drawer dividers
Gold paper flower
Treat boxes
How to make paper flowers using Cricut?
Follow the steps below to make flowers using your Cricut:
You need to cut the flower template on Cricut
Then, cut the petals from cardstock by using a machine.
Now, overlap the slit at the bottom of each petal and glue.
After that, use clothespins or wonder clips while the glue sets.
Glue the first layer of petals to the flower base, starting with the largest bottom layer.
Next, continue gluing each layer of petals towards the center.
Finally, add the center of the flower and leaves if desired.
For more information visit: cricut.com/setup app cricut account login design.cricut/setup
Source: Easy Beginner Cricut Projects
#easy beginner Cricut projects#cricut design space download#cricut design space app#design.cricut.com#cricut software app#cricut machine setup#cricut account login#cricut joy extra#cricut maker setup
1 note
·
View note
Text
How to Pair Cricut Machine via Bluetooth or USB? (Easy Tips)
Cricut machines are a must-have for DIY crafters, designers, and small business owners. Whether you’re working on vinyl decals, paper crafts, or fabric designs, pairing your Cricut machine correctly is the first step to getting started.
I still remember the day my Cricut machine arrived as if it were yesterday. But within minutes, my excitement faded as I struggled to connect the machine to my laptop. I couldn’t figure out how to connect it to my laptop. But you don’t have to worry about that. Pairing your Cricut isn’t as complicated as it seems once you know what to do.
In this blog, I’ll explain exactly how to pair Cricut machine with your Windows or Mac, whether you use Bluetooth or a USB cable. It’s a beginner-friendly guide designed to help you avoid the roadblocks I encountered.
Let’s get your machine up and running so you can start creating!
Step 1: Turn On Your Cricut Machine
Before you start pairing, make sure your machine is powered on. Follow these steps:
Plug in your machine: Make sure the power cable is connected to the machine and plugged into a power source.
Turn on the machine: Press the power button (usually located on the side or top) to turn it on. A blinking light indicates readiness.
Step 2: Connect via Bluetooth (Wireless Connection)
You can connect your machine wirelessly via Bluetooth. Here’s how to do it:
For Windows Users
Follow the steps given below to learn how to pair Cricut machine via Bluetooth on Windows:
Open Bluetooth settings: Click onthe Start menu, then select Settings, then Devices. After that, go to Bluetooth & other devices.
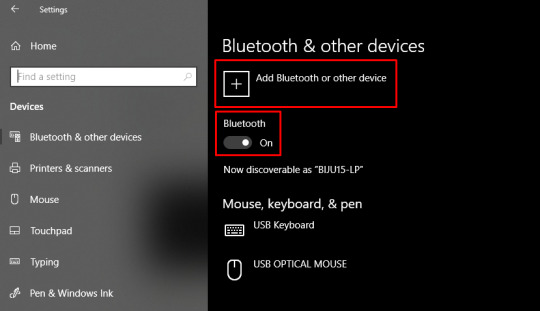
Turn on Bluetooth: Ensure Bluetooth is turned on in your computer’s settings.
Put your machine in pairing mode: Press and hold the Bluetooth button on the machine. The machine’s Bluetooth light will begin blinking, indicating that it’s ready to pair.
Select your machine in Bluetooth settings: On your computer, under the “Bluetooth & other devices” settings, click on Add Bluetooth or another device. Choose Bluetooth, then select your machine from the list of available devices.
Confirm the connection: Once paired, the Bluetooth light on your machine will stop blinking and become solid, indicating that it is connected to your computer.
TIP: Cricut Explore and Maker models include Bluetooth functionality by default. Older models may require a separate Bluetooth adapter.
For Mac Users
Follow the stepwise guide listed below to learn how to pair Cricut machine via Bluetooth on a Mac:
Open Bluetooth settings: Tap on the Apple menu > System Preferences > Bluetooth.
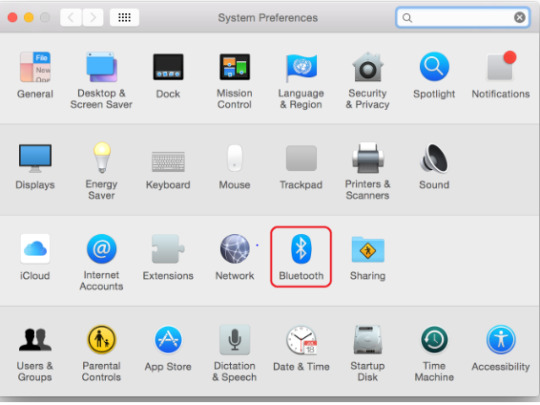
Enable Bluetooth: Make sure Bluetooth is turned on in your Mac’s settings.
Put your machine in pairing mode: Press and hold the Bluetooth button on your machine until the Bluetooth light blinks.
Select your machine name: On your Mac, you should see your machine model in the list of available Bluetooth devices. Click on Pair to connect.
Confirm the pairing: After pairing, the Bluetooth light on your machine will remain solid, confirming the connection.
Step 3: Connect Using a USB Cable (Wired Connection)
If you prefer a wired connection or your device doesn’t support Bluetooth, you can connect your crafting machine using a USB cable.
Locate the USB port on your machine: The USB port is on the left side of the machine, where you can connect the USB cable.
Plug in the USB cable: Now, connect one end of the USB cable to the machine and the other end to a USB port on your computer.
Open Design Space: Launch the software on your computer, and the machine should be automatically recognized.
If prompted, follow the on-screen prompt to complete the setup.
Step 4: Setup Cricut Design Space on Your Device
Now that your Cricut machine is paired with your device, you need to set up Design Space to start creating designs.
Download Design Space: If you haven’t already, download and install Design Space on your computer or mobile device.
Create or sign in to your account: Open the software and either sign in with your existing account or create a new account.
Select your machine name: Once logged in, the software will automatically detect your machine. If not, go to Settings and select your machine from the list.
Start designing: Once everything is set up, you can start creating your projects in Design Space and send them to the cutting machine for cutting.
Troubleshooting Cricut Pairing Issues
Sometimes, your machine may not pair correctly due to device settings or software glitches. Here are quick fixes.
Turn off both the machine and your computer or phone. Turn them back on and retry the pairing steps.
Remove any old Bluetooth devices that could be conflicting.
Ensure both your device’s operating system and the Design Space software are updated to their latest versions.
Clear the cache in the Cricut Design Space software.
Reopen the software and attempt to pair again.
Final Words
Pairing your machine doesn’t have to be difficult. Whether you use Bluetooth or a USB cable, the steps above will help you connect quickly and efficiently. Just keep your software up to date, follow the correct steps, and stay patient!
Once your Cricut machine is paired, the world of crafting will be at your fingertips!
Frequently Asked Questions (FAQs)
What to do if Design Space doesn’t recognize my Cricut machine?
If Design Space isn’t recognizing your machine, make sure of the following key points:
Ensure that the Bluetooth or USB connection is enabled and that the machine is discoverable.
Restart both your computer and machine.
Ensure your machine is within the recommended range of 15 feet from your device.
Make sure Cricut Design Space and your machine’s firmware are up to date.
If updates don’t resolve the issue, consider uninstalling and reinstalling Cricut Design Space.
Do all Cricut Machines have Bluetooth?
No, not all Cricut machines have Bluetooth connectivity out of the box. While newer models like the Cricut Joy, Joy Xtra, Maker, Maker 3, Explore Air 2, Explore 3, and Venture utilize Bluetooth, older models like the Explore One require a separate Bluetooth adapter to connect to devices.
Note: Cricut Explore and Explore One require a Bluetooth adapter.
Can I pair the same Cricut Machine with multiple devices?
Yes, you can connect extra devices to one Cricut machine, but only one device can actively control the machine at a time. This prevents conflicts and ensures that the machine receives clear instructions. You can install Cricut Design Space on multiple devices and access the same account and projects. You can connect to the machine via USB or Bluetooth, and the software will guide you through selecting the desired machine for your project.
SOURCE: How to Pair Cricut Machine via Bluetooth or USB
#how to pair Cricut machine#Cricut Setup#Cricut software app#cricut machine setup#cricut design space app#cricut design space software
0 notes
Text
How to Download Images From Cricut Design Space: Full Guide

If you are new to the Design Space app and want to know how to download images from Cricut Design Space, then you are in the right place. Most beginners and crafters wish to learn how to download and upload images to the Cricut app. But let’s know a bit about the Design Space app. It is a free digital design app that allows you to cut and draw for the Cricut machine and is compatible with desktop and mobile devices. And to cut with it, you need to use Cricut cutting machines.
Suppose you intend to learn the full download process of the image. Read this blog.
Functions of the Cricut Design Space App
This app allows you to create your designs online and offline. We have compiled the software’s functions and then read them to learn.
It lets you make your designs, cut, and edit your craft projects with the help of easy tools.
You can use pre-designed images and fonts for your crafts.
You can edit the pre-made projects if required.
You can connect to Cricut Explore and Cricut Maker machines using Bluetooth.
It has a feature to auto-save projects.
How to Download Images From the Cricut Design Space App
Follow the below steps to learn the process of the Cricut Design Space app:
Step 1: Search and Download an Image
First, switch on your device and search for the image you want to download in the search engine. When you are done searching and choosing the picture, right-click on it and click the Save as Image to Downloads option. The image will be successfully downloaded to your downloads folder.
Step 2: Upload the Image to the App
Now, open your Cricut Design Space app and sign in with your Cricut ID and password. Next, a new web page will appear. Click on the New Project at the top right-hand corner of the page.
On the left side of the page, under the Menu bar, click on the Upload tool to upload the image, and then browse to open the downloaded pictures in your folder.
Step 3: Remove Background From the Image
To remove the background, use the background remover tool and select the background of the downloaded image. Then, click on the places you want to make the changes and click the Apply and Continue button on the bottom right side of the page. Another method to remove the background image is to choose the Cut Image and remove the background of your downloaded image.
Step 4: Upload the SVG File to the Design Space App
After following the above steps, tap the Upload button at the bottom right side of the page. Navigate to Recently viewed images, and you can locate your edited photos. Then, choose the image and click on the Add to Canvas button to add it. Then, resize and select the Make It option. Select the image on the cutting mat and proceed towards the cutting process.
Methods to upload images
Here are the steps you need to follow to upload basic and vector images on Design Space app:
Method 1: Uploading Basic Image
Choose the basic JPG, GIF, or PNG images and drag them to your Design Space app Upload window. Then, choose the image type and click on the Continue option. Next, select the Crop tool to remove, erase, or restore unwanted background. If you wish to preview the edited image, look at the preview button on your screen and modify it according to the project’s needs. Afterwards, select the Continue option.
Method 2: Uploading the Vector Image
On the contrary, if you use vector and complex images, .svg or .dxf file to the file selector and select the Open option. Then, drop the file in the image upload window, give it a name, and click on the Upload box. Then, search for your vector file by inserting its name inside the search bar.
Then, choose the file. It will be directly moved to your Cricut app canvas. Finally, the images designed with layers will appear as grouped images. After ungrouping the photos, you can move and change their size separately according to your project.
Conclusion
After reading this guide, you will know how to download images from the Cricut Design Space app. It opens the possibility of making your projects with the Design Space app, and you can do endless projects with it. Keep designing and using the cutting machine to unleash your creativity and make new projects.
FAQs
Where can we find uploaded images in Cricut Design Space?
Follow the steps below to learn how to find the uploaded images in Cricut Design Space.
First, open your Cricut Design Space app.
Then, under the Menu panel, click on the given Images option.
Now, from the list, you can find all the downloaded and uploaded images by name.
Also, you can find the image in the Upload section.
Can you search for the project without an internet connection?
No, you cannot search or browse through the projects or images without an internet connection. However, you can use the offline features if you have saved the downloaded file to your computer. You can find your saved projects on the home screen, or you can also click View All to see all your saved projects.
How do you download free images from the Cricut Design Space app?
There are some quick and easy steps by which you can download free images:
Open the Design Space app in your system.
Create a new project.
Then, click on the images from the bottom navigation.
Now, select free under Highlighted Categories.
All the free images will be displayed.
#how to download images from cricut design space#cricut design space app#cricut design space download#cricut design space software#install cricut design space app#cricut software app#cricut new product setup
1 note
·
View note
Text
Why Won’t My Cricut Design Space Open (Easy Steps)
Why won’t my Cricut Design Space open? This is a question that I frequently receive from many readers. Finally, I got a chance to write something about it. Recently, I experienced the same issue, and it was not opening on my PC at all. At that time, I had to use the Cricut software on my mobile device; thanks to Cricut, it is compatible with smartphones, too.
install cricut design space app
www.cricut.com setup login
cricut.com setup mac
#setting up your cricut maker#cricut setup#cricut design space#cricut setup explore air 2 setup#cricut setup create account#cricut setup for pc#cricut setup maker#cricut software app#cricut setup on computer#cricut setup log in#cricut software download#www.cricut.com/setup login#www.cricut.com setup login
0 notes
Text
How to Make Labels With Cricut Explore for Office?
Hi! Lovely crafters. I have been waiting to write this blog for many days after designing a custom label for my daughter’s school assignment. It was fun making it. And most importantly, my daughter loved it. So, I thought, why not share my way of creating labels with a Cricut Explore machine?
Well, you all are here to learn how to make labels with Cricut. I am ready to share all the important points with you all. Let’s dive into this beautiful project that you can make any time.
Supplies and Tools Needed for Creating Cricut Labels
This is the important part. You should get ready with all the things I am mentioning in the list below.
Finally, you are set with your supplies. Now, let’s check out the final steps for creating a label.
How to Make Labels With Cricut Explore Machine?
Now, it’s time to learn the process for creating a label with your Cricut machine. Here are the step-by-step instructions on making the best labels.
Step 1: Make a Design in the Cricut Software
To get started, you’ll need to create a design in the Cricut Design Space. You must be already familiar with Design Space, and while making labels you have plenty of options to select your font, size of font, and everything else that is needed to make a proper label. And, you can also make labels in multiple sizes that fit your place.
You first need to be clear about the purpose of your label, where you are going to put it on. For instance, I created the labels for a basket for my daughter. What’s your use? Select the size accordingly.
Step 2: Allow Your Cricut Machine to Cut Labels
When you are done with the labels, don’t wait to cut them down with your Cricut cutting machine. After that, hit the Make It button to let the machine cut your design effectively. As you are using premium vinyl, you’ll get the best cut with the machine.
Step 3: Remove the Excess Vinyl
When you are ready with your final cut, it’s time to weed off the excess vinyl from the design. This step is really important to keep the design precise and avoid overlapping of letters. Here, Cricut’s weeding tool can save you.
Step 4: Apply Labels to the Surface
Finally, you know how to make labels with Cricut Explore. And now, it’s time to learn how to transfer it on the surface. Basically, you need to apply tape on your label’s sheet. Next, smooth down the surface with a scraper tool. This step will stick your vinyl designs well to the tape.
Now, cut down the label pieces. Then, you have all the label pieces with transfer tape on them. These tapes have a significant role in transferring the design.
So, how do you transfer the final design? To start, select a label and place it on the area you want it to stick. Also, remove the backing paper from the label. Your label will transfer to the surface. Use the scraper tool again to smooth out the final design. Finally, peel off your transfer tape to leave only the vinyl design.
Conclusion
Wasn’t it fun learning how to make labels with Cricut? I hope you all enjoyed the process. Moreover, the supplies are minimal to get started. With no complex procedure, you can make any label with your Cricut cutting machine. I like making such small things for my office. If you’re also a working person and want to create a label for your name to put it on your desk, go for it.
FAQs
How to Make Name Labels With Cricut?
To make a name label with Cricut, all you need to do is use your Cricut Design Space to create any text you want. Use your name or the name of anyone you want to create a label for. Then, cut it with your Cricut machine and stick transfer paper on it. Now, transfer the design to your surface, remove the backing of the transfer tape, and peel off the transfer tape to leave the final design.
What Do You Need to Make a Label With Cricut Explore?
To get started making a label with Cricut Explore, you will need these things:
● Cricut cutting machine
● Cutting mat
● Transfer tape
● Cricut’s vinyl
● Weeding tool
● Scraper tool
● Label design
How to Make Labels With Cricut Print and Cut?
The process for making labels with the Print then Cut feature is simple. To do this, you must have a printer to print the image you want to make a label of. In this process, you’ll make a design using the Cricut Design Space and will print it with your printer and then cut it with the Cricut machine. Lastly, you can easily transfer your design on its place using a transfer tape.
Visit: install cricut design space app
Source: https://mannyexplore.com/cricut-design/how-to-make-labels-with-cricut-explore-for-office
#cricut.com setup#cricut.com/register#cricut.com/setup#cricut.com/create#cricut.com sign in#cricut.com design space#cricut.com/setup login#cricut setup#install cricut design space app#cricut create connect to computer#cricut design space app#cricut new machine setup#cricut software app#cricut design space#cricut explore air 2#cricut.com#cricut setup on computer#cricut setup create account
1 note
·
View note
Text
How to Connect Cricut to MacBook: A Complete Guide
Do you want to connect your Cricut machine to your MacBook? If yes, then this blog will help you understand the connection between Cricut and Macbook. It’s not only about you; almost everyone who is starting with a Cricut machine finds the setup procedure difficult. Therefore, be with me and learn how to connect Cricut to MacBook here.
Before that, you need to understand that Cricut Design Space is an intuitive Cricut software that you need to set up on your device to connect your Cricut product. To get this software, you need to download and install it on your device. Then, you will be ready to set up your Cricut machine for a MacBook.
What Do You Need to Get Started?
To get started with the Cricut connection to MacBook, you need to keep a few things in mind. Look at the steps below to learn the necessary requirements.
Now, you are ready to start the Cricut setup on your MacBook. Let’s check the steps.
How to Connect Cricut to MacBook?
As you know, Cricut machines are compatible with Windows and Mac computers; you can set it up easily on any of your devices. Here, you’ll learn how to connect it to a Mac device. Look at the steps below.
Step 1: Connect Cricut to a MacBook via Bluetooth
Your first step should be to connect your Cricut to a MacBook using a suitable method. I’m choosing the Bluetooth connection method, which is the best wireless connection.
Finally, your pairing process will be finished. You have learned one step towards how to connect Cricut to MacBook.
Step 2: Download Cricut Design Space
In the second step of connecting Cricut to a MacBook, you need to download and install the Cricut Design app on your device. Look at the steps given below to install the Cricut software.
Finally, you have learned how to install Cricut Design Space and how to connect Cricut to MacBook. Now, you can start project-making with your amazing Cricut machine.
FAQs
How Do I Setup Cricut Machine on My Phone?
To set up a Cricut product on a phone, follow these steps.
How to Connect Cricut Maker to Mac?
Follow these steps to learn how to connect Cricut to MacBook:
Why Am I Unable to Run Cricut Design Space on My Mac?
This problem is common, and everyone might have experienced it. This issue may arise when your app is not updated or there are some issues with the device you’re installing. Hence, if you get such issues, immediately try updating your app. Otherwise, you can also uninstall it and then install it back.
Visit: install cricut design space app www.cricut.com setup login
Source: https://explorenewmachine.com/how-to-connect-cricut-to-macbook-a-complete-guide/
#cricut.com/setup mac#cricut.com/create#cricut.com/setup#cricut.com sign in#cricut.com design space#cricut setup#cricut explore air 2#cricut#install cricut design space#cricut design space#install cricut design space app#cricut design space login#cricut design space app#www.cricut.com setup login#www.cricut.com/setup#www.cricut.com/setup login#install cricut explore air 2#cricut new machine setup#cricut software app#cricut create connect to computer#setting up your cricut maker#cricut setup for pc#cricut setup explore air 2 setup
0 notes
Text
How to Connect Cricut to App: A Stepwise Setup Guide
So, here you will learn how to connect Cricut to app. Right? But before I dive further into this blog, I would like to clarify one thing. This blog talks about how to connect your Cricut machine to an app (Cricut Design Space), but I don’t think it is the same as connecting Cricut to your computer or mobile phone.
Connecting a Cricut to an app and connecting Cricut to a compatible device are two different things. Don’t get confused! The question is, if both are different, then what are we going to learn from this blog? In this blog, I will teach you how to connect a Cricut machine to an app. However, it is also called a Cricut setup. We will be learning about machine setup on Windows computers. Let’s dive into it without any further ado!
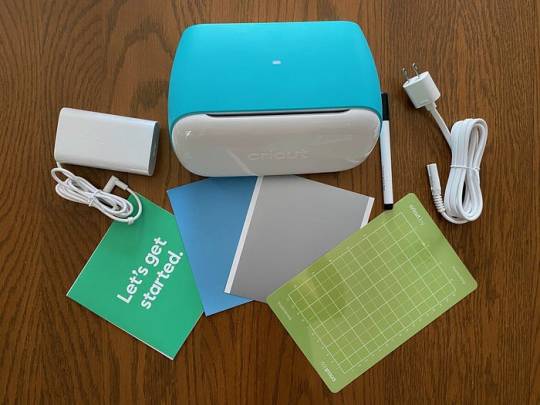
Step 1: Unboxing a Cricut Product
Okay, so to get to the exciting part of the Cricut machine setup, we will first need to unbox the machine. However, if you have already unboxed it, enjoy🥳and move to the second step in order to learn how to connect Cricut to app.
Here, let me share my experience of unboxing my Cricut.
I opened the box’s lid and saw a matted folder over the top surface of the Cricut machine. Here I am, actually, opening my Cricut Explore Air 2 machine. It came with a blue LightGrip mat. Those who got the Cricut Maker machine then will receive a green StandardGrip mat.
The list is long; let me show you what else I got with my Cricut Explore:
Step 2: Open Your Cricut Cutting Machine
To open the Cricut machine, I pressed the Open button (on the left side). As I pressed the button, the rest of the doors opened on their own. Here, Cricut Maker users need to lift the top lid. After that, the front door will open on its own (automatically).
Note: Do not open the doors that open automatically. Just wait and let them open slowly on their own.
When your Cricut is opened, you need to remove the foam and other tape on the side.
Step 3: Plug Into a Cricut Machine
Plugging the power cable into the Cricut cutting machine is the first step in learning how to connect Cricut to app. Now, it’s time to turn it on. Yes! So, let’s grab the power cords that come with our Cricut machine.
You can just plug the main plug into the wall outlet and insert the other into the back of your Cricut machine. But, here, you have to plug in the machine; you don’t need to turn it on the machine here. We’ll do it later.
As the machine is turned on, you need to move to the next step, where we will start setting up our machine.
Step 4: Pair Cricut to a Computer via Bluetooth
I have connected my Cricut using a USB cable, too. Currently, I am using a Bluetooth wireless connection. So, let me show you how to connect Cricut to PC via Bluetooth:
Now, let’s download a Cricut app so that you can understand how to connect Cricut to app, i.e., how to setup Cricut.
Step 5: Download Cricut Design Space
The machine setup requires software called the Cricut Design app. To download the software, you need to go through the steps given below:
Next, follow the prompts until your installation is done. Once done, move to the last steps to learn how to connect Cricut to app.
Step 6: Finish the Cricut Setup
Launch the Cricut Design Space software, and you will see the option to select your Cricut cutting machine on the app. Select the type of machine you want to setup. Next, sign in to your Cricut account. If you don’t have an account, sign up to create one.
Once you have created an account, you need to sign in and then start connecting your Cricut to your app. Although you will get screen prompts to setup the machine, I will explain it briefly.
First, turn on the machine by pressing the power button, and then you need to connect your machine. After that, your setup is done!
HURRAY!!!!!!!!! 😍 YOU DID IT!
FAQs
Question 1: Can I connect my Cricut to an app on my mobile phone?
Answer: Yes, absolutely! Connecting Cricut to the app or setting it up is the same. For this, you will need a Cricut app that you can download from an online app store where you can download the app. For example, if you want to install the Cricut software on iOS, then you can get the application from the App Store, and for Android, you need to go to the Google Play Store. In short, you can easily connect your Cricut machine to an app.
Question 2: Is Cricut machine setup difficult or time-consuming?
Answer: Setting up the Cricut machine is easy and not that time-consuming if you have the right software. The simple-to-use interface of Cricut Design Space will walk you through the easy directions to setup the Cricut cutting machine, which will take you a few minutes. So, install the right software on a compatible device, and then you will be ready to go.
Question 3: Is Bluetooth compulsory for Cricut machine setup?
Answer: No, it is not necessary if your Cricut has a USB cable. Except for the Cricut Joy machine, all the Cricut models have USB ports so that they can be connected via USB cords, too. However, for Cricut Joy users, Bluetooth is compulsory when setting up the machine. In short, Bluetooth is compulsory only for machines for which Bluetooth is not available.
Source: https://desincricut.wordpress.com/2024/04/16/how-to-connect-cricut-to-app-a-stepwise-setup-guide/
#cricut.com/setup#cricut.com setup download#cricut.com setup#cricut.com setup mac#cricut.com setup windows#cricut.com/create#cricut.com sign in#cricut.com/register#cricut.com design space#www.cricut.com setup mac#install cricut printer#install cricut design space app#install cricut explore air 2#cricut explore air 2#cricut create connect to computer#connecting cricut maker to computer#cricut com setup#cricut setup#setting up my cricut maker#setting up your cricut maker#cricut new product setup#cricut design space app#cricut design space#cricut new machine setup#cricut software app#cricut explore 3#cricut account on setup#cricut setup on account#cricut
0 notes
Text
Cricut Design Space Login App: Access Crafting Software Easily
It’s been over a year since I started operating Cricut cutting machines to create DIY projects. Initially, I was completely unaware of Cricut models, its software, and how to use them. But my fighting spirit uplifted me to keep going, and I started researching them. It was time-consuming, but I learned about installing the Cricut software, creating a Cricut ID, and the Cricut Design Space login app process.
Cricut Design Space is the company’s registered design software, providing crafters with a wide range of benefits. With this Cricut app, you must get it on your device to make uncountable crafts. Afterward, you should create a Cricut ID and access your account through login credentials. Keep going with the blog, as I covered the continuous info regarding installation, creating an ID, and logging into the account.
Step 1: Download Cricut Design Space on Your Mobile Device
The foremost step before proceeding with the Cricut Design Space login app is to install Cricut software on your mobile devices. You can use this software as an app rather than opening it in a web browser. Exam the section below to install the app on Android or iOS devices.
Android
With the help of the following method, it will become simple for you to install this software on your Android devices:
After installing this Cricut Design app on an Android device, quickly scan the next section. It will introduce you to the method for installing on various iOS devices.
iOS
Equally important, take the help of the following steps to install this software on your iOS devices:
Further adding to the blog, you must have your separate Cricut account; only then will you get permission to use the Cricut app for crafting purposes.
Step 2: Create a Cricut Account ID on Your Device
Before entering the Cricut Design Space login app, you must create a separate Cricut ID. If you fail, you won’t be able to access the software and create DIY crafts. By considering the below steps, it will become a piece of cake for you to make your separate account:
After successfully creating your Cricut ID, you can easily log in to your Cricut account without any technical errors. If you intend to do that, take a sneak peek at the coming section of the blog.
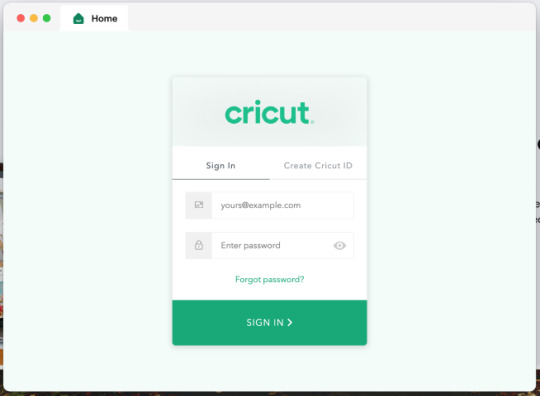
Step 3: Cricut Design Space Login App
In conclusion with this blog, get to know about how you can log in to the Cricut app with the help of the following steps:
Conclusion
In conclusion, the Cricut software is the most crucial tool for crafting. Without it, you won’t be able to form the inner DIY ideas correctly. To get this Cricut app on your device, you must check whether your device meets the system requirements. Afterward, you can easily install the app on your smartphone. You also need to log in to your account and then log in again to use it to create various designs.
Visit: install cricut design space app www.cricut.com/setup login
Source: https://cricutdesignacut.wordpress.com/2024/04/12/cricut-design-space-login-app-access-crafting-software-easily/
#cricut.com/setup#www.cricut.com/setup login#cricut setup#install cricut design space app#install cricut design space#cricut design space app login#cricut create connect to computer#setting up my cricut maker#setting up your cricut maker#cricut install setup#cricut explore air 2#cricut new machine setup#cricut software app#cricut explore 3#cricut design space#cricut software#cricut setup maker#cricut new product setup#cricut setup on computer
0 notes
Text
How to Make Cake Topper With Cricut: A Stepwise Guide
I understand you are pressed for time with an upcoming event at your house and need to know how to make cake topper with Cricut. No worries! You don't have to search elsewhere. I've compiled all the tips, tricks, and instructions you need in one blog.
Making a cake topper with the Cricut is not a mystery. Even if you are new to cake decorating, it's quick and easy. In my crafting room, you'll find many DIY projects. I recently used my Cricut machine to create a custom party cake topper for my son's birthday, and it turned out perfectly.
To help you, I will provide step-by-step guidance on creating a simple yet attractive cake topper. Once you've made it, you can try various designs using your Cricut machine. Follow the guide till the end and enjoy the procedure.
Step 1: Tools and Materials Required
I know you're excited to learn how to make cake topper with Cricut, but before diving in, let's see the materials you need.
After gathering all your tools and supplies, it's time to start crafting. Let's get started!
Step 2: Prepare a Design in the Cricut App
Open your computer and follow the instructions in the section below, but make changes to the text and whatever you see fit.
Step 3: Editing the Text
How to make cake topper with Cricut requires editing cake toppers in Cricut Design Space.
Step 4: Adjust the Text and Add Colors
To make the cake topper more stable and noticeable, I am going to add layers. You can choose the layers as per your preference.
Step 5: Cut and Assemble Your Cake Topper
Once the design is prepared, let's learn how to make cake topper with Cricut. I will cut and weed the design, then assemble it.
Final Thoughts
Cake toppers are a great way to decorate your cake in your unique style. They are both beautiful and versatile, and making them with the Cricut machine is an easy task. I have guided you through the procedure of how to make cake topper with Cricut, from setting up the design to cutting it out, assembling it, and beyond. Now that you have your Cricut machine and Design Space, you can enjoy crafting cake toppers for any occasion.
Frequently Asked Questions
Which Cricut font should I use to make a cake topper?
Well, it totally depends on you. Which font would you like to use for your text as a cake topper? You will find many font options in Design Space. However, let me suggest some fonts that you might want to consider. Firstly, there are 'Script fonts' and 'Serif fonts,' both of which look fantastic and are well-suited for cake toppers.
What are the best materials for making cake toppers with Cricut?
I believe there are many materials worth trying to make a cake topper with a Cricut. These include cardstock (especially glitter), acrylic, and thick paper or wood. While there are other options available, these are perfect choices as they look classy on the cake. I think you should proceed with these materials without any hesitation.
Which Cricut is good for cake toppers?
By the way, you can create the cake topper using the Cricut machine. However, for a simpler process, you can opt for the Cricut Maker 3, which allows you to make cake toppers even from wood and acrylic. Otherwise, if you already have another model, you can certainly continue using it.
Visit: cricut.com/setup www.cricut.com/setup login cricut design space setup cricut explore air 2 setup design.cricut.com/setup
Source: https://cricricutdesigncut.wordpress.com/2024/03/07/how-to-make-cake-topper-with-cricut-a-stepwise-guide/
#digital design#design space setup#cricut explore#cricut explore air 2#design space cricut#cricut setup#cricut project ideas#cricut design space app#cricut design space login#cricut design space download#cricut new machine setup#cricut software app#design.cricut.com/setup#design.cricut.com#www.cricut.com setup login#www.cricut.com/seup#www#www.cricut.com/setup login#www.cricut.com/setup
0 notes
Text

The Cricut Venture Machine is your ultimate companion for exploring the world of crafting and creativity. Designed to inspire your imagination and empower your projects, this versatile machine offers precision cutting, drawing, and scoring capabilities. Whether you’re a seasoned crafter or just beginning your crafting journey, the Cricut Machine Setup provides endless possibilities for bringing your ideas to life. With its intuitive design and user-friendly interface, you can easily create custom designs, personalized gifts, home decor, and more. Take your crafting ventures to new heights with the Cricut Venture Machine.
#Cricut Venture Machine#cricut explore air 2#cricut.com/setup mac#cricut.com/setup pc#cricut.com/setup windows#cricut.com/setup#cricut explore 3#design space cricut#cricut maker 3 bundle#cricut software app
0 notes
Text
How to Use Infusible Ink Pens With Cricut: A Complete Guide
Cricut infusible ink pens and markers are just awesome. I use them to create my iron-on projects like custom T-shirts for myself and my sweet little child. Well, you can make multiple things with these Cricut products. It’s very easy to use and gives a well-finished project in the end. Its color never fades and always provides shiny, vibrant, and colorful crafts. If you are also a crafter and want to learn how to use infusible ink pens with Cricut, then stay with me till the end of this blog to learn in depth.
I have done dozens of iron-on projects with my tiny Cricut Joy machine and infusible ink. The ink is so permanent that it won’t fade after washing. I am really excited to share my way of using infusible ink pens and creating lovely projects.
In this blog, you will get everything about Cricut’s infusible products, like how to use them, what type of projects you can make with them, and even some of my tips. So, let’s get started to learn everything.
What Are Infusible Ink Pens and Markers?
Basically, Cricut’s infusible ink pens and markers are simple pens with infusible ink intended to make various heat projects such as designing aT-shirt, tote bag, or any apparel where ink is necessary.
These products can be easily loaded into the clamp of your Cricut machine and draw your favorite designs. You can draw it with your hands, too.
How Do Cricut Infusible Ink Products Work?
Before learning how to use infusible ink pens with Cricut, you should know how it works. Infusible ink works on the principle of sublimation. It sounds a bit complex, but it’s so simple. When you use the infusible ink or marker on a paper, it’s in a solid state, which is its original state.
But, the moment you apply heat to it, it gets transformed into gas. During this process, it infuses your material, and when you remove the heat, it cools down again. And then, after cooling, it will again become solid.
One thing to note here is that these products only work on specific materials, such as poly-based materials, polyester fabric, coasters, and mugs with a poly-coated ceramic coating.
So, if you want to make such projects, Cricut infusible ink pens and markers will be a must-have. Luckily, these amazing accessories are compatible with all types of Cricut machines, including Cricut Maker, Explore, and Cricut Joy.
How to Use Infusible Ink Pens With Cricut Machine?
Here comes the final part of the blog, which I was excited about. You already understand why we use it. And now, you are going to learn the exact procedure through the steps that I am sharing with you now. Before moving to the final steps, let’s see the materials you will need while making your project.
Step 1: Tools and Supplies Required
Here are some of the essential materials and tools you will need for your project.
When you are done with all the materials, it’s time to start the project. So, let’s start the step-by-step guide and learn how to use infusible ink pens with Cricut.
Step 2: Create Your Design
In the first step, you need to put a sheet of laser copy on your cutting mat and then put it into the Cricut machine.
Now, move to your Design Space and choose the size of your design to fit onto your blank. After that, adjust your Linetype to draw and select a Cricut infusible pen or marker. Don’t forget to mirror the design before the cutting procedure.
Step 3: Load Infusible Ink Pens
Now, select your material. In the case of an older Cricut machine, set the Smart Set Dial to Custom. Once done, put your infusible Cricut pen or marker into Clamp A and then hit the Go button to load different colors.
Step 4: Unload the Cricut Cutting Mat
When your design is ready, you can unload your mat and then take out the design from the mat.
When your design is ready, you are ready to apply heat to your apparel using the Cricut EasyPress mat. To get started, first place the sheet of cardstock inside your apparel blank to keep it protected from wrinkles and damage.
Moreover, use a fresh and clean lint roller to remove the lint from the surface of your apparel blank. It will also remove the fiber particles to create a perfect apparel for heat transfer.
Step 5: Preheat Your T-shirt
Then, cover your apparel with the butcher paper. In the next step, you need to preheat your apparel to remove unwanted moisture from it. Also, you need to check the Cricut Heat Guide from time to time to follow the instructions correctly. Apply the heat with a light pressure.
After that, take off the butcher paper and let the apparel cool down. Now, put the design pieces on your apparel facing down. Then, apply the tape on each corner of your design with a Heat Resistant Tape, which will keep your design free from moving.
Step 6: Apply Heat to the Design
Next, put the butcher paper on top of your design. Afterward, select the correct temperature and time settings for your project from the Cricut Heat Guide. Once set, apply heat with the optimum pressure, and when you hear a beep sound, lift away the press and slowly remove the butcher paper.
In the end, let your project cool completely and enjoy it. Finally, you learned how to use infusible ink pens with Cricut, and hopefully, you will try it on your own.
Conclusion
The process was extremely easy, wasn’t it? All you need to do is to gather some accessories and get started with the project. I used an example of a T-shirt, but you can make use of any apparel like a tote bag or anything where ink pens can be used. You can make beautiful creations with your Cricut infusible ink pens and an EasyPress machine. So, get ready to create something and use the Design Space software to make things beautiful and unique.
Visit: cricut.com/setup
design.cricut.com/setup
install cricut design space app
cricut.com setup mac
www.cricut.com/setup login
Source: https://cricuthelp.wordpress.com/2024/02/21/how-to-use-infusible-ink-pens-with-cricut-a-complete-guide/
#cricut.com/setup#www.cricut.com/setup login#www.cricut.com/setup#cricut design space download#cricut project ideas#cricut explore air 2#cricut software app#cricut new machine setup#install cricut design space app#install cricut explore air 2#cricut new product setup#setting up your cricut maker#cricut create connect to computer
0 notes
Text
How to Make a Puzzle on Cricut: A Step-by-Step Guide

My nephew Philip is about to celebrate his 2nd birthday, and as his godmother, I’m determined to make it an unforgettable one. As a craft teacher, I couldn’t resist the chance to surprise him with a unique gift. I decided to step into my art room and begin a puzzle-making adventure with my Cricut machine set up.
Of course, puzzles will not only test his mental skills but will also increase his IQ level. Before rolling over with how to make a puzzle on Cricut, I need to have all the crafting supplies. I am on a mission to teach you the right way to make a puzzle with Cricut.
If you are thinking that this project is very hard to create, then you are wrong. This guide will let you know the method through which you can make this craft with ease.
Step 1: Log in to Cricut App and Create a Design
Start the process by downloading Cricut Design Space on your device. If you don’t have an account, create one by providing the required details. After creating your account, open the app and tap the Uploads toolbox. Now, upload the file from the Downloads folder into the Cricut Design app. After that, select your image and hit the Insert Image button at the bottom right side of the page.
Also, change the size of your image and open the Uploads toolbox again. At this point of how to make a puzzle on Cricut process, choose the picture and click the Save as a Print Then Cut Image option.
Next, start changing the size of your picture to make it fit perfectly on the puzzle. To make a puzzle with Cricut, select both of the files and open the Align section. After it opens, select Center. Then, tick the Attach option present at the end of the Layers column.
At this stage of how to make a puzzle on Cricut, follow the steps and and take out the printout of your picture. Now, place the printout on the item you are going to use and then remove the sticker paper from it. Equally important, give a smooth press to ensure that it is placed properly without leaving any bubbles.
Step 2: Select Material & Load It to Your Cricut Machine
To make a custom puzzle out of a cutting machine, you should settle down the design on your Cricut mat. After doing that, open the Browse All Materials drop-box and search for Cereal Box. After finding it, please select it and then hit the Done button given inside the green box. Now, go ahead and change the pressure from Default to More and load the Deep-Point Blade into Clamp B.
Step 3: Put All the Puzzle Pieces Together
Also, the cutting machine will do the rest of the work by cutting the design into equal parts. Following this, put the mat upside down and gently remove the puzzle without any hurries. Now, take your Cricut weeding tool and separate the puzzle pieces one by one without causing any damage to the image.
After collecting all the pieces of the puzzle, shuffle them and make the design again. While joining back all the pieces, you will surely feel proud of how smoothly you completed the process by paying attention to every single detail during the process.
Didn’t you fall in love with how to make a puzzle on Cricut? If yes! Then, there is nothing better than looking at your kids playing with it with so much excitement. Besides, the puzzle can also become a great idea for giving as a present at a birthday party or a return gift to the guest.
FAQs
Can You Make a Custom Puzzle With Cricut Design Space?
You can make a custom puzzle using the Cricut Design Space app. After signing into the app, it will get much easier for you to create the design that you are going to use for your puzzle. Also, the Cricut Design app will give you access to the library and other tools while drawing your design.
Which Blade Should I Use to Cut the Cricut Cereal Box?
The Cricut blade that can help you in cutting the cereal box is the Knife blade. With its sharp edges and amazing flexibility, you will get smooth cuts that will give you equal pieces of the puzzle. Also, it can be installed easily on the Clamp, which means that it will save time during the crafting process.
Is It Possible to Make Money With Cricut Puzzles?
Yes, you can surely make a lot of money by making custom puzzles. You can either start your own business or make it part-time and create puzzles out of any material. But, you should be aware of how to work the craft plotter and choose the correct materials before starting the process.
For more information visit: Cricut.com/setup Cricut setup on computer Cricut account login
Source: How to Make a Puzzle on Cricut
#make a puzzle with cricut#how to make a puzzle on cricut#cricut design space download#cricut design space app#design.cricut.com#www.cricut.com/setup login#cricut software app#cricut machine setup#Cricut setup on computer
1 note
·
View note
Text
How to Use a Cricut Joy: Quick and Easy Guide
A few days ago, I went to my cousin’s house and saw a new Cricut Joy collecting dust in the corner. Being a crafter myself, I couldn’t resist asking her why. She replied that she was confused about how to use it. With a smile, I offered to help. From unboxing the machine to setting it up, I guided her through each step, even teaching her how to create her first project.
Then, I realized that some beginners may not have even opened the box and could use my assistance. That’s why I have prepared this guide for you all. Just like I helped my cousin, I will tell you how to use a Cricut Joy from scratch. However, it is necessary to follow this guide till the end because every piece of information is important for using your Cricut Joy.
Step 1: Unboxing the Cricut Joy
If you have already unboxed your Cricut Joy machine, you can continue to the second step below. If not, let’s take a look at what you’ll find inside the box:
Welcome card
Cricut Joy machine
Power adapter
Fine Point pen (0.4 mm)
StandardGrip mat
Sample of smart vinyl
Around 50 pre-made projects
Free Cricut Access for 30 days
Step 2: Setting up Your Cricut Joy Machine
Setting up a Cricut Joy is a crucial step in learning how to use a Cricut Joy machine effectively. Let’s start by setting up the machine first.
Prepare Your Cricut Cutting Machine
Place the Cricut Joy machine on a flat and clean surface near the electric outlet.
Assemble the machine’s power cord and insert one end into the machine and the other end into the electrical outlet.
After that, turn the power button on, and a light will illuminate the machine.
Connecting a Cricut Joy to Your Computer
The Cricut Joy does not have a USB cord, so you have to connect the cutting machine to a computer via Bluetooth.
Turn on the Cricut Joy machine 10–15 feet away from your desktop computer.
Next, locate the Bluetooth option, turn it on, and wait for the computer to detect your machine.
Now, select Cricut Joy from the list, and if asked for a PIN, enter 0000 and hit Connect.

Downloading and Installing Cricut Design Space
Downloading and installing Design Space on your desktop computer is necessary to complete the process of how to use a Cricut Joy machine.
Go to cricut.com/setup, agree to Cricut��sterms and conditions, and download the file.

After downloading Design Space, locate the file you see on the screen and install it.
Once the software is installed, launch it, create a Cricut ID and password, and sign in.
Note: If you want to access Cricut Joy from mobile (Android or iOS), download the Cricut app from the Play Store or App Store.
Adding Your Cricut Joy Machine in Design Space
Once you have installed and signed into the Cricut software, it’s time to set up the Cricut Joy. To do this, launch the Cricut software, click on the drop-down menu, and select New Machine Setup > Cricut Cutting Machine > Cricut Joy. Also, make sure the connection is established.
Step 3: Using a Cricut Joy to Make a Project
You will need to cut vinyl with Cricut Joy to personalize a wooden tissue holder. Here’s what you need for this project:
Cricut smart vinyl
Unfinished wooden tissue box
Cricut Joy machine
Computer or transfer tape
Design
Create a Design in Design Space
Open the Cricut Design app and select the New Project tab.
After that, use the Text function and a text and change its font.
Once you have the design ready to cut, click the Make It option to move on to the next page.
Then, select the mat page. There is no need to mirror this project. Click Continue.
From the All Browse Material option, search for vinyl and select it as a material.
Now, load the green vinyl into Cricut Joy without using a mat.
Cut & Weed Out the Vinyl Design
Once everything is ready, go back to Design Space and hit Continue to begin cutting.
Once the machine completes cutting, it automatically stops. Now, unload the smart vinyl and weed out unwanted designs.

Next, cut the transfer tape to the size of the vinyl and apply it to the design.
Apply Your Design
Frequently Asked Questions
What can you make using a Cricut Joy?
Cricut Joy is a smart, compact, and portable machine that can be used to create different projects. Below, I have listed some of the Cricut Joy projects.
Vinyl mug
Greeting cards
DIY pillow
Leather earrings
Wall art
Tumblers
Cake toppers
Stickers
Labels
Banners
T-shirts
Jewelry
How does Cricut Joy work?
The Cricut machine works with the user-friendly Cricut Design Space or Cricut Joy app. Users need to install one of these and start a project. Also, the Cricut Joy connects to devices via Bluetooth. Once everything is set up, the user designs it and sends it to the machine. Finally, the Cricut Joy will cut or write according to the selected settings.
Do I need a computer to use a Cricut Joy?
That’s not necessarily true; you can also use your mobile device to use Cricut Joy. All you need is a device where you can download and install Cricut Design Space to command the Cricut machine. However, all of this can also be done from a mobile phone or tablet. So, it depends on the user’s preference and their comfort level.
Conclusion
The Cricut Joy is a beginner-friendly crafting tool that is compact yet versatile. Setting up the Cricut Joy and learning how to use it may not be too difficult for beginners. I have discussed everything in detail in the blog post above. If you followed the instructions exactly, you can now use your Cricut Joy without any hassle.
Read more: install cricut design space app
cricut.com/setup
cricut.com/setup mac
Cricut New Machine Setup
Source: how to use a Cricut Joy
#how to use a Cricut Joy#Cricut New Machine Setup#cricut software app#cricut design space download#cricut explore air 2#cricut.com/setup#cricut project ideas#design.cricut.com/setup#cricut.com/register#cricut.com#cricut.com/create
1 note
·
View note
Text
Explore the possibilities with a Cricut cutting machine to make enticing projects. Get the machine from Cricut’s official site and set it up using Setup Cricut.com. For this, navigate to cricut.com/setup. After this, select the Cricut new machine setup you are using and start cutting the material you want. Cricut is capable of cutting various materials up to 300+ uninterruptedly. Use your computer or mobile device to create an alluring design and control all the functions of your Cricut with one click.
#cricut maker setup#cricut maker 3#Cricut Maker Machine#cricut.com/setup pc#cricut.com/setup windows#cricut.com/setup#cricut explore air 2#cricut design space download#cricut software app#cricut new machine setup#cricut project ideas
0 notes
Text
A Complete Guide to Cricut Software Download on PC/Mobile
Recently, one of my cousins bought a Cricut Joy. Being a beginner, he wants to learn how to use the Cricut cutting machine. But before using the tool, he has to set it up. Also, he was looking for a Cricut software download guide. On knowing this, I assured him of my help.
You don’t need to worry if you are like my cousin and don’t know how to download the software on your Windows, Mac, iOS, or Android. I will help you with that. But did you know that the process of downloading Design Space is different for various platforms? Yes, you heard that right! Each platform will require a different approach. So, join me on my journey and learn how to download Cricut Design Space on a computer and mobile device.
Cricut Software Download on Your Windows PC
The first time I set up my Cricut machine was on Windows. However, before this, I downloaded only on Windows. So, let me teach you how to download your Cricut Design Space on a Windows computer.
Let’s see the steps to download this Design Space app on a PC:
First, open your browser (You can choose Chrome or Microsoft Edge), then type design.cricut.com.
Now, you must mark the checkbox to agree to the Terms of Use and Privacy Policy.
Afterward, it will activate your Download so that you can hit the tab to begin the Cricut download process.

After the download is complete, you have to type the Windows logo + E keys on your keyboard to open File Explorer.
Then, navigate to the Downloads tab located at the left navigation bar.

In the Downloads folder, you will get the downloaded Design Space file. You should double-click on it to install it on your Windows computer.
Next, you should follow the instructions given on the display to finish the installation.

Cricut Software Download on a Mac Computer
I have been using my Design Space app on a Mac computer recently. My experience of using this software on Mac was overwhelming. Let me guide you through the steps to download this app on a Mac device:
First, open your browser (I use a Chrome browser), then look for design.cricut.com.
After that, you need to select the check box to agree to Cricut’s terms and conditions.
Then, you will notice your Download tab in green color, enabling you to select it to be downloaded.

After downloading the app, you should go to the file folder where your file is downloaded. Open thisfolder and double-click the .dmg file.

In the next window, you will need to drag the Cricut icon to the Applications folder to start the installation on your Mac.
Cricut Software Download on Your iOS Smartphone
Here, I will walk you through the steps to the Cricut Design Space download on iPhone or iPad:
First, you will need to tap the App Store to launch it.

Then, on the search bar, you will need to type Cricut Design Space.
Afterward, you will see a Design Space app with a white square shape on which Cricut is written in the center.
Next, you will need to hit the Get button to download the application and then verify the download using your iTunes password if it asks you to enter it.

When the Cricut download is complete, you have to move ahead to the next step for Machine setup or Sign-In.

Cricut Software Download on an Android Device
If you are using Smartphone Android devices such as Samsung, Nokia, Redmi, Realme, etc., you can also download Design Space on these devices. Follow the steps given below for the Cricut Design Space download:
First, you launch the Google Play Store on your smartphone.
Then, you have to go to the search bar.
Type Cricut Design Space and hit the Install button.

After installation is complete, the Cricut app will be added to your home screen.
Lastly, open the app and start setting up your machine or sign in to your Cricut account.
Final Words
In this blog, I covered the complete process of Cricut software download. Simply put, I have explained the steps for downloading Cricut on a computer and mobile device. You can easily download your Design Spaceon Mac, Windows, Android, and iOS. When you download the software to the computer, you may use any browser such as Chrome, Firefox, and others. But on mobile devices, you will need to have the App Store or Play Store for iOS or Android, respectively.
FAQs
Question 1: Does Cricut offer free software?
Answer: Yes, the Cricut software, also known as Design Space, can be downloaded for free. It is supported on four platforms: Windows, Mac, iOS, and Android. The software is free and offers multiple free resources, such as images, fonts, and ready-made projects. Hence, Cricut software is free. However, there are some paid plans that you can access to get the Cricut Access Subscription.
Question 2: Can I use Cricut Design Space without my Cricut machine?
Answer: Yes, obviously, it is cloud-based software, so there is no requirement for a Cricut cutting machine while using it. The only thing you have to ensure is that it is downloaded to a compatible device with the right operating system. Cricut software download is easy on a PC or Mac. However, if you need to, you can also download them on your mobile devices, which support iOS or Android.
Question 3: Can I download Cricut app on my PC?
Answer: Yes, you can! If you want to download the Cricut app on your PC, then follow the instructions below:
First, you have to go to the Cricut’s official website.
Then, you will need to go to the Apps section.
Now, look for the app.
After that, you will need to click on the Download button.
Next, follow the instructions to install it on your PC.
#Cricut New Machine Setup#cricut.com/setup#cricut design space download#cricut software app#cricut explore air 2#cricut design space login#Cricut download#Cricut Software Download#install cricut explore air 2#Cricut Design Space download#cricut design space for mac
1 note
·
View note
Text
How to Create Wall Arts With Silhouette Cameo for Home?
You have come to the right blog if you want to make Silhouette Cameo wall art for your home. My name is Manny Koshbin, and I have been working as a professional crafter for 2 years. Also, I help crafters learn and create projects through my blogs. As a result, I have curated it to provide all the fundamental guides to making wall art hassle-free.
In this blog, I will share a step-by-step guide to creating a wall art project with the Silhouette Cameo machine. Also, you learn the process of setting up the machine and supply requirements. So, keep reading this blog till the end to gain in-depth knowledge of the full procedure.
The Process to Setup a Silhouette Cameo on Your Device
If you want to learn the process of creating Silhouette Cameo wall art for your home, you have to set up the machine first. I am sharing the guide below for setting up Silhouette Cameo 4. You can use this guide to set up the Cameo machine you are using.
Step 1: Register Your Cameo Machine
Step 2: Downloading and Installing the Silhouette Studio App
Step 3: Connect the Cameo Machine
Tools and Supplies You Need for Making a Wall Art
To make this Silhouette Cameo wall art for your home, you have to gather some essential supplies. Below are the supplies that you will need to complete this project.
The Process of Creating a Silhouette Cameo Wall Art
If your Cameo machine setup process is complete and you have all the essential supplies for this machine, then move forward with the process to complete your art project. These are the steps you need to follow.
Step 1: Create a Design on the Silhouette Software
Step 2: Cut the Design on Your Cameo Cutting Machine
Step 3: Complete Your Design
FAQs
How Do You Make Silhouette Wall Art as a Beginner?
To create the wall art with the Silhouette machine then follow the below guide.
What Do You Need to Make Silhouette Art?
These are the supplies you should have to make the SilhouetteCameo wall artproject.
● Any Silhouette Cameo cutting machine
● Silhouette Studio software
● Silhouette Adhesive Stencil Material
● Transfer paper
● A piece of plywood to create your art
● Weeding tools
● Scissors, and others.
However, the supplies can change depending on the type, size, shape, and other aspects of the projects.
Which Silhouette Cameo Is Best for Making Wall Art?
All the Silhouette Cameo machines are suitable for creating any type of wall art design. However, if you are looking for more profound results while creating the project, then you can go for the Silhouette Cameo 4. Plus, this machine comes with a plethora of amazing features and premium results while making projects. Also, it can help you create pro-level projects even if you are a complete beginner.
Visit: cricut.com/setup cricut setup explore air 2 cricut.com setup mac design.cricut.com/setup cricut design space setup
Source: https://mannyexplore.com/silhouette-designs/how-to-create-wall-arts-with-silhouette-cameo-for-home
#Arts With Silhouette Cameo#cricut.com/setup#cricut.com/setup login#cricut maker 3 bundle#cricut project ideas#cricut explore 3#cricut design space download#cricut software app#cricut.com setup#cricut.com setup mac#design.cricut.com/setup#cricut.com setup download#cricut.com design space#cricut.com/register#cricut.com sign in#cricut design space setup#install cricut design space app#cricut create connect to computer#cricut new product setup#setting up your cricut maker#cricut explore air 2#cricut setup explore air 2 setup#install cricut explore air 2#cricut setup new device#cricut install setup#cricut setup maker#cricut setup
0 notes