#Free coding tools for beginners
Explore tagged Tumblr posts
Visit Tumblr Blog
Explore Tumblr blogs with no restrictions, modern design and the best experience.
Last Seen Tumblr Blogs


Fun Fact
Mobile US users spent an average of 115.8 minutes on Tumblr app monthly.
Text
Discover the top 10 free coding tools for beginners in 2025 to start learning programming easily with TCCI Computer Coaching Institute.
#Free coding tools for beginners#Best coding tools 2025#Learn programming free#Beginner coding software#TCCI Computer Coaching Institute
1 note
·
View note
Text
i need to learn 3d modelling so that more than anything my power to mod persona 4 golden can grow
#rambles#modding#the thing is i'm SO BAD at following tutorials#i've always learned better by doing my own thing. messing around with whatever tool it is until it works#but that isn't really something i can do with 3d modelling.#or at least it's not something i can do at a total beginner level. i imagine it'll be kinda like how i learned coding#(did a couple free online classes and once i learned the very basics/got bored i just did my own thing)#but i started THAT when i was like 14. i wanna be as good at blender as i am with html/css NOW!!!!!!#<- is not even that good w html#<- because of the aforementioned ''hates taking classes on this kind of thing'' thing
3 notes
·
View notes
Text
Top 7 Free Tools Every Beginner Developer Should Know in 2025
This article explores the top 7 free coding tools that every beginner developer should use in 2025. It’s designed for students, career switchers, and aspiring developers who want to start coding without paying for expensive software.

You’ll discover tools like Visual Studio Code (a powerful code editor), GitHub (for version control), and Replit (a browser-based IDE), along with FreeCodeCamp, Postman, StackBlitz, and GitPod. Each tool is explained with a beginner-friendly problem-solution format, helping readers understand why it's useful and how to start using it.
The article wraps up with a practical checklist, encouraging readers to take action by downloading tools, joining communities, and building real-world projects.
It’s an essential read for anyone starting their coding journey in 2025 with zero investment.
#free coding tools#IT tools for beginners#best developer tools 2025#tools for learning to code#top 7 free coding tools#coding journey in 2025 .
0 notes
Text
The Best Free No-Code Platforms for Web Development in 2025
Introduction Gone are the days when web development was a privilege reserved for coders and engineers. In 2025, no-code platforms have evolved into powerful, intuitive tools that allow anyone—yes, anyone—to build stunning, functional websites without writing a single line of code. Whether you’re launching a personal blog, a small business website, or a prototype for your next big startup idea,…
#AI-powered web design#beginner web development platforms#best no-code tools#free no-code web builders 2025#no-code website builder comparison
0 notes
Text
Unlock Your Potential: The Ultimate Guide to HugeTools.net
In today’s fast-paced digital world, having access to the right tools can make all the difference in boosting productivity, saving time, and achieving success. Enter HugeTools.net , your ultimate toolkit designed to simplify even the most complex tasks. Whether you're a developer, marketer, student, or entrepreneur, this platform has everything you need to get things done efficiently.
Welcome to our comprehensive guide where we’ll explore what makes HugeTools.net so special, highlight its key features, and show you how it can transform the way you work. Let's dive in!
What Is HugeTools.net?
HugeTools.net is an innovative online platform offering a vast array of free tools tailored to meet the needs of modern professionals and hobbyists alike. From text manipulation and image optimization to data conversion and SEO utilities, HugeTools.net provides solutions for almost every task imaginable.
Our mission is simple: empower users by delivering powerful, user-friendly tools that save time, reduce effort, and deliver high-quality results. No matter your skill level, you'll find something here to help you achieve your goals.
Key Features of HugeTools.net
Let’s take a closer look at some of the standout features available on HugeTools.net:
1. Text Tools
Manipulating text has never been easier with our collection of text tools:
Convert case (uppercase, lowercase, sentence case).
Remove extra spaces or duplicate lines.
Generate Lorem Ipsum for testing purposes.
Perfect for writers, developers, and anyone working with large amounts of text.
2. Image Optimization Tools
Optimize your images effortlessly with these handy utilities:
Resize images for web or print.
Convert file formats (JPEG to PNG, etc.).
Add watermarks for branding purposes.
Ideal for designers, bloggers, and photographers who need optimized visuals without compromising quality.
3. Data Conversion Tools
Transform data into different formats quickly and easily:
CSV to JSON converter.
XML to HTML transformer.
Base64 encoder/decoder.
Great for developers and analysts handling complex datasets.
4. SEO & Marketing Tools
Enhance your online presence with our suite of SEO and marketing tools:
Meta tag generator.
URL shortener.
Keyword density checker.
Helps marketers and content creators improve website performance and visibility.
5. Developer Utilities
Streamline coding tasks with specialized developer tools:
Color picker and palette generator.
Regex tester.
QR code generator.
Saves time for developers and simplifies common coding challenges.
Why Choose HugeTools.net?
Here are just a few reasons why HugeTools.net stands out from the competition:
User-Friendly Interface: Our tools are intuitive and require no technical expertise to operate.
Free to Use: Access all our tools without any hidden fees or subscriptions.
Constant Updates: We regularly update our platform with new features based on user feedback.
Reliable Performance: Trust us to deliver accurate results every time.
At HugeTools.net, usability, reliability, and accessibility are our top priorities. That’s why thousands of users worldwide rely on us to simplify their workflows.
How to Get Started
Ready to try HugeTools.net? Follow these simple steps:
Visit https://hugetools.net and browse through the categories.
Select the tool that matches your needs.
Follow the on-screen prompts to input your data or upload files.
Download or copy the output as needed.
Explore additional options within each tool for advanced functionality.
It’s that easy! Within minutes, you’ll be up and running with one of our powerful tools.
Tips and Tricks
To get the most out of HugeTools.net, consider these pro tips:
Combine multiple tools for enhanced productivity (e.g., optimize an image and then add a watermark).
Bookmark frequently used tools for quick access.
Check the "Help" section for tutorials and FAQs if you encounter any issues.
Share your experience with others—your feedback helps us improve!
Success Stories
Don’t just take our word for it—here’s what real users have to say about HugeTools.net:
"As a freelance graphic designer, I rely heavily on HugeTools.net to compress my images before sending them to clients. It saves me hours of work every week!" – Sarah M., Graphic Designer
"The CSV-to-JSON converter saved my team during a tight deadline. We couldn’t have completed the project without it." – John D., Software Engineer
These testimonials speak volumes about the impact HugeTools.net can have on your workflow.
Conclusion
HugeTools.net isn’t just another collection of tools—it’s a powerhouse designed to revolutionize the way you work. With its diverse range of functionalities, commitment to user satisfaction, and constant innovation, there’s no reason not to give it a try.
Start exploring today and discover how HugeTools.net can transform your productivity. Who knows? You might just find your new favorite tool!
Call to Action
Ready to boost your productivity? Head over to HugeTools.net now and start using our free tools! Don’t forget to leave a comment below sharing your favorite tool or suggesting new ones we could add. Happy tooling!
#Secondary Tags (Specific Features)#Text Tools#Image Optimization#Data Conversion#SEO Tools#Marketing Tools#Developer Utilities#CSV to JSON Converter#QR Code Generator#Regex Tester#Meta Tag Generator#Tertiary Tags (Audience & Use Cases)#For Developers#For Marketers#For Students#For Entrepreneurs#For Designers#Work-from-Home Tools#Remote Work Tools#Digital Marketing Tools#Content Creation Tools#Graphic Design Tools#Long-Tail Tags (Specific Phrases)#Best Free Online Tools#Tools for Boosting Productivity#How to Optimize Images Online#Convert CSV to JSON Easily#Free SEO Tools for Beginners#Quick Text Manipulation Tools#Enhance Your Workflow with HugeTools.net
0 notes
Text
I saw a poll earlier about participation in regular in-person activities, with numbers that make me wonder if a lot of people don't know what the options are or how to find them. Here are some that I have always found welcoming to new people; for me, these are ways to leave my apartment and get some human interaction without having to make much conversation (there is a reasonable amount of that if you want it, but since it's understood that you are there to do an activity, the thing you are doing is the point rather than pure socializing). A search for "[activity] [location]" should tell you what's available in your area.
Contra dancing: This goes at the top and gets explanation because it's my favorite. I grew up doing this and love it very very much; I always look for local dances when I move somewhere new. Most dances are very beginner-friendly (though there are some exceptions), and zero dance experience is required to participate. Many will include a lesson for beginners in the half-hour before the main event starts, and there are always instructions throughout the evening. You truly do not need to know anything going in. The convention is to switch partners throughout the night, and it's completely okay to attend alone and ask people you don't know to dance. Try Contra Dancing has a search tool by zip code. Typically $8-15.
Community theatre tech: Acting is an option if that's your thing, but in my experience, tech is easier if you're looking for an activity because there's not usually competition--you often can just volunteer without needing to worry about auditions or casting. Roles like run crew (where you move set between scenes and such) don't require any prior knowledge, and plenty of the other tasks can be learned with a little training. If you turn up reliably, the word will spread--good techies are invaluable. Free to participate.
Community band or chorus: Prior experience in playing an instrument is necessary for the band; for singing, it depends on the type of chorus. Some are auditioned, others are just thrilled by any participation. May require dues.
Shapenote singing: A more niche one and another of my personal favorites (I ignore the religious lyrics and treat them as poetry). This can take some time to pick up, but many places have a small monthly sing that is very welcoming to new people. fasola.org has lots of information about the tradition and where to sing. Free, optional donations accepted.
Library events: Find your local public library's website and look for a calendar or events page to see if anything appeals. Typically free.
Crafting groups: Yarn stores and other craft supply places often have regular open gatherings (typically free) and/or classes (may cost money for teaching and supplies).
Games: If you have a local game store, check their website for events. Or search "[location] [chess club]" or whatever is your thing. Usually free.
Dance: Depends on what is available in your area. A studio where I am has a monthly swing dance, with beginner lessons before, for $10.
Sports: I don't really do these but they presumably exist and can be found like the other things.
The important thing is to just go do the thing. It will probably feel awkward the first time--that's normal! These are all spaces where the point is for people to show up and participate. They want you to be there, and they want you to come back! Otherwise they can't keep existing. Several of these (contra dancing, shapenote, a lot of crafting groups) are especially excited about new people and younger participants and will be thrilled to teach you how to do the thing. And the only way to make it feel comfortable is to plow through the first awkwardness and go back until you decide if you actually enjoy it or not. When you find a thing you like, keep going, and after a little while you end up with a community of people to see regularly who share your interests. This is what humans are supposed to do.
334 notes
·
View notes
Text
complete beginner's guide to [kpop] giffing, as explained by me!
keep in mind everyone has a different style and process, so there are some things in mine that may not feel intuitive or helpful - if so, don't include it! if you can make the gif, and have fun doing it, that's good enough. this post also assumes interest in specifically kpop giffing, but can for the most part apply to other content as well. i would just recommend different sharpening and coloring for those.
separated by headings (not images, since i need those... for examples) - if you are skipping to a specific section, look for the orange text of what you are looking for!
table of contents: - picking your programs - additional tools and programs (optional) - finding files - importing to photoshop (vapoursynth, screencaps, etc) - photoshop shortcuts and actions - sharpening - coloring - export settings - posting on tumblr
programs:
if you already have photoshop / your giffing program installed and set up, go ahead. if you don't, i would recommend looking here to get photoshop. please make sure you follow instructions carefully and safely! i do know photopea is an alternative people use, and i'm sure there are others. i unfortunately don't know any tutorials to link and probably won't be much help in regards to those programs, but i'm sure there are some floating around on tumblr!
my gif process uses photoshop, so this tutorial assumes that as well. if you use a different one, you might be able to transfer this to what you use, i'm not really sure :(
additional tools and programs: - handbrake: upscaler, found here. i make my own settings and generally only use this on lower quality sources to give vapoursynth a better chance with encoding in higher quality. - davinci resolve: a program i use to make clips appear 60fps when they are choppy or too few frames for the gif to look nice, and occasionally to do pre-photoshop coloring! i use the free version. i do not use this all the time and it is a big program, so definitely don't get it if you think you'd forget to / not want to use it. - yt-dlp: open source, downloads pretty much any file i could want quite well. i use this for most of my downloads and for subtitles as well. does require some knowledge of code, or, at the very least, willingness to troubleshoot set-up. find it here! i can share the command lines i run for: video, audio, vid + sub. - 4k+ downloader: what most people use for youtube-source sets, i believe. you have a limited number of downloads per day on the free version, thus the other downloading programs. - jdownloader2: no limit but sometimes a little slow or will refuse to download because of not being logged into an account, etc. a good download alternative if you plan on downloading a lot and yt-dlp is too much. - vlc: free program, standard on some devices, good for viewing files. - mpv: excellent file viewing, can also deinterlace and screencap (if you do not have / use vapoursynth) - vapoursynth: mac users beware, it's not optimized or set up and is a huge headache. windows users, once you get it set up, it's golden.
finding files, what to look for, and how to use them: how to use is explained here, with a focus on smooth and nice speeds! but finding the file is the first step, so let's head there.
stages: k24hrs (invite only, feel free to private dm or send an ask off anon for a file - i will do my best to get it to you); kpopbuzzhub; sharing korea torrent (requires a torrent app); twitter (shrghkqud (only has recent files) and a few other uploaders, requires much more active searching). there are a few other places you can look, but it is often more trouble than it is worth (or costs $). i am also always willing to help people find materials, so you can ask me to help you look for something or to link a source i used for whatever set.
music videos: also sometimes on k24hrs. i use vimeo a lot (color graders, directors, etc., will upload clearer versions). sharemania.us has some kpop mvs, typically bigger groups (i.e. blackpink). this is a place i check for ggs. and if none of these places or searching for torrents on btdigg, or on google in korean works, i just download the highest quality setting from youtube.
other types: like vlogs and fancams, normally directly downloaded from youtube, instagram, or twitter using yt-dlp or sites specifically for the app (i.e. twittervideodownloader).
what do i look for? 1080i for stages (or 1080p) are often super nice as they're a .ts. 2160p/4k is often ideal, but it also depends on your computer and what you are comfortable working with! generally - not always due to ai upscale - a bigger file size (in the gbs, high mbs like 800) is better and has more detail that will look clear when you work on it. older stages (2nd gen and before, some 3rd gen) and music videos often always are lower quality due to camera quality, and much harder to find. if you have to use the youtube upload for a stage, it is definitely doable, but it may be slightly disappointing in the quality you want to achieve. it depends on what you're comfortable posting and making!
how do i use them? if you use vapoursynth, scenedetect (encode/process whole video) or timestamp (just a small clip) your file - if upscaling, using davinci resolve, or any other pre-processing, do that first. it will pull up a resizer and a program and once you encode, it will give you an output file using the size and settings you put. this will import to photoshop. if using mpv or another screencapping method, take your screencaps (again, all pre-processing first) and prepare to import. there are two ways to do that for screencaps. you can also just watch whatever you downloaded, i'm guilty of downloading concert files just for fun 😅
in the next sections, i will be using four different files of varying quality and sources to explain my steps. hopefully that is helpful!
example file 1 (4k and 60fps, obtained using yt-dlp) example file 2 (1080i, obtained from k24hrs) example file 3 (1080p HD, obtained using yt-dlp) example file 4 (pulled from the gg archive i use, master)
importing to photoshop (vapoursynth and mpv explained): using example file 1, i am processing in vapoursynth - i always do one extra second before and after the clip i actually want so it doesn't cut off any frames i'd like. i adjust my sizes based on what works best for tumblr (540px for wide, 268px for 2 column, and 178 for 3 column). i always use finesharp 1.5 (this setting is up to you! i used to use .7, so totally ok if it changes over time, too!) when you export in vapoursynth, you need the y4m header. i use export to mov preset.
when importing to photoshop using a video (so vapoursynth, video files, not screencaps):


i recommend making your selected range a little bigger than the frames you want so they don't accidentally not get included. delete any extra frames while in the frame animation and then turn it into video timeline. i turn all my layers into a smart object (select them all by clicking the bottom layer and then shift-clicking the top one, or use (on windows) ctrl + alt + a to have it select faster). set timeline framerate (if you want to, i always use 60).


now your smart object is ready to sharpen and color!
using example file 2, i am processing mpv - i hit 'd' until deinterlace is on 'auto'. find the clip you'd like and hit your screencap shortcut (alt+s) for me - your screencaps should be super clear, it depends on how you set up your software (if mpv, what compression you told it). screencaps can take up a ton of storage so i recommend only screencapping what you need and deleting them after. when you hit your shortcut, play the file to the end of the clip you went and hit the screencap shortcut again to stop. your frames should be in the folder you designated as pngs now. delete extra frames now!
you now have two options: import as is, which can be a little slow, or turn them into dicom files. importing as is is done through stack. it will prompt you to select what is being loaded - change Use: to folder, and let it process. it will be slow. hit ok when the file list updates.

when it is done loading: create frame animation -> make frames from layers -> reverse frames. i would crop now using the crop tool for processing speed, and then proceed to do video timeline, smart object, and frame rate. when cropping: on the top, above your document names, the second image should show up on the crop tool - this can set your dimensions. i zoom and crop screencaps using this.


the other option is DICOM files, and what i use. when you have your pngs, do alt + d in the folder (windows), type cmd, and run this command: ren *.* *.dcm. press enter. it will update the files. on macOs, just rename the file type to .dcm.

then, import as so (it will prompt you to select the folder your .dcm are in, and will not work if the files are not actually DICOM). i find it much faster than the stack import. crop when it is done importing for processing time, like the other screencap import style.

create frame animation -> make frames from layers -> video timeline -> smart object from layers -> 60 fps.
photoshop shortcuts and actions: (windows) - ctrl + alt + a: select all layers - ctrl + shift + alt + w: export as image - ctrl + alt + shift + s: save for web (legacy) - this is the gif one!
actions are imported or created, i've shared my sharpening ones before. there are plenty you can find (or make) for a variety of things, such as aligning objects to a fixed position on all docs, doing the screencap reverse and import for you, etc. they are imported using load actions - select the [downloaded] .atn file and it'll pop up.

sharpening: explained here, and has my actions (feel free to use). very important to the quality and clarity of the gif. the better the file, the clearer a gif looks, sharpening can only do so much. play around during this step!
coloring: very much the most personal taste stage of giffing. i explain my process here. in kpop giffing, we tend to focus on unwhitewashing. other giffing tends to be more aesthetic tastes and fun since the source has better colors to work with.
export settings: these are what i use! you need the 256 colors. i do not recommend lossy or interlaced. i think bicubic sharper is the clearest i have tried.

posting on tumblr: use these dimensions FOR GIFS. edits can be different. height is up to you - i would not go over 800, but i think my quality looks weird past 600 range anyways.

example gifs: yeji, from example file #1, imported using vs. uses no. 1 sharpening (altered) from my pack. colored. zhanghao, from example file #2, imported using mpv and the load via stack. uses no. 4 sharpening (altered) from my pack. colored. taeyeon, from example file #3, imported using mpv and the load via dicom. uses no. 1 sharpening from my pack. colored. eunbi, from example file #4, imported using vs. uses no. 2 sharpening from my pack. colored.


if your gifs don't look how you want right away, that's okay! it takes time. my first ones were not great either. i am always improving on and working on my gifs. good luck and have fun hehe ♡
#i do not feel that qualified to answer this so caveat im not the best. and please also take ideas from my lovely moots and their resource#tags and tutorials / shared things. they are all so good#m:tutorial#resources#long post#flashing tw#userdoyeons#awekslook#ninitual#useroro tuserflora#useranusia#userchoi
91 notes
·
View notes
Note
hellooo i LOVE your art and all of ur little games so so dearly <3 ur style inspires me every day and i'm always excited to see what you put out next! i've been interested in creating my own games recently and i was wondering if you had any advice as to where to start?
( ^^)人(^^ )♡!!
i recommend you look into these tools/engines, which require little or no coding:
free: -twine -bitsy -decker -GB studio -godot (this one needs more coding knowledge afaik but very beginner friendly)
paid: -construct 3 -RPG maker
please note that even with the simplest ones, "no coding" doesn't mean you'll automatically know how to use them. all of them have their own logic and workflow and you're gonna need some patience (i myself tried using RPG maker and didn't understand sh1t lol but plenty of people find it easy)
you could also look for gamejams to join ^^ some people join without pre-established teams and look for others to team up/learn together
220 notes
·
View notes
Text

THE SIMS 3 TUTORIAL
HOW TO CREATE DEFAULT REPLACEMENT MOD USING CUSTOM MESH & TEXTURE FOR SIMPLE OBJECT
⚠️ Tumblr has 30 pictures limit, so I cannot include too many pictures. If you want to zoom in the pictures, click the pictures to enlarge, or save the pictures into your PC, zoom the pictures on picture viewer or zoom in the pictures on your mobile phone. ⚠️
----------------------------------------------------
I create this tutorial to make easier to follow because there are older tutorials available before but scattered on internet and usually only say "Export to replace s3asc" without explaining how to export the edited object properly.
My method is using TSR Workshop instead of exporting the object using Sims 3 Object Export/Import plug in because exporting to replace the s3asc using that plug in always giving error notification "ERR: Model has 1 groups; original had 0" and cannot be exported.
For beginners who are very new using s3pe and haven't created default replacement mod before, better start from simple object first.
Simple objects I mean in-game object that has single MODL and single texture with no morphs, no GeoStates, no presets, no CAS colour channels, and easily cloned from OBJD on catalogue. Usually as utensils that Sims holding in their hand, not buy/build objects. For example: Pencil, pan, fork, spoon.
----------------------------------------------------
Tools to prepare:
s3oc
s3pe
Milkshape 3D for bone assignment (Version I use 1.8.5 beta, discontinued by its developer, therefore feel free to download the full version with its license key provided).
Sims 3 Object Export/Import 1.01 by Wesley Howe (Milkshape plug-in. Download msS3ObjPluginsV101.rar )
TSR Workshop (Older version for TS3 only version 2.0.88)
TSR Workshop plug-ins for export.import TSRW Object.
3D Program (Blender/Maya/3dsMax)
Editing images software (Photoshop, make sure you have to install .dds plugin by Nvidia. For free software alternative, you can use GIMP with its .dds plugin)
This tutorial will not teach you how to:
Meshing object ❌
Create alpha texture ❌
Change thumbnails in-game ❌
Install programs and plug-ins ❌
This is how I created Chinese chopsticks replacement mod using custom mesh and texture.
In summary, this tutorial has 10 steps:
Step 1. Clone the Object using s3oc
Step 2. Open S3PE to Copy the Original Resource Code and Export the Files
Step 3. Export the Original Mesh as Base Mesh to .obj format
Step 4. Create Your Custom Mesh
Step 5. Bone Assignment & Create Group
Step 6. Create custom Texture
Step 7. Import the .wso of Edited Mesh on TSR Workshop & Export the package
Step 8. Export MODL file from Package saved from TSR Workshop
Step 9. Finalizing in s3pe & Replacing the Original file with Edited File & Correcting the Code As Same As Default Code
Step 10. Test the CC in your game.
-----------------------------------
✳️ Step 1. Clone the Object using s3oc
Before cloning the object, check the Game Folder for in-game object file location. Settings > Game Folders...
Take a look if the Base Game or Expansion Pack for object file you want to clone is in the right folder. For example, my The Sims 3 game are all bought from Steam, so the location is D:\SteamLibrary\steamapps\common\The Sims 3
If you want to clone object from Expansion Pack, make sure input the folder location. For example, the location for World Adventures EP is D:\SteamLibrary\steamapps\common\The Sims 3\EP1

If you are done, close the pop-up box. You can continue click Cloning then choose Normal Object...
Wait until you get the whole catalogue. Click Search...

For example, I clone object from World Adventures Expansion Pack. You can clone object from Base Game or other Expansion Packs as long it is considered as "utensil" that Sim holding on hand. For example: "Pencil" or "Pan"
Search for text: chopsticks
or if you want to clone object from Base Game, search: utensil
Tick check marks for Resource Name, Object Name, Object Desc then click "Search button"
Search result gives you results with name "chopsticks". Here is the object we are looking for: UtensilChopsticks
We need the OBJD file to clone. OBJD = Object Data.

Click "Clone or Fix" at the right bottom. Then you see the next page to determine if you want to clone with renumber or not. If you want to make default replacement, then do not check the Renumber box. Keep it blank.
Tick check box means the s3oc will generate new resource code for new item. Not tick the check means the s3oc will overwrite the same resource code, it is to replace object you cloned in-game.
I am personally a detailed person, so I usually tick as many as I want: tick "Deep clone" "Missing String Tables" and "Include Thumbnail" to include more details. Then click "Start" to proceed.

It will give you file name [CreatorName]_ObjectName_Number
Then save your package file in "DBPF Package" format in your project folder. Always make folder for any file to make everything organized.
✳️ Step 2. Open S3PE to Copy the Original Resource Code and Export the Files
Open S3pe, locate your package file you cloned from s3oc. Find the MODL of Utensil Chopsticks, Right-Click, "Details..."

On Resource Details, click "Copy TGI" to copy the Resource Code. Type, Group, and Instance will automatically be copied on clipboard. Then open Notepad, Right-Click to "Paste".
Click GRID on bottom of the s3pe (I mark it red on picture), it will give you pop-up box with Data Grid. Click "Resources", it will be highlight blue and there's 3 dots button appeared on the right side. Click the 3 dots button. It will give you TGI Block List Editor.
Inside MODL's TGI Block List Editor only has IMG. You may wondering why, but that's how the game coded. Type, Group, Instance of _IMG inside TGI Block List Editor should be the same as _IMG on the package.
Copy the TGI, Group, Instance to your Notepad.

After you copied code of MODL, do the same for the texture image (_IMG), but only copy the code from Resource Details. You cannot edit TGI Block List Editor for _IMG as the Grid button for _IMG is greyed out.
The main task is the code of your edited mesh and texture should be the same as the code you copied now from original package you cloned with s3oc.
Keep the code on notepad. You will need this code later.
Export the MODL file. Right-Click, "Export to s3asc". The file appears in long string such with name for example: S3_01661233_08000001_B619DB2238C3430B%%+MODL_filebase
Do not rename the file. Save.

Export the texture file. Right-Click "Export > To File..." The file will be saved in .dds format. Do not rename the file. Save.

✳️ Step 3. Export the Original Mesh as Base Mesh to .obj format
Open Milkshape. Import the s3asc file you saved before.
More steps click spoiler tag "Read More / Keep Reading" below
File > Import > Sims 3 Object Import v 1.01 by Wesley Howe

Locate the s3asc file, then the original chopsticks mesh appears.
Click the "Joints" tab. It has 4 codes. Check box "Draw vertices with bone colors" It will show Bone Assignment colors on the original mesh. Yellow on top chopstick and light blue on bottom chopstick. The colours are to make the object has rig and movement following the Sim's interaction.

Take a look at the 4 codes on Joints Tab. You can play around to see which colour of the code will appear, after that copy paste the code to Notepad to make it easier to comprehend.
Click Select from Tools menu, Select Options: Face. On "Right/Left/Top/Bottom 2D View", Left-click make selection of one part of chopsticks. While the part of object being selected (Red), click Joints then Choose "Assign".
0x96239247 --> Yellow 0xFEAE6981 --> Purple 0xCD68F001 --> Light Blue 0xD0DECA8E --> Red
Your edited mesh must have the exact same Bone Assignment colour later. Check again if the code and colour are correct.

You can save object mesh as .obj to other 3D software such as Blender or any other 3D software.
✳️ Step 4. Create Your Custom Mesh
Use the original .obj as base model. While you can create longer mesh or any edited version as you wish.
Make sure the scale and position of the edited mesh is same as base original mesh, because the edited mesh will be used on Sim's hand.

If you are done editing the mesh, export the UVmap.
You can export the uvmap in higher resolution, as long as it is Power of 2. 64x64, 128x128, 256x256, 512x512, 1024x1024, 2048x2048, 4096x4096. I export in 1024x1024 pixels to make the size of texture larger and have more details.
Then export the mesh object in .obj format.
✳️ Step 5. Bone Assignment & Create Group
Open Milkshape. Import the original mesh.
Check the Groups Tab. Original mesh has 1 group, "group 00". Group 00 means it is the main mesh. There is no shadow beneath the object.

Import the edited mesh as .obj file.

My edited mesh has one single name "default" name on the Group Tab. While edited mesh may have a lot of file name scattered on Group Tab. Regroup the file name to simplify your edited mesh into one single name. Select > Regroup.
The main task is replacing the EA's original mesh with your edited mesh.
Before you delete anything, you must do Bone Assignment first to the edited mesh you created.
Your edited mesh does not have Bone Assignment, so it appears white.
Remember the 4 codes you copied earlier in Notepad.

Copy Bone Assignment from original mesh to your edited mesh.
This case, your want to Bone Assign Yellow colour.
Select > Face to select one part of chopsticks of your edited mesh. On Joints Tab, double click the appropriate code 0x96239247 in blue highlight then the code box on the right side of "Rename" will appear 0x96239247. Make sure the code is correct. Then you can click "Assign".

Your edited mesh will appear in Yellow colour. Then do the same for another part of chopsticks.
Select another part of chopsticks of your edited mesh. On Joints Tab, double click the appropriate code 0xCD68F001 in blue highlight then the code box on the right side of "Rename" will appear 0xCD68F001. Click "Assign".

Your edited mesh will appear in Light Blue colour.
Then what's the other code for? With colour purple and red?
Leave them. Let the codes have the same exact codes as appear in original mesh and let the colours only assigned Yellow and Light Blue. The colours are to determine rig for interaction in-game, which only use Yellow as upper part of chopstick and Light Blue as bottom part of chopstick.
You can safely delete the original mesh with name group00 until it remains your only your edited mesh.

Rename your edited mesh to group00. Type group00 on the box then click "Rename" on the left side.

Export to TSRW Object in .wso format. .wso is format with bone assignment on object attached.

Save your .wso in your project folder.
✳️ Step 6. Create custom Texture
Import original texture you exported from s3pe to your editing image software.
Look at the original texture made by EA. 32x64 pixels. It is very low resolution, blurry and stretched, because the texture should be compressed as low as possible by game designer. As player you want it has higher detail to look realistic as possible and your PC of course can handle high resolution content, sure you can make the resolution much higher than EA's.

Import the UVMap you saved from 3D software. For example, UVmap I imported has 1024x1024 resolution. Add your custom texture. Then save it to .dds format in the same name as original texture. Save in separate folder, name it "Edited Texture" to keep it separated from original texture.
✳️ Step 7. Import the .wso of Edited Mesh on TSR Workshop & Export the package
Open your TSR Workshop.
Create New Project > New Import >Next...

Then Browse original mesh by EA in package format in your project folder.
On Open file box, you cannot see .package file because the filter is .wrk (TSR Workshop Project). Choose the .package dropdown.

Then you can see .package file.
Open the .package. After the file is located, then Next. On Project Details I usually skip without giving name of Project Name and Title. Next.
You must have seen green land with white blank sky.
Where's the mesh? It is actually there... just being zoomed in too close. You need to zoom out by scrolling down mouse.
You can see the original chopsticks mesh by EA. You can save the project file in .wrk format. After you save the file, import the .wso of your edited mesh. Mesh tab > High Level detail. Click green arrow folder icon to import. Then your edited mesh will appear replacing the original EA mesh.

As you see, the texture is messed up because the texture is still using original EA's texture. But then you check Textures tab and it has blank dropdown...
I cannot change the texture on this TSR Workshop!
Don't worry, we can replace the texture on s3pe later.
No need to change anything other than importing mesh. Click Edit > Project Contents to save as package.
You will see pop up box with number or files DDS, FTPT, LITE, MODL, OBJD, OBJK, etc. Export > To. package. Give name such as "EditedChopsticks_TSRW"

✳️ Step 8. Export MODL file from Package saved from TSR Workshop
Open S3PE, File > Open package "EditedChopticks_TSRW" that you saved from TSR Workshop.
Export MODL. Right-Click, export. It gives you file name with [StringOfNumber] .model .
Save it on project folder. Keep it organized and separated from original MODL. Name the folder "Edited MODL". Do not rename the file.
✳️ Step 9. Finalizing in s3pe & Replacing the Original file with Edited File & Correcting the Code As Same As Default Code
Open s3pe, File > Open original package that you cloned from s3oc. [CreatorName]_ObjectName_Number
Find the MODL. Right-Click > Replace...
Locate to your edited MODL with filename .model .
Then click Open.
The original MODL of the package should be replaced with your edited mesh.
Do the same for the texture.
Locate to your edited texture with filename .dds
Then click Open.
The original texture of the package should be replaced with your edited texture.
Take a look at MODL's Type, Group, Instance. It has the same code as original MODL in the original package cloned with s3oc (because it has been replaced)
Don't forget to see the code inside TGI Block List Editor.
Repeat step 2 how to check the code. Right-Click on MODL/IMG > Details... and click GRID > Resources > TGI Block List Editor.
The Type, Group, Instance of the _IMG are different compared from IMG from original package clone, which means that is the evidence of edited mesh replaced the original.
Rename the Instance with default/original Instance you copied on notepad from Step 2. Type, Group, Instance should be the same as default/original Type, Group, Instance.

Open notepad with resource code you copied from Step 2. Make sure the Type, Group, and Instance are all the same.
If the codes are the same, then your edited mesh and texture will overwrite the default mesh and texture with the same code in the game. Save, Commit, Save the package.
Check again if the texture is replaced properly. Right-Click on _IMG > ViewDDS.
ALTERNATIVES!
Yes, you can delete unwanted files in your edited package, to keep the package clean. Simply Right-Click>Deleted.
The only files needed in package are: MODL, _IMG, _KEY
They are the only files with your edited mesh/texture including codes to overwrite the default codes.
You can Start new fresh blank s3pe. Right-Click>Import from file...
Locate your edited MODL and _IMG (texture) file.
On Resource Details box, tick mark "Use resource name" > OK.
Make sure all the Type, Group, and Instance of MODL and _IMG including in the TGI Block List Editor are all the same as the code in original package.

Save the package.
✳️ Step 10. Test the CC in your game.
Put the package to your CC folder in your The Sims 3 document folder to see if the CC is working or not.
If the CC is working as your intended, with your custom mesh and texture, then test the animation. Are the chopsticks animation working as the same as original EA's? If the animation are working well too, then congratulations!

Your default replacement are working. Give applause to yourself. 👏
-------------------------------------
QUESTIONS!
Q:
Can I use this tutorial for making default replacement for buy/build object?
A: This tutorial covers basic method of using TSR Workshop and replacing the default codes (Type, Group, Instance), so you will understand the basic principle of doing default replacement mod.
Keep in mind that different object has different case. Buy / build object has MLOD (not just MODL) more than one, texture images more than one, has presets, and CAStable colour channels.
The TGI Block List Editor for buy/build object has a lot of codes, so have to spend a lot of time to do trial-and-error to make the default replacement working properly, because a lot of times the texture doesn't work (still using default EA's texture), or when the object appears right with your edited mesh and texture, after you choose the presets, the object reverts back to your edited mesh with default EA's texture.
Q:
Help! The texture is black! / still using same EA's texture when tested in the game!
A: The texture codes must be not the same. Check the Type, Group, Instance of _IMG. Do the codes are the same like codes in original package? Check the TGI Block List Editor for MODL, is the _IMG inside has the same Type, Group, Instance as in original package.
Q:
Help! The object disappears when tested in the game!
A: You must be replacing OBJD in your package. Do not replace OBJD. Just MODL and texture only.
#tutorial#the sims 3#the sims 3 tutorial#thebleedingwoodland#the sims 3 default replacement mod#modding#s3pe#s30c#TSR Workshop
120 notes
·
View notes
Text
learning to code!
When I was 9 years old, I learned enough html to code neopets pages, my own geocities websites, and I even made forums on my own sites so my friends could all roleplay together or rant together lol. And then? I forgot so much. I no longer no how to make a forum, or even a 'next page' button - so even the dream of just making a simple blog or webnovel site feels like a huge hurdle now. (9 year old me could probably figure it out in 2 hours).
So I'm relearning! I figured this would be a fun post to place resources I find for coding, since there's coding languages, and I figure maybe if you like running you're blog then you also might be interested in tools for making blogs!
First, for those of you who miss the old geocities and angelfire type of sites to make your own free site on: neocities.org
You can make free sites you can code yourself, the way 9 year old me did. A lot of people have made SUCH amazing sites, it's baffling my mind trying to figure out how they did, I definitely wish I could make an art portfolio site even a fourth as cool as some of the sites people have made on here.
And for those pressed for time, who aren't about to learn coding right now: wix.com is the place I recommend for building a site, it requires no coding skill and is fairly straightforward about adding pages or features by clicking buttons. I used it to make my art portfolio site, I am testing out using it for my webnovel - the alternative is Wordpress, but wix.com is letting me basically make a wordpress blog Inside my own site. It's very beginner friendly in terms of "how the fuck do I set up a 'sign up for updates' message and have my site actually email these people my novel updates?" and "I need a 4x20 grid of my art down the page, that lets people click the art to see it's information and make it bigger."
I did neocities.org's little html tutorial today, it's the part of html I DID remember (links, paragraphs, headers).
My next step is to go through htmldog.com's tutorials. They go from beginner, to intermediate, to CSS. Unlike many a coding tutorial I've seen, they explain what program on your computer you need to WRITE the code in and then how to save it and how to open it. (You'd think this isn't a big deal but I've been looking into how to learn Python for months and I can't find a tutorial explaining what fucking program to write my python in... notepad? do I need something else? I don't fucking know!! My dad finally gave me a printed textbook which supposedly tells you what to download to start... I learned C++ in college and for that you needed Visual Basic to code C++, so I figured I needed Something to Write the fucking python IN.)
#coding#rant#wooh my new CODING TAG#learning to code#i feel very. odd if im honest?#i genuinely knew how to build full fucking forum websites as a child including user sign ups#and i studied Computer Science Engineering in college so i did everything with C++ we were asked to and got As#and then i promptly BLOCKED IT OUT because i#HATED studying c++ SO fucking much. i hated my whole major. i did not like Engineering. i hated it. i was so mentally destroyed#by my college major that when i graduated i got a DIFFERENT job#and do NOTHING related to my major#i want to get into a more tech focused career eventually...since that is what my fucking degree is in#but i've been looking into something with less coding OR trying to teach myself#to like coding as long as its not fucking c++ again... i cant do it. too many bad memories#i think cybersecurity sounds like a fun job.#but u know me. im a person who likes knowing the BASICS#so i feel like i need to Relearn to code and learn python decently#before i try to study cybersecurity specific shit
38 notes
·
View notes
Text
tips that i've collected in my years of writing
i've been interested in writing fiction stories since i was like five, and because of that i've accumulated a lot of tips and tricks. from the internet, teachers, fellow writers, readers, and my own brain - so there's a lot to share !
just a disclaimer; i am by no means a professional. but i've been seriously writing for about four or five years, so im not a beginner either. these are just the things that have helped me personally as a writer, and only a few cause we'd be here all day otherwise lol
the last one is probably the most important ❤️
1) said is dead
repetitive words often make a story feel flat and boring, "said" being the most common offender. there's a bunch of lists online that you can use to find a substitute, and you can even search for different types of speech. for example, if someone is angry: seethed, yelled, shouted, bellowed.
SAID IS DEAD !!
wordhippo is a great free website that i use pretty much every time im writing, you can use it for synonyms, antonyms, rhymes, a lot more <3
2) use of repetition
like i said, repetitive words get boring - but sometimes you can use repetition to your advantage. to reiterate or drive home a point. especially with the use of italics, it can make something hit harder. for example (from Losing Dogs):
" Mingi doesn't know what to do, he feels like his body isn't responding to his mind. His mind wants to knock Seonghwa over the head and run away with you in his arms. But his body seems to remember the pain of the last time he tried to help you even slightly. He's stuck. He's stuck. "
the repeated "he's stuck" is used to tell the readers not only how he feels but how he's acting: he's stuck physically and mentally
another way i use this a lot is to show disbelief or anger, a repeated "no,no,no" is simple and effective
3) chose a pov and stick to it
i'm brave enough to admit that i'm a victim of this in my early days 😭 choosing a point of view to write from is tricky, so pick what goes best with your story !
example ; 1st person- one person describing a story from their perspective: what they see, feel, hear, and KNOW. if you're writing from first person, it limits the knowledge the reader has because they only see what's happening through one set of eyes. it can be a blessing or a curse
pick a pov and stick to it, it can be confusing if it suddenly changes from "her" to "my" or "your" when describing the same person
4) foreshadowing
i can't lie i'm a huge sucker for some foreshadowing !! it's a way to capture readers attention or make them go "hoooooolyyyy shit" when something comes back or just a way to deepen the story
my favorite is probably indirect foreshadowing or foreshadowing through objects or nature. ex: in "Serendipity" the black dahlia lego representing betrayal and tragedy and the rain that keeps baby in the apartment which she thought would pass
there's also direct foreshadowing; where you tell the audience almost exactly what will happen. ex from CODE L-O-V-E:
" "You guys are whipped, no one is this... enchanting! Enchanting, that's it!" San would be eating his words in less than forty-eight hours. "
and then he ends up watching her in awe while she's writing a song, eating his words kkkkkk
5) set the mood / get into the mindset
this is a big one ! genres exist for a reason, and it's important to keep a steady atmosphere unless you're trying to purposefully make tension or confusion (which CAN be done effectively)
the tone of a story can do a lot, and it's hard to balance sometimes. my best tip for trying to set the mood is to read, watch, listen, do SOMETHING that matches the atmosphere you're trying to go for. if you're going for a horror, watch a scary movie. comedy, watch a standup show.
get yourself into the mindset that you want your readers to be in when they read your story ! the mind is a powerful tool
whenever i'm writing CODE L-O-V-E i listen to the songs ive imagined as the group's discography, along with the songs that they're singing/covering/ect. but whenever im writing sad things, i listen to classical music. ect ect, find something that works for you !
6) dialogue
dialogue is a HUGE DEAAAAL and it can make or break a story. theres so many thing to say about writing dialogue but probably the most important thing i can say is make it feel real; even when it's fiction
remember where the characters are, how they feel about they people they're talking to, and what's going on around them
the most important thing is to remember who's speaking. what kind of character are they ? are they an introvert ? are they talking to someone they're close to or a stranger ? what's the point of their dialogue ? where are they from, how did they grow up ? are they being truthful ? SO MANY FACTORS LIKE SO MANY AAAAH
i know all of those questions are overwhelming to think about every single time you want to write a sentence where someone asks where the nearest bus is, but it will improve your story so much. and there's an easy way to keep track —
7) character spreadsheets
this has made my life so much easier ! if you take one piece of advice from this, take this one !! it has so many benefits. seeing how a character fits into a story: what they add, what's their role, how do they change things in the plot, what's something that makes them unique, how do you want the audience to feel about them throughout ?
you don't have to write all of the answers to those questions lmaooo
just fill out the basics: what they like or dislike, what their goals are, who they're close to, how they grew up, things like this
8) surprise
to surprise an audience , you have to surprise yourself !
i took this from the director of "Barbarian", one of the only movies where i genuinely had no idea what was going to happen. he said, in order to surprise the viewers, he first had to surprise himself. he wrote the script not knowing what would happen next, and it WORKED SO WELL DUDE.
obviously if you have a plot in mind that you want to stick to, do that ! but if you're writing a thriller or horror or who-done-it, this will guarantee that it will be hard to guess what will go down.
if you chose to do this, remember not to just write random things for the fuck of it; as it can give the audience whiplash if plot twist after plot twist happens
9) just write !!!
now, hear me out. it sounds simple, right ? but i know from experience that sometimes you can just be drawing blanks — DONT LET THAT HOLD YOU BACK.
even if all you write is : "then they tried to do this. but then this stopped it from happening. then they get lost" literally anything is better than a blank page.
you can ALWAYS go back and flesh out a story more, you can ALWAYS change something you don't like, YOU CAN ALWAYS WRITE !! if you have an idea, WRITE IT DOWN !!
don't force yourself to write an extremely detailed sentence the first time around. drafts exist for a reason. ex:
idea: "they met at night"
1st draft: "it was nighttime when they bumped into each other."
and keep adding more until you like it;
final: "The moon was at its highest point, casting its soft light on the quiet city. Neither of them was expecting it. But tonight was the night they would fall in love."
also, don't force yourself to write things in the order they happen in. i'm also a victim of this, and it held me back sooooo much ! if you know what you want to happen, if you're inspired: do it !!! don't let your ideas get away from you
10) the bigger the headache, the better the story
yes, i stole this from hongjoong... but its honestly true !! the stories that ive had in my head for years that i finally get around to making come to life are always the best or my favorites.
Allure, CODE L-O-V-E, the ateez vampire one i'm working on — they have all been giving me headaches for years; trying to move things around and come up with more ideas and changing it because i don't like it and all of this bull hunky... but they're always my favorite which leads me to the next bit of advice
11) write what you want
do what you want, it's your story ! it's your world and YOU are in control, and that's the beautiful thing about writing fiction.
you can do anything you want in your story and no body will stop you. if they don't like it — they can close the tab !
if you want to make a story about a unicorn who suddenly learns how to speak english and tells everyone that aliens are real and they're just avoiding earth cause humans suck... YOU CAN DO THAT !!
you can do anything
write the stories that you would want to read, and they will be amazing no matter what
and most importantly:
we are all our own worst critics.
one of my mutuals told me this probably about two years ago after i was showing them a part of a fic i was working on and i said that i still didn't think it was good enough. they told me this, and it's been in my head ever since.
we are all our own worst critics. we spend every second of the day with ourselves, so of course it makes sense that we will be hardest on our work. if it's art, or singing, or cooking, everything we do we will always think the most about it. but outsiders don't know what you were trying to do, they don't know if something you've created was supposed to be bigger or better
we are all our own worst critics, we all think we're worse at things than we really are
so don't think to much about if your writing is good enough or engaging enough or this that and the other — just do it because you want to.
and now i've taken enough of your time lolol
have a good day, and keep writing !! 화이팅 !!
23 notes
·
View notes
Text
a year and a day of witchcraft research
Years ago, I asked myself how I would approach witchcraft if I were to start all over again. I loved the idea of dedicating yourself to a year and a day of study, even if I don’t align with Wicca. From this, I created a weekly study plan for a year and a day of witchcraft research Realistically, I don’t think you can study one topic in depth per week, but I do think it’s useful for beginners to explore a little bit of everything to find their interests. Please don’t feel confined by the weekly structure! If a topic interests you, take more time to explore it! The application of a topic is just as important as reading about it. If a topic doesn’t hold your attention, be grateful for what it has taught you and move on. Or just use this for inspiration on what to dive into next!
A note on research - not all sources are the same quality! Over the years, I’ve gravitated to academic articles and botanical books for information on history, plants, etc. Many witch authors have spread an insane amount of misinformation, so being able to track where their information is coming from is crucial. That’s not to say there aren’t good witch authors on witchcraft – do a quick search on their background and look at book reviews! This is additionally important to understand what biases may be lurking in their writing.
Finally, I want to encourage you to keep two journals during your study. I keep one journal as a grimoire/book of shadows (BOS) or whatever name you choose to call it. I keep another journal to keep my personal experiences with the craft (meditations, spell work, etc.). I’ve loved being able to look back at my progress over the years.
Week 1: History and Cultural Appropriation
A good place to start your witchcraft research is the history of witchcraft. Learn a bit about where it started and how it evolved to its modern form. This is also a good time to also do some research into cultural appropriation – many modern witchcraft practices are full of it! Understanding the roots of practices will help you to not only build discernment skills, but it will also help you to respect closed practices.
Week 2: Traditions
There’s many schools of thought and cultural contexts for witchcraft. This is a good time to explore the different witchcraft traditions and see what resonates with you. I personally would discourage beginner witches from picking a path early on, as I find that you’ll naturally gravitate towards what’s meant for you. However, doing some research on different paths early on can help you make connections and see practices through different lenses as you progress.
Week 3: Ethics
In addition to there being many paths, many witches have created codes of ethics. Do some research into what ethical framework you wish to move forward with – you are more than free to create your own! What does ethical witchcraft mean to you?
Week 4: Cleansing and Banishing
Learn what cleansing and banishing are, and find a few ways to do it that you like. What are some indicators that a cleansing or banishing might be needed? Think about cleansing yourself, your home, your sacred space, tools etc.
Week 5: Protection
To follow up cleansing and banishing, learning some forms of magical protection and warding. Again, think about the different ways you might protect yourself and your space. What are some signs that it’s time to renew your protections? Make sure to practice protection magic moving forward in addition to learning about it!
Week 6: Meditation
Do a little research into how to meditate and give it a try. Meditation doesn’t come easy to everyone, so don’t get discouraged! For this week, focus on your breathwork, entering a blank space, and generally relaxing your mind and your body.
Week 7: Visionary Work
Once you’ve gotten the basics of meditation down, move on to visionary work. Build your visualization skills – this does not have to be “seeing” things in your head. It can include all senses! Something that helped me with visionary work was to look at my surroundings in front of me while “seeing” my surroundings that were behind me. Incorporate meditations with visionary aspects during this week.
Week 8: Centering and Grounding
Now that we’ve done some visionary work, try doing some meditations with the goal to center/ground yourself. There’s so many meditations (and even other ways to center and ground yourself) out there – find what works for you! What are some signs that it’s time to ground yourself again?
Week 9: Energy Work
Hopefully you’ve already got a bit of a sense for handling energy from centering and grounding, but this week it’s time to really dive into energy work. What does your energy feel like? What about others’? Objects? How can you manipulate and shape energy? Etc.
Week 10: Shadow Work
Get to know your shadow this week! Learn about what shadow work is and how to integrate your shadow. There's lots of exercises and prompts out there already - go ahead and explore!
Week 11: Developing the Senses
Next, let's start developing the psychic senses. From the visionary magic week, you might already have a sense of which of your psychic senses might be strongest. Start looking into what the psychic senses are, and how you might start developing them. For an introduction, I really like this video by The Norse Witch.
Week 12: Consecration and Desecration
Now we're going to focus on how to consecrate and desecrate objects. Consecration is a valuable skill to be able to designate objects for a certain intent, and desecration is valuable for when you need to remove intent from an object, whether good or bad. Learn about a few different methods for each!
Week 13: Bioregionalism
It's time to get to know the nature around you. What plants grow in the area? What rocks and minerals can you find? Where are some crossroads that you can visit? These questions are just a starting point; take the time to really get to know the land around you!
Week 14: Elements
Now we're going to focus on the elements. The four classical elements may not apply to the tradition you're working within - do some research to see what the "building blocks" are for you! If you do want to work with the four (or five) elements, take some time to learn about the correspondences, associated spirits, etc.
Week 15: Directions
Building off of the research done on elements, do some research on the four directions and their associations. This can also be a good point to look at wind magic, and how different directions are associated with different winds.
Week 16: Holidays and Seasons
While many witches choose to work with the wheel of the year, you might find there are other holidays associated with other traditions. This can be a good time to think on how you want to celebrate the changing of the seasons. How do you know each season has come? What magical workings might be best for each season?
Week 17: Lunar Phases
This week, let's look at the different lunar phases and their correspondences. What workings are best for each phase? What about for each sign the moon can be in? This is also a good time to look at the correspondences for the lunar eclipse.
Week 18: Planetary Correspondences
Now let's research the correspondences for each planet. How does the positioning of each planet have the potential to affect your spellwork?
Week 19: Astrology
While learning everything about astrology would be very time consuming, this week you could aim to understand your birth chart, as well as what each sign is associated with.
Week 20: Timing
Zooming in now, let's look at timing. Look up what the days of the week and times of the day are associated with, and how they can affect your practice.
Week 21: Written Verse, Incantations, etc.
Written verse is a part of spell work for many practitioners. How can you write the incantations for a spell? Does your tradition offer any guidance or structures?
Week 22: Color Correspondences
What do you associate each color with? While there are many correspondences you can find online, be sure that they align with your intuition as well.
Week 23: Candle Magic
Building off of color magic, this week is for delving into candle magic. How can candles be used? How do you dress/anoint a candle?
Week 24: Knot Magic
Look into what knot magic and some ways you could practice it. Personally, I am a big fan of the Witch's Ladder.
Week 25: Herbalism
There's too many plants to learn the correspondences for all of them in one week (or even a lifetime), but take this opportunity to learn more about the plants growing in your area! This is also a good time to look at how to make balms, tinctures, etc.
Local/native plants
Week 26: Crystals
Once again, there's too many crystals for one week. What are some rocks/minerals you could find in your region? How can you use them in your practice?
Week 27: Tools
What are some tools you can use in your practice? This doesn't have to be the athame, chalice, etc. You can think of both physical and nonphysical tools for this.
Week 28: Spell and Ritual Writing
Now that you've got down a lot of the parts of spell writing, it's time to put them all together! While you can rely on others' spells for a while, learning to write your own is a powerful skill.
Week 29: Amulets and Talismans
How would you create an amulet or talisman? What purposes can they serve? If you feel called to it, try making your won.
Week 30: Shrines and Altars
What's the difference between a shrine and an altar? What are some purposes for both, and what might you put on them? This would also be a good time to make your own, if you feel called to it.
Week 31: Pendulum
This week, we'll start focusing on some divination practices, starting with the pendulum. Look into how to use one, as well has how to make a pendulum and pendulum board if you don't want to go out and buy these things.
Week 32: Tarot
For tarot research, I found that looking up the meaning of each card, taking in the visual symbolism, and then assigning one word meanings to each card helped me to learn how to read tarot. Look into some spreads you could use as well!
Week 33: Scrying
To add another divination practice you can choose from in the future, research scrying and how to perform it. It might also be a good idea to find some ways to make your own scrying mirror.
Week 34: Runes
This week, let's look at the runes? Learn about their origin and history, the rune poems, their meanings how to perform divination with them, etc.
Week 35: Tea Leaf Reading
To wrap up the divination weeks, learn a bit about tea leaf reading (tasseomancy). What are some common shapes, and what are their meanings?
Week 36: Sigils
What are sigils? How are they charged and activated? How do you draw a sigil? There's a few different ways to create sigils - see what works best for you!
Week 37: Symbols
What are some symbols and their meanings? What are their origins? Which ones resonate with you?
Week 38: Sacred Geometry
Do a little dive into sacred geometry. What is it? What are some examples of wit can appear? How can you use sacred geometry in your practice?
Week 39: Alchemy
Look into alchemical principles and how you might want to apply them to your practice (if at all). Does it align with your view of witchcraft?
Week 40: Numerology
What are the correspondences for each number? If you're interested in it, look into your life path number and what it means.
Week 41: Axis Mundi
Many traditions have a concept of an "axis mundi" - what is the axis mundi in your tradition (and if you don't subscribe to a tradition, what does an axis mundi mean to you? How might this relate to your practice and accessing other worlds?
Week 42: Animal Correspondences
What are some correspondences for different animals? What animals are good psychopomps? What might seeing certain animals mean to you?
Week 43: Protective Spirits
Many different traditions have some concept of protective personal spirits. Many modern witches might instead refer to a "spirit team". Do some research into the different protective spirits - what resonates with you?
Week 44: Ancestral Work
Some of the easiest spirits to work with are our ancestors! You can start an ancestral practice to honor those who came before you, even if you do not know or wish not to honor your blood ancestors. Look into some ways you can work with and honor your ancestors during this week.
Week 45: House Spirits
Next, let's look at some house spirits. Do some research into some different house spirits, and get to know the spirit of your house!
Week 46: Land Spirits
This week, let's move on to land spirits. Dive into what some different land spirits are and get to know the land spirits around you. This may include spirits from folklore, as well as the spirits of rocks, plants, water sources, etc.
Week 47: Egregores
Now, let's look at egregores. Research what they are, how they are created, etc. You don't need to create one now, but it will help you to have this knowledge background if you choose to continue with spirit work.
Week 48: Dream Work
This week, let's research how to interpret dreams, lucid dreaming, how to communicate with spirits through dreams, etc. This is also a good time to start recording your dreams, if you haven't already. You can also build off past herbalism research to enhance your dreams.
Week 49: Astral Work
For this week, research the astral plane, other types of spirits, how to reach the astral, etc. For many, astral projection/travel takes a lot of time and practice - don't get discouraged! There's many ways to interact with spirits outside of the astral plane.
Week 50: Pantheons and/or Animism
Many witches choose to incorporate deity work into their practice. Other witches do not, and some of these witches may believe in animism and choose to work with plant, rock, etc. allies. What do you believe it? If you do feel called to deity work, this could be a good time to start. I recommend starting with looking into the different pantheons and seeing what resonates. I do advise against assuming everything is a sign that a deity is calling to you - reach out to those you want a relationship with, and your psychic senses or divination to see if they want to work with you too.
Week 51: Mythology and Folklore
Whether you choose to believe that stories from folklore/mythology are true or not, they do often contain valuable information on witchcraft from their traditions. Take some time to read these and recognize patterns within them. How can these inform your practice?
Week 52: Covens v. the Solitary Path
What are some benefits to working in a group? What are some benefits of working alone? Are there other practicing witches in your area? How might you meet them?
Last Day: Reflecting on your Path
You made it to the last day, congratulations! This day is dedicated to reflecting on your path so far. What lessons have you learned? Are you feeling called to any particular paths, or what interested you more than others? Do you see yourself looking for a group to practice with, or do you wish to continue on your own?
#witchcraft#witches#witch#beginner witch#witch blog#baby witch#pagan#paganism#pagan witch#wicca#wiccan#magick#occult#occultism
51 notes
·
View notes
Text
HOW I PERSONALLY ORGANIZE MY DIGITAL ZINE MASTERCOPIES!
Hey zineovators, hello every'all. I am here to note down how I (PERSONALLY) fix around and assign my digitally-made zine mastercopies for easy access. This isn't meant to be a guide and it surely isn't the "correct" way to file zines, nor is this necessary, it might even be redundant for a lot of people, but this is just the way I do it. I have some really crappy guides throughout my yap session, BUT I will provide a REAL example using my own zine at the end! anyhow, let us begin! WHY DO I BOTHER?
because it makes my personal zine creation process more manageable
organization makes it less daunting for me to actually go through with the creation process
It tickles my fish brain to file and sort things, and it makes me happy to do so
so yeah, it all boils down to personal preference. I like making my digital process cleaner and a bit more streamlined, but you really don't have to follow me or use me as a standard. I just do what I do best.
That aside... TERMS I COINED AND WILL BE USING AND EXPLAINING (LIST) (yes this is based off of A/B/O but also coding)
ALPHA Mastercopy (A-Copy, Alpha copy)
BETA Mastercopy (B-Copy, Beta Copy, Physical Mastercopy)
OMEGA Mastercopy (O-Copy, Omega Copy, Assembled Mastercopy)
PRELIMINARIES!
A master copy in my own words is the original mother version of your zine that you can use to duplicate or create more copies for distribution purposes. You usually do not give a master copy away especially if you plan to make more prints of a specific zine design in the future! Also, I'm using the classic 8-page mini-zine format as an example here because...I specialize in mini-zines, lol. With that in mind, here is the portion you are waiting for.
ALPHA MASTER COPY (i.e.. RAW DIGITAL FILE)

The Alpha copy is the version of your zine that you made/scanned into a digital format. Typically I would use a PDF along with the zine design that I pre-formatted for this due to the clarity and easy access of PDF files. I avoid .png or .jpg because flattening my zine files tends to crush the text quality, by a LOT.
The Alpha copy doesn't have to just be the formatted version already. It can be individual panels, single pages, artwork or scanned pages, etc. That's also an alpha copy, but in its own way. The version I'm talking above is print-ready copy that is already prepared.

^ THIS counts as an alpha copy as well.
Now down below is an example of my own alpha copy in PDF format, featuring my DAVID SYLVIAN zine (I'll try to upload it on an archive soon, it will be completely free! Pls tell me in advance if you'd like to reproduce and distribute it irl since I dont want to get sued </3)

btw the tagline "be seen, make a zine" was taken from brattyxbre on YouTube. I would gladly recommend her for zine resources, discussions and zine-related topics, especially if you are a beginner!
BETA MASTER COPY (i.e.. PRINTED TEMPLATE)
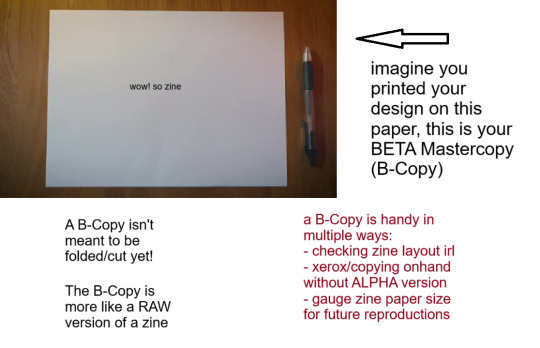
Your Beta copy is a version of your zine that is printed on paper with the proper formatting for folding/cutting already. The only difference with this version and omega copy is, well, you DON'T fold or cut this copy.
The primary purpose of a B-Copy is to check:
print quality (text visibility, color vibrance, ink bleeding, etc.)
graphic size and an overview of your zine's general physical appearance.
And the other, marginally vital role of your B-Copy is to serve as:
the physical print that you can use for XEROX (photocopying) or other copying services and tools
scannable output that you can scan/copy for distribution, especially if the person who wants your zine would like to assemble it themselves, if you do not have a final version of your zine on hand to share, or you yourself do not have your A-Copy for reproduction.
A printed copy that you can catalogue or archive, especially if you are the sort of person who retires zines, or are just deeply sentimental (like me, lol!).
Down below is the B-Copy of my example zine. Ignore the fact that this is literally my omega copy that I just dismantled because I don't have my Beta in hand lol. But approximately this is how it looks like.

I personally store B-copies (alongside O-copies) inside a dedicated clearbook or binder to safeguard against weathering or chemical ink deterioration, alongside some information and stuff about the zine itself. This is useful especially if you want to showcase zines and zine content to others, apart from safekeeping purposes.
I might make another longform infodump about digital and physical zine storage and archiving processes (because as an aspiring librarian I feel it is my duty to rant about that) but that will be for another time.
OMEGA MASTER COPY (i.e., FINAL EXAMPLE PRINT)

Okay this is kind-of self explanatory, but I will elaborate regardless.
If you are the sort of person who handcrafts zines (aka make, draw, write or assemble them traditionally) you likely know what the O-Copy is, because your original finished zine is what I am referring to as the Omega copy. That is, the ACTUAL "Master Copy" itself.
Omega Master Copy is what most zinesters and zine creators refer to as just the master copy. But seeing from this post, you KNOW I had to make it fancier (read: unnecessarily complicated)
The Omega copy serves as your first official print, and you can use this version to store or show around. The only difference is, if you end up using my organizing format (good luck!), you'll end up using the O-Copy more as a finished product display to show how it looks when finished as an assembled copy, and the B-Copy as the actual thing you use to reproduce or duplicate your zines for distribution.
Here is the example of my O-copy for my example zine. (again you will be able to access this through an archive soon, maybe I will announce it later on or just post about where I store them digitally.)

I used the software development jargon ALPHA, BETA & OMEGA because it kind of fits(?) lol. I am not a coding aficionado but I know loosely enough to utilize the words. But also, live laugh omegaverse. hopefully this helps(?) but also if you reached to this point, hi. I'm glad you indulged in my little rant. EDIT: here's the Internet Archive Link for the specific zine featured in this post! Have fun! Communicate, create, zineovate! Until next time.
#zines#fanzine#zine#zine preview#art zine#zine making#zinester#mini zine#digital archiving#master copy#zineovator#self publishing#david sylvian#japan band
29 notes
·
View notes
Text

Hello! In this post I will share some tips I have to help you on your custom content making journey. These are more general rather than creating a specific item, but I may make another part in the future!
Things covered: learning curve of blender, free resources, learning your computer, using references

1️⃣ There’s no need to pay for anything
The only money I have spent on anything related to TS4/custom content is for some of the expansion packs. Every resource I have used I have only had to pay with time. Blender, Sims 4 Studio, and Sims 4 Tray Importer are all free! And for Photoshop, a good free alternative I use is Photopea, which is just a web version. Another good alternative is GIMP, which is an application.
There are applications like Substance Painter and Marvelous Designer, but I would only recommend those if you have a genuine interest in 3D modeling outside of TS4.
And in terms of finding tutorials, scouring the internet will always lead to some result. A good tumblr page is @thefoxburyinstitute, which has many sections based on your level of experience. Adding “reddit” to the end of a search helps too!
2️⃣ You can export anything from Sims 4 Studio as a reference (mod or EA object)
For an EA item, In S4S, go to Tools -> Browse Game Content -> then select the category you need a ref. If it’s a mod, click on My Projects and find the package you want.

From here, you can export the mesh, images, or any textures you need without having to create a new package for it! Best used when you have already created your own package and just need one aspect of the object.
If you want to append in Blender, go to File -> Append (works with any .blend file exported from S4S), then find the location of whatever you exported. Go to the Object folder, find anything labeled s4studio_mesh_number, then append. I just append all of them, then delete ones I don’t need.

Also, in the Scene tab, make sure the cut box is blank for the reference you imported! S4S will confuse this with your mesh if not, as the cut number determines which mesh will replace the EA one.
3️⃣ File management is important!
The more you create, the more random things you’ll download on your computer. You need to be aware of where you’re downloading things from, duplicate files, how much storage it’s taking up, etc. I recommend the Sims 4 Mod Manager by GameTime. Back up your files often and learn how your computer works because every device is different! Below is how I organize my CC (could use some improvement), but use whatever keeps you organized.

4️⃣ Learn Blender outside of Sims 4 CC
There have been so many times when I’m so frustrated about Blender that I have to take a step back and focus on a different hobby. The first time that happened years ago, I decided to learn how to make simple models in Blender, and not only did I enjoy it, but I also learned so much that can be applied to CC! Below are some tutorials that I watched.
Blender 3D Beginner Tutorial by 3DGreenhorn
A simple room tutorial.
3D Isometric Bedroom by artbytran
Another simple room tutorial, but with more cute details.
Creating Stylized Low Poly Characters by lacruzo
How to make a low-poly character and texture paint on it (I used this tutorial to texture paint on a hair clip!)
Intro to Creative Web Development by Andrew Woan
Okay I know the 5 hours is daunting, but only (lol) the first 2 hours are Blender. This video goes more into the technological aspect and making models optimized for video games/web (ahem TS4). After the 2-hour mark, it's all coding, which is not needed for CC making.
5️⃣ It takes time/consistency
As a person who only makes CC once every other month or so, it’s mostly muscle memory and consistent practice that makes someone feel confident in their CC making abilities. Remember how as a kid typing was the slowest thing ever, and today you’re (hopefully) better? It’s cause you kept practicing over a long period of time.
The first time I opened Blender to make poses was in 2021, and 4 years later, there’s so much that I have learned from others, and 10x more that I don’t know due to the endless possibilities of what can be created. But hey, I’m confident enough that I made this post of tips, right? Take small steps, the end goal is to make something you or others enjoy.
Thanks for reading this if you’ve come this far, and here are two pages I recommend reading to help you on your CC journey! :D
Internet safety regarding TS4 by crazy-hazy-sims (pls read this) Custom Content Creation by simlaughlove
9 notes
·
View notes
Text

A Beginner's Guide to Learning Cybersecurity
I created this post for the Studyblr Masterpost Jam, check out the tag for more cool masterposts from folks in the studyblr community!
(Side note: this post is aimed towards the technical side of security, rather than the governance/management side, because the tech stuff is what I'm familiar with.)
Where do I start?
Cybersecurity is a specialization of general tech & therefore builds on some concepts that you'll need to know before you can dive deep into security. It's good to have a background in and understand:
how computers & operating systems work
how to use Linux
computer networking & basic protocols
If you're serious about learning cybersecurity, it can be helpful to look at certifications. Even if you don't want to get certified or take the exam (they can get expensive), they provide you with a list of topics that you can use to guide your self-study. And if you want to find a job, a certification is practically required for getting your foot in the door.
I personally recommend the CompTIA series of certifications, because they're well-recognized and I think they expose you to a good breadth and depth of material to get you started. Start with the A+ certification if you have zero tech background. Start with the Network+ certification if you've never taken a networking course. Once you get your basic computer and networking knowledge down, then you can jump into security. The Security+ is a good starting point.
Do I need to know how to code?
No, but it would be really really helpful. You don't have to be a skilled software engineer, but understanding the basics and being able to write small scripts will give you a solid foundation.
From Daniel Miessler's post How to Build a Cybersecurity Career:
You can get a job without being a programmer. You can even get a good job. And you can even get promoted to management. But you won’t ever hit the elite levels of infosec if you cannot build things. Websites. Tools. Proofs of concept. Etc. If you can’t code, you’ll always be dependent on those who can.
How do I gain skills?
Play Capture the Flag (CTF) games.
Stay up to date with security news via an RSS reader, podcasts, or whatever works for you. Research terms that you're unfamiliar with.
Watch conference talks that get uploaded to YouTube.
Spin up a VM to practice working with tools and experiment on your own computer.
There are lots of brilliant, generous people in cybersecurity who share their knowledge and advice for free. Find their blogs, podcasts, and YouTube channels. Look for local meetups in your area.
I'm still relatively new to the field, but I have a general knowledge of lots of different things, so feel free to send me an ask and I can probably help point you to some resources. We're all in this together!
Previous Cybersecurity Masterposts
An Introduction to Cybersecurity
Cybersecurity Book Masterpost
Free Cybersecurity Learning Resources Masterpost
Masterpost of Study Tips for Cybersecurity
Cybersecurity Tools Masterpost
Thank you so much to everyone who participated in the #StudyblrMasterpostJam this week! It was wonderful to see what other studyblr folks are passionate about. The jam technically ends today but there are no official rules, so if you've been thinking about writing a masterpost, this is your sign!
32 notes
·
View notes
Text

"My mind is twisted up and you're to blame... Are you aware of how you say my name? I've tried so hard to push you away..." (x)
---
New Dog's Life chapter today! ~ 3rd Life series fan-season
Chapter 33 - “Cinders (Etho)”
❤️ Read on AO3
💛 Start from Chapter 1
💚 More Pixels Imperfect fics
---
"But for real, the most beautiful thing Lizzie did was treating me like a stranger. She didn't see him." Sniff sounds like he's floating, eyes like glaciers. "I'm never going to stop being 'Joel 2.0' to you. Am I?"
Etho finally tells SnifferMyFeet what happened between him and Joel post-Double Life. Sometimes people slip right through your fingers... It's just weird it happened twice.
#smalletho - Etho/Sniff tension followed by several flashbacks about Etho's past with Joel (bed sharing, cuddling, teasing, discussing Joel's kids (Hermes & Tiny Tom), and Etho trying to learn Joel's boundaries, which Joel avoids defining)
(First 1,000 words under the cut)
---
Yeah, we allogrooming (chewing on each other's code strings and pulling them with mouths to straighten them); keep scrolling
---
Etho - Fox
Status: Keep 'em guessing
Self-taught programmer, full-time hero
💙 🧡 💚
It's familiar, but not in the way you think. It's familiar because the universe speaks to itself (to his soul) each time it checks he's doing okay. Especially on full moon nights. When the moon reaches down its light, Etho adjusts his footing and licks his lips, then chews its fingers and nuzzles back.
Give yourself a shake. Fluff up your fur. It's the arctic fox way. Then you run off to do exactly what you're meant to do, because you're born of the universe and were given conscious thought so you could love your role. The mobs play their part. You play yours. Beneath silver moonlight, we meet and make merry, for tomorrow we're AFK for weeks or months on end. You're born in the code. You live forever. And that's just the way of things.
Which is to say that snuggling up next to Sniff, one hand pressed to the back of his shoulders to hold him down against the mattress, is one of those wild things that's new and familiar at the exact same time. You remember all those tools we were gonna clean his code with? Yeah, those are beginner's toys. This is how it's done right.
It's a work of teeth and tongue: nipping code beneath his skin with glowing teeth and pulling it to straighten strings. It's goopy, thick, and messy. It's the way of the world; song as old as time.
Sniff keeps very quiet, his hands stretched out in front of him. He kneads the pillow. They don't speak. Not now. Etho keeps his hand firm, bearing weight on Sniff through a blanket so their pixels won't blend together, as he makes his way around cheek, neck, shoulder, and back. Sniff's filled with stagnant energy. It doesn't move fast - doesn't carry the parts that need attention towards Etho's mouth the way it should - but his tongue's doing the job the activator whisk should do. It ripples through his code. It stirs the stuff awake. That'll get him moving. Sniff gives a big, silent yawn that splays his fingertips and flicks his tongue. Then he turns his head away. His wings flex like a butterfly's and slowly fold against his back.
Etho keeps working. The mask's been dropped aside for this- It's just easier than letting it dangle at his neck. He nips with his teeth, catching strings, and fixes everything he can. There's only so much you can do with stagnant code. Most species don't eat it, but a fox can. Like the phantoms, they scavenge.
Etho takes the stuff Sniff doesn't need. He doesn't need scratches and aching muscles. He doesn't need chipped nails and dirty feet. He doesn't need the callus on his writing finger, the ink stains, or the ache between the V of two fingers. These are little add-ons (just wrinkles in the code). Etho pulls them free of soul and skin. They slip between his teeth.
Sniff drags Etho's other hand forward. Etho shifts, keeping balance. His hand's pretty neat and tidy after the week-long experience of Sniff cycling his code. Sniff nibbles at it anyway. The bits in his system that are ruffled prickle to attention and swish the messy bits forward so Sniff can gnaw the tangles away. Yeah, that's the spot. Etho thumps his tail against the bed.
Unlocking advancements feels like this. And the universe loves them, and it gave them thought without breaking the ecosystem, because it wanted them to know they're loved.
If there's an advancement for allogrooming, it's one he achieved a long, long time ago. Probably when he was just a kit. Not a lot of memories from the early days still stick with him, but he does remember Rhetoric chewing on his ear. He had fox ears back then. They used to wrestle with each other, but growing up is complicated. Sometimes you do the best you can every day of your life… and for what? Your mother will still pick you up by the scruff and drop you on the doorstep of a dragon she thinks could use you more.
He and Bdubs have that in common. Bdubs just refuses to admit it.
Oh yeah… We can't let the Slime Dragon see Sniff. She'll wanna kill him so he respawns at his mom's nest. Etho yawns. He stops messing with the code. Instead, he nestles his chin against the back of Sniff's neck. What time is it? Feels like they've been here for a thousand ticks, but it's such a blur that it could easily be half as much. It probably isn't. It can't be that long… He hasn't been called to Dog's Life yet.
Sniff chews at his fingers for a little longer, but his teeth slow too. He rests his cheek against his knuckles. Etho sweeps his tail sideways, brushing it across Sniff's back. He's warm. And without the nips and pulls, consistent collision isn't going to last. Pixels prickle. His chin starts to sink straight through.
It's familiar. But not the way you think. He never groomed Joel like this, with his mouth, except one time he had to re-open some rumpled bite marks that had sealed themselves in ridges across his shoulders. Long story there… but it's familiar because the universe told him this feels right tonight.
And it does feel right tonight. He's not gonna leave the mask off for long. Or the bandana, for that matter. He's way too exposed like this, raised blue scar curling over his eye and across his lips (all of it on display). Sniff probably feels the same way. He's still got both his shirts off. The curve of his spine's marked with a stripe. When you're this close, you can see the tiny zigzag marks where skin meshes like it's stitched. His giant scar - that big, white X - pulses with a dim, hazy glow.
Etho removes his head before he can sink any lower. He noses Sniff's cheek, then his chin. Once they're upturned, he gets back to work. A little more clipping here. A little trimming there. Making his way around. Sniff makes one soft noise like he's debating whether to squirm away. He keeps his eyes shut though, arms relaxed, and his wings stay folded up- lazy and content. Etho adds a few licks, keeping them light so he can seal the tiny gashes left behind by his teeth without startling Sniff enough to ask questions about 'what they are' again.
Funny. Last week, we did this the other way around. But he doesn't go as far as Sniff did. Tonight's about grooming, not feeding. Etho chews a knot from the back of Sniff's neck, then draws back. "Hey, Sniff, you-"
"My full name, Etho," he mumbles, not opening his eyes. "I only have one rule."
Right. Etho rasps his tongue around his lips and starts again. "SnifferMyFeet, I want to ask something."
"Mm?"
"I know we said we wouldn't be 'serious' right now. I've just been wondering if maybe, after I do recordings and Hermitcraft clean-up… If you'd want to eat my soul again?"
Sniff's fingers still against the sheets. They alternate whose turn it is to breathe, like they used to at night on The Relation or when they were testing how far they could swim without coming up for air. Spoilers: Oxygen does not transfer from one soulmate's body to another.
Then Sniff blinks himself back to full awareness. He sits up on his knees. The covers slide down his back. Hands still braced, but no longer looking cozy. The guy reaches to pinch his brow and take his folded tank top at the same time. "You… want to use my vessel? Fluff, I dunno. Can I say that? I think I can."
[Full chapter on AO3 - Link at top]
#smalletho#trafficfic#traffic soulmates#mcyt#Dog's Life#Dog's Life art#fic announcement#ridwriting#apparently art#trafficshipping#hermitshipping#Sniff and Pig#Pixels Imperfect#allogrooming#<- idk if anyone blocks this tag but. there ya go
27 notes
·
View notes