#HTML tags for lists
Explore tagged Tumblr posts
Visit Tumblr Blog
Explore Tumblr blogs with no restrictions, modern design and the best experience.
Last Seen Tumblr Blogs


Fun Fact
Tumblr Inc. has $15.1M in annual revenue.
Note
You're more amazing than lineart
You're more amazing than tag blocking
#fa added tag blocking yesterday!#but only for the modern theme...#which would be fine if the modern theme didn't have a bunch of little annoyances#navigation bars that follow you when you scroll down are the devil#like fuck off! stop following me! if i want to use you then i'll just scroll up it's not that hard#they're called sticky navbars or fixed navbars#i actually messed around with the html and css and found the part that makes it sticky and turned it off#but making a whole browser extension just to make modern theme slightly less bad isn't worth it#other Various Annoyances: the giant raccoon art at the top of every page that pushes the rest of the page down#the submission titles don't turn blue after you've clicked on them so you can't tell which pics you've already clicked#the minigallery on submission pages is awful because they copied deviantart's layout which was not designed for a minigallery#the minigallery thumbnails are cropped more than they need to be which i think might be just straight-up a mistake#also there's a really easy way they could've partially implemented keyword blocking. REALLY easy#the search feature already has a method to exclude results that contain a certain keyword(s)#so just let users make a list of blocked keywords and then alter all their searches to use that method to exclude the keywords#literally just add “-(@keywords blocked_keyword_example)” for each keyword. just take the search string and append that. easy#it'd only work on searches but it would've been so fucking easy but that's irrelevant now#ka asks
1 note
·
View note
Text
spent a good 20 minutes yesterday daydreaming about what a hypothetical personal website for myself would look like
#one of these days ill learn html#plum rambles#if i implement any kind of search or filtering system#youll be able to drag an drop little blocks labeled with boolean operators into it#there would be an accessibility settings button#and settings would be saved with cookies#everything. EVERYTHING would have tooltips#and lists would be categorized with silly little icons for different categories#thered be a legend at the top of the page where you could click on an icon to filter it#i want it to be like. something you can play with. toy block ass website#the home page would have art of me (irl human appearance) and Tir (turtlesona) posing back to back#with buttons for the main pages to the right of them#the top or bottom of the site would have a banner saying that i dont know what im doing and to contact me#if you have accessibility concerns or encounter bugs#maybe have a little google form as an alternative to emailing me bc emails are scary!!#anyways. um.#plum rambles (in the tags)#web design
0 notes
Text

ok so. this is the link i have in a button on my strawpage

and this is what it sends you to when you click it. wbat
1 note
·
View note
Text
updating fics list (not completely lmao) and probably it would be a good idea to compile all the oneshots i wrote directly on tumblr and port them to my ext harddrive. just in case
#feel like i have said this before#also aaaaa realization that i could link all the one-off drabbles ive done#but i would want another drop-down menu to keep the list short#and when i did that for tags page i had to make the page not live anymore which is so hard to update now#smth abt tumblr not supporting the html bla bla but i dont want every page to be static!!#maybe i will jus keep as is then#when my meds wear off im sure i wont do anything anymore n will forget anyway#but uhhhh generic hey if you ever a certain fic of mine and cant find it#pls send an ask and i will dig it out for you!!!
1 note
·
View note
Text
I wouldn't call it *good* but I moved some things around in a base theme's code and now all I gotta do is add some images to the sides. baby's first tumblr theme edit 👍
#godsrambles#themeposting#once again making up a tag that may never come up ever again#the one problem i have with all these tumblr theme makers is how goddamn tiny the text is. why is it always so small#can now add 'learning minimal amounts of html and css' to the list of things these fictional guys have gotten me to do
0 notes
Text
Tumblr Backup Options: None of them do everything
Cheeky but true. I'll go through what's good and bad about each option though so you can decide which balances out for you.
Covered: native export, WordPress (kinda), TumblThree, tumblr-utils (kinda)
Native Export
If you go to "https://www.tumblr.com/settings/blog/yourblogname", at the bottom of the page is an export option

Once you hit the button to start the request, it will start processing. Feel free to log off, this is going to to take a few hours. You don't need to keep it open. ~22k posts took roughly a day for me. If you have a small number of posts and get stuck, you're probably broken.
When it's done processing, you can hit that download backup button and then wait some more as you wait for the zip file to download. Mine failed the first time after like twenty minutes, and then I had to start over. I think it took 1-2 hour(s) and I'm almost certain that was on Tumblr and not my internet. And that was the zip file! So make sure your computer can be on for a while before getting this started.
So what do you get?
A media folder, conversations folder, and posts folder
Media folder: Every single photo, gif, and video that has ever been on your blog or in your DMs. There is no context data attached (except for dm images which do say which conversation they're from at least), but they seem to be in chronological order because they seem to be titled by the post's ID (the string of numbers in the address bar after "/post/"). They look like "100868498227", "100868498228_0", "100868498228_1"
When you see something end with "_0" and up that means the photos are in the same post, so _0 represents the first image in the post, _1 represents the second, etc (at least, I think).
Conversations folder: HTML export files of every DM history you have on your blog. These are actually pretty well formatted, see example here.
Posts folder: html subfolder and posts_index.html file
posts_index.html: File listing every single post on your blog by post ID on its own line with no other context. Example of a line: "Post: 780053389730037760". The ID number will link to the post in the html folder
html subfolder: contains a submissions subfolder and stripped html file versions of every post on your blog. See below first what the post looks like on Tumblr, and second what the post looks like in the html folder


The way you seem to be intended to use this is to open the file index, select a post ID, and be jumped to where that post is saved as an html file, but I don't know why you would bother when the index doesn't provide any information about the posts inside it. The posts all have extremely minimal formatting. See a reblog chain below.

Notice I said ALL posts on your blog. Photo posts without a caption will just have a broken image icon and then the date and tags. Theoretically, it might be that if you unzip the entire export folder that allows it to automatically link to the image saved in your media folder. I have no fucking idea, unzipping the folder was estimated to take two hours so I didn't do it. Let me know if you do though so I can update this post!
The submissions folder is such a rabbithole I made a post just on it but long story short it's asks you haven't replied to
What do I see as the main reasons to opt for this option? 1) you don't want to download any programs or files from the internet just to backup your blog, 2) your blog is relatively small, so digging through the ID files isn't a big deal, 3) you mostly just want to download either the images (which will be browsable via thumbnail previews in the media folder if you unzip it) or conversation history, which are fairly well formatted, 4) you don't need to update your export often/ever, because you'd have to request it from the start and download the entire thing all over again, 5) you want to be able to read your text posts clearly and don't care about preserving the full formatting, and/or 6) you don't plan to reupload this information elsewhere (say on... a WordPress blog)
WordPress Automatic Ex/Import
Move your post's from Matt's right hand to his left! WordPress (another product of Automattic) has a native Tumblr importer found under your WP Admin dashboard for your site under Tools > Import > Tumblr.
How does this work? No idea! I hit import 2 days ago and it has done nothing. Maybe I'm stuck, maybe it's permanently broken. It says to contact support if it's been over 24 hours but they don't make that easy. I disconnected from Tumblr (you can only port over a blog you have the login of) and reconnected and it still said it was importing. I don't think it's ever going to do anything.
Presumably it's supposed to 1:1 import every post on your blog onto the WordPress site, which will result in a whole lot of stolen art because there's no way to select just your original posts. Also, you'd need enough storage on your webhost to house all the posts (this honestly might be my problem, but I was planning to delete all the non-original posts once it imported.... anything and backfill what it didn't get to). The one thing I'll say about this option is that it's the only one I've seen so far that exports drafts and queues as well.
I mean, if it exported anything. If this ever does anything I'll update this post, but either my blog is too large or this tool isn't totally functional anymore.
TumblThree
(previously TumblTwo, etc)
TumblThree is an all-in-one program requiring no extra downloads beyond the main Zip, and was last updated fairly recently at the time of this post. In order to run it, unzip it into one folder and run the main .exe. It has a full UI interface with lots of very descriptive helper text to help you select the right options for you without looking at the wiki. I think it's user-friendly for non-tech people.
There are a lot of options in TumblThree to change what output it gives you, but I'm going to start with the largely universal parts first:
Everything from one blog will be exported to one folder, no subfolders or sorting. As a result, the output is very messy and difficult to wade through, but post metadata and the photos are named in the same way so you can scroll, see an image preview, and then click on the metadata txt for that post and read the caption.
Depending on your settings, you can export all photos, videos, text posts, etc as their own files or exclude them from the export entirely. For the different types of media posts, you can independently select if you what to download just the media, just the metadata for it (everything that surrounds the post when you see it on Tumblr, such as the caption, OP, tags, etc), or both.
Master txt file: For every type of media metadata you export, a correspondingly named txt file will be created (images.txt, answers.txt, etc) that contains the text/metadata of every post of that type in one txt file. This is also the default behavior for exporting text posts.
Note: for text posts (which includes asks/answers), it only creates a master txt file if you do not select "Save texts as individual files", in which case it will only save each text as an individual txt file and not make a master file.
The formatting on these files is so brutal I won't even give examples, but they're unreadable. Being a .txt file, there is no native formatting, so it exports in html formatting.
Example: instead of a post that says "I want to go swimming", it exports: "I want to go < b >swimming< / b >" (minus the spaces around the b) as the post body, which is a big part of what makes it unreadable, because there are a lot of hyperlinks in all the header information listed below.
Each post in the master txt exports with: Post ID, date, post URL, slug, reblog key (no idea what that is), reblog URL, reblog name, title, [the text/caption itself], and tags.
Theoretically this means you could ctrl+f "cybertrucks" in the master txt file and then browse all your posts making fun of Tesla owners by tabbing through the returns. This is not possible with any of the previous options, and only is possible because it's all in one file, as ridiculous as it is, which is why getting that master file is so important.
For the trick to get both the individual text posts and master text.txt & answers.txt file, as well as my recommended settings and details on how updating backups works, see the read more at the end of this post.
The images.txt includes all the information listed above, but with the following additions: photo url (NOTE: this is the url on Tumblr, not a link to where it is in your folder), photo set URLs, photo caption, and "downloaded files" (NOTE: this is the name of the file it has downloaded)
The video.txt is similar to the above
The use case for this would be similar to what I described for text posts above: search keywords from captions, tags, etc and when you find what you think is what you want, copy the name from "downloaded files" and search your folder to find the actual image
I really hated TumblThree's output the first time I looked at it and then I realized the single file is the only way to make browsing tags workable, because otherwise you would have to have a folder for every tag, and posts with multiple tags would have to be duplicated between them. I'm not pressed on finding a txt to HTML converter right now but it could be an option in the future if you wanted to make things more readable.
Okay, let's get into the non-universal stuff you can customize in settings, because it's like, everything:
File names: We've already established you can search with the downloaded file name for images, but what will that be? Whatever you fucking want. Post date, reblogger name, post ID, post title, original file name, you can make it any and all of these in any order you want! You can have actually useful file names! Personally I like %e_%p_%q_%i_%x which exports as DateTime_PostTitle_BlogOriginName_PostID_IteratingNumber (note: you need some kind of unique iterator to be valid so two files don't have the same name, such as multiple photos from one post). Look how much searchable information that gives me, in chronological order! It decreases your need for the master txt file.
Tip I wish I thought of before doing my massive export: make one of the unique headers from the master txt file part of the exported file name so it's easy to search for it after identifying it in the master file.
Files scanned: this is the only method I've found that lets you back everything up, remember what it backed up, and then lets you add any new posts since that date without having to download the whole thing again. That's a game changer, but see the read more below for limitations.
You also have the option to rescan the entire thing if you want.
Post type: T3 (I'm abbreviating it now) also lets you export just your original posts, just reblogs, etc - again, giving you the most control of any options. It also lets you export replies. I, uh, would not do this because if you have any popular post on your blog it might have hundreds, or thousands of replies but hey, you can do it!
You also have the option to only download posts with a certain tag.
Blog options: You can export literally any blog you have the URL of. In fact, if you copy a blog URL while it's open, it will automatically add that blog to its UI and create an empty folder for it. It makes it easy, no private key required. I do have mixed feelings about the concept of exporting someone else's blog... but I'm also planning to do it to some of Crew-ra's blogs so... my digital horde must grow.
You can also queue blogs up and leave it to run through a lot of them. It is a lot faster than Tumblr's native export, I started this import well after I started typing this post and it took a few hours, probably not all that much longer than just downloading Tumblr's export took (and that's while running it alongside other data copy operations because I'm backing up a lot of stuff right now).
I do recommend doing a test export with a sideblog, I was able to use wild-bitchofthenorthwoods as a test import since it only has one post and it has media, so it was super quick.
(I do want to note, I think the number of downloadable items starts out matching the number of posts on your blog without scanning them until you start the export - but if you choose to export everything as its own file, you're going to end up with way more than that because a post with three images would be multiple files)
Things T3 cannot export:
Since in its simplest form it's just accessing the public upload of your blog, it cannot export your drafts, queue, or conversations
It cannot export posts as HTML files, and thus cannot export them with readable formatting natively
What do I see as the main reasons to opt for this option? 1) you don't care about exporting your DMs/conversations, 2) you want the ability to export only certain kinds of posts (original, photos, using a tag, etc), 3) you want to control the titles of the exported files 4) you don't mind wading through massive folders, 5) you want the ability to search tags (using the txt files), 6) you want the ability to update your export without starting over from the beginning, 7) you either don't want to reupload this information somewhere else, or you want to upload it somewhere that supports automatic HTML conversion (for instance, you can switch a Tumblr post from a rich text format to HTML, same with AO3, so you can put it in as HTML and then hit post to see it turn into a rich format. This techically makes T3 the most versatile/useful export option if you're planning to do anything with it other than browse your own files).
tumblr-utils
Full disclosure: haven't tried this one. But others have! tumblr-utils is a no-UI, python-based backup software. This means in order to use it you have to type commands into the terminal. If you don't know what I just said, don't use this one.
If you do, you'll need to separately download python and youtube-dl just to get this one running. You'll also need to give it your personal Tumblr API key and feed it commands deciphered from the wiki page I linked. Here are two different guides people have written on how to use it. Output:
Obviously I'm guessing based on the documentation, but one thing that is nice is this tool allows you to save each post in its own folder. Presumably each post is multiple files like we saw with T3, so this would make it easy to group them, but it also means you'd have to look in every single folder to find anything.
It seems to break posts up into timestamp folders by month, again, helping with management to narrow down where you have to search
It allows you to save only certain kinds of posts at a time like T3
It allows you to backup posts only from a certain time period (so if you keep a little .txt note of the last time you backed up, you can easily add only the new posts into your backup without having to start over from the beginning)
It allows you to only save posts under a certain tag like T3
It allows you to save only original posts
It's the only one I've found that lets you back up your liked posts
What do I see as the main reasons to opt for this option? 1) you don't care about exporting your DMs/conversations, 2) you want the ability to export only certain kinds of posts (original, photos, using a tag, etc), (okay now we get to the points that aren't also covered by T3), 3) you want posts to export already broken into folders, whether by post or by month, 4) you want to back up your likes, 5) you don't care what file names look like, 6) you're comfortable with the command line/coding and don't need a UI.
Summary:
None of these options are ideal for reuploading your files anywhere (except WordPress), but I do think TumblThree is the best of the options because of the written HTML formatting in the txt files being useful for websites that support automatic conversion (or require HTML input).
For starting another blog, WordPress wins. If it works. I'm trying to be generous here.
For searchability, T3 wins again.
For versatility... yeah you know it's T3, but tumblr-utils has a lot of the same features, too!
For sentimentality (aka conversations), it has to be the native export. There literally is not any other option.
For queues and drafts, the only theoretical option is WordPress. If it works.
For likes, the only option is tumblr-utils.
Every option does something the others don't, so theoretically to cover everything, you have to do all four options. Actually I would say do the native export if you don't have a lot of posts and aren't a freak like me, check it out, and if it doesn't work (I know it's finnicky) or you don't like the export, go with TumblThree. This also means you'll at least have your conversations even if you don't end up using the native export any other way.
And I wish it could go without saying, but don't repost people's shit, y'all. I'm backing up everything for my records only and it will never be shared with anyone else, or even browsed as long as using Tumblr instead is an option.
TumblThree adding to old backup quirks, recommended settings, & master file backup solution:
Adding to backup quirks:
From my tests, when you scan a blog you've already backed up to just add new posts to it, it does not update the master file, so if you want to update it, you'll have to do the steps I list at the end of this post. It might be possible it does update if you force rescan, but I highly doubt it.
If you scan a blog you previously backed up under more restrictive settings - say you only backed up original text posts as one file before and now you've selected to back up absolutely everything - it will only download up until the time you last backed up that blog. It will not blow past where you last downloaded to download all the photos and videos it didn't get before just because they're selected now. This is great for doing after using the master file solution I'm showing below, but if you do need to download everything after doing a more restrictive scan, you can once again follow the first few steps below to do so.
Recommended settings:
This will obviously vary by what you're trying to do, but one or two things weren't immediately obvious to me and I did say I think this was the best solution for less technical users, so I want give my personal recommendations. Settings can obviously be found under the settings button at the bottom of the screen (you may need to use the scrollbar on the UI for, which is separate from the scrollbar on the blogs panel), but when you click on a blog, when you click "Details" in the right sidebar, you can also see your most important settings at a glance and adjust them to whatever you want them to be "per blog". I believe TumblThree remembers what you last used for the blog and applies the things in settings only to new/other blogs.
The thing that is going to vary the most is how many different types of posts you want to back up (text, video, reblogs included, etc), so I'll leave that up to you. If you're going to export a media type, though, I generally recommend exporting the metadata too.
I already gave my preferred file names above and again that's going to be something that varies a lot by people. Hover over the "Filename template" box and it will give you all the options in the legend you can combine via underscores.
Leave "Skip .gif files" off unless you're hurting for hard drive space. This removes all the gifs from your download, and the reason this is provided as a separate setting is because gifs have relatively massive files (at least compared to a text file)
I'll be honest I haven't seen a difference between turning on and off "Group photo sets". Because of the way file names work, most conventions will naturally lead to photos from the same post all being in a row.
"Save texts as individual files": if you only want texts to be saved as their master text.txt and answers.txt files, uncheck this. If you want the individual files I highly recommend you also download the master file for searching purposes, in which case my recommendation is this:
1) Select to export texts only, leaving off all media options, and uncheck the "Save texts as individual files" option. 2) Export the blog. This will only result in two files, answers.txt and texts.txt. 3) Move these files elsewhere on the computer to save them. 4) With T3 closed, delete the folder for the blog and the blog's Indexes (see instructions at the end of this post for finding these). 5) Reopen T3, which shouldn't remember it ever saw the blog and create a new folder for it. Turn on the "Save texts as individual files", as well as any other media posts you want to download. 6) Export the entire blog again. 7) Move the texts.txt and answers.txt file back into the blog's folder.
I leave all other options on the Details tab off, except for:
"Force rescan" scans past the point it last backed up and searches the whole blog again. If you have a big blog, this is going to burn time. This is needed for the number of downloaded items in the panel to be accurate but I don't know why you would care or turn this on unless it lets you skip steps 3-4 above, but my blog is too big to burn through testing that, so if you try it, let me know and I'll update this post!
Master file backup solution:
See my 7 steps from above to skip having to do this, but if you accidentally do things out of order and then realize you still need the master files for texts post after backing everything else up, here's how you get it with minimal pain:
T3 will make an "Index" folder in both the main folder for the program where the exe is located and the destination folder where you have your blogs backing up (note: these were two very different places for me, if you just have it back up to the automatic Blogs folder within T3's folder, it might not create a second Index folder).
To make T3 "forget" what it has backed up previously so it goes through to the beginning and makes a master file that includes everything, all you have to do is remove the Index file(s) for the blog while it's closed so it doesn't remember it anymore. I backed my index up in another folder.
Check off for it to only download text posts, and then uncheck the "Save texts in individual files" option. This will cause it to only create the master answers.txt and texts.txt file on the rescan.
The combination of only going for one post type and only downloading one file for it means this rescan is relatively fast. When you look at your Blogs folder, you'll find a new folder has been created for your blog name (in my case, there was "n7punk" and "n7punk_2) and your output is in the new folder. I just moved it over to the original folder.
At this point you can restore the indexes, though I've only gotten it to half recognize them. I can get it to recognize my original n7punk folder so everything can stay there, but the total downloaded items is stuck at what it was when I did just the text posts. I don't really care, it was mainly the folder thing I wanted to fix. If you have lag between your last full backup and your master-only backup, this might cause some issues? I don't know because I made sure there wasn't lag, so I recommend doing another backup to add any missing items before doing this method.
You can also use this technique if you want to download only your original posts and then download everything else to a second folder. Adjust the setting to only download original posts, download the whole blog, close T3 and delete the indexes, rename the folder to whatever you want ("n7punk_original", etc), and then reopen T3 and set it to download everything and run it again from the start.
#tumblr#automattic#words and things#tumblr hacks#resource#tumblr-utils#tumblthree#100#posts that haunt me#in a good way back up your shit yall lol
474 notes
·
View notes
Text
========================================================
[tutorial: build your own neocities/nekoweb page]
========================================================
a beginner's guide for making your very own home on the indie web—retro, personal, weird, and 100% yours.
this ain’t an average wix, squarespace, or tiktok aesthetic.
we’re talking full html/css with soul and attitude.
[ prerequisites ]
------------------
> an idea
> basic text editor (vscode, notepad++, or even notepad)
> account on https://neocities.org or https://nekoweb.org
> some gifs or tiles you love (dig deep or make your own)
> optional: image host or gif repo (or self-host everything)
[ feeling overwhelmed? read this. ]
-----------------------------------
you do *not* need to know everything.
html is not a mountain. it's a garden.
you plant one tag. then another. then a style. then a button.
you can build your site piece by piece.
and every piece is a portal to somewhere personal.
you are allowed to make broken pages.
you are allowed to use templates.
you are allowed to start over as many times as you want.
this is *your* world. you control the weird.
[ step 1: create an account ]
-----------------------------
> neocities: https://neocities.org
> nekoweb: https://nekoweb.org
register a name, log in, and enter your file manager.
this is where you upload your files and see your site live.
[ step 2: your first file - index.html ]
----------------------------------------
make a new file: `index.html`
basic starter:
<html>
<head>
<title>my weird little corner</title>
<link rel="stylesheet" href="style.css">
</head>
<body>
<h1>welcome to the void</h1>
<p>this is my page. it’s strange. like me.</p>
<img src="mygif.gif">
</body>
</html>
> upload to the dashboard
> boom. you’re live at
https://yoursite.neocities.org
or https://nekoweb.org/u/yoursite
[ step 3: add a style sheet - style.css ]
-----------------------------------------
create a file called `style.css` and upload it.
here’s some nostalgic magic:
body {
background: url('tile.gif');
color: lime;
font-family: "Courier New", monospace;
text-shadow: 1px 1px 0 black;
}
img {
image-rendering: pixelated;
}
marquee {
font-size: 20px;
color: magenta;
}
link it in your html and the vibes activate.
[ step 4: decorate it like a haunted usb ]
------------------------------------------
> use <marquee> for chaos scrolls
> embed gifs from https://gifcities.org/
> steal buttons from https://cyber.dabamos.de/88x31/
> set up a guestbook at https://www.smartgb.com/
> loop audio with <audio autoplay loop>
> add fake errors, 90s web lore, random link lists
[ step 5: resources, themes, and comfort ]
------------------------------------------
> templates & layouts: https://numbpilled-themes.tumblr.com
> glitchy gifs & buttons: https://glitchcat.neocities.org/resources
> layout builder: https://sadgrl.online/projects/layout-builder/
> free tiled backgrounds: https://backgrounds.neocities.org/
> beginner html intro: https://www.w3schools.com/html/
> pixel fonts & cyber assets: https://fontstruct.com/
remember:
you don't need to know js. you don't need to be a coder.
you just need a mood, a direction, a dream.
the html will follow.
[ bonus concept: shrine pages ]
-------------------------------
> a page just for one character you love
> a room to house digital fragments of your identity
> embed quotes, music, images like altars
> call it shrine.html and link it from your homepage
[ closing mantra ]
------------------
you are not here to be optimized.
you are not a brand.
you are a ghost inside the machine,
carving your initials into the silicon void.
welcome to Your website.
========================================================
#webcore#old web graphics#neocities#web graphics#carrd graphics#carrd resources#rentry decor#rentry graphics#carrd moodboard#carrd inspo#neopets#indie#indie web#early web#webdevelopment#web development#web resources#web design#old internet#old web#oldweb#nekoweb#transparent gif#tiny pixels#pixel gif#moodboard#tutorial#html page#html theme#htmlcoding
490 notes
·
View notes
Text
this is my most autistic half-birthday ever!
I gave myself the day to pursue a special interest and fulfill an offer I'd made last year.
The Jewish Virtual Library has a page listing all the rocket and mortar attacks on Israel since 2001 (which was when they first started). But it's incomplete. Last fall, I noticed it stopped in August, so I wrote to them offering to help update it. They thanked me and gave me some places I could look.
Today, I finally did it. I ended up cross-referencing with the lists on Wikipedia, digging through multiple Twitter accounts and outside news sources and NGOs, and sending them an email with my updates... plus an html file where I'd updated the code on the page so they could just check it and upload it instead of typing in all the data themselves.
I am such a huge nerd.
There's definitely more research to do. But I think I found a strong stopping place that let me actually send what I found and post about it. Which is always the hardest part. As my drafts folder could tell you.
I have more than two thousand drafts on here.
Anyway, I'm going to put my findings under a cut tag. Before you read on, I want you to try to guess.
Because one of the things I've been told most often by people who wanna Argue About Palestine Without Having To Learn Anything About Palestine (Or Israel Or History Or Imperialism Or Fact-Checking Or ?????) is that the reason for October 7, the reason for literally anything in fact, is that "Israel bombs Palestine constantly."
I want to put together a list of Israeli airstrikes next. I would love to reblog this with that information. But first, I want you to guess:
Note that this DOES NOT include terrorist car rammings, mass shootings, mass stabbings, bus bombings, suicide bombings, etc. It therefore excludes almost the entire Second Intifada.
After correcting the most recent four years and sending in my corrections, I made a list of the totals using the most complete collection I could find for each year. (Sometimes it was Jewish Virtual Library, sometimes it was Wikipedia, and sometimes they matched.)
2024: 12,629 (an average of 35 per day)
2023: 12,295 (34 per day)
2022: 1,180 (only 3 per day)
2021: 4,425 (12 per day)
2020: about 203
2019: 798+
2018: 348+, 0.95 per day
2017: Only 47!!! Why, it's almost like living in Canada!! 0.1 per day.
2016: Wow, only 20. See, if you go through the years backwards, it looks like progress is being made. Very exciting. Until I get to the Second Intifada, probably. 0.05 per day.
2015: 58.
2014: oh right, that war. 4,778. (Wikipedia's 2015 list claims " In August 2014, Operation Protective Edge was ended after 4,594 rockets and mortars launched toward Israel. From the end of the operation came into force an unofficial cease-fire between Israel and Hamas." but there were three more after that, and 181 before it, listed on wikipedia alone. so like. 4,778 actually, for 13 a day.)
2013: 70 total. Wikipedia notes this was the lowest number since 2001.
2012: 2,442, or 6.7 per day.
2011: 680, for 1.9 a day.
2010: 365, for exactly one a day.
2009: 858, or 2.4 per day.
2008: 3,107! that's 8.5 a day.
2007: 2,807: 7.7 a day.
2006: 1,275, or 3.5 a day.
2005: 858. An average of 2.4 per day.
2004: 1,158.
2003: 637.
2002: 472.]
2001: "These attacks commenced in April 2001, although the first rocket to hit an Israeli city was on 5 March 2002, and the first Israeli fatality was 28 June 2004." I count 173 mortar attacks in 2001, however. Which makes the first fatality a critically-injured baby in 2001. And as soon as I make 250+ more edits and have the power to edit Wikipedia articles on "controversial" topics, I'll make it say so.
Grand Total: 51,685.
An average of SIX PER DAY.
FOR 24 YEARS.
I've been saying four.
But there were actually thousands that weren't listed on the Virtual Library site yet. It really cranked up that average.
Now consider this: between 10%-30% misfire and either crash into the sea, or hit Gaza.
A surprising number of Gazan casualties in every "conflict" have been from Hamas & Co's own missiles.
And they know this. And not only do they not care, but they keep using everything from mosques to humanitarian zones as rocket launch sites.
And why shouldn't they? You have to really dig to find information on how many Gazans die that way. Almost everyone just attributes the deaths to Israel. Hamas is never going to get any actual flak for accidentally killing its own civilians. It barely gets any flak for intentionally killing Israeli civilians, for pete's sake.
176 notes
·
View notes
Note
Hi hi! I hope you're having a good day so far! 😊 I have been super appreciating seeing you creating site skins and I saw you said you were self taught. I wanted to ask if you might share some of the resources you've found helpful in learning to make them. I've gone through the posts ao3 has in the FAQ and I have got some limited experience with html from the myspace/livejournal/early tumblr days (though it's been a while since I used them and am definitely rusty lol) so I got a grasp on basics. I can figure out how to make changes like color and font and padding and etc, but where I've been struggling is trying to figure out what the available selectors are and what they control. Like .workskin and .bookmarks. I've tried to find something like a glossary or list of what's available to mess with and I've tried just going through other people's skins to see what I can decipher, but it's definitely been a struggle to process and understand working that way. Any pointers or resource suggestions you might have are greatly appreciated! Thank you!
My main resource for the CSS code skills is W3Schools.com. The tutorials are mostly easy to follow, and most of them have an option where you can run their code and then modify it to run your own version.
If I can't find what I need there then I just google "CSS drop cap" or whatever I'm trying to do and something usually pops on StackOverflow or CSS Tricks.
As for the selectors, that's where you want to be on a computer instead of a mobile device so that you can use your browser's Inspect feature. Right click on the page you want to look at and this menu pops up. You can choose Inspect down there near the bottom.
Using a cut because of length and screenshots.

This is what AO3 looks like with the Inspect window open in the Firefox browser. If you're using Chrome, the window will open along the right hand side instead.
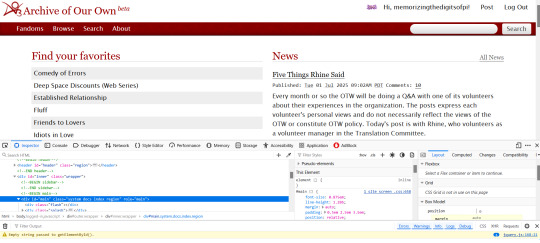
The thing that makes the magic happen is the tiny little arrow inside the tiny little box in the far left upper corner.
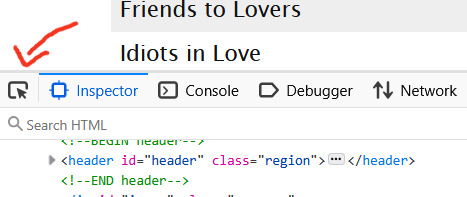
Click on that little arrow and then hover your mouse over the website. As you move your mouse around, different areas will highlight. You'll also see some mouseover text telling you the selector for that element.

a.tag is still pretty generic, though. That just tells you it's a link (the html a tag) that is also a tag. So how do you get to know that specific link in particular in that specific part of that specific page?
Click on it. When you do that, the inspect window will shift automatically to that exact area of the code, including selectors
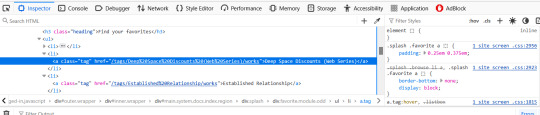
On the left, you can see the favourited tag link is highlighted. On the right, you can see a couple of different snippets of code that start with .splash .favorite a
if I scroll down within that window, I can see more code for that area of the page
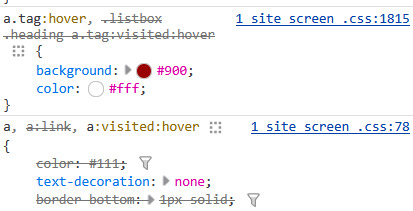
this shows me that tag links have a red background and white text when you hover over them
a.tag:hover { background: #900; color: #fff; }
The great thing about the inspect window is that you can do temporary edits in there to try stuff out. So you could change that red to a blue. You could change the white to black. You can add more lines of code like a border or increased padding etc and see it change live on the screen. All changes will revert if you refresh the page.
The other thing, that I only JUST noticed as I was making that medieval skin (or maybe the rustic hospitality one I made just before it?) is that there's also a breadcrumb along the bottom of the lefthand window!

That breadcrumb shows me the exact selector I need for the element I clicked on! In this case, that favourited tag can be styled with
.splash .favorite.module.odd li a
I have no memory of why I know this but you leave off the div when you're writing the CSS
You can get as specific as a link (and even use a pseudo-class like nth-of-type if you want to make each one of those links a different colour) or you can leave off the li a (list item link) and just style the box itself. That's how I added the woman throwing hearts into the favourites in the medieval skin.
This might be too much information or it might make you crave even more, but either way I hope it gets you started? Good luck!
116 notes
·
View notes
Text
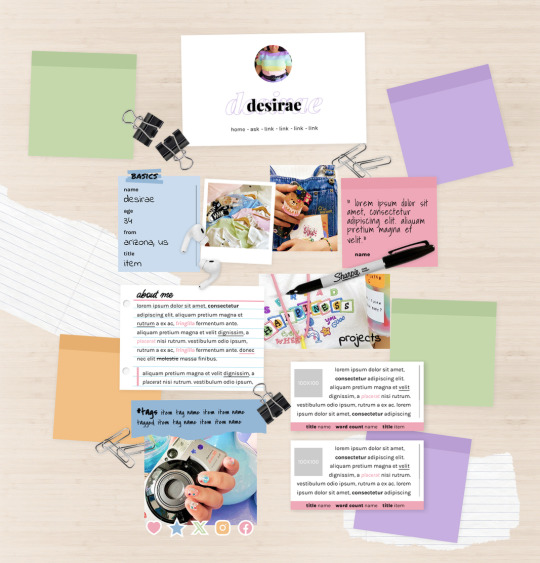
MEL: ABOUT PAGE BY ETHEREAL THEMES
View on payhip ($6.00), check out the preview or support me on patreon for more themes + pages, header templates, coloring psds and more every month!
About Page
Navigation: Home, ask + 4 links (room for more if needed)
**No Javascript Needed**
Color options for: background, links, all content boxes, five accents + more
Sections include:
Profile with avatar, name and links
Basics/info list
Sticky note quote
About me notecard
Tags links
Scrolling Project/WIPs cards
Social media sticker links
Images Include:
100x100 Avatar
170x170 Polaroid
Three additional images
Advanced HTML to edit colors and information as this is only available as an HTML page; box + table size changes not recommended. Let me know if you come across any issues.
102 notes
·
View notes
Text
List of Tumblr things that would NOT get the Tumblr devs eaten alive for changing the website (Tumblr please take notes)
We're changing how moderation works: Reporting blogs at a certain threshold (maybe 1000 unique reports) gets it sent to a human person for manual review. Nobody gets deleted without a human pulling the kill switch.
Refined search engine: There's a new button you can press when searching a term that lets you exclude certain tags, sort by date posted/most likes/etc. Also you can refine it to include only results from certain users. It's the Ao3 system. Please I'm begging you Tumblr's search is so broken and hides so many works behind an arbitrary cap. You can't tell me there are only 3000 posts about Zelda over the 10+ years this site has been alive, you CAN'T.
Theme on/off switch on page: Themes are an integral part of Tumblr. You can HTML things to death. But sometimes they're illegible to some people, so instead of having to swap "powdermelonkeg.tumblr.com" to "tumblr.com/powdermelonkeg" manually, there's a sliding toggle at the top of the blog that allows you to quickly switch between them.
Filterable asks: You can set blocked terms so people can't send you them in your ask box. For example, if I don't want to see anything about "weather," nobody can ask me anything that includes the word "weather." And if there's a scam/copypasta sort of thing going around, you can block entire paragraphs of text.
Mutual icons beside usernames on posts: Same as it is in the Activity tab, you can now see if someone who put something on your dash is a mutual or not.
Search followers/following letter-by-letter: No longer do you have to type in "powdermelonkeg" spelled exactly correctly to see if you're following powdermelonkeg, you can just type in "powd" and all users except "powdermelonkeg," "powderpuffgirls," "expowd" etc will be filtered out. (I MADE THESE USERNAMES UP EXCEPT MINE. I DON'T KNOW THESE PEOPLE)
Toggleable See Results: You asked, we heard, you can now decide when making a poll whether or not people should be allowed to see the results before they've voted.
Block Specific Posts: Sometimes something's so icky it makes your stomach turn. Sometimes you're just sick of all your mutuals reblogging the same meme. Block a post without blocking OP.
212 notes
·
View notes
Note
I'm prefacing this by saying that I dislike when oneshots are posted in a single fic with a a bunch of different relationship tags. I'm with most people on that one. I much prefer individual oneshots to be posted as individual fics and usually skip collections unless it's 3 in the morning and I'm desperate.
That being said, AO3's rules against non-fanwork might push people into doing things that way. Separate fic with the request details isn't allowed? Fine, then let's just put it all in one fic upload and make the first chapter have all the information. It's not how I reason, but I can see how this measure by accident pushes people to make that choice.
The alternative is to dump all your info in the author's notes (which is an unsightly huge block of text) or hide it with a collapse HTML/link to an off-site post, which is probably slashing the number of people who will know you're open for requests and who'll actually request by a large chunk. There's a term for this in video games, where the design of the game brings about inevitable negatives that no one can do anything about because of how a dynamic works, but the term for that escapes me at the time of writing.
--
Your list of what requests you take doesn't belong in your author's notes either. It belongs on social media. This is not an AO3 design problem: it's a culture clash.
72 notes
·
View notes
Photo
tag list (ask to be added or removed): @risingsh0t @sstewyhosseini @statichvm @roofgeese @unholymilf @confidentandgood @arklay @jinfromyarikawa @shellibisshe @simonxriley @queennymeria @marivenah @faerune @feypacts @mrdekarios @thedeadthree @jacobseed @jackiesarch @heroofpenamstan @dameayliins @jillvalentinesday @shadowglens @fenharel @alexxmason @yurgir


POKO RIKIHISA (jujutsu kaisen)
Happy Birthday Poko! [October 26th]
#morning reblog#self reblog*#my edits#my ocs#jjk oc#anime oc#jujutsu kaisen#late reblog cus I semi forgot#but also couldn’t edit the html text to add the tag list when I posted it
43 notes
·
View notes
Text
Day 6 [Forms In HTML]
Introduction To HTML
Day 2 [Multimedia Elements In HTML]
Day 3 [Table in HTML]
Day 4 [Link Tag In HTML]
Day 5 [Lists In HTML]
Forms are basically used for collecting user information. And they are really important to learn. Here's a simple form in HTML:
Code:


Line By Line Explanation:
<form>: Used for creating forms. All the form elements go in this tag. Action: When submitted, data is sent to this file or URL [index.html] Method="post": Sends data
<label> : This describes the input tag for="___": Connects the label to the input with id="name" id : gives a unique identification to the tag <input>: It's used to make the form elements
<input> Type Elements :
type="text" : A simple text box is created.
type="email" : A box to input email.
type="checkbox" : A small square that users can tick. Can select multiple options using this.
type="radio" : A small circle, you can only select one option.
type="submit" : A button that submits the data to the server.
<textarea>: Accepts multiple lines of text. rows="4": It creates 4 lines cols="30": It creates 30 characters
<select> : Creates a drop-down list <option>: Creates an item in the dropdown. value="colorname": This is the data sent to the server if chosen.
Output For The Code:

_______________________
Hope This Helps !!
#code#codeblr#css#html#javascript#python#studyblr#progblr#programming#comp sci#web design#web developers#web development#website design#webdev#website#tech#html css#learn to code#school#study motivation#study aesthetic#study blog#student#high school#studying#study tips#studyspo#website development#coding
44 notes
·
View notes
Text
BG3 Photomode Tutorial #2.5: More Scene Manipulation
Chapter 0: Overview
Chapter 1: Script Extender Debug Console
Chapter 2: Scene Manipulation
Chapter 2.5: More Scene Manipulation
Chapter 3: Otis_Inf Camera Tools
Supplement: Mods and Resources
In continuing from the last tutorial, I wanted to talk about how you find and play cutscenes. There's a couple ways to do this but I will show you my way because I think it is the most thorough way if you need to figure out what flags you may need to edit in order to get this working. It'll also give you the tools you need to troubleshoot flag settings.

In the above screenshot, you can see a cutscene that is meant to be played in the Shadowcursed lands: The cutscene where you play the Lyre to summon Kar'niss. It is a complex scene with tags to resolve and multiple NPCs - some of which aren't humanoid.
I will show you how to find a scene based on a snippet of dialog, how to locate its name and UUID so you can plug it into this command:
Osi.QRY_StartDialogCustom_Fixed("SCL_Drider_Caravan_HalfOrcCaster_865adfae-1b72-1ed2-f961-d55abd4fb7b1","S_GOB_DrowCommander_25721313-0c15-4935-8176-9f134385451b",Osi.DB_Avatars:Get(nil)[1][1],"S_Player_Gale_ad9af97d-75da-406a-ae13-7071c563f604","S_Player_Astarion_c7c13742-bacd-460a-8f65-f864fe41f255", 1,1,-1,1)
Warning: Please keep in mind, this is still a very finicky process. Again, take it slowly. And please don't be afraid to ask for help if you're struggling. Once you get the hang of it, you can pull out scenes and troubleshoot them into playing with ease.
There's also a good chance I'm glossing over something and not explaining it clearly/accurately. Please send me an ask, DM, comment to clarify anything that's confusing!
BG3 Dialog Reader
In order to do this my way, you'll need to download BG3 Dialog Reader and generate HTML files that include all the dialog of the game. There's already a very lovely tutorial on how to do this, so I recommend you follow it. EDIT: Or download their parsed files from their Google Drive: BG3 - parsed dialogue (1.7).zip
You've probably seen posts in this format before:

So you should now have HTML files located somewhere on your system. You need to search for a line that you'll find in the cutscene you want. Now you need to ask yourself: What line can I search for that is unique to that cutscene so that if I search for it I will get exactly what I'm looking for?
In the Drider-Lyre scene I recall an NPC asking "Did you bring the lyre?" so that's what I searched for. I use the Everything search tool because it's awesome and search for the file like so:

You will need to take a look at this file later, but for now, just take note of the name: SCL_Drider_Caravan_HalfOrcCaster. This is the first half of what you need to complete the first parameter in the command at the beginning. And we are going to use this to find the UUID.
Finding the UUID
To find the UUID, you're going to need another tool. The BG3 Modder's Multitool. Go to their GitHub, look along the right column and click on the link in the Releases section.

After that, click on bg3-modders-multitool.zip to download it. Extract the files to a new folder somewhere handy and run bg3-modders-multitool.exe.
In BG3 Modder's Multitool, click on Configuration and set the bg3.exe location to your Baldur's Gate 3 executable (E:\Program Files (x86)\Steam\steamapps\common\Baldurs Gate 3\bin or something along those lines). The Documents folder should auto-populate but you may want to double check it.

Now click in Search Index. It's going to start a process where it searches through the BG3 files. This can take a while the first time, but will be instant after that.

Once it's complete, you can now take the name of the scene and pop it into the new Index Search window that popped up.

In the results on the left, there will be a lot of files that list it, but I generally look for ones that say Assets\Dialogs\[PAK] and end in _merged.lsf and click on it. Then click Convert & Open.
This should open in Notepad or Notepad++. Now search this file for "SCL_Drider_Caravan_HalfOrcCaster" - keep in mind there can be MULTIPLE results. Note that the first instance you will get is SCL_Drider_Caravan_HalfOrcCaster_AtTower. This is the wrong scene.
You are now looking in the code a couple lines above that string for a value that is an ID type and has a value that's a lot of letters and numbers. This is the UUID.

So you have what you need to create this first parameter. Combine SCL_Drider_Caravan_HalfOrcCaster with the string of letters and numbers separated by an underscore. Like so:
SCL_Drider_Caravan_HalfOrcCaster_865adfae-1b72-1ed2-f961-d55abd4fb7b1
Plugging into the StartDialogCustom Command
Note that this copies straight in to this command in the first parameter:
Osi.QRY_StartDialogCustom_Fixed("SCL_Drider_Caravan_HalfOrcCaster_865adfae-1b72-1ed2-f961-d55abd4fb7b1", "S_GOB_DrowCommander_25721313-0c15-4935-8176-9f134385451b", Osi.DB_Avatars:Get(nil)[1][1], "S_Player_Gale_ad9af97d-75da-406a-ae13-7071c563f604", "S_Player_Astarion_c7c13742-bacd-460a-8f65-f864fe41f255" ,1,1,-1,1)
Now on first glance this looks pretty much like other times I've shown you this command, except note that there's FOUR actors. When a cutscene doesn't play at first (after double checking the UUID), this is very often the reason why. This is the minimum because the roles for the half-orc and Karniss need to be filled. First position is Kansif the Half-Orc, second is Tav, third is Brawler Vez, and fourth is Kar'niss.
Note: Kar'niss CAN be played by a non-Drider NPC - they will float angrily around carrying the lantern. It's hilarious. Try it. Here's when I tried it with my Tav:

Setting and Clearing Flags
Now. Depending on where and when you play this scene, the scene may or may not play or it will quit early. There could be a few reasons for that. The UUID could be wrong, the number of actors could be wrong, or a flag could be set that's not supposed to be set.
Let's have a look at the BG3 Dialog Reader file for this scene to see what flags are in use.

By default you should be able to see checkflags (blue) and setflags (orange). Look at the top of the page for a reminder of what the colors mean. The blue check flags are checking to see if the flag is set or not. If SCL_Drider_HasMet_CaravanFirstTime = False then you have met the drider caravan yet and this line will play. You will notice that after that is the orange SCL_Drider_HasMet_CaravanFirstTime setflag. That means the game will NOW set the flag as you have now met the Caravan for the first time. There may be occasions where you need to change the flags to get a cutscene to play. Here's the good news: There's handy commands for that!
print(GetFlag("flag",Osi.DB_Avatars:Get(nil)[1][1]))
Osi.ClearFlag("flag", Osi.DB_Avatars:Get(nil)[1][1])
Osi.SetFlag("flag",Osi.DB_Avatars:Get(nil)[1][1])
The bad news is you will have to find the UUID for each flag! So we gotta go back into BG3 Modders Multitool and search for the flag SCL_Drider_HasMet_CaravanFirstTime
Thankfully, you'll only get one result and the big string of letters and numbers is the UUID you need.

Now you combine them like you did with the cutscene name and UUID before, separated by an underscore: SCL_Drider_HasMet_CaravanFirstTime_39e94029-84f7-418d-ddce-8947bcbb7688
So let's say the cutscene isn't playing because you're on a save where that scene has already played. Clear the flag on your Tav: Osi.ClearFlag("SCL_Drider_HasMet_CaravanFirstTime_39e94029-84f7-418d-ddce-8947bcbb76", Osi.DB_Avatars:Get(nil)[1][1])
And I think we will leave it at that. I realize this was a LOT to cover. Go through this very slowly. It will take time to understand what is happening here.
And as always, if you have something you're trying to do and you're struggling with the directions, I can try to help! Please send me a DM, Ask, whatever else and I'll gladly help you with whatever you're trying to do.
Thanks for reading and sticking through this so far!
#okay just... if you don't know coding#take a deep breath and tackle this one section at a time - this is a lot#bg3 photomode#bg3 photography#mog's bg3 virtual photography tutorial#bg3#bg3 virtual photography#baldur's gate iii#baldur's gate 3#mog's vp tag
53 notes
·
View notes
Note
Hi!! I wanted to say that I loved reading about your journey of creating a personal website. I'm still unsure between Vercel and Netlify. I have a small question to ask. See, one of the reasons I want to make a website is to archive drawings and journal/sketchbook. Would you have any tips for creating an area on my website just for the diary/journal, which has tags, files for each entry, etc.?
Bello!

Really happy to hear about your interest in websites! I want everyone to make their own site so I don't have to log into social media and get instant tummyaches ♥
Vercel vs Netlify: I think I settled on Vercel for absolutely no reason whatsoever. I just made a site on Netlify, then tested on Vercel, and now I have like 5 websites on Vercel so I just kept using it LOL. I'm sure a more tech-savvy person would know the difference - I think they have certain integrations with specific programs.
Creating a diary or journal with tags:
There's a couple of different ways you can do that, with different levels of work needed.
you got me yapping again:
This sadgrl tutorial might be outdated and may or may not work, but explains the process better than I can.
Easiest: make a journal on Dreamwidth, or another blogging site (wordpress??) that allows easy tags and RSS feed, and embed that RSS feed onto your site.
This requires almost no HTML set-up, and the easiest to organize tags, but you don't truly have the data on your own site since it's just embedded.
When I snuck into a web design class at college, this was one of the methods that the professor used for a blog within a portfolio site LOL.
Shit like wordpress is what a LOT of ~professional~ sites do for their blog section. They code it separately from the main site haha. It's the most popular thing, but not necessarily the best. And wait til you read on what the CEO of wordpress has been having meltdowns about... he owns tumblr too!
It's made with a tutorial for Neocities if that's what you use.
Medium: Set up zonelets.
It will require some HTML and JS editing, but will help automate making headers/footers for each page of a blog.
I've never used it myself, but I see other people speak highly of it.
HARD FOR ME CUZ I'M A GORILLA: I believe a lot of professional web devs will slap your face with their coding cock until you use a static site generator (SSG) to make your site.
You will need some coding knowledge to set up the tagging system since it doesn't come with it enabled by default. But it's made explicitly to be an alternative to big Static Site Generators which are...
It requires some more intimidating knowledge, because it's a lot of scripts that turn files that are not HTML/CSS/JS into plain HTML.
Also you have to use the command line, and that doesn't come with buttons that tell you what you can do. You have to copy/paste all that shit or memorize the code to 'dev build astro' and it all looks silly.
I've used Eleventy, and now am using Astro. Other people use Hugo or Jekyll or some other stuff with crazy names like Glup Shitto. I hate all these sites cuz none of the words mean anything to me. This is a common theme for me and tech. I don't know what NODES or CONTENT or ISLANDS are!!!
I had the most success attempting to learn how to use a SSG by downloading a template and altering it with github + VScodium. Here's the template page for Astro. You click on a theme you like, and it takes you to its github page. (If you don't want to use evil Microsoft stuff sorry. Skip this entire section.) Follow the instructions on the page for "forking" the glup shitto. When it tells you to run commands, I run those commands through the terminal window in VScodium. These tutorials never tell you what these commands do cuz they assume you already know. Usually those commands automatically install the files you need onto your computer, and create the final files.
You can see my wip here for a "tag system" that SHOULD show members of a web listing haha but I don't know what I'm doing and I have a reading disorder AND don't know cumputer good.
THEORETICALLY this will be the simplest and easiest way to maintain tags and files, because after you set it up you just have to write the "content" of the blog page. And you don't have to set up the header/footer ever again. I see the vision, and potential, but I am not there yet when it takes me 5 hours a day to figure out what any of the words in the documentation mean and I don't want to ask an actual tech person cuz they will be like 'obviously just press the Blip on the Repository and then Suck My Ass in the command line".
(side note I haven't updated fujofans in like a year cuz I'm struggling with this part to make updating easier).
Con: the final HTML/CSS code is really ugly if it's "minified", and a lot of themes use """"""professional"""""" CSS libraries like Bootstrap and Tailwind that I honestly think are ugly cuz that's what every fuckin' tech website uses to style their pages and make them look Professional and Minimalist with stupid code like style="500-w dark-gray-balls D-cup-bra" on every single element. Even Toyhouse uses Bootstrap. Eugh!
But maybe you're smarter than me and can wrangle these things better!
That was really long. Woops. I hope you can slug through this wall of text and find something helpful. Feel free to email me if you have any more specific questions. I may or may not be helpful.
If someone else sees this and has better suggestions for making BLOGS, please chime in. I'm begging you.
64 notes
·
View notes