#How to Test Named Credentials in Salesforce
Explore tagged Tumblr posts
Visit Tumblr Blog
Explore Tumblr blogs with no restrictions, modern design and the best experience.
Last Seen Tumblr Blogs


Fun Fact
Mobile US users spent an average of 115.8 minutes on Tumblr app monthly.
Text
How to Test Named Credentials in Salesforce?
If you're diving into Salesforce Testing using Provar (which you totally should!), you've probably come across the term Named Credentials. Sounds fancy, right? But what exactly are they, and more importantly, how do you test them properly?
Well, you’re in the right place. In this blog, we’ll break down what Named Credentials are, why they’re important, and how to test them in a smooth and reliable way—especially when you're using a Salesforce-native test automation tool like Provar.
What Are Named Credentials in Salesforce? Let’s simplify it. A Named Credential in Salesforce is basically a safe place where you store authentication details (like usernames, passwords, or tokens) so Salesforce can connect securely to an external system (like REST APIs).
Think of it as a locker holding your access keys.
Endpoint URL: The base URL of the external system.
Authentication: Username-password, OAuth 2.0, AWS signature, etc.
Named Credential Reference: Instead of hardcoding credentials, you reference this secure setup directly in your Apex or flow.
This way, you avoid hardcoding sensitive credentials and you get better security, logging, and governance.
Why Should You Test Named Credentials? Great question. Because if something’s wrong with the connection or authentication, your integration won't work—simple as that.
Here’s what can go wrong:
Expired or incorrect credentials
Changes in the external system's endpoint
Incorrect permissions or scopes
In real-world automation scenarios, especially in a CI/CD pipeline, you want to make sure your Named Credentials are working as expected—before deploying to production. And that’s where Provar can really help.
How to Test Named Credentials Using Provar? Testing Named Credentials manually can be time-consuming and error-prone. But Provar simplifies this using its Salesforce-native integration and API testing capabilities. Let’s walk through how you can do it.
Step 1: Set Up Your Named Credential in Salesforce
Navigate to Setup in Salesforce.
Search for “Named Credentials”.
Click “New Named Credential”.
Fill out the endpoint URL, authentication method, and save.
Make sure to test it using the “Test Connection” button inside Salesforce. If it fails here, don’t even bother testing it in automation yet—it needs to be fixed first.
Step 2: Create an API Test in Provar Here’s where Provar steps in like a pro.
Open Provar Desktop.
Go to “Test Cases” and click “New API Test Case”.
Select the request type (GET, POST, etc.) and the endpoint.
Instead of hardcoding credentials, use the Named Credential by referencing it as part of your Salesforce environment configuration or within headers.
Provar automatically pulls in the authentication mechanism from your Salesforce environment (thanks to metadata!) so you don’t have to reconfigure it manually.
Step 3: Validate the Response Once the request is sent, use Provar’s assertion features to check:
HTTP status codes (200, 401, etc.)
Response body (Is the data what you expected?)
Error messages (Helpful if something goes wrong)
You can even parameterize the test and use Test Data Services to loop through different scenarios and tokens.
Common Mistakes to Avoid We’ve worked with a lot of teams and seen some avoidable missteps. Here are a few tips:

Can You Automate This? Absolutely! With Provar, you can integrate this as part of your regular CI/CD pipeline. You can:
Run these tests during deployment
Automatically validate integrations using Named Credentials
Send results to your Provar Manager dashboard for reporting
This is why Provar is the go-to for Salesforce teams looking to scale Salesforce Testing with confidence.
Best Practices When Testing Named Credentials Here are a few expert-level tips:
Use separate Named Credentials for sandbox and production.
Apply strict access policies and monitor usage logs.
Always test both valid and invalid states (e.g., expired tokens).
Include timeout and retry scenarios in your tests.
Want bonus points? Create a Provar test that runs daily to validate the health of all your active Named Credentials. If one fails, have it email your team or create a Jira ticket automatically.
Conclusion: Let Provar Handle the Heavy Lifting Testing Named Credentials in Salesforce doesn’t have to be hard. With Provar, you get Salesforce-native integration, metadata-driven test creation, and seamless automation that saves time and reduces errors.
Whether you’re testing OAuth flows, basic authentication, or integrations with third-party APIs, Provar helps you build reliable and repeatable Salesforce Testing that scales with your business.
#How to Test Named Credentials in Salesforce#testing salesforce#salesforce automation#provar#provar testing#test automation#ci/cd
0 notes
Text
Google reCAPTCHA Integration in Salesforce Visualforce Page using Apex
In the modern digital world, securing online forms from bots and spam is more important than ever. Whether you're capturing leads, handling contact requests, or managing user registrations through a Visualforce page in Salesforce, protecting your forms from automated submissions is essential. Google reCAPTCHA is a powerful tool that helps identify and block such unwanted activity.
This article explains how to integrate Google reCAPTCHA into a Salesforce Visualforce page and validate user submissions using Apex, without diving into code.
What is Google reCAPTCHA?
Google reCAPTCHA is a free service by Google that protects websites from spam and abuse by verifying if a user is a human or a bot. It can be displayed as a simple checkbox, an invisible check, or a challenge-based interaction (like identifying traffic lights in images). It works on both the client-side (user's browser) and the server-side (your Apex controller).
How Integration Works
Integrating reCAPTCHA in Salesforce involves a few simple steps:
Register Your Website: Go to the Google reCAPTCHA admin console and generate a site key and a secret key.
Add reCAPTCHA to Visualforce Page: The site key is used on the Visualforce page to show the reCAPTCHA widget.
Form Submission: When a user fills out the form and submits it, a token is generated by reCAPTCHA and passed along with the form data.
Server-Side Verification: The Apex controller receives the token and uses the secret key to verify the token by sending a request to Google’s reCAPTCHA API.
Response Handling: Based on the verification result from Google, the form is either accepted or rejected.
Why Use Two Apex Classes?
To keep the integration clean and maintainable, the logic is split into two classes:
1. Visualforce Page Controller: This handles form inputs, manages user interactions, and calls the reCAPTCHA validation logic.
2. reCAPTCHA Service Class: This makes the callout to Google’s verification API, parses the response, and sends back a success or failure status.
This approach follows Salesforce best practices: separation of concerns, code reusability, and easy testing.
Benefits of Using reCAPTCHA with Visualforce
Prevents spam: Stops bots from submitting fake entries.
Improves security: Ensures only real users can interact with your forms.
Better user experience: The invisible or checkbox method is smooth for users.
Easy integration: With just a small setup, your forms become much safer.
Best Practices
Always store the secret key securely using Custom Metadata, Custom Settings, or Named Credentials.
Handle errors and timeouts gracefully in your Apex logic.
Use HTTP mocks in test classes for callout testing.
Log or monitor verification failures for auditing or debugging.
Final Thoughts
Implementing Google reCAPTCHA in a Visualforce form using Apex is a smart way to secure your Salesforce application from bots and spam. It not only enhances the trustworthiness of your system but also ensures a smoother experience for real users.
By separating responsibilities between a controller and a helper class, you follow clean architecture principles that make your solution scalable and easier to maintain in the long run.
read more:https://scideassolutions.com/google-recaptcha-integration-in-salesforce-visualforce-page-using-apex/
#SalesforcereCAPTCHAintegration, #Visualforcesecurity, #GooglereCAPTCHAApex, #spampreventionSalesforce
Looking to grow your business? Connect with us for a free consultation and discover how we can help you succeed online.
📌 Website: www.scideassolutions.com 📧 Email: [email protected] 💬 Skype: skumar25dec
1 note
·
View note
Text
The Simplest Way to Test Salesforce CRM Multi-Factor Authentication

Salesforce Multi-factor Authentication (MFA) requirement went into effect on February 1, 2022. Read the full announcement here. If you haven’t planned MFA testing for Salesforce, now would be the time to do so. Fortunately, Exoprise offers an updated version of the Salesforce sensor to ensure both availability and secure access to your favorite CRM. While discussing MFA, we recently published blogs on Teams testing and new changes to our synthetic sensors. Read them also:
Introducing Multi-Factor Authentication for Synthetics
How to Test Multi-Factor Authentication for Microsoft Teams
Assuming you have correctly configured the user ids for MFA authentication in Salesforce, end-users should see the following screen when trying to login into the CRM application. The TOTP-based verification code is generated in third-party authenticator apps (Google or Microsoft) on your mobile device when you first scan the QR code or enter the key manually in the app.
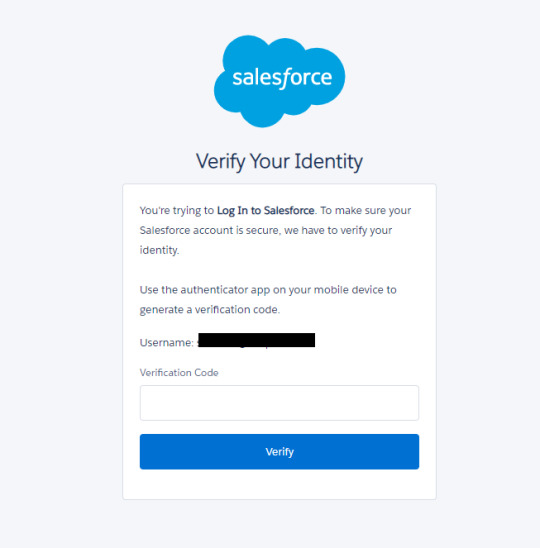
In this article, we’ll guide you through all the steps you need to set up our Salesforce MFA Web Sensor in your environment.
1. Locate the Salesforce Sensor in Exoprise
Under the Sensors tab, click “Add Sensor” and search for Salesforce in the text box. If you haven’t yet started an Exoprise trial, you can do so here. Please note that existing users and customers of our Salesforce Web Sensor will need to reconfigure their setup to include MFA. We will be deploying the sensor to a private site for this test. Double click the Salesforce Web Sensor icon.
2. Download the Management Client
The Exoprise Management client assists with deploying and installing Exoprise sensor monitoring solutions on a user’s desktop. You can also familiarize yourself with the features of the Salesforce Web Sensor under the first tab. View our earlier video (How to monitor Microsoft SharePoint Online) showing how to download the management client and set up a private site.
3. Login to the Exoprise Management Client
After successfully installing the management client and private site, log into the network application. Under the Sensors tab, select “Add Sensor” and search for the Salesforce Web Sensor to start the deployment. Click Next.
4. Start the deployment of the Salesforce MFA Sensor
This step ensures that your private site is set up correctly, and all system requirements are met to proceed. Click Next.
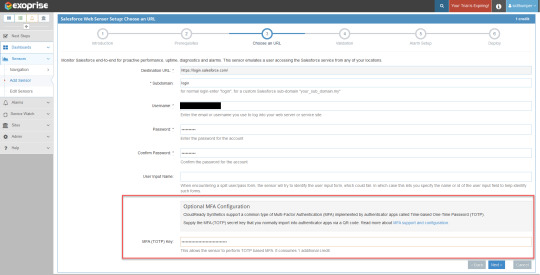
Enter all the login credentials on this page, including your username, password, and the TOTP key you received when you set up MFA in Salesforce. Click Next.
Once your configuration input has been successfully validated, you will see a sample screenshot of the Salesforce CRM page. Click Next.
Exoprise automatically configures alarm notifications for your Salesforce sensor. Your recipient group will receive alerts if the Salesforce sensor fails during MFA login, page unavailability, server failure, etc. Additionally, you can customize the alarm settings on this page. Click Next.
In the final step, select the private sites that use the Salesforce MFA sensor. You can also change the frequency of the sensor that collects Salesforce performance data. Click Finish.

Congratulations! You have completed your Salesforce sensor setup for MFA testing. Click on the sensor name. In a matter of few minutes, Exoprise collects all web performance and network connection metrics for Salesforce under different categories (Page Layout, Login and Render, Connect, and Site metrics). Compare metrics such as DOM loaded time, connect time, TTFB, TCPIP, authentication time, etc., with crowd-sourced analytics benchmarks and optimize accordingly. Keep an eye on alarms and errors under the respective tabs.
Enhance Security with Salesforce Multi-Factor Authentication Testing
Request a demo today with the Exoprise team to learn face-to-face (over Teams we mean!) about our new Salesforce MFA Web Sensor and its commitment to smooth IT business operations. Compliance with Salesforce platform technology and security requirements is critical for enterprises that rely on CRM every day. Our latest MFA implementation solution meets all those requirements.
Does your organization also use Single Sign-On (SSO) for Salesforce? Our sensor also monitors Single Sign-On (SSO) which increases security and simplifies the login experience for your entire workforce.
ONLY Exoprise provides you with complete coverage on the Salesforce app performance and sends network administrators proactive notifications if the Salesforce MFA infrastructure breaks down.
#salesforce #CRM #MFA #multifactorauthentication #syntheticmonitoring #synthetics
Originally published at www.exoprise.com/blog on Feb 27, 2022
0 notes
Text
Email Marketing for Lawyers: 12 Tips & Tools to Increase Clients

Email marketing is one of the most underrated methods of digital marketing. It's also one of the best ways for professionals and freelancers to grow their reach.
Popular professionals like Gary Vee and Marie Forleo have built their online empire with the help of email marketing campaigns and offers.
We all know that social media (ads) are a popular option for brands to generate revenue, but according to the CNBC survey, workers between ages 25 and 34 spend 6.4 hours a day checking their email.
Unlike social media, more than a third of this age group regularly check their email before they even get out of bed.
If this sounds like your demographic, keep reading. I'll be teaching you the best email marketing tips, along with email marketing tools every lawyer needs and how to use these tips effectively.
How Do You Collect Emails from Customers
Before we dive in, if you're new to email marketing, then I'd like you to start collecting customer data and emails. You can craft the perfect email, but if you have no one to send it to, you won't see much results.
Around 61% of consumers are fine with data collection as long as brands give them a more personalized experience in return.
You can collect data about your email subscribers voluntarily with opt-in forms or website popups placed on your website and content. Be sure to ask for their full name and email; any additional information is just fluff.
Wishpond's simple drag-and-drop editor makes it easy for anyone to create amazing popups, without the need for designing or programming knowledge.

Lawyer Email Marketing Tip #1: Know Your Audience
Gone are the days when selling was the most important thing about, well selling. Today customers want a more tailored experience, and they don't want to be another name on your list.
Instead, they want to feel heard, understood by the profession they choose to represent them in the law.
The first step to crafting a killer email is to know your audience, who exactly you are writing this email for, and why they should open it, much less read it.
You could have the perfect email copy, but it's written for the wrong audience. Instead of throwing out a wide net and hoping to catch anything, you can position yourself in a sweet place that speaks to the ideal client you'd like to pay for your services to get quality email leads.
Email Example: Landerholm Family Law

Five Things Your Audience Can Teach You about Email
What type of jargon you should use in your emails
What buzzword or power words to use in subject lines
How long or short your email should be
The variety of topics you can write about
What time you can send your emails for higher open rates
Lawyer Email Marketing Tip #2: Write An Amazing Subject Line
Your subject line is the first thing your customers see before they open the email. It's the difference between a potential lead or another email thrown in the trash.
Mailer Lite said it best, "Treat your subject line like the movie trailer. Give a preview, so they know what to expect."
Subject lines affect your open rate and increase your chances of success far more than the copy instead of your email. Try to spend most of your time a/b testing your subject lines as often as you can.
Five Things to Consider For Your Email Subject Line
Consider your subject line as a headline, because it is. You can use these headline formulas to guide you.
Most people use mobile to read their emails on the go; if the subject line is too long, they won't see all the words and most likely won't click to read. The perfect subject line should be eight words max.
When you use power words in your headlines, it piques your reader's interest and drives them to click.
Avoid clickbait subject lines unless you want to be marked as a spammer by your readers or their email provider.
A/B test your subject lines. It may seem like a lot of work, but this practice can help you to find the best subject lines to generate the most conversions.
Here are some guides on how to craft the perfect subject lines for your business:
5 Guaranteed Ways to Craft the Best Email Subject Lines for Sales.
13 Clickable Email Subject Line Examples Your Customers Will Love
Wishpond's Email Marketing Master Class for Beginners
Lawyer Email Marketing Tip #3: Keep Your Emails Short
No one's going to sit down and read an endless story about your practice as a lawyer, and people have short attention spans and even less patience for wordy emails. If you want to write more than 150 words, you can put it in a blog, not your email.
Let's be honest we get massive amounts of emails every day and a long list of things to do, so the last thing anyone wants is an email that feels like an endless epistle.
Keep your emails short, straight to the point, and filled with content only your readers care about because, at the end of the day, you can list all your achievements, but all readers care about is what you can do for them.
Let them know that your email provides a solution to a problem they want to be fixed. How you are helping and what you want them to do to get that solution.
Email Example: Dorcey Law Firm

3 Marketing Secrets to Writing Shorter Emails:
Short sentences allow readers to skip through faster and forces you to write only the necessaries you want, so you get your point across.
Set a word limit and stick to it, you can use a word counter like Word Counter or try highlighting your text and pressing Ctrl+Shift+C in Google doc or Microsoft word to view your word count.
One tip that helps, imagine that you have to pay $1 for every word you write. If your email looks like it's going to break the bank, time to trim it down to a shoestring budget.
Lawyer Email Marketing Tip #4: Write About Benefits, Not About You
It's not you. It's them. People are hardwired to point out benefits that can make their lives easier.
When it comes to getting customers with email marketing campaigns, the most important thing is to highlight your value proposition or benefits.
Wishpond has fantastic features like landing page creation, email marketing automation, and more. What our customers really care about is the fact that we can help them market their business more effectively and easily without the hassle of using multiple tools, this is the perfect example of listing the benefits you offer.
Explain the value of your service and what it is so your readers can quickly see how they themselves benefit from you as their lawyer.
4 Ways to Highlight Benefits that Sell:
Use testimonials stories about the benefits of your service.
Show real statistics resulting from a customer using your service.
Show off your credentials and how they help your reader.
Highlight big or small brands that you've helped along the way.
Lawyer Email Marketing Tip #5: Segment Your Emails
Email segmentation allows readers to see relevant content they're interested in to encourage them to stay subscribed.
As a lawyer, you have different cases, for example, if you're a divorce lawyer, the email you send to a young couple divorcing without kids will differ from an email you'll send to an old couple divorcing with kids. They have two different lifestyles that require special services/requests for their situation.
According to a study by the Direct Marketing Association, segmented and targeted emails generated 58% of all revenue for the marketers surveyed, and 36% of revenues were driven by emails sent to segmented target audiences.
There's no rule of thumb to segmenting your emails; it's all based on your customer interest and what your email goals are. But here are some ways you can segment your email if you're just starting.
If you want to be even more effective with your emails, then segment your email list based on income, law services, or geographic location.
Most lawyers (if they decide to send emails) will most likely send to all, but smart lawyers, marketing-savvy lawyers, know that extra effort pays off in the end when it comes to marketing.
Lawyer Email Marketing #6: Send Follow-Up Emails
Sending one email is not going to increase your client list massively; in fact, it would probably take a series of emails before you start booking appointments for your services.
You need to add a follow-up strategy to an email marketing campaign, or you're not going to get any conversions any time soon.
Follow up emails may seem like a bother to some readers, but to others, it's a gentle reminder that you're still interested in working with/for them.
Let's be honest we get hundreds of emails a week, even if we get an email that we're interested in, it's lost in our inbox or forgotten due to our day to day activities. That's why you should always try to stay at the top of your reader's inbox.
When you send a follow-up email, try to use testimonials showing off your old or current clients to draw readers in or reintroduce the benefits of your services to the reader to remind them why you're the best choice for a lawyer.
Six Email Marketing Tools Every Lawyer Needs
1. Wishpond Email Marketing Tool

Overview: Awarded the G2 Crowd' 's 2019 "High Performer" for Best Emailing Marketing Software category based on its high levels of customer satisfaction and easy-to-use email campaigns.
Wishpond's email marketing platform integrates with many platforms, including Mail Chimp, Shopify, Salesforce, Campaign Monitor and Facebook, and so much more. Easily capture leads with forms and integrate them with your CRM platform. Not to mention built-in marketing automation

You can manage your email marketing campaigns on your own, or if you have your hands full, allow our expert marketers to manage it for you, the choice is yours.
Free Demo Available: Yes
Ready to Learn More: Click here!
2. Grammarly

Overview: Grammarly is a proofreading and editing tool, as well as a personal favorite for the Wishpond Content Team. Grammarly helps to structure your sentences properly, fix common grammatical errors, and it has a built-in thesaurus to expand your content's vocabulary.
Free Account Available: Yes
Cost: $29.95 /month
3. Mailshake Email Copy Analyzer

Overview: Let's say that you've just finished writing your email. Even a grammar nazi would be proud. But your copy's missing something you just can't quite put your finger on, Milkshakes Email Copy Analyzer can help you master email copy to help increase clicks and sign-ups.
Free Account Available: No, but a 30-day money-back guarantee is in place for new users.
Cost: $59-99/Monthly
4. Venngage

Overview: Venngage is an online design tool that helps marketers and small business owners visualize their ideas. Humans are visual creatures, and they retain images more than text.
Adding graphics and images to your email will give it a professional and memorable touch. Venngage makes it easy to pull off professional designs in minutes.
Free Account Available: Yes
Cost: $19-49/Monthly
5. Coschedule Headline Analyzer

Overview: Earlier we spoke about how much subject lines play a role in your email marketing success, instead of testing blindly here's a headline analyzer that can make it easier. It not only tells you how strong or effective your subject line is, but it shows you where and how to improve it. Test and compare subject lines, all with one tool!
Free Account Available: Yes
Cost: Zero
6. Dictionary.com Thesaurus

Overview: As a lawyer, you're trained in the art of law and defense; however, your client isn't as jargon savvy as you. Sometimes you'll need to use simple words in your email so your readers can understand what benefits you plan to deliver if they choose to work with you. This online thesaurus provides the best word alternatives to help you connect better with your readers. It's also a copywriter approved tool, so keep it close.
Free Account Available: Yes
Cost: Zero
Last But Not Least
Email Marketing is a marketing niche on its own. When done correctly can help to grow your practice and online brand presence. It's worth the investment.
There's a bit of a learning curve if you decide to do your email marketing, but even if you pass the task on to an expert, you should still and take the time to learn specific terms and email marketing metrics.
Here are the top email marketing courses online (Paid & free) you should consider taking to educate yourself on the power and world of email marketing.
Here are the six email marketing tips every lawyer should follow: *Send Follow-Up Emails *Segment Your Emails *Write About Benefits, Not About You *Keep Your Emails Short *Write An Amazing Subject Line *Know Your Audience
Here are six email marketing tools every lawyer needs: *Wishpond *Grammarly *Mailshake Email Copy Analyzer *Venngage *Coschedule Headline Analyzer *Dictionary.com Thesaurus
What are some of the ways you're using email marketing to grow your business? Comment below and let me know!
from RSSMix.com Mix ID 8230801 https://ift.tt/3aO98k1 via IFTTT
0 notes
Text
How to export contacts and notes from ACT!
My organization is in the midst of a Salesforce implementation. We're going in phases, replacing systems in order and getting departments live as they're built out and ready to go. Our first department that went live on Salesforce converted over from a legacy ACT! database. This is a case study of the steps taken to get contacts and notes data out of that system.
The department that we migrated into Salesforce first was chosen in part because their data needs were relatively simple. The department consists of just one employee (ah, small staff nonprofit life) and their customer data was stored in an older ACT! database where the only features being used were contacts and notes. The simplicity of this data model made for a relatively low bar for entry into the new system. The version they were on at migration was Sage ACT! Pro 2011, and the age of that software already presented a couple of challenges. For instance, after upgrading that person's computer earlier this year I found that the version of ACT! required Microsoft Office 2010 to export reports to Excel. And for months afterwards their old computer stayed running under my desk so it could be RDP'd onto for that purpose. *sigh*
So the environment for this case study is a client computer running Windows 7 Professional, Microsoft Office 2010, and Sage ACT! Pro 2011.
I researched how to get data out of ACT! by scouring support articles and forum posts, and what I found was that there seemed to be a couple of methods for getting customer data out but couldn't find any successful methods for exporting notes data. I did find a couple of products for sale in the $300-$500 range which could ostensibly do that for me, but for a one-time deal like this I prefer elbow grease to tapping my limited available budget. The method I landed on as the best choice for getting data out of ACT! was to setup a connection to the source database file in Excel. Once again, the version of ACT! I'm working with requires Excel 2010. Along the way I did try running the data connection in Excel 2016 and it did not work.
The steps for setting up the data connection in Excel are as follows:
In the Data tab select From Other Sources - From Data Connection Wizard
Select Other/Advanced and click Next
Select ACT! OLE DB Provider for Reporting and click Next
In the Connection tab, select your database file (.PAD file extension) from wherever on your network that's stored, enter your ACT! user credentials, and click Test Connection to ensure that you're able to connect. Then click OK.
Select the desired table to export
Export into new worksheet


And boom, there I was able to get data out from the underlying contacts (VRP_CONTACT) and contact notes (VRP_CONTACT_NOTE) tables. Maybe it won't be so painful to extract that notes data after all. Eeeeeeexxxcellent!
With the data exported to Excel, I got to work writing formulas to convert it into our staging worksheets for upload into Salesforce. A detailed explanation of how those formulas work is beyond the scope of this case study, but you're welcome to download a copy of my ACT! data conversion template and pick them apart. The general idea is that the formulas get the data you need into the right columns, then select all and copy, paste values over the formulas, get to work cleaning it up, and once it's nice and pretty push it in to the new system.
It's important to note that in my experience the data connection proved to be brittle. It crashes easily, including every time I clicked the Refresh All button in Excel's Data tab. Therefore to update the data it was necessary to import each table again into a new tab, then go into the staging worksheets and run find-replace operations to modify the formulas to reference the new tables.
So I was chugging along getting data transferred from the source tables into the staging sheets when I got to the notes data and noticed something awry. That VRP_CONTACT_NOTE table had exported all of the notes data (enclosed in a ton of artifact coding), but there's no column indicating which customer each note belongs to. *commences swearing under my breath* So I had all the notes data in hand but no way of linking it to the proper customer records. That's a problem.
I started searching for a solution. First course was testing a bunch ACT! table exports, but nothing I found contained the data I needed to link notes back to their customers. I finally figured out a way to do it. It's not an elegant solution, nor for the faint of heart, but in the end this got the job done.
Step one is getting the notes data out of ACT!, which I accomplished via the Notes-History canned report inside of ACT! like so:
In ACT! navigate to Reports
Select Notes-History from the list
In the General tab select HTML File for the report output, Create report for All Contacts, and uncheck Exclude 'My Record'
In the History tab, uncheck all of the boxes (my use case didn't include this data)
In the Note tab, ensure that the Notes box is checked and click Custom for the Date Range
Click OK to export the report to an HTML file


Important caveat here, trying to export too much data at once via this method causes ACT! to hang. On my first attempt I tried to export everything and left it running at the end of the workday only to check several hours later and find that exported an HTML report with all of the customers listed but every notes field blank. So I started chunking it out a year at a time. If it doesn't spit out the report within a few minutes, then I'd cancel the operation, shorten the date range, and try again. At a point I realized that it was hanging on shorter and shorter date ranges, and figured out that I seemed to get better results by closing and re-opening ACT! after each export. And after rinse-wash-repeating that process through 15+ years worth of notes data, it was all successfully exported from the system. On to the challenge of parsing the HTML into usable data.
When you look at the HTML export it has a header at the top stating what the report is and who ran it, and a footer stating when it was run and the page number. In between it lists the date, time, and content of each note grouped together by contact. The contact's organization name is listed along with their name. The first step to extrapolating this is to remove the header and footer information. Open the HTML file in a text editor or code editor. The header is the first 94 lines of the file. The footer is the last 10 lines. Delete those, repeat for each of your export files, then copy-paste what remains into a single combined file.
Once all of your HTML is combined into one long document, then it's time to get it in to Excel. The key concept to understand is that each field in the HTML file is preceded by a span tag with a class declaration which corresponds to specific fields like so:
f28 = Contact Name
f29 = Organization Name
f43 = Date
f42 = Note Content
Because each piece of data is on a separate line, and the type of data can be derived from the span class in the HTML tag, it's possible to parse this out and win. Not easy, but possible. The first step is to use Excel's text file import wizard to import the file, specifying a text delimiter after that span tag.

With the HTML in Excel, start find-replacing your way to victory. The first goal is to strip that span tag down to just the class value so you can match data by it. The first two find-replace example functions in the list found in the template file should do the trick. After that, there's a whole bunch of formula writing needed to massage the right data into the right columns and roll it on up to a flattened row. I'm not going to get into detail, but here's my ACT! notes data conversion template for you to pick apart and use as a starting point. The gist of what's going on in there is that it parses out the necessary fields and rolls them up to the first row for each contact. Because there can be multiple notes grouped under a contact, the formulas are designed to flatten each note out to its own column. The intent is that you take the result of the formulas and copy-paste the values into a new worksheet. Then sort that by the New Record column so that the flattened rows are on top and everything below them can be deleted. Then follow the cues of what's going on in the Flatten worksheet to concatenate all of the comments into a single comments field for upload.
Understand that when you're doing this with a decent size data set things can get slow. In my case there were about 95,000 rows of HTML to parse, the Excel file grew to over 55MB, and once all the formulas were in place the re-calculation process was painful. This was neither an easy nor a fun data conversion process, but it was ultimately an effective one.
0 notes
Link
In our last post we learn about Introduction about Heroku from the scratch. In this post we will learn about how to Integrate Salesforce with Heroku and deploy app on Heroku platform. Deploy Code on Heroku account Let’s quickly deploy an Node JS app on the Heroku platform and see how it works! Before we get started, if you don’t have a Heroku account please go ahead and create one! In our case we will deploy the sample NodeJs app from GIT, head over to the repository and click on the “Deploy to Heroku” button. Create Heroku app This will navigate you to the Heroku app creation page. Enter a name for the app, let the region be default as “United States” and then click on deploy app. Add-ons Once the app creation is complete you will be navigated to the Heroku Dashboard. Click on the “Resources” tab on the dashboard. On the “Add ons” search box type “Heroku Postgres” and provision(add) the resource to your app. Choose the default “Hobby Dev Free” plan and click on provision. Similarly search for “Heroku Connect” and provision the resource. Heroku connect Heroku Connect makes it easy for you to build Heroku apps that share data with your Salesforce deployment. Using bi-directional synchronization between Salesforce and Heroku Postgres, Heroku Connect unifies the data in your Postgres database with the contacts, accounts and other custom objects in the Salesforce database. After provisioning both the resources, click on the “Heroku Connect” add on which you just provisioned. Setup Connection It’s time that we establish a connection between our Salesforce org and our Heroku app. After clicking on the Heroku Connect resource(which we just provisioned) you will be navigated to a page where we would need to set up our org connection. Click on the “Setup Connection” button. We need not make any changes further, click on next. In our case we will be authorizing a Developer Edition org so we will choose production from the dropdown of “Environment” and then click on Authorize. If you want to authorize a Sandbox/Org with a custom domain you can select and change the options from the environment list. API versions will be pre-populated as per Salesforce’s current Release. Clicking on the authorize button will navigate you to the login page for your Salesforce org. Enter the credentials for your Salesforce org and click on login. Once you successfully authorize your org you will be able to see the connection status Create Mapping Now click on the mappings tab. And then click on the “Create Mapping” button. This will initialize all your Salesforce Objects with your authorized org. In our case we will be choosing the contact object..so search for “Contact” in the search box and click on the row. Next step for us would be to choose the fields that we want to be polled into our Heroku App’s database. We will be choosing the firstname, lastname, Mobile phone, phone and email fields. Check the Accelerate Polling box on the top right. Any changes in Salesforce stream to Heroku in near real-time. Also Check the Write to Salesforce any updates to your database box and select the External_Id__c field. Now we’re syncing both ways from SF to our heroku app and Heroku app to SF!! If you don’t have an external ID field in your contact, go ahead and create one. Finally click on the “Save” button on top. This will start polling of data from the“Contact” object in Salesforce org to our Heroku app. Time to give our app a Spin!! Click on the launcher icon from top click on the dashboard option and navigate to the “Heroku Dashboard”. Time for Testing: Open App Click on your app name and then finally click on “Open App”. This will open your Heroku app in the browser. Type in a contact name matching with a one in your Salesforce org and then modify/update the phone number once you have filled the details click on the “Update phone number” button which will make changes to your contact record. In my case I’ll be updating a contact’s phone number to a different one(refer images below): After updating the phone number using the Heroku app, we can see the record detail changed to a new phone number. Hooray! Don’t feel shy to pat yourself you just deployed your first heroku app, synchronized data from your Salesforce org to the Heroku app, Enabled bi-derictional Sync. and modified a record with just using a few clicks!! Recording I hope you have enjoyed reading, in our next blog we will dive deep into the technical capabilities of the Heroku platform and also discuss various design capabilities and solutions achievable using the powerful polyglot platform. Till the next time Stay Safe and Happy Learning!! 57 total views, 48 views today The post Salesforce & Heroku Integration appeared first on Apex Hours.
0 notes
Link
Salesforce exposes a rich set of APIs that lets you integrate your org with third party systems in a great variety of scenarios. All of these APIs are thoroughly documented, but how can you quickly try them on a given org – or better yet, on multiple orgs? In this post, I’ll introduce you to Postman and show you how to easily explore and test different Salesforce APIs against multiple orgs using an open source Postman collection (that I’ve already assembled for you). This unofficial collection currently holds close to 200 API call templates for 10 Salesforce APIs (REST, Bulk, UI, Tooling, Metadata and Composite just to name a few). About Postman Postman is a desktop application that lets you configure and call HTTP-based APIs like REST or SOAP. It’s a very convenient and powerful tool that leverages point and click configuration. It supports environment variables, team workspaces and JavaScript automation among other useful features. Exploring and Testing APIs With Postman As a Technical Architect, (and like most developers) I often configure and troubleshoot API calls. I configure and compare those calls on multiple environments (sandboxes, production orgs…) then share the results of my findings. In order to do that, I use a couple of tools. There are several Salesforce and third party tools that let you explore and call APIs. I’m not going to list them all here but a a classic go-to solution for developers is Workbench. Workbench lets you execute Salesforce API calls against all types of orgs directly from your browser. This tool was created by the community and is now operated by Salesforce, but it’s not officially supported and only receives security updates. Workbench is a great tool to explore the Salesforce APIs and run one-shot tests. However, it has several limitations for a broader use: it doesn’t allow you to save your configuration, reuse it on multiple orgs or collaborate. Since Workbench didn’t cover all of my needs, I started using Postman to troubleshoot API calls. Unlike Workbench, it’s not tied to Salesforce technology but it has several great advantages: It gives you full control over HTTP requests. There’s no file upload limit; you can set headers and parameters, and use any content type (binary, text…) You can switch between multiple environments. For instance, you can have an environment for production and another one for a sandbox. When switching environments, all variable values are updated to environment-specific values. If you use the free version of Postman, you can collaborate on requests by importing/exporting your workspaces. There are also paid plans that couple Postman with source control for live collaboration. You can automate things by building post execution scripts with JavaScript. That can be used for setting environment variables. You can generate code snippets for a great variety of languages from your requests. Here’s an example of how you can retrieve your Salesforce API limits by calling the REST API with the JavaScript Fetch function: Postman helps me quickly design and reuse API requests across projects. As the number of reusable requests grew, I decided to create an open source Salesforce APIs collection. Introducing the Salesforce API Collection Collection Overview Salesforce APIs for Postman is a collection of requests for Salesforce APIs. The collection includes hundreds of request templates grouped into folders (one per API), a template environment with variables and header presets. Building from API request templates instead of going into each API’s documentation saves you a lot of time and greatly reduces the risk of errors. However, just like Workbench, the Salesforce APIs Collection doesn’t replace the documentation. You’ll need to use Postman in combination with the API’s documentation. An advantage of Postman over tools like Workbench is that it allows you to explore a variety of Salesforce authentication flows. The Salesforce APIs Collection lets you try these different flows: you can try the SOAP login flow, OAuth username/password flow, JWT Bearer Token flow and other flows. That’s particularly interesting when working on integrations. When working on a project, I usually maintain a Postman environment per org. I start by cloning the template environment and fill in the first five variables for each org: url, version, username, password and secret token. This way I can quickly use the SOAP login flow then build and call APIs using the Salesforce API Collection. Then, later on, I can easily switch to another environment and use the same requests. Let’s see how easy it is to use the collection with an example. Sample Use Case : Inserting an Attachment on a Case Before jumping into the example, make sure to complete the following pre-work: Install Postman. Import the Salesforce APIs Collection and follow the project readme for instructions. Clone the template environment and configure it with your org’s credentials. Log into your org using the SOAP Login flow in order to validate your settings. For the purpose of this sample use case, you’ll be in the shoes of a developer working for Acme Inc., a fictitious company that sells goods and manages its operations using the Salesforce Platform. Acme Inc. provides a mobile application to its customers to allow them to create cases about the products they receive. The application lets customers upload a picture of the packages they receive and attach it the cases. Your goal is to provide the configuration of the Salesforce REST API call that will be used to upload the image as an attachment to a case. As always, a good start is to head for the API documentation in order to learn about the request’s usage and the required fields (Name, ParentId, and Body for this request). Now that you know more about the API request, let’s create it in Postman: Create an Acme collection to regroup your custom requests. Select the SObject Create request from the Salesforce APIs Collection and duplicate it. Rename the new request to Create Attachment on Case and store it in your Acme collection. Update the endpoint URL by replacing with Attachment. Change the body JSON so that it has a Name, ParentId and Body parameters (as required in the documentation). Your boilerplate request is ready! Let’s try it out with some real data: Provide a name to the attachment with a Name value. Grab a case Id and set it as the ParentId value. Find a picture. Use a service like this to convert it into Base64 and paste the resulting string as the value of the Body parameter. Hit the Send button and voila! Refresh your case record and you should see your image in the attachments. You can now: Share the new endpoint with your team. Replay the request at will in your dev or testing environment and help troubleshoot potential issues. Generate and share the code to make this call in several programming languages. Summary Now that you know about Postman and this great API collection, follow the getting started instructions and explore the Salesforce APIs. Can’t find the API request you need in the collection? Feel free to contribute to the repository, it’s Open Source! About the authors Sébastien Colladon Sébastien Colladon is a Senior Technical Architect at Salesforce Professional Services in Paris, France. He works closely with customers to help them deploy Salesforce in their IT Systems and boost their business. He is a Certified Technical Architect (CTA), enjoys learning about technology and working with others as a team. Check his GitHub projects @scolladon. Philippe Ozil Philippe Ozil is a Principal Developer Evangelist at Salesforce where he focuses on the Salesforce Platform. He writes technical content and speaks frequently at conferences. He is a full stack developer and enjoys working on robotics and VR projects. Follow him on Twitter @PhilippeOzil or check his GitHub projects @pozil.
0 notes