#How to access your Wifi router settings?
Explore tagged Tumblr posts
Visit Tumblr Blog
Explore Tumblr blogs with no restrictions, modern design and the best experience.
Last Seen Tumblr Blogs


Fun Fact
70% of Tumblr users say the Dashboard is their favorite place to spend time online.
Text
An important life tip for parents who block your wifi on PC/laptop (Windows 10)
I found a workaround that's suiting me so far. How it works is, wifi is blocked through the router by detecting your computer's IP address, and blocking said address. Now, it seems complicated because there are tons of methods to use for changing your IP. But so you don't have to go through the same steps every time, do this:
Make sure you're connected to a wifi network that you're blocked on. You can check by going to the Windows search bar, type "settings", hit enter, and select "Network & Internet".
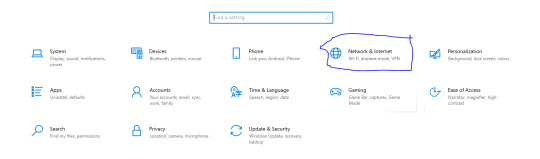
It will show you the network you're currently connected to. If it says "connected, no internet" or something along those lines, you're good for the next step.
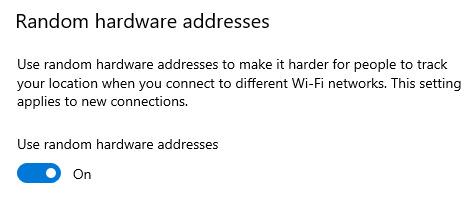
Next, go to the tab on the left labeled "WiFi". There, you will see a setting labeled "Random hardware address", and a slider beneath it that is most likely greyed out. Select it, making sure it turns blue.

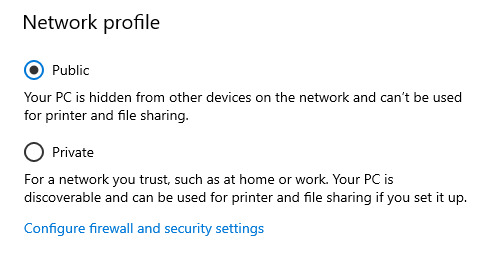
Then, you're going to hit the tab on the left labeled "Status". From there, just beneath where it says you're connected to a router without internet, click the grey button labeled "properties".
Where it says "Network profile", click the "Public" setting, so that other devices in the house cannot discover your computer or connect to it, and therefore reach its files and settings.
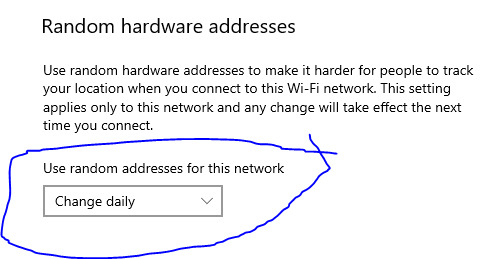
And lastly, scroll down to the section labeled "Random hardware address". There is a drop down menu. Open the menu, and select "Change daily". This will change your IP address on a daily basis, meaning your computer will be unblocked until the IP is discovered, but once the next day arrives, it will change again and unblock it.
Hope this helps y'all as it helped me. Do not let fucking shit block you from the most essential resource in the modern world. Internet connects you to every necessary thing in existence. It's a basic necessity at this point, by ethical standards. Regain access to it however you can, wherever you can, whenever you can.
463 notes
·
View notes
Text
Zorana's Guide To The Poke Classic Network!
Do you want to connect your DS Pokemon games to the internet long after Nintendo shut down their servers? Do you wish to trade and battle with your internet friends who play the gen 4 and 5 Pokemon games? Do you have a desire to watch and upload battle videos like you used to years ago?
If you said yes to any of these questions then I have the thing for you!
The Poke Classic Network!
This is a fan server for Pokemon DPPT, HGSS, BW, and BW2 that's running with the help of the Kaeru WFC! Not only does it let you connect your games to the internet again, the site will let you see what Pokemon are up on the GTS for both the gen 4 and gen 5 servers!
Below is my guide on how to get this working for you so you can bring a new life to these wonderful Pokemon games. Also I thought this would be shorter but it's rather long, so under the cut it goes! Please let me know if I missed anything in here! I'll try my best to fix it if I can.
Getting Started:
Before you get connected, make sure you are using the device you plan on doing all of your online connections with! For some reason you are locked to one device for this stuff and using another one will wipe your PalPad, and assign you a new friend code. Since what's available in the GTS search function is based on SEEN Pokemon the most reliable way to get particular pokemon (without marking everything as seen via cheating) would be trading them from people you've registered in the PalPad.
If you only plan on using the GTS then you don't need to worry as much about this.
The Poke Classic Network works on ALL DS/3Ds systems!
I will note that the Gen 5 games are easier to set up if you're using a 3Ds since they can see and read the Wifi settings of the 3Ds and can just have the DNS swapped without additional set up.
Connecting DPPT/HGSS on all systems and BW/BW2 on the DS/DSi:
I will go over connecting via Emulator in another section, this section and the next one is for if you're PHYSICAL HARDWARE.
What you'll need:
The console of choice
The game of choice, preferably played to the point where you can access the GTS for testing purposes. --- In DPPT you can find the GTS building in Jubilife City. --- In HGSS you can find the WFC building in Goldenrod City. --- In BW/BW2 you can access the GTS in the top part of every Pokecenter. --- I don't remember when exactly the GTS is unlocked for the games unfortunately.
Some way to create a Wifi network point with a compatible WEP (password type) or just no password. --- The easiest way I've found is just using a hotspot without a password. --- I know some modern routers will let you create an extra network like this if you know how. I do not and it'd likely be different for each router anyways. --- There are also some programs that can make one using your computer. I've used one for a bit before it locked what I needed behind a paywall.
What to do:
The first step is setting up the connection!
Start up the Wifi network point so it'll show up on your system.
I recommend using a hotspot that doesn't have a password on it. Make sure you change the bandwidth to 2.4 GHz, since 5 5 GHz doesn't seem to work. DO NOT PUBLICLY OPEN YOUR HOTSPOT IN A PUBLIC PLACE! You do not want someone deciding to eat up your data while you're trading pokemon, so only do this in a place you know is safe to do so, like at home or at a friend's place.
Once you've done that you'll want to open your game and go to the Nintendo WFC Settings. The button will look like one of these depending on the game you're playing:


This will take you to the DS wifi settings that are saved to the cart!
Next you'll want to tap on the big blue button which will take you to this screen.

You may or may not have connections here already if you've played before Nintendo's servers shut down. Erase them now if you do as they will no longer work. Then you'll want to tap the None button for Connection 1.
I'll be demonstrating using Connection 2 myself, but stick to the first connection.
Tap on the Search for access point button. This will bring up a list of nearby connections that your system can see. You'll want to tap on the one you started earlier. It will test the connection and the boot you back to the screen with the big blue button. Tap the big blue button and then the Ready button that's now showing up for the first connection.
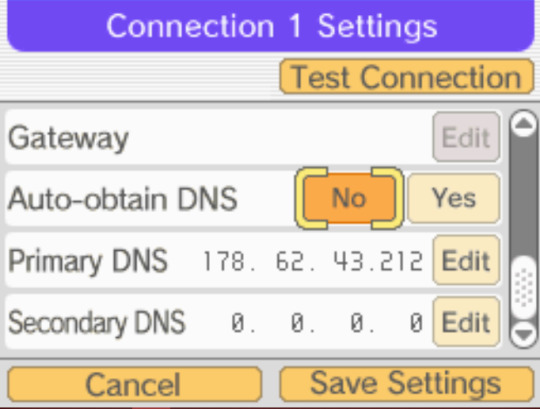
Now scroll down to the very bottom and turn off Auto-obtain DNS and change the primary DNS to 178.62.43.212. You can also change the secondary DNS to the same one as well or keep it all 0s.
Once you're done it should look something like this:
Save the settings, close out of the Wifi connections menu, start your save, and try connecting to the GTS!
If you connect to the GTS then congrats, you are now able to use the Poke Classic Network! If it doesn't work the first try don't worry and try again. You can also swap the secondary DNS to the other one you weren't using and try again that way.
Connecting BW/BW2 on the 3Ds/2Ds:
This one is super simple and doesn't require any additional set up! Sorry I don't have any pictures for this one atm. I may edit this to add a couple later.
What you'll need:
Game of choice
Console of choice
What to do:
Open the internet settings on your 3Ds and tap on Connection settings.
Tap on a connection you know is working, tap Change Settings, then go to the next page.
Tap on DNS and tap No, then tap Detailed Setup. Change the primary DNS to 178.62.43.212 and either keep the secondary one as all 0s or use the same DNS address you put in the primary DNS slot.
Save your settings and go start your game, then try connecting to the GTS.
If you connect to the GTS then congrats, you are now able to use the Poke Classic Network! If it doesn't work the first try don't worry and try again. You can also swap the secondary DNS to the other one you weren't using and try again that way.
Connecting any DS Pokemon game using MelonDS (emulator):
This method will let you connect to the Poke Classic Network if you don't have the physical hardware or can't connect your system to the internet for any reason and know how to back up your save to your computer.
What you'll need:
The MelonDS emulator [Link] --- Desume doesn't have Wifi functionality so you'll need to move your saves over if that is your primary DS emulator. --- If the latest version doesn't work for some reason try again with the second newest one.
Game of choice
What to do:
The steps are nearly identical to the first section once you have the emulator running! Instead of using your own connection though you'll be using the one MelonDS makes for you, so there's no need to worry about finding a way to make one yourself.
The access point will look like this when searching for an access point:

#the pokemon tag#pokemon#pokemon diamond#pokemon pearl#pokemon heartgold#pokemon soulsilver#pokemon platinum#pokemon black 2#pokemon white 2#pokemon white#pokemon black
41 notes
·
View notes
Text
How to Log In to Your ZTE Router Using the ZTELink App?
For the ZTE Router Login using the app, first connect your device to the router’s Wifi. Open the ZTELink app, enter your default username and password, and access the settings dashboard. From here, you can manage network settings, update passwords, and check device status. For more help, come to us!
2 notes
·
View notes
Text
Maximize Your WiFi Potential with Reliable Signal Boosting
Is the weak WiFi signal annoying at some points of your rooms or workspace? Well, the use of the WiFi extender will create a huge difference. Visit the Belkin Login page and install the internet coverage within minutes.
The Belkin range extender login is where the setup process begins by connecting the extender to an already existing router. This login portal acts as a gateway to access extension settings, your network of choice, and your secured connection. You can seek the default IP/web address that comes with your device to access the Belkin WiFi Extender Login screen if you are unsure how to access this.
On getting access to the site, you can then monitor performance, update firmware, and serve the setup based on preference. The design of the belkin extender login interface caters to user convenience, thus allowing even non-tech-savvy people to manage networks.
Stop signing in with slow, buffering networks. This is going to benefit you more if you use your Belkin Login. Your WiFi's potential is reliable, fast, and easily manageable: just log in.
#belkin.range#Belkin Extender Login#http //belkin.range#Belkin Range Extender Login#Belkin Login#belkin.setup
1 note
·
View note
Text
How Can Wear Communications Improve Your Connectivity in Surrey?

Whether you're upgrading a home network, building out commercial infrastructure, or setting up a reliable TV system, the quality of your installation makes all the difference. In Surrey, where everything from rural homes to corporate offices demand high-speed, stable connections, Wear Communications stands out as a trusted provider of professional WiFi installation, satellite installation, aerial installation, and network data cabling services.
With decades of technical experience and a strong focus on reliable performance, the team delivers future-ready solutions to properties across Surrey. Here’s how their services ensure better connectivity and lasting value.
WiFi Installation Surrey – Eliminate Blackspots and Boost Performance
Slow internet and patchy signals are more than just inconvenient—they disrupt daily life and work productivity. Wear Communications provides expert WiFi installation in Surrey, customised to suit the size, structure, and layout of each property.
Their engineers don’t just plug in a router—they analyse the building’s architecture, assess interference levels, and install systems that maximise both coverage and speed. Using high-quality mesh networks, business-grade access points, and secure configurations, they ensure every room gets reliable WiFi.
Ideal for:
Home offices and remote work
Multi-device households
Online gaming and streaming
Small to medium businesses
Whether it’s a top-floor flat in Woking or a detached property in Epsom, Wear Communications brings consistent internet performance throughout your space.
Satellite Installation Surrey – Accurate Setup for Stronger Signals
Modern entertainment depends on more than just smart TVs—it requires properly installed satellite systems that deliver uninterrupted viewing. With Wear Communications' expert satellite installation in Surrey, you can expect professionally aligned dishes, robust signal strength, and discreet installation that suits the look of your home or office.
The team supports:
Sky, Freesat, and international systems
New dish installations and system upgrades
Repositioning, alignment, and fault correction
Multi-room connectivity for households or shared buildings
They work efficiently while respecting your property—minimising disruption while delivering flawless satellite reception.
Aerial Installation Surrey – Crisp Reception for Every Screen
Still relying on Freeview or digital aerial services? You’re not alone. Thousands of Surrey residents watch TV through aerial connections. However, poor installation or outdated equipment can cause interference, weak signals, or full loss of service.
That’s where Wear Communications steps in, offering top-tier aerial installation in Surrey tailored to your environment. From new builds to heritage properties, they ensure your signal is strong and stable—regardless of location or building type.
Their aerial installation services cover:
Digital TV aerial systems
DAB and FM radio aerials
Signal testing and fine-tuning
Aerial upgrades, repositioning, and fault repairs
Every job includes a full assessment to ensure the aerial works in harmony with the surrounding signal landscape, avoiding tall trees, obstructions, or reflective materials that can affect performance.
Network Data Cabling Surrey – Smart Wiring for the Digital Age
WiFi has its place, but when you need speed, stability, and security, nothing beats structured cabling. Businesses, landlords, and homeowners alike turn to Wear Communications for dependable network data cabling in Surrey that supports high-bandwidth applications, security systems, and smart building setups.
Their data cabling solutions include:
CAT5e, CAT6, and CAT7 installations
Structured cabling design and layout
Ethernet point installations for homes and offices
Fibre optic cabling for ultra-fast connections
Patch panels and server rack configuration
Every cable is routed cleanly and tested before sign-off, ensuring the network is ready to support remote working, VoIP, CCTV, or any other data-heavy setup.
Tailored Solutions for Residential and Commercial Clients
What makes Wear Communications different is their ability to handle both residential and commercial projects with equal care and precision. Whether you're a homeowner in need of a new aerial, or a facilities manager overseeing a data cabling rollout in a multi-storey office, their team delivers scalable solutions with a personal touch.
Clients include:
Homeowners improving their entertainment systems
Builders needing installation across multiple plots
Landlords ensuring strong signal across rental units
Offices upgrading to modern, high-speed networks
Retail stores requiring strong WiFi for POS and CCTV
Every job is handled by trained engineers who understand the specific connectivity demands of each environment.
More Than Installation: Ongoing Support You Can Count On
Connectivity isn’t just about getting things set up—it’s about making sure it keeps working long-term. Wear Communications offers more than just installation; they also provide diagnostics, upgrades, maintenance, and system health checks to ensure your setup continues to deliver.
This is especially important in larger homes, older buildings, or environments with changing tech demands. As smart homes and connected offices become the norm, your system should grow with you.
They also offer advice on:
Device compatibility
Equipment positioning
Network security
Future-proofing with cabling and hardware
This consultative approach ensures you're not just connected today—but prepared for tomorrow.
Get Connected with Confidence – Choose Wear Communications
If you're looking for:
Professional WiFi installation in Surrey
Accurate and secure satellite installation in Surrey
Durable and discreet aerial installation in Surrey
Future-ready network data cabling in Surrey
Wear Communications offers everything you need under one roof.
Whether you're planning a new setup, fixing ongoing issues, or upgrading for better performance, their team is ready to help. With years of experience, a strong reputation in Surrey, and a customer-first mindset, they’re the go-to choice for communication system installations across the region.Contact Wear Communications today to book a site visit or speak with a qualified engineer about your property’s connectivity needs.
#WiFi installation surrey#satellite installation surrey#aerial installation surrey#network data cabling surrey#wear communications
1 note
·
View note
Text
192.168.1.254 Router Login & Setup – Easy Guide
Learn how to access your 192.168.1.254 router login and configure settings effortlessly. This guide covers WiFi setup, password changes, troubleshooting tips, and security enhancements to optimize your network. If 192.168.1.254 is not working, follow our step-by-step solutions.
1 note
·
View note
Text
Nihilus Rex Ch. 10: First Move
This chapter took 2 weeks to write. One to hash out what all our intrepid villains would need to do to pull this off, and one to actually write the chapter and make sure all bases are covered.
I and @baelpenrose have taken very few liberties with what this trio is doing, but I want to double-down on his note from the previous chapter: trying this would not only be extremely illegal, but in 2024 it wouldn't even remotely work. Especially not the lien release part: most of those records are digital now, and each bank has maybe four people total with the level of access required to release them. Maybe four.
Cause I am, I am
A little wicked
I am, I am
Hands red, hands red
Just like you said
I am, a little wicked
Valerie Broussard, “A Little Wicked”
After two detours - one to find another thermos, the other to fill both - we managed to make our way to a mall so old and worn-looking that even Spirit Halloween would give it a pass. Nils led us around to a side entrance before holding the door open with a sweeping gesture. I rolled my eyes good naturedly, Bishop groaning behind me as we shouldered past. Pausing to rub the dust from an old map with one sleeve, I found what I was looking for and glanced up. “Please tell me the stairs are in good shape? Best Buy is all the way on the fourth floor.”
“They are, and it is, but we won’t need either.” I suppressed a shiver as he reached past me to tap a location on our same level. “Sears. The television section is down here, and the cable connections are still intact.”
“And we didn’t enter on that side because…?” Bishop asked, seeing how far away it looked on the map.
“Internet is up, power doors are not,” came the dry answer. “And this door was the only one I could get my hands on a key for.”
“How did you - “ I started.
“You don’t want to know, Baklava. Plausible deniability - if anyone gets busted, Nothing did the breaking and entering, we weren’t aware he wasn’t lawfully here.” Hiking his bag further up on his shoulder, Bishop grunted. “Let’s go.”
Walking through the mall gave the eerie impression of being a zombie movie - rustling could be heard constantly, along with voices coming from beyond some of the locked grates covering storefronts. Squatters, I realized. Better use of the space than just leaving it here to rot, I thought approvingly. At least they aren’t freezing to death outside.
“Anyway.” Nils led the way into the employee break room in the Sears, one where he’d clearly helped himself to a few of the beanbags from the small furniture store, and locked the door behind us. “Router is behind the counter. We got wifi, we have a place to sit, we have work to do. Everyone, grab a beanbag or a chair. Local squatters won’t bother us in here - there’s an arrangement. I paid for a generator, they don’t mess with my stuff, and stay out of my way when I need to do a thing.”
I made a mental note to bring food next time, provided I could figure out a way to bring it without Nils or Bishop noticing - last thing I needed was Bishop informing Nils about my stray-cat tendencies. Grabbing a bean bag and an abandoned tray to set my computer on, I nested in and started getting everything connected. Once I was happy with where everything was at, I dug in my bag for some snacks, pulling them out triumphantly before realizing Nils and Bishop were staring at me.
“What? You said we had work to do.”
Nils started snickering. “Not that. Just. Never known anyone who brought chili pistachios to a hack job. That’s all.” He shrugged. “Kind of cool.”
“Creampuff. You and I both know if it was anyone else - like me, or even like Shade, you’d be saying something that would end with everyone either laughing or punching your lights out.” Harvey glanced at him with exasperation.
I offered some of my snack. “Keep the nut jokes to a minimum and I’ll share.”
“Please, Lash. We are not WintermuteWeasel. We come up with classier jokes than that when there is a lady present.” Nils replied, with faux-dignity.
“In that case, I won’t offer you this,” I sighed dramatically, holding up a bag of homemade jerky. “Because god forbid you put my meat in your mouth.”
Bishop leaned past Nils. “I will gladly put your meat and your nuts in my mouth,” he managed to deadpan, making me throw my head back laughing before handing over both pistachios and jerky.
Nils blinked. “Apologies, clearly I misunderstood your sense of humor. My apologies. I’d do this casually, but you now strike me as the type who’d doubtless prefer a bit of begging for the privilege of your tasty, tasty nuts. Please…” He gave me giant puppy dog eyes and fell out of his bean bag chair, doing his best attempt at looking pathetic, not quite topping how he’d looked when bleeding in a torn suit, but much, much funnier.
I surrendered and nodded for Bishop to pass the snacks over. “And don’t worry, I didn’t cook any of these, so they taste really good. Fair warning, the lamb jerky is - “
“Hooooleee crap,” Bishop gasped around a mouthful, grabbing a bottle of water and taking a big swig. “Spicy. Very very spicy. Lots of cilantro spicy, was not prepared.”
“That,” I finished lamely. “So go slow or we’ll never get any work done. Speaking of the Weasel… Any word?”
“Called him, he should be calling back in….” His phone started ringing. “Now. I’ll deal with him, try to keep quiet, both of you. It’s gonna be easier if you two don’t acknowledge that I’m buying for you so he doesn’t hold up the sale for something gross, you know?” He stepped off. “Wintermute, yeah. Best icebreaker. Needs to be less than 30MB. Able to tear through the absolute best encryption out there? Can you do it?”
Something on the other end.
“Need to get a worm and a data bomb through it, and be able to activate the data bomb on the other end after the worm has had time to work. No, you don’t need to know what for. You just need to know the parameters. High end, government encryption. Less than 30MB file size.” Harvey got tense, and began rolling his eyes, held the phone away from his head for a minute. He began doing ducklips - might have picked that up from me.
Eventually he put it back to his head. “Yeah, I get it’ll be expensive. No, no I will not disclose who I’m working with. Cash only payments. Yeah, I can pay that.”
He hung up. “Great. He’ll meet me in a few weeks. He bitched about it, a lot, but after a bit he said he could do it. It’ll ring three thousand. Each of you down to cover a grand?”
I squinted and did some mental math. “Yeah, I can cover that.” I’d have to bite the bullet and work on some more anime commissions, but the money was practically sitting there otherwise. “Richie McWhiteboy, you don’t need to auction off a leather jacket or anything, do you?”
“You know what’s sad? I am so useless in so many ways, but I have the kind of academic credentials where I get paid to research for the university as a grad student as long as I keep helping professors with their research and it covers rent. All my jobs basically just cycle in paying for other jobs and expenses. And I still have money left over to give away. Yeah, I can throw a thousand - probably a little more if it’ll take strain off of you two.”
Bishop winked at me. “Ah, to have rich people problems, right?”
I threw my hands up. “I will totally take financial help in providing snacks and decent coffee. Titties only get me so far.” Belatedly, I realized what I had said and covered my face with both hands. “ART!” I shouted. “ART!”
Nils snickered. “Most artists have drawn big tittied anime girls for money, and most academics who need it have either written Marvel fanfiction for kinks they didn’t want to know about or written someone else’s papers. Don’t think about it too hard.”
Bishop just shook his head as I peeked through my fingers and dragged over a second bean bag to prop his feet on. “Before we get completely derailed by a taco joke, let’s reel it in, children. Our not so friendly neighborhood perv is working on the encryption breaking, do we want to do the worm or databomb first?”
Nils looked to me. “I’d prefer doing the databomb first, since a spore with extra activations is easy enough and just having it done early so all we have left is the hard part means that when we’re done with the hard part we don’t have anything left, but if anyone has any objections to that I’ll hear them?”
“The county records…?” I asked, glancing between the both of them. “You know, the physical liens? With the counties?”
It was completely the opposite of reassuring when Nils went pale and Bishop’s eyes glazed over. With a deadpan, almost contemptuously exhausted tone, Nils grunted, “Fuck. Alright, malware 4 and 5, another encryption breaker, another databomb, let’s go. And find some way of getting those released. And finding which ones we’re looking for…”
“I mean a dial-up bot that just asks after public records isn’t hard, you and I have made like a few dime a dozen ones, that’s easy. Hell, I have a DDoS botnet or two we can repurpose, just collecting dust. Start generating those to get public records on liens, they’re public record. Hard part is the lien releases, that’ll take…some courts and counties take digital copies or faxed copies of the notarized forms, I say we collect the records with that and start sending forged copies out. I mean, we’d need to pay a good forgery guy, but I know one. It takes about thirty days, but we can mill the fucking things once we get all the records and get good fake state seals made.”
“Make sure they are backdated by several months,” I suggested. “Totally Purloined Letter it, act like they’ve had it this entire time and lost their copy. They’ll be too embarrassed to object.”
“Right, add about a month to the process for that and finishing our worm and encryption breaker, county records are easily breakable, we can make our own icebreakers for that but we’re gonna need a lot of computers to launch that many attacks at once…That, plus adequate databombs.”
“Add another twenty five days after we send the fake releases, give time for as many as possible to be recorded,” Bishop added. “They’re less likely to be lumped in with the attack, that way.”
“Okay. That, plus I have to regularly commune with my morons on their “orders” for the “joint operation” about dealing with the “evil shadow government.” Nils sighed. “Okay. We have a lot of work to do but we should be able to manage it. We can’t brag about it after, which kinda sucks because we’re rapidly approaching Inception-timed-to-music levels of bullshit, and if we pull it off any reasonable world would give us bragging rights forever, but there are way worse things.”
“I don’t suppose any of your far right fucknuckle brother uncles are notaries?” I sighed. “We’d never be that lucky.”
“Sadly, no. I do have a relative who is but she’d never get caught up in anything illegal for political reasons, perish the thought,” Nils’ voice took on a note of contempt. “She conveniently forgets that marrying her husband was illegal until around 60 years ago, and that the entire concept of civil disobedience is ‘breaking the law for political reasons’.” He shrugged.
Bishop grunted, snagging a thermos. “Pocket notaries going on Santa’s wishlist in the event we are ever good little boys and girl…. We are now at 55 day lead time, minimum. The thirty days will give us time to come up with hardware without getting too much scrutiny, and we use that time to let bots dig up the information we need on the liens and student debt.” I blinked and he waggled a finger at me. “I didn’t forget that part, don’t worry. Student debt is going to be the least painful, because zero potential damage there, Sallie Mae can just fuck right off.”
He typed for second and tilted his head. “Then we send the faked releases - I don’t know if my guy can do them in bulk, so it would be smart to have a program to mock them up as back-up. Who can code that, because I’ll be too busy.”
I raised my hand. “Digital art en masse is my area of expertise,” I nodded confidently. “I can cobble something together from my animation stuff, no problem.” Would I test it by using it to clear my commissions inbox? Probably, but they didn’t need to know that. I already felt guilty enough about it.
“Okay, so I’ll handle the databombs and the basic icebreakers, Bishop will repurpose his dialup net, and Lash will get the mock-ups ready so we can mill out fake lien releases. I’ll also handle getting the gun nuts ready and primed for when we go. We’ll work together on the worm since that’ll be the hardest part.” Nils was standing, the irritated exhaustion gone, eyes suddenly alight. “We have a little less than two months, and when that’s done, we’ll be paying back the banks for the 2008 crash and all the futures they stole with student loans. And we’ll be stealing a lot of them back. Let’s get to work.”
#writeblr#writers on tumblr#nihilus rex#afterverse#prequel#dystopian#cyberpunk#fiction#my writing#original characters#original fiction
7 notes
·
View notes
Note
alright Specs give me a lesson on WiFi Standards
I can't wait to see the brilliance you'll share<3
-anon
Interesting choice, as this is the less interesting option. But if you insist /nm
You've most likely heard of Wifi 5 or Wifi 6, maybe even wondered about Wifis 1, 2, 3, and 4. In the fancy IT speak, these are lumped together with the number 802.11 (eight oh two dot eleven). There are a lot of them, but the ones that made the press are 802.11a, b, g, n, ac, and ax. All but n, ac, and ax are out of date, with n on the way out.
802.11a and 802.11b are sister standards. But I suppose first I need to say that Wifi communicates on a frequency of either 2.4 gigahertz or 5 GHz. The best way to think of these frequencies is like radio stations - each station is called a channel. There are a lot more non-overlapping channels at the 5 GHz range (non overlapping reduces noise and signal degradation), but the US government uses them so your signal gets less priority over, say, air traffic controllers. 2.4 GHz has fewer overlapping channels, but you're not fighting the government. As I recall, 5 GHz travels farther, but that isn't always necessary. If you're sitting right next to the router, for example, you don't need such a strong signal to get to your internet box.
802.11b was released shortly before 802.11a, and it is b that took hold. Once I give the numbers, you may find that confusing. 802.11a can transmit at a speed of 54 megabits per second in the 5 GHz frequency. 802.11b transmitted at 11 mbps in the 2.4 GHz frequency. Slower, but at a different frequency. So why did b win out? Because it got there first and was a lot cheaper than 802.11a.
5 years later, in 2003, 802.11g was ratified. It transmits at 54 mbps on the 2.4 GHz frequency. Because it's at that frequency, a device that is set for 802.11b - an older device, by definition - can communicate on an 802.11g network, and vice versa. The only problem is that the slowest device sets the speed, so it doesn't matter how great your network is - if your device can't take the speed, you're not going to get it. 802.11g also uses a different "language" to encode signals, in addition to the one that 802.11b uses. Since b can't understand the one that g uses, b devices can't tell if the router is busy, so the signals could get mixed up. This is solved again by, the slowest device sets the speed. The access point will revert to the language b understands, and ALL devices connected to it won't go any faster than 11 mbps. Not ideal, but reduces costs when a network is updated. So network administrators can choose either faster devices at a greater upfront cost, or spread that cost over a few years but suffer overall slow speed across the network.
We stuck with g for a good long while before 802.11n was introduced, under the name Wifi 4. 802.11n transmits at 600 mbps in theory, 300-450 in practice, at both 2.4 GHz and 5 GHz, which means it's backwards compatible with 802.11a, b, and g. It gets that speed by being able to transmit more than one signal at a time, through a thing called MIMO (multiple in, multiple out - I say "meemo" but "my mo" is also acceptable.) That's mostly a fancy way of saying there are more antenna on an access point than just one. An 802.11n device can support up to eight antennas, with four going in and four going out.
In 2014, 802.11ac, or Wifi 5, was released, and was the first standard that used Gigabit ethernet. 802.11ac transmits at 6.9 gigabits per second (nice) in theory, 1.3 in practice, at 5 GHz. ac doubles the amount of antenna, and also lets up to four devices transmit on each antenna at a time. It also has a fancy little thing called beamforming, which means the signal goes in a straight line to the device, instead of being broadcast everywhich way.
Wifi 6, or 802.11ax, was released in 2019, and is still making its way across the world. 802.11ax goes at a max speed of 9.6 gbps at both 2.4 GHz and 5 GHz. It also uses another encoding language, which means any devices on 802.11b, if those senior citizens are still around, are SOL. Which is fine - let grandpa rest. 802.11ax lets more devices connect to the router at once, and lets more devices transmit at once.
You regret choosing this one now, don't you. I much would have preferred to talk about motherboard connections - I don't have to have a textbook next to me for that.
2 notes
·
View notes
Text
Is the Furbo Pet Camera Worth $199? An Honest Take from a Busy Pet Parent

Ever wondered what your furry friend does when you're not home? The Furbo pet camera answered that question for me—and opened up a whole new world of pet parenting. Priced at $199 on Amazon and Chewy, this treat-dispensing dog camera offers more than just basic monitoring. Actually, it's packed with features that caught my attention: it tosses treats at your command, lets you talk to your pet through a two-way mic, and even alerts you when your dog is barking. Beyond that, the companion app uses AI to track your pet's behavior throughout the day. However, is this high-tech pet surveillance worth the investment? Some might wonder if it's just an expensive pet security camera, especially when there are 23 other options on the market. Throughout this review, I'll share my unfiltered experience as a busy pet parent and help you decide if the Furbo deserves a spot in your home.
Furbo Pet Camera Setup and First Impressions
Unboxing and Design Esthetics Opening the Furbo box reveals a sleek, modern device that strikes a balance between technology and home decor. The first thing I noticed was its elegant cylindrical shape topped with an eco-friendly natural bamboo lid. This thoughtful design element helps the camera blend seamlessly into most home environments, unlike many tech-focused pet products that stick out like a sore thumb. Beneath the stylish exterior lies some impressive hardware: a full HD camera with automatic night vision capability, integrated barking sensor, built-in microphone and speaker for two-way communication. The newer 360° model offers complete room coverage through its rotating camera—a significant upgrade from the fixed-position original version. Initial Setup and App Pairing Setting up the Furbo proved remarkably straightforward. You'll need three things to get started: a smartphone, the Furbo camera itself, and a 2.4GHz WiFi connection. The setup process begins by downloading the Furbo app from either the App Store or Google Play Store, depending on your device. After plugging in the camera, you'll notice indicator lights that signal readiness for pairing. For newer 360° models, look for a blinking yellow light, while older versions display a solid green light. The app guides you through creating an account (or signing in if you already have one), selecting your device type, and connecting to your home WiFi network. Throughout my setup experience, the app provided clear instructions with helpful visuals. The entire process—from unboxing to fully functioning—took less than 25 minutes, which feels refreshingly efficient compared to other smart home devices I've installed. Placement Tips for Best Coverage Finding the ideal spot for your Furbo significantly impacts its effectiveness. For optimal coverage, place the device 22-45 inches above the floor based on your pet's height. This elevation allows the camera to capture your pet's activities clearly while keeping the treat dispenser at an accessible height. Additionally, position the Furbo away from direct sunlight and moisture to protect its electronic components. Since the WiFi antenna is located on the right side of the device, placing it approximately 5 feet away on the left or front side of your router ensures better connectivity. For households with particularly enthusiastic pets, the three 3M double-sided tapes on the bottom provide welcome stability, preventing knock-overs and treat theft attempts. Furthermore, ensuring the treat dispenser faces an open area prevents treats from getting lost behind furniture.
Core Features That Make Furbo Stand Out

Image Source: Amazon.com What truly sets the Furbo apart from standard pet monitoring devices are its specialized features designed with both pets and owners in mind. Treat Tossing: How It Works and Pet Reactions The treat-tossing mechanism is undoubtedly Furbo's most distinctive feature. With a capacity for up to 100 treats, this functionality turns remote monitoring into an interactive experience. To dispense treats, I simply swipe up on the treat icon in the app, which triggers a customizable sound. The default is a "squeaky toy" noise that alerts your pet treats are coming, though you can record your own 6-second audio cue. For optimal performance, the device works best with dry, firm, round treats between 0.4-0.75 inches in diameter. The newer Furbo 360 model allows you to specify whether you're using small (less than 0.5 inches) or large (0.5-0.75 inches) treats via the app. My pet quickly learned to associate the sound with treats, running at full speed whenever it played. Nevertheless, some pets might initially be startled by flying treats, which is why Furbo provides training resources to help acclimate them. Two-Way Audio: Talking to Your Pet Remotely The built-in microphone and speaker enable real-time two-way communication. During testing, the audio quality proved surprisingly good, allowing clear communication between pet and owner. Despite the quality connection, pet reactions vary. Some pets appear confused when hearing their owner's disembodied voice, occasionally searching around the house for their absent human. Others find comfort in the familiar sound during moments of anxiety. Barking and Activity Alerts: Are They Accurate? Furbo's barking alert system sends notifications to your phone (and Apple Watch) when it detects your dog barking. For frequent barkers, notifications are limited to once per minute. The sensitivity can be adjusted or turned off completely. Regarding accuracy, the system responds to any louder-than-average noise rather than specifically recognizing barking. This means you might receive false alarms from other household sounds. Moreover, users report the alerts being quite reliable despite occasional false positives. Camera Quality: Day and Night Performance The Furbo camera delivers 1080p full high-definition video with minimal lag. It features a 160-degree wide-angle lens with 4x digital zoom. The 360° model provides complete room coverage through its rotating capability. Notably, the newer model includes enhanced night vision that produces color images in low-light settings. This improvement offers dramatically superior clarity compared to the standard black-and-white night vision of earlier models. Throughout my testing, the image quality remained sharp and colorful in good lighting, while the color night vision proved valuable during evening check-ins.
Is the Subscription Worth It?
Beyond the core functionality, one crucial question remains for potential Furbo owners: is the subscription service worth the additional cost? Furbo Nanny Plan: What You Get The Furbo Nanny subscription enhances your pet monitoring experience with AI-powered features. First and foremost, subscribers receive advanced alerts including Howling Alert, Activity Alert, and even critical notifications like Smoke Alarm Alert. The AI continuously learns your pet's patterns and behaviors, becoming more personalized over time. Other premium features include Video History for reviewing past footage, Doggie/Kitty Diary (a video summary of your pet's day), and pet emergency alerts. The system can even detect specific behaviors like running, eating, and in some cases, potty activities. Free vs Paid Features Comparison In essence, Furbo operates on a freemium model. The fundamental features will always remain free for standalone models - these include basic barking/meowing alerts, treat-tossing functionality, and camera live-view. You can monitor your pet, communicate through the two-way audio, and receive basic notifications without paying extra. The subscription unlocks the full potential of the device through cloud storage, AI analysis, and ongoing feature development. This distinction allows users to decide based on their specific monitoring needs - basic observation or comprehensive pet intelligence. Monthly vs Annual Pricing Breakdown Furbo offers flexible pricing options to accommodate different budgets: - Basic Plan (for single device): - Monthly: $6.99/month - Yearly: $69.00 ($5.75/month) - saves $14.88 annually - 2-Year: $129.00 ($5.38/month) - saves $38.76 overall - Pro Plan (for up to 4 cameras): - Monthly: $7.99/month - Yearly: $79.00 - 2-Year: $149.00 For those uncertain about committing, every Furbo camera includes a 30-day free trial of the Nanny subscription. This trial period allows you to test advanced features before deciding if they're worth the investment for your particular situation. Additionally, there's occasionally a special 99-cent offer for the first three months.
Real-World Use: A Week With the Furbo
After setting everything up, I put the Furbo through its paces for a full week to see how it performed in real-world conditions. Daily Routine Integration Integrating the Furbo into my daily schedule proved remarkably straightforward. I placed it in the living room where my pet spends most of their time. Each morning before leaving, I'd load the treat dispenser with dry treats, ensuring they were the appropriate size to prevent jamming. Throughout the workday, I found myself checking in periodically—a practice that unexpectedly reduced my separation anxiety as much as my pet's. The barking notifications became particularly useful, alerting me to delivery arrivals or neighborhood disturbances. In response, I could quickly open the app, assess the situation, and either dispense a treat or use the two-way audio to calm my pet. Pet Behavior Monitoring Insights Perhaps the most fascinating aspect was discovering my pet's secret life. The Daily Diary feature compiles a 5-second to 1-minute time-lapse video of highlights between 7 AM and 7 PM, revealing patterns I'd never noticed before. For instance, I learned that my pet wasn't anxious all day as I'd feared—they typically settled into predictable napping routines shortly after I left. The camera also identified that certain destructive behaviors weren't rebellion but often stemmed from legitimate needs. In one household's experience, Furbo helped solve a mystery: their dog's nighttime destructiveness was simply due to needing an earlier morning bathroom break. Unexpected Benefits and Limitations Beyond pet monitoring, the Furbo doubles as an additional home security system. The 360° model's rotating capability allowed me to check different areas of the room when I received notifications about unusual activity. Nevertheless, there were some drawbacks. The WiFi connection occasionally proved unreliable, resulting in video lag when trying to access the camera feed. Additionally, the AI-powered recording sometimes generated an overwhelming number of clips—up to 50 recordings from a single night of pet movement. Finally, being tethered to an electrical outlet limited placement options.
On Final Note
After spending a week with the Furbo pet camera, I can definitely say this device offers more than just basic pet monitoring. The treat-tossing feature quickly became a highlight for both me and my pet, creating a unique way to connect when apart. My furry friend now associates the distinctive sound with treats, making check-ins something we both look forward to throughout the day. The question remains, though – is the Furbo worth $199? For busy pet parents who spend significant time away from home, the answer is undoubtedly yes. The peace of mind alone justifies the cost. Additionally, the insights gained about my pet's daily routine proved invaluable, debunking several misconceptions I had about their behavior when alone. The basic features work well without any subscription, yet the Nanny plan adds considerable value through AI-powered alerts and video history. Essentially, your specific needs will determine whether the subscription makes sense for your situation – the free 30-day trial provides ample time to decide. The device does have limitations. WiFi connectivity issues occasionally disrupt the experience, while the abundance of notifications from the AI system can sometimes feel overwhelming. The need for a power outlet also restricts placement options within your home. The Furbo stands out among pet cameras due to its thoughtful design, user-friendly interface, and genuinely useful features. This isn't merely a surveillance tool – it creates genuine moments of connection between you and your pet throughout the day. Pet parents who struggle with separation anxiety might find this device particularly beneficial, as checking in becomes a source of comfort rather than concern. Altogether, the Furbo pet camera delivers on its promises. The high-quality camera, interactive treat-tossing, and insightful monitoring capabilities transform how we care for our pets when away from home. While not perfect, the benefits far outweigh the drawbacks for most pet owners seeking a reliable way to stay connected with their furry family members.
Key Takeaways
After a week of real-world testing, here are the essential insights about whether the Furbo pet camera justifies its $199 price tag: • Interactive treat-tossing creates genuine connection - The unique treat dispenser with customizable sounds helps pets associate your remote presence with positive experiences, reducing separation anxiety for both pet and owner. • Basic features work well without subscription - Core functionality including live video, two-way audio, and barking alerts operate effectively with the free plan, while the $6.99/month Nanny subscription adds AI insights and video history. • Reveals surprising pet behavior patterns - Daily monitoring often debunks assumptions about pet anxiety, showing most pets settle into predictable routines and destructive behaviors usually stem from legitimate needs rather than rebellion. • WiFi reliability affects user experience - Connection issues can cause video lag and missed notifications, making stable internet essential for optimal performance and limiting placement to areas with strong signal. • Doubles as home security bonus - Beyond pet monitoring, the 360° camera provides additional home surveillance capabilities, alerting you to deliveries, visitors, and unusual household activity. The Furbo transforms pet monitoring from simple surveillance into meaningful interaction, making it worthwhile for busy pet parents who spend significant time away from home. After a week of real-world testing, here are the essential insights about whether the Furbo pet camera justifies its $199 price tag: • Interactive treat-tossing creates genuine connection - The unique treat dispenser with customizable sounds helps pets associate your remote presence with positive experiences, reducing separation anxiety for both pet and owner. • Basic features work well without subscription - Core functionality including live video, two-way audio, and barking alerts operate effectively with the free plan, while the $6.99/month Nanny subscription adds AI insights and video history. • Reveals surprising pet behavior patterns - Daily monitoring often debunks assumptions about pet anxiety, showing most pets settle into predictable routines and destructive behaviors usually stem from legitimate needs rather than rebellion. • WiFi reliability affects user experience - Connection issues can cause video lag and missed notifications, making stable internet essential for optimal performance and limiting placement to areas with strong signal. • Doubles as home security bonus - Beyond pet monitoring, the 360° camera provides additional home surveillance capabilities, alerting you to deliveries, visitors, and unusual household activity. The Furbo transforms pet monitoring from simple surveillance into meaningful interaction, making it worthwhile for busy pet parents who spend significant time away from home.
FAQs
Q1. What are the main features of the Furbo pet camera? The Furbo pet camera offers HD video streaming, two-way audio communication, treat dispensing, barking alerts, and night vision capabilities. Some models also include AI-powered pet behavior monitoring and 360-degree room coverage. Q2. How easy is it to set up and use the Furbo camera? Setting up the Furbo is straightforward and typically takes less than 25 minutes. The process involves downloading the app, connecting to WiFi, and following the in-app instructions. Daily use is simple, with features like treat tossing and two-way audio easily accessible through the smartphone app. Q3. Is a subscription required to use the Furbo camera? Basic features like live video streaming, two-way audio, and treat dispensing are available without a subscription. However, advanced features such as AI-powered alerts, video history, and behavior analysis require a paid Furbo Nanny subscription. Q4. How does the treat-tossing feature work? The treat-tossing feature is activated through the Furbo app. When triggered, it makes a customizable sound to alert your pet and then tosses a treat. The device works best with dry, round treats between 0.4-0.75 inches in diameter. Most pets quickly learn to associate the sound with treats. Q5. Can the Furbo camera help with separation anxiety? Many pet owners find that the Furbo camera helps reduce separation anxiety for both pets and owners. The ability to check in, communicate, and dispense treats remotely can provide reassurance and create positive associations with the owner's absence. However, individual pet responses may vary. Read the full article
0 notes
Text
Digital Nomad Traders

What Is a Digital Nomad Trader?
A digital nomad trader is someone who earns income by trading in financial markets (like stocks, forex, crypto, or commodities) while living a location-independent lifestyle. They travel from one city or country to another while continuing to analyze markets and place trades – all from a laptop or mobile phone.
Is It Really Possible?
Yes, it is possible! But it requires discipline, planning, a stable internet connection, and the right trading strategy.
With trading apps, cloud platforms, mobile trading tools, and a proper setup – you can trade from almost anywhere: a beach café in Goa, a mountain Airbnb in Manali, or a co-working space in Bali.
Things You Need to Become a Digital Nomad Trader
1. Reliable Internet In today’s world, work no longer needs to be tied to a desk or a fixed location. Thanks to technology, a growing number of people are becoming digital nomads – professionals who travel the world while working remotely. Among them, a new group is rising: digital nomad traders.
But the big question is – can you really trade effectively while traveling?
Let’s explore the reality, the tools you need, the challenges, and how to make it all work seamlessly.
This is your lifeline. You need:
High-speed WiFi
A mobile hotspot or portable router
Local SIM cards with data plans (as backup)
2. Trading Tools & Apps
Some essentials include:
Broker platforms like Zerodha, Upstox, ICICI Direct (for Indian markets)
Global brokers like Interactive Brokers, eToro, or MetaTrader
Charting tools like TradingView
VPN for accessing your trading accounts securely
3. Lightweight Hardware
A good laptop
Mobile phone with trading apps
Power bank and universal charger
Optional: Tablet for charts and news
4. Time Zone Awareness
Markets open and close at different times. If you're in Asia and trading the US market, prepare to stay up late or wake early.
Common Challenges Faced

🔹 Internet Drops
Always have a backup connection (mobile data or second SIM).
🔹 Time Zone Conflicts
Use apps like World Time Buddy to track market hours.
🔹 Lack of Focus
Being in a new city can be distracting. Stick to your routine.
🔹 Emotional Discipline
Trading from the beach sounds cool but emotions + markets = danger. Maintain discipline and avoid overtrading.
What Type of Trading Works Best for Nomads?
Here are some styles that suit travel:
Swing Trading
Hold positions for a few days to weeks
Less screen time needed
Good for travelers with limited daily trading hours
Position Trading / Investing
Long-term strategies
Check charts occasionally, not daily
Day Trading (Possible but demanding)
Requires intense focus and fast execution
Better suited for stable environments like co-working spaces
Best Places for Trading Nomads
These cities are known for good internet, low costs, and vibrant communities:
Bali, Indonesia
Bangkok, Thailand
Chiang Mai
Goa & Himachal, India
Tbilisi, Georgia
Lisbon, Portugal
Canggu, Indonesia
Dubai (for tax benefits)
How to Manage Risk While Traveling
Set stop-losses and alerts on all trades
Use cloud backup for trading logs and data
Avoid overleveraging
Use 2FA (Two-Factor Authentication) for security
Final Thoughts
Yes – you can trade while traveling. It’s a powerful lifestyle, but only if you balance freedom with discipline. Prepare your tools, manage risk, and always have a backup plan. With the right mindset, digital nomad trading can offer financial independence and life on your own terms.
Ready to Start Your Journey?
Whether you're learning to trade or want to upgrade your skills while traveling, Traders Training Academy offers a complete Pro Trader Course – perfect for nomads, beginners, and serious traders.
Master trading. Travel the world. Live the dream.
0 notes
Text
How to Set Up WiFi on Your D-Link Router ?
Configure your new home network quickly with Dlink router wifi setup. Connect your D-Link router to your modem and power it on. Access the router's web interface by navigating to dlinkrouter.local or its default IP address. Follow the intuitive setup wizard to establish your secure Wi-Fi name, password, and essential internet settings. Establish your reliable D-Link network.
0 notes
Text
Facebook WiFi Check-In: Build a Bigger Audience with Every Customer Visit

In today’s digital-first world, customers expect more than just free WiFi—they expect value. And for businesses, that value goes both ways. Imagine that every customer who connects to your Wi-Fi also checks in to your business on Facebook, increasing your reach and credibility with zero effort.
Introducing Facebook WiFi Check-In, a potent yet underutilized feature that makes every visit a chance for promotion. Whether you're running a restaurant, café, salon, gym, or retail store, Facebook WiFi can help you build a bigger audience, gain visibility, and boost customer engagement—all while offering the convenience of free internet.
📲 What Is Facebook WiFi?
Facebook WiFi is a feature that allows businesses to offer free WiFi to customers in exchange for a simple Facebook check-in. Instead of asking customers to enter a password, they log in through Facebook and check in to your business page to gain access.
Once checked in, this activity appears on their feed, introducing your business to their network of friends, many of whom may live nearby and be potential customers.
✅ Why Facebook WiFi Is a Game-Changer for Local Marketing
Most small businesses struggle with organic reach on Facebook. Paid ads help, but word-of-mouth remains one of the most trusted forms of promotion. That’s where Facebook WiFi comes in—it’s digital word-of-mouth at scale.
Every check-in:
Acts like a mini-ad to the customer’s friend list
Includes your business name, location, and Facebook page link
Often results in likes, new followers, and visits from people in the area
It’s one of the simplest ways to increase your social media exposure without spending money on ads.
🔍 How It Works
Set up Facebook WiFi using a compatible router and link it to your business page.
Customers see your WiFi name and are redirected to Facebook when they try to connect.
They are prompted to check into your business or like your page.
Once they do, access is granted, and your business gets a free promotional post on their timeline.
It’s seamless, secure, and incredibly effective.
💡 Benefits of Using Facebook WiFi Check-In
1. Grow Your Facebook Audience Organically
Each check-in introduces your business to dozens or even hundreds of new people. Unlike ads, these are trusted recommendations from a friend or family member.
2. Increase Page Likes and Follows
Customers are encouraged to like your page via the check-in prompt. Over time, this builds an engaged local following that sees your updates, promotions, and events.
3. Enhance Local Visibility
When someone checks in, Facebook prioritizes showing that activity to their friends, especially those nearby. That means more local reach, perfect for brick-and-mortar businesses.
4. Get More Reviews
Once people engage with your page, they’re more likely to leave a review, especially if they had a good experience. Positive reviews further boost your credibility.
5. Access Customer Insights
Facebook provides valuable analytics like:
Gender, age, and location of people who checked in
Frequency of visits
Trends over time
This aids in audience comprehension and marketing optimization.
🏪 Best Business Types for Facebook WiFi
Facebook WiFi is ideal for any business with a physical location and a customer waiting area. Top industries benefiting from it include:
Restaurants and cafés
Customers spend time seated, using their phones, and are likely to connect.
Salons and spas
A waiting guest checking in helps promote your services to their network.
Gyms and fitness studios
People love to share their healthy habits—make check-ins part of the routine.
Retail stores
Shoppers checking in can attract others to new product launches or promotions.
Co-working spaces and lounges
Provide smooth WiFi with advantages for community development and brand promotion.
🧰 How to Set Up Facebook WiFi at Your Business
Step 1: Use a Supported Router
Facebook WiFi works with several compatible routers, including:
Cisco Meraki
ASUS
Netgear
TP-Link (business models)
Ubiquiti (with some custom configuration)
Choose a business-grade router that supports captive portal login.
Step 2: Link Your Facebook Page
Log in to your Facebook Business Page
Go to Settings → Facebook WiFi
Follow the setup instructions
Authorize the router and customize your check-in message
Step 3: Customize Your Portal
Add your business logo and welcome message
Set session length (e.g., 1 hour)
Choose whether to require a check-in or just allow a like
Step 4: Promote It In-Store
Use signage like:
“Get Free WiFi by Checking In on Facebook!”
“Stay Connected. Like Us on Facebook to Browse Free.”
Teach employees to bring it up when clients request WiFi.
🎯 Pro Tips for Maximizing Facebook WiFi Results
✅ 1. Offer a Reason to Check In
Encourage participation with:
A discount or coupon
Entry into a contest
Loyalty points for each check-in
✅ 2. Run Facebook Retargeting Ads
Use the audience data to run retargeting campaigns to customers who have checked in or liked your page.
✅ 3. Monitor and Respond
Thank people who check in or leave reviews. Engage with their comments and build a community around your brand.
✅ 4. Analyze Trends
Use Facebook Insights to see:
When people are checking in
Demographics
Repeat vs new visitors
This helps in planning your offers and staff shifts.
🔐 Is Facebook WiFi Secure?
Yes—Facebook WiFi is secure for both users and business owners. Customer data is anonymized unless they explicitly choose to interact with your page. Sessions are limited by time and device, preventing abuse.
You also don’t have to manually manage logins or passwords, saving your team time and hassle.
💬 Final Thoughts
In the era of digital marketing and short attention spans, Facebook WiFi Check-In is a powerful tool hiding in plain sight. It transforms free internet into a high-performing social media engine that grows your audience, boosts engagement, and builds community—all while making your customers’ lives easier.
If you’re offering free WiFi, why not get something in return? With just a simple check-in, your customers help spread the word about your business, build your online presence, and attract more people every single day.
So, if you're ready to turn your WiFi into a marketing machine, it's time to connect your business to Facebook WiFi today.
#Facebook Social Wifi#Social Wifi Facebook#Restaurant Facebook Wifi#Facebook Wifi Check-in#Facebook Portal Australia#Facebook Wifi#Facebook Portal Connect to Wifi
0 notes
Text
Netgear Orbi AX6000 Setup: Step By Step Process
The Netgear Orbi AX6000 is an excellent choice, If you are seeking a robust whole- home WiFi result that delivers high speed internet and eliminates dead zones. This advanced mesh WiFi system supports WiFi 6 technology and provides content for large homes with multiple devices. To unleash its full eventuality, you’ll need to complete the Netgear Orbi AX6000 setup duly. In this article we specify in detail, step by step setup process using orbilogin.com, the sanctioned Orbi web interface. Whether you're a first- time stoner or elevation from a former model, this guide will help ensure your installation is smooth and hassle free.
Before You Begin: Requirement
Prior diving into the Orbi AX6000 setup, confirm that you have the following:
A stable internet connection from your ISP
An active modem
Your Orbi AX6000 router and satellite
A smartphone, laptop, or desktop
The default login credentials
Access to orbilogin.com
Netgear Orbi AX6000 Setup Process
Netgear Orbi AX6000 Setup can be initiated by unpacking the device and ends with the customization of the network. Check out the steps in detail further to configure the network:
Unbox and Power Up
Begin by unboxing your Orbi AX6000 system. The box generally includes the main router, one or further satellite units, power appendages, and an Ethernet string.
Near to your modem device, plug the orbi router.
Use the included Ethernet string to connect the Orbi router to your modem.
Power on the router and stay for the LED light to turn solid white, indicating that it’s ready for setup.
Next, draw in the Orbi satellite in a central area of your home. Stay for the LED on the satellite to blink white.
Connect to Orbi’s Network
Once the device is powered on:
On your computer or mobile device, go to WiFi settings.
Locate the default Orbi network name (SSID) and connect to it using the default password provided on the device label.
You're now connected to the Orbi network locally and can do configuration through orbilogin.com.
Access the orbilogin.com
Rush to a web cybersurfer and type orbilogin.com into the address bar. This will take you to the Orbi login runner.
Enter the dereliction username( generally admin) and the dereliction word.
still, produce a new admin word and answer many security questions, If urged.
The setup wizard will launch automatically to guide you through the rest of the configuration.
If orbilogin.com doesn’t load, try accessing it using the IP 192.168.1.1 into the cybersurfer rather than web address.
Follow the Setup Wizard
The setup wizard is a simple tool that walks you through connecting your Orbi router to the internet and linking your satellite( s).
The wizard will describe your internet connection type. Confirm the details or enter them manually if needed.
The system will also describe and sync with the satellite( s). Make sure they're powered on and placed within range.
You’ll be asked to set a new WiFi name( SSID) and word for your Orbi network. This will be the name you and your family use to connect units going forward.
Once all settings are verified, the Orbi system will apply the configuration and reboot.
Test Your Connection
After the reboot
Reconnect your mobile or laptop to the recently created Orbi network using the streamlined SSID and word.
Verify LED pointers. Solid blue generally indicates a strong connection between the router and satellite.
Open a web cybersurfer and visit any website to confirm that your internet is working duly.
Return to orbilogin.com if needed to fine tune settings like guest networks, maternal controls, and firmware updates.
Update the Firmware
Keeping your Orbi system streamlined is essential for performance and security. Then’s how to modernize via orbilogin.com
Log back into orbilogin.com using your admin credentials.
Navigate to Advanced settings and then Administration
Hit on Firmware Update to step ahead.
Click check to see if a newer interpretation is available.
Click Update Now and stay for the process to complete, If an update is available.
Your router and satellites will reboot during the update process. Avoid interposing this step.
Customize fresh Settings
Once your Orbi AX6000 is over and running, you can explore more advanced options through orbilogin.com
Guest WiFi produces a separate network for callers.
Maternal Controls Block specific websites or set operation schedules.
QoS( Quality of Service) Prioritize bandwidth for gaming, streaming, or videotape conferencing.
Traffic Meter Monitor how important data is being used on your network.
These settings allow you to conform your Orbi system for optimal use in your ménage or office.
Final Words
Setting up your Netgear Orbi AX6000 using orbilogin.com is a stoner-friendly process designed for both newcomers and tech- smart druggies. With just many simple ways, you can enjoy lightning-fast pets, extended content, and flawless performance across all your unit. Whether you’re streaming 4K content, working from home, or just browsing the web, a duly configured Orbi system ensures a dependable and secure network. Take advantage of orbilogin.com to manage your network with ease, and enjoy continued internet like no way ahead.
0 notes
Text
How to Select the Best Antenna for Your WiFi Network
In today's digital world, Wi-Fi access is critical for business, pleasure, and communication. However, poor or irregular Wi-Fi connections may be annoying, particularly in big homes, businesses, or outdoor settings. One of the most effective strategies to improve network performance is to select the appropriate antenna for your Wi-Fi router or access point.
Wi-Fi antennas play an important role in signal transmission and reception, and choosing the proper one may improve your coverage, speed, and stability. Here's a comprehensive guide on selecting the ideal antenna for your Wi-Fi network.
1. Understand Your Wi-Fi Frequency Band
Wi-Fi usually runs on two frequency bands.
2.4 GHz: Longer range but slower speeds.
5 GHz: Offers quicker speeds but shorter ranges.
Check that the antenna you chose supports the appropriate frequency band (or both, if using dual-band Wi-Fi). Many current antennas are dual-band, operating at both 2.4 GHz and 5 GHz for optimal compatibility.
2. Know the Types of Wi-Fi Antennas
Omni-directional Antennas
Radiate the signal evenly in all directions (360°).
Ideal for interior settings ranging from small to medium size.
Perfect for routers that are centrally situated.
Directional Antennas (Yagi, Panel)
Concentrate the signal in one direction, increasing its range and power.
Suitable for targeting specific regions, lengthy halls, or connecting buildings.
Ideal for point-to-point Wi-Fi connections.
3. Consider the Antenna Gain (dBi)
Gain is how successfully an antenna transforms power into radio waves in a certain direction.
Low gain (2-5 dBi): Provides more coverage but shorter range—ideal for tiny spaces.
Medium gain (6-9 dBi): provides a good blend of range and coverage.
High gain (10+ dBi): A focused signal for long-range or directional applications—ideal for outdoor or big venues.
Choose the gain that best fits the size and configuration of your coverage region.
4. Indoor Vs. Outdoor Use
Indoor antennas are often smaller, compact, and frequently integrated into routers.
Outdoor antennas are waterproof and designed to withstand harsh environments, making them excellent for expanding Wi-Fi coverage across campuses, farms, and outdoor events.
When installing outside antennas, make sure they are properly weatherproofed and that the wires are protected.
5. Connector Type and Compatibility
Make that the antenna works with your network or access point. Common connection types include:
RP-SMA (Most home routers).
N-Type (often utilized in professional or outdoor settings)
Use adaptor cables as needed to guarantee a safe and lossless connection.
6. Installation and Placement Tips
Position antennas above obstructions and away from metal surfaces and walls.
Position omni-directional antennas vertically to provide horizontal coverage.
Use directional antennas in certain regions and aim carefully for the greatest results.
Keep cable lengths short and utilise low-loss coaxial cables to improve transmission quality.
Conclusion
Understanding your surroundings, network needs, and technological compatibility are all important considerations when selecting the finest Wi-Fi antenna. Whether you're strengthening residential coverage, increasing signal in a large workplace, or building a long-distance outdoor link, the appropriate antenna may make a big impact in Wi-Fi performance.
Contact Us
Eteily Technologies India Pvt. Ltd.
📍 B28 Vidhya Nagar, Near SBI Bank Bhopal - 462026, Madhya Pradesh
📧 Email: [email protected] 📞 Phone: +91-9993979758 🌐 Website: https://eteily.com
#best Wi-Fi antenna#Wi-Fi signal boost#omni-directional antenna#directional antenna#2.4GHz antenna#5GHz antenna#Wi-Fi coverage#antenna gain#RP-SMA connector#Eteily Wi-Fi solutions
0 notes
Text
Troubleshooting Common Issues Through PLDTHomeWiFiSettings

Dealing with internet slowdowns or connectivity issues can be frustrating, especially when you rely heavily on WiFi for work, streaming, and daily communication. Fortunately, many common problems can be resolved using pldthomewifisettings. This guide will walk you through practical troubleshooting tips and tricks using your PLDT router's admin panel.
Understanding PLDTHomeWiFiSettings
The pldthomewifisettings portal is your gateway to diagnosing and solving most network issues at home. From checking signal strength to rebooting your system remotely, it offers a variety of tools to enhance your internet experience.
How to Access PLDTHomeWiFiSettings
Before troubleshooting, you’ll need to access the settings:
Connect your phone or computer to the PLDT Home WiFi.
Open a web browser and type 192.168.1.1 or 192.168.0.1.
Enter login credentials—usually "admin" and "1234" (or "adminpldt" with a specific password).
You’ll now see the pldthomewifisettings dashboard.
Once inside, you’re ready to start troubleshooting.
Problem 1: Slow Internet Speed
If your internet seems slower than expected:
Go to Status > WAN to check the real-time speed.
Run a speed test from your browser and compare it with your subscribed plan.
Use QoS Settings to prioritize work-related devices or apps.
Reduce the number of connected devices by checking the Client List.
Through pldthomewifisettings, you can quickly allocate bandwidth to where it matters most.
Problem 2: Frequent Disconnections
A common issue with wireless connections is frequent drops. Try the following:
Change the WiFi Channel under Wireless Settings. Avoid crowded channels like 1 or 6.
Switch from 2.4GHz to 5GHz if supported. It’s faster and less prone to interference.
Ensure firmware is updated via System > Firmware Upgrade.
If none of these fixes work, a factory reset through pldthomewifisettings might be necessary.
Problem 3: Unauthorized Users on the Network
Are you noticing unfamiliar devices?
Navigate to the Client List in your dashboard.
Block unknown devices using MAC Filtering.
Change your WiFi password under Wireless > Security and re-authenticate trusted devices.
Regularly monitoring your pldthomewifisettings can help you catch freeloaders before they eat up your bandwidth.
Problem 4: Can’t Connect to WiFi
Sometimes your device might not connect at all:
Restart your router using System > Reboot.
Check if the WiFi signal is hidden. Go to Wireless Settings and make sure SSID broadcast is enabled.
Ensure the device isn’t blocked under MAC Filtering.
This is a common situation easily resolved by checking settings via pldthomewifisettings.
Problem 5: WiFi Signal Weak in Certain Areas
Dead zones in your house?
Try changing the transmission power from “Low” to “High” under Wireless > Advanced Settings.
Reposition your router centrally in your home.
Add a WiFi extender or Mesh system and link it via LAN cable.
While pldthomewifisettings can help optimize range, hardware limitations may also need to be addressed.
Problem 6: Can’t Log In to PLDTHomeWiFiSettings
If you can’t even access the admin panel:
Check the IP address. It should be 192.168.1.1 or 192.168.0.1.
Make sure you're connected to the PLDT WiFi, not mobile data.
Reset the router to factory settings using the small reset button at the back.
Access to pldthomewifisettings is crucial for all troubleshooting, so this step is foundational.
Problem 7: Port Forwarding Not Working
Need to open ports for gaming or remote access?
Navigate to NAT > Port Forwarding.
Input the local IP, start/end port, and protocol.
Save and reboot the router.
If port forwarding doesn’t work even after setup, check with PLDT support—some accounts are on CGNAT which restricts this function.
Preventive Maintenance Tips
Log into your pldthomewifisettings weekly to monitor devices.
Change your password monthly.
Keep firmware updated.
Avoid overloading your network with too many devices.
Preventive maintenance reduces the frequency of technical problems and improves long-term performance.
Conclusion
When problems arise with your internet, don’t panic. Many issues—from speed concerns to unknown users—can be resolved by exploring your pldthomewifisettings. By taking the time to understand the control panel, you empower yourself to maintain a fast, secure, and stable network connection without always needing technical support.
FAQs on PLDTHomeWiFiSettings Troubleshooting
Q1. What should I do if my PLDT WiFi keeps disconnecting? Ans. Check for channel interference, update firmware, and limit the number of connected devices using pldthomewifisettings.
Q2. Can I remove a device from my WiFi using PLDTHomeWiFiSettings? Ans. Yes, go to the device list, find the suspicious device, and block it via MAC filtering.
Q3. What if I forget my PLDTHomeWiFi admin password? Ans. You can reset the router to factory settings and log in using default credentials, then reset the password again.
0 notes
Text
Why Your Digital Life Needs a Security Checkup (And How Vulnerability Scanning Can Save You)
Hey tech fam! 👋 Let's talk about something that might sound super technical but is actually pretty important for anyone who uses the internet (so... everyone?).
What's This "Vulnerability Scanning" Thing Anyway?
Think of vulnerability scanning like getting a regular health checkup, but for your computers, websites, and digital stuff. Just like how a doctor checks for health issues before they become serious problems, vulnerability scanning looks for security weak spots before hackers can exploit them.
It's basically an automated security guard that goes through all your digital assets and says "Hey, this password is weak," or "This software needs updating," or "This door is wide open for cybercriminals."
The Different Types of Digital Health Checks 🩺
Network Scanning: Checks your WiFi, routers, and all the tech that connects your devices together. Think of it as examining your digital nervous system.
Web App Scanning: Looks at websites and online applications for common hacker tricks like SQL injection (sounds scary, right?).
Database Scanning: Makes sure your stored data isn't sitting there with a "please steal me" sign on it.
Wireless Scanning: Checks if your WiFi is basically broadcasting "free internet and data access" to the whole neighborhood.
How Does It Actually Work? 🤖
Discovery Phase: The scanner maps out everything connected to your network (like taking inventory of your digital house)
Detection Phase: Compares what it finds against huge databases of known security holes and vulnerabilities
Risk Assessment: Ranks problems from "meh, fix when you have time" to "OMG FIX THIS NOW"
Reporting: Creates reports that actually make sense (hopefully)
Why Should You Care? 🤷♀️
Because Hackers Don't Take Days Off: They're constantly looking for easy targets. Regular scanning helps you not be one.
Compliance Stuff: If you run a business, there are probably rules you need to follow. Scanning helps with that boring (but important) paperwork.
It's Cheaper Than Getting Hacked: Trust me, prevention costs way less than dealing with a data breach. Way, way less.
Expert Help: Professional services give you more than just "here's a list of problems" - they actually help you understand and fix things.
What Makes a Good Vulnerability Scanning Service? ✨
Covers Everything: Should check all your digital stuff, not just some of it
Stays Updated: New threats pop up daily, so the service needs to keep up
Customizable: Your business isn't exactly like everyone else's, so your scanning shouldn't be either
Plays Well With Others: Should work with your existing security tools
Clear Reports: Nobody has time for technical gibberish without explanations
Real Talk: The Challenges 😅
Performance Impact: Scanning can slow things down temporarily (like how your phone gets slow during updates)
Information Overload: Sometimes you get SO many alerts that you don't know where to start
Not Enough Time/People: Small teams often feel overwhelmed by all the security stuff they need to handle
Pro Tips for Success 💡
Set up regular scans (like scheduling those dentist appointments you keep putting off)
Mix up authenticated and non-authenticated scans for different perspectives
Actually track whether you've fixed the problems (revolutionary concept, I know)
Learn to ignore false alarms so you can focus on real issues
The Future is Pretty Cool 🚀
AI and machine learning are making vulnerability scanning smarter. Soon, systems might even fix some problems automatically (while we're sleeping, hopefully).
We're also moving toward real-time monitoring instead of just periodic checkups. It's like having a fitness tracker for your cybersecurity.
Bottom Line 💯
Look, cybersecurity might seem intimidating, but vulnerability scanning is actually one of the more straightforward ways to protect yourself. It's like having a really thorough friend who points out when your digital fly is down before you embarrass yourself in public.
The internet can be a scary place, but you don't have to navigate it defenseless. Regular vulnerability scanning is like having a really good security system - it won't stop every single threat, but it'll catch most of them and give you peace of mind.
Ready to give your digital life a security checkup? Professional services can handle all the technical stuff while you focus on... literally anything else. Check out comprehensive vulnerability scanning solutions here and sleep better knowing your digital house has good locks on the doors.
Stay safe out there! 🛡️
What's your biggest cybersecurity worry? Drop it in the comments - let's discuss! 💬
#cybersecurity #vulnerability #techsafety #infosec #digitalsecurity #smallbusiness #technology #hacking #cybercrime #datasecurity
1 note
·
View note