#Neutral Density Filter Lens
Explore tagged Tumblr posts
Visit Tumblr Blog
Explore Tumblr blogs with no restrictions, modern design and the best experience.
Last Seen Tumblr Blogs


Fun Fact
In 2020, 44% of users from Denmark used Tumblr daily.
Text


A few of my favorite shots from Feast of the Hunters' Moon this past weekend! I took my Pentax MX and shot one roll of color film and one roll of black & white. As much as I love color generally, I'm really pleased with how the black & white shots came out!
Color film: Kodak UltraMax 400 B/W film: Kodak Double-X Developed & scanned by me
And a bonus: your humble photographer, as captured by @witchertits!

#i got a lot of use out of my bargain bin graduated neutral density filter#it works great but i can't put my lens cap on over it because the size is weird#my photography#analog photography#feast of the hunters' moon#technically the group shot is us at the culver's in lafayette but we were still in garb so it counts
10 notes
·
View notes
Text
Yvette Heiser - Mastering Filters in Photos for High-Impact Professional Photography
In professional photography, taking the ideal photo is just the beginning of the creative process. The other half lies in how you enhance and present your images to create a lasting impression. Filters play a crucial role in this process, allowing photographers to manipulate light, color, and mood to produce high-impact visuals. Yvette Heiser - The Role of Light in Professional Photography highlights how understanding light and using filters effectively can dramatically transform a photo’s atmosphere and appeal. Mastering filters in photography is essential for anyone aiming to elevate their work from ordinary snapshots to compelling, professional-grade images.

Understanding Filters: More Than Just Effects
Filters are not just trendy overlays or Instagram presets. In professional photography, filters serve as powerful tools that modify how light interacts with the camera sensor or film. Filters generally fall into two categories: physical filters that attach directly to the camera lens and digital filters added during the editing process.
Physical Filters
Physical filters are glass or resin attachments placed on the camera lens. Some common types include:
Polarizing Filters: These reduce reflections and glare from surfaces like water or glass, enhancing color saturation and contrast.
Neutral Density (ND) Filters: ND filters reduce the amount of light entering the lens, enabling longer exposure times or wider apertures even in bright conditions.
Graduated ND Filters: These help balance exposure between bright skies and darker landscapes.
Color Filters: Used primarily in black-and-white photography, these filters can accentuate contrasts or tones.
Digital Filters
Digital filters are applied during editing using software like Adobe Photoshop or Lightroom. They can simulate the effects of physical filters or introduce creative adjustments such as:
Color grading
Sharpening or softening
Adding vignettes or lens flares
Enhancing textures
Why Mastering Filters Is Vital for Professionals
Using filters effectively allows photographers to control their image’s story and emotional impact. Whether aiming for a dramatic landscape or a crisp product shot, filters help set the tone. Here’s why mastering them matters:
Enhance Visual Appeal: Filters can make colors pop, deepen shadows, and add contrast that draws the viewer’s eye.
Control Light: Proper use of ND or polarizing filters helps manage tricky lighting situations, enabling clearer, more balanced photos.
Create Mood and Style: Filters contribute significantly to the mood of an image, whether it's a warm, nostalgic feel or a cold, modern aesthetic.
Save Time in Editing: Skilled use of physical filters can reduce the need for extensive post-processing, saving time without sacrificing quality.
Tips for Mastering Physical Filters
Invest in Quality Gear: High-quality filters maintain image sharpness and avoid unwanted color casts. Cheap filters can degrade your photos.
Understand Your Environment: Know when to use each filter depending on lighting conditions and subject matter.
Practice Long Exposures: Use ND filters to capture motion blur in waterfalls or clouds for artistic effects.
Rotate Polarizers: Adjust the polarizing filter to find the best angle for reducing glare and boosting colors.
Tips for Mastering Digital Filters
Subtlety Is Key: Avoid overusing digital filters that make images look artificial.
Learn Color Theory: Understand how color adjustments affect mood and composition.
Use Layer Masks: Apply filters selectively on different parts of an image for balanced results.
Experiment with Presets: Start with presets to learn different styles, then customize them to fit your vision.
Combining Physical and Digital Filters
The most impactful professional photos often result from a blend of physical and digital filtering techniques. For example, a photographer might use a polarizing filter during shooting to reduce glare and then apply digital color grading to enhance mood in post-production. This combination provides greater control and flexibility than relying on one method alone.
Common Mistakes to Avoid
Overfiltering: Too many filters can clutter an image and distract from the subject.
Ignoring White Balance: Filters can alter color temperature; always adjust white balance accordingly.
Neglecting Lens Quality: Using low-quality lenses with filters can cause unwanted effects like vignetting or softness.
Relying Solely on Digital Filters: While convenient, digital-only approaches sometimes lack the authenticity that physical filters provide.
Conclusion
For photographers aiming to produce striking, professional-quality images, learning how to effectively use filters is an essential skill. Yvette Heiser – Texas, talks about the importance of filters in photos, emphasizing how understanding both physical and digital filters, knowing when and how to use them, and avoiding common pitfalls can significantly improve the visual quality and emotional depth of their work. Whether shooting landscapes, portraits, or commercial projects, filters are indispensable tools that help transform ordinary photos into powerful stories told through light and color. Invest time in learning these techniques—it’s an investment that will pay off in every frame you capture.
#camera#pictures#photographer#wedding#moments#photography#yvette heiser#photographytips#childphotography#events
6 notes
·
View notes
Text
LensCraft Mastery: Elevate Your Photography Skills to the Next Level

Photography is more than just pressing a button; it’s an art, a science, and a means of storytelling. LensCraft Mastery is a comprehensive guide designed to help photographers—whether beginners or seasoned professionals—unlock their full creative potential. This tutorial series delves into the intricate aspects of photography, from mastering the fundamentals of exposure and composition to exploring advanced techniques in lighting, post-processing, and storytelling through imagery.
Why LensCraft Mastery?
The name LensCraft Mastery symbolizes the fusion of technical expertise (Lens) with artistic craftsmanship (Craft). Photography is both a technical discipline and an expressive medium, requiring a balance between understanding camera mechanics and developing an artistic vision. This tutorial series aims to bridge that gap by offering structured, easy-to-follow lessons that cater to all levels of experience.
1. Mastering the Basics of Photography
For those new to photography, LensCraft Mastery begins with the fundamental concepts that form the backbone of great photography:
Exposure Triangle: The Key to Perfectly Lit Photos
Aperture: Understanding how f-stops affect depth of field and light intake.
Shutter Speed: Capturing motion creatively, from freezing action to long exposures.
ISO: Controlling sensor sensitivity for optimal brightness without excessive noise.
Composition Techniques: Crafting Visually Stunning Images
Rule of Thirds: Placing subjects strategically for balanced compositions.
Leading Lines: Drawing the viewer’s eye to the subject.
Framing & Negative Space: Enhancing depth and focus in a photograph.
2. Advanced Photography Techniques
Once the basics are mastered, LensCraft Mastery delves into techniques that can take your photography to a professional level.
Understanding Light & Shadows
The role of natural light vs. artificial lighting in photography.
How to use soft light for flattering portraits and harsh light for dramatic effects.
Mastering golden hour and blue hour photography.
Camera Settings & Manual Mode
How to use manual focus for precision.
Customizing white balance for accurate color reproduction.
Shooting in RAW vs. JPEG and when to use each format.
3. Specialized Photography Genres
Photography is a vast field, and LensCraft Mastery explores different genres, allowing photographers to find their niche.
Portrait Photography
How to pose subjects naturally for candid and professional shots.
Best lenses for portrait photography (prime vs. zoom).
Background blur (bokeh) techniques for dreamy aesthetics.
Landscape Photography
Composition techniques for breathtaking vistas.
Use of ND (neutral density) filters for long exposures.
How to capture the perfect sunrise and sunset.
Street Photography
Capturing the essence of everyday life.
Ethical considerations in photographing strangers.
How to blend into the scene for natural compositions.
Wildlife & Macro Photography
Tips for photographing animals in motion.
Choosing the best gear for close-up macro shots.
Patience and planning for capturing rare moments.
4. The Power of Post-Processing
A great photo doesn’t always end with the camera—post-processing is essential for refining images. LensCraft Mastery provides in-depth tutorials on:
Adobe Lightroom & Photoshop Editing
Adjusting exposure, contrast, and white balance for balanced images.
Retouching techniques for portraits and landscapes.
Removing unwanted elements and enhancing details.
Mobile Editing for On-the-Go Photography
Best apps for editing (Snapseed, VSCO, Lightroom Mobile).
Color grading techniques for a unique aesthetic.
Quick retouching methods for social media-ready images.
5. Developing a Photographer’s Mindset
Photography is more than just technical skill—it requires creativity, patience, and an eye for detail. LensCraft Mastery helps photographers develop a storytelling approach, teaching how to:
Capture emotions and narratives within a single frame.
Use minimalism and abstract photography to create intriguing images.
Experiment with angles and perspectives to bring a fresh outlook to everyday scenes.
6. Monetizing Your Photography Skills
For those looking to turn their passion into a profession, LensCraft Mastery includes insights on:
How to start a photography business and build a portfolio.
Selling photos online (stock photography, prints, NFTs).
Social media strategies to grow an audience and attract clients.
Final Thoughts
Whether you’re just starting or looking to refine your craft, LensCraft Mastery offers a structured, engaging, and practical way to enhance your photography skills. By blending technical knowledge, artistic creativity, and real-world applications, this tutorial series is designed to empower photographers at every stage of their journey.
Start mastering your craft today and turn your vision into reality—one frame at a time. 📸✨
2 notes
·
View notes
Text
Edmund Scientific was a company that got its start in the 1940s selling surplus optics — lenses, and then microscopes and telescopes — and expanded into a big mail-order catalog that sold science educational stuff to the public. It also branched out into selling top-shelf scientific lens, camera, and laser systems to industry and research labs. Early in the 2000s, they decided they were just going to focus on the latter and flogged off the consumer end of the business.
But somehow I stayed on their mailing list, which is why I've gotten a glossy catalog full of aspherical lenses, optical stages, beamsplitters, neutral density filters, and helium-neon lasers delivered to me every couple of months for the past two decades.
5 notes
·
View notes
Text
The Symphony of Landscape Photography: A Novice's Prelude
In the vast canvas of photography, landscape photography stands as a symphony of light, colors, and natural grandeur. For those just stepping onto this captivating stage, a world of artistic possibilities awaits. In this creative guide, we embark on an artistic journey, exploring landscape photography's vibrant palette, offering novice photographers the tools to compose their own visual masterpieces.
1. The Essentials of Equipment
The Camera: Your Maestro
Your camera is the maestro of this symphony. While you don't need a virtuoso's instrument, a camera with manual settings is essential. A DSLR or mirrorless camera paired with a versatile lens, such as an 18-55mm or 10-20mm, serves as your artistic conductor.
The Steadfast Tripod
In this visual symphony, stability is key. A sturdy tripod acts as your conductor's podium, ensuring your images are crisp, free from the tremors of shaky hands, especially in the low-light serenades of sunrise and sunset.
Filters: Harmonious Accents
Filters are the embellishments that enrich your composition. A polarizing filter reduces reflections and deepens colors, while neutral density filters allow you to play with time, capturing the flowing streams of clouds or water in long-exposure dreams.
2. Composing the Overture
The Rule of Thirds: Your Melodic Guide
The rule of thirds, a foundational musical note, divides your frame into a sonnet of nine equal parts. Place the crescendos of your landscape at the intersections or along these lines to compose a balanced and melodious arrangement.
Leading Lines: The Guiding Symphony
Nature's pathways and man-made lines become the melodies that draw the viewer's eye into the composition. Rivers, roads, and fences lead the way, adding depth and intrigue to the visual composition.
Framing: The Ornamental Chorus
Natural frames, like trees and arches, encircle your visual composition, giving it depth and dimension. The audience becomes a part of the scene, enveloped in the story you weave.
The Foreground Sonata
Incorporate a captivating foreground element—rocks, wildflowers, or textured treasures—to create depth and context, like a sonata's opening notes, drawing the audience into your visual composition.
3. The Aria of Exposure
Manual Mode: Conducting the Light
In this symphony of light, command your camera's manual mode. Adjust the aperture (f-stop), shutter speed, and ISO to compose the harmonious exposure you envision.
The Histogram: Your Conductor's Baton
The histogram is your conductor's baton—a visual score that guides your exposure. A harmonious histogram, with notes distributed evenly, heralds a well-exposed composition.
The Golden Hours: Nature's Crescendo
During the golden hours, the sun paints landscapes with soft, warm hues. These moments, right after sunrise and before sunset, weave enchanting melodies into your photographs.
HDR Crescendo: Bracketing Technique
Capture multiple exposures of the same scene and blend them in post-processing to unveil a symphony of tones—a crescendo that maintains detail in the deepest shadows and brightest highlights.
4. The Rhapsody of Focus and Depth
Aperture: The Depth Composer
Experiment with aperture settings to orchestrate depth. A wide aperture (low f-number) creates a shallow depth of field, isolating your subject. A narrow aperture (high f-number) deepens the composition, holding more elements in focus.
The Harmonious Hyperfocal Distance
Master the concept of hyperfocal distance, the closest point of focus that keeps everything from that point to infinity acceptably sharp. This technique orchestrates maximum depth in your visual symphony.
5. The Overture of Patience and Timing
Cultivating Patience
Landscape photography, like a sonata, requires patience. Wait for the ideal moment—the perfect light, the right cloud formation, or the moment when nature's instruments are in tune. Often, a few extra minutes compose a remarkable difference.
Scouting the Score
Before you raise your camera to compose, scout your locations. Visit them at different times and seasons to understand the evolving melodies of light and nature.
6. Post-Processing: The Harmony of Artistry
The Editing Studio: Your Composer's Desk
Enter the editing studio with software like Adobe Lightroom or Photoshop. Here, you fine-tune your visual score, enhancing your images, refining the exposure, and drawing out their full potential.
A Natural Crescendo
In your artistic journey, balance is key. Avoid over-editing, allowing the natural essence of your composition to shine through. Preserve the authenticity of the scene you captured.
7. Safety and the Nature's Ballad
Nature's Sanctuary: A Harmonious Respect
In the grand amphitheater of nature, act as a respectful guest. Stay on designated paths, refrain from disturbing wildlife, and follow the principles of Leave No Trace to harmonize with the environment.
The Prelude of Safety
Prioritize your safety, especially in remote or challenging locales. Inform someone of your plans, carry essential safety equipment like a first-aid kit, and be prepared for nature's whims.
8. The Symphony of Learning
Studying the Masters: Lessons in Harmony
Listen to the compositions of renowned landscape photographers for inspiration and knowledge. Study their compositions, their play of light, and their artistry in post-processing.
The Chorus of Photography Communities
Join photography communities, forums, or workshops to share your work, seek feedback, and learn from fellow photographers. These harmonious interactions accelerate your growth as a landscape photographer.
Practice: The Eternal Symphony
Photography, like music, demands practice. Do not be disheartened by initial discord. Keep experimenting, learning, and refining your techniques to compose your own unique symphony in landscape photography.
Landscape photography is a symphony that resonates with the heart and soul of nature. Armed with the knowledge of equipment, composition, exposure, and artistic sensibility, novice photographers can embark on an exhilarating journey of visual composition. Beyond the final image lies the profound experience—the moments spent in nature and the stories your visual symphony will tell. So, seize your camera, embrace the great outdoors, and compose your own magnum opus in the world of landscape photography today.
1 note
·
View note
Text
Men's Tortoise Sunglasses: Classic Frames That Never Go Out of Style
Tortoiseshell frames have long been a staple in men’s eyewear, offering a perfect blend of tradition and modernity. Whether you’re drawn to the warm amber hues or the sophisticated pattern, mens tortoise sunglasses deliver a timeless look that enhances any outfit. In this guide, we’ll explore why these frames endure, how to choose the right pair, and tips for care and styling.
We’ve organized this post into 12 sections, each featuring two in-depth paragraphs. Along the way, you’ll encounter LSI keywords like vintage eyewear, UV protection, polarised lenses, frame durability, and face shape to give you a comprehensive understanding of why men’s sunglasses tortoise remain an enduring favourite.

The Enduring Appeal of Tortoiseshell Frames
Tortoiseshell patterns first gained popularity in the early 20th century as an imitation of natural tortoise shell, prized for its rich, variegated texture. Today’s mens tortoiseshell glasses capture that same warmth with modern acetate materials, combining vintage eyewear charm with durability. The unique mottled design of each frame ensures no two pairs are identical, offering a personalized touch to every wearer.
Beyond aesthetics, tortoiseshell frames exude versatility. Their neutral palette—from honey browns to deep ambers—pairs seamlessly with various skin tones and wardrobe colours. Whether you’re dressing up for a formal event or keeping it casual on weekends, mens tortoise sunglasses provide a subtle flair that complements both tailored suits and laid-back jeans-and-tee combos.
Understanding the Classic Colours and Patterns
The classic tortoise pattern consists of dark spots scattered over a lighter background, typically in shades of brown, amber, and caramel. This contrast gives men's sunglasses tortoise their signature look, which can range from bold and dramatic to soft and understated. Brands often experiment with pattern density—some frames feature a sparse speckle, while others boast a dense, almost marble-like appearance.
Variations also include two-tone and translucent styles. Light-infused acetate can create a glowing effect in bright sunlight, emphasizing the depth of the tortoiseshell pattern. Choosing the right colour intensity helps tailor your eyewear to your personal style: subtle, muted tones for a refined appearance, or high-contrast patterns for a fashion-forward statement.
Frame Materials: Acetate Versus Natural Shell
Modern mens tortoise sunglasses are predominantly crafted from cellulose acetate—a plant-based plastic known for its flexibility, strength, and color retention. Acetate allows manufacturers to embed vibrant patterns deep into the material, resulting in frames that won’t fade or chip easily. Its hypoallergenic properties also make it suitable for sensitive skin.
In contrast, genuine tortoise shell (now banned due to wildlife protection laws) offered unparalleled warmth and natural variation but was brittle and expensive. Today’s acetate recreations honour the aesthetic while improving on frame durability and ethical sourcing. Some luxury brands still market “shell-inspired” designs, emphasizing eco-friendly craftsmanship without compromising style.
Lens Technologies: UV Protection and Polarisation
While the frame pattern draws the eye, lens quality is crucial for eye health and vision clarity. Always look for UV protection that blocks 100% of UVA and UVB rays, safeguarding your eyes from long-term damage. Many mens tortoise sunglasses come equipped with anti-reflective coatings to reduce glare in bright conditions.
For even greater comfort, consider polarised lenses, which filter horizontal light waves that bounce off surfaces like water or pavement. Polarisation enhances contrast and reduces eye strain, making these sunglasses ideal for driving, fishing, or outdoor sports. Combined with the classic tortoiseshell frame, polarised lenses offer both style and substance.
Choosing the Right Face Shape
Selecting the ideal silhouette for your mens tortoiseshell glasses involves understanding your face shape. Oval faces, with balanced proportions, can wear almost any frame style, including the timeless rectangular or round tortoise designs. Square faces benefit from softer, round frames that contrast with strong jawlines and angular features.
Round faces look sharper in rectangular or wayfarer-style frames, adding definition to softer curves. Heart-shaped faces suit bottom-heavy designs or frames with wider temples to balance a narrower chin. Identifying your face shape ensures that your men’s sunglasses tortoise not only look stylish but also enhance your natural facial structure.
Popular Tortoiseshell Frame Styles for Men
Classic Wayfarers and Clubmasters dominate the men's tortoise sunglasses market, celebrated for their retro appeal and universal fit. Wayfarer styles feature thick rims and a trapezoidal shape, offering a bold yet approachable look. Clubmasters, with their metal browline and tortoise acetate lower rims, provide a refined, intellectual vibe.
For a more modern twist, aviators and round frames have been reimagined in tortoiseshell patterns. Tortoise aviators soften the iconic teardrop shape, infusing warmth into an otherwise utilitarian design. Round tortoiseshell glasses channel a 1960s aesthetic, perfect for those seeking a unique, vintage-inspired accessory.
Styling Tips: From Casual to Formal
In casual settings, pair your men’s sunglasses tortoise with neutral basics—white tee, denim jacket, and chinos—to let the frames stand out as a focal point. The warm hues of the tortoise pattern add depth to simple outfits and harmonize with earthy colour palettes like olive, tan, and navy.
For formal occasions, choose a streamlined tortoiseshell design with minimal embellishment. A slim, rectangular frame in dark amber pairs beautifully with a charcoal or navy suit. Coordinating your belt and shoes in complementary brown tones creates a cohesive look, elevating your ensemble from business-ready to effortlessly stylish.
Caring for Your Tortoiseshell Eyewear
To preserve the vibrant pattern and structural integrity of your mens tortoise sunglasses, regular maintenance is essential. Clean lenses with a microfiber cloth and lens solution—never use paper products or household cleaners, which can scratch coatings. Wipe the acetate frame gently to remove oils and debris.
When not in use, store your glasses in a hard-shell case to prevent accidental drops or crush damage. Avoid leaving them in high-heat environments, like car dashboards on sunny days, as acetate can warp. Thoughtful care ensures your mens tortoise shell sunglasses remain in pristine condition for years.
Balancing Functionality and Fashion
While aesthetics are important, practical features should not be compromised. Look for spring hinges that provide flexibility and reduce frame stress over time. Adjustable nose pads can improve fit and comfort, especially during extended wear. Some tortoise frames also feature integrated temple grips to prevent slipping.
Innovations like laminated wood or metal-stem accents can elevate both frame durability and design. These hybrid approaches blend classic tortoise patterns with contemporary materials, offering the best of both worlds: fashion accessory appeal and long-lasting performance.
Sustainable and Ethical Options
As consumer awareness grows, many eyewear brands now offer eco-friendly tortoiseshell alternatives. Look for frames made from recycled acetate or bio-based plastics, reducing reliance on fossil fuels. Some companies also participate in carbon offset programs or offer take-back initiatives for old frames.
Ethical manufacturing certifications—such as Fair Labour practices and non-toxic dye processes—ensure that your purchase supports responsible business. Choosing sustainable mens tortoise sunglasses means you can enjoy the classic look guilt-free, knowing it aligns with environmental and social values.
Popular Brands and Price Ranges
Tortoiseshell frames span a wide range of price points. Entry-level brands like Warby Parker and Ray-Ban offer quality mens tortoise sunglasses in the $100–$200 range, balancing craftsmanship with affordability. Premium labels like Persol, Tom Ford, and Moscot command higher prices ($300–$500+) and feature handcrafted acetate and bespoke detailing.
For budget-friendly options, fast-fashion retailers also produce tortoise-patterned eyewear under $50. While these may lack high-end finishes or advanced lenses, they allow experimentation with trends. Understanding your priorities—whether it’s lens technology, branding, or bespoke craftsmanship—guides your investment.
How to Spot Authentic Tortoiseshell Designs
With the rise in popularity of mens tortoiseshell glasses, counterfeit or low-quality imitations have flooded the market. Authentic acetate frames have a certain weight and a smooth, polished finish. Look for consistent pattern depth: genuine acetate exhibits layered hues, whereas cheap knockoffs may appear flat or printed on the surface.
Check for brand hallmarks—laser-etched logos on temples or serial numbers inside the arms. These details indicate legitimate craftsmanship. Purchasing from authorized retailers guarantees authenticity, warranty coverage, and proper UV protection for long-term peace of mind.
Final Thoughts
mens tortoise sunglasses marry classic aesthetics with modern functionality, making them an enduring staple in any eyewear collection. From understanding frame materials and lens technologies to choosing the right shape for your face and caring for your glasses, this guide covers all you need to know. Whether you favour vintage-inspired Wayfarers, scholarly Clubmasters, or contemporary aviators, men’s sunglasses with tortoise frames will keep you looking sharp and protected season after season. Choose wisely, care diligently, and enjoy the timeless elegance that only mens tortoiseshell glasses can offer.
0 notes
Text
Landscapes in Focus: Capturing Nature’s Grandeur Through the Lens
Landscape photography is one of the most rewarding genres, offering a unique opportunity to explore the beauty of the natural world while developing creative and technical skills. Whether it’s vast mountain ranges, quiet lakesides, rolling hills, or desert sands, each environment tells its own story. Capturing these stories with your camera requires more than luck—preparation, patience, and a solid understanding of technique.
This guide will help you improve your landscape photography by focusing on essential strategies, practical gear tips, and creative approaches. Whether hiking through forests or traveling to national parks, these insights can help you bring more depth and emotion into every shot.
The Magic of Lighting in Landscape Photography
Lighting is often the difference between an average photo and a stunning one. Most seasoned landscape photographers shoot just after sunrise or before sunset during the golden hour. This is when the sun casts soft, warm light that enriches colors and enhances texture. The golden hour creates depth and character, making the landscape feel more alive and visually dynamic.
However, not all great photos are taken in ideal conditions. Shortly before sunrise and after sunset, Blue hour delivers cool, moody tones that can turn a simple landscape into something ethereal. Even overcast skies can add a soft, cinematic feel perfect for capturing subtle color transitions in woodlands or fields. Adapting to different lighting conditions gives you more flexibility and creativity.
Finding Balance Through Strong Composition
Good composition is what keeps the viewer engaged. The rule of thirds is a helpful starting point—by placing key elements along the lines or intersections of a three-by-three grid, your image becomes naturally more balanced. For example, placing a mountain peak or tree at one of the intersections draws attention without making the frame feel too centered.
Beyond this, try to include elements that lead the viewer’s eyes through the scene. Paths, rivers, and fences often serve as excellent leading lines. Including foreground interests, such as rocks, wildflowers, or driftwood, adds depth and pulls the viewer into the image. Framing elements like overhanging branches or archways can help isolate the subject and structure your photo. Ultimately, every detail in the frame should serve a visual purpose.
Selecting the Right Equipment for the Scene
While your creativity matters most, having the right gear lets you make the most of each situation. A DSLR or mirrorless camera with manual controls allows you to adjust settings based on the environment. A wide-angle lens (16mm–35mm) helps capture expansive views, allowing for dramatic sky and terrain interactions.
A tripod is one of the most valuable tools for landscape photography. It keeps your camera stable for long exposures, especially in low-light conditions. You can also fine-tune your composition without the pressure of handholding the camera. Additional accessories like remote shutter releases and lens filters, including polarizers and neutral density filters, further expand your creative options. These tools reduce glare, manage exposure, and enhance colors naturally.
Mastering Exposure and Sharpness
Capturing detail across the entire frame requires careful attention to exposure and focus. Use a small aperture—around f/11 to f/16—to achieve a considerable depth of field so the foreground and background remain in focus. However, be cautious not to use tiny apertures, like f/22, as they can reduce sharpness due to diffraction.
Manual focus or single-point autofocus works best for precision. Focus one-third into the frame, or use the hyperfocal distance to ensure the sharpest possible results throughout the scene. Always review your images on your camera’s screen by zooming in to check for sharpness before moving on. Even minor focus errors can undermine an otherwise beautiful composition.
Using Weather to Your Advantage
While many photographers wait for sunny skies, moody or stormy weather can produce more dramatic and emotional images. Clouds add texture and contrast to the sky, while mist or fog can create layers that add mystery and depth. Rain brings out saturated colors and adds reflections that enhance the composition.
Each season also brings unique opportunities. Snow-covered landscapes in winter offer clean, minimalist scenes with stark contrast. Autumn provides rich, golden tones and dynamic foliage. Spring and summer present lush greens and vibrant skies. Understanding how weather and seasons affect color, contrast, and mood helps you plan your shoots more effectively.
Crafting Visual Stories with Editing
Post-processing allows you to bring out the full potential of your landscape images. Shooting in RAW format captures more data, giving you more flexibility in adjusting exposure, contrast, highlights, and shadows. Programs like Adobe Lightroom, Capture One, or Luminar are designed to enhance photos while preserving detail and natural aesthetics.
When editing, the goal should be enhancement, not alteration. Avoid over-saturating colors or pushing contrast too far—this can make images feel unnatural. Subtle adjustments to color grading, white balance, and clarity can dramatically improve the mood of a photo. Pay attention to how your adjustments affect the image’s emotional impact, and always aim to reflect what you saw and felt in the field.
Telling a Story Through the Landscape
The best landscape photos do more than showcase pretty scenery—they evoke a feeling or tell a story. Ask yourself what caught your attention in a scene and how you can highlight that visually. It might be the isolation of a lone tree, the power of a rushing waterfall, or the stillness of a mountain reflected in a lake.
Composition, light, and timing work together to guide emotion. Use elements of nature to convey scale, atmosphere, and mood. Include subjects like hikers, boats, or animals when appropriate—they offer a human or narrative element that draws viewers in. Storytelling turns your image into a meaningful experience for those who see it.
Practice Makes Perspective
Like any art form, landscape photography improves with repetition. The more you get into nature, the more you train your eye to notice light, form, and potential compositions. Explore different environments, revisit the exact location under new weather, and shoot at various times of the day. Each outing sharpens your instincts and builds confidence in your vision.
Be patient. Not every outing will yield an award-winning shot. Sometimes, it’s about observing, learning, and preparing for the next opportunity. Keep your curiosity alive, and view each photo as a stepping stone toward mastering the craft.
Ultimately, landscape photography is about connection—between you and the land, between the image and its audience. It’s a chance to honor the natural world while expressing your creative voice. With persistence, knowledge, and passion, your best photographs can capture the awe, wonder, and tranquility that only nature provides.
0 notes
Text


The joy of an 8 mm lens topped with a 9-stop variable neutral density filter…
May 2025
0 notes
Text
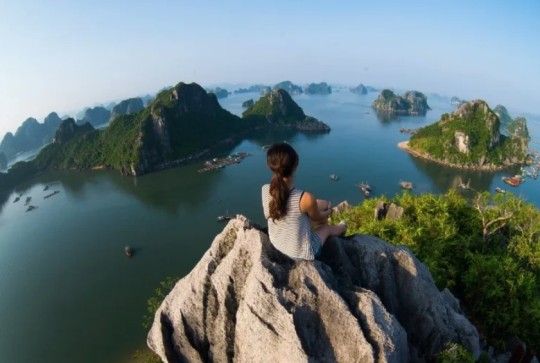
Best Photo Spots in Ha Long Bay: A Photographer's Complete Guide
Nestled in northeastern Vietnam, Ha Long Bay stands as one of nature's most spectacular masterpieces and a photographer's paradise. This UNESCO World Heritage Site, adorned with nearly 2,000 limestone islands and karst formations rising dramatically from emerald waters, offers endless photographic opportunities that have captivated visitors from around the globe. Whether you're a professional photographer or simply looking to capture stunning vacation memories, this comprehensive guide will lead you to the most breathtaking photo spots in Ha Long Bay while providing essential photography tips to help you immortalize its beauty. Panoramic Viewpoints: Capturing Ha Long Bay's Grandeur from Above To truly appreciate and document the magnificent scale of Ha Long Bay, elevated viewpoints are absolutely essential. These vantage points typically deliver the most "classic" and awe-inspiring images of the bay. Ti Top Island Summit Climb 400-450 steep steps to Ti Top's peak for a stunning 360° view of Ha Long Bay. Its central location offers an ideal photography spot, though it's best to visit early to avoid crowds. Named after Soviet cosmonaut Gherman Titov, the island combines scenic beauty with historical charm. Photography tip: For the best lighting, arrive either shortly after sunrise or before sunset. Bring a wide-angle lens to capture the expansive vista, and consider using a graduated neutral density filter to balance the bright sky with the darker landscape. Bai Tho Mountain (Poetry Mountain) This viewpoint overlooks both Ha Long City and the bay. Though the steep 200-meter hike is tough and the entrance tricky to find, the sunset views are worth it. It's also near attractions like Dau Go Cave. Photography tip: The golden hour casts a magical glow over the karst formations. Bring a zoom lens to capture both wide vistas and detailed shots of interesting formations in the distance.
Website: https://joytime.vn/en/blog/9698-best-photo-spots-in-ha-long-bay.html
#joytime #BestphotospotsinHaLongBay
0 notes
Text
Act 2: Location and Filming
location: West Kilbride - Seamill
From early on, I knew I wanted the second act of the film to be filmed at a body of water. I toyed with the idea of lochs, rivers and beaches, but ultimately chose the latter for its vastness and openness. These are qualities that felt symbolically important in the context of the film.

I considered locations such as Irvine and Troon, which I had visited previously and could visualise fairly well. However, I began to worry about how busy these beaches might be and how that could disrupt the filming process. I didn’t want modern-day beachgoers to appear in the background, and I was also hesitant about performing such a personal piece in front of an audience.
To find a more secluded spot, I asked friends for recommendations for quieter coastal areas. A friend suggested Seamill, a stretch of the west coast she knew well. She was able to point me toward a specific area that she knew to be both quiet and visually striking, which ultimately became the chosen location for filming.
I invited two close friends to assist with the shoot, who played vital roles. Louis, who had supported me in the first act of the video, again generously offered the use of his Canon 6D Mark II with a 50mm lens. His knowledge of the camera and guidance around lighting were crucial, especially in adapting to the ever-changing coastal environment. Jasmine offered support by driving us to the location, allowing us to transport all the equipment, costume pieces, and props safely. Her car also provided a necessary space for me to warm up after filming in the cold sea. Jasmine assisted during the shoot itself, holding the layers of fabric during shots where I wanted to experiment with shadows. She also stayed nearby with towels and dry clothes to ensure I could change quickly out of the wet costume for health and safety reasons. Louis' and Jasmine's presence helped create a sense of ease on set, allowing me to focus more fully on the emotional and performative aspects of the shoot.
Working with friends who understand my intentions and the personal nature of my work allows the process to feel safe and intimate.
I didn’t go into the shoot for Act 2 with many pre-planned ideas. I knew I wanted to capture a long shot of me walking into the water in my costume, and I knew this had to be the last thing that was filmed, as my clothes would be soaked through afterwards. With this in mind, I filmed a variety of clips leading up to my submersion in the water, utilizing the flowing fabrics of my dress and veil.
The winds at the location were stronger than I had expected. This turned out to be a source of inspiration, as I experimented with ways of using the winds to my advantage. I asked Louis to film my dress and veil as they were caught by the wind. I also had Jasmine help by holding the veil to the sand so we could film the shadow cast by the lace material. Rather than being a hindrance, the wind became an unexpected collaborator in the process!
I had postponed filming for the second act for as long as I feasibly could, wanting to avoid the colder months when swimming in the sea, as this could be a health and safety concern. The timing of the shoot on a bright, sunny day meant I could focus on the performance and the shots without the distraction of discomfort or safety concerns.
The brightness of the sun, especially the way it reflected off the waves, created a heavenly, ethereal atmosphere. I felt it was essential to capture this natural light in the shots. However, this presented some challenges. Many of the shots were backlit, which resulted in me appearing as a silhouette, an effect I hadn’t intended. My clothing was an important consideration in the film, so I wanted the fabrics to be visible.
If I were to reshoot any of these clips, I would use a neutral density filter on the camera to reduce the intensity of the light. This would allow me to control the exposure more effectively, giving me greater flexibility to adjust the lighting during the editing process.
The shoot evolved as the day unfolded. I enjoyed working this way, following my intuition and the environment rather than a rigid plan. I reviewed the clips at the end of the day and felt confident that with some cropping and colour grading, the filmed sections would be perfect.
0 notes
Link
GoPro HERO13 Black Accessory Bundle - Includes The Handler (Floating Hand Grip), 2 Enduro Batteries, 2 Curved Adhesive Mounts, 64GV SanDisk MicroSD Card, Carrying Case, and more Batteries : 2 Lithium Ion batteries required. (included) Product Dimensions : 3.36 x 5.66 x 5.08 cm; 157 g Release date : 10 September 2024 ASIN : B0DFY6JWWZ Item model number : CHDRB-131-RW Country of origin : China HB-Series Lenses with Auto Detection: HERO13 Black is compatible with the HB-Series Lenses that let you instantly set up your camera for a variety of specialty shots. The Ultra Wide Lens Mod is the ultimate POV lens for action-packed scenes and epic landscapes. The Macro Lens Mod captures close-up shots in stunning detail. Neutral Density Filters add motion blur to your footage and let you adjust the lighting in your shots with professional results. Try the Anamorphic Lens Mod for pro-level cinematic shots. HERO13 Black even detects when a lens or filter is attached and automatically adjusts its settings accordingly. Best-in-Class 5.3K Video: 5.3K video delivers breathtaking image quality with 91% more resolution than 4K and an incredible 665% more than 1080p. HERO13 Black captures the action with crisp detail and exacting image quality so any shot with any lens will look amazing. 5.3K video also lets you grab stunning photos up to 24.7MP from your footage using the GoPro Quik app. Burst Slo-Mo: HERO13 Black features our slowest slo-mo ever with the ability to record video clips with the action slowed down to 13x normal speed. You’ll also be able to record short 4x slo-mo clips using our highest 5.3K resolution video to catch epic details that you’d never be able to see with the naked eye.
0 notes
Text
Yvette Heiser: A Journey into the Beauty and Impact of Filters in Photography
In the world of photography, filters have long been celebrated for their ability to transform and elevate images. From the classic polarizer to modern digital presents, filters have become essential tools for photographers seeking to enhance their work. Yvette Heiser, a renowned photographer and visual artist, has harnessed the power of filters to create stunning and impactful imagery. In this exploration, we delve into Yvette Heiser – The Beauty of Filters in Photographyjourney with filters and uncover how these tools have shaped her artistic vision and elevated her photography.

The Magic of Filters: Enhancing Natural Beauty
For Yvette Heiser, the journey with filters began with a fascination for capturing the natural beauty of the world around her. Filters, she discovered, offered a way to enhance and emphasize the inherent qualities of her subjects. One of the first filters she experimented with was the polarizing filter, which is known for its ability to reduce glare and enhance colours. "Using a polarizer transformed my landscape photography," Yvette recalls. "It allowed me to capture vivid skies, crystal-clear waters, and the true essence of nature."
Creative Expression: Exploring Artistic Filters
As Yvette's photography evolved, so did her exploration of filters. She began experimenting with artistic filters that allowed her to express her creativity and add a unique touch to her images. One such filter is the neutral density (ND) filter, which reduces the amount of light entering the lens without affecting the color balance. This enables photographers to use slower shutter speeds or wider apertures in bright conditions, resulting in artistic effects such as motion blur and shallow depth of field.
Digital Revolution: The Power of Presents
With the advent of digital photography, filters have taken on a new form in the guise of presets and editing software. These digital tools allow photographers to apply a wide range of effects and adjustments with just a few clicks. Yvette Heiser embraced this digital revolution, recognizing the potential of presets to streamline her workflow and enhance her creative expression.
The Impact of Filters: Elevating Visual Storytelling
Filters, both physical and digital, have had a profound impact on Yvette Heiser's photography, enabling her to elevate her visual storytelling and convey her artistic vision. By understanding the strengths and applications of different filters, Yvette has been able to capture images that resonate with viewers and evoke a sense of wonder and emotion. One of Yvette's most impactful projects involved documenting the changing seasons in a remote forest. Through the use of polarizing filters, ND filters, and custom presents, she was able to capture the vibrant colours of autumn, the serene beauty of winter, the rebirth of spring, and the lushness of summer.
Photography, as an art and a science, has undergone a remarkable transformation since its inception. From the early days of black-and-white film to the digital revolution, the evolution of photography has been driven by technological advancements, creative innovation, and changing cultural landscapes. Renowned photographer Yvette Heiser talks about-How Photography Has Evolved Over the Years has witnessed and embraced these changes throughout her career. In this piece, she shares her insights on how photography has evolved over the years, highlighting the key milestones and innovations that have shaped this dynamic field.
The Beginnings: The Dawn of Photography
The journey of photography began in the early 19th century with the invention of the daguerreotype by Louis Daguerre in 1839. This process, which involved exposing a silver-coated copper plate to light, produced a single, highly detailed image. "The daguerreotype was a ground-breaking innovation," Yvette Heiser explains. "It marked the beginning of capturing moments in time, creating a tangible record of reality."
The Film Era: The Art of Analogy Photography
The late 19th and early 20th centuries saw significant advancements in film photography, with the introduction of roll film and portable cameras. George Eastman's invention of the Kodak camera in 1888 revolutionized photography by making it accessible to the masses. "The Kodak camera democratized photography," Yvette notes. "It allowed everyday people to capture their own memories and experiences, shaping the way we document our lives."
The Digital Revolution: Transforming Photography
The advent of digital photography in the late 20th century marked a paradigm shift in the field. The introduction of digital sensors, memory cards, and post-processing software revolutionized the way images were captured, stored, and edited. "Digital photography opened up a world of possibilities," Yvette says. "It provided unprecedented control over the image-making process, from shooting to editing."
The Rise of Smartphone Photography: Capturing Moments on the Go
The proliferation of smartphones with high-quality cameras has further transformed the landscape of photography. With advanced features such as multiple lenses, computational photography, and AI-enhanced processing, smartphones have made photography more accessible than ever before. "Smartphones have democratized photography even further," Yvette observes. "Everyone now has a powerful camera in their pocket, capable of capturing stunning images."
Conclusion: A Journey of Discovery and Innovation
Yvette Heiser's journey into the beauty and impact of filters in photography is a testament to the transformative power of these tools. From enhancing natural landscapes to exploring creative effects and embracing digital innovation, filters have played a pivotal role in shaping her artistic vision and elevating her work. For aspiring photographers, Yvette's journey serves as an inspiration to experiment, innovate, and harness the full potential of filters to create images that are not only visually stunning but also deeply meaningful.
#wedding#moments#photographer#camera#photography#yvette heiser#childphotography#pictures#events#photographytips
14 notes
·
View notes
Text
Landscape Photography Tips: How to Choose the Right Gear for Outdoor Photos?
Landscape photography is one of the most rewarding and breathtaking forms of photography, allowing photographers to capture the beauty of nature in its purest form. Whether you're photographing mountains, forests, or coastlines, the right techniques and equipment can significantly enhance the quality of your shots. Mastering landscape photography tips will help you take stunning outdoor images with perfect composition, clarity, and lighting. In this guide, we'll explore essential tips, including selecting the best camera, choosing the right lens, must-have accessories, and using filters to elevate your landscape shots. Whether you're a beginner or a seasoned photographer, these tips will enhance your photography skills.
Landscape Photography Tips: Selecting the Best Camera for Outdoor Shots
Choosing the right camera is the first step in capturing high-quality landscape photos. While smartphones have improved, a dedicated camera provides superior control over settings like aperture, shutter speed, and ISO. DSLR and mirrorless cameras are the best options due to their large sensors, which produce high-resolution images with excellent dynamic range. Full-frame cameras, such as the Canon EOS R5 or Sony A7R IV, capture more detail and handle low-light conditions better. APS-C cameras are also great for landscape photography tips if you're looking for a more affordable option. Prioritize weather-sealed cameras to protect against dust and moisture, especially in rugged outdoor environments.
Choosing the Right Lens for Stunning Landscape Photography
Selecting the appropriate lens is crucial for capturing breathtaking landscape shots. Wide-angle lenses, such as a 16-35mm, are ideal for including vast landscapes in a single frame. They create a sense of depth and scale, making them popular for landscape photographers. Prime lenses, like a 24mm or 35mm, provide sharpness and excellent image quality. Telephoto lenses (70-200mm) are useful for capturing distant subjects, such as mountains or wildlife within a landscape. Investing in high-quality glass with low distortion ensures your images remain sharp and true to life. A lens with a wide aperture (f/2.8 or f/4) allows for better light control.
Essential Gear for Landscape Photography: What You Need to Get Started
Aside from a camera and lens, essential gear is necessary to enhance your landscape photography. A sturdy tripod is a must-have for stability, especially when using long exposure techniques. A remote shutter release minimizes vibrations when taking shots. Carry extra batteries and memory cards to avoid running out of power or storage. A cleaning kit ensures your lens remains free from dust and moisture. A rain cover protects your camera in unpredictable weather conditions. A reliable GPS tracker helps locate stunning photo spots. Proper gear improves your shooting experience, making your photography sessions more productive and enjoyable.
Landscape Photography Tips: Importance of Tripods for Stability and Clarity
A tripod is one of the most essential tools for landscape photography, ensuring sharp and stable shots, especially in low-light conditions. When using slow shutter speeds for long exposures, a tripod prevents camera shake and motion blur. Carbon fiber tripods are lightweight yet sturdy, making them ideal for outdoor use. Adjustable legs and ball heads provide flexibility when shooting on uneven terrain. Tripods also allow for precise framing and composition, making it easier to capture panoramas. A good tripod paired with a remote shutter release can significantly improve the quality of landscape shots, resulting in clearer and more professional-looking images.
Must-Have Accessories for Landscape Photography Success
Accessories can make a significant difference in landscape photography. A polarizing filter reduces glare and enhances sky contrast. Neutral density (ND) filters allow for longer exposures, creating smooth water and cloud motion. A lens hood prevents lens flare and enhances image contrast. A weatherproof camera bag protects gear from harsh conditions. Portable reflectors help balance lighting in shadowed areas. A headlamp is useful for early morning or nighttime shoots. Investing in the right accessories ensures better image quality and more creative flexibility, allowing photographers to capture landscapes in diverse conditions with ease and efficiency.
How to Choose Filters to Enhance Your Landscape Photos?
Filters are essential tools in landscape photography, enhancing colors, contrast, and exposure balance. A circular polarizer deepens blue skies, reduces reflections, and makes colors more vibrant. Graduated ND filters balance exposure between the bright sky and darker land. Full ND filters allow for longer exposure times, producing soft, ethereal effects in moving water and clouds. UV filters protect the lens from dust and scratches while improving clarity. High-quality glass filters with multi-coating ensure the best image quality. Understanding how to use filters effectively can transform landscape photos, adding depth, drama, and a more dynamic look to your shots.
Selecting the Right Backpack for Carrying Your Landscape Photography Gear
A reliable backpack is essential for carrying your landscape photography gear safely and comfortably. Look for a backpack with padded compartments to protect cameras, lenses, and accessories. A weatherproof design keeps equipment safe from rain and dust. Ergonomic straps and weight distribution features make long hikes more manageable. Some backpacks have side access for quick gear retrieval, while others include tripod holders for convenience. Lightweight yet durable materials ensure comfort without sacrificing protection. Choosing the right backpack ensures that your photography gear remains organized, accessible, and well-protected, allowing you to focus on capturing stunning landscape shots without worrying about damage.
Conclusion
Landscape photography is an incredible way to capture nature’s beauty, but it requires the right techniques and equipment to achieve stunning results. By selecting the best camera, choosing high-quality lenses, using essential gear like tripods and filters, and investing in a sturdy backpack, photographers can enhance their skills and capture breathtaking images. Following these landscape photography tips will help you create visually stunning, well-composed, and technically superior photos. Whether you're a beginner or an experienced photographer, continuously refining your approach will lead to more dynamic and captivating landscape shots that showcase nature in its finest detail.
0 notes
Text
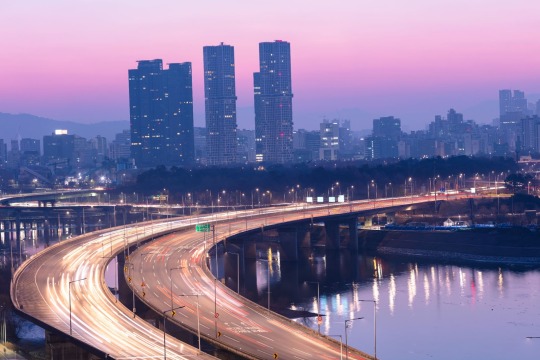
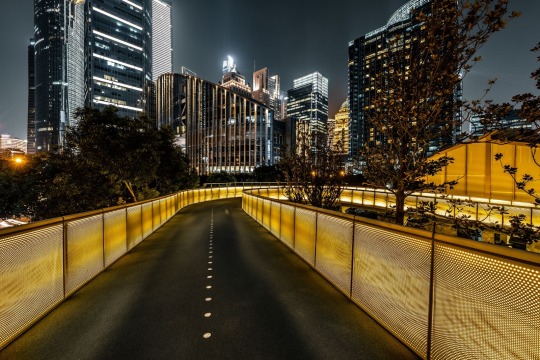
5 Tips for Captivating Cityscape Photography
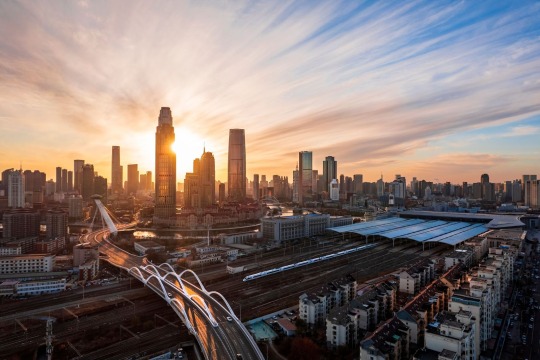
To capture enchanting cityscapes photography, we should use leading lines and the rule of thirds for balanced compositions. A full-frame camera paired with a wide-angle lens allows for stunning vistas. Light is our best friend; golden hours create warmth, while long exposures at night add vibrancy. Unique perspectives, like reflections or elevated angles, can enhance our shots. Finally, let’s navigate practical challenges by using sturdy gear and keeping an eye on our surroundings. There’s so much more to explore!
Mastering Composition Techniques
In cityscape photography, composition is key. Try incorporating leading lines that draw the viewer’s eye into the scene. The rule of thirds can create balance and interest in your shots, helping to break away from static framing.
Experiment with unique perspectives like reflections in glass buildings or water to add depth. Symmetry can evoke a sense of order amidst the chaos, and architectural patterns create visual rhythm. Additionally, long exposures can bring motion to the image, making bustling streets look ethereal.
Choosing the Right Gear
Choosing the right gear can greatly impact our cityscape photography experience.
To capture stunning urban vistas, we should consider using a full-frame camera, which excels in low light and offers a broader dynamic range. Pair it with a wide-angle lens, like a 24mm prime or 16-35mm zoom, to encompass sweeping scenes.
A sturdy tripod is essential for sharp images, especially in low-light conditions, so opting for a carbon fiber model can make a difference. Additionally, using a neutral density filter can help us achieve longer exposures without overexposing our shots.
With these tools in hand, we can elevate our photography and reveal the beauty of the cities we explore.
Let’s gear up and get shooting!
Harnessing the Power of Light
How can we truly capture the essence of a cityscape? By harnessing the power of light, we transform ordinary scenes into enchanting images.
We should aim for the golden hours—early mornings or late afternoons—when the sun’s low angle bathes our urban landscapes in a warm glow. This light enhances colors and creates depth, making glass towers and bustling streets come alive.
We can also experiment with night photography, using long exposures to capture vibrant city lights. Keeping our cameras steady with a tripod is essential here.
By understanding how light interacts with our surroundings, we elevate our cityscape photography, revealing the hidden beauty that pulses through the heart of the city.
Let’s embrace this dynamic element in our work!
Exploring Unique Perspectives

While exploring unique perspectives in cityscape photography, we can reveal stunning compositions that showcase our urban environments in new ways.
Let’s experiment with different angles and viewpoints to capture eye-catching images. Elevating our shooting positions can transform skyline captures, while incorporating foreground elements adds depth and intrigue.
We should also consider using mid-range lenses, as they effectively frame single landmarks without distortion. By altering our distance from subjects, we can change perspectives for creative results.
Remember to maintain a straight horizon line for professionalism in our compositions. Each fresh viewpoint invites us to discover the beauty and complexity of our cities, making our photographs truly enchanting.
Let’s embrace this exploration for unforgettable urban imagery!
Navigating Practical Challenges
Cityscape photography can come with its challenges. Sometimes, tripods aren’t allowed, so consider using a hard-shell backpack for stability. Weather, like rain or stormy skies, can add drama to your photos, but be sure to protect your gear.
Being in an urban environment means staying aware of your surroundings for safety. A secure bag can keep your gear safe, and having a buddy during night shoots can enhance both safety and creativity.
What People Are Saying About Maps Studio
At Maps Studio, we take pride in the positive feedback we receive from our clients. Here are some of the reviews shared across various platforms like Google My Business. You can check out more on our website Maps Studio.


Frequently Asked Questions
What Are Common Mistakes to Avoid in Cityscape Photography?
In cityscape photography, we often overlook composition, neglect lighting, and fail to scout locations. Let’s remember to plan our shots, consider the time of day, and frame our subjects thoughtfully for impactful images.
How Do I Edit Cityscape Photos for Enhanced Impact?
When we edit cityscape photos, we enhance impact by adjusting contrast and saturation, sharpening details, and cropping for better composition. Let’s also experiment with filters to create mood and highlight unique urban features effectively.
Can I Shoot Cityscapes With a Smartphone?
Absolutely, we can shoot stunning cityscapes with our smartphones! They offer impressive capabilities these days, allowing us to capture vibrant details and unique perspectives. Let’s get out there and explore our urban environment creatively!
What Are the Best Times of Year for Cityscape Photography?
We believe the best times for cityscape photography are during spring and fall. The light’s softer, colors pop beautifully, and the weather’s often pleasant, allowing us to capture stunning urban scenes without extreme temperatures.
How Do I Find Hidden Urban Photography Spots?
To find hidden urban photography spots, we can explore lesser-known neighborhoods, consult local photography groups, and use apps that highlight unique locations. Let’s wander off the beaten path and discover hidden gems together!
Conclusion
In summary, cityscape photography offers endless opportunities to capture the soul of urban life. By mastering composition techniques, selecting the right gear, harnessing light, exploring unique perspectives, and maneuvering practical challenges, we can elevate our photography skills. Let’s keep experimenting and pushing our creative boundaries as we explore the vibrant streets and stunning skylines. Together, we can transform our images into enthralling works of art that reflect the beauty of our cities. Happy shooting!
and let our creativity shine through every click of the shutter!
Visit Mapsstudio for more information about photography.
Note: We love sharing creative inspiration, photography tips, and industry insights to help you capture life’s best moments! However, the services, styles, and equipment mentioned in our articles are for informational purposes only and may not reflect our current offerings. For the latest on our photography services and portfolio, visit Maps studio. Let’s create something beautiful together!
#map design studio#maps modeling studio#maps modeling studio photos#maps modeling studio reviews#maps nyc modeling#maps studios boston#modeling studio#maps studio nyc#modeling photography studio#Cityscape Photography
0 notes
Text
Price: [price_with_discount] (as of [price_update_date] - Details) [ad_1] Product Description 【Shoot Like A Pro DSLR】This clip-on filter kit from K&F Concept includes a K&F Concept Nano-K series variable ND2-ND400 neutral density filter and a clip for phone, it is fit for travel shots, street photography, outdoor landscape, and time-lapse photography, Instagram, weddings, vacations, and other fun shooting, etc. 【K&F Concept 52mm Nano-K Series Variable ND2-ND400 Filter 】Made of top optical glass and aluminum alloy frame, adopt 18 layer MRC coating, with 1 to 9 stops of adjustable light reduction and 360-degree rotation for precise dimming settings, this filter is perfect for diverse scenarios. (Note: High stops may cause a cross-pattern effect, commonly known as an "X black cross." This phenomenon is natural and temporary, occurring due to the adjustable ND filter's interaction with certain lenses and focal lengths.) 【Light Reduction】The variable ND2-ND400 filter helps reduce the amount of light reaching the lens without affecting the color. Applies slow shutter speed under strong sunlight exposure. 【Widely Compatibility】The clip can be clamped on most smartphones to take pictures like a professional SLR camera. The 52mm VND filter can also work with the DSLR cameras with ø 52mm lens thread. 【Quick Install & Easy Operation】Simply screw the variable ND filter on the phone clip, then clamp it on your phone, rotate the filter to a desired stop according to the light condition and start taking photos. During a photo shoot, easily rotate the filter to adjust light exposure for different effects [ad_2]
0 notes
Text
Must-Have Drone Accessories for an Enhanced Flying Experience
Drones have revolutionized photography, videography, and even recreational flying. Whether you're a professional drone pilot or a hobbyist, the right accessories can significantly improve your drone’s performance, extend its flight time, and enhance your overall experience. Here’s a guide to some essential drone accessories that every drone owner should consider.
1. Extra Batteries for Extended Flight Time
One of the biggest limitations of drones is their battery life. Most drones offer a flight time of 20-30 minutes per charge, which isn’t always enough for capturing stunning aerial shots or completing a project. Investing in extra batteries ensures you can fly longer without constant recharging.
2. High-Quality Propellers
Propellers are crucial for stable flight and maneuverability. Having a spare set of high-quality, durable propellers can save you from being grounded due to damage from crashes or rough landings. Some propellers are designed to reduce noise and improve efficiency, making them a worthy upgrade.
3. ND Filters for Better Aerial Photography
Neutral Density (ND) filters help control the amount of light entering your drone’s camera lens, improving image quality, especially in bright conditions. They reduce glare and motion blur, allowing for smoother video footage and sharper photos.
4. Landing Pad for Safe Takeoff and Landing
A portable landing pad provides a clean and stable surface for takeoff and landing, protecting your drone from dust, dirt, and uneven ground. It’s particularly useful when flying in sandy, grassy, or rocky areas.
5. Carrying Case for Protection and Portability
A sturdy carrying case keeps your drone and accessories organized and protected from damage while traveling. Look for a waterproof and shockproof case with custom compartments for batteries, propellers, and other gear.
6. GPS Tracker for Lost Drones
Losing a drone can be a nightmare, especially if it crashes in an unknown location. A GPS tracker attaches to your drone, allowing you to track its location in real-time and recover it quickly if it goes missing.
7. FPV Goggles for Immersive Flying
First-Person View (FPV) goggles give you a real-time aerial view from your drone’s perspective, making flying more immersive and exciting. They’re a must-have for drone racing and cinematic shots.
Final Thoughts
Drone accessories can enhance flight time, improve safety, and take your aerial photography to the next level. Whether you're flying for fun or professionally, investing in these must-have accessories will ensure a smoother and more enjoyable experience.
0 notes