#OS X 10.9
Explore tagged Tumblr posts
Visit Tumblr Blog
Explore Tumblr blogs with no restrictions, modern design and the best experience.
Last Seen Tumblr Blogs


Fun Fact
The KCSC sent more than 20K requests to delete posts related to prostitution and porn to Tumblr from January to June 2017.
Photo

Pantum P2512W Mono Laser Printer 22ppm WiFi Model: P2512W Print Speed: 22ppm(A4) / 23ppm(Letter) First print out time (FPOT): Maximum monthly volume 15000 pages Recommended monthly volume: 2000 pages Resolution(dpi): 1200x1200 Print languages: GDI Duplex Mode: Manual Paper input: 150 Paper output: 100 Media type: Plain, Thick, Transparency, Cardstock, Label, Envelope, Thin Dimensions (WxDxH): 3.37 x 2.2 x 1.78 cm Weight (kg): 4.75kg Noise Printing: 52dB Standby: 30dB Power Consumption Printing: Average 370W Ready: 38W Sleep Mode: Less than 2W Operating system compatibility: Microsoft Windows Server 2003/Server2008/Server2012/XP/Vista/Win7/Win8/Win8.1/Win10a3a832/64 Bita3a9 Mac OS 10.9/10.10/10.11/10.12/10.13/10.14/10.15/11.1/11.3/11.4a3bb Linuxa3a814.04&16.04&18.04a3a9a3a832/64 Bita3a9 Connectivity: Hi-Speed USB 2.0; WiFi 802.11b/g/n Processor speed: 600MHz Memory: 128MB Starter Consumable: PG-208Ka3a81600a3a9 Standard Consumable: PG-208KEVa3a81600a3a9PG-209KEVa3a81600a3a9 Refill Kit: PG-208Ka3a81600a3a9 What's in the box 1 x Printer 1 x Printer Cable
0 notes
Text
طريقة الوصول إلى الخوادم ومحركات الأقراص البعيدة عبر Finder على نظام Mac بسهولة
يعد Finder على نظام Mac أداة قوية تتيح لك الوصول إلى الخوادم ومحركات الأقراص البعيدة ومشاركات الشبكة بكل سهولة. سواء كنت تعمل في بيئة شبكية أو تحتاج إلى الوصول إلى ملفات مخزنة على خادم بعيد، فإن Finder يوفر طريقة بسيطة وفعالة للقيام بذلك. في هذا المقال، سنستعرض خطوات سهلة لتمكين هذه الميزة واستخدامها لتحسين إنتاجيتك وإدارة ملفاتك بشكل أفضل.
يمكنك توصيل جهاز ماك الخاص بك بأجهزة كمبيوتر مشتركة تعمل بنظامي ويندوز ولينكس، ومحركات أقراص شبكية، وخوادم بعيدة عبر بروتوكولات قياسية مثل SMB. تابع القراءة لمعرفة كيفية الوصول إلى مشاركات الشبكة على نظام macOS ببضع نقرات لمشاركة الملفات بسهولة.
بروتوكولات مشاركة الملفات: SMB مقابل CIFS مقابل NFS
يدعم نظام macOS بروتوكولات كتلة رسائل الخادم (SMB)، ونظام ملفات الإنترنت المشترك (CIFS)، ونظام ملفات الشبكة (NFS)، من بين بروتوكولات مشاركة الملفات الأخرى. لم نذكر بروتوكول Apple Filing Protocol (AFP)، المعروف سابقًا باسم بروتوكول AppleTalk Filing Protocol، والذي كان الخيار الأمثل لمشاركة الملفات والطابعات مع أجهزة كمبيوتر Apple التي تستخدم نظام ملفات Apple (APFS) المتوافق مع محركات أقراص الحالة الصلبة (SSD)، أو نظام الملفات الهرمي (HFS+) الأقدم لمحركات الأقراص الداخلية الميكانيكية والهجينة. نظرًا لأن Apple أوقفت استخدام AFP، لم يعد بإمكانك استخدامه لمشاركة وحدات التخزين الداخلية أو تركيب وحدة التخزين المتصلة بالشبكة (NAS). على الرغم من أن دعم AFP على نظام macOS ليس له تاريخ انتهاء صلاحية، إلا أنه يُنصح بشدة باستخدام SMB كلما أمكن لضمان التوافق المستقبلي. لم تدعم Apple خوادم AFP منذ إصدار macOS 11.0 Big Sur عام 2020. لا يزال نظام CIFS يُستخدم في حلول تخزين البيانات مثل أجهزة NAS، ولكنه أصبح الآن قديمًا إلى حد كبير نظرًا لاعتماد الصناعة على SMB. يُعد NFS الأنسب لخوادم Linux وUNIX، ويُستخدم عادةً لمشاركة الملفات من خادم إلى خادم. لا يعمل NFS بشكل جيد مع عملاء مشاركة الملفات على نظام Mac. يدعم Windows إصدارات متعددة من عميل وخادم NFC. يُعد SMB البروتوكول المف��ل للوصول إلى مشاركات شبكة Windows والملفات والعملاء. يتوافق macOS تمامًا مع أحدث مواصفات SMB 3. ونظرًا لدعم SMB في جميع الأجهزة تقريبًا، سيستخدمه معظم مستخدمي Mac للاتصال بالأجهزة البعيدة ومشاركات الشبكة. SMB هو بروتوكول Apple الافتراضي للاتصال بالخوادم على جميع إصدارات macOS، بدءًا من Mac OS X 10.9 Mavericks (الإصدار 2013) فصاعدًا. يجب تفعيل مشاركة الملفات على أجهزة كمبيوتر Mac وWindows المشتركة لتكون مرئية على الشبكة وتسمح لك بالاتصال بها.
الوصول إلى الخوادم وأجهزة الكمبيوتر المشتركة ومحركات أقراص الشبكة على جهاز Mac
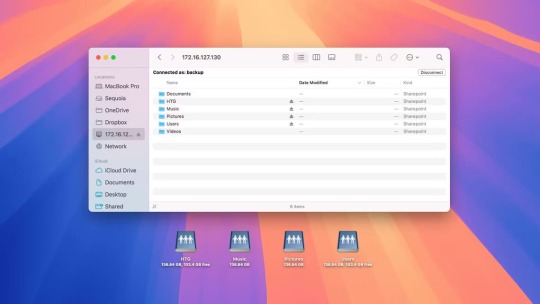
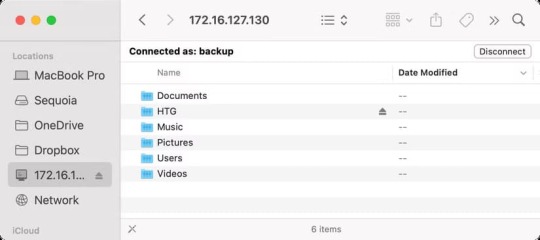
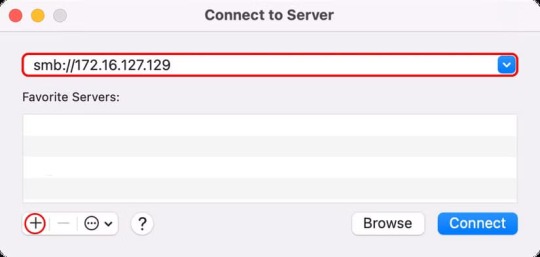
يمكنك توصيل جهاز Mac بأجهزة الكمبيوتر المشتركة ومجلدات الشبكة والخوادم البعيدة بطريقتين: أمر "الاتصال بالخادم"، الذي يتطلب إدخال عنوان مشاركة الشبكة يدويًا؛ ومتصفح شبكة مدمج يتيح لك تصفح مشاركات الشبكة بنفس طريقة تصفح الملفات والمجلدات المحلية على جهاز Mac. الاتصال بخادم أو جهاز كمبيوتر مشترك عبر عنوان شبكته افتح نافذة Finder جديدة أو حدد سطح المكتب. انقر على "انتقال" > "الاتصال بالخادم" في القائمة أو اضغط على Command+K على لوحة المفاتيح. في نافذة "الاتصال بالخادم"، أدخل عنوان الشبكة للكمبيوتر أو الخادم أو محرك الشبكة، ثم اضغط على زر "الاتصال".

إذا كنت تعرف معلومات تسجيل الدخول لمشاركة الشبكة، فاختر "مستخدم مسجل"، وأدخل بيانات اعتماد مشاركة الشبكة في حقلي "الاسم" و"كلمة المرور" (وليس اسم المستخدم وكلمة المرور لحساب macOS)، ثم اضغط على زر "اتصال". وإلا، فحاول الاتصال باستخدام خيار "ضيف" إذا كان الكمبيوتر المشترك يسمح بوصول الضيف.

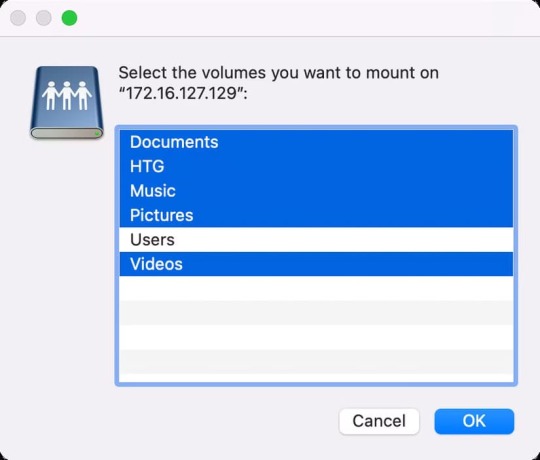
ضع علامة في المربع بجوار "تذكر كلمة المرور هذه في سلسلة مفاتيحي" لحفظ تسجيل الدخول هذا، لتتمكن من الاتصال بهذه الشبكة المشتركة في المستقبل دون الحاجة إلى كتابة كلمة المرور. إذا توفرت عدة مجلدات أو محركات أقراص مشتركة في تلك الوجهة، فسيُطلب منك اختيار المجلدات أو محركات الأقراص التي تريد تحميلها. اضغط باستمرار على مفتاح Command للنقر على عدة عناصر، ثم انقر على زر "موافق".
تظهر وحدات التخزين المركبة كأيقونات محرك الشبكة على سطح المكتب.

لعرض خوادمك المُثبّتة، ومشاركات الشبكة، ومحركات الأقراص على سطح المكتب للوصول السريع، اختر Finder ثم انقر على Finder > Preferences في القائمة. ثم اختر علامة التبويب "عام" وفعّل خيار "الخوادم المتصلة". استخدم متصفح الشبكة المدمج للاتصال بشبكة مشاركة يمكنك أيضًا الاتصال بأجهزة الكمبيوتر والخوادم ومحركات الأقراص التي يمكن اكتشافها على شبكتك أو جزء منها ضمن منطقة الشبكة أو مجموعة العمل نفسها التي يستخدمها جهاز Mac.
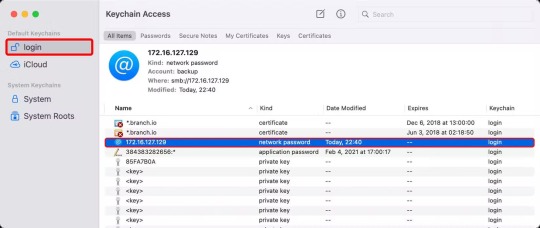
افتح نافذة Finder جديدة بالنقر على أيقونة Finder في شريط الأدوات، ثم اختر خيار "الشبكة" من قسم "المواقع" في الشريط الجانبي. إذا لم يظهر هذا القسم، فقم بتوسيعه بوضع المؤشر فوق "المواقع" في الشريط الجانبي والنقر على السهم الذي يظهر.
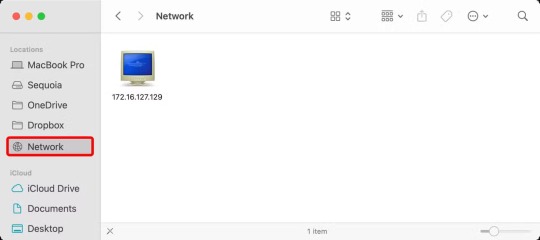
ألا يوجد خيار شبكة في الشريط الجانبي لـ Finder؟ تأكد من تحديد خيار "الخوادم المتصلة" ضمن تبويب الشريط الجانبي في إعدادات Finder. ستظهر مشاركات الشبكة المكتشفة في نافذة Finder بعد قليل. انقر نقرًا مزدوجًا على الشبكة التي ترغب في الاتصال بها، ثم اضغط على زر "الاتصال باسم" في الزاوية العلوية اليمنى.
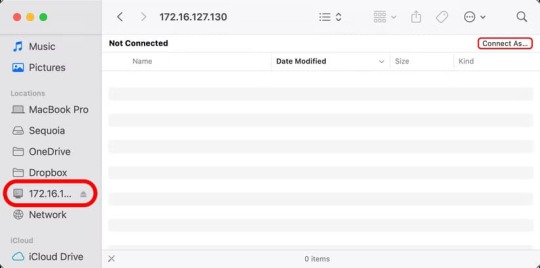
ستظهر لك نافذة "الاتصال بالخادم" في Finder. اختر ما إذا كنت ترغب بالاتصال كضيف أو مستخدم مسجل، ثم اضغط على زر "اتصال"، وأدخل بيانات اعتماد مشاركة الشبكة (إذا طُلب منك ذلك)، وحدد وحدات التخزين أو المجلدات المشتركة المراد تحميلها، ثم اضغط على زر "موافق".
كيفية إعادة الاتصال بالخوادم المستخدمة مؤخرًا
إذا كنت تستخدم شبكات مشاركة محددة بشكل متكرر، يمكنك إعادة الاتصال بأي منها بسرعة بأربع طرق مختلفة. سجل اتصالاتك إذا كنت متصلاً سابقًا بشبكة مشاركة، فانقر على السهم في نافذة "الاتصال بالخادم" لتحديدها من السجل بدلاً من إعادة كتابة كلمة المرور.

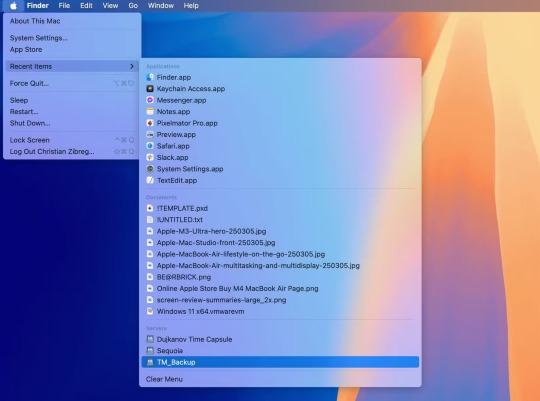
نصيحة يمكن لأي شخص يستخدم جهاز ماك الخاص بك رؤية الخوادم وأجهزة الكمبيوتر التي اتصلت بها مؤخرًا. لتعزيز خصوصيتك، قد ترغب في مسح سجل اتصالك من حين لآخر: انقر على أيقونة ... (علامة الحذف) في نافذة "الاتصال بالخادم"، واختر "مسح الخوادم الحديثة" من القائمة، ثم اضغط على زر "موافق" لتأكيد العملية. قائمة العناصر الحديثة يمكنك أيضًا النقر على قائمة Apple، واختيار "العناصر الحديثة"، ثم تحديد مشاركة الشبكة التي اتصلت بها سابقًا من القائمة الفرعية ضمن قسم "الخوادم".
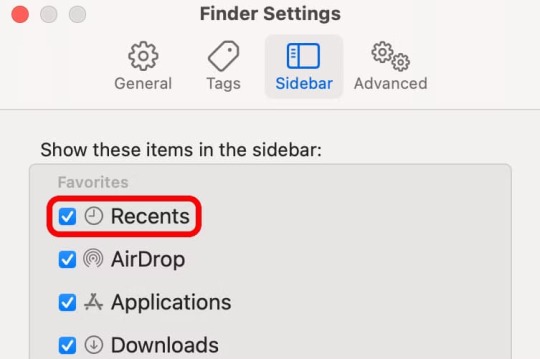
نصيحة إذا كنت ترغب في مسح قائمة العناصر الحديثة لأسباب تتعلق بالخصوصية، فاختر خيار "مسح القائمة" أسفل القائمة. الشريط الجانبي لـ Finder لتسريع الوصول، أضف عناصرك الحديثة إلى الشريط الجانبي لـ Finder. للقيام بذلك، انقر على سطح المكتب أو افتح نافذة Finder جديدة، ثم انقر على قائمة Finder، واختر "الإعدادات"، ثم اختر علامة التبويب "الشريط الجانبي"، وحدد المربع بجوار "العناصر الحديثة".
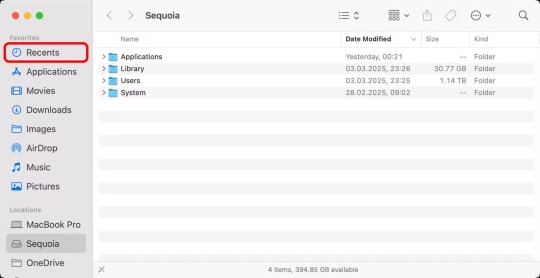
أصبح قسم "التطبيقات الأخيرة" متاحًا الآن في الشريط الجانبي لنوافذ Finder.
لتبديل الشريط الجانبي في Finder، اختر "إظهار الشريط الجانبي" أو "إخفاء الشريط الجانبي" من قائمة "عرض" في Finder، أو اضغط على Control+Command+S على لوحة المفاتيح. قائمة الخوادم المفضلة وفّر وقتك بإضافة مشاركات الشبكة التي تستخدمها بكثرة إلى مفضلاتك، لتتمكن من الاتصال بها بسرعة عبر قائمة الخوادم المفضلة في نافذة "الاتصال بالخادم".
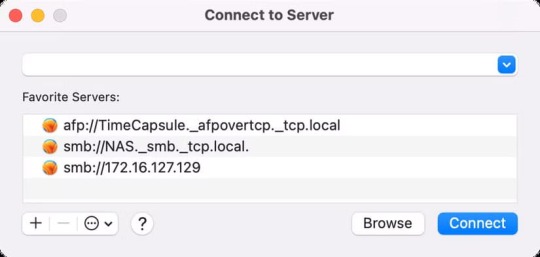
لإضافة مشاركة شبكة إلى المفضلة، أدخل عنوان شبكتها في نافذة "الاتصال بالخادم"، ولكن لا تنقر على زر "الاتصال". بدلاً من ذلك، اضغط على زر "+" في الزاوية السفلية اليسرى من النافذة.
يمكنك إلغاء إضافة خادم أو جهاز كمبيوتر محفوظ إلى المفضلة بسهولة؛ ما عليك سوى تحديده في القائمة والنقر فوق الزر - (ناقص).

كيفية تثبيت مشاركات الشبكة تلقائيًا
إذا كنت تستخدم أجهزة كمبيوتر أو خوادم أو محركات أقراص متصلة بالشبكة بشكل متكرر، مثل Synology Diskstation، للنسخ الاحتياطي ومشاركة الملفات، فمن المستحسن ضبطها للتثبيت تلقائيًا عند بدء تشغيل جهاز Mac. للقيام بذلك، ما عليك سوى إضافة أي مشاركات شبكة مطلوبة إلى عناصر تسجيل الدخول، وهي قائمة بالبرامج التي تفتح تلقائيًا عند تشغيل جهاز Mac. ولكن أولًا، يجب عليك توصيل جهاز Mac بالخادم أو محرك الأقراص/الكمبيوتر المتصل بالشبكة المطلوب بالنقر على خيار قائمة "انتقال" > "الاتصال بالخادم" في Finder واتباع التعليمات الواردة في القسم السابق. بعد ذلك، انقر على قائمة Apple واختر "إعدادات النظام" أو "تفضيلات النظام" على أجهزة Mac القديمة. اختر "عام" من الشريط الجانبي لإعدادات النظام، ثم انقر على "عناصر تسجيل الدخول والملحقات" على اليمين. إذا لم يظهر هذا الخيار، فمرر للأسفل. بعد ذلك، انقر فوق زر + (زائد) الموجود أسفل قائمة عناصر تسجيل الدخول الخاصة بك، وحدد سطح المكتب في الشريط الجانبي لـ Finder، واختر مشاركة الشبكة المثبتة لديك، وانقر فوق "فتح" لإضافتها إلى قائمة عناصر تسجيل الدخول الخاصة بك.

سيقوم جهاز ماك الخاص بك تلقائيًا بتثبيت هذا الخادم أو محرك الأقراص أو مشاركة الشبكة عند تسجيل الدخول إلى macOS وعرض أيقونته على سطح المكتب. كرر هذه الخطوات لأي مشاركات شبكة أخرى ترغب في تثبيتها تلقائيًا عند تسجيل الدخول.

كيفية إنشاء اختصارات لمشاركات الشبكة
يمكنك إضافة مشاركة شبكة كاختصار على سطح المكتب. أولاً، ثبّت مشاركة الشبكة باتباع الخطوات الموضحة في هذا البرنامج التعليمي، ثم حددها وانقر على "ملف" > "إنشاء اسم مستعار" من قائمة Finder، أو اضغط على Control+Command+A لإنشاء اسم مستعار على سطح المكتب. أعد تسمية الاسم المستعار حسب الحاجة، ويمكنك تخصيص أيقونته إذا لم تُعجبك أيقونة القرص الصلب الافتراضية.

أحبُّ استخدام أسماء مستعارة في نظام macOS لأنها تُثبِّت تلقائيًا محرك الأقراص أو الكمبيوتر أو القرص المتصل بالشبكة عند النقر عليه، مما يُشعرني وكأنني أتعامل مع مجلدات محلية على جهاز Mac. تبقى الأسماء المستعارة فعّالة بعد إعادة التشغيل حتى تُحذف، مما لا يُؤدي إلى حذف العنصر الأساسي المرتبط بها. نصيحة اسحب هذه الأسماء المستعارة إلى إعدادات النظام > عام > عناصر تسجيل الدخول والملحقات لتثبيت مشاركات الشبكة تلقائيًا عند تسجيل الدخول. أسرع طريقة للوصول إلى مشاركات الشبكة هي استخدام نافذة Finder. ما عليك سوى سحب مشاركة شبكة إلى اللوحة اليسرى من أي نافذة Finder لإنشاء اختصار مباشرةً في الشريط الجانبي لـ Finder.

لا يتطلب الأمر سوى النقر فوق اختصار الشريط الجانبي للاتصال بمشاركة الشبكة هذه.

أنا من أشد المعجبين بشريط Finder الجانبي. يُمكنني بسهولة إلغاء تحميل مشاركات الشبكة ومجلدات أخرى مباشرةً بالضغط على أيقونة الإخراج الصغيرة بجوار اختصار الشريط الجانبي.

نصيحة لإزالة اختصار الشريط الجانبي دون فصل وحدة التخزين، اسحب أيقونته من نافذة Finder حتى يظهر رمز "x"، ثم اتركه. مع تعدد مشاركات الشبكة، قد يزدحم سطح مكتبك. أنشئ مجلدًا جديدًا وضع فيه جميع اختصارات سطح المكتب. سيساعدك هذا على تنظيم سطح مكتبك المزدحم، وسيصبح لديك مجلد مخصص على سطح المكتب للوصول إلى جميع مشاركات الشبكة.
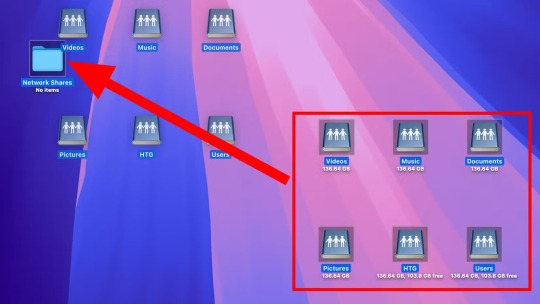
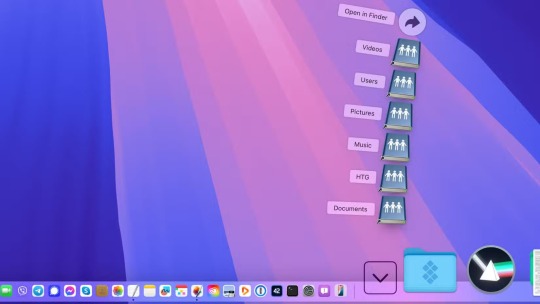
والآن، دعني أشاركك إحدى نصائح الطاقة المفضلة لدي - قم بإسقاط مجلد مشاركات الشبكة هذا على الجانب الأيمن من Dock في القسم بعد الفاصل الرأسي، حيث يوجد رمز سلة المهملات.

بالنقر المستمر على هذا الرمز، تظهر قائمة سهلة الاستخدام تعرض جميع مشاركات الشبكة لديك. والأفضل من ذلك، يتم تثبيت مشاركة الشبكة ديناميكيًا عند النقر عليها من هنا. وهكذا، لديك الآن طريقة فائقة السرعة للوصول إلى مشاركات الشبكة لديك!
نصيحة لتخصيص كيفية ظهور المجلد من شريط المهام، انقر مع الضغط على مفتاح Control على أيقونة شريط المهام، ثم اختر من بين خيارات "المروحة"، و"الشبكة"، و"القائمة"، و"التلقائي". لجعله يظهر كمجلد عادي بدلاً من مجموعة من الأيقونات، انقر على "مجلد" في قسم "العرض كـ".
تغيير بيانات اعتماد مشاركة الشبكة المحفوظة
أحفظ دائمًا بيانات اعتماد مشاركة الشبكة، لذا لا أضطر إلى إعادة كتابة كلمة المرور في كل مرة يتصل فيها جهاز ماك الخاص بي بها. ومع ذلك، إذا غيّرت أنت أو أي شخص آخر كلمة مرور الخادم أو القرص، فستحتاج إلى تحديث كلمة المرور المحفوظة يدويًا من جانبك، لأنها لا تُحدّث تلقائيًا. وإلا، فلن تتمكن من الوصول إلى الكمبيوتر أو القرص أو الخادم المشترك.

اضغط على Command+Space لفتح بحث Spotlight (أو اطلب من Siri فتحه)، ثم اكتب "Keychain Access"، وحدد التطبيق من نتائج البحث، واضغط على Enter لفتحه. ملاحظة يتم إيقاف استخدام Keychain Access تدريجيًا لصالح تطبيق كلمات المرور الجديد من Apple. في نظام macOS Sonoma والإصدارات الأقدم، كان Keychain Access موجودًا في مجلد التطبيقات/الأدوات المساعدة. أما في نظام macOS Sequoia، فقد وضعته Apple في مجلد /System/Library/CoreServices/Applications. سيتم سؤالك عما إذا كنت ترغب في فتح تطبيق كلمات المرور أو Keychain Access. انقر على "فتح Keychain Access" وامنح الإذن بالوصول باستخدام Touch ID أو كلمة مرور macOS.

عند فتح Keychain Access، حدد "تسجيل الدخول" ضمن "Default Keychain" في الشريط الجانبي، ثم انقر نقرًا مزدوجًا فوق مشاركة الشبكة المحفوظة على اليمين.
سيؤدي هذا إلى فتح لوحة تحتوي على معلومات تسجيل الدخول المحفوظة. انقر على مربع "إظهار كلمة المرور" في الأسفل، وأدخل كلمة مرور حساب مستخدم macOS الخاص بك، ثم اضغط على زر "السماح".

ستظهر كلمة المرور المحفوظة. اكتب كلمة مرور مشاركة الشبكة الجديدة وانقر على زر "حفظ التغييرات".
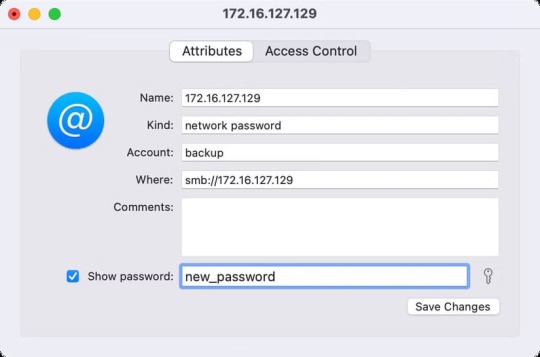
يمكنك الآن إغلاق التطبيق. بعد ذلك، سيستخدم الاتصال بمشاركة الشبكة هذه تلقائيًا كلمة المرور المُحدّثة من Keychain Access. ملاحظة لحذف بيانات اعتماد مشاركة الشبكة المحفوظة من جهاز Mac، حدد مشاركة الشبكة المحفوظة في Keychain Access، وانقر على "تحرير" > "حذف" في القائمة، أو اضغط على مفتاح Backspace، ثم انقر على "حذف" لتأكيد العملية.
استكشاف أخطاء مشاركات الشبكة وإصلاحها
قد يفشل الاتصال بمشاركات الشبكة لعدة أسباب. عادةً ما ستعرف أن هناك خطأً ما عندما يتعطل شريط التقدم عند الاتصال بمشاركة شبكة. في أحيان أخرى، لا يظهر أي مؤشر مرئي على تعذر إنشاء اتصال.

جرّب نصائح استكشاف الأخطاء وإصلاحها هذه إذا تعذر على جهاز ماك الاتصال بشبكة مشاركة. - تحقق من العنوان: تحقق جيدًا من عنوان المشاركة البعيدة التي أدخلتها بحثًا عن أي أخطاء إملائية. - تحقق من اسم المستخدم: هل اسم تسجيل الدخول الخاص بك مدرج في قائمة المستخدمين المسموح لهم؟ - تحقق من كلمة المرور: إذا تغيرت كلمة مرور مشاركة الشبكة، فاطلب من المسؤول كلمة المرور الجديدة وتأكد من تحديث كلمة المرور المحفوظة في Keychain. - تحقق من تنسيق العنوان: مع أن هذا لا يُفترض أن يُسبب مشكلة، تأكد من استخدام تنسيق مشاركة الشبكة الصحيح، مثل smb:// أو nfs://. - تحقق من الاتصال: هل جهاز ماك متصل بالإنترنت؟ هل أنت متصل باتصال Wi-Fi مستقر؟ هل كابل Ethernet يعمل؟ - تحقق من إعدادات مشاركة الملفات: تأكد من تفعيل مشاركة الملفات لمشاركة الشبكة؛ اطلب من المسؤول إيقافها ثم إعادة تفعيلها. - تحقق من الأذونات: إذا تم رفض منحك إذن الوصول إلى مشاركة شبكة، فاطلب من المسؤول منحك إذن الوصول إلى الملفات والمجلدات المشتركة. - إعادة التشغيل: إذا فشلت جميع الحلول الأخرى، فحاول إعادة تشغيل جهاز ماك، مما سيعيد تهيئة اتصالات الشبكة ويزيل الأخطاء المؤقتة. هناك طرق أخرى للاتصال بالمشاركات عن بُعد على جهاز ماك. على سبيل المثال، قد يرغب المستخدمون المتمرسون باستخدام Terminal لذلك. ولكن بالنسبة للغالبية العظمى من مستخدمي ماك، يُعد الاتصال عبر Finder أكثر من كافٍ للوصول إلى مشاركات الشبكة. الوصول إلى الخوادم ومحركات الأقراص البعيدة عبر Finder على نظام Mac يمكن أن يغير طريقة إدارتك للملفات ويعزز إنتاجيتك. باتباع الخطوات المذكورة في هذا المقال، ستتمكن من تحقيق ذلك بكل سهولة. جرب هذه الطريقة وشاركنا تجربتك في التعليقات: كيف ساعدك Finder في إدارة ملفاتك؟ ولمزيد من النصائح حول نظام Mac، تابع مقالاتنا القادمة. Read the full article
0 notes
Text
Price: [price_with_discount] (as of [price_update_date] - Details) [ad_1] 【4K HDMI Game Capture Card】: 1Goal game video capture card is designed with high-end smart chip, stylish and compact by decent Aluminum Alloy shell. Supports up to 4K@60fps HDMI input, plug and play let the device work instantly with stream media like OBS. Ideal for live streaming, gaming broadcast, video recording, conference rooms, etc. 【HD 1080P 60fps Signal Loop Out】: This HDMI capture card for Nintendo Switch has maximum HDMI output resolution up to 4K@30fps, and streams 1080p@60fps video signal through USB 3.0 port. It outputs a clean and clear excellent inage quality without frame lag. You can enjoy recording specific moments in video game adventures. 【3.5mm Microphone and Audio Input/Output Port】: You can connect the audio video capture device with your earphone with 3.5.mm audio out port, you can also connect the video capture device with 3.5mm Microphone so that you can stream your voice and record your voice by the ports easily. you can also use it to add external commentary when playing a game. 【Wide Compatible with Multiple Systems】: 4K PC capture card is suitable for Windows 7/ 8/ 10, Mac OS X 10.9 or above, Linux and many other systems. Compatible with PS4, Nintendo Switch/3DS, Xbox One, Camera, Webcame, DSLR, be real-time streaming on Twitch/Youtube/OBS/Potplayer/VLC more easily with your gameplay. Make sure your product have Type C 3.1 to support HDMI output, most of the phones and tablet have USB C 2.0 which doesn't support HDMI output. 【Quality service and Notice】: You will get 1xHDMI capture card, 1xUSB 3.0 cable, and 1xuser manual. Please note that the OBS Studio software needs to be restarted after audio settings are completed, otherwise it will cause no sound output. And you will get actual 1080p records by connecting USB port monitor after insert MIC/Audio Output devices [ad_2]
0 notes
Text
e-instruments – Grand Y Download

The quintessential piano sound for your productions. The Animator adds a top session player, and the Pentamorph is a pioneering sound design tool.
Overview
The Yamaha CFIIIS Concert Grand Piano delivers stunning dynamics and energetic clarity, making it an outstanding Kontakt instrument for all your piano needs.
Product Video
Session Keys Overview Watch Session Keys Overview
Session Keys Walkthrough Watch Session Keys Walkthrough
Audio Demos
Grand Y Jazz Concert
Grand Y Modern Concert
Grand Y Studio Ballad
Grand Y Studio Pop
The Grand Piano
Grand Y captures the clear, transparent, and dynamic sound of a Yamaha CFIIIS Concert Grand Piano. Rich overtones, a sparkling high end, and a powerful bass define the tonal fingerprints of this exceptional Kontakt instrument.
Two Characteristics
The Grand Y piano was recorded with meticulous attention to detail, including two distinct sample sets:
“Concert” Mode: Features the piano with an open lid, ideal for classical recordings.
“Studio” Mode: Features the piano with the lid removed, perfect for popular music applications.
Switch between the two as your creativity requires.
Pentamorph
The Pentamorph controller makes Session Keys Grand Y more than just a piano. This innovative tool allows you to transform the sound from a traditional piano to eerie atmospheres, mechanical sounds, and more—all with a single knob. It’s beautifully designed and incredibly powerful.
Animator
The Animator brings ideas to life with more than 400 flexible piano phrases that follow your harmonies. Adjust complexity and dynamics using the pitch bend and modulation wheels for a truly interactive session partner.
Smart Chord
Need help crafting harmonies? Smart Chord mode creates instant piano chords or riffs from single keys or pads. Just set the key of your song, and Smart Chord does the rest.
Design
The Session Keys Grand Y features a pure, minimalistic, and clean design, ensuring ease of use during intense music production sessions. Its interface helps you stay focused and inspired.
For more details on the design, explore the UI design case study.
Feature Summary
Instrument
Yamaha CFIIIS Concert Grand with two distinct sample sets:
Studio Mode: Lid removed for modern music.
Concert Mode: Open lid for classical recordings.
Control
Pentamorph: Transform the sound from mechanical to ethereal with a single knob.
Playability
Animator: Over 400 flexible piano phrases for inspiration and quick arrangements.
Smart Chord
Instant chords or riffs from single keys or pads to craft impactful progressions.
NKS Compatible
Native Instruments hardware integration for browsing, tagging, sound previews, and more.
Technical Specifications
Native Instruments NKS Compatible
24-bit, 44.1 kHz audio quality
System Requirements
Windows: 7, 8.1, or 10 (latest Service Pack, 32/64-bit) Intel Core 2 Duo or AMD Athlon 64 X2, 4 GB RAM
Mac: OS X 10.9, 10.10, or 10.11 (latest update) Intel Core 2 Duo, 4 GB RAM
Learn More
For detailed information and purchasing options, visit the official product page: https://soundbanks.io/product/e-instruments-grand-y/
#GrandY#eInstruments#GrandPianoVST#CinematicPiano#MusicProduction#PianoSounds#SoundLibrary#ExpressiveInstruments#FilmScoring#CreativeComposing#RoyaltyFreeSounds#EpicSoundtracks#PianoTextures#MusicForFilm#GameSoundtracks#HybridOrchestration#StudioEssentials#MusicForProducers#ModernPiano#ProfessionalPiano
0 notes
Text
XLN Audio Suite Full Bundle 2022 (MAC) Download

Unleash your creativity with the XLN Audio Suite Full Bundle 2022 for Mac, a comprehensive collection designed for professional music producers and enthusiasts. Featuring M1 support and optimized performance, this bundle includes some of the most powerful tools in music production, tailored exclusively for Mac users. Whether you're composing, mixing, or mastering, this suite has everything you need to craft industry-standard tracks.
What's Inside the XLN Audio Suite?
The bundle features five cutting-edge tools:
XLN Audio Addictive Drums 2: Build dynamic drum tracks with a vast library of kits and rhythms.
XLN Audio Addictive Keys: Access authentic, studio-quality keyboard sounds for any genre.
XLN Audio RC-20 Retro Color: Add vintage warmth and character to your mixes with this versatile effects plug-in.
XLN Audio Addictive Trigger: Revolutionize your drum mixing with smart, precise triggering and replacement technology.
XLN Audio XO: Explore beats in a revolutionary way, connecting drum samples and rhythm creation like never before.
Key Features of the XLN Audio Suite Full Bundle:
Software Type: Drum and Effects Plug-in
Platform: Exclusively for Mac
Upgrade/Full: Full Version Included
Download/Boxed: Digital Download for Instant Access
Bit Depth: 64-bit for pristine audio quality
Formats: Standalone, AAX, VST, AU compatibility ensures integration with all major DAWs
Hardware Requirements: Intel Multi-core Processor, 4GB RAM or more recommended
OS Requirements: Compatible with OS X 10.9 or later
Why Choose This Bundle?
This suite is more than just software; it’s a complete toolkit for turning ideas into reality. From drum programming to key melodies, retro soundscapes to sample organization, the XLN Audio Suite ensures you have everything at your fingertips. Its intuitive interface and premium features save time and effort, letting you focus on the music.
Instant Download & Lifetime Activation
With just a few clicks, download your copy and enjoy lifetime activation with no recurring fees. Start producing right away with seamless access to the most versatile audio tools available.
Download Now
Click the link below to secure your copy of the XLN Audio Suite Full Bundle 2022 (MAC): 👉 XLN Audio Suite Full Bundle 2022 Download
0 notes
Text
Introduction The Amazon Fire Max 11 is here, and it's Amazon's biggest, most powerful tablet yet. But does it live up to the expectations, or is it just another budget tablet with limited functionality? In this comprehensive Amazon Fire Max 11 review, we'll dive into every detail, from design and display quality to performance, battery life, and more. Whether you’re considering this tablet for entertainment, productivity, or even as a potential laptop alternative, we’ll help you decide if it’s the right choice. Design and Build Quality: Sleek and Sturdy Amazon has stepped up its design game with the Fire Max 11. This tablet boasts a modern, minimalist design with an aluminum body—a major upgrade from the plastic seen in earlier Fire models. The tablet is impressively thin and lightweight, making it comfortable to hold during long reading or streaming sessions. The sleek finish, combined with a robust frame, makes the Fire Max 11 feel much more premium than Amazon’s previous tablets. Built to Last The Amazon Fire Max 11 also comes with reinforced glass on the display, which provides added durability. Amazon claims it’s twice as durable as the iPad 10.9 in drop tests. This rugged build quality is especially useful if you’re buying a tablet for a child or if you often travel with it. Display: A Step Up from Previous Models With an 11-inch, 2000 x 1200 resolution display, the Amazon Fire Max 11 brings a substantial upgrade to viewing quality. The colors are vibrant, and the brightness level is decent, making it suitable for both indoor and outdoor use. The display supports up to 400 nits of brightness, which is enough for most viewing scenarios, though it may struggle under direct sunlight. Visual Quality and Responsiveness The display’s 60Hz refresh rate keeps things smooth but isn’t comparable to higher-end tablets. Scrolling feels fluid, and for casual gaming or streaming, it’s perfectly fine. However, if you’re used to a 90Hz or 120Hz refresh rate, you might notice a slight lag. Performance: Can It Handle Heavy Lifting? Powered by the MediaTek MT8188J octa-core processor, paired with 4GB of RAM, the Fire Max 11 is Amazon’s most powerful tablet to date. While it isn’t a high-performance powerhouse like the latest iPads, it’s more than capable for everyday tasks. Multitasking and App Performance The tablet handles multitasking quite well, with minimal lag when switching between apps. Streaming, web browsing, and even casual gaming are smooth experiences. However, heavy-duty apps or intensive games may push the tablet beyond its limits. Fire OS: Amazon’s Custom Take on Android Fire Max 11 runs on Fire OS, a heavily modified version of Android. The interface is straightforward and easy to use, with a home screen filled with Amazon’s content offerings. Limited App Selection and Customization One downside is that Fire OS doesn’t offer the Google Play Store by default, meaning you’re limited to apps from the Amazon Appstore. However, you can sideload apps or access the Google Play Store through unofficial methods if you’re tech-savvy. Battery Life: All-Day Use with Ease One of the standout features of the Fire Max 11 is its impressive battery life. With an estimated 14 hours of usage on a single charge, this tablet is perfect for long days of streaming, reading, or web browsing. Charging and Battery Efficiency The Fire Max 11 supports 15W fast charging, though the included charger is only 9W. Upgrading to a faster charger could save significant charging time, but the slower charge speed is something to consider if you’re in a hurry. Audio Quality: Good, Not Great Amazon Fire Max 11 features dual speakers with Dolby Atmos support, which enhances audio quality during movies or music playback. The sound is clear and decently loud, but it lacks the depth you might find in higher-end tablets. Perfect for Casual Media Consumption The speakers are perfectly suitable for casual viewing or listening.
However, for immersive audio, especially with music or high-quality streaming, using headphones or external speakers would be beneficial. Productivity Features: Is It Good for Work? Amazon has positioned the Fire Max 11 as a potential productivity tool, offering an optional keyboard and stylus. The keyboard attachment is comfortable to type on, though it lacks the full functionality of a laptop keyboard. The stylus is responsive, but not as sophisticated as an Apple Pencil or Samsung’s S Pen. Compatible Accessories and Ease of Use For basic productivity tasks—like email, document editing, or light note-taking—the keyboard and stylus work well. It’s not a full replacement for a laptop, but it’s ideal for those who need a simple and portable device for light work. Camera Quality: Serviceable for Video Calls With an 8MP rear camera and an 8MP front camera, the Fire Max 11’s cameras are adequate but far from exceptional. They perform well for video calls and casual snapshots, but they lack the detail and color accuracy of higher-end tablets or smartphones. Front Camera for Video Conferencing The front-facing camera is reasonably clear for video calls, making it suitable for remote work or virtual meetings. However, don’t expect DSLR-level quality from this tablet’s camera setup. Connectivity: Wi-Fi 6 and Bluetooth 5.2 The Amazon Fire Max 11 supports Wi-Fi 6, a welcome addition for those with modern routers and fast internet connections. This feature helps with streaming and downloading large files without interruption. Bluetooth 5.2 is also onboard, making it easier to connect to wireless headphones, speakers, and other Bluetooth-enabled devices. Parental Controls and Kid-Friendly Features Like other Amazon tablets, the Fire Max 11 includes extensive parental controls, making it an excellent choice for families. Parents can set screen time limits, restrict content, and monitor usage. There’s also the Amazon Kids+ subscription, which provides access to kid-friendly games, apps, books, and educational content. Specifications for the Amazon Fire Max 11 Display11-inch LCD, 2000 x 1200 resolution, 60HzProcessorMediaTek MT8188J Octa-coreRAM4GBStorage Options64GB / 128GB (expandable via microSD)Operating SystemFire OS (based on Android)Rear Camera8MPFront Camera8MPBattery LifeUp to 14 hoursChargingSupports 15W fast charging (9W charger included)AudioDual speakers with Dolby Atmos supportConnectivityWi-Fi 6, Bluetooth 5.2PortsUSB-C, microSD card slotDimensions259 x 163 x 7.5 mmWeight490 gramsColorsBlackOptional AccessoriesKeyboard cover, StylusPrice RangeStarting from $229.99 USD Pricing and Value for Money The Amazon Fire Max 11 is priced competitively, making it an attractive option for budget-conscious buyers. With its premium design, long battery life, and solid performance, it offers great value for money, especially when compared to similarly priced tablets. Who Should Consider Buying It? If you’re already invested in the Amazon ecosystem or looking for a tablet primarily for media consumption, reading, and casual productivity, the Fire Max 11 is a fantastic choice. However, if you need high-performance multitasking or rely heavily on Google’s services, other options might be more suitable. Pros and Cons Pros: Sturdy aluminum design Impressive battery life Vibrant display Supports optional keyboard and stylus Cons: Limited app selection with Fire OS Average camera performance Basic productivity tools FAQ: 1. Is the Amazon Fire Max 11 good for productivity? Yes, the Amazon Fire Max 11 can handle basic productivity tasks with ease. With the optional keyboard cover and stylus, it supports light document editing, note-taking, and email. While it won’t replace a full laptop, it's ideal for users looking for a portable device for everyday tasks. 2. Does the Amazon Fire Max 11 support the Google Play Store? The Fire Max 11 runs on Fire OS, Amazon’s custom version of Android, which doesn’t natively include the Google Play Store.
However, tech-savvy users can sideload it manually, giving access to more apps beyond the Amazon App Store. 3. How long does the battery last on the Amazon Fire Max 11? The Fire Max 11 offers impressive battery life, lasting up to 14 hours on a single charge, depending on usage. This makes it a reliable choice for long reading, streaming, or browsing sessions. 4. What accessories are compatible with the Amazon Fire Max 11? The Fire Max 11 is compatible with Amazon’s official keyboard cover and stylus. These accessories can enhance the tablet’s productivity and are sold separately. 5. How does the Amazon Fire Max 11 compare to other Amazon tablets? The Fire Max 11 is Amazon's most advanced tablet to date, with a larger display, better build quality, and improved performance compared to the Fire HD models. It’s designed for users seeking a premium experience without breaking the bank. 6. Can the Amazon Fire Max 11 be used for gaming? Yes, the Fire Max 11 handles casual gaming well thanks to its MediaTek processor and 4GB of RAM. However, for intensive, high-graphics games, performance may be limited. 7. Is the Amazon Fire Max 11 kid-friendly? Absolutely! With extensive parental controls and access to Amazon Kids+, the Fire Max 11 is a family-friendly device. Parents can control screen time, restrict content, and monitor usage easily. 8. What is the display quality like on the Amazon Fire Max 11? The Fire Max 11 features an 11-inch 2000 x 1200 LCD display. It offers vibrant colors and a sharp resolution, making it suitable for watching movies, browsing, and reading. 9. Does the Amazon Fire Max 11 have good audio quality? The Fire Max 11 has dual speakers with Dolby Atmos, providing decent audio quality for a tablet. While the sound is clear and loud enough for most uses, audiophiles may prefer using headphones or external speakers for a richer experience. 10. How much does the Amazon Fire Max 11 cost? The Amazon Fire Max 11 starts at around $229.99, depending on storage options and optional accessories like the keyboard and stylus. Conclusion The Amazon Fire Max 11 is a significant leap forward for Amazon’s tablet lineup, offering better performance, design, and functionality than its predecessors. While it may not replace a high-end laptop or tablet, it serves well as a multimedia device with some productivity perks. For the price, it’s hard to beat what the Fire Max 11 brings to the table, especially if you’re already embedded in Amazon’s ecosystem. Whether you’re a casual user, a parent, or someone looking for an affordable tablet for light work, the Amazon Fire Max 11 is worth considering. If you’re intrigued by this budget-friendly powerhouse, Amazon has made this tablet more versatile and appealing than ever.
0 notes
Text
Best Voice Calling Tablets (2024)

While some tablets do not support traditional cellular calls, almost all offer VoIP capabilities through dedicated apps. Tablets with voice-calling features typically come equipped with 3G, 4G, or even 5G connectivity modules, allowing users to make voice calls using a SIM card and take advantage of mobile data services. You can find a selection of top tablets for voice calling on the Gadgetzview Voice Calling Tablets page, where options are provided to help you select the best device for your needs.
For even more customized results, you can refine your search at the top of the page under the "Gadgetzview Calling Tablets" section. Here, you can filter choices by Popularity, Price (High to Low or Low to High), and Name. Additionally, options on the left side allow for further filtering by manufacturer, screen size, storage capacity, camera quality, RAM, battery capacity, and more. You can even set a specific price range with a sliding bar at the top of the page to narrow down options within your budget.
Apple iPad Air (2022) Wi-Fi + Cellular

Price: ₹57,999 Specifications:
Display: 10.9-inch, 2360x1640 resolution
Processor: Apple M1, octa-core
RAM: 8GB
Storage: 64GB
OS: iPadOS 15
Cameras: 12MP front and rear cameras
Dimensions: 247.6 x 178.5 x 6.1 mm, 462 grams
Colors: Blue, Pink, Purple, Space Grey, Starlight
Connectivity: USB Type-C, Wi-Fi 802.11 a/b/g/n/ac, GPS, Bluetooth
Sensors: Accelerometer, ambient light sensor, barometer, compass, gyroscope, proximity sensor
Released on March 8, 2022, the iPad Air offers high performance with an Apple M1 chip, 8GB of RAM, and a 12MP camera setup for both front and rear photography.
Apple iPad mini (2021) Wi-Fi + Cellular

Price: ₹79,900 Specifications:
Display: 8.3-inch, 2266x1488 resolution, Liquid Retina
Processor: A15 Bionic chip
Storage: 64GB
OS: iPadOS 15
Cameras: 12MP rear camera with True Tone flash, 12MP Ultra Wide front camera with Center Stage
Connectivity: Wi-Fi 6, 5G
With an upgraded Liquid Retina display and A15 Bionic chip, the iPad mini (2021) offers an enhanced performance boost, improved camera features, and is compatible with Wi-Fi 6 and 5G.
Lenovo Yoga Smart Tab

Price: ₹14,999 Specifications:
Display: 10.1-inch, 1920x1200 resolution
Processor: Qualcomm Snapdragon 439
RAM: 3GB
Storage: 32GB (expandable up to 256GB)
OS: Android 9.0 Pie
Cameras: 8MP rear, 5MP front
Battery: 7000mAh
Color: Iron Grey
Connectivity: Wi-Fi 802.11 a/b/g/n/ac, GPS, 4G
The Lenovo Yoga Smart Tab, released on September 5, 2019, provides a large display and solid battery life, featuring an expandable storage option and convenient connectivity options.
Honor Pad 5 (10.1-inch)

Price: ₹19,999 Specifications:
Display: 10.1-inch, 1920x1200 resolution, IPS
Processor: HiSilicon Kirin 659
RAM: 3GB
Storage: 32GB (expandable up to 256GB)
OS: Android Oreo with EMUI 8.0
Cameras: 8MP rear, 2MP front
Battery: 5100mAh
Color: Glacial Blue
Connectivity: Wi-Fi 802.11 a/b/g/n/ac, GPS
Released on June 11, 2019, the Honor Pad 5 is an affordable option with solid display quality and expandable storage, best suited for general multimedia use.
Samsung Galaxy Tab A 10.5 (LTE)

Price: ₹29,999 Specifications:
Display: 10.5-inch, 1920x1200 resolution
Processor: Qualcomm Snapdragon 450
RAM: 3GB
Storage: 32GB
OS: Android 8.1
Cameras: 8MP rear, 5MP front
Battery: 7300mAh
Sound: Four speakers with Dolby Atmos
The Samsung Galaxy Tab A 10.5 delivers strong battery life and immersive sound, making it a great choice for entertainment-focused users.
Xiaomi Mi Pad 4 (Wi-Fi + LTE)

Price: ₹26,999 Specifications:
Display: 8.0-inch, 1920x1200 resolution
Processor: Qualcomm Snapdragon 660
RAM: 3GB
Storage: 32GB (expandable up to 128GB)
Cameras: 13MP rear, 5MP front
Battery: 6000mAh
The Xiaomi Mi Pad 4 offers good performance with a Snapdragon 660 processor and an above-average camera, suitable for everyday use and photography.
Honor Pad 5 (8-inch)

Price: ₹16,999 Specifications:
Display: 8.0-inch, 1920x1200 resolution
Processor: HiSilicon Kirin 710
RAM: 3GB
Storage: 32GB (expandable up to 512GB)
OS: Android 9 Pie with Magic UI 2.0
Cameras: 8MP front and rear
Battery: 5100mAh
Ideal for portable use, the Honor Pad 5 (8-inch) provides a decent display and reliable performance, complemented by a user-friendly OS and expandable storage.
#VoiceCallingTablets#Tablets2024#BestTablets2024#TabletsWithSIM#VoiceCallingFeatures#4GTablets#5GTablets#TopTabletsForCalling#TabletBuyingGuide#Gadgetzview#TabletRecommendations#TabletsUnderBudget#BestTabletsForCalls#TabletConnectivity#TabletWithVoIP#SIMCardTablet
0 notes
Text
Un día como hoy (22 de octubre) en al tecnología

El 22 de octubre de 2013, Apple libera a lo usuarios el sistema operativo Mac OS X Mavericks, versión 10.9, anunciada el 10 de junio de ese año en el WWDC. Es la primera versión nombrada por un lugar en California, en vez de un felino #retrocomputingmx #macosx #mavericks
0 notes
Note
what do you think of OS X 10.9 Mavericks?
see now THIS is the shit I wanna get asked
it's FINE, but it's not GREAT, and let me tell you why
10.9 came out right after iOS 7 released, which means there's an absolute ton of weird visual inconsistencies that make it just...kinda fucking weird? like a lot of the skeuomorphic stuff *is* still in the OS< but it's not 100% There
for example, a lot of the 'linen' from 10.7/10.8 is just completely gone, and replaced with weird transparency/blur effects. but so you end up with like, the notification center or whatever, which instead of being a pleasing, coherent linen, is just a kinda gross gray block with an inner drop shadow, and it just feels *bad* and looks *worse*
it's the last version of OS X with that look but it's clear they were thinking ahead already with it. the problem is that because it's like right in the middle of everything it just kinda looks like shit
it was pretty stable though, and pretty polished, so it gets a pass on that from us. but visually it's one of the least cohesive builds of OS X to date
1 note
·
View note
Text
Características do Produto O Archer T2U Nano recebe sinais Wi-Fi em duas bandas separadas. O suporte à tecnologia 256QAM aumenta a taxa de transferência dados de 2.4GHz de 150Mbps para 200Mbps para um desempenho 33% mais rápido. 433Mbps em 5GHz é ideal para streaming de vídeo HD e jogos online sem atraso, enquanto 200Mbps em 2.4GHz é perfeito para uso cotididano, como navegação na Web com dispositivos legados. EspecificaçõesRequerimentos do SistemaWindows 10/8.1/8/7/XP (32/64bits), Mac OS X 10.9-10.13 HardwareInterface: USB 2.0 Dimensões (L X C X A): 15,7 x 1,18 x 6mm Tipo de Antena: Omni Direcional WirelessPadrões Wireless: IEEE 802.11ac, IEEE 802.11a, IEEE 802.11n, IEEE 802.11g, IEEE 802.11b Frequência: 5GHz, 2.4GHz Taxa de Sinal: 5 GHz - 11ac: até 433Mbps (dinâmico), 11n: até 150Mbps (dinâmico), 11a: até 54Mbps (dinâmico); 2,4 GHz - 11n: até 200Mbps (dinâmico), 11g: até 54Mbps (dinâmico), 11b: até 11 Mbps (dinâmico) Potência de Transmissão:
0 notes
Link
#Fanxiang#SSD#NVMe#M2SSD#Speicherlösung#Speicherupgrade#SolidStateDrive#Computerhardware#Datenspeicher#Geschwindigkeit
0 notes
Text
Price: [price_with_discount] (as of [price_update_date] - Details) [ad_1] The Samsung T5 Portable SSD has the latest in Samsung V-NAND flash memory technology. Its portable design, blazing fast transfer speeds of up to 540 MB/s, shock resistance, and secure encryption make it the best portable SSD on the market. Superfast Read-Write speeds of up to 540 MB/s Top to bottom metal design that fits in the palm of your hand Optional password protection and AES 256-bit hardware encryption Includes USB Type C to C and USB Type C to A cables User can set password when it is necessary. Requires Windows 7, Mac OS X 10.9 (Mavericks), Android 4.4 (KitKat), or higher. Older versions of the Windows, Mac and Android operating systems may not be supported [ad_2]
0 notes
Text
FAQ for Preparing for Your Oracle Exam Session on your computer

What are the minimum system requirements for taking an Oracle exam?
Your computer must have one of the following operating systems: Windows 11, Windows 10, or Mac OS X (10.9 or later). Other operating systems such as iOS, Windows CE, Windows RT, Android, and Chrome OS are not supported.
You must have at least 8 GB of RAM.
Multiple monitors and devices such as Chromebooks and mobile phones are not allowed.
You must use one of the supported internet browsers: Safari or Chrome.
Your internet connection must have a consistent and reliable speed of at least 3mbs (Up/Down).
Do not use a mobile hotspot or tethered connection.
Your webcam must have a minimum resolution of 640x480 @ 10 fps.
Audio and microphone must be turned on.
You must use an English QWERTY keyboard.
Download and install the Secure Browser for your operating system.
What type of identification is required for taking an Oracle exam?
You must present a government-issued identification with a recent, recognizable photo. The ID must match the exact first and last name used for exam registration, be valid (not expired or invalidated), and include your name and photo. Some acceptable forms of ID include international travel passport, driver's license, military ID, and school ID. IDs from countries subject to US sanctions (Cuba, Iran, North Korea, Sudan, and Syria) are not acceptable.
What items are not allowed in the exam space?
You must not have access to any mobile devices, watches, other electronics, materials, books, screens, or anything else deemed unacceptable by the proctor. You should be the only person in the room and should not speak for the entire duration of the exam.
What do I need to do on the day of the exam?
Thirty minutes before your scheduled exam time, click the "Check In" button in your registration confirmation or reminder email, and then the "Log into your exam" button. The exam administrator will guide you through the check-in and exam start process.
What happens after the exam?
Your exam results will be displayed on the screen, and you will also be able to view your detailed score report in Oracle CertView.
Can I reschedule my exam?
If you need to reschedule your exam, you must do so at least 24 hours before your appointment time.
What is the cancellation policy?
If you need to cancel your exam, you must do so at least 24 hours before your appointment time. Failing to do so may result in forfeiting your exam attempt. Any expenses incurred beyond the cost of the exam are your responsibility, including but not limited to travel, equipment, and lost wages. Oracle will not be responsible for these costs.
0 notes
Text
TP-Link AC600 USB WiFi Adapter for PC (Archer T2U Plus)-

Brand TP-Link Hardware Interface USB Color Black Compatible Devices Laptop, Desktop Product Dimensions 2.28"L x 0.71"W x 6.83"H Data Link Protocol USB Data Transfer Rate 600 Megabits Per Second Item Weight 18.14 Grams
Get This > TP-Link AC600 USB WiFi Adapter for PC (Archer T2U Plus)-Wireless Network Adapter for Desktop with 2.4GHz, 5GHz High Gain Dual Band 5dBi Antenna, Supports Win11/10/8.1/8/7/XP, Mac OS 10.9-10.14
1 note
·
View note
Text
Ample Bass A (MAC) Download

If you're seeking a powerful, versatile bass virtual instrument for your music projects, Ample Bass A (MAC) is your ultimate choice. This cutting-edge software combines extraordinary sampling with advanced features, delivering unmatched realism and expressiveness for acoustic and electric bass sounds.
System Requirements and Sampling Excellence
Ample Bass A (ABA) is compatible with Mac systems running OS X 10.9 or newer and supports popular formats like VST2, VST3, AU, AAX, and Standalone. To ensure smooth operation, your system should have an Intel i5 processor or higher and at least 10 GB of hard disk space.
The heart of ABA lies in its meticulously crafted 4.89 GB sample library, recorded naturally on every single fret without destructive editing or dynamic processing. This guarantees pristine sound quality that resonates with authenticity. The library supports 12 articulations, including Sustain, Palm Mute, Natural Harmonic, Hammer On & Pull Off, and more. Its Legato articulations enable seamless transitions, allowing notes of any duration, speed, pitch, or polyphony.
Features That Redefine Versatility
ABA takes virtual bass instruments to a new level with its dual-sample engine, offering both mic and DI samples. Users can mix and process these independently, unlocking a world of sound customization. Whether you need rich expressiveness for solos or a steady middle-low end for a band setting, ABA has you covered.
Highlights include:
Alternate Tuning: Supports tunings down to the lowest note B0.
Stereo and Mono Modes: Adjustable mic volumes and widths for more options in stereo; robust mono modes for band arrangements.
Redesigned Tab Player: Realistic playback with support for all articulations and notations, enhanced with fine parameter adjustments.
Multiple Capo Logics: Customizable automatic fingering logic tailored for solo, chorus, and more.
Why Choose Ample Bass A (MAC)?
Designed for professionals and enthusiasts alike, ABA delivers an unparalleled bass-playing experience. Whether you're creating intricate solos or dynamic soundscapes, its features ensure precise and expressive performance every time.
Download Ample Bass A (MAC) today and take your music production to the next level!
👉 Download Link: Ample Bass A (MAC)
1 note
·
View note