#Outlook Password Keep Prompting
Explore tagged Tumblr posts
Visit Tumblr Blog
Explore Tumblr blogs with no restrictions, modern design and the best experience.
Last Seen Tumblr Blogs


Fun Fact
130K people were victims of a chain letter scam that affected Tumblr in May 2011.
Text
How to install Office 365 from portal.office.com on Mac?
Microsoft Office 365 is an essential suite of productivity applications that includes Word, Excel, PowerPoint, Outlook, and more. If you own a Mac and need to install Office 365, the process is straightforward and can be completed via the official Microsoft portal: portal.office.com. This guide will walk you through the steps required to install Office 365 on your Mac efficiently.
System Requirements for Office 365 on Mac
Before installing Office 365, ensure that your Mac meets the minimum system requirements:
Operating System: macOS Monterey (12), macOS Big Sur (11), macOS Catalina (10.15), or later.
Processor: Intel or Apple Silicon (M1/M2) with Rosetta 2.
RAM: At least 4GB.
Storage: Minimum of 10GB of free disk space.
Internet Connection: Required for downloading and activating Office 365.
You can check your macOS version by clicking Apple Menu > About This Mac.
Step-by-Step Guide to Installing Office 365 on Mac
Step 1: Sign in to Your Microsoft Account
Open your preferred web browser (Safari, Chrome, or Firefox).
Navigate to portal office com.
Enter your Microsoft account credentials (email and password) associated with your Office 365 subscription.
If prompted, complete the multi-factor authentication (MFA) process.
Note: If you do not have an active Office 365 subscription, you must purchase one before proceeding. You can subscribe through Microsoft 365 plans.
Step 2: Download the Office 365 Installer for Mac
Once signed in, you will be redirected to the Office 365 homepage.
Click on the Install Office button in the top-right corner.
Choose Office 365 apps to begin downloading the installer.
The download will start automatically, saving a .pkg file in your Mac's "Downloads" folder.
Tip: If the download does not start, refresh the page or try using a different browser.
Step 3: Install Office 365 on Mac
Open Finder and navigate to the Downloads folder.
Double-click the Microsoft_Office_Installer.pkg file.
The Microsoft Office installer will launch. Click Continue.
Read and accept the license agreement, then click Continue.
Select the Install Location (default location is recommended).
Click Install and enter your Mac’s administrator password if prompted.
Wait for the installation to complete.
Click Close once the installation is finished.
Tip: If you encounter a security warning, go to System Preferences > Security & Privacy and allow the installation under the "General" tab.
Step 4: Activate Office 365 on Mac
Open any Office application (e.g., Word, Excel, or PowerPoint).
A welcome screen will appear; click Sign In.
Enter the Microsoft account credentials used to purchase the subscription.
Follow the on-screen instructions to complete activation.
Once activated, click Start Using Office.
Note: If you see an error stating that your subscription cannot be verified, ensure you are connected to the internet and try signing in again.
Troubleshooting Common Installation Issues
1. Office 365 Installation is Stuck or Not Starting
Restart your Mac and try installing again.
Ensure that your internet connection is stable.
Clear your browser cache and try downloading the installer again.
2. macOS Blocks the Installation
Go to System Preferences > Security & Privacy > General.
Click Allow next to "Microsoft Corporation."
Restart the installation process.
3. Unable to Sign in to Activate Office 365
Double-check your Microsoft credentials.
Try signing in through a different browser.
Ensure that your Office 365 subscription is active.
Updating Office 365 on Mac
To keep Office 365 updated with the latest features and security patches:
Open any Office application (e.g., Word or Excel).
Click on Help in the menu bar.
Select Check for Updates.
Follow the on-screen prompts to install available updates.
Uninstalling Office 365 from Mac
If you need to remove Office 365 from your Mac, follow these steps:
Open Finder > Applications.
Locate Microsoft Office apps (Word, Excel, PowerPoint, Outlook, etc.).
Drag each app to the Trash.
Open Finder > Go > Go to Folder.
Type ~/Library and delete the following folders:
Containers/com.microsoft.*
Group Containers/UBF8T346G9.Office
Empty the Trash and restart your Mac.
Final Thoughts
Installing Office 365 on a Mac is a simple and quick process when done through portal.office.com. By following this guide, you can successfully download, install, and activate Microsoft Office 365 on your Mac.
If you encounter any issues, Microsoft's support team is available to help resolve installation or activation problems.
Now that you have Office 365 installed, you can enjoy seamless productivity and collaboration with its suite of powerful applications!
0 notes
Text
Outlook 2016 keeps prompting for password in cache mode

#Outlook 2016 keeps prompting for password in cache mode for mac#
#Outlook 2016 keeps prompting for password in cache mode upgrade#
#Outlook 2016 keeps prompting for password in cache mode password#
Cannot initialize Microsoft Office shared utilities. MICROSOFT OUTLOOK 2007 - i KEEP GETTING THE "ENTER NETWORK PASSWORD" BOX POPPING UP - IT IS ALREADYĬannot start Microsoft Office Outlook. Outlook 2010 and Microsoft Setup Bootstraper. Outlook 2010 won't launch after installin Microsoft office 2010 service pack 1Īll of a sudden Microsoft outlook 2007 lost its profileĬannot start Microsoft Office Outlook. Send Secure Email Through Microsoft Outlook 20 (32 bit) Microsoft office outlook 2007 showing configuring outlook accounts for hoursĬonverting an old Microsoft Outlook PST to a new Unicode PST Outlook for smartphone with non-microsoft email address Microsoft Outlook Hotmail Connector Error: The text exceeds the limit of 1024Īnyone with this Microsoft Outlook issue can help? Zoom in Microsoft Outlook Views? (Not Messages) "Microsoft Exchange Add-In" (UmOutlookAddin.dll) + Outlook Security Form. I cannot start Microsoft Outlook 2013 directly opening a. Microsoft Outlook 2007 Font Size Too Small
#Outlook 2016 keeps prompting for password in cache mode password#
Outlook keeps prompting for Microsoft username and password for share calendarĬonnection to the microsoft exchange server has been lost. The connection to Microsoft Exchange is unavailable. Microsoft Outlook 2010 Automatically Restarting Outlook 2013 not fixed correctly by Microsoft!! Microsoft Outlook can't translate this document. Unable to link email messages in BCM using a single microsoft office 365 account in outlook 2013Ĭannot start Microsoft Office Outlook Error Message Microsoft Personal vs Work Accounts in OutlookĪdding new Exchange (2016) rule very slow down Microsoft Outlook
#Outlook 2016 keeps prompting for password in cache mode for mac#
Microsoft Outlook 2016 - Gmail not sending, asks for password for SMTP, tried different portsīackup Email Accounts On OutLook For Mac 2016 (Microsoft 365 subscription version)Ĭalendar invites sent from Microsoft Outlook to Mac Outlook is not working Microsoft 365 Outlook keeps requesting password on Local Account It is probably not a registry error because I setup a new user on my PC with a small/new e-mail profile and still get the error.Īny ideas on how I can solve this problem without reinstalling a newer version of Outlook? It is not due to mailbox size because if I open a profile for a very tiny mailbox, I get the same problem. It is not due to my router or network because I have a laptop with Outlook 2013 that doesn't have this problem.
#Outlook 2016 keeps prompting for password in cache mode upgrade#
The obvious answer is to upgrade my Outlook 2007 which is required by Office/365 by October anyway, but I'm in transition to a new machine and don't have room for an upgrade need to get another couple of months out of this machine. I have to click the icon to "cancel server request" then it eventually comes back for a short time before the error persists again - all day long. Typically, when I first start Outlook, it's fine for an hour or so then I get this message. About a month ago I started getting a message: "Microsoft Outlook is requesting data from the server" in my tray. Exchange 2016 CU18 + Outlook 2016 Users with Cached mode on - Outlook prompt for password and crash with chart.dll error file Exchange 2016 CU18 + O365 - Everything is ok I have done the following : 1.
0 notes
Text
How Many Email Accounts Do You Get With Bluehost?

Bluehost's email hosting service is very similar to that of other web hosts, and you can sign up for an email plan from the control panel. You will need to enter your account name and password and any other information you may want to keep private. Then, you'll have to choose a strong password that uses upper and lower case letters, numbers, and symbols. To ensure security, you can also choose to use a machine-generated complex password. To get started with your new email service, first sign in to your Bluehost account. You'll need to choose a domain to connect to, and then create a password. You can either manually type in the password, or let the system create one for you. Next, you'll need to select a mailbox size, and which webmail client you want to use. Choose unlimited mailbox sizes if you'd like to use your own, but you can leave the default Bluehost webmail client blank if you prefer. You'll find an easy-to-use interface for managing your email at Bluehost, which is available from all three of the email hosting services they offer. If you'd like to have a dedicated business email address, you can use the email hosting service's webmail interface. It's easy to create a new email account with Bluehost, and there's no charge for business email accounts. To set up your email account, sign in to the website's dashboard. Click the e-mail icon on the left-hand side of the menu. You'll be prompted to choose a POP server port. You'll need to choose an SMTP server port. Make sure to choose the SMTP server port, which is 465. Once you've done that, you'll be able to configure Outlook 2010. If you're a business owner, you'll want to make sure you're getting as many email accounts as possible. You'll probably need several different email accounts, and you should be able to manage them easily. Generally, you'll need at least one email account for your website. However, you can use the email address you've created to access your site. Then, you'll need to decide which interface is best for your purposes. If you're a business, a free business email account is a good idea. If you don't need to have a website yet, a free account is a great way to get started with a website. For small businesses, it's best to start with a plan that offers a lot of email accounts. A host can offer unlimited email accounts if you're willing to pay a monthly fee. Once you've chosen a domain, you'll need to choose an email address. Once you've chosen a domain, Bluehost will check its availability for it, and if it's already taken, you can choose a new one. When setting up a new email address, you'll need to enter a few details about the domain and your account. If you're a beginner, you can set up a free account with a premium domain name. Another option is to go with G Suite. This premium product starts at $6 a month per user and allows you to set up email accounts through Google. If you're a business owner, you can use Gmail to manage your business's emails. If you're a freelancer, you can use a free business email account to get your work done. You'll also need to set up an account for clients with Bluehost to save money on your website. There are several options for setting up email addresses with Bluehost. For example, you can choose to use the email program on your computer. With Bluehost, you can use your Mac mail, Microsoft Outlook, or Google mail, as well as Gmail. Depending on your needs, you can create as many email accounts as you need, as long as you're satisfied with the basic plan. But if you're not a business owner, you can use the service.
2 notes
·
View notes
Text
Hotmail Login
The catch is you could utilize this technique simply on the off chance that you simply empowered a two-venture examine. Tragically, should you destroy the choice, then you'll not have the option to make the most of the recuperation structure. In order to utilize this association, you need an e mail handle that you simply approach. It doesn’t have to be your personal e-mail account; any e-mail document will do. After that, go to account.reside.com/acsr, and enter the Hotmail tackle you need to recover.
When you arrange your account, you probably gave them a telephone quantity or another e mail address in case of this very situation. Just click "forgot my password" and you could be prompted on how hotmail.com login to continue. If your inbox opens to a special person's account, signal out by clicking the profile icon within the top-right corner of the display screen after which clicking Sign out in the ensuing drop-down menu.

Outlook.com, Hotmail, Live, and MSN 365 accounts are powered by Outlook.com. If you aren't a Windows Live Hotmail or Outlook consumer, listed right here are some helpful facts that may add many tips for considered this mail service. The steps to creating a private online account at Outlook are pretty easy versus the number of functionalities it offers. This information will stroll you through the steps required to create and access your individual private Outlook on-line account. Those of you who've enabled two-step verification should enter a four-digit security code that might be emailed, textual content to you, or available through a smartphone app, to log in.
Enter your energetic mobile phone quantity within the second subject. It will open a login page asking you to enter a Hotmail email tackle. To receive an e-mail, the e-mail address is enough, do not disclose the password to the sender. If you've entered both another e mail account or the phone number whereas creating a Hotmail account, you'll have the ability to recover your Hotmail account for which you have forgotten the credentials.
So you’ve successfully added an alternate e mail account and cellphone quantity they usually can be utilized to recuperate the password or username in case you forget them at any point in time. Some individuals don't enter neither of those two and face problems to recvoer their Hotmail account. Hence, it is suggested to at all times add recovery email or cellphone quantity. If have already got a Hotmail.com account, you'll have the ability to click below button to reach to the log in page. If you don’t have, read on this text, I’ve steps to create a Hotmail account. The advantages of placing documents on-line are you could log in to your account from anyplace in the world and access those paperwork.
You can change your Microsoft Hotmail or Outlook.com account. To change your Hotmail or Outlook.com account or the password, click your profile image, and select View account. Then, click on Change secret word, enter your current secret key, and snap Sign in. At that point, you’ll have to examine your character. To do that, click Send code and enter the code that you get through your cell phone or e mail handle. After checking your report, enter your current secret phrase, the new secret word, and snap Confirm.
In the tip, click Next, and an email will be despatched confirming the difference in your secret phrase or password. If you’re usingtwo-step verificationto login or check in Outlook.com with single-use code, the verification code is essential to complete Outlook login. And when you did not obtain the verification code, just keep in mind to entered the proper cell quantity, and you’ve access to it. We suggest you to make use of Authentication app to generate code, so that you don’t need to rely on the textual content message to receive security code. Windows Live Hotmail is extra than just sending and receiving email messages. Once you're a present account holder of a Hotmail account, your email account is used as your Windows Live ID thereby permitting you to expertise a variety of providers provided by Microsoft.
This and the fact that you'll find a way to access your account anywhere, at any time and from any location out of your cell system or out of your Windows or Mac computer. Mobile expertise has gone by way of nice leaps and bounds for users to enjoy and take full benefit of being cell. Enjoy this experience with a Windows Live Hotmail account. Two-step authentication lets you sign up to Hotmail e-mail account securely.
1 note
·
View note
Text
Why I Hate Electronics
In the old days we had ms-dos and had to fiddle with config.sys and himem.sys spending endless hours and sleepless nights trying to get the computer to run a program. Computers have come a long way since windows 95 but using them certainly hasn’t gotten any easier. I remember wondering back then why they couldn’t make a computer that actually worked, that actually figured out how to make itself work and work with other programs and devices…after all, it is a computer, isn’t it? No, instead they just get more complicated and mystifying. Now its modems and routers and ethernets and wifi that drive me crazy, and trying to cope with constant buffering when I try to watch Netflix. Who the hell can remember which remote to use to access the right button? And when you do find the right remote to access your tv who can figure out how to get to whatever it is you need to fix? And how many fucking passwords can a person remember? And passwords have to be more complicated every year. I can barely use my phone, flipping from one screen to another with my finger. It seems the only way to get out of certain screens is to shut your phone off and restart it. And nobody tells you this stuff…you have to figure it out on your own. Ever read the Microsoft manual? Who does? Just looking at the pages makes me scream. And even when you go to Youtube they go so fast you have to pause it every two seconds to write that shit down. I have endless sheets of paper in a drawer filled with step-by-step instructions on how to do computer problems. Why? Why can’t computers do these things by themselves? The last time I lost my internet connection I got all excited when I discovered this thing on my computer that told me it would run a diagnostic of my system and troubleshoot it. Wow, that sounded great. When I went there and ran it it said “you have lost your internet connection.”
They say that computers can do everything, but they still haven’t given us a computer that can fix itself or even do something as simple as letting us plug it into a router without having to go through an eleven step process to get the damn thing to work. What pisses me off is that I know they could do this. I can’t even get my two wifi extenders to work. By some miracle I did get them to work for a while but one day they both just shut off and I haven’t been able to get them running since. I can’t get past the step where I’m asked for a password. It says I’m supposed to use the one on the back of the router. Well, what it says on the back of the router is “password: (leave the field blank)”. Except when I am asked for the password it won’t let me leave the field blank. Instead it says “your password is not long enough.” Then I’m told to go to my wifi icon on my taskbar to find out what the password is. But I don’t have a wifi icon on my taskbar. So I go online and find that there are pages on how to find and/or replace the wifi icon on my taskbar, and after going through all five of the different methods of finding and replacing that icon on the taskbar without success I learn that there is no way I’m gonna get that icon to appear on the taskbar because the Windows 10 system that came with my computer doesn’t come with a wifi icon on the taskbar; Microsoft removed that file in the latest version of Windows 10. I learn that I have to buy Windows 10 Pro to get that stupid wifi icon. Are you shitting me?
I finally did find an obscure site that explained a convoluted way to find out what your router and extender passwords were. You have to start with your command prompt to get there…but that didn’t help…surprise, those passwords there didn’t work either. And don’t even ask me how to go back there and look at those passwords again. It took me an hour to figure out how to get to my command prompt from my start menu. Hint: don’t left click like you’re used to doing. When you left click on the Start menu you are presented with a long and very impressive list of places to go, all in alphabetical order, and you would think that the “Command” prompt would be there under the “c” column. But no, there is nothing that says “Command Prompt”. No, you have to right click instead. You’ll find another list of places to go there. But even then there is nothing that says “Command Prompt.” You have to click on “run” for the command prompt to come up. There is a lot of shit you can do through the command prompt but nobody is going to tell you what the secret codes are that will allow you to do those things. It used to be easy to get to the command prompt. All you had to do was click on the “Start” button. But now they’ve decided to make this an hour-long quest to find it. I have all this shit written down on endless sheets of paper in that drawer. Truth be told this electronic world makes me tear my hair out. I hate it with a passion. What pisses me off even more is that I also love it…when it’s working.
I can’t even get my computer to recognize my own email address. I bought a new Dell desktop three years ago and still get a daily message saying that I need to fix a problem with my Microsoft account. So I periodically go through the process and change my password but no matter what I do I still get that stupid message. I even had Microsoft tech reps guide me through the process three times now yet I still get that same old message. And every time I try to access my Microsoft account I’m told “that email address is already used by a different account.” I deleted all my accounts and started over but the message still comes up…the problem remains. I’ve explained all this to those tech reps but nothing keeps that message from coming up. I even signed up for a different email address but that didn’t fix the problem either and now I have an extra “Outlook” email address that I never use and wouldn’t know where it is if I did want to use it. I think the problem started when I bought a new Dell laptop. I had to sign up for a Microsoft account then. But I didn’t care for the laptop and sent it back two days later and ordered the desktop…and now Microsoft still thinks that whoever owns that laptop has the rights to my email address and not me. I explained all this to those Microsoft tech reps but that didn’t solve anything either. Yeah, this stuff bothers me. I’m the kind of guy who doesn’t like loose ends. I like things to be neat and tidy and feel like everything is in its place. But this computer stuff feels all scattered and disconnected and just fucked up. I know it’s working on my mind even when I’m not struggling with it.
In order to fix my Netflix buffering problem (and my wife’s need to have internet access for her work-at-home job) I bought a new router. I’ve had the same old cheap router for 6 years so I figure its time for a new one. I did just buy a 40 ft ethernet cable that I plugged into the back of the router and ran it along the ceiling down the hall and into the back of the tv in the living room, but we’re still having problems with “Home not available” still coming up at times. I actually bought a new router last year; an Archer A7. But I was never able to get it to work so I had to send it back, thinking it must have been defective. I realize now that it probably worked just fine and that the problem was me…that I couldn’t figure out how to get it to work. Then I had a helluva time trying to get the old one up and running again. Did you ever feel that your brain was on fire and ready to burst? That was how I felt after struggling with those two routers for 3 days. So my new router came last week and it turns out it’s the same model; the same one I tried to set up and sent back last year. I thought it was a different one because it was called a Tp-link, but its actually an Archer A7 too. On the box it says it’s a AC 1900 and on the instruction sheet it also says it’s a MU-MIMO Wi-Fi Router, so just figuring out what these things are called is a science in itself. So now I’m frightened to death to even try to set it up. The first thing the instructions say is “if this” and “if that”…as if I know the answers to these ifs. There is also a long list of FAQs in case you have problems and need help. That scares the shit out of me, too, cause I know I’m gonna need help…and lots of it. Then it gives me three different methods of setting the thing up, all of them quite convoluted and requiring me to access various internet sites, SSIDs and wireless passwords. Then I have to go to a number url: 192.188.1.1 and I remember that this is where I had to go to get my extenders to work but I was never able to get those urls to come up. Then I found out that they only come up if you use Google Chrome, and of course there is nothing in the instructions that tells you you can only use Google Chrome. No, you have to find that out on your own too. So now I have to change my browser and come up with another password so I can access Google Chrome. I am so afraid that I will not be able to complete these steps correctly and that I will then have to struggle another two days to get my old router to work again that the new router is still sitting on a shelf two weeks later. I’m thinking that I should go to Best Buy and have the Geek Squad come and set up my router but I know I’ll have to listen to them explain their convoluted tech plan that will ask me to decide whether to get a one visit deal or buy a year subscription…and I know one visit will not fix all my loose ends. And it makes me wonder if that is the reason why computers intentionally aren’t made to fix things.
Oh, by the way, I’m sitting here writing all this down with my Microsoft Word, and now I find that I am unable to save what I’ve written because I don’t have a subscription to Word any more. I guess my free time is over. God, don’t you love it? You can’t even buy a computer with a simple word processor in it without having to pay a yearly fee to use it. Next thing you know somebody will figure out how to put a chip under your skin that measures how many breaths you take so they can charge you for the air you breathe.
Dear Lord, if reincarnation is real please let me go to a world that is either before computers or way beyond computers. Or better yet, where computers and routers and extenders actually use a computer so they can work together.
1 note
·
View note
Text
What are Solid ways to fix Outlook keeps asking for password?
Microsoft outlook is one of the most efficient, powerful, and secure email applications, which is majorly used by millions of users. If you’re using MS outlook, it is sure that you may experience minor or major technical errors related to MS outlook. Often errors and technical warning messages make user experience more annoying. One of the most intricate inconveniences that users experience is when outlook keeps asking for password. It creates complicated technical situation just by the irregular password prompt again and again, even you’ve types the correct login credentials. Therefore, let us attempt to resolve this technical problem using some permanent methods.
Why does MS outlook keep asking for a password again and again?
Before solving this error, you must know the exact causes of this technical problem.
· MS outlook is completely configured to prompt for credentials
· Wrong outlook password completely stored by credential manager
· MS outlook profile is completely corrupted
· Poor Network connection
· Antivirus software causes outlook problems
Solid ways to resolve Outlook keeps asking for password issue-
Here, we are going to share some permanent methods to fix outlook keeps asking for password problem.
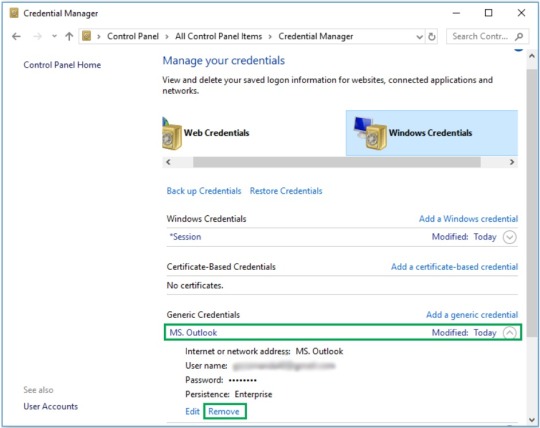
Method1-Clean the cached passwords
The users will obtain a password asked error again and again, if the cached credentials are wrong. So, it is very necessary to clean the passwords using the windows credentials manager to rectify this technical issue. You should follow the steps one by one-
Step1- You must open both control panel and Microsoft outlook similarly
Step2- In the second step, you need to go to user accounts> credential manager>manager, your credentials use the MS outlook credentials correctly
Step3- In the last, you should click on the name option to increase the credentials and click on “remove” button
Paste image here from reference link designed by designers
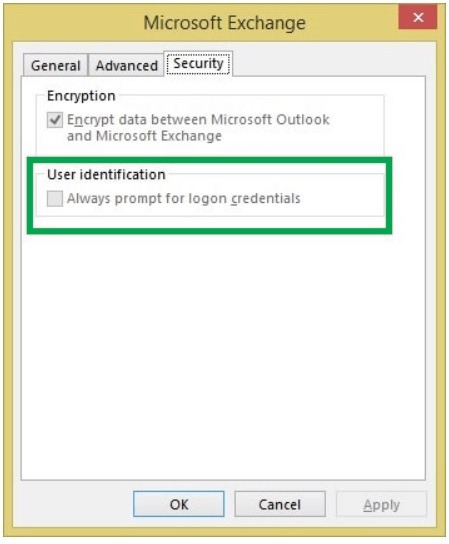
Method2- Disable the Outlook password prompts login credentials
When outlook user identification settings are completely enabled in MS outlook, it asks constantly for the login credentials. To come out from this issue, you need to disable the settings by following below explained instructions-
Step1-Frist of all, you need to open MS outlook, and then navigate to file> Account settings
Step2- Secondly, you should choose the exchange account button and click on “change” option
Step3- Thirdly, you need to click on “more settings” in the fresh dialogue box menu
Step4- Finally, you need to uncheck constantly prompt for the login credentials button. Thus, you can solve outlook keeps asking for password error simply.
Paste image here designed by designers.
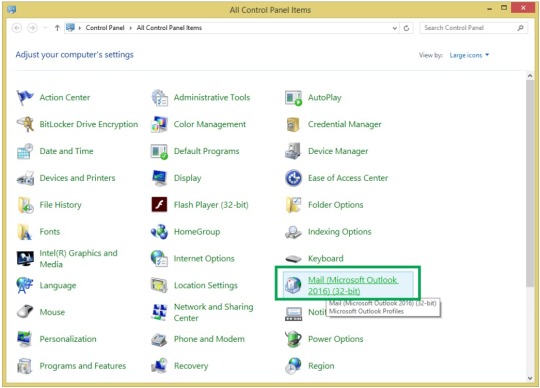
Method3-Eliminate the corruption from MS outlook profile
It is very clear that MS outlook may fail to remember password due to complete corruption in MS outlook profile. To rectify the corruption error, you must create a fresh profile. You should follow below instructions to create a fresh profile-
Step1- You should open control panel button and choose the “mail” button
Paste image here designed by designers
Step2- In the displaying window, you need to hit on “show profiles” button
Paste image here designed by designers
Step3-After that, you can opt MS outlook from the outlook profile and click on “Add option and after that, click on “OK” button
Paste image here designed by designers
Step4- Next step, you can select a profile name and click on “OK” button
Paste image here designed by designers
Step5- Then, you need to apply the instructions to complete the required information of your outlook account
Paste image here designed by designers
Step6-Now, you’ve created a fresh MS outlook profile successfully. After that, you need to click on “Finish and proceed” button appropriately.
Paste image here designed by designers
Step7- Finally, you can click on “Always use this profile” option and choose the fresh profile from the drop-down list displayed icon.
With the help of all these above instructions, you can resolve outlook keeps asking for password error. These instructions are useful for solving this error permanently. Still, if you have any technical doubt, you can take the specialized technical assistance from our certified technical experts anytime.
1 note
·
View note
Text
McAfee total protection 2020 reviews
McAfee total protection 2020 reviews - McAfee has three consumer security products – but which is best, and how do they compare to rivals.
Where to seek out Mcafee Activation Code?
The Mcafee security package is simple to setup & install at www.mcafee.com/activate. Simply find a 25-character alpha-numeric code that is written on the backside of the retail card. Here may be a sample Product Key to let you understand:
xxxxx-xxxxx-xxxxx-xxxxx-xxxxx
McAfee 2020 Antivirus solutions review:
Installing McAfee Total Protection was a long nightmare during our last review, but this time, fortunately, it was very different. There were no error messages, no delays, no hassles of any kind: the setup tool just downloaded the full Total Protection package, installed it on our hard drive and let us know when it was done. Simple.
The installation did have one unusual aspect. We installed Total Protection on a system already equipped with Kaspersky Security Cloud installed, just to see what it would do. Most antivirus packages will ask you to remove competing for software to avoid conflicts, but McAfee's installer said nothing at all.
Does this matter?
It probably depends on the user. If McAfee might conflict with other security software, enabling newbies to run two antivirus apps side by side is likely to be a bad idea. But if you're an expert, confident you can reconfigure one antivirus to reduce the chance of problems, and sure you can cope with whatever issues arise, you might see this as an advantage.
After the installation was complete, Total Protection prompted us to reboot. We did, and again there were no hassles or unexpected events – no sign of change other than a shiny new McAfee icon in our system tray.
Interface :
The McAfee Total Protection interface grabs far more valuable screen real-estate than most, yet does almost nothing with it.
The expansive opening screen contains a big green tick to show your security status, for instance but has barely any other useful content.
The rest of the console is largely wasted with a button to help you protect other devices, pointless system information ('we are protecting 309 apps/connections/tasks'; is that good, bad? how are you supposed to know?), a button to view a security report, and a large panel recommending that you set up the password manager, or optimize your apps.
These might have some value, but we would much rather have a button to launch a Quick Scan, a line that tells us when our definitions were last updated, or something with real practical value.
Clicking a small icon that comprises three dots reveals a more detailed status report of Total Protection's various features, so, for instance, you can confirm that antivirus, the firewall, and the update system are all working correctly. That's the kind of information which should be visible at a glance, rather than hidden, but at least it's only a click away.
It's not obvious, but this status display also doubles as a menu, and for example, clicking the Virus Scan status loads the Scan dialog.
You can also click various tabs at the top of the screen – PC Security, PC Performance, My Privacy – to view separate panels with their own groups of features. These also waste plenty of space, so, for instance, the PC Performance area includes only three useful elements: a couple of buttons and an on/off status indicator. We've seen more features on desktop widgets.
This approach could have some appeal to casual users who might be overwhelmed by lots of buttons or technical information, but more experienced types might become frustrated.
Antivirus:
McAfee Total Protection keeps its antivirus scanning options to a minimum: just a Quick Scan, a Full System Scan and the ability to scan custom items directly from the Explorer right-click menu.
What you don't get is a specific removable drives scan, a custom scan you can define from the interface, or the ability to set up a new scan type or define how it works. For example, Avast's Windows products can be used to set up a scan that checks specific file types in the folders you need, using the scanning technologies and rules you define, and you can then run that scan whenever you like. There's nothing like that here.
Scan times were a little slower than average, although acceptable.
Scan reports are poor, and short on detail. Our first Quick Scan proudly displayed 'Issues: 0' at the top, while also stating 'All issues fixed', 'We wiped out all the threats on your PC' and listing cryptic names of three threats it had removed.
As Total Protection hadn't asked us if it could remove these 'threats', we clicked on the first, 'JTI/Suspect.19661214ca37a5b9d3b', in the hope of finding out exactly what the program had just deleted.
A browser window opened with a lengthy URL including multiple parameters, presumably intended to display a page with more details. But this immediately redirected to the front page of McAfee's Threat Center, with no more information at all.
A 'View Details' button was also less than helpful, telling us the engine had detected three dangerous files, but not what or where they were.
Eventually, we found the details we needed in the Quarantine section, but it really shouldn't take so much effort to locate such fundamental information.
We noticed another oddity in the Details screen suggesting McAfee's Quick Scan checks files only, ignoring processes, critical system files or boot records. If true, that's disappointing; we think checking running processes should be one of the key elements of a Quick Scan.
Protection:
AV-Comparatives' Real-World Protection Test is an intensive benchmark that pits 16 of the world's biggest antivirus engines against the very latest threats. The company runs 10 tests every year, making it a great way to monitor particular vendors over time.
McAfee's most recent test performance was average, with the July-October summary report placing the company in 8th place with a protection rate of 99.4%.
That's a long way behind the leaders – Avira and Symantec blocked 100% of threats – but it's ahead of some big-name competition, including Avast (99.3%), F-Secure (99.3%) and even Kaspersky (99.1%).
The AV-Test Home Windows report for October 2019 broadly matches this picture, with McAfee not at the top of the list, but performing well enough to earn it one of AV-Test's 'Top Product' awards.
We can't begin to compete with the time and resources the big testing labs put into their work, but what we can do is add to their findings with a small test of our own.
We have created a very, very simple ransomware simulator which spiders through a folder tree, reading and encrypting images, audio files, Office documents and more. By running this on a review system, we're aiming to see whether an antivirus can detect undiscovered ransomware by behavior alone, and discover how many files, if any, might be lost before an attack can be stopped.
The results were disappointing, as McAfee Total Protection left our simulator to run to completion and encrypt thousands of files. Other tools typically do much better, with, for instance, Kaspersky Security Cloud Free 2020 not only detecting and killing the simulator but also recovering the very few files our program had managed to encrypt.
However, this result should be interpreted with care. McAfee may have missed our test program, unlike the best of the competition, but we can't be sure why or what that tells us about the security suite overall. What we do know from the lab tests is that McAfee can detect most real-world malware from behavior alone, and that's the most important result.
Firewall:
Total Protection includes a firewall that automatically makes intelligent choices about which programs on your system can access the internet. This is mostly tucked away within the interface, and most users won't ever have to know of its existence.
Experts get access to a wide range of firewall settings, including the ability to open or close specific ports or define custom rules for individual applications. These options are harder to find than we'd like, though, and it took us some time to begin to figure out what was possible.
Even then, we were often puzzled. The firewall has an Intrusion Detection system, for instance, but it's turned off by default, only has two settings (Basic or High) and even the web knowledgebase has no real information on what it does and the consequences of turning it on (or off).
More features:
Total Protection's spam filter wasn't installed by default in our previous review, but this time it set itself up correctly, added an extension to our Outlook setup and began filtering mail.
The performance was excellent, with the filter detecting most spam and not falsely flagging any legitimate emails. But if this doesn't work for you, a wide range of settings enable customizing the protection to suit your needs.
The True Key Password Manager allows for creating and syncing passwords across up to five devices. It's strong on multifactor authentication methods – email, fingerprint, the second device, Windows Hello, more – but not so good in other areas, with no general form-filling abilities and no secure password sharing.
A Vulnerability Scanner is supposed to check for and install missing application updates, but it did nothing for us. We tried two ways of launching it, and in each case, nothing happened; there was no new dialog box, no error message, nothing at all.
Other apparent features of the program are entirely separate tools which you must download and install separately. Clicking ‘Protect Me On The Web’ opens the website for McAfee WebAdvisor, for instance, a browser extension that defends you against malware, malicious sites and more. It's handy, but it's also available for free, and you don't have to buy Total Protection to use it.
The feature list continues in the PC Performance area, where you'll find a couple of speedup options.
App Boost optimizes CPU and me/O priorities for foreground applications to improve performance. This won't make much difference – sometimes it'll have no noticeable effect at all – but the company suggests you could see an 11-14% speed increase in the targeted apps, which, if true, is worth having.
A Web Boost feature sounds promising, but it's just a separate module that stops videos automatically playing on your choice of many popular websites (YouTube, Netflix, Twitch.tv, Skype.com, ClickMeeting.com and many more). It's a reasonable idea, and may well make web browsing a little less annoying (a worthwhile goal all on its own), but it's probably not going to deliver much of a speed boost.
There are multiple minor tools to explore. A QuickClean option removes tracking cookies and temporary files and can be scheduled to run automatically. A Shredder securely deletes confidential files so they can't be undeleted, and a Network Monitor looks for intruders connecting to your Wi-Fi. Experienced users will probably have more powerful freeware tools already, but these are easy to use and convenient to access and add a little extra value to the suite
Final verdict:
McAfee Total Protection has lots of features, but none are outstanding, and they're not always well implemented (the interface isn't great, the vulnerability scanner simply didn't work). It's hard to see why you would choose this package when others are faster, cheaper, more accurate or easier to use.
MCAFEE TOTAL PROTECTION MULTI-DEVICE: McAfee total protection 2020 reviews-
As you might guess from the name, McAfee Total Protection Multi-Device isn't just another Windows-based security tool; it has apps for Android, iOS, and Mac, too.
The standard license covers five devices, too, up from the miserly one you'll get with Total Security Individual.
Turn on auto-renewal for your subscription and US users also get access to McAfee's ID Theft Protection Essentials service, which monitors the web for signs of trouble and helps you recover from any problems it finds.
That's an unusual feature for a security suite, and it doesn't seem to have bumped up the price. Despite its premium functionality, McAfee Total Protection Multi-Device costs a very reasonable $40 for a five device, one-year license, $100 on renewal. Norton 360 with LifeLock Select, another major suite with identity theft protection, is priced at a relatively chunky $100 for year one, $150 after that.
Multi-platform :
McAfee's Android app is a capable product with all the essential technology you'll find in the Windows version, along with a bunch of more mobile-oriented tools.
The free edition of the app includes on-demand scanning, anti-theft (GPS blocking, remote cleaning, more), and useful reports highlighting which apps are using the most data. Of course, there are ads, too.
The paid version removes the ads and throws in browsing protection, device cleaning, an app locker and related Guest Mode (control the apps a guest can see on your device), a battery booster and extra protection from unsecured Wi-Fi networks. It's a quality set of tools, and the current 4.5-star rating on the Google Play store suggests most users are happy.
McAfee's iOS offering also has a free version with basic functions, including wireless scanning, anti-theft, and a media vault to securely store private photos and videos. The paid edition also blocks malicious links via McAfee's Safe Web and protects you from phishing sites and ARP Spoofing (that's low-level network trickery).
McAfee's Mac edition doesn't have as many extras, but still, more than covers the essentials, with antivirus, firewall, and browsing protection.
Identity Theft Protection:
Total Protection has a more interesting and unusual extra in a separate Identity Theft protection service for its US customers.
Cyber Monitoring is one of the service highlights, regularly checking the dark web for personal details including your social security number, email addresses, phone numbers, banking and credit card details, driver's license, passport and more. If any of your information shows up online in a data breach, you'll be alerted.
Other features include Social Media Monitoring which alerts you to risks with the content you're sharing, and an optional Social Security Number trace and Address Change Monitoring service which could warn you of scammers trying to steal and use your personal details.
This is still a relatively basic product. You won't get to see your credit report, for instance, or be warned when your score changes, and there's no monitoring of loan or credit card applications, court or criminal records.
If you've no plans to buy separate identity theft protection, anyway, this won't matter much. Whatever the McAfee service gives you, it'll be better than what you'd have otherwise.
But if you've very specific ideas on what you need, or maybe you're looking for the best possible protection, it's probably wise to go shopping for it separately. Check out McAfee's standalone Identity Theft Protection plans to get an idea of what's available, and what it might cost.
Overall value:
Thinking of buying McAfee Total Protection Individual? Then stop! Unless you're completely sure you'll only ever want to protect a single PC, signing up for McAfee Total Protection Multi-Device makes a lot more sense. It's only fractionally more expensive than Total Protection Individual ($40 in year one, $100 on renewal, as opposed to $35 and $80 respectively), yet covers up to five devices rather than one, and supports Android, iOS and Mac, as well as Windows.
Whether Total Protection Multi-Device is good enough to make you choose McAfee in the first place – well, that's more open to question. Probably not, although McAfee's identity protection service might just win you over.
MCAFEE TOTAL PROTECTION FAMILY: McAfee total protection 2020 reviews-
McAfee Total Protection Family doubles your device allowance to a generous 10, but the price stays much the same. You'll pay $45 in year one, and $120 on renewal.
The upgrade gets you another major benefit in McAfee's Safe Family, a parental controls package for Windows, Android and iOS (beware, it doesn't work on Mac). That's a big deal because this isn't the usual feeble security suite addition; McAfee sells it as a standalone app for $50 a year.
Safe Family's core features are much as you'd expect. You're able to block websites by content type, restrict access to specific apps, or limit device access to particular times of the day.
The package is easy to configure, too. Safe Family uses default settings based on the age of your child, getting you off to a quick start, then you can tweak them further to suit your needs.
Furthermore, it's flexible. You can add multiple schedules to decide exactly when your kids can and can't use their devices. If the content filter doesn't quite suit your needs, you're able to allow or block your chosen websites. And, unusually, Safe Family recognizes that absolute rules don't always work. If your kids need more screen time or want to access a specific site, a Requests messaging system allows them to ask you, and – if you approve – they can benefit right away.
Safe Family does a good job of keeping you up to date on what your kids are doing. As soon as it's set up, you're able to view the apps and websites they're accessing, along with any attempts to break the rules. You can even check the location of your kids' device on a map.
It's far from perfect – we'd like more content filtering categories, for instance, and there's no built-in protection to prevent anyone uninstalling the Windows edition – but Safe Family tramples all over the parental controls tools in most security suites.
If you need a decent parental controls system, and you have lots of devices to protect, McAfee Total Protection Family might be a sensible choice. Its $45 cost in year one is only $10 more than you'll pay for the basic Total Protection Individual, so there's minimal risk. Check out the trial, see how it works for you.
1 note
·
View note
Text
How do I access the Microsoft 365 portal login page?
Microsoft 365 is a comprehensive suite of cloud-based productivity tools designed to enhance efficiency and collaboration. Whether you need to access your Outlook email, Teams, OneDrive, or SharePoint, logging into the Microsoft 365 portal is the first step. In this guide, we will walk you through the process of accessing the microsoft365 portal login page, troubleshooting login issues, and enhancing security measures.
What is the Microsoft 365 Portal?
The Microsoft 365 portal is a centralized platform where users can access various Microsoft applications and services. These include:
Outlook – Email and calendar management
Teams – Collaboration and communication
OneDrive – Cloud storage
SharePoint – Team collaboration
Word, Excel, PowerPoint – Office productivity apps
Admin Center – For IT administrators to manage users and security settings
By logging into the Microsoft 365 portal, users can seamlessly switch between these services without needing to enter credentials multiple times.
Steps to Access the Microsoft 365 Portal Login Page
Step 1: Open a Web Browser
Start by opening a web browser of your choice, such as Google Chrome, Mozilla Firefox, Microsoft Edge, or Safari.
Step 2: Enter the Microsoft 365 Portal URL
Type portal.office.com in the address bar and press Enter. This will redirect you to the Microsoft 365 portal homepage.
Alternatively, you can directly enter portal.office.com to go straight to the login page.
Step 3: Enter Your Credentials
Once the login page loads:
Enter your registered Microsoft 365 email address (e.g., [email protected]).
Click Next.
Enter your password.
Click Sign In.
Step 4: Authenticate Your Login (If Required)
Depending on your organization's security settings, you may be prompted to authenticate using:
Multi-Factor Authentication (MFA) – A security code sent to your mobile device or email.
Biometric Authentication – If enabled, you can use Windows Hello or a fingerprint scanner.
Step 5: Access Microsoft 365 Apps
Once logged in, you will see a dashboard with all Microsoft 365 applications. Click on any app to start using it.
How to Troubleshoot Microsoft 365 Login Issues
If you are experiencing issues accessing the Microsoft 365 portal, try the following troubleshooting steps:
1. Check Your Internet Connection
Ensure that you have a stable internet connection by testing other websites.
2. Verify Your Login Credentials
Double-check that you are entering the correct email and password. If you forget your password, click “Forgot Password?” to reset it.
3. Clear Browser Cache and Cookies
Sometimes, stored cache and cookies can interfere with login attempts. Clear your browser’s cache and try again.
4. Try a Different Browser or Device
If the login page does not load properly, try accessing it on another browser or device.
5. Disable VPN or Firewall
Some VPNs or firewalls may block access to Microsoft 365 services. Temporarily disable them and try logging in again.
6. Check Microsoft Service Status
Microsoft services occasionally experience outages. Check the Microsoft Service Health page (https://status.office365.com) to see if there are any ongoing issues.
7. Contact IT Support
If you are part of an organization, contact your IT department for further assistance.
Enhancing Security When Accessing Microsoft 365
Security is crucial when using cloud-based services like Microsoft 365. Here are some best practices to enhance your login security:
1. Enable Multi-Factor Authentication (MFA)
MFA adds an extra layer of protection by requiring a second form of verification, such as a mobile authentication app or SMS code.
2. Use Strong Passwords
Create a strong password using a mix of uppercase letters, lowercase letters, numbers, and special characters. Avoid using easily guessed words like "password123."
3. Keep Your Software Updated
Ensure your browser and operating system are up to date to protect against security vulnerabilities.
4. Beware of Phishing Scams
Do not click on suspicious links or provide login details in response to unsolicited emails.
5. Log Out When Using Public or Shared Computers
Always sign out from your Microsoft 365 account when using a public or shared device.
Conclusion
Accessing the microsoft365 portal login page is a simple process that provides entry to a suite of powerful productivity tools. By following the steps outlined in this guide, you can quickly log in, troubleshoot common issues, and enhance security. Whether you are using Microsoft 365 for personal or business purposes, ensuring smooth and secure access is key to maximizing productivity.
0 notes
Text
Your Outlook Keeps Asking for Password on Window
If your Outlook app keep asking the password again and again even after you have successfully logged in, it can be due to window updates or your Outlook settings has changed. This issue can be taken as an example where outlook keeps troubling you with the login prompts. Get More Details At : http://email-customer-care.com/blog/outlook-keeps-asking-password/

1 note
·
View note
Text
Essential Apps For Any Computer User
With the production nearby, all of us have a few things on the mind may would like clarified. Recreation itself is advisable and an innovation of MMOs. The problem is the company itself significantly has not been very great at keeping people informed. A lot of the information with regard to the release dissapear there, but buried in uncertain to find posts or on the website where do not even notice it. Windows 7 may be installed 1 partition absolutely no problem, but partitioning the volume will help you separate the information with the Windows installation files and programs. When prompted, hit any key near the keyboard produce up the Windows setup screen. Hit the Enter key and subsequently the F8 key on laptop keyboards on the setup screen. Click to choose the existing Windows installation and then hit the D key on key board. Hit buy windows 10 pro upgrade license key while the L at the centre of wipe the hard disk. It might take some time, so wait. Programs for Account Password Finder.One click to recover your passwords, MSN Hotmail password, Yahoo password, Outlook password, IE Auto Complete password, Website login password, dial-up password etc. Just works with your own individual computers. Let's have a look in the best to be able to activate your home windows OS using the internet. windows 10 pro digital license key crack need added with a direct connection or you can just use a modem in this context. First we'll focus on how you activate House windows 7 along with the use of the direct network. windows 10 serial key activation and then proper-click on on PC, and click Properties, following which Activate Glass now. Glass windows will begin to detect an Web net link connection. When it's detected, check out Activate Windows on-line immediately. You'll be required to insert Administrator password for confirmation. They it'll immediate for Windows 7 windows 10 product key. Give this key and click Subsequent, and comply more than directions you need to do activation. Now simply find the disk or partition the want to be able to the os in this handset. Make sure to select the right disk or partition before doing the next stage. It is worth mentioning if you meet any errors activating this online you can always select activate by phone and call the quantity. If you are unable to activate it over the phone through their automated activation process then call back and keep saying customer service after every prompt. After times of not understanding you will transferred any human individuals help. You want to update mobile phone system nicely. In order to perform this task, connect to the internet and run Windows Update. You may also do the same by following Tools after which it click Windows Update. Once update is complete restart Your windows program.
1 note
·
View note
Text
Encryptomatic OpenPGP for Windows Brings Strong Encryption to Desktop and Outlook Email
Encryptomatic OpenPGP is the strong public key encryption tool for Microsoft Windows, and also Microsoft Outlook. Use it to apply encryption protection to files on your Windows PC. You can also use it to encrypt and decrypt Outlook email messages. Today we want to provide you with a an overview of the Encryptomatic OpenPGP Outlook integration.
When you first launch Encryptomatic OpenPGP, the installation wizard walks you through creating a new OpenPGP key pair (a pair consists of a public key you can share with the world, and a private key that must remain confidential). Your key pair allows you to securely communicate through encrypted email. Anyone wanting to send you a secure email will encrypt the message using your public key; only your private key can decrypt or open the message. It's very important to keep your private key, well, private! You can also import most other OpenPGP compatible keys created by other software packages into Encryptomatic OpenPGP
After downloading and installing Encryptomatic OpenPGP from the developer's website, you can access its functions from a new Outlook email window. The software integrates into the Windows and Outlook menu systems. Its location in the Outlook toolbar will depend on whether you are using Outlook's classic or simplified menu.
This image shows how Encryptomatic OpenPGP shows if you have selected the classic Outlook toolbar.

Classic Outlook toolbar and Encryptomatic OpenPGP
If you elect to use Outlook's simplified toolbar, you will need to click or tap on the expansion button to view the Encryptomatic OpenPGP functions.
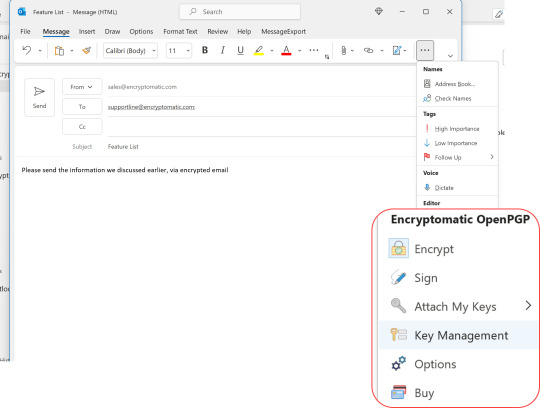
Encryptomatic OpenPGP integrated with Outlook simplified menu.
Encrypting message can be done by clicking on the Encrypt button. You can also automate encryption by setting rules. Rules allow you to tell Encryptomatic OpenPGP when it should always encrypt a message, such as when a specific email address or domain is present in the message's TO: field.
To make use of this functionality, go to Settings > Rules. Next, type the email address or domain, choose whether the rule causes the software to encrypt the email, sign the email, or both, and then choose "Add New Rule."
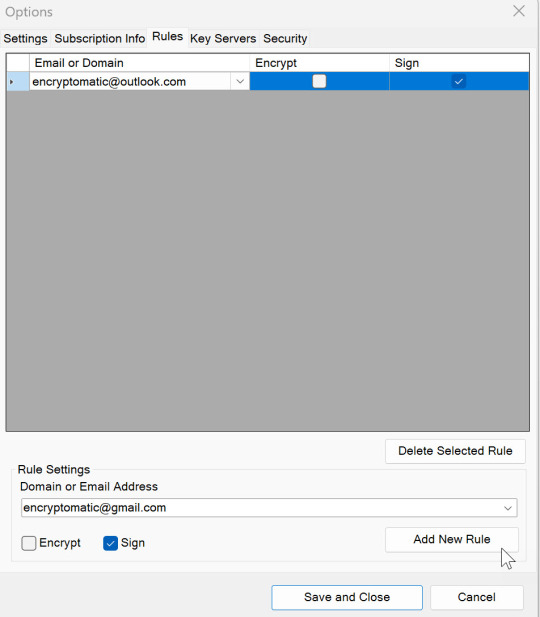
Setting Email Encryption Rules by Domain or Email
Encryptomatic OpenPGP also works with standard OpenPGP key servers so you can publish your public key, or discover public keys for other users. Key servers are still widely used, but they concept is not ageing well. If you choose to use key public servers, you may find that spammers have harvested your email. In some cases there have been "attacks" on public key servers uploading false public keys for various email addresses.

Public OpenPGP Key Servers Are Supported
Encryptomatic OpenPGP allows you to include private key servers. For example, you could upload public keys to your company's own key server, if they have one. Just beware of the common pitfalls if you choose to use the open and well known public key servers.
Encryptomatic OpenPGP provides you with options that help you configure how it operates. You'll find them in the Settings area.
When you send an encrypted message, your private keys are secured by your password. You can set a delay for how often Encryptomatic OpenPGP should prompt you for a password. The default is 5 minutes, meaning that if you send another encrypted email within 5 minutes of the last encrypted email, you won't be prompted again to provide the password. This is a matter of personal workflow, but generally, 5 minutes or less is the most secure opsec.


Encryptomatic OpenPGP is free for personal use. We ask businesses to support the project by purchasing an inexpensive annual license. For more information, please visit https://www.encryptomatic.com/openpgp/
0 notes
Text
Microsoft office 2016 mac issues

#MICROSOFT OFFICE 2016 MAC ISSUES FOR MAC#
#MICROSOFT OFFICE 2016 MAC ISSUES INSTALL#
#MICROSOFT OFFICE 2016 MAC ISSUES INSTALL#
Yes, see Install and set up Office on an iPhone or iPad and set up email on an iOS device (iPhone or iPad). In the Dock, Control+click or right-click the app icon and choose Options > Keep in Dock.Ĭan I install Office on my iPhone or iPad? Go to Finder > Applications and open the Office app you want. Microsoft Office 2016 Home and Business (Mac) contains the applications Word, Excel, Outlook, PowerPoint and OneNote. How do I pin the Office app icons to the dock? If Office activation fails, see What to try if you can't install or activate Office for Mac. If you need help activating Office, see Activate Office for Mac. The What's New window opens automatically when you launch Word.
#MICROSOFT OFFICE 2016 MAC ISSUES FOR MAC#
Step 3: Launch an Office for Mac app and start the activation processĬlick the Launchpad icon in the Dock to display all of your apps.Ĭlick the Microsoft Word icon in the Launchpad. If Office installation fails, see What to try if you can't install or activate Office for Mac. Then type: killall cfprefsd to kill the cached preferences and press Enter: 4. I already have a license and trying to reinstall it. When I start my office it asks for activation. I got a new one and restored my environment from the old one. In terminal type: defaults delete and press Enter: 3. I have MS Office 2016 for Mac Book Pro installed on my previous laptop. Click Close when the installation is finished. Search for Terminal on your Mac by going to the spyglass in the top right corner and searching for Terminal: 2. (This is the password that you use to log in to your Mac.) The following issues occur in the Unified Logging Service (ULS) log: The server has redirected to a non. Simply go to the Help menu and then select Check For. Additionally, you may see any of the following symptoms. The first and most common solution is to run Microsoft AutoUpdate from within Office 2016 for Mac. Note: If you want to only install specific Office apps and not the entire suite, click the Customize button and uncheck the programs you don't want.Įnter your Mac login password, if prompted, and then click Install Software. When you try to activate or sign in to any of the Microsoft Office 2016 applications after you install the version 15.33 update, you receive a blank authentication screen.
0 notes
Text
Itsycal mac integrate with outlook

#ITSYCAL MAC INTEGRATE WITH OUTLOOK HOW TO#
#ITSYCAL MAC INTEGRATE WITH OUTLOOK FOR MAC#
#ITSYCAL MAC INTEGRATE WITH OUTLOOK INSTALL#
Sync your Outlook calendar with iCal via a USB drive Click on “Server Options” on the menu and add this URL to the prompt that pops up (replace username with your own account name): Click “Add” to add the calendar, and you should be good to go!Ĥ.Pick a name for your new calendar and type in your Google email address and password.Then, go to the “Accounts” tab and click the “+” button to add a new calendar. Launch iCal and select “Preferences” from the menu.Second, you need to sync your Google calendar to your iCal. Specify the parameters of how you’d like your calendars to sync and click “Save”.Enter your Google email address and password when prompted in the app, and click on the “2-way” option.
#ITSYCAL MAC INTEGRATE WITH OUTLOOK INSTALL#
Download and install the program Google Calendar Sync on your computer or mobile device.
#ITSYCAL MAC INTEGRATE WITH OUTLOOK HOW TO#
Here’s how to do it:įirst, you need to sync your Outlook calendar Mac with your Google calendar. It’s more time consuming than using SyncMate, but it gets the job done for completely free. This program was created before SyncMate existed, because, at the time, there was no direct way to sync iCal with Outlook. This process is a bit more complicated, as it involves syncing your iCal with Google first, then using the Google Calendar Sync program to sync your Google calendar with Outlook. Sync your iCal with your Google calendar via Google Calendar Sync In our opinion, the safer (and simpler) option is to use software specifically designed to do this job for you.ģ. Please keep in mind that if you choose to sync iCal with Outlook manually, you risk losing data and you may need Mac backup. Choose “All Calendar” to save your entire calendar, or choose a specific date range.The “Save As” pop up window should appear - click on the “More Options” button at the center-right bottom of the window.Go to File Menu, then click on Save Calendar.Press the button that looks like a calendar on the lower left-hand side of Outlook.If you are choosing to do this task manually, it’s probably best that you have some technical knowledge and are experienced with Mac and Windows. There is also software available that will do this task for you, but here we will explain how to sync iCal with Outlook. So you need to sync your Microsoft Outlook emails and files to your iCal software on your Mac? There are a few different ways to do so - some simple, and some a bit more complicated. Transfer Outlook Calendar to iCal manually There is a handy Auto-sync option - go for it if you want the app to do all the work for you in the background, and you can carry on with your other tasks.Ģ. Login using your username and password.Note, that sync is performed between your Mac and Outlook online account. Wizard will assist you, just make sure to click Microsoft Services button to choose Outlook. In the left pane click ‘Add New’ link.Once the installation is complete, launch the application to display the main window. Download and install SyncMate on your Mac.To sync your Outlook Calendar with Mac Calendar, do as follows:
#ITSYCAL MAC INTEGRATE WITH OUTLOOK FOR MAC#
You can opt for automatic synchronization, the app will do it for you in the background, so nothing will distract you from your work.ĭue to macOS limitations SyncMate only syncs with online Outlook accounts sync with desktop Outlook app for Mac is not supported at this time. The application can sync not only Calendar entries, but also Contacts, files, folders and media libraries (iTunes, iPhoto).
0 notes
Text
Grammarly plugin for microsoft office mac download

Grammarly plugin for microsoft office mac download how to#
Grammarly plugin for microsoft office mac download install#
Grammarly plugin for microsoft office mac download password#
Grammarly plugin for microsoft office mac download Offline#
Grammarly plugin for microsoft office mac download download#
Once the setup is complete, open an existing or create a new Word document.
Note: Keep in mind that Grammarly will not function with Microsoft Word if you hit the Skip button and don’t log in with your user credentials.
Once the installation is complete, create a Grammarly account or log-in with your existing one.
Grammarly plugin for microsoft office mac download install#
Note: Make sure that any instance of Word or Outlook is not running before you hit the Install button. Selecting the products that you’ll use Grammarly in Then, click the Install button to begin the installation process.
Select the Office products that you want to use the Grammarly extension on.
Click Get Started at the first installation prompt.
Double-click on the GrammarlyAddInSetup.exe (the installation executable that you’ve just downloaded).
Grammarly plugin for microsoft office mac download download#
Visit this link ( here) and click the freeload button to download the Office extension version of the software.
The steps of installing Grammarly as a Microsoft Office extension are a little more tedious than just enabling the extension in your browser, but we’ll guide you through the whole thing.įollow the steps below to install Grammarly on Microsoft Office and use it with Microsoft Word: This is great because we all know that the default proofreading feature of Word is certainly not reliable. I’ve been using Grammarly for a while now, but I only recently discovered that you can also use it with the Word Editor as a Microsoft Office extension.
Grammarly plugin for microsoft office mac download how to#
Grammarly Chrome extension How to use Grammarly with Microsoft Word You can also use it their own editor to store and paste documents for automatic proofread. Most users make use of the free Grammarly extensions or add-ons for Firefox and Chrome to correct emails, blog posts, and social media post. But did you know that Grammarly also offers a free extension that will allow you to use it with Microsoft Word and other Microsoft Office tools?
Grammarly plugin for microsoft office mac download Offline#
If you work with words a lot, chances are you are already using Grammarly since it’s already the most popular online and offline checking tool. It’s capable of checking for spelling errors, verb agreement, subject agreement, sentence formation, punctuation mistakes and a lot more if you go beyond the free version. Sure, it’s not as good a human editor, but it comes pretty darn close. Using Grammarly to check for grammar errors In this case, a tool like Grammarly can be just what you need to help you find grammar errors. But making sure that your grammar is top of the line with every report or material that you make takes time and will actually hurt your productivity. You should see a small green dot in the upper right of your Home tab that reads, "Enable Grammarly." For more about using Grammarly, check out the Using Grammarly’s Word App webpage.For most office jobs, grammar skills are very important because they make the content you’re easy to read and understandable.
In the Grammarly popup window, click "Finish.".
If you had Microsoft Office programs open, save your work then close all programs.
If Microsoft Word was already open, a popup will appear that asks you to restart Microsoft Office.
Wait while the installation completes-you can watch the progress on the loading bar.
Make sure "Grammarly for Word" is checked.
Wait a moment, then a popup will open.
A pop-up window might open asking if you want to run the file.
Wait for the Add-In to download at the bottom of your browser window, then click to open it.
On the Grammarly Apps screen, scroll down to Grammarly for Microsoft Office and choose "Install.".
On the new screen that opens, choose "Apps" from the left-hand toolbar.
For more instructions on setting up an account, visit our Accessing Grammarly page.
If you do not yet have a Grammarly account, you can create one with your Walden e-mail and set a new password.
Grammarly plugin for microsoft office mac download password#
Log in with your Walden email (don’t forget the "u" in ) and password for your Grammarly account.You may also need to allow pop ups in your browser settings to complete this process.Save and close anything you have open in Microsoft Word since you’ll need to restart it to add the app.Here are some steps for how to download Grammarly’s new app and use it on your Word document drafts! Instead of submitting your paper to Grammarly through Grammarly’s website, you can simply enable Grammarly once your document is ready to check. Grammarly has a new app (also called an add-in) for Microsoft Office that enables Walden students to add Grammarly’s checks directly to a Microsoft Word document.
0 notes
Text
Mozilla thunderbird keeps freezing

#Mozilla thunderbird keeps freezing update#
#Mozilla thunderbird keeps freezing Patch#
#Mozilla thunderbird keeps freezing code#
#Mozilla thunderbird keeps freezing password#
“In general, these flaws cannot be exploited through email in the Thunderbird product because scripting is disabled when reading mail, but are potentially risks in browser or browser-like contexts.” However, Mozilla says that exploiting these vulnerabilities with a malicious email isn’t possible because of the way Thunderbird is configured right now. Some of these bugs showed evidence of memory corruption and we presume that with enough effort some of these could have been exploited to run arbitrary code,” Mozilla says. “Mozilla developer Jason Kratzer reported memory safety bugs present in Thunderbird 78.2.
#Mozilla thunderbird keeps freezing code#
These problems have been discovered and reported by a Mozilla developer, and the parent company explains that in the worst-case scenario, an attacker abusing the vulnerabilities could get access to run arbitrary code on devices where an unpatched version of Mozilla Thunderbird is running. Out of these vulnerabilities, only the memory safety bugs have been flagged with a high severity rating.
CVE-2020-15677: Download origin spoofing via redirect.
CVE-2020-15676: XSS when pasting attacker-controlled data into a contenteditable element.
CVE-2020-15678: When recursing through layers while scrolling, an iterator may have become invalid, resulting in a potential use-after-free scenario.
CVE-2020-15673: Memory safety bugs fixed in Thunderbird 78.3.
Mozilla Thunderbird 78.3 also comes with the following security fixes: Beginning with this update, the installation of legacy MailExtensions is disabled, according to the official changelog.
#Mozilla thunderbird keeps freezing update#
Then, the update also includes a change for MailExtensions. OpenPGP: Creating a new key pair did not automatically select it for use.
#Mozilla thunderbird keeps freezing password#
Selecting "Cancel" on the Master Password prompt at startup incorrectly reported corrupted OpenPGP data.
OpenPGP: Do not show external key UI when disabled by preference.
OpenPGP: Improved decryption performance with large messages.
These are the OpenPGP improvements available in this update, as per the official changelog: There are no new features in this update, but only changes and fixes.įirst and foremost, the OpenPGP implementation is getting more refinements, and Mozilla says this update brings improved decryption performance with large messages, and the UI to hide the external key is now disabled by preference. Other than that, Mozilla Thunderbird version 78.3.1 comes with all the improvements included in its predecessor, so let’s have a look at what’s included in version 78.3.0 too.
#Mozilla thunderbird keeps freezing Patch#
So this new build is more of an emergency patch that deals with the whole thing and thus brings Thunderbird back to fully working condition. It’s a fix that resolves crashes reported in Thunderbird 78.3.0, an update that was released only a few days before. The most recent update shipped to Mozilla Thunderbird users is version 78.3.1, and as the parent company itself explains, there’s just one important fix in this release. The feature lineup is absolutely impressive, and Mozilla keeps improving it with every new release. Mozilla has released a new version of the Thunderbird email app, and this time the changelog points to a super-important fix that brings the client back to working condition.Īs we all know already, Mozilla Thunderbird is one of the best email apps currently around, and if you ask me, it’s one of the best alternatives to Microsoft Outlook right now.īut the simple thing that it’s available with a freeware license makes Thunderbird the go-to app for so many users out there, and it happens for a good reason.
0 notes
Text
How to install Microsoft Office from portal.office.com?
Microsoft Office is one of the most widely used productivity suites globally, offering essential tools like Word, Excel, PowerPoint, Outlook, and more. Installing Microsoft Office from portal.office.com is a straightforward process. In this comprehensive guide, we will walk you through each step to successfully install Microsoft Office on your device.
Prerequisites for Installing Microsoft Office
Before proceeding, ensure you meet the following requirements:
A valid Microsoft account (e.g., Outlook, Hotmail, or a work/school account)
An active Microsoft Office subscription (such as Microsoft 365)
A stable internet connection
Sufficient storage space on your device
Step 1: Sign In to portal.office.com
Open your preferred web browser (e.g., Chrome, Firefox, Edge).
Visit portal.office.com.
Click on Sign in.
Enter your Microsoft account credentials (email and password).
Complete any additional security verifications if prompted.
Step 2: Access Your Account Dashboard
Once signed in, you will land on the Office home page. This is your central hub for accessing Microsoft Office apps and services. Look for the Install Office button.
Step 3: Download Microsoft Office
Click on the Install Office button.
Select Office 365 apps or Install Office from the dropdown menu.
The download process will begin. Depending on your internet speed, it may take a few minutes.
Step 4: Run the Installer
Once the download is complete, locate the installer file in your Downloads folder (e.g., Setup.exe for Windows or .pkg for macOS).
Double-click the file to run the installer.
Follow the on-screen instructions.
Accept the terms and conditions.
Click on Install to proceed.
Step 5: Complete the Installation
The installation progress will be displayed on your screen.
Once finished, you will see a confirmation message.
Click Close or Finish to complete the process.
Step 6: Activate Microsoft Office
Open any Office app (e.g., Word, Excel, or PowerPoint).
Click Sign in when prompted.
Enter your Microsoft account details.
Follow the activation instructions.
Your Office apps are now ready to use.
Troubleshooting Installation Issues
If you encounter issues during installation, consider the following solutions:
Ensure your device meets the minimum system requirements.
Restart your device and try again.
Temporarily disable antivirus software.
Clear browser cache and cookies.
Tips for a Successful Installation
Use a high-speed internet connection.
Ensure you have sufficient disk space.
Keep your system updated with the latest software patches.
Conclusion
Installing Microsoft Office from portal.office.com is a simple process that ensures you have access to powerful productivity tools. By following these steps, you can complete the installation quickly and efficiently. If you experience any issues, Microsoft Support is readily available to assist you.
For more tech guides and troubleshooting tips, stay tuned to our blog!
0 notes