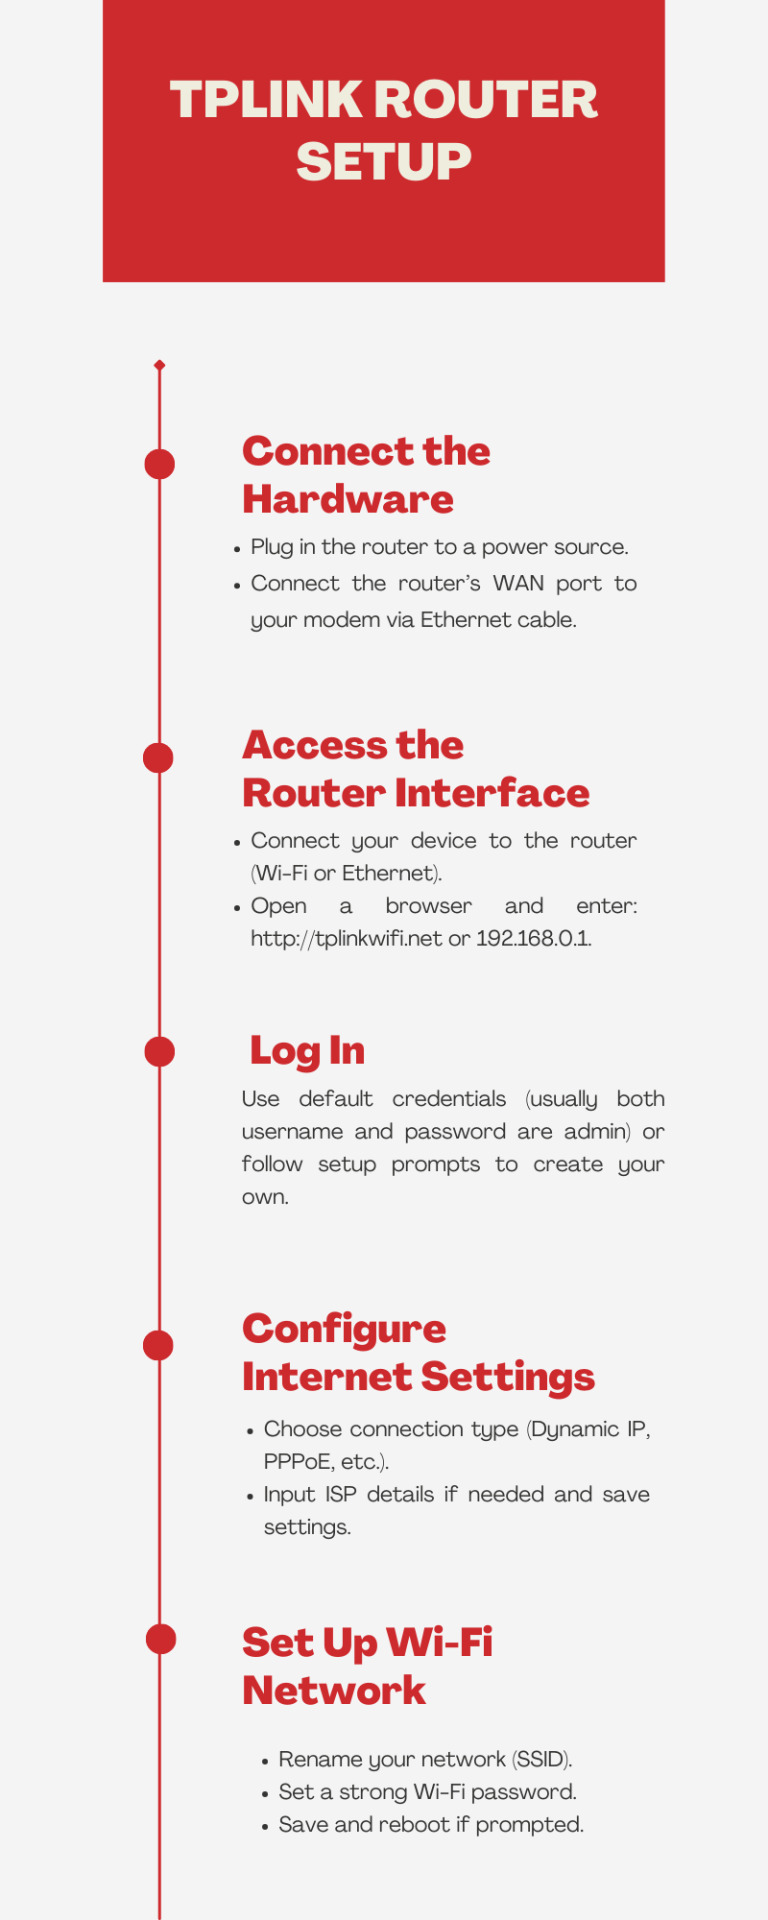
#Tplink router setup
Explore tagged Tumblr posts
Visit Tumblr Blog
Explore Tumblr blogs with no restrictions, modern design and the best experience.
Last Seen Tumblr Blogs


Fun Fact
The Tumblr app for Google Glass was released on May 16, 2013.
Text
Tplink Router Setup
To perform the tplink router setup, connect the router to your modem and power. Connect your computer or phone to the TP-Link WiFi network and open a web browser. Enter the default IP address (usually 192.168.0.1 or 192.168.1.1) and follow the setup wizard to configure your network.
0 notes
Text
The Tplink router setup can be easily performed using the Tether app. Proceeding with the app, firstly download the recent version of the app on your smartphone. Now, a login page prompts, enter your login credentials. Further, configure the Settings accordingly from the quick setup wizard of the router. If you get stuck, let us know!
0 notes
Video
youtube
TP-Link EC220-G5 AC1200 Wireless Dual Band Gigabit Router Setup
0 notes
Text
How to Set Up TP-Link WiFi Extender ?
Expanding your Wi-Fi coverage with Tplink extender setup is quite simple. Plug the extender into an outlet within range of your router. You can use the WPS button on both devices for a quick connection, or connect to the extender's Wi-Fi and visit tplinkextender.net in a browser, following the intuitive setup wizard. Boost your wireless signal effortlessly.

0 notes
Text
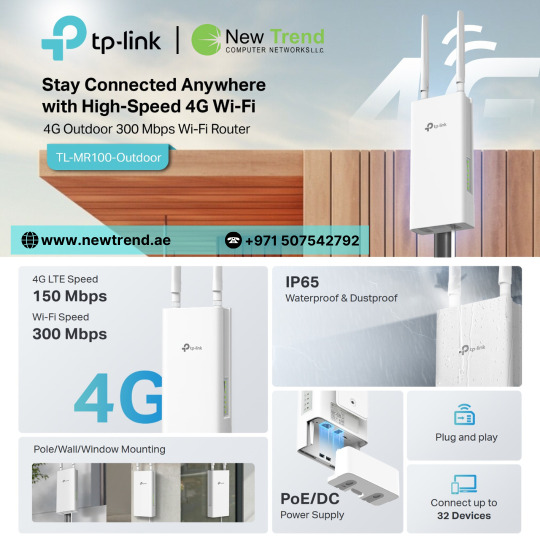
Experience seamless 4G LTE connectivity with the TL-MR100-OUTDOOR – built for reliable performance in harsh outdoor environments. Ideal for remote areas, this rugged router ensures stable internet with weatherproof design, powerful antennas, and plug-and-play setup. Stay connected anywhere, anytime with TP-Link’s trusted outdoor networking solution.
For more information, Visit:https://newtrend.ae/product-category/tplink/ Live chat: +971 507542792
#TPLINK#OutdoorRouter#4GLTE#RuggedConnectivity#RemoteAccess#WeatherproofWiFi#StayConnected#NetworkingSolutions#InternetAnywhere#NewTrendTech
0 notes
Text
can you put a vpn on a tplink router
���🌍✨ Get 3 Months FREE VPN - Secure & Private Internet Access Worldwide! Click Here ✨🌍🔒
can you put a vpn on a tplink router
VPN setup on TP-Link router
Setting up a VPN on your TP-Link router can enhance your online security and privacy, allowing you to browse the internet anonymously and securely. Follow these steps to configure your TP-Link router with a VPN:
Choose a VPN Provider: Start by selecting a VPN provider that offers router support. Make sure the provider offers detailed instructions for setting up their service on TP-Link routers.
Gather Required Information: Before proceeding, gather the necessary information from your VPN provider, including the server address, username, password, and any encryption settings.
Access Router Settings: Open a web browser on a device connected to your TP-Link router and enter the router's IP address in the address bar. Log in to the router's admin panel using your username and password.
Navigate to VPN Settings: Once logged in, locate the VPN settings section within your router's configuration interface. This may vary depending on the router model, but it's typically found under the "Advanced" or "Security" tab.
Enter VPN Configuration Details: Enter the VPN configuration details provided by your VPN provider into the appropriate fields. This usually includes the server address, username, password, and any additional settings required by your VPN service.
Apply Settings and Reboot Router: After entering the VPN configuration details, apply the settings and reboot your TP-Link router to activate the VPN connection.
Test the VPN Connection: Once the router has rebooted, test the VPN connection to ensure it's working correctly. You can do this by visiting a website that displays your IP address and verifying that it matches the IP address provided by your VPN provider.
Optional: Configure Additional Settings: Depending on your preferences and the features offered by your VPN provider, you may want to explore and configure additional settings such as split tunneling, port forwarding, or DNS settings.
By following these steps, you can easily set up a VPN on your TP-Link router and enjoy the benefits of enhanced online security and privacy for all devices connected to your home network.
TP-Link router VPN configuration
Title: Simplifying Your Online Security: A Guide to TP-Link Router VPN Configuration
In an era where online privacy and security are of paramount importance, setting up a Virtual Private Network (VPN) on your TP-Link router can provide an additional layer of protection for your internet connection. By encrypting your internet traffic and masking your IP address, a VPN ensures that your online activities remain private and secure from prying eyes, whether you're browsing the web, streaming content, or accessing sensitive information.
Configuring a VPN on your TP-Link router is a straightforward process that can be completed in just a few steps. Here's a simple guide to help you get started:
Choose a VPN Service: Before you begin, you'll need to subscribe to a reputable VPN service provider. Make sure to choose a service that offers compatibility with TP-Link routers and provides robust security features.
Access Router Settings: Using a web browser on a device connected to your TP-Link router, access the router's admin panel by entering the router's IP address (typically 192.168.0.1 or 192.168.1.1) into the address bar.
Login and Navigate to VPN Settings: Enter your router's username and password to access the admin panel. Once logged in, navigate to the VPN section in the router settings menu.
Enter VPN Configuration Details: Here, you'll need to enter the configuration details provided by your VPN service provider. This usually includes the VPN server address, VPN protocol (such as OpenVPN or PPTP), and your VPN username and password.
Save Settings and Connect: After entering the VPN configuration details, save the settings and initiate the connection. Your TP-Link router will now establish a secure VPN connection, encrypting all internet traffic passing through it.
Verify Connection: Once connected, verify that your VPN connection is active by checking your IP address using an online tool or the settings in your router's admin panel.
By following these steps, you can enhance your online security and privacy by configuring a VPN on your TP-Link router. Enjoy the peace of mind knowing that your internet connection is encrypted and your data is safe from prying eyes.
Installing VPN on TP-Link router
When it comes to ensuring your online privacy and security, installing a VPN on your TP-Link router can be a great solution. A VPN, or Virtual Private Network, encrypts your internet connection and routes it through a remote server, making it difficult for anyone to track your online activities. By setting up a VPN directly on your router, you can protect all the devices connected to your network, including smartphones, laptops, smart TVs, and more.
To install a VPN on your TP-Link router, you first need to choose a VPN service provider that supports router configurations. Once you have signed up for a VPN service, follow the provider's instructions to configure your TP-Link router. Typically, this involves accessing your router's settings through a web browser, entering the VPN connection details provided by your provider, and saving the settings.
After successfully setting up the VPN on your TP-Link router, all the devices connected to your network will automatically benefit from the VPN protection. This means that your internet traffic will be encrypted, your IP address will be hidden, and your online activities will be secure from prying eyes.
Installing a VPN on your TP-Link router is a straightforward process that can significantly enhance your online security and privacy. By taking this simple step, you can enjoy a safer and more private internet browsing experience for all your connected devices.
TP-Link router VPN compatibility
When it comes to ensuring online privacy and security, using a Virtual Private Network (VPN) is a popular choice among users. VPNs encrypt the internet connection, providing anonymity and protection from potential cyber threats. However, not all routers are compatible with VPN services, which is why it's essential to choose a router that supports VPN setups.
TP-Link routers are known for their reliability and performance, but not all models are VPN-compatible. It's crucial to verify if a TP-Link router supports VPN services before purchasing one.
Some TP-Link routers come with built-in VPN capabilities, allowing users to easily set up and configure VPN connections. These routers offer various VPN protocols, such as PPTP, L2TP, and OpenVPN, making it convenient for users to choose one that best fits their needs.
For routers that do not have built-in VPN support, users can still utilize VPN services by manually configuring the connection settings on the router. This process may vary depending on the router model and the VPN service provider, so it's essential to follow specific instructions provided by both parties.
By using a VPN-compatible TP-Link router, users can secure their internet traffic and protect their online activities from prying eyes. Whether for personal privacy or business security, having a VPN-enabled router adds an extra layer of protection to any network.
Overall, ensuring VPN compatibility when selecting a TP-Link router is crucial for those looking to enhance their online security and privacy effortlessly.
VPN client for TP-Link router
A VPN client for TP-Link routers can enhance your online security and privacy by encrypting your internet connection. With the increasing importance of protecting personal data online, using a VPN client on your TP-Link router is a smart choice.
Setting up a VPN client on a TP-Link router enables all devices connected to the network to benefit from the encrypted connection without needing to install a separate VPN app on each device. This means that your smart TV, gaming console, and even smart home devices can all enjoy the added security and privacy that a VPN provides.
There are various VPN services that offer support for TP-Link routers, making it easy to find one that suits your needs. Once you have chosen a VPN service provider, you can follow the step-by-step instructions provided by the service to set up the VPN client on your TP-Link router.
By using a VPN client on your TP-Link router, you can also bypass geo-restrictions and access content that may be blocked in your region. Additionally, a VPN can help prevent your Internet Service Provider from tracking your online activities and browsing history.
Overall, adding a VPN client to your TP-Link router is a practical way to enhance your online security, privacy, and freedom while ensuring that all devices connected to your network benefit from the added layer of protection.
0 notes
Text
How To Setup Your TPlink Archer AXE75? Easy Tips & Tricks!
To optimize the TPlink Archer AXE75, follow the setup process by powering on your router, opening a web browser, and entering 192.168.110.1 to access router configuration and network parameters. Suppose you are still in a dilemma about how to set up TP-Link Archer AXE75, it will be the best option to get in touch with our technicians who will help you know the whole setup process!
0 notes
Text
If you are wondering how to connect TP-Link WiFi extender to modem, you can do so easily. You cannot connect the extender to the modem direct. You need to connect your router to the modem using an Ethernet cable. Once the connection is secure, you need to log into the extender and connect your extender to the router. Once the conneciton is proper, you can start using the extender properly. Still need help? Connect with our experts!
0 notes
Text
How to Setup the TP-Link Extender?
A weak Wi-Fi network can be really frustrating, mainly when it causes dead zones and slow internet speeds in your home/office. To overcome such challenges, the TP Link Extender Setup acts as an excellent solution. Setting up the TP-Link extender is very easy to conduct, and you can do it very easily.
This blog post includes the complete TP Link Extender Setup through the WPS button, web browser, and the TP-Link Tether app. So read through the following blog post right away.
Steps for Setting Up the TP-Link Extender
Setting up your TP-Link extender is pretty simple and you can easily do it through the following steps:
Tplink Extender Setup through the WPS Button
The first thing you must do is place your extender near the router before you start the setup process.
After that, you need to plug your extender into a nearby power outlet and wait for it to completely power on. If you see the Green LED light, it means that the extender is successfully On.
Consequently, you must locate & hold down the “WPS Button” on your router and release it after a few seconds.
Next, you should also press the WPS button on the TP-Link extender within 2 minutes.
If you see the WPS LED blinking on the extender, you must know that it is successfully connecting to the router.
The WPS LED will become solid green once the connection is established between the extender and the router.
Tplink Extender Setup through the Web Browser
To set up the TP-Link extender through the Web Browser, plug the extender into a power plug in the first place.
After that, you must open a web browser and enter “192.168.0.1” or “tplinkrepeater.net” in the URL bar.
Next, you’ll be prompted to the TP-Link login page where you must enter the admin username & password.
Consequently, click on the “Login” button and choose your desired mode - Range Extender.
After that, the setup wizard will scan and connect to the available Wi-Fi network.
Finally, log into your extended Wi-Fi network and configure the Wi-Fi settings.
After configuring the Wi-Fi settings, you must click on the “Apply” button to save the settings.
Tplink Extender Setup through the “TP-Link Tether” App
To set up the extender through the app, download the “TP-Link Tether” from the Play Store or the App Store.
Next, you must open the app and follow the in-app instructions to create an account, if you don’t have one.
If you already have an account, try logging in to the app using your admin username & password.
After that, you must connect your smartphone to the TP-Link extender’s default network.
Then you must click on the “+” icon, choose the “Range Extender” and follow the on-screen setup wizard.
Finally, the app will guide you through the complete setup process, and customize the extender’s network issues.
Follow the above steps carefully and successfully complete the Tplink extender setup.
Wrapping It Up
With these effective methods, you can set up your TP-Link Extender easily to extend your Wi-Fi network, eliminate all the dead zones, and enjoy the internet experience across your office or home. Choose the appropriate method that befits your desire and prepare to improve your Wi-Fi network with ease.
But if you are unable to conduct the TP Link Extender Setup, feel free to connect with our technical experts. They’ll guide you through the complete setup process and help you resolve the possible setup issues. So, get in touch with our technical experts right away.
0 notes
Text
How do I fix my modem not connecting to the Internet? Tplinkwifi.net
To reboot your modem: 1. Unplug the power cord from the back of the modem. Check to make sure all the lights on the modem are OFF.
2. Wait one full minute. Plug the power cord back into the modem.
3. Wait for the internet light or main status light to turn green.
4. Now try connecting to the internet again.
Read more at https://www.tplinkwifirouter.net/.
#tplink#tplinkwifi.net#TP-Link Router Setup#Tp-Link Admin Page#tp-link router settings#tplink router login#tplink router setup#How do I fix my modem not connecting to the Internet?#How do I fix my modem not connecting to the Internet? Tplinkwifi.net
2 notes
·
View notes
Text
TP-Link router login via www.tplinkwifi.net
Tplinkwifi.net is one of the best and foremost names in the wireless networking industry. The TP-Link produces some of the most reliable and durable products for its users. TP-Link produces the networking devices like Wi-Fi routers, modems, networking cables, and power supply adapters etc. The users earlier had to face a lot of issues while logging in to their TP-Link routers and other Wi-Fi devices like range extenders etc. because the users used to login through the default IP address i.e. http://192.168.1.1or 192.168.0.1. This problem used to happen due to the wrong input of the IP address which is quite complex to remember. Therefore, TP-Link created the web domain www.tplinkwifi.net for the ease of their users while logging in to the TP-Link routers.
#www.tplinkwifi.net#TP-Link router login#tplinkwifi.net#http://tplinkwifi.net#tplinkwifi.net login#tplinkwifi.net setup#tplink router setup#tplink router login
1 note
·
View note
Text
Guidelines do the easy tplink router login process
Are trying to do the tplink router login but you are not able to do it. You can now do the login without having much trouble. All you have to do is follow the instructions provided here and you are all good to go. If you face any issues while doing the login, you can contact us.
1 note
·
View note
Video
youtube
TP link BE230 3 6Gbps New Launching WIFI 7 Router setup
0 notes
Text
Troubleshooting Tplink Extender Setup: Common Issues and Solutions
The Tplink extender setup can be easily performed using the WPS button method. For that, you need to locate the button first on your device and press it using a small pointed object. Simultaneously, press the WPS button on the router within 2 minutes. When the LED indicator turns on, release it. For more info, approach us!
0 notes
Text
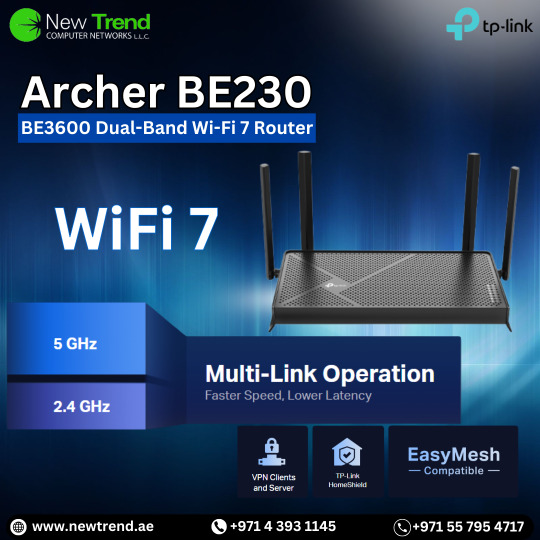
BE3600 Dual-Band Wi-Fi 7 Router
Features - 3.6 Gbps Dual-Band WiFi 7 - 2× 2.5G Ports - EasyMesh-Compatible - Easy Setup and Use
For more information, Visit:https://newtrend.ae/product-category/tplink/ Live chat: +971 507542792
#ArcherBE230#WiFi7#DualBandRouter#3600Mbps#FastConnectivity#TPLink#Networking#EasyMesh#NextGenWiFi#TechInnovation#SeamlessConnectivity#FutureOfWiFi#NewTrend#2_5GPorts#ReliableNetwork#EasySetup
0 notes
Text
How To Setup TP-Link Router Through http://tplinkwifi.net?

To get into web management page of tplink wifi router, you need to make use of a default web address http://tplinkwifi.net. The default web address helps a user to login and configure tplink wireless router. User can also access the tplink router login page using the IP address 192.168.1.1. Get in contact with us, to know more.
1 note
·
View note