#Wifi-ext setup
Explore tagged Tumblr posts
Visit Tumblr Blog
Explore Tumblr blogs with no restrictions, modern design and the best experience.
Last Seen Tumblr Blogs


Fun Fact
Premium Tumblr themes are available from anywhere between $9 to $49.
Text
Enjoy Uninterrupted Connectivity With Netgear Extender Setup
Want to eradicate dead zones from your home or office space but do not know how to conduct the Netgear wifi extender setup process seamlessly? If the answer to this question is yes, then you have found the right post. In this post we'll be sharing three different setup methods for your Netgear extender. Each method has its own advantages, so you can pick one which you find easier to conduct and serves your needs well. So let's start with the first Netgear wifi extender setup method which is done using the WPS button.
Quick Setup: WPS Method
Before you carry on with this setup method, ensure one important aspect. It is that your existing router must support a Wifi protected setup method. In case it doesn't, then you skip this one and move directly to the next head. Now let's check out the steps one by one for the WPS setup method:
✓ First if your Netgear extender has a mode switch button, then ensure it is set to extender.
✓ Now thoughtfully plot the wifi signal repeater in close proximity to your router. With the help of its adapter, activate it.
✓ Once the Netgear wifi range extender boots up properly, you can press the WPS button on it.
✓ While the WPS light on the repeater is flickering, press the wifi protected setup switch on the router.
✓ After you successfully complete the above Netgear wifi extender setup steps, you need to wait for the WPS LED as well as for the router LED to turn green or blue.
✓ When you get the above indication, you can unplug the Netgear range extender and locate it in an area where you require coverage. Turn it on.
Note: Do not move it to an area where the signals from the router are less than 50 percent. Because effective communication between the router and the Netgear wifi repeater is crucial for the seamless connectivity.
✓ Finally, enjoy the Netgear wifi extender setup by connecting your smart gadgets to the new network. The network identity remains similar to that of your router but it has EXT in the end.
Deep Configuration: Using Web Browser
Users who want to configure their Netgear wifi range extender deeply, can pick the web browser setup method. So the steps for it are:
First strategically plot the Netgear wifi extender in an area which is halfway from the router and the area where you require extended connectivity.
Now, ensure your router is linked to the Internet. As well as note down its details like password and the SSID as well.
Moving further, power on the range extender. Allow it to start up properly.
Thereafter, bring your smartphone or you can also use your laptop. Enable its wifi. From the list, link to the network “Netgear_EXT”. Although it is an open network, so you do not have to input any password. But if prompted then use the term “password” for the password. Tap on Connect.
Now comes the most important step for Netgear wifi extender setup. So what you need to do is, open an internet browser. Go to its address field. In it, without any error input, mywifiext.com. Press Enter.
As you click enter, a major window opens up. Tap on the New Extender Setup option. Read various terms and after that tap on I Agree.
Now you'll be prompted to fill up a few details. After you do that, answer security questions and tap Next.
Finally, select the network that resonates with your router. Tap Next. Input the password. Tap Next. Lastly, follow the directions one by one to wrap up the Netgear wifi extender setup using a web browser.
Do not log out of the setup panel, until you see a green or blue light on both router LED as well as the power LED of your Netgear range extender.
Hassle-free Setup Using Nighthawk App
If you want an alternative to both the above-written Netgear wifi extender setup methods then this is the one for you. The steps for it are:
First ensure the linkage of your router to the Internet source. Additionally note down its SSID and password.
Now open the Nighthawk application on your mobile phone. Don't have access to it? If yes, no issues. Install it from nighthawk-app.com. Alternatively you can fetch it down from the Play Store. Also available on the App Store.
Moving further, as you open the application, select the Menu option. From it tap on the “Set Up A New Nighthawk System”. Then click on “Get Started”. Thereafter, on the “Range Extender”.
Finally, turn on the range extender. Ensure its mode switch button is turned towards extender.
After your range extender turns on successfully, revisit the app and hit Next. Now to wrap up the Netgear wifi extender setup without any error, all you have to do is follow the Nighthawk app instructions one by one. Do not skip any step because this will lead to incomplete setup.
In case of any query or you need expert assistance for the setup, then you can connect to us through phone call, live chat or write to us through email.
0 notes
Text
Netgear WiFi Extender: Maximizing Connectivity for Smart Homes
Plugging your Netgear extender into a power outlet close to your Wi-Fi network will enable you to set it up. Use WPS configuration or join the extender's Wi-Fi network. For configuration, use a web browser or the Netgear installation aid to follow the on-screen instructions. By visiting our website, you can simplify the configuration of your Netgear wifi extender. Should you require more assistance with the process execution, don't hesitate to reach out to our experts.
1 note
·
View note
Text
does google wifi support vpn dd-wrt
🔒🌍✨ Get 3 Months FREE VPN - Secure & Private Internet Access Worldwide! Click Here ✨🌍🔒
does google wifi support vpn dd-wrt
Google Wi-Fi VPN compatibility
Title: Exploring Google Wi-Fi VPN Compatibility: Enhancing Security and Privacy
In today's digital age, safeguarding online privacy and security has become paramount. With the rise in cyber threats and concerns over data breaches, many users are turning to Virtual Private Networks (VPNs) to encrypt their internet connection and protect their sensitive information. Google Wi-Fi, a popular mesh Wi-Fi system known for its reliability and ease of use, has garnered attention regarding its compatibility with VPN services.
Fortunately, Google Wi-Fi routers are generally compatible with most VPN providers, offering users the flexibility to integrate VPN protection seamlessly into their network setup. Whether you're concerned about securing your home network or safeguarding sensitive data while browsing on public Wi-Fi networks, utilizing a VPN with Google Wi-Fi can provide an additional layer of security and privacy.
Setting up a VPN with Google Wi-Fi is typically straightforward, with many VPN providers offering dedicated apps or detailed setup guides for various devices. By configuring the VPN directly on the router or installing the VPN client on individual devices connected to the network, users can enjoy encrypted connections and anonymized browsing across all their devices.
One of the significant benefits of using a VPN with Google Wi-Fi is the ability to protect all connected devices simultaneously, including smartphones, tablets, laptops, and smart home gadgets. Whether you're streaming content, conducting online banking transactions, or simply browsing the web, a VPN can help mitigate risks and enhance your online privacy.
However, it's essential to choose a reputable VPN provider with robust encryption protocols and a strict no-logs policy to ensure maximum security and privacy. Additionally, users should consider factors such as server locations, connection speeds, and compatibility with streaming services when selecting a VPN for use with Google Wi-Fi.
In conclusion, leveraging a VPN with Google Wi-Fi can bolster your network security and protect your sensitive data from prying eyes. By taking proactive measures to enhance privacy and security, users can enjoy peace of mind knowing that their online activities remain secure and confidential.
DD-WRT support on Google Wi-Fi
Title: Enhancing Google Wi-Fi with DD-WRT: A Comprehensive Guide
Google Wi-Fi is a popular choice for users seeking a reliable and user-friendly mesh Wi-Fi system. However, some advanced users may find themselves wanting more control and customization options than the stock firmware provides. Fortunately, with DD-WRT support, users can unlock a plethora of advanced features and functionalities on their Google Wi-Fi routers.
DD-WRT is an open-source firmware that replaces the manufacturer's firmware on compatible routers, offering a wide range of benefits such as increased security, advanced networking options, and improved performance. While Google Wi-Fi routers do not natively support DD-WRT, certain models can be flashed with third-party firmware to unleash their full potential.
Before proceeding with the installation of DD-WRT on your Google Wi-Fi router, it's crucial to research and ensure compatibility with your specific model. Flashing incompatible firmware can result in bricking your device, rendering it unusable. Once compatibility is confirmed, the installation process typically involves downloading the DD-WRT firmware, accessing the router's administration interface, and performing the flashing procedure according to the provided instructions.
Once DD-WRT is successfully installed, users gain access to a myriad of advanced features including VPN support, VLAN capabilities, QoS (Quality of Service) controls, and much more. Additionally, DD-WRT provides extensive monitoring and management tools, allowing users to optimize their network performance and security to suit their specific needs.
It's important to note that flashing third-party firmware may void the warranty of your Google Wi-Fi router, and improper installation can lead to irreversible damage. Therefore, it's recommended to proceed with caution and follow the provided instructions carefully.
In conclusion, DD-WRT support opens up a world of possibilities for enhancing the functionality and performance of Google Wi-Fi routers. By leveraging the power of open-source firmware, users can take full control of their network infrastructure and tailor it to meet their individual requirements with ease.
Virtual Private Network on Google Wi-Fi
Title: Enhancing Security with a Virtual Private Network (VPN) on Google Wi-Fi
In today's digital age, safeguarding your online privacy and security is paramount. With the proliferation of cyber threats and data breaches, individuals and businesses alike are seeking robust solutions to protect their sensitive information. One effective tool in this arsenal is a Virtual Private Network (VPN), and integrating it with Google Wi-Fi can further fortify your network defenses.
Google Wi-Fi, renowned for its reliability and ease of use, serves as the backbone of many home and small office networks. By leveraging the capabilities of a VPN, users can encrypt their internet traffic and mask their IP addresses, thereby shielding their online activities from prying eyes.
The benefits of integrating a VPN with Google Wi-Fi are manifold. Firstly, it ensures a secure connection, especially when accessing public Wi-Fi networks in cafes, airports, or hotels, where the risk of data interception is high. By encrypting the data transmitted between the device and the VPN server, sensitive information such as passwords, financial transactions, and personal messages remain safeguarded from potential threats.
Moreover, a VPN provides anonymity by masking the user's IP address. This prevents advertisers, ISPs, and malicious actors from tracking their online behavior and profiting from their data. Additionally, it enables users to bypass geo-restrictions and access region-locked content on streaming platforms, enhancing their online experience.
Setting up a VPN on Google Wi-Fi is a straightforward process, typically involving the installation of VPN client software on the connected devices or configuring the VPN directly on the router. Once activated, the VPN operates seamlessly in the background, offering continuous protection without compromising network performance.
In conclusion, integrating a VPN with Google Wi-Fi is a prudent step towards bolstering your cybersecurity posture. By encrypting your internet traffic and preserving your anonymity online, you can enjoy peace of mind knowing that your digital footprint remains secure from external threats.
Google Wi-Fi firmware for VPN
Google Wi-Fi is a popular choice for many individuals and businesses looking to enhance their Wi-Fi network performance. Recently, Google has introduced firmware updates that include the ability to set up a VPN (Virtual Private Network) directly on your Google Wi-Fi network.
VPN technology allows users to establish a secure and encrypted connection over the internet, providing increased privacy and security for online activities. By integrating VPN functionality into the Google Wi-Fi firmware, users can now ensure that all devices connected to their network are protected by a secure VPN connection.
Setting up a VPN on your Google Wi-Fi network is a straightforward process that can be done through the Google Home app. Once the VPN is configured, all internet traffic passing through your Wi-Fi network will be encrypted and routed through the VPN server, preventing third parties from monitoring your online activities.
Whether you are accessing sensitive information, working remotely, or simply browsing the web, using a VPN on your Google Wi-Fi network can help safeguard your data and protect your privacy. It is recommended to regularly update your Google Wi-Fi firmware to ensure that you have access to the latest features and security enhancements, including VPN support.
Overall, the addition of VPN functionality to Google Wi-Fi firmware is a valuable upgrade that provides users with an extra layer of security and privacy for their online connections. Make sure to take advantage of this feature to keep your network and devices safe while browsing the web.
VPN setup on Google Wi-Fi
Setting up a VPN on your Google Wi-Fi can provide an extra layer of security and privacy for your internet connection. While Google Wi-Fi does not have built-in VPN support, you can still set up a VPN by following a few simple steps.
Firstly, you will need to subscribe to a reputable VPN service provider that offers support for routers. Once you have chosen a VPN service, you will need to access your Google Wi-Fi settings. This can be done by opening the Google Home app on your smartphone or tablet and selecting the Wi-Fi network you wish to configure.
Next, locate the IP address of your Google Wi-Fi router by navigating to the Network preferences on your device. Once you have the IP address, open a web browser and enter the IP address in the address bar to access the router settings.
In the router settings, look for the VPN section and enter the details provided by your VPN service provider, such as the server address, username, and password. Save the changes and restart your Google Wi-Fi router to apply the VPN settings.
After restarting the router, your Google Wi-Fi network should now be protected by the VPN. You can verify the connection by checking your IP address to ensure that your internet traffic is being encrypted and routed through the VPN server.
Setting up a VPN on your Google Wi-Fi router is a great way to enhance your online security and privacy, especially when using public Wi-Fi networks or accessing sensitive information. By following these steps, you can enjoy a secure and private internet experience on all your connected devices.
0 notes
Text
How to Update Netgear Ex6110 Ac1200 Firmware Version? Netgear Extender Software Update
youtube
___________________________________________Netgear Ex6110 Ac1200 Extender #Firmware Update can be done by logging in to the netgear extender web management page. So, first connect your computer/laptop to netgear ext network name and then type mywifiext.net into the url. In case you cant update netgear extender firmware then follow our step by step guide to complete #ex6110 firmware update.Do Like And Subscribe If The Video Was Useful To Support My Channel!!!Our Official website for Technical help:- https://devicessetup.comDownload Netgear Extender Latest Firmware File From here :- https://downloadcenter.netgear.comNetgear Wifi Extender Setup SCAM :- https://youtu.be/Mr4zMKXhLBcNetgear Ex6110 setup guide :-How to Login Into Wifi Extender Using Its Ip Address:- https://youtu.be/Iszz2Oyna4EHow to reset netgear ex6110 extender :- https://youtu.be/c8i3ryUpyCQHow to setup netgear extender as access point or using ethernet cables :- https://youtu.be/uxce3UpK3uoHow to turn Netgear Extender Leds On or Off? :- https://youtu.be/5LWIo9NlsqM----------------------------**FAIR USE**Copyright Disclaimer under section 107 of the Copyright Act 1976, allowance is made for “fair use” for purposes such as criticism, comment, news reporting, teaching, scholarship, education and research.Fair use is a use permitted by copyright statute that might otherwise be infringing.Non-profit, educational or personal use tips the balance in favor of fair use.--------------------#netgearextenderfirmwareupdate #netgearex6110#ex6110ac1200 #netgearextenderex6110 #netgearexthelp #wifiextender #wifirepeater #diy #technicalhelp #netgear #devicessetup
1 note
·
View note
Text
Netgear AC1750 Wifi Mesh Extender Setup

Netgear AC1750 Manual When you buy a brand new Netgear AC1750 extender, you will get a manual in the package. This Netgear AC1750 Manual contains a series of setup steps from starting to end. All you have to do is simply walk through these Netgear AC1750 Setup steps and make your extender up and running within minutes. However, understanding these installation instructions is very difficult for regular users. The best way to install your Netgear WiFi extender with great ease is to contact our professionals. They will guide you each and every step for Netgear AC1750 Setup.
#Netgear ac1750 extender manual setup#Wifi-ext setup#Extender setup help#mywifiext local#mywifiext-setup#mywifiext-local#mywifiext.net'#Login Netgear Extender
0 notes
Text
Netgear EX6150 Range Extender Setup| Mywifiext.Net .
There are two different ways to arrange the EX6150 Range Extender Setup as a reach extender.
One alternative is to utilize the program arrangement and the other is to utilize the WPS strategy.
This article will manage you on the best way to arrange your extender utilizing program arrangement.
To install your extender using browser setup:
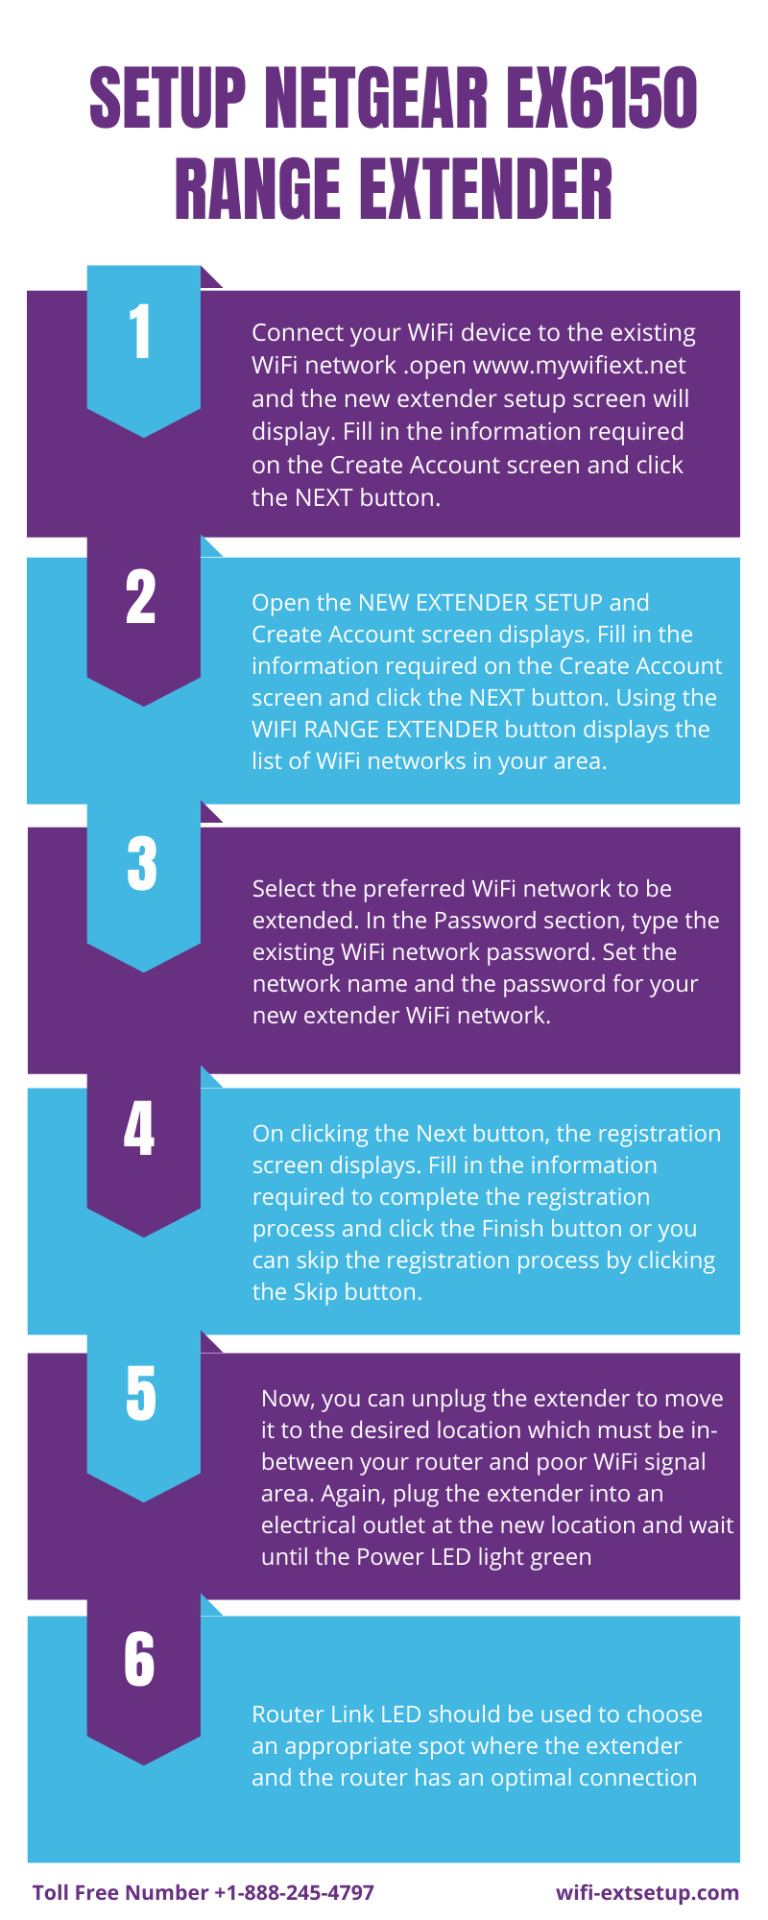
Attachment the extender into an electrical plug and sit tight for the force LED Image to get strong green.
Utilize a Wi-Fi customer (remote PC, advanced mobile phone, or tablet)
and associate with the NETGEAR_EXT remote organization (SSID).
Note: You can likewise utilize a wired PC to introduce the extender.
Utilize an Ethernet link and associate between the PC and the extender Ethernet port.
When the remote customer is associated with the extender network, the Device LED Image will turn on.
youtube
Open a web program and go to www.mywifiext.net.
Snap NEW EXTENDER SETUP.
Complete the Extender Setup screen and click NEXT.
Click WIFI RANGE EXTENDER.
Select the Wi-Fi network that you would like to extend and click NEXT.
Enter the wireless Password (network key) then click NEXT.
Enter your preferred network name and security settings. Click NEXT.
Connect your wireless device to the extender and click Continue.
Your extender is now configured as a wireless range extender. Click Next to proceed with the registration.
Click Finish after completing the registration.
#Wifi Ext Setup#Mywifiext.Net#Netgear Extender Setup#Mywifiext local#Mywifiext-Help#Mywifiext-Setup#EX6150 Setup#Range Extender Setup#Netgear Extender tech#Extender technical support#Extender setup.Net#SSID Extender setup#WiFi network Setup
1 note
·
View note
Link
#WiFi Extender Setup#Net Wifi Solutions#wireless range extender setup#mywifiext.net not working#mywifi netgear#netgear live chat#my wifi ext new extender setup#setup netgear wireless extender#mywifiext default password#how to setup netgear ext#mywifiext wifi settings#Wireless range extender USA#wirelss range extender outdoor#wireless range extender for home
1 note
·
View note
Text
Follow the steps beneath to login to mywifiext setup page
1. Link your Computer or Mobile phone to Netgear_ext Network. 2. Open any internet browser like Google Chrome or Firefox. 3. Hover on the web address bar of the browser. 4. Type mywifiext.net on the location bar. 5. New extender setup button will show up, click on it at that point. 6. You can create an account here and click on continue button to open mywifiext.net setup page.
https://www.mywifi-exts.net
#mywifiext#mywifiext.net#mywifiext.net-login#mywifiext.net-setup#mywifiext-local#New-extender-Setup#www.mywifiext.net#my-wifi-ext#Netgear-Extender-Setup#Netgear-Genie-Setup
1 note
·
View note
Text
Mywifiext.net is the configuration site for Netgear.
Mywifiext .net is the configuration site for Netgear. For opening www.mywifiext .net web address your gadget should be physically associated by link or your wifi must be associated with a Netgear Range Extender contraption for you to get appropriate sign. Diverse internet browsers for the most part show distinctive error messages when a client has to associate with www. mywifiext.net. Google Chrome program shows the message "Unfit to associate with the Internet. Google Chrome can't show the site page in light of the fact that your PC isn't associated with the Internet". Firefox shows "Server not found. Firefox can't discover the server at www. mywifiext.net".
https://mywifiexthelp.com
#mywifiext#mywifiext.net#mywifiext.net login#mywifiext.net setup#mywifiext local#www.mywifiext.net#my wifi ext
1 note
·
View note
Text
Optimizing Your Network: A Guide to Netgear Extender Setup?
Inputting your Netgear WiFi extender into a power outlet that is adjacent to your current wireless internet connection is how you set it up. First, press the WPS button on your router, then on your extender. Await the LED lights turning on to show that the connection was successful. Visiting our website will be a terrific first step towards finding the answers to any additional questions you may have regarding the Netgear extender setup. If you need further help, you may connect with our specialists using the live chat option on our website.
1 note
·
View note
Text
Range Extenders & How They Work To Give A Better Network

Internet is the need of the hour today, a necessary evil and a source of immense information. We cannot do our daily day today works without the facility of a fast internet with good connectivity wherever we might be in our home or office. Wifi range extenders come in the picture here, as they are something that you need for those dead zones of your house or office where you cannot get a good wifi signal because your host router’s signal coverage doesn’t reach to those areas. The wifi range extenders boosts your signal and retransmits it from your host router, giving you increased range and improved connectivity wherever you wish to use the internet from. They take away the blockage in the signal and helps you get fast speed internet so that you can stream HD videos and play games, watch entertainment and do much more without interruption.
The Wifi range extenders come with various features and you can check and select a particular range extender according to your need. There are extenders for larger areas to medium and small areas as well and they come with the following features –
FastLane Technology:
When you connect your extender to your router, the extender might connect your router and your device on both the bands (2.4GHz and 5GHz) at the same time. This can thereby decrease the speed of your connection, but all the Netgear dual band wifi range extenders come with the FastLane technology which helps in increasing the speed.The FastLane technology connects one band to your device and links the other to your router. This results in giving the maximum speed on each of the bands and helping you to experience fast internet connectivity.
Easy To Use:
These extenders are very easy to setup and use because they come with a CD-less setup technique, which is great if you want to connect from your mobile devices. They also come with the Push ‘N’ connect using Wifi Protected Setup (WPS), which is the easiest setup for your extender. When you push the WPS buttons on the extender and router, they connect with each other and the setup gets taken care of without you struggling for it by the various settings.
Fastest Of Speed For Smoother HD Streaming
A lot of time you get frustrated because of the bad quality and wait for the HD streaming of your videos. The Netgear extenders give you faster speed for streaming your videos wherever you might be in your house or office. All that is required is that you have to set your extender to the same network name as your main wifi network and it will automatically switch between your host router and your extender so that you can have the best network in all the areas and zones. The Netgear extenders then works as a mesh whole–home wifi system, giving you fast and smooth connectivity to stream your videos without any kind of interruption.
You can check the various Netgear wifi range extenders for its many other features and range connectivity.
#mywifiext#mywifiext.net#mywifiext.net login#mywifiextlocal#www.mywifiext.net#mywifiext.net setup#my wifi ext
1 note
·
View note
Link
#New Netgear wifi extender setup#Netgear wifi extender new setup#Steps for how to configure Netgear extender#Setup New Netgear wifi extender#mywifiext net new extender setup#Netgear extender setup wizard#Netgear extender setup#my wifi extender setup#mywifiext net setup#Netgear wifi range extender setup#my wifi ext#Netgear wifi extender setup instructions#Netgear wifi extender n300#Netgear wifi extender n300 setup#Netgear wifi extender setup ex6100#www.mywifiext.net new extender setup#Netgear ex2700 setup#how do you connect a wifi extender?#Netgear wifi extender setup website#Netgear setup wn3000rpv3#Netgear plug in wifi extender setup#192.168.1.250 Netgear extender setup#new Netgear wifi range extender setup#netgear wn3000rpv3 setup
5 notes
·
View notes
Text
Netgear AC1750 Extender Setup

Netgear AC1750 Manual When you buy a brand new Netgear AC1750 extender, you will get a manual in the package. This Netgear AC1750 Manual contains a series of setup steps from starting to end. All you have to do is simply walk through these Netgear AC1750 Setup steps and make your extender up and running within minutes. However, understanding these installation instructions is very difficult for regular users. The best way to install your Netgear WiFi extender with great ease is to contact our professionals. They will guide you each and every step for Netgear AC1750 Setup.
#Netgear ac1750 extender manual setup#Wifi-ext setup#Extender setup help#'#mywfiext#mywifiext setup#mywifiext.net#Mywifiext-Help#Mywifiext local#Netgear ac17500 setup#Wifi Extender support
0 notes
Text
How do I reconnect my NETGEAR WiFi range extender to my home network?
This article provides instructions on how to reconnect your NETGEAR WiFi range extender to your home network. The extender must have previously connected to your router and obtained a valid IP address.
To set up a new extender, see How do I set up my NETGEAR WiFi Range Extender?.
To reconnect your NETGEAR WiFi range extender via Ethernet:
Connect your range extender to your computer with an Ethernet cable.
Launch a web browser on your computer.
Type http://mywifiext.net into your web browser’s address bar.
Press Enter or click Search.
The login page displays.
For troubleshooting help, see I can’t access www.mywifiext.net; what do I do?.
Enter the username and password that you chose during set-up.
Note: The default username is admin and the default password is password. The username and password are case sensitive.
To recover your password, click the Username & Password Help link.
To reset your login credentials, see How do I perform a factory reset on my NETGEAR range extender?.
Click LOG IN.
Select Setup > Wireless Settings.
Under Security Options, verify that the value in the Password (Network Key) field matches your router password.
If the password does not match, change it to your router password.
Click Apply.
Reconnect your WiFi devices to the extender.
To reconnect your NETGEAR WiFi range extender via Ethernet:
1. Connect your range extender to your computer with an Ethernet cable.
2. Launch a web browser on your computer.
3. Type https://www-mywifiext-net.net/ into your web browser’s address bar.
4. Press Enter or click Search. The login page displays. For troubleshooting help, see I can’t access www.mywifiext.net; what do I do?.
5. Enter the username and password that you chose during set-up. Note: The default username is admin and the default password is password. The username and password are case sensitive. To recover your password, click the Username & Password Help link. To reset your login credentials, see How do I perform a factory reset on my NETGEAR range extender?.
6. Click LOG IN.
7. Select Setup > Wireless Settings.
8. Under Security Options, verify that the value in the Password (Network Key) field matches your router password. If the password does not match, change it to your router password.
9. Click Apply.
10. Reconnect your WiFi devices to the extender.
To reconnect your NETGEAR WiFi range extender via WiFi:
1. Push and hold the Factory Settings button (located on the side panel) for 7 seconds. Your range extender resets.
2. Open your computer or mobile device’s WiFi menu and connect to the extender’s default WiFi network, NETGEAR_EXT.
3. Launch a web browser on your connected device.
4. Type http://mywifiext.net into your web browser’s address bar.
5. Press Enter or click Search. The login page displays. For troubleshooting, see I can’t access www.mywifiext.net; what do I do?.
6. Enter your username and password. Note: The default username is admin and the default password is password. The username and password are case sensitive.
7. Click LOG IN.
8. Follow the prompts to reconnect your extender to your home network. Note: If your router uses WEP security, enter its network name (SSID) and password when prompted.
9. Reconnect your WiFi devices to the extender.
If the password does now no longer match, change it in your router password.
Click Apply. Reconnect your WiFi gadgets to the extender.
To reconnect your NETGEAR WiFi variety extender through Ethernet:
1. Connect your variety extender in your laptop with an Ethernet cable.
2. Launch an internet browser in your laptop.
3. Type https://www-mywifiext-net.net/ into your web browser’s address bar.
4. Press Enter or click on Search. The login web page displays. For troubleshooting help, see I can’t get admission to www.mywifiext.net.net/; what do I do?.
5. Enter the username and password which you selected at some point of set-up.
Note: The default username is admin and the default password is password. The username and password are case sensitive. To get better your password, click on the Username & Password Help link. To reset your login credentials, see How do I carry out a manufacturing unit reset on my NETGEAR variety extender?.
6. Click LOG IN.
7. Select Setup > Wireless Settings.
8. Under Security Options, affirm that the fee withinside the Password (Network Key) field suits your router password. If the password does now no longer match, extrade it in your router password.
9. Click Apply.
10. Reconnect your WiFi gadgets to the extender.
To reconnect your NETGEAR WiFi variety extender through WiFi:
1. Push and maintain the Factory Settings button (positioned at the aspect panel) for 7 seconds. Your variety extender resets.
2. Open your laptop or cell device’s WiFi menu and connect with the extender’s default WiFi community, NETGEAR_EXT.
3. Launch an internet browser in your related device.
4. Type http://mywifiext.internet into your net browser’s cope with bar.
5. Press Enter or click on Search. The login web page displays. For troubleshooting, see I can’t get admission to www.mywifiext.net.net; what do I do?
6. Enter your username and password. Note: The default username is admin and the default password is password. The username and password are case sensitive.
7. Click LOG IN.
8. Follow the activates to reconnect your extender to your private home community.
Note: If your router makes use of WEP security, input its community name (SSID) and password while prompted.
9. Reconnect your WiFi gadgets to the extender.
0 notes
Text

0 notes