#and explain what you can expect during the installation process. From selecting the right installer to understanding the installation proce
Explore tagged Tumblr posts
Visit Tumblr Blog
Explore Tumblr blogs with no restrictions, modern design and the best experience.
Last Seen Tumblr Blogs


Fun Fact
The Tumblr app for Google Glass was released on May 16, 2013.
Text
Garage Door Installers in Pittsburgh, PA: Your Guide to Quality Installation Services

When it comes to home improvements, a new garage door can be one of the most impactful upgrades you can make. It not only enhances your home’s curb appeal but also boosts its functionality and security. If you're looking for a professional and reliable garage door installer in Pittsburgh, PA, you have plenty of options. However, selecting the right garage door installer can make a big difference in the quality of your installation and the long-term performance of your door.
In this article, we’ll guide you through the process of choosing the best garage door installer in Pittsburgh, PA, and explain what you can expect during the installation process. From selecting the right installer to understanding the installation procedure, we have you covered.
Why You Need Professional Garage Door Installers
Installing a new garage door is a significant investment, and ensuring that it’s done correctly is crucial for the safety, convenience, and security of your home. Here are some reasons why hiring a professional garage door installer is important:
Expertise and Experience: Garage doors are complex systems that require specialized knowledge and experience to install. From ensuring proper alignment to selecting the correct hardware, professional installers know the ins and outs of the process.
Proper Safety Measures: Garage doors are heavy and can be dangerous to handle without the right equipment and training. Professional installers have the tools and expertise to handle the job safely, preventing accidents and injuries.
Longevity and Performance: A poorly installed garage door can wear out quickly, leading to costly repairs and even potential security issues. Professional installation ensures that your door operates smoothly for years, minimizing the need for frequent repairs.
Time-Saving: Installation of a garage door can be time-consuming, especially if you lack experience. Hiring a professional installer ensures that the job is completed efficiently, saving you time and hassle.
Warranty Protection: Many garage door manufacturers offer warranties for products that are professionally installed. If you attempt a DIY installation, you may void the warranty, so professional installation is always the safest option.
Choosing the Right Garage Door Installer in Pittsburgh, PA
There are several garage door installers near me, each offering a range of services. To ensure you choose the best one for your needs, consider the following factors:
1. Experience and Reputation
Experience matters when it comes to garage door installation. A company with years of experience will have a proven track record of handling different types of doors and installations. Reputation is equally important. Look for companies with positive reviews and testimonials from previous customers. You can check online reviews, ask for references, or get recommendations from friends and neighbors who have had recent garage door installations.
2. Range of Services Offered
Garage door installers typically offer more than just installations. Many also provide repair and maintenance services. If you’re considering getting your door serviced in the future, it’s a good idea to choose a company that offers comprehensive services. Some common services to look for include:
Garage door repair (broken springs, faulty openers, etc.)
Garage door maintenance (tuning, lubricating, etc.)
Emergency repair services
Custom garage door design and installation
3. Licensing and Insurance
It’s important to choose a garage door installer who is licensed and insured. A licensed company ensures that they follow local building codes and regulations, while insurance protects you in case of accidents or property damage during the installation process. Always ask about licensing and insurance before hiring an installer.
4. Quality of Products
A good installer will use high-quality garage doors and parts from reputable manufacturers. Ask the installer about the materials and brands they work with to ensure that your new door is durable, secure, and energy-efficient. Whether you’re looking for a steel, wood, or custom door, quality products will ensure long-lasting performance.
5. Transparent Pricing
It’s essential to choose a garage door installer who offers transparent pricing with no hidden fees. The cost of a new garage door installation can vary depending on factors such as the type of door, materials, and labor. A good installer will provide a detailed estimate upfront and explain the cost breakdown so that you can make an informed decision.
6. Customer Service
When hiring a garage door installer, choose a company that values customer service. A reliable installer will communicate clearly, respond to inquiries promptly, and keep you updated throughout the installation process. Look for a company that offers a satisfaction guarantee, so you know they stand behind their work.
What to Expect During the Garage Door Installation Process
The process of installing a new garage door typically involves several steps. Here’s a general overview of what to expect during the installation process:
1. Consultation and Measurement
The first step in the installation process is usually a consultation where the installer assesses your needs and preferences. They will take accurate measurements of your garage opening to ensure a perfect fit. If you need help choosing a style or material, the installer can offer advice based on your budget and preferences.
2. Selection of the Door
Based on your consultation, the installer will help you choose the best garage door for your home. This may include selecting the material (steel, wood, aluminum, etc.), style (carriage house, contemporary, traditional), and color. They will also discuss additional features, such as insulation, windows, and custom designs.
3. Removal of the Old Door (if applicable)
If you’re replacing an existing door, the installer will remove the old door and its components. This includes detaching the old door from the opener and removing any old hardware. The installer will also dispose of the old door in an environmentally responsible manner.
4. Installation of the New Door
Once the old door is removed, the new door is carefully installed. This step involves assembling the door panels, installing the tracks, springs, and hardware, and ensuring everything is properly aligned. The installer will take extra care to ensure the door is balanced and functions smoothly.
5. Installation of the Opener (if applicable)
If you're also installing a new garage door opener, the installer will mount the opener unit, attach the door to the opener, and ensure proper operation. Modern openers come with additional features, such as smart technology, remote access, and battery backup, so the installer will ensure these features are properly set up.
6. Testing and Adjustments
After the door is installed, the installer will test its operation. They will check that the door opens and closes smoothly, and adjust the springs, opener, and sensors to ensure everything works correctly. They will also check for balance and make any necessary adjustments to prevent future issues.
7. Final Inspection and Cleanup
Once the installation is complete, the installer will conduct a final inspection to ensure everything is functioning correctly. They will also clean up the installation area, removing any debris or packaging materials. Some installers will walk you through the door’s features and provide maintenance tips.
Top Garage Door Installers in Pittsburgh, PA
Here are some of the top-rated garage door installers in Pittsburgh, PA:
1. A1 Garage Door Service
Known for their exceptional customer service, A1 Garage Door Service is a trusted name in Pittsburgh. They offer a wide range of services, including garage door installation, repairs, and maintenance. Their team of skilled technicians ensures fast, reliable service, and they offer same-day installations when needed.
#garage door installers near me#PA: Your Guide to Quality Installation Services#When it comes to home improvements#a new garage door can be one of the most impactful upgrades you can make. It not only enhances your home’s curb appeal but also boosts its#PA#you have plenty of options. However#selecting the right garage door installer can make a big difference in the quality of your installation and the long-term performance of yo#In this article#we’ll guide you through the process of choosing the best garage door installer in Pittsburgh#and explain what you can expect during the installation process. From selecting the right installer to understanding the installation proce#we have you covered.#Why You Need Professional Garage Door Installers#Installing a new garage door is a significant investment#and ensuring that it’s done correctly is crucial for the safety#convenience#and security of your home. Here are some reasons why hiring a professional garage door installer is important:#Expertise and Experience: Garage doors are complex systems that require specialized knowledge and experience to install. From ensuring prop#professional installers know the ins and outs of the process.Proper Safety Measures: Garage doors are heavy and can be dangerous to handle#preventing accidents and injuries.Longevity and Performance: A poorly installed garage door can wear out quickly#leading to costly repairs and even potential security issues. Professional installation ensures that your door operates smoothly for years#minimizing the need for frequent repairs.Time-Saving: Installation of a garage door can be time-consuming#especially if you lack experience. Hiring a professional installer ensures that the job is completed efficiently#saving you time and hassle.Warranty Protection: Many garage door manufacturers offer warranties for products that are professionally instal#you may void the warranty#so professional installation is always the safest option.#Choosing the Right Garage Door Installer in Pittsburgh#There are several garage door installers near me#each offering a range of services. To ensure you choose the best one for your needs#consider the following factors:#1. Experience and Reputation
0 notes
Text
SRWE or AI? Best Ways to Upscale Sims 4 Screenshots
Are you also tired of seeing social media mercilessly crush your The Sims 4 screenshots? We’ve tried every trick in the book to keep our pics crisp – SRWE, AI upscalers, you name it – and now we’re ready to break down how to save your favorite sim’s photos from pixelation, quick and easy. In this article, we’ll explain (no tech jargon, promise!) what actually works, plus share our hands-on experience and top tips.
Your upscaling method depends heavily on the source image and the look you’re going for. We all have different ideas of what makes a sims beautiful – some love natural textures, even slight skin imperfections, while others prefer flawlessly smooth, hyper-sharp results.
We’ve tested different upscaling tools to help boost your screenshot quality. But to find your perfect match – the one that makes your shots look just right (by your standards!) – we recommend trying a few yourself.
You can enhance screenshots both before and after saving them! We’ve covered both approaches, so pick whichever suits you best.
Before Saving the Screenshot: SRWE (Simple Runtime Window Editor)
This tool is well-known in The Sims 4 community – there are tons of YouTube tutorials covering it. When it comes to improving image quality before taking a screenshot, SRWE is one of the first solutions that comes to mind.
It works by bypassing Windows' DPI scaling, allowing you to capture screenshots at a higher resolution without blurring.
Pros:
— A fantastic tool: it delivers the exact same image but in much better quality.
— No conflicts with GShade/ReShade: your presets will look exactly as intended.
— Free and easy to install, no hidden costs or complicated setup.
— No post-processing needed, preserves original texture and UI quality.
— No extra plugins or presets required, works right out of the box.
— Great performance even on low-end PCs. If your computer can run GShade, SRWE will work just fine.
Cons:
— Limited functionality.
— Some users find SRWE a bit tricky to set up (though we personally disagree).
Now, let’s break down how to use it and what results to expect.
If you prefer a video guide, check out this link for a detailed walkthrough by Chii.
Step 1
First things first – you'll need to download the program itself. It's available for free on GitHub – you can grab it here.
There's no real benefit to getting the version with pre-configured profiles, so just download the standard version without profiles.
Step 2
Extract the files from the archive.
It doesn’t matter where you store them on your computer – it won’t affect how the program works.
Step 3
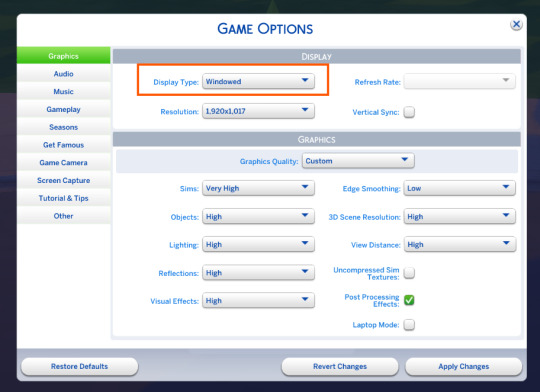
Now it’s time to launch the game and switch from fullscreen to windowed mode in the settings. You can also do this with the Alt+Enter shortcut.
Step 4
Set up your shot exactly how you want it. Open the location, pose your sims, apply any presets if needed. At this point, you can take a regular screenshot (for comparison) using your usual method.
Step 5
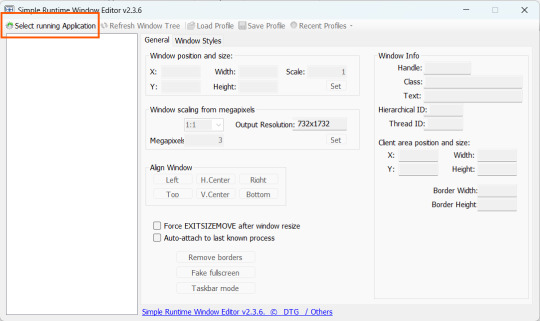
1. Go back to the SRWE folder.
There are only two files inside – one of them launches the program (no installation needed).

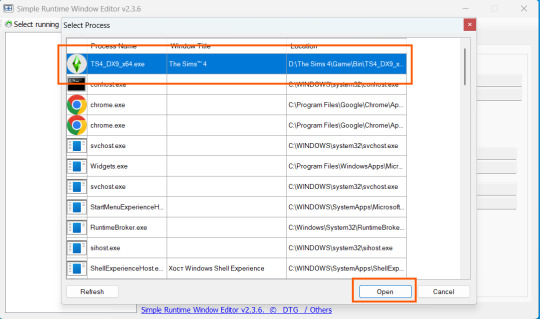
2. In the window that opens, select The Sims 4 from the list.
3. Check all the boxes.
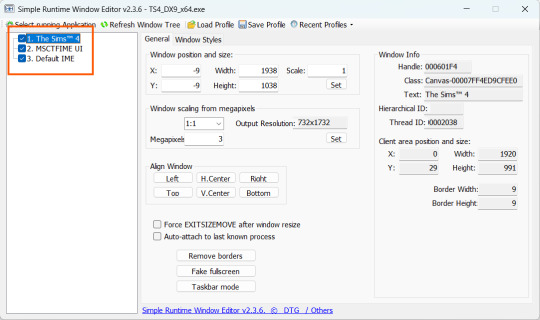
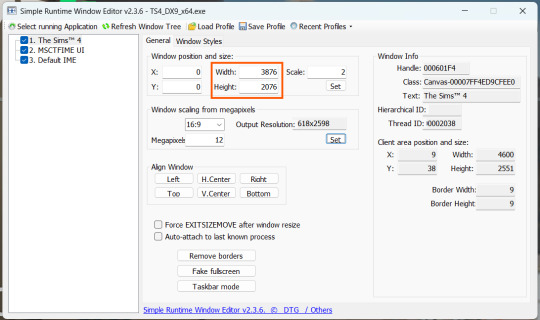
4. Image Size
You can set your screenshot size in a few different ways:
— The easiest method: Multiply your current resolution by the desired factor. For example, to upscale 1080p to 4K, multiply by 2. Tap Set.
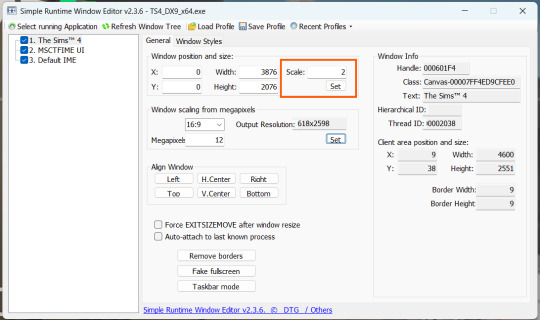
— Manual input: Enter your preferred pixel dimensions. Tap Set.
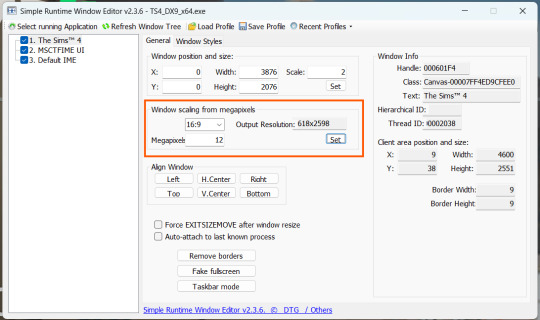
— Aspect ratio mode: Choose a format (1:1, 16:9, 4:3, etc.) and set your target megapixels. The program will automatically calculate the dimensions. Tap Set.
Honestly, you can experiment with any size. During our tests, even a weak PC handled an 8K screenshot without issues – though realistically, 4K is more than enough for most purposes.
Plus, if you're capturing in-game scenes (not just CAS), your screenshots will already be pretty large in file size. You probably won’t want them taking up even more space unnecessarily.
Step 6
Now when you return to the game, you'll notice the image has become significantly larger and no longer fits your screen resolution – you're only seeing a part of it.
Don't panic! Just wait for your preset to fully load (if you're using one), then take your screenshot as you normally would.
Step 7
Once you've captured your planned screenshot, head back to SRWE and click "Fake Fullscreen" to return to the original resolution.
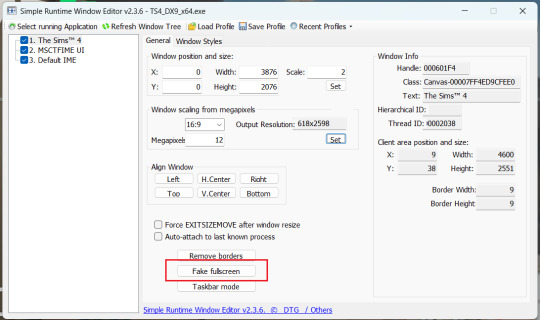
Now let's compare our results.
Gameplay Scenes

CAS

For in-game screenshots, this method works much better if you have at least a moderately powerful PC. After upscaling, navigation can become tricky due to lag. That said, it's still completely doable since we've prepared our scene in advance.
Post-Processing Screenshots
We've tested several post-processing programs: two paid options and several free ones.
Let's start with the paid options – Topaz Gigapixel AI and Let's Enhance.
Topaz Gigapixel AI
A specialized tool from Topaz Labs designed specifically for AI-powered image upscaling.
It doesn’t include extra features like noise reduction or face correction, but it delivers more precise upscaling, which is especially useful for The Sims 4 screenshots.
Pros:
— Upscale up to 600% (6x) without losing detail.
— Preserves texture clarity (hair, clothing, patterns).
— Automatically restores lost details (e.g., small decor items).
— Supports batch processing (multiple screenshots at once).
Cons:
— $99 price tag.
— Requires a powerful PC for 4K upscaling.
— Limited functionality (just upscaling, no additional edits).
— Trial version doesn’t allow exports.
Example:

Let's Enhance
A convenient online AI-powered tool for enhancing screenshots. No downloads required – just head to https://letsenhance.io/boost and you're good to go.
Pros:
— Automatic upscaling up to 16K, boosts resolution without losing detail (hair and clothing textures become sharper).
— Dead simple to use: just upload your screenshot, pick a model, and download the result.
— AI doesn't just upscale, it subtly "beautifies" images too (though this is subjective, of course).
Cons:
— Free version limits you to 10 images/month (watermarked downloads; subscription starts at $9/month).
— Internet connection required (no offline mode).
We found these settings work best for Sims screenshots:
Now, let's see the results:

Free Upscaling Tools: Upscayl (with detailed usage guide), Bigjpg, and Waifu2x.
Bigjpg
A handy tool for basic image upscaling tasks, though the free version has limitations on processing speed and number of images.
Pros:
— Solid baseline results: boosts resolution effectively, making images noticeably sharper with genuine quality improvement.
— Free 2x/4x upscaling with watermark-free downloads.
Cons:
— Free version restricts image quantity, size, and processing speed.
— Lacks advanced parameter fine-tuning.
Our recommended settings combo:

The 4x upscale delivers noticeably weaker results.
Sample Bigjpg output:

Waifu2x
A free neural network-based tool. Originally created for upscaling anime images, but works perfectly for The Sims 4 as well.
Pros:
— Upscales images 1.5x–2x without noticeable distortion.
— Preserves art style, doesn't turn pixel art into a "blurry mess" (unlike some other upscalers).
— Available in both online and offline versions.
— Offline version supports batch processing of screenshots.
— Free 2x upscaling with no watermarks.
— No powerful PC required.
Cons:
— Free online version has a 5MB file size limit.
— Maximum 2x scale (no higher options).
— Lacks advanced parameter tuning.
Our recommended settings:

Waifu2x results:

Upscayl
A free, open-source program that uses neural networks to upscale images without quality loss.
Pros:
— Upscales images without distortion.
— Enhances fine details.
— Supports multiple AI models for different screenshot styles.
— Offline version handles batch processing.
— Free 4x upscaling with no watermarks.
— Doesn't require a powerful PC for 2x upscaling.
— Works offline, no internet needed after installation.
Cons:
— Requires a powerful PC for 4x upscaling.
— Minimalist interface – fewer beginner-friendly guides.
— Lacks advanced parameter tuning.
Given Upscayl's minimalist interface and lack of detailed tutorials, we decided to provide a more thorough walkthrough.
Step 1
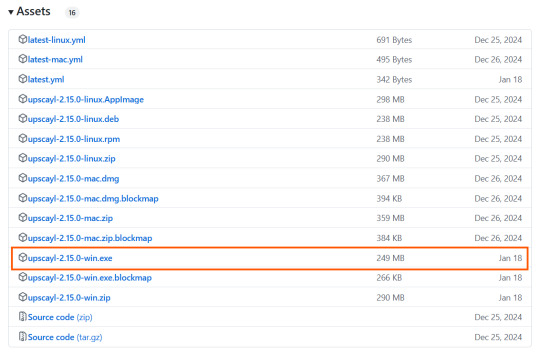
First, download the program from its GitHub page. It's completely free and open-source.
Multiple versions are available – choose the one matching your system. For standard Windows, download the file highlighted in the screenshot below.
Step 2
Run the installer as administrator.
Install location doesn't matter – it won't affect performance. Select the destination folder. Click "Install".
Step 3
Upscayl includes several built-in AI models (good for testing), but we strongly recommend downloading custom models for better results:
1. Download the custom models pack here (also accessible via Settings → Add Custom Models in-app).

2. Extract the archive.
3. Navigate to custom-models-main → custom-models-main.
Move this folder to your Upscayl installation directory (optional: rename it).
Your Upscayl folder should now look like this:

4. Add Custom Models:
— Launch Upscayl.
— Go to Settings and click Select Folder.

— Navigate to Upscayl → custom-models-main → models
Critical: The folder must be named "models" – don't rename it.
Step 4
Now that you have both the default and custom models loaded, it's time to start enhancing your screenshots.
1. Click Select Image or simply drag and drop your file into the processing area.

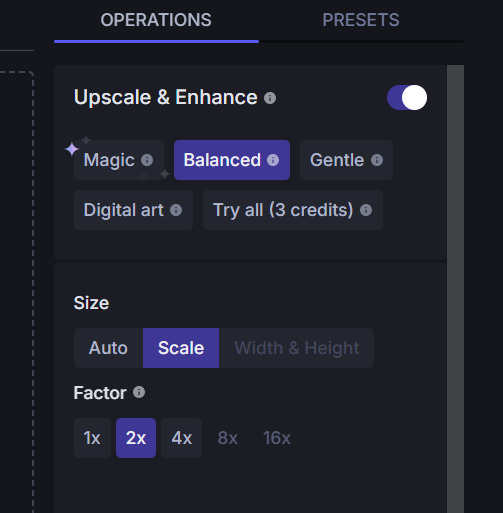
2. Choose Upscale Factor.
While Upscayl supports up to 16x magnification, it warns that anything above 5x may severely strain your system.
For optimal results, stick with 2x to 4x.

3. Select AI Model.
Click the Select AI Model dropdown: default models show before/after previews, custom models appear as a text list.

4. Experiment! Try different models on the same screenshot. Test various scales (2x, 3x, 4x) – sometimes better results come from modest scaling, while 4x might degrade quality.
For this demo, we'll use the first default model.
5. Click to begin enhancement.

6. Processing time duration depends on original image quality, selected parameters and your PC's power (may complete quickly or take several minutes).
After processing, you'll see a clear side-by-side comparison of the changes.
7. Click the three-dot menu (⋮) for advanced viewing options.
Magnifying lens compares original vs. enhanced versions side-by-side.
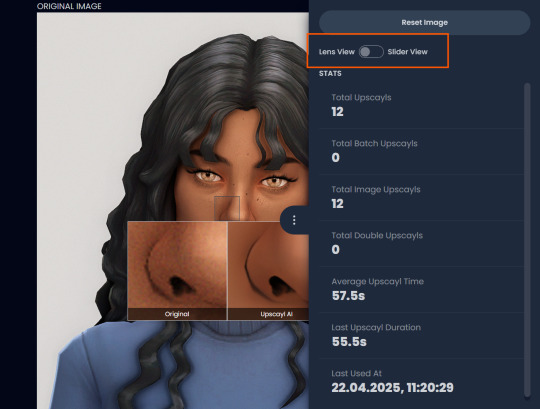
Also you may reset to original and revert all changes instantly.
8. Save your image.
By default, Upscayl saves to the source image's folder. To change this click Set Output Folder.

9. After this, use the Ctrl+S keyboard shortcut, and the new image will be saved. The original filename will be appended with the name of the AI model used and the upscaling scale applied.
You can also use batch processing. Before loading images, you simply need to enable batch loading.

In the settings, there are different format options for saving processed images: PNG, JPG, WEBP. To preserve the best quality, we recommend choosing PNG.
Finally, we're sharing the AI model options we liked best for processing Sims screenshots:
— Remacri (default model)
— Uniscale Restore (custom model)
— Unknown-2.0.1 (custom model)

🌱 Create your family tree with TheSimsTree
❓ Support 🌸 Our Blog
#TheSimsTree#simslegacy#legacychallenge#sims4#sims2#sims3#simsfamily#simstree#sims#sims4legacy#sims4roleplay#sims4stories#sims4couple#thesims4#ts4#ts4cc#plumtreeapp#simsta#simstagram#sims proposal#sims ideas#inzoi
40 notes
·
View notes
Text
What to Expect During Your Concrete Driveway Installation Process in Milan
Concrete driveways are a popular choice for homeowners in Milan, offering durability and aesthetic appeal. But what can you expect during the concrete driveway installation process? This comprehensive guide will walk you through each step, providing insights into what to anticipate, the benefits of working with professionals, and tips for ensuring your project goes smoothly.
check here Understanding Concrete Driveway Installation What is Concrete Driveway Installation?
Concrete driveway installation is the process of preparing and pouring concrete to create a durable surface for vehicles and pedestrians. This involves several stages, including site preparation, form setting, pouring, finishing, and curing. The goal is to create a long-lasting surface that can withstand heavy traffic while enhancing your property's curb appeal.
Benefits of Installing a Concrete Driveway
Concrete driveways offer numerous advantages:
Durability: Concrete can last up to 30 years with proper maintenance. Low Maintenance: Unlike asphalt, concrete requires less frequent sealing. Aesthetic Versatility: Available in various finishes and colors. Cost-Effective: Long-term savings due to less frequent repairs or replacements. Preparing for Your Concrete Driveway Installation Choosing the Right Contractor
Before beginning your project, it's crucial to select a reputable contractor. Look for:
Experience in concrete driveway installation Positive reviews from previous clients Clear communication and transparency in pricing Assessing Your Property
Consider dimensions and layout before installation begins. A proper assessment ensures that water drainage systems work efficiently and minimizes future issues like cracking.
What to Expect During Your Concrete Driveway Installation Process in Milan
The installation process typically unfolds over several days:
Consultation: Discuss your vision with contractors. Site Preparation: Clearing the area of debris and vegetation. Form Setting: Building forms that outline where the concrete will be poured. Subgrade Compaction: Ensuring a solid base by compacting soil or gravel. Pouring Concrete: Mixing and pouring the concrete into prepared forms. Finishing Touches: Smoothing out surfaces and adding texture if needed. Curing Process: Allowing time for the concrete to set properly. Detailed Breakdown of Each Phase of Installation Consultation Phase
In this phase, you'll meet with your contractor to discuss design options, colors, patterns, and textures available in concrete driveway installation Milan offers.
Site Preparation Essentials
Proper site preparation is vital:

Remove existing asphalt or concrete Clear away dirt and debris Grade the area to ensure proper drainage Form Setting Explained
Forms provide structure during pouri
0 notes
Text
Transforming Spaces with SHR Tarrant: Your Expert for Bathroom Remodel Fort Worth TX

Introduction
Did you know that updating your bathroom is one of the most cost-effective ways to increase your home’s value? According to national statistics, a well-executed bathroom remodel can offer up to a 70% return on investment. In Fort Worth, where homes range from historic gems to modern builds, bathroom renovations are in high demand.
At SHR Tarrant, we specialize in high-quality, customized remodeling solutions, including kitchen upgrades, home additions, and most importantly—bathroom remodel Fort Worth TX. With years of hands-on experience, our team brings craftsmanship, attention to detail, and a passion for design into every project. This article will walk you through the benefits of remodeling, what to expect during the process, and why SHR Tarrant is the go-to contractor for bathroom remodels in Fort Worth.
Why a Bathroom Remodel Is a Smart Investment
Functional and Financial Value
A bathroom remodel does more than improve aesthetics—it adds comfort, functionality, and equity to your home. Homeowners looking for bathroom remodel Fort Worth TX services often aim to:
Increase storage and efficiency
Replace outdated fixtures and finishes
Improve energy and water savings
Create a more relaxing, spa-like environment
Boost overall home value
With the right design and execution, your new bathroom can enhance daily living while offering long-term financial rewards.
Choosing SHR Tarrant for Bathroom Remodel Fort Worth TX
A Local Company with a Personal Touch
At SHR Tarrant, we take pride in transforming ordinary bathrooms into beautiful, functional spaces. Every bathroom remodel Fort Worth TX project is handled with the highest level of care and precision.
What sets us apart:
Tailored Designs: We customize layouts to suit your lifestyle and preferences.
Transparent Estimates: No hidden costs—just honest pricing.
High-Quality Materials: From tiles to fixtures, we use only the best.
Skilled Team: Experienced professionals who specialize in bathroom remodeling.
Timely Completion: Your project will be completed on schedule without compromising quality.
Our local knowledge and deep industry expertise make us a trusted name in bathroom remodel Fort Worth TX.
The Remodeling Process Explained
From Vision to Reality
A successful bathroom remodel Fort Worth TX requires careful planning. At SHR Tarrant, we guide you through every step:
Initial Consultation: We listen to your needs, goals, and design inspiration.
Design Phase: Our designers create a layout that optimizes space and function.
Material Selection: We help you choose the right tiles, vanities, lighting, and more.
Construction: Our team handles demolition, installation, plumbing, and finishing touches.
Final Walkthrough: We ensure every detail meets your expectations.
This transparent process allows you to stay informed and involved throughout the project.
Popular Bathroom Remodel Trends in Fort Worth TX
Bringing Style and Function Together
Modern bathrooms are more than just utility spaces—they’re personal sanctuaries. When considering a bathroom remodel Fort Worth TX, here are some popular features homeowners love:
Walk-in Showers: Sleek and spacious, perfect for a modern look
Freestanding Tubs: A luxurious focal point for relaxation
Smart Storage: Custom cabinetry and floating vanities
High-Tech Fixtures: Motion-sensor faucets and touchless lighting
Eco-Friendly Upgrades: Low-flow toilets and LED lighting
Whether your style is traditional, modern, or somewhere in between, SHR Tarrant can bring your vision to life.
Planning Tips for a Successful Bathroom Remodel
Before diving into your project, consider these essential tips for your bathroom remodel Fort Worth TX:
Set a Realistic Budget: Include a 10–15% buffer for unexpected costs.
Think About Resale Value: Choose upgrades that future buyers will appreciate.
Maximize Space: Small bathrooms can still feel big with smart layouts.
Focus on Lighting: Proper lighting enhances both function and style.
Choose Durable Materials: Bathrooms see daily use—quality matters.
Bullet Point Recap: Why SHR Tarrant is the Right Choice
✅ Trusted leader in bathroom remodel Fort Worth TX
✅ Fully licensed and insured
✅ Custom design and space planning
✅ Access to premium materials and finishes
✅ Transparent communication and timelines
✅ Over a decade of remodeling experience
We combine creative design and solid construction to bring you a better bathroom—on time and on budget.
Conclusion
Your bathroom should be more than just a place to get ready—it should be a space where style meets comfort, and where form meets function. At SHR Tarrant, we bring that vision to life with every bathroom remodel fort worth tx project we complete.
SOCIAL MEDIA:
FACEBOOK
0 notes
Text
5-Inch vs 6-Inch Gutters: Which Size Is Right for Your Home?
Introduction
When it comes to home maintenance, proper gutter installation is often overlooked. However, gutters play a crucial role in protecting your property from water damage, foundation issues, and landscaping erosion. Among the most common decisions homeowners face is whether to opt for 5-inch or 6-inch gutters. This article dives deep into the nuances of these two sizes, helping you choose the right option for your home while covering various aspects such as installation costs, material comparisons, and maintenance tips.
5-Inch vs 6-Inch Gutters: Which Size Is Right for Your Home?
Choosing between 5-inch and 6-inch gutters can be a tough call. The size you select will significantly affect water flow capacity, aesthetics, and overall functionality.
Understanding Gutter Sizes
Gutter dimensions: https://www.townplanner.com/directory/241292/ The primary difference between these two sizes lies in their capacity to handle rainwater. A 5-inch gutter can typically handle around 1,200 square feet of roof area in moderate rainfall conditions, while a 6-inch gutter can accommodate approximately 2,000 square feet.
Why Does Size Matter? Water Flow Capacity: Larger gutters can channel more water away from your home during heavy rains. Debris Management: Bigger systems are less prone to clogging with leaves and debris. Aesthetics: The visual appeal may differ based on your home's architectural style. Signs You Need a Gutter Replacement
Before making a decision on gutter size, it's essential to evaluate the condition of your existing system. Here are some signs indicating it might be time for a replacement:
Cracks or Holes: Visible damage could lead to leaks. Sagging Gutters: This indicates they’re overloaded or improperly installed. Rusting or Corrosion: Especially important if you have metal gutters. Frequent Clogs: If you're constantly cleaning out debris, it may be time for an upgrade. Gutter Installation Process Explained The Basics of Gutter Installation
Installing gutters isn't just about attaching them to your fascia boards; it's about ensuring they function correctly. Here’s what you can expect during the installation process:
Choosing Materials: Options include aluminum, vinyl, steel, and copper. Measuring Your Home: Accurate measurements help determine how much material you'll need. Cutting and Fitting Sections: This step involves aligning sections properly to minimize leaks. Securing Downspouts: Proper downspout placement ensures effective drainage away from your foundation. How Long Does Gutter Installation Take?
The timeline varies depending on several factors:
Size of the house Type of materials used Weather conditions
On average, professional installations take anywhere from several hours to two days.
Gutter Installation Costs Broken Down
Understanding costs is vital for budget planning:
| Item | Estimated Cost | |------

youtube
0 notes
Text
What to Expect When Visiting a Mazda Dealership: A Comprehensive Overview

When it comes to finding the right vehicle that combines style, performance, and reliability, Mazda stands out as a favourite among car buyers. Whether you’re a first-time car buyer or a loyal Mazda enthusiast, visiting a Mazda dealership in Stirlingshire can be an exciting and fulfilling experience. But what exactly should you expect during your visit? From exploring the latest models to understanding the service options available, this comprehensive overview will help guide you through the dealership journey.
1. A Welcoming Environment
The first thing you’ll likely notice when stepping into a Mazda dealership in Stirlingshire is the professional and inviting atmosphere. Dealerships in this area often reflect the warm hospitality that Stirlingshire is known for. Expect friendly staff ready to assist you without the pressure often associated with car buying. Whether you're browsing or ready to purchase, the focus is on creating a relaxed environment where you can make informed decisions.
2. Showcasing the Latest Mazda Models
A significant highlight of any dealership visit is getting up close with the latest Mazda models. From compact cars like the Mazda2 to the popular Mazda CX-5 and stylish Mazda MX-5 roadster, you’ll find an impressive lineup of vehicles to explore.
The knowledgeable staff at a Mazda dealership in Stirlingshire will walk you through the key features, trim options, and performance specs of each model. They can also explain the newest in-car technology, including infotainment systems, advanced safety features, and hybrid or electric powertrains, if available.
3. Test Drive Opportunities
One of the best ways to understand whether a Mazda is right for you is by getting behind the wheel. Most Mazda dealerships in Stirlingshire offer test drives that allow you to experience the vehicle in real-world conditions.
During a test drive, you’ll get a feel for the handling, comfort, acceleration, and visibility. Whether you’re testing a nimble city car or a family-friendly SUV, the goal is to make sure the vehicle suits your lifestyle and driving habits.
4. Pre-Owned Vehicle Options
If you’re in the market for a more budget-friendly option, dealerships typically offer a selection of high-quality used and approved pre-owned Mazda vehicles. These cars go through detailed inspections to ensure they meet the brand’s high standards for safety and performance.
A Mazda dealership in Stirlingshire will provide a full history report, service record, and any certifications that accompany the used car. This gives you added peace of mind knowing you’re making a reliable investment.
5. Financing and Leasing Services
Understanding your financing options is an essential part of the buying process. At a Mazda dealership in Stirlingshire, finance specialists are available to help you navigate loan terms, down payment options, and monthly instalments that fit your budget.
Whether you’re looking to buy outright, finance through a loan, or explore leasing options, they can offer tailored solutions based on your financial profile. Many dealerships also provide online calculators and pre-approval tools to make the process smoother.
6. Trade-In Evaluations
If you already own a vehicle and are considering an upgrade, dealerships can provide trade-in evaluations. During your visit, a team member will inspect your current vehicle and offer a market-competitive value that can be applied toward your new Mazda purchase.
This convenient option saves time and can reduce the overall cost of your next vehicle. The Mazda dealership in Stirlingshire staff will ensure you receive a fair assessment based on the age, mileage, and condition of your vehicle.
7. Dedicated Service and Maintenance Department
Your relationship with a dealership doesn’t end after the purchase. A trusted Mazda dealership in Stirlingshire offers ongoing service and maintenance to keep your vehicle running at its best. From oil changes to MOT testing and more complex repairs, the service department is equipped with certified technicians and genuine Mazda parts.
Booking a service appointment is usually easy, with options for scheduling online or over the phone. Many dealerships also provide courtesy cars or shuttle services, making the experience as hassle-free as possible.
8. Mazda Accessories and Parts
Whether you want to personalise your new vehicle or replace a worn component, you’ll find a variety of genuine Mazda accessories and parts available. Roof racks, all-weather floor mats, and advanced lighting options are just a few ways to enhance the look and functionality of your Mazda.
Staff can help ensure you select parts that are compatible with your model and offer installation services if needed. A Mazda dealership in Stirlingshire ensures that quality and performance are never compromised.
9. Customer Support and After-Sales Care
Excellent customer service is a hallmark of a reputable dealership. Beyond the sale, customers can expect continued support through service reminders, warranty information, and helpful vehicle care tips.
Dealerships often follow up after your purchase to ensure satisfaction and address any concerns you may have. This level of commitment builds long-term relationships and trust within the local community.
10. Eco-Friendly and Digital Innovations
Modern Mazda dealerships in Stirlingshire are also embracing eco-conscious initiatives and digital tools. You might find electric vehicle charging stations on-site, digital touchpoints to explore vehicle features, or even virtual showrooms for browsing from the comfort of your home.
These innovations enhance convenience and reflect Mazda’s vision for a sustainable and connected future.
Final Thoughts
A visit to a Mazda dealership in Stirlingshire offers much more than a car buying experience—it’s an introduction to a brand known for quality, innovation, and driving enjoyment. With expert guidance, flexible finance options, and ongoing support, the dealership journey is designed to make you feel confident and satisfied at every step.
Whether you’re ready to drive away in a brand-new Mazda or just beginning your research, your local dealership in Stirlingshire is the perfect place to start.
#Official Mazda Dealer in Falkirk#Official Mazda Dealer in Stirlingshire#Mazda Financing Offers in Falkirk#Mazda Financing Offers in Stirlingshire#New Mazda Car Deals in Falkirk#New Mazda Car Deals in Stirlingshire#New Mazda CX-80 Falkirk#New Mazda CX-80 Stirlingshire#Mazda New Cars Falkirk#Mazda New Cars Stirlingshire#New Mazda 2 Cars Falkirk#New Mazda 2 Cars Stirlingshire#Mazda2 Hybrid Falkirk#Mazda2 Hybrid Stirlingshire#Mazda Car Dealers Stirlingshire#Mazda Car Dealers Falkirk#New Mazda3 Falkirk#New Mazda3 Stirlingshire#Mazda Dealership in Falkirk#Mazda Dealership in Stirlingshire#New Mazda3 Hatchback Falkirk#New Mazda3 Hatchback Stirlingshire#Mazda MX-30 Stirlingshire#Mazda MX-30 Falkirk#Mazda Electric SUV Falkirk#Mazda Electric SUV Stirlingshire#Mazda MX-30 R-EV Falkirk#Mazda MX-30 R-EV Stirlingshire#Mazda Hybrid SUV Falkirk#Mazda Hybrid SUV Stirlingshire
0 notes
Text
What to Expect During a Gutter Installation Service
Investing in a quality gutter installation service is essential for protecting your home from water damage caused by rain and runoff. Whether you’re replacing old gutters or installing a new system, understanding what happens during the process can help ease any concerns.
Initial Inspection and Measurement The gutter installation process begins with a thorough inspection of your home’s roofline and existing drainage setup. Professionals will measure the dimensions of your roof and fascia accurately to ensure a custom fit. This step is crucial because gutters must be sized and angled properly to direct water away from your foundation effectively.
Material Selection and Preparation During the initial stages, you will discuss gutter material options with your installer. Common materials include aluminum, copper, steel, and vinyl. Each has its benefits, from durability to aesthetic appeal. After selecting the right materials, the gutter sections are prepared—if seamless gutters are chosen, they are often fabricated on-site to match your home’s exact measurements.
Removal of Old Gutters (if applicable) If you are replacing an old gutter system, the crew will safely remove the existing gutters and dispose of them properly. This step ensures that the new gutters have a clean, solid surface to attach to and that there is no damage hidden underneath the old system.
Installation of New Gutters Once preparation is complete, the installation team will begin attaching the new gutters. Special attention is paid to the slope and pitch to promote efficient water flow towards the downspouts. Proper placement of hangers and brackets is also important to keep gutters secure during heavy rain or snow.
Downspout Installation and Final Adjustments Downspouts are installed to carry water safely away from your home’s foundation. Professionals ensure that they are placed in strategic locations and securely fastened. The team will check the entire system for leaks, proper flow, and overall performance.
Cleanup and Customer Walkthrough A reputable gutter installation service includes a complete cleanup of the work area. The crew will remove all debris and leftover materials, leaving your property tidy. They will also walk you through the new system, explaining maintenance tips and answering any questions.
If you’re ready for a hassle-free gutter upgrade, contact a gutter service company near Springdale, Stamford, CT to schedule your installation today. Quality workmanship and attention to detail will ensure your home stays protected for years to come.
0 notes
Text
What Questions Should You Ask Epoxy Flooring Contractors in Brisbane?
When considering epoxy flooring for residential, commercial, or industrial spaces, hiring the right professionals is crucial. Epoxy Flooring Contractors Brisbane offer specialized services that transform ordinary floors into durable, attractive surfaces with excellent resistance to wear, chemicals, and moisture. To ensure the best results and long-lasting performance, it is essential to ask the right questions before selecting a contractor.
This comprehensive guide outlines the key questions to ask Epoxy Flooring Contractors Brisbane to help you make an informed decision, avoid common pitfalls, and secure high-quality workmanship.

Why Is Choosing the Right Epoxy Flooring Contractor Important?
Epoxy flooring involves multiple technical steps including surface preparation, mixing, application, and curing. Incorrect installation can lead to problems such as peeling, bubbling, or uneven finishes. Selecting experienced and reputable Epoxy Flooring Contractors Brisbane guarantees professional handling of each stage, adherence to safety standards, and an epoxy floor that meets aesthetic and functional expectations.
What Experience Do You Have with Epoxy Flooring Projects in Brisbane?
Understanding a contractor’s experience is fundamental. Brisbane’s climate and local conditions may affect flooring materials and installation processes. Request details about their past projects in the region, including types of surfaces coated, scale of work, and specific challenges encountered. Experience ensures familiarity with Brisbane’s environmental factors and building codes, leading to a smoother installation process.
Are You Licensed and Insured?
A legitimate Epoxy Flooring Contractors Brisbane company must hold proper licenses and insurance. Licensing confirms compliance with industry standards and legal requirements, while insurance protects homeowners and businesses from liability in case of accidents or damage during the project. Always verify documentation before signing any contracts.
What Types of Epoxy Flooring Do You Offer?
Epoxy flooring comes in various formulations tailored for different needs—such as high-gloss, matte, slip-resistant, chemical-resistant, and decorative options. Discuss the types available and which would best suit the intended use of the floor. A knowledgeable contractor should guide choices based on durability, appearance, and maintenance requirements specific to the client’s environment.
Can You Provide References or Customer Testimonials?
Reliable Epoxy Flooring Contractors Brisbane should willingly share references or direct you to reviews and testimonials from previous clients. Feedback on workmanship, professionalism, timeliness, and customer service offers valuable insights into what to expect. Contacting past customers can confirm the contractor’s reputation and reliability.
What Surface Preparation Process Do You Follow?
Proper surface preparation is vital for epoxy adhesion and longevity. Inquire about the specific steps taken before application, such as cleaning, grinding, repairing cracks, or moisture testing. Contractors should be transparent about the process and explain how they handle common problems like uneven concrete or contamination.
What Is the Expected Timeline for Completion?
Project duration affects planning and daily operations, especially in commercial or industrial settings. Request an estimated timeline covering all stages—from initial preparation to final curing. Understanding this helps coordinate other work and set realistic expectations. Ensure the timeline includes contingencies for potential delays.
What Warranty or Guarantee Do You Offer?
A trustworthy Epoxy Flooring Contractors Brisbane business provides warranties covering materials and workmanship. Warranty terms vary, so clarify what is included, the length of coverage, and how claims are handled. A solid warranty demonstrates confidence in the quality and durability of their epoxy flooring solutions.
How Do You Ensure Safety During Installation?
Epoxy materials involve chemicals that require proper handling and ventilation. Ask about the safety measures contractors implement to protect workers, occupants, and property during the installation process. This question also reflects their professionalism and commitment to responsible service.
What Maintenance and Care Advice Do You Provide?
Post-installation care influences the lifespan and appearance of epoxy floors. Seek guidance on cleaning methods, suitable products, and preventive maintenance to keep the floor in optimal condition. Experienced contractors will offer practical advice tailored to the specific epoxy system applied.
What Are the Estimated Costs and Payment Terms?
Cost transparency is essential to avoid surprises. Obtain a detailed written quote that outlines labor, materials, preparation, and any additional charges. Clarify payment schedules, deposits, and accepted payment methods. Comparing quotes from multiple Epoxy Flooring Contractors Brisbane can also help ensure competitive pricing without compromising quality.
Conclusion
Choosing the right Epoxy Flooring Contractors Brisbane requires careful consideration and asking targeted questions. Verifying experience, licensing, warranty, and understanding the scope of work ensures a professional installation that enhances both aesthetics and durability. By addressing these critical points, property owners and managers can confidently invest in epoxy flooring solutions that stand the test of time and Brisbane’s unique environment.
0 notes
Text
Selecting the Right Provider for Furnace Install Service and Repair

When your heating system starts to malfunction or you're planning a complete upgrade, finding the right professionals is essential. Selecting a dependable provider for furnace install service and repair guarantees your system operates efficiently, safely, and consistently throughout the winter season. A qualified company delivers both technical know-how and the confidence that your home is in capable hands.
Essential Traits to Seek in a Furnace Install Service and Repair Company
Experience is a major factor when deciding on a service provider. A business with a long history in furnace install service and repair typically has the expertise to manage everything from routine maintenance to more advanced problems. Make sure their technicians are certified and knowledgeable about a variety of furnace models and brands to ensure accurate diagnostics and effective recommendations.
Customer feedback can also provide insight into the company's reputation. Prioritize providers with strong, positive reviews that mention timely responses, open communication, and honest pricing. A reputable company will clearly explain costs and each step of the process, so you know exactly what to expect. This kind of openness builds trust—especially for homeowners who may not be familiar with how HVAC systems work.
The Importance of Choosing a Reliable Furnace Install Service and Repair Company
Proper installation is as critical as the quality of the furnace itself. If a furnace is installed incorrectly, it can cause inconsistent heating, increased energy costs, and even pose safety concerns. Choosing a skilled provider for furnace install service and repair ensures the job is handled correctly from the start. Experienced professionals will evaluate your home’s layout and heating requirements to recommend the best system for your space.
Ongoing service is just as important as installation. Look for companies that offer maintenance plans to help your furnace run smoothly and last longer. These plans often include seasonal inspections, filter replacements, and system safety checks. Regular upkeep can prevent costly issues and ensure your heating system remains dependable throughout the colder months.
It’s also wise to select a company that offers warranties or satisfaction guarantees. Providers who back their work with these assurances demonstrate confidence in their service. Whether you need a complete installation or just a simple fix, knowing your provider stands behind their work gives you extra peace of mind.
Finding the best company for furnace install service and repair isn’t only about convenience—it’s about ensuring year-round comfort and dependable performance. With an experienced and trustworthy team, you’ll receive professional guidance, fast service, and a heating system that meets your needs for years to come.
#Emergency Heating Repair#Heat Pump Installation and Service#Air Conditioner Installation and Maintenance#Furnace Installation and Repair#Duct Cleaning and Repair#HVAC Contractor Services
1 note
·
View note
Text
What Should You Know When Hiring an Electrician in Balmain?

Electrician in Balmain refers to the skilled professionals who specialise in electrical services for homes and businesses in the Balmain area of Sydney. This historic suburb, known for its charming terraces and modern developments, often requires expert electrical services for both new builds and heritage properties.
When hiring an electrician in Balmain, it’s essential to consider both their technical expertise and their familiarity with local building codes and requirements. Here’s what you should keep in mind when looking for electrical services in this area.
What Qualifications Should You Look For in an Electrician?
Licensed and Insured ElectriciansA certified electrician ensures that your work will meet Australian electrical standards and local regulations. Insurance provides peace of mind that any potential damage during the job will be covered.
Relevant Experience with Local PropertiesBalmain homes vary from historic houses to modern apartments. An electrician with experience in the local area will understand the specific electrical systems and challenges faced by these different property types.
How Can You Ensure Safety and Compliance?
Adherence to Australian Electrical StandardsElectricians must comply with the AS/NZS 3000 Wiring Rules, ensuring that the electrical work is safe and up to code. It’s crucial that any work done adheres to these standards to prevent hazards like fires or electric shocks.
Safety Checks and InspectionsA reputable electrician should carry out thorough inspections of your property’s electrical system. They should also offer advice on safety upgrades, especially if your property is older and has outdated wiring or circuit breakers.
What Types of Electrical Services are Common in Balmain?
Rewiring and Upgrading Electrical SystemsOlder properties in Balmain may require rewiring due to the age of the wiring and its ability to handle modern electrical loads. An experienced electrician can ensure that the electrical system is upgraded to meet the demands of contemporary appliances and devices.
Lighting Installations and UpgradesWhether it’s installing new lighting in a kitchen renovation or upgrading existing lighting to energy-efficient LEDs, an electrician in Balmain can offer tailored solutions for aesthetic and functional lighting.
What Are Some Common Electrical Issues in Balmain Homes?
Frequent Circuit Breaker TripsFrequent tripping of circuit breakers can be a sign of an overloaded circuit or faulty wiring. An electrician can diagnose the cause and recommend necessary repairs or upgrades.
Old or Faulty WiringMany of Balmain’s older properties have outdated wiring that is more prone to faults. This can lead to safety hazards, so it’s crucial to hire an electrician to conduct regular inspections and replace old wiring where needed.
What Should You Expect During an Electrical Job?
Clear Communication and TransparencyThe electrician should explain what the job will entail and provide a written estimate before starting any work. It’s essential to understand the process, costs, and timeline upfront.
Post-Completion InspectionOnce the job is completed, a thorough inspection should be conducted to ensure everything is functioning properly and safely. A good electrician will also provide after-service support if any issues arise.
Choosing the right electrician in Balmain means selecting someone with the experience, qualifications, and local knowledge to handle all your electrical needs, ensuring safety and efficiency for your home or business.
0 notes
Text
New Pool Construction in Oxnard: What Homeowners Need to Know

When it comes to transforming your backyard into a refreshing oasis, few home improvements make as much of an impact as a custom-built swimming pool. With the sunny climate and relaxed lifestyle of Oxnard, CA, having a pool is a perfect way to enhance both the value and enjoyment of your property. But before you dive into pool construction, it's crucial to understand the various factors involved in the process. From choosing the right pool contractor to navigating permits, here’s everything homeowners need to know about new pool construction in Oxnard.
Why Choose Pool Construction in Oxnard?
Oxnard is known for its coastal charm, beautiful beaches, and Mediterranean-like climate, which makes it an ideal place to invest in a pool. Whether you're seeking a place for relaxation, entertainment, or fitness, a pool can help you maximize the enjoyment of your outdoor space. But as with any major home improvement project, pool construction requires careful planning, research, and expert guidance. That’s where a reputable pool contractor Oxnard CA comes into play.
Step 1: Choosing the Right Pool Contractor
One of the first and most important decisions you’ll make when building a pool in Oxnard is selecting a reliable pool contractor. Your choice of contractor will significantly impact the quality, cost, and timeline of your pool construction project. Here’s what to look for when hiring a pool contractor Oxnard CA:
Experience and Reputation: Make sure to hire a pool contractor with a proven track record in Oxnard. Look for testimonials, reviews, and a portfolio of previous pool construction projects. Local contractors familiar with the area will know the unique challenges and requirements for pool construction in Oxnard, such as soil conditions and local building codes.
Licensing and Insurance: Always verify that your pool contractor is licensed and insured. This ensures that they are qualified to handle the project and that you are protected in case of accidents or property damage during construction.
Specialized Services: Depending on your needs, you may want a contractor that specializes in specific pool types (e.g., inground, above-ground, or fiberglass) or services like pool design, landscaping, or renovation. Ensure that the contractor you choose can meet your specific needs and vision.
Transparent Pricing: A reputable pool contractor will provide a clear, detailed estimate that outlines all the costs involved. Be wary of contractors who give vague pricing or push for quick decisions without explaining the full scope of work.
Strong Communication: Effective communication is crucial throughout the pool construction process. Choose a contractor who listens to your ideas, offers expert advice, and keeps you updated on the progress of your project.
Step 2: Understanding the Costs
One of the most significant factors homeowners must consider when building a pool is the cost. The price of pool construction can vary widely based on several factors, including the type of pool, size, materials, and additional features you want to include. On average, homeowners in Oxnard can expect to spend anywhere from $30,000 to $70,000 or more for a new pool installation.
Here are some cost factors to keep in mind:
Type of Pool: The most common types of pools in Oxnard are concrete (gunite), fiberglass, and vinyl-lined. Concrete pools are the most customizable but tend to be more expensive. Fiberglass pools are typically quicker to install and lower in cost, while vinyl pools are a budget-friendly option.
Size and Shape: Larger, custom-designed pools will naturally cost more than standard shapes and sizes. However, the size and shape of your pool should complement the available space in your backyard and your intended use.
Additional Features: Features like waterfalls, fountains, lighting, custom tiles, and poolside landscaping can add to the overall cost of your pool. While these elements can enhance your pool’s aesthetic and functionality, they will also impact the price.
Permitting and Excavation: The permitting process can also affect the total cost. Oxnard, like many other cities in California, requires building permits for pool construction. Your pool contractor will need to handle this process, and there may be additional costs for excavation or soil preparation, especially if your yard has challenging terrain.
Step 3: Navigating Permits and Regulations
Before any construction can begin, you’ll need to obtain the necessary permits from the City of Oxnard. This process ensures that your pool meets local building codes and safety standards. Your pool contractor Oxnard CA will typically handle this for you, but it’s important to be aware of the following requirements:
Building Permits: These permits are required for all new pool installations in Oxnard. They ensure that your pool meets the minimum safety and construction standards set by the city. The permitting process can take several weeks, so plan accordingly.
Safety Fencing: According to California state law, pools must be surrounded by a safety fence to prevent accidental drownings, especially if there are children in the household. The fence must meet specific height and gap requirements, and it should be installed before the pool is filled with water.
Drainage and Electrical Codes: Proper drainage is essential to prevent flooding around your pool area, and electrical systems (for pool lighting, heaters, etc.) must comply with strict safety codes.
Your pool contractor will be familiar with these regulations and can guide you through the process of obtaining permits, ensuring compliance with local laws, and avoiding potential delays.
Step 4: Planning Your Pool Design
Once the logistics are sorted, it’s time to focus on the design of your pool. This is where a skilled pool contractor Oxnard CA can help you bring your vision to life. Here are some design elements to consider:
Shape and Style: Choose a shape that complements your outdoor space. Popular designs include freeform, rectangular, and kidney-shaped pools. If you’re looking for a more luxurious feel, consider custom features like infinity edges or geometric shapes.
Material Choices: Concrete pools allow for the most customization, while fiberglass and vinyl pools offer faster installation and lower maintenance costs.
Features: Think about additional features like built-in spas, waterfalls, tanning ledges, and pool lighting to create a truly unique and functional backyard retreat.
Step 5: The Pool Construction Process
The construction of your pool will take several weeks to complete. The typical process involves:
Excavation: The first step is excavating your backyard to create the space for your pool. This is a major part of the process and can take several days depending on the pool's size and the condition of your yard.
Building the Pool Shell: Once the excavation is complete, the pool’s structure (whether concrete, fiberglass, or vinyl) is installed.
Plumbing and Electrical Work: This involves setting up the filtration system, pumps, heaters, lighting, and other electrical components.
Finishing Touches: After the main structure is in place, the final steps involve adding finishes like pool tiles, coping, and decking. Landscaping around the pool area will also enhance the overall look of your backyard.
Inspection: After construction is complete, a city inspector will visit to verify that the pool meets safety standards. Once approved, you’ll be ready to enjoy your new pool!
Conclusion
Building a new pool in Oxnard can be an exciting and rewarding project, but it’s essential to approach it with careful planning and the help of a qualified pool contractor Oxnard CA. By selecting the right contractor, understanding the costs involved, navigating local regulations, and focusing on the design elements that matter most to you, you can ensure that your new pool is a beautiful, functional addition to your home. If you're ready to start your pool construction journey, consider contacting Oxnard Pool Contractors for expert guidance and professional service every step of the way.
For more information on pool construction requirements and city regulations, visit the City of Oxnard Official Website.
Oxnard Pool Contractors 1000 Town Center Dr Suite 430, Oxnard, CA 93036 (805) 725-0034 https://oxnardpoolcontractors.com/
1 note
·
View note
Text
Preparing Your Home for a Sewer Lateral Replacement Project
Introduction
A sewer lateral replacement project can be a daunting task for homeowners. Not only is it essential to ensure that your plumbing system operates effectively, but it also involves a significant amount of planning and preparation. This article will guide you through the entire process of preparing your home for a sewer lateral replacement project. We'll explore essential steps, considerations, and expert recommendations to ensure the project runs smoothly and efficiently.
youtube
Table of Contents
Understanding Sewer Lateral Replacement Signs You Need a Replacement Choosing the Right Plumbers in Livermore The Importance of Directional Boring Trenchless Sewer Repair: An Overview Horizontal Directional Drilling Explained What to Expect During Pipeline Installation Pre-Project Considerations How to Prepare Your Yard for Construction Dealing with Utility Construction Services Permits and Regulations: What You Need to Know Cost Factors in Sewer Lateral Replacement Insurance Considerations During the Project Choosing Between Traditional vs Trenchless Methods Post-Construction Cleanup: What’s Involved? Maintaining Your New Sewer System Common Mistakes to Avoid During Preparation FAQs About Sewer Lateral Replacement Projects Understanding Sewer Lateral Replacement
Sewer lateral replacement refers to the process of replacing the pipeline that connects your home’s plumbing system to the municipal sewer line or septic system. This line directional boring is crucial as it handles all wastewater from your home, including sewage and greywater.
Why is Sewer Lateral Important?
The sewer lateral plays a vital role in maintaining your home's sanitation and hygiene standards by ensuring proper waste disposal. A sewer pipe installation malfunctioning or damaged sewer lateral can lead to serious problems, including backups, leaks, and health hazards.
Signs You Need a Replacement
Recognizing the signs that indicate you might need a sewer lateral replacement is crucial for timely intervention.

Common Indicators: Frequent clogs Foul odors around drains Slow draining sinks or toilets Unexplained wet spots in your yard Foundation cracks caused by shifting soil due to leaks
If you notice any of these symptoms, it’s wise to consult with professional plumbers in Livermore who can diagnose the issue accurately.
Choosing the Right Plumbers in Livermore
Selecting experienced plumbers is one of the most critical steps in preparing for a sewer lateral replacement project.
Tips for Choosing Quality Plumbers: Research Credentials: Verify their licenses and certifications. Read Reviews: Check online reviews and testimonials. Ask for Estimates: Get multiple quotes before making a decision. Inquire About Experience: Ensure they have
1 note
·
View note
Text
The Countertop Installation Process: What to Expect
When it comes to transforming your kitchen, one of the most exciting upgrades you can make is installing new countertops. Whether you’re going for a sleek granite surface, a modern quartz look, or a natural stone aesthetic, the countertop installation process can seem a little overwhelming. But with the right team guiding you through, the experience can be smooth and stress-free. So, let’s break down what to expect during the countertop installation process and why American Pride Kitchens in Parrish, FL, offers the best service for the job.
Step 1: Initial Consultation and Design
The first step in installing new countertops is the consultation. This is where you’ll meet with the experts to discuss your vision. Whether you have a clear idea of the material and design or you're still deciding, this is the time to explore your options. The team at American Pride Kitchens offers personalized advice to help you choose a material that fits your aesthetic, lifestyle, and budget. During this consultation, measurements are taken, and your needs are carefully listened to.
Step 2: Choosing the Perfect Material
Once you’ve narrowed down your design vision, it’s time to pick the material for your countertops. Popular options include granite, marble, quartz, and concrete. Each material has its unique benefits – granite offers a natural, durable finish, while quartz is engineered for strength and color consistency. You’ll want to consider factors like durability, maintenance, and how the material complements the rest of your kitchen.
The team at American Pride Kitchens is knowledgeable about the pros and cons of each option, so they’ll guide you toward the best choice for your home. They take the time to explain how the material will perform over time and ensure you're happy with your selection before moving forward.
Step 3: Fabrication and Preparation
Once you've selected your material, the next phase is fabrication. This is when your countertop is custom-cut to fit your kitchen’s exact measurements. At this stage, you’ll be able to see the actual slabs of material and approve the cuts, ensuring everything aligns with your design preferences. American Pride Kitchens has a skilled team that works meticulously to ensure precision in every cut, guaranteeing your countertops fit perfectly.
While the fabrication process takes some time – typically 1-2 weeks – it’s an essential part of ensuring a flawless installation. During this time, you can rest easy knowing your countertops are being crafted with care.
Step 4: Installation Day
When it’s finally time for installation, you can expect a professional, timely, and efficient process. The American Pride Kitchens team will arrive with your pre-cut countertops, ready for installation. Depending on the size of the project, installation typically takes 1-2 days, and the team works diligently to minimize disruption to your home. They’ll carefully remove your old countertops and install the new ones with expert precision.
For larger or heavier materials, like granite or marble, additional assistance may be needed to lift and position the countertops. American Pride Kitchens ensures that all the necessary precautions are taken, from safely transporting the materials to installing them without any damage to surrounding areas.
Step 5: Final Touches and Inspection
Once the countertops are installed, the team at American Pride Kitchens will inspect everything to ensure it meets the highest standards. They’ll check for proper alignment, secure seams, and make sure all edges are smooth and even. If any additional adjustments are needed, they’ll take care of that for you. You’ll also get a chance to see the countertops in place and make sure everything looks just how you imagined.
Finally, the installation crew will clean up the space, leaving your kitchen looking brand new. They’ll go over maintenance tips for your new countertops to help you keep them in top condition.
Why Choose American Pride Kitchens?
Choosing American Pride Kitchens for your countertop installation means working with a dedicated team of professionals who care about delivering quality results. Based in Parrish, FL, their team brings years of experience, offering expert design advice, seamless installation, and aftercare support. They understand that every kitchen is unique, and they work tirelessly to ensure your countertops not only look stunning but are also built to last.
When you're ready to upgrade your kitchen, trust American Pride Kitchens for the best countertop installation service. Their attention to detail, commitment to quality, and personalized approach make them the go-to choice for homeowners in Parrish and beyond. Whether you’re remodeling or starting fresh, they’ll bring your vision to life.
0 notes
Text
How to Pick a Highly Recommended HVAC Contractor in Milltown, NJ
Choosing the right HVAC contractor ensures your heating, ventilation, and air conditioning system operates efficiently and reliably. Whether installing a new system, repairing an existing one, or performing routine maintenance, selecting a trustworthy, skilled, and highly recommended contractor can make a significant difference. In Milltown, NJ, where diverse weather conditions demand efficient HVAC systems year-round, it's essential to research and find the best professional for the job. Here's a guide on how to pick a highly recommended HVAC contractor in Milltown.

Look for Certifications and Licenses
One of the most important factors when choosing an HVAC contractor is ensuring they are properly licensed and certified. In New Jersey, the state must license HVAC professionals to perform installation, repairs, and maintenance on heating and cooling systems. Certification from reputable organizations such as North American Technician Excellence (NATE) is also a good indicator of a contractor's expertise. These certifications ensure that the contractor has passed rigorous exams and is up-to-date on the latest HVAC technologies and industry standards.
Ask for Referrals and Read Reviews
Word of mouth is a powerful tool for finding a highly recommended HVAC contractor in Milltown, New Jersey. Ask friends, family, and neighbors in Milltown for recommendations based on their experiences. Personal referrals provide insight into a contractor's quality of service, reliability, and professionalism. In addition to referrals, online reviews can help you assess a contractor's reputation. Websites such as Google, Yelp, and Angie's List often feature customer reviews, giving you a better understanding of what to expect. Pay attention to recurring comments about the contractor's punctuality, work quality, and customer service.
Verify Experience and Expertise
Experience matters when it comes to HVAC systems. An experienced contractor will have a solid track record of dealing with various HVAC systems and handling issues. Look for contractors who have been in business for several years, as they are more likely to have developed the necessary expertise to handle complex installations or repairs. Additionally, ensure the contractor has experience working with your specific type of HVAC system, whether it's a traditional central air system, a ductless mini-split, or an energy-efficient geothermal unit.
Get Multiple Estimates
When hiring an HVAC contractor, getting multiple estimates before deciding is a good idea. A reputable contractor will offer a written estimate detailing the scope of work, materials, labor, and other associated costs. Compare the estimates from several contractors to ensure you get a fair job price. Be cautious of unusually low estimates, as they may indicate subpar materials or lack of experience. On the other hand, a high estimate doesn't always mean high quality, so take the time to evaluate the value of the services offered.
Assess Customer Service and Communication
Good communication is essential for any home improvement project, including HVAC work. A reliable contractor should be easy to reach, responsive to your questions, and willing to explain the work's details. Pay attention to how the contractor communicates with you during your initial interactions. Are they professional, courteous, and transparent about the process? Clear communication indicates that the contractor values customer satisfaction and will likely provide quality service.
Ensure They Offer Warranties and Guarantees
A highly recommended HVAC contractor in Milltown, New Jersey, should stand behind their work by offering warranties or guarantees on parts and labor. This shows confidence in their ability to perform quality work and provides peace of mind, knowing that the issue will be addressed without additional costs if something goes wrong. Always ask about the warranties offered before finalizing any agreements.
Picking a highly recommended HVAC contractor in Milltown, NJ, involves thorough research and considering several key factors. Focus on finding a licensed, experienced, and well-reviewed contractor who offers transparent pricing, excellent customer service, and strong warranties. Taking these steps will ensure that your HVAC system is in good hands and can provide optimal comfort for years.
0 notes
Text
What to Expect During a Professional Gutter Guard Installation
Installing gutter guards is a smart investment for homeowners looking to reduce maintenance and ensure their gutters are always functioning efficiently. Gutter guards help prevent debris like leaves and twigs from clogging gutters, which can lead to water damage, roof leaks, and costly repairs. A professional gutter guard installation service can provide you with the expertise needed to choose and install the right system for your home. Here’s what you can expect during a typical installation process.
1. Initial Consultation and Gutter Assessment
The first step in professional gutter guard installation is a thorough consultation. The installation team will assess your existing gutters to determine the best type of guard for your home. They’ll consider factors such as the size and pitch of your roof, the amount of debris in your area, and the specific challenges your home’s drainage system faces. This ensures that the gutter guard system will be effective and compatible with your gutters.
2. Choosing the Right Gutter Guard System
There are various types of gutter guards, including mesh screens, reverse curve guards, and foam inserts. The installation team will guide you through the options, explaining the pros and cons of each based on your needs. Whether you need a system that can handle heavy debris or one that can withstand extreme weather, a professional can help you select the right guard to keep your gutters clean and protected.
3. Preparation and Cleaning
Before the gutter guard installation begins, the team will clean your gutters thoroughly. This step is essential to ensure that there is no debris obstructing the flow of water once the guards are in place. Cleaning includes removing leaves, dirt, and other materials from the gutters and downspouts. If there are any existing issues with your gutters, such as leaks or sagging, these will be addressed before the guards are installed.
4. Installation Process
Once the gutters are clean, the professionals will begin installing the gutter guards. The installation method depends on the type of guard chosen. Some systems are installed by snapping or locking the guards into place, while others may require additional fasteners to secure them. Professional installation ensures that the guards are properly aligned and fit securely, reducing the risk of gaps or loose sections.
5. Final Inspection and Testing
After the installation is complete, the team will perform a final inspection to ensure everything is functioning correctly. They may run a water test to check that water flows properly through the gutters and downspouts, ensuring the guards are working as intended. They’ll also make sure the guards are securely attached and there are no gaps where debris could enter.
For high-quality, professional gutter services in Stamford, CT 06907, a local team can help ensure that your gutter guard installation is completed efficiently and effectively. With their expertise, your gutters will be well-protected, reducing the need for frequent cleaning and maintenance.
1 note
·
View note
Text
What To Expect During Alarm System Installation?
Installing an alarm system is a great step toward securing your home or business. Whether you want to protect your family or safeguard valuable assets, having a reliable security system provides peace of mind.
But if you're wondering what happens during the installation of Brisbane alarm systems, you're in the right place. In this blog, we’ll explain what you can expect during installation, from initial consultation to final testing. Let’s dive in!
1. Initial Consultation and Assessment
Before the installation process begins, you’ll have an initial consultation with the alarm system provider. This is an important step in which a professional assesses your property and recommends the best alarm systems based on your needs.
During the consultation, the technician will ask questions about your security concerns, such as:
What areas of your property need the most protection?
Are there any potential security risks you’re aware of?
Do you prefer a system with cameras, motion detectors, or basic alarms?
They’ll also evaluate your home or business layout to determine the best locations for sensors, cameras, and control panels to maximise efficiency.
2. System Design and Customisation
After gathering all the necessary information, the technician will design a custom alarm system tailored to your property’s requirements.
If you opt for Brisbane alarm systems with surveillance cameras, they’ll select locations with maximum coverage without compromising your privacy. You’ll be given a rundown of the system components, including:
Control panels: This is where you’ll arm/disarm the system.
Sensors: These will detect any movement or door/window breaches.
Cameras: If included, these will monitor high-risk areas.
Mobile app integration: So you can control the system from your phone!
It’s a good idea to ask questions at this stage to ensure everything aligns with your security goals.
3. The Installation Day: What Happens Next?
The installation process typically takes a few hours to a full day, depending on the system's complexity. When the technician arrives, you’ll likely notice the process is more seamless than anticipated.
Here’s what you can expect:
Wiring and Placement: The technician will install sensors, cameras, and wiring in discreet locations to maintain aesthetics while ensuring effectiveness. They’ll keep wires hidden and cleanly routed to avoid unnecessary disruptions.
Drilling and Mounting: If your Brisbane alarm systems include wall-mounted components like cameras or control panels, expect some minor drilling. Don’t worry – they’ll ensure everything is secured properly without causing major damage to your property.
Configuration and Calibration: The technician will calibrate the system once everything is installed to ensure everything functions correctly. This includes adjusting sensor sensitivity and camera angles and verifying alarm sounds.
During this time, you will be asked to review the installation layout and ensure that it meets your expectations.
4. System Testing and Final Walkthrough
Now comes the exciting part: testing the system! After installation, the technician will fully test the system to ensure everything works as intended. This will include:
Triggering sensors to confirm they detect motion or door/window breaches.
Checking the camera feed to ensure it provides clear, consistent footage.
Testing the alarm sound, remote control functions, and mobile app integration.
Once everything passes the test, the technician will walk you through using your alarm systems. You’ll learn how to arm/disarm the system, set up codes for different users, and troubleshoot basic issues if needed.
5. Ongoing Support and Maintenance
The installation doesn’t end when the technician leaves your property. Many Brisbane alarm systems providers offer ongoing support to ensure your system remains effective. This includes regular maintenance checks, software updates, and even troubleshooting if the system malfunctions.
Ask about the warranty, service packages, and additional monitoring services. This will ensure that you’ll have the support you need if anything goes wrong in the future.
Conclusion
Installing Brisbane alarm systems is an investment in your security and peace of mind. From the initial consultation to the final walkthrough, the process must be thorough and tailored to your unique needs.
Remember, a little preparation and understanding of what’s involved will help ensure your alarm system installation goes smoothly. So, take that first step toward a safer property with a reliable, customised security system!
Source: What To Expect During Alarm System Installation?
0 notes