#apollo's dev log
Explore tagged Tumblr posts
Visit Tumblr Blog
Explore Tumblr blogs with no restrictions, modern design and the best experience.
Last Seen Tumblr Blogs


fenetres-et-portes-fenetres-blog
Installation de fenêtres et portes-fenêtres aluminium et PVC
1 post

Fun Fact
In 2020, 44% of users from Denmark used Tumblr daily.
Text
Dedicated DEV LOG #3

i know it sounds like a repeating excuse but please give me leniency i'm trying to finish up my last quarter of college ( TДT)
still working hard on the game!! writing is much harder than it seems and most of my time is just me sitting and thinking..... then writing and deleting..... i also gotta get some inspiration by reading or playing or watching other games.......
but in any case!!! more below the read more!! yet another month to "Dedicated To..." (abbreviated as DT throughout)
---------------------------------------------------------------------------
progress on the story is going fine!! i think!!!! i haven't written a lot honestly but at least i know what direction i want to take the game in!
previously, i felt like i was unsure if i could properly convey tybalt's suffering while balancing happy moments, nor was i really sure about how reyn should be... i was really stuck for a while and i didn't know if i was doing my best work, but i decided to write whatever i can anyways and edit it later
before i knew it, i was making reyn seem like an insensitive jerk who keeps saying extremely romantic things or keeps thinking about girls!!!!!!!! Σ( ̄□ ̄;)
"but that's not the man tybalt would fall in love with!!! he has better taste!!!" or at least that's what i told myself
i thought to myself "what is so appealing about reyn to tybalt?" while also considering the joke of how both of them are supposed to be extremely generic in design, and i decided to look a bit into romance vns and how the protag acts
honestly i feel like i didn't do enough research still, but there's probably a point where i'm doing too much and i should just trust myself, y'know (^o^;)
someone who's extremely nice and forgiving, but a bit mischevious at times and ready to take action, that's the person i feel like reyn is!! his dynamic with tybalt is all about bringing someone out of their shell and trying to cheer them up!! too bad he won't be there for tybalt when he really needs it (¬‿¬)
picture below of tybalt handing you a list of non-extensive content and trigger warnings totally unrelated

i think i was also trying to make it too depressing when the first 2 days are supposed to be happy to let your guard down!! after all, happiness doesn't hit as hard if there isn't sadness to compare to, right? kinda like the cliche saying of a rainbow coming after rain!!
\(^o^)/
i feel like i may be stunting my development progress and showing any real progress by focusing on the story first, but this is a story-focused game, so the story should be my best work!! please bear with me for a bit longer!! im working completely solo here with no help after all
ᕙ( •̀ ᗜ •́ )ᕗ
by the way, the game will follow roughly 7 days per route, the first 2 days is tybalt and reyn's date hangout, the next 3 days (with a 6 day timeskip in between) is when tybalt suffers, the next is…. well, his gruesome demise ☆
and then the last day is when reyn Finds Out (ゝω・´★)
most of the gameplay will be contained in the 3rd and 4th days after the hangout, and i decided on making simple puzzles! they'll also contribute to the horror atmosphere depending on each route and they'll be simple puzzles because i'm too stupid to think of complicated ones!!!!
i think this should be good for now!! i don't want to reveal all of my cards early if i'm going to continue doing this for a while ( ´ ω ` )
you can stop reading if you'd like, but from here on i want to talk a little bit about a game related to DT i have planned after i complete this one and other updates!!
---------------------------------------------------------------------------

woah who's this girl
after this game is over, i might want to work on a fun little old-school styled visual novel running on a simulated DS you are not making me call the DS retro i refuse to believe it
it'll follow an AU of reyn where he meets a certain girl in high school, and it's up to you to help him get with her!!!!!!!!!!!!
tybalt? don't worry about him!!! he's just a side character and the friend that helps you!!!!!!!!!! there totally isnt a secret path that goes down a darker road of how reyn copes with tybalt's death and maybe seeing him dead!!!!!!!!!!!!!!!!!!!!!!!!!!!!!!!!!!!!!!!!!!!!!!
this game honestly is just a concept so far since i should focus on finishing DT before i actually do anything extra lol
but if you have any good old school romance vns to recommend to me or advice on writing vns, feel free to leave it in the inquiry!!
---------------------------------------------------------------------------
using the suffering i have obtained in my college classes, i'm planning on creating my own website!! it'll feature interactable elements where you can view my art, blog posts, projects, characters, and interact with me (apollo or nyarl)!! ( • ̀ω•́ )✧
yeah i repurposed an old piece of mine sue me
you can click on me (apollo or nyarl) and we'll speak to you like a visual novel! there will be random events (and some hidden secrets throughout the website?)
i'm also trying to work on this while working on DT, so please forgive me if progress goes slow m(_ _)m
i'll also be going on a month long vacation from mid april to may, so the next dev log will be in june!!
thank you for reading to the very end!! i don't know how many people actually read these, but i appreciate you if you're reading this!
(^_^)v
0 notes
Text
5 Reliable Tech-Stack That Power Your Go-To Workout Apps
Looking to build the next big workout & training app or fitness training app?
With over 71000 health and fitness apps on the market, creating one that stands out takes more than a great idea.
The secret lies in choosing a robust tech stack. The right combinations of frameworks, databases, and APIs separate the top workout & training apps from the rest.
So let's explore the 5 most reliable tech stacks powering cutting-edge workout training apps and fitness app development today:
What are the best tech stacks for mobile workout apps?
1. React Native - The Go-To Framework for Workout & Training Apps
React Native has emerged as the ideal framework for building fast, high-performing mobile workout & training apps on both iOS and Android. Leading apps using React Native include Skype, Facebook, Instagram, Discord, and UberEATS.
For workout & training app development, React Native enables devs to write code once and deploy it to both platforms. This saves substantial development time and costs compared to native app development.
React Native also utilizes native components for ultra-smooth UI interactions. This results in fitness training apps that “feel” entirely native with fast rendering and minimal bugs across operating systems.
Additionally, React Native allows leveraging skills like JavaScript, CSS, and React to build mobile apps. This enables web developers to more easily transition to building workout training apps.
No wonder React Native powers top workout training apps like:
- Gymaholic - React Native handles detailed workout logging and timers.
- Fitbod - React Native provides smooth UIs for exercise demos and voice control.
- Sworkit - React Native enables fast rendering of HD workout videos.
2. Apollo GraphQL - The Modern API Layer
The Apollo GraphQL framework supercharges the backend and API layer of your workout & training app. Leading apps using Apollo include Airbnb, Expedia, and The New York Times.
GraphQL acts as “middleware” connecting the app front-end to back-end data sources. It replaces REST APIs enabling you to query and manipulate data faster and more flexibly.
For workout training app development, GraphQL is ideal for:
- Fetching exercise data like instructions, videos, reps, and sets in a customizable way.
- Enabling real-time syncing of workout data across devices.
- Easily aggregating data from diverse sources like wearables, sensors, user input, etc.
Apollo builds on raw GraphQL providing helpful tools like caching, error handling, and data management.
Top workout training apps powered by Apollo:
- Lifesum - Apollo manages complex nutrition data syncing across devices.
- 8fit - Apollo delivers customized workout plans and recipes.
- HealthifyMe - Apollo powers real-time tracking of workouts, meals, and goals.
Comparison of Top Tech Stacks for Workout & Fitness Apps
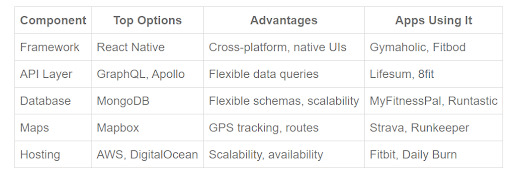
3. MongoDB - The Workout Training App Data Workhorse
MongoDB is the leading NoSQL document database used in over 15 million downloads. Major apps powered by MongoDB include eBay, Forbes, and Adobe.
For workout & training app development, MongoDB provides:
- Flexible schemas to store diverse workout data like exercises, weights, sets, reps, distances, times, etc.
- Scalability to handle exponentially growing volumes of workout data.
- High performance for complex queries to analyze workout trends and patterns.
- Easy integration with complementary tech like React Native and Node.js.
Leading workout training apps using MongoDB include:
- MyFitnessPal - MongoDB stores millions of food items with custom nutrition data.
- Runtastic - MongoDB manages activity tracking and reporting.
- Fitocracy - MongoDB powers the social fitness network backend.
4. Mapbox - Integrating Maps for Outdoor Workout & Training Apps
Mapbox provides customizable maps and location data services for apps. Major Mapbox users include CNN, The Weather Channel, Lonely Planet, and Snapchat.
For fitness app development, Mapbox enables:
- Tracking outdoor workouts via GPS like running, cycling, hiking.
- Mapping running and cycling routes with turn-by-turn directions.
- Providing elevation profiles and terrain data for trail runs and rides.
- Analyzing post-workout metrics like pace, distance and elevation gain.
Top workout & training apps powered by Mapbox:
- Strava - Mapbox maps and analyzes bike rides and runs.
- Runkeeper - Mapbox tracks and maps outdoor workouts.
- Trailforks - Mapbox maps mountain biking and hiking trails globally.
5. DigitalOcean or AWS - Robust Cloud Infrastructure
Leading cloud platforms like DigitalOcean or AWS provide the server infrastructure to host and scale your workout training app.
Key advantages include:
- Flexible configure your own virtual servers and storage.
- Quickly scale up capacity as your userbase grows.
- High availability across multiple global data centers.
- Tools to rapidly deploy updates and new features.
Popular training workout apps hosted on DigitalOcean and AWS:
- Fitbit - AWS provides the backbone for its fitness platform.
- MyFitnessPal - DigitalOcean provides fast and scalable cloud infrastructure.
- Daily Burn - DigitalOcean hosts streaming workout videos on demand.
Conclusion;
Bring Your Workout & Training App Vision to Life
Those were 5 proven and scalable tech stacks to build the next big workout & training app or fitness training app. Each provides unique advantages from fast UIs to flexible data and mapping integrations.
The ideal tech stack depends on your app’s specific needs and budget. But combining tools like React Native, Apollo, MongoDB and cloud hosting will empower you to turn your workout training app vision into reality.
If you need an experienced partner, check out Consagous Technologies. Our team of developers and designers have delivered successful apps for leading startups and brands. We can bring deep expertise in selecting the optimal tech stack for your app’s performance, scale, and user experience.
Contact us today to kick start building your workout & training app MVP. And get ready to crush your fitness goals!
0 notes
Text
I think it's worth noting the CEO of Reddit was caught red-handed lying about the developer of Apollo, a leading 3rd party app, claiming the dev threatened to extort Reddit. When the Apollo dev presented audio logs disproving the accusation, he doubled down on it. It appears this was an attempt to pit the community against 3rd party developers, and it backfired spectacularly.
It sucks that people are treating the Reddit blackout as a joke or assuming it's impotent rage over a minor decision bc it's Reddit when like. No, a tech company shutting down access to their API by forcing third-party devs to pay completely unreasonable fees ($12,000 per 50 million API requests, which to the largest third party clients would be tens of millions of dollars) and in the process destroying both accessibility apps and moderation tools is Bad Actually
47K notes
·
View notes
Text
Let’s Create Our Own Authentication API with Nodejs and GraphQL
Authentication is one of the most challenging tasks for developers just starting with GraphQL. There are a lot of technical considerations, including what ORM would be easy to set up, how to generate secure tokens and hash passwords, and even what HTTP library to use and how to use it.
In this article, we’ll focus on local authentication. It’s perhaps the most popular way of handling authentication in modern websites and does so by requesting the user’s email and password (as opposed to, say, using Google auth.)
Moreover, This article uses Apollo Server 2, JSON Web Tokens (JWT), and Sequelize ORM to build an authentication API with Node.
Handling authentication
As in, a log in system:
Authentication identifies or verifies a user.
Authorization is validating the routes (or parts of the app) the authenticated user can have access to.
The flow for implementing this is:
The user registers using password and email
The user’s credentials are stored in a database
The user is redirected to the login when registration is completed
The user is granted access to specific resources when authenticated
The user’s state is stored in any one of the browser storage mediums (e.g. localStorage, cookies, session) or JWT.
Pre-requisites
Before we dive into the implementation, here are a few things you’ll need to follow along.
Node 6 or higher
Yarn (recommended) or NPM
GraphQL Playground
Basic Knowledge of GraphQL and Node
…an inquisitive mind!
Dependencies
This is a big list, so let’s get into it:
Apollo Server: An open-source GraphQL server that is compatible with any kind of GraphQL client. We won’t be using Express for our server in this project. Instead, we will use the power of Apollo Server to expose our GraphQL API.
bcryptjs: We want to hash the user passwords in our database. That’s why we will use bcrypt. It relies on Web Crypto API‘s getRandomValues interface to obtain secure random numbers.
dotenv: We will use dotenv to load environment variables from our .env file.
jsonwebtoken: Once the user is logged in, each subsequent request will include the JWT, allowing the user to access routes, services, and resources that are permitted with that token. jsonwebtokenwill be used to generate a JWT which will be used to authenticate users.
nodemon: A tool that helps develop Node-based applications by automatically restarting the node application when changes in the directory are detected. We don’t want to be closing and starting the server every time there’s a change in our code. Nodemon inspects changes every time in our app and automatically restarts the server.
mysql2: An SQL client for Node. We need it connect to our SQL server so we can run migrations.
sequelize: Sequelize is a promise-based Node ORM for Postgres, MySQL, MariaDB, SQLite and Microsoft SQL Server. We will use Sequelize to automatically generate our migrations and models.
sequelize cli: We will use Sequelize CLI to run Sequelize commands. Install it globally with yarn add --global sequelize-cli in the terminal.
Setup directory structure and dev environment
Let’s create a brand new project. Create a new folder and this inside of it:
yarn init -y
The -y flag indicates we are selecting yes to all the yarn init questions and using the defaults.
We should also put a package.json file in the folder, so let’s install the project dependencies:
yarn add apollo-server bcrpytjs dotenv jsonwebtoken nodemon sequelize sqlite3
Next, let’s add Babeto our development environment:
yarn add babel-cli babel-preset-env babel-preset-stage-0 --dev
Now, let’s configure Babel. Run touch .babelrc in the terminal. That creates and opens a Babel config file and, in it, we’ll add this:
{ "presets": ["env", "stage-0"] }
It would also be nice if our server starts up and migrates data as well. We can automate that by updating package.json with this:
"scripts": { "migrate": " sequelize db:migrate", "dev": "nodemon src/server --exec babel-node -e js", "start": "node src/server", "test": "echo \"Error: no test specified\" && exit 1" },
Here’s our package.json file in its entirety at this point:
{ "name": "graphql-auth", "version": "1.0.0", "main": "index.js", "scripts": { "migrate": " sequelize db:migrate", "dev": "nodemon src/server --exec babel-node -e js", "start": "node src/server", "test": "echo \"Error: no test specified\" && exit 1" }, "dependencies": { "apollo-server": "^2.17.0", "bcryptjs": "^2.4.3", "dotenv": "^8.2.0", "jsonwebtoken": "^8.5.1", "nodemon": "^2.0.4", "sequelize": "^6.3.5", "sqlite3": "^5.0.0" }, "devDependencies": { "babel-cli": "^6.26.0", "babel-preset-env": "^1.7.0", "babel-preset-stage-0": "^6.24.1" } }
Now that our development environment is set up, let’s turn to the database where we’ll be storing things.
Database setup
We will be using MySQL as our database and Sequelize ORM for our relationships. Run sequelize init (assuming you installed it globally earlier). The command should create three folders: /config /models and /migrations. At this point, our project directory structure is shaping up.
Let’s configure our database. First, create a .env file in the project root directory and paste this:
NODE_ENV=development DB_HOST=localhost DB_USERNAME= DB_PASSWORD= DB_NAME=
Then go to the /config folder we just created and rename the config.json file in there to config.js. Then, drop this code in there:
require('dotenv').config() const dbDetails = { username: process.env.DB_USERNAME, password: process.env.DB_PASSWORD, database: process.env.DB_NAME, host: process.env.DB_HOST, dialect: 'mysql' } module.exports = { development: dbDetails, production: dbDetails }
Here we are reading the database details we set in our .env file. process.env is a global variable injected by Node and it’s used to represent the current state of the system environment.
Let’s update our database details with the appropriate data. Open the SQL database and create a table called graphql_auth. I use Laragon as my local server and phpmyadmin to manage database tables.
What ever you use, we’ll want to update the .env file with the latest information:
NODE_ENV=development DB_HOST=localhost DB_USERNAME=graphql_auth DB_PASSWORD= DB_NAME=<your_db_username_here>
Let’s configure Sequelize. Create a .sequelizerc file in the project’s root and paste this:
const path = require('path')
module.exports = { config: path.resolve('config', 'config.js') }
Now let’s integrate our config into the models. Go to the index.js in the /models folder and edit the config variable.
const config = require(__dirname + '/../../config/config.js')[env]
Finally, let’s write our model. For this project, we need a User model. Let’s use Sequelize to auto-generate the model. Here’s what we need to run in the terminal to set that up:
sequelize model:generate --name User --attributes username:string,email:string,password:string
Let’s edit the model that creates for us. Go to user.js in the /models folder and paste this:
'use strict'; module.exports = (sequelize, DataTypes) => { const User = sequelize.define('User', { username: { type: DataTypes.STRING, }, email: { type: DataTypes.STRING, }, password: { type: DataTypes.STRING, } }, {}); return User; };
Here, we created attributes and fields for username, email and password. Let’s run a migration to keep track of changes in our schema:
yarn migrate
Let’s now write the schema and resolvers.
Integrate schema and resolvers with the GraphQL server
In this section, we’ll define our schema, write resolver functions and expose them on our server.
The schema
In the src folder, create a new folder called /schema and create a file called schema.js. Paste in the following code:
const { gql } = require('apollo-server') const typeDefs = gql` type User { id: Int! username: String email: String! } type AuthPayload { token: String! user: User! } type Query { user(id: Int!): User allUsers: [User!]! me: User } type Mutation { registerUser(username: String, email: String!, password: String!): AuthPayload! login (email: String!, password: String!): AuthPayload! } ` module.exports = typeDefs
Here we’ve imported graphql-tag from apollo-server. Apollo Server requires wrapping our schema with gql.
The resolvers
In the src folder, create a new folder called /resolvers and create a file in it called resolver.js. Paste in the following code:
const bcrypt = require('bcryptjs') const jsonwebtoken = require('jsonwebtoken') const models = require('../models') require('dotenv').config() const resolvers = { Query: { async me(_, args, { user }) { if(!user) throw new Error('You are not authenticated') return await models.User.findByPk(user.id) }, async user(root, { id }, { user }) { try { if(!user) throw new Error('You are not authenticated!') return models.User.findByPk(id) } catch (error) { throw new Error(error.message) } }, async allUsers(root, args, { user }) { try { if (!user) throw new Error('You are not authenticated!') return models.User.findAll() } catch (error) { throw new Error(error.message) } } }, Mutation: { async registerUser(root, { username, email, password }) { try { const user = await models.User.create({ username, email, password: await bcrypt.hash(password, 10) }) const token = jsonwebtoken.sign( { id: user.id, email: user.email}, process.env.JWT_SECRET, { expiresIn: '1y' } ) return { token, id: user.id, username: user.username, email: user.email, message: "Authentication succesfull" } } catch (error) { throw new Error(error.message) } }, async login(_, { email, password }) { try { const user = await models.User.findOne({ where: { email }}) if (!user) { throw new Error('No user with that email') } const isValid = await bcrypt.compare(password, user.password) if (!isValid) { throw new Error('Incorrect password') } // return jwt const token = jsonwebtoken.sign( { id: user.id, email: user.email}, process.env.JWT_SECRET, { expiresIn: '1d'} ) return { token, user } } catch (error) { throw new Error(error.message) } } },
} module.exports = resolvers
That’s a lot of code, so let’s see what’s happening in there.
First we imported our models, bcrypt and jsonwebtoken, and then initialized our environmental variables.
Next are the resolver functions. In the query resolver, we have three functions (me, user and allUsers):
me query fetches the details of the currently loggedIn user. It accepts a user object as the context argument. The context is used to provide access to our database which is used to load the data for a user by the ID provided as an argument in the query.
user query fetches the details of a user based on their ID. It accepts id as the context argument and a user object.
alluser query returns the details of all the users.
user would be an object if the user state is loggedIn and it would be null, if the user is not. We would create this user in our mutations.
In the mutation resolver, we have two functions (registerUser and loginUser):
registerUser accepts the username, email and password of the user and creates a new row with these fields in our database. It’s important to note that we used the bcryptjs package to hash the users password with bcrypt.hash(password, 10). jsonwebtoken.sign synchronously signs the given payload into a JSON Web Token string (in this case the user id and email). Finally, registerUser returns the JWT string and user profile if successful and returns an error message if something goes wrong.
login accepts email and password , and checks if these details match with the one that was supplied. First, we check if the email value already exists somewhere in the user database.
models.User.findOne({ where: { email }}) if (!user) { throw new Error('No user with that email') }
Then, we use bcrypt’s bcrypt.compare method to check if the password matches.
const isValid = await bcrypt.compare(password, user.password) if (!isValid) { throw new Error('Incorrect password') }
Then, just like we did previously in registerUser, we use jsonwebtoken.sign to generate a JWT string. The login mutation returns the token and user object.
Now let’s add the JWT_SECRET to our .env file.
JWT_SECRET=somereallylongsecret
The server
Finally, the server! Create a server.js in the project’s root folder and paste this:
const { ApolloServer } = require('apollo-server') const jwt = require('jsonwebtoken') const typeDefs = require('./schema/schema') const resolvers = require('./resolvers/resolvers') require('dotenv').config() const { JWT_SECRET, PORT } = process.env const getUser = token => { try { if (token) { return jwt.verify(token, JWT_SECRET) } return null } catch (error) { return null } } const server = new ApolloServer({ typeDefs, resolvers, context: ({ req }) => { const token = req.get('Authorization') || '' return { user: getUser(token.replace('Bearer', ''))} }, introspection: true, playground: true }) server.listen({ port: process.env.PORT || 4000 }).then(({ url }) => { console.log(`🚀 Server ready at ${url}`); });
Here, we import the schema, resolvers and jwt, and initialize our environment variables. First, we verify the JWT token with verify. jwt.verify accepts the token and the JWT secret as parameters.
Next, we create our server with an ApolloServer instance that accepts typeDefs and resolvers.
We have a server! Let’s start it up by running yarn dev in the terminal.
Testing the API
Let’s now test the GraphQL API with GraphQL Playground. We should be able to register, login and view all users — including a single user — by ID.
We’ll start by opening up the GraphQL Playground app or just open localhost://4000 in the browser to access it.
Mutation for register user
mutation { registerUser(username: "Wizzy", email: "[email protected]", password: "wizzyekpot" ){ token } }
We should get something like this:
{ "data": { "registerUser": { "token": "eyJhbGciOiJIUzI1NiIsInR5cCI6IkpXVCJ9.eyJpZCI6MTUsImVtYWlsIjoiZWtwb3RAZ21haWwuY29tIiwiaWF0IjoxNTk5MjQwMzAwLCJleHAiOjE2MzA3OTc5MDB9.gmeynGR9Zwng8cIJR75Qrob9bovnRQT242n6vfBt5PY" } } }
Mutation for login
Let’s now log in with the user details we just created:
mutation { login(email:"[email protected]" password:"wizzyekpot"){ token } }
We should get something like this:
{ "data": { "login": { "token": "eyJhbGciOiJIUzI1NiIsInR5cCI6IkpXVCJ9.eyJpZCI6MTUsImVtYWlsIjoiZWtwb3RAZ21haWwuY29tIiwiaWF0IjoxNTk5MjQwMzcwLCJleHAiOjE1OTkzMjY3NzB9.PDiBKyq58nWxlgTOQYzbtKJ-HkzxemVppLA5nBdm4nc" } } }
Awesome!
Query for a single user
For us to query a single user, we need to pass the user token as authorization header. Go to the HTTP Headers tab.
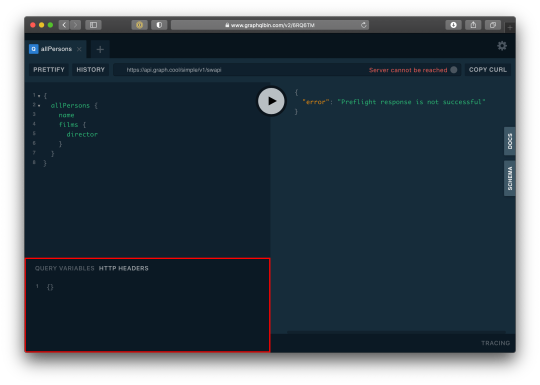
…and paste this:
{ "Authorization": "eyJhbGciOiJIUzI1NiIsInR5cCI6IkpXVCJ9.eyJpZCI6MTUsImVtYWlsIjoiZWtwb3RAZ21haWwuY29tIiwiaWF0IjoxNTk5MjQwMzcwLCJleHAiOjE1OTkzMjY3NzB9.PDiBKyq58nWxlgTOQYzbtKJ-HkzxemVppLA5nBdm4nc" }
Here’s the query:
query myself{ me { id email username } }
And we should get something like this:
{ "data": { "me": { "id": 15, "email": "[email protected]", "username": "Wizzy" } } }
Great! Let’s now get a user by ID:
query singleUser{ user(id:15){ id email username } }
And here’s the query to get all users:
{ allUsers{ id username email } }
Summary
Authentication is one of the toughest tasks when it comes to building websites that require it. GraphQL enabled us to build an entire Authentication API with just one endpoint. Sequelize ORM makes creating relationships with our SQL database so easy, we barely had to worry about our models. It’s also remarkable that we didn’t require a HTTP server library (like Express) and use Apollo GraphQL as middleware. Apollo Server 2, now enables us to create our own library-independent GraphQL servers!
Check out the source code for this tutorial on GitHub.
The post Let’s Create Our Own Authentication API with Nodejs and GraphQL appeared first on CSS-Tricks.
You can support CSS-Tricks by being an MVP Supporter.
Let’s Create Our Own Authentication API with Nodejs and GraphQL published first on https://deskbysnafu.tumblr.com/
0 notes
Text
I'm actually sympathetic to them. I think Reddit creates a large amount of value for the world, and so far has captured less than none of it. They're not profitable and that's not sustainable.
(the Apollo dev said something like «based on the numbers they've given, each user is costing them something like _ but they're asking for twice that from me», but afaict he was using revenue numbers for this calculation which are obviously irrelevant)
Is this a good solution? I dunno. It's bad for me personally because I don't like the official app much (I do use it for chat, and to get notifications from logged-out accounts). More to the point, it seems to be bad for a lot of mods, and mods are also creating value that probably most of them don't capture.
But what else to do? They've experimented with various voluntary ways of making money and apparently they all haven't been enough. Making 3PA users pay for their own API usage above a certain point might be an option, but my guess is that point is either low enough that it kills the apps anyway, or high enough that it doesn't actually help. Maybe have some profit sharing clause with 3PAs? My guess is they aren't profitable enough for that to make much difference.
So yeah, I'm sympathetic, at least on a high level. (Conditioning on them going this route, it kinda seems like they're doing it in a shittier way than necessary? But I haven't paid close enough attention.) But at the same time, if RIF shuts down and a lot of subs go dark and others become shit because the mods don't have the tools they need... sympathy or not, that's the kind of thing that makes me spend less time there.
I guess if Reddit shits the bed I might end up back here.
12 notes
·
View notes
Text
Date Pairings for 2/3
Storm and Demetruis ( @stormszn & @youneedachill )
Safiyaa and Vulgar ( @brcwnsugah & @speakingvulgarity )
Kim and Zeus ( @kimberly-petit & @thcgvwdzeus )
Devyn and Tayden ( @dev--ill & @tayhuncho )
Ashanti and Jayden ( @ashcnti & @wavyjdn )
Silver and Zayden ( @she-is-silver & @lethalpcpi )
Katrina and Shawnie ( @katrina--parker & @shcwnie )
Angel and Maddison ( @angelindisquisecole & @mcddisen )
Selena and Fabian ( @thatfcreign & @fah-bian )
Saige and Kelvin ( @svigee & @cagethegemini )
Melody and Nasir ( @melodyp0pping & @kngnasir )
Tonia and Jameel ( @wtftonia & @fckinmeel )
Rhea and Tahja ( @lovethyrhea & @tahjadomingo )
Naz and Julian ( @nznknt & @sincerelyjulien )
Courtney and Apollo ( @courtphcm & @apollodomingo )
Jhea and Blaise ( @iheartjhea & @blviseszn )
Siren and Jaesin ( @issasiren & @stfujaeee )
Cassie and Tyrek ( @miseducationofcassie & @ty-rek )
Maxx and Maddison ( @maxxdelarosa & @mcddisen )
Storm and Delano ( @stormszn & @dclano )
Each date is an hour long if you are paired up with more than one person, please make sure you go on both dates. If your date doesn’t log on for whatever reasons, then when we have speed dating event again, you will be paired with them again. If you don’t see your name here, then please let us know in the ims!! Thank you
22 notes
·
View notes
Text
Using GraphQL in Production iOS Applications - Part 2
In Part 1, we discussed what made GraphQL an attractive technology for one of our client projects. We ended up learning a good amount about the technology.
Here’s what was great, what was okay, and what was disappointing about the experience.
What worked
Schema as Contract
Initial, rapid prototyping of our backend data model was incredibly easy. All it took was an initial GraphQL schema as a contract for both teams to build against. Apollo Server can serve a simple mock server based on the schema with zero configuration, and it is straightforward to expand the mock server’s functionality.
Expanding the schema was also trivial. So long as the only changes were additive, the backend could quickly revise the API to support new properties or new objects. Existing clients could only ask for properties they already knew about, so all prior builds would just work without issue.
Efficient Queries
The frontend was able to get the data needed and nothing more with a minimum amount of requests.
What sorta worked
Authorization
There’s not a GraphQL standard for authorization. Because we were building a server that only had one level of authorization for users, we used standard REST endpoints for logging in, and then gave authenticated users unrestricted access to the GraphQL queries. This wouldn’t work with a more complex security model. The lack of standard here was uncomfortable, especially in an app that needed to be HIPAA compliant. Apollo Server does suggest a solution, though.
Automatically Generated Models
These worked great and saved us a lot of time early in development. However, two requests that ask for the exact same object with the exact same properties are, in fact, two different types. While this can be solved by GraphQL’s Fragments, they begin to etch away at what made these models so easy to use in the first place. We only just reached the point where the complexity of Fragments was needed before this project ended, so it’s unclear if it’d be best to keep going with Fragments or implement our own model layer.
Instead, we worked around that by making as few requests as possible so we could share types. The impact of that was…
Maximized Bandwidth
Unfortunately, “get all the data with minimal queries” is the antithesis of “only ask for the data you need, when you need it”. Most of our queries asked for a single model, and for all the properties on that model. That became the generated type for that model that we used throughout the app. We absolutely didn’t take advantage of batching queries together, or only asking for minimal data. Indeed, it would be exceedingly difficult to take advantage of that without a translation layer from the query-generated models into the app’s data model.
Decoupled Development
The schema is at the core of developing a GraphQL app, and it is a net gain to dev speed. However, because of its central role, non-additive modifications do require coordination between frontend and backend teams. This means that development is not entirely decoupled.
For example, changing existing types and fields broke existing clients that were built with an older schema. This isn’t surprising and on-par with the effects of making a breaking change to a REST implementation. Still, those breaking changes snuck up on us more than they should have. Additionally, every breaking schema change required a code change on the client. This was not only to rebuild the query models, but also to propagate the property names and type changes throughout the codebase.
All this highlights a gap between the promise & execution of GraphQL. While the schema is a wonderful source of truth, without perfect foreknowledge it’s actually a very sensitive dependency.
What did not work
Batching? We don’t need no stinking batching.
Despite the fact that we weren’t making any batch requests, the Apollo response could still contain both data and errors, as if we had made a batch request. This meant every request had 3 results (success, partial success, and error) rather than simply “success” & “error”. This complexity was a pain, and was unavoidable.
Caching in the Apollo iOS SDK
A sane person wouldn’t cache a response with an error. Unfortunately, that’s exactly the default configuration for caching in the Apollo iOS SDK. While that’s been reported as a bug, the lack of support forced us to choose between functional caching or a schema that allowed nullable queries, a central concept of GraphQL. Both options are likely to become unacceptable at a certain point.
Not only does the JavaScript SDK have a more sane default, it also has configuration options that are completely inaccessible in the iOS SDK. This reinforces the notion that the iOS SDK is a second-class citizen, and that they’re not really looking to actively fix bugs found in it.
Is it right for you?
In Part 3, we’ll reflect on all we’ve learned and let you know what you should consider when using GraphQL in your project to maximize the benefit while minimizing the costs.
Using GraphQL in Production iOS Applications - Part 2 published first on https://johnellrod.weebly.com/
0 notes
Text
Dedicated DEV LOG #2

i'm a month late ( ´・ω・)
at least finals are over for now!!!
please don't be disappointed i tried my best to manage stress, seasonal depression, and self-doubt while writing over the past two months ( T∀T)
once again, this month's blog post is decicated to "Dedicated To…"
---------------------------------------------------------------------------
man, fall quarter always sucks, and i hate when it gets so dark out so quick!!! how are you supposed to expect apollo to function without much sun!!!!!! ヽ( `Д´)ノ
well, i hope everyone's been okay! i've been trying to be as mentally stable as possible… and it's kind of working! even with seasonal depression, therapy has been helping teach me how to calm myself and live to tomorrow! i did get some anxiety medication a short bit after my last dev log too, and it's been going great for me!! ( ´∀` )b
lately, i've been looking at other games and media and wondering what makes psychological horror so good, and what even is it? turns out no one has a set answer and it's hard to describe (´・ω・`)
looking at the reception of mouthwashing (which i really enjoyed!!), i'm starting to get my own doubts on how scary my game really is and if i'm doing things right enough…
i started to rewrite and add stuff to the first route when i thought i was finished and going to move onto the second route….. i even made the first route much longer as a result, and now the other routes need to match up... ( T∀T)
i ended up putting in more abstract representations and symbolism of mental struggles and fears, similar to how pocket mirror does things! i also especially added more bits where you can actually play the game, as how i currently had it, the game was more of a visual novel with rpg elements and made in rpg maker instead of ren'py lmao
compared to the original script i had, i felt the game's script was set too much in realism and didn't come off as scary, especially thinking about how rpgs themselves aren't really scary since you're not playing in a 1st-person view, therefore you're not that scared because the scary stuff is happening to a 3rd party and takes you out of the immersion
it's a lot more work than i thought trying to make things scary.... you really have to look into human instinct and nature, not to sound too pragmatic ( ´_ゝ`)
before i rant a bit more, here's a preview of reyn's full art, the one tybalt is hopelessly in love with!! feel free to stop reading at this point if you think i'm annoying as shit don't worry i feel the same

i hope i made him look cute AND cool enough! i made him to my tastes after all lol
speaking of which, i hope my feelings—ugly, pitiful, relatable however they may be—get across in this game, i have a lot of anxieties around love, be it familial, platonic, or romantic, and i've always felt lonely, ignored, and out of place a lot of the time
suffice to say, i am projecting on tybalt a lot lol
honestly, i wonder if anyone even reads these, or if anyone cares at all, but i hope someone out there does
as i said in a depressing tweet, my works and stories and i may be worthless, but i like them and they get me wanting to live another day!
i hope by the next update either in the next month or two, i'll have at least two routes finished!
i'm sorry i can't show more than this, but i swear i'm putting my all into this!! especially since i want to work on a comic soon too!
i'll leave everyone with a scrapped doodle i had that i was initially going to include with an update i was gonna post before halloween, but you already know what happened (´・ω・`)
thank you once again for following me and my stupid, worthless works! (^_^)v (and if you're interested in who exactly these characters i keep posting are, if anyone's interested i have a whole story!! but basically they're all me in a sense!)

0 notes
Text
Dedicated DEV LOG #1

hey!! it's apollo/nyarl!! this'll be a first in a series of posts that are basically indie game development logs filled with a shit ton of rambling
i'll maybe try and post these monthly or bi-monthly, but it's mostly for me to motivate myself to make progress to have something to show off and to archive the process of making a game!
this month's dev log is dedicated to—well—"Dedicated To..."
---------------------------------------------------------------------------
(i may keep saying this for future projects and games so bear with me) "Dedicated To..." (abbreviated as DT from now on) originally was an idea i had in middle school!
it was really edgy tho and i'd honestly kms if it ever got leaked to the public but it was essentially an angst piece for when i was discovering my own sexuality as a gay cis man
staying somewhat true to its gay angst origins, this game is a story based psychological horror rpg maker game! maybe you can add it's a story based gay psychological horror rpg maker game lmao
it won't be a long game, and it'll have 4 routes determined by one early game choice and 5 endings!! the 5th one is considered a secret dont tell anyone
i did change the protagonist's name and design bc it was literally just a self insert for me lmao even had clothes i often wore fucking lame
BUT ANYWAYS!!!!! you'll play as tybalt, a college student majoring in english literature or something as he struggles to create a fairy tale as his capstone (don't think about it too much)
here's a preview of his full art and draft of his portrait as thanks for listening to me ramble so far i will continue to ramble!! (i have yet to turn it into pixel art and plan different expressions)

i really wanted to make a gay character with these kinda cat eyes whatever you call em lol
and the man he'll be pinning for is reyn!! i didnt give him a major bc it doesnt matter in the grand scheme of things!!! he's probably a finance major!!!!
also idk why i named him reyn, it was something i kept from the original middle school stories
ig it was because i was watching chugga's lets play of xenoblade lmao
i've taken some time with working with rpg maker mz before since i had the chance to use it in a game dev class (after splurging most of my financial aid on plugins lmao), but unless i can figure out javascript on my own and break the engine, i'll be focusing on using rpg maker vx ace since it has more plugins!
for now, i'm still focusing on the story and full body character art before diving into programming and learning how to make pixel art _(:3」∠)_
btw i forgot to mention that part. yeah i'm an absolute newbie when it comes to pixel art so i have to learn that too cries
even though i'm making it in rpg maker vx ace, i'm aiming to recreate the feel of rpg maker 2000/2003 because i was SUUUUUUPER inspired by end roll, okegom's games, and specifically for this game charon's works!! so now i gotta bust out the pixels
there will be 4 routes with 5 endings! there was another route + ending but i scrapped it because i only had an idea of the ending (more on that in the future) and nothing else lol
so far i've drafted 3 of the 4 routes! even though there is no canon ending, the 4th one is the one that has the 5th ending and can branch off into other works (once again more on that in the future lmao)
i'm starting to write the dialogue for the 1st route and it's going okay!! tbh i wish i worked on it more over summer break while my college classes aren't gonna kill my ass and classes start next week (´;ω;`)
but i spent a majority of summer break testing out medication for my adhd, and i still am!! it was a really rough process and i'm glad i didn't go through mania-like symptoms while classes were going on _(´ཀ`」 ∠)_
i'm better now tho and i say i'm at a semi good spot!! now time to treat my horrid anxiety lol
i'll end it here for now before it gets too long!! sorry and thanks to listening to me ramble! i'll leave you with a snippet of the intro!
---------------------------------------------------------------------------


0 notes
Text
Let’s Create Our Own Authentication API with Nodejs and GraphQL
Authentication is one of the most challenging tasks for developers just starting with GraphQL. There are a lot of technical considerations, including what ORM would be easy to set up, how to generate secure tokens and hash passwords, and even what HTTP library to use and how to use it.
In this article, we’ll focus on local authentication. It’s perhaps the most popular way of handling authentication in modern websites and does so by requesting the user’s email and password (as opposed to, say, using Google auth.)
Moreover, This article uses Apollo Server 2, JSON Web Tokens (JWT), and Sequelize ORM to build an authentication API with Node.
Handling authentication
As in, a log in system:
Authentication identifies or verifies a user.
Authorization is validating the routes (or parts of the app) the authenticated user can have access to.
The flow for implementing this is:
The user registers using password and email
The user’s credentials are stored in a database
The user is redirected to the login when registration is completed
The user is granted access to specific resources when authenticated
The user’s state is stored in any one of the browser storage mediums (e.g. localStorage, cookies, session) or JWT.
Pre-requisites
Before we dive into the implementation, here are a few things you’ll need to follow along.
Node 6 or higher
Yarn (recommended) or NPM
GraphQL Playground
Basic Knowledge of GraphQL and Node
…an inquisitive mind!
Dependencies
This is a big list, so let’s get into it:
Apollo Server: An open-source GraphQL server that is compatible with any kind of GraphQL client. We won’t be using Express for our server in this project. Instead, we will use the power of Apollo Server to expose our GraphQL API.
bcryptjs: We want to hash the user passwords in our database. That’s why we will use bcrypt. It relies on Web Crypto API‘s getRandomValues interface to obtain secure random numbers.
dotenv: We will use dotenv to load environment variables from our .env file.
jsonwebtoken: Once the user is logged in, each subsequent request will include the JWT, allowing the user to access routes, services, and resources that are permitted with that token. jsonwebtokenwill be used to generate a JWT which will be used to authenticate users.
nodemon: A tool that helps develop Node-based applications by automatically restarting the node application when changes in the directory are detected. We don’t want to be closing and starting the server every time there’s a change in our code. Nodemon inspects changes every time in our app and automatically restarts the server.
mysql2: An SQL client for Node. We need it connect to our SQL server so we can run migrations.
sequelize: Sequelize is a promise-based Node ORM for Postgres, MySQL, MariaDB, SQLite and Microsoft SQL Server. We will use Sequelize to automatically generate our migrations and models.
sequelize cli: We will use Sequelize CLI to run Sequelize commands. Install it globally with yarn add --global sequelize-cli in the terminal.
Setup directory structure and dev environment
Let’s create a brand new project. Create a new folder and this inside of it:
yarn init -y
The -y flag indicates we are selecting yes to all the yarn init questions and using the defaults.
We should also put a package.json file in the folder, so let’s install the project dependencies:
yarn add apollo-server bcrpytjs dotenv jsonwebtoken nodemon sequelize sqlite3
Next, let’s add Babeto our development environment:
yarn add babel-cli babel-preset-env babel-preset-stage-0 --dev
Now, let’s configure Babel. Run touch .babelrc in the terminal. That creates and opens a Babel config file and, in it, we’ll add this:
{ "presets": ["env", "stage-0"] }
It would also be nice if our server starts up and migrates data as well. We can automate that by updating package.json with this:
"scripts": { "migrate": " sequelize db:migrate", "dev": "nodemon src/server --exec babel-node -e js", "start": "node src/server", "test": "echo \"Error: no test specified\" && exit 1" },
Here’s our package.json file in its entirety at this point:
{ "name": "graphql-auth", "version": "1.0.0", "main": "index.js", "scripts": { "migrate": " sequelize db:migrate", "dev": "nodemon src/server --exec babel-node -e js", "start": "node src/server", "test": "echo \"Error: no test specified\" && exit 1" }, "dependencies": { "apollo-server": "^2.17.0", "bcryptjs": "^2.4.3", "dotenv": "^8.2.0", "jsonwebtoken": "^8.5.1", "nodemon": "^2.0.4", "sequelize": "^6.3.5", "sqlite3": "^5.0.0" }, "devDependencies": { "babel-cli": "^6.26.0", "babel-preset-env": "^1.7.0", "babel-preset-stage-0": "^6.24.1" } }
Now that our development environment is set up, let’s turn to the database where we’ll be storing things.
Database setup
We will be using MySQL as our database and Sequelize ORM for our relationships. Run sequelize init (assuming you installed it globally earlier). The command should create three folders: /config /models and /migrations. At this point, our project directory structure is shaping up.
Let’s configure our database. First, create a .env file in the project root directory and paste this:
NODE_ENV=development DB_HOST=localhost DB_USERNAME= DB_PASSWORD= DB_NAME=
Then go to the /config folder we just created and rename the config.json file in there to config.js. Then, drop this code in there:
require('dotenv').config() const dbDetails = { username: process.env.DB_USERNAME, password: process.env.DB_PASSWORD, database: process.env.DB_NAME, host: process.env.DB_HOST, dialect: 'mysql' } module.exports = { development: dbDetails, production: dbDetails }
Here we are reading the database details we set in our .env file. process.env is a global variable injected by Node and it’s used to represent the current state of the system environment.
Let’s update our database details with the appropriate data. Open the SQL database and create a table called graphql_auth. I use Laragon as my local server and phpmyadmin to manage database tables.
What ever you use, we’ll want to update the .env file with the latest information:
NODE_ENV=development DB_HOST=localhost DB_USERNAME=graphql_auth DB_PASSWORD= DB_NAME=<your_db_username_here>
Let’s configure Sequelize. Create a .sequelizerc file in the project’s root and paste this:
const path = require('path')
module.exports = { config: path.resolve('config', 'config.js') }
Now let’s integrate our config into the models. Go to the index.js in the /models folder and edit the config variable.
const config = require(__dirname + '/../../config/config.js')[env]
Finally, let’s write our model. For this project, we need a User model. Let’s use Sequelize to auto-generate the model. Here’s what we need to run in the terminal to set that up:
sequelize model:generate --name User --attributes username:string,email:string,password:string
Let’s edit the model that creates for us. Go to user.js in the /models folder and paste this:
'use strict'; module.exports = (sequelize, DataTypes) => { const User = sequelize.define('User', { username: { type: DataTypes.STRING, }, email: { type: DataTypes.STRING, }, password: { type: DataTypes.STRING, } }, {}); return User; };
Here, we created attributes and fields for username, email and password. Let’s run a migration to keep track of changes in our schema:
yarn migrate
Let’s now write the schema and resolvers.
Integrate schema and resolvers with the GraphQL server
In this section, we’ll define our schema, write resolver functions and expose them on our server.
The schema
In the src folder, create a new folder called /schema and create a file called schema.js. Paste in the following code:
const { gql } = require('apollo-server') const typeDefs = gql` type User { id: Int! username: String email: String! } type AuthPayload { token: String! user: User! } type Query { user(id: Int!): User allUsers: [User!]! me: User } type Mutation { registerUser(username: String, email: String!, password: String!): AuthPayload! login (email: String!, password: String!): AuthPayload! } ` module.exports = typeDefs
Here we’ve imported graphql-tag from apollo-server. Apollo Server requires wrapping our schema with gql.
The resolvers
In the src folder, create a new folder called /resolvers and create a file in it called resolver.js. Paste in the following code:
const bcrypt = require('bcryptjs') const jsonwebtoken = require('jsonwebtoken') const models = require('../models') require('dotenv').config() const resolvers = { Query: { async me(_, args, { user }) { if(!user) throw new Error('You are not authenticated') return await models.User.findByPk(user.id) }, async user(root, { id }, { user }) { try { if(!user) throw new Error('You are not authenticated!') return models.User.findByPk(id) } catch (error) { throw new Error(error.message) } }, async allUsers(root, args, { user }) { try { if (!user) throw new Error('You are not authenticated!') return models.User.findAll() } catch (error) { throw new Error(error.message) } } }, Mutation: { async registerUser(root, { username, email, password }) { try { const user = await models.User.create({ username, email, password: await bcrypt.hash(password, 10) }) const token = jsonwebtoken.sign( { id: user.id, email: user.email}, process.env.JWT_SECRET, { expiresIn: '1y' } ) return { token, id: user.id, username: user.username, email: user.email, message: "Authentication succesfull" } } catch (error) { throw new Error(error.message) } }, async login(_, { email, password }) { try { const user = await models.User.findOne({ where: { email }}) if (!user) { throw new Error('No user with that email') } const isValid = await bcrypt.compare(password, user.password) if (!isValid) { throw new Error('Incorrect password') } // return jwt const token = jsonwebtoken.sign( { id: user.id, email: user.email}, process.env.JWT_SECRET, { expiresIn: '1d'} ) return { token, user } } catch (error) { throw new Error(error.message) } } },
} module.exports = resolvers
That’s a lot of code, so let’s see what’s happening in there.
First we imported our models, bcrypt and jsonwebtoken, and then initialized our environmental variables.
Next are the resolver functions. In the query resolver, we have three functions (me, user and allUsers):
me query fetches the details of the currently loggedIn user. It accepts a user object as the context argument. The context is used to provide access to our database which is used to load the data for a user by the ID provided as an argument in the query.
user query fetches the details of a user based on their ID. It accepts id as the context argument and a user object.
alluser query returns the details of all the users.
user would be an object if the user state is loggedIn and it would be null, if the user is not. We would create this user in our mutations.
In the mutation resolver, we have two functions (registerUser and loginUser):
registerUser accepts the username, email and password of the user and creates a new row with these fields in our database. It’s important to note that we used the bcryptjs package to hash the users password with bcrypt.hash(password, 10). jsonwebtoken.sign synchronously signs the given payload into a JSON Web Token string (in this case the user id and email). Finally, registerUser returns the JWT string and user profile if successful and returns an error message if something goes wrong.
login accepts email and password , and checks if these details match with the one that was supplied. First, we check if the email value already exists somewhere in the user database.
models.User.findOne({ where: { email }}) if (!user) { throw new Error('No user with that email') }
Then, we use bcrypt’s bcrypt.compare method to check if the password matches.
const isValid = await bcrypt.compare(password, user.password) if (!isValid) { throw new Error('Incorrect password') }
Then, just like we did previously in registerUser, we use jsonwebtoken.sign to generate a JWT string. The login mutation returns the token and user object.
Now let’s add the JWT_SECRET to our .env file.
JWT_SECRET=somereallylongsecret
The server
Finally, the server! Create a server.js in the project’s root folder and paste this:
const { ApolloServer } = require('apollo-server') const jwt = require('jsonwebtoken') const typeDefs = require('./schema/schema') const resolvers = require('./resolvers/resolvers') require('dotenv').config() const { JWT_SECRET, PORT } = process.env const getUser = token => { try { if (token) { return jwt.verify(token, JWT_SECRET) } return null } catch (error) { return null } } const server = new ApolloServer({ typeDefs, resolvers, context: ({ req }) => { const token = req.get('Authorization') || '' return { user: getUser(token.replace('Bearer', ''))} }, introspection: true, playground: true }) server.listen({ port: process.env.PORT || 4000 }).then(({ url }) => { console.log(`🚀 Server ready at ${url}`); });
Here, we import the schema, resolvers and jwt, and initialize our environment variables. First, we verify the JWT token with verify. jwt.verify accepts the token and the JWT secret as parameters.
Next, we create our server with an ApolloServer instance that accepts typeDefs and resolvers.
We have a server! Let’s start it up by running yarn dev in the terminal.
Testing the API
Let’s now test the GraphQL API with GraphQL Playground. We should be able to register, login and view all users — including a single user — by ID.
We’ll start by opening up the GraphQL Playground app or just open localhost://4000 in the browser to access it.
Mutation for register user
mutation { registerUser(username: "Wizzy", email: "[email protected]", password: "wizzyekpot" ){ token } }
We should get something like this:
{ "data": { "registerUser": { "token": "eyJhbGciOiJIUzI1NiIsInR5cCI6IkpXVCJ9.eyJpZCI6MTUsImVtYWlsIjoiZWtwb3RAZ21haWwuY29tIiwiaWF0IjoxNTk5MjQwMzAwLCJleHAiOjE2MzA3OTc5MDB9.gmeynGR9Zwng8cIJR75Qrob9bovnRQT242n6vfBt5PY" } } }
Mutation for login
Let’s now log in with the user details we just created:
mutation { login(email:"[email protected]" password:"wizzyekpot"){ token } }
We should get something like this:
{ "data": { "login": { "token": "eyJhbGciOiJIUzI1NiIsInR5cCI6IkpXVCJ9.eyJpZCI6MTUsImVtYWlsIjoiZWtwb3RAZ21haWwuY29tIiwiaWF0IjoxNTk5MjQwMzcwLCJleHAiOjE1OTkzMjY3NzB9.PDiBKyq58nWxlgTOQYzbtKJ-HkzxemVppLA5nBdm4nc" } } }
Awesome!
Query for a single user
For us to query a single user, we need to pass the user token as authorization header. Go to the HTTP Headers tab.

…and paste this:
{ "Authorization": "eyJhbGciOiJIUzI1NiIsInR5cCI6IkpXVCJ9.eyJpZCI6MTUsImVtYWlsIjoiZWtwb3RAZ21haWwuY29tIiwiaWF0IjoxNTk5MjQwMzcwLCJleHAiOjE1OTkzMjY3NzB9.PDiBKyq58nWxlgTOQYzbtKJ-HkzxemVppLA5nBdm4nc" }
Here’s the query:
query myself{ me { id email username } }
And we should get something like this:
{ "data": { "me": { "id": 15, "email": "[email protected]", "username": "Wizzy" } } }
Great! Let’s now get a user by ID:
query singleUser{ user(id:15){ id email username } }
And here’s the query to get all users:
{ allUsers{ id username email } }
Summary
Authentication is one of the toughest tasks when it comes to building websites that require it. GraphQL enabled us to build an entire Authentication API with just one endpoint. Sequelize ORM makes creating relationships with our SQL database so easy, we barely had to worry about our models. It’s also remarkable that we didn’t require a HTTP server library (like Express) and use Apollo GraphQL as middleware. Apollo Server 2, now enables us to create our own library-independent GraphQL servers!
Check out the source code for this tutorial on GitHub.
The post Let’s Create Our Own Authentication API with Nodejs and GraphQL appeared first on CSS-Tricks.
You can support CSS-Tricks by being an MVP Supporter.
Let’s Create Our Own Authentication API with Nodejs and GraphQL published first on https://deskbysnafu.tumblr.com/
0 notes
Text
What is Developer Experience (DX)?
Developer Experience¹ is a term² with a self-declaring meaning — the experience of developers — but it eludes definition in the sense that people invoke it at different times for different reasons referring to different things. For instance, our own Sarah Drasner’s current job title is “VP of Developer Experience” at Netlify, so it’s a very real thing. But a job title is just one way the term is used. Let’s dig in a bit and apply it to the different ways people think about and use the term.
People think of specific companies.
I hear DX and Stripe together a lot. That makes sense. Stripe is a payment gateway company almost exclusively for developers. They are serious about providing a good experience for their customers (developers), hence “developer experience.” Just listen to Suz Hinton talk about “friction journals”, which is the idea of sitting down to use a product (like Stripe) and noting down every single little WTF moment, confusion, and frustration so that improvements can be made:
Netlify is like Stripe in this way, as is Heroku, CodePen, and any number of companies where the entire customer base is developers. For companies like this, it’s almost like DX is what UX (User Experience) is for any other company.
People think of specific technologies.
It’s common to hear DX invoked when comparing technologies. For instance, some people will say that Vue offers a better developer experience than React. (I’m not trying to start anything, I don’t even have much of an opinion on this.) They are talking about things like APIs. Perhaps the state is more intuitive to manage in one vs. the other. Or they are talking about features. I know Vue and Svelte have animation helpers built-in while React does not. But React has hooks and people generally like those. These are aspects of the DX of these technologies.
Or they might be speaking about the feeling around the tools surrounding the core technology. I know create-react-app is widely beloved, but so is the Vue CLI. React Router is hugely popular, but Vue has a router that is blessed (and maintained) by the core team which offers a certain feeling of trust.
> vue create hello-world
> npx create-react-app my-app
I’m not using JavaScript frameworks/libraries as just any random example. I hear people talk about DX as it relates to JavaScript more than anything else — which could be due to the people in my circles, but it feels notable.
People think of the world around the technology.
Everybody thinks good docs are important. There is no such thing as a technology that is better than another but has much worse docs. The one with the better docs is better overall because it has better docs. That’s not the technology itself; that’s the world around it.
Have you ever seen a developer product with an API, and when you view the docs for the API while logged in, it uses API keys and data and settings from your own account to demonstrate? That’s extraordinary to me. That feels like DX to me.
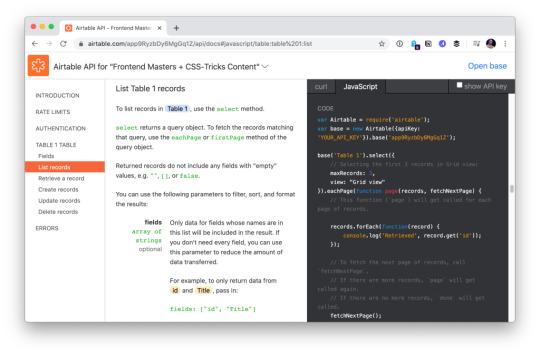
Airtable docs showing me API usage with my own data.
“Make the right thing easy,” notes Jake Dohm.
That word, easy, feels highly related to DX. Technologies that make things easy are technologies with good DX. In usage as well as in understanding. How easily (and quickly) can I understand what your technology does and what I can do with it?
What the technology does is often only half of the story. The happy path might be great, but what happens when it breaks or errors? How is the error reporting and logging? I think of Apollo and GraphQL here in my own experience. It’s such a great technology, but the error reporting feels horrendous in that it’s very difficult to track down even stuff like typos triggering errors in development.
What is the debugging story like? Are there special tools for it? The same goes for testing. These things are fundamental DX issues.
People think of technology offerings.
For instance, a technology might be “good” already. Say it has an API that developers like. Then it starts offering a CLI. That’s (generally) a DX improvement, because it opens up doors for developers who prefer working in that world and who build processes around it.
I think of things like Netlify Dev here. They already have this great platform and then say, here, you can run it all on your own machine too. That’s taking DX seriously.
One aspect of Netlify Dev that is nice: The terminal command to start my local dev environment across all my sites on Netlify, regardless of what technology powers them, is the same: netlify dev
Having a dedicated CLI is almost always a good DX step, assuming it is well done and maintained. I remember WordPress before WP-CLI, and now lots of documentation just assumes you’re using it. I wasn’t even aware Cloudinary had a CLI until the other day when I needed it and was pleasantly surprised that it was there. I remember when npm scripts started taking over the world. (What would npm be without a CLI?) We used to have a variety of different task runners, but now it’s largely assumed a project has run commands built into the package.json that you use to do anything the project needs to do.
Melanie Sumner thinks of CLIs immediately as core DX.
People think of the literal experience of coding.
There is nothing more directly DX than the experience of typing code into code editing software and running it. That’s what “coding” is and that’s what developers do. It’s no wonder that developers take that experience seriously and are constantly trying to improve it for themselves and their teams. I think of things like VS Code in how it’s essentially the DX of it that has made it so dominant in the code editing space in such a short time. VS Code does all kinds of things that developers like, does them well, does them fast, and allows for a very wide degree of customization.
TypeScript keeps growing in popularity no doubt in part due to the experience it offers within VS Code. TypeScript literally helps you code better by showing you, for example, what functions need as parameters, and making it hard to do the wrong thing.
Then there is the experience outside the editor, which in the browser itself. Years ago, I wrote Style Injection is for Winners where my point was, as a CSS developer, the experience of saving CSS code and seeing the changes instantly in the browser is a DX you definitely want to have. That concept continues to live on, growing up to JavaScript as well, where “hot reloading” is goosebump-worthy.
The difference between a poor developer environment (no IDE help, slow saves, manual refreshes, slow pipelines) and a great developer environment (fancy editor assistance, hot reloading, fast everything) is startling. A good developer environment, good DX, makes you a better and more productive programmer.
People compare it to user experience (UX).
There is a strong negative connotation to DX sometimes. It happens when people blame it for it existing at the cost of user experience.
I think of things like client-side developer-only libraries. Think of the classic library that everyone loves to dunk: Moment.js. Moment allows you to manipulate dates in JavaScript, and is often used client-side to do that. Users don’t care if you have a fancy API available to manipulate dates. That is entirely a developer convenience. So, you ship this library for yourself (good DX) at the cost of slowing down the website (bad UX). Most client-side JavaScript is in this category.
Equally as often, people connect developer experience and user experience. If developers are empowered and effective, that will “trickle down” to produce good software, the theory goes.
Worst case, we’re in a situation where UX and DX are on a teeter totter. Pile on some DX and UX suffers on the other side. Best case, we find ways to disentangle DX and UX entirely, finding value in both and taking both seriously. Although if one has to win, certainly it should be the users. Like the HTML spec says:

In case of conflict, consider users over authors over implementors over specifiers over theoretical purity.
People think about time.
How long does a technology take to adopt? Good DX considers this. Can I take advantage of it without rewriting everything? How quickly can I spin it up? How well does it play with other technologies I use? What is my time investment?
This kind of thing makes me think of some recent experience with Cloudflare Workers. It’s really cool technology that we don’t have time to get all into right here, but suffice to say it gives you control over a website at a high level that we often don’t think about. Like what if you could manipulate a network request before it even gets to your web server? You don’t have to use it, but because of the level it operates on, new doors open up without caring about or interfering with whatever technologies you are using.
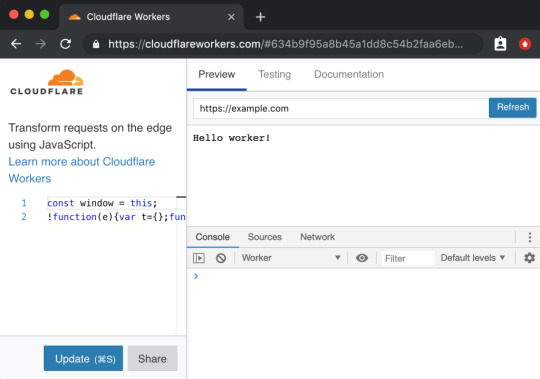
Not only does the technology itself position itself well, the DX of using it, while there are some rough edges, is at least well-considered, providing a browser-based testing environment.
A powerful tool with a high investment cost, eh, that’s cool. But a powerful tool with low investment cost is good DX.
People don’t want to think about it.
They say the best typography goes unnoticed because all you see is the what the words are telling you, not the typography itself. That can be true of developer experience. The best DX is that you never notice the tools or the technology because they just work.
Good DX is just being able to do your job rather than fight with tools. The tools could be your developer environment, it could be build tooling, it could be hosting stuff, or it could even be whatever APIs you are interfacing with. Is the API intuitive and helpful, or obtuse and tricky?
Feel free to keep going on this in the comments. What is DX to you?
Are we capitalizing Developer Experience? I’m just gonna go for it.
Looks like Michael Mahemoff has a decent claim on coining the term.
The post What is Developer Experience (DX)? appeared first on CSS-Tricks.
What is Developer Experience (DX)? published first on https://deskbysnafu.tumblr.com/
0 notes
Text
What is Developer Experience (DX)?
Developer Experience¹ is a term² that has one somewhat obvious meaning — the experience of developers — but it eludes definition in the sense that people invoke it at different times for different reasons referring to different things. For instance, our own Sarah Drasner’s current job title is “VP of Developer Experience” at Netlify. But a job title just one way the term is used. Let’s dig in a bit and apply it to the different ways people think about and use the term.
People think of specific companies.
I hear DX and Stripe together a lot. That makes sense. Stripe is a company almost exclusively for developers. They are serious about providing a good experience for their customers (developers), hence “developer experience.” Just listen to Suz Hinton talk about “friction journals”, which is this idea of using a product (like Stripe) and noting down every single little WTF moment, confusion, and frustration so that improvements can be made:
Netlify is like Stripe in this way, as is Heroku, CodePen, and any number of companies where the entire customer base is developers. For companies like this, it’s almost like DX is what user experience (UX) is for any other company.
People think of specific technologies.
It’s common to hear developer experience invoked when comparing technologies. For instance, some people will say that Vue offers a better developer experience than React. (I’m not trying to start anything, I don’t even have much of an opinion on this.) They are talking about things like APIs. Perhaps the state is more intuitive to manage in one vs. the other. Or they are talking about features. I know Vue and Svelte have animation helpers built-in while React does not. But React has hooks and people generally like those. These are aspects of the DX of these technologies.
Or they might be speaking about the feeling around the tools surrounding the core technology. I know create-react-app is widely beloved, but so is the Vue CLI. React Router is hugely popular, but Vue has a router that is blessed (and maintained) by the core team which offers a certain feeling of trust.
> vue create hello-world
> npx create-react-app my-app
I’m not using JavaScript frameworks/libraries as just any random example. I hear people talk about developer experience as it relates to JavaScript more than anything else — which could just be due to the people who are in my circles, but it feels notable.
People think of the world around the technology.
Everybody thinks good docs are important. There is no such thing as a technology that is better than another but has much worse docs. The one with the better docs is better overall because it has better docs. That’s not the technology itself; that’s the world around it.
Have you ever seen a developer product with an API, and when you view the docs for the API while logged in, it uses API keys and data and settings from your own account to demonstrate? That’s extraordinary to me. That feels like DX to me.

Airtable docs showing me API usage with my own data.
“Make the right thing easy,” notes Jake Dohm.
That word, easy, feels highly related to DX. Technologies that make things easy are technologies with good DX. In usage as well as in understanding. How easily (and quickly) can I understand what your technology does and what I can do with it?
What the technology does is often only half of the story. The happy path might be great, but what happens when it breaks or errors? How is the error reporting and logging? I think of Apollo and GraphQL here in my own experience. It’s such a great technology, but the error reporting feels horrendous in that it’s very difficult to track down even stuff like typos triggering errors in development.
What is the debugging story like? Are there special tools for it? The same goes for testing. These things are fundamental DX issues.
People think of technology offerings.
For instance, a technology might be “good” already. Say it has an API that developers like. Then it starts offering a CLI. That’s (generally) a DX improvement, because it opens up doors for developers who prefer working in that world and who build processes around it.
I think of things like Netlify Dev here. They already have this great platform and then say, here, you can run it all on your own machine too. That’s taking DX seriously.

One aspect of Netlify Dev that is nice: The terminal command to start my local dev environment across all my sites on Netlify, regardless of what technology powers them, is the same: netlify dev
Having a dedicated CLI is almost always a good DX step, assuming it is well done and maintained. I remember WordPress before WP-CLI, and now lots of documentation just assumes you’re using it. I wasn’t even aware Cloudinary had a CLI until the other day when I needed it and was pleasantly surprised that it was there. I remember when npm scripts started taking over the world. (What would npm be without a CLI?) We used to have a variety of different task runners, but now it’s largely assumed a project has run commands built into the package.json that you use to do anything the project needs to do.
Melanie Sumner thinks of CLIs immediately as core DX.
People think of the literal experience of coding.
There is nothing more directly DX than the experience of typing code into code editing software and running it. That’s what “coding” is and that’s what developers do. It’s no wonder that developers take that experience seriously and are constantly trying to improve it for themselves and their teams. I think of things like VS Code in how it’s essentially the DX of it that has made it so dominant in the code editing space in such a short time. VS Code does all kinds of things that developers like, does them well, does them fast, and allows for a very wide degree of customization.
TypeScript keeps growing in popularity no doubt in part due to the experience it offers within VS Code. TypeScript literally helps you code better by showing you, for example, what functions need as parameters, and making it hard to do the wrong thing.
Then there is the experience outside the editor, which in the browser itself. Years ago, I wrote Style Injection is for Winners where my point was, as a CSS developer, the experience of saving CSS code and seeing the changes instantly in the browser is a DX you definitely want to have. That concept continues to live on, growing up to JavaScript as well, where “hot reloading” is goosebump-worthy.
The difference between a poor developer environment (no IDE help, slow saves, manual refreshes, slow pipelines) and a great developer environment (fancy editor assistance, hot reloading, fast everything) is startling. It essentially makes you a better and more productive programmer.
People compare it to user experience (UX).
There is a strong negative connotation to DX sometimes. It happens when people blame it for it existing at the cost of user experience.
I think of things like client-side developer-only libraries. Think of the classic library that everyone loves to dunk: Moment.js. Moment allows you to manipulate dates in JavaScript, and is often used client-side to do that. Users don’t care if you have a fancy API available to manipulate dates because that is entirely a developer convenience. So, you ship this library for yourself (good DX) at the cost of slowing down the website (bad UX). Most client-side JavaScript is in this category.
Equally as often, people connect developer experience and user experience. If developers are empowered and effective, that will “trickle down” to produce good software, the theory goes.
Worst case, we’re in a situation where UX and DX are on a teeter totter. Pile on some DX and UX suffers on the other side. Best case, we find ways to disentangle DX and UX entirely, finding value in both and taking both seriously. Although if one has to win, certainly it should be the users. Like the HTML spec says:

In case of conflict, consider users over authors over implementors over specifiers over theoretical purity.
People think about time.
How long does a technology take to adopt? Good DX considers this. Can I take advantage of it without rewriting everything? How quickly can I spin it up? How well does it play with other technologies I use? What is my time investment?
This kind of thing makes me think of some recent experience with Cloudflare Workers. It’s really cool technology that we don’t have time to get all into right here, but suffice to say it gives you control over a website at a high level that we often don’t think about. Like what if you could manipulate a network request before it even gets to your web server? You don’t have to use it, but because of the level it operates on, new doors open up without caring about or interfering with whatever technologies you are using.

Not only does the technology itself position itself well, the DX of using it, while there are some rough edges, is at least well-considered, providing a browser-based testing environment.
A powerful tool with a high investment cost, eh, that’s cool. But a powerful tool with low investment cost is good DX.
People don’t want to think about it.
They say the best typography goes unnoticed because all you see is the actual thing it’s telling you. That can be true of developer experience. The best DX is that you never notice the tools because they just work.
Good DX is just being able to do your job rather than fight with tools. The tools could be your developer environment, it could be build tooling, it could be hosting stuff, or it could even be whatever APIs you are interfacing with. Is the API intuitive and helpful, or obtuse and tricky?
Feel free to keep going on this in the comments. What is DX to you?
Are we capitalizing Developer Experience? I’m just gonna go for it.
Looks like Michael Mahemoff has a decent claim on coining the term.
The post What is Developer Experience (DX)? appeared first on CSS-Tricks.
What is Developer Experience (DX)? published first on https://deskbysnafu.tumblr.com/
0 notes
Text
Get Started Building GraphQL APIs With Node
We all have a number of interests and passions. For example, I’m interested in JavaScript, 90’s indie rock and hip hop, obscure jazz, the city of Pittsburgh, pizza, coffee, and movies starring John Lurie. We also have family members, friends, acquaintances, classmates, and colleagues who also have their own social relationships, interests, and passions. Some of these relationships and interests overlap, like my friend Riley who shares my interest in 90’s hip hop and pizza. Others do not, like my colleague Harrison, who prefers Python to JavaScript, only drinks tea, and prefers current pop music. All together, we each have a connected graph of the people in our lives, and the ways that our relationships and interests overlap.
These types of interconnected data are exactly the challenge that GraphQL initially set out to solve in API development. By writing a GraphQL API we are able to efficiently connect data, which reduces the complexity and number of requests, while allowing us to serve the client precisely the data that it needs. (If you’re into more GraphQL metaphors, check out Meeting GraphQL at a Cocktail Mixer.)
In this article, we’ll build a GraphQL API in Node.js, using the Apollo Server package. To do so, we'll explore fundamental GraphQL topics, write a GraphQL schema, develop code to resolve our schema functions, and access our API using the GraphQL Playground user interface.
What is GraphQL?
GraphQL is an open source query and data manipulation language for APIs. It was developed with the goal of providing single endpoints for data, allowing applications to request exactly the data that is needed. This has the benefit of not only simplifying our UI code, but also improving performance by limiting the amount of data that needs to be sent over the wire.
What we’re building
To follow along with this tutorial, you’ll need Node v8.x or later and some familiarity with working with the command line.
We’re going to build an API application for book highlights, allowing us to store memorable passages from the things that we read. Users of the API will be able to perform “CRUD” (create, read, update, delete) operations against their highlights:
Create a new highlight
Read an individual highlight as well as a list of highlights
Update a highlight’s content
Delete a highlight
Getting started
To get started, first create a new directory for our project, initialize a new node project, and install the dependencies that we’ll need:
# make the new directory mkdir highlights-api # change into the directory cd highlights-api # initiate a new node project npm init -y # install the project dependencies npm install apollo-server graphql # install the development dependencies npm install nodemon --save-dev
Before moving on, let’s break down our dependencies:
apollo-server is a library that enables us to work with GraphQL within our Node application. We’ll be using it as a standalone library, but the team at Apollo has also created middleware for working with existing Node web applications in Express, hapi, Fastify, and Koa.
graphql includes the GraphQL language and is a required peer dependency of apollo-server.
nodemon is a helpful library that will watch our project for changes and automatically restart our server.
With our packages installed, let’s next create our application’s root file, named index.js. For now, we’ll console.log() a message in this file:
console.log("📚 Hello Highlights");
To make our development process simpler, we’ll update the scripts object within our package.json file to make use of the nodemon package:
"scripts": { "start": "nodemon index.js" },
Now, we can start our application by typing npm start in the terminal application. If everything is working properly, you will see 📚 Hello Highlights logged to your terminal.
GraphQL schema types
A schema is a written representation of our data and interactions. By requiring a schema, GraphQL enforces a strict plan for our API. This is because the API can only return data and perform interactions that are defined within the schema. The fundamental component of GraphQL schemas are object types. GraphQL contains five built-in types:
String: A string with UTF-8 character encoding
Boolean: A true or false value
Int: A 32-bit integer
Float: A floating-point value
ID: A unique identifier
We can construct a schema for an API with these basic components. In a file named schema.js, we can import the gql library and prepare the file for our schema syntax:
const { gql } = require('apollo-server'); const typeDefs = gql` # The schema will go here `; module.exports = typeDefs;
To write our schema, we first define the type. Let’s consider how we might define a schema for our highlights application. To begin, we would create a new type with a name of Highlight:
const typeDefs = gql` type Highlight { } `;
Each highlight will have a unique ID, some content, a title, and an author. The Highlight schema will look something like this:
const typeDefs = gql` type Highlight { id: ID content: String title: String author: String } `;
We can make some of these fields required by adding an exclamation point:
const typeDefs = gql` type Highlight { id: ID! content: String! title: String author: String } `;
Though we’ve defined an object type for our highlights, we also need to provide a description of how a client will fetch that data. This is called a query. We’ll dive more into queries shortly, but for now let’s describe in our schema the ways in which someone will retrieve highlights. When requesting all of our highlights, the data will be returned as an array (represented as [Highlight]) and when we want to retrieve a single highlight we will need to pass an ID as a parameter.
const typeDefs = gql` type Highlight { id: ID! content: String! title: String author: String } type Query { highlights: [Highlight]! highlight(id: ID!): Highlight } `;
Now, in the index.js file, we can import our type definitions and set up Apollo Server:
const {ApolloServer } = require('apollo-server'); const typeDefs = require('./schema'); const server = new ApolloServer({ typeDefs }); server.listen().then(({ url }) => { console.log(`📚 Highlights server ready at ${url}`); });
If we’ve kept the node process running, the application will have automatically updated and relaunched, but if not, typing npm start from the project’s directory in the terminal window will start the server. If we look at the terminal, we should see that nodemon is watching our files and the server is running on a local port:
[nodemon] 2.0.2 [nodemon] to restart at any time, enter `rs` [nodemon] watching dir(s): *.* [nodemon] watching extensions: js,mjs,json [nodemon] starting `node index.js` 📚 Highlights server ready at http://localhost:4000/
Visiting the URL in the browser will launch the GraphQL Playground application, which provides a user interface for interacting with our API.

GraphQL Resolvers
Though we’ve developed our project with an initial schema and Apollo Server setup, we can’t yet interact with our API. To do so, we’ll introduce resolvers. Resolvers perform exactly the action their name implies; they resolve the data that the API user has requested. We will write these resolvers by first defining them in our schema and then implementing the logic within our JavaScript code. Our API will contain two types of resolvers: queries and mutations.
Let’s first add some data to interact with. In an application, this would typically be data that we’re retrieving and writing to from a database, but for our example let’s use an array of objects. In the index.js file add the following:
let highlights = [ { id: '1', content: 'One day I will find the right words, and they will be simple.', title: 'Dharma Bums', author: 'Jack Kerouac' }, { id: '2', content: 'In the limits of a situation there is humor, there is grace, and everything else.', title: 'Arbitrary Stupid Goal', author: 'Tamara Shopsin' } ]
Queries
A query requests specific data from an API, in its desired format. The query will then return an object, containing the data that the API user has requested. A query never modifies the data; it only accesses it. We’ve already written a two queries in our schema. The first returns an array of highlights and the second returns a specific highlight. The next step is to write the resolvers that will return the data.
In the index.js file, we can add a resolvers object, which can contain our queries:
const resolvers = { Query: { highlights: () => highlights, highlight: (parent, args) => { return highlights.find(highlight => highlight.id === args.id); } } };
The highlights query returns the full array of highlights data. The highlight query accepts two parameters: parent and args. The parent is the first parameter of any GraqhQL query in Apollo Server and provides a way of accessing the context of the query. The args parameter allows us to access the user provided arguments. In this case, users of the API will be supplying an id argument to access a specific highlight.
We can then update our Apollo Server configuration to include the resolvers:
const server = new ApolloServer({ typeDefs, resolvers });
With our query resolvers written and Apollo Server updated, we can now query API using the GraphQL Playground. To access the GraphQL Playground, visit http://localhost:4000 in your web browser.
A query is formatted as so:
query { queryName { field field } }
With this in mind, we can write a query that requests the ID, content, title, and author for each our highlights:
query { highlights { id content title author } }

Let’s say that we had a page in our UI that lists only the titles and authors of our highlighted texts. We wouldn’t need to retrieve the content for each of those highlights. Instead, we could write a query that only requests the data that we need:
query { highlights { title author } }
We’ve also written a resolver to query for an individual note by including an ID parameter with our query. We can do so as follows:
query { highlight(id: "1") { content } }

Mutations
We use a mutation when we want to modify the data in our API. In our highlight example, we will want to write a mutation to create a new highlight, one to update an existing highlight, and a third to delete a highlight. Similar to a query, a mutation is also expected to return a result in the form of an object, typically the end result of the performed action.
The first step to updating anything in GraphQL is to write the schema. We can include mutations in our schema, by adding a mutation type to our schema.js file:
type Mutation { newHighlight (content: String! title: String author: String): Highlight! updateHighlight(id: ID! content: String!): Highlight! deleteHighlight(id: ID!): Highlight! }
Our newHighlight mutation will take the required value of content along with optional title and author values and return a Highlight. The updateHighlight mutation will require that a highlight id and content be passed as argument values and will return the updated Highlight. Finally, the deleteHighlight mutation will accept an ID argument, and will return the deleted Highlight.
With the schema updated to include mutations, we can now update the resolvers in our index.js file to perform these actions. Each mutation will update our highlights array of data.
const resolvers = { Query: { highlights: () => highlights, highlight: (parent, args) => { return highlights.find(highlight => highlight.id === args.id); } }, Mutation: { newHighlight: (parent, args) => { const highlight = { id: String(highlights.length + 1), title: args.title || '', author: args.author || '', content: args.content }; highlights.push(highlight); return highlight; }, updateHighlight: (parent, args) => { const index = highlights.findIndex(highlight => highlight.id === args.id); const highlight = { id: args.id, content: args.content, author: highlights[index].author, title: highlights[index].title }; highlights[index] = highlight; return highlight; }, deleteHighlight: (parent, args) => { const deletedHighlight = highlights.find( highlight => highlight.id === args.id ); highlights = highlights.filter(highlight => highlight.id !== args.id); return deletedHighlight; } } };
With these mutations written, we can use the GraphQL Playground to practice mutating the data. The structure of a mutation is nearly identical to that of a query, specifying the name of the mutation, passing the argument values, and requesting specific data in return. Let’s start by adding a new highlight:
mutation { newHighlight(author: "Adam Scott" title: "JS Everywhere" content: "GraphQL is awesome") { id author title content } }

We can then write mutations to update a highlight:
mutation { updateHighlight(id: "3" content: "GraphQL is rad") { id content } }
And to delete a highlight:
mutation { deleteHighlight(id: "3") { id } }
Wrapping up
Congratulations! You’ve now successfully built a GraphQL API, using Apollo Server, and can run GraphQL queries and mutations against an in-memory data object. We’ve established a solid foundation for exploring the world of GraphQL API development.
Here are some potential next steps to level up:
Learn about nested GraphQL queries and mutations.
Follow along with the Apollo Full Stack tutorial.
Update the example to include a database, such as MongoDB or PostgreSQL.
Explore more of the great CSS-Tricks GraphQL articles.
Use your newfound GraphQL knowledge to build static websites with Gatsby.
The post Get Started Building GraphQL APIs With Node appeared first on CSS-Tricks.
Get Started Building GraphQL APIs With Node published first on https://deskbysnafu.tumblr.com/
0 notes
Text
pairings:
Angela and Fabian. ( @angelindisquisecole & @fah-bian )
Tahja and Tonia. ( @tahjadomingo & @wtftonia )
Jenai and Shawnie. ( @jenai-rpg & @shcwnie )
Selena and Demetrius. ( @thatfcreign & @youneedachill )
Apollo and Storm. ( @apollodomingo & @stormszn )
Devyn and Maximiliano. ( @dev--ill & @maxxdelarosa )
Tyrek and Melody. ( @ty-rek & @melodyp0pping )
Kimberly and Jayden. ( @kimberly-petit & @wavyjdn )
Safiyaah and Carter. ( @brcwnsugah & @crtrcs )
Jameel and Katrina. ( @fckinmeel & @katrina--parker )
Tayden and Saige. ( @tayhuncho & @svigee )
Ashanti and Zeus ( @ashcnti & @thcgvwdzeus )
Sliver and Julien. ( @she-is-silver & @sincerelyjulien )
Delano and Casandra. ( @dclano & @miseducationofcassie )
Zayden and Jhea. ( @lethalpcpi & @iheartjhea )
Blaise and Devin. ( @blviseszn & @ohdevynharlow )
If your date doesn’t log on for whatever reasons then when we have speed dating event again, you will be paired with them again. If you don’t see your name here then please let us know in the ims!! Thank you.
17 notes
·
View notes