#embed tag in html example
Explore tagged Tumblr posts
Visit Tumblr Blog
Explore Tumblr blogs with no restrictions, modern design and the best experience.
Last Seen Tumblr Blogs


Fun Fact
Celebrities use Tumblr as well.
Text
BatB Week podfic instructions and tips

Thanks to everyone who signed up for the podfic exchange! If you signed up as a reader, you should have gotten a message with info on who you matched with. Send a DM if you missed the message.
(If you didn’t sign up, there is still time! We still need one more podficcer! The form to sign up is here.)
I don’t personally do voice/audio work, but I’ve pulled together some quick tips and instructions for recording, editing, and posting podfics below the cut. If someone else has better/more suggestions, please add on!
Recording and editing
Need audio recording/editing software? You don't need anything fancy; you can record it on whatever voice recording software comes installed on your phone (I have Samsung Voice Recorder, for instance), or use one of these free, beginner-friendly audio editors: Lexis Audio Editor (Android, iOS, Windows), Audacity (Windows, Mac, Linux), GarageBand (Mac), Audiotool (online).
Nastasia Marquez has a great tutorial on how to record and edit voiceovers for beginners in Audacity. It's very easy to follow along and gets straight to the point.
When recording, watch out for plosives and sibilances (e.g. your "pps," "sss," and "shh") as they can easily hinder the quality of your recording by being aggressive to the ear. It’s hard to give tips since everyone will be working with different devices, but my suggestion would be to put some space between your mouth and the microphone, or have your device inside a sock. You can learn more on them and how to deal with them here.
A good way to get clean audio is to record under a blanket. It’s silly, but it’s as close to a padded studio as you can get for free. It reduces echo and makes the audio sound much better no matter the mic you use.
Don't be afraid to record in short batches! There’s no need to do it in long unbroken takes. Piece it together later.
Posting the audio file
Once you have your finished audio file, you have to upload it somewhere, because AO3 can host the link to it, but not the audio file itself. It seems like Internet Archive is popular for hosting podfic audio files. You can also host it on Google Drive, YouTube, Mediafire, or Spotify.
Posting the podfic to AO3
Go to ‘Post > New work’ just like you would for posting any fic to AO3.
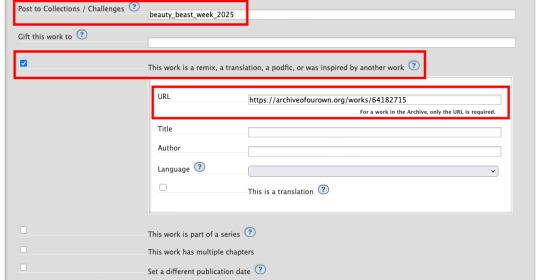
In the ‘Post to Collections / Challenges’ field, enter “beauty_beast_week_2025” (see first screenshot below).
Check the box that reads ‘This work is a remix, a translation, a podfic, or was inspired by another work’ and include the URL to the original fic (see first screenshot below). This not only gives credit to and notifies the author, but it adds a link to your podfic from their fic (when they approve it) so that your podfic gets more hits and kudos.
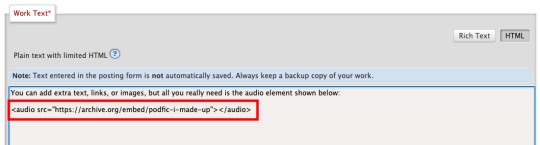
In the body of the post, insert the HTML to embed the audio file (see second screenshot below). It’s easy: AO3 has a simple guide to copy and paste from here.
If you’d like, you can add more content to the body of the post, like the event banner or some text, but it’s not necessary.
Here are some examples of BatB podfics so you can see how they’ve set things up: The Great Wide Somewhere, Mutual Care, and The Beast Within
Posting to the event
Important: tag the @beauty-beast-week account within the body of your Tumblr post itself by typing the @ symbol, typing beauty-beast-week, and then selecting that account name from the autocomplete menu that appears. This is the only way to be sure we see your post so we can reblog it from this account and include it in our master list posts.
Other than that, make sure you post to Tumblr on the day of the prompt you're using and include in your post:
Tag the @beauty-beast-week account within the body of the post (yes, I’m repeating myself)
Which fic your podfic is for, and link to it
Which day/prompt your podfic is for, in the body or tags
The event hashtag #batbweek and/or #batbweek 2025
Any other appropriate hashtags (characters, ship, NSFW and content warnings)
Optional: The event banner (save from the top of this post) or the day's banner (in the full event instructions that will come later)
Heads up authors! Check your AO3 email during the event!
If your work was adapted into a podfic for the exchange, check your email and follow the link to approve linking back the podfic to your original work so more people can discover the podfic version!

Send an ask or DM if you have any problems or questions!
7 notes
·
View notes
Text
How to Embed Images and Links on AO3
Note: I have a site skin so the colors might look different. Just follow along with the red arrows! Also, this is a tutorial used on the computer, and I assume mobile posting would be different.
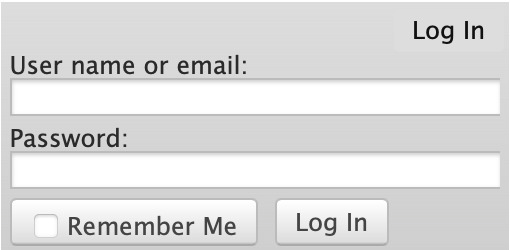
First, open archiveofourown.org and log in if you haven't already. If you don't have an AO3 account, sign up for one as soon as possible because it takes about a week for them to verify you and give you access to your new account.

Next, select "Post" in the top right hand corner like you would typically. Set up everything you desire as you normally would until you reach "Work Text*".
Note: If you need further help, I have an AO3 Tag Guide, a Story Title Guide, a List of Random AO3 Shortcuts, and a How to Post a Work on AO3 with Step-by-Step Explanations Guide for your convenience! I also have a Foundations Writing Lesson post for any beginners or for people who would appreciate a review <333

Once there, click on "Rich Text" in the top right of that section, and then select the image icon or the link icon, depending on which you are intending to make.
Note: Check under the cut for more in-depth instructions slash a continuation of this guide! There is an Image Icon Route and a Link Icon Route.
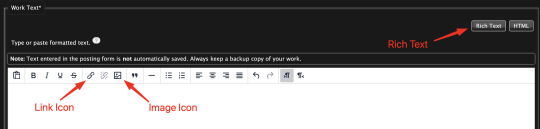
Image Icon Route
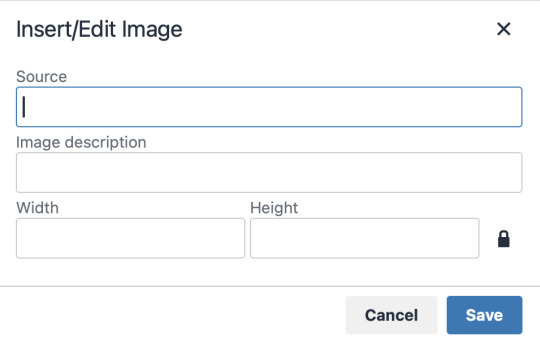
Once you click on the Image Icon, the screen similar to below should pop-up:
*Link Icon Route detour start here
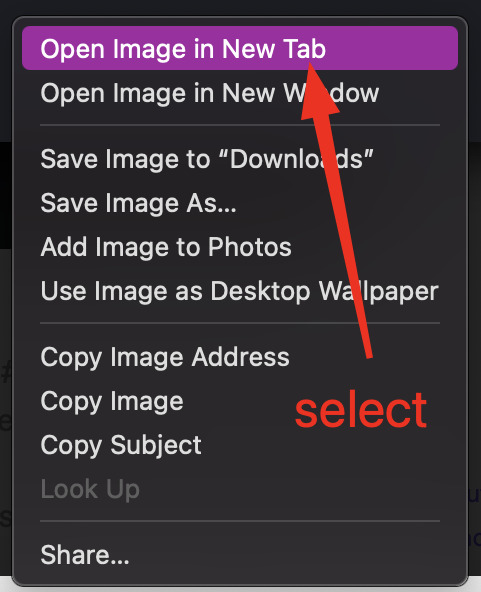
The source is the link to the image you're wanting to add to your work. AO3 doesn't host images itself, but you can use an image hosting site such as postimages.org or even Tumblr itself. If you want to use Tumblr, post a draft with the desired image or locate a post with the desired image. Once you've done that, right click the desired image and Open Image in New Tab (or whatever your computer's equivalent is).
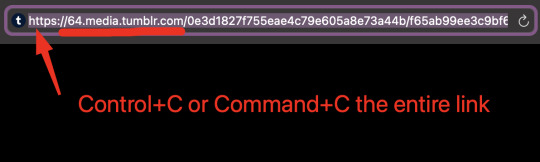
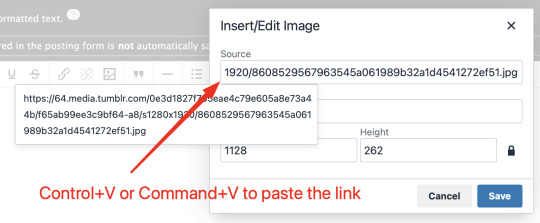
You should have a tab open that starts with "https://64.media.tumblr.com" followed by a bunch of numbers and letters. I want you to copy that link and post it in the source box.
*Link Icon Route detour ends here
Now that the image link is in place, adjust your Width/Height boxes if desired. Feel free to add an image description as well. For best result, I suggest doing 100% in the Width box with nothing in Height, but this is ultimately a personal decision. Feel free to mess around with the proportions using the work drafts and find what's best for you!
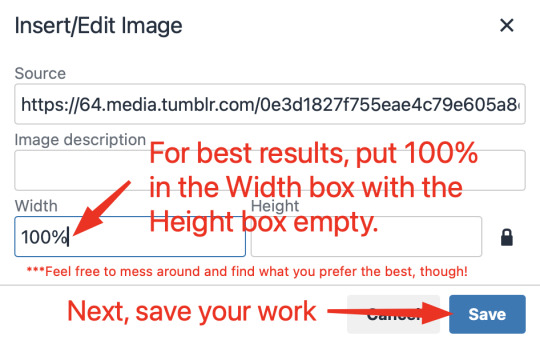
If you prefer, you can also use < img src="LINK" alt="IMAGE DESCRIPTION" width="100%" align="center" /> aka < + img src="https://64.media.tumblr.com/0e3d1827f755eae4c79e605a8e73a44b/f65ab99ee3c9bf64-a8/s1280x1920/8608529567963545a061989b32a1d4541272ef51.jpg" alt="" width="100%" align="center" /> for this example (*excluding the plus sign at the start) to insert an image using HTML instead of Rich Text. It'll look like this:

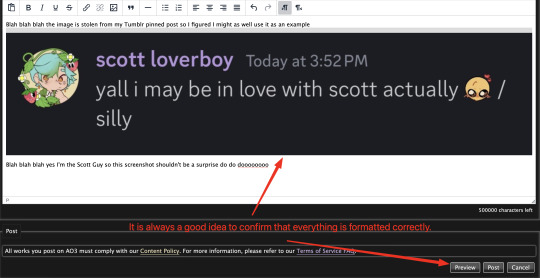
It is always a good idea to double-check and confirm that everything is how you want it. Previewing your work also allows you to create a draft.

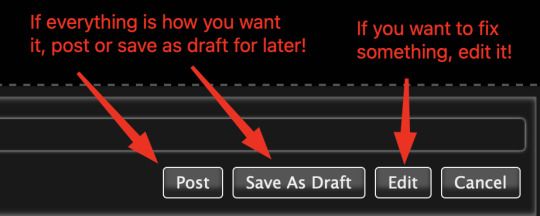
If you're unhappy with something, edit the work to fix it! If you're happy with how everything looks, go ahead and post it! You're finished here! You've successfully posted a work with an image embedded! Well done; good job :D
Link Icon Route
Once you click on the Link Icon, the screen similar to below should pop-up:
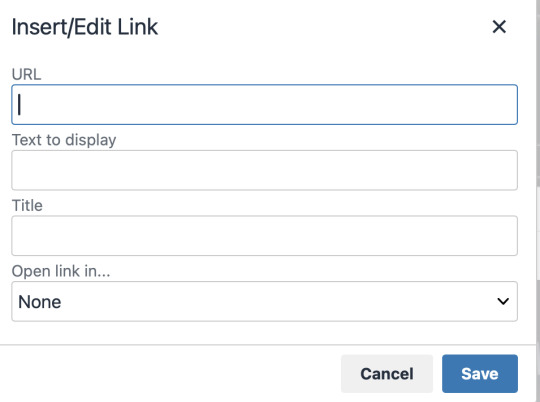
Go copy (Control+C or Command+C) the link to whatever it is you want to insert into the body of the work.
Note: If you're wanting to link specifically to an image and not a post containing that image, scroll up to the link icon route detour colored purple.
Once you got that, paste (Control+V or Command+V) the link into the URL box. If you want something other than the link to display, change the text in the "Text to display" box.
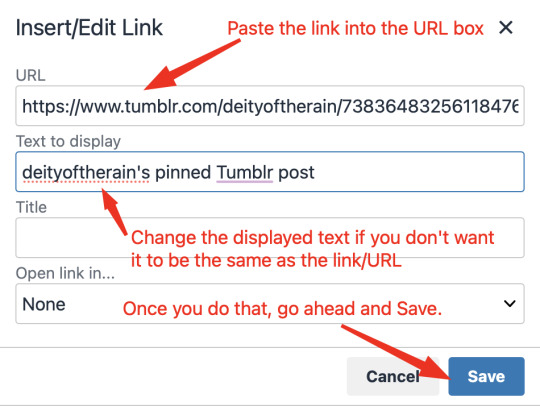
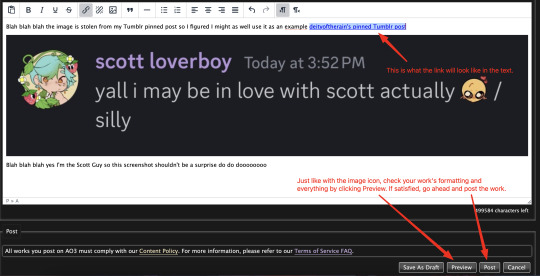
Save your work, check the formatting and everything else like we did in the Image Icon Route section. If everything is how you want it, then congratulations! You have successfully added a link embedded to your work!
If you have any questions or comments, feel free to comment and I'll respond! If this guide was helpful to you, please like and reblog! I appreciate it <333
#rain’s tips#ao3 author#ao3 help#ao3 writers#ao3#archive of our own#embedded#images#links#ao3 link#ao3 images#ao3 guide#idk how to tag this#idk what tags to use#writing help#guide
17 notes
·
View notes
Text
Learn HTML and CSS: A Comprehensive Guide for Beginners
Introduction to HTML and CSS
HTML (HyperText Markup Language) and CSS (Cascading Style Sheets) are the core technologies for creating web pages. HTML provides the structure of the page, while CSS defines its style and layout. This guide aims to equip beginners with the essential knowledge to start building and designing web pages.
Why Learn HTML and CSS?
HTML and CSS are fundamental skills for web development. Whether you're looking to create personal websites, start a career in web development, or enhance your current skill set, understanding these technologies is crucial. They form the basis for more advanced languages and frameworks like JavaScript, React, and Angular.
Getting Started with HTML and CSS
To get started, you need a text editor and a web browser. Popular text editors include Visual Studio Code, Sublime Text, and Atom. Browsers like Google Chrome, Firefox, and Safari are excellent for viewing and testing your web pages.
Basic HTML Structure
HTML documents have a basic structure composed of various elements and tags. Here’s a simple example:
html
Copy code
<!DOCTYPE html>
<html>
<head>
<title>My First Web Page</title>
<link rel="stylesheet" type="text/css" href="styles.css">
</head>
<body>
<h1>Welcome to My Web Page</h1>
<p>This is a paragraph of text on my web page.</p>
</body>
</html>
: Declares the document type and HTML version.
: The root element of an HTML page.
: Contains meta-information about the document.
: Connects the HTML to an external CSS file.
: Contains the content of the web page.
Essential HTML Tags
HTML uses various tags to define different parts of a web page:
to : Headings of different levels.
: Paragraph of text.
: Anchor tag for hyperlinks.
: Embeds images.
: Defines divisions or sections.
: Inline container for text.
Creating Your First HTML Page
Follow these steps to create a simple HTML page:
Open your text editor.
Write the basic HTML structure as shown above.
Add a heading with the tag.
Add a paragraph with the tag.
Save the file with a .html extension (e.g., index.html).
Open the file in your web browser to view your web page.
Introduction to CSS
CSS is used to style and layout HTML elements. It can be included within the HTML file using the <style> tag or in a separate .css file linked with the <link> tag.
Basic CSS Syntax
CSS consists of selectors and declarations. Here’s an example:
css
Copy code
h1 {
color: blue;
font-size: 24px;
}
Selector (h1): Specifies the HTML element to be styled.
Declaration Block: Contains one or more declarations, each consisting of a property and a value.
Styling HTML with CSS
To style your HTML elements, you can use different selectors:
Element Selector: Styles all instances of an element.
Class Selector: Styles elements with a specific class.
ID Selector: Styles a single element with a specific ID.
Example:
html
Copy code
<!DOCTYPE html>
<html>
<head>
<title>Styled Page</title>
<link rel="stylesheet" type="text/css" href="styles.css">
</head>
<body>
<h1 class="main-heading">Hello, World!</h1>
<p id="intro">This is an introduction paragraph.</p>
</body>
</html>
In the styles.css file:
css
Copy code
.main-heading {
color: green;
text-align: center;
}
#intro {
font-size: 18px;
color: grey;
}
CSS Layout Techniques
CSS provides several layout techniques to design complex web pages:
Box Model: Defines the structure of an element’s content, padding, border, and margin.
Flexbox: A layout model for arranging items within a container, making it easier to design flexible responsive layouts.
Grid Layout: A two-dimensional layout system for more complex layouts.
Example of Flexbox:
css
Copy code
.container {
display: flex;
justify-content: space-around;
}
.item {
width: 100px;
height: 100px;
background-color: lightblue;
}
Best Practices for Writing HTML and CSS
Semantic HTML: Use HTML tags that describe their meaning clearly (e.g., , , ).
Clean Code: Indent nested elements and use comments for better readability.
Validation: Use tools like the W3C Markup Validation Service to ensure your HTML and CSS are error-free and standards-compliant.
Accessibility: Make sure your website is accessible to all users, including those with disabilities, by using proper HTML tags and attributes.
Free Resources to Learn HTML and CSS
W3Schools: Comprehensive tutorials and references.
MDN Web Docs: Detailed documentation and guides for HTML, CSS, and JavaScript.
Codecademy: Interactive courses on web development.
FreeCodeCamp: Extensive curriculum covering HTML, CSS, and more.
Khan Academy: Lessons on computer programming and web development.
FAQs about Learning HTML and CSS
Q: What is HTML and CSS? A: HTML (HyperText Markup Language) structures web pages, while CSS (Cascading Style Sheets) styles and layouts the web pages.
Q: Why should I learn HTML and CSS? A: Learning HTML and CSS is essential for creating websites, understanding web development frameworks, and progressing to more advanced programming languages.
Q: Do I need prior experience to learn HTML and CSS? A: No prior experience is required. HTML and CSS are beginner-friendly and easy to learn.
Q: How long does it take to learn HTML and CSS? A: The time varies depending on your learning pace. With consistent practice, you can grasp the basics in a few weeks.
Q: Can I create a website using only HTML and CSS? A: Yes, you can create a basic website. For more complex functionality, you'll need to learn JavaScript.
Q: What tools do I need to start learning HTML and CSS? A: You need a text editor (e.g., Visual Studio Code, Sublime Text) and a web browser (e.g., Google Chrome, Firefox).
Q: Are there free resources available to learn HTML and CSS? A: Yes, there are many free resources available online, including W3Schools, MDN Web Docs, Codecademy, FreeCodeCamp, and Khan Academy.
#how to learn html and css#html & css course#html & css tutorial#html and css#html course#html css tutorial#html learn#html learn website#learn html#learn html and css#html and css course#html and css full course#html and css online course#how to learn html and css for beginners
4 notes
·
View notes
Text
Hi, this is Creative School. Today we share with you how to generate PDF documents from any website. If you want to develop a website and want to provide PDF downloading features, you are exactly in the right place. This video will help you to insert a PDF generator feature in your website on any page of any specific size and shape. GitHub Link: https://github.com/BorhanHosen/How-to-add-pdf-file-download-option-in-your-website.git 0:00 Explanation 3:10 Intro 3:39 Explaining Puppeteer 7:12 Server Side Code Explanation 15:01 Client Side Code Explanation 26:21 Final Touch 28:18 Outro Here are some of our previous tutorial links. You can watch and learn new things and techniques. Enjoy them: How to Send Data from HTML Form Data to Google Sheets | Creative School https://youtu.be/A4TPkOw2Ess Mastering Full Invoice Inventory Management in Microsoft Excel | Creative School Tutorial https://youtu.be/f8BTxan1QTo Motion Graphics in PowerPoint Full Playlist: https://youtube.com/playlist?list=PLsWfHxHIjBT87YgBulwX6X-bnEk4TayQu How to Create the Best Animated Info-graphic in PowerPoint [Part-1] 2020 || Creative School || https://youtu.be/rV-mykyBQIM Awesome Flat Intro Animation In PowerPoint Part 2 || Creative School || https://youtu.be/TafoVSYadEg The Night Sky with a Mountain, fountain, a tree, Bird & Moon Creating in PowerPoint || Creative School || https://youtu.be/jyCTlxJrGyg SAMSUNG Galaxy Boot Animation in PowerPoint [Full Tutorial- 2020] https://youtu.be/pqh-P1mUNp8 How to make an intro video of 10-minute school in PowerPoint 2020. [Part 1] https://youtu.be/I1xObR_SVco Water Animation In PowerPoint Animation! || Creative School https://youtu.be/WfzKTzbGVRA How to add pdf file #download option in your #website https://youtu.be/cNhQ-0VBt5A ===HashTags=== #reactjs #creativeschool #pdfconversion #html #nodejs #vscode #website #javascript #convertpdf #generatepdf #pdfconverter #downloadpdf #puppeteers #mernstack #javascript ===Related Tags=== react pdf generator, generate pdf using react, generate pdfs from html & css with nodejs using puppeteer, certificate generator website, how to create a pdf file using reactjs, html to pdf using javascript, generate pdf from html, generate pdf using javascript, how to add pdf object on a website, how to convert html to pdf in react app using jspdf, easy way to embed pdfs on a website, how to convert html content to pdf in react app using jspdf, generate pdf with react, how to create a pdf with node and puppeteer, generate pdfs from html & css with nodejs using puppeteer, puppeteer, getting to know puppeteer with example, get started with headless chrome and puppeteer, headless chrome and puppeteer, how to generate pdf from html with node.js, how to create a pdf file using reactjs, generate pdf using javascript, how to create pdfs with node js and react, puppeteer examples, puppeteer tutorial, puppeteer html to pdf generation with node.js,
#react pdf generator#generate pdf using react#generate pdfs from html & css with nodejs using puppeteer#certificate generator website#how to create a pdf file using reactjs#html to pdf using javascript#generate pdf from html#generate pdf using javascript#how to add pdf object on a website#how to convert html to pdf in react app using jspdf#generate pdf with react#how to create a pdf with node and puppeteer#javascript#creativeschool#mernstack#puppeteer#website#download
3 notes
·
View notes
Text
HTML Tags and Elements You Must Know
HTML, or Hypertext Markup Language, is the backbone of web development. Whether you're a beginner or an experienced developer, understanding HTML tags and elements is crucial for creating structured and accessible web content. This guide will explore essential HTML tags, including headings, paragraphs, images, links, lists, and tables, complete with examples to help you grasp their usage effectively.
HTML Code
Headings
Headings are used to define the structure and hierarchy of content on a web page. They range from <h1> to <h6>, with <h1> being the highest level of importance and <h6> the lowest.
Example:
<h1>Main Heading</h1> <h2>Subheading</h2> <h3>Sub-subheading</h3>
Headings help search engines understand the structure of your content and improve accessibility for screen readers.
Paragraphs
Paragraphs are used to separate blocks of text, making content more readable. The <p> tag is utilized for creating paragraphs.
Example:
<p>This is a paragraph of text that provides information to the reader.</p>
Using paragraphs effectively can greatly enhance the flow and readability of your content.
Images
Images are a vital part of web content, providing visual interest and information. The <img> tag is used to embed images, and it requires at least the src and alt attributes.
Example:
<img src="image.jpg" alt="Description of image">
The alt attribute is crucial for accessibility, as it describes the image to users who cannot see it.
Links
Links connect web pages and provide a way for users to navigate through content. The <a> tag is used to create hyperlinks.
Example:
<a href="https://www.example.com">Visit Example</a>
The href attribute specifies the URL of the page the link goes to. Including descriptive text within the link improves accessibility and user experience.
HTML Code
Lists
Lists are a great way to organize information. HTML supports ordered lists (<ol>) and unordered lists (<ul>), with list items marked by the <li> tag.
Ordered List Example:
<ol> <li>First Item</li> <li>Second Item</li> <li>Third Item</li> </ol>
Unordered List Example:
<ul> <li>Bullet Item One</li> <li>Bullet Item Two</li> <li>Bullet Item Three</li> </ul>
Ordered lists are ideal for step-by-step instructions, while unordered lists are perfect for bullet points.
Tables
Tables are used to display data in a structured format. They consist of the <table>, <tr>, <th>, and <td> tags.
Example:
<table> <tr> <th>Name</th> <th>Age</th> </tr> <tr> <td>John Doe</td> <td>30</td> </tr> <tr> <td>Jane Smith</td> <td>25</td> </tr> </table>
Tables are useful for organizing data but should be used sparingly as they can be less mobile-friendly than other elements.
HTML Code
Conclusion
Understanding these essential HTML tags and elements is the first step toward creating well-structured, accessible, and visually appealing webpages. Incorporating headings, paragraphs, images, links, lists, and tables into your HTML documents will significantly enhance your ability to communicate content effectively.
FAQs
1. What is the purpose of the alt attribute in an <img> tag?
The alt attribute provides a text alternative for images, improving accessibility for users who cannot see the image, such as those using screen readers.
2. Can headers be used for styling purposes in HTML?
While headers can affect the appearance of text, they should primarily be used for content hierarchy and structure. Styling should be handled with CSS.
3. Are tables still relevant in modern web design?
Yes, tables are relevant for displaying structured data but should be used judiciously, especially in responsive designs, where other layout techniques might be more appropriate.
4. How do you create a link that opens in a new tab?
To open a link in a new tab, use the target="_blank" attribute within the <a> tag.
5. What is the difference between ordered and unordered lists?
Ordered lists (<ol>) display items in a sequential order, often numbered, while unordered lists (<ul>) use bullet points without implying a specific sequence.
#HTMLBasics#LearnHTML#WebDevelopment#HTMLTags#FrontEndDevelopment#WebDesign#HTMLForBeginners#CodeNewbie#HTMLTutorial#AssignmentHelp#WebDevTips#AssignmentOnClick#machinelearning#techforstudents#aiforstudents#assignmentwriting#assignment service#assignmentexperts#assignment help#assignment
0 notes
Text
Langley On-Page SEO: Best Practices for Small Business Sites
In today’s competitive digital landscape, every small business in Langley needs more than just a good-looking website. If your site isn’t optimized for on-page SEO, you’re leaving money—and rankings—on the table.
At LangleySEO.ca, we help Langley-based businesses build websites that both look great and rank high on Google. This guide breaks down the best on-page SEO practices you should follow to improve visibility, attract local customers, and grow your business organically.

What Is On-Page SEO?
On-page SEO is everything you can control on your website itself to help search engines understand, rank, and deliver your content to the right people.
It includes:
Keywords
Page structure
Internal linking
Meta tags
Image optimization
Page speed and more
Think of on-page SEO as the foundation of your house—without it, nothing you build on top will last.
1. Use Langley-Specific Keywords
Your content should naturally include local keywords like:
"Langley SEO agency"
"Langley plumber"
"dentist in Langley BC"
Use these in:
Headings (H1, H2s)
First 100 words
Meta titles and descriptions
URL slugs
Image alt text
Example: On our Homepage, we target keywords like "Langley SEO" and “local digital marketing services.”
2. Optimize Title Tags & Meta Descriptions
Title tags appear on Google’s results page—they need to be clear, clickable, and keyword-rich.
Title Tag Example:
Affordable Plumbing Services in Langley | 24/7 Local Experts
Meta Description Example:
Need a plumber in Langley? Our licensed experts are available 24/7 for fast, affordable service. Call today!
Keep:
Title tags under 60 characters
Meta descriptions under 155 characters
3. Use One H1 Tag Per Page
The <h1> tag is your main page headline and should include your primary keyword.
Bad:
html
CopyEdit
<h1>Welcome to Our Website</h1>
Better:
html
CopyEdit
<h1>Trusted Langley SEO Agency for Local Business Growth</h1>
Use H2 and H3 tags to organize the rest of your content for better readability and structure.
4. Make Internal Linking a Habit
Linking to other pages on your website helps Google crawl your site and keeps users engaged.
Best practices:
Link naturally within text
Use descriptive anchor text
Don’t overdo it (3–4 internal links per 1000 words is ideal)
Example: This article naturally links to our Contact Page and Blog.
5. Add Schema Markup
Schema is structured data that tells Google more about your business.
Local businesses should use:
LocalBusiness schema
Review schema
Service schema
This helps enhance your listings with rich snippets like star ratings, hours, and more.
If you're unsure how, we offer Schema Implementation Services to help.
6. Optimize for Mobile & Speed
Google uses mobile-first indexing—which means if your site isn’t mobile-friendly, it won’t rank well.
Tips:
Use responsive design
Avoid pop-ups or elements that cover content
Compress images (use WebP)
Use fast hosting and caching tools
Test your site speed at PageSpeed Insights.
7. Improve Readability
Your site should be easy to read for real people—not just bots. Aim for Grade 5 readability using:
Short sentences
Clear headings
Bullet points
Simple words
Pro Tip: We use readability tools to optimize every article on our Langley SEO Blog.
8. Use SEO-Friendly URLs
Keep URLs clean, short, and keyword-rich.
Bad: www.yoursite.com/page?id=123
Good: www.yoursite.com/langley-seo-services
Avoid dates or unnecessary numbers in your URLs.
9. Add Calls to Action (CTAs)
Guide your visitors to take the next step—don’t make them guess.
Use buttons or links that say:
“Call Now”
“Get a Free Quote”
“Book a Consultation”
“Request a Website Audit”
And don’t forget to link back to your Homepage for easy navigation.
10. Create Localized Landing Pages
If you serve multiple areas around Langley (like Surrey, Aldergrove, or Abbotsford), create individual location pages for each.
Each page should have:
Unique content
Local images
Google Maps embed
Service details
This helps you rank for area-specific searches.
On-page SEO is the most controllable part of your website's search performance. With the right structure, content, and strategy, you’ll attract more local traffic and convert more visitors into customers.Need expert help implementing these best practices? Contact LangleySEO.ca to request a free site audit today.
0 notes
Text
HTML Interview Questions: Crack Your Web Developer Interview

HTML (HyperText Markup Language) is the foundation of every website you see on the internet. Whether you're a fresher stepping into the tech world or an experienced developer preparing for a job switch, mastering HTML interview questions is crucial for clearing any web developer interview.
In this guide, we’ll explore the most commonly asked HTML interview questions, along with clear explanations and examples. These questions are ideal for both beginners and intermediate developers aiming to showcase their front-end knowledge.
Why HTML is Important in Web Development Interviews
HTML is the standard markup language used to create the structure of web pages. It forms the base upon which CSS and JavaScript work. Employers test HTML skills in interviews to evaluate a candidate’s understanding of webpage structure, semantic elements, accessibility, and proper coding practices.
Basic HTML Interview Questions and Answers
1. What is HTML?
Answer: HTML stands for HyperText Markup Language. It is used to structure content on the web using elements like headings, paragraphs, links, lists, and images.
2. What are HTML tags and elements?
Answer: HTML tags are the building blocks used to create HTML elements. Tags are enclosed in angle brackets, like <p> for paragraphs. An element includes the start tag, content, and end tag, e.g., <p>This is a paragraph</p>.
3. What is the difference between HTML and HTML5?
Answer:
HTML5 is the latest version of HTML.
HTML5 supports semantic elements like <article>, <section>, and <nav>.
It introduces multimedia tags like <audio> and <video>.
HTML5 supports APIs for geolocation, local storage, and canvas graphics.
4. What is a semantic HTML element?
Answer: Semantic HTML elements clearly describe their meaning to both the browser and developer. Examples include <header>, <footer>, <article>, and <aside>. These improve SEO and accessibility.
5. What is the difference between <div> and <span>?
Answer:
<div> is a block-level element used for grouping content.
<span> is an inline element used for styling small pieces of text or elements.
Intermediate HTML Interview Questions
6. How do you create a hyperlink in HTML?
Answer: Use the <a> tag with the href attribute. Example: <a href="https://example.com">Visit Example</a>
7. How can you insert an image in HTML?
Answer: Use the <img> tag with the src and alt attributes. Example: <img src="image.jpg" alt="Description of image">
8. What is the purpose of the alt attribute in images?
Answer: The alt attribute provides alternative text if the image can't load and improves accessibility for screen readers.
9. What is the use of the <meta> tag?
Answer: <meta> provides metadata about the HTML document such as character encoding, page description, keywords, and author. It is placed inside the <head> tag.
10. What are void (self-closing) elements in HTML?
Answer: Void elements do not require a closing tag. Examples include <img>, <br>, <hr>, <input>, and <meta>.
Advanced HTML Interview Questions
11. What is the difference between id and class attributes in HTML?
Answer:
id is unique and used to target one specific element.
class can be used on multiple elements for grouping and styling.
12. How do you create a form in HTML?
Answer:<form action="/submit" method="post"> <input type="text" name="username"> <input type="password" name="password"> <input type="submit" value="Login"> </form>
This creates a form that takes input and submits data to a server.
13. What are some new input types in HTML5?
Answer: HTML5 introduced new input types such as:
email
date
time
number
range
color These enhance validation and user experience.
14. What is the use of <iframe> in HTML?
Answer: <iframe> is used to embed another HTML page or external content (like YouTube videos) within a current webpage.
Example:<iframe src="https://example.com" width="600" height="400"></iframe>
15. How does HTML handle accessibility?
Answer: HTML supports accessibility through:
Semantic tags
alt attributes for images
ARIA (Accessible Rich Internet Applications) roles
Proper use of forms and labels
These features make content more usable for screen readers and assistive technologies.
Bonus Tips to Crack HTML Interviews
Practice Real Code: Use platforms like CodePen or JSFiddle to experiment with HTML structures.
Understand Semantic HTML: Many companies focus on code that is SEO- and accessibility-friendly.
Be Clear with Fundamentals: Interviewers often focus on basic but important questions.
Combine with CSS & JavaScript: Know how HTML works in combination with styling and scripting.
Ask Clarifying Questions: If you're given a coding task, ask questions before you begin coding.
Final Thoughts
Cracking a web developer interview starts with having a strong grip on the basics, and HTML is at the core of front-end development. This guide — “HTML Interview Questions: Crack Your Web Developer Interview” — has walked you through a range of frequently asked questions from beginner to advanced levels.
By preparing these questions and practicing real-world HTML code, you’ll be well-equipped to confidently answer your interviewer and demonstrate your understanding of webpage structure, elements, and best practices.
So, keep coding, stay curious, and crack that web developer interview!
0 notes
Text
How to Use Contact Form to Any API to Automate Your Lead Capture Process
In the modern digital landscape, capturing and managing leads efficiently is key to business growth. Whether you’re using a WordPress site, Webflow, or any custom-built landing page, the first interaction often begins with a simple contact form. But what happens after a visitor hits submit?
If your answer involves checking emails or manually copying data to your CRM or database — it’s time for an upgrade.
With Contact Form to Any API, you can instantly send form submissions to any endpoint — CRMs, Slack, Notion, Airtable, Google Sheets, or custom-built APIs — without writing any code. This blog will walk you through exactly how to automate your lead capture process with Contact Form to Any API, save time, and avoid costly lead leaks.
🚀 Why Automate Your Lead Capture?
Before diving into the how-to, let’s talk about the why.
Manual lead collection:
Increases the risk of human error
Delays follow-ups (hurting conversions)
Becomes unsustainable at scale
Automating your form-to-API workflow means:
Instant data delivery to your CRM or app
No missed leads, ever
Centralized tracking, so your marketing and sales teams can work faster
🔧 What Is Contact Form to Any API?
Contact Form to Any API is a lightweight, code-free solution that acts as a bridge between your website's contact form and any external REST API.
It works by:
Capturing the form submission
Mapping fields to your target API’s structure
Sending the data in real-time using POST/PUT requests
Optionally adding headers (for authentication or custom needs)
Unlike complex platforms like Zapier or Make, it’s built for developers and marketers who just need to send data — fast, simply, and affordably.
✅ Key Benefits
No code needed – works with WordPress, Webflow, HTML forms, and more
Supports any REST API – including custom ones
Customizable payloads – full control over JSON structure
Flexible headers & auth – works with Bearer tokens, API keys, etc.
Lightweight and fast – no bloat, no middlemen
📝 Step-by-Step Guide: Automating Your Lead Capture
Let’s walk through how to set up your automation using Contact Form to Any API.
Step 1: Create Your API Endpoint
Decide where your leads should go. This could be:
A CRM like HubSpot, Salesforce, or Zoho
Google Sheets via Apps Script
A Notion database
Your own backend or marketing automation platform
Each of these tools provides a public API endpoint to accept data.
Make sure you understand the required format and authorization method.
Step 2: Set Up Contact Form to Any API
Go to ContactFormToAPI.com and sign up.
Create a new endpoint integration.
Paste the API endpoint you want to send data to.
Choose the HTTP method (usually POST).
Add any required headers (Authorization: Bearer, Content-Type: application/json).
Define the request body using field variables from your form.
Example JSON Body:
json
CopyEdit
{
"name": "{{name}}",
"email": "{{email}}",
"message": "{{message}}"
}
The {{name}}, {{email}}, etc., are dynamic tags from your form fields.
Step 3: Connect Your Frontend Form
Now you need to make sure your contact form sends data to the Contact Form to Any API endpoint.
✅ For HTML Forms:
Use the provided action URL from the dashboard:
html
CopyEdit
<form action="https://contactformtoapi.com/your-endpoint-url" method="POST">
<input name="name" required>
<input name="email" type="email" required>
<textarea name="message"></textarea>
<button type="submit">Send</button>
</form>
✅ For WordPress:
Use any form plugin (Contact Form 7, WPForms, Gravity Forms) and set the action to Contact Form to Any API using a webhook or redirect logic.
✅ For Webflow:
Use the built-in Webflow form and update the form action URL in the embed code or via HTML override.
Step 4: Test and Verify the Integration
Submit a test form to ensure:
Data is being captured and sent
The API endpoint is responding successfully (e.g., 200 OK)
The fields are mapped correctly
You receive leads instantly in your destination app
You can use browser tools (Network tab) or your Contact Form to Any API dashboard logs to troubleshoot issues.
Step 5: Add Conditional Logic or Field Formatting (Optional)
Contact Form to Any API allows you to:
Add custom rules (e.g., only send data if email contains @company.com)
Format fields (e.g., convert names to Title Case)
Set default values for missing fields
These options help you clean and qualify data before it hits your backend.
🔄 Bonus: Multi-Destination Lead Sync
Need to send leads to multiple destinations?
For example:
CRM
Slack notification
Google Sheet backup
Contact Form to Any API lets you create multiple integrations from the same form — just duplicate your endpoint and route the data where you need it.
💡 Real-World Examples
1. Send Leads to HubSpot
Use HubSpot’s API endpoint /crm/v3/objects/contacts
Add a Bearer token in the header
Map form fields to HubSpot fields like firstname, email, phone
2. Send Leads to Slack
Use the Slack Incoming Webhook URL
Format the payload like:
json
CopyEdit
{
"text": "New Lead: {{name}}, {{email}}, {{message}}"
}
3. Send Leads to Notion
Use the Notion API to create a new page in a database
Authenticate with a Bearer token
Convert form fields to the Notion schema format
🔐 Security Best Practices
Use HTTPS for all endpoints
Validate fields (email, phone) before sending to API
Add CAPTCHA to your contact form to prevent spam
Monitor error logs and webhook failures
📈 What Happens Next?
Once your form is integrated with Contact Form to Any API, you can:
Track and store every submission
Build automations on top of your CRM (email sequences, sales tasks)
Analyze lead sources using UTM fields
Respond faster and close deals quicker
🏁 Conclusion
In today’s fast-moving digital world, speed and automation win. Manually processing leads slows you down, increases error rates, and leads to lost revenue.
With Contact Form to Any API, you can connect any form to any system — instantly and reliably. Whether you’re a solopreneur, agency, or SaaS team, this tool helps you create a seamless lead capture flow that scales with your growth.
0 notes
Text
SEO for Developers: Technical Tips to Boost Your Website’s Ranking
As a developer, you might think SEO (Search Engine Optimization) is a marketer’s job. But the truth is, technical SEO is the backbone of every high-ranking website—and it’s your expertise that ensures search engines can crawl, index, and understand your site. At Coding Nectar (codingnectar.com), we’ve helped countless developers bridge the gap between code and visibility. Here’s how to optimize your website’s technical foundation for better rankings.
1. Start with a Lightning-Fast Website
Page speed isn’t just a ranking factor—it’s a user experience game-changer. Google prioritizes fast-loading sites, and studies show that 53% of users abandon pages that take longer than 3 seconds to load.
What to do:
Compress Images: Use modern formats like WebP and tools like Squoosh or ImageOptim.
Minify Code: Remove unnecessary characters from HTML, CSS, and JavaScript.
Leverage Caching: Implement browser and server-side caching (e.g., Redis, Varnish).
At Coding Nectar, we use automated build tools like Webpack to bundle and optimize assets during deployment. For example, lazy-loading images with <img loading="lazy"> can cut load times by 20-30%.
2. Master Mobile-First Indexing
Google now uses mobile-first indexing, meaning it primarily crawls the mobile version of your site. If your site isn’t responsive, you’re invisible to most search traffic.
What to do:
Test Responsiveness: Use Chrome DevTools or Google’s Mobile-Friendly Test.
Avoid CSS/JS Blockers: Ensure critical resources load first.
Use Fluid Layouts: Replace fixed pixels with rem, em, or % units.
Pro Tip: At codingnectar.com, we design all client projects with mobile-first frameworks like Tailwind CSS to ensure seamless responsiveness.
3. Fix Crawlability Issues
Search engines rely on crawlers to index your site. If they hit roadblocks, your content won’t rank.
What to check:
robots.txt: Ensure you’re not accidentally blocking critical pages.
XML Sitemap: Generate and submit a sitemap via Google Search Console.
HTTP Status Codes: Fix 404s (broken links) and 301-redirect old URLs.
Example: A client at Coding Nectar saw a 40% traffic boost after we fixed crawl errors caused by misconfigured rel=canonical tags.
4. Structure Data with Schema Markup
Schema markup helps search engines understand your content, increasing chances of earning rich snippets (e.g., star ratings, FAQs).
What to add:
JSON-LD: Embed structured data for articles, products, or events.
Breadcrumbs: Improve navigation and SEO with BreadcrumbList schema.
Tool Recommendation: Use Google’s Structured Data Testing Tool to validate your markup.
5. Optimize for Core Web Vitals
Google’s Core Web Vitals measure user experience through metrics like:
LCP (Largest Contentful Paint): Load time for the main content.
FID (First Input Delay): Time until the site becomes interactive.
CLS (Cumulative Layout Shift): Visual stability during loading.
What to do:
Prioritize above-the-fold content.
Defer non-critical JavaScript.
Use font-display: swap to prevent layout shifts from fonts.
Case Study: After optimizing Core Web Vitals for a SaaS platform, Coding Nectar reduced their CLS score by 75%, boosting organic traffic by 28% in 3 months.
6. Secure Your Site with HTTPS
HTTPS is a non-negotiable ranking signal. It encrypts data and builds user trust.
Steps:
Buy an SSL certificate (many hosts offer free Let’s Encrypt integration).
Force HTTPS by redirecting HTTP traffic via .htaccess or NGINX configs.
Update internal links to use https://.
7. Audit Regularly with SEO Tools
SEO isn’t a one-time task. Use tools like:
Google Search Console: Track performance and errors.
Ahrefs/Screaming Frog: Analyze backlinks and technical issues.
Lighthouse: Audit performance, accessibility, and SEO.
Pro Tip: Coding Nectar offers custom SEO audits (codingnectar.com/seo-audit) to identify hidden issues like duplicate meta tags or slow API calls.
Final Thoughts
Technical SEO isn’t about chasing algorithms—it’s about building websites that are fast, accessible, and easy for search engines to love. By focusing on speed, mobile optimization, structured data, and regular audits, you’ll create a foundation that drives organic growth.
At Coding Nectar (codingnectar.com), we blend cutting-edge development with SEO best practices to help businesses rank higher and convert better. Ready to optimize your site? Let’s turn your code into a traffic magnet.
1 note
·
View note
Text
Updating HTML Websites: A Beginner's Guide
Maintaining a current and engaging website is essential for any online presence, but updating an HTML website can feel daunting for beginners. The good news is that even non-technical users can make meaningful updates with a few basic steps. This guide will walk you through how to update my HTML website easily, covering everything from understanding the basics of HTML to making content and SEO adjustments to keep your site relevant and optimized.

Understanding HTML Basics
Before diving into updates, it's essential to familiarize yourself with the structure of HTML (HyperText Markup Language). HTML serves as the backbone of your website, and understanding a few key elements will make editing much easier.
Tags and Elements: HTML uses tags to define elements on a page. Common examples include:
: Denotes a paragraph of text.
to : Headings, with being the largest and the smallest.
: Creates hyperlinks.
: Embeds images.
Structure: HTML pages are typically structured with a section (containing meta information) and a section (containing visible content).
For beginners, recognizing these essential components will help you confidently identify and edit the right sections of your website.
Using the Right Tools
Editing HTML code doesn't require sophisticated software. There are several beginner-friendly tools available to make the process more intuitive:
Notepad++: A free text editor that supports syntax highlighting, making it easier to spot tags and errors.
Visual Studio Code: A versatile editor with features like autocomplete and extensions to streamline coding tasks.
Sublime Text: Known for its simplicity and efficiency, it is perfect for lightweight HTML editing.
These tools help you locate specific lines of code and preview changes before they go live, reducing the risk of mistakes.
Updating Text and Images
One of the most common updates to an HTML website involves changing text or replacing outdated images. Once you locate the right section in the code, these edits are straightforward.
Editing Text:
Open your HTML file in your chosen editor.
Locate the or tags containing the text you want to update.
Replace the text between the opening and closing tags.
html
<p>Welcome to our website!</p>
Change to:
html
<p>Welcome to our newly updated website!</p>
Replacing Images:
Locate the tag in the HTML code.
Update the src attribute to point to the new image file.
html
<img src="old-image.jpg" alt="Old Image">
Change to:
html
<img src="new-image.jpg" alt="Updated Image">
These simple edits ensure your content stays relevant and visually appealing.
Adding or Modifying Links
Links are critical to website navigation. Updating outdated links or adding new ones is another beginner-friendly task.
Modifying Existing Links:
Look for the tag in your code.
Update the URL within the quotation marks.
html
<a href="http://oldsite.com">Visit Us</a>
Change to:
html
<a href="http://newsite.com">Visit Us</a>
Adding New Links:
Insert a new tag in the desired location within your code.
html
<p>Check out our <a href="http://newblog.com">latest blog post</a>.</p>
Regularly checking and updating links ensures a seamless user experience and avoids the frustration of broken links.
Basic SEO Edits
Improving your website's visibility on search engines doesn't require an SEO expert. Minor tweaks to meta tags and content can make a big difference.
Update Meta Tags:
Locate the tags in your HTML file's section.
Update the name and content attributes to reflect relevant keywords.
html
<meta name= "description" content=" Learn how to update my HTML website easily with this beginner-friendly guide.">
Add Alt Text for Images:
Ensure all tags include a descriptive alt attribute.
html
<img src="product.jpg" alt="High-quality product image">
Refresh Titles:
Update the tag in the <head> section to match current content.
html
<title>Beginner's Guide to HTML Updates</title>
By making these simple adjustments, you can improve your site's ranking and accessibility.
Testing and Saving Changes
Before publishing updates, previewing your changes and testing for accuracy is crucial.
Preview in Browser:
Save your updated HTML file and open it in a web browser to check how it looks and functions.
Test all links and interactive elements to ensure they work correctly.
Backup Your Original File:
Always create a backup of your original HTML file before making changes. This allows you to revert to the previous version if something goes wrong.
Publish Updates:
Once satisfied with the changes, upload the updated HTML file to your hosting server using tools like FileZilla or your hosting provider’s file manager.
This careful approach minimizes errors and ensures a smooth user experience.
Taking Control of Your Website
Learning how to update my HTML website easily empowers beginners to maintain their sites confidently. Whether updating text, enhancing SEO, or replacing visuals, mastering these basics keeps your site fresh and relevant. With regular practice and the right tools, you can transform your website into a dynamic platform that meets your goals and engages your audience.
Take the first step today, and see how minor, consistent updates can make a big difference in your online presence!
0 notes
Text
Supercharge Your Lead Management: A Step-by-Step Guide to Web-to-Lead Automation with Zoho CRM
Effective lead management is essential for business success. It’s not just about generating leads; properly managing and nurturing these leads can transform them into loyal customers.

Streamlining this process becomes more efficient when you combine web-to-lead functionality with a powerful CRM like Zoho CRM and automation capabilities like Zoho Flow. This comprehensive guide will walk you through each component, providing technical insights and actionable steps to optimise your lead management strategy.
How to Boost Lead Management Using Web-to-Lead Automation
Understanding Web-to-Lead
Web-to-lead is an effective way for businesses to capture leads directly from their websites. Whenever a visitor expresses interest—whether through a form, resource download, or newsletter signup—this data is automatically added to your CRM. This automation simplifies lead generation and ensures timely follow-up.
Key Benefits:
Efficiency: Automated data capture reduces manual effort.
Accuracy: Eliminates errors associated with manual entry.
Real-Time Data: Instant recording enables timely responses.
Improved Lead Nurturing: Quick access to leads facilitates better communication.
Setting Up Zoho CRM Web Forms
Creating web forms in Zoho CRM is a straightforward process:
Login to Zoho CRM: Access the setup from the top-right corner, and navigate to the Developer Space, where you'll find Web Forms.
Create a Web Form: Select the module, such as Leads, and drag-and-drop essential fields like Name, Email, and Phone Number.
Customise Your Form: Tailor fields to your needs, ensuring key information is captured.
Add Form Details: Give your form a descriptive name and add appropriate tags.
Embed the Form: Copy and paste the form’s code into your website's HTML.
Test and Use: Ensure your form is working correctly by testing various scenarios.
Integrating Zoho CRM with Your Lead Management Strategy
Once your web form is functional, you can integrate it into your lead management strategy with Zoho CRM. Zoho CRM not only acts as a data warehouse but also helps manage customer interactions, sales, and marketing efforts.
Zoho CRM Features:
Lead Management: Track, score, and nurture leads through the sales funnel.
Sales Automation: Automate tasks like follow-up, lead assignment, and reminders.
Reporting: Create analytical reports and track performance metrics.
Automating Workflows with Zoho Flow
Zoho Flow allows you to automate repetitive tasks, ensuring leads are managed efficiently. With Zoho Flow, you can connect different apps and automate actions like sending notifications to the sales team when a new lead is created.
Setting Up Zoho Flow:
Create a Flow: Choose Zoho CRM as the trigger application and set events like “New Lead Created.”
Select an Action Application: Automate actions like sending Slack messages or updating Google Sheets.
Test the Flow: Ensure the automation works as intended by generating test leads.
Advanced Automation Techniques
For more advanced needs, custom coding can help enhance your automation efforts. For example, you can create a Deluge script to track UTM parameters from leads to measure the effectiveness of marketing campaigns.
Best Practices for Lead Management Automation
To ensure your lead management process remains effective:
Review automation flows regularly.
Keep CRM data clean and up-to-date.
Personalise communication even after automation.
Track metrics like conversion rates and lead response times.
Train your team on Zoho CRM and Zoho Flow to maximise potential.
Real-World Example: XYZ Digital Marketing
XYZ Digital Marketing, a fast-growing agency, struggled with manual lead management. By implementing Zoho CRM and Zoho Flow, they automated the process, reducing response times from 48 hours to just one hour and increasing conversion rates by 30%. Their sales team saved time on data entry, allowing them to focus on nurturing relationships and closing deals.
Conclusion
Effective lead management can make or break an organisation in today's competitive landscape. By integrating web-to-lead functionality with Zoho CRM and automating workflows with Zoho Flow, businesses can streamline their operations, nurture leads, and drive sustainable growth. Whether you're running a small business or a large corporation, utilising these tools will position you for success in your lead generation and management efforts.
Ready to optimise your lead management process? Connect with IT Solutions Solved today to get started!
0 notes
Text
No.1 Wordpress Development Services Company In Rajkot, India | Devweb Technology

Students who enrol in the Devweb Technology wordpress development course receive the fundamental knowledge they need to build websites and begin their journey into the profession. Our Wordpress Development Services starts from the very beginning and offers hands-on experience creating websites. Our centres offer a Devweb Technology best wordpress development services in rajkot. For a free trial session, get in touch with our centres right now. We offer the best wordpress development services for college students in rajkot.
What is Wordpress Development?
WordPress is one of the most versatile and user-friendly content management systems (CMS) available today. It powers millions of websites, ranging from simple blogs to complex e-commerce platforms. For developers, WordPress offers a robust framework that allows for extensive customization and functionality enhancement. This guide delves into key aspects of WordPress development, providing essential insights to help you create dynamic and engaging websites.
WordPress Basics
WordPress is built on PHP and MySQL, which work together to create a powerful and dynamic web platform. PHP handles the server-side scripting, while MySQL manages the database where all the content and settings are stored. HTML and CSS are used to structure and style the content, making it visually appealing.
Themes and Templates
One of the most exciting aspects of WordPress development is working with themes and templates. Themes control the overall look and feel of a website, while templates are individual files within a theme that determine the layout of specific pages or sections.
1. Theme Structure
A typical WordPress theme consists of several key files:
style.css: This File features the CSS Styles For The Theme.
index.php: The main template file for displaying the content.
header.php: Contains the code for the header section.
footer.php: The footer.php file contains the code for the footer section.
functions.php: Allows you to add custom functions to your theme.
2. Template Hierarchy
WordPress uses a template hierarchy to determine which template file to use for different types of content. For example, single posts use single.php, pages use page.php, and the blog index uses index.php. Understanding this hierarchy is crucial for customizing your theme effectively.
Widgets and Menus
Widgets and menus are essential components of WordPress that help enhance the user experience.
1. Widgets
Widgets are small blocks of content that can be placed in various widget areas of a theme, such as sidebars and footers. WordPress comes with several built-in widgets, and you can also create custom widgets to display specific content.
2. Menus
Menus are used to create navigation links for your site. WordPress supports multiple menus, allowing you to create custom navigation structures for different sections of your website. You can manage menus through the WordPress dashboard and assign them to different locations within your theme.
Custom Post Types and Taxonomies
WordPress allows you to create custom post types and taxonomies to organize your content in meaningful ways.
1. Custom Post Types
Custom post types extend the default post types (posts and pages) to include different kinds of content. For example, you can create a custom post type for products in an e-commerce site or portfolio items for a portfolio website.
2. Custom Taxonomies
Custom taxonomies are used to categorize and tag custom post types. They work similarly to categories and tags for posts but provide more flexibility. For example, you can create a custom taxonomy called “Genres” for a custom post type called “Books.”
Shortcodes
Shortcodes are small code snippets that allow you to embed content within posts, pages, and widgets easily. They are incredibly powerful and can be used to add dynamic content without writing complex code.
Page Builders
Page builders are tools that allow you to create complex page layouts using a drag-and-drop interface. They are especially useful for users who don’t have extensive coding knowledge. Elementor, Beaver Builder, and Divi are some of the most popular WordPress page builders.
E-commerce Integration
WordPress can be easily transformed into a full-fledged e-commerce platform using plugins like WooCommerce. WooCommerce is the most popular e-commerce plugin for WordPress, offering a range of features to create and manage an online store. It supports product listings, shopping carts, payment gateways, and much more.

Follow US: Facebook: https://www.facebook.com/devwebtechnology Instagram: https://www.instagram.com/devwebtechnology Email: [email protected] website: https://www.devwebtechnology.com For Whatsapp click here-https://wa.me/+917016892290 Contact Us:+(91)7016892290
#wordpress#development#developer#wordpressdevelopment#wordpressblog#wordpressdevelopmentjobs#wordpressdevelopmentinternship#wordpresswebsite#wordpressexperts#ecommerce#wordpressdeveloper#digitalagency#wordpressblogger#wordpressdesign#wordpresstheme#wordpressthemes#wordpresstips#wordpressdesigner#wordpressseo#wordpresswebsites#wordpressplugin#wordpresshelp#wordpressthemedevelopment#wordpressbloggers#wordpressblogs#wordpresswebsitedesign#wordpresstraining#wordpressoptimization#wordpressphoto#wordpresstip
0 notes
Text
How to Embed Secure Videos on Your Website Using HTML5

The role of video in online content has never been more significant. Whether running an e-learning platform, an e-commerce site, or a content-driven blog, embedding videos can drastically enhance user engagement and convey complex information more effectively. With the rise of HTML5, embedding videos on websites has become more seamless, secure, and accessible. In this guide, we’ll walk you through everything you need to use an HTML5 video player on your website. We'll cover everything from the basics of HTML5 video integration to advanced features and the latest trends to ensure your website delivers a top-notch video experience. What is an HTML5 Video Player? HTML5 video players are the standard for embedding video content on websites today. Unlike previous technologies like Flash, HTML5 is natively supported by all modern browsers, making it the preferred choice for web developers. The HTML5 element allows you to embed a video without additional plugins, providing a smoother, faster, and more secure video experience. Why Choose HTML5 for Video Playback? Cross-Platform Compatibility One of the key advantages of HTML5 is its cross-platform compatibility. HTML5 videos can be played across all modern browsers and devices, including desktops, tablets, and smartphones. This ensures that your content reaches the widest possible audience without technical barriers. Improved Security HTML5 is more secure than legacy technologies like Flash, often prone to vulnerabilities and exploits. With the addition of Digital Rights Management (DRM) and encrypted video streams, HTML5 video players can offer high content protection, making it ideal for businesses concerned with piracy and unauthorized access. Faster Load Times HTML5 video players are optimized for faster load times, crucial in maintaining user engagement and reducing bounce rates. The lightweight nature of HTML5 ensures that your videos load quickly, even on slower internet connections, providing a better user experience. Customizability HTML5 video players offer extensive customization options, allowing you to tailor the video player’s appearance and functionality to match your website’s branding and user experience goals. HTML5 provides the flexibility to create a unique video experience, from custom controls to interactive features. How to Embed an HTML5 Video Player on Your Website Embedding an HTML5 video player on your website is straightforward. Here’s a step-by-step guide: Step 1: Prepare Your Video File Before embedding your video, ensure it’s in a web-friendly format. The most commonly supported formats for HTML5 are MP4, WebM, and Ogg. MP4 is the most widely used format due to its compatibility with most browsers and devices. Video Compression: Compress your video files without losing quality to reduce load times. Tools like HandBrake or Adobe Media Encoder can help you optimally balance file size and quality. Step 2: Write the HTML Code Once your video is ready, you can embed it using the following HTML code: Your browser does not support the video tag. In this code: Width and height: Define the dimensions of your video player. Controls: Adds play, pause, volume, and other controls to the video player. Source src: Specifies the video file’s location and format. Alternative Text: Always include alternative text like "Your browser does not support the video tag" to inform users if their browser doesn’t support HTML5. Step 3: Customize the Video Player HTML5 allows for extensive customization of the video player. You can use CSS to style the video player’s controls or JavaScript to add interactive features like subtitles, playlists, or chapter markers. Styling with CSS: Customize the appearance of your video player with CSS. For example, you can hide or style the default controls to match your site’s design better. Adding Captions: Enhance accessibility by adding captions or subtitles using the element in HTML5. This ensures your content is inclusive and complies with accessibility standards. Advanced Features of HTML5 Video Players While the basic setup is sufficient for many use cases, leveraging advanced features can take your video experience to the next level: DRM and Video Security For businesses that need to protect their video content, HTML5 supports advanced DRM solutions like Widevine, FairPlay, and PlayReady. These technologies ensure only authorized users can access your content, making it ideal for premium video services or educational platforms. VdoCipher Integration: VdoCipher provides an out-of-the-box DRM solution for HTML5 video players. By integrating VdoCipher, you can secure your videos with encryption and watermarking, preventing unauthorized downloads and screen recording. Adaptive Bitrate Streaming Adaptive bitrate streaming is a technology that adjusts the video quality in real time based on the viewer’s internet connection. This ensures smooth playback and minimizes buffering, even on slow networks. HLS and DASH: Implement adaptive streaming protocols like HLS (HTTP Live Streaming) or DASH (Dynamic Adaptive Streaming over HTTP) to deliver a seamless video experience across different devices and network conditions. Google Analytics Integration: Use Google Analytics to track video performance metrics directly within your existing analytics dashboard. This lets you understand how your videos contribute to overall site performance. Best Practices for Using HTML5 Video Players To get the most out of your HTML5 video player, follow these best practices: Optimize Video Loading Ensure your videos load quickly using a content delivery network (CDN) and optimizing file sizes. A fast-loading online video player improves user experience and boosts your site’s SEO. Lazy Loading: Implement lazy loading for videos that are below the fold. This technique delays loading the video until the user scrolls to it, reducing initial load times and improving page speed. Enhance Accessibility Make your videos accessible to a broader audience by adding captions, transcripts, and audio descriptions. This not only complies with accessibility standards but also improves user experience for all viewers. Keyboard Navigation: Ensure your video player is fully navigable via keyboard for users with disabilities. This includes providing keyboard shortcuts for essential controls like play, pause, and volume adjustment. Regularly Update and Test As with any web technology, it’s essential to regularly update your video player to ensure compatibility with the latest browsers and devices. Regular testing across different platforms will help you catch any issues before they affect your users. Browser Testing: Test your video player on all major browsers and devices to ensure consistent performance. Tools like BrowserStack can help you automate this process. Conclusion HTML5 has revolutionized how videos are delivered online, offering a secure, fast, and customizable solution for embedding videos on your website. Whether you want to enhance user engagement, protect your content, or optimize for SEO, an HTML5 video player is the way to go. Following the steps and best practices outlined in this guide, you can create a seamless video experience that captivates your audience and drives results. Read the full article
0 notes
Text
HTML Media

HTML supports various media elements like images, audio, and video, allowing you to embed rich content directly into your web pages. Let’s explore how to use these elements in HTML.
1. Images
Images are embedded using the <img> tag. This tag is self-closing and requires the src attribute to specify the image source.
Basic Image Example
<img src="image.jpg" alt="Description of the image">
src: Specifies the path to the image file.
alt: Provides alternative text for the image, useful for accessibility and in cases where the image cannot be displayed.
Adding Image Width and Height
<img src="image.jpg" alt="Description of the image" width="500" height="300">
width and height: Set the dimensions of the image in pixels.
Linking Images
You can make an image clickable by wrapping it inside an <a> tag:<a href="https://www.example.com"> <img src="image.jpg" alt="Clickable image"> </a>
2. Audio
HTML provides the <audio> tag to embed sound files. You can also include multiple audio sources within this tag to support different formats.
Basic Audio Example
<audio controls> <source src="audio.mp3" type="audio/mpeg"> <source src="audio.ogg" type="audio/ogg"> Your browser does not support the audio element. </audio>
controls: Adds playback controls (play, pause, volume).
<source>: Specifies the path to the audio file and its format.
3. Video
The <video> tag is used to embed videos. Like the <audio> tag, it can also include multiple sources.
Basic Video Example
<video width="640" height="360" controls> <source src="video.mp4" type="video/mp4"> <source src="video.ogg" type="video/ogg"> Your browser does not support the video tag. </video>
width and height: Set the dimensions of the video.
controls: Adds video controls (play, pause, volume, fullscreen).
<source>: Specifies the video file path and format.
Autoplay, Loop, and Muted Attributes
<video width="640" height="360" autoplay loop muted> <source src="video.mp4" type="video/mp4"> </video>
autoplay: Automatically starts playing the video when the page loads.
loop: Replays the video continuously.
muted: Mutes the video by default.
4. Embedding YouTube Videos
You can embed YouTube videos using the <iframe> tag.
Example
<iframe width="560" height="315" src="https://www.youtube.com/embed/VIDEO_ID" frameborder="0" allowfullscreen></iframe>
src: The URL of the YouTube video.
width and height: Set the dimensions of the embedded video.
frameborder: Removes the border around the iframe.
allowfullscreen: Allows the video to be viewed in fullscreen mode.
5. Media Attributes and Accessibility
Accessibility Considerations
alt Attribute for Images: Always provide descriptive alt text for images.
captions and subtitles: Add subtitles or captions for video content using the <track> tag.
<video controls> <source src="video.mp4" type="video/mp4"> <track src="subtitles_en.vtt" kind="subtitles" srclang="en" label="English"> </video>
kind: Specifies the type of track (subtitles, captions, etc.).
srclang: Language of the subtitles.
label: Label for the track, often shown in the video player.
6. Responsive Media
To make media elements responsive, use CSS to control their size relative to their container:img, video { max-width: 100%; height: auto; }
This ensures that images and videos scale down to fit within the layout on smaller screens, maintaining their aspect ratio.
Key Takeaways
Images: Use the <img> tag with src and alt attributes to embed images.
Audio: Use the <audio> tag with source elements to embed sound files and provide playback controls.
Video: Use the <video> tag with source elements to embed videos and provide controls for playing, pausing, and more.
Embedding External Media: Use <iframe> to embed content like YouTube videos.
Accessibility: Always consider adding captions, subtitles, and descriptive alt text for better accessibility.
These basic media elements allow you to create rich, multimedia web experiences directly within your HTML content.
Read More…
0 notes
Text
Creating Responsive Drupal Websites: Ensuring Your Site Looks Great on All Devices

In today’s digital landscape, ensuring that your website is responsive is crucial for providing an optimal user experience across various devices and screen sizes. Drupal offers powerful tools and features to create responsive websites that adapt seamlessly to desktops, tablets, and smartphones. This guide will walk you through the essential steps and best practices for creating responsive Drupal websites.
1. Understanding Responsive Design
Responsive design ensures that your website’s layout adjusts and scales to fit different screen sizes and orientations. This approach enhances usability and accessibility, leading to better user engagement and improved SEO.
2. Choosing a Responsive Drupal Theme
2.1. Selecting a Responsive Theme
Theme Directory:
Start by exploring Drupal’s theme directory for responsive themes. Look for themes specifically marked as "responsive."
Key Features to Look For:
Mobile-Friendly Layouts: Ensure the theme adapts well to various screen sizes.
Flexible Grids: The theme should use a fluid grid system that adjusts content dynamically.
Media Queries: Check if the theme uses CSS media queries to adjust styles based on screen size.
Recommended Responsive Themes:
Bartik: A core theme with responsive design and clean layout.
Olivero: A modern, accessible theme included in Drupal core that is responsive and mobile-friendly.
Bootstrap: A theme based on the popular Bootstrap framework, known for its responsive design and customizability.
3. Configuring Responsive Layouts
3.1. Using Layout Builder
Enable Layout Builder:
Navigate to Extend and enable the Layout Builder module.
Access Layout Builder:
Go to Structure > Content types > [Your Content Type] > Layout to manage layouts for specific content types or pages.
Design Responsive Layouts:
Add and configure blocks and sections within the Layout Builder. Ensure layouts adjust well on different devices by using the responsive settings.
3.2. Customizing Layouts with CSS
Use Media Queries:
Implement CSS media queries to control the layout and appearance of elements based on screen size.
Example: css Copy code @media (max-width: 768px) { .my-class { font-size: 14px; } }
Responsive Grid Systems:
Utilize responsive grid systems like Bootstrap’s grid or CSS Grid to create fluid and adaptive layouts.
4. Optimizing Images and Media
4.1. Responsive Images
Use Image Styles:
Go to Configuration > Media > Image styles to create responsive image styles.
Configure image styles for different sizes and devices.
Implement srcset Attribute:
Use the srcset attribute in <img> tags to provide different image resolutions for different devices.
Example: html Copy code <img src="image.jpg" srcset="image-small.jpg 480w, image-medium.jpg 800w, image-large.jpg 1200w" sizes="(max-width: 600px) 480px, (max-width: 1200px) 800px, 1200px" alt="Description">
4.2. Video and Media Management
Responsive Embeds:
Ensure videos and other media are responsive. Use CSS to make embedded media adapt to different screen sizes.
Example: css Copy code .responsive-embed { position: relative; padding-bottom: 56.25%; height: 0; overflow: hidden; max-width: 100%; background: #000; } .responsive-embed iframe { position: absolute; top: 0; left: 0; width: 100%; height: 100%; }
5. Testing and Debugging Responsiveness
5.1. Browser Developer Tools
Responsive Design Mode:
Use browser developer tools (e.g., Chrome DevTools) to test how your site looks on various devices and screen sizes.
Access responsive design mode by pressing Ctrl+Shift+M (Windows) or Cmd+Option+M (Mac).
Check for Breakpoints:
Ensure your site adjusts correctly at different breakpoints. Verify that all elements are visible and usable on small and large screens.
5.2. Manual Testing
Test on Actual Devices:
Test your site on real devices to ensure the user experience is consistent across different platforms.
Use Online Testing Tools:
Utilize online tools like BrowserStack or Responsinator to test responsiveness across various devices and screen sizes.
6. Performance Optimization for Responsive Sites
6.1. Minimize Resource Loading
Optimize Images:
Use compressed and appropriately sized images to reduce load times.
Enable Caching:
Implement caching strategies to improve page load times. Use Drupal’s built-in caching options or modules like Boost.
6.2. Use Content Delivery Networks (CDNs)
Implement CDN:
Utilize CDNs to distribute your site’s static resources (e.g., images, scripts) across multiple servers, reducing latency and improving load times.
7. Best Practices for Responsive Design
Design Mobile-First:
Start designing for mobile devices first, then scale up to larger screens. This approach ensures that your site is optimized for the smallest screen sizes.
Prioritize Usability:
Ensure that navigation, forms, and interactive elements are easy to use on all devices. Test usability to identify and address potential issues.
Keep Layouts Simple:
Avoid overly complex layouts that may not adapt well to smaller screens. Aim for clean, simple designs that work across devices.
Regularly Update and Maintain:
Keep your themes, modules, and Drupal core updated to ensure compatibility with new devices and browser updates.
Conclusion
Creating a responsive Drupal website involves selecting a responsive theme, configuring responsive layouts, optimizing images and media, and thoroughly testing your site across different devices. By following best practices and leveraging Drupal’s built-in tools and features, you can ensure that your website provides a seamless and engaging experience for users on all devices. Regularly update and maintain your site to keep up with evolving web standards and technologies.
Hire a Drupal Developer Hire Drupal Web Developers Drupal Website Development Company
Drupal Developers Drupal Agency Drupal Development CompanyFreelance Drupal Developer
Drupal Development Agency Drupal Development Services Drupal Development Firm Drupal Web Agency Drupal Website Developer Drupal Consulting Services Find Drupal Developer
Drupal Web Development Company Drupal Companies Drupal Web Design Agency
Drupal Web Development Agency Hire Dedicated Drupal Developers Drupal Web Development Services Best Drupal Developers Drupal Digital Agency Drupal Web Design Company
Top Drupal Development Companies Drupal Developer Company Drupal Web Design Services
Drupal Development Shop Best Drupal Development Companies Drupal SEO Company
Drupal Website Company Hire Drupal Programmers Top Drupal Companies Best Drupal Agencies Hire Drupal Expert Best Drupal Development Agency Companies That Build Drupal Websites
Dedicated Drupal Developers in India Drupal 8 Development Company Drupal 8 Enterprise Web Development Drupal 9 Development Company Drupal Agency Near Me Drupal Agency Website
Drupal CMS Development Company Drupal CMS Development Services Drupal Consulting Company
Drupal Design Agency Drupal Design Company Drupal Developers Near Me Drupal Development Consulting Company Drupal Development Services Providers Drupal Ecommerce Agency
Drupal Ecommerce Development Services Drupal Experts for Hire Drupal Migration Company
Drupal Module Development Services Drupal SEO Agency Drupal Support Company Drupal Web Company Drupal Web Design Firm Drupal Web Design Firms Drupal Web Design Services Providers
Drupal Web Design Studio Drupal Web Developer Company Drupal Web Development Firm
Drupal Web Development Service Provider Drupal Web Development Services Company
Drupal Web Expert Drupal Website Design Company Drupal Website Development Services
Enterprise Drupal Development Expert Drupal Developers Expert Drupal Programmer
Expert Drupal Web Developer Hire Dedicated Drupal Developer Hire Drupal Designers
Outsource Drupal Development Top Drupal Developers Top Drupal Experts Web Agency Drupal
#drupal development services#hire drupal ajency#hire drupal coders#hire drupal developers#hire drupal experts#hire dedicated drupal developer#expert drupal web developer
1 note
·
View note
Text
How to Write JavaScript
JavaScript is a powerful and versatile programming language used widely in web development. This guide provides beginners with the basic steps necessary to start writing JavaScript code and emphasizes how it can be used to develop dynamic functionalities such as an instant admin panel.
Understanding the Basics
Before diving into JavaScript, it's essential to have a grasp of HTML and CSS, as these technologies work together to create interactive web pages. JavaScript can manipulate the elements and styles defined by HTML and CSS, making it a critical tool for dynamic web applications.
To start writing JavaScript, you can embed the code directly within an HTML document using the <script> tag or link to an external JavaScript file. This separation of concerns promotes cleaner code, easier maintenance and better performance.
Working with Functions and Events
JavaScript functions are blocks of code designed to perform particular tasks when called. Here's a simple example:
To make your webpage interactive, JavaScript uses events. Events are actions that occur as a result of the user's interaction, such as clicks, mouse movements or keyboard actions. You can set up event listeners to trigger functions, enhancing the user experience. For instance, if you're developing an instant admin panel, you might use a button-click event to fetch and display user data dynamically.
Debugging and Tools
As you write more complex JavaScript, debugging becomes crucial. Modern browsers come equipped with developer tools, which include a console where you can test and debug your JavaScript code. These tools also allow you to inspect HTML elements and view any changes made through JavaScript in real time.
With these fundamentals, you'll be well on your way to writing effective JavaScript for various applications, from adding simple animations to creating an admin panel. Practice regularly and utilize online resources to deepen your understanding and refine your coding skills.
Read a similar article about admin panel software here at this page.
0 notes