#embed tag in html for pdf
Explore tagged Tumblr posts
Visit Tumblr Blog
Explore Tumblr blogs with no restrictions, modern design and the best experience.
Last Seen Tumblr Blogs


Fun Fact
In 2020, 44% of users from Denmark used Tumblr daily.
Text
Hi, this is Creative School. Today we share with you how to generate PDF documents from any website. If you want to develop a website and want to provide PDF downloading features, you are exactly in the right place. This video will help you to insert a PDF generator feature in your website on any page of any specific size and shape. GitHub Link: https://github.com/BorhanHosen/How-to-add-pdf-file-download-option-in-your-website.git 0:00 Explanation 3:10 Intro 3:39 Explaining Puppeteer 7:12 Server Side Code Explanation 15:01 Client Side Code Explanation 26:21 Final Touch 28:18 Outro Here are some of our previous tutorial links. You can watch and learn new things and techniques. Enjoy them: How to Send Data from HTML Form Data to Google Sheets | Creative School https://youtu.be/A4TPkOw2Ess Mastering Full Invoice Inventory Management in Microsoft Excel | Creative School Tutorial https://youtu.be/f8BTxan1QTo Motion Graphics in PowerPoint Full Playlist: https://youtube.com/playlist?list=PLsWfHxHIjBT87YgBulwX6X-bnEk4TayQu How to Create the Best Animated Info-graphic in PowerPoint [Part-1] 2020 || Creative School || https://youtu.be/rV-mykyBQIM Awesome Flat Intro Animation In PowerPoint Part 2 || Creative School || https://youtu.be/TafoVSYadEg The Night Sky with a Mountain, fountain, a tree, Bird & Moon Creating in PowerPoint || Creative School || https://youtu.be/jyCTlxJrGyg SAMSUNG Galaxy Boot Animation in PowerPoint [Full Tutorial- 2020] https://youtu.be/pqh-P1mUNp8 How to make an intro video of 10-minute school in PowerPoint 2020. [Part 1] https://youtu.be/I1xObR_SVco Water Animation In PowerPoint Animation! || Creative School https://youtu.be/WfzKTzbGVRA How to add pdf file #download option in your #website https://youtu.be/cNhQ-0VBt5A ===HashTags=== #reactjs #creativeschool #pdfconversion #html #nodejs #vscode #website #javascript #convertpdf #generatepdf #pdfconverter #downloadpdf #puppeteers #mernstack #javascript ===Related Tags=== react pdf generator, generate pdf using react, generate pdfs from html & css with nodejs using puppeteer, certificate generator website, how to create a pdf file using reactjs, html to pdf using javascript, generate pdf from html, generate pdf using javascript, how to add pdf object on a website, how to convert html to pdf in react app using jspdf, easy way to embed pdfs on a website, how to convert html content to pdf in react app using jspdf, generate pdf with react, how to create a pdf with node and puppeteer, generate pdfs from html & css with nodejs using puppeteer, puppeteer, getting to know puppeteer with example, get started with headless chrome and puppeteer, headless chrome and puppeteer, how to generate pdf from html with node.js, how to create a pdf file using reactjs, generate pdf using javascript, how to create pdfs with node js and react, puppeteer examples, puppeteer tutorial, puppeteer html to pdf generation with node.js,
#react pdf generator#generate pdf using react#generate pdfs from html & css with nodejs using puppeteer#certificate generator website#how to create a pdf file using reactjs#html to pdf using javascript#generate pdf from html#generate pdf using javascript#how to add pdf object on a website#how to convert html to pdf in react app using jspdf#generate pdf with react#how to create a pdf with node and puppeteer#javascript#creativeschool#mernstack#puppeteer#website#download
3 notes
·
View notes
Text
Step-by-Step Guide to Setting Up Odoo Learning Management System (LMS)
Odoo offers a powerful eLearning module that allows businesses, educators, and trainers to manage courses, lessons, quizzes, and certifications in one place. Whether you're setting up a training portal for employees or an online academy for learners, Odoo makes it easy to organize and deliver high-quality content. This step-by-step guide will walk you through how to set up your Odoo Learning Management System.
Step 1: Install the eLearning Module
To begin, you need to install the eLearning app in Odoo:
Log in to your Odoo backend with administrator rights.
Go to the Apps module.
Search for eLearning or a Learning Management System.
Click Install on the eLearning module.
Once installed, you will see a new menu called eLearning or Courses on your dashboard.
Step 2: Create a Course
After installing the module, the next step is to create your first course:
Navigate to the eLearning app.
Click Create to add a new course.
Fill in the basic course details:
Title: Name of your course.
Responsible: Assign a person or department.
Description: Write an overview of what the course covers.
Tags: Add categories to group similar courses.
Turn on or off features like Forums, Quizzes, and Certifications as needed.
Once done, click Save.
Step 3: Add Course Content (Lessons)
Courses in Odoo are structured with lessons or content blocks. Here's how to add them:
Open the course you created.
Scroll down to the Content tab.
Click Add Content.
Choose the type of content:
Document (PDF, Word files)
Video (YouTube or upload)
Quiz
Web Page (HTML content)
Enter a title, upload your content, and add any notes or instructions.
You can reorder lessons using drag and drop to match your preferred sequence.
Step 4: Create Quizzes
Quizzes help reinforce learning. To create one:
Go to the Content section of a course.
Click Add Content and select Quiz.
Name the quiz and add a short introduction if needed.
In the Questions tab, click Add a Question.
Choose question type:
Multiple choice
Single choice
Text input
Add answers and mark the correct one(s).
Quizzes can be scored, and you can define passing criteria.
Step 5: Set Up Certification (Optional)
You can provide certificates for course completion:
In the course form, enable the Certification option.
Define the criteria (e.g., complete all lessons or pass the final quiz).
Choose a certification template or create your own.
Certificates will be auto-generated and available for download in the learner's portal.
Step 6: Assign Courses to Users
You can assign users manually or allow them to enrol via the website.
Manual Assignment:
Go to the course.
Under the Participants tab, click Add.
Select users from the list.
Public Access:
Make the course Published.
Set the course as Free or Paid.
Share the link with users or embed it on your site.
Step 7: View Learner's Progress
Track how learners are engaging with your courses:
Go to the eLearning dashboard.
Click on Reports.
View:
Course completions
Quiz scores
Certification status
Time spent on lessons
You can also export reports in Excel or PDF for sharing.
Step 8: Customize the Learning Portal
Odoo allows customization of the portal interface:
Go to Website > eLearning.
Use Odoo's website builder tools to:
Customize fonts, colours, and banners
Organize course listings by categories
Add filters and search options
You can also add a blog, testimonials, or FAQ section to support learners.
Step 9: Enable Email Notifications
Keep learners informed with automated notifications:
Use Automated Actions or Marketing Automation to:
Send welcome emails
Notify learners of new content
Remind about upcoming quizzes or deadlines
Set the conditions and templates for each scenario.
Step 10: Monitor and Improve
After setup, continue improving your LMS:
Collect feedback using forms or surveys.
Analyze popular courses and content.
Update lessons regularly based on learner performance.
Offer new certifications or advanced training.
Conclusion
Odoo Learning Management System is a flexible and user-friendly tool to train employees, teach students, or deliver professional courses. With features like quizzes, certificates, progress tracking, and detailed reporting, you can build a complete learning platform that fits your business needs. Follow these steps to get started and make learning accessible, engaging, and effective for everyone involved.
#odoo learning#odoo learning software#odoo learning software management#Odoo eLearning management software#odoo#odoo app#odoo erp
1 note
·
View note
Text
HTML embed Tag
The HTML <embed> tag is used to embed external content such as a web page, image, media player, web application etc in an HTML document. This element is new in HTML5. Syntax <embed src="" /> Example <!DOCTYPE html> <html> <head> <title>HTML Embed Tag</title> </head> <body> <h2>HTML embed tag example</h2> <p>Add image using embed tag</p> <embed src="mylogo.png" style="border:1px solid #000;"…

View On WordPress
#embed#embed tag#embed tag - html 5#embed tag and attributes#embed tag by ks computer#embed tag html#embed tag html5#embed tag in html#embed tag in html example#embed tag in html for pdf#embed tag ks computer#embed tag pdf#embed tag use in html#embed video html#embed youtube video#html 5 embed tag#html embed tag#html embed youtube video#tag embed html#what is embed tag in html#youtube embed code
0 notes
Text
Oh, this guide is great!
People following this blog probably know I use the free/base Neocities plan for my fansite. I host a more than just plaintext there (some .pdfs, graphics, all sorts), and I have not come close to running up against the 1GB limit yet; if you're plaintext posting fic, it is more than enough to host anything you could possibly want. You don't have to pay a penny, as I've seen some people wonder. Trust me. You will never get close to that 1GB.
If you have any fic that is illustrated, it's also gonna cover those still images, unless you have truly enormous amounts of fanart in like, .raw format or something, LMAO. You're good.
Anyway, I want to add a few tips:
If you have new fic you want to post and which you therefore can't immediately download as HTML from AO3, or for any reason you want to post a fic to your site and not AO3, you can run it through this Google Docs script. It formats it for you; I often use it, in fact, if I have a bunch of text I need to quickly add basic HTML to for the site. It's also obviously useful for formatting to post to AO3 as originally intended, haha. This naturally won't give you the tags, rating info, etc that AO3 lets you download and include, but the fic itself will now post with all your line breaks etc included!
To upload and embed images, first you upload the image file to Neocities. This will automatically assign it a URL for where it is hosted. Then, wherever you want it in your fic, you embed it using: "< img src="[URL HERE]" >. (Remove the spaces!) Yep, that simple. Here's an example of what uploading a picture as its own file looks like in Neocities:

So that bottom image has a URL- "https://autothots.neocities.org/images/G2AutobotInsigniaAlternate.png". I would copy that URL into the tags as above and presto! It would show up on my page. I host all my images on Neocities itself, and it works great. So no need to worry about finding a host.
If anyone wants any resources for stuff relating to this, do feel free to ask, I've accumulated all sorts over the course of mashing my site together with half-remembered HTML knowledge from 2005, haha.
How To Make Your Own Fanfiction Archive, In Just Ten Easy Steps
As the go-to "person who knows about AO3" for quite a few people who read fanfic but aren't really linked-in to wider fandom culture, I've fielded a lot of questions about how to do certain things on AO3 to which my best answer is "you should really start your own archive!" I think, in general, more fans starting their own small archives would be a net good for fandom. AO3 was never meant to be the only archive for all fandom, or even the main archive, and the more spread out and backed up we are the more resilient we are.
But of course I have to be reminded that a lot of fans these days don't really have any idea how little "you should start your own archive!" really involves. (Also, that I should practice what I preach.) So I am now making my own fanfiction archive, and writing up this post as I do it to tell people how to make theirs!
Go to https://neocities.org/ and sign up for an account. It only needs a username (which will also be your website address), password, and email. Pick a username that will be related to your archive's title!
Choose the free account option (if you ever need more than what the free account offers for a text-only archive, you should probably look into graduating from neocities.) This should take you to a menu of "how to make a website" tutorials. You should do them! They're useful skills. But let's get your archive running first.
Hit the big red Edit Site button, or open the menu under your username and select "Edit Site".
Select the "Index.html" file to edit. You're now in an HTML Editor. Congrats, you're a web developer c. 1999!
Find where it has text between the < title> tags. Delete the filler text, and put in the title of your new archive. This text will be what shows on the tab when people go to your archive.
Find where it has text between the < h1 > tags. This will be big header text at the top of your page. Put the title of your archive here again. If you have no experience with HTML, you should read over the other sample text. It covers the basic basics very well! Once you've done that, you can delete everything else between the < /h1> tag and the < /body> tag. Save your index.html file.
Get an HTML file for a fanfic you would like to add to your archive. If it's on AO3, you can use the html download option built into AO3. If you have it as a word processor/google docs file, you should have the option to save as an html file. Save that html file to your computer.
Go back to Edit Site on Neocities and go to "upload". Find the html file you saved and upload it. (You can also drag and drop files to upload.)
The file you uploaded should now be showing with your other neocities files. Right-click on the title and select "copy link".
Go in to edit index.html again. Under where you put your header text, type < br> < a href=" . Then paste in the link you copied. Then type "> Then put in the title of the fic. Then type < /a> . Then save the index page again when you're done. You can do this for every fanfic you have.
Congratulations! You now have your very own personal private fanfiction archive that you are 100% in charge of and make all the rules for. It's at least as good as half the ones I was reading on when I started reading fanfiction and will serve its function well as a way to let people read your fic. You can link to it from anywhere you want! (Including your AO3 profile.)
Blogpost version, with FAQs and discussion
Anyway, here's my beautiful new fanfiction archive made using this tutorial:
Melannen's Fanfiction Archive
(I am honestly way more disproportionately proud of finally making that than I expected to be. It's nice to have your own archive.)
If you make one, share it here ! I want to see!
4K notes
·
View notes
Photo
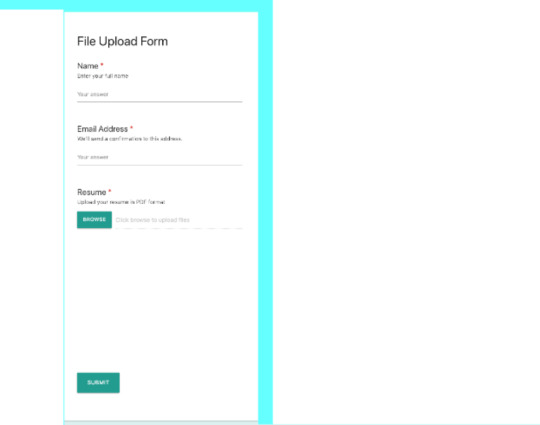
How to Create File Upload Forms on Your WordPress Site
Forms are an easy way to collect information from website visitors, and file uploads allow users to add even more useful or important information. Some of the data which you can collect from file upload forms include:
user-submitted images and videos
content in the form of blog posts
resume files
In this post, I'll show you how to create a resume upload form for a WordPress website. Users will be able to upload resume files in PDF format. By the end of this tutorial, we should have something like this.
I'll also show you how to add these uploaded files to Dropbox.
20 Best WordPress Login Forms on CodeCanyon
Sometimes you need to modify your WordPress login form to make it more user-friendly or maybe add some features. No matter your reason, here are 20 best...
Eric Dye
09 Apr 2018
WordPress
Best WordPress Form Builder Plugins for 2019
If you own a WordPress site, forms are indispensable for creating a satisfying user experience and increasing your conversion rates. You need forms for...
Lorca Lokassa Sa
01 Apr 2019
WordPress Plugins
Create a Drag-and-Drop Contact Form With the FormCraft 3 WordPress Plugin
Whether you are running an online store, marketplace, or a blog on your WordPress website, you'll need a contact form. In this article, I am going to show...
Daniel Strongin
28 Aug 2019
WordPress Plugins
Creating WordPress Forms That Get Filled In
The forms on your site are useless unless people actually complete them. Find out how to create great forms that encourage people to click submit.
Rachel McCollin
26 Jun 2019
WordPress
Drag and Drop File Uploader Add-on for Contact Form 7
The Drop Uploader add-on for Contact Form 7 is a powerful plugin that allows you to add an upload area of any format to a form. You can also add several uploading areas to one form. It also allows you to copy these uploaded files to your preferred server or to Dropbox, which provides another backup for your data.
Other features include:
Javascript (front-end) file validation
ability to restrict specific file extensions
unlimited file upload ensures you can upload files of any size
ability to drag and drop or browse during upload
styling customization including colors, browse buttons and icons
receive uploaded files as links, mail attachments or both
receive attachments as zip files
store files in Dropbox
delete old files at a specific time
The plugin is translation ready and supports English, Spanish, French, Italian, German, Russian and Ukraine
Create Your Resume Upload Form
To get started creating an upload form, first purchase and download the Drop Uploader for CF7 plugin. You can find your installable WordPress files in the download section of your account.
Once you download the WordPress files, log in to your WordPress site, and install the plugin. Go to Plugins > Add New and upload the WordPress zip file you got from CodeCanyon. After uploading, click Install Now, wait a few seconds, and then click Activate. You can now start using the plugin.
Configurations
Go to Settings > CF7 Drop Uploader Settings and customize the Drop Uploader Style and other options such as layout and file storage.
File Storage
CF7 Drop Uploader offers three ways of storing files:
Attachment: if you enable this option, all files will be archived in to zip files.
Link: this option allows you to store uploaded files as links. It also allows you to delete the files at a specified time.
Dropbox: this option allows you to integrate and add your files to Dropbox. All you need is the Dropbox token, which you can obtain from your Dropbox account. You can also generate shareable links and link them to files or folder.
Create Your First File Upload Form
Install Contact Form 7 from the official WordPress plugins directory. Once done, you can now start creating your forms. Click Contact > Add New in your WordPress Dashboard menu. Contact Form 7 comes pre-configured with a ready to use template as shown below
Click on Drop Uploader, and you should see a popup like the one below.
Mark the field type as a required field, set the Files count limit, and input Accepted file types as PDF format. Select the HTML Link checkbox if you wish to send links in HTML. Once you are done, click on Insert Tag, and all the changes are applied to the form. Rearrange the fields as you would want them to appear in your form. You can also add a message by clicking on the Drop Uploader Message tab.
The form template also contains additional fields such as checkboxes, date, and radio buttons, which you can use to make any form.
Next, go to the Mail tab and add the uploader shortcode—in my case [dropuploader-313]—to the message body and save the changes.
You can also receive the uploaded files as mail attachments by pasting the shortcode id of the uploader to the File Attachments section.
Embed Your Resume Upload Form in a Page
The final step is to embed the upload form to a WordPress page. To add the upload form, click the Add shortcode option and paste the shortcode of the contact form.
Receive Uploaded Files in Dropbox
In this section, we’ll cover how you to integrate Dropbox with your contact forms and send copies to Dropbox.
The first thing is to head to Dropbox developers and log in to your Dropbox account. Click on Create apps, select the Dropbox API option, choose the type of access you need for the API, and create a name for your app. Finally, click the Create app button. You will be redirected to the page which contains all the app’s information. Scroll to the OAuth 2 section and click on the Generate token button.
Once the token has been generated, copy and paste it to the Dropbox token section on your WordPress site.
To ensure your files will be stored in Dropbox, edit the form by enabling receiving files option. Go to the Drop Uploader tab and activate the Dropbox setting.
Save your form settings. In addition to receiving files as links in the message body, you will also receive files via Dropbox. To confirm if your file submissions have been saved to your Dropbox account, simply login to your Dropbox account and check under Apps.
Conclusion
This post has covered everything you need to get started on creating upload forms and storing your information. CF7 Drop Uploader will cater to every need, whether its for big or small files. If you are looking for a way to quickly create upload forms that automatically sends your file uploads to your Dropbox, this is an easy way to manage files and ensure safekeeping for your files. Take advantage of this awesome plugin and easily create file uploads.
WordPress
20 Best WordPress Login Forms on CodeCanyon
Eric Dye
WordPress Plugins
Best WordPress Form Builder Plugins for 2019
Lorca Lokassa Sa
WordPress
Creating WordPress Forms That Get Filled In
Rachel McCollin
WordPress
Use a Drag-and-Drop Form Builder for WordPress
Ashraff Hathibelagal
WordPress
How to Pick a WordPress Form Builder Plugin
Lorca Lokassa Sa
by Esther Vaati via Envato Tuts+ Code https://ift.tt/2WgZ5hl
1 note
·
View note
Text
Information About APE Audio Recordsdata
Start APE2MP3 Converter. FLAC is a lossless audio format that gives compression in dimension with out loss in high quality. Get MP3 sound of high-end, as a lot as 320 KBps. is a FLAC to MP3 freeware website that will convert FLAC to MP3 on-line free. Convertio is a free on-line FLAC to MP3 converter that is easy to utilize. It helps you to convert your music info fully free to WMA, MP3, AAC, WAV, FLAC, OGG, AIFF, Apple Lossless format and bunch of others. I've a bunch of ape files around 78mb every. The ape information play high-quality in VLC but after I convert the file the mp3 file shows zerokb. Freemore FLAC to MP3 Converter is the audio converter that may make it easier to convert lossless FLAC to MP3 to be able to play it on any models. With just some mouse clicks, it could probably convert a whole bunch of FLAC info to MP3 format inside a few minutes. Aimersoft Video Converter Last, which working as an APE to MP3 converter, often is the good alternative for changing a variety of audio and video information. This converter has quite a few options that you could find terribly helpful and environment friendly for conversion like APE format to MP3. 5.Audio joiner utility allows you to join multiple audio files into one big audio file. Based on the users' feedback, the considerable good thing about Free APE to MP3 Converter is Free APE to MP3 Converter is quick, although some folks have noticed that Free APE to MP3 Converter has such a disadvantage as Free APE to MP3 Converter will not be free. Convert any audio format, like MP3, WAV, AAC, AC3, ape to mp3 converter 320 kbps ALAC, WMA, OGG, FLAC, AIFF, MP2, M4P, M4A, etc to another one. Hey L Goldfine, Thank you on your inquiry. The Flac extension simply is not a supported file type of Home windows Media Player. You may nonetheless particular person your favourite search engine to seek for a solution which is able to convert the file to a Dwelling windows Media Participant supported file kind. In conclusion, Portable Free APE to MP3 Converter is a useful gizmo which will assist you turn APE format to MP3 or WAV files, with the press of a button. Drag recordsdata or folders onto one of the format buttons. Click the large "Convert" button of DTS Converter to start and ape to mp3 converter 320 kbps finish the conversion of DTS to AC3, MP3, WAV, AAC, FLAC, and many others. Boxoft Free FlipPhoto Maker is a professional software program program for you to convert photos to enchantment flipping e e book in three outputting codecs: EXE, HTML and ZIP. In case you wanted, you can burn it to CD as you like. APE to MP3 Converter affords you a easy and fast strategy to convert APE to MP3 audio with high quality. Audio Transcoder is a sophisticated APE to MP3 Converter and Audio CD Ripper with assist of assorted in model audio formats and encoders. It helps commonest codecs like OGG, MP3, AMR, WMV, WMA, WAV, FLV, MOV, RAM, PCM, ALAC, EAC-three, FLAC, and many others. Audio file converter instruments are also helpful if your favorite music app in your phone or pill does not support the format that a new track you downloaded is in. An audio converter can convert that obscure format into a format that your app helps. Magic APE to MP3 Converter is just not listed in Packages and Options. Help for Monkey's Audio (APE) format is constructed into Total Recorder. You do not want to download any extra software or libraries to work with APE format. You possibly can show the version of the APE libraries being used on the "APE" dialog (menu Choices -> Settings, Formats tab). Though ape to mp3 converter 320 kbps information are smaller, if in comparison with FLAC, chances are you'll want to convert APE to FLAC for a variety of reasons. Initially, the APE format uses a symmetric compression algorithm, which signifies that a participant will want vital processing energy with the intention to decode (play) APE information. Moreover, FLAC recordsdata are generally better supported on various platforms and by various devices. Do you must embed video, sounds recordsdata, pictures to your flip e e book? Do you want to add hyperlinks, textual content, shapes to your flip e-book? Do it is advisable to add printable house, picture slideshow, button to your flip guide? It's quite simpler so that you could embed film, background music, flash, links, dynamic text, shapes, buttons to your flip e-ebook by utilizing Boxoft PDF to Flipbook Professional for Mac. In right here, it's good to follow the usual conversion process to get the specified outcome like adding the APE recordsdata utilizing Add file choice, then deciding on the MP3 from Format menu, and lastly, beginning the conversion by clicking on the Convert button. This software may also perform batch APE to MP3 audio conversion. The second step is to select the output settings. To start, choose the folder to avoid wasting the output file to and choose the motion to be executed if the output file already exists - create a brand new file, overwrite or skip the existing file. I suggest you to make use of tubemate for downloading and converting videos on-line. No must purchase or obtain any software program. Monkey's Audio's chief opponent is FLAC, which has extra features than Monkey's Audio (streaming help, for instance) and hardware help to its edge, although its efficiency in compression is not as great. We also show you the best way to play Flac recordsdata on iPhone (without converting). Reserve all ID3 tags within the authentic information after converting audio to MP3. Free APE To MP3 Converter 4dots was checked for attainable viruses by numerous leading antivirus software products and it's confirmed to be 100% clean and secure. Although, no malware, spyware and adware or other malicious threats was found we strongly advise you to examine product once more before installing it in your LAPTOP.
Looks like Itunes solely presents to convert information from disk to AAC, (only from CD to mp3). Abyssmedia Audio Converter Plus is a strong, professional resolution designed for changing the preferred audio codecs and Audio CD tracks straight into MP3, WMA, OGG, AMR, FLAC, APE or WAV codecs. Why Convert APE to MP3, FLAC, WAV, and so on? APE format (usually known as Monkey's Audio) is an algorithm and file format for lossless audio data compression, which is freely obtainable to users with plug-ins for playback on hottest media avid gamers.Monkey's Audio - or APE - is a lossless audio compression format that can make copies of music which can be 1:1 exact copies. When decompressed, the audio is precisely the identical as the supply materials, whether it's a CD or another beginning media. Free APE to MP3 Converter jest darmowym programem konwertującym pliki APE (Monkey's Audio) do formatu MP3 lub WAV. Ponadto program umożliwia wyodrębnianie ścieżek audio z plików dźwiękowych na podstawie arkuszy CUE. Pliki CUE są często dołączane do obrazów płyt Audio CD utworzonych przez takie programy jak EAC (Actual Audio Copy), CDRWin, CUERipper.
1 note
·
View note
Text
uTube 5 released
Just in time for the holiday season. This is a major update for the uTube stack, available as a free download from today.
uTube has surely got to be the most feature-rich YouTube stack that exists for RapidWeaver! Unlike the standard embed code that YouTube already provides, uTube unlocks some secret configurations that you perhaps never knew existed. Plus some extra optimisations exclusively for RapidWeaver-built websites. All packaged inside a familiar drag-and-drop interface with simple GUI controls in the Stacks side panel.
The result of many hours consulting, research, development and testing; the updated uTube 5 stack incorporates the following changes...
New, longer, higher-resolution 1080p sample video to experiment with.
Fixes an edge case bug with the Source framework applying extra borders and padding on iFrames.
Adds support for YouTube Shorts.
If the playlist is enabled, the box to type in IDs is now taller.
Added a missingURL key to Info.plist.
New 'Enable Privacy-Enhanced Mode' checkbox. When enabled, YouTube claims not to not to store information or create cookies for your website users, unless they play the video. Good for website privacy compliance.
Deleted 'mobile actions' because by now, nearly all modern smartphones can play YouTube.
Internal changes to make stack templates referenced as an array, per API recommendations.
Viewing macros updated to API 9, to support future versions of Stacks.
Added accelerometer, autoplay, clipboard-write, encrypted-media, gyroscope and picture-in-picture attributes to the iFrame tag, to future-proof things further on the frontend.
Tidied the underlying source code and reduced its overall size for faster page loads.
Renamed and reordered a couple of stack settings for easier and quicker setup.
Lazy loading is achieved using the HTML 'loading' attribute, instead of relying on jQuery. This new method uses significantly less code, is more reliable and well supported in modern web browsers.
New select menu to choose a video format preset or to set a custom size.
The ability to hide the video in print / PDF output can be toggled on and off.
A new setting to exclude video resizing in jQuery FitVids.js (sometimes still included with old or unsupported RapidWeaver themes).
Updated a couple of the informational tooltips shown against some settings, to make things easier to understand.
An illustration of a ‘YouTube Short’ video now supported by uTube and the expanded choice of new settings displayed within the Stacks side panel:

This update is available via automatic updates in Stacks or you can grab a fresh download from the product page here.
All existing instances of uTube in your websites should update without any issue. But as always, it's suggested you have reliable backups of your files and you check pages before re-publishing them. Some settings (like lazy loading) may require applying again, if you want to continue using them.
If you like using this stack, please consider how much time it has saved you and make a donation here. Donations help towards the resources needed to keep stacks like uTube available for you to use. Please pay what you think the stack is worth. Or contribute in some other way, like writing a Trustpilot review.
Merry Christmas and best wishes for the New Year!
0 notes
Text
I was gonna put this in the tags but I feel like this program should be talked about more. Ever since I got shown it!! I've been using it religiously!! So I'm advertising this LMFAO (Notion pls pay me, I'm starving)
Notion is super easy and aesthetically pleasing to use, mainly because I don't have to click around if I want to put in a table or insert an image. All you do is hit "/" and if you type in "image", for example, it gives you the option to upload a file or embed a link into the Notion page.
You can also export the Notion page into PDF, HTML, or Markdown, which is so super convenient, and import files into it.
You can choose between three of their fonts (the default being the best, duh) and you can even format it into that cute, aesthetic small font with a single click.
You can create a page (which is a doc) and sub-pages, and they all appear on a hidden sidebar that all you have to do is hover over to get it to show up.
You can create a "teamspace" and work on a doc together with other "members" (they have to have a Notion account). There are also templates that exist, for whatever you have in mind that you want to create.
That's it, y'all, that's all I got.
spread this around please!!
#but also.... YEAH#CALENDAR APP???? tf????#and i went from word to apple notes to notion soooooo...#✦ misc.#notion
13K notes
·
View notes
Text
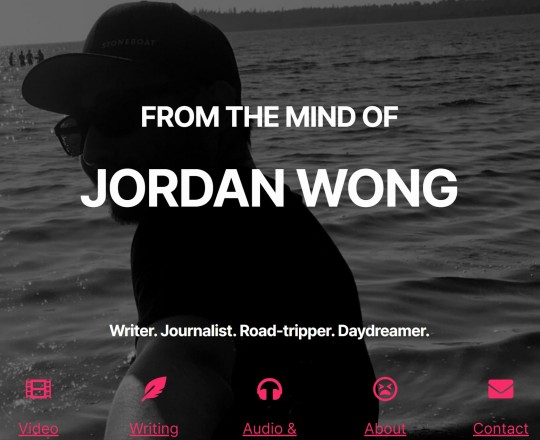
#3. Ok, web designers should be paid more
We had a couple of stressful midterms here, our first semester at BCIT. Coffee and late nights studying, sure, and then we went and got it over with. Brief pain. The whole band-aid.
I never lost more sleep than I did worrying about our personal website assignment. Like advanced psychological torture, this is how you induce elevated levels of stress and severe sleep deprivation. Step one: blank canvas. Step two: worth 30 marks.
And these ain’t any old completion or “you tried” marks. Some requirements were clear cut: a set number of pieces of work/projects to show off and some necessary pages (about, contact, privacy policy). Anything else is up to you, and on you, if you know what I mean. You can spend hours building up block by block and coming away feeling accomplished when you see it take shape and come together, and then the next day you can spend hours trying to figure out why this plugin isn’t doing the thing you need it to do, Googling for help, trying a same-but-different-plugin, dropping in bits of HTML somebody on Quora left on a tangentially related issue twelve years ago, and then convincing yourself that your site will be perfectly fine without that cool feature you really wanted. Like an art form, there is no such thing as time management. There is only messing around and messing up.
Nobody sets out to make a shitty website. But it might end up that way because 1) they literally can’t see colour 2) this font screams “fun” 3) “what do now?” and 4) “oh god, what did I just do?”
Numbers 3 and 4 are interchangeable but also just kinda states of being, all throughout the process?

Once we hit the ground running with our domains and hosting and our about pages, we had carte blanche. Free reign, but with a looming deadline. Like players exiting Vault 101 and stepping out into the wasteland for the first time: breathtaking freedom, but oh so barren and, oh yeah, you’ll probably die out here so get moving. Building a website is fun until you run into a problem.
My portfolio of writing (as well as video and audio work) came together quickly. Wasting my time is my number one hobby and I had no shortage of things I’d worked on previously, good and bad. And if it’s not evident by now, I just *love* talking about myself. I could big up all these things I had rotting away on my hard drive with fun descriptions no problem. Another requirement squared away.
Then it came time for the home page. Here I struggled. Thinking about it began to keep me up at night. Because this was no longer a question of learning the site editor and adding fancy bells and whistles, it was a visual design problem. At this point all I had was pages full of text and media and PDF embeds. It was maybe one step up from whatever we came up with in our Grade 9 Info Tech class, where we learned how to build a simple webpage with HTML. Open tags, close tags. It struck me that even though things are basically drag ‘n drop templates or pre-made themes in EasyWP, with barely any effort you can still create a site that looked like it was made by children—in other words, a real early Oughts-ass looking website. Where were the safety rails? Nobody should have that terrible power. Really irresponsible, is what it is.
I already talked about myself in my about page, I already talked about my work in their respective content pages, so what would my front page say or even look like? It’s 2022 and I haven’t typed a specific url into my address bar in actual years. My daily web experience begins with some sort of feed (it’s Reddit, Reddit is my only feed). So I felt like a moron when I had to Google examples of pretty cool front pages.
But I found one that caught my eye. It had attitude. From the photo choice to the lettering. The gears in my head turned. I found an old photo somewhere in the Cloud some friends and I had taken a couple years ago down in Birch Bay, Washington. An Insta-worthy glam shot. It became my new website cover photo, and it makes me laugh every time I pull up my homepage because what you don’t see (I cropped out), attached to the hand I’m holding, is my buddy’s shockingly hairy arm. And my website was always called “From the mind of Jordan Wong,” from day one. It knows what it's doing. It was only fitting I go with this layout.
I handed my website in and the next day I rolled into class with utmost confidence. Like I’ve never been more sure of anything in my life. Our instructor, Paul, told us right away that he had a look at our websites… and he’s giving us a week to work on them some more.

It’s a gutpunch that didn’t register until I went up to the front of the room, to show off my website to everybody on the big screens, and Paul told me he looked at mine last night and it was one he actually wanted to talk about. Site functionality issues, I think it was he said. Well god dammit I was already in the captain’s chair and all I could do was plug in the address and hit go with all eyes on me. It felt like an ambush.
So he didn’t like the homepage. Or something. He referred to it as “bold.” Well I told myself, it was a stylistic choice and I stand by it! I liked my magenta/orange colour palette (Zune colours, I call ‘em), I liked that you had the words fade in all cinematically like that, even if you had to scroll down a little. The icon columns were too far down (they were originally below the cover photo). I didn’t see what the big deal was. So I sat on it another few days, and that weekend I came down with a pretty nasty flu? Virus? Whatever it was, it made me sweaty and feverish and put me on the couch for the entire week.
The night before the stupid site was due again, I knew what needed to be done and got myself into a sitting position and got to work. Cover photo: widescreen fix. Don’t know how to do it properly with Photoshop content aware fill and it looks jank. Okay, just live with it. Move my navigation icons higher, assume the user doesn’t know how to scroll down. Done. Now what? The navigation icon columns Paul helped me implement are breaking the hyperlinks on my rightmost column—and only if I mouseover from the right? Google has no solutions. Resizing the column widths does nothing, nor does changing the number of columns there are. Disaster. I was about to delete the columns completely when I decided to try throwing an animation on that block.
Whatever it did, it worked. It made the Contact icon and text link clickable again.
Except… that animation wouldn’t fire off at the same time as the title. I had to scroll a tiny bit down before it did. I refreshed and tried again. Nothing again until I scrolled. I panicked.
Oh my god, Paul’s going to think I’m an asshole, I thought. I assure you, I wasn’t deliberately trying to make visitors scroll down this time. Moving the blocks as high as they could go did nothing. Adjusting the height of the cover photo did nothing. It was already 12 o’clock midnight and I needed to wake up at 6:15AM for school, still feverish. (There was an un-skippable engagement for another class: a 20-minute meeting that I waited in my car almost two hours for, by the way.) I couldn’t go to bed until I’d solved the issue. I went so far as to try rebuilding the entire front page from scratch but had to stop when I couldn’t remember how to get my cover photo stretched full screen, nor could I remember how to get the font for my titles the same as it was previously. (Protip: copy block, paste block.)
In the end I think I got it. I had a block of similar icons on another page that I copied over and just swapped the icons and links. This one seemed to play nicer, seemed to fire off its animation at the same time as my bold, beautiful title text, so all hyperlinks worked. The moment I saw that, I saved it up and called it a night. I didn’t want to touch it again lest something else break.
So that was my foray into web design. A minute to break, a literal hour to put back. Hours spent writing content and organizing layouts, and hours wasted trying and failing to put in new fancy features. Dreaming too big and getting slapped back to reality. For instance, I went through four or five different PDF embed plugins before settling for embedding Google Drive PDFs with an iframe. Not the prettiest but it'll have to do. I was really, really trying to get the flowpaper plugin working.
I’ve always been a form over function guy. Sue me. But I’ll stick to my guns: I know what I like. Even if I need to find a workaround. The Fantastic Mr. Fox clip I have on my contact page, technically against the rules of the assignment by way of implementation (so a pretty easy fix) but when pointed out the first time, before Paul could elaborate, I couldn’t have been more resolute and quicker on the draw when I said, “I’m keeping that.”
Wanna check out my site? jordan-wong.com
EDIT: Reviews are in!!! One website critic (it's Paul) gave it 29.5/30! I definitely won't let that go to my head or anything.
0 notes
Text
Word cloud generator for phrases

#Word cloud generator for phrases how to#
#Word cloud generator for phrases generator#
#Word cloud generator for phrases series#
#Word cloud generator for phrases download#
They can map data, such as, words and tags in a visual and engaging way. They provide quick insights at a glance but won’t help you make key decisions about your business.įor more advanced text analysis tools that provide deeper insights, visit MonkeyLearn or request a demo.Word cloud generators are popular online tools. Keep in mind, though, that word clouds should be used as a starting point for doing text analysis. It’s easy to create word clouds with the help of online tools like MonkeyLearn. There’s also an easy-access menu that gives you the option to edit, save, or print your word cloud. Paste the text into the simple interface, and click ‘Create’ to generate a word cloud.ĪBCYa offers pictorial customization buttons for word limit, layout, color, and font. ABCYaĬreated in 2004 by teachers, and designed for children, ABCYa is a platform that offers different educational tools and games, including a word cloud creator. In addition, you can create word clouds that are clickable and animated. WordArt also offers a comprehensive set of customization tools, allowing you to change font, size, color, theme, angle, layout, style, and more.
#Word cloud generator for phrases series#
Rebranded from Tagul to WordArt in 2017, this is a very intuitive word cloud creator with a series of fun and artistic shapes to choose from.
#Word cloud generator for phrases download#
To use it, paste your text data, click on ‘Go’ and download your word cloud as an. You can also edit the angle of your word cloud and change fonts, size, color, and more.
#Word cloud generator for phrases generator#
The Jason Davies Word Cloud Generator can generate archimedean or rectangular layouts. In terms of formatting, you can choose from various fonts, colors, and layouts, and vary word size based on frequency, rank, a randomized setting, etc. You can set a minimum word length, filter punctuation, and more. WordItOut is an easy-to-use tool that transforms your text into word clouds in a matter of seconds. Also, you can create clickable word clouds that link to relevant information. You can choose custom shapes, themes, colors, and fonts, and edit word lists, size, and word spacing. Wordclouds allows you to paste text, upload a document, or enter a URL. You can save word clouds in HTML and PDF, or embed them on your website. Here's a list of some other popular word cloud tools that you might want to try out: TagCrowdįounded in 2006, TagCrowd is a straightforward tool that offers several options to tailor your word clouds, including language, word limits, and similar word groupings.
#Word cloud generator for phrases how to#
Now that you know how to use MonkeyLearn’s WordCloud Generator, let’s explore other tools to create word clouds. Upload Your Data to The Word Cloud GeneratorĬhoose your text source and upload it to the word cloud tool by pasting text, or uploading a document.
Upload your data to MonkeyLearn WordCloud Generatorġ.
Learn how to create word clouds from your data it in four simple steps, or watch our video tutorial: This advanced word cloud tool also reduces words to their root form (a process known as stemming), and determines which words are most relevant. MonkeyLearn’s word cloud generator automatically creates word clouds that keeps phrases together by detecting collocations (words that often go together). It’s a great text analysis tool to get started with. MonkeyLearn's AI-powered word cloud tool has a simple user interface, allowing you to gain accurate insights quickly and easily. However, some tools are more intuitive and accurate than others. Online word cloud generators enable you to create tag clouds with ease. Either way, MonkeyLearn WordCloud Generator can help you create a visual representation of your data in seconds. Create word clouds from text to discover topics that are mentioned most often in your documents, or brighten up a report.
0 notes
Text
Egretia - Amazing Concept For Future
Creating an Ecosystem With True Token Circulation Content
What is HTML 5?
BlockChain Industry
What is Egretia
Vision of Egretia
HTML5 Egretia BlockChain Engine & Platform
Reasons Why you should invest on Egretia
Team
RoadMap

vision:
“Bring 200,000 Developers and 1 Billion HTML5 Devices to The Blockchain World.”
What Is HTML5?

HTML5 is a markup dialect utilized for organizing and displaying content on the World Wide Web. It is the fifth and current real form of the HTML standard.
HTML5 incorporates definite handling models to support more interoperable usage; it expands, enhances and justifies the markup accessible for records, and presents markup and application programming interfaces (APIs) for complex web applications. For similar reasons, HTML5 is likewise a contender for cross-stage portable applications, since it incorporates highlights outlined in light of low-controlled gadgets.
Top 10 Reasons to Use HTML5 Right Now
1 – It’s the Future, Get With It!
The number one reason why you ought to begin exploitation HTML5 nowadays is this: it’s the long run, begin exploitation it currently thus you don’t get left behind
2 – Mobile, Mobile, Mobile
Mobile browsers have totally adopted HTML5 therefore making mobile prepared comes is as straightforward as coming up with and constructing for his or her smaller bitscreen displays — thus the recognition of Responsive style. There ar some nice meta tags that conjointly enable you to optimize for mobile:
3 – Legacy/Cross Browser Support
Report a bugYour fashionable, in style browsers all support HTML5 (Chrome, Firefox, campaign IE9 and Opera) and also the HTML5 doctype was created so all browsers
4 – Game Development
Yup, that's correct, you'll develop games victimisation HTML5’s <canvas> tag. HTML5 provides an excellent, mobile friendly thanks to develop fun, interactive games. If you’ve designed Flash games before, you’ll love building HTML5 games
5 – Better Interactions
Beyond <canvas>, HTML5 likewise accompanies a huge number of incredible APIs that enable you to fabricate a superior client encounter and a beefier, more unique web application
6 – Smarter Storage
7 – Cleaner Code
On the off chance that you are enthusiastic about basic, rich, simple to peruse code then HTML5 is the brute for you. HTML5 enables you to compose clear and graphic code, semantic code that enables you to effectively isolate importance from style and substance. Consider this run of the mill and basic header code with route
8 – Doctype
<!DOCTYPE html>
Correct that is it, that is the doctype, not much, not much. Quite straightforward right? Not any more reordering some long indistinguishable line of code and not any more messy head tags loaded with doctype qualities. You can just and effectively type it out and be upbeat. 9 – Video and Audio Support
Disregard Flash Player and other outsider media players, make your recordings and sound genuinely open with the new HTML5 <video> and <audio> tags. Getting your media to play effectively has dependably been basically a bad dream, you needed to utilize the <embed> and <object> labels and dole out a tremendous rundown of parameters just to get the thing unmistakable and working accurately.
10 – Accessibility
With new semantic tags screen readers can better inspect the HTML archive and make a superior affair for the individuals who utilize them.
What Is BLOCKCHAIN?

By permitting digital data to be distributed however not traced, blockchain technology created the backbone of a brand new form of web. Originally devised for the digital currency, Bitcoin, (Buy Bitcoin) the school community is currently finding alternative potential uses for the technology. Bitcoin has been known as “digital gold,” and for an honest reason. To date, the whole price of the currency is on the brink of $9 billion North American nation. And blockchains will build alternative sorts of digital price. just like the web (or your car), you don’t have to be compelled to savvy the blockchain works to use it. However, having a basic information of this new technology shows why it’s thought-about revolutionary

What is Egretia
Egretia may be a HTML5 blockchain platform that makes a whole, open, and easy surroundings for internet, Game, and Apps developers. operating with one in every of the world’s leading HTML5 developers, Egret Tech, Egretia intends to bring a secure, fair, secure and low-priced development scheme to the complete community. Developing HTML5 round the world. Egretia features a foremost team of game distributors and applications through the prevailing egret diversion platform with forty million monthly active users, operationalcontent that integrates the token asking system. Egretia to confirm the world circulation of Egreten. Egretia features a well-established advertising platform to advertise games and merchandise supported Egreten with strategic partners equivalent to Facebook and Google.
Vision Of Egretia

World's First HTML5 Blockchain Engine and Platform
In partnership with Egret & the HTML5 business, the Egretia is committed to assembling the world's initial HTML5 blockchain engine and platform, combining blockchain technology with verified tools, communities and content of partners, getting to bring two hundred,000 developers and one billion mobile devices into the blockchain world.
Building a Decentralised HTML5 User Ecosystem
The blockchain of the egretia Network are combined with Egret HTML5 workflows. employing a token mechanism, each player can have a singular ID in games high-powered by the heron Engine. this may build a solid foundation for a stable user scheme
Creating an Ecosystem With True Token Circulation
Based on the user ecosystem of the Egretia Network, there's the aim of shaping a new virtual currency token that may be employed in all content high-powered by the egret Engine: Egreten.
HTML5 Egretia BlockChain Engine & Platform
Key Products and Services
The World's First HTML5 Blockchain Game Development Workflow
The work flow includes fourteen products like the engine itself, associate degree IDE visual editor, animation tools, crossplatform packaging tools. All tools square measure cross-platform and support each Windows and macintosh.

The World's Largest HTML5 Blockchain Platform: Egretia
The platform of the Egretia Network includes a development work flow supported blockchain technology, four core product associated an apparatus, providing comprehensive blockchain solutions and services for players, content suppliers, channels and advertisers, providing creation of associate inter-connected ecosystem.

Benefits
Egretia Incubator
Egretia Ad Platforms
Virtual Goods Trading Platform
Game Distribution Platform
Distributed Communications and Storage Platform
Blockchain Game Dev Workflow
Features of the Egretia Network
Self Developed public chain
The Egretia Network can embody a self-developed, economical public chain supported the DPoS (Delegated Proof of Stake) agreement mechanism, geared toward optimising HTML5 game performance. Through the blockchain interface layer, together with the Egret engine tools, developers will quickly produce blockchain-based DApps.
Consensus Mechanisms
The public chain of the Egretia Network are going to be employing a DPoS (Delegated Proof of Stake) as consensus mechanism. The DPoS mechanism is analogous to a board vote, wherever holders of coins solid a certain variety of nodes, victimisation the mechanism for verification and accounting
High Performance
The public chain of the Egretia Network may be a public chain with high synchronic processing power, wherever performance is optimised for the wants of the sport industry. it's designed to own a quick TPS (Transaction Per Second) rate. Nonetheless, in blockchain technology, Associate in Nursing "impossible triangle" exists, which means that scalability, decentralisation, and security can't be achieved at constant time
Real time parameter adjustment
The Egretia Network will modify system parameters while not bifurcation: Instead, the Egretia Network are going to be ready to amendment blocktime, blocksize, transaction fee etc. via voting.
Convenient and efficient Development suit
The evidenced tools of egret lays a solid foundation for the blockchain project of the Egretia Network, creating blockchain application development easy, convenient and efficient.
Reasons why you must invest in Egretia
- Egretia is that the world’s 1st HTML5 blockchain platform and repair platform, leading forever to form market direction and direction in any industry, therefore i believeheronia can integrating the blockchain technology into Egret Technologies mature HTML5 development workflow are going to be a brand new explosion. -Egretia owns a proficient team, a in project. investigate the event team, Egretia Blockchain workplace with core members from Qualcomm, Adobe, Microsoft, etc., as well. Blockchain consultants to mix blockchain technology with the highest engineers of the HTML5 technology platform can certainly bring success once launching the project. - owning an oversized, reliable partner, heronia is currently partnering with Egret technical school to integrate and access the prevailing community of over two hundred,000 programmers and partners. adore Microsoft, Tencent and seventy fifth of the HTML5 game market. China.
Team


Advisors

Road Map & Milestone

More Information
Website: http://egretia.io/
Whitepaper: http://egretia.io/static/Egretia_White_Paper_V1.0.pdf
Reddit Page: https://www.reddit.com/r/Egretia
Instagram: https://www.instagram.com/egretia_io/
Twitter: https://twitter.com/Egretia_io
Linkedin: https://www.linkedin.com/company/Egretia/
Facebook: https://www.facebook.com/Egretia.io/
Medium: https://medium.com/Egretia
Author: https://bitcointalk.org/index.php?action=profile;u=1583686
60 notes
·
View notes
Photo

https://www.wpplatformhelp.com/wordpress-tutorials-by-wp-learning-lab/how-to-set-html5-video-autoplay/
How To Set HTML5 Video Autoplay
youtube
Grab Your Free 17-Point WordPress Pre-Launch PDF Checklist: https://wplearninglab.com/17-point-wp-pre-launch-checklist-optin-yt/?utm_source=YouTube_Video&utm_medium=Description_Link&utm_term=Description_Link&utm_campaign=YouTube
How To Set HTML5 Video Autoplay https://youtu.be/_QrBbXRK844
Blog post with code: https://wplearninglab.com/html5-video-embed-loop-autoplay/
HTML video embed code video: https://youtu.be/KRC1NNc7g70
The HTML5 video autoplay feature can be activated using a single word in the video tag. It’s fast, easy, and seamless. If you add the loop feature then you’ll have a video that autoplays and loops indefinitely.
Exclusive for WPLearningLab viewers, up to 50% off hosting: https://wplearninglab.com/wordpress-hosting-offer/
Stop brute force attacks before they happen with this workshop: https://wplearninglab.com/brute-force-eliminator-workshop
Grab your free 17-Point WordPress Pre-Launch PDF Checklist: http://vid.io/xqRL
Download your exclusive 10-Point WP Security Checklist: http://bit.ly/10point-wordpress-hardening-checklist
Subscribe to this awesome channel here: http://www.youtube.com/subscription_center?add_user=wplearninglab source
0 notes
Link
What Are the Best Online Text Editors for Blog Writing?
I have a blogging platform, why would I want to use an online text editor for blog writing? If you’re a blogger there are some BIG advantages to using online blog editors, learn why.
Image Source: Trix-Editor
The whole deal with bloggers is that they have to do a lot of blog writing quickly and efficiently.
Professional bloggers do this for their own sites as well as other sites. When it comes to quick and efficient writing for blogs, you’ll learn quickly that formatting content ‘the right way’ for online publishing isn’t alway that easy.
While publishing content online — you don’t have time to check html and proper code structure. Using online text editors will allow you to write, edit and publish quickly without having to worry about errors.
The text editor allows bloggers to edit the blog post within a few seconds.
Online text editors are used to quickly submit the content without any mistake.
Oh, and many online blog editors even suggest sentence structure and check for duplicate content while you write!
We’re going to cover the Pros of using an online text editor as well as what the Best online blog editors are and where to find them.
Pros of the Online Text Editor in Blog Writing
Online text editors provide the following benefits to bloggers when writing blogs:
Direct Content Uploading
The editor allows you to directly paste the document into the editor without opening a proper software for editing installed in the system.
Writing Options
It provides bloggers and other content creators with some best writing options to quickly edit the document.
You can use online editors to make quick and desired changes in the content.
For example, you can create clean HTML output with the easiest WYSIWYG editing possible. If you’ve already started writing rich-text content, all you have to do is paste it the online blog editor, make your adjustments, extract HTML output from view-source mode and reuse it anywhere on the web!
Faster to Edit
The online editors are best to make changes quickly in the content using the best features for cross platform application.
Saves Time
Online editors save your precious time and allow you to quickly edit the blog post while proofing content.
This also helps you to submit the blog or any other report within the given time. Besides, manually coding HTML can be extremely time-consuming and is ripe with the potential for errors.
Provide Listings
The text editors also provide you with the best bullet and numbered listing options.
You can add these listings anywhere in the content just within a single click.
Multiple Formats
One of the best benefits of this online editor tool is that it also allows you to change the format of the document.
You can select the desired format by using the online blog editor.
For example many bloggers begin writing posts using another editor (such as Google Docs or Microsoft Word). The problem with moving your writing for websites from an outside editor over to WordPress or another online blog platform is that a lot can get lost in translation.
Have you ever noticed some extra code when switching between the visual editor and the text editor after copying and pasting text from outside of the WordPress environment?
Unnecessary tags can become tedious to manually remove. If you opt not to remove these extra code characters, it can actually hurt your ability to rank well in relevant search engine inquiries because of the “code bloat.”
Other Media
You can quickly add media files, tables, and other offered features by a text editor.
Save the File
Here you have the option to directly copy the content from the editor or can easily save it in the system within a single click.
As a blogger, you don’t want to waste your time checking technical errors — you want an online blog editor that will get the job done.
That’s exactly why, we’re going to discuss the best online text editors that can help to edit content quickly. There are a lot of options out there, but here are our favorite online blog editors:
5 Best Online Text Editors
1. Trix-Editor
Trix is a text editor that is widely used to edit blogs, articles, assignments, and other documents with the best features.
It provides an attractive formatted text in the web application to quickly edit reports and blogs.
Simply paste the text into the editor and start editing as:
Features:
File Uploading: This editor allows you to upload files directly from the system.
Bold & Italic: Here, bloggers and writers have the feature to Bold the text and also have an option to change the text into the Italic font.
Insert a Link: You can easily insert a link into the anchor text by using this text editor.
Headings: It also allows you to make headings within a single click.
Listings: This editor has the feature to create bullet and numbered listings.
2. Prepostseo
The online text editor by Prepostseo allows you to edit the text to make a quick content submission.
This plain text editor provides excellent features to edit blogs or any kind of document.
Directly paste the text into the editor as:
Features:
Emoticons & Special Characters: This editor allows you to add emoticons and special characters into the plain text.
Listings: It provides numbered and bullet listing features to edit blogs.
Insert Links & Date: This word pad online allows users to insert a date and a link into the anchor text.
Tables: This editor also provides a table feature to add to the plain text.
Find & Replace: You can quickly find and replace the specific words in the text by using this editor.
File Saving: It also allows you to save the file in PDF or DOC form.
Plagiarism & Grammar Check: You can easily check plagiarism and grammar of text by using multiple Prepostseo online tools.
3. Adresults
It is also one of the best text editors that can be used online to edit blogs and other documents.
It is widely used to edit the plain text which helps in submitting content within the given time.
Simply paste the document or write it into the editor as:
Features:
Empty Lines: The editor removes all the empty lines in the text.
Multiple Spaces: It also removes multiple spaces in the text document.
Replace Letters: This editor is widely used to replace lowercase and uppercase letters.
Capitalization: By using this editor, you can capitalize the first letter of each word within a single click.
Safe & Free: The editor is 100% secure and safe to use.
4. Onlinehtmleditor
The online HTML editor provides some excellent features to edit the text in the editor.
This editor can add basic text formatting to the document.
Directly paste or write the text into the online editor as:
Features:
Styling and Formatting: This feature allows you to write the text in proper format with the best styling features as well
Tables: The editor also provides an excellent feature to add tables in the text.
Inserting Images: You can easily insert images and other media in the text by using this editor.
Embed Media: The editor allows you to embed media in resources in with a perfect output in the text.
Accessibility: You can easily inspect the accessibility level of the content by using this editor.
Font and Size: The editor provides some features to change the font and size of the text.
5.
Wordhtml
This online editor comes with some unique features to edit the plain text.
This editor comes with built-in best code cleaning features.
Simply paste the content into the editor and start editing the text as:
Features:
Formatting: The editor provides excellent features to change the format of the text to look impressive.
Add Listings: The online editor allows you to add a bullet and numbered listings anywhere in the text.
Emoticons and Tables: The editor allows you to add new emoticons and tables in the document.
Insert Links: You can easily insert a link in an anchor text with the help of this editor.
Print: You can quickly print the text written in the editor within a single click.
Wrapping Up
Online text editors are widely used by professional bloggers to quickly edit blog posts and other content.
All the pros of the online text editor in blog writing have been mentioned above.
These are free online text editor tools that will improve your blog writing — don’t wait!
Give them a try and revolutionize the way you write blog content starting today.
0 notes
Text
FREE iFrame Generator : Create Responsive HTML Iframes Free [2020]
FREE iFrame Generator: Create Responsive HTML Iframes Free [2020] Check How to add responsive iframe in WordPress https://www.youtube.com/watch?v=5-5xVhhz7Rg Download NOW: https://bit.ly/2ASg6od Example URLs to be used in Iframe Generator: 1- Youtube video = https://www.youtube.com/watch?v=5-5xVhhz7Rg 2 - Google maps = https://bit.ly/2Rvf4r7 3- Blogger post = https://bit.ly/2JS3oul 4- Weebly post = https://bit.ly/2UWwlvj 5- Wordpress post = https://bit.ly/3egfrzE 6- Vimeo video = https://bit.ly/2XrbmlS 7- Money site = https://bit.ly/2ASg6od 8- GMB site = https://bit.ly/2zZQpkN iframe generator iframe generator WordPress iframe generator google map iframe generator HTML iframe generator youtube iframe generator 2020 iframe generator responsive iframe-generator HTML iframe generator iframe generator autoplay advanced iframe generator iframe button generator iframe generator.com iframe generator CSS iframe generate content iframe code generator for WordPress iframe code generator for google maps generate iframe c# youtube iframe code generator responsive iframe code generator iframe generator iframe embed generator google maps iframe embed generator iframe code generator iframe generator free iframe facebook generator iframe maker for WordPress iframe form maker iframe generator google maps google map iframe generator google map iframe generator online google maps iframe generator iframe generator online iframe javascript generator jquery iframe generator keynote iframe generator iframe layout generator iframe link generator iframe generator map multiple iframe generator mobile iframe generator map iframe generator iframe map generator maps iframe generator OpenStreetMap iframe generator iframe pdf generator iframe-playlist-generator iframe radio player generator iframe random generator google maps iframe generator responsive RSS iframe generator iframe responsive generator iframe script generator iframe generator tool iframe tag generator iframe text generator twitter iframe generator iframe URL generator iframe generator video Vimeo iframe generator video iframe generator iframe website generator youtube iframe generator youtube embed code iframe generator iframe google map code generator google map iframe code generator iframe google map code google map embed generator iframe google maps embed iframe generator google map embed iframe code generator free google map iframe generator HTML iframe generator online iframe HTML code generator HTML iframe code generator iframe HTML generator free HTML iframe generator website iframe generator iframe to HTML generator iframe to HTML converter youtube video iframe generator iframe generator html5 HTML iframe maker online HTML tools iframe generator HTML to iframe generator javascript generate iframe content create iframe using javascript generate iframe javascript google map embed code generator youtube embed code generator online youtube embed code generator embed code iframe generator responsive iframe generator iframe-based embed code generator iframe embed code generator embed code generator iframe twitter embed iframe code generator twitter embed code generator twitter embed generator twitter feed embed code generator iframe video embed code generator iframe video code generator iframe video embed code HTML youtube embed code generator online iframe code generator radio web player iframe code generator embed iframe code generator embed iframe generator free iframe code generator html5 iframe code generator iframe code generator online
https://youtu.be/-PqcG9IT3SQ from Blogger https://bit.ly/2V2iDY1
0 notes
Text
How to detect end of scroll on embed control
I’m trying to enable a checkbox after a user has scroll down a pdf document displayed on embed tag.
This is the function:
<script type="text/javascript"> function scrolled(o) { if(o.offsetHeight + o.scrollTop == o.scrollHeight) { alert("End"); } } </script>
HTML
<div id="terms" onscroll=scrolled(this)> <embed id="termsDoc" onscroll="scrolled(this)" src="../pdf/terms.pdf" type="application/pdf" width="100%" height="100%"> </div>
I have tried with onscroll but it is not working, I can see that the down arrow is disabled after the end of the document reaches so I guess it is possible to detect the end. Any help is appreciated.

Archive from: https://stackoverflow.com/questions/59042459/how-to-detect-end-of-scroll-on-embed-control
from https://knowledgewiki.org/how-to-detect-end-of-scroll-on-embed-control/
0 notes
Text
Blog·8:Ipad/Iphone and Art
In my last blog post, I talk about digital art, and today I want to continue my research on this topic. 80% of my illustrations are done through iPad, thus I would like to introduce creating with iPad as the medium in this article.
I read a large number of books about creating with iPad, among which one of the authors states that a new art movement would usually be replaced by another. In this short period of 20 years, realism gives way to impressionism, and surrealism and pop art are separated from Dadaism. Marcel Duchamp’s readymades and Kurt Schwitters’ creative collages are outmoded by the idea of surrealists, who come back to re-emphasize the importance of technical proficiency. Dadaists and surrealists make place for abstract expressionists, pop artists and conceptual artists. If artistic freedom is the origin of the art movement, the artistic freedom in the 21st century brings art movement to a new level. Through the powerful network, the interaction and communication of this art movement are beyond the imagination of artists in the past.

Marcel Duchamp’s “Fountain ”
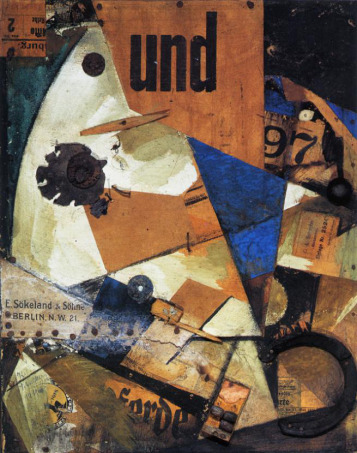
Kurt Schwitters’collages
In the past, people needed to make a chart to connect each art movement. But now the art of digital tools, such as the iPhone and iPad, is influenced by the diversity of the world and the artists who share the same artist studio. The iPhone art movement encompasses the artistic styles of artists all over the world, including realists, impressionists, dadaists, cubists, surrealists, abstract expressionists, pop artists, concept artists, technical artists, music artists, video artists, and craft artists. What they have in common is that they use the iPhone or iPad and use any of their skills to create art.
There are certain times when the birth of a new art movement needs to be based on the destruction of another. However, the emergence of digital illustration does not disrupt any art movement. Application developers adopt the latest and greatest tools to provide a creative platform for the public. New technology creates new art. In the long history, people always create technology. For instance, in 1841, the first metal paint tube was first invented by an American oil painter, who applied for a patent for the collapsible metal paint tube made of tin, a way to bring the pigments to the outdoor for use. These tubes were actually syringes, which were used by squeezing the paint. In addition, this also made the storage time of the pigments greatly longer, which not only increased the flexibility of artists, but also allowed them to use a larger palette. Before the first metal paint tube came out, artists had to play the role of chemists, grinding pigments themselves and mixing them with oil and paint thinners.
In order to make painting outdoors easier, artists had to put the paint mixture in the pig bladder. Unfortunately, even in this way, the paint dried out quickly.
Therefore, metal paint tube was a new technology at that time, which enabled impressionist artists to create art outdoors, promoting the creation of the most popular movement in the art history.
The artist Pierre-Auguste Renoir once said, "without paint in tubes, there would have been…nothing of what the journalists were later to call Impressionists". In the field of digital art, the technology that drives artists is not the metal paint tube, but the introduction of hardware and software.

Newspapers, life magazines and supplements were the most popular publications until the tablet computer came out in 2010. However, the rapid development of digital publications today offers new opportunities for designers, publishers and advertisers. Including website, mobile phone, Android tablet computer, iPad, and a wide variety of applications, all enable to designers to add mobile images and interactive contents to digital newspapers and magazines. Many people carry mobile devices with them, giving publications more followers via digital transmission than print editions.
The earliest digital publishing websites were mainly page sites with PDF documents, which could be viewed as quickly as traditional paper newspapers or magazines, but required large memory spaces and available fonts. Conde nast, an American publisher, developed its own customized software without using the external software system, and produced a series of magazines such as Wired, GQ and Vanity Fair. In the 1990s, HTML emerged as a computer-coding language, which made it convenient for designers to embed mobile content into websites, and then browsers read tags and convert them into texts and images for the public to view.
With the development of interactive design technology, a variety of applications attract a large number of advertisers to add mobile images and interactive content to advertisements. With the launch of the iPad in 2010, digital publishing has become a better and more portable way of publishing. The iPad puts all the editorials and life needs into a portable device, including email, photos, shopping, surfing the Internet, and reading.
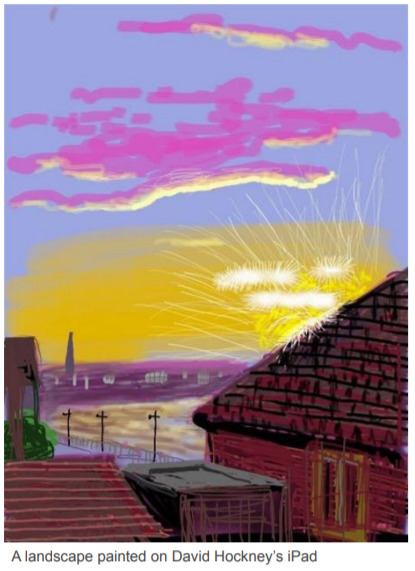

The painting above is by a famous artist Hockney on the iPhone, who has illustrated hundreds of works since he began using apple devices in 2008. He has been creating his own works on the iPad since the spring of 2008, some of which are on display at the Fleurs Fraiches at the Fondation Pierre berge-yves Saint Laurent, Paris, from October 21 to January 30. He often sends illustrations drawn on his iPhone to his friends. The iPhone is a new medium for him, with unlimited possibilities. He experiments with this unorthodox method of painting, choosing to use his fingers instead of pens. Hockney mainly paints with the edge of his finger, because the iPhone is so sensitive to heat that he can't use the whole finger. Finger painting is more than just touching. It is difficult to control the area where a finger touches the electronic screen, the lines can bend.
References:
Leibowitz, D.S. 2013, Mobile Digital Art: Using the iPad and iPhone as Creative Tools, Taylor and Francis, Independence.pp.2-3
Caldwell, C. & Zappaterra, Y. 2014, Editorial design: digital and print, Laurence King Publishing, London.pp.23-24.
Gayford, M. (2010). David Hockney's iPad art David Hockney explains why the iPhone and iPad inspire him. [online] Prod-images.exhibit-e.com. Available at: http://prod-images.exhibit-e.com/www_richardgraygallery_com/2010_DH_Telegraph.pdf [Accessed 15 Dec. 2019].
Tate. (2019). ‘Fountain’, Marcel Duchamp, 1917, replica 1964 | Tate. [online] Available at: https://www.tate.org.uk/art/artworks/duchamp-fountain-t07573 [Accessed 15 Dec. 2019].
Tate. (2019). Kurt Schwitters 1887-1948 | Tate. [online] Available at: https://www.tate.org.uk/art/artists/kurt-schwitters-1912 [Accessed 15 Dec. 2019].
Winsornewton.com. (2015). From the Archives: The History of the Metal Paint Tube. [online] Available at: http://www.winsornewton.com/na/discover/articles-and-inspiration/from-the-archives-history-of-the-metal-paint-tube [Accessed 15 Dec. 2019].
Gayford, M. (2010). David Hockney's iPad art David Hockney explains why the iPhone and iPad inspire him. [online] Prod-images.exhibit-e.com. Available at: http://prod-images.exhibit-e.com/www_richardgraygallery_com/2010_DH_Telegraph.pdf [Accessed 15 Dec. 2019].
0 notes