#ff6600;>How
Explore tagged Tumblr posts
Visit Tumblr Blog
Explore Tumblr blogs with no restrictions, modern design and the best experience.
Last Seen Tumblr Blogs


Fun Fact
Celebrities use Tumblr as well.
Photo

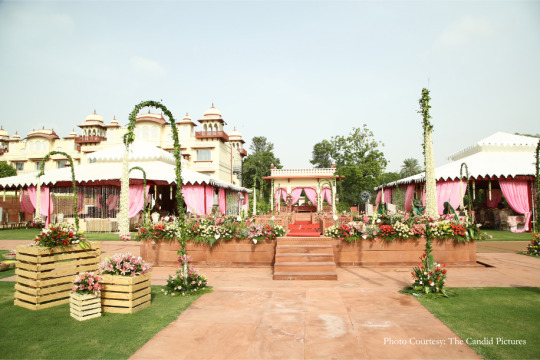
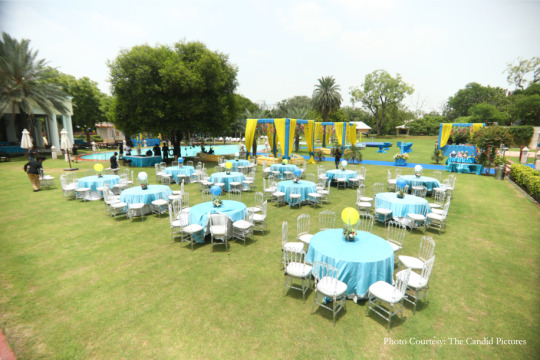
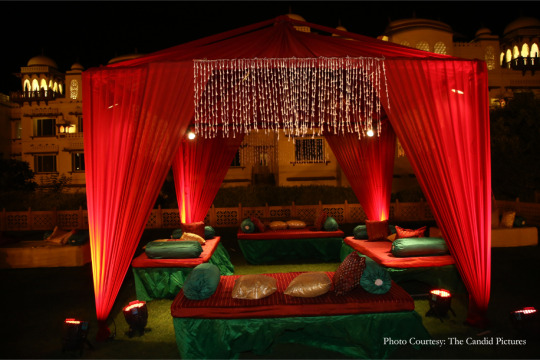
Nidhi and Varun first met at a music festival but long after the festival ended, the romantic background score played on. A few years later, they decided to celebrate their wedding at the Jai Mahal Palace. The festivities, orchestrated by WeddingSutra Favorite – Indian Wedding Planners, were a sight to behold! Co-founder Anant Khandelwal says, “Our vision for this wedding was to create regal magnificence and we spared no effort in trying to achieve absolute perfection. Right from palatial venues and magnificent decor to captivating couple entries and other unique details, everything contributed to this royal theme. This indeed was a once in a lifetime celebration that will be cherished not only by the two families but also their gusts.”

The groom tells us their story and shares highlights from their wedding.
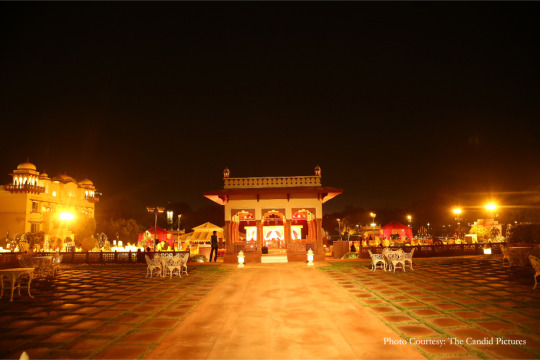
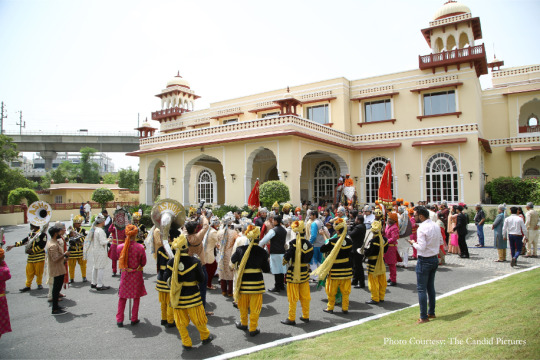
“Soon after the engagement, our families decided on a destination wedding in Jaipur. We wanted the venue to be very regal and Jai Mahal Palace stole our hearts! The 280-year-old, 18-acre property has three large lawns that are frequented by peacocks and various species of birds. Not only was this hotel undeniably majestic but even the staff were incredibly warm and hospitable.”
Indian Wedding Planners and it was a pleasure working with them. They did a fantastic job of bringing everything that we wanted to life using their expertise. The team was patient, cooperative, willing to understand our needs and eager to work with us as a family. We are grateful to have had them by our side through this journey.”


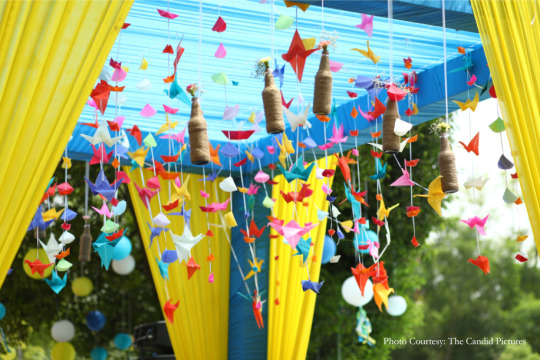
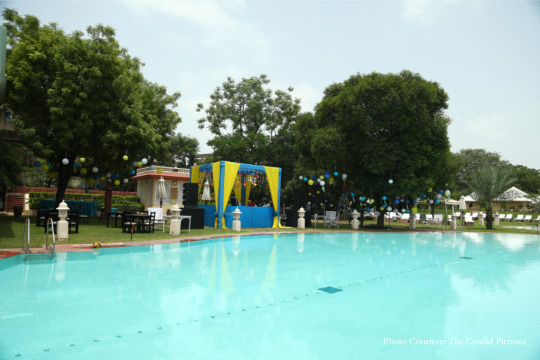
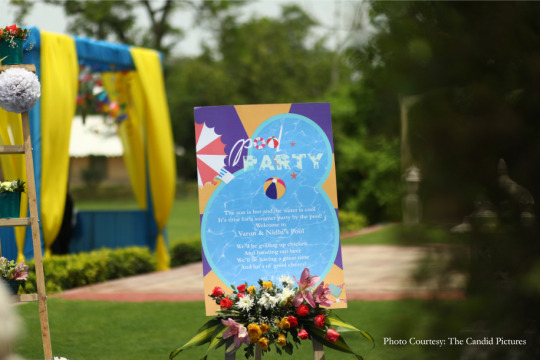
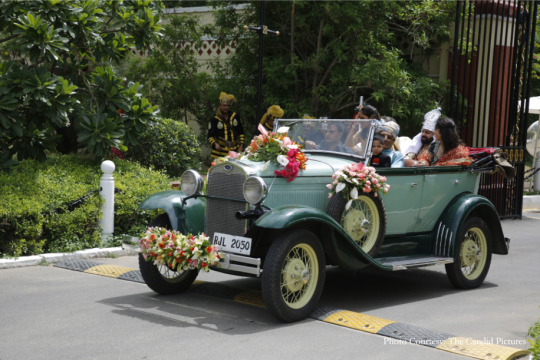
“We kicked off the wedding with a smashing pool party in shades of blue, yellow and white. At the entrance, we had trellises decorated with oversized paper flowers along with wooden ladders decked with fresh blooms. The canopies featured origami birds while colorful paper lanterns were suspended from the trees. The vibrant color palette we chose was perfect for this bright day!”


Rambagh Palace under the starry sky. While the decor designed for this function further enhanced the regal appeal of the venue, the stellar performances put together by our family and friends made this night absolutely unforgettable.”
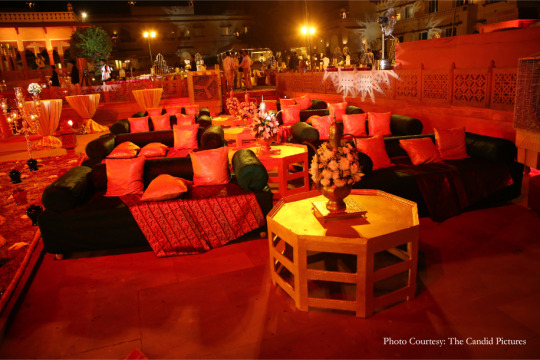
“For the Sufi Night, Nidhi and I made our entry to the song ‘Azeem-O-Shaan Shehenshah’ in a horse-drawn chariot. The dress code was red and gold. The décor was filled with Moroccan-inspired elements – metal water jugs decorated with flowers as centerpieces, large Moroccan lamps at the entrance and sofas with bright rugs and cushions set the stage.”

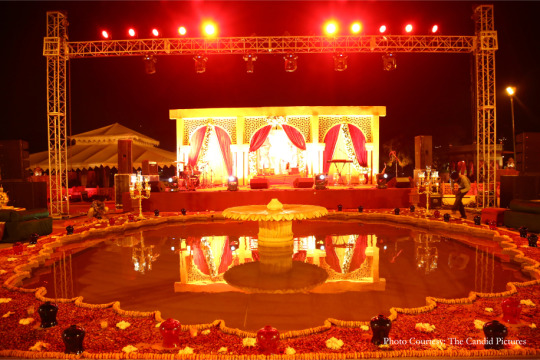

Jai Mahal Palace to life. I arrived with my baaraat on an elephant for the varmala. This was followed by a beautiful ceremony conducted by a priest who explained the significance of each ritual. These were some of the most poignant moments from all the festivities and are sure to be etched in our memories forever.”


Venues: Jai Mahal Palace (Pool Party, Mehendi, Sufi night and Wedding), Rambagh Palace (Sangeet) Wedding Planner: Indian Wedding Planners Makeup: Zorains Studio and Khowsalya DJ: DJ Ronnie Choreography: Vijay and Zafar
Photography: The Candid Pictures
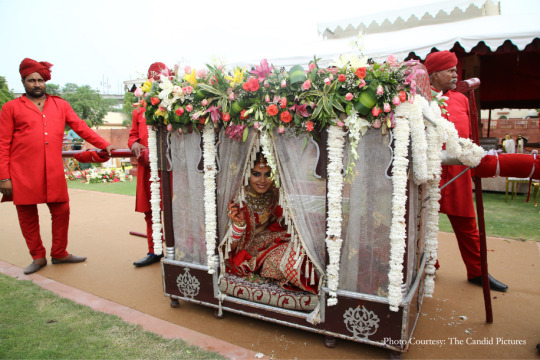
The post This bride’s bidai in a regal doli made for an exit that was was both nostalgic and memorable appeared first on WeddingSutra Blog.
#><a#ff6600;#>How#e75789;#>Wedding#>Pool#>Mehendi</b><br#>Wedding</b><br#e75789;>Wedding#e75789;>Sangeet</b><br#e75789;>Sufi#e75789;>Advice#e75789;">The
0 notes
Photo

Off the coast of Mauban floats a small island, Cagbalete, which looks ordinary at first glance. However, a great scenery resides underneath its waters, which only reveals at low tide.
Cagbalete Island is one of the pride of Quezon province. It features wide coastlines and an ecologically diverse habitat. The verdant greens serves as a host to unique bird and plant species. Moreover, the waters surrounding it is a home to abundant marine life. Cagbalete is a total package for adventurers and nature-lovers who seek for a tranquil getaway.
If you are planning to see Cagbalete Island one of these days, this guide may help you.
A vast shoreline appears at low tide in Cagbalete
M/B Neneng and M/B Anthony have two daily Mauban-Cagbalete v/v trips. The boat to Cagbalete leaves Mauban every 10:00AM and 03:30PM while the return boat leaves the island every 07:00AM and 01:00PM. Travel time is 45 minutes, and the fare is ₱50 per person.
You can hire a private boat if the schedule is not amenable to your itinerary, or you just need your trip to be solitary. This will cost you or your group ₱1,200 per way. Major resorts in Cagbalete usually offers private boat transfer upon request.
Boat Ride to Cagbalete
The passenger boat will drop you off at Sabang port. From there, some kids will offer to guide you to your resort for a small fee.
Sabang – Cagbalete’s coastal residential area and port
On our case, we hired a carabao pull cart to get to Villa Cleofas. However, I refused to ride it. I just don’t advocate the use of animals for transport.
Island transpo
Villa Cleofas canoe
Villa Noe
Villa Noe is located along the same strip as Villa Cleofas but a little distant. As of their website, Villa Noe collects corkage fees for liquors which is a downside for hard party drinkers. Their cottages are bit pricey too. The room costs ₱4,000 for 10-12 individuals, ₱3,500 for 8-10 pax, ₱3,000 for 6-8 persons, etc. Pitching your own tent will require you to pay ₱200/tent.
If you don not want to cook, you can avail Villa Noe’s food catering at ₱800/person per day. This includes breakfast, lunch, snack, and dinner.
To secure your accommodation, visit their site: www.villanoe.com.
Doña Choleng
Doña Choleng offers an equally relaxing stay with a lot of activity offerings. Air-conditioned for 6 persons costs ₱4,500 while the non-A/C of the same capacity is ₱3,500.
For worry-free travel, they offer a food package for only ₱800 per head consisting of 3 meals (breakfast, lunch, and dinner) and 2 snacks per day.
For more info and reservations, see their website (www.cagbaletedonacholeng.com).
Cagbalete DIY Travel Guide appeared first on Freedom Wall.
0 notes
Text
Making custom growth charts
Here I will try to explain how custom growth charts would work!
Feel free to ask anything!
There are various things that we must place in the folder “CCharacter” before we can raise a custom growth egg.
First, the sprites of the egg, we need 2 images per egg:


A big one, called “egg_xb.png” (48x48 px, 4 24x24 sprites) and


a small one, “egg_xs.png” (32). You must replace the x with a number between 9 and 15!
Then, if you want to add custom characters, you have to add 2 sprite charts for each too!
Depending on the stage, the big one will have to be a different size:
Babies: 64x64 px, 16 16x16 sprites
Child/Teen: 96x96 px, 16 24x24 sprites
Adult: 128x128 px, 16 32x32 sprites
Examples for each:


Regardless of stage, it should be named “chara_xb.png”
Then there’s the small one:

Must be called “chara_xs.png”, (32x32, 3 16x16 sprites + pallete) here you must also include the pallete for the rarest colouration, having the colours that appear on the sprite on the left and the alternate ones on the right. You must only put the colours that you want to change, which cannot be cyan or any of the outline colours.
The x must be replaced w/ a number between 385 and 65535.
For all sprites, the background must be transparent cyan (#00FFFF), and the outline must be one of these: #000064 (normal), #0099EE (ura), #FF6600 (aka). You cannot use any of these colours for any other reason.
The sprites must be indexed to 256 colours and w/ the cyan background being transparent.
You must then add the names of the custom characters (if there are any), to the Names.txt file, like this: “index#:Name”
For example, to add Kakutchi, I would have to write: “386:Kakutchi”
Each character must be on a different line.
Then you must make the text file of the growth chart itself, give it a short name and make sure it follows the following structure:
1 egg/2 babies/4 toddlers/12 teens/36 adults/2 seniors Write the index number for each character separating each with a '-' and each stage with a '/'! The egg must be one of the custom ones you added, so pick a number higher than 8! The numbers will be written alternating between male and female, then considering the required skill(s) and then care level.

This is a template that will apply to all custom growth charts. You can find the index numbers for non-custom characters by checking the dex!
Here’s a finished example:
It’s text file (multi.txt) would look like this:
9/386-385/25-26-27-30/61-62-105-106-121-122-81-80-63-64-65-66/217-218-277-278-325-326-253-254-305-306-349-340-321-322-219-220-279-280-345-346-255-256-307-308-275-276-323-324-221-222-303-304-347-350-257-258/379-380
In order to clear up any confusion, I will show it w/ the names instead of the numbers (bear in mind that the babies are custom and have a number beyond 384, so they are not in the TamaDex and have to be inserted manually as explained previously), but the final text file must only have the numbers :
Egg/Kakutchi-Tsubutchi/Harutchi-Puchitchi-Mizutamatchi-Mohitamatchi/Y. Mametchi-Y. Mimitchi-Gourmetchi-Y. Memetchi-Y. Kuchipatchi-Y. Dorotchi-Y. Androtchi-Ringotchi-Hinotamatchi-Ichigotchi-Oniontchi-Nikatchi/Mametchi-Mimitchi-Togetchi-Memetchi-Kuchipatchi-Yattatchi-Ura Mametchi-Horoyotchi-Yasaguretchi-Ura Memetchi-Ura Kuchipatchi-Shitekitchi-Minotchi-Pukatchi-Zukyutchi-Maidtchi-Shimashimatchi-Violetchi-Tenpatchi-Ura Debatchi-Samuraitchi-Tsukkomitchi-Ura Togetchi-Ura Violetchi-Tosakatchi-Ponytchi-Tarakotchi-Sebiretchi-Androtchi-Marotchi-Celebtchi-Primatchi-Tougyutchi-Ura Yattatchi-Matsuritchi-Ura Zukyutchi/Ojitchi-Otokitchi
Use this to help you place the numbers correctly, but never actually leave any names on it, just numbers like the example!
Once you’ve got everything in order, open the sim, go te the options/settings menu and click on import characters, if there’s a beep and you are not immediately sent back, everything turned out fine, you will be able to hatch this custom egg at the egg adoption menu once your current Tamagotchi has graduated!
If when trying to go to the egg adoption menu you are sent back, it means something probably went wrong.
If trying ta raise a custom character you get Nazotchi, it means the images are not formatted correctly.
Please do ask if you have any questions! I hope this was helpful!
24 notes
·
View notes
Link
In the world of software development, the design system is not new. Frequently, Topcoder contests involve system design and some even require us to create a design system for a particular company. Therefore it helps us learn how to apply it to our work. Through this blog post we will learn what a design system is, remind you of its benefits and see the best examples available. What is the Design System? A design system is a set of components that can be reused in different combinations. The design system allows you to manage designs on a large scale. Design systems contain a comprehensive guide to project design – a collection of rules, principles, constraints, and best practices. The core element of the design system is often the UI Component Library. These UI elements are also their representations implemented in code. Benefits of Design Systems? In the initial phase before designing, a design system does look complicated and like you will expend a lot of effort to create it. However, after it is built, the design of the system can save you a lot of time in future product development. The following are some of the main benefits of creating a system design. Consistency With a design system and front end designer, the developer will be able to implement a consistent UI much more easily. They can think of certain pages as sets of components. Example: Developers don’t have to think that this is a button with a # ff6600 background, a Proxima Nova Bold 12pt font, and 4px padding. The engineer knows that this is just the Main Button, and he uses this component in a few pages. Consistency gives the impression of higher quality. QA specialists can easily monitor designs that are implemented with the design system documentation. Inconsistencies should rarely occur. Better Communication The creation of a design system fosters better communication with the development team. Since the design system is the only source of truth, this means it contains vocabulary that can be used in the project. When developers and designers discuss the page, they will use the same component name. Thanks to this you will not talk about “this little purple button,” but “the secondary button.” Many errors occur due to misunderstanding, but a design system allows you to speak with the same naming conventions throughout the project. Faster Process You have built or purchased a UI control library that is needed to implement the UI. Now you only use it when new features require the creation of new pages or modification of existing ones. Even if you decide to build a UI library from scratch, a lot of time spent on this task will allow you to quickly create UI for new features. Focus More on UX Using the UI library means you don’t need to re-learn each time what the input field should look like on this page – it’s already been determined. Visuals were previously explained in the system – now you can put together new pages with them and focus more on better usability and creating a pleasant experience. What is in the Design System? The fundamental purpose of the design system is to facilitate teamwork and to match the values and images that are being shared by organizations or companies. Therefore, the following things must exist in the design system that you are building. Values, Vision, and Mission of the Company Every organization and company must have a value and purpose in the formation of the company. Therefore, before a design system is created, it is important to align the team around a set of shared goals that are clearly in line with company objectives. This will help build the vision and make sure everyone looks toward the same direction. These goals will develop over time and that is normal. The capabilities of the design system must ensure that change is widely communicated. As for values, they are the big ideas that will guide your choices, in accordance with brand goals. We need to ensure that the design system that we create is no different from these key values. Design Principle Design principles must guide design choices. Design principles are far more than just the visual aspects of a product. Design principles are guiding sentences that help teams to achieve product goals because of the design. They will help the team to make meaningful design decisions. As an example, on the Medium site, one of their design principles is “Direction of choice”. Thanks to that principle, instead of designing a plain text editor with unlimited color and font choices, they chose a simpler one. That allows the writer to focus on the content of the article rather than the visual aspect. Brand Identity & Language Identity must be defined in line with brand strategy and objectives. There are several elements that can shape the identity and language of your brand including: ColorFontsSpaceShapeIconIllustrationTaking picturesAnimationSound and toneSounds These brand elements will require several rules that will form the system. In the design system, this is realized by guidelines: do’s and don’ts and good examples of use. This will ensure the design team uses the right combination of language. If this is done correctly the brand will be very unique and easily recognizable. Components & Patterns Components and patterns are at the heart of the system. All the elements mentioned earlier will help us to make the system and provide a consistent experience. Components are used in Sketch by the designer, and directly in the code by the developer. Their functional behavior must be determined. As for patterns, they are building instructions that will allow us to use the components logically and consistently, across all products. Best Practice In addition to documentation, which is often directly linked to the system, best practices will accompany the team in a larger and more transverse manner. The idea is to explore general best practices and extract only those that make sense, based on the product and the level of maturity of the team. Best practices will help teams to form and develop their technical skills. What Design System Characteristics Does Your Organization or Company Need? Many of the design system characteristics that we see are scattered throughout the internet. All the characteristics of a design system are built according to the needs of the organization. The following are some examples of character design systems that you can apply to your organization. Tight or Loose System The strict system will have comprehensive and detailed documentation and will be fully synchronized between design and development. There will be a rigorous process for introducing new patterns in the system. A strict system must be very broad to cover most cases that the team might face. A loose system will leave more room for experimentation. The system is here to provide a framework for the team while maintaining freedom. Designers and developers are free to use it or not, regarding their specific needs for the product being built. You have to find the right balance between rigorous and flexible: a very strict system might be opposed by designers and developers who don’t want to use it. On the other hand, if the design system is too loose, the character of your organization or company will look uneven in the products being built. Modular or Integrated Modular systems are made of interchangeable and reusable parts. This is suitable for projects that have to scale quickly and which have to adapt to various user needs. The negative part of a modular system is that it is often more expensive to realize (because it can be difficult to make modules that can be independent while working well together). This kind of system will be especially suitable for large-scale products such as e-commerce, financial and government websites. For modular systems, it would be very interesting to work with the atomic design in mind. Integrated systems focus on one unique context. Integrated systems also consists of parts, but these parts will not be interchangeable. This type of system is compatible with products that have very few repeatable components and which require strong and frequently changing art direction. Centralized or Distributed Model The organization around the design system is very important for its evolution and scalability. In a centralized model, one team is responsible for the system and makes it grow. This team is in place to facilitate the work of other teams and must work closely with them to ensure that the system covers most of their needs. In the distributed model, several people from several teams are responsible for the system. The adoption of the system is faster because everyone feels involved but it also requires a team leader who will maintain overall vision. In each case, it’s best if everyone participates and makes suggestions to improve the system, to create a sense of ownership. Whatever system design you are going to build, first make sure to answer the questions listed below. How big is your organization or company? How many people will use your design system?How familiar are the teams in your organization or company with the design system?What variety of products or methods of development will be aligned with the design system to be created? What level of consistency does our product require? Examples of Existing Design Systems Take a look at these design systems that have been created by some of the world’s top companies. Although we realize that some of these companies created their systems through many hours of work, this is provided publicly. Please learn and create a new design system that suits the style of your organization or company. Material Design This is one of the most popular systems. It was formed over the years but is now used not only by the Google Team but also by many makers of Android and Web Applications. Atlassian Design System One of the most complete on the market used in real products made by Atlassian. Polaris Design system created by Shopify Carbon System design made by IBM Human Interface Guide Apple prepared the design system for all of its platforms Grommets The design system by Hewlett-Packard is presented in a very friendly way. Conclusion Knowledge of system design is one of the important elements that you must have in this era. The design system is a complete product, which will help project actors to build other products. With the design system, the product development process will be more effective, have good quality, and will have a DNA that is suitable for the company. The post Design Systems 101 appeared first on Topcoder.
0 notes
Text
I’m exactly three years behind Daniel Howell.
In 2009, when Dan was 18, he finished the British version of high school. In 2012, when I was 18, I finished high school. In 2011, when Dan was 20, he dropped out of his law program to take a gap year. In 2014, when I was 20, I dropped out of art school with plans to return. In 2012, when Dan was 21, he decided not to return to uni. In 2015, when I was 21, I faced the fact that I could never return to art school. Since 2012, Dan has gained millions of subscribers, written two books, gone on tour with a stage show and, for all anyone can tell, appears happy. I'm not trying to compare myself to that. I'm not trying to do any of what he did; I'm taking a different path. Since 2015, I've gotten two degrees from attending two colleges and I'm starting my doctorate program. I know I'm three years younger than Dan. So I'm only two years removed, while he's five. I can't help but wonder how he thinks about it, though. We followed a very similar timeline, and so I can't help but wonder what I'll be doing in three years, when I'm his current age. I mean, I think I know what I'll be doing. The plan is to still be in graduate school, which I'll graduate from in 2021. The plan is to help people and have enough schooling to be most effective in doing so. But...how will I think about it? How does Dan think about it? I know that for all the timeline similarities, it was a different situation. I don't know what he went through, not entirely. But again, I wonder. For a long time, I would break down hearing the letters "CIA". I packed away everything into boxes that are still in my parent's basement, labeled "things I can't deal with right now". I still can't. There is so much intense shame. For all I've done in the last two years, for all I've accomplished--I still failed at that. There's no way to fix it; it's a permanent failure on my life story. Does he ever feel anything similar? Did he ever? For everything he accomplished, did he ever still feel bad about dropping out? Is there shame, is there a sense of failure? He put it in his diss track, so it can't be a completely overwhelming true regret. But...were there, are there, ever moments? Again, it's a different situation. But I can hope and wish that he doesn't feel that way. That he's at peace with law school. Of course because I want him to be happy. But also because if he can be at peace, maybe I can too. Maybe if he can make jokes like on the diss track...maybe I won't cry when I see #FF6600. If he can talk about law school without his voice getting thick, maybe I can too. If he can see a contract and not want to die, then maybe I can see the sketched wireframe of a car. If he can make peace with law school, if he can shed the regrets and stand up straight...maybe I can too. One day.
#personal#past failures#enduring shame#these are weird tags#but i won't tag it with the other person's name#because it's not relevant to that tag#college dropout
3 notes
·
View notes
Text
Jeffrey - How Far Mp3.
Jeffrey – How Far Mp3.
Jeffrey came through with this amazing vibe titled How Far. The song is produced by Runtinz, and it’s here for download.
[audiomack background=”1″ color=”ff6600″ src=”https://audiomack.com/embed/song/jeffrey-sings/how-far”%5D
Jeffrey – How Far Mp3 Download
View On WordPress
0 notes
Text
How to Easily Add Icon Fonts in Your WordPress Theme
Discontinuance you to decide to want to have the ability to add icon fonts in your wordpress plot? Presently considered one of our readers requested what’s absolutely the top system to have the ability to add icon fonts of their wordpress theme?
Icon fonts will allow you to add vector (resizable) icons with out slowing down your internet snarl materials. They’re loaded like internet fonts and may per probability properly moreover be styled utilizing CSS.
On this article, we’ll abet you to with out exclaim add icon fonts in your wordpress theme, little by little.
What are Icon Fonts and Why You Must unruffled Use Them?
Icon fonts admire symbols or pictograms as an totally different of letters and numbers. These pictograms may per probability properly moreover be with out exclaim added to internet snarl materials snarl materials and resized utilizing CSS. When in distinction to picture primarily based mostly icons, font icons are highly effective quicker which helps together with your general wordpress internet snarl materials scAMPer.
Icon fonts may per probability properly moreover be extinct to command usually extinct icons. As an exAMPle, you may properly properly presumably moreover use them together with your shopping cart, salvage buttons, function packing containers, giveaway contest, and even in wordpress navigation menus.
There are a number of free and originate-source icon fonts readily available that has a total lot of beautiful icons.
Really, each wordpress arrange comes with the free dashicons icon font place. These icons are extinct within the wordpress admin menu and different areas inside wordpress admin area.
Another customary icon fonts are:
Font Apt
Genericons
IcoMoon
Linearicons
Self-discipline cloth Icons by google
The Noun Mission
For the sake of this tutorial, we’ll be utilizing Font Apt. It is a long way essentially the most conventional free and originate-source icon font readily available. We use FontAwesome on WPBeginner internet snarl materials as correctly as our wordpress plugins like OptinMonster, WPForms, RafflePress, and so forth.
On this information, we’re going to cover Three methods of including icon fonts in wordpress. You may properly moreover select the reply that works absolute top for you.
Including Icon Fonts in wordpress Utilizing Plugins
Similtaneously you may properly properly presumably correctly be a newbie stage person actual making an attempt to have the ability to add some icons to your posts or pages, then this diagram is suitable for you. You wouldn’t want to change theme recordsdata, and likewise that you simply simply might be in a construct to make the most of icon fonts throughout the set up in your internet snarl materials.
Very first thing or not it’s very important to realize is ready up and activate the Font Apt plugin for wordpress. For extra miniature print, look our little by little information on find out how to arrange a wordpress plugin.
Upon activation, the plugin permits Font Apt improve in your theme. You may properly moreover now edit any wordpress put up or internet snarl and use icon shortcode like this:
[icon name=”rocket”]
You may properly moreover use this shortcode together with different textual content or by itself in a devoted shortcode block.
As soon as added, you may properly properly presumably moreover preview your put up or internet snarl to look how the icon will choose on a dwell plot. Right here is the diagram through which it appeared on our check out plot.
You may properly moreover moreover add the font icon shortcode inside a paragraph block by itself the set up you may properly properly presumably moreover use the block settings to increase icon measurement.
As you prolong the textual content measurement, this may per probability properly choose unfamiliar contained in the textual content editor. That’s as a result of the shortcode wouldn’t mechanically alternate into an icon font contained in the block editor.
You may properly should click on the preview button in your put up or internet snarl to look how the true icon measurement would choose.
You may properly moreover moreover use the icon shortcode inside columns and manufacture function packing containers like this:
2. Utilizing Icon Fonts with a wordpress Internet web page Builder
Most well-liked wordpress internet snarl builder plugins comprise built-in improve for icon fonts. This allows you to with out exclaim use icon fonts in your landing pages as correctly as different areas in your internet snarl materials.
Beaver Builder
Beaver Builder is essentially the most simple wordpress internet snarl builder plugin within the market. It enables you to with out exclaim manufacture customized internet snarl layouts in wordpress with out writing any code.
Beaver Builder comes with beautiful icons and keen to make the most of modules that you simply simply may properly properly presumably moreover actual scramble and plunge into your put up and pages.
You may properly moreover manufacture icon teams, add a single icon, and switch them into properly-positioned rows and columns. You may properly moreover moreover take dangle of your admire colours, background, spacing, and margin with out writing CSS.
You may properly moreover even manufacture solely customized wordpress themes with out writing any code utilizing Beaver Builder’s Themer product.
Elementor Professional
Elementor is one different customary wordpress internet snarl builder plugin. It moreover comes with a number of components that may allow you to use icon fonts, together with an Icon element.
You may properly moreover actual scramble and plunge an icon anyplace and use it with rows, columns, and tables to manufacture beautiful pages.
Different customary internet snarl builders like Divi and Visible Composer moreover bear stout improve for icon fonts.
3. Including Icon Fonts in wordpress Manually with Code
As we talked about earlier that icon fonts are actual fonts and may per probability properly moreover be added to your plot equal to that you simply simply may add any customized fonts.
Some icon fonts like Font Apt, are readily available from CDN servers throughout the rep and may per probability properly moreover be linked out of your wordpress theme straight.
You may properly moreover moreover add the complete font itemizing to a folder in your wordpress theme after which use these fonts in your stylesheet.
Since we’re utilizing Font Apt for this tutorial, we’ll expose you the system you may properly properly presumably moreover add it utilizing each methods.
Methodology 1:
This handbook diagram is very simple.
First, or not it’s very important to hunt the recommendation of with the Font Apt internet snarl materials and enter your electronic message sort out to safe the embed code.
Now study your inbox for an electronic message from Font Apt together with your embed code. Copy and paste this embed code in your wordpress theme’s header.php file actual prior to the ticket.
Your embed code will probably be a single line that may obtain the Font Apt library straight from their CDN servers. This may per probability properly choose one factor like this:
This mannequin is easiest, nonetheless it will set off conflicts with different plugins.
A loads greater system may per probability properly properly be to correctly load JavaScript in wordpress utilizing the built-in enqueueing mechanism.
As a exchange of linking to the stylesheet out of your theme’s header template, you may properly properly presumably moreover add the next code in your theme’s capabilities.php file or in a plot-explicit plugin.
function wpb_load_fa() { wp_enqueue_script( 'wpb-fa', 'https://use.fontawesome.com/123456abc.js', array(), '1.0.0', factual ); } add_action( 'wp_enqueue_scripts', 'wpb_load_fa' );
Methodology 2:
The second diagram simply is not absolutely the top, nonetheless it might will allow you to host the Font Apt icon fonts in your admire internet snarl materials.
First, or not it’s very important to hunt the recommendation of with the Font Apt internet snarl materials to salvage the font bundle to your pc.
Merely salvage the icon fonts and unzip the bundle.
Now, you may properly should be a part of to your wordpress website hosting utilizing a FTP shopper and lag to your wordpress theme’s itemizing.
Or not it is a long way vital to manufacture a latest folder there and title it fonts. Subsequent, or not it’s very important to add the contents of the icon fonts folder to the fonts itemizing in your website hosting server.
Now you may properly properly presumably correctly be keen to load icon fonts into your wordpress theme. Merely add this code to your theme’s capabilities.php file or in a plot-explicit plugin.
function wpb_load_fa() { wp_enqueue_style( 'wpb-fa', get_stylesheet_directory_uri() . '/fonts/css/font-gracious.min.css' ); } add_action( 'wp_enqueue_scripts', 'wpb_load_fa' );
You may properly need efficiently loaded Font Apt into your wordpress theme.
Now comes the phase the set up you may properly be including precise icons into your wordpress theme, posts, or pages.
Manually Displaying Icon Fonts in wordpress
Budge to the Font Apt’s internet snarl materials to look the stout listing of icons readily available. Click on on any icon you to decide to want to make the most of, and likewise it is a long way probably so that you can to look the icon title.
Copy the icon title and use it like this in wordpress.
You may properly moreover mannequin this icon in your theme’s stylesheet like this:
.fa-arrow-alt-circle-up { font-size: 50px; shade:#FF6600; }
You may properly moreover moreover mix fairly just a few icons collectively and magnificence them immediately. As an exAMPle, let’s command you to decide to want to command an inventory of hyperlinks with icons subsequent to them. You may properly moreover wrap them under a
element with a selected class.
Residence Library Functions Settings
Now you may properly properly presumably moreover mannequin them in your theme’s stylesheet like this:
.icons-group-item i { shade: #333; font-size: 50px; } .icons-group-item i:fly { shade: #FF6600 }
We hope this text helped you be taught to with out exclaim add icon fonts in your wordpress theme. You may properly properly moreover are trying to look at out our tutorial on how to have the ability to add picture icons with navigation menus in wordpress.
Similtaneously you cherished this text, then please subscribe to our YouTube Channel for wordpress video tutorials. You may properly moreover moreover procure us on Twitter and Fb.
The put up Absolutely the top approach to With out issues Add Icon Fonts in Your wordpress Theme appeared first on WPBeginner.
from WordPress https://ift.tt/2ICpz7w via IFTTT
0 notes
Text
iOS 12.1 brings Dual SIM support, Group FaceTime, New Emojis and more to iPhone and iPad
Apple has now released iOS 12.1, the latest iOS update after iOS 12 which was first announced at the company’s Worldwide Developers Conference on June 4, 2018. The latest update brings several new features for iPhone and iPad which includes Dual Sim Support, 70 new emojis, Real-time Depth Control in Portrait Mode, and Group FaceTime.
iOS 12.1 Features and Changelog: Group FaceTime
With iOS…
View On WordPress
0 notes
Photo

From quiet coasts fringed by swaying palm trees to stark desert landscapes,
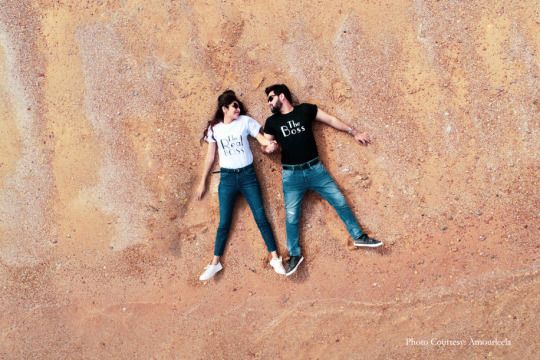
“Rajat’s proposal was very old-fashioned. Instead of popping the question to me, he went and asked my mother for my hand. He promised her that he would take care of me and love me more than anything else in the world. I thought this was a very sweet gesture since every mother needs to feel assured that the man her daughter is going to marry is the right match for her.”


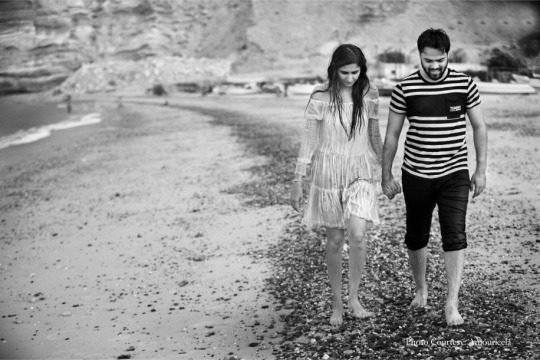

“A lot of thought went into creating each look, and we were always making sure that the colors and styles of our clothes aligned with the scenes against which we posed. We planned five unique looks for the photo shoot which included me wearing a full-sleeved white gown while Rajat opted for a burgundy suit against the rugged landscapes of the Sultanate. We also wore jeans with black leather jackets that allowed us to emulate the ‘biker-couple’ look. Pictures of us on a pier with me in a maxi dress and him in a lemon yellow jacket spelled relaxed romance. We also clicked pictures by the vivid blue waters of


“This was the first time we had ever got a professional photo shoot done and capturing our love this way gave us a ton of memories to take back home. One of the most unforgettable moments was when we were traveling on a boat. At one point the waters got quite rough because of which everyone on the boat, understandably got quite scared. Rajat and I, however, managed to have fun even in that situation.”
youtube
Location: A Pre-Wedding Photo Shoot Against Oman’s Most Stunning Vistas appeared first on WeddingSutra Blog.
#>Oman</span></a>#ff6600;#>How#e75789;#>Pre-Wedding#ff6600;>Oman</span></a>#e75789;>The#e75789;>Oman</span></a>#ff6600;>Oman</span></a><br
0 notes
Photo

Settled at 1000 meters above sea level, and is sandwiched between Roxas-Matulas and Daguma Mountain Ranges, the municipality of Lake Sebu is unsurprisingly temperate and abundantly vegetated. Springs and rivers from these rolling hills provide continuous water supply to the three important watersheds of the town, namely; Lake Sebu, Lake Lahit, and Lake Seloton.
The home of the indigenous T’Boli, Ubo, Tiruray, and Manobo tribes is also known for its majestic water cascades, mighty rivers, and a mega-diverse ecosystem, prompting the government to develop and promote the town as an eco-tourism and cultural destination.
The lotuses (or loti) are in full bloom in the unsurprisingly calm Lake Sebu
The most sought-after adventure in town is trekking to the seven falls, or taking a zipline ride that hovers over the most breathtaking countryside scenery at a height that is incomprehensible to acrophobes.
The seven falls zipline, if not the on top of the list, is one of Asia’s highest.
In the backdrop is Lake Sebu’s Hikong Alo a.k.a. Falls no. 1
You can complete your adventure in Lake Sebu for a day if you leave early from GenSan, however, if you want to stay a night or two, here a list of mountain resorts and hotels you can choose from:
Punta Isla Lake Resort Booking: www.Agoda.com/PuntaIsla Address: Sitio Toku-fol, Brgy. Poblacion, Lake Sebu 9512, South Cotabato, Philippines
El Galong Waterpark Resort Booking: www.Agoda.com/ElGalong Address: Brgy. Poblacion, Lake Sebu 9512, South Cotabato, Philippines
Dolores Lake Resort Booking: www.Agoda.com/DoloresLakeResort Address: Brgy. Poblacion, Lake Sebu 9512, South Cotabato, Philippines
Sunrise Garden Lake Resort Booking: www.Agoda.com/SunriseGarden Address: Brgy Lake Seloton, Lake Sebu 9512, South Cotabato, Philippines
A traditional musical instrument inside T’boli Museum
Punta Isla Lake Resort – Witness and taste how Punta Isla Lake Resort creatively and masterfully created the recipe.
Lake Sebu Travel Guide: Where to Stay and How to Get There appeared first on Freedom Wall.
0 notes
Text
2 simple Methods to Add Icon Fonts in Your WordPress Theme
Here we are providing the complete overview of how you can add Icon fonts in your WordPress Theme. Icon fonts let you add vector icons without slowing down your site. We will present you the two methods for adding Icon Fonts in WordPress Theme. So let’s see in detail.
What are Icon Fonts and Reasons for Using Them?
Icon fonts hold pictograms or signs instead of letters and numbers. You are able to resize these pictograms by using CSS without increasing your pages' download size. You can use it for your feature boxes, sliders, social media buttons, shopping cart and in WordPress navigation menus.
Here we have free and open source icon font available including of icons. Each admin toolbar within the admin area. Some other famous icon fonts are - Font awesome, Genericons, Linearicons, IcoMoon. Therefore, we are going to show you the two ways of adding icon fonts in WordPress. First of all, you have to utilize a plugin and the second method will display you adding an icon font without a plugin.
Adding Icon Fonts in WordPress via Plugins
FontAwesome and other free icon fonts are used by many WordPress plugins. By using a plugin You can easily add an icon font to any WordPress theme without editing any code.
First of all, install and activate the Better Font Awesome plugin. Then visit on Setting >>Better Font Awesome page for configuring the plugin settings.
Font Awesome lets you to add font icons using shortcodes as shown below:-
[icon name=”rocket”]
[icon name=”cloud”]
[icon name=”headphones”]
You can also add the icons in post editor by selecting an icon. Move ahead and create a new post or edit an existing one and you will see the Insert Icon button.
Tapping on it will bring up a popup where you can locate an icon and insert it.
Next, you will observe that the plugin will add a shortcode to your post editor which will look like this:
[icon name=”university” class=”” unprefixed_class=””]
You can add your own CSS class for adding custom styles if you want to further customize the icon.
[icon name=”university” class=”universityicon” unprefixed_class=””]
You can style the icon now by using CSS in your theme or child theme stylesheet.
.fa-universityicon {
font-size:100px;
color:#FF6600;
}
Read More: 2 simple Methods to Add Icon Fonts in Your WordPress Theme
You can talk to our WordPress Support team in case of any help related to WordPress, dial + 1 844 897 0441(Toll-Free).
0 notes
Text
Best Brain Supplements And Pills
Our Top Choice – Addy S
Take a look how Addy S can help you:
Helps sustain your attention span.
Increase your ability to stay on task.
Increase focus.
Increase concentration.
No crashing and no side effects
Our Other Recommendations
#go-pricing-table-34 .gw-go-col-wrap { min-width:130px; } #go-pricing-table-34 .gw-go-col-inner { border-radius:0 0 0 0; } #go-pricing-table-34 .gw-go-tooltip-content { background-color:#9d9d9d;color:#333333;max-width:130px; } #go-pricing-table-34 .gw-go-tooltip:before { border-top-color:#9d9d9d; } #go-pricing-table-34 .gw-go-col-wrap-0 .gw-go-body li[data-row-index="0"] { font-size:12px !important; line-height:16px !important; } #go-pricing-table-34 .gw-go-col-wrap-0 .gw-go-footer-row[data-row-index="0"] .gw-go-btn { font-size:12px !important; } #go-pricing-table-34 .gw-go-col-wrap-0 .gw-go-footer-row[data-row-index="0"] .gw-go-btn { background-color:#ff6600 !important; } #go-pricing-table-34 .gw-go-col-wrap-1 .gw-go-body li[data-row-index="0"] { font-size:12px !important; line-height:16px !important; } #go-pricing-table-34 .gw-go-col-wrap-1 .gw-go-footer-row[data-row-index="0"] .gw-go-btn { font-size:12px !important; } #go-pricing-table-34 .gw-go-col-wrap-1 .gw-go-footer-row[data-row-index="0"] .gw-go-btn { background-color:#ff6600 !important; } #go-pricing-table-34 .gw-go-col-wrap-2 .gw-go-body li[data-row-index="0"] { font-size:12px !important; line-height:16px !important; } #go-pricing-table-34 .gw-go-col-wrap-2 .gw-go-footer-row[data-row-index="0"] .gw-go-btn { font-size:12px !important; } #go-pricing-table-34 .gw-go-col-wrap-2 .gw-go-footer-row[data-row-index="0"] .gw-go-btn { background-color:#ff6600 !important; } #go-pricing-table-34 .gw-go-col-wrap-3 .gw-go-body li[data-row-index="0"] { font-size:12px !important; line-height:16px !important; } #go-pricing-table-34 .gw-go-col-wrap-3 .gw-go-footer-row[data-row-index="0"] .gw-go-btn { font-size:12px !important; } #go-pricing-table-34 .gw-go-col-wrap-3 .gw-go-footer-row[data-row-index="0"] .gw-go-btn { background-color:#ff6600 !important; } #go-pricing-table-34 .gw-go-col-wrap-4 .gw-go-body li[data-row-index="0"] { font-size:12px !important; line-height:16px !important; } #go-pricing-table-34 .gw-go-col-wrap-4 .gw-go-footer-row[data-row-index="0"] .gw-go-btn { font-size:12px !important; } #go-pricing-table-34 .gw-go-col-wrap-4 .gw-go-footer-row[data-row-index="0"] .gw-go-btn { background-color:#ff6600 !important; } #go-pricing-table-34 .gw-go { visibility:inherit; }@media only screen and (min-width: 480px) and (max-width: 767px) { #go-pricing-table-34 .gw-go-col-wrap { width:50%; } }@media only screen and (max-width: 479px) { #go-pricing-table-34 .gw-go-col-wrap { width:100%; } }
Adderin
Get More Info
Brain Pill
Get More Info
Brain Sense
Get More Info
CogniDepth
Get More Info
Inteligen
Get More Info
What Are Brain Supplements?
Brain pills, otherwise known as nootropics are mixtures of various ingredients that are used to improve your mental function. This includes helping your motivation, memory, ability to focus, improve your cognitive skills, improve your problem solving skills and help eliminate brain fog.
It is very similar to how an athlete would take supplements to help improve various parts of the body. These however, are for your brain! Anyone from college students to high level CEO’s have taken advantage of these powerful supplements to help give them an edge.
Customer Questions
Q: Are Brain Supplements Safe?
A: Yes! However, when it comes to supplements, you always want to check the ingredients. I prefer to choose ones that are made from natural FDA approved ingredients like different herbs that are known to have specific brain improving properties.
Q: How Long Before I See Results?
A: Most brain supplements recommend to take them for 1 to 3 months to start seeing noticiable results.
Q: Who Should Take Brain Supplements?
A: People in any age group, men or women should be able to benefit from these.
Q: Are Brain Supplements Effective?
A: To be completely open and honest, I believe that it all depends on the person taking the pill. Some people notice a huge difference in brain power when taking these on a regular basis. Others report that they have not felt much difference at all. With that said, I believe that even if someone does not actually “feel” any difference, they are still getting beneficial properties and may be just not “feeling” the difference.
Q: Are There Any Side Effects Of Taking Brain Supplements?
A: This is actually going to depend on the specific supplement that you decide to take. I would suggest doing research on your chosen pill and looking to see if that specific product has any known side effects.
In general though, the type that are made from natural herbal ingredients should not have side effects.
Q: How Do Brain Supplements Make You Feel?
A: This depends. If you experience “brain fog” or times that you feel forgetful, confused or just have a lack of focus and mental clarity, it should help clear that up. However, it should be mentioned that you may also want to look at things like your diet in order to help your brain fog symptoms as well.
Q: Are Brain Supplements Legal?
A: Yes. Most are completely legal however there are some that would require a doctor’s perscription.
Q: Where Can I Buy Brain Supplements?
A: Just look at the top of this page and click the links! You’ll get the best deals right from the suppliers.
Q: Will These Brain Supplements Improve My Memory?
A: Absolutely. This is actually one of the main reasons why you would choose to use these. If you take a look at my top choice of Brain Pill, you will see that it contains synapsa which is known to help improve your mental performance with memory and recall. It also has Huperzia Serrata for alertness and Phosphatidylserine that helps your short term memory.
Q: If I Stop Taking Brain Supplements, Will My Improvements Go Away?
A: While it would not go away overnight, you may find that your brain function eventually returns to how it originally was before you started taking the supplement.
Q: Can I Take Brain Supplements If I Am Sick?
A: If you are taking supplements that are made from all natural ingredients, you should not have to worry about whether or not to take it while you are sick.
Other Brain Related Information
Looking for brain treatments for conditions relating to concussions, TBI, memory loss, etc? Take a look below:
Cerebrum Health Centers
Cerebrum Health Centers Expands Practice For Veterans
Cerebrum Health Centers – another news article on the expansion.
Save
Save
Save
Save
Save
Save
Save
Save
The post Best Brain Supplements And Pills appeared first on Healthy Orbit.
0 notes
Text
Residential Tower May Be On Tap For Former Mandarin Oriental Space
Eleven years after the Chicago architecture world was dazzled by SBC’s design for a Mandarin Oriental hotel tower just behind Michigan Plaza, there are signs once again that something might be happening there.
Former 215 North Michigan proposal (SBC)
It was 2006 that plans were revealed for a 74-story, 900-foot-tall building that would house 250 hotel rooms, 150 luxury condominiums, and 100 über-luxe palaces in the sky branded as The Mandarin Oriental Residences.
When the economy went all pear-shaped, the $750 million plan ate itself, ended up in foreclosure, in court, and out of commission.
During the intervening years there have been whispers of interest in the property from random bodies of varying seriousness. It bears the official address of 210 North Stetson Avenue, but also has the vanity address of 215 North Michigan Avenue. Ooh la la.
Now things appear to be getting serious. According to city documents, it appears there is a developer interested in the site. The developer isn’t interested in the hotel portion, though. It appears to be aiming for an all-residential solution for the space.
Specifically, it has asked the city for an opinion on how many residences it might be allowed to squeeze into the space under current zoning laws if the hotel rooms were replaced by residences. If we’re reading the paperwork right, the answer is 375.
What’s interesting is that this most recent inquiry is not the first along these lines. Back in February of 2016, the city’s Department of Planning and Development was asked the exact same question, and gave the exact same answer. It’s not known if that was the same developer or not, though both use the same big name law firm.
What’s new this time is that the developer also wants to know if it would be subjected to the city’s Affordable Housing ordinance. The answer from the city is no, because the zoning for that parcel pre-dates the city’s Affordable Housing ordinance.
We’ll continue to keep our ears to the ground on this one.
215 North Michigan. Nothing to see here, people. Keep moving.
from Chicago Architecture https://www.chicagoarchitecture.org/2017/09/26/residential-tower-may-be-on-tap-for-former-mandarin-oriental-space/
0 notes
Text
Terry Apala & Major Bankz - How Far Mp3.
Terry Apala & Major Bankz – How Far Mp3.
Terry Apala and Major Bankz came through with this amazing vibe titled How Far. The song is off their joint Extended play titled Major Vibes, and it’s here for download.
[audiomack src=”[audiomack background=”1″ color=”ff6600″ src=”https://audiomack.com/embed/song/terryapalaofficial/how-far”%5D
Terry Apala & Major Bankz – How Far Mp3 Download
View On WordPress
0 notes
Text
We’ve already broken down the Pacific Crest Trail Class of 2016’s gear and resupply, so now it’s time to take a closer look at the demographics (and miscellaneous datapoints) from this last year’s PCT class.
A lot of the data here is more along the lines of, “Hmmm…I think this would be an interesting thing to look at,” as opposed to something that might actually assist you in completing the Pacific Crest Trail.
The data points we examine are: sex, age, average start date, days on trail, fitness level, longest day, zero days, near-o days, resupply stops, resupply boxes sent, pairs of shoes used, starting base weight, ending base weight, amount spent on gear, and amount spent on entire hike.
Not sure what one or more of the terms listed above means? Check out the thru-hiker glossary.
The comparisons below are:
Male vs. Female Hikers
Young vs. Old Hikers
Domestic vs. International Hikers
First Timers vs. Experienced Hikers
Fast vs. Slow Hikes
Cheap vs. Expensive Hikes
Light vs. Heavy Packs
Overall Best And Worst
If at any point you find yourself wondering, “It would be interesting to see how X compares to Y,” then let me know in a comment or via message and I may be able to add it to the collection.
NOTE: if some of the “overall��� numbers look strange in relation to the categories it’s because the overall stat includes all hikers in the group while the other numbers may only include the finishers (e.g. the ages of hikers in the “Fast vs. Slow Hikes”).
MALE VS. FEMALE
First let’s break the data down in a simple and relatable fashion: male vs. female hikers.
Of the hikers surveyed, 33% of respondents identified as female, while the remaining 67% all identified as male.
Here’s what I came up with:
.tg {border-collapse:collapse;border-spacing:0;margin:0px auto;} .tg td{font-family:Arial, sans-serif;font-size:14px;padding:10px 5px;border-style:solid;border-width:1px;overflow:hidden;word-break:normal;} .tg th{font-family:Arial, sans-serif;font-size:14px;font-weight:normal;padding:10px 5px;border-style:solid;border-width:1px;overflow:hidden;word-break:normal;} .tg .tg-s6z2{text-align:center} .tg .tg-3xho{font-weight:bold;background-color:#ffc702;color:#000000;text-align:center} .tg .tg-rx9y{font-weight:bold;background-color:#333333;color:#ffffff;text-align:center} .tg .tg-c1w6{font-weight:bold;background-color:#ffffff;color:#ff6600;text-align:center} .tg .tg-yf2n{font-weight:bold;background-color:#333333;color:#ffffff;text-align:center;vertical-align:top} @media screen and (max-width: 767px) {.tg {width: auto !important;}.tg col {width: auto !important;}.tg-wrap {overflow-x: auto;-webkit-overflow-scrolling: touch;margin: auto 0px;}}
FINISHERS FEMALE MALE OVERALL COMPLETION % 72% 78% 76% AGE 32 34 34 AVERAGE START DATE April 20 April 25 April 23 DAYS ON TRAIL 146 146.38 143.84 FITNESS LEVEL 6.7 6.6 6.63 LONGEST DAY (MI) 35.63 37.75 37.17 ZERO DAYS 16.93 17.24 17.24 NEAR-O DAYS 16.15 12.70 13.78 RESUPPLY STOPS 27.26 26.29 26.61 BOXES SENT 13.82 11.57 12.20 PAIRS OF SHOES USED 4.6 4.1 4.25 BASE WEIGHT (START) 17.74 lbs 8.06 kg 20.43 lbs 9.29 kg 18.21 lbs 8.28 kg BASE WEIGHT (END) 15.67 lbs 7.12 kg 16.89 lbs 7.68 kg 15.53 lbs 7.06 kg $ SPENT ON GEAR $1,563.43 $1,685.41 $1,659.18 $ SPENT ON HIKE $5,803.79 $6,155.59 $6,087.41
Of all the comparisons made in this post, female hikers made the most resupply stops (27.26) and used the highest number of shoes on their hikes (4.6).
Male hikers had the heaviest starting base weight (20.43 lbs / 9.29 kg) and the heaviest ending base weight (16.89 lbs / 7.68 kg).
#gallery-0-17 { margin: auto; } #gallery-0-17 .gallery-item { float: left; margin-top: 10px; text-align: center; width: 25%; } #gallery-0-17 img { border: 2px solid #cfcfcf; } #gallery-0-17 .gallery-caption { margin-left: 0; } /* see gallery_shortcode() in wp-includes/media.php */
PCT-NorCal-Burney-Falls
PCT Oregon Mount Jefferson
PCT-Desert-Wind-Farm
PCT Oregon Crater Lake Wizard Island
YOUNG VS. OLD
The average age of survey respondents was 34. Here, I split the data into two groups: those thirty-four and older, and those thirty-three and younger.
Will this help you plan your hike? Probably not. Is it interesting to look at? Yes. Funny to see the two groups spent (nearly) the exact same amount on gear before their hikes.
FINISHERS UNDER 34 34 AND OVER OVERALL COMPLETION % 81% 67% 76% MALE/FEMALE % 66/34 73/27 67/33 AVERAGE START DATE April 25 April 19 April 23 DAYS ON TRAIL 142.96 147 144 FITNESS LEVEL 6.62 6.65 6.63 LONGEST DAY (MI) 38.2 34.81 37.17 ZERO DAYS 17.69 16.11 17.24 NEAR-O DAYS 14.33 12.32 13.78 RESUPPLY STOPS 26.73 26.28 26.61 BOXES SENT 11.42 13.65 12.20 PAIRS OF SHOES USED 4.13 4.48 4.25 BASE WEIGHT (START) 18.25 lbs 8.3 kg 18.14 lbs 8.25 kg 18.21 lbs 8.28 kg BASE WEIGHT (END) 15.39 lbs 7 kg 15.83 lbs 7.2 kg 15.53 lbs 7.06 kg $ SPENT ON GEAR $1,600.10 $1,600 $1,659.18 $ SPENT ON HIKE $6,005.16 $6,289.13 $6,087.41
Of all the comparisons made in this post, older hikers had the lowest completion percentage (67%) and the shortest average longest day (34.81 mi / 56.02 km).
Younger hikers had the highest percentage of female hikers (34%).
DOMESTIC VS. INTERNATIONAL
This year I received responses from hikers coming from twenty-four countries (including the US).
COUNTRIES: Australia, Canada, Croatia, Czech Republic, Denmark, England, Finland, France, Germany, Greece, India, Israel, Italy, Mexico, Netherlands, New Zealand, Poland, Russia, Scotland, South Africa, Sweden, Switzerland, UK, USA
TOP SEVEN COUNTRIES
USA 69.84%
Canada 7.41%
Australia 4.50%
UK 3.70%
France 3.17%
Germany 2.91%
Netherlands 1.32%
TOP SEVEN STATES
California 22.34%
Washington 14.65%
Oregon 9.16%
Colorado 4.03%
New Hampshire 3.66% (T)
New York 3.66% (T)
Texas 3.66% (T)
FINISHERS USA INTERNATIONAL OVERALL COMPLETION % 74% 81% 76% MALE/FEMALE % 67/33 72/28 67/33 AGE 34 33 34 START DATE April 24 April 22 April 23 DAYS ON TRAIL 143.41 145.35 144 FITNESS LEVEL 6.79 6.3 6.63 LONGEST DAY (MI) 36.81 37.73 37.17 ZERO DAYS 16.04 19.33 17.24 NEAR-O DAYS 13.56 14.06 13.78 RESUPPLY STOPS 26.98 25.82 26.61 BOXES SENT 13.96 8.87 12.20 PAIRS OF SHOES USED 4.4 3.95 4.25 BASE WEIGHT (START) 17.51 lbs 7.96 kg 19.56 lbs 8.89 kg 18.21 lbs 8.28 kg BASE WEIGHT (END) 15.03 lbs 6.83 kg 16.49 lbs 7.5 kg 15.53 lbs 7.06 kg $ SPENT ON GEAR $1,564.66 $1,802.16 $1,659.18 $ SPENT ON HIKE $5,677.70 $6,749.44 $6,087.41
Of all the comparisons made in this post, domestic hikers were pretty average.
However, international hikers had the lowest average starting fitness level (6.3), the lowest number of resupply stops (25.82), sent the fewest number of resupply boxes (8.87), used the fewest number of shoes (3.95), and spent the most on their thru-hikes ($6,749.44).
#gallery-0-18 { margin: auto; } #gallery-0-18 .gallery-item { float: left; margin-top: 10px; text-align: center; width: 25%; } #gallery-0-18 img { border: 2px solid #cfcfcf; } #gallery-0-18 .gallery-caption { margin-left: 0; } /* see gallery_shortcode() in wp-includes/media.php */
PCT Desert Trail
PCT Washington Mac
Southern Terminus PCT Monument
PCT Sierras Selfie Hiking
FIRST TIMERS VS. EXPERIENCE
Of the hikers on the trail this year, 73% were taking on their first long-distance trail and 27% had experience on one or more previous long-distance hikes.
The trails most commonly hiked by those with experience were:
32% Appalachian Trail
24% John Muir Trail
12% Pacific Crest Trail
5% Colorado Trail
3% Camino de Santiago
3% Arizona Trail
3% Long Trail
2% Continental Divide Trail
2% PCT Section Hike
14% Other Long-distance Trail
FINISHERS FIRST LONG-DISTANCE THRU-HIKE PREVIOUS THRU-HIKE OVERALL COMPLETION % 74% 82% 76% MALE/FEMALE % 68/32 72/28 67/33 AGE 32 37 34 START DATE April 24 April 22 April 23 DAYS ON TRAIL 145.71 140.22 144 FITNESS LEVEL 6.64 6.59 6.63 LONGEST DAY (MI) 37.22 36.88 37.17 ZERO DAYS 17.51 16.30 17.24 NEAR-O DAYS 14.04 12.99 13.78 RESUPPLY STOPS 26.33 27.18 26.61 BOXES SENT 12.18 12.38 12.20 PAIRS OF SHOES USED 4.28 4.16 4.25 BASE WEIGHT (START) 19.20 lbs 8.73 kg 15.91 lbs 7.23 kg 18.21 lbs 8.28 kg BASE WEIGHT (END) 15.93 lbs 7.24 kg 14.58 lbs 6.63 kg 15.53 lbs 7.06 kg $ SPENT ON GEAR $1,683.22 $1,557.38 $1,659.18 $ SPENT ON HIKE $6,261.92 $5,520.31 $6,087.41
Of all the comparisons made in this post, first-time hikers were fairly average.
Experienced hikers had highest completion percentage (82%), were the oldest (average age of 37), and had the lowest average starting base weight (15.91 lbs / 7.23 kg).
//<![CDATA[ aax_getad_mpb({ "slot_uuid":"310885f0-f80c-4218-ae32-80efe127ad86" }); //]]>
FAST VS. SLOW HIKES
How about people who hiked the trail quickly vs. those who took a bit more time to complete their thru-hikes?
Here we split and compare hikers based on the length of time it took them to finish the trail. The average number of days thru-hikers spent completing a thru-hike was 144 days (that’s just under five months).
I’ve divided hikes into “Fast Hikes” (quicker than 144 days) and “Slow Hikes” (those that took 144 days or longer).
FINISHERS FASTER HIKES SLOWER HIKES OVERALL MALE/FEMALE % 74/26 67/33 67/33 AGE 31 33 34 START DATE May 1 April 17 April 23 FITNESS LEVEL 7 6.32 6.63 LONGEST DAY (MI) 39.80 35.04 37.17 ZERO DAYS 12.03 20.99 17.24 NEAR-O DAYS 11.66 15.58 13.78 RESUPPLY STOPS 26.38 26.67 26.61 BOXES SENT 11.45 12.77 12.20 PAIRS OF SHOES USED 4.19 4.31 4.25 BASE WEIGHT (START) 16.92 lbs 7.69 kg 18.99 lbs 8.63 kg 18.21 lbs 8.28 kg BASE WEIGHT (END) 14.23 lbs 6.47 kg 16.54 lbs 7.52 kg 15.53 lbs 7.06 kg $ SPENT ON GEAR $1,522 $1,751.73 $1,659.18 $ SPENT ON HIKE $5,371.21 $6,580.04 $6,087.41
Of all the comparisons made in this post, faster hikes had the latest average start date (May 1), the highest average level of fitness (7), the longest average day (39.80 mi / 64.05 km), took the fewest zero days (12.03), took the fewest near-o days (11.66), the lowest average ending base weight (14.23 lbs / 6.47 kg), and were the cheapest overall ($5,371.21).
Slower hikes had the earliest average start date (April 17), took the most zero days (20.99), and took the most near-o days (15.58).
#gallery-0-19 { margin: auto; } #gallery-0-19 .gallery-item { float: left; margin-top: 10px; text-align: center; width: 25%; } #gallery-0-19 img { border: 2px solid #cfcfcf; } #gallery-0-19 .gallery-caption { margin-left: 0; } /* see gallery_shortcode() in wp-includes/media.php */
PCT Oregon Tunnel Falls Trail
CHEAP VS. EXPENSIVE
Now to an issue that many future thru-hikers concern themselves with: how much will it cost to hike the Pacific Crest Trail (and how much should they spend)?
Will spending a lot of money on a thru-hike make it more successful? Enjoyable? Sexy? Probably not. But if you’re looking to spend less on a thru-hike, then it would appear that completing your hike as quick as possible (and not taking many days off) would be in your best interest.
The average cost of a completed thru-hike this year was $6,087.41, and that’s where I divided the survey respondends into the categories of “Cheaper Hikes” and “Expensive Hikes.”
FINISHERS CHEAPER HIKES EXPENSIVE HIKES OVERALL MALE/FEMALE % 66/34 75/25 67/33 AGE 32 35 34 START DATE April 25 April 19 April 23 DAYS ON TRAIL 139.6 151.82 144 FITNESS LEVEL 6.70 6.41 6.63 LONGEST DAY (MI) 37.45 37.34 37.17 ZERO DAYS 16.03 20.47 17.24 NEAR-O DAYS 13.16 15.40 13.78 RESUPPLY STOPS 26.03 26.87 26.61 BOXES SENT 12.03 11.34 12.20 PAIRS OF SHOES USED 4.15 4.39 4.25 BASE WEIGHT (START) 18.28 lbs 8.31 kg 18.42 lbs 8.37 kg 18.21 lbs 8.28 kg BASE WEIGHT (END) 15.34 lbs 6.97 kg 16.08 lbs 7.3 kg 15.53 lbs 7.06 kg $ SPENT ON GEAR $1,440.78 $2,095.13 $1,659.18
Of all the comparisons made in this post, cheap hikes were the shortest (139.6 days) and spent the least on gear ($1,440.78).
Expensive hikes had the fewest number of female hikers (25%), were the longest (151.82 days) and spent the most on gear ($2,095.13).
More on how much it costs to hike the Pacific Crest Trail here.
LIGHT VS. HEAVY PACKS
And now to the proverbial thru-hiker dick-measuring competition: pack weight.
The average starting base weight for this year’s PCT thru-hiking class was 18.21 lbs / 8.28 kg and the average ending base weight was 15.53 lbs / 7.06 kg.
I split this section based on starting base weight. What did we find out here? Well, nothing really. I suggest taking a look at this year’s gear guide instead of trying to glean any information from this chart.
FINISHERS LIGHTER PACKS HEAVIER PACKS OVERALL COMPLETION % 81% 68% 76% MALE/FEMALE % 67/33 73/27 67/33 AGE 31 34 34 START DATE April 22 April 22 April 23 DAYS ON TRAIL 142.07 149.32 144 FITNESS LEVEL 6.67 6.46 6.63 LONGEST DAY (MI) 37.49 36.72 37.17 ZERO DAYS 16.46 19.63 17.24 NEAR-O DAYS 13.94 14.21 13.78 RESUPPLY STOPS 26.95 26.25 26.61 BOXES SENT 13.03 11.26 12.20 PAIRS OF SHOES USED 4.33 4.11 4.25 $ SPENT ON GEAR $1,671.05 $1,720.97 $1,659.18 $ SPENT ON HIKE $6,172.34 $6,154.29 $6,087.41
Interestingly enough, there’s nothing really of note about the light vs. heavy packs comparison.
#gallery-0-20 { margin: auto; } #gallery-0-20 .gallery-item { float: left; margin-top: 10px; text-align: center; width: 25%; } #gallery-0-20 img { border: 2px solid #cfcfcf; } #gallery-0-20 .gallery-caption { margin-left: 0; } /* see gallery_shortcode() in wp-includes/media.php */
PCT-Washington-Owl
PCT-Desert-Eagle-Rock
OVERALL
Lastly, we take a look at which of the above groups had the lowest and highest averages from the overall pool of data.
To be honest, most of the data below makes a lot of sense (or I am just incredibly illogical). For example, international hikers spent the most on their hikes (an average of $800) – could this be the cost of airfare? Faster hikes had the fewest zero and near-o days – yup, checks out. Cheaper hikes had the least amount spent on gear; expensive hikes had the most.
Leave a comment below and let me know if you find anything fitting and accurate or perhaps out of place and mysterious.
FINISHERS LOWEST HIGHEST OVERALL COMPLETION % OLDER HIKERS 67% EXPERIENCED HIKERS 82% 76% MALE/FEMALE % EXPENSIVE HIKES 75/25 YOUNGER HIKERS 66/34 67/33 AGE QUICKER HIKES + LIGHTER PACKS 31 EXPERIENCED HIKERS 37 34 START DATE SLOWER HIKES April 17 FASTER HIKES May 1 April 23 DAYS ON TRAIL CHEAP HIKES 139.6 EXPENSIVE HIKES 151.82 144 FITNESS LEVEL INTERNATIONAL HIKERS 6.3 FASTER HIKES 7 6.63 LONGEST DAY OLDER HIKERS 34.81 mi / 56.02 km FASTER HIKES 39.80 mi / 64.05 km 37.17 mi 59.82 km ZERO DAYS FASTER HIKES 12.03 SLOWER HIKES 20.99 17.24 NEAR-O DAYS FASTER HIKES 11.66 SLOWER HIKES 15.58 13.78 RESUPPLY STOPS INTERNATIONAL HIKERS 25.82 FEMALE HIKERS 27.26 26.61 BOXES SENT INTERNATIONAL HIKERS 8.87 DOMESTIC HIKERS 13.96 12.20 PAIRS OF SHOES USED INTERNATIONAL HIKERS 3.95 FEMALE HIKERS 4.6 4.25 BASE WEIGHT (START) EXPERIENCED HIKERS 15.91 lbs / 7.23 kg MALE HIKERS 20.43 lbs / 9.29 kg 18.21 lbs 8.28 kg BASE WEIGHT (END) FASTER HIKES 14.23 lbs / 6.47 kg MALE HIKERS 16.89 lbs / 7.68 kg 15.53 lbs 7.06 kg $ SPENT ON GEAR CHEAPER HIKES $1,440.78 EXPENSIVE HIKES $2,095.13 $1,659.18 $ SPENT ON HIKE FASTER HIKES $5,371.21 INTERNATIONAL HIKERS $6.749.44 $6,087.41
AND THAT’S IT!
To find out more from this year’s Pacific Crest Trail Thru-hiker Survey, check out the gear guide, resupply guide, or the original results.
#mc_embed_signup{background:#fff; clear:left; font:14px Helvetica,Arial,sans-serif; width:100%;}
ENTER YOUR EMAIL TO PARTICIPATE IN NEXT YEAR’S SURVEY
PCT Class of 2016 Survey: The Demographics We've already broken down the Pacific Crest Trail Class of 2016's gear and resupply, so now it's time to take a closer look at the demographics (and miscellaneous datapoints) from this last year's PCT class.
0 notes