#form tag in html with example
Explore tagged Tumblr posts
Visit Tumblr Blog
Explore Tumblr blogs with no restrictions, modern design and the best experience.
Last Seen Tumblr Blogs


Fun Fact
Kazakhstan’s Minister of Communications and Informatics has blocked the Tumblr site because it contained 60 sites of terrorism, extremism, and pornography in 2015.
Text
BatB Week podfic instructions and tips

Thanks to everyone who signed up for the podfic exchange! If you signed up as a reader, you should have gotten a message with info on who you matched with. Send a DM if you missed the message.
(If you didn’t sign up, there is still time! We still need one more podficcer! The form to sign up is here.)
I don’t personally do voice/audio work, but I’ve pulled together some quick tips and instructions for recording, editing, and posting podfics below the cut. If someone else has better/more suggestions, please add on!
Recording and editing
Need audio recording/editing software? You don't need anything fancy; you can record it on whatever voice recording software comes installed on your phone (I have Samsung Voice Recorder, for instance), or use one of these free, beginner-friendly audio editors: Lexis Audio Editor (Android, iOS, Windows), Audacity (Windows, Mac, Linux), GarageBand (Mac), Audiotool (online).
Nastasia Marquez has a great tutorial on how to record and edit voiceovers for beginners in Audacity. It's very easy to follow along and gets straight to the point.
When recording, watch out for plosives and sibilances (e.g. your "pps," "sss," and "shh") as they can easily hinder the quality of your recording by being aggressive to the ear. It’s hard to give tips since everyone will be working with different devices, but my suggestion would be to put some space between your mouth and the microphone, or have your device inside a sock. You can learn more on them and how to deal with them here.
A good way to get clean audio is to record under a blanket. It’s silly, but it’s as close to a padded studio as you can get for free. It reduces echo and makes the audio sound much better no matter the mic you use.
Don't be afraid to record in short batches! There’s no need to do it in long unbroken takes. Piece it together later.
Posting the audio file
Once you have your finished audio file, you have to upload it somewhere, because AO3 can host the link to it, but not the audio file itself. It seems like Internet Archive is popular for hosting podfic audio files. You can also host it on Google Drive, YouTube, Mediafire, or Spotify.
Posting the podfic to AO3
Go to ‘Post > New work’ just like you would for posting any fic to AO3.
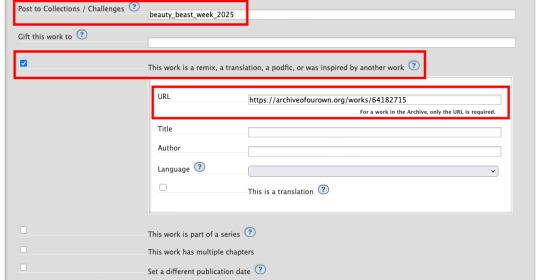
In the ‘Post to Collections / Challenges’ field, enter “beauty_beast_week_2025” (see first screenshot below).
Check the box that reads ‘This work is a remix, a translation, a podfic, or was inspired by another work’ and include the URL to the original fic (see first screenshot below). This not only gives credit to and notifies the author, but it adds a link to your podfic from their fic (when they approve it) so that your podfic gets more hits and kudos.
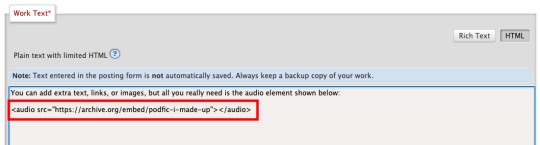
In the body of the post, insert the HTML to embed the audio file (see second screenshot below). It’s easy: AO3 has a simple guide to copy and paste from here.
If you’d like, you can add more content to the body of the post, like the event banner or some text, but it’s not necessary.
Here are some examples of BatB podfics so you can see how they’ve set things up: The Great Wide Somewhere, Mutual Care, and The Beast Within
Posting to the event
Important: tag the @beauty-beast-week account within the body of your Tumblr post itself by typing the @ symbol, typing beauty-beast-week, and then selecting that account name from the autocomplete menu that appears. This is the only way to be sure we see your post so we can reblog it from this account and include it in our master list posts.
Other than that, make sure you post to Tumblr on the day of the prompt you're using and include in your post:
Tag the @beauty-beast-week account within the body of the post (yes, I’m repeating myself)
Which fic your podfic is for, and link to it
Which day/prompt your podfic is for, in the body or tags
The event hashtag #batbweek and/or #batbweek 2025
Any other appropriate hashtags (characters, ship, NSFW and content warnings)
Optional: The event banner (save from the top of this post) or the day's banner (in the full event instructions that will come later)
Heads up authors! Check your AO3 email during the event!
If your work was adapted into a podfic for the exchange, check your email and follow the link to approve linking back the podfic to your original work so more people can discover the podfic version!

Send an ask or DM if you have any problems or questions!
7 notes
·
View notes
Text
Is there an actually complete guide to AO3's limited HTML somewhere? I know for a fact that some features work but only under slightly weird rules.
For example, if you're using the <a> tag to form an anchor to refer to later, you HTML will end up looking like <a name="Anchor" rel="nofollow" id="Anchor"> when it's done auto-correcting in the Preview. If you type in <a name="Anchor"> or <a name="Anchor" id="NotAnchor">, it will autocorrect to that, but if you type <a id="Anchor"> it will correct to an <a> tag whose only attribute is rel, or <a rel="nofollow">. (The rel="nofollow" attribute has no practical effect for most users' purposes.)
I know that AO3 will autocorrect any incompatible HTML to compatible HTML, but I don't know what the compatible HTML is, and the above <a name="Anchor"> example demonstrates that some things are compatible but don't look compatible unless you do them right!
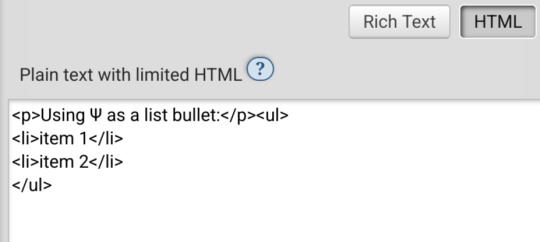
This is especially confusing because the editor will autocorrect some HTML as soon as you switch from the HTML editor to the Rich Text editor - but it won't correct everything. I've attempted to do slightly funky things with styling that seemingly worked just fine in the editor, but vanish when I preview the chapter.
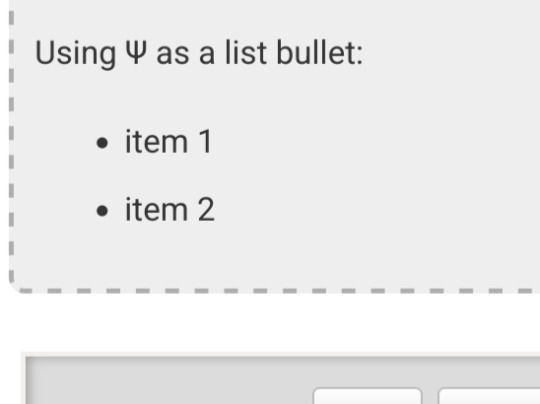
For example, here I am trying to use using the Greek character Ψ as a list bullet. When I originally typed it into the html field, I used the actual character Ψ. As soon as I switched to rich text and then back to html, it had autocorrected to Ψ, which is the escape character for Ψ. (For those who don't know, escape characters are a special code to tell the browser that this is NOT supposed to be code. <p> is an html tag; < p > will literally render "< p >".) So, it accepted the style attribute and the list-style-type, but it forced it into an escape character. So far so good.
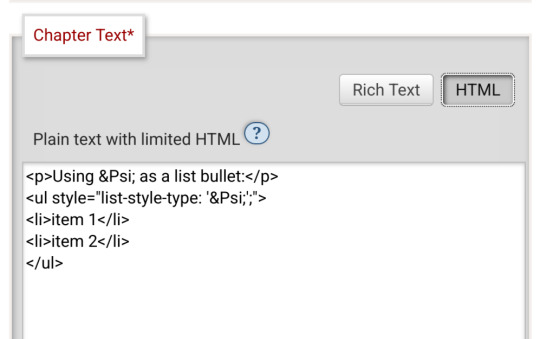
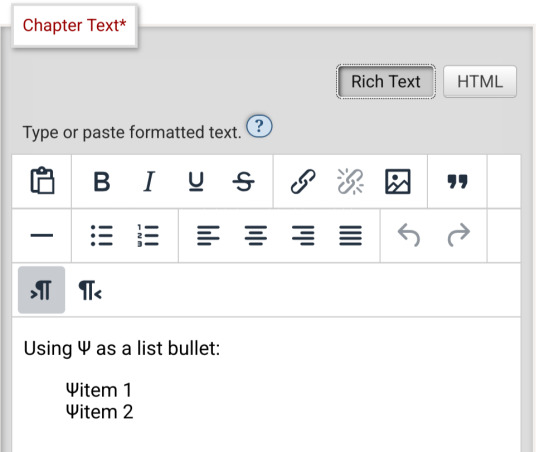
Until I click preview. Now the custom bullet is gone, replaced with the standard circle. If I click edit again, the code has removed the CSS attribute that changed the bullet... and also replaced the escape character Ψ with the character Ψ.
Weird.
#ao3#otw#html#ao3 formatting#ao3 html#I do not mind the lack of a clear standard at all#OTW is a nonprofit full of overworked staff and volunteers#and complete documentation is very hard#I just wanna be able to nerd more effectively#Can anyone direct me to the part of the open-source code that dictates HTML autocorrection? Is that a thing I can examine?
20 notes
·
View notes
Text
How To Sign Up To This Gift Exchange
This exchange does signups on Ao3, to help with matching! (Last year it took us 8 days to do it by hand and that's just not sustainable).
Once you are on Ao3, there are two sections, one for your requests (stuff you’re telling people (and the machine) would be a good gift for you), and one for your offers (stuff you’re telling the machine that you can make as a gift for other people). Here’s how you fill them out.
Requests
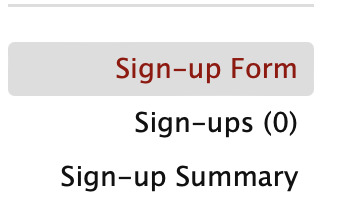
First you go to the collection that you want. The all-ages one is here, and if you are opting into NSFW (and are over 18), you can go to the 18+ collection! In the sidebar on the left-hand side of the page there is a button for sign-up form, you can press to be taken to the sign-up form.
That brings you to the first page, which looks like this.

Lots of buttons, but don't worry, it's pretty simple once you get the underlying logic!
Let's say I start with 3rd Life. I know I want to opt into pearl gifts, shadowrot, and platonic desert duo. What will that look like?
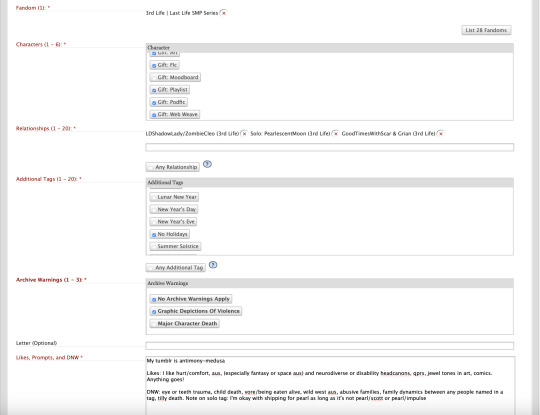
So I selected the fandom I wanted (3rd Life) and what types of gifts that I was open to. And then I selected the relationships that I'd like as a gift! I could match on any one of these, my gifter might have offered only one relationship in this fandom— but we match on one, so they know which relationship to focus on! And each of those tags is formatted a little differently— the desert duo one the names are connected with a & (so that means i'll get something platonic), the shadowrot one the names are connected with / (so that means I'll get something shippy if my gifter chooses to write that relationship), and the pearl tag is Solo, so that means I could get anything as long as pearl is still the focus! So I have to specify later if I'm okay with shipping or not, or any relationships I don't want.
Additional tags is telling people what kind of holidays I'm open to in my gift— not everybody celebrates the same holidays! For this one I don't want any holidays, so I selected no holidays. And then archive warnings is telling people if I'm okay with archive warnings in my gift— because it's 3rd life I'm okay with graphic depictions of violence, or I'm also okay with no archive warnings in my gift at all! Note that if you select archive warnings that just means you're opting into them as an option, not that your recipient HAS to give them to you. And then we get down to the free text box, where I give my gifter a little more idea of how to make a gift that I'd like. We start with my tumblr, because my gifter has to know how to give me my gift on tumblr eventually! And then a list of likes, stuff to give my gifter some ideas. Mods ask that you include at least a couple likes, and/or some prompts, or link a letter in that letter text box.
What's a letter? Ao3 has a text limit of 5 thousand characters in that box, and sometimes people exceed it because they have detailed prompts— especially if they're requesting lots of different ships as options! You also can't do any formatting unless you code it in HTML. So, if you are running out of space on Ao3, you can write the information for your gifter offsite, on Dreamwidth or Google Docs or a tumblr post! Here is an example from another exchange of what a letter can look like.
IMPORTANT NOTE: If you are linking a google doc letter, make sure that you are not using an account that has your real name in it. Make a fandom email for it, or host the letter somewhere like tumblr or dreamwidth, where your real identity will not be connected to your fandom identity. And if you link a tumblr, don't change your blog URL or the letter will disappear for people!
Anyways, I'm not doing a letter cause I'm just doing a quick and dirty signup, so I just did some likes and my DNW! You can also add specific prompts if you want (and it's nice for your gifter if you do) but it's not required!
What is a DNW? DNW stands for Do Not Want, and it's anything (anything) that would ruin a gift for you. You can DNW certain characters, crossovers, types of aus, types of content, specific ways of writing or art, quotes from specific people if you're requesting web weaves, specific music if you're okay with playlists, types of endings, specific sounds if you're requesting podfic— the list goes on. I did a short DNW there to make it all fit within the screen, but my normal one is quite long. There will be a thread in the discord where people can compare DNWs to see if there's anything you want to add to yours.
The rule is that as long as you are polite (nothing like "no kid fic because it's creepy to age down characters") and specific (nothing like "no kinks", because that is too broad and subjective of a category for people to try and navigate) and you don't box your gifter into a specific gift (nothing like "nothing that isn't canon compliant fic specifically about the fairy fort burning") then you're good to go! Because I selected a Solo tag I specifically have to tell my gifter if I'm okay with shipping and which ships, so there's a line there about that. You do need to either put down a DNW or say DNW: no restrictions, so that your recipient knows that everything is on the table.
Please make sure that your DNW and your letter link (if you're using a letter) is included on every fandom box. This is for two reasons. 1) we need to make sure your DNW is in a format that locks once it gets sent to your gifter, not somewhere you could still edit it, like tumblr. 2) There is an option to separate up requests by fandom for people who are looking for extra gifts to give, and that means someone might see only one fandom of your request before giving you something. You need to make sure that anyone who sees just one fandom of your request still has all the information necessary to make a gift.
Note: If you are signing up to the 18+ collections, it's a very good idea to include specific NSFW likes and NSFW DNW because people's tastes can vary wildly, and there's nothing worse than someone carefully making you a gift that's exactly the wrong type of thing for you because are into different things. Give your gifter something to work with and a direction to head in!
And then there's the optional tags box. This is for extra holidays! The additional tags are how you tell someone what holidays you're good to have in your gift, and it only allows you to select 20 at once. But if you wanted to select more holidays than that, you can put them down in the optional tags box! Or you can select any additional tags and just do every holiday at once.
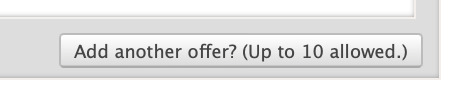
And technically, that's three relationships, so I could call it done there! That's the minimum to request, I'm done. But what if I like other fandoms too? How do I add them? Well. There is a button for that.

In that case, I can hit this button, and it brings me up another request box, and I can do this all over again with another fandom! You can go up to 10 fandoms, with a maximum of 20 tags for each.
But what if you really really REALLY like rats smp and there are 30 tags in the tag set and you want them all?
Two options. One is that instead of putting in relationship tags one by one, you hit the any relationship button.
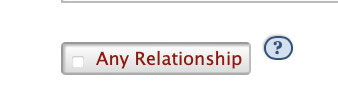
That will match you to any relationship in the tag set. That doesn't mean any tag on Ao3, but it does mean any tag that's been nominated into the tag set, and we keep the tag nominations open so people can get in their last-minute ships. If you select this one, keep an eye on the tag set to make sure that nobody nominates something that's a hard no for you.
Option two is that you hit the button for another request, and then you just do Rats SMP again, with different tags! You can request the same fandom more than once, with different tags— so you can do a request for your shippy tags and one for your platonic ones, or one for your family tags and one for your non-family ones, or one for desert duo and one for convex, or any other way you want to split it up! As long as you go over the minimum of three relationships requested, you've filled out a valid request! Request ten different fandoms or the same one ten times— it'll work.
Offers
And then we scroll down a little bit to the offers page. Let's take a look at it!

So this is telling the machine the type of gift you are open to making, and making sure you're matchable to someone else's request that will look like the one we just did. You've gotta give the machine the information in a way it'll understand so it can whirr away and give you a match to someone who requested the type of stuff you like to make. So how is this done? I did 3rd life again for the fandom, and the type of gift I can make is fic, so I selected fic for the gift type.
I only need a minimum of three relationships for the relationships, but there's more stuff that'll write than I wanted as a gift, so I have a bunch of relationships in there! I could match on any one of them, so I make sure to offer just relationships I'm confident I can write. Like with the requests, / means a romantic (or sexual, if you are in the 18+ collection) relationship, and & means platonic. Solo: means I can bring any relationships I want into the fic as long as the focus is on the person in the tag and my recipient hasn't DNWed those characters.
When it comes to holidays I COULD go down the list and select everything, but it's easier to just select any additional tag, and that'll make sure I'm matchable no matter what holidays someone selects! I figure that I can do my research on different holidays, and maybe ask for a beta reader to help out if I match on a holiday I'm not used to!
On archive warnings I select no archive warnings apply and graphic depictions of violence, and that means I'm matchable to people who selected either one of those.
And Optional tags is for overflow holidays, but I already selected any holidays, so I'm good to go! This is a complete signup! I can submit it now!
But what if I want to offer other fandoms too? There's rats SMP, there's Hermitcraft, I'm still a DSMP fan—
You can add up to ten fandoms, and same as with requests, you can go up to either 20 tags or "any tag (in the tag set)" for each fandom.
And then you scroll down to the bottom and hit submit, and that's it, you're officially signed up!

Editing and etc
You can go back and edit and tweak your signup any time you want until signups close— remove ships, add them, add prompts, edit your DNW— it's all editable until midnight EST on the 17th of November, when signups close and lock for us to run matching on.
The matching requires:
1 match on fandom
1 match on character (gift type)
1 match on relationship
1 match on additional tags (holidays)
1 match on warnings
So you will be assigned to someone where you have at least one tag in common in all of those categories— a fandom you selected, a gift type you can make, a relationship you said you can do, a holiday you opted into, and a level of archive warnings you said you were good with. The system tries to match you with more tags, but sometimes there are edge cases and you only match on one tag. No matter what is on your recipient's signup, you only have to make one gift, and you only have to make a gift with the tags you signed up with— if someone requested major character death and no warnings apply and you offered no warnings apply, you just can focus in on no warnings apply. Your requests are public, so that people can give bonus gifts if they want to and so that we can pinch-hit your requests if necessary (and so your recipient can see what you requested), but your offers are private (only the mods see them). Make sure you only request things which you are okay having public, or speak to the mods about setting up a sock account.
Signing up gives mods access to your Ao3 email (it's how we send you your assignment), so make sure the email attached to your AO3 account is one that a) you check regularly, and b) are comfortable with exchange mods seeing. You can verify your email here: archiveofourown.org/users/[your ao3 name here]/change_email If for some reason we can’t find a way to give you an assignment (say you only offered ships that nobody was requesting), mods will ask you to make more offers until we can give you an assignment. If we can't give you an assignment— there's nobody in the whole exchange you could make a gift for— you will not be able to continue in the exchange. If we can’t assign you to someone (either you are requesting things nobody offered or the matching just didn't work out to cover you), you will be an initial pinch hit, and someone will opt in to take you on as an extra assignment. Initial pinch hits are normal and expected in an exchange of this size, don't panic if you see yourself as one of them. If there is someone in the exchange that you don’t want to match with (for any reason ranging from "we have each other blocked on tumblr" to "we give each other gifts a lot and we want to give gifts to other people this time"), contact the mods through the ticket system and we’ll hand-adjust the matches. We can only do this before matches go out— if you match to someone you can't create for you'll have to drop your assignment and send it to pinch hits, which we would like to avoid happening if at all possible. Please make sure you send us any Do Not Match requests before signups close!
19 notes
·
View notes
Note
Hello, wanted to say I read and loved the demo. Very well done. I just had a few questions, would love to know what Twine Template you use, especially at the beginning. Where you have the character creator, I love that the box around your selection changes to say/match what you chose. Such as depending on what skin color I choose it changes to signify that. Would love to know if you would share how you did that. I look forward to future updates! Best of luck.
Thank you! 🤍
I'm using the default template for SugarCube, if I remember correctly. Glad that you liked the box effect, it was my solution to reducing the number of passages whilst still allowing the validation of user input in character creation.
I did it through a combination of HTML tags and SugarCube native macros. Technical stuff under the cut:
Here is an example for eye color:
<fieldset class="charbox"><legend id="chareyes" class="chartxt">$p.appearance.eyes</legend> <div class="charoptions">Your eyes are: <<link "hazel">><<set $p.appearance.eyes to "hazel">><<replace "#chareyes">>$p.appearance.eyes<</replace>><</link>> <<link "brown">><<set $p.appearance.eyes to "brown">><<replace "#chareyes">>$p.appearance.eyes<</replace>><</link>> [rest of the options removed for brevity]</div> </fieldset>
The fieldset and the legend HTML tags together form a single box, a so-called legend, which I declare per attribute such as name, skin color, etc. You need a fieldset to make legend work iirc, but legend is where that text is displayed and it is positioned on the box frame by default. Important here is to give a unique ID to the legend tag ("chareyes" in this case), as we are interested in manipulating the text shown in it depending on our box.
In the sample above, the options I present for the eye color are listed within the Twine <<link>> tags. For these links there is no target passage to go to. Instead, you can see it is coded to do two things upon clicking the respective option. One, setting a game variable to the selected color.
<<set $p.appearance.eyes to "brown">>
Two, triggering a replace command to change the value shown in the legend to the description of the selected eye color according to the variable we have set in the same line. This is the bit you are asking about:
<<replace "#chareyes">>$p.appearance.eyes<</replace>>
Replace triggers without changing passages, so this way you can adjust multiple variables on a single "page". You'd obviously need to adjust the corresponding CSS classes to make it look the desired way, but the mechanics are serviced with just this idea above.
Hope this helps!
12 notes
·
View notes
Text
Tangling the web: an upcoming post series (?)
Hey all! Amari here. I'll be starting a post series about web design traits and trends that have become inescapable across the internet, and whether we can internet without them—as users, developers, and designers.
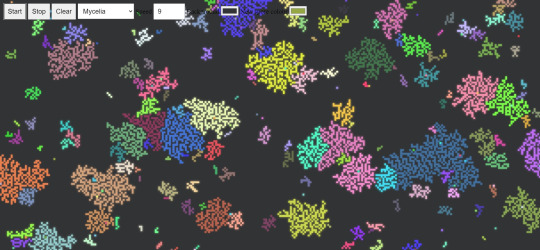
Petri Dish - a weird web experience thing I made.
So, I'm a web developer who's had brief stints in graphic design, and my current PhD research orbits around the theme of virtual spaces and places. I've made websites, I've taught people how to make websites, and I'm something of an avid user of websites myself.
And…well…I'm bored! I'm bored of SEO-driven design. I'm bored of single-flow webpages that start with a giant hero image and end in a shiny call to action button—all designed to channel you as quickly as possible to the part where you subscribe or enter your card details.
(Even this post is formatted like one of them! It wasn't even intentional! It's become ingrained in the way I structure and present my ideas, and that's just a little disturbing.)
These templates are sweeping the landscape like invasive trees. And at the heart of this scourge is the vaunted axiom of "Predictability," which gets peddled in every UI/UX class that is "future-oriented" enough to use that acronym. Predictability lets users learn a new site quickly so they spend money sooner, fosters comfort and familiarity with the idea of spending money, and allows for the development of usage patterns where money is spent.
I get the merits of that axiom; I get that it has a time and place. But when game and webcomic sites look and feel and interact like that, I think we have to ask: Can we imagine something different? Can we slow the takeover of the smooth corpo aesthetic? Can we avert a future where the effective geography of the web, with all its varied terrain and endemic textures, is bulldozed into featureless oblivion?
I think it would be presumptuous to suggest that they're some mythic species of the past that slowly died out, too. A lot of the web experiences we loved well as kids are still right there, or have successors that are! They've just gotten so crowded out, by the combination of corporate sites and corporate-driven search algorithms, that one wonders if they will someday become impossible to stumble upon.
Anyway, the intended post series is born out of these provocations. I'd like to tackle elements of the current schema of "good web design" and contemplate a web without them (hopefully with examples if I can find them):
Predictable layouts, the "F" scan pattern, and calls to action
Discoverability / SEO
Well-formed HTML and well-maintained linkage
Responsive web design
Identity and device tracking
Socially engineering higher engagement through design
Statefulness and timelines
Visually communicating functionality
And I know, all of these things sound like good traits for a site to have. And yes, in most contexts, they are! But I think imagining the web without them is a highly worthwhile exercise anyway.
Anyway, stay tuned if that interests you—I will be posting them to this blog and tagging them with #tangling the web. Alas, my Call to Action reflex could not be denied, and I had to give you an easily actionable instruction at the end of the post.
7 notes
·
View notes
Text
Learn HTML and CSS: A Comprehensive Guide for Beginners
Introduction to HTML and CSS
HTML (HyperText Markup Language) and CSS (Cascading Style Sheets) are the core technologies for creating web pages. HTML provides the structure of the page, while CSS defines its style and layout. This guide aims to equip beginners with the essential knowledge to start building and designing web pages.
Why Learn HTML and CSS?
HTML and CSS are fundamental skills for web development. Whether you're looking to create personal websites, start a career in web development, or enhance your current skill set, understanding these technologies is crucial. They form the basis for more advanced languages and frameworks like JavaScript, React, and Angular.
Getting Started with HTML and CSS
To get started, you need a text editor and a web browser. Popular text editors include Visual Studio Code, Sublime Text, and Atom. Browsers like Google Chrome, Firefox, and Safari are excellent for viewing and testing your web pages.
Basic HTML Structure
HTML documents have a basic structure composed of various elements and tags. Here’s a simple example:
html
Copy code
<!DOCTYPE html>
<html>
<head>
<title>My First Web Page</title>
<link rel="stylesheet" type="text/css" href="styles.css">
</head>
<body>
<h1>Welcome to My Web Page</h1>
<p>This is a paragraph of text on my web page.</p>
</body>
</html>
: Declares the document type and HTML version.
: The root element of an HTML page.
: Contains meta-information about the document.
: Connects the HTML to an external CSS file.
: Contains the content of the web page.
Essential HTML Tags
HTML uses various tags to define different parts of a web page:
to : Headings of different levels.
: Paragraph of text.
: Anchor tag for hyperlinks.
: Embeds images.
: Defines divisions or sections.
: Inline container for text.
Creating Your First HTML Page
Follow these steps to create a simple HTML page:
Open your text editor.
Write the basic HTML structure as shown above.
Add a heading with the tag.
Add a paragraph with the tag.
Save the file with a .html extension (e.g., index.html).
Open the file in your web browser to view your web page.
Introduction to CSS
CSS is used to style and layout HTML elements. It can be included within the HTML file using the <style> tag or in a separate .css file linked with the <link> tag.
Basic CSS Syntax
CSS consists of selectors and declarations. Here’s an example:
css
Copy code
h1 {
color: blue;
font-size: 24px;
}
Selector (h1): Specifies the HTML element to be styled.
Declaration Block: Contains one or more declarations, each consisting of a property and a value.
Styling HTML with CSS
To style your HTML elements, you can use different selectors:
Element Selector: Styles all instances of an element.
Class Selector: Styles elements with a specific class.
ID Selector: Styles a single element with a specific ID.
Example:
html
Copy code
<!DOCTYPE html>
<html>
<head>
<title>Styled Page</title>
<link rel="stylesheet" type="text/css" href="styles.css">
</head>
<body>
<h1 class="main-heading">Hello, World!</h1>
<p id="intro">This is an introduction paragraph.</p>
</body>
</html>
In the styles.css file:
css
Copy code
.main-heading {
color: green;
text-align: center;
}
#intro {
font-size: 18px;
color: grey;
}
CSS Layout Techniques
CSS provides several layout techniques to design complex web pages:
Box Model: Defines the structure of an element’s content, padding, border, and margin.
Flexbox: A layout model for arranging items within a container, making it easier to design flexible responsive layouts.
Grid Layout: A two-dimensional layout system for more complex layouts.
Example of Flexbox:
css
Copy code
.container {
display: flex;
justify-content: space-around;
}
.item {
width: 100px;
height: 100px;
background-color: lightblue;
}
Best Practices for Writing HTML and CSS
Semantic HTML: Use HTML tags that describe their meaning clearly (e.g., , , ).
Clean Code: Indent nested elements and use comments for better readability.
Validation: Use tools like the W3C Markup Validation Service to ensure your HTML and CSS are error-free and standards-compliant.
Accessibility: Make sure your website is accessible to all users, including those with disabilities, by using proper HTML tags and attributes.
Free Resources to Learn HTML and CSS
W3Schools: Comprehensive tutorials and references.
MDN Web Docs: Detailed documentation and guides for HTML, CSS, and JavaScript.
Codecademy: Interactive courses on web development.
FreeCodeCamp: Extensive curriculum covering HTML, CSS, and more.
Khan Academy: Lessons on computer programming and web development.
FAQs about Learning HTML and CSS
Q: What is HTML and CSS? A: HTML (HyperText Markup Language) structures web pages, while CSS (Cascading Style Sheets) styles and layouts the web pages.
Q: Why should I learn HTML and CSS? A: Learning HTML and CSS is essential for creating websites, understanding web development frameworks, and progressing to more advanced programming languages.
Q: Do I need prior experience to learn HTML and CSS? A: No prior experience is required. HTML and CSS are beginner-friendly and easy to learn.
Q: How long does it take to learn HTML and CSS? A: The time varies depending on your learning pace. With consistent practice, you can grasp the basics in a few weeks.
Q: Can I create a website using only HTML and CSS? A: Yes, you can create a basic website. For more complex functionality, you'll need to learn JavaScript.
Q: What tools do I need to start learning HTML and CSS? A: You need a text editor (e.g., Visual Studio Code, Sublime Text) and a web browser (e.g., Google Chrome, Firefox).
Q: Are there free resources available to learn HTML and CSS? A: Yes, there are many free resources available online, including W3Schools, MDN Web Docs, Codecademy, FreeCodeCamp, and Khan Academy.
#how to learn html and css#html & css course#html & css tutorial#html and css#html course#html css tutorial#html learn#html learn website#learn html#learn html and css#html and css course#html and css full course#html and css online course#how to learn html and css for beginners
4 notes
·
View notes
Text
Understanding HTML: The Building Blocks of the Web
In the vast landscape of the internet, HTML stands as the foundation upon which the digital world is built. From simple static web pages to dynamic interactive experiences, HTML (Hypertext Markup Language) plays a pivotal role in shaping the online landscape. Let's embark on a journey to demystify HTML and understand its significance in the realm of web development.
What is HTML?
HTML is a markup language used to create the structure and content of web pages. It consists of a series of elements, or tags, that define the various components of a web page, such as headings, paragraphs, images, links, and more. These elements are enclosed within angled brackets (< >) and typically come in pairs, with an opening tag and a closing tag, sandwiching the content they define.
The Anatomy of HTML:
Tags: Tags are the building blocks of HTML and serve as the basic units of structure. They encapsulate content and provide semantic meaning to different parts of a web page. Common tags include <html>, <head>, <title>, <body>, <h1> (heading), <p> (paragraph), <img> (image), <a> (anchor/link), and many more.
Attributes: Tags can also contain attributes, which provide additional information about the element. Attributes are specified within the opening tag and consist of a name and a value. For example, the <img> tag may include attributes such as src (source) to specify the image file and alt (alternative text) for accessibility purposes.
Nesting: HTML elements can be nested within one another to create hierarchical structures. This nesting allows for the organization and hierarchy of content, such as placing lists within paragraphs or dividers within sections.
Document Structure: Every HTML document begins with a <!DOCTYPE> declaration, followed by an <html> element containing <head> and <body> sections. The <head> section typically contains metadata and links to external resources, while the <body> section contains the visible content of the web page.
The Role of HTML in Web Development:
HTML serves as the backbone of web development, providing the structure and semantics necessary for browsers to interpret and render web pages correctly. Combined with CSS (Cascading Style Sheets) for styling and JavaScript for interactivity, HTML forms the core technology stack of the World Wide Web.
Conclusion:
In essence, HTML is the language of the web, enabling the creation of rich and immersive digital experiences. Whether you're a seasoned web developer or a newcomer to the world of coding, understanding HTML is essential for navigating the intricacies of web development. Embrace the power of HTML, and embark on a journey to craft compelling narratives and experiences in the ever-evolving digital realm.
5 notes
·
View notes
Text
HTML Elements & Tags
Element: anything from the start tag to the end tag.
Tag: a piece of markup language that is used to indicate the beginning and end of an html element in an html document.
Example: <p> your text here </p>
<header><;/header> - Represents a container for introductory content or a set of navigation links. Usually contains one or more heading elements (<h1> - <h6>), logo or icon, or authorship information.
<;h#></h#> - header element. The higher the number, the greater the importance. Only use one <h1> element per page. There can only be six. Main topic on a web page. When visitors to your website see the h1's, it draws attention as it stands out the most on the page as it generally appears as a larger font size and in bold.
<p></p> - paragraph. used to create a paragraph of text on websites. Always starts on a new line. A lot of browsers add some white space (a margin) before and after a paragraph.
<;!-- ____: _______ --> - comment. Used to notate code with text that will not appear on the website/browser display. It allows you to make code inactive. You can use them to explain your code, which can help you when you edit the source code at a later date.
<main></main> - an element that identifies a content area. The main element. Specifies the main content of a document. This type of element/tag makes your html easier to read and helps with Sear Engine Optimization and accessibility. Should not contain any content that is repeated across documents such as sidebars, navigation links, copyright information, site logos, and search forms. When you put things inside the main element, this is called nesting. Nesting elements should be placed two spaces further to the right from the element they are nested in. This spacing is called indentation and is used to make html easier to read.
Example: <main> <h1>Tumblr Meme App</h1> <h2>Tumblr Photos</h2> <!-- TODO: Add link to Tumblr photos --> <;p>See more Tumblr memes in our gallery</p> </main>
<img> - used to images to your website. This element has an opening tag without a closing tag. A tag for an element without a closing tag is called a self-closing tag.
{{ under construction }}
#html#html coding#coding#web development#website development#web design#responsive web design#html web design#html how to#how to html#hot to html#html5#html elements#html tags
4 notes
·
View notes
Note
hello!!! is there a central place/piece of content (like a comic or website, for example) that i could find IS-OT art at? or are things kinda just a collection of parts forming a storyline? i recently found ur blog and LOVEEE your work and would love to see more !!!
for now it's just the "tthw" tag on this tumblr! when i'm feeling less under the weather i'm going to go back and individually tag ocs for ease of browsing.
the story is planned but not posted anywhere. i am piecing together a website for that though! this will take awhile-- im slow with html and keep getting distracted by the siren song of drawing my ocs. you know how it is. for now please enjoy the snippets i post
and THANK YOU!! who doesnt love robots with problems!!
#every time i code im like “man this would be so much easier if i just compromised and made things look a little less cool”#and EVERY TIME i reply “but i dont want it to look less cool”#fun fact. whatever form his story takes will likely be multimedia because im picky and hate commitment but looove experimenting with art#inquiries#commad
10 notes
·
View notes
Text
Hi, this is Creative School. Today we share with you how to generate PDF documents from any website. If you want to develop a website and want to provide PDF downloading features, you are exactly in the right place. This video will help you to insert a PDF generator feature in your website on any page of any specific size and shape. GitHub Link: https://github.com/BorhanHosen/How-to-add-pdf-file-download-option-in-your-website.git 0:00 Explanation 3:10 Intro 3:39 Explaining Puppeteer 7:12 Server Side Code Explanation 15:01 Client Side Code Explanation 26:21 Final Touch 28:18 Outro Here are some of our previous tutorial links. You can watch and learn new things and techniques. Enjoy them: How to Send Data from HTML Form Data to Google Sheets | Creative School https://youtu.be/A4TPkOw2Ess Mastering Full Invoice Inventory Management in Microsoft Excel | Creative School Tutorial https://youtu.be/f8BTxan1QTo Motion Graphics in PowerPoint Full Playlist: https://youtube.com/playlist?list=PLsWfHxHIjBT87YgBulwX6X-bnEk4TayQu How to Create the Best Animated Info-graphic in PowerPoint [Part-1] 2020 || Creative School || https://youtu.be/rV-mykyBQIM Awesome Flat Intro Animation In PowerPoint Part 2 || Creative School || https://youtu.be/TafoVSYadEg The Night Sky with a Mountain, fountain, a tree, Bird & Moon Creating in PowerPoint || Creative School || https://youtu.be/jyCTlxJrGyg SAMSUNG Galaxy Boot Animation in PowerPoint [Full Tutorial- 2020] https://youtu.be/pqh-P1mUNp8 How to make an intro video of 10-minute school in PowerPoint 2020. [Part 1] https://youtu.be/I1xObR_SVco Water Animation In PowerPoint Animation! || Creative School https://youtu.be/WfzKTzbGVRA How to add pdf file #download option in your #website https://youtu.be/cNhQ-0VBt5A ===HashTags=== #reactjs #creativeschool #pdfconversion #html #nodejs #vscode #website #javascript #convertpdf #generatepdf #pdfconverter #downloadpdf #puppeteers #mernstack #javascript ===Related Tags=== react pdf generator, generate pdf using react, generate pdfs from html & css with nodejs using puppeteer, certificate generator website, how to create a pdf file using reactjs, html to pdf using javascript, generate pdf from html, generate pdf using javascript, how to add pdf object on a website, how to convert html to pdf in react app using jspdf, easy way to embed pdfs on a website, how to convert html content to pdf in react app using jspdf, generate pdf with react, how to create a pdf with node and puppeteer, generate pdfs from html & css with nodejs using puppeteer, puppeteer, getting to know puppeteer with example, get started with headless chrome and puppeteer, headless chrome and puppeteer, how to generate pdf from html with node.js, how to create a pdf file using reactjs, generate pdf using javascript, how to create pdfs with node js and react, puppeteer examples, puppeteer tutorial, puppeteer html to pdf generation with node.js,
#react pdf generator#generate pdf using react#generate pdfs from html & css with nodejs using puppeteer#certificate generator website#how to create a pdf file using reactjs#html to pdf using javascript#generate pdf from html#generate pdf using javascript#how to add pdf object on a website#how to convert html to pdf in react app using jspdf#generate pdf with react#how to create a pdf with node and puppeteer#javascript#creativeschool#mernstack#puppeteer#website#download
3 notes
·
View notes
Text
Complete Guide to Rapid URL Indexer's RESTful API for Developers
Rapid URL Indexer has released comprehensive documentation for its RESTful API, giving developers everything needed to integrate powerful URL indexing capabilities into their applications and workflows.
This detailed reference covers all aspects of the API, from authentication to error handling, with clear examples for each endpoint.
Core API Endpoints
The documentation details five essential endpoints that form the backbone of the indexing service:
/api/v1/projects/list (GET): Retrieve all your indexing projects with detailed status information, ordered by creation date with newest first
/api/v1/projects (POST): Submit new URLs for indexing with customizable project names and notification preferences
/api/v1/projects/{project_id} (GET): Monitor the status of specific projects including submission counts and indexing progress metrics
/api/v1/projects/{project_id}/report (GET): Download comprehensive CSV reports for completed indexing projects
/api/v1/credits/balance (GET): Check your available credit balance to ensure uninterrupted service
Authentication System
Rapid URL Indexer implements a straightforward authentication system using API keys. All requests require the inclusion of an X-API-Key header containing your unique key. This approach provides strong security while maintaining simplicity for implementation.
The documentation includes clear examples of how to properly authenticate requests across different programming environments.
Project Management Features
The API handles project creation with intelligent defaults and data validation. When creating projects, the system automatically:
Sanitizes project names to remove special characters and HTML tags
Generates fallback names using MD5 hashing when no name is provided
Validates all URLs to ensure they begin with "http://" or "https://"
Filters out invalid URLs during processing
Comprehensive Error Handling
The documentation provides detailed information about possible error responses, including:
400 Bad Request: Returned when requests are malformed or missing required parameters
401 Unauthorized: Indicates missing or invalid API keys
403 Forbidden: Occurs when permissions are insufficient (such as inadequate credits)
404 Not Found: Returned when requested resources don't exist
429 Too Many Requests: Triggered when rate limits are exceeded
500 Internal Server Error: For unexpected server-side issues
Each error response includes a descriptive message to help troubleshoot integration issues.
Project Status Tracking
The API implements a comprehensive status tracking system with five possible states:
pending: Created but not yet submitted for indexing
submitted: Currently in progress with indexing underway
completed: Successfully finished the indexing process
failed: Indexing process encountered critical errors (with automatic credit refunding)
refunded: Partial refund issued for URLs not indexed within the 14-day window
This granular status reporting allows for precise tracking of indexing progress across multiple projects.
System Limitations
To ensure fair usage and system stability, Rapid URL Indexer implements a rate limit of 100 requests per minute per API key. This provides sufficient capacity for most integration scenarios while preventing abuse.
Developer-Friendly Documentation
The API reference includes a complete OpenAPI 3.1 specification in YAML format, making it compatible with a wide range of API development tools. This specification can be used to automatically generate client libraries, interactive documentation, and testing tools.
Implementation Guidance
For each endpoint, the documentation provides detailed request and response examples, showing exactly what data to send and what to expect in return. This includes proper formatting for:
Project submission requests
Interpreting status responses
Handling the CSV report format
Processing error messages
Integration Use Cases
The API is designed to support various integration scenarios, including:
Automated submission of new content for indexing
Scheduled monitoring of indexing progress
Generation of indexing reports for client deliverables
Credit balance monitoring for account management
Rapid URL Indexer's comprehensive API documentation makes these integrations straightforward while providing the flexibility needed for complex applications and workflows.
https://rapidurlindexer.com/indexing-api/
0 notes
Text
How We Used Google Tag Manager to Unlock Hidden Revenue in the Customer Journey

What if I told you most brands are leaking conversions—not because of bad products, but because they don’t track what really matters?
That’s where Google Tag Manager (GTM) changed everything for us. We stopped guessing and started seeing the full customer journey, click by click.
In this blog, I’ll walk you through exactly how we used GTM to:
Uncover friction points
Personalize experiences
Improve funnel performance
Drive more conversions (without spending more on ads)
🧠 First: GTM Isn’t Just for Coders Anymore
GTM used to be the nerdy cousin of Google Analytics—overlooked and misunderstood. Now? It’s a marketer’s secret weapon.
It allows you to add tracking codes, conversion pixels, and behavior triggers without touching the site code. That means real-time changes, fast testing, and deep tracking that fuels growth.
🔍 Step 1: We Mapped Our Entire Funnel Inside GTM
We started by asking: Where are users dropping off? And why?
Using GTM, we tagged key micro-events across our site, such as:
Scroll depth (25%, 50%, 75%, 100%)
Clicks on “Add to Cart” or “Learn More”
Abandoned form fields
Time on page thresholds
Result: We found that users scrolled halfway through our landing page but weren’t clicking CTA buttons.
That insight alone helped us redesign sections above the fold for better engagement.
🧩 Step 2: We Set Up Custom Events for Every Key Action
Out of the box, Google Analytics tracks sessions, bounce rate, and pageviews—but those don’t tell you who’s serious about buying.
With GTM, we tracked:
Product video views (25%, 50%, 100%)
Price comparison clicks
Downloads of lead magnets
Live chat interactions
Example: We noticed users who watched at least 50% of our product demo converted 3x more often.
So, we built a custom audience segment of those users and ran remarketing ads focused on pricing FAQs.
Conversions jumped by 28%.
⚙️ Step 3: We Enhanced Personalization with Dynamic Tags
Here’s where GTM gets spicy. We used custom HTML tags to change content dynamically based on behavior.
First-time visitor? Show a “Welcome” popup.
Returning visitor with cart activity? Show urgency offers.
Scrolled 75% without clicking CTA? Fire a nudge banner.
Using these custom triggers, we increased click-through rates by 19% on mobile, where engagement was previously low.
💸 Step 4: We Synced GTM with Ad Platforms for Better Attribution
What’s better than conversions? Knowing where they actually came from.
We integrated GTM with:
Meta Pixel
LinkedIn Insight Tag
Google Ads Conversion Tracking
Each platform received real-time event data, allowing us to:
Attribute revenue to campaigns more accurately
Optimize based on mid-funnel actions (not just final purchases)
Reduce wasted ad spend by 15% in just 30 days
📊 Bonus: We Visualized All of It in GA4 and Looker Studio
Data is only useful if you can act on it.
We pushed all GTM event data into GA4 and built a dashboard in Looker Studio that showed:
Customer journey paths
High-intent behaviors
Drop-off triggers
This dashboard became our weekly decision-making hub, helping us tweak messaging, improve UX, and launch smarter A/B tests.
✅ Final Takeaways
Most brands treat GTM like a one-time setup tool. But used correctly, it becomes your real-time insight engine—showing you not just who converts, but why.
Here’s what worked for us:
Track more than just pageviews—map the full journey
Use GTM to fire smart triggers and personalize in real time
Sync GTM data with ad platforms for better targeting
Turn your insights into actions that actually move revenue
Don’t just install GTM and forget it. Use it to maximize every inch of the customer journey.
0 notes
Text
How Generative Engine Optimization Is Reshaping Content Discovery

The way we search, consume, and interact with online content is changing faster than ever before. The rise of Generative Engine Optimization (GEO) is a key driver of this transformation. While traditional SEO focused on optimizing content for keyword-based queries, GEO is about optimizing for AI-driven, generative search systems that provide synthesized answers, not just links.
Search is no longer just about ranking on a page, it’s about being the best possible answer in a world where machines summarize and suggest content. GEO is not a buzzword. It’s a fundamental shift in how content is created, optimized, and delivered across AI-first platforms.
In this blog, we’ll explore how Generative Engine Optimization is reshaping content discovery, why it matters now more than ever, and what strategies brands need to adopt to stay visible in an AI-powered search landscape.
What Is Generative Engine Optimization?
Generative Engine Optimization is the practice of tailoring digital content so it’s discoverable, preferred, and accurately represented in generative search results, like those produced by ChatGPT, Google’s Search Generative Experience (SGE).
Instead of focusing only on blue links and meta tags, GEO focuses on structured answers, semantic relevance, promptable content, and machine-readable accuracy.
In other words, GEO is content optimization for machines that generate answers, not just retrieve them.
Traditional SEO vs. Generative Engine Optimization
Traditional SEO is primarily optimized for:
Keyword density and placement
Backlink profiles
Meta descriptions and tags
Page speed and mobile responsiveness
Generative search engine SEO, on the other hand, prioritizes:
Semantic meaning and context
Structured and well-labelled content
Prompt engineering and AI training data
Factual consistency and source credibility
Where SEO aimed to rank higher on human-facing results pages, GEO ensures content becomes part of AI-generated narratives.
The Rise of Generative Search Engines
Generative search engines do more than retrieve content. They interpret, summarize, and synthesize information across sources to present context-rich answers in natural language.
For example:
A user asks ChatGPT: “What are the health benefits of matcha?”
Instead of giving links, ChatGPT delivers a 200-word explanation with citations, bullet points, and context.
If your content isn’t structured or semantically relevant, AI engines may skip over it or misinterpret it. This is where GEO becomes mission-critical.
How GEO Is Reshaping Content Discovery
1. Answers Over Listings
In traditional search, content was found via lists of links. With generative search, AI directly presents the answers, often without a click. This means:
Your content must be optimized to appear as part of AI-generated summaries.
Being cited by the AI engine is the new form of ranking.
This redefines what “visibility” means in 2025.
2. Semantic Content Wins
Generative AI understands context, tone, and structure, not just keywords. For content to be discoverable:
Sentences must be clear, concise, and logically connected.
Headings and subheadings must follow a coherent hierarchy.
The use of semantic HTML becomes more important.
AI prioritizes content it can interpret cleanly, which means well-structured writing beats keyword stuffing.
3. Authoritativeness Matters More Than Ever
AI search engines aim to reduce hallucination and misinformation. Therefore, content with high factual accuracy, trusted authorship, and proper citation stands out.
To stay discoverable:
Link to credible sources.
Add author bios with relevant credentials.
Ensure that data is up-to-date and sourced.
Generative engines reward trust.
4. Promptability Is the New Readability
AI systems rely on underlying models trained on large text datasets. If your content can answer questions directly, it’s more likely to be cited.
To make your content promptable:
Use FAQ sections.
Include concise summaries at the end of each section.
Structure information in bullet points, tables, and numbered lists.
This allows AI systems to extract information cleanly.
5. Long-Form Content Finds New Purpose
While short content may have performed well in traditional SEO, long-form content optimized for GEO provides depth and context, which is essential for AI summarization.
However, it’s not just about length—it’s about:
Logical flow
Topical depth
Accurate sectioning
If your blog answers multiple related questions on one page, AI will extract and recombine those insights into helpful, multi-layered answers.
6. Topical Authority Over Page Authority
In traditional SEO, one high-performing page could lift an entire domain. In GEO, AI prioritizes topic clusters—multiple well-written pages around a central theme.
That means:
Publishing consistent content on a specific topic builds AI-trainable authority.
Topic clusters (pillar pages + subtopics) are more likely to be cited in generative summaries.
Think of it as training the AI to “trust” you on a subject.
How to Optimize for GEO: Actionable Strategies
If you're wondering how to prepare your content for this new era, here are practical Generative Search Optimization strategies:
Answer-Based Writing
Focus each section around a clear, well-phrased question.
Follow up with a structured and factual answer.
Use Schema Markup
Apply structured data like FAQ, How-To, and Article schemas to help AI parse your content.
Build Internal Topic Maps
Interlink related articles to guide generative engines through your content ecosystem.
Update Content Regularly
Generative AI systems favour content that reflects current data, trends, and perspectives.
Leverage Visual Structuring
Use tables, charts, and lists that are easy for AI to extract and interpret.
Optimize for Zero-Click Discovery
Aim to be the source cited in answers, even if the user doesn’t click your link.
Industries That Will Feel the Impact First
While GEO will impact all industries, the first sectors to feel the change include:
Healthcare & Wellness – where factual consistency is critical
Finance & Legal – where trust and clarity are vital
Education & E-learning – where structured, explainer content performs best
E-commerce – where AI will summarize and compare products directly
If you’re in any of these verticals, GEO is not optional—it’s urgent.
Final Thoughts: Prepare for the GEO Revolution
Generative Engine Optimization is not a replacement for traditional SEO; it’s an evolution. As users shift to conversational, AI-powered search platforms, the content that gets discovered will be the content that is semantically sound, well-structured, and optimized for machine comprehension.
GEO bridges the gap between human curiosity and machine-generated answers. Brands that adapt early will not just survive, they will lead.
Looking to future-proof your digital presence? ThatWare LLP offers cutting-edge Generative Engine Optimization solutions that help your brand stay visible, authoritative, and AI-ready in today’s evolving search landscape.
0 notes
Text
Learn to Code
Daily Blogs 356 - Oct 26th, 12.024 Being someone who actually codes and is a software engineer, please learn how to code.
Why?
Before anything else, it is fun, even more if you like puzzles and solve problems, and you could find your future career even.
Nonetheless, coding is an enormous skill to have nowadays with every little job, task, and even hobby, having some sort of technology or another. How many times have you wanted to rename a bunch of files into a more structured form? Or even wanted to have a fast way to see all your tasks for the day? Maybe you are animating in After Effects (unfortunately) and want to make an object pulse following a song beat? Or maybe in your job you have to make spreadsheets in Excel (again, unfortunately) and need something more dynamic? Or maybe, you want to have your own simple website? All of these things can be done, and can be easier, knowing a little bit of coding/scripting.
Coding not only lets you do things in a faster way, it also helps you better understand the technology you use. Did you never think how the little applications that you use are made? Because they are, by humans, like me and you, and that's why they have bugs most of the time. Maybe learning to code, you can even start modding your favorite game! Or even create your own.
But Coding is Hard!
I'm going to be honest, yes, it can be hard. But we aren't talking about doing whole software products or even what could be called engineering, we are talking about scripting/coding, which is just creating files for some utilities, which is far from hard. And instead of trying to explain, let me show you some examples.
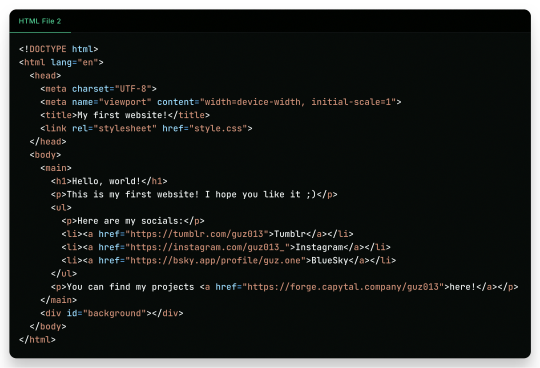
Creating a Website Yes, you heard me right, the first example is how to create a website, because you can do it in literally just a file:
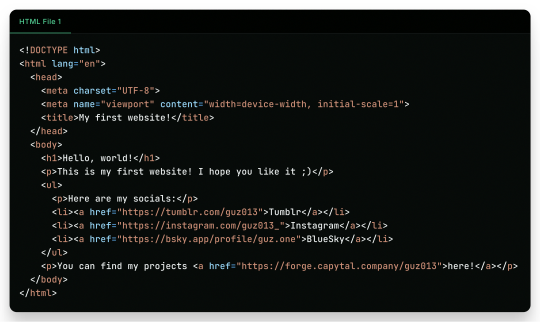

"But it is ugly!", well, just modify a little the first file, and add another file!

And there it is! Your own website. Now to put it into the internet to everyone to see it is nothing more than uploading these two files to a Web Hosting Service, which most of the simple ones are free! A few examples are GitHub Pages, Vercel, Netlify, all of them you can find easy tutorials to upload your files and have them for the web!
What Are Those Files?
Glad you asked! Let's go step by step.
The first file, the one full of <tags\/>, is what is called an HTML file. HTML (or Hypertext Markup Language) is the language used by all websites you visit, it is designed to structure text in such a way that you can easily put meaning and style into the document, and have you browser read it to show you. These files are marked up using tags, which encapsulate text with an opening tag (like this one <p>) and a closing tag (like this one </p>, see the slash before the letter P), looking like this <p>Hello world</p>. We have multiple types of tags, such as <p> for Paragraphs, <h1> for Heading/titles, <h2> for subheadings/subtitles, <link> for linking one file to another, <ul> for an Unsorted List, which will have <li> for each List Item, <main> for informing what's the main content, <a> for an Anchor/hyperlink for another website, etc. etc. All HTML files will have an <html> encapsulating everything, a <head> tag for information about the page, and a <body> tag for the content of the page. That's pretty much how HTML works, and all you need is to learn what tag does what, and you're pretty much good to go.
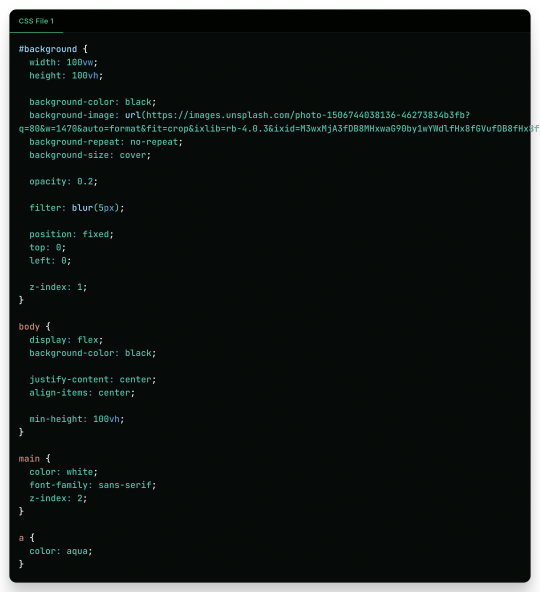
In the second file, we just add some structure to it better, adding a <main> tag and a <div> tag with the ID "background", so the third file, the stylesheet, can make it look pretty! The third file, the one with the {} blocks, is a CSS (or Cascading Style Sheets) file, and it is the one that makes all of our websites beautiful. It is made by these "blocks" of code that applies styles for multiple elements in the page, it is a little bit more hard to explain, but in summary, that file does this:
The "#background" block applies styles to any tag with ID "background". In the example, we make the tag have 100% of the view width (width: 100vw) and 100% of the view height (height: 100vh); make the background be an Unsplash image; decrease the opacity, so the image is not so bright; apply a blur filter; and make its position be absolute in the top left corner, so it doesn't move with the rest of the content;
The "body" block applies styles to the tag and makes it display its content on a flexible layout (display: flex), which we use to make the content be centralized in the page;
We then make the text-color inside the tag white, use a sans font, and make it be in front (z-index: 2) of the tag (see the z-index: 1 in the "#background" block);
And to finish off, we make the color of links an aqua color.
That's pretty much it and pretty much how the fundamentals of how to create a website works. Just 2 files of code, and you can have your own website.
But Where Are the Loops? Where Are the "if"s?
Yes, yes, if you know the concept of coding, you may be asking where are all the loops, "if"s, and variables. Truth be told is that HTML and CSS aren't programming language per-say, they are markup languages to structure and display text, so they can't run anything really. However, they are easy to understand and are considered "code" nonetheless, and personally I find fascinating that websites, the thing we all access every single day, that most people I know think is magic… are based in two simple languages that anyone can learn in an afternoon and have its own website up and running in less than a day.
I Want real code!
Ok ok! Let's so add a little interactivity into our website. What about a little character you can control? Yes, a little game character to control with WASD on your website, with less than 40 lines of code. Let's first update the HTML file so we can add the character:
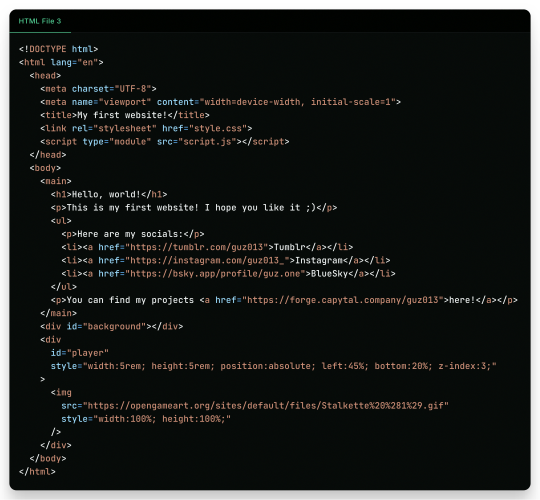
As you can see in the new file, we just added another <div> tag on the website, with the ID "player" and a <img> tag which we can use to add a visual sprite to our character! I'm using this simple sprite/gif I found on OpenGameArt.org. Also, in the new <div> we add some CSS styling directly in the tag, using the style attribute, the reason to this being that here we can manipulate its value with a programming language, in the case of the web, JavaScript. We add the JavaScript file with a <script> tag.
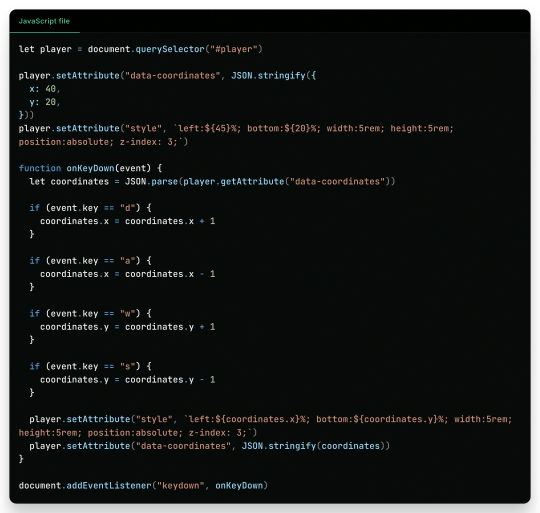
And in the JavaScript file, we can write this simple script:
This can be a little overwhelming, but let's go line by line:
First, we get the player element/tag with document.querySelector("#player") (similar on how in CSS we would use #player {} to style the tag). This tag is then saved into a variable player, think of it like a box or alias for document.querySelector("#player"), so when we use something like player.setAttribute it can be thought like document.querySelector("#player").setAttribute;
After that, we use player.setAttribute("data-coordinate", JSON.stringify({ x: 40, y: 20 })). This is just so we can more easily access the coordinates of the player after. An attribute is like that style in the tag, so calling this is like we wrote in the HTML file;
We again call player.setAttribute, but this time to rewrite the value of the style attribute, just to be sure. See how in the text for the style tag (the 2nd argument, aka the left: ${45}%; bottom:${20}%; ...), we use ${}? Well, this is a neat feature that lets us put values inside the text, so it makes the final result be left: 40%; bottom 20% ..., in this line it seems a little redundant, but in later in the lines we will use it more cleverly. Just remember that if we make a variable, a "box", like let x = 10 and use it inside the text like left: ${x}%, it would be in the end left: 10%;
Now the meat of the script, the "onKeyDown" function. A "function" in programming is like a piece of code you can reuse, and pass variables to it to use inside the code, like a box you can put stuff inside to it to do things, a box that uses other boxes, a box inception. Inside the "onKeyDown" function, we take back the value inside that data-coordinates attribute we wrote on the 3rd line, and put it inside the coordinates variable; than, we check if the key pressed is "d", if so, we add 1 to the X coordinate, we are changing the value of coordinate.x; we check for the other keys like "a", "w" and "s", changing the according variable to it; and then, we rewrite both the style attribute and data-coordinates attribute with the new value;
And finally, we use document.addEventListener("keydown", onKeyDown) to tell the browser "hey! Use this function ("onKeyDown") when a key is pressed!".
And that's pretty much it.

As you can see in the top right corner, the values of the style and data-coordinate attribute change when we press a key!
If you want to access this simple website, this is the live version of it hosted on GitHub Pages and the source-code is available under the public domain.
Learning More
Being honest, what I showed here is just a very small toy project, and a lot is simplified because of the gigantic convenience that the browser provides nowadays. But again, this is the type of thing you can do with just a little bit of knowledge on how to code, probably the scripts you will do can be even simpler than this. And just imagine the things you can invent, learning a little bit more!
Besides the toy project, code can be used in a lot of fields:
If you work on data or science in general, coding in Python is a great skill to have on your toolkit, and it is very easy to learn. It works great with creating graphs and can even be used inside Excel for creating more dynamic spreadsheets;
Do you want to make games? Well, learn something like Lua, a very simple language and one of my favorites for scripting, and powerful enough to be chosen by engines like Roblox Studio (which surprisingly is powerful than I thought). But if Roblox is not your taste, well, learn something like GDScript, the language of the Godot game engine, fully free, fully open;
Also, Lua is used for modding on games such as Factorio, and can be very powerful for small scripts for your computer;
If you want to make websites, HTML, CSS and JavaScript, learn them and go nuts (I won't recommend you use any framework as other programmers use, learn the fundamentals first). There are a lot of documentation about the web, and it is one of the fields with the lowest entry;
Are you an 3D Artist? Well then, Python is also the language used for creating add-ons, you can take some time to learn and create your owns to help your workflow!
And if you are a poor soul who is using Adobe products, first: my condolences; second, most Adobe products use ActionScript to create dynamic animations and values such as making an element react to music beats in After Effects.
---
Learn to code, be happy, and maybe you will find a new passion like I did.
Today's artists & creative things Music: Late Night Walk - by Ichika Nito
© 2024 Gustavo "Guz" L. de Mello. Licensed under CC BY-SA 4.0
please learn how to code
like, if you're bored today, and not doing anything,
learn a little bit of coding please
35K notes
·
View notes
Text
JavaScript Tutorial for Students and Freshers

In today’s digital era, web development is one of the most sought-after skills, and at the heart of every interactive website lies JavaScript. Whether you're a student pursuing computer science or a fresher looking to enter the tech industry, understanding JavaScript is a key step in becoming a competent web developer. This JavaScript tutorial for students and freshers will guide you through the basics, making it easy to get started and build your first interactive web page.
What is JavaScript?
JavaScript is a powerful, high-level scripting language used primarily to create dynamic and interactive features on websites. It runs in the browser and allows developers to manipulate content, respond to user inputs, and communicate with servers — all without needing to reload the page.
JavaScript is one of the core technologies of the web, alongside HTML and CSS. While HTML structures the content and CSS styles it, JavaScript brings it to life.
Why Students and Freshers Should Learn JavaScript
If you are just starting your journey into programming or web development, JavaScript is one of the best languages to learn. Here’s why:
Easy to learn: JavaScript has a beginner-friendly syntax.
Used everywhere: It works in all modern web browsers.
In-demand skill: Almost every company building web apps uses JavaScript.
Foundation for frameworks: React, Angular, and Vue are based on JavaScript.
Great for projects: Helps in creating interactive portfolios, calculators, games, and web apps.
Getting Started with JavaScript
To start writing JavaScript, you don’t need any fancy tools. All you need is a web browser (like Chrome or Firefox) and a text editor (like VS Code, Notepad++, or Sublime Text).
Add JavaScript to an HTML Page
<!DOCTYPE html> <html> <head> <title>My First JavaScript Page</title> </head> <body> <h1>Hello JavaScript!</h1> <script> alert("Welcome, Student!"); console.log("This is your first JavaScript script!"); </script> </body> </html>
This example shows how easy it is to insert JavaScript into a webpage using the <script> tag.
Basic JavaScript Concepts Every Beginner Should Know
1. Variables
Variables store data. You can use let, const, or var (though let and const are preferred in modern JS).let name = "Amit"; const age = 21;
2. Data Types
Common types:
String: "hello"
Number: 100
Boolean: true or false
Array: [1, 2, 3]
Object: {name: "Amit", age: 21}
3. Functions
Functions are reusable blocks of code.function greet() { alert("Hello, student!"); } greet();
4. Conditionals
let score = 85; if (score > 80) { console.log("Excellent!"); } else { console.log("Keep trying!"); }
5. Loops
for (let i = 1; i <= 5; i++) { console.log("Number: " + i); }
DOM Manipulation (Document Object Model)
JavaScript allows you to interact with HTML elements using the DOM.<button onclick="changeText()">Click Me</button> <p id="demo">Original text</p> <script> function changeText() { document.getElementById("demo").innerHTML = "Text changed!"; } </script>
This example changes the paragraph text when the button is clicked — a simple but powerful interaction.
Simple Project Ideas for Students
Practicing with real-world mini-projects helps reinforce your learning. Try building these:
To-Do List App – Add, delete, and mark tasks as complete.
Calculator – A basic calculator for addition, subtraction, etc.
Quiz App – Multiple-choice questions with score calculation.
Digital Clock – Displays current time updating every second.
Form Validation – Check user input like email and password fields.
These projects not only improve your JavaScript skills but also make great additions to your resume or portfolio.
Tools and Resources for Learning
Online Editors: JSFiddle, CodePen, Replit
Documentation: MDN Web Docs
YouTube Channels: Programming with Mosh, FreeCodeCamp, Traversy Media
Courses: Codecademy, Coursera, Udemy (look for beginner JavaScript courses)
Books: Eloquent JavaScript, JavaScript & JQuery by Jon Duckett
JavaScript in the Real World
JavaScript is not limited to client-side browser code. With technologies like Node.js, it’s also used for backend development. Other popular uses include:
Web Development (Frontend & Backend)
Mobile App Development (React Native)
Game Development
Automation and Scripting
APIs and Server Communication
As a fresher or student, learning JavaScript opens doors to multiple career paths in tech.
What’s Next After Learning JavaScript?
Once you’re confident with the basics of JavaScript, you can explore:
ES6 and Modern JavaScript
JavaScript Frameworks (React.js, Angular, Vue.js)
AJAX and APIs – For dynamic data fetching
Node.js – To build server-side applications
Full-Stack Development – Combine JavaScript with HTML/CSS, MongoDB, Express, and Node.js (MERN Stack)
Final Thoughts
This JavaScript tutorial for students and freshers is just the beginning of your journey into web development. JavaScript is not only essential for making websites interactive but also a gateway to understanding advanced programming concepts and full-stack development.
If you dedicate time each day to learning and practicing JavaScript, you'll build a strong foundation that can lead to internships, freelance gigs, and full-time developer roles. Remember: consistency beats complexity. Start small, build projects, and keep coding!
0 notes
Text
How to Add a Table of Contents in WordPress 2025 Boost SEO, Improve User Experience & Maximize Site Navigation

Why a Table of Contents Matters in WordPress

What Is a Table of Contents (ToC) in WordPress? A Table of Contents (ToC) is a navigational element often placed at the top or within content that lists the main s of a page or post. Each ToC item is typically a clickable link that jumps the reader to a specific of the content. In WordPress, a ToC can be added automatically using plugins or manually using anchor links and heading structure. This guide from SEOHostKing will walk you through every possible way to create, optimize, and master the Table of Contents for WordPress — whether you're running a personal blog, WooCommerce store, or a massive content marketing engine. We’re not stopping at surface-level info — we’re going 15,000+ words deep. Let’s start by understanding the real power of adding a ToC to your WordPress site. Why Add a Table of Contents to Your WordPress Content? 1. Massively Improves User Experience (UX) When someone lands on a long-form article or guide (like this one), they don’t want to scroll aimlessly to find what they need. A Table of Contents allows them to see the structure immediately and skip to the that’s most relevant to them. Examples: - A developer wants to jump directly to “Manual HTML Anchor Method” - A beginner just needs the “Best WordPress ToC Plugins” - An SEO wants the “Schema Optimization for ToC” By creating clarity and immediate access, you reduce bounce rate and increase time on page — both critical SEO metrics. 2. Drives SEO Visibility and Rich Snippets Search engines, especially Google, reward well-structured content. When your post includes a ToC, Google may automatically extract those headings into clickable sitelinks in the SERPs (Search Engine Results Pages). This can result in: - Higher CTR (Click-Through Rate) - Occupying more SERP real estate - Better internal link structure signals to Google Adding a ToC is a step toward semantic structure, which is a pillar of modern SEO. 3. Essential for Long-Form and Evergreen Content If your WordPress content strategy includes long-form blog posts, evergreen guides, pillar pages, or knowledge hubs — then ToCs aren’t optional; they’re critical. They make your content scannable and user-friendly for both humans and bots.
Complete Breakdown of Methods to Add a Table of Contents in WordPress
Add a ToC Using a WordPress Plugin Using a plugin is the most common method, especially for non-technical users. Below, we’ll walk through the top options with full configuration steps, SEO tips, and pros/cons. 1. Easy Table of Contents (ETOC) Plugin – Beginner-Friendly Classic Overview: Easy Table of Contents is one of the most popular and reliable ToC plugins available in the WordPress ecosystem. It automatically inserts a ToC into posts, pages, or custom post types based on heading tags (H1, H2, H3, etc.). Key Features: - Automatic insertion by heading hierarchy - Supports posts, pages, and custom post types - Selective heading levels - Smooth scrolling and collapsible design - Customizable appearance (color, font, border) - Supports AMP and responsive design How to Install & Configure: Step 1: Installation - Go to your WP dashboard → Plugins → Add New - Search for “Easy Table of Contents” - Click Install Now and then Activate Step 2: Initial Setup - Navigate to Settings → Table of Contents - Enable automatic insertion for desired content types (posts, pages, etc.) - Choose which heading levels to include (e.g., H2-H4) - Set the position of the ToC (before content, after first heading, etc.) Step 3: Customize Appearance - Choose width, background, border, and link color - Enable smooth scrolling and collapsible functionality - Rename “Table of Contents” heading if desired Step 4: Fine-Tune Per Post - Each post/page will now include a checkbox to enable or disable the ToC - You can override global settings on a per-post basis SEOHostKing Pro Tip: Combine ETOC with schema markup (manual or plugin-based) to help Google display in-SERP jump links. Also, ensure your heading tags follow a logical hierarchy for best results. 2. AIOSEO’s Table of Contents Block – SEO-Friendly Gutenberg Integration Overview: If you’re using the All in One SEO (AIOSEO) plugin — which is one of the top-ranked SEO plugins for WordPress — it comes with a native ToC block built for Gutenberg. Features: - Native Gutenberg block (no shortcode needed) - Auto-pulls headings from the post content - Drag-and-drop reorder or exclude sections - Seamless integration with other SEO features - Performance-optimized and lightweight How to Add ToC with AIOSEO: Step 1: Install AIOSEO - Go to Plugins → Add New → Search “AIOSEO” - Install and Activate Step 2: Insert Table of Contents - In Gutenberg, click “+” to add a block - Search for “Table of Contents (AIOSEO)” - Insert and it will auto-generate headings Step 3: Customize - Rename section titles - Drag headings to reorder - Choose to hide specific subheadings Step 4: Save and Preview - Preview your content on desktop and mobile - Confirm the scroll behavior works smoothly SEOHostKing Insight: The AIOSEO ToC block is built with SEO in mind — unlike some bloated plugin alternatives. It integrates well with structured data, which increases your chances of showing ToC links in search results. 3. Qi Addons for Elementor – Best Visual Control Overview: If your site is built using Elementor, Qi Addons by Qode Interactive (yes, the same team that wrote the original article) offers a powerful and customizable ToC widget for free. Key Features: - Full drag-and-drop Elementor control - Visual custom styling (colors, borders, typography) - Responsive and animated behavior - Supports anchors and smooth scrolling Installation Steps: Step 1: Install Qi Addons - Go to Plugins → Add New - Search “Qi Addons for Elementor” → Install → Activate Step 2: Use Elementor Editor - Open a page or post in Elementor - Search for “Table of Contents” in the widget panel - Drag the Qi Addons ToC widget to where you want it displayed Step 3: Configure - Choose which headings (H2-H5) to include - Style colors, typography, padding, spacing - Enable collapsible functionality for mobile devices Best Use Case: Qi Addons is ideal for those who: - Use Elementor regularly - Want full visual design control - Need a responsive, collapsible ToC 4. LuckyWP Table of Contents – Lightweight with Gutenberg and Classic Support Features: - Compatible with Gutenberg and Classic Editor - Auto-insert or manual shortcode - Multiple themes and customization options - SEO-friendly with accessible markup Configuration: - Install from Plugins → Add New → Search “LuckyWP Table of Contents” - Enable auto-insert or use shortcode - Customize appearance and select post types
2: Manual Table of Contents for WordPress (No Plugin)
For users who want complete control or are performance-obsessed (avoiding plugins), a manual ToC is the way to go. 1. HTML Anchor Method (Manual ToC) This method involves linking a ToC list to individual anchor IDs manually assigned to your headings. Example: - Step 1 – Install Plugin - Step 2 – Configure Settings
Step 1 – Install Plugin
Content for step 1...
Step 2 – Configure Settings
Content for step 2... How to Add Anchors in Gutenberg: - Select a heading block - In the right sidebar, under “Advanced,” enter a unique HTML anchor (e.g., step1) - Link to that anchor using #step1 in your HTML list Pros: - Ultra-lightweight - Zero plugin dependency - Full control over structure and styling Cons: - Manual updates when changing content - Higher effort for long articles 2. Use Shortcode + Anchor Combo You can wrap your anchor links into a shortcode for reusability: function custom_toc_shortcode() { return ' - Section One - Section Two '; } add_shortcode('customtoc', 'custom_toc_shortcode'); Then, place where you want your ToC to appear.
3: Adding ToC in Custom Post Types and WooCommerce
Adding a ToC to WooCommerce product descriptions, FAQs, or CPTs like portfolios requires special attention. Tips: - Ensure ToC plugin supports CPTs (most do) - Manually wrap anchor tags in long product descriptions - Consider using Elementor + Qi for WooCommerce templates Example Use Case: A long single-product WooCommerce page with multiple sections (Features, Specs, Reviews) benefits greatly from a ToC to allow users to jump directly to what they care about.
Advanced Customizations, Styling, Accessibility, and SEO for WordPress Table of Contents
Styling Your Table of Contents with CSS
Why Customize ToC Appearance? A generic ToC often looks like a dull list. Custom styling allows your ToC to blend seamlessly with your website’s branding and improve user engagement. Common Styling Elements to Customize: - Background color & opacity — Make the ToC visually distinct but harmonious. - Borders & box shadows — Add depth and separation. - Font styles & sizes — Match your site typography. - Hover & active link colors — Improve interaction feedback. - Indentation & spacing — Show heading hierarchy clearly. - Collapsible toggle icons & animations — For better mobile experience. Example: Custom CSS for Easy Table of Contents Plugin Here’s some sample CSS you can add to your WordPress Appearance > Customize > Additional CSS or child theme stylesheet: /* Container Styling */ #toc_container { background-color: #f9fafb; border: 2px solid #0073aa; padding: 20px; border-radius: 8px; font-family: 'Segoe UI', Tahoma, Geneva, Verdana, sans-serif; } /* Heading Styling */ #toc_container .toc_title { font-weight: 700; color: #0073aa; font-size: 1.5rem; margin-bottom: 15px; } /* List Styling */ #toc_container ul { list-style-type: none; padding-left: 0; } /* List Items and Links */ #toc_container ul li { margin-bottom: 8px; padding-left: 12px; border-left: 3px solid #0073aa; } #toc_container ul li a { text-decoration: none; color: #005177; font-weight: 600; transition: color 0.3s ease; } #toc_container ul li a:hover { color: #e94e77; } /* Nested Lists for Subheadings */ #toc_container ul ul { margin-top: 8px; padding-left: 20px; border-left: 2px dashed #0073aa; } /* Collapsible Toggle Styling (for collapsible ToC) */ #toc_toggle { cursor: pointer; font-size: 1.2rem; color: #0073aa; margin-bottom: 10px; display: inline-block; } Tips for Styling Elementor or Qi Addons ToC - Use Elementor’s style panel for typography and spacing. - Add custom CSS classes and target them specifically. - Use Elementor motion effects to animate ToC entrance. - Test different colors on mobile to maintain readability.
2: Making Your Table of Contents Mobile-Friendly & Collapsible
Why Mobile Optimization Matters With over 60% of global web traffic on mobile devices, your ToC must be usable and unobtrusive on smaller screens. A giant always-visible ToC can overwhelm the mobile viewport. Best Practices for Mobile ToC - Use collapsible or toggle-able ToCs on mobile. - Ensure tap targets (links/buttons) are large enough. - Optimize font size and line height for readability. - Use smooth scroll to enhance navigation. How to Add a Collapsible ToC with Easy Table of Contents Plugin - Navigate to Settings → Table of Contents. - Enable “Collapsible” option. - Customize the default state (collapsed or expanded). - Save and preview on mobile devices. This creates a toggle button users can tap to expand or collapse the ToC, reducing screen clutter. Mobile ToC with Custom JavaScript Example (Manual ToC) document.addEventListener("DOMContentLoaded", function() { const toc = document.getElementById('toc_container'); const toggleBtn = document.createElement('button'); toggleBtn.innerText = 'Show Table of Contents'; toggleBtn.id = 'toc_toggle'; toc.parentNode.insertBefore(toggleBtn, toc); toc.style.display = 'none'; toggleBtn.addEventListener('click', function() { if (toc.style.display === 'none') { toc.style.display = 'block'; toggleBtn.innerText = 'Hide Table of Contents'; } else { toc.style.display = 'none'; toggleBtn.innerText = 'Show Table of Contents'; } }); }); This code snippet creates a mobile-friendly toggle button for manual ToCs.
3: Accessibility Best Practices for ToC
Why Accessibility Matters An accessible ToC ensures that screen readers and keyboard users can navigate your content effectively — a must for both UX and legal compliance (e.g., ADA in the US). Key Accessibility Features for Table of Contents - Use semantic HTML: - Proper heading hierarchy so screen readers can interpret structure. - Keyboard navigation: All links must be reachable via keyboard (Tab key). - ARIA roles and labels to describe ToC purpose. - Focus styles: Visually highlight links on keyboard focus. Example: Accessible ToC Wrapper
Contents
- Section 1 - Section 2 This informs screen readers about the navigation purpose.
4: Schema Markup & Rich Snippet Optimization for Table of Contents
What Is Schema Markup? Schema.org markup is structured data that helps search engines understand the content’s structure, improving how your pages appear in search results. Benefits of ToC Schema - Enables Google’s “Jump to Section” links in the search results. - Improves snippet appearance, increasing click-through rate. - Provides better content hierarchy context to crawlers. How to Add ToC Schema in WordPress 1. Using SEO Plugins (Yoast SEO, AIOSEO, Rank Math) Most major SEO plugins support adding FAQ or HowTo structured data but ToC schema is less common. However, some plugins and custom code can add ToC schema. 2. Manual JSON-LD Implementation Here is a basic JSON-LD example for ToC: You can add this to your theme’s footer.php or via a plugin like Header Footer Code Manager. 3. Using Plugins Specifically for ToC Schema - Some ToC plugins like LuckyWP Table of Contents include schema support. - You can add schema via specialized plugins or custom development.
5: Common Problems and How to Fix Them
Problem 1: ToC Not Showing on Some Posts - Check if ToC is enabled for that post type. - Ensure your headings are proper
, , etc. - Some page builders may interfere with auto-detection. Problem 2: Duplicate or Broken Links in ToC - Avoid duplicate headings with the same text. - Clear caching plugins. - Use unique anchors if manual. Problem 3: Slow Page Load Due to Plugin - Use lightweight plugins like AIOSEO ToC or LuckyWP. - Avoid stacking multiple ToC plugins. SEOHostKing Tip for ToCs: Keep your ToC updated with your content — each time you add or remove sections, update anchors or headings so the ToC remains accurate and useful. A stale ToC can frustrate users and harm SEO.
Table of Contents for WooCommerce, Large Content Hubs, and SEO Siloing Strategies
Adding a Table of Contents to WooCommerce Product Pages
Why Add a ToC to WooCommerce? Long product descriptions, specifications, FAQs, and customer reviews can make WooCommerce product pages lengthy and difficult to navigate. A ToC improves usability by letting customers jump directly to sections they want. Best Practices: - Include main sections: Product Overview, Features, Specifications, Reviews, FAQs. - Use anchor links to create jump navigation. - Ensure ToC fits visually within product page design. How to Add a ToC in WooCommerce Product Descriptions Method 1: Using a Plugin Supporting Custom Post Types Plugins like Easy Table of Contents or LuckyWP Table of Contents support WooCommerce products as a custom post type. - Enable ToC for Products in the plugin settings. - Use heading tags properly within product description and additional tabs. - The plugin will auto-generate a ToC inside product pages. Method 2: Manual Anchor Links in Product Tabs You can manually add anchors in product description or custom tabs: - Overview - Features - Specifications - Reviews
Overview
Product overview details...
Features
Product features... Styling and Responsiveness - Use CSS to integrate ToC visually with product layout. - Use collapsible ToC on mobile to save space. - Test on various devices and browsers.
2: Table of Contents for Large Content Hubs and Knowledge Bases
What Are Content Hubs? Content hubs are centralized sites or sections containing a large volume of interrelated content on a specific topic — think online encyclopedias, FAQ centers, or tutorial libraries. Why Use ToC in Content Hubs? - Improve navigation between related articles. - Help users find information quickly. - Distribute link equity through internal linking. Strategy: Hub & Spoke with ToC Create a hub page with a comprehensive ToC linking out to related spoke articles: - The hub page acts as a master ToC with categorized links. - Each spoke article can have its own smaller ToC. - Use keyword-rich anchor texts for SEO benefits. Example Structure: - Hub Page ToC: - SEO Basics - On-Page SEO - Link Building - Technical SEO - Spoke Article ToC: Smaller ToC within each article for subtopics.
3: Multi-Page Guides and ToC Navigation
When your content spans multiple pages or posts (pagination), ToCs can guide users through the entire series. How to Implement: - Add a master ToC on the first page with links to all pages. - Use "Next," "Previous," and breadcrumb navigation. - Maintain consistent styling.
4: Using Table of Contents for SEO Siloing
What Is SEO Siloing? SEO siloing organizes content into thematic groups (silos) to help search engines understand site structure and topical relevance. How ToC Helps Siloing - Internal linking via ToC strengthens topic clusters. - Improves crawlability by highlighting content relationships. - Enhances user experience with clear navigation paths. Steps to Build SEO Silo with ToCs - Create Pillar Content: A comprehensive article covering a broad topic. - Develop Supporting Content: Create smaller articles for subtopics. - Build ToCs: On the pillar page, add a detailed ToC linking to sub-articles. - Cross-Linking: Within sub-articles, add ToCs linking back to pillar and sibling articles. - Optimize Anchor Texts: Use exact or partial match keywords in links. - Use Breadcrumbs: For clear navigation and schema markup. Benefits of SEO Silo ToC: - Improves topical authority. - Boosts keyword rankings. - Increases average session duration.
5: Tools & Plugins for Advanced ToC and SEO Silo Management
- Yoast SEO & Rank Math: For breadcrumbs and structured data. - Table of Contents Plugins: With custom post type and shortcode support. Read the full article
#AccessibleTableofContents#HowtoaddTableofContentsinWordPress#SEOsiloing#TableofContentsanalytics#TableofContentsoptimization#TableofContentsschemamarkup#TableofContentsSEO#TableofContentsstyling#WooCommerceTableofContents#WordPresscontentnavigation#WordPressTableofContents#WordPressToCplugin#WordPressuserexperience
0 notes