#gl inet router setup
Explore tagged Tumblr posts
Visit Tumblr Blog
Explore Tumblr blogs with no restrictions, modern design and the best experience.
Last Seen Tumblr Blogs


Fun Fact
Tumblr has 411 employees.
Text
How to Set Up Your GL.iNet Router ?
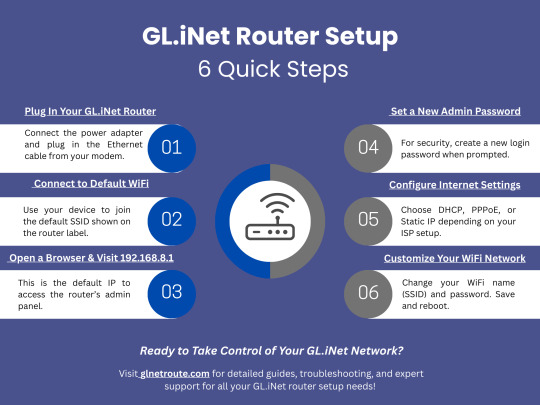
Prepare your portable network by initiating the gl inet router setup. Connect your GL.iNet router to a power source. Then, link your device to its temporary Wi-Fi network. Open a web browser and access the default IP address, typically 192.168.8.1, to proceed with the intuitive setup wizard and configure your internet connection. Get your secure portable network running.
0 notes
Text
How To Rightly Configure GL iNet GL E750V2 Router
GL iNet offers a wide variety of routers, especially in the travel category. One such masterpiece from its wide collection is GL-E750V2 also popularly known as Mudi V2. So if you also got your hands on it, then you must surely be keen on configuring it at the earliest. Because without proper configuration, you won't be able to make the best possible use of the device. So to lend you a helping hand for the same, in this guide we'll be sharing the complete insights about GL iNet GL E750V2 setup. Without any delay, let's start with highlighting its key features.
Mudi V2 Feature Set
GL-E750V2 is a tiny, travel appropriate 4G LTE router. It is compatible with all the global carriers. The router operates on dual frequency bands. The first frequency band (2.4Ghz) supports speeds of 300 Mbps. On the other hand the 5Ghz frequency band supports speeds of 433 Mbps. Moving further, the E750V2 router supports Micro SD cards of up to 1TB. Additionally the built-in battery of 7000mAh makes the GL iNet GL E750V2 setup worth investing in. For uninterrupted connectivity for all your devices the Mudi V2’s multi-WAN support works amazing.
Collect The Package Contents
Now as you are familiar with the features of GL iNet GL E750V2 setup, let's find out what is there inside the router package. As you unbox it, here's what you receive:
✓ First and most important is your GL iNet GL E750V2 mini router.
✓ Next up, its power adapter.
✓ A converter based on your shipping address.
✓ Thereafter comes an Ethernet cable.
✓ One USB-C port replicator.
✓ Moving further you receive two cables one is USB-C to C and other is USB-A to C.
✓ The package also includes a pouch for carrying your LTE router securely on your travel journey.
✓ Additionally, there is warranty card, thankyou card and lastly the GL iNet GL E750V2 setup manual.
Begin The Configuration
The setup process is simple and we bet with right guidance even a non-tech individual can conduct the setup without any expert assistance. So the complete step-by-step configuration steps are written here:
✓ Insert SIM card Into Your Mudi V2
Before you power on your GL iNet GL E750V2 setup insert the SIM card as well as your SD card if you want to. For doing so, follow these steps:
Turn your Mudi V2 backwards. Here you'll find a lid. Just by the side of the covering there is a hole. Poke your finger into it and slide the lid and then pull upwards.
Thereafter, insert the cards into their allocated ports.
Finally, push the lid back into its position.
✓ Power On
There are two methods through which you can turn on the Mudi V2. First if it has enough charging, then press the power button for three seconds. The router will turn on automatically. But if it doesn't have charging, then you can use the 5V/2A power adapter for turning it on.
✓ Link Your Smart Device For Configuration
Moving ahead, take your laptop or any other smart device with wifi functionality. Visit its wifi settings. Activate wifi. Now select the network that resonates with your router. It is GL-E750-XXX. Thereafter fill up the password. It is “goodlife”. Use lower letter case only. Finally tap on Connect.
Many users require a more stable connection for GL iNet GL E750V2 setup, so for them the alternative is to link via ethernet wire. First take your docking station and connect it to the E750V2 router. Now fetch an Ethernet wire. Link it to the docking station (LAN port) and then to your device.
✓ Wrap Up The Setup
To wrap up GL iNet GL E750V2 setup, on your networked device open an internet browser. Ensure it is compatible. Our recommendations for the same are: internet explorer, chrome, firefox, safari as well as edge. Now in its address field, type 192.168.8.1. Click enter. Ensure the accuracy for errorless login. Alternatively you can use http://192.168.8.1/index.
Moving forward, select the language. Hit Next. Now you'll be prompted to fill up the password. There are no defaults for the same. So you can curate your own. As you do so, tap on Submit. Additionally, ensure the password must possess at least more than 5 characters.
Finally, as you complete the above steps with accuracy you get access to the panel. From here choose the Internet option. You get four options: one is Ethernet, second is Repeater. Then comes Tethering and the last one is Cellular. Select any one and fulfill the on-screen information to enjoy seamless internet connectivity for your devices.
Lastly, before you close the GL iNet GL E750V2 setup window, look for the pending updates. If found, complete the installation task for the same as well. You'll get the guidance for it on your screen itself. So it's not a difficult task. The installation is important because it will make your network secure and will allow it to work optimally.
0 notes
Text
How To Set Up The GL.iNet GL-AXT1800 Router
It is a compact yet powerful travel router to offer high speed and secure internet connectivity. With the help of WiFi 6 technology the robust security feature and VPN support is an excellent choice for the travellers, remote workers and tech enthusiasts. This guide will walk you through the configuration process to get the best performance from your GL-AXT1800 router.
Unboxing And Hardware Overview
When you first get GL.iNet GL-AXT1800 router, ensures that your package include
GL-AXT1800 router
Ethernet cable
Power adaptor
User manual
GL.iNet GL-AXT1800 Setup Key Features
Provide speed up to 1200 Mbps 5GHz and 600 Mbps on 2.4GHz.
Support 1.2GHz quad core processor for the fast performance.
It built in the VPN support for wire guard and open VPN.
Adguard home to block ads and tracking scripts.
Multiple connection options such as WAN, LAN or USB 3.0 port
Manual Setup
Follow below few simple steps
Power On Your Router
Plug the power adaptor into the router and connect it with the power outlet.
After that wait for the router to boot up.
The LED light indicates that the device is now powered on and ready.
Connect To The Router
Use ethernet cable to attach the router WAN port to the modem or existing network.
Access Or Go To Admin Panel
Open the web browser and type 192.168.8.1 in the address bar. Login by entering the default credentials which are written on the router package. Consider all the setup process instructions to change the WiFi SSID, password and admin credentials for the security purposes.
Configuring Internet Connection
The GL.iNet GL-AXT1800 Router supports various internet connection methods.
Wired Connection:
If you are using a wired connection, go to the network settings and then tap on the internet. After that, verify DHCP mode is enabled.
WiFi Repeater Mode:
If you want to extend an existing WiFi network:
In the admin panel go to the repeater settings.
Now, scan for the available WiFi networks and pick up the desired one.
Enter WiFi password and save all settings.
Connect Modem Or Smartphone
Just connect the USB modem or the smartphone via the USB 3.0 port.
Select the connection mode in the admin panel and consider all the prompts.
Setup VPN For Secure Browsing
Using Wire-Guard VPN
Go to VPN and then tap the wire guard client.
Now, upload or manually enter the wire guard VPN configuration.
Enable the VPN and check connection status.
Using Open VPN
Navigate to VPN and OpenVPN client.
After that upload the open VPN configuration file which is provided by the VPN provider.
Later, connect and verify your IP address for successful connection.
With AdGuard Home Enhanced Security
It is a powerful tool for blocking ads and tracking.
To enable this, go to the navigation and click on AdGuard home. After that, enable the services and customize settings. Further, add a filter list to enhance blocking effectiveness.
Additional Features & Customization
Guest WiFi:- It creates a separate WiFi network for the visitors with restricted access.
Custom DNS Server: Uses cloudflare, google or a custom DNS provider for the faster and more protective browsing.
After the router GL iNet GL AXT1800 setup if you are facing any issue then try the below troubleshooting tips to fix the issue such as AX1800 router not working properly.
Solution Tips
Check/Identify All Cable Connections
Must verify that all the cables must be perfectly plugged in.
Look Up For Overheating
If your router gets hot then move it to the well ventilated area to cool it down.
Use Different Power Source
Try to use a different USB-C power adapter
Power Cycle Router
Press the router power button to turn it off. Now, take out the router power plug from the specified working socket. After that, wait for at least 2 minutes and put the router plug back in the socket. At the end, press router power to turn it on.
After trying the apart basic router troubleshooting tips if you fail to fix an issue. Then don’t be worried just try the below advanced troubleshooting tips steps.
Update Router Software/Firmware
Early go to the router admin panel.
After that, tap on settings and then hit on firmware.
Further, update the latest version.
Alternatively, install the firmware from the GL.iNet website and open it manually.
Reset Router From Factory Default
Early, look for the reset button on your router.
After that, take a paper pin and insert it in the router reset button.
Now, all LEDs of the GL.iNet GL-AXT1800 router are completely turned off.
Hence, your router is reset now.
Note: After resetting all default settings, do the GL.iNet GL-AXT1800 setup and installation process again.
Therefore, after the entire study or information of this article you can do the setup of your router with the modem. After router installation if you face any issue then also fix it easily by trying the apart troubleshooting tips.
0 notes
Text

My telescope setup.
The mount is a G11 Gemini 2 with the RA and Dec extension kit.
Starting at the bottom, there is a small UPS battery backup. Beside it is a Powerwerks 30 amp power supply. It uses Anderson power pole connectors.
On the shelf is. A Kamrui I7 mini computer. It is wired to a GL-Inet travel router, powered by usb.
The scope is a Celestron 9.25. Attached to the back is an Optec Tcf-s focuser.
On the tube is a power pole hub and a powered USB 3 hub.
The current configuration is for planets. There is a flip mirror box and a ZWO asi678c.
When imaging dso’s this is replaced with an Optec Pyxis rotator, an Optec f/.63 reducer, and a QHY 268m with filter wheel and oag.
0 notes
Text
The Ergohacks Verdict
Earlier this week we took a look at TorGuard’s VPN offerings. If you’re setting yourself up on a VPN you’ve got a couple of choices – get every single device talking via the VPN on their own or create a central point which every system can talk to to protect them all. A central hub has a number of advantages. It can let devices like IoT things which don’t have the capacity to be on a VPN work with one, it can take one VPN account and share it with many devices and it can let you share your VPN without giving people your account details. TorGuard gave us a Gl-iNet Mango Router to play with.
Setup was easier than I expected. Plug the Mango in and it creates a wifi network. Join that and you get access to its control console. From there you can setup your VPN manually or use a script file that you’ve hopefully already downloaded from TorGuard. Finally, you can then attach it to your local network. Once you got that sorted it’s a question of what do you want it to do?
So what can it do? As well letting you pipe everything via a VPN it’s also a wifi router with a number of modes. You can set it up to create its own wifi network from a wired network or extend an existing network. There’s also a USB 2.0 port that can be used with a plug-in USB MiFi dongle, plugged into your phone to share its connection or if you plug in a USB Hard disk you can share it on your local network. There’s also printer sharing and a fair amount of software customization possible.
That sounds like a lot of functionality and I was sceptical that it would work well but iNet was smart. Rather than trying to produce their own software they loaded OpenWRT. This is a well regarded open-source Linux Framework that will let you add your own packages. That means that if there’s something the hardware can do chances are there’s already the software package available to do it and it’s easy to add the functionality. It also means that security patches come from the very active OpenWRT community rather than having to wait for the manufacturer.
On a day to day basis, the chances are that you won’t care about these extras. I can see two big uses for the Mango for most people. As a wifi hub on the go for coffee shop users worried about their security and as a second wifi network for home users who want the occasional option to switch to a more secure setup or to change their virtual location. The Mango works perfectly for either and I’m keeping it set up in my home office – when I want to switch to a VPN I just switch wifi networks. If you’re a VPN power user the Mango gives you more options and flexibility. High recommended.
Buy it from GL.iNet or get if from your VPN provider +
Price: ± $25 Included: Quick start cards, manual, hub, microUSB cable Discounts: Liking the iNetFacebook page can get a small discount. The Mango is also available via several resellers in particular VPNs like TorGuard who often bundle it with longer packages.
Specification
Product dimensions: 5.8 x 5.8 x 2.5 cm Item Weight: 39g Colour: Mango – yellow-orange Model Number: GL-MT300N-V2 OS: OpenWRT External storage spec: FAT32/EXFAT/EXT4/EXT3/EXT2/NTFS Internal Storage: DDR2 128MB and Flash 16MB Extra Pins: UART, 4GPIOs, 3.3V & 5V power port
Wifi: 2.4GHz Transmission rate 300Mbps Interfaces: 2x Ethernet (1 WAN, 1 LAN), 1x USB 2.0, 1x microUSB (power) Power input: 5V/1A
We based our Ergohacks Verdict on 3 weeks of testing and experimenting. This product is still in regular use today. It was provided by TorVPN in 2017. This article was first published on 7 December 2017.
Gl-iNet Mango Router The Ergohacks Verdict Earlier this week we took a look at TorGuard's VPN offerings. If you're setting yourself up on a VPN you've got a couple of choices - get every single device talking via the VPN on their own or create a central point which every system can talk to to protect them all.
0 notes
Text
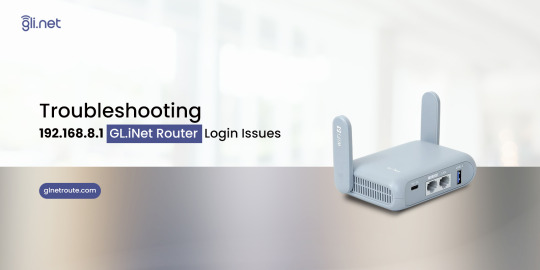
Troubleshooting 192.168.8.1 GL.iNet Router Login Issues
Access your GL.iNet router's administration panel by navigating to 192.168.8.1 gl inet router login in your web browser. Ensure your device is connected to the GL.iNet network. You will be prompted to enter your administrator password, which you set during the initial setup. For more details, drop by!
0 notes
Text
Setup Guide For GL iNet GL SFT1200 Travel Router
Looking for a travel router or a router that suits small apartments and businesses? If yes then you must surely check Opal from GL iNet. Also known as GL SFT1200. It is a mini router that fits seamlessly into your travel bag so you can work remotely, enjoy wifi access on the go. The GL iNet GL SFT1200 setup configuration is crucial for making the best possible use of the device. The setup is quick, simple and is done using a web browser. Therefore in this guide you'll get access to the same.
Feature Set
Before proceeding with the GL iNet GL SFT1200 setup steps, first let's learn about its features.
The Opal runs on dual frequency bands. The 2.4 GHz band provides broader coverage and speeds of upto 300 Mbps. Whereas on 5Ghz band you can grab the high speeds of upto 867 Mbps. Further you get outstanding security due to VPN. For connecting your devices straight to the Opal, you get access to not one or two but three Gigabit ethernet ports. The best part about the GL iNet GL SFT1200 setup is that you can access the internet in multiple ways. You can use it as a repeater, connect it to the modem, access it in AP mode and more. Simultaneously, you get to connect a maximum of 52 devices to the Opal. Moreover with Web UI 3.0 you can use your files securely and remotely.
GL iNet GL SFT1200 Setup Steps
The setup steps are simple, straightforward and consume a very little time. So let's begin:
✓ Start By Unboxing
First unbox your package contents. Inside the package you receive:
GL SFT1200 router (Opal).
A power adapter with a converter.
An Ethernet cable
A quick user guide alongside warranty and thankyou card.
Apart from the above written components, the requirements for the setup are only two. One is a smart device of your choice and second is a vacant power outlet. Additionally, we recommend you to give a quick reading to the user guide. This step will make the GL iNet GL SFT1200 setup smoother.
✓ Turn On The Opal
It's time to activate the Opal. For this you need the power adapter. But first open the antennas to 180° from both sides. Now slip in the power pin of your power cable into the Opal’s back panel. And secure the adaptor into an electrical socket. Turn on. Let the Opal stabilize.
✓ Connect
In this GL iNet GL SFT1200 setup step, you require a smart device. So fetch it. Connect it to the Opal bh choosing any two options as are written below.
Turn on wifi. From the available list pick GL-SFT1200-XXX. Use goodlife as a password. The password needs to be written in lower letter case only. Last tap on Connect.
The second option is using ethernet cable. Connect the cable that is moving from your smart device to the port which is marked as LAN on Opal.
✓ Using Web Browser For Setup
Finally as you connect your device to the SFT1200 open an internet browser. For smooth access to GL iNet GL SFT1200 setup page, take some notes. First choose a browser that is compatible. We would tell you to use internet explorer, chrome, safari, edge or firefox. Next clean up browser caches and cookies. Also update the browser if you see any pending updates.
Now take access to the browser's address field. In it enter 192.168.8.1. Push enter. A window opens up. It asks you to choose the language, therefore do so and tap Next. Curate an admin password. Keep it unique and strong. For this, combine letters, special characters as well as numbers. Once done, hit Submit.
Finally you now get to complete the GL iNet GL SFT1200 setup, by connecting to the Internet. So select the Internet option, pick a connection type which is suitable to you and give in the asked details. As the Opal has access to the Internet, the front panel LED will pop up a solid white light. Thus indicating a complete setup.
Factory Resetting Opal
Left the above written steps midway due to any reasons? If yes then no issues as you can reset the router and perform them from the scratch so that the outcome is successful. To reset the Opal, first power it up with the help of the supplied adapter. Remember one thing as you turn on your Opal do not immediately move to the reset button, rather let the router start up properly. Next, when the router is undergoing the process of resetting, you can not perform any other activity on the router as this may damage the hardware. So after the router boots up, press the reset button which is nearby to the mode switch button. Do not release it until the light on the front panel starts flickering. As you release it, the reset completes. So now you can re-perform the GL iNet GL SFT1200 setup.
For any query or assistance feel free to get support from experts.
0 notes