#how to make bootable pen drive in windows 7
Explore tagged Tumblr posts
Visit Tumblr Blog
Explore Tumblr blogs with no restrictions, modern design and the best experience.
Last Seen Tumblr Blogs


Fun Fact
The Tumblr app for Google Glass was released on May 16, 2013.
Video
youtube
How To Create Windows 10 Bootable USB Flash Drive
#How to Create Windows 10 Bootable USB Flash Drive#Windows 10 Bootable USB Drive#Windows 10 USB Drive#Windows 10 ISO#Windows 10 installer#How to Create A Windows 10 Bootable USB Flash drive#USB Drive#how to make a pendrive bootable for windows 10#download windows 10#How to download windows 10#windows 10 operating system#How towindows 10 download 64 bit#how to make bootable pen drive in windows 7#Thumbdrive#how to boot pendrive for windows
0 notes
Text
How to Alter Your Microsoft Office Format?
You can alter the format whenever. Pen Drive Data Recovery can cause changes to the layout you to have saved prior to utilizing these means:
Stage 1: Go to Document > Open.
Stage 2: Double tap This PC or PC relying upon the Microsoft Office adaptation you are utilizing.
Stage 3: Go to the Custom Office Layouts organizer under Archives/My Records.
Stage 4: Select the objective layout and snap Open. You can likewise double tap the layout to open it.
Stage 5: Alter the items and configurations of the record according to your necessities. Then, save the layout and close it.
How to make a Microsoft layout on Windows? You can track down the ways from this article to save a Word/Succeed/PowerPoint report as a layout.
Snap to Tweet
How to Utilize Your Layout to Make Another Record?
To make another report utilizing your current layout, you can follow this aide:
Stage 1: Snap Document > New > Individual/Custom (contingent upon the Microsoft Office form you are utilizing).
Stage 2: Find the layout you need to utilize and click it to open a duplicate of it.
Stage 3: Alter the items in the report.
Reward Tip: Recuperate Your Lost and Erased Records Utilizing USB Drive Data Recovery software Power Information Recuperation
There ought to be numerous significant records on your Windows PC. On the off chance that these documents are erased accidentally or get lost because of some explanation, you can utilize proficient Windows information recuperation programming like USB Drive Data Recovery software Power Information Recuperation to get them back.
This is a free document recuperation instrument. With it, you can protect a wide range of documents from your PC's inward hard drives, inner hard drives, SSDs, USB streak drives, memory cards, SD cards, and that's only the tip of the iceberg. This product can work in various circumstances.
For instance, on the off chance that you can't get to your hard drive effectively, you can utilize this product to examine that drive and recuperate information. On the off chance that you erase your documents for all time, you can utilize this instrument to recover them for however long they are not overwritten by new information. In any event, when your Windows becomes unbootable, you can utilize the bootable release of this product to save your documents before you go to lengths to fix the framework.
This product can chip away at all adaptations of Windows, including Windows 11, Windows 10, Windows 8/8.1, and Windows 7. You can initially attempt the preliminary version to examine the drive you need to recuperate information from and check whether it can assist you with tracking down your required documents.
How to Consolidate Message from At least two Cells into One Cell?
Here, we will present two simple and powerful methods for assisting you with joining message from at least two cells in a single cell in Microsoft Succeed.
It is extremely simple to utilize this product to recuperate your lost and erase documents on Windows: with a couple of snaps, you can get your records back:
Stage 1: Open the product to enter its fundamental connection point.
Stage 2: You can see every one of the drives that can be distinguished under the Sensible Drives area. You can float over the one where the lost or erased documents were recently saved and click the Output button to begin examining that drive. You can likewise change to the Gadgets segment to filter the entire circle in the event that you are don't know which is the objective drive.
Stage 3: Hold on until the entire filtering process closes. Then, at that point, you will see the output results. You can open every way and find the records you need to protect.
Stage 4: To recuperate information with this product, you want to utilize a full version. You can get a permit key from the USB Drive Data Recovery software official site and register the product by tapping the key symbol simply on the sweep results interface.
Stage 5: Select the documents you need to recuperate, click the Save button, and pick a reasonable organizer to save your chose records. The objective envelope ought not be in the first area of the erased or lost documents. This can keep these records from being overwritten and becoming unrecoverable.
To recuperate your lost or erased documents on Windows, you can attempt USB Drive Data Recovery software Power Information Recuperation.
How to Make a Microsoft Office Layout on Macintosh?
Microsoft Office is likewise accessible on macOS. On the off chance that USB Drive Data Recovery software use Microsoft Office on your Macintosh PC, you can
the most effective method to make a Microsoft layout.
#Pen Drive Data Recovery#USB Drive Data Recovery#Pen Drive Recovery#USB Drive Recovery#Pen Drive Recovery software#USB Drive Recovery software#Pen Drive Data Recovery software#USB Drive Data Recovery software
0 notes
Text
How to make a flash drive bootable using rufus

#How to make a flash drive bootable using rufus how to#
#How to make a flash drive bootable using rufus install#
#How to make a flash drive bootable using rufus windows 10#
#How to make a flash drive bootable using rufus portable#
Rufus is a free software designed to format and create external devices such as flash or memory cards to be bootable, so it can be used as normally using DVDs. “Transfer” the ISO file into USB Flash Drive using Rufus.“Save” important files from USB Flash Drive to another place, as this will be “formatted” and emptied.Prepare USB Flash Drive that has a capacity of at least “4 GB” or higher to be used for Windows 8 installation.
#How to make a flash drive bootable using rufus install#
To install Windows 8 from USB Flash Drive with Rufus, follow these step by step below: This is a very lightweight application, with a tiny size that can transfer Windows Setup from ISO file and make external device “bootable”, so we can use it later as a normally using DVD for installation. There are many software programs that can help to perform this task easily, one of them is “Rufus”. Not only that, even memory card or other external device can also be used. And start the installation process.USB Flash Drive can be an Alternative choice to install Windows 8 or 8.1 operating system that normally uses “DVD setup”. From the boot menu select the USB drive to boot the system with it.
After that connect to a PC or laptop where you want to install Windows 11, start/restart it.
Wait for few minutes, once the process is completed click on the Close button.
Select Partition Scheme MBR/ GPT, target system UEFI.
Click on the SELECT button to choose the Windows 11 ISO file.
Now, from the Device drop-down select the USB drive that you want to bootable.
Double click on the executable file of the Rufus to run it on your existing Windows 10/8/7 system.
Go to its official website and download it.
#How to make a flash drive bootable using rufus portable#
Secondly, we require a portable tool called Rufus- a bootable USB maker.
#How to make a flash drive bootable using rufus how to#
Follow our article How to Download Windows 11 ISO 64-bit If you already have the copy then move to the next steps or else first download the same.
The first thing is of course you must have the Windows 11 ISO copy.
ĭownload Windows 11 ISO to create a bootable USB drive Remember your PC must support TPM 2.0 and Secure Boot to install Windows 11.
Graphics card DirectX 12 compatible graphics / WDDM 2.x.
TPM Trusted Platform Module (TPM) version 2.0.
System firmware UEFI, Secure Boot capable.
64-bit Processor at 1 gigahertz (GHz) or faster with 2 or more cores.
Thus, if you have already grabbed the ISO file of Windows 11, then here are the simple steps to follow to create a bootable pen drive of it. More default themes this time as compared to Windows 10. Unlike in the past, windows can not only be maximized or minimized but can also be specifically placed in a corner of the screen or arranged side by side. A handy feature that should come with Windows 11 is the new window control. Quick search terms and a list of the most recent search terms are intended to simplify and speed up the search for the user. The Windows search has been revised and now works via a magnifying glass icon in the system tray. Programs are pinned to the top of the start menu and below that the user will find the files last accessed, the controls for switching off the system are there as well. And also the pop-up start menu window also has been changed in Windows 11, with a new set of icons, fluid interface, curvey edges for windows, which means a refreshing experience. Yes, Microsoft has ditched its traditional extreme left side start menu and instead of that, it is now somewhat in the middle. The key thing which is clearly new to everyone is the overhauled interface of Windows 11. Thus, many citizens already have experienced it.
#How to make a flash drive bootable using rufus windows 10#
Here we will learn the steps to create a bootable USB drive using Windows 11 ISO file and Rufus software.Īlthough, now it is official that Windows 11 will be the successor of Windows 10 on June 24, however, somehow the preview ISO copy of it has already been on the internet to install before the announcement. Windows 11 is the latest release operating system from Microsoft.
0 notes
Text
How to make a flash drive bootable for windows 10 free

How to make a flash drive bootable for windows 10 free how to#
How to make a flash drive bootable for windows 10 free install#
How to make a flash drive bootable for windows 10 free full#
How to make a flash drive bootable for windows 10 free windows 10#
How to make a flash drive bootable for windows 10 free software#
How to make a flash drive bootable for windows 10 free software#
Secondly, you can insert your windows OS CD or DVD directly inside DVD-RW where the software fetches all files and folder needed for making a bootable pen drive. Let say you want to create a USB bootable pen drive of windows XP you will surely need an iso file of win XP or say you need to create a startup pen drive of windows 7 you must have an iso image of win 7. To make a bootable USB device there are some requirements such as you will need an iso image of the operating system.
How to make a flash drive bootable for windows 10 free install#
What is a Bootable USB pen Drive or Flash DriveĪ bootable USB Pendrive or flash drive is a device when used we can install an operating system on our computer hard disk.
How to make a flash drive bootable for windows 10 free how to#
How to Create a Dos Bootable USB Pendrive.
The operating system may be corrupted by some of the viruses which are spread over the internet and when these types of viruses come in contact with our hard disk they infect some of the important system or operating system files which are necessary for normal computer booting.
How to make a flash drive bootable for windows 10 free full#
You can find many articles on the web when you google them but here I am going to share every possible way to make a bootable USB pen drive or flash drive.īootable or startup pen drives are mainly used to repair corrupt operating system files which are damaged by accidentally deleting or updating files that are necessary for an operating system to perform to its full potential. So nowadays many professional and home users create bootable pen drives for installing new and fresh operating systems to their computers or laptops. There are many drawbacks to using a CD or DVD for computer booting the bootable CD or DVD normally gets corrupted or become damaged as its very hard to maintain or keep safe from scratches. For computer booting, we usually boot from a CD or DVD which is a traditional way for computer boot. After your PC restarts to the Choose an option screen, select Troubleshoot > Advanced options > Startup Settings > Restart.If you are searching for how to create a bootable USB Pendrive you might find this article useful. Under Advanced startup, select Restart now. How do I boot my laptop in Windows 10?įrom Settings Press Windows logo key + I on your keyboard to open Settings. This displays the BIOS setup utility interface. The Options menu will be seen after executing the above procedures.
How to make a flash drive bootable for windows 10 free windows 10#
To enter BIOS from Windows 10 Click –> Settings or click New notifications. How do you get into the BIOS in Windows 10? In the new command line window that opens, to determine the USB flash drive number or drive letter, at the command prompt, type list disk, and then click ENTER. Open a Command Prompt window as an administrator. To create a bootable USB flash drive Insert a USB flash drive into a running computer. Go to ① screen, select USB flash drive/CD-ROM in Boot Override that you want to use②, then press Enter key to boot the system from USB flash drive/CD-ROM. In Legacy mode, you only can select items by using Arrow Keys and Enter Key. › wiki › USB_flash_drive USB flash drive – Simple English Wikipedia, the free encyclopedia Some computer programs can be run from a USB flash drive. It is often easier to use a flash drive than to carry many CD-ROMs. USB flash drives have a lot of storage space. Go to ① screen, select USB flash drive/CD-ROM in Boot Override that you want to use②, then press Enter key to boot the system from USB flash drive/CD-ROM.Boot the system from USB flash driveUSB flash driveFlash drives are used to store any type of data file, or to move data from one computer to another.
How do I get into BIOS on ASUS laptop Windows 10?īoot the system from USB flash drive/CD-ROM in BIOS – Legacy mode.
How do you get into the BIOS in Windows 10?.
How do I reinstall Windows 10 from USB in BIOS?.
How do I get my laptop to boot from USB?.
How can I enter BIOS if F2 key is not working?.
How can I make a bootable USB for Windows 10?.
How do I select boot device on my Asus laptop?.
USB flash drive – Simple English Wikipedia, the free encyclopedia.
0 notes
Text
Logic pro x for windows xp free download 無料ダウンロード.Logic pro XP windows 32 bit
Logic pro x for windows xp free download 無料ダウンロード.New Features For Logic Pro X 10.1.

ダウンロードとインストール Logic Pro あなたのWindows PCで.Download logic pro XP windows 32 bit for free
Download logic pro XP windows 32 bit for free. Multimedia tools downloads - Logic Pro by Babya and many more programs are available for instant and free download Download logic for XP for free. Multimedia tools downloads - Logic Pro by Babya and many more programs are available for instant and free download Installation Requirements for Logic Pro X Application. Since Logic Pro X is an Apple software and has been designed for macOS, the only way to use it on a Windows PC is by using a VirtualBox. A VirtualBox allows you to run guest operating systems on your host system and can be used to emulate macOS High Sierra on your Windows host
Logic pro x for windows xp free download 無料ダウンロード.Logic Pro X Download for Windows - EuroDownload
Installation Requirements for Logic Pro X Application. Since Logic Pro X is an Apple software and has been designed for macOS, the only way to use it on a Windows PC is by using a VirtualBox. A VirtualBox allows you to run guest operating systems on your host system and can be used to emulate macOS High Sierra on your Windows host Nov 11, · Windows PCにLogic Pro をダウンロードしてインストールします。 あなたのコンピュータにLogic Proをこのポストから無料でダウンロードしてインストールすることができます。PC上でLogic Proを使うこの方法は、Windows 7/8 / / 10とすべてのMac OSで動作します。 Download logic pro XP windows 32 bit for free. Multimedia tools downloads - Logic Pro by Babya and many more programs are available for instant and free download
A thoughtfully redesigned Logic Pro makes it easier than ever to translate musical inspiration into professional productions. energyXT is a program that enables you to create an unlimited number of MIDI, drums and audio tracks. The program includes the following features:. The MPX Native Reverb Plug-in consists of a single polymorphic plug-in with seven different reverb types and over one PCMate Free WiFi Hotspot Creator is a free virtual WiFi hotspot creator for Windows which allows you to instantly turn adopts a better logic for faster and query logic for faster Zelio Soft 2 can be used to program Zelio Logic Smart Relay family of controllers.
AOMEI Partition Assistant Professional Edition is multifunction and multilingual disk partition software that can assist you to optimize your disk performance. primary to logical partition and Pandora Recovery allows you to find and recover recoverable deleted files from NTFS and FAT-formatted volumes MultiMedia Logic is an source MultiMedia Logic Design System Hetman Partition Recovery helps you bring back deleted files from hard disks, memory cards, and USB drives.
XRY is a software application designed to run on the Windows operating system which allows you to perform a secure packages from EXE files. Converting EXE files to converting multiple EXE packages to Video Converter 3. the paid Pro version in the Pro version Windows XP , Vista running Windows XP , Vista using Windows XP , then exe and click with Windows XP also requires is Windows XP or Windows with Windows XP or DVD Converter Pro is a DVD Converter Pro on DVD Converter Pro Step exe " or the executable EXE file.
exe ". Windows Mac. Windows Users' choice Logic pro. exe for XP Logic pro. exe for XP Most people looking for Logic pro. exe for XP downloaded: Logic Pro. MPX Native Reverb bit. PCMate Free WiFi Hotspot Creator. exe free. Zelio Soft 2. Aomei Partition Assistant Professional Edition. Pandora Recovery. MultiMedia Logic. Hetman Partition Recovery. Free Audio Converter. How to convert EXE to MSI with Advanced Installer. How to convert PPT into VCD With E.
PowerPoint Video Converter PRO. How to convert PST to CSV with PSTViewer Pro. How to Clean Up Windows Autorun List. How to create bootable USB flash and pen drive for Windows. How to burn a CD in 4 ways. How to block applications from accessing the Internet in Windows Twitter Facebook.
0 notes
Text
Format Flash Drive Ms Dos Mac
Format Flash Drive Ms Dos Machine
Format Flash Drive Exfat Mac
Using Flash Drive On Mac
Formatting Flash Drive On Mac
Hey Friends today we will see how to format usb flash drive using MS-DOS. Manny times we need to format our usb drives, people find it difficult so today reading this article you will be able to format you usb very easily,lets see the steps.
You'll be given several format options when you try to format a USB drive on Mac, including OS X Extended (Journaled), OS X Extended (Case-sensitive, Journaled), MS-DOS (FAT) and ExFAT. If you are using macOS 10.13 or later, you'll also see an option named APFS, which is the default file system of macOS 10.13 and later. Yes, connecting an external hard drive or USB flash key to a Mac will generally read and work fine as is because the Mac can easily read other filesystem formats, including Windows MSDOS, FAT, FAT32, ExFat, and NTFS formats, but unless you intend on using the drive between a Windows and Mac machine, formatting it to be entirely Mac compatible. What is FAT32 Format? FAT32 is an improved version of the FAT system which was introduced in. To format a flash drive on a Mac, plug in the drive and open the 'Applications' folder, the 'Utilities' folder and then 'Disk Utility.' Your flash drive should be listed in the left menu. So if you need DOS for DVD drive firmware flashing, GPU bios flash experiments (like dumping original MacPro X1900XT flash etc. HOWTO for DOS boot CD: - Make a DOS bootable floppy or usb stick (if you need more stuff use USB, I did) (www.bootdisk.com, I used XP Startup disk floppy image).
Steps To Format Your Unformatable USB

1) Click Start > Run, and type cmd in the box then Click OK

Utorrent game downloads. 2) The command prompt window appears. 3) Type the following command:
format X:
Note: Replace “X:” with the letter of your USB Flash Drive. You can use “diskpart” to list all drive letters.

4) If you want to format it as FAT32 then type:
format X: /FS:FAT32
5) After that type the above command, press Enter.
Format Flash Drive Ms Dos Machine
6) When it asks for pressing Enter again, just press it to confirm.
7) It will prompt you to enter a name for the drive, write it and hit Enter
8) Thats it you are all done by Now.
And if you lost data after formatting your USB, Wondershare could help you recover files from USB flash drive
So by reading this article i hope you will be now easily able to format your USB flash dirve. IF you find this article usefull than plz click on g+1. Thank you 🙂
Format Flash Drive Exfat Mac
People who Read this Also read these:
Using Flash Drive On Mac
Hide/Unhide Drives without any Software.=crp_title>
How to Remove Toshiba USB Flash Write Protection…=crp_title>
How to make Windows 7 Bootable USB Pendrive=crp_title>
How to remove shortcut virus from your pen drive=crp_title>
How to install Windows apps on an SD card or USB drive=crp_title>
Disk Utility User Guide
In Disk Utility, you can format an external disk that you can use with both a Microsoft Windows-based computer and a Mac. For example, you might want to do this if you use a flash drive to store data files you need to use on your Mac at home and when using a Windows-based computer at school or the public library.
WARNING: Formatting a disk or volume erases all the files on it. Save any files you need to another volume before formatting.
In the Disk Utility app on your Mac, choose View > Show All Devices.
Windows 10 avast antivirus download. If Disk Utility isn’t open, click the Launchpad icon in the Dock, type Disk Utility in the Search field, then click the Disk Utility icon .
In the sidebar, select the disk you want to format to use with Windows computers.
Click the Erase button in the toolbar.
In the Erase dialog, click the Scheme pop-up menu, then choose a partition scheme.
Click the Format pop-up menu, then choose one of the following:
MS-DOS (FAT): Choose this format if the size of the disk is 32 GB or less.
ExFAT: Choose this format if the size of the disk is over 32 GB.
Enter a name for the volume.
The maximum length for the volume name is 11 characters.
Click Erase, then click Done.
Formatting Flash Drive On Mac
See alsoFile system formats available in Disk Utility on MacPartition schemes available in Disk Utility on MacPartition a physical disk in Disk Utility on Mac
0 notes
Text
Usb Flash Drive Format Tool Ufix-ii Download

Usb Flash Drive Format Tool Ufix-ii Download Windows 7
Usb Flash Drive Format Tool Ufix-ii Downloadl Ufix Ii Download
Usb Flash Drive Format Tool Ufix-ii Download Windows 10
USB flash drives, pen drives, thumb drives can easily get corrupted or result in device failure due to a virus attack, file system corruption, hardware malfunction, improper shutdown, and more. When it happens, you have to repair the corrupted USB flash drive or pen drive to make the device work normally again. After some testing I found this tool that will erase them and turn them into normal usable USB Flash drives. Click on this link and then look for USB Flash Driver Format Tool (Ufix-II) download – unzip and run it. Make sure you select the correct drive to erase – it will erase all files on the drive.
PNY USB Flash Drive Warranty Statement. Firmware Update. USB Firmware Update (128GB Turbo USB 3.0 Model Only) Name Revision File Size Download; USB Firmware Upgrade Tool Manual v.1: 357 Kb: Download Manual: Firmware Update Package v2.1.8.14: 2.7 Mb: Download Firmware: Carbonite Online Back-Up Offer. Carbonite Online Back-Up Offer. Usb Flash Drive Format Tool Ufix-Ii Download Posted on 5/25/2019 From Rogosoft: USB Drive Format Tool is a tiny freeware utility designed for formatting any USB storage devices (USB Flash drive, USB stick, USB pen drive, USB portable drive, and SDCard) in FAT, FAT32, exFAT, and NTFS file systems.
'I encountered the disk not formatted error on my 64GB Toshiba flash drive. The error message said 'You need to format the disk in Drive H: before you can use it'. How can I format my USB flash drive for reuse successfully?'
USB format tool, also known as USB formatter, lets you solve many USB format problems. With the help of the recommended USB format tools on this page, you can easily format USB drive to FAT32 or NTFS, format a write-protected USB flash drive, format USB drive back to the original size, etc.
PAGE CONTENT:
#1. EaseUS Partition Master
#2. Windows File Explorer
#3. Windows Disk Management
#4. Windows Diskpart Command
#5. HP USB Disk Storage Format Tool
Pick up the best USB format tool and follow the respective tutorial here to format your USB with ease now.
Why Do You Need USB Format Tool
Generally, formatting is the quickest way to prepare a USB drive ready for data storage, plus it is the best way to troubleshoot many general USB issues.
When you meet any one of the following issues, you would like to format your USB drive or a pen drive with a reliable USB format tool:
USB is slow in writing or transferring files.
USB becomes RAW, not accessible, not formatted USB drive
Remove data and restore USB drive to its full capacity.
Can't save a single file bigger than 4GB on USB.
Can't create a partition larger than 32GB on FAT32 USB drive.
Windows was unable to complete the format while formatting a USB.
Can't format USB with 'the disk is write-protected' error.
You may also interest in:
2021 Top 5 Best USB Format Tools for Windows 10/8/7/XP Users
To help you fix USB cannot format, USB drive is write-protected, USB format error, USB becomes raw, and more issues, here we collected top 5 best USB format tools in 2021 to help you out.
Pick up one and format your USB flash drive to fix the problems immediately:
5 USB Format ToolsProsCons#1. EaseUS Partition Master
Format USB to FAT32/NTFS/Ext4/3/2/exFAT.
Support Windows 10/8/7/XP/Vista, and Windows Servers.
The only bootable USB format tool.
Doesn't have a Mac version.
#2. File Explorer
Format USB to FAT32/NTFS.
Support Windows 10/8/7.
Can't format USB to Ext4/3/2.
#3. Disk Management
Format USB to FAT32/NTFS.
Support Windows 10/8/7.
Can't format USB to Ext4/3/2.
#4. DiskPart Command
Format USB to FAT32/NTFS.
Support Windows 10/8/7.
Can't format USB to Ext4/3/2.
Complex for beginners.
#5. HP USB Disk Storage Format Tool
Format USB to FAT32/NTFS.
Support Windows XP.
Can't format USB to Ext4/3/2.
Among the top 5 USB formatters, EaseUS Partition Master is highly recommended as the TOP ONE USB format tool. It allows all Windows users to format their USB flash drive, external or internal hard drive, SD card, etc. to all any file system with ease.
Important
As formatting will cause data loss, remember to back up valuable files from the USB drive to another location first. Reliable file backup software - EaseUS Todo Backup can help.
After picking up the USB format tool, you may follow the tutorial below to format your USB flash drive with ease now.
#1. EaseUS Partition Master - The Best USB Format Tool in 2021
There are many USB formatting tools available online to help, like HP USB Disk Storage Formatting Tool, MMC Formatting tool, USB formatting software, etc. Which one is the best?

Here, we would like to recommend you try EaseUS partition software. Its powerful formatting capacity and easy-to-use features allows all levels of users to format their USB flash drive from all complex cases within only a few simple clicks.
Features You May Like:
Format USB to Fix 'File Is Too Large for Destination File System' Error
Format USB to EXT2/3/4, FAT16/32, NTFS, exFAT
Convert USB from FAT32 to NTFS without Formatting.
Tutorial: How to Format USB Flash Drive with EaseUS USB Formatting Tool
Now you can try the following guide to format your USB drive in Sandisk, Kingston, Panasonic, Lexar, Samsung, Sony, etc. with a few simple steps.
Step 1. Select the USB drive to format.
Connect the USB drive or pen drive to your computer. Download and launch EaseUS partition software. Right-click the USB drive you intend to format and choose 'Format'.
Step 2. Set the drive letter and file system.
Assign a new partition label, file system (NTFS/FAT32/EXT2/EXT3), and cluster size to the selected partition, then click 'OK'.
Step 3. Check the warning box.
Click 'OK' if you see the Warning window. If you have important data on it, back up the data in advance.
Step 4. Apply the changes.
Click the 'Execute operation' button first, and then click 'Apply' to format the USB drive.
#2. Windows File Explorer - Format USB Drive in Windows 10/8/7
Windows has default programs that let users format USB pen drives and a variety of hard drive storage devices as well. Windows File Explorer is one of them, though not a professional USB format tool, yet the easiest tool for formatting a USB flash drive or USB.
Note that File Explorer is not designed to solve every USB corruption issue but it's good to have the first try when your USB drive starts malfunctioning.
Features You May Like:
Free
Format USB to NTFS/FAT32, exFAT (on big USB drive)
Delete and remove files from USB
Tutorial: Format USB Flash Drive Using File Explorer
Connect the USB flash drive to your computer, after Windows recognizes the USB, you can follow the steps below to format your USB drive now:
Step 1. Open File Explorer.
Usb Flash Drive Format Tool Ufix-ii Download Windows 7
Step 2. Choose 'This PC' from the left pane.
Step 3. Right-click the connected USB flash drive and select 'Format'.
Usb Flash Drive Format Tool Ufix-ii Downloadl Ufix Ii Download
Step 4. Under the File system section, set NTFS, FAT32 or exFAT for the USB.
Step 5. Tick 'Quick Format' and click 'Start'.
#3. Windows Disk Management - Format a Not Working USB Drive
Disk Management is the other native Windows program that is available in Windows 10/8/7. It enables users to undertake many more tasks to manage a disk as they want.
Features You May Like:
Free
Format RAW USB to NTFS/FAT32/exFAT
Create New Volume on USB
Delete Volume on USB
Tutorial: Format (RAW or Not Working) USB Flash Drive in Disk Management
Step 1. Right-click on This PC and navigate to Manage > Disk Management.
Step 2. Right-click on the USB drive, and choose 'Format'.
Step 3. Set the allocation unit size and select NTFS, FAT32, or exFAT as the file system.
Step 4. Check 'Perform a quick format' and click 'OK' to start formatting the USB drive.
#4. Windows Diskpart Command - Advanced USB Formatter for Professionals
Windows Command Prompt is a built-in tool in Windows that can troubleshoot all kinds of computer problems with various commands. You can use the Diskpart command as the USB formatter to format an external USB drive.
Features You May Like:
Free
Format USB to NTFS/FAT32/exFAT
Delete USB Partition
Create New Volume on USB
Tutorial: Format USB Flash Drive Using DiskPart Command
This method is somehow complex for many Windows beginners. Be patient and careful while utilizing this way to tackle some USB issues via formatting.
Connect your USB to the computer and start formatting it via DiskPart now:
Step 1. In Windows 10, press Windows + R keys and type cmd in the Search box.
In Windows 8/7, click the Windows icon and select 'Search'. Type command prompt in the Search box.
Step 2. Right-click Command Prompt and select 'Run as administrator'.
Step 3. Type the following command lines one by one and hit Enter each time:
diskpart
list disk
select disk + number (If the USB flash drive is disk 2, then enter disk 2)
list volume
select volume + number (If the USB flash volume is volume 10, select volume 10)
format fs=ntfs quick (You can also replace ntfs with FAT32 or exFAT)
exit
#5. HP USB Disk Storage Format Tool - Best for Windows XP
The HP USB Disk Storage Format Tool was created to format USB drives and desktop computers that were produced prior to 2012 and computers that run Windows XP. The formatting tool will work with newer Windows operating systems but results may vary.
Features You May Like:
Free
Format USB to NTFS/FAT32
GUI Similar Interface, Windows XP Formatting Tool

Guide: How To Format USB Drive with HP USB Disk Storage Format Tool
To achieve the best USB format result, Windows XP users can consider the USB Disk Storage Format Tool to format a USB drive, flash drive or pen drive.
Connect the USB drive to your Windows XP computer and start with the following tutorial:
Step 1. Launch HP Disk Storage Format Tool, click 'Devices' and select the USB drive to format.
Step 2. On the File System menu, select a file system. In the Volume Label input box, enter a new name for the reformatted USB.
Step 3. Click the Quick Format option to enable a quick format.
Step 4. Click Start to begin the USB formatting.
The Bottom Line
On this page, we provided 5 top USB format tools for you to pick up one and follow the respective tutorial to effectively format your USB flash drive or external USB drives to the desired format.
Remember that no what why or how you want to format the USB, you should take a backup of all important data first.
Among the 5 USB format tools, EaseUS Partition Master is always ready for you to try. Besides basic formatting operations, this software also allows you to partition the hard drive, and clone disk, even migrate OS to another drive with ease.
People Also Ask
1. How do I format a USB drive?
Connect the USB drive or pen drive to your computer.
Launch EaseUS partition software. Right-click the USB drive and choose 'Format'.
Assign a new partition label, file system, and cluster size to the selected partition, then click 'OK'
2. What happens when you format a USB?
Usb Flash Drive Format Tool Ufix-ii Download Windows 10
1. Remove existing data from USB.
2. Reset the file system.
3. Restore USB to full capacity.
3. Why can't you format a USB flash drive?
USB Flash drive formatting has its advantages. But File Explorer, Disk Management, or DiskPart can't format USB due to the following reasons:
Virus Infection
Bad Sectors
Physical Damage
Device Locked or Write Protected
Incompatible File System
To resolve these issues and format your USB back to a normal state, you'll need the best USB format tool - EaseUS Partition Master as recommended on this page for help.
FonePaw - Solution - - HP USB Disk Storage Format Tool - Download & Fix USB Flash Drive
Formatting seems like the most effective way to fix a USB flash drive that can't be detected or accessed with various errors. And when you fail to format a USB flash drive in Windows' File Explorer or Disk Management, you have to turn to a dedicated USB formatter. HP USB Disk Storage Format Tool is a tool that is designed to format USB drive to FAT, FAT32, and NTFS.
Developed by HP in 2014, the tool is recommened by SanDisk to format SanDisk USB drive, while it can also be used to format Kingston, Apacer, Patriot and many other flash drive. The HP format tool works with Windows XP, Vista, 7, 8, 10, although some users with computers on newer versions of Windows found the tool caused their computer to crash.
HP USB Format - Features
Format USB flash drive to FAT, FAT32, and NTFS, but not exFAT.
Provide quick format.
Create a volume label for the USB drive.
Can be used to create a DOS bootable USB drive.
Format HHD or SSD drive and other storage devices.
Free Download
The HP USB Disk Storage Format Tool(opens new window) 2.2.3 is available to download.
The HP USB format utility is for Windows PC only, to format USB drive on a Mac, learn how to format USB drive on Mac(opens new window).
# HP USB Disk Storage Format Tool - How It Works
Step 1: Save Data from USB Drive Before Starting HP Format Tool
Since formatting a USB drive with HP usb disk format tool will erase all data on the drive, you may want to back up everything on the USB drive before formatting.
FonePaw Data Recovery(opens new window) can save data from USB flash drive even the USB drive is corrupted and inaccessible. It can recover files, photos, videos, etc. from broken USB drive so that you can fix the drive without losing your precious files.
Download FonePaw USB Data Recovery tool.
Run the tool.
On the homepage, select data and select your USB drive. (It can detect the drive even if the computer can't).
Click Scan and the tool will try to find everything from the corrupted USB drive.
Click Recover to save the USB drive data back to your computer.
Step 2: Format USB Drive with HP Format Utility
Download HP USB Disk Storage Format Tool package and run the tool as administrator. The application requires no installation process.
The HP USB disk tool looks like Windows' built-in utility and has a very simple interface.
Connect the USB flash drive that needs to be formatted to your computer. Select the drive in Device column.
Select the file system(FAT, FAT32, NTFS) that you want to format the USB drive to. Which file system should you choose when formatting USB drive? Learn about the pros and cons of FAT, FAT32, NTFS.
Select Format options. You can tick Quick Format, which takes only several minutes or even a few second to complete the USB drive formatting.
Also, there is the Enable Compression option, but normally you should not enable compression since it will compress all files on your USB drive, which slow down the write and read speed of the drive as the files needs to be compressed and decompressed all the time.
After you have selected the file system and formatting option, click Start.
The HP USB tool will warn you that the process will delete all data on the USB drive, click Yes to proceed.
When the USB drive is formatted, you should see a result window as follow.
Should you choose quick format on HP format tool?
To make the best choice, you need to understand the difference between Quick Format and Full Format.
By running a quick format on your USB drive, the HP USB format tool will only delete all data on the drive, but the data is recoverable with tools like FonePaw Data Recovery(opens new window) after the formatting.
On the other hand, if you untick Quick Format, you are performing a full format on the flash drive, which will delete all data on the drive and overwrite the storage space with zero. This makes it more difficult to recover files from the formatted USB drive. Moreover, a full format will scan the whole volume for bad sectors, which could take hours depending on the storage size.
To conclude, if you would like to recover files after formatting the drive, tick quick format and see if your USB drive is fixed after formatting; if you would like to remove everything on the drive to get rid of virus and fix problems on the drive, you should not select Quick Format on the HP USB format tool.
Good
Rating: 3.8 / 5 (Based on 126 ratings) Thanks for your rating.
0 notes
Text
Macos Catalina Internet Recovery
Power down your Mac completely. Power your Mac back on and hold down the Command + Option + R keys until you see a spinning globe on the display. The following is how you boot Mac in recovery mode that uses your Internet connection: Step 1. Click on the Apple logo at the top left corner of your screen and select Restart to restart your Mac. When you hear the boot chime on your Mac, press the Command + Option + R keys together on your keyboard.
Customers get Software upgrades for Mac computers through the online app store ever since the release of macOS Lion. Be it a clean install or upgrade, Mac App store require you connect to the internet to download whole installation files. The online OS update is OK if you have stable broadband connectivity and enough bandwidth. Apple also provides an option for internet recovery of macOS if your computer fails to boot. But there are situations where you can’t download the OS from the Apple servers. Having a macOS offline installer or a bootable USB disk is the only solution in such scenarios.
Download macOS offline Installer
Installing macOS without internet requires a bootable USB disk. And you need to download a full-size macOS installer for making this disk. Hence, before anything, we will tell you how to download macOS offline installer directly from Apple to your Mac using a GitHub script.
Download the gibMacOS script from this link and extract it to your Mac. From the extracted folder, run the script called gibMacOS.command — it will open the Terminal as shown below.
Wait for the script to fetch the macOS download catalogue from Apple. When the list is ready choose a number as per your OS option and press the Return/Enter key. You can use this script to download macOS Big Sur (11.1), Catalina (10.15), Mojave (10.14), and High Sierra (10.13.6). A new folder “macOS downloads” appears in the “gibMacOS-master” as you provide a download option, and the OS starts downloading as you can see in the video.
The OS gets downloaded as parts, PKGs, DMGs and other files. For macOS versions up-to Big Sur, you need to use another script “BuildmacOSInstallApp.command” in the main folder to join all the downloads and make the full macOS installer app. All you need is to drag and drop the downloaded macOS folder to the terminal window. The script will build the offline installer and save it to the same folder.
You don’t need to use the second script if your choice is macOS Big Sur. Because, for macOS Big Sur you get a full-size installer from Apple in PKG format. Double-click and open the InstallAssistant.PKG to save the “Install macOS Big Sur.app” to the Applications folder.
Apart from this, some older versions of macOS are available for direct download from Apple (Sierra, EL Capitan, Yosemite) in DMG format.
How to make a macOS bootable USB installer
Macos Catalina Internet Recovery Download

How To Install Catalina From Internet Recovery
It is possible to create a backup macOS installer on a DVD or USB drive but later is the best choice. Most of the Macs these days don’t have DVD slots, and the installation through a disc is very slow. Hence we discuss only about making macOS recovery installer on a USB disc. For this you need a Mac and a USB pen drive of at least 8 GB space, and a third-party app called DiskMaker.

First, download a copy of Disk Maker from the official website.
Choose a version as per your requirement. For example, if you want make USB installer for macOS Catalina 10.15, download Disk Maker X 9.
I use an MacBook Pro with High Sierra. Hence, I’m downloading disk maker X 7.
The next step is to download full macOS installer from the App Store to your Applications folder.
Run Disk Maker DMG installer and copy the app to the Applications.
The application will automatically detect the downloaded macOS as shown in the screenshot. Select “Use this Copy” if you would like to proceed with it.
Next is setting the USB pen drive for creating the bootable installer. Choose the third option ” An 8 GB USB Thumb drive.”
The app will list all drives in your system. Pick the one you would like use as macOS USB installer.
Ignore the warning message and proceed to Erase and Create macOS USB disk. Don’t forget to provide your admin password when it prompts.
Keep checking notifications tab for progress. When it completes you will find Install macOS Mojave (or High Sierra) mounted to your desktop as a USB disk.
That’s your backup. Unmount and keep the USB installer to a safe place.

Unfortunately, the above app is not compatible with macOS Big Sur 11 and above. Check the instructions on Apple website, the manual method to make macOS offline USB installer.
What is the alternative if I don’t have usable Mac at the moment?
This method is applicable when you have a Mac, and the internet recovery fails. But think about a situation when your only Mac stops to boot, and you don’t have USB installer or TimeMachine backup! Downloading MacOS DMG file might save you. If you have a macOS DMG, you can create bootable USB disk from a Windows PC — use a software like TransMac for this purpose.
Clean installing or restoring a Mac offline with USB pen drive

As said earlier, you could use the macOS USB installer to do a clean install or restore it upon a boot failure. Just connect the USB disk and press the Option/Alt Key when you hear the boot sound. The Mac will then display all the startup disks available.

Pick the USB drive starting with the label “Install macOS” and follow on-screen instructions to complete the installation. If you need, use the Disk Utility to format the drive for doing a clean install.
0 notes
Text
Macos Bootable Usb Not Showing Up

Plug the bootable installer into a Mac that is connected to the internet and compatible with the version of macOS you're installing. Press and hold the Option (Alt) ⌥ key immediately after turning on or restarting your Mac. Release the Option key when you see a dark screen showing your bootable volumes. Create Linux Mint Bootable USB on Windows PC. Windows is the most popular desktop OS and there are many apps that are capable of creating bootable Linux Mint USB installer. In this section, we pick up the best three one based on our testing. UUByte LiteBoot. There are a lot of Windows users that are planning to give a try on Linux Mint.
Macos Bootable Usb Not Showing Upload
Macos Bootable Usb Not Showing Up Iphone
Macos Bootable Usb Not Showing Upgrade
Macos Bootable Usb Not Showing Upside Down
These advanced steps are primarily for system administrators and others who are familiar with the command line. You don't need a bootable installer to upgrade macOS or reinstall macOS, but it can be useful when you want to install on multiple computers without downloading the installer each time.
What you need to create a bootable installer
A USB flash drive or other secondary volume formatted as Mac OS Extended, with at least 14GB of available storage
A downloaded installer for macOS Big Sur, Catalina, Mojave, High Sierra, or El Capitan
Download macOS
Download: macOS Big Sur, macOS Catalina, macOS Mojave, or macOS High Sierra These download to your Applications folder as an app named Install macOS (version name). If the installer opens after downloading, quit it without continuing installation. To get the correct installer, download from a Mac that is using macOS Sierra 10.12.5 or later, or El Capitan 10.11.6. Enterprise administrators, please download from Apple, not a locally hosted software-update server.
Download: OS X El Capitan This downloads as a disk image named InstallMacOSX.dmg. On a Mac that is compatible with El Capitan, open the disk image and run the installer within, named InstallMacOSX.pkg. It installs an app named Install OS X El Capitan into your Applications folder. You will create the bootable installer from this app, not from the disk image or .pkg installer.
Use the 'createinstallmedia' command in Terminal
Connect the USB flash drive or other volume that you're using for the bootable installer.
Open Terminal, which is in the Utilities folder of your Applications folder.
Type or paste one of the following commands in Terminal. These assume that the installer is in your Applications folder, and MyVolume is the name of the USB flash drive or other volume you're using. If it has a different name, replace MyVolume in these commands with the name of your volume.
Big Sur:*
Catalina:*
Mojave:*
High Sierra:*
El Capitan:
* If your Mac is using macOS Sierra or earlier, include the --applicationpath argument and installer path, similar to the way this is done in the command for El Capitan.
After typing the command:
Press Return to enter the command.
When prompted, type your administrator password and press Return again. Terminal doesn't show any characters as you type your password.
When prompted, type Y to confirm that you want to erase the volume, then press Return. Terminal shows the progress as the volume is erased.
After the volume is erased, you may see an alert that Terminal would like to access files on a removable volume. Click OK to allow the copy to proceed.
When Terminal says that it's done, the volume will have the same name as the installer you downloaded, such as Install macOS Big Sur. You can now quit Terminal and eject the volume.
Use the bootable installer
Determine whether you're using a Mac with Apple silicon, then follow the appropriate steps:
Apple silicon
Plug the bootable installer into a Mac that is connected to the internet and compatible with the version of macOS you're installing.
Turn on your Mac and continue to hold the power button until you see the startup options window, which shows your bootable volumes and a gear icon labled Options.
Select the volume containing the bootable installer, then click Continue.
When the macOS installer opens, follow the onscreen instructions.
Intel processor
Plug the bootable installer into a Mac that is connected to the internet and compatible with the version of macOS you're installing.
Press and hold the Option (Alt) ⌥ key immediately after turning on or restarting your Mac.
Release the Option key when you see a dark screen showing your bootable volumes.
Select the volume containing the bootable installer. Then click the up arrow or press Return. If you can't start up from the bootable installer, make sure that the External Boot setting in Startup Security Utility is set to allow booting from external media.
Choose your language, if prompted.
Select Install macOS (or Install OS X) from the Utilities window, then click Continue and follow the onscreen instructions.
Learn more
For more information about the createinstallmedia command and the arguments that you can use with it, make sure that the macOS installer is in your Applications folder, then enter the appropriate path in Terminal:
Big Sur: /Applications/Install macOS Big Sur.app/Contents/Resources/createinstallmedia
Catalina: /Applications/Install macOS Catalina.app/Contents/Resources/createinstallmedia
Mojave: /Applications/Install macOS Mojave.app/Contents/Resources/createinstallmedia
High Sierra: /Applications/Install macOS High Sierra.app/Contents/Resources/createinstallmedia
El Capitan: /Applications/Install OS X El Capitan.app/Contents/Resources/createinstallmedia
A bootable installer doesn't download macOS from the internet, but it does require an internet connection to get firmware and other information specific to the Mac model.
Linux is a great open-source operating system that can be installed on any desktop or laptop. What sets Linux apart from Windows and macOS is that it has a number of different versions that suit all your needs, ranging from newcomers to hard-core users. We call these versions distributions. The best part is that you can download all of Linux's distributions for free and install them on multiple machines.
One of the most popular Linux distributions is Linux Mint. Each distribution serves as a different purpose and there is no exception to Mint. Basically, Linux Mint is specifically designed to produce a modern and elegant operating system which is very easy to use. The coolest part is that a Linux Mint stick can be created from macOS and Windows, meaning that you can boot from Linux without installation.
Macos Bootable Usb Not Showing Upload
In this guide, we will show you how to create a Linux Mint bootable USB in Windows 10 and macOS. Before we proceed, there are a couple of things you need to understand about Linux Mint.
Why Linux Mint?
Linux Mint is one of the most used Linux distributions out there, as it is free and reliable. Like other distributions, Linux Mint can be installed on all platforms, including macOS, Windows, Android, and iOS. Linux Mint is widely supported by community and developers. The best thing about Linux Mint is that it is not vulnerable to viruses and malware attacks, which is ideal for testing purposes.
Creating a Linux Mint bootable USB is a no-brainer if you want to use it on a different computer. However, the process may be a little bit confusing to some folks. With that in mind, we are here to help.
Create Linux Mint Bootable USB on Windows PC
Windows is the most popular desktop OS and there are many apps that are capable of creating bootable Linux Mint USB installer. In this section, we pick up the best three one based on our testing.
1. UUByte LiteBoot
There are a lot of Windows users that are planning to give a try on Linux Mint. So at the beginning, we are introduing a couple of methods to create Linux Mint bootable USB on Windows, especially on Windows 10, which is now the most popular desktop operating syste.
Creating Linux Mint Bootable USB on Windows 10 is not hard at all. The first software recommendation is called UUByte LiteBoot. It is a leading program that's designed to handle all your needs for bootable USB thumb drive, including Windows, Linux and macOS. It also includes other modules for Windows ISO download and system backup and restore. Plus, it is buit with a modern UI and has a very pleasant user experience.
Step 1: Once you have UUByte LiteBoot installed on your computer, download Linux Mint onto your Mac (you can download it from here).
Step 2: Insert a USB thumb drive into Windows 10 where UUByte LiteBoot being installed. Make sure your USB device is fully compatible with the hardware, you can empty it and then reformat it using the built-in utility from right-click optionsl.
Step 3: Open UUByte LiteBoot on Windows 10 and then select Linux Boot from the main menu. Now, import the Linux Mint ISO file you downloaded earlier. Before the burning process begins, make sure you have made a copy of all important files on that USB drive.
Step 4: Click Burn button to start burning Linux ISO to the target USB drive. It usually takes about 7 minutes to complete the task. Please be patient and you will see an alear on the screen when it is done.
Step 5: Now, you have a bootable Linux Mint USB. You should insert this drive into the computer and start installing Linux mint on it by changing the first boot device to USB during startup.
In short, if you are in searching for a reliable ISO burner to create bootable Linux Mint USB, then give UUByte LiteBoot a try. It is lightweight, fast, and reliable.
2. ISO to USB
ISO to USB is a free program that lets you burn ISO image file to a USB drive, including USB Pen drive, USB sticks and USB thum drive. It is lightweight and features a simple user interface. However, it lacks some important features, including the ability to create ISO archive from external drives.
First off, you can download ISO to USB from its website and then open it on your Windows 10 machine. When the main menu shows up, click Browse to locate the Linux Mint ISO file you downloaded earlier. Select the USB drive you inserted and then hit the Burn button. The tool will start burning the ISO file to USB drive. ISO to USB has a high success rate, so you won't have any issues here.
3. RMPrepUSB
RMPrepUSB is one of the most powerful software for creating Windows and Linux bootable USB drives. In reality, RMPrepUSB is not just about creating a bootable drive, as it can do a lot more. One such thing lies in the ability to format USB and run USB speed test. And there are much more options for selecting bootloader and file systems.
This program is completely free (no subscription plans), so you don't need to spend some extra cash on its advanced features. However, it is only for advanced users as there are two many advanced settings being involved.
Step 1: Download RMPrepUSB from here and then open it on your Windows 10 computer.
Step 2: Once you are done, insert a blank USB drive into Windows . From the main menu, you can see the USB drive name showing up at the top.
Macos Bootable Usb Not Showing Up Iphone
Step 3: Click Prepare Drive to initiate the burning process and click OK from the popup menu. If this the first time you are using RMPrepUSB, the tool will run a test. Once the test is complete, repeat the above steps.
Step 4: After the bootloader information was written to USB, then extract the ISO file of Linux Mint image and copy the folder to USB. Now, it becomes a bootable Linux Mint USB.
To verifiy the burning successful or not, the user can test the result with QEMU emulator that is embeded into the program in default. You can see the option on left sidebar. This is the same as UUByte Boot Pro.
Create Linux Mint Bootable USB on Mac: Terminal App
You can create a bootable USB for Linux Mint from a Mac environment. However, you can not do it on your own as you need a little help from some third-party software out there. If you do some googling, you should find tons of them, but many of them might not work for you. Don't worry, we made a list of the best programs for creating Linux Mint bootable USB.
If you don't want to install some third-party app on your computer, you can use the dd command in macOS Terminal. This is a cool tool that allows you to execute some commands in macOS. In this case, you can rely on Terminal to create a bootable USB for Linux Mint.
Step 1: Insert the USB drive into your Mac and then open Terminal (Applications folder > Utilities).
Step 2: Enter the following command to convert ISO file IMG file:
hdiutil convert -format UDRW -o img_file_output_path linux_mint_iso_file_path
Step 3: Find the USB drive number and unmount the disk, X is the drive number of inserted USB drive:
diskutil list
diskutil unmountDisk /dev/diskX
Step 4: When all preparations are completed, it is the time to write the converted IMG file to USB, which becomes bootable afterwards.
sudo dd if=/img_file_path of=/dev/rdiskN bs=1m
Step 5: Ignore warning message that pops up uppon completion and eject the USB drive. You can now use this bootable USB to install Linux Mint on any computer.
Linux Mint Bootable USB Not Working? Troubleshooting Guide
Macos Bootable Usb Not Showing Upgrade
The success rate of creating bootable Linux Mint USB is pretty high with recommended tools we suggest above. However, some user may experience technical error during boot, such as disk error or no bootable device found. Here are a few useful tips to fix the problem.
Issue 1 : USB drive not detected
Answer: First, make sure the USB drive is installed. On Windows 7 and later version, the dirve will be installed automatically when the USB is plugged in. If failed, you have to download the USB driver and install it manually. On Mac, you can format the drive with Disk Utility app.
Issue 2: Black screen during installation
Answer: If you got a black screen during install, it means the burning process failed. Mostly because the free space is not enough on the drive. At least 4G free storage is required for installation. Also, check the ISO image is valid. If you tried two programs and failed, then it is highly possible that the ISO file is damged. You have to re-download the file again.
Issue 3 : Installation won't start
Answer: This happens frequently on old hardware that does not support UEFI boot. You need to disable secure boot and swithc to legacy Boot in BIOS.
Macos Bootable Usb Not Showing Upside Down
Wrapping Up
Creating Linux Mint bootable USB has been a lot of easier with modern software and applications, especially on Windows. Mac solution is much less due to the lack of apps from third-party developers. Honestly, there are far more options then the software listed above but they are the best among them so you don't take much time to test the candidate one by one.
0 notes
Text
Xcode 7 Download

With an all-new design that looks great on macOS Big Sur, Xcode 12 has customizable font sizes for the navigator, streamlined code completion, and new document tabs. Xcode 12 builds Universal apps by default to support Mac with Apple Silicon, often without changing a single line of code.
Download Xcode For Pc
Xcode 12.5 For Higher Sierra
Xcode 12 Beta 7 Download
Apple Xcode 7 Download
Xcode 7 Download For Mac
Designed for macOS Big Sur.
Xcode 12 looks great on macOS Big Sur, with a navigator sidebar that goes to the top of the window and clear new toolbar buttons. The navigator defaults to a larger font that’s easier to read, while giving you multiple size choices. New document tabs make it easy to create a working set of files within your workspace.
Document tabs.
The new tab model lets you open a new tab with a double-click, or track the selected file as you click around the navigator. You can re-arrange the document tabs to create a working set of files for your current task, and configure how content is shown within each tab. The navigator tracks the open files within your tabs using strong selection.
Apple Xcode is part of these download collections: View XML, Edit XML, Open XML. Apple Xcode was reviewed by George Popescu. DOWNLOAD Apple Xcode 12.4 Build 12D4e / 12.5 Build 12E5244e Beta 3. This enables Disqus, Inc. To process some of your data. This version includes the SDKs for iOS 14, iPadOS 14, macOS Big Sur, tvOS 14, and watchOS 7. Download the beta. Xcode Download and Install for your computer - either Windows PC 10, 8 or 7 and macOS 10 X, 32/64-bit processor, we have you covered.
Navigator font sizes.
The navigator now tracks the system setting for “Sidebar icon size” used in Finder and Mail. You can also choose a unique font size just for Xcode within Preferences, including the traditional dense information presentation, and up to large fonts and icon targets.
Code completion streamlined.
A new completion UI presents only the information you need, taking up less screen space as you type. And completions are presented much faster, so you can keep coding at maximum speed.
Redesigned organizer.
An all-new design groups all critical information about each of your apps together in one place. Choose any app from any of your teams, then quickly navigate to inspect crash logs, energy reports, and performance metrics, such as battery consumption and launch time of your apps when used by customers.

SwiftUI
SwiftUI offers new features, improved performance, and the power to do even more, all while maintaining a stable API that makes it easy to bring your existing SwiftUI code forward into Xcode 12. A brand new life cycle management API for apps built with SwiftUI lets you write your entire app in SwiftUI and share even more code across all Apple platforms. And a new widget platform built on SwiftUI lets you build widgets that work great on iPad, iPhone, and Mac. Your SwiftUI views can now be shared with other developers, and appear as first-class controls in the Xcode library. And your existing SwiftUI code continues to work, while providing faster performance, better diagnostics, and access to new controls.
Universal app ready.
Xcode 12 is built as a Universal app that runs 100% natively on Intel-based CPUs and Apple Silicon for great performance and a snappy interface.* It also includes a unified macOS SDK that includes all the frameworks, compilers, debuggers, and other tools you need to build apps that run natively on Apple Silicon and the Intel x86_64 CPU.
Updated automatically
When you open your project in Xcode 12, your app is automatically updated to produce release builds and archives as Universal apps. When you build your app, Xcode produces one binary “slice” for Apple Silicon and one for the Intel x86_64 CPU, then wraps them together as a single app bundle to share or submit to the Mac App Store. You can test this at any time by selecting “Any Mac” as the target in the toolbar.
Test multiple architectures.
On the new Mac with Apple Silicon, you can run and debug apps running on either the native architecture or on Intel virtualization by selecting “My Mac (Rosetta)” in the toolbar.
Multiplatform template
New multiplatform app templates set up new projects to easily share code among iOS, iPadOS, and macOS using SwiftUI and the new lifecycle APIs. The project structure encourages sharing code across all platforms, while creating special custom experiences for each platform where it makes sense for your app.
A guide to installing OS X El Capitan on a PC UPDATE: This was removed earlier because it's technically piracy, but HackinDoge suggested I put this back up anyway (thanks!). This is for those Windows users who just aren't able to get access to a Mac, and don't want to use highly modified distros either. Oct 22, 2018 How to download Mac OS El Capitan I need to download the El Capitan to install on my Mac computer. What is the best place to download the El Capitan dmg or El Capitan iso. Sep 30, 2015 Download El Capitan OS X is also significant since it’s the last version of Apple Mac OS X releases as its successor Sierra was released in the year 2016 under the brand macOS. El Capitan is a rock formation found in Yosemite National Park, which gives out the meaning that the new release is a solid version of its predecessor, Yosemite. OS X El Capitan 10.11.4.iso (7.14 GB) Choose free or premium download SLOW DOWNLOAD. FAST INSTANT DOWNLOAD Download type. Iso el capitan os x.
Improved auto-indentation
Swift code is auto-formatted as you type to make common Swift code patterns look much better, including special support for the “guard” command.
StoreKit testing
New tools in Xcode let you create StoreKit files that describe the various subscription and in-app purchase products your app can offer, and create test scenarios to make sure everything works great for your customers — all locally testable on your Mac.
Download Xcode For Pc
Get started.
Download Xcode 12 and use these resources to build apps for all Apple platforms. Soundflower mac download 2020.
Xcode is coding software or to precisely say is an app development software for Apple devices created by Apple Inc. The devices like iPhone, iPad & MacOS can use the software or applications developed using the Xcode. The Xcode IDE (Integrated Development Environment) can easily analyze the project made by the user and even identify the mistakes or issues that can arise because of an incorrect logic or syntax. But still, you can’t use the application because you do not have a system having MacOS and you want to download Xcode for Windows now.
So, today in this article I will help you install Xcode in Windows PC Can i download netflix on my mac air. if available and if not available then will let you know what are the best alternatives instead of Xcode.
Contents
2 How to Install and Run Xcode on Windows?
3 Windows Alternatives for Xcode
Is Xcode available for Windows?
Since it is developed by Apple, meaning that it is not officially available for Windows platform to develop applications and users can use it for Mac OS only. But, though there are some ways using which we can use Xcode in Windows.
Below, in the next point, I will discuss a few methods using which you can install the Xcode for Windows OS. Just follow the steps that I provide and you can install Xcode easily and start developing applications for various Apple devices.
How to Install and Run Xcode on Windows?
Apple has not launched any software or application using which one can use Xcode on Windows and create applications for iPhone, iPad or MacOS. Meaning you would need MacOS to run the Xcode software and create your own apps. So, you should install MacOS in your system first and then you can install Xcode for your Windows.
1. Virtual Box.
A Virtual Box is a software developed that allows users to use multiple operating systems in one single operating system of a PC. You can use any operating systems like Windows, Linux, Mac, whichever you want to use and the best part of using this app is you don’t need to remove your old operating system.
You can download the Virtual Box software from here.
Install the software and run it.
Open the OS that you want to open using the Add button in Virtual Box. But you need to download the Virtual Box image file of that O.S. in your system beforehand.
After the O.S. is added you can use the Xcode software to create the apps of Apple devices howsoever you wish.
Apart from Virtual Box, there is another similar software for using multiple operating systems i.e. VMWare Player. If you have already installed VMWare then you can use it for the installing Xcode for Windows.
2. VMWare Player
VMware player is also the same as Virtual Box and can be used to install any operating systems on a single PC and run multiple OS at the same time. The steps for the installing VMware would be the same as those of Virtual Box but for your reference, I will guide you using these simple steps:
Download the VMware using the link.
Install & run the software now.
You must have download OS image file (MacOS image file for VMware) already in your PC.
Add the OS using the add button and after installation is done, you can start using it.
You can now create applications for various Apple devices like iPhone, iPad or Mac or if you are a beginner then you can start learning & creating applications slowly.
3. Boot Windows to Mac OS
In this method, you can download and create a bootable drive(like pen drive) to install the MacOS on your Windows PC. You can use the devices as an external bootable drive to use it for MacOS(but it should have a large space of more than 16GB) or you can boot it into your device keeping or removing your Windows OS during the process and install MacOS.

The whole process can be followed using this link.
After the MacOS is installed using any of the above mentioned 3 methods, you can now download and install Xcode software to your MacOS.
The link to download Xcode for Windows is here.
Using these methods you can download Xcode for Windows 32 bit or 64 bit and use it for developing the apps. But an important note – Apple has not legalized the use of MacOS in Windows by anyway yet and using the Xcode in Windows is illegal.
Windows Alternatives for Xcode
Now since we know that Xcode is not officially available for Windows and so, we can use some alternatives instead of Xcode to develop applications for Apple devices.
1. These applications/platforms might help
React Native – Uses JavaScript to build native mobile apps for Android & iOS.
Xamarin – It uses C# language to build mobile apps that you can deploy natively to Android, iOS, and Windows operating systems.
Appcelerator – It can also be used to build native mobile apps using JavaScript.
PhoneGap – It builds a hybrid cross-platform mobile app using HTML, CSS, and JavaScript languages.
Flutter – Flutter is a mobile application development framework created by Google to develop applications for Android and iOS.
These are the best alternatives available in the market which can develop apps for both Apple & Android and some can develop for Windows too. But using them to develop applications for Apple devices won’t be of worth because as a result, you will be needing the Xcode software to check the application & also you would need an Apple developer I’d to add the application to the Apple Store.
2. Other Alternatives
Rent the MacOS over a cloud – The cheapest way to use MacOS for those who can’t afford to buy the MacOS system then you can use MacOS by renting it through the cloud. You can just google rent MacOS using cloud and there will be a bunch of results helping you out. Review the site properly before renting the MacOS and then only pay. Using this method, you can use MacOS and complete your needs for a short term period.
Xcode 12.5 For Higher Sierra
Buy a Mac – The best option and the last option left is to buy a system from Apple and use it for developing applications for Apple devices. The easiest and legal way for those who can afford the system.
Xcode 12 Beta 7 Download
Also Read: Best Android Emulators for Win 10
Conclusion
Apple Xcode 7 Download
The Xcode isn’t available for Windows since Apple hasn’t launched anything on this topic yet. Also, if you really need to install MacOS and use Xcode for Windows then the alternatives are there for your help. For more help, we are there for you and you can comment below and let us know if in case you have any doubts or queries. Also, you can comment below if you find any new method or alternative that can help people use Xcode on Windows OS.
Xcode 7 Download For Mac
Related Posts:
0 notes
Text
Mac Os X For X86 Iso

Mac os for android tablet. Global Nav Open Menu Global Nav Close Menu; Apple; Shopping Bag +.
Mac Os X Iso Pc
Mac Os X 10.5 Leopard Pc X86.iso
Mac Os X For X86 Iso 32-bit
A community of users running Mac OS X on x86 hardware. Jan 15, 2020 Mount the OS x86 DVD ISO file in Daemon Tools or Virtual Clone Drive (You can use Alcohol 120% if you want). You cannot mount the ISO directly in VMware because VMware cannot properly read HFS+ images (thats the format the Mac OS ISO is in) Step 3: Configure VMware. Note: In this guide, VMware Workstation 6 will be used.
M4a to mp3 for mac os. But, it’s also getting popularity day by day.
Jump to: navigation, search
This is a list of installation guides that will help you to get OSx86 up and running. If you are new to OSx86, please use one of the guides in the Recommended section.
Please do not copy the content from one site to another site, please use original content on your site.
Please do not put your link anywhere; place it in the correct section.
Some of these guides don't tell you how to partition, please see the bottom of the page for details on partitioning or see Partitions.
38International Guides
Getting Started
If you want to install OSX on your Intel or AMD computer, your computer processor needs to support at least SSE2. Most current (2011) CPUs support SSE2 and SSE3, so you may want to skip the next paragraph.It is recommended that your computer supports SSE3 for application compatibility, speed and performance. Make sure to check which version of OSx86 you need for your processor. You can check for SSE2 support from Windows with a program called CPU-Z. If you're already on a mac use CPU-X. If you are using Linux, enter the following in a terminal:
Additional hints after installation:
InsanelyMac Installation Guide sub-forums
See also installation guides from InsanelyMac sub-forums here.
The below commands work on Windows 7, Windows 8, Windows 10 and all other server editions. Reboot command for mac.
Love listening to audiobooks while sleeping, crafting? All within just a few clicks on your Mac, you will experience and enjoy an exciting and wide range of voices.Audiobooks are the perfect way to relax and get things around the house, more and more people like to listen to audio books rather than read eBooks on an iPad, iPhone or Kindle for long hours. Audio Book enables its uses to convert any eBooks to audiobooks and listen on an iPhone, Android or MP3 player. Supported input format: pdf, epub, rtf, txt, html; Supported output format: mp3, aiff. Audio equalizer for mac os. Getting tired of reading eBooks on your Kindle, iPhone, iPod or MP3 player?
10.11 Guides
10.10.3 Guides
Plain App Store Installer Hackintosh Full Tutorial Covers all OS X versions since 10.7 to the latest release. Download the new EFI partition manager Mt. EFI and installation assistant tool qlover note. Fusion Drive setup tutorial, system optimising, various trouble shooting and much more.
10.10.1 Guides
Vanilla Kernel Hackintosh Full Tutorial Installation assistant qlover note now out of beta. Covers all OS X versions since 10.7 to the latest release. Fusion Drive setup, system optimizing and much more.
10.10 Guides
Vanilla Kernel Hackintosh Full Tutorial Brand new tutorial. Contains installation assistant software that easily makes a USB installation disk based on Clover EFI boot loader. Covers all OS X versions since 10.7 to the latest betas and DPs, Fusion Drive, system optimizing and much more.
10.9.5 Guides
Vanilla Kernel Hackintosh Full Tutorial Brand new tutorial. Contains installation assistant software that easily makes a USB installation disk based on Clover EFI boot loader. Covers all OS X versions since 10.7 to the latest betas and DPs, Fusion Drive, system optimizing and much more.
10.9 Developer Preview Guides
10.8.4 Guides
10.8.2 Guides
Easiest way to Install Mountain Lion 10.8.2 On Any Intel PC | Techable (Bootable USB Install Disk Method)
Install OSX 10.8 on PC (upgradeable to 10.8.2, 10.8.3) (Easy)
10.8 Guides
Install Mountain Lion 10.8 on PC Vanilla Installation Guide
Install Mountain Lion 10.8 in VMware Window Host Only for Intel processor
Install OS X 10.8 Mountain Lion on PC Hackintosh (Bootable USB) Runs on ANY PC, Easy Guide
10.7.5 Guides
HP ProBook 4530s Installation Guide Based on myHack, should be fairly beginner-friendly. Requires existing Hackintosh or real Mac.
10.7.4 Guides
Vanilla Kernel Hackintosh Full Tutorial Hardware recommendation list for motherboard, CPU, graphics card. Includes trouble shooting for known issues.
10.7.3 Guides
Vanilla Kernel Hackintosh Full Tutorial Hardware recommendation list for motherboard, CPU, graphics card. Includes trouble shooting for known issues.
10.7.2 Guides
Vanilla Kernel Hackintosh Full Tutorial Updated to Post iCloud Edition with 2 additional chapters. New hardware recommendation list for motherboard, CPU, graphics card now available.
Install Lion 10.7.2 on your PC Osx86tutorial hackintosh universal tutorial. (laptop Desktop)
Install Lion 10.7.2 on your PC with DVD preparation Guide with video. (How to build a Mac OS X PC. In Greek (howtomacospc.wordpress.com)
Complete Installaton guide for Lion 10.7.2 Installation Guide for Gigabyte 35/45 mobos, software included.
OS X Lion on VMware Install Mac OS X Lion on VMware Player or Workstation
10.7.1 Guides
Vanilla Kernel Hackintosh Full Tutorial from Snow Leopard install, Lion 10.7.1 upgrade with Software Update.
10.7.0 Guides
Install Mac OS X Lion 10.7 on PC First guide for Installing OSX 10.7 Lion.
Vanilla Kernel Hackintosh Full Tutorial from Snow Leopard clean install, Lion upgrade, etc FULL instruction.
10.6.8 Guides
How to upgrade from 10.6.6 to 10.6.8 A guide brought to you by Testing Grounds
Install MAC OSX 10.6.8 on Toshiba M-305 First guide for Installing OSX 10.6.8
10.6.7 Guides
Clean 10.6.7 install via 10.6.6i Hazard or VMware image Guide for a Pentium 4 Dual and AsRock G31M-GS-R2
10.6.6 Guides
Install Mac OSX Snow Leopard 10.6.6 VMware on Windows PC Ready-made image, get started in minutes
Clean 10.6.6 install via 10.6.6i Hazard or VMware image Guide for a Pentium 4 Dual and AsRock G31M-GS-R2
How to Build a Hackintosh Very detailed installation guide, written on 17 pages
10.6.5 Guides
How to install Snow Leopard 10.6.5 update on Vmware/Virtualbox Short video guide using 2 available downloads
How to install 10.6.5 on a Dell mini10v (1011)
10.6.4 Guides
How to install Snow Leopard Retail on PC without hack! its so easy..
The Pirate EFI-X (Intel-based) include Post-Installation Tools
Testing Grounds Snow Leopard Guide Extremely thorough in-depth guide (with pictures) of Snow Leopard on a PC. Showcases both boot CD and thumbdrive methods.
In-depth Installation Guide for PC with Triple-booted Windows 7 64-bit, Mac OS X Snow Leopard and Ubuntu 10.04 Using GRUB bootloader (bigfloppydonkeydisk Blog).
Guide for Using 'myHack installer' with additional custom kext files
Complete Installation Guide for HP dv5 Using iBoot + Multibeast
10.6.2 Guides
How to install OS X on VirtualBox the easy step by step way A short simple video giving step by step instructions to installing OS X 10.6.2 on Virtualbox.
How to install OS X on Vmware the easy step by step way A short simple video giving step by step instructions to installing OS X 10.6.2 on Vmware.
10.6.0 Guides
Install Snow Leopard in VMware Window Host Only for Intel-Based Machines
Install Snow Leopard 10.6 on AMD PC Hackintosh easy guide for AMD
Install Snow Leopard 10.6 on AMD PC Hackintosh Easy guide for all AMD machines
Triple boot (MS Windows 7, Linux Ubuntu 10.10, Mac OS X 10.6) With Chameleon bootloader, tutorial and files download included
Existing Leopard Method Using an existing Leopard. install and a separate partition for Snow Leopard, install Snow Leopard
How to install Snow Leopard 10.6 on DELL Latitude D630/D630C File and tutorial available
Mac How articles
How to install guide for Dell mini10v (INSPIRON mini) Files and easy to follow tutorial
Video: How to build your own USB pen drive How to create a USB OS X 10.6 installer for a new HD install. Screencast and files
Video: Install on an Asus P5 series motherboard Starting from an existing 10.5 HD. Screencast, files and tutorial all in one place
Using 'myHack installer' with additional custom kext files Using myhack installer for basic installation + additional self-choosen kext files (use for new undocumented hardware)
10.5.8 Guides
Samsung N120 install using iATKOS v7.1 DVD. Step-by-step guide for complete beginners.
10.5.7 Guides
Mac Os X Iso Pc
HP DV1000 Step-by-step clean, works with similar models. DV1XXX
10.5.6 Guides
Mac OS X Leopard Retail Installation Simple Guide Simple and easy for beginners
DD's script for the Gigabyte GA-EX58-UD5 i7 motherboard Newest version (not documented here yet) supports Snow Leopard 10.6 too. .
OSX Leopard 10.5.6 Install with iPC Step-by-step for complete beginners.
10.5.5 Guides
OSX Leopard 10.5.5 Installation Guide For Complete Beginners A step by step guide with many pictures and details.
10.5.5 on the Dell Inspiron/mini 9 Guide for 10.5.x to 10.5.5 on the Dell Inspiron/mini 9
10.5.2 Guides
Make Coriolis Systems DVD boot on hackintosh machine . This guide helps you to patch Coriolis System DVD (iPartition) to boot it on a pc, to resize, remove, and re-partition your disk.
Install 10.5.2 on an AMD nForce4 A8N This install uses Kalyway 10.5.2 AMD / Intel and is designed to be very step-by-step .
Install 10.5.2 and XP on the same hard drive (INTEL ONLY) Easy-peasy beginners' guide. Uses Kalyway 10.5.2 and shows how to partition your drive in simple steps
10.5.1 Guides
iAtkos v1.0i Leopard 10.5.1 on AMD! Also includes dual boot help! Uses iAtkos Leopard v1.0i
10.5.0 Guides
NauGHTiBeaTZ's How to Install Mac OS X 10.5 on an Intel Pentium 4 Simple Guide on using Kalyway's bootable disc to make a bootable hard disk for Leopard. Kalyway's disc also works for previous versions of Mac OS X. Download and print all 4 pictures
10.4.9 Guides
10.4.9 10.4.9 Installation Guide Install 10.4.9 on your AMD or Intel computer. This guide now includes instructions to update the kernel to 8.9.1.
10.4.8 Guides
Quad Booting: XP/Vista/OSx/Linux A comprehensive guide on quad booting.
How to Create a Simple Dual Boot System (Win XP/Mac OS 10.4.6/10.4.7/10.4.8) A simple guide on how to get dual booting working.
Tiger on Asus EeePC This guide shows how to install Mac OS X Tiger, on an Asus 701 Eee PC.
OSX86 10.4.8 PC Installation Guide How to install OS X on a PC, A step-by-step with pictures.
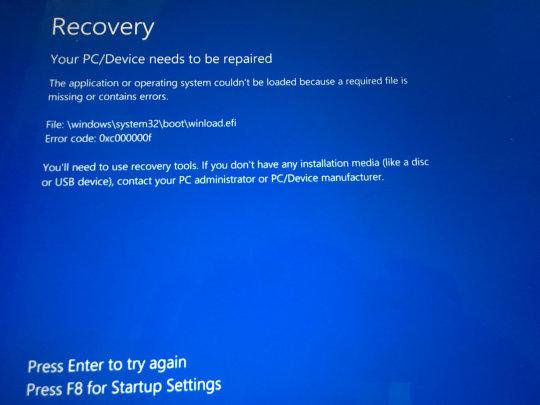
10.4.5 Guides
Mac OS X86 10.4.5 Installation guide This is a installation guide that should be used if you are starting from scratch with a myzar's DVD.
VMWare -> Native (Video) Using myzar ISO for AMD and Intel systems. In English and Spanish.
Install Mac OS X Tiger on Intel with Myzars Dual Boot with Windows Vista included.
10.4.4 Guides
10.4.3 Guides
Install and Configure OSx86 This is a start-to-finish guide for 10.4.1 with 10.4.3 notes appended.
10.4.1 Guides
International Guides
Please don't put Google or other translated guides in this area. This is for native language guides, please add translations beside your own guide
Bulgarian
French
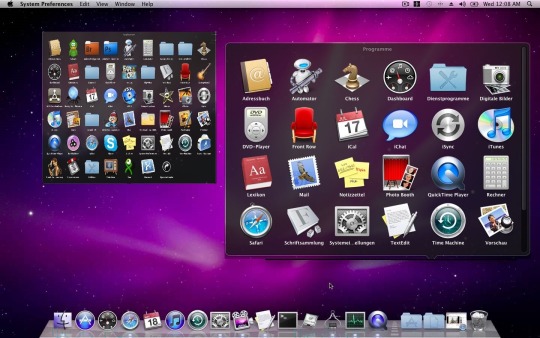
Installation guide in French Guide d'installation en français de l'image VMware 'deadmoo' sur disque dur. Convient pour les débutants.
German
Installation guide in German Deutsche Anleitung zur Installation des 'deadmoo' VMware Images auf einer Festplatte. Auch für Anfänger geeignet.
Greek
Complete Installaton guide for Lion 10.7.x Installation Guide for Gigabyte 35/45 mobos, software included.
Installation guide in Greek (OS X x86 10.4.7 και 8), Απλος οδηγος εγκαταστασης στα Ελληνικα
Upgrade guide in Greek (OS X x86 10.4.8 σε 9), Οδηγος αναβαθμισης στα Ελληνικα
Installation guide in Greek (OS X x86 10.4.6), Wiki guide in Greek Οδηγίες εγκατάστασης και Wiki στα ελληνικά
Install MacOS X Snow Leopard 10.6.x & 10.7.x to GA-EP35-DS3P, 8800GT. Αναλυτικές οδηγίες εγκατάστασης Mac OS X (10.6.x και 10.7.x) σε PC και updates. (howtomacospc.wordpress.com).
Hungarian
Installation guide in Hungarian(10.4.4-10.4.7) Magyar telepítési útmutató és wiki
Indonesia
Installation guide in Bahasa Indonesia (Mac OS X 10.5.6 Retail) Gampang banget teman. :D
Installation guide in Bahasa Indonesia (Mac OS X 10.6.3 Retail) Dengan menggunakan Pirate EFI-X Boot CD dari osx86 Indonesia
Upgrade guide in Bahasa Indonesia (OS X x86 10.6.4) Hayooo kita Update
Portuguese-BR
Instalação IDeneb 10.5.6 Guia em Português do Brasil para instalação do IDeneb - MacOSX Leopard 10.5.6
Polish
Spanish
Instalación OS X 10.9 Mavericks con MyHack
Guia de Instalación Leopard 10.5.1 en Español Guia de instalación de Leopard en una PC
Turkish
Installation Guide in Turkish (for OSX 10.4.6) Türkçe MacOS x86 Kurulum Rehberi
Update Guides
Update guide for Leopard 10.5.x Update your 10.5.4 leopard
USB Drive Installation Guides
USB External Drive Installation.9 step guide .
Simple Video tutorial .
VMware Install Guides
Install OSX 10.6 on VMware Video How to easily install OS X 10.6.2 on VMware.
Mac OS X 10.4.8 VMware-only Installation Guide Guide to installing Mac OS X 10.4.8 on VMware Workstation 5/6. Intel/AMD SSE2 or SSE3. Uses JaS Mac OS X 10.4.8 Intel/AMD SSE2 SSE3 PPF1 + PPF2 DVD.
Install Mac OS X x86 10.4.5 on VMware 5 Simple guide to installing Mac OS X86 10.4.5 on VMware.
Install Deadmoo OSx86 on VMware How to easily install Deadmoo OSx86 on VMware.
Mac Os X 10.5 Leopard Pc X86.iso
Dual Boot
Booting Mac OS X, Windows 7 and Ubuntu from a Custom-Built PC A how-to on installing OS X, Windows (and optionally Ubuntu) using iBoot and MultiBeast or grub (from hcetech's blog).
Triple-boot Windows 7 64-bit, Mac OS X Snow Leopard and Ubuntu 10.04 Using GRUB bootloader (bigfloppydonkeydisk Blog).
Dual boot leopard and xp (Nederlands)(Dutch) '[Dual boot xp of Vista en leopard 10.5.1 op de zelfde harddisk ] kan het nog makkelijker
How to create XP/Vista/OSX/Linux bootloader without any scripting Use the easyBCD tool to add osx or linux partitions to your vista bootloader in one click!
How to Create a Simple Dual Boot System (Win XP/Mac OS 10.4.6/10.4.7/10.4.8) A simple guide on how to get a dual boot running in less than 25 minutes!
How to dual boot OS X with Xp and any other operating system An extremely simple guide on How to dual boot OS X with Xp and any other operating system.
Triple booting Windows, Linux, and OSX86 A guide on how to get a triple boot up and running.
Multibooting Uses CentOS and Grub.
Use Multibooting Reference Shows how to use WinGrub in place of Grub according to above article.
Install on a Partition, Simple and Accurate Start with this one if you want to install. (Video on How to dual boot XP & Mac OSX)
Native Hardware (after installation)
Mac Os X For X86 Iso 32-bit
Laptop Install w/ home-made dongle This is a forum link regarding laptop install problems, especially blue screens at boot. An external monitor is needed, or if you have none, this describes making a dongle that will pacify the OS.
Retrieved from 'http://wiki.osx86project.org/wiki/index.php?title=Installation_Guides&oldid=72342'
This page was last modified on 7 July 2020, at 17:18. This page has been accessed 9,622,876 times.
0 notes
Text
New Post has been published on Strange Hoot - How To’s, Reviews, Comparisons, Top 10s, & Tech Guide
New Post has been published on https://strangehoot.com/how-to-make-bootable-pendrive-using-cmd/
How to Make Bootable Pendrive Using CMD

How to Boot Pendrive
In older days, computers/laptops were available with DVD/CD drives. These drives were used to install any application or operating system. Nowadays, these drives are no longer available with new generations of computers/laptops. USB Pen Drives have taken the place of DVD/CD drives.
Why boot pendrive?
There are times when your operating system is corrupted or somehow, it is not working properly. A need to install the operating system arises. But, the problem is when your operating system doesn’t work, you cannot proceed beyond booting your computer. In such a situation, you can boot the operating system via bootable pendrive.
There can be other symptoms that your operating system doesn’t work properly. Some of them are – hardware drivers are outdated or corrupted, some of the system files are corrupted, hard drive issues such as a bad sector or other hardware failures.

Bootable pendrive helps to repair, recover and re-install the operating system. The USB port(s) are available in all computers/laptops/MacBooks. It is a simple step thereafter. Insert your bootable pendrive in the USB port, select the bootable pendrive from your BIOS setup and continue the process of repairing the operating system.
Assuming you already have created a bootable pendrive, let us see the steps how to boot the pendrive from different machines having Windows, Linus, Mac OS operating systems.
How to boot pendrive – Windows 10
In the USB slot of your computer, insert the pendrive which is bootable.
Press the POWER button to start your computer/laptop.
Press the F2 key on your keyboard. You will be on the BIOS setup of your machine.
Make sure you are on the Main tab of the window.
Press the RIGHT-ARROW key on your keyboard to navigate to the Boot tab. You will see the Boot Settings section as shown below.
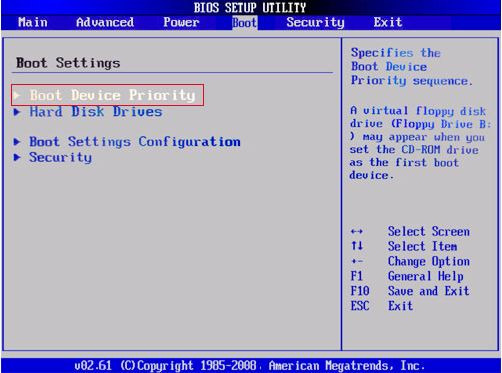
Make sure you are on the Boot Device Priority menu. Press the UP ARROW key if required to be there.
Press ENTER. Make sure you are on the 1st Boot Device list item.
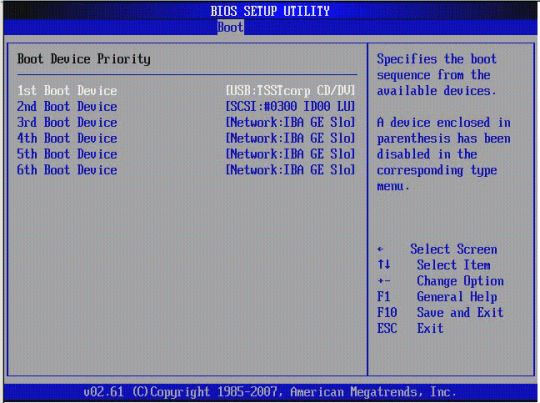
Press the UP ARROW key if required to navigate to the 1st Boot Device list item.
Press ENTER. The list of options appears. For example – CD/DVD drive, HDD or USB Flash drive.
Select the USB-HDD option.
Press ENTER. The option is selected.
Press the F10 key to save and reflect the changes.
Press the ESCAPE key. You will be moved out from the BIOS menu.
Now, your operating system, Window 10 will be loaded from the bootable pendrive.
How to boot pendrive – Windows 7
Insert the pendrive which is bootable in the USB port of your computer/laptop.
Press the POWER button to start your computer/laptop.
While booting, the Boot Menu prompt appears. (In some computers, you may not have this option. In that case, press F2 to open the BIOS setup and change the boot settings from there.)
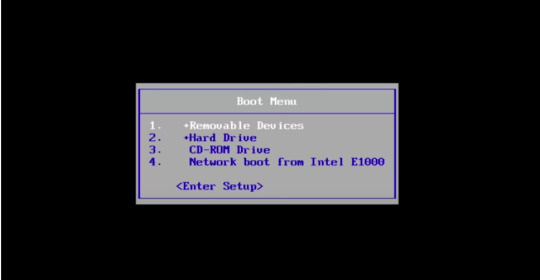
Use the ARROW keys of your keyboard and go to the Removable Devices option.
Press ENTER. Select the USB option from the list.
OR
Alternatively, from the BIOS menu, select the Advanced BIOS Features list item.
Make sure the First Boot Device list item is highlighted. If not, please press the UP ARROW key on your keyboard to go there.
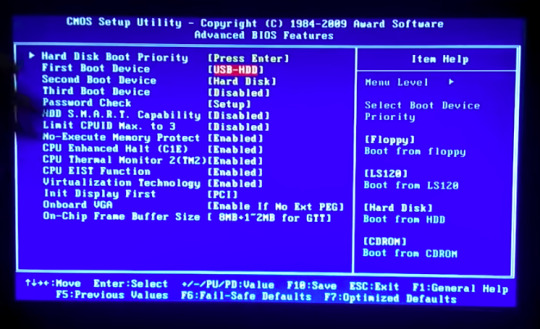
Press ENTER. A menu with the list of options appears.
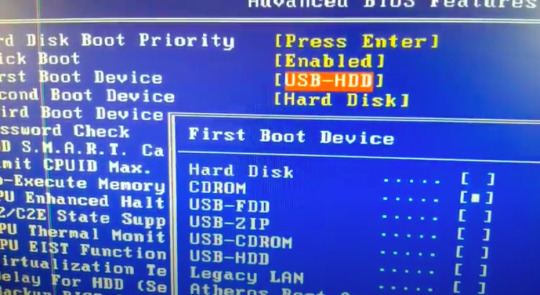
Move to the USB-HDD option using the DOWN ARROW key on the keyboard.
Press ENTER. The above mentioned option is selected with a square bullet sign in the square brackets.
Press the F10 key to reflect the changes of your bootable device option.
Press the ESC key to exit the BIOS setup.
How to boot pendrive – Linux
Press the POWER button to switch off your computer/laptop.
Insert your bootable pendrive in the USB slot of your computer/laptop.
Press the POWER button again to power on your machine.
Press the F2 key or the F10 key of your keyboard. You will see the list of methods in the list.
Choose the boot method as Full installation media (DVD or USB).
The Linux operating system will automatically be loaded from the inserted bootable pendrive.
How to boot pendrive – Mac OS
Power of your MacBook.
Insert your bootable pendrive in the USB slot of your Mac.
Use the POWER button to switch on your Mac.
Press and hold the Option (alt) key quickly on the startup. The macOS Utilities screen appears.
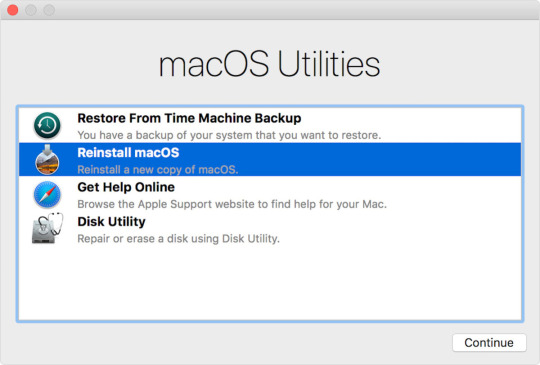
Click to select the Reinstall macOS option. Click the Continue button.
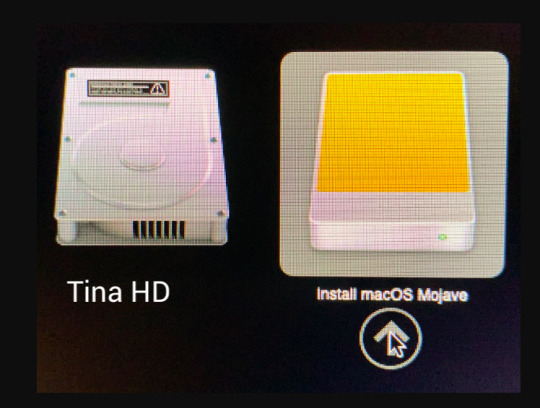
Click the USB drive icon where Install MacOS Mojave label option is shown. The Mac OS will be loaded from the USB drive.
We have seen the steps of booting the different operating systems from the USB drive using the Boot menu option from the BIOS. In the next section, we will see how to make a USB drive or a pendrive bootable.
Operating systems are installed from the hard disk drive of your computer/laptop. If the operating system is not working properly or giving issues booting from your machine’s hard drive, there is a need to make the bootable pendrive. To repair and re-install the operating system, a bootable pendrive can be used to fix the issue.
There are two ways to make the pendrive bootable.
Make bootable pendrive using the User Interface
Make bootable pendrive using the Command Line option (CMD)
We will go through steps of making a bootable pendrive using CMD option in different operating systems.
Make Bootable Pendrive using CMD in Windows
A USB flash drive with at least 16 GB storage is required to make it bootable. Follow the steps below to create the USB pendrive bootable in Windows OS.
Format the pendrive. We will use the command prompt for formatting the drive.
Press the Windows key + X on your keyboard. The command window appears.
Insert the pendrive in the USB slot of your computer/laptop.
Make sure you are in the “Windows → System32” directory.
If not, type cd.. You will need to type this command till you are in your C:/ drive.
Then, enter cd Windows. You will be in the Windows directory.
Enter cd System32. You will be in the System32 directory.
Enter the command, diskpart.
Press ENTER.
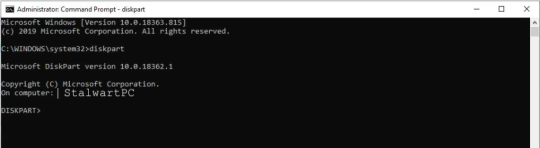
Enter the command, list disk, press ENTER. You will see a list of disks available in your computer including your USB flash drive.
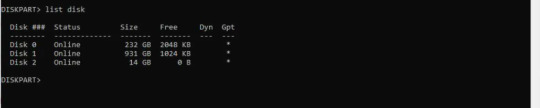
In the screen above, the Disk 2 option with the 14GB size looks like it is the USB disk drive.
Enter the command, select Disk 2. Press ENTER. You will see the message as the selected disk is now disk 2.
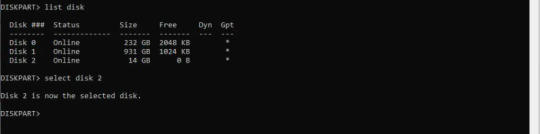
Enter the command, clean. Press ENTER. The formatting starts.
Once the formatting process is finished, you will see the success message.
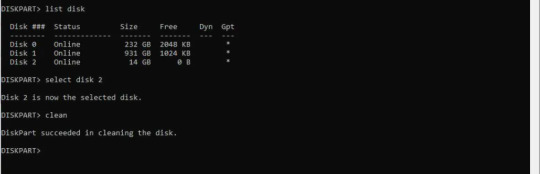
After formatting the pendrive, you need to create the bootable.
Based on your Windows version, you can create the bootable format. There are 2 options for bootable format. 1) Master Boot Record – MBR (used for Windows 7) 2) GUID Partition Table – GPT (used for Window 8 and later)
For Master Boot Record bootable:
Enter the command, convert mbr.
Press ENTER. The successful conversion to the Master Boot Record format message appears as below.
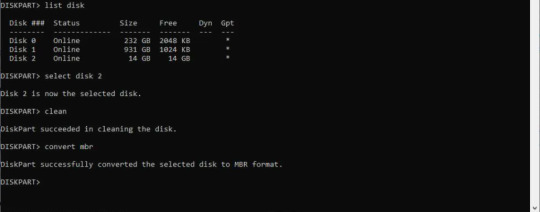
Enter the command, create partition primary. Press ENTER.
The partition success message appears as below.
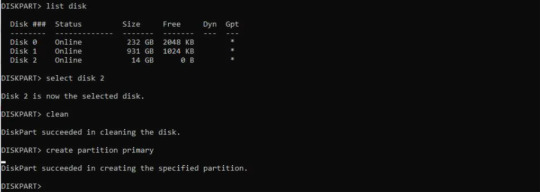
Enter the command, select partition 1 and press ENTER.
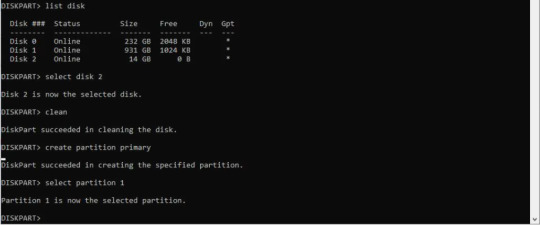
Enter the command, active. Press ENTER. The current partition is enabled.

Enter the command, format fs=ntfs quick. Press ENTER. The partition is formatted as NTFS file system.

The formatting process of a pendrive is completed successfully.
Enter the exit command to come out from DISKPART. You have successfully created the Master Boot Record bootable format.
For GUID Partition Table bootable:
You will need to create two partitions instead of one. In this case, the Operating System (Windows 8 or later) recognises the FAT32 file format.
All the steps are the same as mentioned in the Master Boot Record formatting the drive.
Enter the command, convert gpt. Press ENTER.

Type the command, create partition primary size=64. Press ENTER. This creates an EFI partition. EFI partition supports the hard drive drivers available with Windows 8 or later.
Now, type the command, create partition primary. Press ENTER. This creates a data partition.

Type the command, select partition 1. Press ENTER. The partition 1 is selected.
Type the command, format fs=fat32 quick. Press ENTER.

Type the command, select partition 2. Press ENTER. The partition 2 is selected.
Type the command, format fs=ntfs quick. Press ENTER.

For Master Boot Record bootable: Now, copy the ISO image file from your computer to your pendrive. NOTE: ISO image file is the image of a disc. The file format is .iso and used as a compressed format of installation software.
To do the above step, go to the directory where your ISO file is stored.
Type the command, copy f:\<filename>.ISO /s/e/f g:.
Press ENTER. NOTE: In the above command, the f: drive is the source drive where your ISO file is located. You will need to replace <filename> to the actual ISO name. G: drive is your USD drive slot.
You have successfully created the bootable pendrive for Windows 7 or earlier versions.
For GUID Partition Table bootable: Go to https://efi.akeo.ie/downloads/efifs-latest/.
Download these folders: ntfs_x64.efi, ntfs_ia32.efi, ntfs_aa64.efi, ntfs_arm.efi from the above URL.
Copy these folders in the partition 1 you have created in your pendrive.
Copy the ISO image of the operating system in the partition 2 you have created in your pendrive.
You have successfully created the bootable pendrive for Windows 8 or later versions.
Make Bootable USB using CMD in Linux
Prerequisite – your computer should be powered on.
Insert the USB pen drive in the USB slot of your computer/notebook.
Open the terminal. To open the terminal, press the CTRL + ALT +T keys on your keyboard.
Enter the command, dmesg. In the terminal window, you will see the message logs. In the screen below, TinaS is the name of the USB flash drive you have inserted in the USB slot.

Type the command su. Press ENTER.
Enter the root password. Press ENTER.
Now, enter the command, findmnt device. Replace device with the USB drive name you found in the above screen.

Press ENTER.
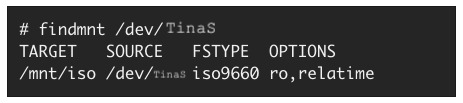
The next step is to unmount the pendrive.
Look at the TARGET column in the above screen. It shows /mnt/iso.
Enter the command, umount /mnt/iso. Press ENTER. The unmount process is successful.

Enter the command, dd if =/image_direction/image.iso of =/dev/device bs=blocksize. Press ENTER. This command copies the installation ISO image directly to your pendrive.
In the above command, replace /image_directory/image.iso with the actual directory path of the ISO file you have stored. (The bs command is used to increase the speed of the writing process.)

Let’s take an example: If the ISO image is located in /home/devuser/Downloads/rhel-server-7-x86_64-boot.iso and the detected device name is TinaS. The command will be as follows.

The command, dd will finish copying the image to the pendrive.
Wait for a few seconds to complete the process.
Log out from the root account. Remove your USB drive from the USB slot of your computer.
You have successfully created the bootable pendrive.
Make Bootable USB using CMD in Mac OS
Prerequisite – Your USB flash drive should have at least 12GB free space available.
Make sure your USB flash drive is formatted as Mac OS Extended.
For more information, click here: https://support.apple.com/en-us/HT208496. You can perform the steps from the MacOS Utilities → Disk Utility option.
Inject your USB flash drive in any one of the USB slots of your Mac.
Press the POWER button to start your Mac.
Open the terminal.
Press the command + SPACEBAR keys on your keyboard. The spotlight search bar appears.
Enter the text, terminal.app and press ENTER. The terminal is open.
Enter the command, createinstallmedia when you are in the Resources folder. The command will look like below. (For each Mac OS version, the command is given.)
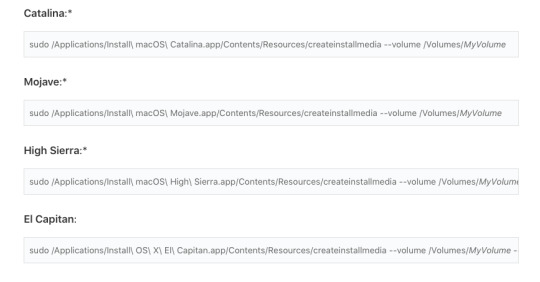
In the above command, replace MyVolume with your USB drive name.
Press ENTER after entering the createinstallmedia command.
Enter your password when prompted. Press ENTER.
Enter y when prompted. This will format the volume. Press ENTER.
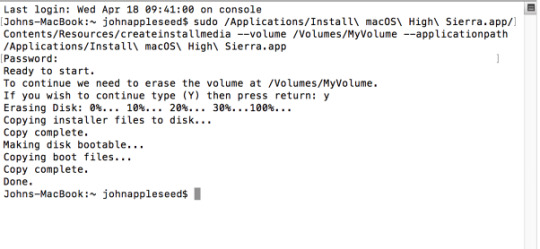
When it shows the Done message, and you are at root, quit the terminal. To quit the terminal, enter the command, exit. Press ENTER.
Eject the USB flash drive. Your bootable USB drive is ready.
Conclusion
It is recommended to make pendrive bootable or your USB drive bootable with the command line (CMD) window. There are chances that your drive is not formatted properly using the User Interface (UI) or the partitions may not get created appropriately using the User Interface.
The steps to make a bootable device via CMD are lengthy, but it ensures that the bootable drive is made without any errors and while you want to load the operating system using your bootable pendrive, it loads successfully.
It is always suggested to keep the USB drive bootable of your operating system and keep it as backup. Whenever you encounter any issues with the operating system, you are ready with the bootable pendrive.
Read: How to update BIOS software of computer
0 notes
Link
tech news , technical help, technical news ,daily tech news , Tech Rohit
0 notes
Photo

How to Make Bootable Pendrive For Windows 7 Software https://techtspot.blogspot.com/2016/08/make-bootable-pen-drive-using-software.html
0 notes
Video
youtube
Hello, This video demonstrates how to create/make Ubuntu 19.10 USB Pen/Flash Drive on Windows 10/8/7. Download Ubuntu 19.10 from this URL https://ift.tt/2MsNysG Download Rufus Bootable Drive Maker https://rufus.ie Disclaimer: This video description contains few affiliate links, that means anything you buy through these links, I get commission from these websites, but that does not cost you anything extra. How cool is that! by TubeMint
0 notes
Link
How to make Bootable Pendrive for Windows 7 with Pictures create Bootable PenDrive for windows
0 notes