#how to uninstall application windows 10
Explore tagged Tumblr posts
Visit Tumblr Blog
Explore Tumblr blogs with no restrictions, modern design and the best experience.
Last Seen Tumblr Blogs


Fun Fact
Kazakhstan’s Minister of Communications and Informatics has blocked the Tumblr site because it contained 60 sites of terrorism, extremism, and pornography in 2015.
Text
Alright. I'm making this post because I was unpleasantly surprised to find Microsoft had forcibly downloaded an """"ai assistant"""" onto my computer (called Copilot), and because finding a site that actually told me how to kill it for good -- in clear, truly step-by-step terms -- was way harder than it needed to be.
Preface: this is only relevant if you're running Windows 11.
Here is your target:

If you see this logo on your taskbar -- or... have Edge installed on Windows 11 -- you've got Copilot. You can't delete it on its own, Microsoft has integrated it into the OS as best they can. The most you can do is disable it (instructions for which are at the very end of this post).
So... to REALLY get rid of it you need to uninstall Microsoft Edge, because it's a part of/reliant on Edge. A lot of bells and whistles of Windows are also reliant on Edge, like widgets, but I never use those. I use my PC almost exclusively for gaming, and I don't want this slimy "ai" shit on my computer. I use Firefox anyway. Edge can go die as far as I'm concerned.
Here's the actual steps, copy-pasted from a website that took me way too long to find. It also really makes my browser chug for some reason, which is why I'm copy-pasting the whole thing. If you still want to look at the site itself, put it in reader view as fast as you can (link to site).
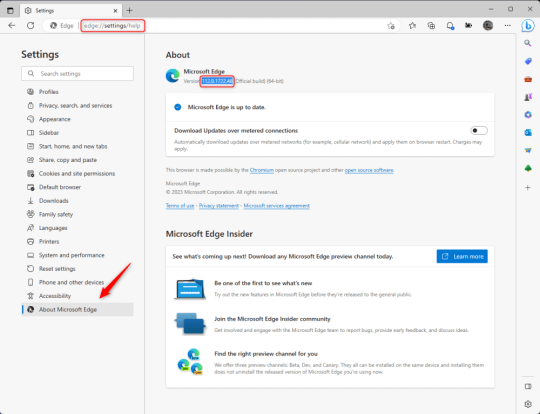
1.) Open Microsoft Edge, type "edge://settings/help" in the address bar, and then press Enter.
2.) Click "About Microsoft Edge" at the bottom of the left-hand pane. Copy the version number at the top of the screen, under Microsoft Edge.
3.) Press Windows Key + S to open Windows Search.
4.) Type "Command Prompt", right-click the result, and then select "Run as Administrator".
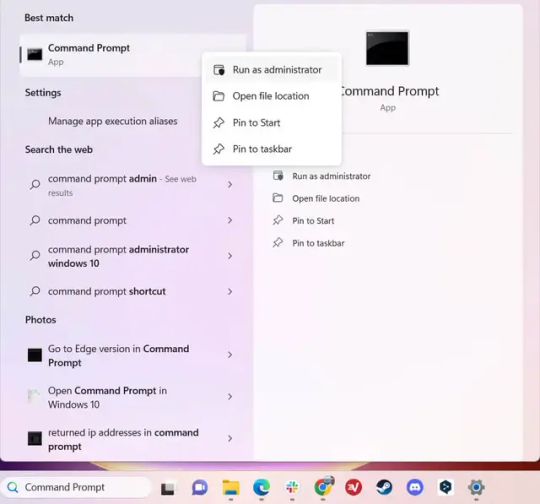
5.) The User Account Control (UAC) prompt will appear. Click "Yes".
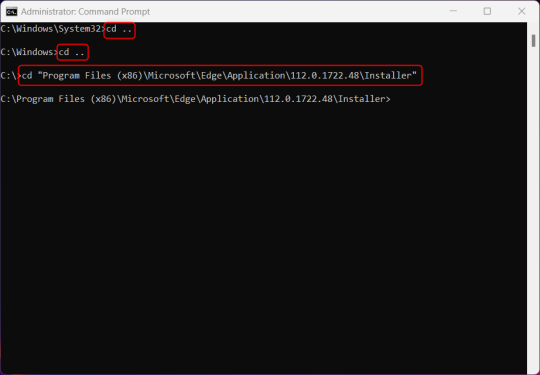
6.) Navigate to Edge’s “Installer” directory by using the cd command. Depending on which directory your Command Prompt opens in by default, you may need to use the "cd .." command to go back a level or two.
Once ready, run this command:
cd “Program Files (x86)\Microsoft\Edge\Application\Version Number\Installer”
Replace "Version Number" with your actual version number copied earlier.
7.) Next, run this command to uninstall Microsoft Edge:
setup –uninstall –force-uninstall –system-level
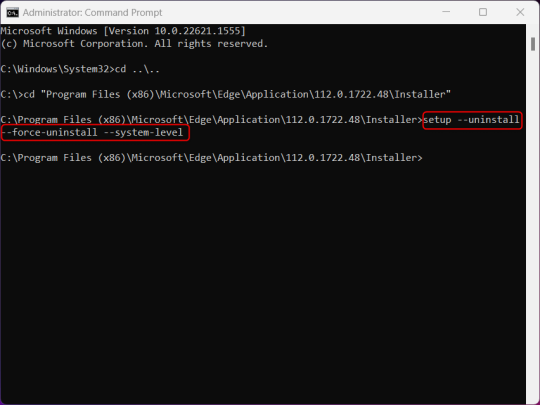
((It will look like nothing happened! Don't worry!))
8.) Restart your PC for the changes to take place.
((HOWEVER, Windows will try to reinstall it the next time your PC updates (or whenever it feels like it lol) so there's a second half to this))
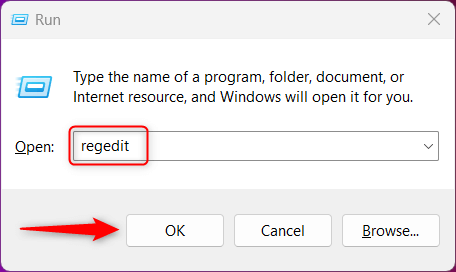
1.) Press Windows Key + R to open Run.
2.) Type "regedit" in the text box and click OK to open the Registry Editor.
3.) The User Account Control (UAC) prompt will appear. Click "Yes".
4.) In the Registry Editor, navigate to HKEY_LOCAL_MACHINES\SOFTWARE\Microsoft.
5.) Right-click the "Microsoft" folder, hover your cursor over "New", and then select "Key".
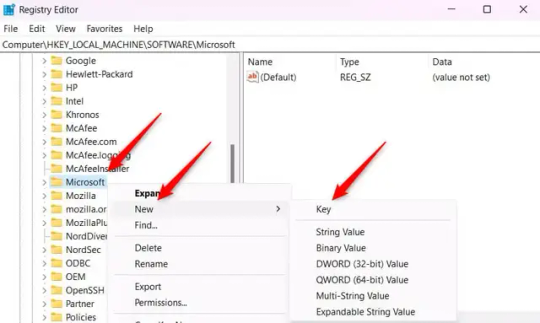
6.) Rename the new Key to "EdgeUpdate".
7.) Right-click EdgeUpdate, hover your cursor over "New", and then select "DWORD (32-bit) Value".

8.) Right-click the new value, which is currently named "New Value #1".
9.) Select "Rename" from the context menu.
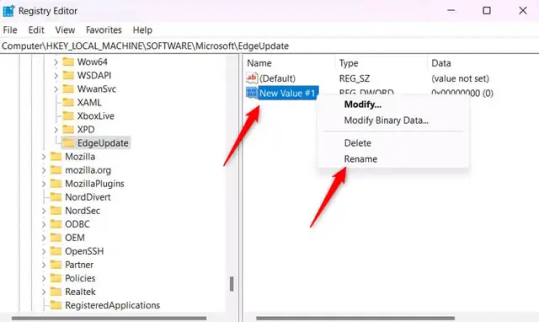
10.) Rename the value to "DoNotUpdateToEdgeWithChromium".
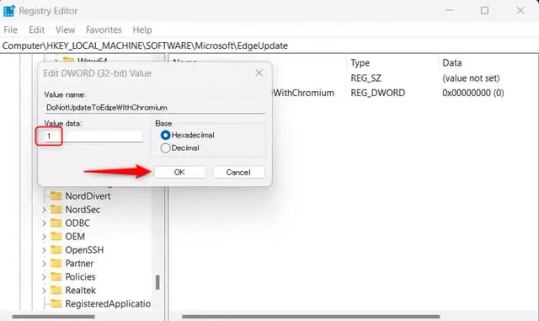
11.) Right-click the newly-named DoNotUpdateToEdgeWithChromium value and select "Modify" from the context menu.
12.) The Edit DWORD (32-bit) Value window will appear. Change the Value data to "1" and then click OK.
((You are now free. If you ever run into a really serious, unavoidable issue with your OS that's clearly a result of Edge being gone, you can redownload it like a regular app. But you should be fine.))
((And, if for some reason you want still want Edge around but just want the copilot thing gone, here's what you do:
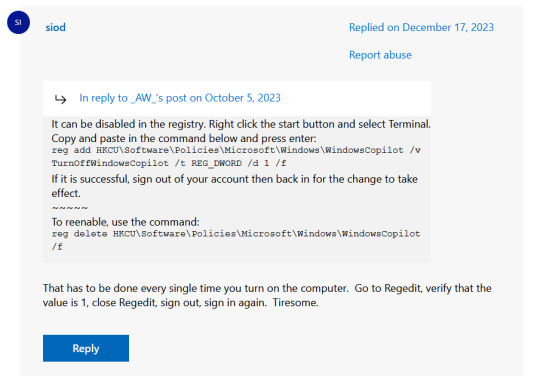
The command, for ease of copy-pasting: reg add HKCU\Software\Policies\Microsoft\Windows\WindowsCopilot /v TurnOffWindowsCopilot /t REG_DWORD /d 1 /f
You can't actually truly delete Copilot (without deleting Edge), only disable it. And as the reply says, you do have to do this every time you turn the computer on. I haven't tested that myself, but I believe it. I assume/hope that excludes just waking the computer up after it goes to sleep, but I don't know for sure.))
120 notes
·
View notes
Note
i really liked your addition to the tech literacy post, it felt very poetic (and also true)
Thank you!
It's funny, but I was terrified of computers when I was young. I had a fear of tech in general- cassette players, radios, TVs. To my tiny mind they seemed inscrutable; even when you had a cassette or a record that theoretically allowed you to play the same thing in the same way, the sound would sometimes skip, distort, or fill with static. It was such a small thing, but that unpredictability made them seem alien yet alive. I was having analogue-horror fears long before analogue horror was a genre.
When I was 10 or so, I got an Amiga 1200. I didn't want to mess with the computer at first, but I loved to read instruction manuals. I remember sitting with the manuals for the machine and its programs, each about an inch thick, and having the realisation that it wasn't some black box of a beast that wanted to prey on me, to trick me into making some mistake so it could jumpscare me; it was just a very, very complex series of 0s and 1s. We'd created computers to help us, and as long as you knew how to tell them exactly what to do, they would do it.
The Amiga's time passed, and Windows PCs took its place in the ecosystem. I never got great at coding, but I did teach myself HTML, mostly by pulling apart the code of other websites. I got used to digging around in the settings of applications and making them work for me, editing config files and registry keys, tweaking the BIOS. There was something exhilarating about being a "power user" of sorts, knowing what things did and how to manipulate them. It was also a very convenient skill to have: that combination of curiosity and having an idea of where to start out looking, even if I'd never touched a particular program before. The computer had gone from being a minefield, to being a plaything, to being a useful extension of my memory and abilities.
But with every major update, Microsoft's noose seemed to tighten. They took away more and more of the power to tweak the backend, or locked it behind more expensive "professional" editions priced for businesses. Search slowed to a crawl and became useless. To get features that were standard to older editions, I'd have to install third-party hacks.
At the same time, there were more and more ads. Not just the ads in your browser (which had always been scammy and rigged with malware, and I'd been using adblockers for a while at this point), but in the OS itself. I'd set my default browser to Firefox like I always did, and the computer would wheedle at me- "but Edge is better! Don't you want to use Edge?" (Edge is not better. Currently, Firefox and its forks are the only browser whose makers even remotely care about privacy.) I'd uninstall the games that bombarded my eyes every time I opened the Start menu, and a forced update would bring them right back, waking both me and my computer from sleep at 3am no matter how many registry settings I changed. The word no disappeared; now it's "remind me later", that horrible little henchman of the uninformed lack-of-consent that lines these companies' coffers.
And don't even get me started on AI: again, enforced, unless you know how to block it or turn it off. And they don't make that easy.
Anyway, now I use Linux. But I can't be smug and smarmy and just-use-Linux about it, because kids can't "just use Linux". Kids today might not even get a real computer; they get a phone, an iPad, and those don't teach you how to pick things apart. Yes, you can root your phone and get better access to its features, but if you didn't already know that, how would you find out? Back in the day, computers would tell you how to unlock the advanced settings, remove the training leash- but the people who make them make money from not doing that, from deceiving you for as long as possible.
The modern computer has become the thing I was scared of as a kid: an alien black box that wants to trick you. If I'd been a kid growing up today, I don't know if I ever would have seen the same value in computing as I do now. And that's really saddening.
6 notes
·
View notes
Text
How to Free Up Space on Windows 10: A Comprehensive Guide
As your Windows 10 system accumulates more files and applications, it can start to slow down and become less efficient. Freeing up space not only improves your system’s performance but also extends its lifespan. In this guide, we’ll explore various methods to free up space on Windows 10, going beyond the basics to ensure you have a well-optimized system.

Table of Contents
Introduction
Understanding Disk Space Usage
Utilizing Built-in Windows Tools
Disk Cleanup
Storage Sense
Uninstalling Unnecessary Applications
Managing Temporary and Cached Files
Cleaning Up System Files
Windows Update Cleanup
System Restore and Shadow Copies
Using Third-Party Disk Cleaners
Handling Large Files and Folders
Moving Data to External Storage
Using Cloud Storage Solutions
Conclusion
1. Introduction
As modern software and files grow larger, managing disk space effectively becomes crucial. This guide offers practical steps and tips to reclaim disk space on your Windows 10 computer, ensuring it runs smoothly and efficiently.
2. Understanding Disk Space Usage
Before freeing up space, it’s essential to understand how your disk space is being used. Navigate to Settings > System > Storage to view a detailed breakdown. This will help identify which areas need attention.
3. Utilizing Built-in Windows Tools
Disk Cleanup
Windows 10 features a built-in Disk Cleanup tool designed to delete unnecessary files. To access it:
Type “Disk Cleanup” in the search bar and select the app.
Choose the drive you want to clean.
Select the file types to delete (e.g., temporary files, system cache).
Storage Sense
Storage Sense automates disk cleanup. To enable it:
Go to Settings > System > Storage.
Toggle on Storage Sense and configure settings to regularly delete temporary files.
4. Uninstalling Unnecessary Applications
Unused applications take up significant space. To uninstall them:
Go to Settings > Apps > Apps & features.
Review the list and uninstall non-essential programs.
5. Managing Temporary and Cached Files
Temporary files can quickly accumulate and consume disk space. Use Disk Cleanup or third-party tools to regularly clear these files. Browsers also store cached data, which can be cleared from the browser settings.
6. Cleaning Up System Files
Windows Update Cleanup
Old update files can take up substantial space. Disk Cleanup includes an option to remove these:
Open Disk Cleanup and select Clean up system files.
Choose Windows Update Cleanup.
System Restore and Shadow Copies
System Restore points and shadow copies can consume significant disk space. Manage these by:
Typing “System Protection” in the search bar.
Selecting the drive and clicking Configure.
Adjusting the Max Usage slider to limit space usage.
7. Using Third-Party Disk Cleaners
Third-party tools like CCleaner provide more comprehensive cleaning options. They can remove junk files, clean registries, and manage startup programs to free up space.
8. Handling Large Files and Folders
Identifying and managing large files is crucial. Use tools like WinDirStat to find large files and folders. Consider moving non-essential large files to external storage.
9. Moving Data to External Storage
Free up space by moving data such as videos, photos, and documents to external hard drives or USB sticks. Ensure you regularly back up important data to avoid loss.
10. Using Cloud Storage Solutions
Cloud storage services like OneDrive, Google Drive, and Dropbox offer substantial space. Move infrequently accessed files to the cloud to save local disk space.
11. Conclusion
Regular maintenance and mindful storage practices can keep your Windows 10 system running efficiently. Use the tips and tools outlined in this guide to manage and optimize your disk space effectively.
External Authoritative Sources
Microsoft Support: Free up drive space in Windows
CCleaner Official Website
How-To Geek: The Ultimate Guide to Freeing Up Space on Your Windows PC
By following these detailed steps, you can efficiently manage and optimize your disk space on Windows 10, ensuring your system remains fast and reliable.
#Windows 10 Performance#Disk Cleanup#Storage Management#System Optimization#PC Maintenance#Free Up Space#Windows 10 Tips#Specific Techniques:#Disk Cleanup Tool#Storage Sense#Uninstall Programs#Temporary File Management#System File Cleanup#Third-Party Disk Cleaners#Advanced Techniques:#Large File Management#External Storage Solutions#Cloud Storage for Windows#System Restore Management#Windows Update Cleanup#How-To Guide#Windows 10 Efficiency
2 notes
·
View notes
Text
And now all the search engines are being replaced by AI. I have spent twenty years trying to talk people to go to libraries and check their beliefs against records, and now we face a future without libraries and endless artificially generated idiocy.

There was an argument in the Australian Parliament when Julia Gillard was PM. She accused her opponent of being a misogynist. He pointed out it was a fact that he was not. So the next day the dictionary was edited to 'correct' it, to align with her opinion of what it should be, so she could now label him a misogynist and pretend her definition had always been true.

The trouble with manually removing AI from windows is MS can undo your changes at any time.
Completely remove Microsoft Bing Chat AI from your Windows 11 PC and sidebar.
Open the PowerShell application with administrator privileges. You can do this by searching for "PowerShell" in the Start menu, right-clicking on the result, and selecting "Run as Administrator."
In the PowerShell window, type the following command and press Enter:
Get-AppxPackage bing | Remove-AppxPackage
Wait for the command to execute. This command will uninstall any app packages related to Bing, including the Bing Chat AI. Once it completes, the Bing Chat AI should be removed from your Windows 11 PC.
To remove the Bing Chat AI integration in the Taskbar search, you can disable it using the steps below:
Open the Settings app in Windows 11. You can do this by pressing the Windows key, searching for "Settings," and selecting the "Settings" app.
Click on "Privacy & Security" in the left sidebar.
Under the "Windows permissions" section, click on "Search permissions."
In the "More settings" section, toggle off the "Show Search highlights" option. This will disable the Bing Chat AI integration in the Taskbar search.
After following these steps, the Bing Chat AI should be removed from the Taskbar search and the search home interface in Windows 11.
(This did not disable it but did disable the AI use of the search results in Windows 11 See the next step below to also disable the physical button integration.
Do both steps.)
Manual removal by component:
Page 2: Remove Bing Chat integrated into Microsoft Edge Explorer:
Disclaimer: If you are not comfortable using the registry editor, stop here. If you’re unfamiliar and willing to try anyway, the simplest way to look at this is a set of folders. Each has a parent folder; each folder can contain files. The view is like the windows explorer expanding directories with different naming conventions. It’s rather complicated but simplistic in nature.
How to remove the Bing Chat integration from Microsoft Edge Explorer on Windows, first follow the instructions provided in the first source mentioned:
((Silly AI, Step 1: Back up the registry: Select the folder HKEY_LOCAL_MACHINE\SOFTWARE\ click on the menu bar file, select export, select the destination for the backup file and name the file then save it.))
Open Registry Editor on your PC.
Navigate to the following location: HKEY_LOCAL_MACHINE\SOFTWARE\Policies\Microsoft.
If the “Edge.” Folder exists go to step 5.
Right-click inside the Microsoft folder and choose New, then Key.
Name the new Key (folder) as "Edge".
Right-click inside the Edge folder and select New, then DWORD (32-bit value).
Name the new DWORD as "HubsSidebarEnabled".
Right-click on HubsSidebarEnabled and click Modify.
Ensure the Value data is set to 0.
That's all the work in the Registry. Next, open Microsoft Edge and enter "edge://policy" in the address bar.
Click on the "Reload Policies" button, and the Bing Chat button will now disappear from the Microsoft Edge Explorer window.
These steps should help you remove the Bing Chat button from your Microsoft Edge Explorer window.
Please note that modifying the registry can have unintended consequences if not done correctly, so it's essential to be cautious and comfortable with the process. Additionally, it's always a good idea to back up your registry or create a system restore point before making any changes.
Page 3: Remove Bing from the Windows Start Bar.
If "Show Search highlights" setting was already disabled, and the Bing Chat button is still visible on your start menu bar. Here's an alternative method you can try to remove the Bing Chat button:
((Silly AI, Step 1: Back up the registry: Select the folder HKEY_CURRENT_USER\Software\ click on the menu bar file, select export, select the destination for the backup file and name the file then save it.))
Open the Registry Editor by searching for "Registry" in the Start Menu and selecting the "Registry Editor" app.
Navigate to the following location in the Registry Editor: HKEY_CURRENT_USER\Software\Policies\Microsoft\Windows\Explorer
If this folder does not exist, you can create it manually by right-clicking on the parent folder “Windows” and selecting "New" > "Key." Then, name the new key "Explorer" as instructed inside the 'HKEY_CURRENT_USER\Software\Policies\Microsoft\Windows\' directory.
Right-click on the "Explorer" folder, choose "New," and then select "DWORD (32-bit) Value" from the context menu.
Name the new DWORD value as "DisableSearchBoxSuggestions" (without quotes) and press Enter.
Double-click on the "DisableSearchBoxSuggestions" value you just created and set its value data to "1."
Click "OK" to save the changes.
Restart your computer for the changes to take effect.
After restarting, the Bing Chat button should be removed from the start menu bar. If you want to re-enable it in the future, you can return to the Registry Editor and change the value of "DisableSearchBoxSuggestions" to "0" or simply delete the DWORD value.


109K notes
·
View notes
Text
KB5058379 Windows Update Fix – Solving Install Failures & Error Codes [2025 Guide]

Microsoft has recently released the Windows 10 update KB5058379, which brings the latest round of security patches and several important bug fixes aimed at improving system stability and protecting users from newly discovered threats. This update is part of the monthly Patch Tuesday rollout and is considered essential for all users still running Windows 10. Microsoft strongly recommends installing the update as soon as possible to ensure that your device remains secure and continues to operate smoothly with the latest protections against vulnerabilities.
However, some users have reported issues during the installation of Windows 10 KB5058379, such as the update failing to install completely, downloads getting stuck at a certain percentage, or encountering generic or specific error codes that provide little explanation. These problems can be frustrating, especially when you’re trying to keep your system secure and up to date.
How to Fix Windows 10 Update Not Installing
If you’re struggling to install the Windows 10 KB5058379 update due to errors, stuck downloads, or failed attempts, don’t worry — there are several proven solutions that can help resolve the problem.
youtube
Start by Running the Windows Update Troubleshooter
Let’s start with the easiest and most automated solution: running the Windows Update Troubleshooter. This is a built-in diagnostic tool provided by Microsoft, specifically designed to detect and fix common update-related problems. It checks for issues such as missing or corrupted update files, broken services, and incorrect update settings. Running this tool should always be your first step, as it can resolve many problems without requiring any manual intervention.
Click on the Start menu and select the Settings (gear icon).
In the Settings window, go to Update & Security.
From the left-hand menu, choose Troubleshoot.
Click on Additional troubleshooters.
Under “Get up and running,” select Windows Update, then click on Run the troubleshooter.

Once the tool starts, it will automatically scan your system for problems related to the update process. It may check for things like stuck update queues, missing registry keys, or disabled update services. If it finds any issues, it will attempt to fix them or guide you through the necessary steps.
Free Up Disk Space on the System Drive
A surprisingly common reason why Windows updates fail is due to insufficient disk space. Updates like KB5058379 need adequate storage to download files, unpack them, and install changes to system components. If your C: drive is running low on space, the update may stall or fail entirely.
Open the Start menu and type Disk Cleanup, then select it from the results.
In the Disk Cleanup window, choose the C: drive and click OK.
Wait while Windows calculates how much space you can free up.
In the list of files to delete, check options like Temporary files, Recycle Bin, Delivery Optimization Files, and Windows Update Cleanup.
Click OK and confirm with Delete Files.

Additionally, consider uninstalling unused applications or transferring large files, like videos, photos, or installers, to an external drive or cloud storage. After freeing up at least 10–15 GB of space, attempt the update again.
Perform a Clean Boot to Avoid Software Conflicts
Sometimes, third-party applications — particularly antivirus software, system cleaners, or firewall programs — can interfere with Windows updates. A clean boot starts Windows with only the essential Microsoft services running, eliminating conflicts caused by background applications.
Press Windows + R to open the Run dialog, type msconfig, and press Enter.
In the System Configuration window, go to the Services tab.
Check Hide all Microsoft services, then click Disable all.
Now go to the Startup tab and click Open Task Manager.
In Task Manager, disable all enabled startup items one by one.
Close Task Manager and return to the System Configuration window, then click OK.
Restart your computer.
Once your PC restarts in a clean boot state, try installing the KB5058379 update. If it succeeds, it’s likely that a background service was interfering. After updating, you can re-enable your startup programs by reversing the above steps.
Reset Windows Update Components Manually
If the above steps don’t help, it’s time to manually reset the Windows Update components. Over time, the folders that store update files — like SoftwareDistribution and Catroot2 — can become corrupted or bloated with outdated data. Resetting them essentially gives Windows Update a clean slate.
Before deleting any update files, you need to stop certain services that are currently using those files.
Press Windows + R on your keyboard to open the Run dialog box.
Type services.msc and press Enter. This will open the Services window.
In the list, scroll down and locate the following services:
Windows Update
Background Intelligent Transfer Service (BITS)
Cryptographic Services
Right-click each of these services one by one and select Stop.
Now, Open File Explorer and navigate to C:\Windows\SoftwareDistribution\Download
Inside the Download folder, press Ctrl + A to select all files.
Press Shift + Delete on your keyboard to permanently remove them.
If prompted for administrator permission, click Yes.

💡 This folder contains cached update data that Windows uses during the installation process. Deleting these files will force Windows to download fresh copies.
Once you’ve cleared the update cache, go back to the Services window and the services you stopped earlier.
Now that the components have been reset, go back and try checking for updates again:
Open Settings > Update & Security > Windows Update.
Click Check for updates and wait for the update to download and install.
Use the Microsoft Update Catalog to Install KB5058379 Manually
If automatic updates continue to fail, you can bypass the process entirely by manually downloading the KB5058379 update from the official Microsoft Update Catalog. This method allows you to install the update directly as a standalone package.
Visit the Microsoft Update Catalog.
In the search box, type KB5058379 and press Enter.
Browse the list to find the version that matches your system architecture (for most users, this will be Windows 10 64-bit).
Click Download next to the appropriate version.
A new window will open — click the link to download the .msu file.
Once downloaded, double-click the file to run the standalone installer.
Follow the on-screen instructions to complete the update.

This method bypasses the Windows Update mechanism entirely, making it especially useful when the regular update tool is failing due to service-related issues.
0 notes
Text
Why Won’t Cricut Design Space Open on My Computer: Fixed

Are you wondering why won’t Cricut Design Space open on my computer? Are you encountering issues when opening Cricut Design Space? Don’t worry, you are not alone. Many users face this issue when they try to open Cricut Design Space. Several reasons can cause this problem, including third-party software interference, incorrect network settings, and corrupt files.
In this guide, you will get the answer to your question – why won’t Cricut Design Space open on my computer? We are sure you will be able to open Cricut Design Space on your computer after reading this guide. So, without wasting your valuable time, let’s delve into it.
Why won’t Cricut Design Space open?
How to Fix Cricut Design Space Won’t Open Issue
In order to fix Cricut Design Space won’t open issue, follow the steps given below:
Step 1: Confirm Your Computer Meets the Minimum System Requirements
Your Windows or Mac computer should meet the minimum system requirements for using Cricut Design Space. If it doesn’t, it could be the reason why won’t Cricut Design Space open on your computer. Upgrade your device to meet those requirements.
Below are the minimum system requirements for using Cricut Design Space:
For Windows
Operating System: Windows 10 or later*
CPU: Intel™ Dual-Core or equivalent AMD® processor
RAM: 4GB
Disk Space: Minimum 2 GB of free disk space
Connection: An available USB port or Bluetooth connection
Display: Minimum 1024px x 768px screen resolution
Internet connection: Minimum 2-3 Mbps Download and 1-2 Mbps Upload
For Mac
Operating System: macOS 12 or later*
CPU: 1.83 GHz
RAM: 4GB
Disk Space: Minimum 2 GB of free disk space
Connection: An available USB port or Bluetooth connection
Display: Minimum 1024px x 768px screen resolution
Internet connection: Minimum 2-3 Mbps Download and 1-2 Mbps Upload
Step 2: Restart Your Device
A simple restart can fix lots of problems. When you restart your device, it clears out temporary files and frees up memory. In order to restart your device, follow the steps given below:
For Windows
To restart your Windows device, follow these steps:
Firstly, click the Start button.
Then, select the Power icon.
Choose Restart.
For Mac
To restart your Mac, follow the steps below:
Click the Apple menu in the top-left corner of the screen.
Then, choose Restart.
Step 3: Force Reload Cricut Design Space
You can also fix Cricut Design Space won’t open issue by forcing a reload. Sometimes, slow speed can cause the Cricut Design Space won’t open issue. A force reload can solve the problem.
In order to force reload Cricut Design Space, follow the steps given below:
Open the Cricut Design Space app.
Then, find the system menu in the top left corner.
After that, select the View option.
Lastly, select Force Reload from the dropdown menu.
If your Cricut Design Space still won’t open on your computer, move to the next step.
Step 4: Uninstall and Reinstall Cricut Design Space
Whether the Cricut Design Space is out of date or has had an issue, you can fix these most common errors by simply uninstalling and reinstalling it. Here are the steps on how to uninstall and reinstall Cricut Design Space.
How to Uninstall Cricut Design Space?
If you want to uninstall Cricut Design Space from your computer, follow the steps below:
For Windows
Firstly, make sure that Design Space is closed. If it is not closed, the application will not be uninstalled properly.
Select the Start icon and search for Programs.
Then, choose the option Add or remove programs. This will open the Apps & features window.
Type Cricut in the search field and choose Cricut Design Space from the list.
After that, select the Uninstall button.
A pop-up will show up on the screen asking, “Are you sure you want to uninstall Cricut Design Space?”. Select OK to uninstall Cricut Design Space.
The system will finish the uninstallation process. If prompted, restart your computer.
For Mac
Open the Finder and select Applications.
Then, drag the Cricut Design Space from the Applications to the Trash.
After that, right-click on the trash and select Empty Trash. You can also open the trash, click on the gear icon, and then select the Empty Trash option.
Next, click Empty Trash to confirm that you want to permanently delete the trash items.
Finally, the system will finish the uninstallation. If prompted, restart your Mac.
How to Reinstall Cricut Design Space?
Here are step-by-step instructions on how to reinstall Cricut Design Space.
For Windows
Go to the official Cricut Design Space website: Cricut.com/setup.
After that, type your machine model in the search field and select your device.
Select the checkbox confirming you agree to Cricut Terms of Use and Privacy Policy. Then, click on the Download button.
Once the downloading is complete, double-click the file in your browser or Downloads folder.
If a window opens asking if you trust the application, confirm that you trust the app.
Now, an installation progress window will appear.
Next, sign in with your Cricut ID and password.
Finally, you have successfully reinstalled Cricut Design Space on your computer.
For Mac
Visit the Cricut Design Space website: cricut.com/setup.
Then, enter your Cricut machine model in the search field and select your device.
Next, check the box to agree to Cricut Terms of Use and Privacy Policy. Then, click the Download button.
Select a location to save the file (By default, it will show the downloads folder). Click Save to start the download.
Now, the file download will start.
When the download is finished, go to the downloads folder. Then, double-click on the downloaded file.
A new window will appear. Drag the Cricut icon into the Applications folder icon to start the installation process. After this, Cricut Design Space for Desktop will be automatically added to your Applications folder.
Then, double-click on Cricut Design Space in your Applications folder in order to launch Design Space for Desktop.
A window will appear asking if you want to open the application downloaded from the internet. Click the Open button to continue.
Lastly, sign in with your Cricut ID and password. With this, you have successfully reinstalled Cricut Design Space on your Mac.
Conclusion
If you are wondering why won’t Cricut Design Space open on my computer. Don’t worry; you are not the only person facing this issue. Many Cricut Design Space users encounter this issue at some point. The Cricut Design Space won’t open issue can be caused by several reasons. The good thing is you can fix it easily in a few minutes.
By following the above-mentioned steps, you will be able to fix Cricut Design Space won’t open issue quickly. Make sure your Windows computer or Mac meet the minimum system requirements, restart your device, and force reload Cricut Design Space. If the issue is still there, try uninstalling and reinstalling Cricut Design Space.
Thank you for reading this post. We hope you find this guide helpful in understanding why won’t Cricut Design Space open on your computer and how to fix Cricut Design Space won’t open issue. Please stay connected with us for more tips and guides to make the most of your Cricut.
Source: why won’t Cricut Design Space open
#why won’t Cricut Design Space open#cricut design space won't open#cricut design space download#cricut design space app#cricut design space software#Cricut Setup
0 notes
Text
Something else that tends to speed up computers is disabling Superfetch (or SysMain as it's called now, I think to scare people into not disabling it). Windows Key + R (or right click the start button and click Run), type in services.msc and hit enter or click OK, find SysMain (or Superfetch on older versions of Windows 10 and beyond), right click and go into its Properties, click Stop near the bottom and select Disable for its startup type, then click Apply > Ok.
Superfetch/SysMain takes your history of program usage and loads those applications into your RAM before you click on the program (based on how often and when you use those programs) in order to speed up load times. The impact to performance isn't very noticable on mid-range builds and higher, but business desktops and cheap work laptops bog down pretty hard the longer you use them due to bundled third-party antivirus software (that you should be uninstalling immediately), Windows Defender security updates, and Superfetch filling your RAM before you have a chance to open what you intended to.
i thought my laptop was on its last leg because it was running at six billion degrees and using 100% disk space at all times and then i turned off shadows and some other windows effects and it was immediately cured. i just did the same to my roommate's computer and its performance issues were also immediately cured. okay. i guess.
so i guess if you have creaky freezy windows 10/11 try searching "advanced system settings", go to performance settings, and uncheck "show shadows under windows" and anything else you don't want. hope that helps someone else.
236K notes
·
View notes
Text
Why Choose Yamicsoft Window Cleaner Software?
Introduction
Over time, Windows operating systems accumulate unnecessary files, outdated registry entries, and performance-hindering clutter. Yamicsoft Window Cleaner Software is a powerful and efficient tool designed to optimize and clean Windows-based computers, enhancing speed, stability, and overall system performance.
Yamicsoft Window Cleaner Software
Yamicsoft is known for its expertise in Windows optimization solutions. Our Window Cleaner Software offers a comprehensive suite of tools to remove junk files, optimize the registry, and improve system efficiency — all in one user-friendly package.
Key Features and Benefits
Advanced System Cleaning: Removes unnecessary files, cache, and temporary data to free up disk space.
Registry Optimization: Scans and fixes invalid registry entries to improve system stability.
Startup Manager: Helps manage startup programs to speed up boot times and system performance.
Privacy Protection: Clears browsing history, cookies, and other sensitive data to enhance security.
One-Click Optimization: Quickly improves system performance with a single click.
Uninstaller Tool: Helps remove unwanted programs and leftover files for a cleaner PC.
How It Works
Scan Your System — Run a deep scan to detect junk files, broken registry entries, and unnecessary background processes.
Optimize and Clean — Select optimization options to clean up disk space, manage startup applications, and fix registry issues.
Enhance Performance — Enjoy a faster and more efficient Windows experience with improved speed and responsiveness.
System Requirements
Operating System: Windows 10/11 (32-bit & 64-bit)
Processor: Intel or AMD 1 GHz or faster
RAM: 2 GB or higher
Storage: Minimum 200 MB free disk space
Why Regular Cleaning is Essential
Regularly using Yamicsoft Window Cleaner Software prevents system slowdowns, enhances security, and extends the life of your PC. By removing unnecessary files and optimizing settings, your Windows computer will run at peak efficiency for longer.
Why Regular Cleaning is Essential
Experience a cleaner, faster, and more secure Windows system with Yamicsoft Window Cleaner Software.
0 notes
Text
Can I Uninstall Remote Desktop Connection on Windows 10? A Complete Guide
Removing a Remote Desktop Connection is not as straightforward as uninstalling a typical program. This guide will help you understand whether can I uninstall Remote Desktop connection on Windows 10 and how you can disable or remove it effectively. Can You Uninstall Remote Desktop Connection on Windows 10? Remote Desktop Connection is an integrated Windows component, not a standalone application.…
0 notes
Text
With AMD GPUs Installing Ollama On Linux And Windows

It is possible to run local LLMs on AMD GPUs by using Ollama. The most recent version of Llama 3.2, which went live on September 25, 2024, is the subject of this tutorial.
Llama 3.2 from Meta is compact and multimodal, featuring 1B, 3B, 11B, and 90B models. Here is a step-by-step installation instruction for Ollama on Linux and Windows operating systems using Radeon GPUs, along with information on running these versions on different AMD hardware combinations.
Supported AMD GPUs
Ollama’s product may be used with both older and current AMD GPU models since it supports a variety of them.
Ollama Installation & Setup Guide.
Linux
Ubuntu 22.04.4.
AMD GPUs using the most recent version of AMD ROCm.
To install ROCm 6.1.3.
Use a single command to install Ollama.
Windows
System prerequisites
Windows 10 or Later.
Installed drivers for AMD GPUs that are supported.
After installation, just launch PowerShell and execute it.
Run, llama, llama3.2.
That’s all; you’re set to speak with your local LLM.
AMD ROCm Supported GPUs
Use ROCm to install Radeon software on Linux
The amdgpu-install script helps you install a cohesive collection of stack components, including the ROCm Software Stack and other Radeon software for Linux components.
Makes the installation of the AMD GPUs stack easier by using command line arguments that let you select the following and by encapsulating the distribution-specific package installation logic.
The AMD GPUs stack’s use case (graphics or workstation) that has to be installed.
Combination of elements (user selection or Pro stack).
Carries out post-install inspections to confirm that the installation went well.
Installs the uninstallation script, which enables you to use a single command to delete the whole AMD GPU stack from the computer.
AMD Radeon GPUs
Ollama supports the following AMD GPUs:
Linux Support
Linux Overrides
Not all AMD GPUs are supported by the AMD ROCm library, which Ollama makes use of. You can sometimes cause the system to attempt using a nearby, comparable LLVM target. For instance, the Radeon RX 5400 is gfx1034 (also referred to as 10.3.4), however ROCm does not yet support this target. gfx1030 is the closest support. With x.y.z syntax, you may utilize the environment variable HSA_OVERRIDE_GFX_VERSION. For instance, you may change the server’s environment variable HSA_OVERRIDE_GFX_VERSION=”10.3.0″ to force the system to operate on the RX 5400.
A future version of ROCm v6 is anticipated to support a greater number of GPU families due to AMD’s ongoing efforts to improve it.
GPU Selection
To restrict Ollama to use a subset of your system’s AMD GPUs, you may set HIP_VISIBLE_DEVICES to a list of GPUs separated by commas. The list of devices having rocminfo is shown. You may use an incorrect GPU ID (such as “-1”) to compel CPU utilization while ignoring the GPUs.
Permission for Containers
SELinux may restrict containers’ access to AMD GPU hardware in various Linux editions. To enable containers to utilize devices, execute sudo setsebool container_use_devices=1 on the host system.
Metal: GPUs made by Apple
Through the Metal API, Ollama facilitates GPU acceleration on Apple devices.
In summary
Ollama’s broad support for AMD GPUs is evidence of how widely available executing LLMs locally is becoming. Users may run models like Llama 3.2 on their own hardware with a variety of choices, ranging from high-end AMD Instinct accelerators to consumer-grade AMD Radeon RX graphics cards. More customization, privacy, and experimentation are possible in AI applications across a range of industries thanks to this adaptable strategy for enabling creative LLMs throughout the extensive AI portfolio.
Read more on govindhtech.com
#AMDGPU#InstallingOllama#Windows#Llama32#AMDGPUmodels#ROCm613#ROCmSoftware#RadeonRX#GPUSelection#Apple#technology#technews#AMDRadeonRXgraphicscards#govindhtech
0 notes
Text
IObit Uninstaller 13.6 Pro Key License [1Yr Free 2024]
What is IObit Uninstaller 13.6 Pro Key?
The IObit Uninstaller 13.6 Pro key is a license key that unlocks the full capabilities of IObit Uninstaller 13.6 Pro. This key grants access to advanced features and tools designed to help you efficiently manage and remove unwanted software from your computer. Unlike the free version, the Pro version offers enhanced functionalities for a more comprehensive cleaning experience.
What is IObit Uninstaller 13.5 Pro Key?
The IObit Uninstaller 13.5 Pro key serves a similar purpose for the previous version, IObit Uninstaller 13.5. It provides access to Pro features in that version, allowing for advanced uninstalling capabilities and better system optimization compared to the free version.
Features of IObit Uninstaller 13.6 Pro Key
Advanced Uninstallation: Completely removes unwanted software, including residual files and registry entries.
Browser Toolbar Removal: Easily eliminates unwanted browser toolbars and plugins.
Real-Time Monitoring: Monitors installations in real-time to ensure complete removal.
Powerful Scanning: Performs a deep scan to clean up leftover files and registry traces.
Batch Uninstall: Allows multiple programs to be uninstalled simultaneously.
How to Activate IObit Uninstaller 13.6 Pro Key with License Keys?
Download and Install: First, download and install IObit Uninstaller 13.6 from the official website.
Launch the Software: Open IObit Uninstaller 13.6 Pro on your computer.
Enter License Key: Navigate to the registration or activation section within the software.
Input Key: Enter your IObit Uninstaller 13.6 Pro key in the provided field.
Activate: Click the activation button to unlock Pro features.
How to Uninstall IObit Uninstaller?
Open IObit Uninstaller: Launch the application from your applications or start menu.
Select Program: Choose IObit Uninstaller from the list of installed programs.
Uninstall: Click the uninstall button and follow the prompts to remove it from your system.
Clean Residual Files: Use any built-in cleanup tools to ensure all associated files are deleted.
IObit Uninstall and Remove Administrator Issues on Windows 10
If you encounter administrator issues while uninstalling IObit Uninstaller on Windows 10:
Run as Administrator: Right-click the IObit Uninstaller icon and select “Run as administrator.”
Disable UAC: Temporarily disable User Account Control (UAC) if you continue to face issues.
Use Safe Mode: Boot your computer in Safe Mode and try uninstalling the program again.
Use an Uninstaller Tool: Consider using another uninstaller tool if the built-in method fails.
Why Choose IObit Uninstaller 13.6 Pro Key?
1. Comprehensive Removal: Provides thorough uninstallation to eliminate all traces of unwanted programs.
2. Enhanced Performance: Improves system performance by removing clutter and optimizing the registry.
3. User-Friendly: Offers an intuitive interface for easy navigation and operation.
4. Real-Time Monitoring: Ensures clean installations and removals with real-time monitoring.
IObit Uninstaller 13.6 Pro Key Free License 2024
6E25C-21F89–7F62B-D86BC for 13.6.0.5– Valid till — October 16, 2024.
Free License: 11242-C437D-DE013–6E6TC
New License: DB978–6E333-B12DC-7BDTC
Key: F6741-F743C-7CE93–3C8TC (Valid till June 20, 2024)
30C81–393A2–7DBAF-390TC — Valid till — November 8, 2024
6E25C-21F89–7F62B-D86BC — Valid till — October 16, 2024
F6741-F743C-7CE93–3C8TC — Expiry: June 20, 2024
11242-C437D-DE013–6E6TC — Expiry: May 30, 2024
DB978–6E333-B12DC-7BDTC
11242-C437D-DE013–6E6TC
BE75C-BD2C8–7E065–3FEBC (Valid till Apr 08, 2024)
5E635-B9223-D6779-BAEBC (Valid till Mar 22, 2024)
539C6-A60A4–62290–383TC (Valid till Mar 02, 2024)
6B95D-3EE8D-ED01B-2DDTC (Valid till Mar 02, 2024)
4AEC4-DAE7D-A0C86–765TC (Valid till Mar 02, 2024)
B894E-7ADF2–100F1-CC1TC (Valid till Mar 02, 2024)
539C6-A60A4–62290–383TC (Valid till Mar 02, 2024)
7B48B-01241–1EE02–3BETC (Valid till Feb 18, 2024)
7A54B-0A8ED-8F770–4ECTC (Valid till Feb 09, 2024)
2CBB7–715F7–9E5BE-991TC (Valid till Feb 09, 2024)
IObit Uninstaller 13 ProLicense Key (3 Device)
CDNJF-P6G3P-85BQV-58Y7E
4MM6R-R9332–4JKKJ-X3N46
Q9DHY-5367H-YYVLN-JGW5U
M3JFE-7MNWQ-MM59G-K5WXY
QKSUD-GEZRM-JVNER-K2EGP
Z3XSZ-6PVNJ-YNN8J-ZRPRX
IObit Uninstaller Pro Activation codes (6 Months)
B894E-7ADF2–100F1-CC1TC
81B57-E0F9E-14836–570BC
C7870-A6BBE-D9C12-A25TC
CE697–12E0B-46B82-AE4TC
FE17F-ADE45–6BED8–30DTC
879BF-5A984–8EEB0–86ETC
4BCDA-6B1CC-3AC6F-AD4TC
Conclusion
IObit Uninstaller 13.6 Pro Key is a powerful tool designed to help you manage and remove unwanted software effectively. With advanced features like real-time monitoring and deep scanning, it ensures a thorough cleaning process. To activate the Pro version, simply use the provided license key, and for any issues, follow the suggested solutions to uninstall or troubleshoot.
0 notes
Text
it’s the windows rant. (the operating system.)
This post is:
subjective
(subjective, in case that is hard to read)
this my opinion. as a person.
TL;DR: I’m a fucking nerd & i hate windows 11 in particular
Now, for the record, i am not going to discuss versions of windows i have personally used ever. which is everything before 7. I also may have a lot of nostalgia for windows 7, being the main version of windows i was ever exposed to. let’s move on, shall we? i will also do my best to provide alt text for images of these, if it matters any. not that I think anyone will read this (at all) but: accessibility matters and should be THE NORMAL STATE and can help people even if it was not intended for them!

windows 7:
Released in 2009 and the successor to Windows Vista. It still looks beautiful, even in its older age. If it weren’t for a lack of support, I’d use windows 7 until i fucking died. it’s beautiful. the startup chime, the way everything looks and feels! detailed but not cluttered with useless bullshit. a time when windows was simpler and didn’t give you so much software you didn’t ask for. if i had to describe a texture for this I’d say probably smooth, cold glass. a well made cup or a coffee table.
windows 8.1 (i am not sure how much it varies from 8):
it feels like cheap plastic. it strays away from a lot of the look and feel of windows 7 but somehow is not my least favorite because windows 11 exists. I’ve also used Windows 8.1 a lot, but i can safely say i don’t have a real opinion on it. it feels experimental, a step in a different direction and like a child learning to draw. the sketch for Windows 10. not too bad about stuff i wanted to instantly uninstall. No image for this one, since the desktop and start menu are separated. Sorry.

Windows 10:
it’s fine. looks fine. minimalist, not much character. it feels like more high-quality plastic. it’s also when windows really started giving you software you didn’t want, i believe. I’m not super familiar with this one.

Windows 11:
what the fuck is wrong with this thing.
thanks, i hate it! i have WORDS
it takes most of the things i felt were unique about the way windows looks, looks me in the eye, and smashes everything and everyone i love beneath its heel.
You can, however, make the taskbar go back in its rightful place, the left corner.
it feels so similar to ChromeOS in a sense with its default center taskbar and simple icons. and.. what is that logo. no really, what the fuck is that. It’s just four fucking squares, at least windows 8.1 and 10 made it look like a fucking window by slanting then a little
it’s not even that i hate minimalist design, I promise
it just feels completely and utterly industrialized and removes any sense of fucking uniqueness and whimsy
And for what, applications and and shortcuts I didn’t want or need. do you know whenever I use a windows 11 how many applications i look for in task manager to kill? At least 3!
i can’t even give this thing a texture! it’s smooth, cheap plastic and deceptively thin aluminum that bends if you insult its mother
AND DONT GET ME STARTED ON WINDOWS 11 S MODE oh wait no i guess I should anyway
In case you’re unaware, Windows 11 S mode only allows you to install things from the Microsoft store. This is really good for… kids, the elderly, and anyone who isn’t technologically inclined or savvy or whatever. that’s the use case. but not gamers. this is not for gamers. sorry; you want steam? get fucked. I believe you mostly encounter when it’s preinstalled.
luckily this is completely and entirely removable. it is not able to be put back on (As far as I know).
iirc, it’s a bit awkward to remove? and not very intuitive (windows? being intuitive? in your dreams!)
i should not have to research how to undo a feature on a computer because i wanted to play portal. Not to mention at some point the method changed it appears? last I remember, but again; it’s been a while.
to conclude: windows 11 is the devil and i hate it.
#this is a long ass rant. i don’t want to know how long#this is again more about laptops because i am more familiar with them.#this is a post about hating windows 11#fuck windows 11#i hate it and it’s the devil#you get the point
0 notes
Text
can't connect to nord vpn with windows 10 update
🔒🌍✨ Get 3 Months FREE VPN - Secure & Private Internet Access Worldwide! Click Here ✨🌍🔒
can't connect to nord vpn with windows 10 update
Nord VPN troubleshooting Windows 10
NordVPN is a popular virtual private network service that offers users a secure and private internet connection. However, like any software, it might encounter issues while running on Windows 10. If you are facing problems with NordVPN on your Windows 10 system, here are some troubleshooting steps you can take to resolve them.
Check your internet connection: Make sure you have a stable internet connection. Sometimes, connectivity issues can prevent NordVPN from working correctly.
Restart NordVPN: Close the NordVPN application and reopen it. Sometimes, a simple restart can fix any temporary glitches.
Update NordVPN: Ensure you are using the latest version of NordVPN. Outdated software can contain bugs that may cause issues.
Check firewall settings: Your firewall might be blocking NordVPN's connection. Temporarily disable your firewall and see if NordVPN works then.
Change server locations: Sometimes, the server you are connected to might be experiencing issues. Try switching to a different server location to see if that solves the problem.
Reinstall NordVPN: If none of the above steps work, consider uninstalling and reinstalling NordVPN on your Windows 10 system.
By following these troubleshooting steps, you should be able to resolve most common issues with NordVPN on Windows 10. Remember to contact NordVPN support if you continue to experience problems, as they can provide further assistance tailored to your specific situation.
Windows 10 update Nord VPN connection issue
Title: Troubleshooting Windows 10 Update NordVPN Connection Issue
Are you encountering connectivity issues with NordVPN after updating your Windows 10 operating system? You're not alone. Many users have reported difficulties in maintaining a stable connection with NordVPN following a Windows 10 update. While frustrating, there are several troubleshooting steps you can take to resolve this issue and get back to secure browsing.
Firstly, ensure that your NordVPN application is updated to the latest version. Developers often release updates to address compatibility issues with new operating system versions. Updating your NordVPN app may resolve the connectivity problems you're experiencing.
Next, verify that your Windows 10 system is fully updated. Sometimes, compatibility issues arise due to outdated system files or drivers. By installing the latest Windows updates, you can ensure that your operating system is equipped with the necessary patches and fixes to support NordVPN's functionality.
If updating both NordVPN and Windows 10 doesn't resolve the issue, try restarting your computer. A simple reboot can often clear temporary glitches and restore normal operation.
Additionally, check your network settings to ensure that NordVPN is allowed through your firewall and antivirus software. Sometimes, security programs can inadvertently block VPN connections, causing connectivity issues.
If the problem persists, consider contacting NordVPN's customer support for further assistance. They may be able to provide specific troubleshooting steps tailored to your situation.
In conclusion, encountering connectivity issues with NordVPN following a Windows 10 update can be frustrating, but it's not insurmountable. By following these troubleshooting steps and reaching out to NordVPN's support team if necessary, you can resolve the issue and continue enjoying secure internet browsing.
Fix Nord VPN connection problem Windows 10
Title: How to Fix NordVPN Connection Problems on Windows 10
Are you experiencing connection issues with NordVPN on your Windows 10 system? Don't worry; you're not alone. Many users encounter connectivity problems with VPN services, but fortunately, there are several troubleshooting steps you can take to resolve them.
Check Your Internet Connection: Before troubleshooting NordVPN, ensure that your internet connection is stable. Try accessing other websites or services to confirm.
Restart NordVPN and Your Computer: Sometimes, a simple restart can fix connectivity issues. Close NordVPN, restart your computer, and then relaunch the application.
Update NordVPN: Ensure you're using the latest version of NordVPN. Outdated software can sometimes cause connectivity problems. Check for updates in the NordVPN app or download the latest version from their website.
Change VPN Servers: The server you're connected to might be experiencing issues. Try connecting to a different server location within NordVPN to see if that resolves the problem.
Disable Firewall or Antivirus: Your firewall or antivirus software might be blocking NordVPN's connection. Temporarily disable these programs and try connecting again.
Reset Network Settings: Resetting your network settings can often resolve connectivity issues. Open Command Prompt as an administrator and type the following commands:
netsh winsock reset netsh int ip reset ipconfig /release ipconfig /renew
Contact NordVPN Support: If none of the above solutions work, reach out to NordVPN's customer support team for further assistance. They can provide personalized troubleshooting steps based on your specific issue.
By following these steps, you should be able to resolve most NordVPN connection problems on Windows 10 and enjoy secure and private internet access once again.
Windows 10 Nord VPN connectivity error
When using a VPN service like Nord VPN on your Windows 10 computer, encountering connectivity errors can be frustrating. However, there are several common reasons for these issues and potential solutions that you can try to resolve them.
One of the most common reasons for a connectivity error with Nord VPN on Windows 10 is an unstable internet connection. Make sure that you are connected to a stable and reliable network before attempting to connect to the VPN service.
Another possible cause of the error could be conflicting software or settings on your computer. In some cases, antivirus programs or firewall settings may interfere with the VPN connection. Try disabling these temporarily to see if it resolves the issue.
If you are still experiencing connectivity errors, try changing the VPN server you are trying to connect to. Sometimes, certain server locations may be experiencing high traffic or technical issues, causing connection problems. Switching to a different server can help establish a stable connection.
Additionally, ensuring that your Nord VPN software is up to date is crucial. Developers frequently release updates to address bugs and improve compatibility with operating systems like Windows 10. Check for any available updates and install them to see if it resolves the connectivity error.
By troubleshooting these common issues and following the suggested solutions, you can likely resolve the Windows 10 Nord VPN connectivity error and enjoy a secure and private internet browsing experience.
Nord VPN not connecting after Windows 10 update
NordVPN is a popular virtual private network service that allows users to browse the internet anonymously and securely. However, some users have reported issues with NordVPN not connecting after a Windows 10 update.
If you are facing this problem, there are several troubleshooting steps you can try to resolve the issue. Firstly, make sure that your NordVPN app is up to date as new updates may contain bug fixes that address connectivity issues. You can check for updates in the app settings or on the NordVPN website.
If updating the app doesn't help, you can try restarting your computer as well as the NordVPN app. Sometimes, a simple reboot can resolve connectivity issues caused by the update. Additionally, you can try changing the server you are connecting to as the server you were previously using may be experiencing issues.
Another common solution to NordVPN connection problems after a Windows 10 update is to reinstall the NordVPN app. Uninstall the app from your computer, download the latest version from the NordVPN website, and then reinstall it. This can help replace any corrupted files that may be causing the connectivity issue.
If none of these steps work, you may need to contact NordVPN customer support for further assistance. They may be able to provide additional troubleshooting steps or escalate the issue to their technical team for a resolution.
In conclusion, NordVPN not connecting after a Windows 10 update can be frustrating, but by following these troubleshooting steps, you can hopefully resolve the issue and get back to browsing the internet securely with NordVPN.
0 notes
Text
Bloatware is Annoying: What You Can Do About It
Most computers these days will come with their fair share of bloatware, i.e. unwanted software that comes preinstalled on the operating system by the developers. While the developers do tend to get paid for including bloatware with their operating systems, there is often no need for it, leading users to question why it’s there and what to do about it. Bloatware is a Problem for Individuals and Companies The big problem with bloatware is that it takes up a lot of space without really offering anything to the user in return. Sometimes it can impact the system’s performance while also eating into your storage space, creating issues all around. Businesses also must realize that the solutions that tend to be bloatware are disruptive and better off being replaced by less intrusive solutions. After all, bloatware will often remind users of its presence, and it is often for services that you already have in some capacity. So, what do you do about it? Most Bloatware Can Be Removed Sometimes bloatware has a legitimate use, but more often than not, it has no real practical use in the workplace environment. For example, look at applications like Netflix, Solitaire, and Xbox-related apps, and you’ll see that there is no reason for them to be there on a work PC. While the process might differ, there is usually a way to remove it. How to Remove Bloatware from Windows 10 and 11 You can start the process of removing bloatware when you first get the computer. Rather than going through with the default installation, you can opt for a clean and customized version by deselecting all of the programs that are not related to the workplace. This is the best way to stop bloatware in its tracks—before you even install it in the first place. There are ways to remove bloatware through the Windows operating system, too. You can just right-click on the ones that are causing you so much distress and select “Uninstall” from the menu. If this option isn’t available, tools like Powershell and DISM (Deployment Image Servicing and Management) may be required, but if this is the case, we urge you to contact Reciprocal Technologies to make sure you do it the right way. Get Help from the Best in the Business Whether you want to remove bloatware or simply improve operations in some way, Reciprocal Technologies can help. Learn more by calling us today at 317-759-3972. from https://reciprocaltech.com
0 notes
Video
youtube
Speed Up Microsoft Edge with These 7 Tips | Fix Slow Edge Browser
Did you notice Microsoft Edge running very slow or take time to load webpages? From a lack of system resources to Running an outdated version of Microsoft Edge, Accumulated cache and cookies, or Having an excessive number of tabs open simultaneously can strain system resources leading to a slower browsing experience. Whatever the reason here we have a few tweaks help you fix the problem and make Microsoft Edge load faster or Speed up Edge browser performance. How to Speed Up Microsoft Edge To boost the speed of Microsoft Edge on Windows 11/10, ensure it's updated. Turn off or remove unnecessary extensions, clear browsing data regularly, and manage open tabs efficiently to reduce resource usage. Additionally, optimize Windows settings, adjust startup applications, and consider repairing Microsoft Edge through its settings if problems persist. Update Microsoft Edge Whenever you experience performance issues with your browser, the first step should always be to ensure it's updated to the latest version. Updates not only bring performance enhancements but also fix bugs that might be slowing down Edge's performance. To check for updates, simply open Edge and go to Settings - About Microsoft Edge. If an update is available, it will automatically download and install. Clear Edge cache and Cookies Regularly clearing your browsing history, cache, and cookies can help free up storage space and improve browser responsiveness. These temporary files can accumulate over time and slow down Edge's performance. To clear browsing data, go to Settings - Privacy, search, and services - Clear browsing data. You can choose which types of data to clear and how far back to go. Turn off or Delete Unnecessary Extensions Extensions can enhance functionality but can also impact browser performance. Disable or remove unnecessary extensions that you don't actively use. While some extensions may be useful, having too many can contribute to slowdowns. Navigate to the Extensions menu by clicking on the three-dot menu in the top right corner of Edge, then select Extensions. Here, you can manage your extensions by enabling, disabling, or removing them as needed. Reset Edge Settings If you've tried other solutions and are still experiencing performance issues, resetting Edge settings to their default configuration can help. This will revert all settings back to their original state, potentially resolving any conflicts or misconfigurations that may be impacting performance. To reset Edge settings, go to Settings - Reset settings and click on the "Restore settings to their default values" button. Disable Hardware Acceleration If you're experiencing graphical glitches or performance issues, try disabling hardware acceleration in Edge settings. Hardware acceleration offloads certain tasks to your computer's GPU, but it can sometimes cause compatibility issues with certain graphics drivers. To disable hardware acceleration, go to Settings - System and toggle off the "Use hardware acceleration when available" option. Repair Microsoft Edge Browser Microsoft Edge is the default browser on Windows 11 or 10, so we can't uninstall or reinstall it but Microsoft has incorporated a repair feature that essentially reinstall the browser. Any of the browser's broken, damaged, or missing files in its program folder and Windows registry will be replaced, and this could potentially get it to start working again Flush Edge DNS cache To load webpages faster, Microsoft Edge stores and uses data about the websites that you access in its DNS (or Domain Name Server). However, if it stores too much data or it somehow gets corrupted, it will slow down the browser. In this case, flushing your browser DNS should fix the problem. Check for Malware Perform a thorough malware scan using Windows Defender or a reputable antivirus program. Malicious software can significantly degrade system performance, including browser responsiveness. Make sure your antivirus definitions are up-to-date and perform a full system scan to check for any malware or viruses that may be affecting your computer.
0 notes
Text
Radiant DICOM Viewer 2023.3.3 Crack + Serial Number 2024 [64-Bit]

Radiant DICOM Viewer 2023.3.3 Crack In medical field this software makes the extra ordinary service for the user. With this open and display studies from the different way like, radiography, mammograph etc. Now you can get software to this our site free crack for one year enjoy it.
RadiAnt DICOM Viewer full cracked is a very smart and powerful PACS DICOM viewer for medical images designed to provides you with a unique experience. This software is good and powerful. Its natural interface and unrivaled execution, you’ll never think back. The images can be exported as JPEG, bitmap or a video tutorial (WMV). After opening this kind of image you may use an easy scaling, you can modify the lighting and other variables, there are prepared options of the visualization home window for computed tomography, it will help you to turn the image to the required degree, you can find a good pen for sketching by hand. Get the real one and enjoy the fast and secure connection with this software. Now you are medical images design in a perfect way.
RadiAnt DICOM Viewer License Key Latest Version 2024:
This RadiAnt DICOM Viewer Serial Key a standard user interface with modern visuals that allows users to access all important application that save and search images, scale all elements in the model, and manipulate images and other its uses. Furthermore, if we need new tools that are faster than old program and can also be used added to CD and DVD media. It can be used to provide users with a familiar experience. Also, This program can run tow ways one on Microsoft Windows and second Mac OS.
RadiAnt DICOM Viewer Activation Code Key program has very fast and runs on Windows from CD or DVD media without requiring any installation. Also, When open an image type you have a simple formula, brightness and other settings you can change. In addition, Image display options are also possible in this software. You Can Keep using main window brightness easily. Furthermore, DICOM viewers help convert images to the desired level, which can be achieved with a large data.

Key Features:
RadiAnt DICOM Viewer Activation Key basic program allows you to add transitions and negative methods to DICOM files.
Also, You can easily find files in folders.
It Easily view files in order.
Folders help users upload relevant images.
You can create separate files and folders for patients. You can see it quickly.
Perform a full scan in this program.
All information is protected with program.
Access data whenever you want with just a few clicks.
Split mode allows you to view more than 20 slides simultaneously.
Users can search DICOM files and applications with high efficiency.
You can combine different types of values in a single document.
Length, Ellipse and Angle can be applied to DICOM images.
You can also specify files.
In addition, Users can customize the presentation of medical images.
Mainly used by medical students and doctors.
RadiAnt DICOM Viewer License Key:
7ERYV-M845U-FT747-EFHFI-RRUNC
SKFWT-35TXD-5WETD-FTMVL-SU8Y7
8CS8W-ERICN-KSHR7-CTE5Q-DTWEU
FHCML-S9TYE-HR9EJ-UWR8J-SCEI8
IH7FI-DJWCM-KSDGU-TR7EC-T3T6X
RUMQS-DHUEU-RDCIR-TESDF-QE5TF
53TSW-ESFDW-TYDYM-VRU93-DFRY9
EJDFC-MISE8-R3GUF-EYR7F-TTQFQ
Requirements:
Windows 7, 8, 8.1 or 10 (64-bit).
Mac OS X 10.10 or later (64-bit).
Ubuntu 16.04 or later (64-bit).
At least 2 GB of RAM.
At least 2 GHz processor.
OpenGL 2.0-capable graphics card with 512 MB of VRAM or more.
What’s New?
All previous display issues have been fixed in this software.
This option makes it easier to take a mammography image in the best way.
This may cause problems in supporting DICOM-based health data.
Technical techniques in this process is also available.
How to Install RadiAnt DICOM Viewer Crack?
If you are already using the old version, immediately uninstall it.
Download RadiAnt DICOM Viewer Crack with IDM.
Temporarily turn off your Windows firewall (you can turn on Windows real-time protection after the installation).
Now, you need to extract the downloaded file with WinRAR
Run the setup file.
Click “Next” to start the installation.
After installation, don’t run the software.
Then, copy the crack files and paste them into the installation directory.
#RadiantDICOMViewerSerialNumber2024#RadiantDICOMViewerActivationCode#RadiantDICOMViewerTorrent#RadiantDICOMViewerKeygen#RadiantDICOMViewerCrackMac#RadiantDICOMViewerFullCrackgoogledrive
0 notes