#html form tag tutorial
Explore tagged Tumblr posts
Visit Tumblr Blog
Explore Tumblr blogs with no restrictions, modern design and the best experience.
Last Seen Tumblr Blogs


Fun Fact
Premium Tumblr themes are available from anywhere between $9 to $49.
Text
A Brief Guide on Uploading ChoiceScript Demos to Itch.io
Since Dashingdon is shutting down, and there will be a lot of folks wanting to host their ChoiceScript demos elsewhere, I thought it'd be a good idea to provide a brief guide on how to do so for itch.io.
This is for Windows in the folder actions, but it shouldn't be too difficult for folks to translate for Mac. This also assumes you haven't changed any of the files within your game folder other than those found under 'scenes'.
Within your game folder, locate the 'web' subfolder, right click it and select 'Send to' then 'Compressed (zipped) folder. Name your newly compressed file something sensible, and I recommend moving it to a new folder outside of your game files, just to keep everything neat and tidy.

2. Assuming you already have an itch.io account, navigate to your dashboard, and click the 'Create New Project' button.

3. Name your project as you like, and under 'Kind of project', select the 'HTML' option.

4. Set the 'Pricing' to 'No Payments', you cannot use ChoiceScript for profit unless it is with the Choice of Games or Hosted Games publishing labels. No one wants to get in trouble unnecessarily here.
5. In the Uploads section, upload your newly zipped file we made in step one. After it's finished uploading, you'll be given one drop down and two tick boxes. You need to tick the 'This file will be played in the browser' option.

6. I've found so far that 'Viewport dimensions' work quite well for desktop at 1080 x 640. Either use these numbers or experiment and find what works best for you.
7. You must tick the 'Enable scrollbars' option for your game to display properly, otherwise options, text and buttons can be clipped off the bottom of the viewport.

8. Continue filling out the rest of the form, or skip it for now and scroll all the way to the bottom to the 'Visibility & access' section. Here make sure you have 'Draft' selected. This prevents others from finding your game until you're ready, and I always recommend play testing things before you make your work public.
9. Finally, hit the 'Save' button, then go and have a look at your creation by hitting the 'View page' link. And there you go! When you're ready for public release, just change the option in section 8 to 'Public'.
---
A few things to bear in mind about hosting on itch.io:
There isn't currently any way for your readers to save their game. I'm sure someone could write in a plugin similar to Dashingdon's at some point, but as for right now, this isn't available. See addition/edit below.
Make sure you properly tag your game with the 'choicescript' and 'interactive-fiction' tags. There are an awful lot of games on itch.io and it's easy to get lost in the crowd. Make sure folks can find you by having the right tags.
I hope this brief guide was useful to folks.
Best of luck to you with your writing!
---
Addition/Edit:
Thanks to @hpowellsmith for bringing this to my attention. You can add save functionality to your game by using this addon:
The ChoiceScript Save Plugin
Just tried it out on my own game and it works perfectly.
Rather than run through the addon author's own tutorial here, I'll just forward you to the Readme on their Github page.
One small note I would add is when it asks you to make the two small additions to your index file, make sure you right click the file and open it with your coding program, don't double-click it as this will just open it in an internet browser, and it won't give you the access to what you need to change.
716 notes
·
View notes
Text
BatB Week podfic instructions and tips

Thanks to everyone who signed up for the podfic exchange! If you signed up as a reader, you should have gotten a message with info on who you matched with. Send a DM if you missed the message.
(If you didn’t sign up, there is still time! We still need one more podficcer! The form to sign up is here.)
I don’t personally do voice/audio work, but I’ve pulled together some quick tips and instructions for recording, editing, and posting podfics below the cut. If someone else has better/more suggestions, please add on!
Recording and editing
Need audio recording/editing software? You don't need anything fancy; you can record it on whatever voice recording software comes installed on your phone (I have Samsung Voice Recorder, for instance), or use one of these free, beginner-friendly audio editors: Lexis Audio Editor (Android, iOS, Windows), Audacity (Windows, Mac, Linux), GarageBand (Mac), Audiotool (online).
Nastasia Marquez has a great tutorial on how to record and edit voiceovers for beginners in Audacity. It's very easy to follow along and gets straight to the point.
When recording, watch out for plosives and sibilances (e.g. your "pps," "sss," and "shh") as they can easily hinder the quality of your recording by being aggressive to the ear. It’s hard to give tips since everyone will be working with different devices, but my suggestion would be to put some space between your mouth and the microphone, or have your device inside a sock. You can learn more on them and how to deal with them here.
A good way to get clean audio is to record under a blanket. It’s silly, but it’s as close to a padded studio as you can get for free. It reduces echo and makes the audio sound much better no matter the mic you use.
Don't be afraid to record in short batches! There’s no need to do it in long unbroken takes. Piece it together later.
Posting the audio file
Once you have your finished audio file, you have to upload it somewhere, because AO3 can host the link to it, but not the audio file itself. It seems like Internet Archive is popular for hosting podfic audio files. You can also host it on Google Drive, YouTube, Mediafire, or Spotify.
Posting the podfic to AO3
Go to ‘Post > New work’ just like you would for posting any fic to AO3.
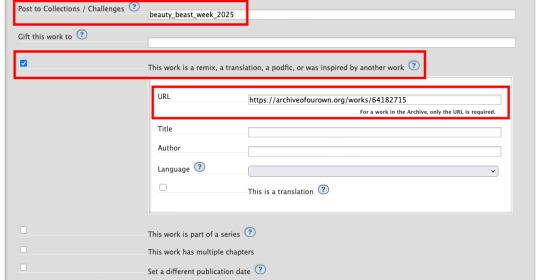
In the ‘Post to Collections / Challenges’ field, enter “beauty_beast_week_2025” (see first screenshot below).
Check the box that reads ‘This work is a remix, a translation, a podfic, or was inspired by another work’ and include the URL to the original fic (see first screenshot below). This not only gives credit to and notifies the author, but it adds a link to your podfic from their fic (when they approve it) so that your podfic gets more hits and kudos.
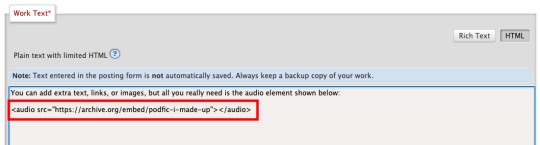
In the body of the post, insert the HTML to embed the audio file (see second screenshot below). It’s easy: AO3 has a simple guide to copy and paste from here.
If you’d like, you can add more content to the body of the post, like the event banner or some text, but it’s not necessary.
Here are some examples of BatB podfics so you can see how they’ve set things up: The Great Wide Somewhere, Mutual Care, and The Beast Within
Posting to the event
Important: tag the @beauty-beast-week account within the body of your Tumblr post itself by typing the @ symbol, typing beauty-beast-week, and then selecting that account name from the autocomplete menu that appears. This is the only way to be sure we see your post so we can reblog it from this account and include it in our master list posts.
Other than that, make sure you post to Tumblr on the day of the prompt you're using and include in your post:
Tag the @beauty-beast-week account within the body of the post (yes, I’m repeating myself)
Which fic your podfic is for, and link to it
Which day/prompt your podfic is for, in the body or tags
The event hashtag #batbweek and/or #batbweek 2025
Any other appropriate hashtags (characters, ship, NSFW and content warnings)
Optional: The event banner (save from the top of this post) or the day's banner (in the full event instructions that will come later)
Heads up authors! Check your AO3 email during the event!
If your work was adapted into a podfic for the exchange, check your email and follow the link to approve linking back the podfic to your original work so more people can discover the podfic version!

Send an ask or DM if you have any problems or questions!
7 notes
·
View notes
Text
Are Game Blogs Uniquely Lost?
All this started with my looking for the old devlog of Storyteller. I know at some point it was linked from the blogroll on the Braid devlog. Then I tried to look at on old devlog of another game that is still available. The domain for Storyteller is still active. The devblog is gone.
I tried an old bookmark from an old PC (5 PCs ago, I think). It was a web site linked to pixel art and programming tutorials. Instead of linking to the pages directly, some links link led to a twitter threads by authors that collected their work posted on different sites. Some twitter threads are gone because the users were were suspended, or had deleted their accounts voluntarily. Others had deleted old tweets. There was no archive. I have often seen links accompanied by "Here's a thread where $AUTHOR lists all his writing on $TOPIC". I wonder if the sites are still there, and only the tweets are gone.
A lot of "games studies" around 2010 happened on blogs, not in journals. Games studies was online-first, HTML-first, with trackbacks, tags, RSS and comment sections. The work that was published in PDF form in journals and conference proceedings is still there. The blogs are gone. The comment sections are gone. Kill screen daily is gone.
I followed a link from critical-distance.com to a blog post. That blog is gone. The domain is for sale. In the Wayback Machine, I found the link. It pointed to the comment section of another blog. The other blog has removed its comment sections and excluded itself from the Wayback Machine.
I wonder if games stuff is uniquely lost. Many links to game reviews at big sites lead to "page not found", but when I search the game's name, I can find the review from back in 2004. The content is still there, the content management systems have been changed multiple times.
At least my favourite tumblr about game design has been saved in the Wayback Machine: Game Design Tips.
To make my point I could list more sites, more links, 404 but archived, or completely lost, but when I look at small sites, personal sites, blogs, or even forums, I wonder if this is just confirmation bias. There must be all this other content, all these other blogs and personal sites. I don't know about tutorials for knitting, travel blogs, stamp collecting, or recipe blogs. I usually save a print version of recipes to my Download folder.
Another big community is fan fiction. They are like modding, but for books, I think. I don't know if a lot of fan fiction is lost to bit rot and link rot either. What is on AO3 will probably endure, but a lot might have gone missing when communities fandom moved from livejournal to tumblr to twitter, or when blogs moved from Wordpress to Medium to Substack.
I have identified some risk factors:
Personal home pages made from static HTML can stay up for while if the owner meticulously catalogues and links to all their writing on other sites, and if the site covers a variety of interests and topics.
Personal blogs or content management systems are likely to lose content in a software upgrade or migration to a different host.
Writing is more likely to me lost when it's for-pay writing for a smaller for-profit outlet.
A cause for sudden "mass extinction" of content is the move between social networks, or the death of a whole platform. Links to MySpace, Google+, Diaspora, and LiveJournal give me mostly or entirely 404 pages.
In the gaming space, career changes or business closures often mean old content gets deleted. If an indie game is wildly successful, the intellectual property might ge acquired. If it flops, the domain will lapse. When development is finished, maybe the devlog is deleted. When somebody reviews games at first on Steam, then on a blog, and then for a big gaming mag, the Steam reviews might stay up, but the personal site is much more likely to get cleaned up. The same goes for blogging in general, and academia. The most stable kind of content is after hours hobbyist writing by somebody who has a stable and high-paying job outside of media, academia, or journalism.
The biggest risk factor for targeted deletion is controversy. Controversial, highly-discussed and disseminated posts are more likely to be deleted than purely informative ones, and their deletion is more likely to be noticed. If somebody starts a discussion, and then later there are hundreds of links all pointing back to the start, the deletion will hurt more and be more noticeable. The most at-risk posts are those that are supposed to be controversial within a small group, but go viral outside it, or the posts that are controversial within a small group, but then the author says something about politics that draws the attention of the Internet at large to their other writings.
The second biggest risk factor for deletion is probably usefulness combined with hosting costs. This could also be the streetlight effect at work, like in the paragraph above, but the more traffic something gets, the higher the hosting costs. Certain types of content are either hard to monetise, and cost a lot of money, or they can be monetised, so the free version is deliberately deleted.
The more tech-savvy users are, the more likely they are to link between different sites, abandon a blogging platform or social network for the next thing, try to consolidate their writings by deleting their old stuff and setting up their own site, only to let the domain lapse. The more tech-savvy users are, the more likely they are to mess with the HTML of their templates or try out different blogging software.
If content is spread between multiple sites, or if links link to social network posts that link to blog post with a comment that links to a reddit comment that links to a geocities page, any link could break. If content is consolidated in a forum, maybe Archive team could save all of it with some advance notice.
All this could mean that indie games/game design theory/pixel art resources are uniquely lost, and games studies/theory of games criticism/literary criticism applied to games are especially affected by link rot. The semi-professional, semi-hobbyist indie dev, the writer straddling the line between academic and reviewer, they seem the most affected. Artists who start out just doodling and posting their work, who then get hired to work on a game, their posts are deleted. GameFAQs stay online, Steam reviews stay online, but dev logs, forums and blog comment sections are lost.
Or maybe it's only confirmation bias. If I was into restoring old cars, or knitting, or collecting stamps, or any other thing I'd think that particular community is uniquely affected by link rot, and I'd have the bookmarks to prove it.
Figuring this out is important if we want to make predictions about the future of the small web, and about the viability of different efforts to get more people to contribute. We can't figure it out now, because we can't measure the ground truth of web sites that are already gone. Right now, the small web is mostly about the small web, not about stamp collecting or knitting. If we really manage to revitalise the small web, will it be like the small web of today except bigger, the web-1.0 of old, or will certain topics and communities be lost again?
60 notes
·
View notes
Text
So I know how to code websites now, but idk how to upload it to the internet. My plan is to give you all a post that will update with a string of code to sort of visit the website(s?) that I am curating. I will reblog a post that had the original, and include a more patched version as time goes on. I am so sorry in advance.
Because of this.... Lemme show you how html and css works!!
For Project Our Realities, it will all be in html and css since that's what I'm learning so far. JavaScript will be included later.
HTML and CSS basics below!!
HTML, or Hyper-Text Markup Language is the basics of coding a website. It describes how a website will look. It unfortunately doesn't get you too far in terms of digital design, which is why we have languages like Css and javascript.
All HTML files start with <!DOCTYPE html>. This declares to the file that you will be coding in html rather than something like lua.
Each HTML file, after declaring it as an html file, starts with <HTML> and </HTML>. To end a tag, you must close it by adding a forward slash before writing its name (unless it is <br> or <hr>, or similar).
The <head> tag lets you add a title (silly little tab name), a favicon (silly little icon next to the name of the tab) and ways to link your CSS to the HTML.
An HTML file will look like this <!DOCTYPE html>
<html>
<head>
</head>
<body>
</body>
</html>
In the body, you can write the rest of your page, using headers (<h>/<h1-6>), paragraphs (<p>), and even forms (<form>).
--
CSS, also known as Cascading Style Sheets, is a type of coding language that is often used to create websites. No, it is not C++.
Rather than <>, CSS uses brackets {} to code.
CSS is used to style html websites, so it addresses html tags and lets you style their appearance. There is something known as inline CSS, where you can use the <style> tag to style something in your HTML file. HTML was never meant to have colors in its code, but you can change the color of text with inline css. Let's say you would like to style a header.
In your HTML file, it would say:
<!DOCTYPE html>
<html>
<head>
<link rel="stylesheet" href="(name of .css file goes here)">
</head>
<body>
<h1> My first header!!! :> </h1>
</body>
</html>
Now that we have our header, let's turn it red.
In your CSS file, it should say...
h1 {
color: red;
}
The H1 addresses that it will select all h1 elements. The code in the brackets shows that all those addressed will be the color red.
CSS has no starting or finishing lines, all elements will by stylized with {}.
--
To create an HTML file, you must end it with .HTML
To create a CSS file, you must end it with .css
Sometimes, when I create a link for the Css, the required name for the file will be in the HTML code already. Make sure that both files are in the same folder, and not one in a different folder within the same parent folder. This will not work.
--
Wanna test this out? Make a new notepad file on Windows, title it as "firsthtml.html", and create another file called "firstcss.css".
Place this in the .HTML file: <!DOCTYPE html>
<html>
<head>
<title> First HTML </title> <link rel="icon" type="image/x-icon" href="https://i.pinimg.com/736x/1a/8d/9d/1a8d9d26cdca15285d217c817f6953ec.jpg">
<link rel="stylesheet" href="firstcss.css">
</head>
<body> <h1>Welcome, traveler!!</h1>
<h3><I>Thank you for reading the tutorial!! Follow the blog to keep up with our news.</I><h3>
</body>
</html>
Now, for your .css file, write this down:
h1 {
color: dark blue;
}
h3 {
color: orange;
}
--
Thank you so much for following this tutorial. I mainly learned about this from w3schools and in my school course. Happy coding!!! :>
-ava
#.io#ava#ava our realities#io our realities#eps foundation#entertainment productions studio#project our realities#our realities#coding#html#HTML stuff#css#Css stuff#hyper text markup language#cascading style sheets#there will be more coding to come#I hope this helps you guys get into coding
3 notes
·
View notes
Text
HTML Tutorial: A Quick Overview
HTML (HyperText Markup Language) forms the backbone of web development, enabling the structure and presentation of content on the web. It’s a markup language that defines elements like headings, paragraphs, links, images, lists, and more, providing a standardized way to format and display information in browsers.
HTML uses tags, enclosed in angle brackets, to represent different types of content. Each tag typically comes in pairs, an opening tag and a closing tag, to wrap and describe the content in between. HTML is fundamental for building web pages, allowing developers to create structured documents with defined sections and multimedia elements.
One of HTML’s key features is its ability to create links, connecting different parts of the web. This hyperlinking capability is what makes HTML unique, forming the web as we know it today. Additionally, HTML supports embedding multimedia like images, videos, and audio, which brings pages to life.
As web standards evolve, HTML has grown, too, with the latest version being HTML5. This version introduced new elements that provide semantic meaning to the structure of web documents, ensuring that content is more accessible and well-organized.
fro more:https://quipoin.com/tutorial/HTML-tutorial
2 notes
·
View notes
Text
Hi, this is Creative School. Today we share with you how to generate PDF documents from any website. If you want to develop a website and want to provide PDF downloading features, you are exactly in the right place. This video will help you to insert a PDF generator feature in your website on any page of any specific size and shape. GitHub Link: https://github.com/BorhanHosen/How-to-add-pdf-file-download-option-in-your-website.git 0:00 Explanation 3:10 Intro 3:39 Explaining Puppeteer 7:12 Server Side Code Explanation 15:01 Client Side Code Explanation 26:21 Final Touch 28:18 Outro Here are some of our previous tutorial links. You can watch and learn new things and techniques. Enjoy them: How to Send Data from HTML Form Data to Google Sheets | Creative School https://youtu.be/A4TPkOw2Ess Mastering Full Invoice Inventory Management in Microsoft Excel | Creative School Tutorial https://youtu.be/f8BTxan1QTo Motion Graphics in PowerPoint Full Playlist: https://youtube.com/playlist?list=PLsWfHxHIjBT87YgBulwX6X-bnEk4TayQu How to Create the Best Animated Info-graphic in PowerPoint [Part-1] 2020 || Creative School || https://youtu.be/rV-mykyBQIM Awesome Flat Intro Animation In PowerPoint Part 2 || Creative School || https://youtu.be/TafoVSYadEg The Night Sky with a Mountain, fountain, a tree, Bird & Moon Creating in PowerPoint || Creative School || https://youtu.be/jyCTlxJrGyg SAMSUNG Galaxy Boot Animation in PowerPoint [Full Tutorial- 2020] https://youtu.be/pqh-P1mUNp8 How to make an intro video of 10-minute school in PowerPoint 2020. [Part 1] https://youtu.be/I1xObR_SVco Water Animation In PowerPoint Animation! || Creative School https://youtu.be/WfzKTzbGVRA How to add pdf file #download option in your #website https://youtu.be/cNhQ-0VBt5A ===HashTags=== #reactjs #creativeschool #pdfconversion #html #nodejs #vscode #website #javascript #convertpdf #generatepdf #pdfconverter #downloadpdf #puppeteers #mernstack #javascript ===Related Tags=== react pdf generator, generate pdf using react, generate pdfs from html & css with nodejs using puppeteer, certificate generator website, how to create a pdf file using reactjs, html to pdf using javascript, generate pdf from html, generate pdf using javascript, how to add pdf object on a website, how to convert html to pdf in react app using jspdf, easy way to embed pdfs on a website, how to convert html content to pdf in react app using jspdf, generate pdf with react, how to create a pdf with node and puppeteer, generate pdfs from html & css with nodejs using puppeteer, puppeteer, getting to know puppeteer with example, get started with headless chrome and puppeteer, headless chrome and puppeteer, how to generate pdf from html with node.js, how to create a pdf file using reactjs, generate pdf using javascript, how to create pdfs with node js and react, puppeteer examples, puppeteer tutorial, puppeteer html to pdf generation with node.js,
#react pdf generator#generate pdf using react#generate pdfs from html & css with nodejs using puppeteer#certificate generator website#how to create a pdf file using reactjs#html to pdf using javascript#generate pdf from html#generate pdf using javascript#how to add pdf object on a website#how to convert html to pdf in react app using jspdf#generate pdf with react#how to create a pdf with node and puppeteer#javascript#creativeschool#mernstack#puppeteer#website#download
3 notes
·
View notes
Text

Master HTML In-Depth: Create Your Own Website
Welcome to our comprehensive HTML tutorial series! Whether you're a beginner or looking to refresh your skills, this playlist covers everything you need to know about HTML tags and attributes. By the end of this series, you'll be equipped to build your own website from scratch.
Key Highlights:
1) HTML Fundamentals: Understand the basics of HTML, including tags, elements, and document structure.
2) Essential Tags: Dive into the most commonly used HTML tags, such as headings, paragraphs, lists, and links.
3) Attributes Demystified: Learn how to enhance your HTML elements with attributes, optimizing your website for better functionality and user experience.
4) Forms and Input: Explore the creation of interactive forms, enabling user engagement and data collection.
5) Multimedia Integration: Incorporate images, audio, and video seamlessly into your web pages.
6) Structural Elements: Master the use of divs, spans, and other structural elements to organize and style your content effectively.
7) SEO Best Practices: Implement SEO-friendly HTML practices to enhance your website's visibility on search engines.
8) HTML5 Features: Explore the latest HTML5 features, including semantic elements and advanced form controls.
By the end of this playlist, you'll have the skills and knowledge to bring your website vision to life. Let's code together and make your mark on the web!
Subscribe, like, and share this playlist to help others embark on their HTML journey. Happy coding!
1 note
·
View note
Text
Learn to Code
Daily Blogs 356 - Oct 26th, 12.024 Being someone who actually codes and is a software engineer, please learn how to code.
Why?
Before anything else, it is fun, even more if you like puzzles and solve problems, and you could find your future career even.
Nonetheless, coding is an enormous skill to have nowadays with every little job, task, and even hobby, having some sort of technology or another. How many times have you wanted to rename a bunch of files into a more structured form? Or even wanted to have a fast way to see all your tasks for the day? Maybe you are animating in After Effects (unfortunately) and want to make an object pulse following a song beat? Or maybe in your job you have to make spreadsheets in Excel (again, unfortunately) and need something more dynamic? Or maybe, you want to have your own simple website? All of these things can be done, and can be easier, knowing a little bit of coding/scripting.
Coding not only lets you do things in a faster way, it also helps you better understand the technology you use. Did you never think how the little applications that you use are made? Because they are, by humans, like me and you, and that's why they have bugs most of the time. Maybe learning to code, you can even start modding your favorite game! Or even create your own.
But Coding is Hard!
I'm going to be honest, yes, it can be hard. But we aren't talking about doing whole software products or even what could be called engineering, we are talking about scripting/coding, which is just creating files for some utilities, which is far from hard. And instead of trying to explain, let me show you some examples.
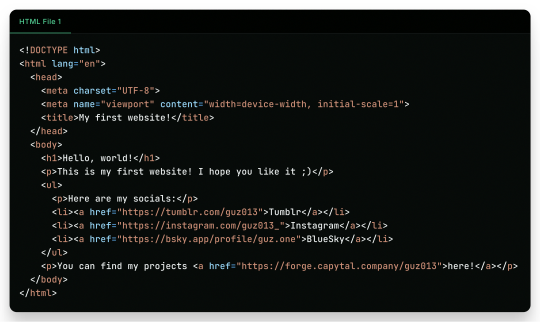
Creating a Website Yes, you heard me right, the first example is how to create a website, because you can do it in literally just a file:

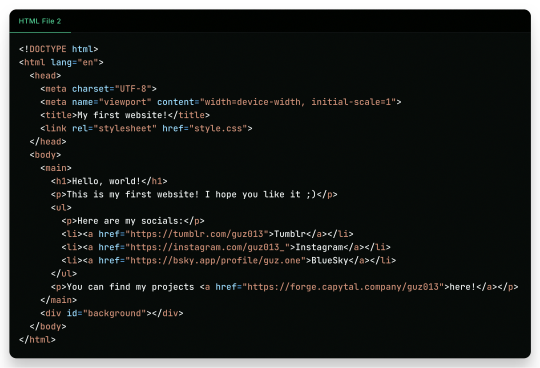
"But it is ugly!", well, just modify a little the first file, and add another file!
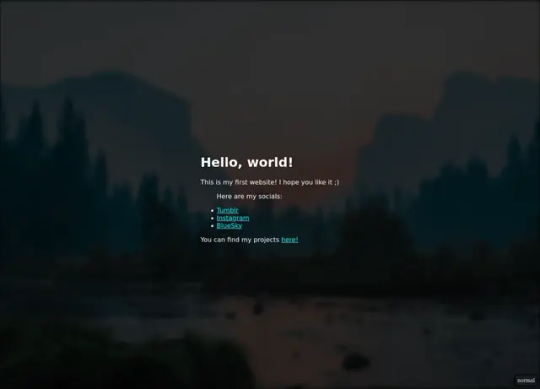
And there it is! Your own website. Now to put it into the internet to everyone to see it is nothing more than uploading these two files to a Web Hosting Service, which most of the simple ones are free! A few examples are GitHub Pages, Vercel, Netlify, all of them you can find easy tutorials to upload your files and have them for the web!
What Are Those Files?
Glad you asked! Let's go step by step.
The first file, the one full of <tags\/>, is what is called an HTML file. HTML (or Hypertext Markup Language) is the language used by all websites you visit, it is designed to structure text in such a way that you can easily put meaning and style into the document, and have you browser read it to show you. These files are marked up using tags, which encapsulate text with an opening tag (like this one <p>) and a closing tag (like this one </p>, see the slash before the letter P), looking like this <p>Hello world</p>. We have multiple types of tags, such as <p> for Paragraphs, <h1> for Heading/titles, <h2> for subheadings/subtitles, <link> for linking one file to another, <ul> for an Unsorted List, which will have <li> for each List Item, <main> for informing what's the main content, <a> for an Anchor/hyperlink for another website, etc. etc. All HTML files will have an <html> encapsulating everything, a <head> tag for information about the page, and a <body> tag for the content of the page. That's pretty much how HTML works, and all you need is to learn what tag does what, and you're pretty much good to go.
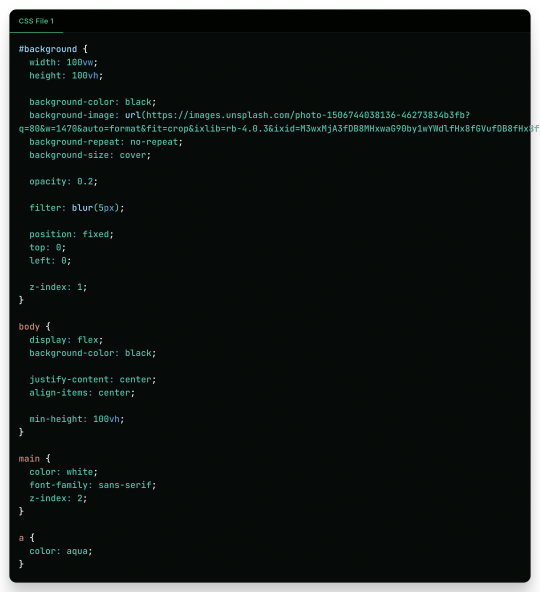
In the second file, we just add some structure to it better, adding a <main> tag and a <div> tag with the ID "background", so the third file, the stylesheet, can make it look pretty! The third file, the one with the {} blocks, is a CSS (or Cascading Style Sheets) file, and it is the one that makes all of our websites beautiful. It is made by these "blocks" of code that applies styles for multiple elements in the page, it is a little bit more hard to explain, but in summary, that file does this:
The "#background" block applies styles to any tag with ID "background". In the example, we make the tag have 100% of the view width (width: 100vw) and 100% of the view height (height: 100vh); make the background be an Unsplash image; decrease the opacity, so the image is not so bright; apply a blur filter; and make its position be absolute in the top left corner, so it doesn't move with the rest of the content;
The "body" block applies styles to the tag and makes it display its content on a flexible layout (display: flex), which we use to make the content be centralized in the page;
We then make the text-color inside the tag white, use a sans font, and make it be in front (z-index: 2) of the tag (see the z-index: 1 in the "#background" block);
And to finish off, we make the color of links an aqua color.
That's pretty much it and pretty much how the fundamentals of how to create a website works. Just 2 files of code, and you can have your own website.
But Where Are the Loops? Where Are the "if"s?
Yes, yes, if you know the concept of coding, you may be asking where are all the loops, "if"s, and variables. Truth be told is that HTML and CSS aren't programming language per-say, they are markup languages to structure and display text, so they can't run anything really. However, they are easy to understand and are considered "code" nonetheless, and personally I find fascinating that websites, the thing we all access every single day, that most people I know think is magic… are based in two simple languages that anyone can learn in an afternoon and have its own website up and running in less than a day.
I Want real code!
Ok ok! Let's so add a little interactivity into our website. What about a little character you can control? Yes, a little game character to control with WASD on your website, with less than 40 lines of code. Let's first update the HTML file so we can add the character:
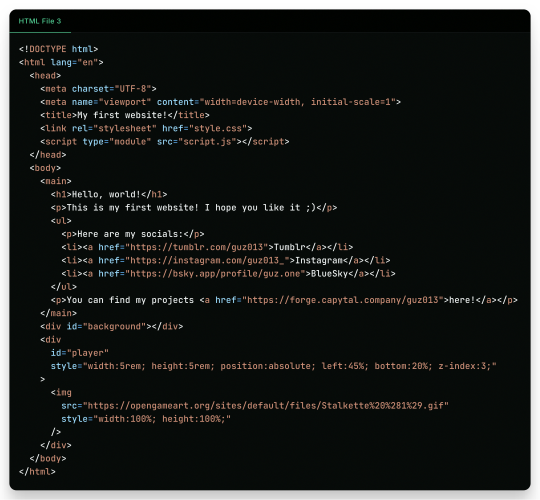
As you can see in the new file, we just added another <div> tag on the website, with the ID "player" and a <img> tag which we can use to add a visual sprite to our character! I'm using this simple sprite/gif I found on OpenGameArt.org. Also, in the new <div> we add some CSS styling directly in the tag, using the style attribute, the reason to this being that here we can manipulate its value with a programming language, in the case of the web, JavaScript. We add the JavaScript file with a <script> tag.
And in the JavaScript file, we can write this simple script:
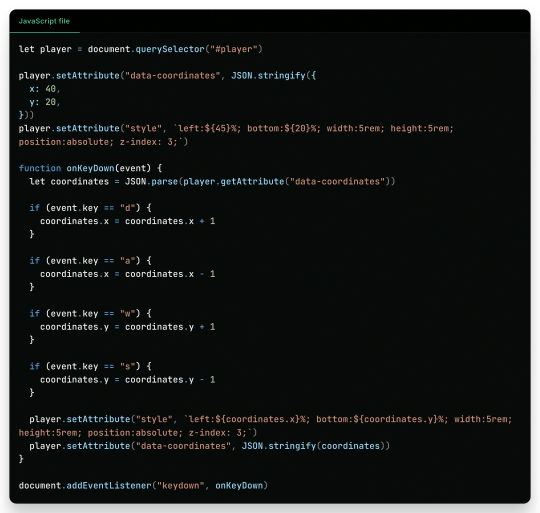
This can be a little overwhelming, but let's go line by line:
First, we get the player element/tag with document.querySelector("#player") (similar on how in CSS we would use #player {} to style the tag). This tag is then saved into a variable player, think of it like a box or alias for document.querySelector("#player"), so when we use something like player.setAttribute it can be thought like document.querySelector("#player").setAttribute;
After that, we use player.setAttribute("data-coordinate", JSON.stringify({ x: 40, y: 20 })). This is just so we can more easily access the coordinates of the player after. An attribute is like that style in the tag, so calling this is like we wrote in the HTML file;
We again call player.setAttribute, but this time to rewrite the value of the style attribute, just to be sure. See how in the text for the style tag (the 2nd argument, aka the left: ${45}%; bottom:${20}%; ...), we use ${}? Well, this is a neat feature that lets us put values inside the text, so it makes the final result be left: 40%; bottom 20% ..., in this line it seems a little redundant, but in later in the lines we will use it more cleverly. Just remember that if we make a variable, a "box", like let x = 10 and use it inside the text like left: ${x}%, it would be in the end left: 10%;
Now the meat of the script, the "onKeyDown" function. A "function" in programming is like a piece of code you can reuse, and pass variables to it to use inside the code, like a box you can put stuff inside to it to do things, a box that uses other boxes, a box inception. Inside the "onKeyDown" function, we take back the value inside that data-coordinates attribute we wrote on the 3rd line, and put it inside the coordinates variable; than, we check if the key pressed is "d", if so, we add 1 to the X coordinate, we are changing the value of coordinate.x; we check for the other keys like "a", "w" and "s", changing the according variable to it; and then, we rewrite both the style attribute and data-coordinates attribute with the new value;
And finally, we use document.addEventListener("keydown", onKeyDown) to tell the browser "hey! Use this function ("onKeyDown") when a key is pressed!".
And that's pretty much it.
As you can see in the top right corner, the values of the style and data-coordinate attribute change when we press a key!
If you want to access this simple website, this is the live version of it hosted on GitHub Pages and the source-code is available under the public domain.
Learning More
Being honest, what I showed here is just a very small toy project, and a lot is simplified because of the gigantic convenience that the browser provides nowadays. But again, this is the type of thing you can do with just a little bit of knowledge on how to code, probably the scripts you will do can be even simpler than this. And just imagine the things you can invent, learning a little bit more!
Besides the toy project, code can be used in a lot of fields:
If you work on data or science in general, coding in Python is a great skill to have on your toolkit, and it is very easy to learn. It works great with creating graphs and can even be used inside Excel for creating more dynamic spreadsheets;
Do you want to make games? Well, learn something like Lua, a very simple language and one of my favorites for scripting, and powerful enough to be chosen by engines like Roblox Studio (which surprisingly is powerful than I thought). But if Roblox is not your taste, well, learn something like GDScript, the language of the Godot game engine, fully free, fully open;
Also, Lua is used for modding on games such as Factorio, and can be very powerful for small scripts for your computer;
If you want to make websites, HTML, CSS and JavaScript, learn them and go nuts (I won't recommend you use any framework as other programmers use, learn the fundamentals first). There are a lot of documentation about the web, and it is one of the fields with the lowest entry;
Are you an 3D Artist? Well then, Python is also the language used for creating add-ons, you can take some time to learn and create your owns to help your workflow!
And if you are a poor soul who is using Adobe products, first: my condolences; second, most Adobe products use ActionScript to create dynamic animations and values such as making an element react to music beats in After Effects.
---
Learn to code, be happy, and maybe you will find a new passion like I did.
Today's artists & creative things Music: Late Night Walk - by Ichika Nito
© 2024 Gustavo "Guz" L. de Mello. Licensed under CC BY-SA 4.0
please learn how to code
like, if you're bored today, and not doing anything,
learn a little bit of coding please
35K notes
·
View notes
Text
JavaScript Tutorial for Students and Freshers

In today’s digital era, web development is one of the most sought-after skills, and at the heart of every interactive website lies JavaScript. Whether you're a student pursuing computer science or a fresher looking to enter the tech industry, understanding JavaScript is a key step in becoming a competent web developer. This JavaScript tutorial for students and freshers will guide you through the basics, making it easy to get started and build your first interactive web page.
What is JavaScript?
JavaScript is a powerful, high-level scripting language used primarily to create dynamic and interactive features on websites. It runs in the browser and allows developers to manipulate content, respond to user inputs, and communicate with servers — all without needing to reload the page.
JavaScript is one of the core technologies of the web, alongside HTML and CSS. While HTML structures the content and CSS styles it, JavaScript brings it to life.
Why Students and Freshers Should Learn JavaScript
If you are just starting your journey into programming or web development, JavaScript is one of the best languages to learn. Here’s why:
Easy to learn: JavaScript has a beginner-friendly syntax.
Used everywhere: It works in all modern web browsers.
In-demand skill: Almost every company building web apps uses JavaScript.
Foundation for frameworks: React, Angular, and Vue are based on JavaScript.
Great for projects: Helps in creating interactive portfolios, calculators, games, and web apps.
Getting Started with JavaScript
To start writing JavaScript, you don’t need any fancy tools. All you need is a web browser (like Chrome or Firefox) and a text editor (like VS Code, Notepad++, or Sublime Text).
Add JavaScript to an HTML Page
<!DOCTYPE html> <html> <head> <title>My First JavaScript Page</title> </head> <body> <h1>Hello JavaScript!</h1> <script> alert("Welcome, Student!"); console.log("This is your first JavaScript script!"); </script> </body> </html>
This example shows how easy it is to insert JavaScript into a webpage using the <script> tag.
Basic JavaScript Concepts Every Beginner Should Know
1. Variables
Variables store data. You can use let, const, or var (though let and const are preferred in modern JS).let name = "Amit"; const age = 21;
2. Data Types
Common types:
String: "hello"
Number: 100
Boolean: true or false
Array: [1, 2, 3]
Object: {name: "Amit", age: 21}
3. Functions
Functions are reusable blocks of code.function greet() { alert("Hello, student!"); } greet();
4. Conditionals
let score = 85; if (score > 80) { console.log("Excellent!"); } else { console.log("Keep trying!"); }
5. Loops
for (let i = 1; i <= 5; i++) { console.log("Number: " + i); }
DOM Manipulation (Document Object Model)
JavaScript allows you to interact with HTML elements using the DOM.<button onclick="changeText()">Click Me</button> <p id="demo">Original text</p> <script> function changeText() { document.getElementById("demo").innerHTML = "Text changed!"; } </script>
This example changes the paragraph text when the button is clicked — a simple but powerful interaction.
Simple Project Ideas for Students
Practicing with real-world mini-projects helps reinforce your learning. Try building these:
To-Do List App – Add, delete, and mark tasks as complete.
Calculator – A basic calculator for addition, subtraction, etc.
Quiz App – Multiple-choice questions with score calculation.
Digital Clock – Displays current time updating every second.
Form Validation – Check user input like email and password fields.
These projects not only improve your JavaScript skills but also make great additions to your resume or portfolio.
Tools and Resources for Learning
Online Editors: JSFiddle, CodePen, Replit
Documentation: MDN Web Docs
YouTube Channels: Programming with Mosh, FreeCodeCamp, Traversy Media
Courses: Codecademy, Coursera, Udemy (look for beginner JavaScript courses)
Books: Eloquent JavaScript, JavaScript & JQuery by Jon Duckett
JavaScript in the Real World
JavaScript is not limited to client-side browser code. With technologies like Node.js, it’s also used for backend development. Other popular uses include:
Web Development (Frontend & Backend)
Mobile App Development (React Native)
Game Development
Automation and Scripting
APIs and Server Communication
As a fresher or student, learning JavaScript opens doors to multiple career paths in tech.
What’s Next After Learning JavaScript?
Once you’re confident with the basics of JavaScript, you can explore:
ES6 and Modern JavaScript
JavaScript Frameworks (React.js, Angular, Vue.js)
AJAX and APIs – For dynamic data fetching
Node.js – To build server-side applications
Full-Stack Development – Combine JavaScript with HTML/CSS, MongoDB, Express, and Node.js (MERN Stack)
Final Thoughts
This JavaScript tutorial for students and freshers is just the beginning of your journey into web development. JavaScript is not only essential for making websites interactive but also a gateway to understanding advanced programming concepts and full-stack development.
If you dedicate time each day to learning and practicing JavaScript, you'll build a strong foundation that can lead to internships, freelance gigs, and full-time developer roles. Remember: consistency beats complexity. Start small, build projects, and keep coding!
0 notes
Text
best WordPress course in Jalandhar
TechCADD presents the best WordPress course in Jalandhar, Punjab. Excel in website development and management with expert support for all skill levels!
https://techcadd.com/best-wordpress-course-in-jalandhar.php
A WordPress course offers a comprehensive pathway for individuals interested in creating, managing, and optimizing websites without needing deep coding knowledge. As the world’s most popular content management system (CMS), WordPress powers over 40% of all websites on the internet, making it an essential skill for web developers, bloggers, entrepreneurs, and digital marketers. A well-structured WordPress course introduces learners to the fundamentals of website creation, beginning with domain name registration, hosting selection, and WordPress installation—either manually or through a hosting provider’s one-click setup tools. From there, students explore the WordPress dashboard, learning how to navigate menus, customize themes, and install essential plugins to enhance site functionality. These courses typically cover both WordPress.com (hosted) and WordPress.org (self-hosted), explaining the pros and cons of each so learners can choose the best option for their goals.
As learners progress, they’re guided through designing pages and posts using the block-based Gutenberg editor or classic editor, with hands-on exercises on formatting content, embedding media, creating menus, and using widgets for added interactivity. Understanding how to structure a website for both user experience (UX) and search engine optimization (SEO) is a core focus, with tutorials on permalinks, categories, tags, and metadata. Many WordPress courses also introduce learners to theme customization, where they can explore both free and premium themes, and learn to adjust colors, fonts, layouts, and logos to match their branding or design goals. Some advanced courses even include lessons on using page builders like Elementor or Beaver Builder for drag-and-drop website creation, making the design process accessible to non-designers.
Beyond design, a strong WordPress course dives into functionality—teaching students how to install and configure plugins to expand their site’s features. This includes plugins for SEO (like Yoast or Rank Math), security (such as Wordfence), backups (like UpdraftPlus), contact forms, social sharing, eCommerce, and analytics. By using plugins effectively, learners can add professional-level features to their websites without writing a single line of code. Additionally, courses often touch on performance optimization, covering techniques like caching, image compression, and mobile responsiveness to ensure websites load quickly and perform well on all devices.
For those interested in online business, many WordPress courses offer dedicated modules on setting up eCommerce stores using WooCommerce, the platform’s most popular online store plugin. Learners get step-by-step guidance on how to list products, set prices, manage inventory, configure payment gateways, calculate taxes and shipping, and manage customer orders. They also explore marketing integrations, such as email list building, customer reviews, coupons, and abandoned cart recovery—all crucial for building a successful online business.
Another important aspect covered in WordPress courses is website security and maintenance. Students are taught best practices to protect their websites from malware, spam, and unauthorized access. Lessons typically include how to keep WordPress, themes, and plugins updated, use secure passwords, install SSL certificates, and schedule regular backups. Additionally, students learn about GDPR compliance and how to ensure their sites meet privacy regulations by incorporating cookie notices, privacy policies, and data handling practices.
Many modern WordPress courses also address basic HTML, CSS, and even introductory PHP for those who want to move beyond pre-built tools and gain more control over customization. This allows learners to make specific changes to theme files or child themes, troubleshoot errors, and create custom functionality. While not mandatory, this knowledge enhances the learner’s confidence and opens the door to freelance web development or offering client services.
The flexibility of WordPress means that learners can use their skills in a wide range of projects, from blogs and portfolios to business websites, nonprofit platforms, and educational sites. A good WordPress course encourages project-based learning, where students build real websites from scratch, apply new concepts, and receive feedback. These hands-on projects not only reinforce learning but also help students build a portfolio they can use to showcase their skills to potential clients or employers.
In addition to technical skills, many WordPress courses offer guidance on launching and maintaining a career or freelance business. This includes tips on pricing web design services, managing client relationships, creating contracts, and using platforms like Fiverr, Upwork, or personal websites to attract business. With WordPress development in high demand, completing a course can be the first step toward a rewarding and flexible career in tech or digital entrepreneurship.
WordPress courses are available in various formats—self-paced video tutorials, instructor-led classes, bootcamps, or even university-affiliated certifications. Platforms like Udemy, Coursera, LinkedIn Learning, Skillshare, and local training centers offer a wide selection of WordPress courses catering to beginners through to advanced users. Some courses include certification upon completion, which can be added to resumes or LinkedIn profiles to validate one's skills.
In conclusion, a WordPress course equips learners with the tools and knowledge needed to build professional, functional, and attractive websites—without requiring deep programming experience. It covers everything from setting up a basic blog to launching a full-fledged online store, all while emphasizing usability, performance, and scalability. Whether you're a student, entrepreneur, freelancer, or career changer, learning WordPress opens the door to countless opportunities in the digital space, offering a valuable and future-proof skillset in an increasingly online world.
#WordPress#WP#WordPressSite#WordPressBlog#WordPressDeveloper#WordPressDesign#WordPressThemes#WordPressPlugins
0 notes
Text
Types of Digital Marketing
Digital marketing refers to the promotion of products or services using digital channels, primarily on the internet. As businesses and consumers increasingly rely on digital platforms, various forms of digital marketing have evolved to target audiences more effectively. Below are the main types of digital marketing:

1. Search Engine Optimization (SEO)
SEO is the process of optimizing a website to improve its visibility in search engine results pages (SERPs). The goal is to increase organic (non-paid) traffic by targeting relevant keywords. SEO includes on-page tactics like optimizing content and HTML tags, off-page techniques like link-building, and technical SEO such as improving site speed and mobile responsiveness.

2. Search Engine Marketing (SEM) / Pay-Per-Click (PPC)
SEM refers to paid advertising on search engines like Google. The most common form is PPC, where advertisers pay a fee each time their ad is clicked. Google Ads is the leading platform for PPC. This method offers immediate visibility and allows for precise targeting based on keywords, location, demographics, and user behavior.
3. Social Media Marketing (SMM)
SMM involves using social media platforms such as Facebook, Instagram, Twitter, LinkedIn, and TikTok to engage with audiences and promote products or services. Businesses use organic posts, paid ads, influencer partnerships, and interactive content to increase brand awareness, generate leads, and drive sales.
4. Content Marketing
Content marketing focuses on creating valuable, relevant content to attract and retain a clearly defined audience. This includes blog posts, videos, infographics, podcasts, eBooks, and more. Instead of directly promoting a product, content marketing aims to provide useful information that builds trust and nurtures customer relationships.
5. Email Marketing
Email marketing involves sending targeted emails to a list of subscribers to promote products, share news, or nurture leads. Effective email marketing includes newsletters, promotional campaigns, drip campaigns, and personalized messages based on user behavior. It remains one of the most cost-effective digital marketing strategies.
6. Affiliate Marketing
Affiliate marketing is a performance-based strategy where businesses reward affiliates (partners) for driving traffic or sales through their referrals. Affiliates use their platforms—like blogs, YouTube channels, or social media—to promote a business’s products and earn commissions on resulting sales.
7. Influencer Marketing
Influencer marketing leverages individuals with large followings on social media or other platforms to promote products or services. By collaborating with influencers, brands can reach niche audiences, increase credibility, and drive conversions through authentic endorsements.
8. Mobile Marketing
This form targets users on smartphones and tablets through SMS, app notifications, in-app ads, and mobile-friendly websites. Mobile marketing ensures that users receive tailored messages based on their location, preferences, or behavior on mobile devices.
9. Video Marketing
Video marketing involves creating and sharing videos to promote a brand or product. Platforms like YouTube, TikTok, and Instagram Reels are popular for this. Video content can range from product demos to tutorials, customer testimonials, and live streams.
In conclusion, digital marketing offers a wide range of tools and strategies to connect with audiences across different channels. By understanding and integrating these various types, businesses can create powerful, multi-channel marketing campaigns that drive real results.
1 note
·
View note
Text
Unlock Success with the Ultimate Google Tag Manager Course: Beginner to Advanced!!

If you've ever wanted to track what users are doing on your website, fire custom events, or optimize ad performance without constantly relying on a developer, then you’ve probably heard about Google Tag Manager (GTM). But knowing about GTM and actually mastering it are two very different things.
Enter the Ultimate Google Tag Manager Course: Beginner to Advanced—a comprehensive training that can literally change how you handle analytics, tags, and online marketing performance.
Whether you're new to digital marketing or already knee-deep in SEO, PPC, or web analytics, this course could be your game-changer.
Why Google Tag Manager Is a Must-Have Skill Today
Imagine being able to control and deploy your marketing and analytics tags with no code changes needed from developers. GTM allows you to manage:
Google Analytics tags
Conversion tracking pixels
Remarketing tags
Event tracking
Custom HTML/JavaScript
And much more—all from one central dashboard
It’s no wonder GTM has become a go-to tool for digital marketers, entrepreneurs, and businesses of all sizes. But just installing GTM isn’t enough—you need the skills to unlock its full power.
And that's where the Ultimate Google Tag Manager Course: Beginner to Advanced comes in.
What Makes This Course the “Ultimate” Solution?
There are many GTM tutorials floating around the web. So what sets this course apart?
This isn’t just a surface-level overview. It’s a deep, hands-on journey that takes you from the absolute basics to advanced implementations—all in one place. Here’s why this course stands out:
✅ Structured Learning Path
Starting from zero? No problem. This course is designed in logical modules that build on each other. You’ll start with:
What is GTM?
Setting up your GTM account
Installing GTM on your website
Then, you’ll quickly move into practical use cases, including:
Tracking clicks, form submissions, and downloads
Creating custom events
Setting up tags, triggers, and variables
Debugging with GTM’s preview mode
✅ Advanced Lessons That Most Courses Skip
Most free resources stop after basic tracking. This course? It goes deep.
You’ll learn:
Cross-domain tracking
Enhanced eCommerce tracking
Integrating GTM with Google Analytics 4 (GA4)
Data Layer mastery
Custom JavaScript for advanced use cases
And yes—you’ll get to create, test, and deploy real tags.
✅ Easy to Follow, No Jargon
No matter your background, the instructions are clear, conversational, and visual. It doesn’t drown you in buzzwords. Instead, it shows you how things work with real-world examples.
✅ Real Results, Not Just Theory
By the end of this course, you won’t just know GTM—you’ll use it confidently. You’ll be able to:
Set up precise conversion tracking for ads
Capture user behavior for CRO insights
Manage all tracking needs without developer delays
Improve your website’s marketing performance
Who Is This Course Perfect For?
This isn’t a course just for coders or techies. It’s for anyone who wants more control and clarity when it comes to website analytics and marketing.
✅ Marketers
Track campaigns like a pro. Never miss a conversion again.
✅ Business Owners
Understand what works on your website—and what doesn’t.
✅ Web Analysts
Get clean, actionable data, faster.
✅ Freelancers & Consultants
Offer GTM as a premium service and boost your value instantly.
✅ Developers
Get insights into marketing workflows without having to manage every tag request.
Practical Projects Included
The course isn’t just slides and talking heads. You’ll get to apply what you learn in live environments.
Example projects include:
Tracking outbound link clicks
Setting up scroll depth tracking
Measuring video engagement
Setting up Facebook and LinkedIn remarketing pixels
Integrating GTM with tools like Hotjar, Crazy Egg, and more
These aren’t “demo” projects—they’re real-life applications you’ll use in your job or business.
Why GTM Skills Can Skyrocket Your Career
The digital space is evolving fast, and businesses want people who understand how to track and measure online actions. GTM is one of the most requested skills in digital marketing job descriptions right now.
And yet, few professionals actually master it.
With this course on your resume, you’ll:
Stand out in marketing job interviews
Charge more as a freelancer
Deliver better results for clients
Save hours of dev time in any project
You don’t need a tech background. You need the right training—and this course provides it.
What's Inside the Curriculum?
Let’s take a sneak peek at the modules offered inside the Ultimate Google Tag Manager Course: Beginner to Advanced:
Module 1: Getting Started
What is GTM?
GTM vs. Google Analytics
Installing GTM on a site
Module 2: Core Concepts
Tags, triggers, and variables explained
The GTM interface walkthrough
Creating your first tag
Module 3: Event Tracking
Click tracking (buttons, links)
Form submissions
Scroll tracking and engagement
Module 4: Enhanced eCommerce
GA4 eCommerce setup
Tracking product views and checkouts
Using the Data Layer
Module 5: Integrations
Google Ads, Facebook Pixel, LinkedIn Insights
CRM tracking (HubSpot, Salesforce)
Third-party scripts and custom HTML tags
Module 6: Debugging & Testing
Preview and Debug mode
Chrome GTM extension
Troubleshooting tag errors
Module 7: Going Advanced
Cross-domain tracking
Custom JavaScript functions
Server-side GTM basics
Bonus Materials
Pre-built GTM templates
Tag firing checklists
Best practices for tag governance
Learn from an Expert, Not a Blogger
What makes this course even more valuable is who teaches it. The instructor is a seasoned GTM expert with hands-on experience in enterprise-level implementations. This isn’t recycled content—it’s tested frameworks and proven strategies.
The explanations are not just theoretical. They're based on real-world problems and actual campaign optimization workflows.
Mobile Friendly, Lifetime Access, Certificate Included
You can take the course:
On desktop or mobile
At your own pace
Anytime, anywhere
And once you finish, you’ll receive a certificate of completion—a great addition to your LinkedIn profile or freelance portfolio.
The Investment That Pays for Itself
For the price of a dinner or two, this course can unlock:
Career opportunities
Better marketing results
Smarter data insights
Developer independence
Not to mention—peace of mind knowing you finally understand what’s happening with your site’s tracking.
And let’s be honest: learning GTM from scratch through YouTube or trial-and-error could take months. This course saves you time, confusion, and missed opportunities.
What Learners Are Saying
Here’s what actual students have shared about their experience:
💬 “I thought GTM was too technical. This course made it crystal clear. I’ve now implemented conversion tracking for 5 clients—without any help from devs!” — Emily D., Digital Strategist
💬 “I landed a remote job with a US agency after showcasing the GTM setup I learned in this course.” — Rahul K., Freelancer
💬 “I finally understand the difference between a trigger and a variable. That alone made the course worth it!” — Sandra M., eCommerce Founder
Final Thoughts: Your Next Step to Digital Mastery
It’s clear—GTM isn’t just another tool. It’s a foundational skill in modern digital marketing. But mastering it doesn’t have to be hard or frustrating.
With the Ultimate Google Tag Manager Course: Beginner to Advanced, you get:
✅ A roadmap from basics to expert ✅ Hands-on projects you can use today ✅ Clear, non-technical explanations ✅ Long-term career and business benefits
So don’t waste another campaign wondering whether your tracking is working. Own your analytics. Upgrade your strategy. Be the expert your business or team needs.
Ready to take control of your marketing stack?
👉 Enroll in the Ultimate Google Tag Manager Course: Beginner to Advanced today and transform how you measure success online.
0 notes
Text
Master JavaScript: Step-by-Step Tutorial for Building Interactive Websites
JavaScript Tutorial

Master JavaScript: Step-by-Step Tutorial for Building Interactive Websites
In the evolving world of web development, JavaScript remains one of the most powerful and essential programming languages. Whether you're building simple webpages or full-fledged web applications, JavaScript gives life to your content by making it interactive and dynamic. This JavaScript Tutorial offers a beginner-friendly, step-by-step guide to help you understand core concepts and begin creating responsive and engaging websites.
What is JavaScript?
JavaScript is a lightweight, high-level scripting language primarily used to create dynamic and interactive content on the web. While HTML structures the webpage and CSS styles it, JavaScript adds interactivity—like handling clicks, updating content without refreshing, validating forms, or creating animations.
Initially developed for client-side scripting, JavaScript has evolved significantly. With the rise of environments like Node.js, it is now also used for server-side programming, making JavaScript a full-stack development language.
Why Learn JavaScript?
If you're looking to become a front-end developer or build web-based applications, JavaScript is a must-have skill. Here’s why:
It runs on all modern browsers without the need for plugins.
It’s easy to learn but incredibly powerful.
It works seamlessly with HTML and CSS.
It powers popular frameworks like React, Angular, and Vue.js.
It’s in high demand across the tech industry.
This JavaScript Tutorial is your gateway to understanding this versatile language and using it effectively in your web projects.
Getting Started: What You Need
To start coding in JavaScript, all you need is:
A modern browser (like Chrome or Firefox)
A text editor (such as Visual Studio Code or Sublime Text)
Basic knowledge of HTML and CSS
No complex setups—just open your browser and you're ready to go!
Step 1: Your First JavaScript Code
JavaScript code can be embedded directly into HTML using the <script> tag.
Example:<!DOCTYPE html> <html> <head> <title>JavaScript Demo</title> </head> <body> <h1 id="demo">Hello, World!</h1> <button onclick="changeText()">Click Me</button> <script> function changeText() { document.getElementById("demo").innerHTML = "You clicked the button!"; } </script> </body> </html>
Explanation:
The onclick event triggers the changeText() function.
document.getElementById() accesses the element with the ID demo.
.innerHTML changes the content of that element.
This simple example showcases how JavaScript can make a static HTML page interactive.
Step 2: Variables and Data Types
JavaScript uses let, const, and var to declare variables.
Example:let name = "Alice"; const age = 25; var isStudent = true;
Common data types include:
Strings
Numbers
Booleans
Arrays
Objects
Null and Undefined
Step 3: Conditional Statements
JavaScript allows decision-making using if, else, and switch.let age = 20; if (age >= 18) { console.log("You are an adult."); } else { console.log("You are a minor."); }
Step 4: Loops
Use loops to execute code repeatedly.for (let i = 0; i < 5; i++) { console.log("Iteration:", i); }
Other types include while and do...while.
Step 5: Functions
Functions are reusable blocks of code.function greet(name) { return "Hello, " + name + "!"; } console.log(greet("Alice")); // Output: Hello, Alice!
Functions can also be anonymous or arrow functions:const greet = (name) => "Hello, " + name;
Step 6: Working with the DOM
The Document Object Model (DOM) allows you to access and manipulate HTML elements using JavaScript.
Example: Change element style:document.getElementById("demo").style.color = "red";
You can add, remove, or change elements dynamically, enhancing user interaction.
Step 7: Event Handling
JavaScript can respond to user actions like clicks, keyboard input, or mouse movements.
Example:document.getElementById("myBtn").addEventListener("click", function() { alert("Button clicked!"); });
Step 8: Arrays and Objects
Arrays store multiple values:let fruits = ["Apple", "Banana", "Mango"];
Objects store key-value pairs:let person = { name: "Alice", age: 25, isStudent: true };
Real-World Applications of JavaScript
Now that you have a basic grasp, let’s explore how JavaScript is used in real-life projects. The applications of JavaScript are vast:
Interactive Websites: Menus, image sliders, form validation, and dynamic content updates.
Single-Page Applications (SPAs): Tools like React and Vue enable dynamic user experiences without page reloads.
Web Servers and APIs: Node.js allows JavaScript to run on servers and build backend services.
Game Development: Simple 2D/3D browser games using HTML5 Canvas and libraries like Phaser.js.
Mobile and Desktop Apps: Frameworks like React Native and Electron use JavaScript for cross-platform app development.
Conclusion
Through this JavaScript Tutorial, you’ve taken the first steps in learning a foundational web development language. From understanding what is javascript is now better.
As you continue, consider exploring advanced topics such as asynchronous programming (promises, async/await), APIs (AJAX, Fetch), and popular frameworks like React or Vue.
0 notes
Text

💻 Start Your Coding Journey – Learn HTML with Us! 🚀 Ready to build your first website? It all begins with HTML – the foundation of every webpage. Join us and master the building blocks of the web in a simple, engaging, and beginner-friendly way. Whether you're a student, professional, or curious learner, our step-by-step tutorials and hands-on projects will help you gain practical skills and real confidence in coding. From structuring pages to adding images, links, and forms – you'll learn how the internet really works. No experience? No problem! With expert guidance and interactive lessons, we’ll help you unlock the world of web development one tag at a time.
🌐 Build your future, one line of code at a time. Learn HTML today!
#LearnHTML #CodingForBeginners #WebDevelopment #HTMLBasics #CodeWithUs #TechSkills #FrontendDevelopment #BuildWebsites #DigitalSkills #LearnToCode #FutureInTech #HTMLTraining #ProgrammingJourney #WebDesignStart #CodeLife
0 notes
Text
How to Build an Instagram Clone App and Website using PHP and MySQL

This comprehensive blog post serves as a step-by-step guide to building an Instagram-style social networking platform using PHP and MySQL. It emphasizes not just replicating Instagram’s core functionality but also understanding and customizing it for your unique project or brand vision. Aimed at developers eager to expand their full-stack skills, the tutorial walks through creating a complete backend system while allowing room for front-end creativity.
An Instagram clone, as defined in the blog, replicates basic features such as user registration, photo uploads, comments, likes, and feeds. While it doesn’t match the full scale of the original app, building a clone provides a strong foundation in web development and architecture. The main advantage lies in saving time and resources - developers don’t have to code core functionalities from scratch, which makes for a faster launch and more room for custom features.
The blog outlines 10 essential steps to building the app:
Development Environment – Set up using tools like XAMPP or WAMP.
Database Creation – Design scalable tables for users, posts, likes, and comments.
User Authentication – Build secure login and registration forms with password hashing.
User Profile System – Enable photo uploads, bio edits, and privacy controls.
Post & Feed System – Implement photo uploads and display them in a dynamic feed.
Interaction Features – Add comment and like capabilities.
Front-End Design – Use HTML, CSS, and JavaScript to build a responsive UI.
Search and Tagging – Add hashtag and user search functionality.
Testing & Debugging – Use PHP tools to fix bugs before launch.
Deployment – Host the app on a scalable live server.
For those wanting faster results, the blog also recommends using ready-made Instagram clone scripts, particularly highlighting SocialEngine and phpFox. SocialEngine stands out as a scalable, professional solution with rich customization options, mobile plugins, SEO optimization, and robust API support.
Key benefits of using SocialEngine include:
Insta Clone Theme for a sleek UI
Cross-platform mobile support with Android and iOS plugins
SEO-friendly architecture for better visibility
Developer-friendly modular framework
Built-in analytics to monitor engagement
Third-party API integrations for added functionality
In conclusion, whether building from scratch or using a script like SocialEngine, creating an Instagram clone is an excellent real-world project for mastering social app development. It equips developers with critical skills in both back-end infrastructure and front-end design. The guide encourages experimentation and growth, and it also recommends exploring additional tutorials like building LinkedIn or Twitter clones using similar technology stacks.
For more details, kindly visit:- How to Build an Instagram Clone App and Website using PHP and MySQL
Mail us at [email protected] to schedule a quote and become the owner of your Insta Clone app and website.
0 notes
Text
Exploring Webflow’s Pros and Cons
Did you know that 68% of website visitors will leave a site if it’s not mobile-friendly or loads too slowly? With Webflow, you can easily create a site that’s fast, responsive, and visually stunning.
But is it the right choice for you? Let’s dive into what Webflow developers have to say regarding the pros and cons of Webflow to help you decide.
What is Webflow?
Design, functionality, and… No code at all. Webflow is a versatile tool. It combines all it takes to make modern websites without any programming expertise.
Here's a more specific breakdown of what it has to offer:

Clean code, hosting, and other technical complexities are handled by Webflow — you can focus on creative freedom. A business website, a personal portfolio, or a full-scale ecommerce store — the tool of this kind has it all.
Weighing the Benefits and Drawbacks of Webflow CMS
Below, I’ll explore its main pros and cons through examples and insights to help you decide whether it’s the right choice for your next project.
Pros of Webflow CMS
Clean Code and SEO Optimization
Benefit: Webflow generates clean code. That results in perfect page loading speed and SEO-friendly structures like meta tags and meta descriptions.
Fact: Websites built with Webflow score high on Google Lighthouse for performance and accessibility.
Design Flexibility & Custom Animations
Benefit: Webflow’s design tool offers unmatched flexibility. That means creators can craft custom animations and interactive animations.
Example: A SaaS company can use Webflow to showcase their features through scroll-based animations to improve user engagement.
No-code Platform for Custom Websites
Benefit: Webflow allows you to build websites with a drag-and-drop interface. It’s perfect for those without coding knowledge.
Example: A freelance graphic designer without HTML skills can easily create a portfolio with interactive elements like animations and galleries.
Fact: Over 3.5 million designers and teams use Webflow platforms for diverse projects.
Ecommerce and Scalability
Benefit: Webflow’s e-commerce plan allows businesses to create scalable online stores. Enterprise plans cater to larger organizations that might need some advanced features.
Example: A small retail shop can start with Webflow Ecommerce and scale as sales grow.
Integrated Hosting and Free SSL Certificate
Benefit: Hosting is built-in. Besides, Webflow offers a free SSL certificate for secure connections and seamless live site management.
Example: An entrepreneur launching a business website can go live without the hassle of external hosting.
Responsive Designs for All Devices
Benefit: Webflow offers responsive layouts for desktop, tablet, and mobile without extra effort.
Example: A blog post or landing page designed in Webflow looks great on any screen size.
Cons of Webflow CMS
Costly for Smaller Projects
Challenge: Compared to other platforms, Webflow’s pricing is higher. Its free plan is limited. Features like form submissions require paid plans.
Example: A hobby blogger might find it expensive to upgrade for custom domains and more storage.
Dependence on Webflow Hosting
Challenge: Sites built with Webflow can only be hosted on its platform. That limits flexibility for developers wanting external hosting options.
Example: Businesses looking for unique server configurations might find this restrictive.
Limited Plugins and Third-party Integrations
Challenge: Unlike WordPress, Webflow lacks an extensive plugin ecosystem.
Example: Integrating advanced marketing tools often requires custom code or third-party services.
Steep Learning Curve
Challenge: While the platform is a no-code tool, mastering its advanced features like custom animations or CMS setup requires a basic understanding of design principles.
Example: Beginners may struggle to understand Webflow’s box model or advanced CSS capabilities.
Insight: Webflow provides extensive tutorials, but time investment is necessary.
No Backend User Roles
Challenge: Managing multiple sites with varying access levels for editors and admins is more complex compared to traditional content management systems.
Example: A team working on a business website might face challenges in assigning granular permissions.
Table: Pros and Cons at a Glance

Conclusion
Webflow CMS offers powerful tools for content management systems and website creation, but it comes with trade-offs like pricing and a steeper learning curve.
Use this checklist to evaluate if Webflow CMS aligns with your needs and goals.
1. Your Technical Skills and Team Setup
Do you have a basic understanding of HTML, CSS, and design tools, or a team with coding knowledge?
Are you comfortable working with a drag-and-drop interface for design?
Will your team benefit from a no-code platform to streamline development?
2. Your Project Requirements
Are you creating a business website, landing pages, or a blog post series?
Do you need advanced features like custom animations, interactive elements, or an e-commerce plan?
Does your project involve managing multiple sites or an enterprise-level solution?
3. Budget and Scalability
Does your budget allow for Webflow's pricing tiers, including free plans and enterprise plans?
Do you require features like form submissions or a free SSL certificate included in paid plans?
Will your site grow to need custom code integration or scalable content management?
4. Your Design and Branding Needs
Are you looking for a design tool that prioritizes flexibility and visual control?
Do you plan to create interactive animations or custom animations that enhance user experience?
Is maintaining a clean code output important for performance and SEO?
5. Your Time and Learning Curve
Do you have the time to overcome Webflow’s learning curve?
Are you seeking a platform that allows you to create websites faster than traditional coding?
Will you benefit from Webflow’s templates for a quick start on your next project?
If most of your answers align with Webflow’s features, it might be your perfect match. No? Explore other content management systems.
0 notes