#lightroom optimize
Explore tagged Tumblr posts
Visit Tumblr Blog
Explore Tumblr blogs with no restrictions, modern design and the best experience.
Last Seen Tumblr Blogs


Fun Fact
25% of US internet users with an annual income of $80-100K use Tumblr.
Text
Amazon-Style Product Photography Tips
I got this message from a lovely follower.
Now, a fairly large part of my new steady job is product photography. Not glamour shots, more documentation. The company I work for makes, among other things, licensed drinkware (think water bottles, mugs, tumblers, etc.). Part of my team's duties is to photograph a mockup or finished product both for our records and to submit to the license holder.
The routine typically goes: put item facing forward in lightbox. Click. Rotate to the left. Click, etc. for the back and right. Then a closeup of the copyright info.
Here, finally, is my question: one of the license holders decreed that all of our photographs must be taken at f/8 and shutter time (?) of 1/25s. This strikes me as… not always optimal, considering the range of colors of objects as well as different materials: polypropylene both transparent and opaque, stainless steel, and lacquered cardboard for packaging. I would love to hear your thoughts on how I might better (while being consistent!) adjust camera settings to account for these kinds of factors
As an added bonus, we let the camera decide white balance/color correction. But I don't think I'm knowledgeable enough to try and correct myself, considering none of the monitors/printers I use are color-correct in the first place. I just know there have been many times where I've submitted photos only for the license holders to be like, "Hmmmm, that green doesn't seem like the right kind of green…RESUBMIT!"
First, I'm going to answer this specific question, but at the end I'm going to recommend a full setup for taking these type of rapid fire product shots.
My answer:
f/8 makes sense. Outside of macro photography, this allows a deep depth of field assuring the photo is sharp and in focus for the entire depth of the product. It is usually the sharpest part of the lens and it is not so small of an aperture that you risk diffraction effects softening your image. They probably were told this by a photographer and thought it applied to all of the camera settings.
The shutter speed is problematic. By forcing it to a fixed setting, your camera is going to choose whichever ISO gives a good exposure. And if you don't have enough light, it will choose a high ISO that will possibly add a great deal of noise to your photo. Noise can corrupt the colors of your photo and it just looks bad.
If your camera is on a tripod and they want the sharpness and depth of field f/8 grants you, then I would set your camera to aperture priority mode (usually Av), lock your ISO to it's lowest number (usually 100) and then your camera will choose the best shutter speed on its own.
So… Camera on tripod Av mode f/8 ISO 100 Camera chooses shutter speed
This is all assuming you are using a tripod and continuous lighting. If you are handholding the camera or using flash, I can rewrite the recipe. Otherwise this will get you very sharp photos with minimal noise.
I'd also recommend getting a shutter release cable so you don't shake the camera when taking the picture. Just search your camera brand and “shutter release” and get the cheap wired version unless you really need wireless.
This is the Canon DSLR one, just to give you an idea.
Be warned, if you do not have powerful lighting, you may get some long shutter speeds. That is perfectly okay as long as it is on the tripod and you aren't shaking the camera when taking the picture.
As far as white balance goes, if you really want it to be accurate, you can order a cheap photography “gray white balance card”. They are as cheap as 10 dollars.
This is the one I use.
There are a couple of ways to utilize the gray card.
Option 1:
You put the gray card in the exact lighting as the product or just hold it directly in front of the product.

You take all your photos in RAW format (JPEG will not work) and adjust the white balance in Lightroom, Photoshop, or any RAW editing software. Use the white balance picker tool (looks like an eyedropper) and click on the gray card.
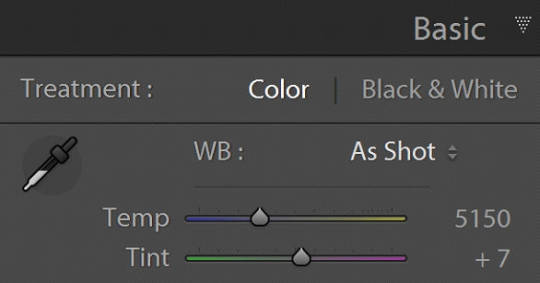
This will give you an exact white balance for that lighting environment. You can synchronize those white balance numbers across all of your photos. Lightroom has a copy and paste function or a "sync" button that will change adjustments in all selected photos as you go.
This is the most accurate option because it allows for “tint” adjustments for extra color accuracy.
youtube
Option 2:
Do the same as above and remember the white balance value. Then set your camera to a custom white balance matching that value. It will probably be around 3200K or 5500K depending on your lights.
Pro tip: If you have any ambient lighting from overhead or other room lights, it could contaminate the photo and skew the white balance into a weird color temperature. Try to make the room as dark as possible aside from your photo lights to avoid this. If you are using flash or have really bright photo lights, this isn't a huge concern.
Option 3:
Use your camera's built in custom white balance tool. It's different for every brand, so you will need to search for a tutorial. But the basic idea is the same. You put the gray card in the lighting of the products, take a picture, the camera analyzes it, and then sets a custom white balance. This can also be done with a white sheet of paper in a pinch.
Here is a video demonstrating the process. Remember every camera brand mau have a slightly different method.
youtube
Good white balance means accurate colors. That is important with product photography and a good value add for your clients. Just be warned, if you change the lighting even a little bit, you have to redo this process. If you bump a light or switch it out for a different one, redo your white balance calibration.
Also, some continuous lights have white balance drift, especially if they allow you to adjust the color temperature manually. Not only will the white balance change depending on the power setting, but it can also change over time. Especially if the lights are used frequently.
Move the lights, redo white balance. Change the power, redo white balance.
And if your lights are stable and on the same power all the time, I’d still redo the white balance every week or so. Personally I would do it before every shoot, but you’ll have to decide if that is worth it depending on how fast you need to turn things around. I usually do it as my first photo in the series so I can set the white balance, select all the photos, and copy the settings to all of them at once.
The nice thing about doing white balance with a gray card is that the results are display agnostic. Even if your monitor is poorly calibrated, you can be assured the white balance is accurate. And if someone says your photos are green, it will be their monitor and not your problem.
You just have to avoid doing any color specific adjustments to the images. Trust the gray card and white balance tool more than your eyeballs and display.
You can boost saturation a tad, but that is all I would mess with unless you know what you are doing. Even if the photos look a little drab or not very colorful, I would leave it alone. It sounds like the importance for this task is accuracy of color rather than making them as pretty as possible.
------------------------------
Okay, that is the question answered. Now I'd like to go through how I would build a setup to do this kind of work.
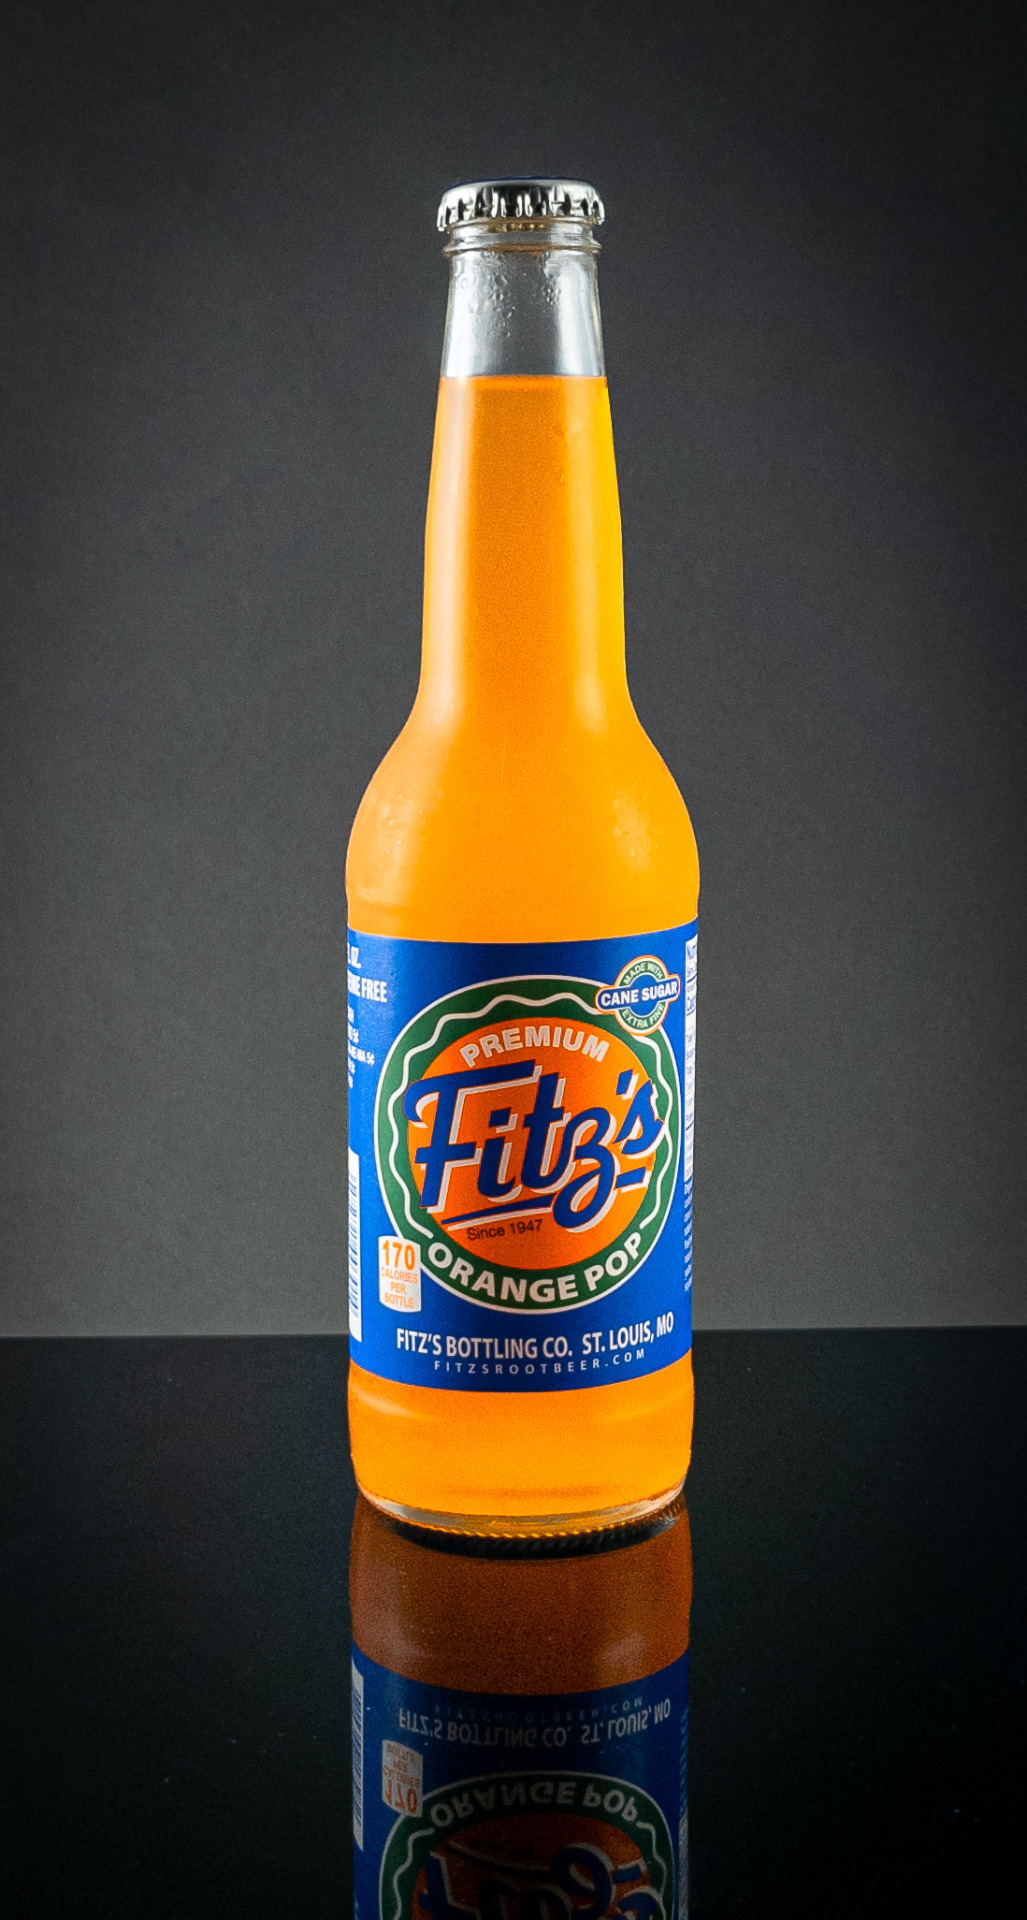
In the product photography world, this workflow is referred to as "pack shots." The idea is to create a consistent setup so you can just swap out the product one by one and speed through the shoot. It is best to control as many variables as possible so all you need to do is set the product down, take the shot, and repeat.
I'm going to show you my ideal pack shot setup with a light cube. I think it will be similar to what my follower is using. And, if not, it might help him streamline his process a bit.
A light cube is just a box made of diffusion material.

You drape a background with the color of your choice. White is usually preferred for Amazon-style pure white background photos. Though I prefer dark gray for aesthetic reasons. You just want to make sure the backdrop has that natural gravity curve so there isn't a hard line or wrinkles.
For lighting, you should get two *identical* lights. They can be desk lamps as long as they are the same and have the same light bulb inside. Then you just place them on either side of the cube. You want the ball of light on the cube to be in front of your subject.

Remember, your light source isn't your actual lights. It's the ball of light on the sides of the cube.
If you want to make it a little fancier, you can get a black or white acrylic sheet to create a reflective surface. You want it as far forward as possible and a little elevated. Here are some things I did in a simple light cube with the setup above.

Here is what the white acrylic looks like.
I placed a big book under the acrylic sheet like this.
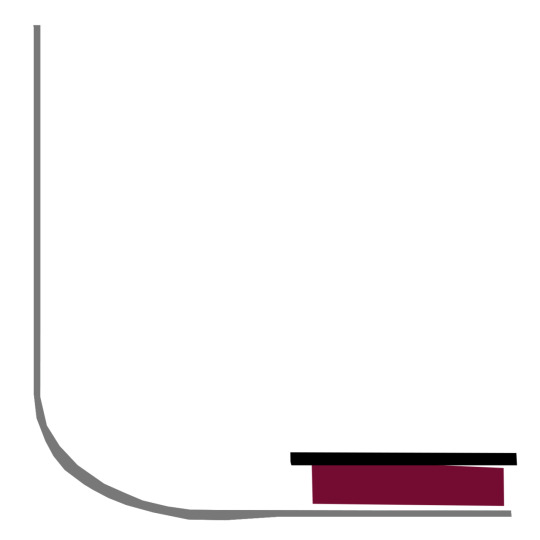
This allowed me to hide the curve of the background and get a nice crisp transition between the acrylic and the background.
And if you do white acrylic, you can get the background to seamlessly blend.

As I said, two desk lamps will work, but if this is for a business and you want something fast, convenient, and reliable, I would suggest something more robust.
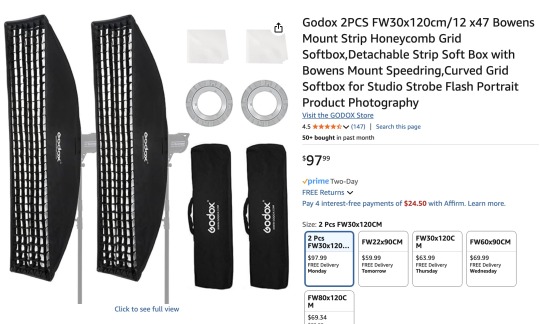
I'd probably get two daylight balanced COB (chip-on-board) LED video lights that have a Bowens mount attachment.

This Godox light is very reasonably priced for its features.
Daylight balanced means one consistent color temperature, so less chance of drift. These are very bright so you can use a quick shutter speed and you won't even need a shutter release cable (still a good idea). You also don't *need* a tripod, but you should still use one. The main advantage of bright lights is they can't be overpowered by room lights. You can be assured any overhead lights or window light will not contaminate your photo. A darker room is always preferable, but if you crank these it won't matter.
The Bowens mount allows you to place any modifier you wish on the light from softboxes to reflectors. But the standard reflector should be fine for the light cube. But if you are taking photos of tall cylinders, a couple of strip boxes might help.
Don't worry about putting the grids on. You just line them up towards the front of the light cube so you have even light from the top to the bottom of your cylinder. Again, this is optional.
Since these lights are so versatile, you can do any kind of lighting for any other photographic needs. Slap on a white umbrella and take company portraits if you want. Or you can use them as video lights to film a worker safety video.
So, here is my recommended ingredient list for a pack shot light cube setup.
Light Cube COB video light Black Plexiglass Seamless paper (color of your choice)
Colored poster board also works if you keep it from getting dinged up. And the light cube also comes with some cloth backgrounds, but watch out for wrinkles.
BONUS TIP: If you want that pure white background like in Amazon shots, add a third light from behind with no background paper. Make the light cube material your background and shine a light through it. You have to make sure it is bright enough to give you pure white, but not too bright that the light blasts your subject from the rear.
Otherwise just use a white backdrop and use Photoshop to brighten it to pure white.
Karl Taylor shows a pack shot setup without a cube, but the same principles apply. He shows you how to dial in that white but not too white background. Just imagine instead of shining a light onto a background, you are shining a light through the background (the back of the cube).
youtube
13 notes
·
View notes
Text
Because I had headcanon that Color is Autistic and has developed special interests in things such as photography, travel, maybe even things like social advocacy.
Maybe even philosophy and psychology. For now, in this posts, I’ll focus on the big two: photography and traveling. (I will also touch on how Color’s physical disability, chronic fatigue, his autism, and perhaps his ptsd/ separation anxiety from Killer also effect his ability to engage in his interests in another post.)
I think he’d develop some decent if not above average technical knowledge, such as camera types and functions. Detailed understanding of different types of cameras (DSLR, mirrorless, point-and-shoot, medium format, etc.) and their specific functions.
Knowledge about various lenses (prime, zoom, wide-angle, telephoto, macro) and their applications. Mastery of camera settings like ISO, aperture, shutter speed, and how to manipulate them for different lighting conditions and artistic effects.
In-depth understanding of how aperture, shutter speed, and ISO interact to create a properly exposed photograph. Proficiency in using software like Adobe Lightroom, Photoshop, or other photo editing tools for post-processing and enhancing images.
He’d learn about artistic elements such as composition techniques, lighten and color theory. Develop a familiarity with compositional rules like the rule of thirds, leading lines, framing, symmetry, and how to creatively break these rules.
Knowledge about natural and artificial lighting, how to use light to create mood and depth, and techniques like backlighting, side lighting, and using reflectors. Understanding of how colors interact, complementary colors, and how to use color to convey emotion and direct viewer attention.
Awareness of different photography styles (portrait, landscape, macro, street, documentary, astrophotography, etc.) and genres, and what makes each unique.
Knowledge about influential photographers and their work, such as Ansel Adams, Henri Cartier-Bresson, Annie Leibovitz, and contemporary photographers.
Understanding the evolution of photography, from daguerreotypes to digital photography, and significant milestones in the field. Awareness of current trends in photography, popular styles, and emerging technologies.
And, of course, he’d develop and grow practical experiences and hands on practice. Experience with on-location shoots, managing different weather conditions, and adapting to various shooting environments.
Knowledge about how to properly maintain and clean camera equipment to ensure longevity and optimal performance. Skills in troubleshooting common issues like lens flare, sensor dust, or focus problems.
He’d have a deep enthusiasm for specific techniques or subjects he enjoys photographing, whichever or whatever you all think those could be exactly.
Likely to have personal photography projects, well-organized portfolios, and possibly an online presence showcasing their work. Extensive collection of books, articles, videos, and tutorials related to photography.
A special interest in traveling, in addition to photography, would manifest in the character in several ways, showcasing their passion and extensive knowledge about various aspects of travel. Here are some specific aspects:
For his interest in travel, he’d be very well versed in the planning and research process. Color might create comprehensive travel itineraries, meticulously planning each day's activities, routes, and schedules.
He might gradually develop an extensive knowledge about various travel destinations, including historical sites, natural landmarks, cultural attractions, and lesser-known gems.
He’d display a proficiency in booking flights, accommodations, and transportation, as well as understanding visa requirements, travel insurance, and local regulations.
An expertise in packing efficiently, knowing what to bring for different climates and activities, and how to pack photography gear safely for travel. Color is likely to show a very deep and profound appreciation for different cultures, learning basic phrases or even fluency in multiple languages to better communicate while traveling.
He’d definitely show a deep interest in trying and understanding local cuisines, knowing popular dishes, and even recipes from various regions. He’d have at least some knowledge about local customs, traditions, festivals, and etiquette to respect and immerse themselves in different cultures.
He’d certainly develop some geographical and historical knowledge, with a detailed understanding of world geography, maps, and the ability to navigate using traditional maps as well as digital tools.
Knowledge about the history of the places he visits, including significant events, historical figures, and the cultural evolution of the region.
He might maintain detailed travel logs or journals documenting his experiences, including photos, notes, and personal reflections. He’d definitely collect souvenirs, postcards, or other memorabilia from his travels; often gifting them to beloved friends.
He’d probably engage with travel communities, forums, and social media groups to share experiences and gain insights.
This special interest would possibly lead to him gaining a lot of practical skills, such as in budget management. Expertise in budgeting for travel, finding deals, and managing expenses effectively.
He might display an ability to adapt to different environments, handle unexpected situations, and problem-solve while on the go.
Although it’d probably be harder for him than most, particularly if he has a harder time handling and dealing with change—especially if the change is unexpected and unplanned.
Knowledge about staying healthy while traveling, such as understanding local healthcare options, vaccinations, and travel safety tips.
He’d like combine both interests by using his photography skills to capture stunning images of the places he visits, creating travel blogs or photo albums to document his journeys.
He might create photo essays or visual stories that capture the essence of the cultures and places he explores. Share his travel experiences and recommendations with others, possibly through writing travel guides, blogs, or social media content.
All this is to say that Killer would definitely encourage Color to come with him to explore abandoned places and ghost towns, and Color’s going to be so overjoyed he starts hand flapping. He’s going to take so many pictures, he’s going to remember it forever.
#utmv headcanons#utmv hc#killer sans#utmv#sans au#sans aus#killer!sans#killertale#othertale#othertale sans#other sans#color!sans#colour sans#color spectrum duo#colorkiller#undertale#undertale au#undertale aus#utmv au#autistic headcanon#special interest#undertale something new#undertalesomethingnew#something new#something new sans#something new au#killertale sans#canon disabled character#bad sanses#bad sans gang
36 notes
·
View notes
Text
LensCraft Mastery: Elevate Your Photography Skills to the Next Level

Photography is more than just pressing a button; it���s an art, a science, and a means of storytelling. LensCraft Mastery is a comprehensive guide designed to help photographers—whether beginners or seasoned professionals—unlock their full creative potential. This tutorial series delves into the intricate aspects of photography, from mastering the fundamentals of exposure and composition to exploring advanced techniques in lighting, post-processing, and storytelling through imagery.
Why LensCraft Mastery?
The name LensCraft Mastery symbolizes the fusion of technical expertise (Lens) with artistic craftsmanship (Craft). Photography is both a technical discipline and an expressive medium, requiring a balance between understanding camera mechanics and developing an artistic vision. This tutorial series aims to bridge that gap by offering structured, easy-to-follow lessons that cater to all levels of experience.
1. Mastering the Basics of Photography
For those new to photography, LensCraft Mastery begins with the fundamental concepts that form the backbone of great photography:
Exposure Triangle: The Key to Perfectly Lit Photos
Aperture: Understanding how f-stops affect depth of field and light intake.
Shutter Speed: Capturing motion creatively, from freezing action to long exposures.
ISO: Controlling sensor sensitivity for optimal brightness without excessive noise.
Composition Techniques: Crafting Visually Stunning Images
Rule of Thirds: Placing subjects strategically for balanced compositions.
Leading Lines: Drawing the viewer’s eye to the subject.
Framing & Negative Space: Enhancing depth and focus in a photograph.
2. Advanced Photography Techniques
Once the basics are mastered, LensCraft Mastery delves into techniques that can take your photography to a professional level.
Understanding Light & Shadows
The role of natural light vs. artificial lighting in photography.
How to use soft light for flattering portraits and harsh light for dramatic effects.
Mastering golden hour and blue hour photography.
Camera Settings & Manual Mode
How to use manual focus for precision.
Customizing white balance for accurate color reproduction.
Shooting in RAW vs. JPEG and when to use each format.
3. Specialized Photography Genres
Photography is a vast field, and LensCraft Mastery explores different genres, allowing photographers to find their niche.
Portrait Photography
How to pose subjects naturally for candid and professional shots.
Best lenses for portrait photography (prime vs. zoom).
Background blur (bokeh) techniques for dreamy aesthetics.
Landscape Photography
Composition techniques for breathtaking vistas.
Use of ND (neutral density) filters for long exposures.
How to capture the perfect sunrise and sunset.
Street Photography
Capturing the essence of everyday life.
Ethical considerations in photographing strangers.
How to blend into the scene for natural compositions.
Wildlife & Macro Photography
Tips for photographing animals in motion.
Choosing the best gear for close-up macro shots.
Patience and planning for capturing rare moments.
4. The Power of Post-Processing
A great photo doesn’t always end with the camera—post-processing is essential for refining images. LensCraft Mastery provides in-depth tutorials on:
Adobe Lightroom & Photoshop Editing
Adjusting exposure, contrast, and white balance for balanced images.
Retouching techniques for portraits and landscapes.
Removing unwanted elements and enhancing details.
Mobile Editing for On-the-Go Photography
Best apps for editing (Snapseed, VSCO, Lightroom Mobile).
Color grading techniques for a unique aesthetic.
Quick retouching methods for social media-ready images.
5. Developing a Photographer’s Mindset
Photography is more than just technical skill—it requires creativity, patience, and an eye for detail. LensCraft Mastery helps photographers develop a storytelling approach, teaching how to:
Capture emotions and narratives within a single frame.
Use minimalism and abstract photography to create intriguing images.
Experiment with angles and perspectives to bring a fresh outlook to everyday scenes.
6. Monetizing Your Photography Skills
For those looking to turn their passion into a profession, LensCraft Mastery includes insights on:
How to start a photography business and build a portfolio.
Selling photos online (stock photography, prints, NFTs).
Social media strategies to grow an audience and attract clients.
Final Thoughts
Whether you’re just starting or looking to refine your craft, LensCraft Mastery offers a structured, engaging, and practical way to enhance your photography skills. By blending technical knowledge, artistic creativity, and real-world applications, this tutorial series is designed to empower photographers at every stage of their journey.
Start mastering your craft today and turn your vision into reality—one frame at a time. 📸✨
2 notes
·
View notes
Text
TIPS: Camera Settings - ISO

Welcome to part two of the monthly tips article! This month we will be looking at the basics of a camera and we will continue with ISO.
The ISO setting on a camera describes the light sensitivity of the sensor. Typically, ISO values range from 100 to 64,000 or even higher, depending on the camera model. There are also rarer settings below 100, which are intended for very well-lit environments. Figure 1 illustrates this quite well. This picture was taken under the same lighting conditions, only the ISO value was changed.
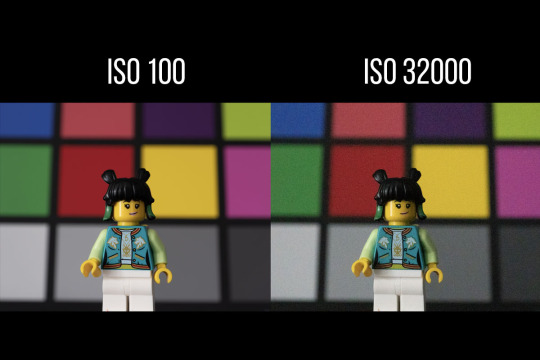
The relationship between ISO and sensor sensitivity is direct: the higher the ISO value, the more sensitive the sensor becomes to light. This means that with higher ISO settings, usable images can still be taken in low light. However, this has a disadvantage: higher sensitivity leads to ISO noise, which appears as annoying grain or artifacts on the image. This can be clearly seen in image 2. The image on the left was taken at ISO100 and the image on the right at ISO32000.
To optimize the quality of the images, the ISO should be kept as low as possible, especially in well-lit environments. Low ISO values mean less noise and better overall image quality. Nevertheless, a noisy image is always better than no (or a blurred) image!
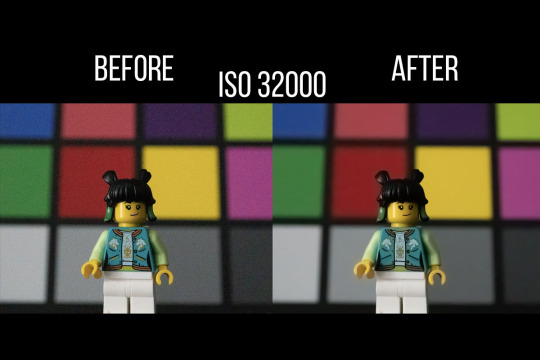
When editing RAW images, the noise caused by high ISO values can be partially corrected. By using image editing software, you can reduce noise while maintaining other aspects of image quality. This can be seen in image 3, where I took an image at ISO32000 and post-processed it using Adobe Lightroom.
Overall, the choice of ISO setting is an important decision that depends on the lighting conditions and the desired aesthetic effects. A conscious approach to the ISO setting can help to achieve optimal results and improve image quality.
See you next week! @joschka-vanderlucht
17 notes
·
View notes
Text
Mastering the Art of Image Editing: Unveiling the Secrets to Stunning Visuals
In the dynamic and visually-driven digital landscape, image editing has become an indispensable tool for individuals and businesses alike. From social media influencers curating eye-catching feeds to businesses enhancing product images for e-commerce, the demand for high-quality, visually appealing content is at an all-time high. In this comprehensive guide, we delve into the world of image editing, exploring its significance, popular techniques, and the tools that empower creators to transform ordinary visuals into extraordinary masterpieces.
The Significance of Image Editing:
Images are powerful communicators, capable of conveying emotions, telling stories, and leaving a lasting impression. Image editing serves as the catalyst that elevates visuals to new heights, making them more engaging and effective. Whether you're a professional photographer, a social media enthusiast, or a business owner, the ability to enhance and optimize your images is a game-changer in today's competitive digital landscape.
Key Techniques in Image Editing:
Color Correction and Grading:
One of the fundamental aspects of image editing is adjusting and enhancing colors. Color correction ensures accurate reproduction of hues, while color grading allows for creative manipulation, setting the tone and mood of the image. Professionals use tools like Adobe Lightroom or Photoshop to fine-tune colors and achieve a visually cohesive look.
Retouching and Enhancement:
Perfecting portraits or product images involves retouching and enhancing details. Removing blemishes, smoothing skin tones, and refining textures are common techniques employed to achieve a polished and professional look. Advanced tools such as frequency separation help achieve nuanced results without sacrificing realism.
Cropping and Composition:
The right composition can transform an ordinary image into a captivating one. Image editing tools provide the flexibility to crop, resize, and reframe images to improve their overall composition. Attention to composition is crucial for creating visually pleasing and balanced visuals.
HDR Imaging:
High Dynamic Range (HDR) imaging is a technique that combines multiple exposures of a scene to capture a broader range of light and detail. This is particularly useful in landscape photography, architectural shots, and any scenario with varying light conditions. HDR enhances the overall tonal range and details in an image.
Adding Filters and Effects:
Filters and effects are powerful tools for infusing creativity into images. From vintage looks to modern aesthetics, a plethora of filters and effects are available to cater to diverse preferences. These can be applied to evoke specific emotions or align with a brand's visual identity.
Tools of the Trade:
Adobe Creative Cloud:
Adobe's suite of creative tools, including Photoshop and Lightroom, remains the industry standard for professional image editing. With a wide range of features and capabilities, these tools offer unparalleled flexibility and control.
GIMP (GNU Image Manipulation Program):
GIMP is a free, open-source alternative to proprietary image editing software. Despite being free, GIMP provides a comprehensive set of tools for tasks ranging from photo retouching to graphic design.
Canva:
Canva is a user-friendly online platform that caters to both beginners and professionals. It offers a range of templates and tools for easy image editing, making it accessible to those without extensive design experience.
Snapseed:
For mobile users, Snapseed is a powerful and intuitive photo editing app. Developed by Google, Snapseed provides a wide array of editing tools and filters, making it a favorite among smartphone photographers.
Conclusion:
In the digital age, where visuals reign supreme, mastering the art of image editing is a valuable skill. Whether you're a seasoned photographer or a social media enthusiast, understanding the significance of image editing and familiarizing yourself with the essential techniques and tools will undoubtedly elevate the quality of your visuals. So, embark on this creative journey, experiment with different editing styles, and witness the transformative power of image editing in making your visuals truly stand out in the digital realm.
3 notes
·
View notes
Text
Demystifying Digital Images and Video: Formats, Tools, Copyright, and More.
Introduction
In today's digital age, images and videos have become an integral part of our daily lives. From personal photographs shared on social media to professional content uploaded on platforms like YouTube and Twitch, understanding the intricacies of image and video file formats, codecs, and manipulation tools is essential. This blog post aims to provide a comprehensive overview of these digital elements, focusing on the definitions of common file types, export settings for popular broadcasting platforms, image manipulation tools, and the critical aspects of image copyright.
Definitions of Commonly Used Image and Web Video Formats, Wrappers, and Codecs
Image Formats:
JPEG (Joint Photographic Experts Group): JPEG is the most widely used image format for photographs and digital images. It uses lossy compression, which reduces file size while maintaining reasonable image quality.
PNG (Portable Network Graphics): PNG is preferred for images with transparent backgrounds or crisp, high-quality graphics. Unlike JPEG, it uses lossless compression.
GIF (Graphics Interchange Format): GIFs are a popular choice for short, looping animations and simple graphics. They use lossless compression and support transparency.
TIFF (Tagged Image File Format): TIFF is a versatile format commonly used in professional photography and graphic design. It supports lossless compression and maintains high image quality.
BMP (Bitmap): BMP is a Windows-native format known for its lack of compression. It results in large file sizes but retains image quality.
Video Formats and Codecs:
MP4 (MPEG-4): MP4 is a widely supported video format that uses the H.264 codec. It offers a balance between quality and file size, making it ideal for streaming and sharing on the web.
AVI (Audio Video Interleave): AVI is an older format that supports various codecs. It is not as efficient as MP4 in terms of compression and is used less frequently nowadays.
MOV (QuickTime Movie): MOV is a format developed by Apple and is popular among Mac users. It can use various codecs, such as H.264 and ProRes, for high-quality video.
MKV (Matroska): MKV is an open-source container format that can contain videos with a variety of codecs, making it highly customizable.
Export Settings for Popular Broadcast Platforms
When it comes to sharing images and videos on popular broadcasting platforms like YouTube, Twitch, and Facebook, selecting the right export settings is crucial for optimal quality and compatibility.
YouTube: For video content on YouTube, the recommended format is MP4 with H.264 video codec and AAC audio codec. The ideal resolution is 1080p (1920x1080) or 4K (3840x2160) for higher quality. These settings balance quality and compatibility across devices.
Twitch: Twitch also prefers the MP4 format with H.264 video and AAC audio codecs. A resolution of 720p (1280x720) or 1080p is recommended, depending on the viewer's internet speed and quality preferences.
Facebook: Facebook accepts a wide range of video formats, including MP4 and MOV. However, MP4 with H.264 video and AAC audio codecs is a reliable choice. The resolution should be adapted to the target audience and device capabilities.
Commonly Used Image Manipulation Tools and Techniques
Image manipulation tools are essential for enhancing and editing images. Here are some commonly used tools and techniques, along with their purposes:
Adobe Photoshop: Photoshop is a versatile image editing software that can be used for tasks like retouching, color correction, and compositing.
Adobe Lightroom: Lightroom is perfect for photo organization and enhancement, with features like exposure adjustment, color grading, and batch processing.
GIMP (GNU Image Manipulation Program): GIMP is a free alternative to Photoshop, offering similar features for image editing and manipulation.
Canva: Canva is a user-friendly online tool for creating graphics and social media content. It simplifies design tasks for non-designers.
Cropping and Resizing: These techniques are fundamental for adjusting image dimensions and removing unwanted parts of an image.
Image Copyright Essentials
Artists and content creators must be aware of copyright laws to protect their intellectual property. Key copyright essentials include:
Ownership: Creators automatically own the copyright to their work upon creation, but registration provides additional legal protection.
Fair Use: Fair use allows limited use of copyrighted material without permission for purposes like criticism, commentary, news reporting, and education.
Licensing: Creators can license their work under specific terms, such as Creative Commons licenses, allowing others to use their work while respecting their rights.
Public Domain: Works in the public domain are not protected by copyright and can be used freely.
DMCA Takedowns: The Digital Millennium Copyright Act (DMCA) enables copyright owners to request the removal of infringing content from online platforms.
Attribution: When using copyrighted material, proper attribution is often required to credit the creator.
Conclusion
Understanding digital image and video formats, codecs, export settings, image manipulation tools, and copyright essentials is essential for content creators, whether amateur or professional. By adhering to best practices and legal guidelines, creators can ensure their work is of high quality, reaches the right audience, and is protected from unauthorized use. Whether you're a budding photographer, a vlogger, or a graphic designer, the knowledge presented in this blog post can serve as a valuable resource to navigate the digital content landscape successfully.
References
Reference list
Arts Law Centre of Australia 2010, Copyright - Arts Law Centre of Australia, Arts Law Centre of Australia.
Attorney-General's Department 2022, Copyright basics, Attorney-General’s Department.
Image Manipulation: The What, How, and Why 2021, Clipping Path Campus.
Image Processing: Techniques, Types, & Applications [2022] n.d., www.v7labs.com.
Video File Formats, Codecs, and Containers Explained | TechSmith 2018, Welcome to the TechSmith Blog.
By: Juan Gutierrez.
4 notes
·
View notes
Text
Self Introduction
Born and raised in Santa Maria, CA, I relocated to Fresno a year and a half ago. My passion lies in capturing landscape photos and the beauty of nature. When a picture turns out as I hoped, I take pleasure in printing and framing it. Otherwise, I tend to let it reside in my Lightroom catalog, occupying significant space on my drives. As I strive to refine my skills in framing subjects and elevate my overall photography, I hold optimism that this class will offer the necessary practice and guidance. While I don't typically take portrait shots of myself, I do have a collection featuring my birds and dogs, which I will share.
3 notes
·
View notes
Text
Make your photographs work for you and earn money.

Selling your photos on stock websites can be a great way to earn additional income. Selling stock photography through mobile devices and DSLRs has become increasingly popular and accessible with the advancement of digital technology. Here are some steps you can take to get started:
Research Stock Websites: There are numerous stock websites where you can sell your photos, such as Shutterstock, Adobe Stock, Freepik, Getty Images and iStock. Look into their submission guidelines, royalty rates, and popularity among buyers.
Assess Market Demand: Before you start shooting and uploading photos, it's important to understand what types of images are in demand. Take a look at the popular categories on stock websites and analyze the types of images that sell well. This will help you focus your efforts and maximize your chances of making sales.
Capture Marketable Photos: Aim to capture high-quality, visually appealing images that have commercial value. Consider popular themes like travel, nature, lifestyle, business, and technology. Ensure your photos are well-lit, properly composed, and have good resolution.
Edit and Enhance: Post-processing your photos can significantly improve their appeal. Use photo editing software like Adobe Lightroom or Photoshop to enhance colors, adjust exposure, and remove any imperfections. However, be careful not to over-edit and maintain a natural look.
Keywording and Descriptions: When uploading your photos, provide accurate and descriptive titles, captions, and keywords. This will help potential buyers find your images when they search for specific topics. Be thorough but relevant in your keyword selection.
Follow Submission Guidelines: Each stock website has its own set of submission guidelines, so make sure to review them carefully. Pay attention to the technical specifications, image size requirements, and file formats they accept. Failure to comply with these guidelines may result in your photos being rejected.
Model and Property Releases: If your photos contain recognizable individuals or private property, you may need model or property releases. These releases grant you legal permission to sell the images commercially. Familiarize yourself with the rules and requirements surrounding model and property releases on the stock websites you choose.
Regularly Upload New Content: Consistency is key to success in stock photography. Regularly upload new photos to keep your portfolio fresh and increase your visibility in search results. By building a diverse and substantial collection of images, you can attract a wider range of buyers.
Track Sales and Optimize: Monitor your sales and analyze the performance of your images. Pay attention to which photos are selling well and which ones are not. This data will help you refine your future photography efforts and focus on the subjects and styles that resonate with buyers.
Be Patient and Persistent: Selling photos on stock websites can take time and perseverance. It may take a while before you start seeing significant income. Stay motivated, continue to improve your skills, and adapt to the changing demands of the market.
Remember, while selling photos on stock websites can be a lucrative venture, it's also a competitive industry. Success often comes with time, effort, and a strong understanding of what buyers are looking for.
#photographers on tumblr#photography#photos#i sell pictures#i sell custom pics#stock images#100 days of productivity#stock photos#bird photos#bird photography#birdlovers#birds nature#birds of prey
2 notes
·
View notes
Text
Manual Product Photo Retouching: A Complete Guide
Product photography retouching is essential for e-commerce, advertising, and branding. Unlike portrait retouching, product retouching focuses on precision, consistency, and realism to make items look flawless while keeping them true to life.
Key Steps in Manual Product Retouching
1. Basic Adjustments (Lightroom/Camera Raw)
White Balance – Ensure colors match the product (use a gray card if possible).
Exposure & Contrast – Balance highlights/shadows without losing detail.
Lens Corrections – Fix distortion, chromatic aberration, and vignetting.
2. Cleanup (Photoshop - Spot Healing & Clone Stamp)
Remove dust, scratches, fingerprints, and imperfections.
Use Spot Healing Brush (for small blemishes).
Clone Stamp Tool (for textured surfaces like fabric or wood).
3. Edge & Shape Refinement (Pen Tool + Masking)
Sharpen edges for a crisp look (especially for jewelry, electronics).
Use the Pen Tool to create precise selections for masking.
Fix distortions (e.g., straightening a crooked label).
4. Color Correction & Uniformity
Use Hue/Saturation and Selective Color to match brand colors.
Sample colors from the product to ensure consistency.
Fix uneven lighting (e.g., gradients on white backgrounds).
5. Shadow & Reflection Enhancement
Natural Shadows – Use Drop Shadow (Layer Style) or manually paint shadows.
Reflections – Add subtle reflections for glass/metal products.
Cutout Products – Place on pure white (#FFFFFF) for Amazon/e-commerce.
6. Final Sharpening & Output
Smart Sharpen (Filter > Sharpen > Smart Sharpen) for web use.
Save for Web (Export as JPEG/PNG with optimized file size).
Essential Tools in Photoshop
✔ Pen Tool (Precise selections) ✔ Clone Stamp & Healing Brush (Blemish removal) ✔ Curves & Levels (Contrast & brightness adjustments) ✔ Layer Masks (Non-destructive editing) ✔ Dodge & Burn (Enhancing textures)
Pro Retouching Tips
✅ Shoot on a Clean Background – Saves hours of clipping. ✅ Use a Polarizing Filter – Reduces glare on reflective surfaces. ✅ Keep Textures Realistic – Don’t over-smooth (e.g., leather, fabric). ✅ Batch Process Similar Products – Use Actions in Photoshop. ✅ Compare Before & After – Ensure the product still looks natural.
Career Opportunities in Product Retouching
E-commerce Retoucher (Amazon, Shopify brands)
Advertising Agencies (High-end product campaigns)
Freelance Retouching (Upwork, Fiverr, PicsRetouch)
In-House for Brands (Fashion, cosmetics, electronics)
Earnings:
Beginner: $15–$30/hour
Professional: $50–$150/hour (luxury brands, high-end retouching)
How to Get Started?
Practice on Free Stock Images (Unsplash, Pexels).
Watch Tutorials (Phlearn, Piximperfect on YouTube).
Offer Free/Cheap Retouching to build a portfolio.
Apply for Jobs (Upwork, LinkedIn, Behance).
0 notes
Text
4000 Ultimate Mobile Lightroom Presets Bundle
🌟 Elevate Your Photos with Ease! 🚀
Unlock the secret to stunning, professional-quality photos with the 4000 Ultimate Mobile Lightroom Presets Bundle. Streamline your editing process and achieve consistent results across all your projects. Whether you're a beginner or a pro, this bundle is your key to effortless photo enhancement.
- 4,000 unique presets for a wide range of photography styles.
- Compatible with Lightroom on both desktop and mobile devices.
- Time-saving solution with ready-to-use presets.
- Optimizes your workflow for faster content production.
- Cost-effective with a one-time payment for lifetime access.
Discover the power of professional photo editing today! Visit: https://sharetool.net/4000-ultimate-mobile-lightroom-presets-bundle/

0 notes
Text
Photography vs. Editing: Building a Workflow That Converts

In the fast-paced world of eCommerce, especially for platforms like Shopify, product presentation is everything. A high-quality photo can grab attention, but editing is what truly seals the deal.
For businesses that want to stand out and convert browsers into buyers, understanding the balance between photography and editing is crucial.
At Clipping Way, we specialize in image clipping path services that bring out the best in your product images.
And yes — understanding Shopify Product Image Sizes is part of crafting an effective workflow.
The Role of Photography in Your Workflow
Photography is the foundation of visual storytelling. The lighting, composition, and angles all matter in capturing the essence of your product. A well-shot photo reduces editing time and enhances the final output. However, even the most professionally taken image often requires post-processing to meet eCommerce platform standards or to create a consistent look across your brand.
Tips for Better Product Photography:
Use consistent lighting (preferably soft, diffused light).
Shoot from multiple angles.
Use a white or neutral background for easy background removal.
Always shoot in high resolution.
But don’t stop at the camera shutter — the real magic happens in post-production.
Why Editing is Essential (and Often Undervalued)
Many business owners underestimate the power of editing. In reality, editing determines how your images are perceived online. Clean backgrounds, enhanced colors, proper shadows, and the right cropping can make an average image look professional — and more importantly, trustworthy.
At Clipping Way, we focus on pixel-perfect image clipping path services. We remove distracting backgrounds, adjust lighting inconsistencies, and ensure your product looks sleek, consistent, and ready to convert.
Building a Workflow That Converts
A converting workflow is about efficiency, quality, and consistency. Here's a step-by-step workflow structure we recommend to our clients:
1. Plan Your Shoot Strategically
Before taking a single photo, define your needs. Know your target platform (Shopify, Amazon, Etsy), understand the required image sizes, and create a checklist of image types: lifestyle, close-up, and scale reference shots.
2. Capture High-Quality Images
Use a DSLR or a high-resolution smartphone with a tripod. Keep the product clean, well-lit, and centered. Don’t worry about the background — our clipping path service can handle that.
3. Upload for Professional Editing
After the shoot, send your images to Clipping Way. We offer a free trial, so you can evaluate the quality before committing. Once approved, we provide tailored editing: background removal, shadow creation, image resizing, color correction, and more.
4. Optimize for Web Platforms
We resize and format your images to meet platform standards. For instance, Shopify product image sizes recommend 2048 x 2048 pixels for square images. Optimization ensures faster load times and better SEO ranking.
5. Get a Quote with Confidence
We understand that budget matters. That’s why we offer the option to get a quotation instantly and ensure the most competitive pricing in the industry — without compromising quality.
6. Test, Analyze, and Improve
After your images are uploaded to your store, monitor their performance. A/B test different backgrounds, angles, and editing styles. Conversion-friendly editing is not a one-size-fits-all — it evolves with your audience.
Why Choose Clipping Way?
Free Trial Available – See our quality before placing an order.
Expert Team – We’re skilled in Photoshop, Lightroom, and eCommerce optimization.
Fast Turnaround – Get your images back quickly, even on tight deadlines.
Dedicated Support – Our customer service is as polished as your product images.
Affordable Pricing – We beat industry prices with unmatched quality.
Frequently Asked Questions
1. What is a clipping path service? A: A clipping path is a manual process in Photoshop where we use the pen tool to cut out the product from its background. This allows you to place your product on any background you desire or keep it transparent.
2. How long does image editing take at Clipping Way? A: Turnaround time depends on the number of images and complexity. For small batches, it can be as quick as 12–24 hours. Larger orders are handled efficiently without delay.
3. Can I try the service before paying? A: Yes! We offer a free trial so you can see the quality of our work before committing.
4. How do I request a quotation? A: Just upload your images through our website and click on "Get a Quotation." Our team will get back to you with a tailored quote within a few hours.
5. Is Clipping Way suitable for Shopify sellers? A: Absolutely. We specialize in optimizing product images for Shopify. From Shopify product image sizes to editing style, we know what converts.
Conclusion
The line between photography and editing isn’t a competition — it’s a partnership. A well-shot image is just the start, but professional editing ensures it meets platform standards, attracts customers, and drives sales.
At Clipping Way, our clipping path services are designed to support your business goals — whether you're selling on Shopify, Amazon, or your own eCommerce site.
Take the first step toward better conversions today. Try our free trial, get a quotation, and discover why hundreds of businesses trust Clipping Way to bring their product images to life — all at the most affordable price.
0 notes
Text
How to Choose the Right Gear for Orlando Photography
To select the right gear for Orlando photography, first define your shooting goals and preferred style—whether capturing vibrant urban scenes, nightlife, or scenic landscapes. Choose a versatile camera body with good low-light performance, like a full-frame or APS-C sensor, paired with wide-angle lenses for cityscapes and telephotos for wildlife or distant details. Incorporate stabilizers, filters, and weather protection for varied conditions. Optimizing portability and future upgrades guarantees seamless captures. Moving forward, you’ll explore key gear options tailored for Orlando’s diverse environments.
Understand Your Photography Goals and Style
Before selecting your photography gear in Orlando, establishing your specific goals and stylistic preferences is essential. This clarity directs your choice of equipment and influences how you approach lighting techniques, which are critical for achieving your desired aesthetic.
Consider whether you prefer natural light, studio setups, or creative lighting effects, as this impacts your lens and flash selections. Additionally, think about your post-processing tools; your editing workflow will determine the compatibility of your gear with software like Adobe Lightroom or Photoshop.
Understanding whether you aim for vibrant landscapes, detailed portraits, or candid street shots guides your sensor choice and lens types. A focused approach ensures your gear aligns with your vision, streamlining your workflow from capture to final image.

Consider the Types of Scenes You'll Capture
Assess whether your scenes primarily involve urban landscapes or natural environments, as this influences lens choices and sensor considerations.
If capturing nighttime shots, prioritize gear with high ISO performance and fast apertures to manage low-light conditions effectively.
If capturing action or movement, opt for fast autofocus Orlando photographer systems and image stabilization features to guarantee sharp, dynamic images.
Urban vs. Nature Scenes
When choosing gear for Orlando photography, understanding the differences between capturing urban and nature scenes is essential. Urban settings demand equipment capable of handling variable street lighting, such https://creators.spotify.com/pod/profile/capra7/episodes/Discovering%20the%20Magic%20of%20Orlando%20Through%20the%20Lens-e31m4qh as fast lenses with wide apertures (f/1.4–2.8) for low-light conditions and stabilization features for handheld shots.
For wildlife preservation shots, a telephoto lens (200mm+) helps capture distant subjects without disturbance, while a sturdy tripod ensures stability. Consider weather-resistant gear for outdoor environments.
Use wide-angle lenses (16-35mm) for cityscape compositions and tight spaces.Opt for a telephoto lens to capture wildlife without intrusion.Incorporate filters (polarizers) to manage reflections and street lighting glare.
Balancing these gear choices guarantees clarity in diverse scenes, whether emphasizing urban street lighting or the quiet detail of wildlife preservation.
Nighttime Photography Needs
To effectively capture nighttime scenes in Orlando, you need to select gear that can handle low-light conditions with precision. Prioritize a sturdy tripod to ensure maximum tripod stability, minimizing camera shake during long exposures. Look for tripods with robust build quality
1 note
·
View note
Text
Photographers for Jewellery: Mastering the Art of Captivating Jewelry Photography

Jewelry photography demands a unique blend of technical skill and artistic vision. Photographers specializing in this niche understand the intricacies of capturing the brilliance and elegance of each piece. Their expertise ensures that every photograph highlights the jewelry's finest details, making it irresistible to potential buyers.
Essential Techniques for Stunning Jewelry Photography
1. Optimal Lighting Strategies
Natural vs. Artificial Light: Natural light offers a soft, flattering glow, ideal for lifestyle shots. Artificial lighting, such as softboxes and LEDs, provides greater control and consistency, especially in studio settings.
Softboxes and Reflectors: Softboxes diffuse light, creating even illumination that reduces harsh shadows. Reflectors bounce light back onto the jewelry, filling in shadows and adding depth.
Controlling Reflections and Glare: Jewelry's reflective surfaces can cause unwanted glare. Using diffused lighting and positioning lights at angles can minimize reflections.
2. Choosing the Right Background
Clean and Simple: A neutral background, such as white or black, ensures the jewelry remains the focal point.
Complementary Textures: Incorporate textures like wood or fabric to add depth without distracting from the jewelry.
3. Utilizing the Right Equipment
Macro Lenses: Essential for capturing intricate details, macro lenses allow photographers to focus closely on small jewelry pieces.
Tripods and Remote Shutters: Stabilizing equipment ensures sharp images, especially in low-light conditions.
4. Styling and Composition
Model Usage: Photographing jewelry on models provides context, showcasing scale and how the pieces complement outfits.
Creative Angles: Experiment with various perspectives to highlight different facets of the jewelry.
5. Post-Processing Excellence
Editing Software: Tools like Adobe Photoshop and Lightroom are vital for color correction, retouching, and enhancing details.
Enhancing Sparkle: Techniques such as dodging and burning can accentuate highlights and shadows, making the jewelry appear more radiant.
Why Professional Jewelry Photography Matters
High-Quality Representation: Professional photographers capture the true essence and quality of jewelry, building trust with potential customers.
Increased Sales Potential: Stunning visuals can captivate audiences, leading to higher engagement and sales.
Brand Consistency: Consistent and high-quality images reinforce brand identity and professionalism.
In conclusion, photographers specializing in jewelry possess the skills and knowledge to transform ordinary pieces into captivating visual stories. Their expertise ensures that every photograph not only showcases the jewelry's beauty but also resonates with the target audience, driving interest and sales.
To locate “Photographers For Jewellery” effortlessly, download the Justdial app (JD App). Simply search “Photographers For Jewellery” within the app to discover nearby dealers/outlets and access detailed information about their offerings.
0 notes
Text
30+ Best Lightroom Presets for Stunning Portraits — Speckyboy
New Post has been published on https://thedigitalinsider.com/30-best-lightroom-presets-for-stunning-portraits-speckyboy/
30+ Best Lightroom Presets for Stunning Portraits — Speckyboy
The purpose of portrait photography is to capture the unique likeness, character, and personality of an individual or group of people. It involves using various techniques such as lighting, posing, and post-processing to create a visually compelling image.
When it comes to portrait photography, beauty may be in the eye of the beholder, but sometimes, it takes some coaxing to show its true nature. And by coaxing, we mean editing. While we have a lot of tech at our disposal (and it has come far), our cameras may not quite capture the essence of the moment and all the little things that make it magical, sometimes, you may need a Lightroom preset to do that for you.
To help you create perfect portraits every time, take a look at the Lightroom presets we have for you here. Many are free, and you’ll get plenty of options for creating authentic and unique moods that your clients and social media followers will love. From Lightroom presets inspired by Instagram effects and sepia tones to presets for bright and colorful portraits, you’ll get plenty to pick from.
Bright and stylish, these Lightroom presets are perfect for professional photographers. Your photos will get a bright, airy, and glossy atmosphere that’s perfect for highlighting the beauty of your subjects. This incredible collection offers 11 Lightroom presets for portrait photography.
You don’t need an analog camera to get stunning results! Give your photos an authentic and vintage feel with Lomography, a collection of 11 Lightroom presets. These beautifully toned Lightroom presets are perfect for professional photoshoots, as well as portfolio and social media photography.
Free to Download
Slumberland is a Lightroom preset that gives a light and airy look to your portrait photos. This preset is especially useful if you have shadowy, dark images that you want to improve. Try it out for fresh summer shots, album cover portraits, or any other creative projects where you want to add a touch of lightness and vibrancy to your photos.
Create diverse and beautiful portraits with these Lightroom presets. You’ll get 14 presets that will help you create flawless and professional results, no matter the lighting. From black and white to minimalist presets, you’ll get plenty of options for the perfect shot!
Free to Download
Contrast Noir is the free preset that challenges the misconception that black and white portraits are dull and uninspiring. By working on contrasts, this preset adds a stylish touch that makes portrait subjects stand out from their backdrops.
Stunning and authentic, Tangerine portrait presets are a fantastic choice. You’ll get 20 portrait presets that play with golden and warm tones and give your photos a matte feel with quick editing in Lightroom or Photoshop. They’re great for professionals and newbies alike!
Free to Download
Cosmic Dancer is a versatile Lightroom preset designed to make colors pop in portrait photography. This preset is perfect for adding a bit of excitement to your flatter images, making them stand out.
Free to Download
If you’re looking for a touch of retro styling for your portraits, look no further than this preset. It delivers exactly what you’re after, with warm, matte tones applied throughout. It is perfect for warming up colors while keeping them soft.
Bring out the right tone in your photos to create a unique feeling with Scarlet Fantasy, a collection of 16 Lightroom presets for portrait photography. You’ll get five toning presets for cold, warm, and sepia tones, as well as 11 preset variations that optimize saturation, contrast, and exposure.
Free to Download
The timeless, brown, and yellow faded sepia tones often found in old and historic photos can now be added to your modern portraits. With this free Lightroom preset, it’s easy to achieve this classic style in just a few clicks.
Perfect for bringing out the natural beauty of your models, these Lightroom presets offer flawless results. You’ll get 60 professional Lightroom presets, so this collection is an excellent addition to your standard editing kit.
Free to Download
Wedding photos are some of the most memorable portraits you’ll ever capture, and they deserve the best possible editing treatment. The Take a Vow preset is tailor-made for wedding shots, helping the happy couple stand out by fading background colors to avoid distractions.
Give your photos a rich and deep atmosphere with Burgundy, a collection of 14 Lightroom presets. These presets bring out the reds in your photos and create a stunning and authentic vintage atmosphere. These Lightroom presets are perfect for portfolio photography and establishing a distinct style!
Free to Download
Are you looking for a bold styling for your portrait photos? The Hopscotch Lightroom preset can deliver just that. Whether you’re looking to create funky, artsy shots or simply need to make the colors pop, Hopscotch offers a range of options to choose from.
If you leveraged natural light for your portrait shots, you’ll love these Lightroom presets! Made with natural lighting in mind, these 30 Lightroom presets give your photos an airy and warm feeling. They’re perfect for professional shoots.
Free to Download
Classy and elegant black and white portraits never go out of style, but shooting in black and white can limit your creative options. With the Limograph Lightroom preset, you can convert your color photos into black and white later and preserve your creative flexibility.
No glitter, but plenty of gold! Aurum is a stunning collection of 14 presets and their variations for portrait photography. They’ll give your photos a warm color boost, no matter the conditions. Aurum presets make every photo beautiful, even if it was shot in a cold studio.
Free to Download
For a black and white portrait preset that emulates the look and feel of film photography, look no further than Shadowze. This Lightroom preset presents photos in a high-contrast yet flat way, without many sharp tones, making it ideal for any subject.
Free to Download
Vintage-styled images can be colorful, stunning works of art that are far from uninteresting. Transform your photos into just that with this free Lightroom preset. It makes full use of yellow and orange tones for a classic, bright look that’s impossible to match with a camera alone.
Add a dash of gold to your standard portrait photography with Yolk, a collection of 31 Lightroom presets. From natural tones that improve professional photoshoots to presets that turn every photo into a masterpiece of fine art, there’s plenty to pick from in this stunning preset collection.
The ultimate bundle for all your portrait photography Lightroom needs! You’ll get 80 presets for rich and moody, vintage black and white, as well as glossy editorial and magazine atmospheres. Add them to your photos for stunning results.
Convey the romantic and cozy atmosphere of autumn with these Lightroom presets. This stunning collection offers 20 Lightroom presets, with effects that vary from soft matte effects to presets with dramatic and deep orange tones. There’s plenty to pick from for your next shoot!
Turn your original shots into works of art with these Instagram-effect Lightroom presets. You’ll get 11 presets that will work on a variety of images, conditions, and lighting environments. You can easily adjust the effects to suit your preferences and create a consistent style.
Save time and get gorgeous, consistent results with these 10 Lightroom presets for portrait photography. These presets offer gentle improvements to your original shots that beautifully convey the unique atmosphere of each moment. You can easily edit the effects to suit your style, and give your original images more depth.
Bright, airy, and glossy, these modern Lightroom presets are fit to appear on the cover of Vogue! You’ll get 30 Lightroom presets that work beautifully for a variety of different shoots, and guarantee stunning results. You can also use them for fashion and wedding photography.
Let your viewers immerse themselves in the nostalgic atmosphere of your photos with Flowerage, a collection of 24 portrait photography Lightroom presets. They adjust the colors to give your original shots a hipster vintage feeling. You can use them for various photos since they offer different brightness and lighting variations.
Mimic the charm of VSCO with these professional portrait Lightroom presets. This collection offers 12 Lightroom presets that will give your standard portrait shots additional depth and moody atmospheres for highly-artistic results. These Lightroom presets are perfect for professional shoots, as well as distinguished portfolio photography.
Give your photos a unique artistic feel with these professional Lightroom presets. These 16 presets offer a film-like look for your photos. The effects range from faded and grainy to soft and smooth. They’re perfect for professional photography.
Diverse and authentic, these Lightroom presets offer excellent options for portrait photography. You’ll get all the must-have filters and effects, from faded matte to soft filters that work on your models’ creamy skin. There are 14 Lightroom presets in this pack, and you’ll love the results!
There’s nothing like black and white to add drama to your photos or showcase the emotions lying underneath. These portrait photography Lightroom presets offer ten black and white filters. From sepia tones to bright filters, you’ll get everything you need to turn your photos into works of art.
Add depth to your photos with Deeptone, a collection of 8 Lightroom presets for portrait photography. They’ll give your photos a moody atmosphere. The presets range from cold greens to neutral and warm tones, so there’s plenty to create a beautiful photo your clients will love.
Flora is a collection of fine-tuned and artistic Lightroom presets, perfect for outdoor portrait photography. You’ll get four preset options, named after the seasons, that work perfectly for creating unique atmospheres and bring the best out of lush, green settings. They work best with natural light!
Retrochrome is a collection of vintage-inspired Lightroom presets perfect for portrait and family photography. It offers beautiful toning for photos by radiating a nostalgic and warm atmosphere. You’ll get 17 retro chrome presets, as well as variations to match your original settings, conditions, and lighting.
It’s time to tell an incredible story with your photos! Use these 11 Lightroom presets if you want to convey a dark fairytale atmosphere. Every preset is editable, so you can customize them to fit your vision (and settings).
If you want to give your portraits a glossy touch, you’ll love these 50 Lightroom presets. You’ll get presets inspired by Kodachrome, Hermes’ red and orange tones, nostalgic filters, and other styles seen in magazines. You can even use them for videos!
Skin Retouching with Presets
The above Lightroom presets offer a range of adjustments to smooth skin texture, improve tone, and reduce blemishes without overdoing it. They simplify the skin retouching process, making it accessible to photographers of all skill levels.
You can achieve natural-looking, flawless skin in your portrait photos with just a few clicks. These presets will save you time and ensure consistent results, allowing your subjects to shine without imperfections.
How to Install Lightroom Presets
Download Presets: Download one of the portrait presets from this page.
Open Lightroom: Launch Lightroom and navigate to the Develop module.
Create Presets Folder: Right-click on an existing preset folder in the left panel and create a new one called Portrait Presets.
Import Presets: Right-click the new folder, select Import, and select the .xmp preset files you downloaded.
Apply Presets: Open a portrait photo, access the Presets panel, and click a portrait preset to apply it.
Adjust as Needed: Fine-tune settings to match the unique characteristics of each portrait.
Batch Edit: Consistently edit multiple portrait images using the same preset.
Perfect Portraits with Lightroom
It’s up to you to pick the perfect preset for your next project(s). At the end of the day, you’ll get stunning results. And no matter the lighting or the conditions, you’ll be able to create the exact scene you originally set out to create.
And once you share your beautiful work with the world – be that in your portfolio or on your social media – you’ll have no problem attracting even more clients who want your magic to themselves.
More Lightroom Preset Collections
Our curated Lightroom preset collections provide a comprehensive toolkit for both photography beginners and experts. We have a vast selection of presets, effects, and LUTs, including those suited for portraits, landscapes, cinematic effects, and much more.
More Lightroom Presets
Related Topics
#ADD#Adobe Lightroom#analog#Art#atmosphere#background#Beauty#bundle#Cameras#Capture#chrome#Collections#Color#colors#comprehensive#creative projects#Dark#Design#easy#Editing#editorial#effects#emotions#eye#fashion#film#Filters#Full#gold#green
1 note
·
View note
Text
Travel Smart with Power and Style The Ultimate Travel Companion in UPERFECT Portable Monitor
A New Generation of Portability and Performance With the boundaries between work, play, and travel continuously blurring in the modern world, being connected and productive on the go is no longer an option—it's a lifestyle. Whether jetting off across the globe, driving to a local café, or simply escaping to the countryside for some clean air, having power and remaining productive on the go is key.
That is where the UPERFEXT portable monitor comes in, beautifully bridging the gap between mobility and power. Drives by a compact, miniaturized design and powerhouse performance, this portable monitor is revolutionizing the way we live, work, and play in transit. Design That Demands Attention On first impression, the UPERFECT Monitor stands out. Built for those who adore form as much as functionality, it features an ultra-thin, lightweight profile that easily slips into backpacks, laptop bags, or carry-ons. The brushed metal frame and borderless display provide a dash of modern chic, making it a style-conscious partner for professionals, creatives, and gamers alike. Don't be fooled by the appearance, however—beneath its sleek design lies some serious tech muscle. Visuals That Redefine Clarity What truly sets the UPERFECT portable monitor apart is its breathtaking 4K resolution. Whether you’re editing high-resolution images, designing immersive visuals, or simply binging your favorite shows, every detail pops with crispness and vibrant color. The 4K portable monitor isn’t just a luxury—it’s a tool that elevates your visual experience to new heights. Colors are realistic, contrast is vivid, and view angles are wide enough to share your screen with coworkers without compromising image quality. Whether you're editing Adobe Lightroom or jumping into a gaming marathon, this screen accompanies you without missing a beat. Work Remotely Without Limits Remote work is the new norm for many, and the need for flexible, reliable gear is higher than ever. With a UPERFECT Monitor, you can convert any room into an extremely efficient workspace. Need two monitors to boost productivity? Plug in your laptop or tablet in seconds and double your screen real estate in no time.
For video calls, spreadsheet work, or navigating multiple browser windows, this monitor facilitates smoother and more convenient multitasking. With plug-and-play via USB-C and HDMI interfaces, there is no tedious setup—just instant use on the move. Creativity Unleashed, Wherever Photographers, videographers, artists, and other visual creatives this UPERFECT portable monitor is more than a monitor—you can think of it as a reliable extension to your creative toolkit. With accurate 100% sRGB rendering and vivid color output, the 4K portable monitor presents your work to you exactly as you meant it to look. Precision matters, and the UPERFECT Monitor delivers it with each pixel. Color grading, retouching, or illustrating—UPERFECT Monitor precision and consistency let you create your best work—no matter how exotic the destination: beachside café or mountain retreat. Gaming Arrives at the Mobile Device, Without Sacrifice For gamers who never accept anything short of optimal performance, the UPERFEXT Monitor offers the ultimate gaming experience wherever life may take you. From fast refresh rates, lower lag to an eye-broadening, razor-sharp display, your games look prettier and run smoother. Connect your Nintendo Switch, PlayStation, Xbox, or gaming PC in seconds, and experience deep, stutter-free play on a screen that fits in your backpack. It's freedom, ability, and fun—all rolled into a single handy package. Built to Last on the Move Portability needn't compromise with durability. UPERFORTABLE portable monitor is made for travel. Durable in design and equipped with protective gear like a smart cover that also provides stand function, it is ready to absorb daily travel's bumping and jolting, or even those of long flights.
The rechargeable battery (on some models) also makes it more portable, offering you hours of use without the need to be plugged into a wall outlet. It's the kind of product that works for your lifestyle—whether backpacking in the woods or hopping from shared workspaces. Seamless Compatibility Across Devices Yet another standout feature of the UPERFECT Monitor is its amazing versatility. It gets along great with pretty much every device—laptops, smartphones, tablets, consoles, and even cameras. No adapters or infinite cables required. The dual speakers and various ports of entry ensure you're never more than a plug away from your perfect setup. Whether presenting, editing a vlog, or gaming with friends, it's built to accommodate your workflow, regardless of what tools you choose. The Last Word In an era where flexibility is key, the UPERFECT portable monitor is the response to the new lifestyle. It's more than just a screen—it's a gateway to freedom, productivity, imagination, and entertainment packed in a style that is both practical and appealing. Equipped with its stunning 4K resolution, sleek design, and effortless connectivity, the UPERFECT Monitor is the ultimate companion for those who work hard, play hard, and never stay put for a moment. Discover the Full Range You're a digital nomad, a creative entrepreneur, or a recreational traveler who expects quality tech. Whatever you are, UPERFECT's portable monitor range has something for you. Discover the entire range at UPERFECT and see how the perfect monitor can transform your work and play. Stay productive anywhere—and do it in style.
0 notes
Text
Can AI Photo Editors Work Better Than Humans?
Strengths of AI Photo Editors
Speed and Efficiency: AI tools like Adobe Photoshop’s Neural Filters, Luminar Neo, or Canva’s Magic Studio perform tasks like background removal, color correction, or object removal in seconds, far faster than manual methods.
Automation for Scale: AI excels at batch processing (e.g., editing hundreds of images) and technical tasks like noise reduction or upscaling. Topaz Gigapixel AI, for instance, enhances low-resolution images with minimal quality loss.
Accessibility: Snapseed, PicsRetouch, and Photopea enable beginners to achieve professional results without steep learning curves, democratizing photo editing.
Advanced Capabilities: AI can restore old photos, generate art (e.g., Midjourney, DALL·E 3), or predict lighting adjustments using models trained on millions of images.
Limitations of AI Photo Editors
Lack of Creative Intuition: AI struggles with subjective decisions, like capturing a specific mood or narrative, where human editors excel.
Errors in Complex Edits: AI can produce artifacts, such as unnatural skin textures or distorted objects, especially in intricate scenes like crowded photos or abstract art.
Dependence on Training Data: AI’s performance relies on its training dataset, which may not handle unconventional styles or niche genres effectively.
Strengths of Human Editors
Artistic Vision: Humans tailor edits to a project’s emotional or cultural context, such as crafting a wedding album or editorial shoot with a unique aesthetic.
Contextual Judgment: Professionals make nuanced choices, like preserving imperfections for authenticity or aligning edits with a brand’s identity.
Precision in High-End Work: Complex retouching for fashion or advertising often requires manual finesse that AI approximates but rarely perfects.
Real-World Insights
Community Feedback: Recent people thought show hobbyists praising AI for quick social media edits, while professionals emphasize manual tools for high-stakes projects like fashion or fine art.
Data Points: A 2024 study found AI editors achieve 85-90% accuracy in automated retouching, but 70% of photographers prefer hybrid workflows, using AI for initial edits and manual tweaks for refinement.
Popular AI Photo Editing Tools
Free/Accessible: Canva, Snapseed, PicsRetouch (browser-based).
Professional-Grade: Adobe Photoshop (Neural Filters), Luminar Neo, Topaz Labs.
Creative/Generative: Midjourney, DALL·E 3 for AI-generated enhancements.
Mobile: Picsart, Adobe Lightroom Mobile for on-the-go editing.
AI shines in speed, scale, and technical precision, while humans excel in creativity and context. Combining both—using AI for tasks like background cleanup or color grading and humans for artistic refinements—yields optimal results. For example, a photographer might use Luminar Neo to enhance a landscape’s sky, then manually adjust shadows in Photoshop for a distinctive style.
1 note
·
View note