#livereload
Explore tagged Tumblr posts
Visit Tumblr Blog
Explore Tumblr blogs with no restrictions, modern design and the best experience.
Last Seen Tumblr Blogs


Fun Fact
Tumblr has 411 employees.
Text
Ionic run livereload network error virtualbox

IONIC RUN LIVERELOAD NETWORK ERROR VIRTUALBOX HOW TO
PS: Let me know if I should add any other log files and information. Code: Select all Expand view Collapse view. VirtualBox is a community effort backed by a dedicated company: everyone is encouraged to contribute while Oracle ensures the product always meets professional quality criteria. (get image from the SCCM - already configured) This machine is set: Boot option first - network Intel PRO/1000 MT Desktop (82540EM). VirtualBox is being actively developed with frequent releases and has an ever growing list of features, supported guest operating systems and platforms it runs on. I am a student and I am trying to learn new things by myself. I also have virtual machine without any OS installed on it.
IONIC RUN LIVERELOAD NETWORK ERROR VIRTUALBOX HOW TO
System halted.Ĭan you please give me some tips how to troubleshoot? I do not know where is the problem (virtual box / DHCP server / anything else). When I turn this machine on I get Code: Select all Expand view Collapse view FATAL ERROR: Could not read from the boot medium. (get image from the SCCM - already configured)īoot option first - network Intel PRO/1000 MT Desktop (82540EM). I also have virtual machine without any OS installed on it. ionic capacitor run android livereload Code Answers capacitor live reload ionic capacitor v3 run android livereload ionic capacitor build livereload. I run it with a Windows server 2016 virtualized under virtualbox version 5.1.24 r117012, in this server I've got SCCM, WDS, DNS, DHCP and Active Directory installed and everything mentioned is normally well configured. I am using Windows 7 64 bit and I'm testing in a virtual environment under virtualbox the deployment by System Center Configuration Manager 2012 R2 SP1. I have some problems with booting in PXE mode.
1 note
·
View note
Text
Quick Tip: Setup Local Previews With Atom
New item has been added on ThemeKeeper.com https://themekeeper.com/web-design/quick-tip-setup-local-previews-atom
When working on a static site your life can be made much easier if you have a simple way to activate a local preview of your design.
0 notes
Text
Svelte + Tailwind + Storybook Starter Template
First of all, here's the link to the Github repo, go ahead and start working on your project than fiddle with the configurations. Trust me that takes a hell lot of time.
Visit this website to see the outcome: Svelte + TailwindCSS + Storybook
// Quickstart npx degit jerriclynsjohn/svelte-storybook-tailwind my-svelte-project cd my-svelte-project yarn yarn dev yarn stories
Svelte and TailwindCSS is an awesome combination for Frontend development, but sometimes the setup seems a bit non intuitive, especially when trying to try out this awesome combination. When integrating Storybook, which is another awesome tool for UI Component development and documentation, there is no obvious place to get how it's done. This repo was made to address just that!
You can easily start your project with this template, instead of wasting time figuring out configurations for each integration.
What do you get in this repo
A fully functional Svelte + TailwindCSS integration with side-by-side implementation of independent Storybook
Storybook with 5 essential Addons
Storybook populated with basic examples of Svelte + TailwindCSS
Addons
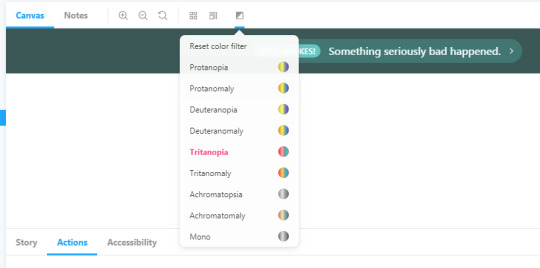
Accessibility Addon

Accessibility Addon - Colorblindness Emulation
Actions Addon

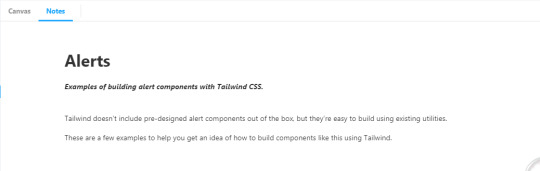
Notes Addon
Source Addon

Viewport Addon

Svelte + TailwindCSS + Storybook
Storybook is an open source tool for developing JavaScript UI components in isolation
Svelte is a component framework that allows you to write highly-efficient, imperative code, that surgically updates the DOM to maintain performance.
TailwindCSS is a highly customizable, low-level CSS framework that gives you all of the building blocks you need to build bespoke designs without any annoying opinionated styles you have to fight to override.
Steps to build
Clone this repo git clone https://github.com/jerriclynsjohn/svelte-storybook-tailwind.git
Go to the directory cd svelte-storybook-tailwind
Install dependencies yarn
To develop your Svelte App: yarn dev
To develop UI components independent of your app: yarn stories
Documentations
Svelte - API and Tutorial
TailwindCSS - Docs and Tutorial
Storybook - Docs and Tutorial (No Svelte Yet!)
Steps to build it all by yourself and some tips [Warning: It's lengthy]
Instantiate Svelte App
Start the template file using npx degit sveltejs/template svelte-storybook-tailwind
Go to the directory cd svelte-storybook-tailwind
Install dependencies yarn
Try run the svelte app yarn dev
Add Tailwind into the project
Install dependencies: yarn add -D tailwindcss @fullhuman/postcss-purgecss autoprefixer postcss postcss-import svelte-preprocess
Change the rollup config as shown:
import svelte from 'rollup-plugin-svelte'; import resolve from 'rollup-plugin-node-resolve'; import commonjs from 'rollup-plugin-commonjs'; import livereload from 'rollup-plugin-livereload'; import { terser } from 'rollup-plugin-terser'; import postcss from 'rollup-plugin-postcss'; import autoPreprocess from 'svelte-preprocess'; const production = !process.env.ROLLUP_WATCH; export default { input: 'src/main.js', output: { sourcemap: true, format: 'iife', name: 'app', file: 'public/bundle.js', }, plugins: [ svelte({ preprocess: autoPreprocess({ postcss: true, }), // enable run-time checks when not in production dev: !production, // we'll extract any component CSS out into // a separate file — better for performance css: css => { css.write('public/bundle.css'); }, }), postcss({ extract: 'public/utils.css', }), // If you have external dependencies installed from // npm, you'll most likely need these plugins. In // some cases you'll need additional configuration — // consult the documentation for details: // https://github.com/rollup/rollup-plugin-commonjs resolve({ browser: true, dedupe: importee => importee === 'svelte' || importee.startsWith('svelte/'), }), commonjs(), // Watch the `public` directory and refresh the // browser on changes when not in production !production && livereload('public'), // If we're building for production (npm run build // instead of npm run dev), minify production && terser(), ], watch: { clearScreen: false, }, };
Add tailwind config using the command npx tailwind init
Add PostCSS config ./postcss.config.js as follows:
const production = !process.env.ROLLUP_WATCH; const purgecss = require('@fullhuman/postcss-purgecss'); module.exports = { plugins: [ require('postcss-import')(), require('tailwindcss'), require('autoprefixer'), production && purgecss({ content: ['./**/*.html', './**/*.svelte'], defaultExtractor: content => { const regExp = new RegExp(/[A-Za-z0-9-_:/]+/g); const matchedTokens = []; let match = regExp.exec(content); // To make sure that you do not lose any tailwind classes used in class directive. // https://github.com/tailwindcss/discuss/issues/254#issuecomment-517918397 while (match) { if (match[0].startsWith('class:')) { matchedTokens.push(match[0].substring(6)); } else { matchedTokens.push(match[0]); } match = regExp.exec(content); } return matchedTokens; }, }), ], };
Build the project with some TailwindCSS utilities yarn dev
Add Storybook into the Svelte Project
Add Storybook dependencies yarn add -D @storybook/svelte
Add 5 commonly used Storybook Addons:
Source: yarn add -D @storybook/addon-storysource
Actions: yarn add -D @storybook/addon-actions
Notes: yarn add -D @storybook/addon-notes
Viewport: yarn add -D @storybook/addon-viewport
Accessibility: yarn add @storybook/addon-a11y --dev
Create an addon file at the root .storybook/addons.js with the following content and keep adding additional addons in this file.
import '@storybook/addon-storysource/register'; import '@storybook/addon-actions/register'; import '@storybook/addon-notes/register'; import '@storybook/addon-viewport/register'; import '@storybook/addon-a11y/register';
Create a config file at the root .storybook/config.js with the following content:
import { configure, addParameters, addDecorator } from '@storybook/svelte'; import { withA11y } from '@storybook/addon-a11y'; // automatically import all files ending in *.stories.js const req = require.context('../storybook/stories', true, /\.stories\.js$/); function loadStories() { req.keys().forEach(filename => req(filename)); } configure(loadStories, module); addDecorator(withA11y); addParameters({ viewport: { viewports: newViewports } });
Add tailwind configs in the webpack.config.js under .storybook and also accommodate for Source addon:
const path = require('path'); module.exports = ({ config, mode }) => { config.module.rules.push( { test: /\.css$/, loaders: [ { loader: 'postcss-loader', options: { sourceMap: true, config: { path: './.storybook/', }, }, }, ], include: path.resolve(__dirname, '../storybook/'), }, //This is the new block for the addon { test: /\.stories\.js?$/, loaders: [require.resolve('@storybook/addon-storysource/loader')], include: [path.resolve(__dirname, '../storybook')], enforce: 'pre', }, ); return config; };
Create the postcss.config.js under .storybook:
var tailwindcss = require('tailwindcss'); module.exports = { plugins: [ require('postcss-import')(), tailwindcss('./tailwind.config.js'), require('autoprefixer'), ], };
Make sure you have babel and svelte-loader dependencies yarn add -D babel-loader @babel/core svelte-loader
Add npm script in your package.json
{ "scripts": { // Rest of the scripts "stories": "start-storybook", "build-stories": "build-storybook" } }
Add a utils.css file under storybook/css/ and make sure you import 'utils.css' in your stories.js files:
/* Import Tailwind as Global Utils */ @import 'tailwindcss/base'; @import 'tailwindcss/components'; @import 'tailwindcss/utilities';
Write your Svelte component in storybook\components and yes you can use your regular .svelte file. The only thing is that you cant use templates in a story yet, not supported, but yes you can compose other components together. For the starter pack lets just create a clickable button.
<script> import { createEventDispatcher } from 'svelte'; export let text = ''; const dispatch = createEventDispatcher(); function onClick(event) { dispatch('click', event); } </script> <button class="bg-blue-500 hover:bg-blue-700 text-white font-bold py-2 px-4 rounded" on:click={onClick}> {text} </button>
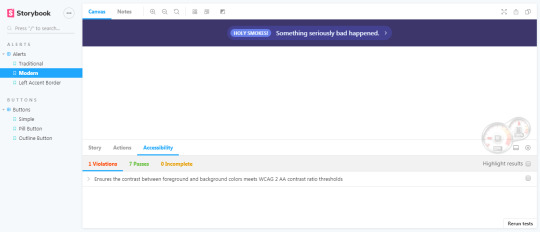
Write your stories in storybook/stories and you can name any number of story file with <anything>.stories.js, for the starter package we can create stories of Button with the readme notes at <anything>.stories.md. Note: reference the css here to make sure that tailwind is called by postcss:
import '../../css/utils.css'; import { storiesOf } from '@storybook/svelte'; import ButtonSimple from '../../components/buttons/button-simple.svelte'; import markdownNotes from './buttons.stories.md'; storiesOf('Buttons | Buttons', module) //Simple Button .add( 'Simple', () => ({ Component: ButtonSimple, props: { text: 'Button' }, on: { click: action('I am logging in the actions tab too'), }, }), { notes: { markdown: markdownNotes } }, )
Write your own Documentation for the Component which will <anything>.stories.md :
# Buttons _Examples of building buttons with Tailwind CSS._ --- Tailwind doesn't include pre-designed button styles out of the box, but they're easy to build using existing utilities. Here are a few examples to help you get an idea of how to build components like this using Tailwind.
Run your storyboard yarn stories and you'll see this:
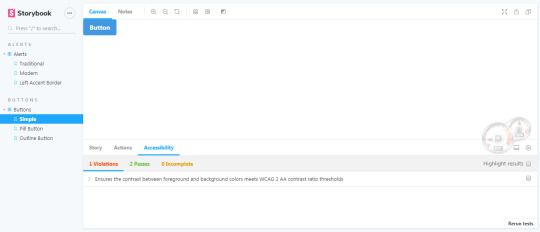
You can add more addons and play around with them.
That's a wrap!
#template#storybook#svelte#tailwindcss#ui#component#frontend#webdevelopment#postcss#purgecss#autoprefixer#node#javascript#css#html5
2 notes
·
View notes
Text
set up the Minimal Mistakes theme for Jekyll
To set up the Minimal Mistakes theme for Jekyll, you will need to do the following:
Install Jekyll by following the instructions at https://jekyllrb.com/docs/installation/.
Create a new Jekyll site by running the following command: jekyll new mysite
Navigate to the directory of your new site: cd mysite
Add the Minimal Mistakes theme to your Gemfile: "gem 'minimal-mistakes-jekyll'" >> Gemfile
Install the theme and its dependencies: bundle install
Set the theme in your _config.yml file: "theme: minimal-mistakes-jekyll" >> _config.yml
Build your site: bundle exec jekyll build
You should now have the Minimal Mistakes theme installed and configured for your Jekyll site. To test it out, you can run bundle exec jekyll serve and view your site at http://localhost:4000.
Change the port that Jekyll serves
To change the port that Jekyll serves your site on, you can use the --port option when running the jekyll serve command. For example, to serve your site on port 8080, you would run the following command:
bundle exec jekyll serve --port 8080
You can also set the port option in your _config.yml file, like this:
port: 8080
Then, when you run bundle exec jekyll serve, Jekyll will use the port specified in your configuration file.
Note that some ports, such as port 80, may require special privileges to bind to. If you encounter an error when trying to use a specific port, you may need to run Jekyll as a privileged user (e.g., using sudo on Linux) or choose a different port.
Livereload
Finally, start your Jekyll site with the --livereload option:
bundle exec jekyll serve --livereload
Your Jekyll site should now be served with LiveReload enabled. Any changes you make to your site will be automatically detected and the page will be reloaded in the browser.
Enable Pagination
pagination work only .html not .md or .markdown
source: https://mmistakes.github.io/minimal-mistakes/docs/configuration/#paginate
0 notes
Text
Brew cask install statusfy

BREW CASK INSTALL STATUSFY SOFTWARE
BREW CASK INSTALL STATUSFY CODE
pen - Live Markdown preview in the browser from your favorite editor.
alex - Catch insensitive, inconsiderate writing.
kill-tabs - Kill all Chrome tabs to improve performance, decrease battery usage, and save memory.
brightness - Change the screen brightness.
wallpaper - Change the desktop wallpaper.
wifi-password - Get the current wifi password.
tmpin - Adds stdin support to any CLI app that accepts file input.
BREW CASK INSTALL STATUSFY CODE
browser-run - Easily run code in a browser environment.license-checker - Check licenses of your app's dependencies.Quickly filter, map, and reduce from the terminal. normit - Google Translate with speech synthesis in your terminal.bcat - Pipe command output to web browsers.Live Server - Development HTTP-server with livereload capability.http-server - Simple, zero-config command-line HTTP server.David - Tells you when your package npm dependencies are out of date.dev-time - Get the current local time of a GitHub user.ESLint - The pluggable linting utility for JavaScript.Standard - JavaScript Standard Style - One style to rule them all.XO - Enforce strict code style using the JavaScript happiness style.clipboard-cli - Copy & paste on the terminal.public-ip - Get your public IP address.is-online - Check if the internet connection is up.is-up - Check whether a website is up or down.vtop - More better top, with nice charts.emoj - Find relevant emoji from text on the command-line.speed-test - Test your internet connection speed and ping.npm-home - Open the npm page of a package.gh-home - Open the GitHub page of the repo in the current directory.npm-name - Check a package name's availability on npm.isomorphic-git - Pure JavaScript implementation of Git.xlsx - Pure JS Excel spreadsheet reader and writer.skale - High performance distributed data processing engine.js-git - JavaScript implementation of Git.seedshot - Temporary P2P screenshot sharing from your browser.Kadence - Kademlia distributed hash table.NodeOS - The first operating system powered by npm.webcat - p2p pipe across the web using WebRTC that uses your GitHub private/public key for authentication.turf - Modular geospatial processing and analysis engine.Bitcore - Pure and powerful Bitcoin library.BitcoinJS - Clean, readable, proven Bitcoin library.peercast - Stream a torrent video to Chromecast.peerwiki - All of Wikipedia on BitTorrent.
BREW CASK INSTALL STATUSFY SOFTWARE
stackgl - Open software ecosystem for WebGL, built on top of browserify and npm.
ipfs - Distributed file system that seeks to connect all computing devices with the same system of files.
dat - Real-time replication and versioning for data sets.
webtorrent - Streaming torrent client for Node.js and the browser.
Delightful Node.js packages and resources
0 notes
Text
Chrome extension uuid generator postgres

Chrome extension uuid generator postgres generator#
d indicates the text input of the request body. Resizing a WebFOCUS Designer Esri map removes layer. An example request body is as follows: ' -H 'X-Auth-Token:MIISkAY***80T9wHQ=' -H 'Content-type: application/json' -X POST Error when migrating DB from SQL to Postgresql and running dbreplicate. rootaccounting-2 (master) sudo -u postgres psql -dbnameidempiere psql (11.8) Type 'help' for help. Where: PL/pgSQL function generateuuid() line 3 at RETURN This usually indicates that the uuid extension is missing from the database. Enter the request body in the text box below. You might need to add explicit type casts. Select raw and then JSON(application/json).
Chrome extension uuid generator postgres generator#
Use one of the UUID-OSSP generator function as th. Once UUID-OSSP is installed, declare a CREATE TABLE and UUID column. It can produce integers, longs, uuids, or strings, as shown in the following example. The algorithm used by the random() function generates pseudo-random values. setseed() sets the internal value for the generator. There is a UUID-OSSP server module to provide such functions, but it must be installed. LiveReload browser extensions are freely available for Chrome. PostgreSQL has two basic functions for generating random data: random() returns a random value with uniform distribution from the range 0.0, 1.0) (includes 0.0, but no 1.0). So you have to add a callback Bean to set your Id manually.Figure 3 Setting parameters on the Body tab page Answer: The PostgreSQL UUID type does not have a built-in sequence generator functions. Several sources ( here, here, here, here, here and here) indicate that there is no auto Id generation for R2DBC. I ditched the JPA approach - and note that we are using R2DBC, not JDBC, so the answer didn't work straight away. Currency conversion extension for Google Chrome and Edge browser that is based on the Chromium open-source project. Thanks to Sve Kamenska, with whose help I finally got it working eventually. The DDL for the table is like this: CREATE TABLE DOODAHS(id UUID not null, fieldA VARCHAR(10), fieldB VARCHAR(10)) NB the persistence is being handled by a class which looks like this: interface DoodahRepository extends CrudRepository Annotate class with Replace spring annotation with seen useful answers here, here and here but none have worked so far.use) or browsers extension such as Firefoxs HttpRequester, or Chromes Advanced. Create the UUID myself - results in Spring complaining that it can't find the row with that id. As an example, create a PyDev project called test-flask with a module.Neo4j: fixed actions menu for graph view tab. In PostgreSQL, there are a number of functions that generate UUID s: The uuid-ossp extension offers functions to generate UUID s. There are several standardized algorithms for that. Annotate the field with (in addition to existing spring Id) Cassandra: fixed generation of CQL script for only selected tables. A UUID (universally unique identifier) is a 128-bit number that is generated with an algorithm that effectively guarantees uniqueness.The class looks like this: class Doodah = strategy = false, unique = true) This extension allows to generate one or multiple Universal Unique Identifiers (UUID v4) with formatting options (with/out hyphens, with/out braces, lower/upper cased), and to copy rows of identifiers to the clipboard. This error indicates that it's expecting the ID column to be auto-populated (with some default value) when a row is inserted. This should be href="" rel="nofollow noreferrer">straightforward since hibernate and postgres have good support for UUIDs.Įach time I create a new instance and write it with save(), I get the following error: o.h.j.JdbcSQLIntegrit圜onstraintViolationException: NULL not allowed for column "ID" SQL statement: INSERT INTO DOODAHS (fieldA, fieldB) VALUES $1, $2). To protect user privacy, Google policies mandate that no data be passed to Google that Google could. The ID column of the table is a UUID, which I want to generate in code, not in the database. Avoid sending PII to Google when collecting Analytics data. How to view-source of a Chrome extension. I am trying to persist a simple class using Spring, with hibernate/JPA and a PostgreSQL database. Tags: uuid guid uuid-generator guid-generator generator time order rfc4122.
0 notes
Text
Automatic browser refresh for Chrome & Safari
Automatic browser refresh for Chrome & Safari
Check mockko’s livereload, an automated browser reloading tool for Chrome and Safari. Really useful for coders.
View On WordPress
0 notes
Photo

Ionic Mobile App Development Company
Ammaiya is a leading ionic mobile app development company that offers ionic app development services. Our Ionic application development process is based on the proven methodology and transparency. All you get is a cross-platform app with desired features and functionality. We are renowned as a best Ionic app development company, with a team of highly talented Ionic developers and mobile app designers who leverage the potential of this framework to build apps with unparalleled user engagement and faster time to market.
Cordova, Less, Sass
CSS, AngularJS
HTML5, Javascript
Grunt, Gulp, Bower
Ionic Lab, LiveReload
Icon/Splash Generation, View App
https://www.ammaiya.com/mobile-web/ionic-app-development-services-india.html
#ionic developer india#ionic#ionic mobile app development#ionic mobile app development services#ionic mobile app development company#mobile app development#hire ionic developer
0 notes
Text
WebpackDevServerを使わずに、Webpackで監視しているファイルが変更された時にブラウザを自動リロードする方法
from https://qiita.com/okumurakengo/items/74dd7819c7f3709b0f2d?utm_campaign=popular_items&utm_medium=feed&utm_source=popular_items
最近私はPHPでサーバー側を作成し、htmlで、webpackでバンドルしたjsを読み込む、という感じのことをやっていたのですが、WebpackDevServerで起動した時のように、 jsファイルを保存 -> ブラウザ自動リロード ができないかと思い、ググってみるとwebpackのプラグインがあったので紹介ですm(_ _)m
webpack-livereload-plugin を使うとうまくできました
Install
npm i -D webpack-livereload-plugin # または yarn add -D webpack-livereload-plugin
webpack.config.js
設定に追加
webpack.config.js
const LiveReloadPlugin = require("webpack-livereload-plugin");
module.exports = {
// ...
plugins: [ new LiveReloadPlugin() ], };
htmlで以下のように読み込みます
<script src="http://localhost:35729/livereload.js"></script>
webpackでビルド、-w または --watchオプションをつけてビルドする
これでWebpackで監視しているファイルが変更された時に自動でブラウザがリロードされます
Reactで試してみる
Reactで試してみた時の自分の設定です

githubにも同じのを置いてあります https://github.com/okumurakengo/webpack-livereload
yarn add react react-dom yarn add -D webpack webpack-cli webpack-livereload-plugin babel-loader @babel/core @babel/preset-env @babel/preset-react
webpack.config.js
const LiveReloadPlugin = require("webpack-livereload-plugin");
module.exports = { mode: process.env.NODE_ENV || "development", module: { rules: [ { test: /\.jsx?$/, use: { loader: "babel-loader", options: { presets: ["@babel/preset-env", "@babel/preset-react"] } } } ] }, resolve: { extensions: [".jsx", ".js"] }, plugins: [ new LiveReloadPlugin() ], };
src/index.js
import React from "react"; import { render } from "react-dom"; import App from "./App";
render(<App />, document.getElementById("root"));
src/App.jsx
import React from "react";
const App = () => ( <>Hello</> );
export default App;
index.html
<!DOCTYPE html> <meta charset="UTF-8"> <title>Document</title> <script src="dist/main.js" defer></script> <script src="http://localhost:35729/livereload.js"></script> <div id="root"></div>
yarn webpack -w #./dist/main.js が出力
この状態で file:///<ディレクトリへのpath>/index.html などでindex.htmlをブラウザで表示する
私の場合はPHPの簡易サーバーを起動してindex.htmlを表示して試してみました php -S 0.0.0.0:8080

ファイルを保存するたびにブラウザが自動でリロードできました。 最後まで読んでいただいてありがとうございました。m(_ _)m
0 notes
Text
12 Best CMS for 2019

2019 is half over, but don’t let that stop you from trying something new… specifically, a new CMS. “But Ezequiel, good buddy, I don’t have time to check out a whole new content management system. I have websites to make!”, you say, in those exact words.
That’s fair, but you should be keeping an eye on the up-and comers anyway. These are the people who have the sheer brass walnuts (which are a real thing, unisex, and available to anyone with money) to go up against giants like WordPress, Joomla, and mostly WordPress. They do this with nothing but a pretty good idea, a GitHub repository, and sometimes some corporate funding of some kind, if they’re very lucky. You ignore them at your own peril.
Well, maybe not peril, but these projects deserve a look.
The CMS that have been selected for this list were (almost) all launched post-2017 (or at least their GitHub repos were), and they’re all free, or at least have a free plan. They’re also all under active development. Let’s get started…
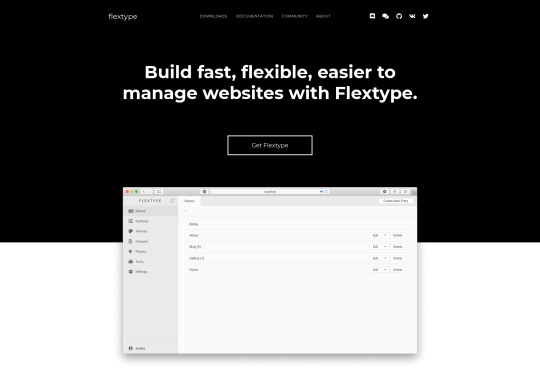
Flextype
Flextype is a simple, PHP7-based, flat-file CMS that’s designed to keep things flexible, allowing you to create more or less anything you want. And I do mean “anything”; Flextype makes it dead-easy to define custom fields for any content entry, and has a built-in theme editor
The actual content editing is easy enough, with a simple WYSIWYG editor, though Markdown support is available via plugin. Doing anything fancy with the content requires the use of WordPress-style shortcodes, though.
All in all, it’s a solid foundation for a CMS, and I can’t wait to see what they do with it.
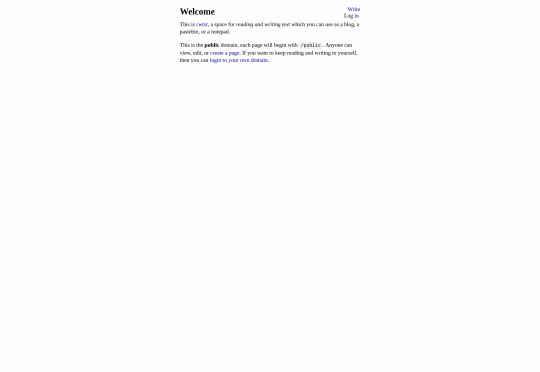
rwtxt
rwtxt is designed to be a simple, searchable notepad where you can jot down notes, keep a journal, or use it as a pastebin. It’s reminiscent of a wiki in that, in its default configuration, anyone can add a page to the public area of the site.
However, you can also add a “domain”, or a sort of personal notepad where you can either keep your private notes private, or make them public and publicly searchable. You can also log into multiple domains at a time, so you could theoretically use rwtxt to run a site with multiple blogs that are thematically different. (You can also add custom CSS to a domain, for further differentiation.)
The whole experience is very bare-bones, but I’m fascinated to see where it goes.
Relevant: rwtxt Github Repo
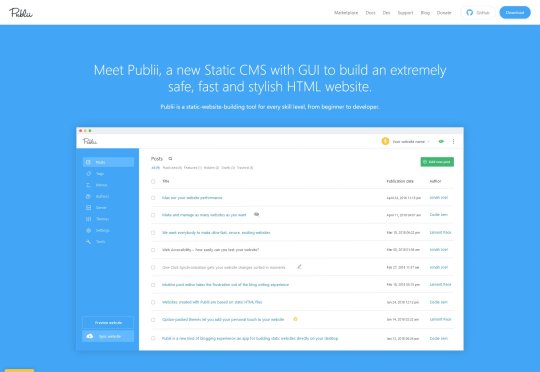
Publii
Publii is one of a few new GUI-focused Static CMS apps that run on the desktop, rather than on your server. You download the app, use it to build a static site, then upload that site onto the hosting of your choice. It’s not a new idea, but it’s one that seems to have picked up steam, lately.
Publii in particular seems to be the most modern and feature-complete of these CMS, and is open source and free to use. It seems to be blog-focused, and there is a marketplace with both free and paid theme options of excellent quality.
Other features include website syncing (supports FTP, GitHub Pages, Gitlab, AWS, Netlify, or Google Cloud), a preview function, a WordPress importer, and a focus on SEO. It’s very definitely focused at more beginner-level users.
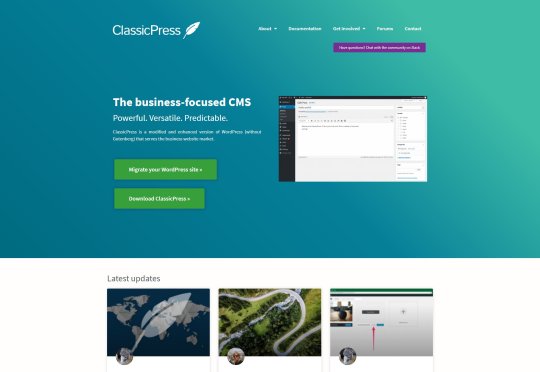
ClassicPress
Speaking, however briefly, of WordPress, ClassicPress is literally a WordPress fork that notably lacks a certain block-based content editor that lots of people disliked. Otherwise, the current version aims to improve security and optimization, remove some bloat, and points the CMS squarely at business users who might be put off by quirky language such as “Howdy”.
The biggest difference so far, besides using the classic content editor, is the governance of the project; there’s a very large focus placed on democracy and voting to determine the future of the project, where WordPress’ future is largely written by Automattic (the company that makes it).
Twill
Twill isn’t strictly a CMS, as such. It’s a “CMS toolkit”, designed to help developers very quickly create a custom CMS to match any need. As such, it’s not something you’d want to install just to start your own blog.
But if you’re a developer, or a business owner who needs a custom-built CMS, it does look like a promising way to get exactly the functionality you need, faster. It’s based on the Laravel PHP framework, so if that’s something you already use and like, try it out.

Canner
CannerCMS is similar to Twill in that it’s a build-your-own CMS kit of sorts. Unlike Twill, it seems to be Node-based, so if writing JavaScript is more your style, CannerCMS has you covered.
Incidentally, they also has a SaaS version of the product, which takes care of all the hosting, CDN configuration, and other general hassles for you. The open source edition also apparently lacks multi-language support, which the SaaS version has.

Grafite CMS
Grafite CMS is a sort of dual purpose CMS. By that I mean you can use it as a standalone CMS, on its own and fully functional, or as an add-on to an existing site or web app. Now lots of CMS will allow you to do this via an API of some sort, but Grafite CMS actually comes with two separate setup/installation modes, depending on whether you want to use Grafite CMS on its own, or integrate it into something larger.
It’s also modular, in that content types like “Pages”, Blog”, “Events”, and other are modules that you can activate or deactivate at will. You can, of course, make your own modules if you need a custom content type. It’s very much based on a “use only what you need” philosophy.

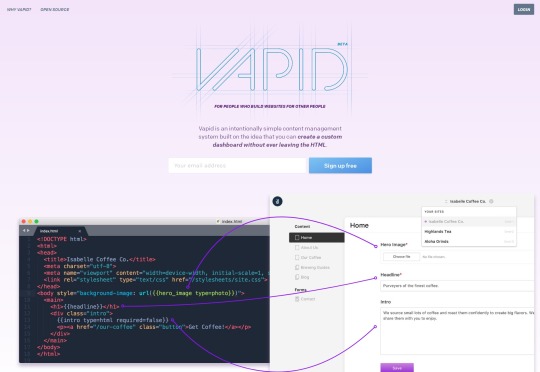
Vapid
Vapid has been mentioned once before here on Web Designer Depot, but it’s worth looking at again, in case you missed it. It’s billed as an intentionally simple CMS, and they mean it. The dashboard is literally generated based on the tags you use in your templates. Every time you mark part of a page as editable content, the dashboard will add the appropriate form field in the admin UI.
It’s written in NodeJS, and you can host the app on your own server for free if you know how (the code itself is open source), or you can deploy your website to Vapid’s own hosting service. Publishing your site there does cost money of course, but the plans are quite reasonable, with the first paid plan starting at 7 USD.
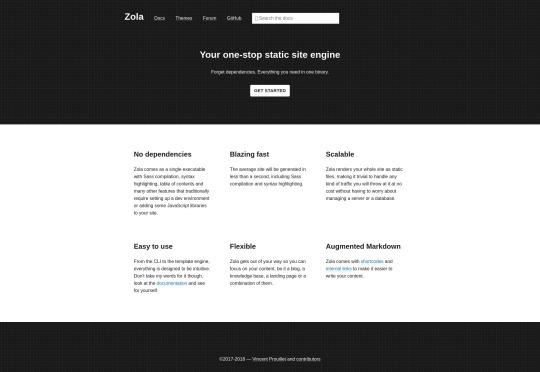
Zola
Zola is a static site generator written in Rust, so it does depend on using a command line interface, but otherwise, they keep development simple. I mean, when’s the last time you heard of a static site generator that didn’t have any dependencies? There are even premade binaries for Windows, Mac, and Linux, so installation is quick and simple.
So yeah, even if you’ve got only a rudimentary understanding of programming like myself, you can probably build sites with Zola. It’s got a list of features about a mile long, including custom taxonomies, LiveReload, Netlify support, shortcodes, image processing, and more. The content is all handled by Markdown, of course.
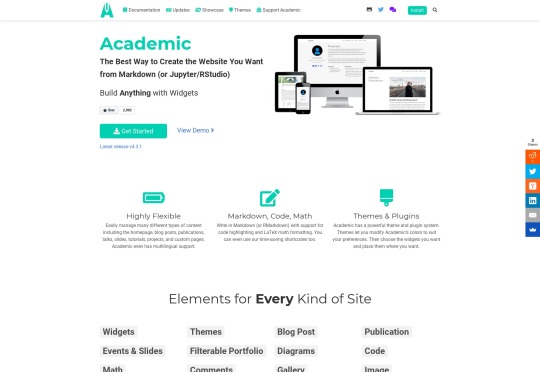
Academic
Academic is interesting because it’s a CMS built on top of another CMS. Specifically, it’s a website / page builder built on top of the Hugo static site generator. It’s designed to take the complexity of a static site generator, and make everything sort of drag and drop. And I do mean everything.
There’s support for easily managing custom pages, talks, slides, tutorials, as well as all the usual content types. There’s multilingual support, and everything can be written in Markdown and, interestingly enough, LaTeX if you’re the math-loving type. Existing themes mostly seem to be Material Design-based, but of course you can make your own.
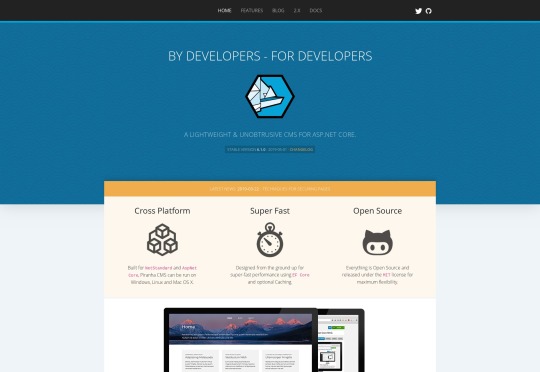
Piranha CMS
I didn’t want our ASP.NET lovers out there feel like we’d forgotten them. For you, Piranha CMS looks rather promising. Interestingly for an ASP.NET CMS, it can run on Windows, Mac, and Linux, with a focus on speed and easy publishing. Considering the tech it’s based on, it’s also Azure-ready right out of the box, if that’s something that matters to you.
Besides all that, you can edit your content as HTML or Markdown, or even plain text. There’s also a Gutenberg-style block editor. There’s image processing, easy internal linking, and even easy ways to run multiple blogs on the same site. The whole thing seems to be aimed at big publishers.
Squidex
Squidex is an ASP.NET-based open source headless CMS (that means they don’t dictate how any of your HTML gets output) that you can run on your own server, or use their SaaS option which also has a limited free plan. It’s the sort of CMS that’s meant to be used as a central repository for all of your content, which you can access anywhere via their API. So theoretically, you could use it to run multiple internal and / or external websites.
As such, it’s the sort of CMS where you sort of have to build your own dashboard, as well as the front end user interface. That said, it does look real good, and offers loads of options to help you build the CMS of your (apparently quite nerdy) dreams.

Featured image via Unsplash.
Source via Webdesigner Depot https://ift.tt/2z09XFL
0 notes
Photo

The Ultimate Angular CLI Reference Guide
In this article, we’ll have a look at what Angular CLI is, what it can do for you, and how it performs some of its magic behind the scenes. Even if you already use Angular CLI, this article can serve as a reference to better understand its inner workings.
Technically, you’re not required to use Angular CLI to develop an Angular application, but its many features can highly improve the quality of your code and save you a lot of time along the way.

This is the preliminary article in a 4-part series on how to write a Todo application in Angular.
Part 0 — The Ultimate Angular CLI Reference Guide
Part 1 — Getting our first version of the Todo application up and running
Part 2 — Creating separate components to display a list of todos and a single todo
Part 3 — Update the Todo service to communicate with a REST API
Part 4 — Use Angular router to resolve data.
Some History
On September 15, 2016, Angular Final was released.
Where AngularJS 1.x was limited to a framework, Angular has grown into an ambitious platform that allows you to develop fast and scalable applications across all platforms such as web, mobile web, native mobile and even native desktop.
With this transition to a platform, tooling has become more important than ever. However, setting up and configuring tooling is not always easy. To make sure Angular developers can focus on building applications with as little friction as possible, the Angular team is putting a lot of effort into providing developers with a high-quality development toolset.
Part of that toolset are close integrations with a wide array of IDEs and editors. Another part of that toolset is Angular CLI.
So let’s get started!
2017.04.25: As of March 24, Angular CLI v1.0 was released. This article has been updated to reflect the latest changes. If you want to add the latest features of Angular CLI v1.0 to your existing Angular project that was generated with an earlier version of Angular CLI, check out the Angular CLI v1.0 migration guide.
2017.02.17: As of February 9, 2017, the ng deploy command has been removed from the core of Angular CLI. Read more here.
2017.01.27: As of January 27, 2017, the official recommendation is to use the name AngularJS for any 1.x release and the name Angular for any 2+ release. This article has been updated to reflect the official branding guidelines.
What Is Angular CLI?
Angular CLI is a command-line interface (CLI) to automate your development workflow. It allows you to:
create a new Angular application
run a development server with LiveReload support to preview your application during development
add features to your existing Angular application
run your application’s unit tests
run your application’s end-to-end (E2E) tests
build your application for deployment to production.
Before we have a look at each of the above in detail, let’s first see how you can install Angular CLI.
Prerequisites
Before you can use Angular CLI, you must have Node.js 6.9.0 and npm 3.0.0 or higher installed on your system.
You can download the latest version of Node.js for your operating system and consult the latest installation instructions on the official Node.js website.
If you already have Node.js and npm installed, you can verify their version by running:
$ node -v # => displays your Node.js version $ npm -v # => displays your npm version
Once you have Node.js installed, you can use the npm command to install TypeScript:
$ npm install -g [email protected]
Although TypeScript is technically not an absolute requirement, it’s highly recommended by the Angular team, so I recommend you install it to make working with Angular as comfortable as possible.
Now that you have Node.js and TypeScript installed, you can install Angular CLI.
Installing Angular CLI
To install Angular CLI, run:
$ npm install -g @angular/cli
This will install the ng command globally on your system.
To verify whether your installation completed successfully, you can run this:
$ ng version
This displays the version you have installed:
@angular/cli: 1.0.0 node: 6.10.0 os: darwin x64
Now that you have Angular CLI installed, let’s use it to create a new application.
Creating a New Angular Application
There are two ways to create a new application using Angular CLI:
ng init: create a new application in the current directory
ng new: create a new directory and run ng init inside the new directory.
So ng new is similar to ng init, except that it also creates a directory for you.
Assuming you haven’t created a directory yet, let’s use ng new to create a new project:
$ ng new my-app
Behind the scenes, the following happens:
a new directory my-app is created
all source files and directories for your new Angular application are created based on the name you specified (my-app) and best-practices from the official Angular Style Guide
npm dependencies are installed
TypeScript is configured for you
the Karma unit test runner is configured for you
the Protractor end-to-end test framework is configured for you
environment files with default settings are created.
You’ll learn more about each of these aspects in the following sections.
At this point you have a working Angular application and your new directory my-app looks like this:
. ├── README.md ├── e2e │ ├── app.e2e-spec.ts │ ├── app.po.ts │ └── tsconfig.e2e.json ├── karma.conf.js ├── package.json ├── protractor.conf.js ├── src │ ├── app │ │ ├── app.component.css │ │ ├── app.component.html │ │ ├── app.component.spec.ts │ │ ├── app.component.ts │ │ └── app.module.ts │ ├── assets │ ├── environments │ │ ├── environment.prod.ts │ │ └── environment.ts │ ├── favicon.ico │ ├── index.html │ ├── main.ts │ ├── polyfills.ts │ ├── styles.css │ ├── test.ts │ ├── tsconfig.app.json │ ├── tsconfig.spec.json │ └── typings.d.ts ├── tsconfig.json └── tslint.json
Available Options
--dry-run: boolean, default false, perform dry-run so no changes are written to filesystem
--verbose: boolean, default false
--link-cli: boolean, default false, automatically link the @angular/cli package (more info)
--skip-install: boolean, default false, skip npm install
--skip-git: boolean, default false, don’t initialize git repository
--skip-tests: boolean, default false, skip creating tests
--skip-commit: boolean, default false, skip committing the first git commit
--directory: string, name of directory to create, by default this is the same as the application name
--source-dir: string, default 'src', name of source directory
--style: string, default 'css', the style language to use ('css', 'less' or 'scss')
--prefix: string, default 'app', the prefix to use when generating new components
--mobile: boolean, default false, generate a Progressive Web App application (see section on upcoming features)
--routing: boolean, default false, add module with routing information and import it in main app module
--inline-style: boolean, default false, use inline styles when generating the new application
--inline-template: boolean, default false, use inline templates when generating the new application.
Run $ ng generate --help to see all available options of your locally installed Angular CLI.
Let’s see how you can start your application so you can see it in action.
Running Your Application
To preview your new application in your browser, navigate to its directory:
$ cd my-app
and run:
$ ng serve
to start the built-in development server on port 4200:
** NG Live Development Server is running on http://localhost:4200 ** Hash: 09fb2ad840c1472e5885 Time: 6230ms chunk {0} polyfills.bundle.js, polyfills.bundle.js.map (polyfills) 158 kB {4} [initial] [rendered] chunk {1} main.bundle.js, main.bundle.js.map (main) 3.62 kB {3} [initial] [rendered] chunk {2} styles.bundle.js, styles.bundle.js.map (styles) 9.77 kB {4} [initial] [rendered] chunk {3} vendor.bundle.js, vendor.bundle.js.map (vendor) 2.37 MB [initial] [rendered] chunk {4} inline.bundle.js, inline.bundle.js.map (inline) 0 bytes [entry] [rendered] webpack: Compiled successfully.
You can now navigate your favorite browser to http://localhost:4200/ to see your application in action:

Behind the scenes, the following happens:
Angular CLI loads its configuration from .angular-cli.json
Angular CLI runs Webpack to build and bundle all JavaScript and CSS code
Angular CLI starts Webpack dev server to preview the result on localhost:4200.
Notice that the ng serve command doesn’t exit and return to your terminal prompt after step 3.
Instead, because it includes LiveReload support, the process actively watches your src directory for file changes. When a file change is detected, step 2 is repeated and a notification is sent to your browser so it can refresh automatically.
To stop the process and return to your prompt, press ctrl-c.
Continue reading %The Ultimate Angular CLI Reference Guide%
by Jurgen Van de Moere via SitePoint http://ift.tt/2punP5T
0 notes
Text
Is HMR any different than livereload nowadays? I remember HMR used to be able to maintain state of parent components while the children reloaded. At least in Next.js, it seems like HMR will always refresh the parent's state.
Is HMR any different than livereload nowadays? I remember HMR used to be able to maintain state of parent components while the children reloaded. At least in Next.js, it seems like HMR will always refresh the parent's state.
— Matthew Mueller (@MattMueller) January 28, 2020
0 notes
Text
The Major Benefits Of Choosing Meteor.js For Creating A Start-up
Meteor or MeteorJS is one of the popular free and open source JavaScript web frameworks that are based on the isomorphic model. It is written in the Node.js and employed for building web and cross-platform mobile applications for Android and iOS platforms. The developers can also implement it with MongoDB. Furthermore, it also helps to publish-subscribe pattern along with the usage of the Distributed Data Protocol. With Meteor, the developer’s job gets simplified as he does not have to write the synchronized codes. This is because this web framework allows automatic propagation of the data changes to clients. So, it can be said beyond that Meteor.js is one such framework that offers the luxury of saving both times as well as effort. It accelerates the development process and provides access to wide-ranging libraries, which makes the prototyping of difficult applications look simple. Since the developers have to indulge in less coding, there are fewer chances of committing mistakes in the project. Let’s now discuss further the various other pros of using Meteor.js and see why it is considered the optimal framework for your web development project.
1. Meteor.js Allows Usage of Single Language
We have already discussed earlier that Meteor.js has played an important role in simplifying the tasks of the web developers. Previously, the developers had to undertake the painstaking job of using both the front-end as well as the back-end languages along with the database. However, the developers feel quite relieved after the arrival of Meteor as they have to now use only one language and that is JavaScript for implementing the front-end, backend, and the database. This can be further illustrated through an example. Suppose if we are building ‘collection’, which is equal to a SQL table using Meteor then BlogPosts = new Meteor.collection('posts'); Thus, it lets you develop a collection through a known syntax and you can control the collection with that known syntax as well. BlogPosts.insert({ title: 'Hello World', content: 'This is the content.', published: true }); The use of a single language to build an app is also advantageous from the point that a single line code runs on both front-end and backend to do things differently. It must be noted that if the code is running at the backend or server, it creates a collection. However, when the codes run at the front-end or the client side by default, it becomes a pure local collection.
2. Offers Facility of Real-Time Applications by Default
The mobile and web development industry is transforming with the emergence of new trends at regular intervals. One of the popular trends witnessed these days is the introduction of real-time web applications. In fact, social media king Facebook and Twitter have already started offering this benefit to their millions of users. The real-time applications work instinctively and as such the user do not need to open a separate page for carrying out different tasks. Before the arrival of Meteor.js, building a real-time application was regarded as a tough task but the framework has diminished that thought process. It has got the real-time feature built in its core. The user template data will upgrade automatically if the database gets updated. If a user is filing and submitting a form, the action takes place in real-time with much ease. So, when you are creating a web application, you get real-time apps by default.
3. The Smart Package Option is Time Savior
The Meteor.js also offers the benefit of Smart Packages that help in saving a lot of time. Let us know how. Take, for example, you are building a user accounts system using another framework where you have to follow a long process. But Meteor.js is an exception. Here the accounting system can be created by the following code meteor add accounts-password When you would run the following code, the Meteor framework would add the smart package to your project. This package needs user sign through their email and password. For all Twitter, Facebook or Google the basic command remains the same and only the name changes at last. In addition, the Meteor also offers the accounts-ui package that builds the client-side for the accounts system with a single code meteor add accounts-ui Once the accounts system gets the setup, it allows you to undertake any task such as the verifying the signing of current user using your templates. Apart from that, you can use utilize the smart packages for conduction other functions such as use CoffeeScript for creating applications, the compilation of LESS files into CSS automatically, and implantation of extras including D3.js and Bootstrap.
4. The Extensive Support from Large Community
Well, if you ask any mobile or web application developer, he would probably say that his greatest support lies at the hand of the community of experienced developers related to that specific framework or language. It is a pleasure to note that Meteor.js has been in the frontline for its extensive support from the large community. The fact that it offers the advantage of detailed documentation along with rich and helpful resources turns out to be the biggest positives of using this framework. The resources include Crater, Evented Mind, and Kadira etc. Since it is an easy framework to work on, you don’t have to spend much time learning the basics and Meteor.js is there to stay in the future.
5. Meteor.js Makes Developer’s Life Easier
One of the other bonuses that make Meteor.js, the favorite framework for web developers is that it is tailor-made for them and quite easy to use. For instance, if we talk about a usual interface of the Meteor app along with the inclusion of template, it would be seen that the developers don’t need to include HTML tags, JavaScript files, and CSS files. Also, note that Meteor.js uses Spacebars or Handlebars-supported syntax for the template work. So, Meteor is playing a key role in reducing the work pressure off developers. And if this is not all to make you delighted, then these details would certainly bring a smile on your face. Firstly, it has a built-in LiveReload feature allowing refreshing the browser on a manual mode. Secondly, the developers are free to structure their projects according to the requirements. There is no hard and fast rule that they have to follow. The meteor also allows you to go for mix and match component due to its modularity.
6. Faster to Build and Easier to Learn
Today is the age of cutting-edge technology and clients look for an approach which can offer them their product in least time with maximum output. This is where Meteor.js proves to a real asset for developers. You can create a web app within a week or so. In fact, it is possible as JavaScript is loaded from both sides; client and server. The availability of the Smart Packages also speeds up the development of apps. As far as learning of the language is concerned, you would find it simpler to learn if you are a fresher. Yes, it’s true that you need to be familiar with a few of JavaScript variable loop conditionals such as JSON but you don’t need to be a JavaScript proficient. And what’s more important is that you also don’t need any previous experience for learning and using the programming language. Mere familiarity with one language is sufficient.
7. Converting Web Apps into Smartphone Apps
If you are looking to convert your web apps into Smartphone apps, you can take the help of Meteor.js without any hesitation. The web apps turn into Smartphone apps using the Cordova platform. Besides, you can even create native apps with JavaScript, HTML, and CSS. It allows you to implement native functions such as camera, GPS etc. The Bottom Line Although Meteor.js has received a positive response from the worldwide developers it is still new in the dictionary of JavaScript frameworks. It is slowing and steadily gaining the ground and offers a spectrum of benefits. One of the major aspects is that it has simplified the work of developers and offers wide support from the community. It makes development faster and project more scalable. Read the full article
0 notes
Text
Was hoping I'd be able to install Ember and teach myself something new but of course it doesn't work on my mac. Always happens this way - go along with the installation, go over a couple bumps, then run face-first into a wall, unable to continue.
Maybe tomorrow I'll try installing it on my desktop and see if I can replicate and fix the problem. Some issue with livereload and a missing .ember_cli file...
0 notes
Photo

Debugging JavaScript in Google Chrome and Visual Studio Code by @jamesqquick #dev environment #editors #chrome #javascript #livereload #plugins https://t.co/0OgL6Hs1co
0 notes