#page tutorial
Explore tagged Tumblr posts
Visit Tumblr Blog
Explore Tumblr blogs with no restrictions, modern design and the best experience.
Last Seen Tumblr Blogs


Fun Fact
Tumblr was created by web developers David Karp and Marco Arment.
Text
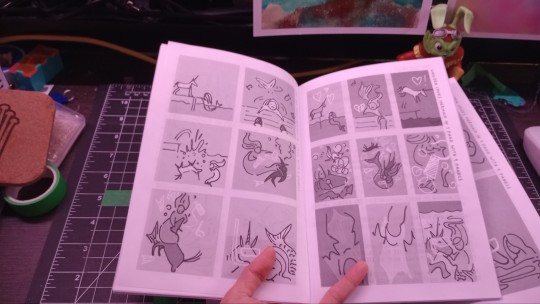
Happy WebcomicDay! I'm Sarii, the creator of The Heart and the Abyss, a fantasy GL comic. A seafaring adventure with sword flights,mermaids and a slow -burn romance.
You can find it at theheartandtheabyss.com
This is my process in drawing and coloring for Thata!

#webcomic day#webcomic#thata#sarii art#fantasy#webtoon#gl#the heart and the abyss#webtoon canvas#mermaids#indie comics#tutorial#art tutorial#coloring tutorial#page tutorial
4 notes
·
View notes
Text
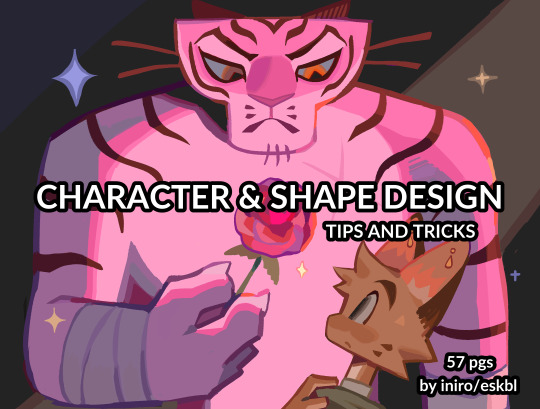
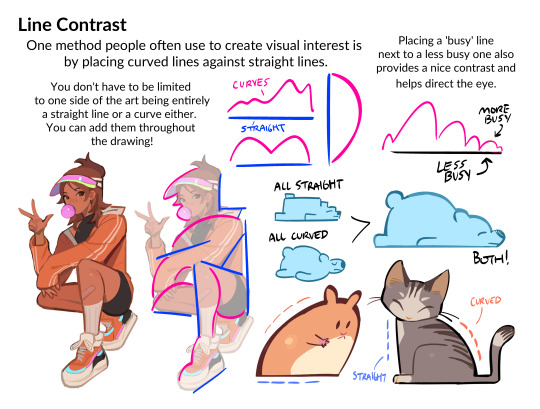
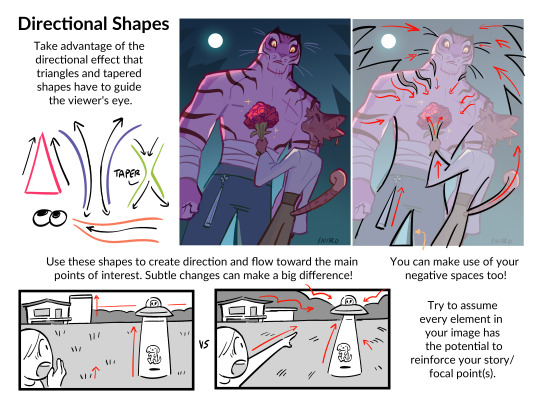
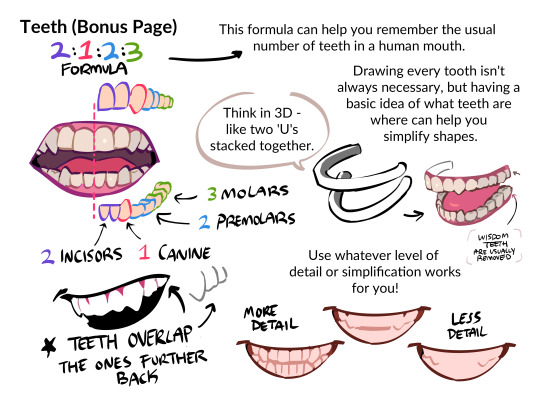

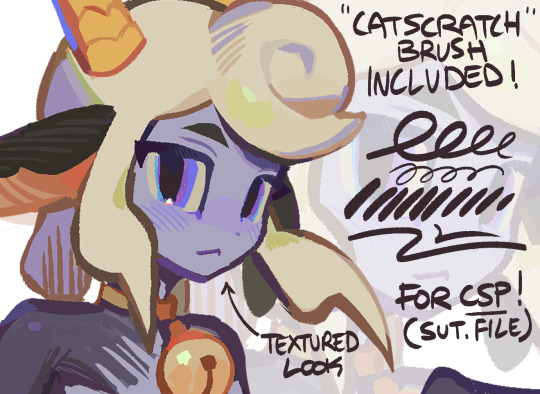
HII my character & shape design tips PDF is now available! ^_^ hope you enjoy !!
BUY HERE or HERE
#character design#art tutorial#art resources#csp brushes#art tips#shape design#myart#i beat the page count of my last pdf woo!
39K notes
·
View notes
Note
How do you make your stamps? :0
Disclaimer: this is an obscenely long explanation, with pictures. Efficiency is stupid
So, for the static ones, I make a 99x56 px file on ibis paint x. Other programs are probably available online but I don't use them.
After that, I either upload an image I want to make into a stamp, or I draw one.
Then, I find a frame I want to use. Ill upload them here but let it be known I stole all of these right from deviantart


Most of them are from Lil-Devil-Melii on deviantart. The rest i have no idea. They're not all 99x56px but you can crop the canvas it's fine
Make sure to erase the edges of the picture , so they're transparent. It's not as cute otherwise
Upload those frames over your image in whatever art program you're using and viola, stamp.
For moving ones, it's a lot harder. Mostly because I refuse to download Photoshop.
There are a couple ways to do this. Some are simple animations, like with flashing text and whatnot. For these, you download the individual animation frames from your art program. Make sure it's transparent.
Then, upload each frame to ezgif.com under the option "GIF maker." You can play around with how fast each frame goes and whatnot but in the end, it'll be a stamp with some rad text that moves. This is easy, and doesn't make me want to shit my pants and cry. If you're new, do this. This is fun. This is good. This does not kill me inside
I made that↓ stamp with this method :)

this next one is how we turn gifs into stamps. This one makes me sad. It involves math and sucks. But we gotta do it. For the vibe
First, grab your gif. I'm using this cow gif because it's awesome

Then, I resize it using ezgif. Literally everything for this will be using ezgif. I am a simple man
At this point you should decide what frame to use. I'm using this one because its the first one I clicked
Figured out what size the inside of the frame is. That's what I resize the gif to, so the edges can be transparent. The inside of this one is 93x50 px, so those are the dimensions I'm making the gif.
Figure it out by putting the frame into ibis paint and realizing the canvas to fit just the inside of the frame, then seeing what the dimensions are. But there could be easier ways

Woah it's so small now
Then, still on ezgif, I go to the "crop" option.
Make sureeee to upload the smaller gif
press the button that says "extend canvas size", and then put the "width" and "height" as the dimensions for your FRAME. This'll put a bit of a transparent border around the gif. For this frame, I did 99px and 56px.
The "left" and "top" boxes show how many pixels the cropping happens from the edges of the canvas. The formula for finding that is
(width of gif / 2) - (difference between gif width and frame width / 2) = left box
For me it's (93 / 2) - (6 / 2) = 43.5
Then you do the same.for the height, which for me ends up being 22 from the top
This is reallyyy touchy and annoying though
Here's my result , with no visible difference

Okay so THEN you go to the "overlay" option, under "effects." And upload your frame. If the cropping was done right, you shouldn't have to move the frame at all and can just download it
Here's my result:

if you don't care about transparency, you can resize your gif to be the same size as the frame, and then put the frame over it. But I'm a slut for transparency
Anyways. I'm sorry if anything was unclear, it's two am. And I hope this was helpful :) these really are fun to make once you get it down
also if anyone has an easier way to make stamps from gifs, please god tell me
#web graphics#old web#neocities#custom#custom blinkies#stamps#page decor#web resources#da stamps#deviantart stamps#blinking gif#How to#tutorial#How to make stamps#Spacehey#deviantart#rentry graphics#old internet#early internet#stamp collecting#ezgif#stamp making#stamp template#Stamp frames#blinkies
7K notes
·
View notes
Text
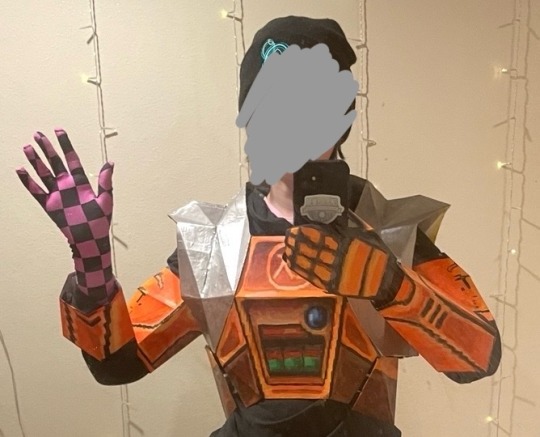
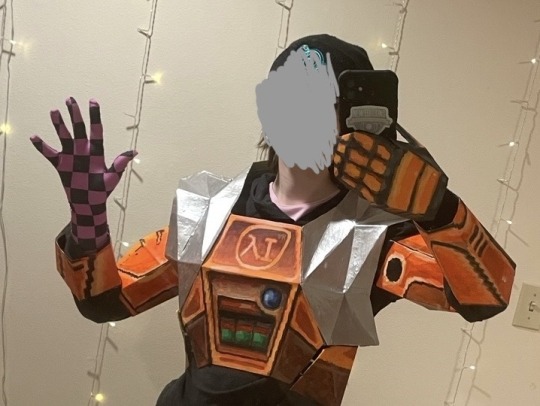
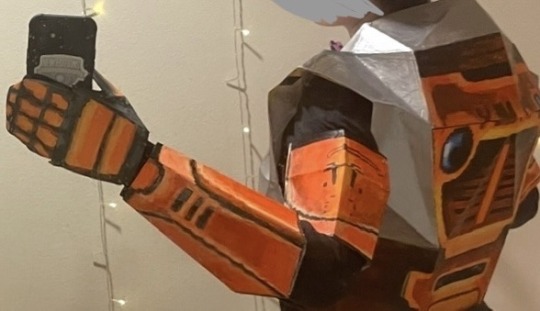
reveal of my gordon hlvrai costume project, now that about half of it is done! this is cardstock and glue and tape and more glue and paint and velcro. and 2 gloves (one hand-sewn)
i got started sometime in early-mid fall, but i committed to making it work with cardstock in january- it was originally meant to be a sizing test before construction with eva foam over the summer. then i realized how expensive thatd be, too much pressure for a form of craft ive never practiced. im pretty amazed with how its come together, even with the large seams! during that whole time when it was unpainted (started painting two weeks ago) there was no way to tell
#thank you sketchfab thank you blender thank you pepakura#school library printer… you were necessary but i dont appreciate that i had to pay per page despite my tuition#i started this because theres a tradition of wearing whatever you want to graduation at my college. ive thought abt how cool itd be to wear#an hev suit like gordon hlvrai.. hlvrai has been important throughout my whole time at college. that plus the stem degree im going for makes#hlvrai the most fitting thing to homage with my outfit#*so important to me#the support of my friends was the last push i needed before research#i havent seen anyone else go for the in-game low poly look for the hev suit! multiple tutorials out there (as expected)#but all i saw involve eva foam and molding. most of them were based on the half life 2 suit which. yeah. that one seems more desirable for#cosplay#lucky that this way was much more simple because its also the most in-theme!#hlvrai#half life vr but the ai is self aware
2K notes
·
View notes
Text
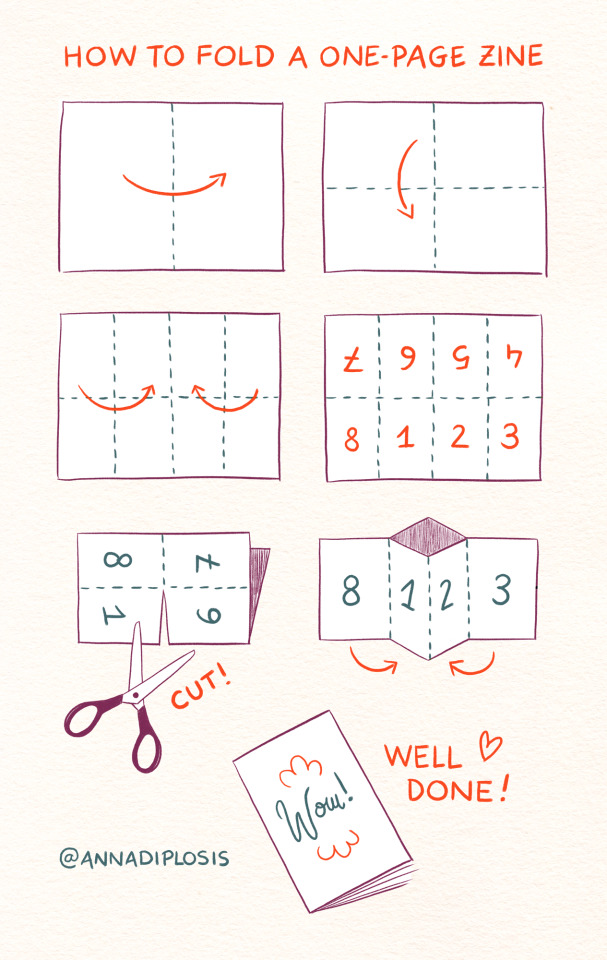
Drew these instructions for this one-page zine and I figured I'd post them on their own just in case anyone finds them useful :)
7K notes
·
View notes
Text
========================================================
[tutorial: build your own neocities/nekoweb page]
========================================================
a beginner's guide for making your very own home on the indie web—retro, personal, weird, and 100% yours.
this ain’t an average wix, squarespace, or tiktok aesthetic.
we’re talking full html/css with soul and attitude.
[ prerequisites ]
------------------
> an idea
> basic text editor (vscode, notepad++, or even notepad)
> account on https://neocities.org or https://nekoweb.org
> some gifs or tiles you love (dig deep or make your own)
> optional: image host or gif repo (or self-host everything)
[ feeling overwhelmed? read this. ]
-----------------------------------
you do *not* need to know everything.
html is not a mountain. it's a garden.
you plant one tag. then another. then a style. then a button.
you can build your site piece by piece.
and every piece is a portal to somewhere personal.
you are allowed to make broken pages.
you are allowed to use templates.
you are allowed to start over as many times as you want.
this is *your* world. you control the weird.
[ step 1: create an account ]
-----------------------------
> neocities: https://neocities.org
> nekoweb: https://nekoweb.org
register a name, log in, and enter your file manager.
this is where you upload your files and see your site live.
[ step 2: your first file - index.html ]
----------------------------------------
make a new file: `index.html`
basic starter:
<html>
<head>
<title>my weird little corner</title>
<link rel="stylesheet" href="style.css">
</head>
<body>
<h1>welcome to the void</h1>
<p>this is my page. it’s strange. like me.</p>
<img src="mygif.gif">
</body>
</html>
> upload to the dashboard
> boom. you’re live at
https://yoursite.neocities.org
or https://nekoweb.org/u/yoursite
[ step 3: add a style sheet - style.css ]
-----------------------------------------
create a file called `style.css` and upload it.
here’s some nostalgic magic:
body {
background: url('tile.gif');
color: lime;
font-family: "Courier New", monospace;
text-shadow: 1px 1px 0 black;
}
img {
image-rendering: pixelated;
}
marquee {
font-size: 20px;
color: magenta;
}
link it in your html and the vibes activate.
[ step 4: decorate it like a haunted usb ]
------------------------------------------
> use <marquee> for chaos scrolls
> embed gifs from https://gifcities.org/
> steal buttons from https://cyber.dabamos.de/88x31/
> set up a guestbook at https://www.smartgb.com/
> loop audio with <audio autoplay loop>
> add fake errors, 90s web lore, random link lists
[ step 5: resources, themes, and comfort ]
------------------------------------------
> templates & layouts: https://numbpilled-themes.tumblr.com
> glitchy gifs & buttons: https://glitchcat.neocities.org/resources
> layout builder: https://sadgrl.online/projects/layout-builder/
> free tiled backgrounds: https://backgrounds.neocities.org/
> beginner html intro: https://www.w3schools.com/html/
> pixel fonts & cyber assets: https://fontstruct.com/
remember:
you don't need to know js. you don't need to be a coder.
you just need a mood, a direction, a dream.
the html will follow.
[ bonus concept: shrine pages ]
-------------------------------
> a page just for one character you love
> a room to house digital fragments of your identity
> embed quotes, music, images like altars
> call it shrine.html and link it from your homepage
[ closing mantra ]
------------------
you are not here to be optimized.
you are not a brand.
you are a ghost inside the machine,
carving your initials into the silicon void.
welcome to Your website.
========================================================
#webcore#old web graphics#neocities#web graphics#carrd graphics#carrd resources#rentry decor#rentry graphics#carrd moodboard#carrd inspo#neopets#indie#indie web#early web#webdevelopment#web development#web resources#web design#old internet#old web#oldweb#nekoweb#transparent gif#tiny pixels#pixel gif#moodboard#tutorial#html page#html theme#htmlcoding
488 notes
·
View notes
Text
Go nuts y’all!
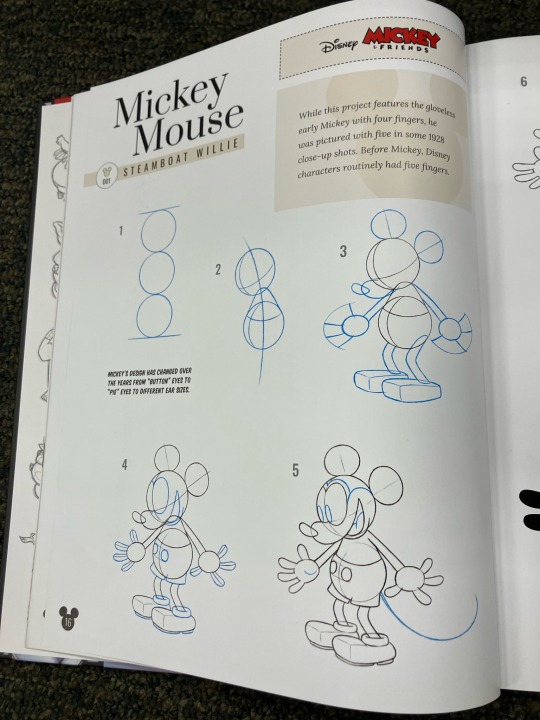
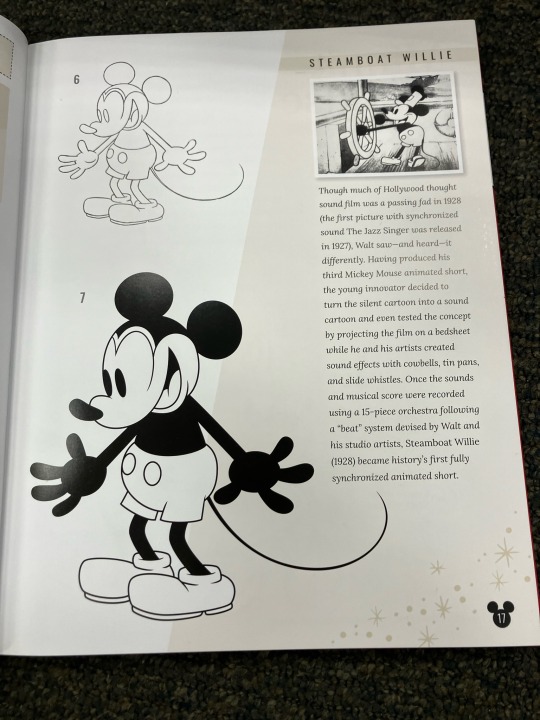
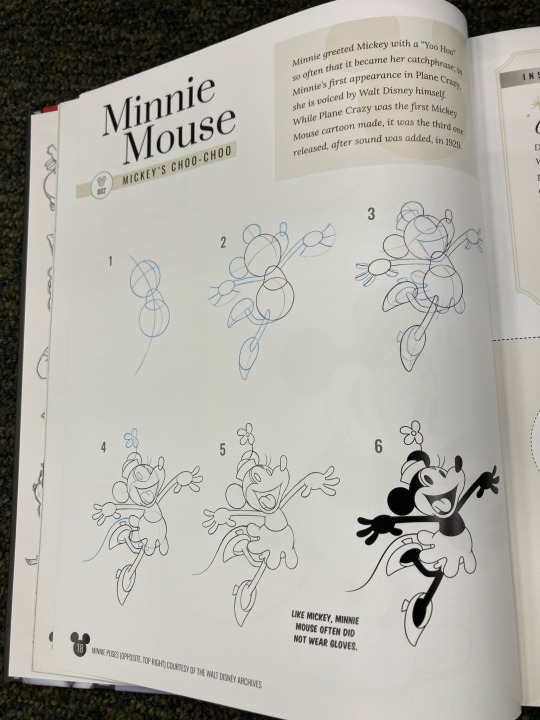
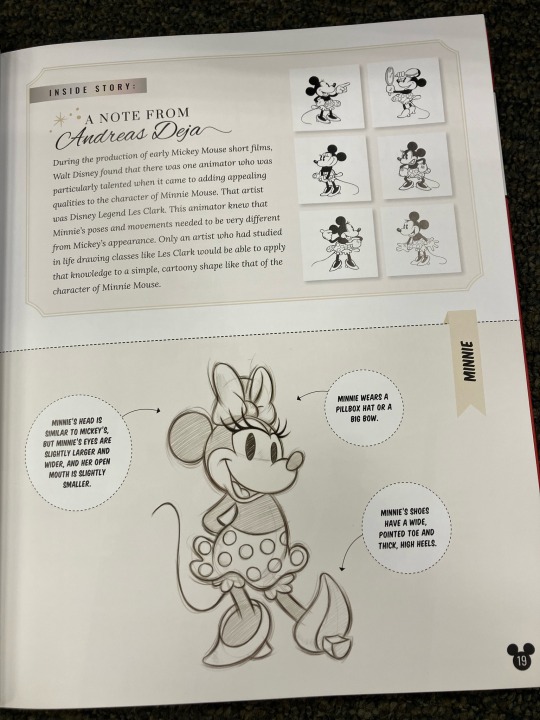
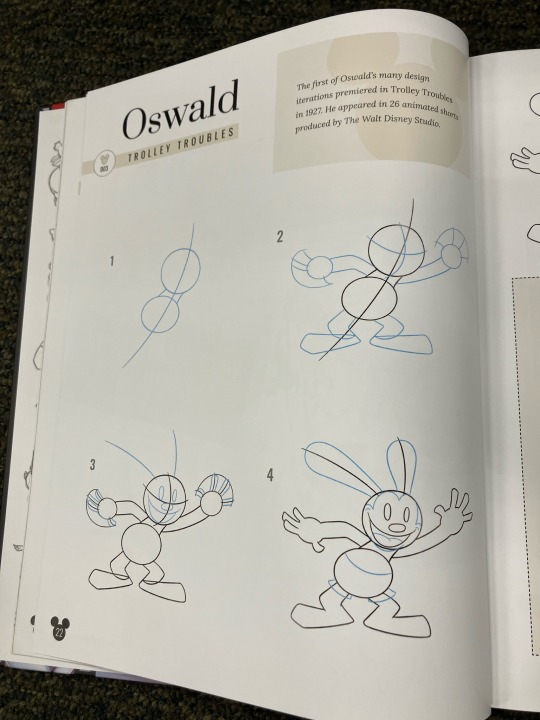

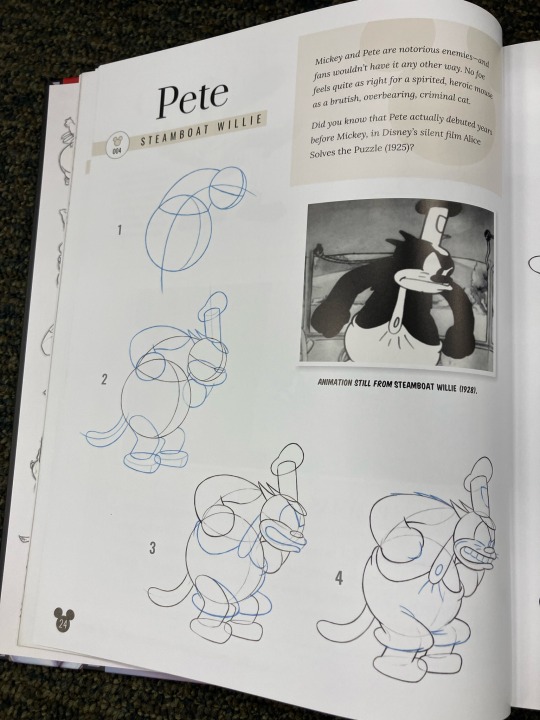
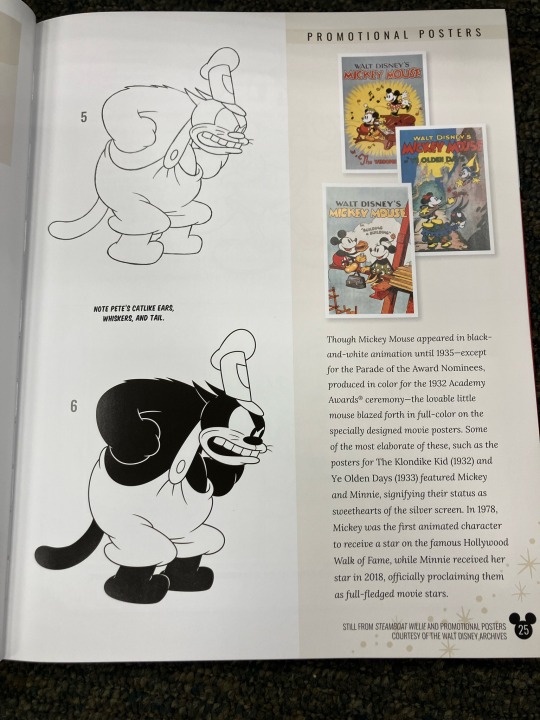
Source: Drawing 100 Years Of Disney Wonder
#Mickey Mouse#Minnie Mouse#Oswald The Lucky Rabbit#Pete The Cat#Peg Leg Pete#Stinky Pete#Public Domain#Disney#Drawing#Drawing Tutorial#Reference#Let me know if you need better snapshots of these pages
3K notes
·
View notes
Text
Digital Stamp Making Tutorial
Hello, and welcome to the long-awaited(at least on my part) digital stamp-making tutorial from neosprites! I’d like to preface that I learned what I was doing from this tutorial so it may be a bit redundant, but if anything I get a bit more specific. Thank you so much to @graphic--horde for your work, it changed me as a graphic maker. This is gunna be a long post so feel free to bookmark it for later. Now, onto the show!

The frame I will be using for this tutorial (which is the frame I use on 99.9% of my stamps) I found from the above linked post, which I believe is from a creator that OP lost track of. Its inner dimensions are 94x50 pixels and its outer dimensions are 99x56 pixels. Here it is!

Find your material! - I recommend using websites like Tumblr and searching with the “GIF” filter only on, or alternatives such as Giphy or Tenor. Your browser may let you directly save the .gif file; if not and you are noticing it restricts you to save it as a .webp file you can try an extension like “Save webp as PNG or JPEG” (for Firefox but I image other browsers have similar functions, but I really recommend you switch to Firefox). To use this you will right click on your source .gif like normal but instead of clicking on “Save image as…” click “Save webP as…” and then click “GIF”. You should be redirected to the website ezgif.com where we will actually be doing all of our editing! Here’s the .gif we’ll be working with.

Convert to GIF (optional) - if you used the extension from the above step you should already be ready to click the blue “Convert to GIF” button. If not, go ahead and open ezgif.com and click on “webP” and then “WebP to GIF”; then convert to a gif with the blue button.

Resize the GIF - now that we have a gif ready to edit, let’s make it the right size. The easiest method I have found is to change it directly to the frame’s inner dimensions, 94x50 pixels. [EDIT: Make sure in the aspect ratio drop drop menu you select "stretch to fit" and not "center and crop to fit" like I did in the photo example.] Click “resize” and then type [94] in for the width and [50] for the height. Next press the blue “resize image” button.


Add the frame - next click “overlay” then click the thin blue button that says “Extend canvas size(use if overlay exceeds GIF sizes)”. This will give us some extra room to add the frame onto the design. Next click “Browse…” and find the frame you have saved onto your device, then click the blue “Upload image” button.


After that it’s going to be misaligned, that’s normal! It will say you have the option to drag it into place, but don’t bother. That’s one of the reasons my old stamps look wack, it’s just harder to do. Instead type [44] in for the Left box and [22] in for the Right box. It took me a while to figure out these dimensions to be honest, and I’ve only tested it with this frame so I don't know if it works with others. Then click the blue “Generate image” button.


Crop the transparent edges - click on “crop”. You will have the option to check a box that says “trim transparent pixels around the image” however, I don’t recommend this as it tends to crop a few of the frame’s pixels with it sometimes. Next, set the Left position to [44] and the Right position to [22]. For the other dimensions we will use the outer dimensions of the frame which are 99x56 pixels, this will trim everything except the tiny spaces in between the stamp frame’s spikes. Type the width as [99] and the height as [56] and click the tiny blue button that says “set”. After that click the blue “Crop image” button.


Save and use! - all that's left is to click “save” and upload the graphic to your liking. (best seen on dark mode obviously)

If you’d like to tag me in stamps you’ve made using my tutorial I would love to see them, but it’s not required!! Make sure to always give credit for pictures/gifs when you can and try not to make stuff out of personal/fan art. Thank you to the person in my inbox who requested this tutorial, I had been meaning to for a while but it was just the kick I needed. :)
#carrd graphics#carrd resources#carrd stuff#rentry graphics#rentry resources#rentry decor#rentry pixels#rentry stuff#rentry inspo#deviantart#neocities#mine#my graphics#my tutorials#resources#tutorials#tutorial#how to#stamps#blinkies#graphics#web graphic#old internet#early internet#spacehey#da stamps#page decor#custom#old web#frames
500 notes
·
View notes
Text

you can now get this adorable illustration as a free colouring page!!🐇
#hopig to upload more free stuff into my ko-fi soon like tutorials references and digital zines!!!!#viks art#artists on tumblr#bunnies#bunny art#digital art#colouring page#coloring page#clip studio paint#original art#coloured pencils#colored pencils#cute illustration#illustration#ko fi shop
118 notes
·
View notes
Text

𓆩♡𓆪 divider tutorial ˖˚
꒰ step one ꒱ ↳ first, find an image or two on a search engine or pinterest/something like it. it's best to use images with plain color (like white or black) backgrounds.
꒰ search terms to try ꒱ ↳ lace trim ↳ lace divider ↳ floral divider ↳ heart divider ↳ clouds divider ↳ bow/ribbon divider ↳ divider clip art
꒰ step two ꒱ ↳ either copy and paste the image or download and upload the image into remove.bg. use erase/restore as needed.
꒰ step three ꒱ ↳ you're done! pretty simple, right? good work \(^_^)/

#aesthetic dividers#tumblr dividers#post dividers#carrd dividers#divider packs#divider#page dividers#text dividers#cute dividers#tumblr layouts#divider tutorial#graphics tutorial#rentry tutorial#carrd tutorial
175 notes
·
View notes
Text


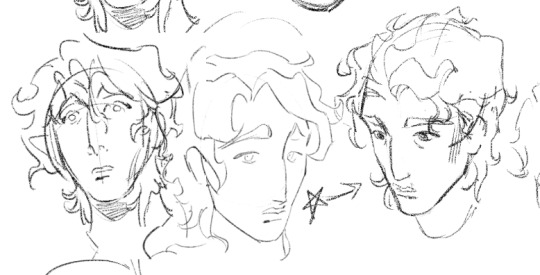

various von zaroviching
#sketches#curse of strahd#strahd von zarovich#sergei von zarovich#sturm von zarovich#getting over my fear of posting sketches with brute force. just the boys though. the girls are... somewhere in these files#strahd hates sturm's beard because it makes him look more like their dad the older they get. okay <3#the head tutorial thing is being made btw. just between working on commissions. it's four pages or so right now so it's getting there
265 notes
·
View notes
Text
RESOURCES FOR BOARD ORGANIZATION AND SEARCHING IMAGES & REFERENCES
Pinterest (Saves every image in different Boards)

Milanote (Able to search your own board and organize notes and sections. For every Project you have in mind.) Literally, you can do a crime board.

UNSPLASH

PIXABAY

Public Work by Cosmos

SAME.ENERGY

Designspiration

#reference#tutorial#art reference#art#poses#artist#art resources#resources#web#pages#help#guide#action#line#figure#animation#photography#3d model#boards#pinterest#milanote#organization
174 notes
·
View notes
Text
Dinosaurchestra CD gifs + png
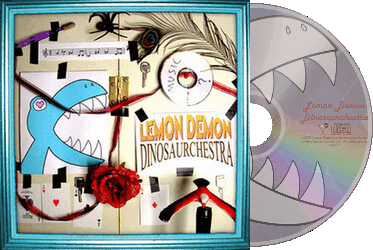
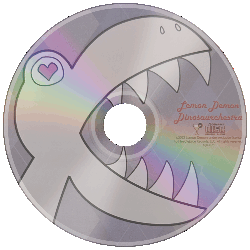
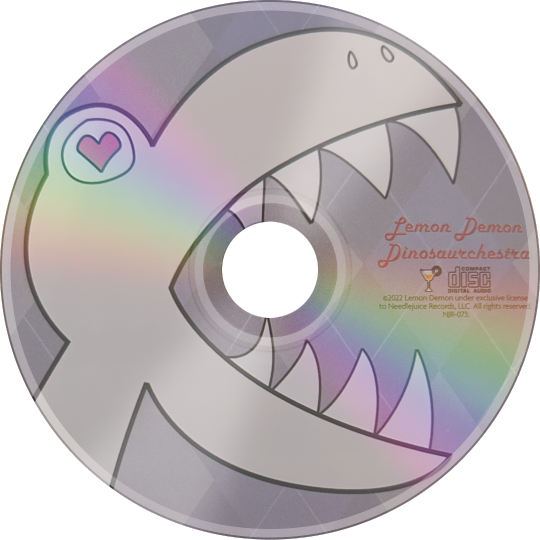
Here's a new gif style today! I've seen gifs like these online before (example, example, example), but I haven't got a clue how they're made, if there's a standard size they're supposed to be, etc. So this is me just trying it out. I did Dinosaurchestra because I wasn't finding a flat photo of a CD I wanted to use, so I just used the one that was next to me irl. Plus, I'm mega autistic for Dinosaurchestra (if you couldn't tell by my profile header lol). I plan to make a few more of these so I can get the hang of this soon.
Here are some smaller ones:
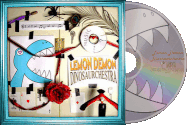

And here is a brief tutorial of how I made them, since it took nine years to figure out:
First, I made a CD in Photoshop. It's important that the hole be completely centered, or the asymmetry will be very noticeable. (But hey, nothing worth loving isn't askew, anyhow.) Here it is:

The layers are split between the base, and the reflections over it.
Then I get a photo of the CD and transform it until it fits into the CD I made. The photo goes above the base, and under the reflections, then on top of the reflections again (also with some different layer modes and varying opacity. Just try shit. Trial and error.). Now I have the png:

Now I take it into 3dgifmaker and put these settings:
Then download, and now I have this:
Next, I take it into Ezgif and click "crop". Instead of cropping, I just extended the canvas twice (I think? maybe thrice) to make room for the album cover. I also made sure the album cover image had the same height as the initial CD. Then I take that to the add overlay section and put the cover halfway over the CD gif. Lastly, I took it back to the crop section and clicked "trim transparent pixels around the image". Then it's done! Little convoluted? Yeah... but hey, I figured it out, right? A win is a win.
#web graphics#page decor#transparent png#animated gif#f2u#f2u without credit#mypngs#mygifs#tutorial#lemon demon#dinosaurchestra
59 notes
·
View notes
Text
every time I turn a page in tsc nora kicks me in the stomach and shoots me in the face. when will enough be enough
#every paragraph is like a new piece of lore that makes me collapse and go into a coma#how does nora come up with this crap#matter of fact WHY does nora come up with this#justice for my boys#they can never catch a break#aftg#tsc#all for the game#the sunshine court#jean moreau#nora sakavic#im always gagged by something and then I turn the page and immediately it gets worse like damn#thought we were at rock bottom#but actually that was the tutorial#like have fun in hell I guess
132 notes
·
View notes
Text
How I make gif stamps in GIMP!
Hi! So I thought I would make a tutorial on how I personally make my animated stamps in GIMP! With images to help!
Firstly, have your stamp base, I use old stamp templates I found or from my own stamps. Then you want to add your gif as a layer.

Once you've opened it as a layer, all the gif layers will appear! You want to first resize the background layer by scaling the layer.

This stamp has an interior width and height of 95x50 pixels, so I make sure to scale the layer to fit. Make sure width and height aren't linked because not all gifs will fit that size naturally.

Then it is very important to merge the background layer with the stamp template layer, this way when you make the gif it looks like a stamp!

Once that's done scale all your other layers to the same width and height so that they too will fit in the stamp! Then what you want to do once that is finished is to open filter > animation > optimise (for gif).

Then once you've done that you can click playback to see if the gif is all right!


Once that's done it is time to export it by going export as, now I always have to change my file to a .gif type in order for it to work. Once you've done that hit export.


Then it will show a pop up window, it is very important you hit check on animation! Otherwise it won't work!

Once that is done, you can now hit the final export and your gif stamp will be made! See my final product below!

#should work the same on a windows computer as well!#tutorial#gimp tutorial#image editing#stamp#stamps#blinkies#web#old web#webcore#old webcore#myspace#heyspace#edit#editing#page decor#help guide#guide
75 notes
·
View notes
Text


I updated the how to comics guide with a short chapter on printing and included a printable pdf (print settings 8.5x11 landscape scale to fit paper). I'm also selling a limited number of hard copies at the Portland Zine Symposium this 9/21 so see some of you there!
121 notes
·
View notes