#photopea tutorials
Explore tagged Tumblr posts
Visit Tumblr Blog
Explore Tumblr blogs with no restrictions, modern design and the best experience.
Last Seen Tumblr Blogs


Fun Fact
When “GIF” was named word of the year in 2012, Oxford Dictionaries U.S.A. credited Tumblr for pushing the word.
Note
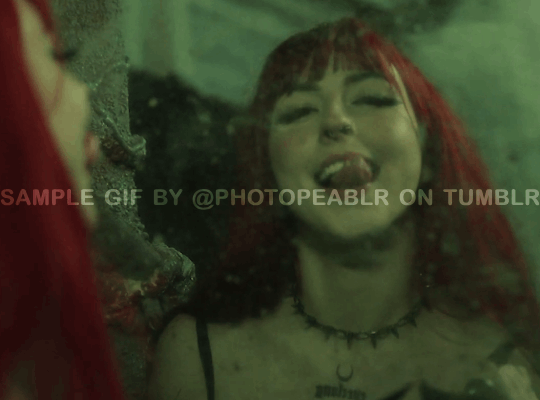
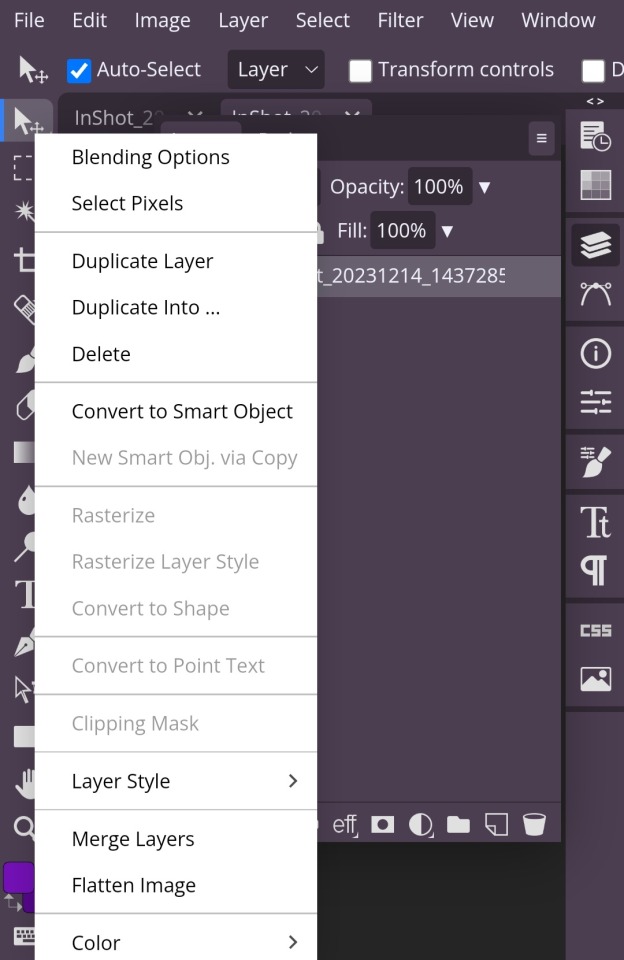
your gifsets are perfect, I'm always in awe of what you can do and you're creativity!!! Could you please explain how you made the broken glass gif with different gif in it on photopea? https://www.tumblr.com/dengswei/754916132337729536/userdramas-creator-bingo-green-asiandramanet?source=share and would it be possible to do something similar with other shapes? Thank you for your lovely creations <33
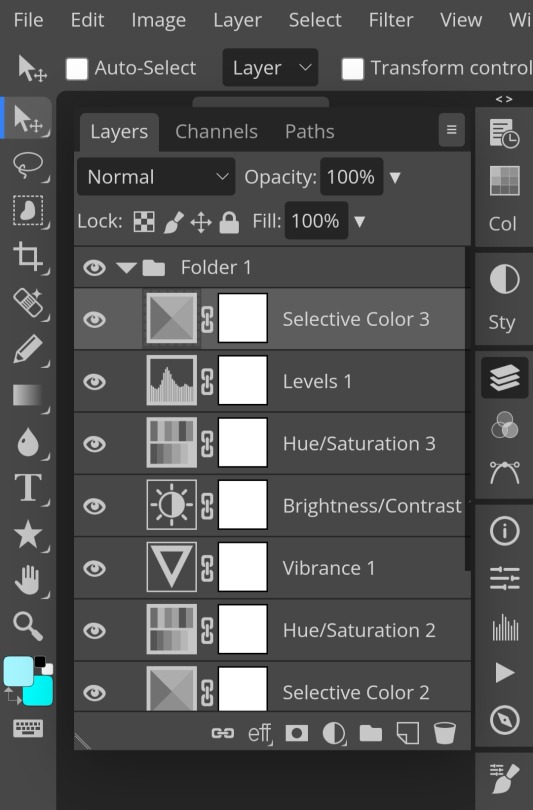
heyy thanks so much!! and of course! i have to admit the way i do it might be a little bit tedious compared to like everyone else (though i don't know how photoshop users or other photopea users might do it 🤣) okay this is gonna end up being so long because of the way i do it so i'm sorry about that and i hope it makes sense 😭
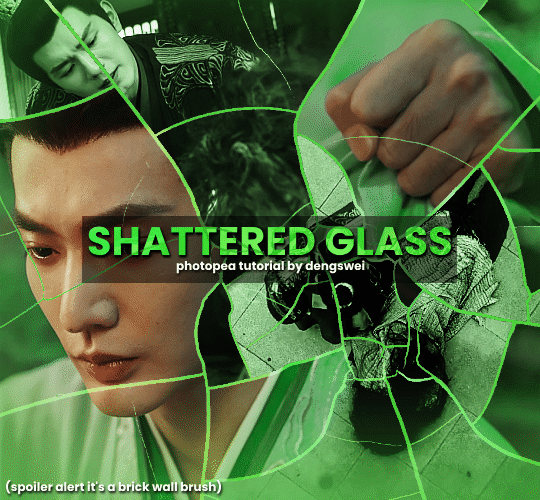
okay i have to admit i couldn't find the texture i've seen people use for the shattered glass effect so i actually used a photopea default brush from this pack
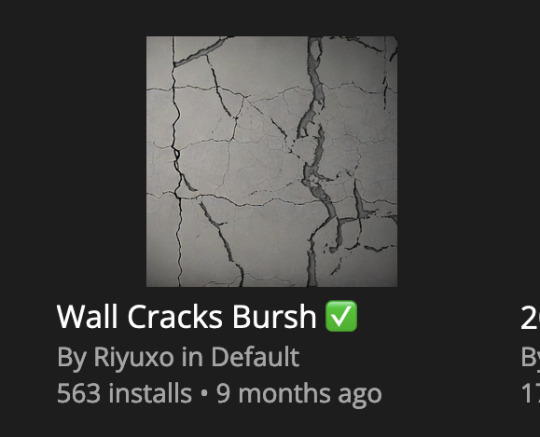
to download the brush set go to window -> plugins -> brush and then search for wall cracks brush (it's literally the only wall related brush set in photopea so it'll show up the moment you download it)
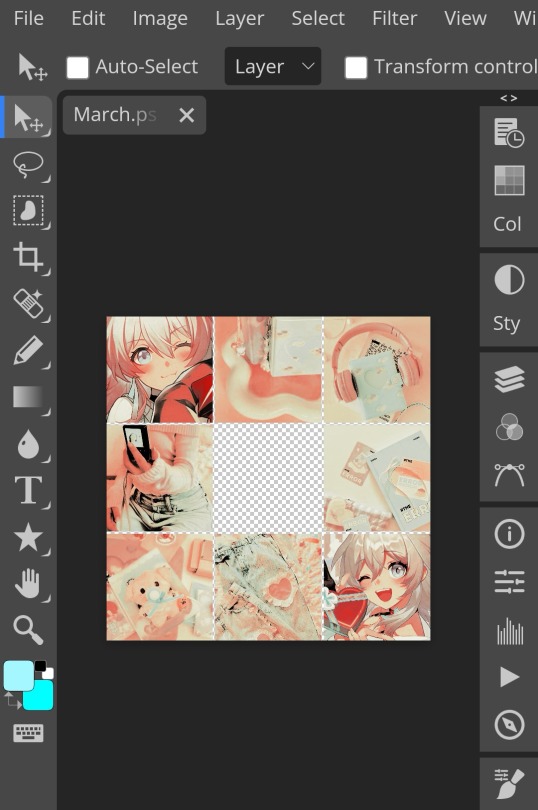
so for the gif i did above i did my giffing the usual way of creating & colouring for different gifs seperatly and then adding them all to one project (it doesn't have to be 4 gifs i just chose 4 because that's what i wanted to show in this gif)
i've done this twice once for this set and another time for this the blood of youth set and i have to say the most important part of this is keep multiple versions of the brush in the position you want as you can so once you've used it to test it out and you like that version keep it because unless you can manage to position the brush in the exact same place every time you're gonna need to reference those (or even use the magic wand tool for it later) and also you need to keep at least a white on black background version for the outline
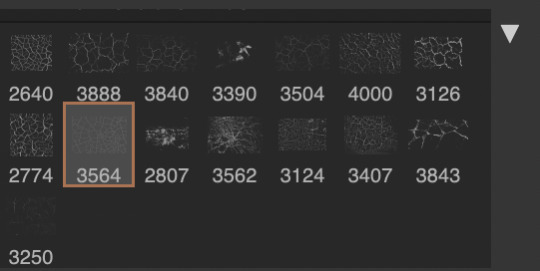
in the brush pack the one i used was this one: (3564, crack b 9)
for this part i just say play around with both positioning and sizing of the brush, it automatically opens with the size 3000+ which is fine i think with the tushan jing one (the green gif above) i stuck with that size and just kept clicking around until i got the positioning i wanted (this is another reason why i said what i said in the paragraph above because if the brush size is bigger than 1000 it's doesn't come out in the exact positioning as you expect it too
i decide the positioning of the gifs on the way i like the brick brush looking rather than the other way around, this is the positioning i went with if you're curious & would like to use it if that's easier 🤣

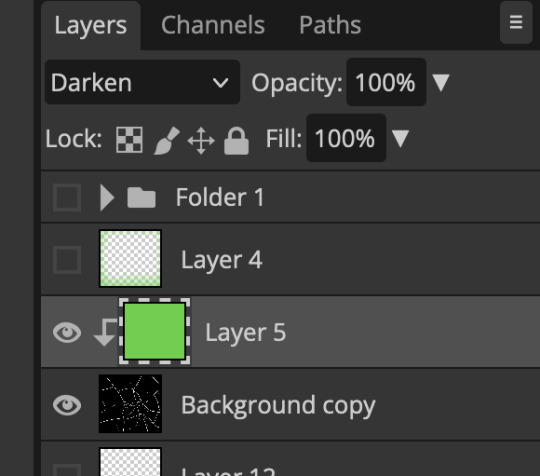
you'll need to keep this as a seperate layer at the top, i had it set to screen and then added a colour fill layer clipped on later so that i had the outline for when i was masking
so to start off i have the base gif which i do nothing to, that stays as it is, with the brush layer above set to screen
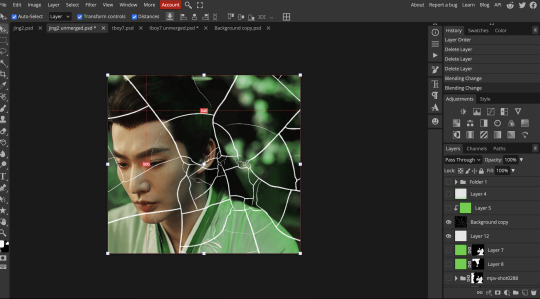
next is where you want to position your other gifs it may benefit to figure this out all at first before doing any of the masking so you know which parts you want to erase and which parts you want to keep
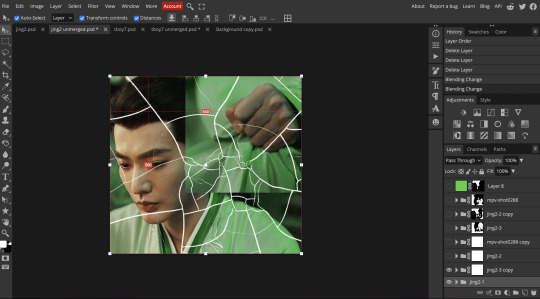
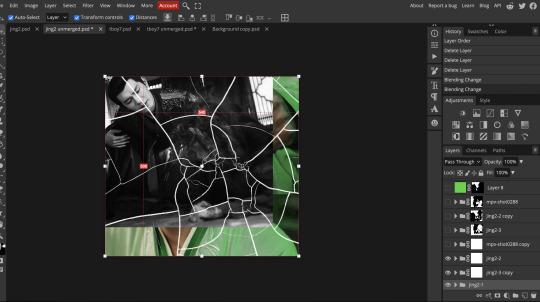
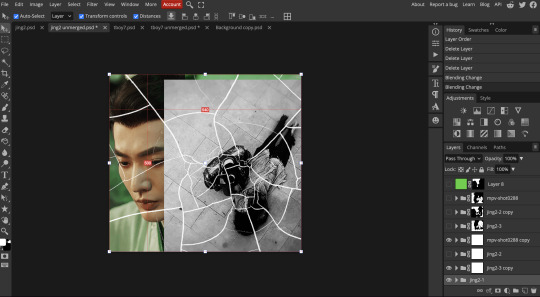
so this is what i decided with my positioning looking at where each of the cracks are
now comes the tedious part, in some ways the way i do this is a lot similar to how i do grid but it's not as easy (for grid photopea automatically locks onto the squares making it easier to mask, here you have to do it all manually)
first put a raster mask on all of the other gifs except for the base gif & use the magic wand tool on the brush layer so you get the outline of the brush and you mask that away from your gif (so if you turned off the brush layer it should look a little something like this: (it's not perfect but it won't matter that much because you should have the original turned on at the end anyway) (you don't have to do this step tbh i just did it because i thought it looked better)
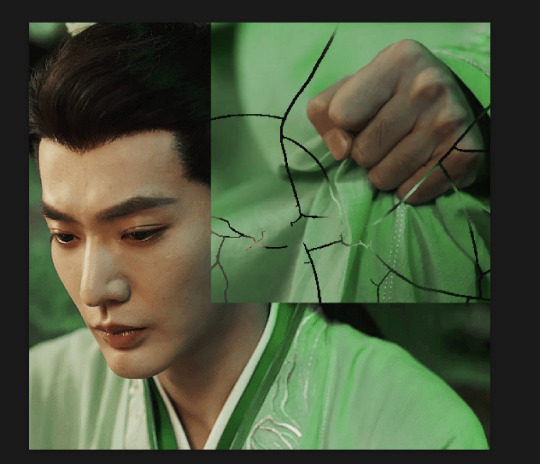
so with the brush layer turned on you can use that as a template to which parts of the cracks you want to erase, you can either use the magic wand or the paint brush tool it really depends on how much of a perfectionist you are and whether or not the sharp edges bother you (plus some of the cracks have small openings so it might erase another part you don't want if you use the magic wand tool so it really is another instance of playing around and seeing what you like, and it might also change once you add the other gifs too)
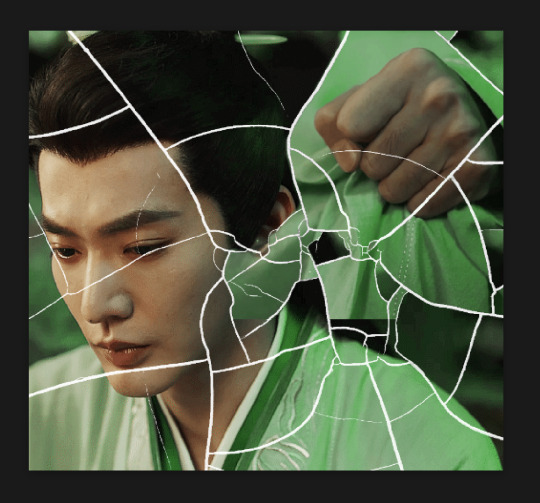
so this is how it looks after i've done that (notice in the middle you can still see the edge of the gif? that won't matter because one of the other 2 gifs i still have yet to mask will cover that) & just repeat the same thing for the other gifs you want to add
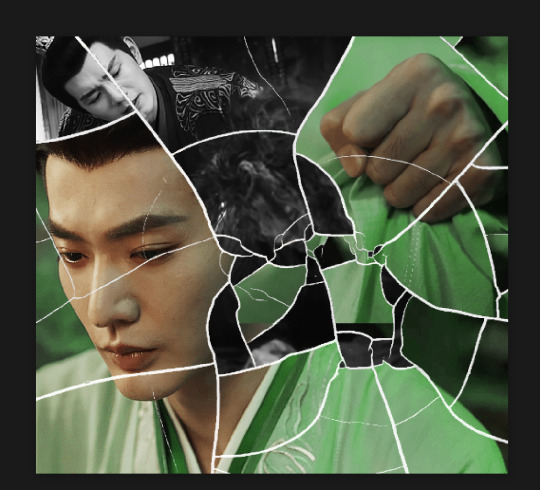
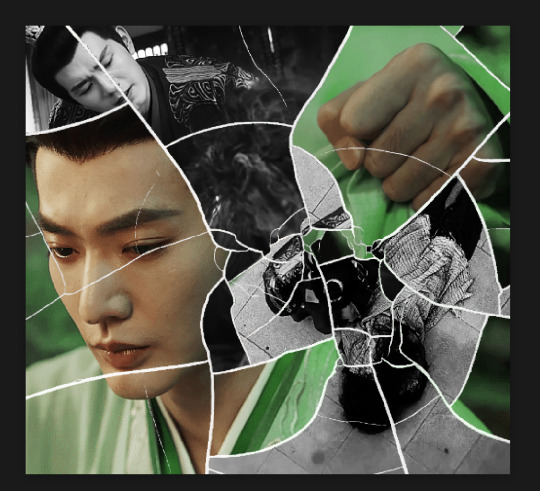
this is how my masking folders look if you're curious
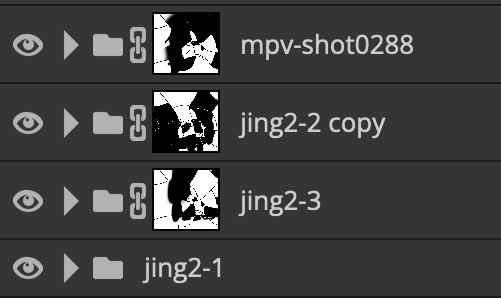
& last but not least i added a green colour fill layer clipped to the brush layer and set that to darken to get the green effect (make sure that the brush layer is still set to screen)
& once you've merged all of the gifs together you should get your desired outcome like the gif above (make sure that all the gifs have the same amount of frames too)
when it comes to other shapes i'm sure you can! like i did a tutorial with the grid version here, i guess it'll just be a lot of trial and error & finding a texture or brush with different shapes to try it out with kinda like how i did with both versions of this (i definitely did it a lot better this time around compared to the first version i did of this)
hopefully this wasn't too long or too confusing, if anything is please feel free to ask me again and i'll try and explain it a little better 🤣
#replies#Anonymous#photopeablr#usergif#tutorials#photopea tutorials#completeresources#mine | tutorials#gif tutorial#photopea#resources#gif resources#gifmakerresource#photopea tutorial#tutorial#gif tutorials
133 notes
·
View notes
Photo
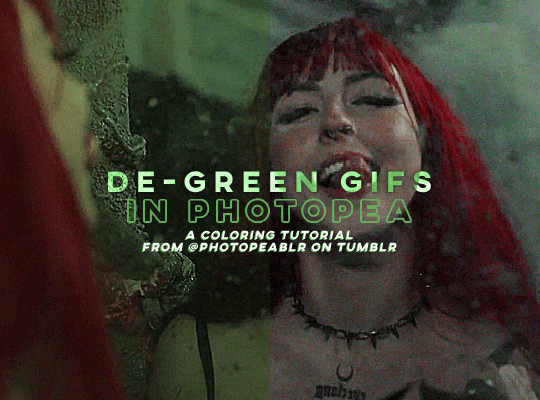
DE-GREEN GIFS in photopea — a coloring tutorial by kai at @photopeablr
howdy everyone! i come bearing another gift of a tutorial, as i’ve seen people run into this problem many times of giffing subjects being... incredibly difficult to de-green.
this tutorial requires:
photopea (free online photoshop)
basic giffing knowledge (check out our gif tutorials tag if you need to!)
with all that out of the way, let’s begin!
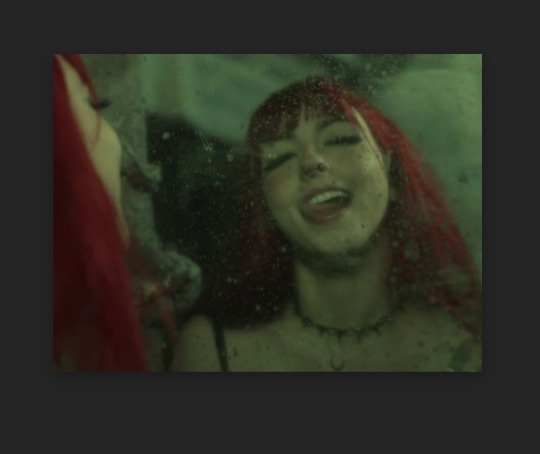
so first thing’s first, we need to get our gif loaded into photopea for us to start with. here’s a screenshot of my gif after i loaded in all the frames and cropped it to the size i wanted (540x400):
from here, we can start coloring! for those of you who haven’t read my coloring tutorial from a couple years ago, my method is more or less very similar to how it was back then. i still do the layer > adjustment layer > brightening/contrast step (though for this gif, i changed the opacity of the layer to 30%) and the layer > adjustment layer > levels, which i have set to these numbers in the pop up:

and doing all of that leaves us with our gif looking like this:
(i know the difference is very minimal but this tutorial is an entire process, give it a minute lol)
but now we get to the fun part: getting rid of that damn green filter.
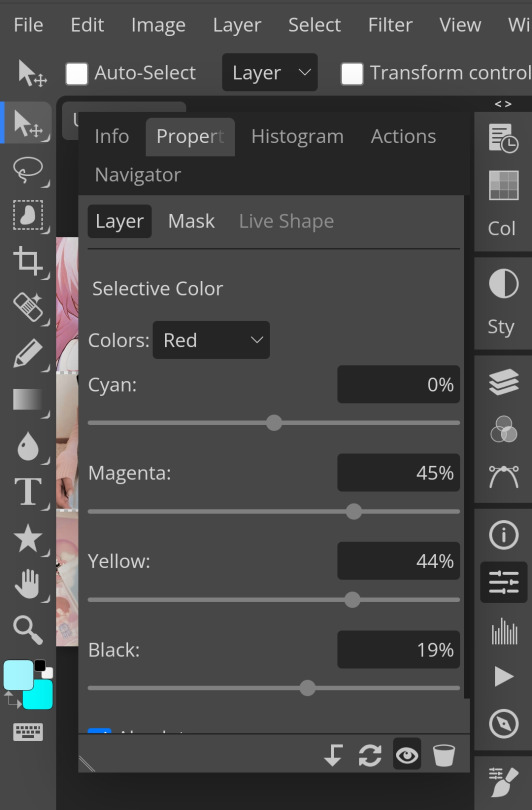
in my original coloring tutorial, i used a channel mixer layer because i was following a method similar to this tutorial. while that tutorial is great for yellow-tinted scenes (i still use that method to this day), over the years, i realized that it wasn’t as great for green-tinted gifs. this is how i started to play around with another adjustment layer known as color balance.
color balance does exactly what it sounds like it does: it balances the colors of your gif. since we’re trying to balance out all the green that’s happening in this gif, it makes sense to use this adjustment layer. go to layer > adjustment layer > color balance (visual below):
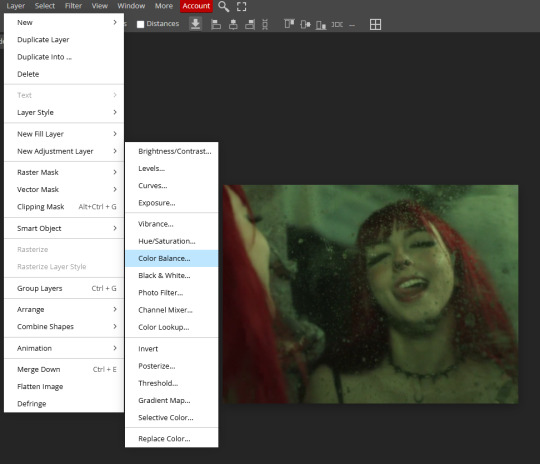
and you’ll get a pop up similar to the channel mixer adjustment layer, but just a bit different. this part of the tutorial requires for you to play around with this adjustment layer—the settings that you are going to use for any gif you make are gonna be different no matter what you’re giffing, so play around with the different settings to see how they mess with the colors of your gif until you get something that neutralizes the green for the gif you’re working with. for my gif here, these are the settings i used for the shadows, midtones, and highlights:

and in doing so, now my gif looks like this (with a before/after):

we’re only three adjustment layers in and it’s already MUCH better than what we had. color balance tends to do most of the work for us in getting the green filter out, so now we can do the rest of our coloring process (whatever that looks like for you) to finish the gif. here is the fully colored + sharpened gif:

and that’s it! a simple tutorial, but it’s immensely useful when giffing with weird green-toned scenes.
a couple things before i stop this tutorial: in some cases, sometimes you’ll need to combine a color balance layer with a channel mixer layer, but (at least in my gif experience) that’s few and far between. color balance is more or less the only layer i really need to use when trying to get rid of green tones, but sometimes scenes need a little extra touches with the channel mixer layer to help neutralize the gif a bit more so it’s easier to color later on in your coloring process. but, again, those are few and far between.
no matter what you’re giffing, color balance is a great base layer that you can build off of with other adjustment layers and should really help out in making that gross green filter go away!
#photopea#photopea tutorial#photopea gif tutorial#photopea tutorials#coloring tutorial#coloring tutorials#gif tutorials#gif tutorial#*#*kai#*tutorials#resources#usergoose#userheartbreak
52 notes
·
View notes
Note
Would you ever share your blending process? It looks amazing!
Of course!!! I'm always happy to help!!! (Also, thank you for saying so 💖💖💖💖)
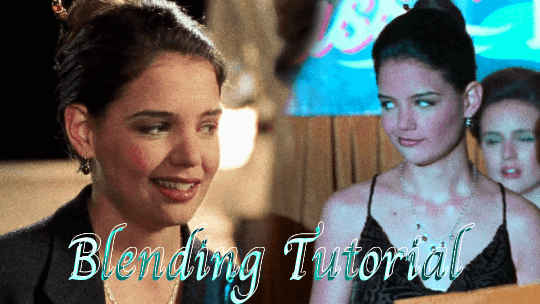
The tutorial below will show you how to make this gif!
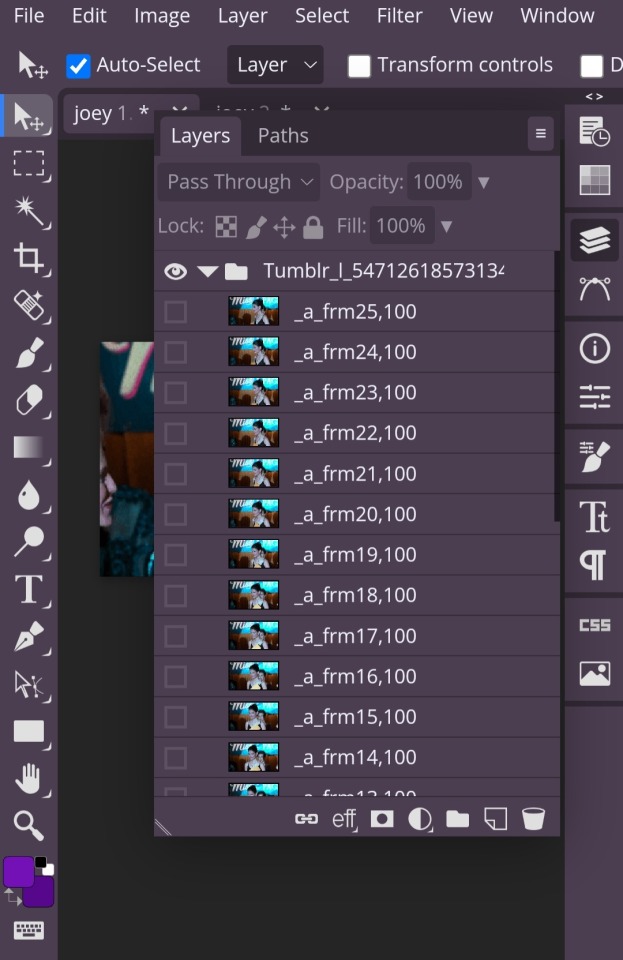
So first you have to open your gifs in photopea and make sure they're the same number of frames.

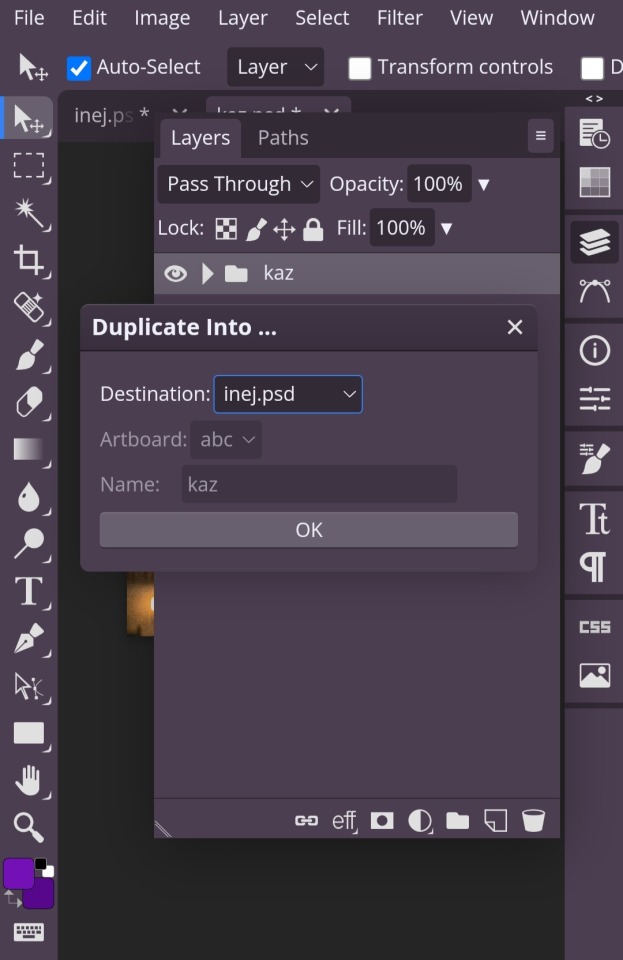
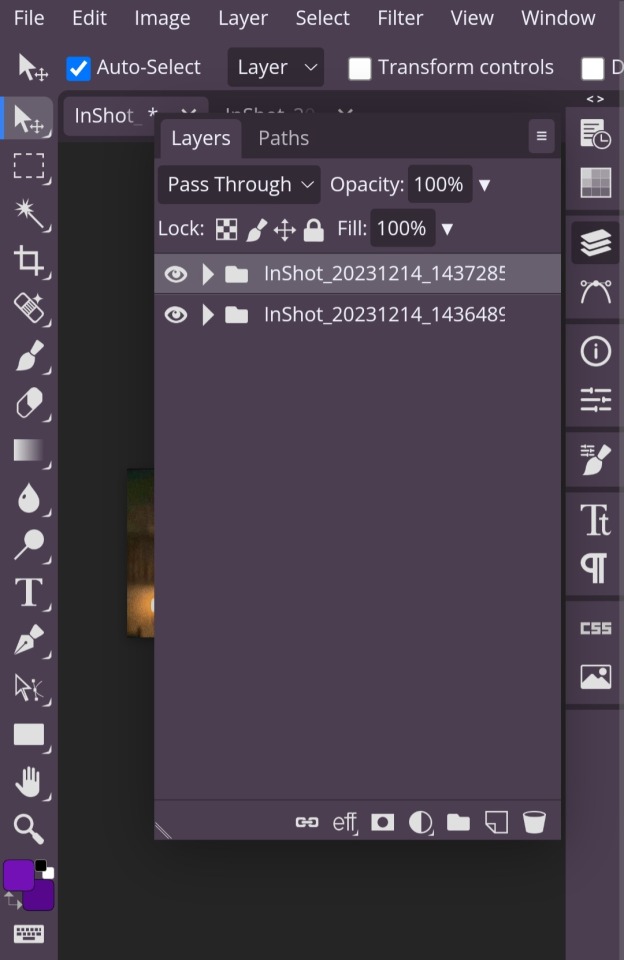
Once both of your gifs are made and have the same number of frames, you'll go into the second gif and right click on it and pick the 'duplicate into' option, where you'll choose to duplicate it into your first gif.
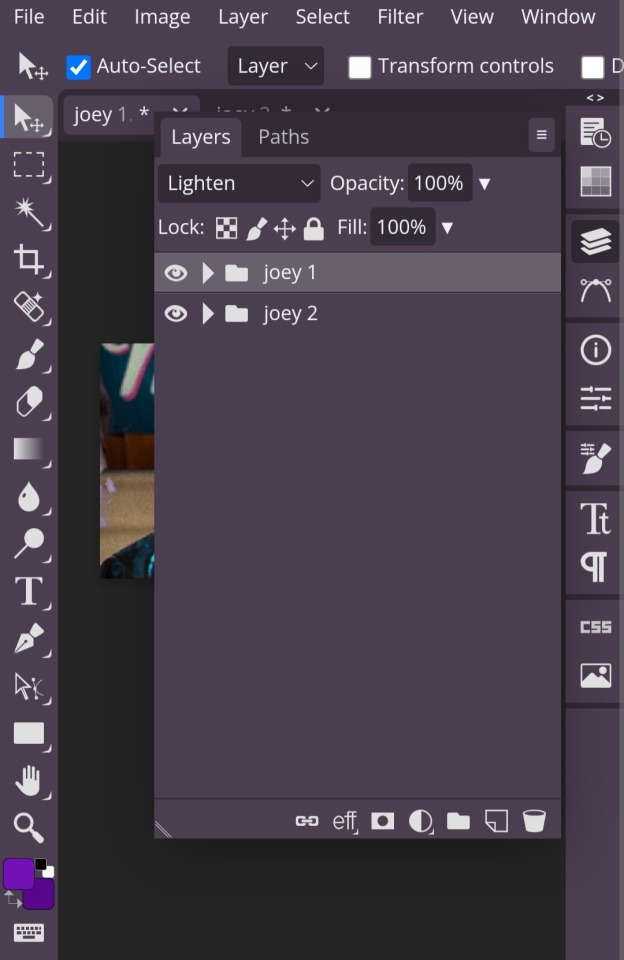
Once you have them together in the same place, you'll change the blending style (which is the dropdown menu next to opacity) from 'pass through' to 'lighten' for both gifs. This step isn't technically required, but it helps you visualize how you want to place your gifs easier.
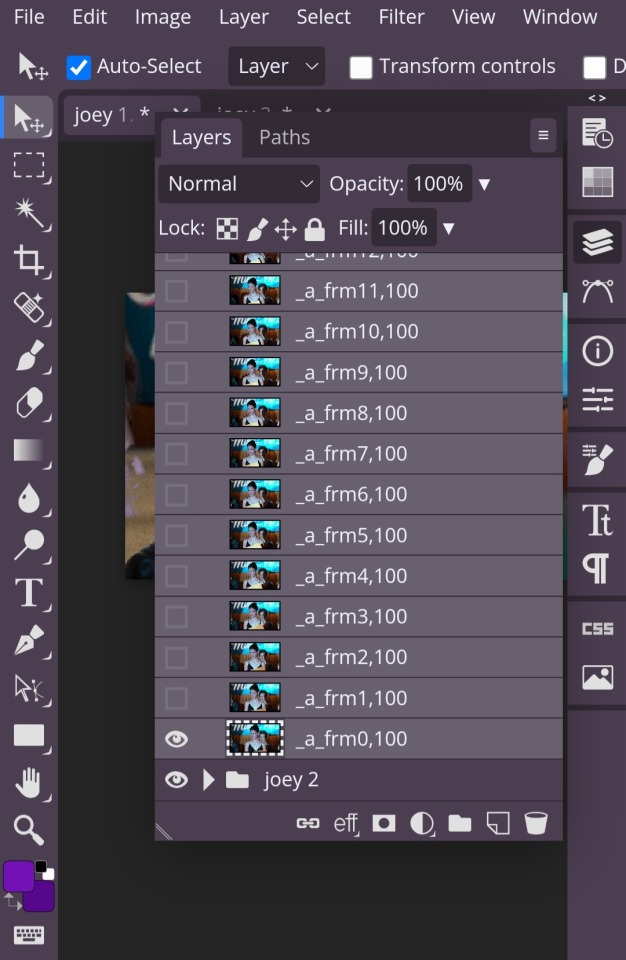
In order to move your gifs to where you want them to be, you have to select all the frames of your gif (otherwise you'll only end up moving one frame). You can do this by clicking on the first frame, then hold down the shift key while you select the last frame. Then you're free to move both gifs to where you want them!
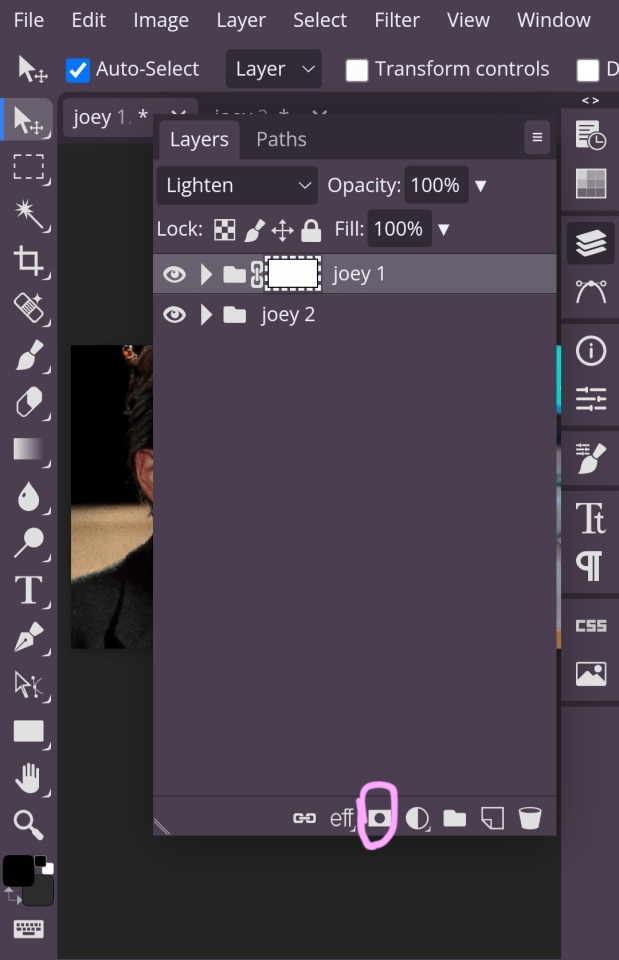
Once you have your gifs where you want them, now comes the blending! Click on the raster mask option, which I've circled.
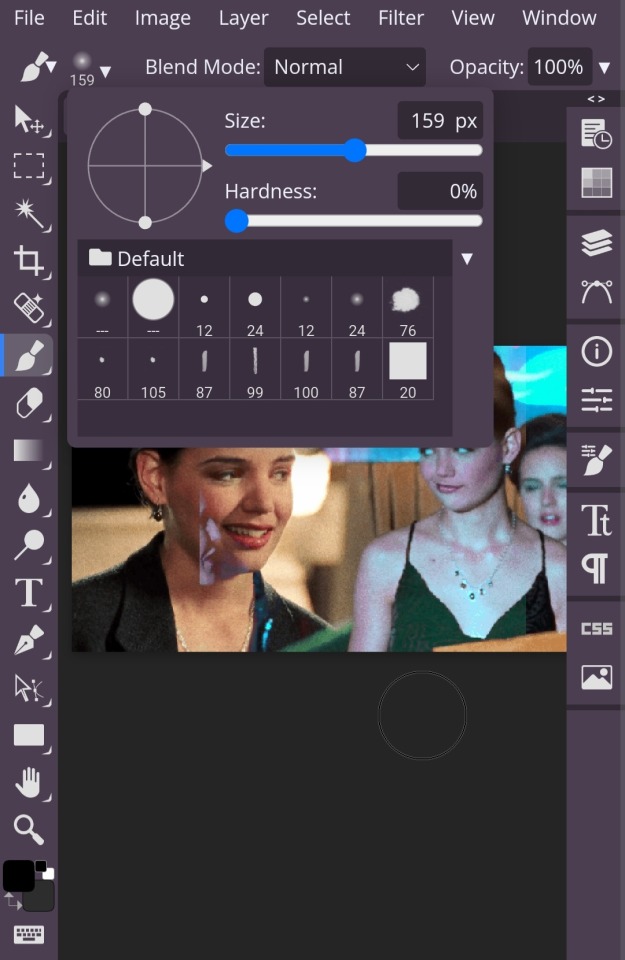
Next, you're going to get a brush. It's best to turn the hardness down, because then you're won't be as, well, hard lol. With a soft brush, it's easier to blend more naturally. And use whatever size you want.
With the raster mask, to erase what you don't want in your gif, like the harsh lines and things blocking parts of your other gif or whatever, you want to turn the color to black. Then, if you erase too much, you can change the color to white in order to add it back in!
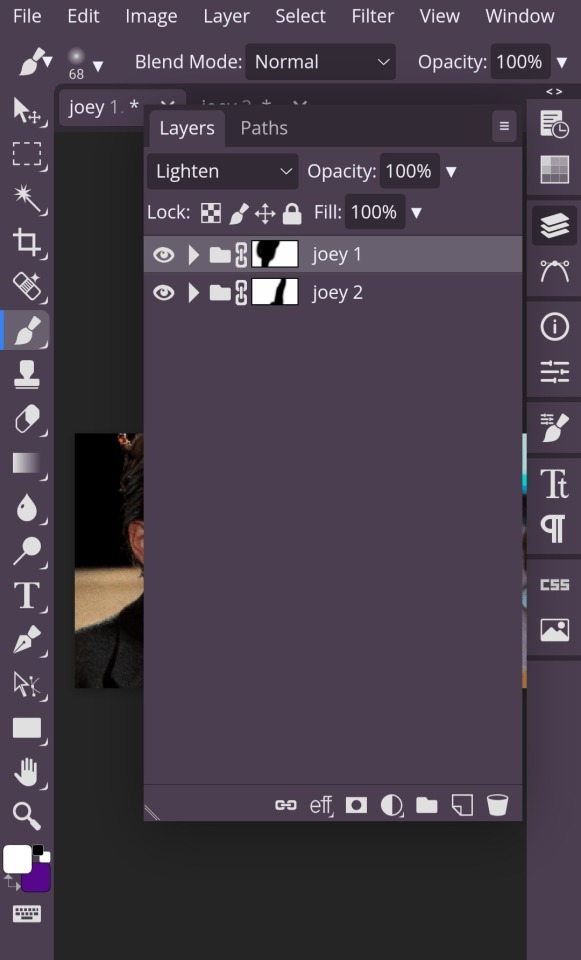
One more thing about the raster mask, since you'll be adding it both gifs. Whatever part of the gif you want to erase make sure you're erasing the part from the gif that mask is applied to.
If that's confusing, what I mean is: I have my gifs labelled 'joey 1' & 'joey 2'. Joey 1 is the gif on the right and Joey 2 is the gif on the left. So, if I want to have more of the Joey 2 gif in my blended gif, I have to erase the parts of Joey 1 from the mask applied to Joey 1. (Hopefully that makes sense!)
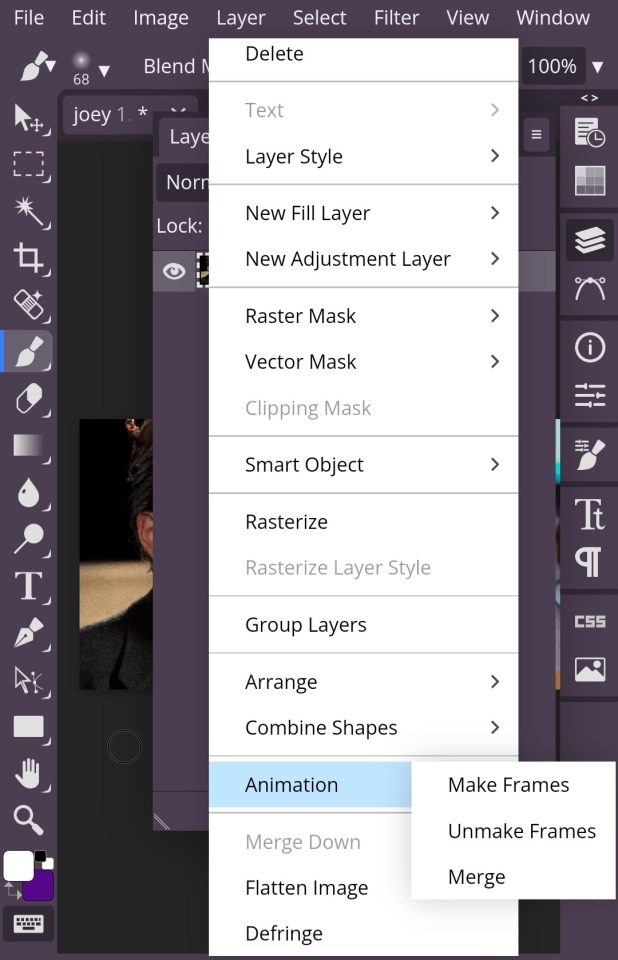
Once you're satisfied with your blending, you're going to select both folders the same way you selected frames when moving your gifs. Then, you're going to click the layer dropdown menu up on the top and scroll until you get to the animation tab which has 'make frames' 'unmake frames' & 'merge' in it. You're going to select merge and you're done!
Just save it as a gif with whatever dimensions you want! And congratulations, you've made your blended gif !!!!!!
#photopea tutorials#photopea#gif tutorials#gif tutorial#photopea tutorial#cloud's tutorials#this was a very quick gif so i hope it looks okay!!!#replies
41 notes
·
View notes
Text
header is a template by @stephysource Mascot/faceclaim is Danielle Campbell - Not updated yet but official blog psd made by @smolresources
this is an under construction blog for lovers of content and content creators. this page endeavors to make things accessible as well as joyful in this community. Wether you make fan art, psds,edits, icons, codes, rp resources paid or otherwise. Feel free to tag in things but we will do our best to reblog tutorials and information as well as commission info or pack or template results. @limoncellocodes is where we have gotten code from. Please feel free to send in asks. Shoutouts for creators is greatly appreciated. We ask that you credit the people you use things from or be blocked as a terrible human and if you can like or reblog if a tutorial is helpful to you
#rph#free rp resources#photopea tutorials#photoshop tutorials#psd coloring#psd commissions#rp commissions#rp community#postivity
8 notes
·
View notes
Text
How do you clip GIFs onto masks?
[PT: How do you clip GIFs onto masks? /END PT]
Right click on your mask layer, click Select Pixels.
Click the Folder icon and then the Raster Mask icon on the bottom right. This should create a new folder.
Duplicate your gif into your project, either by clicking and dragging it into it or by right clicking and duplicating it into your project.
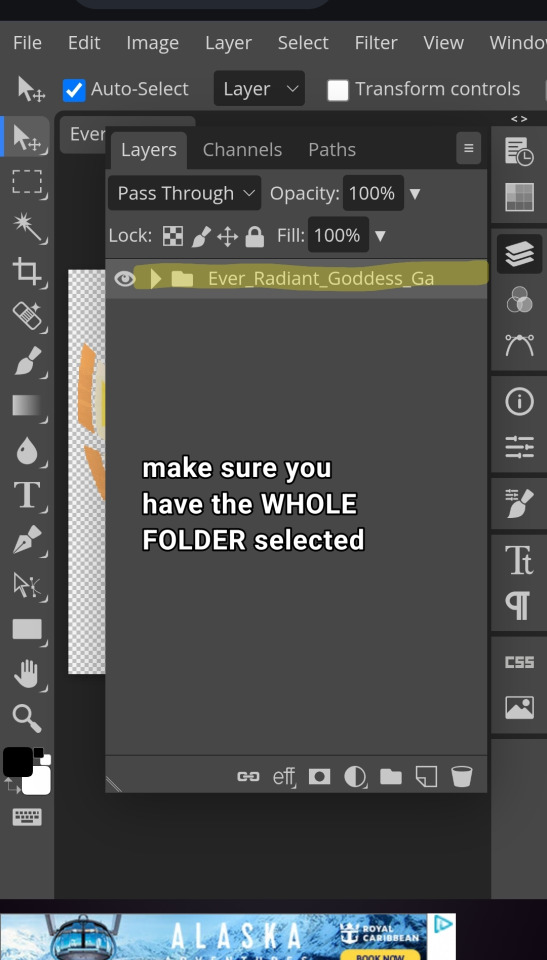
Simply put your gif into the folder that you made earlier and adjust it as needed. (make sure you have the WHOLE GIF FOLDER selected and have AUTO-SELECT OFF! otherwise it'll only edit one frame)
Export it as a gif and you're done.
You CAN do this with images that have faded borders, but it is important to note that gifs will make masks with any fading solid if you export it as a gif. Exporting it as a webp will keep the fading, though.
#𐐪 tutorials and help.#𐐪 from praysia.#𐐪 by praysia.#photopea#photopea tutorial#edit help#editing help#rentry resources#masks#rentry masks#how to#how-to#photopeablr#photopea resources#editblr
553 notes
·
View notes
Text


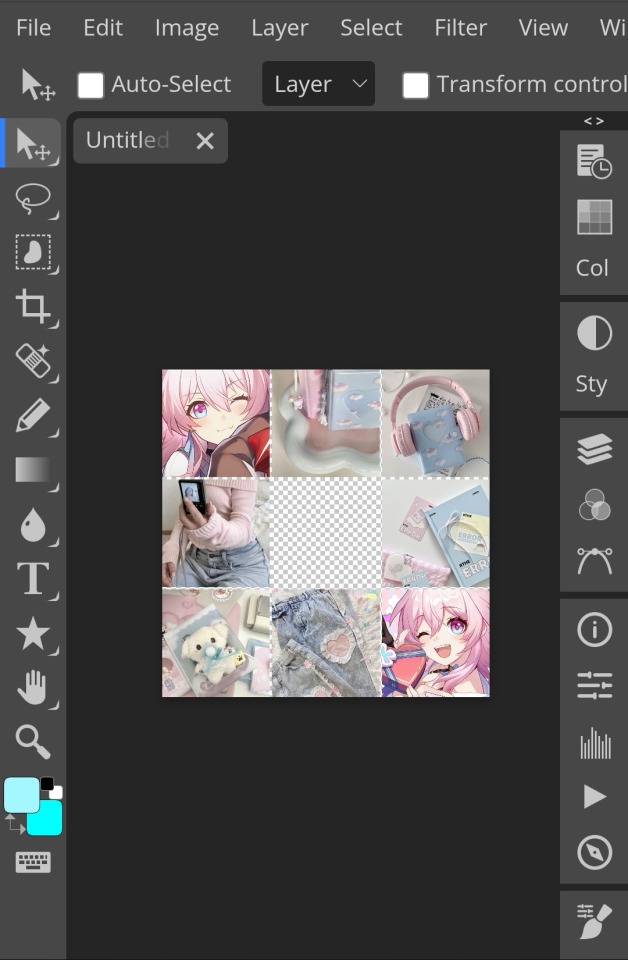
Hello guys! Today ill make a tutorial on how to use psds! Dont be scared, its really easy and very fun too!

First, open photopea with the image you wanna use. click “File” and press open, after that, you open your files and select your psd!


Great! Now we have the psd! But what do we do with it…?
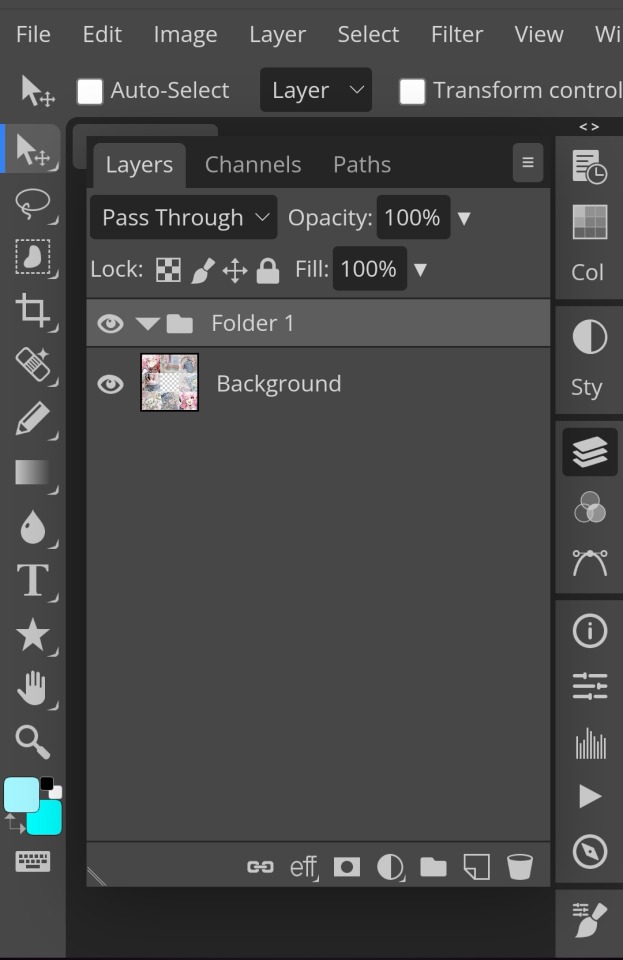
well, first you need to check that youre on the right layer: Make sure youre selecting your psd folder before doing anything here!

great! Now click “layer” and after that, “duplicate into”

Now make sure you change it to the name of the project you wanna apply the psd to!


Enjoy your edits!
Feel free to send in an ask if you have any questions or something wasnt clear enough! Im always happy to help. See ya!

#⌗ 🍦 ⊹⁺ Marking what is mine#rentry decor#photopea psd#psd#psd tutorial#editing resources#edit tutorial#rentry inspo#editblr#rentry resources
568 notes
·
View notes
Note
This isn't a request I've just been having trouble figuring something out, how do you do your rentry/graphics mainly the gifs? I really wanna learn!
:3c < hey ! I learned how to clip gifs in my graphics so I can finally give this tutorial :
end result :

this can apply to any mask !! if you have any questions please contact me at any time !
#Hope you guys like soulja boy#hhh#tutorial#photopea tutorial#photopeablr#photopea resources#୨୧ㅤ. ㅤresources#anons#anons welcome#rentry#rentry graphics#rentry stuff#rentry decor#rentry gif#rentry resources#sntry resources#sntry graphics#sntry decor#gifs#gif
368 notes
·
View notes
Text

Hello everyone! With the poll on my main blog, many ppl have voted for a psd tutorial so here it is! Here are some things to note:
✦ ・ There is NO fixed way on making psds and this is simply my way of going through it.
✦ ・ this will be a in depth tutorial so it'll show u my whole process! Skip to step 3 for actual process.
✦ ・ there are other tutorials on tumblr that i def recommend! Such as @/canarysage and @/imbermagnvs
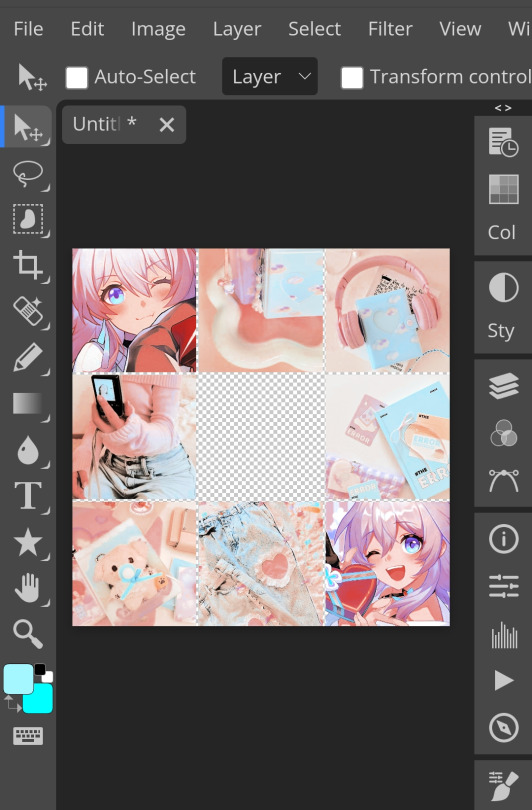
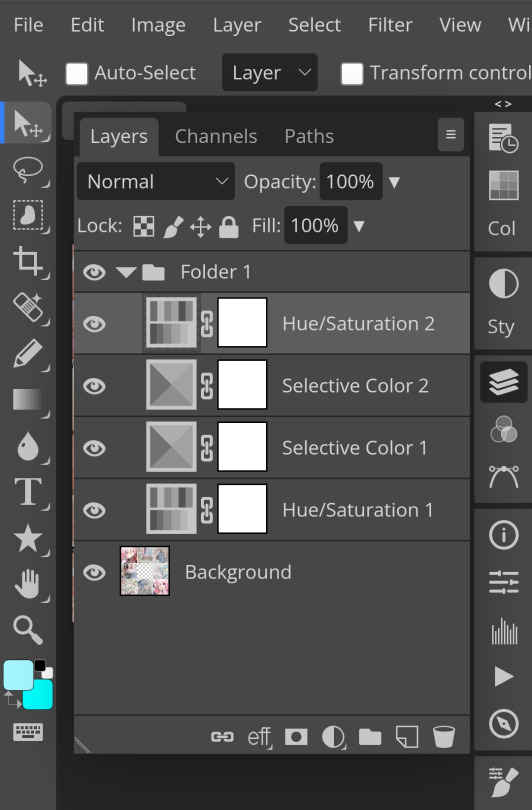
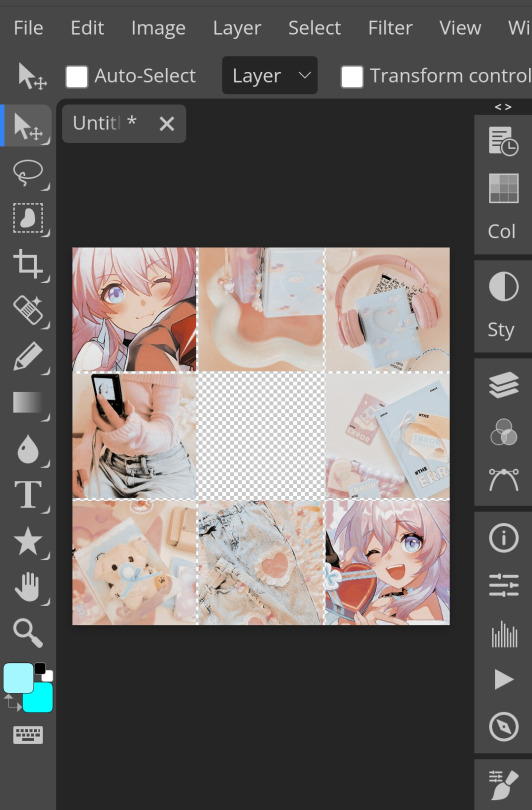
1. Lets get straight to the point! Choose the image(s) you want, i often make a moodboard first but thats optional and you can just choose ur image. (not sure if anyone needs this but to import or place images, press file -> open)
2. Next, make a folder by pressing the layer button (the 5th button the right based on my image)
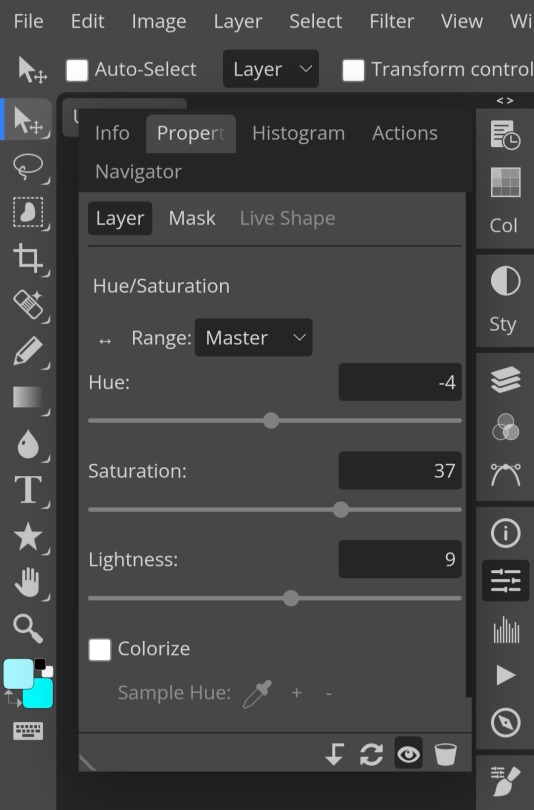
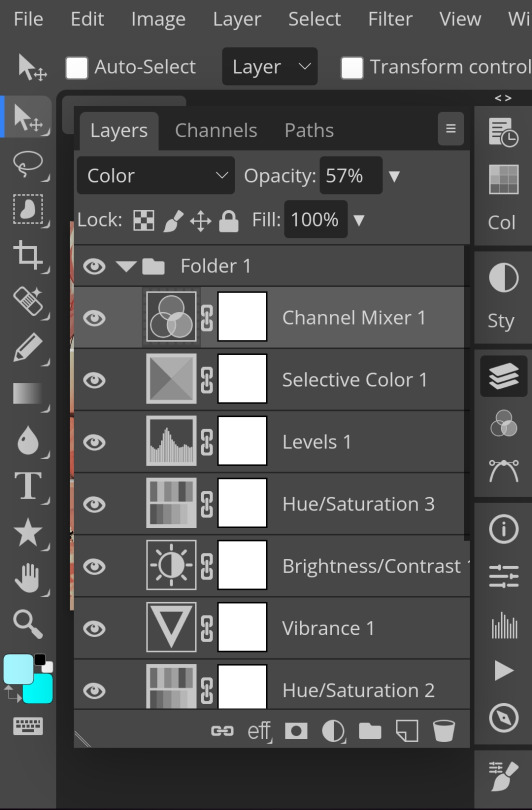
3. Firstly, i use hue/saturation to make her a lil more vibrant so my colours can be more uhhh vibrant or vivid.
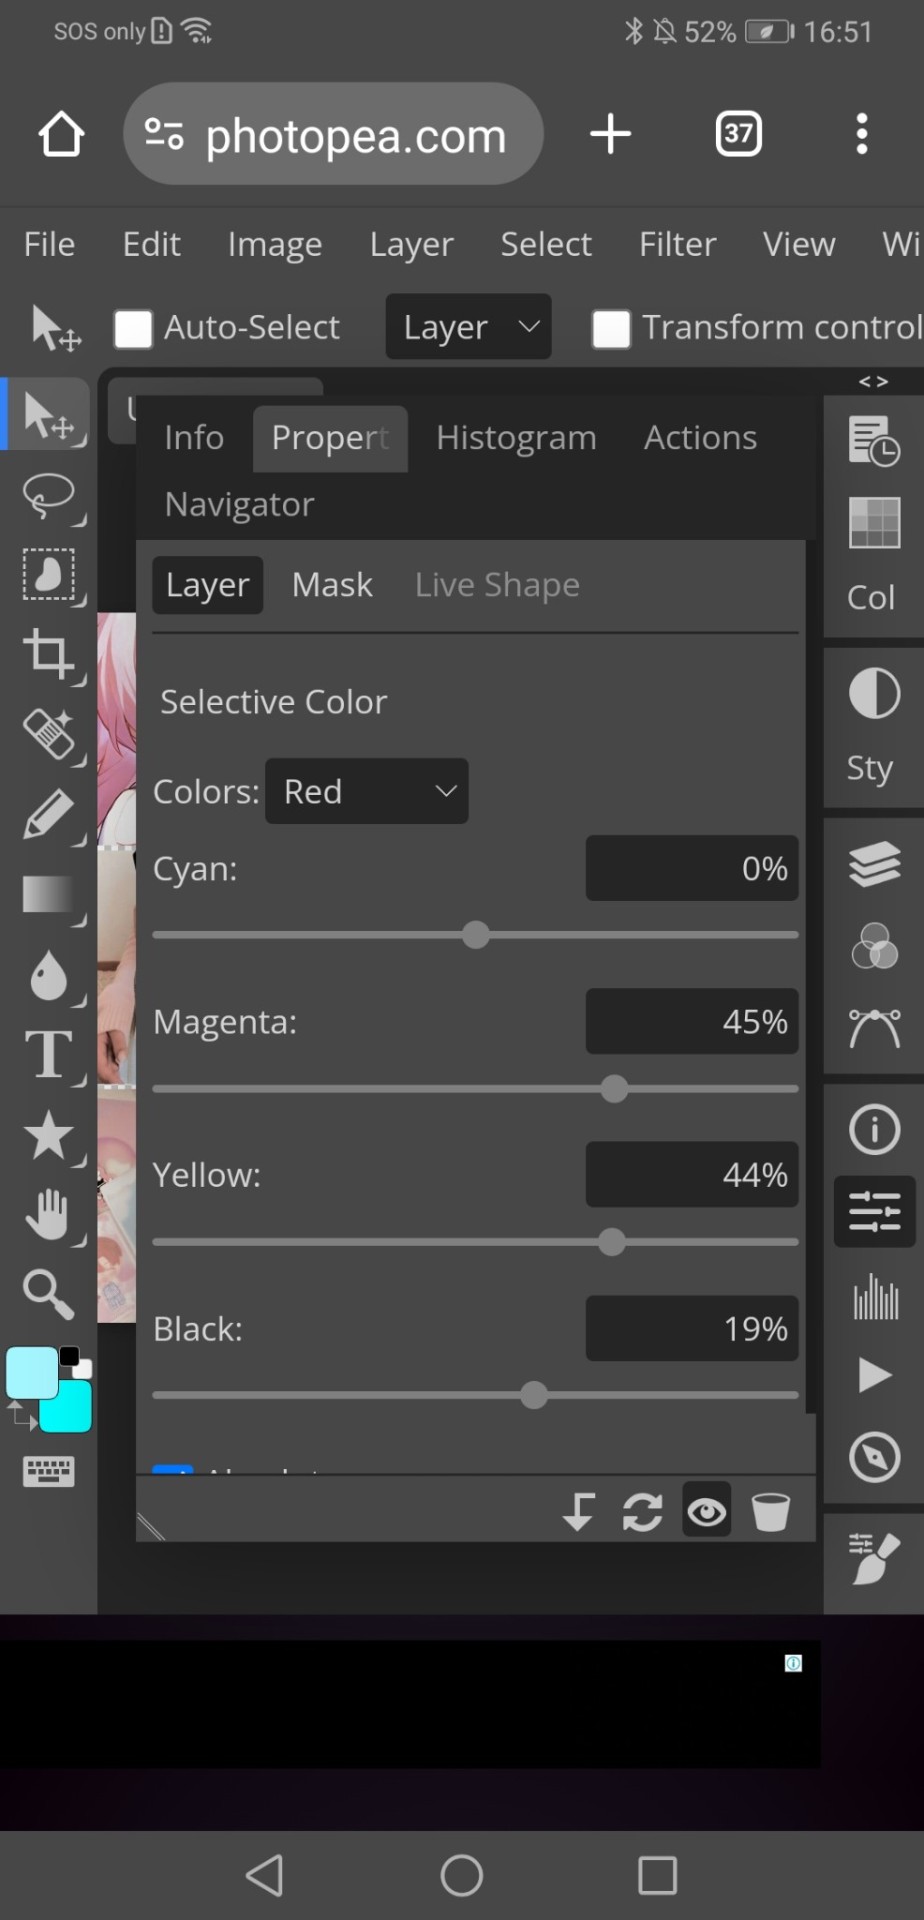
4. Now, every editors fav! Selective colour 💓 I'm not really good at explaining so pls visit canarysage to see what it is! It's good to tweak some colours without affecting the other colours.
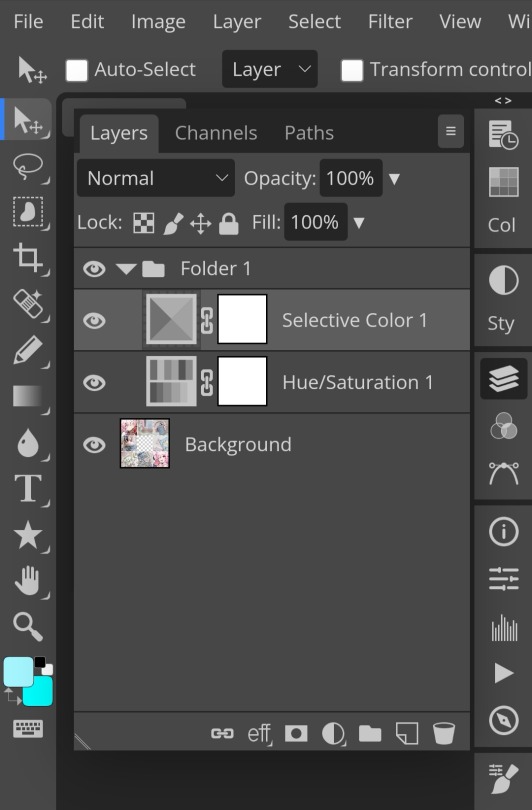
5. I recommend adding more selective colours as i added few more but cuz of the limit i can't show u help but i recommend adding 2-3 anyways! This is the psd so far which seems okay but to me it doesn't pop out so I'll be adding on
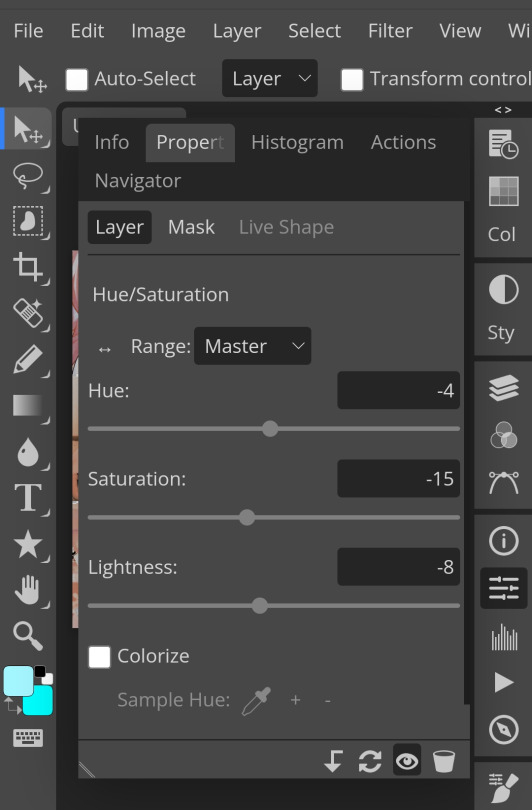
7. So i decided to add hue/saturation w the same reason as point 3.
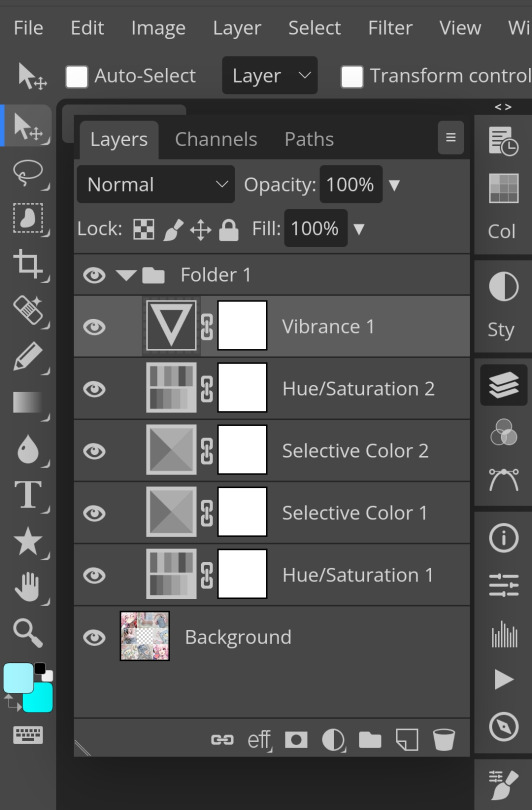
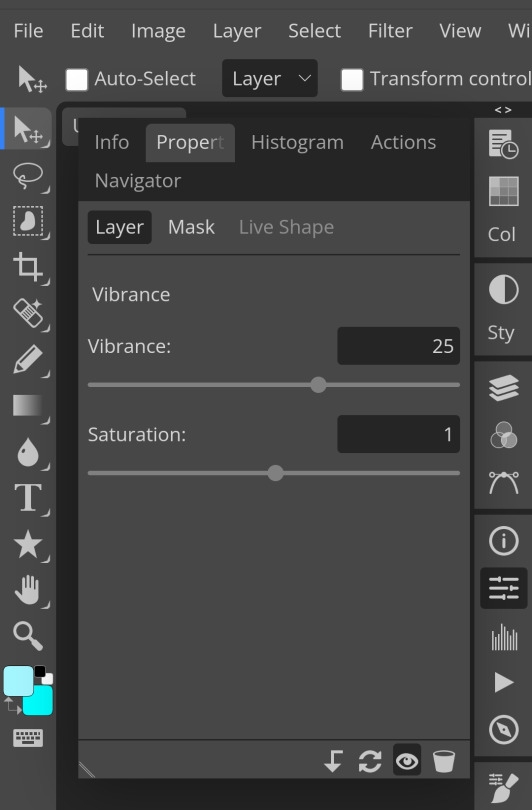
8. Next, i use vibrance to not oversaturate the image.
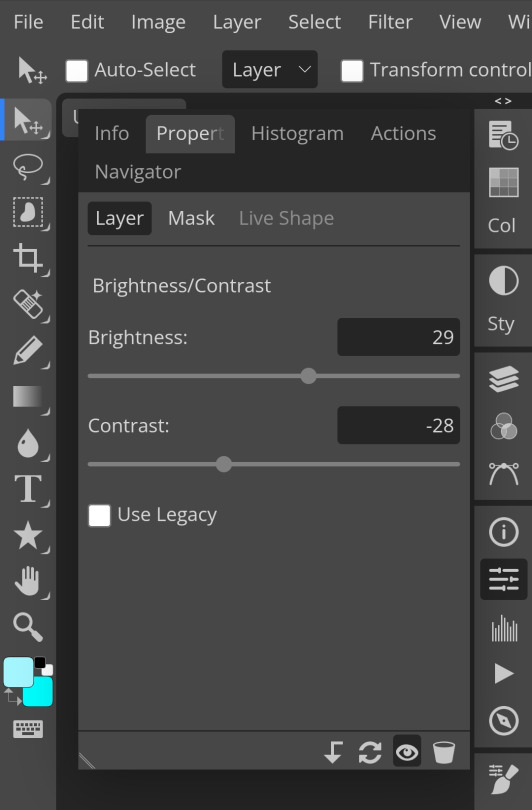
9. Now i use brightness and contrast, It’s often used for quick n straightforward edits to enhance visibility.
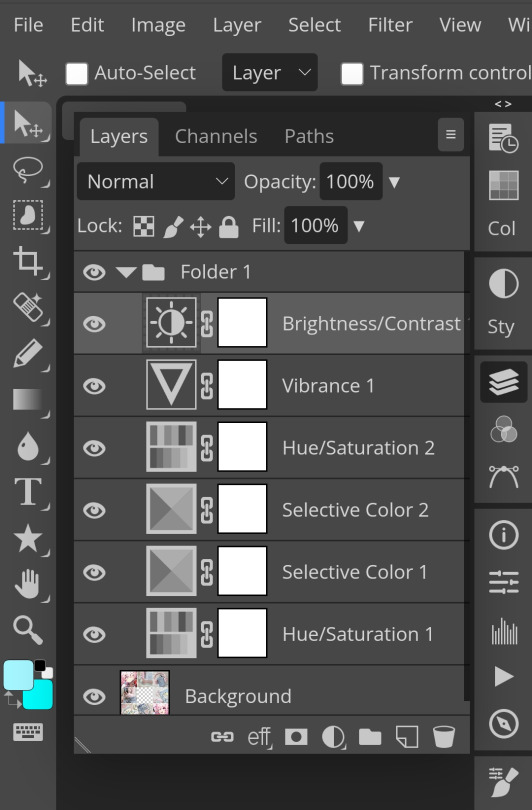
10. Let's add another hue/saturation layer cuz why not! Please remember to experiment w what u do since this is how you can have your own "style" of making ur edits.

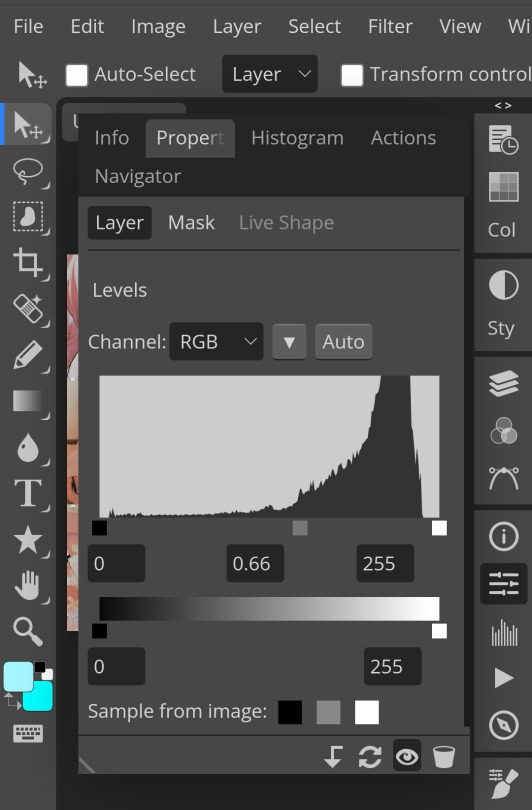
10. Next, let's add levels! I recommend checking out canarysage since they explained it better than i ever could.

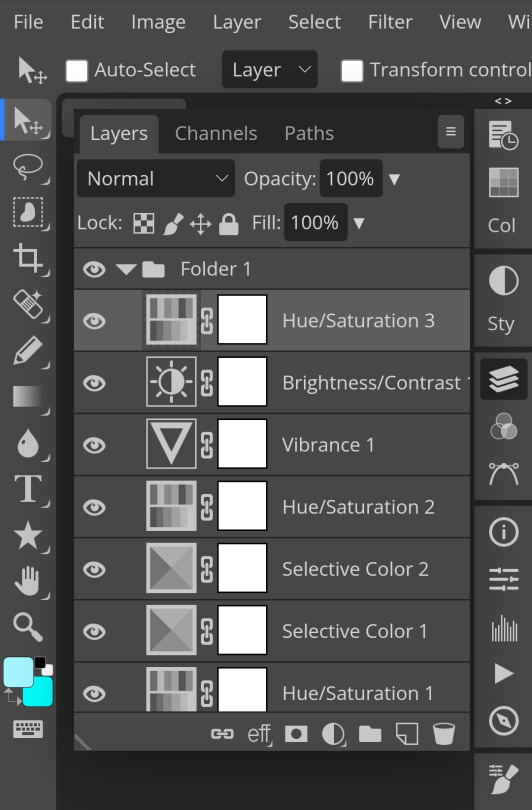
11. Now, another layer of selective colour
and tada! This is my psd so far but i love those psds that r bright so I'll add on but this is optional!
12. Now let's add a channel mixer to create some custom effects <3

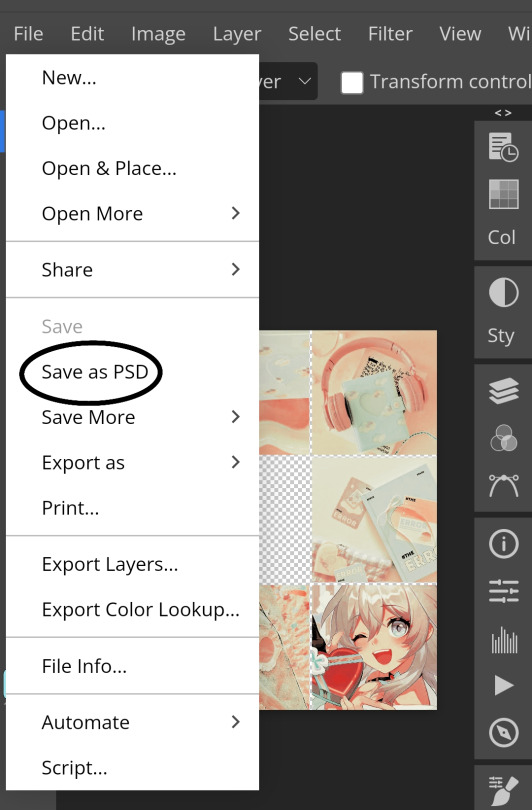
And here's the psd outcome! You'd wanna save it as save as psd (i HIGHLY recommend you put ur psd on a 100x100 canvas w a pic so it doesn't take much space)
ANOTHER NOTE!! i always test my psd on dark skin characters afterwards and made adjustments when needed i realised my selective colours made em abit red so feel free to adjust if ur using this tutorial! If u made it this far drop a follow 😈
216 notes
·
View notes
Text

Moechu presents... Menhera-chan psd! ~ credit appreciated but not mandatory! do not use as a base or mix with other psds!


#[ ♡ DECOR POSTS ]#editblr#rentry decor#rentry resources#rentry#rentry graphics#psd download#psd coloring#photopea psd#icons without psd#psd#photopea resources#photopeablr#photopea tutorial#photopea coloring#carrd moodboard#carrd resources#carrd graphics#carrd stuff#carrd#rentry stuff#rentry inspo
108 notes
·
View notes
Note
HI-LO!! love Ur layouts they’re so Coolio.. i just Wanted to ask hhhow do U do those layouts with the gif under the Graphic? like the One in Ur candy apple header.. the swirly part :-o i Kind of struggled putting the graphic over the Gif i fear

HELLO HAI i think someone else also asked me abt this but i forgot, anywho i use photopea for all my layouts and gifs and idk how to explain it fully but i did make a video tut like two days ago for it
if it doesn’t make a bunch of sense because of how photopea is setup i’ll do a better fleshed out tutorial on how everything works :3

#⏑◜ ͡ 𑙒 ⠀ [[BEST 𓈒 GIRL 𓈒 DAD]] ⠀𓏵𓏵ྀི#photopea tutorial#rentry resources#editblr#editing resources#edit resources#photopea resources#rentry stuff#rentry graphics#rentry inspo
84 notes
·
View notes
Note
I LOVE this set and i was wondering if you could pls explain how you did the text, including how you added texture to the ripped text and the highlighting/circling/etc of words? thank you for posting your beautiful gifs 😊
thank you!! 🥺 & of course! (photopea tutorial)
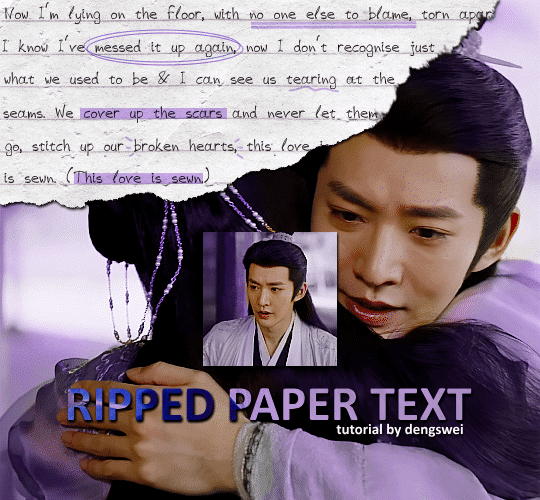
the majority of the texture for the ripped paper effect i can't really take credit for it's on the paper it's self all i did was make the paper white (because the texture was yellow) and used curves to darken the texture), i got the texture from one of photopea's templates but it seems their whole template section has changed drastically and no longer has like anything i used to see before ???? so i'll just share both versions here:
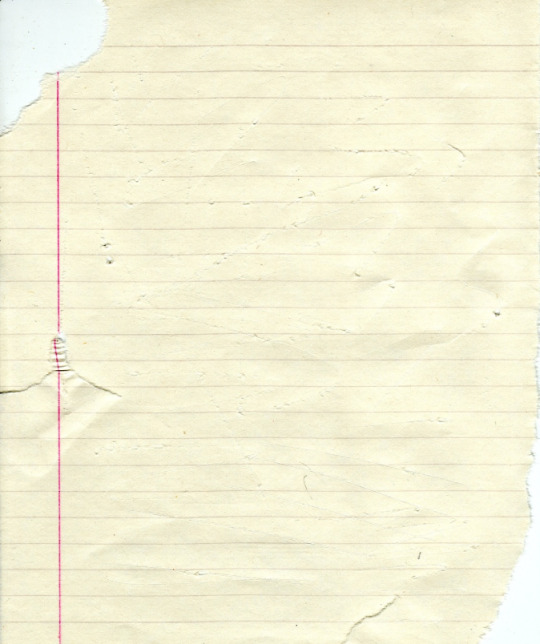
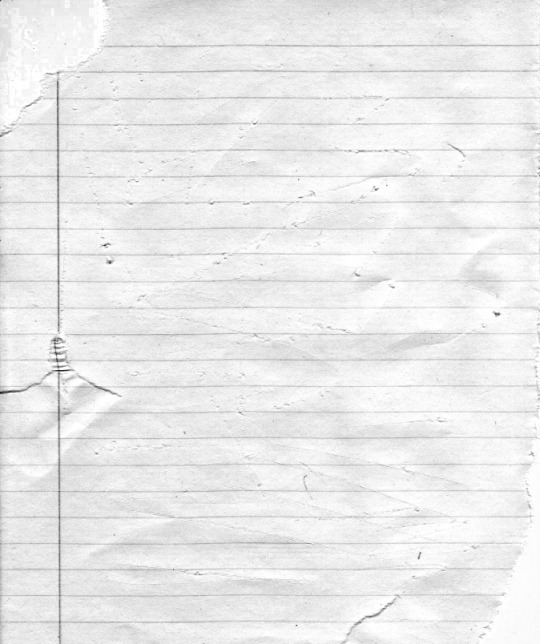
(original & my edited version)
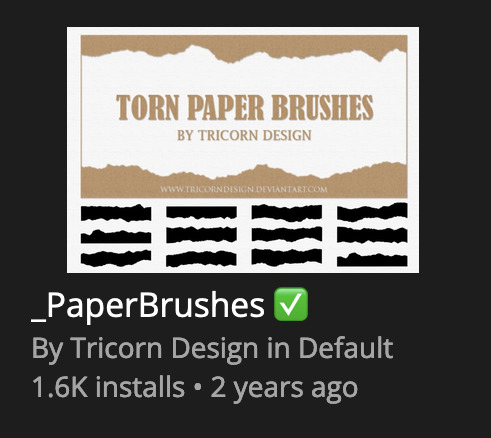
for the ripped parts i just played around with this brush set in the plugins
once i decided which of the paper brushes to use i had a new layer and used it where i wanted, so top left in the gif above, i clip masked the paper texture (and the adjustment layers as well) onto it so you get that ripped effect (if you don't like or want to add to that you can always use the brush tool again (or the erasure tool) set as the paper brush to add or remove sections i did this a lot when i realised certain words i wanted to show weren't on there (also changing the size of the paper brush when wanting to add a little bit or take a little bit away was a massive help)
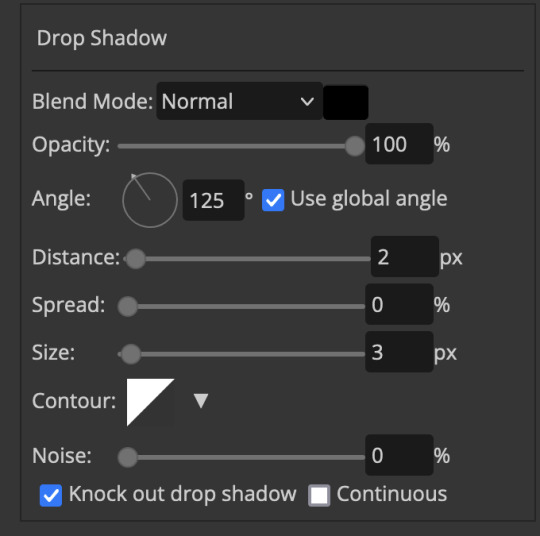
i also always add a drop shadow to my paper textures, the settings i used is mostly the same EXCEPT for the angle for all of the ripped paper (it's also my text drop shadow settings) because depending on how the ripped paper looks you might have to change the angle
also i know in the screenshot below it's on but make sure the use global angle is off if you're going to have multiple different angles of drop shadow in your one gif (so if you want your paper texture on 125° but anything else on 60° the global angle needs to be off but if you want them the same then you can keep that on, which is why it's on for me because the angle is the same for both the text & the ripped paper) (and by text this isn't the text on the ripped paper, there isn't any drop shadow on the text itself there, just to clarify this was for my "ripped paper text tutorial by dengswei" text)
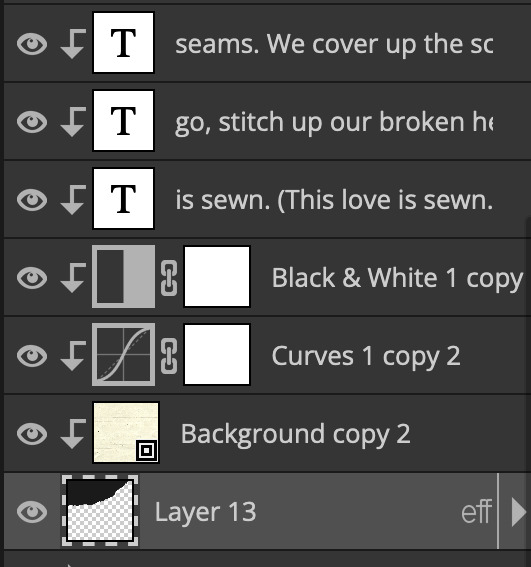
as you can see i also clipped my "handwriting" text to the paper layer this is so it stayed on the paper rather then going onto the gif itself (and it saved the fiddly part of masking it away & it felt more authentic this way too)
i found for me it was easier to seperate the text line by line so i knew exactly which part of the text was on which and if i wanted to change anything either it being a typo, changing the paper texture, or wanting a different word on a different line it was easier that way because it didn't end up messing up all of the text (though you don't have to do it that way, it's just what worked for me here)
font i used was: vag-handwritten (a default photopea font)
all of the next part needs to be above the text on your ripped paper:
for the highlighting, circles, and the lines it's pretty much all the same, i chose the colour which matched the gif (so say purple), for the highlight used the rectangle select & colour fill tools and set that to multiply & then played around with opacity (for most of my highlighting it's set to 50%), for the circles it was the same except the circle shape tool (no fill just stroke) set to purple, set to multiply, with 100% opacity (i found the circles looked better with 100% on some gifs depending on what colour i used), & then duplicated it once or twice and then just moved each circle to where i thought it looked best & the double lines is also the same using the line tool, set to multiply, & playing around with the opacity, & positioning them where i like
for the squiggly lines, the hearts, the 3 small doodle lines at either side of a word, & any other doodles i had on there i doodled them myself with my drawing tablet (you probably don't have to use a drawing tablet i just found it easier that way) using the free pen tool and then did the same thing set it to multiply and played with the opacity
if the colour you choose looks too dark or too light with it set to multiply either try a lighter/darker colour, try out something else like lighten, or screen, or increase/decrease the opacity more (i found i had this issue with the yellow being hard to see on the white paper so i used a darker yellow and kept everything at 100% opacity rather than 50%)
hope that helps! and please if anything is confusing or you want to ask any more don't hesitate to ask i know i ramble on a bit and it can sometimes get a bit confusing 🤣 or if there was anything i missed feel free to ask again 🥰
#replies#edwinas#mine | tutorials#gifmakerresource#photopeablr#photopea tutorial#photopea tutorials#gif tutorial#gif tutorials#usergif#tutorial#tutorials#photopea has so many great default fonts i just spend hours searching through them i barely download fonts now 🤣#i hope i didn't miss anything#also i don't know why the paper textures & my screenshots posted this way i had them side by side#okay they're side by side on mobile but not desktop ??? but mobile doesn't have the read more okay
137 notes
·
View notes
Text

Hello folks! As someone who never did any celebrations nor tutorials for giffing, I decided it's finally the time now. So thank y'all for putting up with my horror shenanigans, 8k is just amazing and I hope y'all will keep enjoying my blog and posts!
PHOTOPEA GIF TUTORIAL
Moving to Photoshop after years of using Photopea, I can say while they both work very similarly, they're also different. Photoshop is far superior, you can still make very HQ and nice gifs in Photopea too! This post aims to show you my personal way of making crispy gifs while also covering the basics of getting the frames and uploading them to Photopea. (If you're looking for more detailed beginner tutorial, there's plenty of those out there, amazingly done!)
Photopea is completely free, video player is completely free, downloading movies is completely free. Only thing it'll cost you is your time.
WHAT YOU'LL NEED:
- photopea - potplayer - good quality movie file ( i go for the highest GB ones, above 10gb is amazing. Sometimes I get 40gb and prefer 1080p source. Note that higher file doesn't immediately mean higher quality - if the movie looks weird just download another one)
GETTING THE FRAMES: Once you get your source file and open it via PotPlayer, find the scene you want to gif. Using D and F keys you can go backwards or forward by single frames. When you get the perfect frame where you want the gif to start, I always go back 10 frames because PotPlayer tends to cut those out. It's better to get more frames than you need as you can always delete those extra ones later on.
I'll be giffing scene from Longlegs alongside the tutorial.
PRESS CTRL + G. This will open the frame capturing window. Fix the setting to match these:

and press "START". Click back on the PotPlayer to bring focus back on the window and hold or press the forward key - F - to play the scene and capture the frames. You can see the frames number going up on your other window. If it stays on 0 you're not capturing anything. Once the desired scene is over, press "STOP" on the frame capturing window and voila - you have your frames in your selected folder. Delete any extra or unwanted ones. The amount of frames usually sits between 40-80 depending on what ratio you'll use later on for the gifs to fit the 10mb Tumblr upload limit.
Now it's time to open PHOTOPEA.
FILE > NEW: you have to write down the exact dimensions of your frames. This action will create a new file with single background. Go back to FILE > OPEN AND PLACE > SELECT ALL YOUR FRAMES and upload them. Depending on the size of the frames, this could take a while or even lag your browser. Make sure to not click anywhere within the app before all frames are done uploading.
Now lets finally make the gif. The following were my most used gif making steps in general, play around other options and find out what works - every gif or scene is different!
Delete the original empty layer at the bottom and then select all the frames (clicking the first/last layer and then click the last/first layer while holding shift to easily select all) and by pressing CTRL+G, group them. Select all layer again and
RIGHT CLICK (on the layers) > RASTERIZE LAYER (on the upper taskbar) > ANIMATION > MAKE FRAMES Now your frames should have _a_ in their names. CREATE NEW LAYER

and select all your frames again.
CROP the whole project to whatever ratio you want, Ill be using 64x44 ratio for wider gif.

By pressing ALT+CTRL+I open the RESIZE window. Tumblr gif dimension is 540px wide max (heres tutorial for other dimensions and why correct sizing is important) so using that and "bicupic sharper" option under resample, resize the gif.

Now you have the base gif done.

Its dark, muddy and unclear. We sharpen it and give it the clear crispy look using noise. FILTER > NOISE > ADD NOISE and set the Amount to 1% and select monochromatic FILTER> SHARPEN > SMART SHARPEN > 150% amount with 1px radius FILTER> SHARPEN > SMART SHARPEN > 50% x 10px

Now its time to bring the gif to life. Create NEW ADJUSTMENT LAYER. This is where all the editing options are.

For this specific gif Im doing:
BRIGHTNESS/CONTRAST +50 brightness, +10 contrast
VIBRANCE +20 vibrance, +10 saturation
HUE/SATURATION master -50 , red +50, cyan +50, blue +50 (the reason i tune all colors in master down by 50 is to mute them all down. Adding back on colors you want is making them stand out way more! It works on gifs with dominant few colors but if the gif is very colorful, you're better off leaving this option out completely and rather work with selective colors. As I said, try it out and see!)
another layer of BRIGHTNESS/CONTRAST +20 brightness
COLOR BALANCE range: midtones > magenta - green: -11, yellow - blue: +8
SELECTIVE COLOR red: cyan: -20%, yellow: +20, black: +10 yellow: yellow: +50% white: yellow: -10%, black: -20% black: black: +4%
CURVES(those are something I didnt use much in Photopea as in general youre just fine with brightness and selective color. Just move the point on the curve and see what it does! For this gif I went with Curves like these and it enhanced the gif nicely.)

another layer of SELECTIVE COLOR > black: black: +2%

Now Im satisfied with the gif and want to save it. Clicking FILE > EXPORT AS > GIF will open this window:

Make sure the quality is at 100%, the size in darker numbers lower than 10MB. Speed in Photopea is quite tricky for some reason, but 180% - 190% is the "normal 100% speed" of the gif.

Enjoy giffing and feel free to ask anything if unclear!
78 notes
·
View notes
Note
/post/672502174884970496/joeypacey-an-exploration-a-four-part-playlist Hi,cloud! If you're still making photopea tutorials, could you show me how you made the gif switch in the first gif of this lovely set? Thank you, in advance!
Hi!!!!! Of course, I'm always happy to help!!!
You can find the tutorial under the cut
For that particular gif, I just recorded that whole scene and made it into one gif. So the shot of Pacey you see is just the camera cutting away from Joey to Pacey!
However, if you want a gif that looks like that but with scenes that aren't connected. All you have to do is make whatever two gifs you want and then duplicate one gif into the other. By right clicking on one of your gifs to open this menu and clicking the duplicate into option and then clicking on your other gif from the dropdown menu.
Once you have both gifs in the same project, you can just save them as a gif and you'll have a gif that looks like that gif!

But if you want a gif with a smoother transition like this gif from this post, you can use this tutorial by @/benoitblanc (they have a ton of other excellent photopea tutorials as well) to achieve that effect
#replies#photopea tutorial#photopea tutorials#gif tutorials#gif tutorial#gif making tutorial#tutorial#tutorials#cloud's tutorials
4 notes
·
View notes
Note
haii i usually use ibis paint to edit and if its not too much trouble i was wondering if you had any tips or like a tutorial on how to make better psds on photopea??(/nf) i tried playing around with the adjustment layers for a bit but it didn’t really turn out the way i wanted it to… 💔 thank you for your time and sorry this was so long 😭
PSD coloring tutorial / Recommendations by a self-taught loser
hello! i don't really know how to make a tutorial on PSDs, but i do have a few recommendations!
a useful setting would be Selective Color ( i apologize if the name is wrong, i have my photopea in spanish and have to translate everything myself 😓😓)

for example, the PSDs i used here barely have any layers, but i used a ton of selective color layers!
basically, from my own experience, i'll say Selective color is to make a specific color kinda .....pop (?. idk how to explain it.
moving on, i also recommend threshold! idk how to explain this one, so i'll just leave an example!
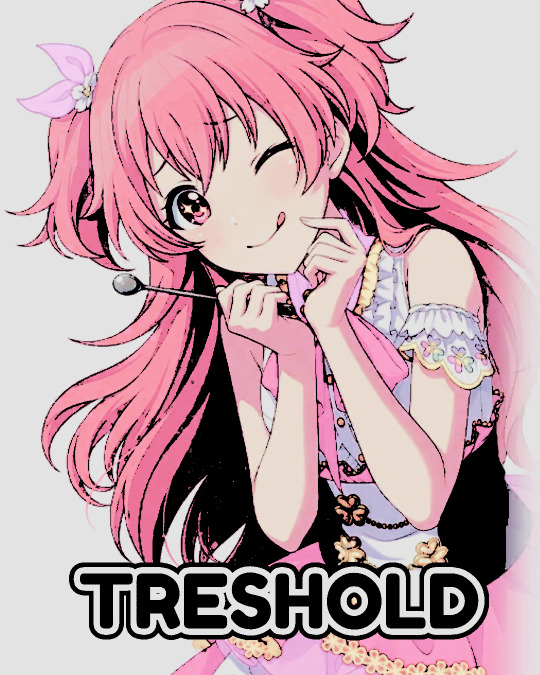
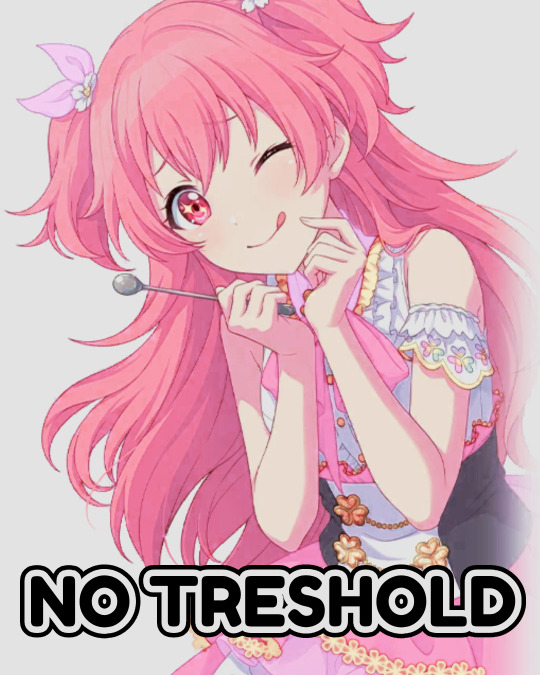
I exagerated it a little to show the effect properly lol, you can adjust it to as little or as much as you want! just remember to set the layer to multiply! (or any blending mode that works for you! many of them work, i just use multiply for... no reason at all actually)
next up, we have Replace Color!
it literally just... replaces colors. most people use it on black! just add the effect, set the color to the one you wish to replace, and start playing with the settings!
-- also, note that when using it on black, you have to turn up the luminosity for it to work!
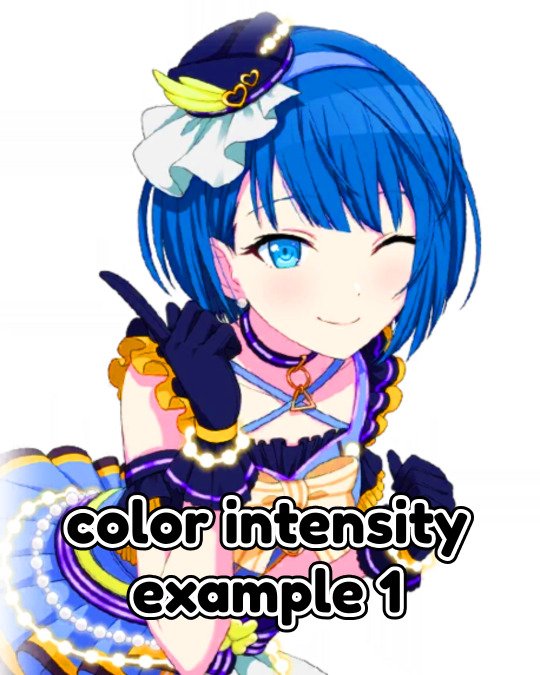
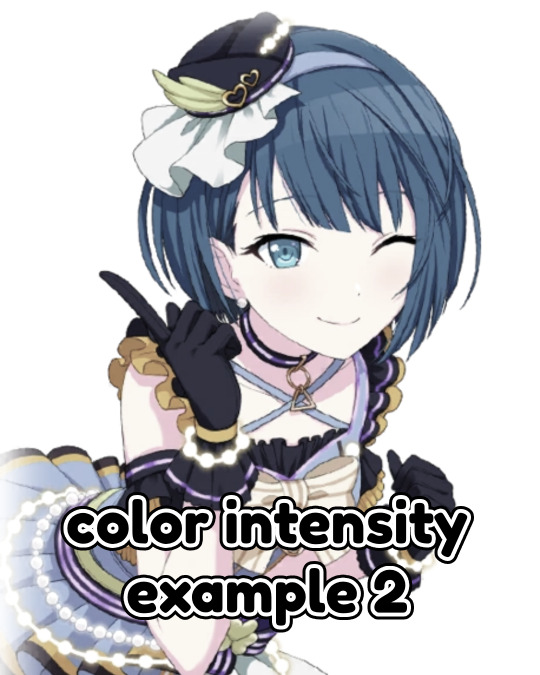
last but not least, Color Intensity!
its just... color intensity. but yeah! its pretty useful! i'll leave 2 examples here.

If anyone has any other tips, feel free to reblog! i kind of learned everything by myself, so im not the best, sorry.
i'll confess i haven't seen it myself, but @/canarysage has a psd tutorial here! so... just saying, you should check that out!
(user canarysage feel free to throw tomatoes at me and boo me off the stage (in other words, feel free to send an ask to be removed!))
...and if i left something out, let me know!
#questions / tutorials。#rentry help#rentry tutorial#photopea tutorial#photopea help#psd help#psd tutorial#rentry#psd#rentry graphics#rentry dividers#carrd material#photopea psd tutorial#coloring help#psd coloring help#photopea coloring tutorial#coloring tutorial#coloring psd
299 notes
·
View notes
Text

HOW TO PUT STROKES/OUTLINES ON YOUR GIFS THE EASY WAY

note — this is often harder to do on larger gifs as it can cause photopea to crash. compressing it on ezgif, choosing a smaller gif, or adding the stroke to ur gif in a seperate project than the rest of the graphic and adding it in afterwards can help this.
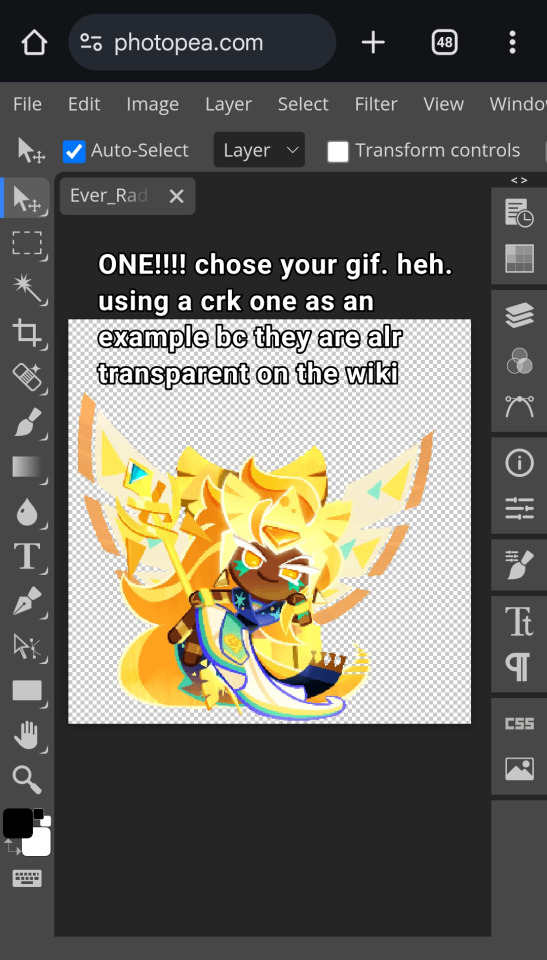
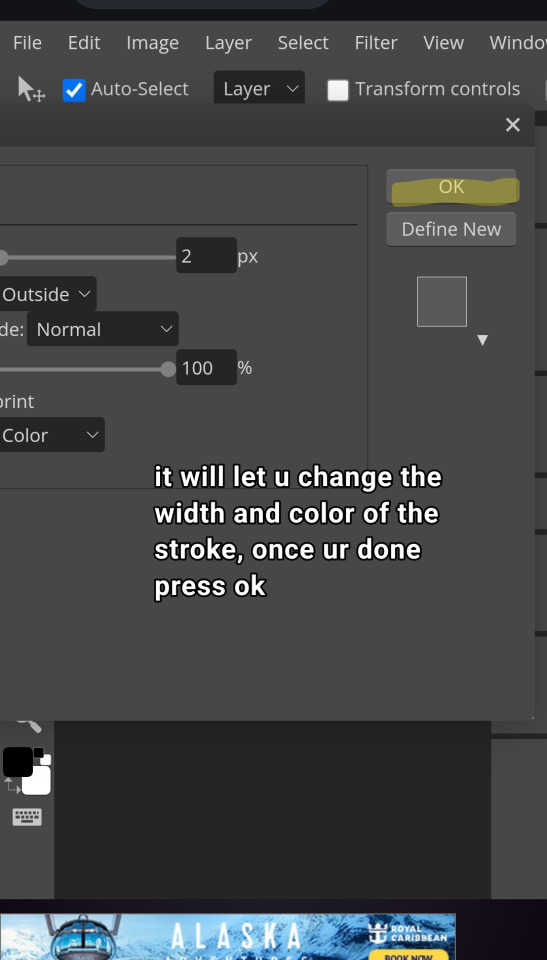
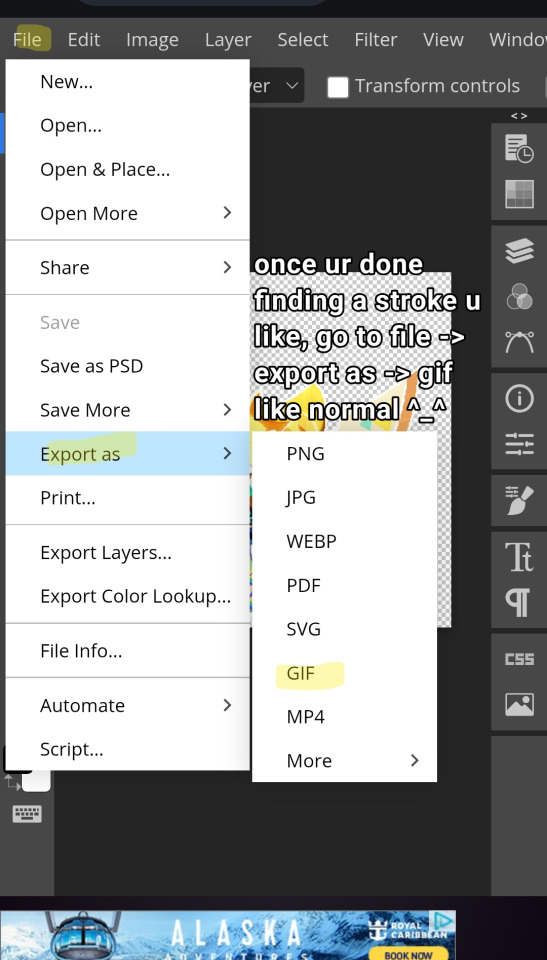

then boom ur gif has an outline ^_^
91 notes
·
View notes
Text
How do you make custom shapes in Photopea?
[PT: How do you make custom shapes in Photopea? /END PT]
This is a very simple process, shown below via video.
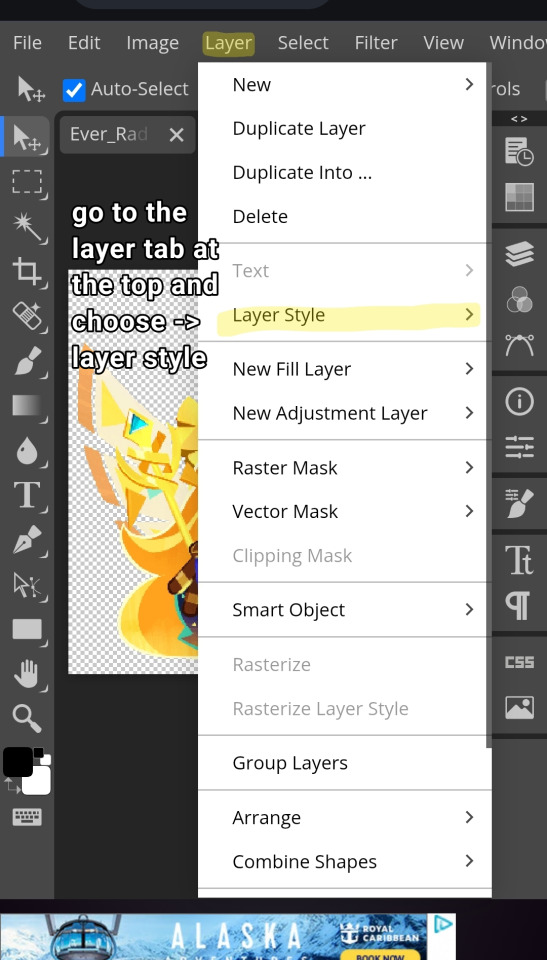
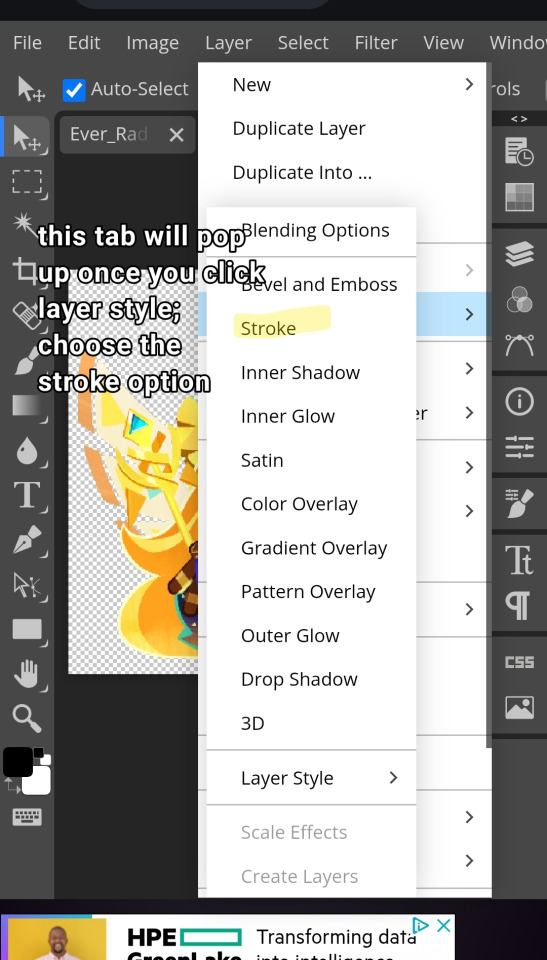
Take any image you want to make into a custom shape (or draw one yourself). Make sure you have the Magic Wand tool selected and then click on the image, or simply right click > select pixels on the layer.
Right click while still using the Magic Wand tool and pick Make Work Path.
From the Edit drop down, go to define new and then custom shape.
Select the Shape Tool and do Custom Shape. Scroll down to the bottom of the shape selection from the top right drop down menu and select your created shape.
And you're done, the rest is up to you! Below is just some further (maybe important?) information relating to saving and importing it.
To my knowledge, created custom shapes don't save between sessions; however, you can export your shape by selecting it in the menu and then exporting it as a .csh so you can easily import it instead of repeating the whole process every time. I believe after importing it as a .csh it'll actually save between sessions, so make sure to check before importing the same shape multiple times.
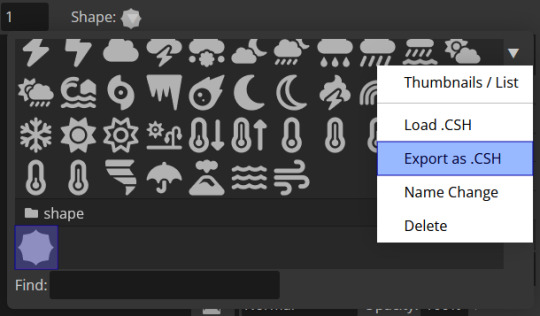
And make sure you have the shape selected! Click on it! Do not be like me and accidentally export every single shape and then import them so that the default selection of shapes doubles and you have to hand delete them!!! Make sure!!!!!!! Though if you do happen to do this, just click on the start of the shapes you want to delete, scroll to the end and shift-click on the last one, then simply delete them.
#𐐪 tutorials and help.#𐐪 from praysia.#𐐪 by praysia.#photopea#photopea tutorial#custom shapes#edit help#editing help#rentry resources#editblr#overexplaining but it's because I am someone who needs my hand held when doing things#I am sure there's others out there like me LOL
130 notes
·
View notes