#polyester bedsheets
Explore tagged Tumblr posts
Visit Tumblr Blog
Explore Tumblr blogs with no restrictions, modern design and the best experience.
Last Seen Tumblr Blogs


Fun Fact
Kazakhstan’s Minister of Communications and Informatics has blocked the Tumblr site because it contained 60 sites of terrorism, extremism, and pornography in 2015.
Text
50/50 cotton/poly blend is Not a very cooperative fabric
#sewing the pirate shirt rn#ive done rolled hems on 100% cotton before and it went fine but the polyester is Fighting Me#on the other hand it doesnt wrinkle that much so thats nice#i think it's just very anti-fold and anti-wrinkle#which is a nice quality in a bedsheet so like. understandable lol#probably a nice quality in a shirt as well! but not WHILE youre sewing it#im spending too long on the neck slit probably but in my defense. the teeny tiny hand stitches look soooo good#magpiemending#pirate shirt
4 notes
·
View notes
Text
that “researching for products sucks now” post has changed something in me, i’ve been taking more time to shop consciously and finding presumably good stuff! it makes me feel better but it’s all so expensive, right as i’m needing to find a new car to replace my dead one too 🥲
#more than anything i want non-polyester bedsheets 😩 my parents bought mine years ago i didn’t realize they cheaped out on it this badly#t
1 note
·
View note
Text

Luxury Sofa Throws
#business#Sofa covers#bedsheets#doormat#doher#Dining Table Mats#Dining Chair Covers#Mattress Protector#Chenille & Polyester Sofa Throws#Luxury Sofa Throws#Bathroom Wall Organizer#Kitchen Wall Organizer#ts#Bathroom Door Mat#Entrance Door Mat#Shower Mat#Sofa Mats
1 note
·
View note
Text
Comparing Polyester and Cotton Bedsheets: Which One is Better?
With so many options available, the age-old question arises: cotton bedsheets for the bedroom or polyester bedsheets for the bedroom, which one reigns supreme?
0 notes
Text
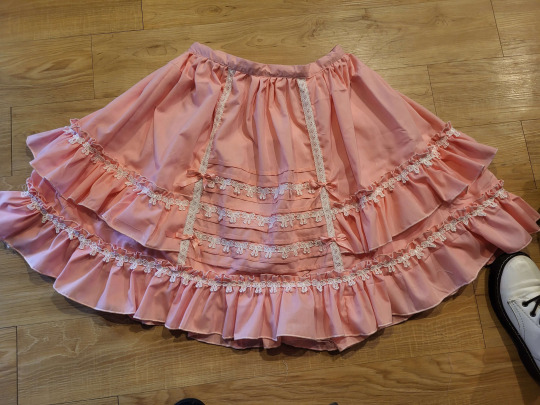
If anyone is wondering, this tutorial to make this skirt is still a method that works. Both those links are from wayback machine captures from a time before Photobucket betraying us all and deleting pictures.
Yes, I'm still mad about that.
Anyway, in the spirit of seeing if budget lolita was still doable in 2023, here we go with a cost breakdown:
>Main skirt fabric was a $10 walmart 4-yard precut; enough fabric to make waist ties not pictured here >Skirt is fully lined with a polyester bedsheet I got for $1 at a surplus store >The bow lace was part of a bulk purchase, ended up costing 21cents a yard. Skirt probably has 6-8 yards of lace on it. The little vertical strips were scraps from another project. Back shirring on skirt is 1/4" elastic, which covid conveniently made super cheap. >I didn't have the zipper on hand, so I had to buy one for $1 at walmart. As anyone who has been on Wawak knows, that's massively overpaying for zippers.
This skirt is 3" longer and a few sizes larger than the one in the post. I had to make a new cutting layout for the skirt, and it took a fair bit of additional fabric. In addition, to save on fabric width, the "side seams" on this are actually a little bit farther back than the side of the skirt. I cut the back of the skirt to full fabric width, and then added the adjustment for the fullness into the side front pieces. Clarice, who wrote the original tutorial, mentions that the person she made it for was very small, so I sized it up a little bit.
I make sketches like this as I go for personal reference, but maybe it'll be helpful.
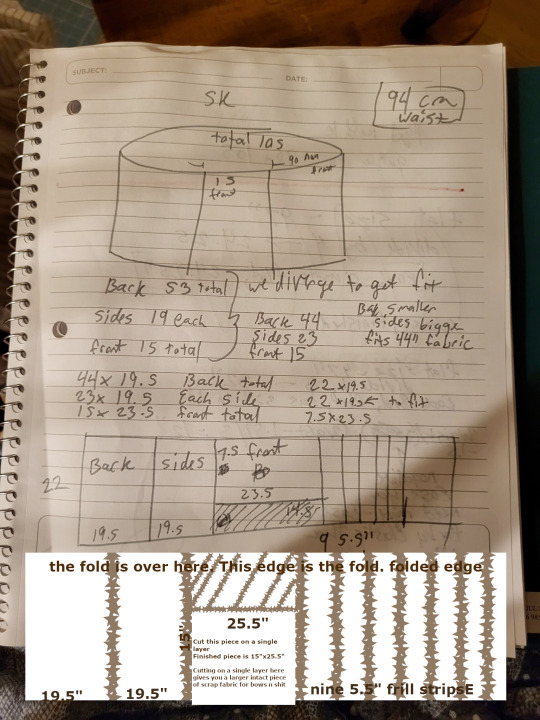
In the spirit of livejournal, I "clarified" my sketch by making it more confusing in GIMP. (Your pieces you need to cut will be back: 44"x19.5", cut 1. Side Front, 22"x19.5", cut 2. Center Front, 15"x25.5", cut 1. Frills, 5.5"x44", cut 9 or 10).
So, when we get into it, yeah, if you have a good design (or can copy a good design) and you're willing to put some time into it, you can still do a budget lolita skirt for under $20 of materials, if you're careful. I'm mostly making this post to save which archive.org captures are the ones with working pictures.
(It also helps if you don't mess up on the waistband so many times that it slowly shrinks into a 1" waistband.)
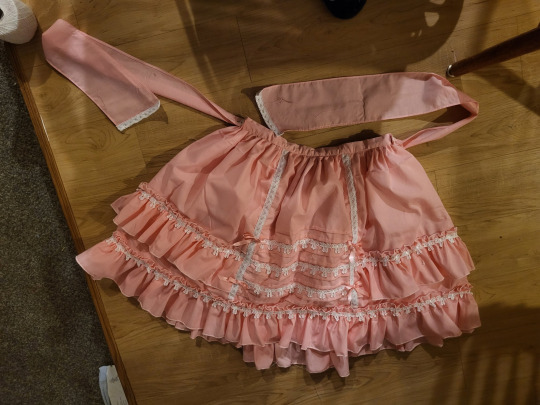
Fun fact: the trim on the ends of the waist ties may or may not be because I hemmed them sloppily and the hem came up bubbly, and zigzagging some lace onto the bottom handily covered up the bubbling. One of the advantages about knowing a decent amount about lolita fashion is that you can look at things and go, "Yeah, if I added x here, it'd be fine," and knowing enough about sewing to go, "yeah, if I do x cheat here, it'll look better" and being able to put the two together and go, "hey, if I cheat here, it'll still look lolita!" It's a good feeling.
Anyway, if anyone else has ever used Clarice's tutorial to make a skirt, I'd love to see it! This is my second time using it, but the last time was almost a decade ago at this point, and I think I've improved a lot since then.
474 notes
·
View notes
Text
How to Build a Fabric Stash without Breaking the Bank
Fabric can be expensive but it doesn’t have to be. If you are not stuck on Name Brands or Specialty Fabric Store Exclusives here are some ways to build your fabric stash without costing an arm and a leg. I have made many beautiful quilts using various fabrics from various supplies. And I believe that the quality is not just in the fabric you use but also in your stitch work and seams sizes. If your seams are less than a ¼” they will not hold (personally I prefer to use a ½” seam allowance). If you are not securing your thread ends, your stitch work is going to come undone. So be sure to watch these things too.
Look for fabric at your local Thrift Store (Goodwill, Value Village, etc.)
I have found some wonderful fabrics in various sizes, notions, storage items and more at my local Thrift Stores. I have even found unfinished quilt tops that I have brought home and added a backing to then quilted. Remember that almost any size fabric remnant can be added to other remnants to make some wonderful scrappy quilts so save your own remnants after making a quilt, you may be able to use it later in another quilt.
Look for local Fabric Sales held by Quilting Guilds in Your Area.
We have 2 near me every summer.One charges $2 per pound for any fabric. The second one charges $2 per yard for any fabric. Both also sell batting, notions, books, machines, tools, and more.
Look for fabric on Facebook Marketplace, Nextdoor and other sites.
I sell extra fabric on Marketplace and Nextdoor. I have also found several ladies near me selling fabric that I have purchased. And some I have purchased with shipping to me.
Look for older 100% Cotton Sheets at your local Thrift Stores.
Back in the 1800’s and early 1900’s, Quilts were not show pieces. They were real functional blankets that were made from any and all fabrics they could get, usually used clothing. I think there is no reason why we cannot still do that instead of buying expensive fabrics. I have often used clothing, sheets, curtains, and other linens to make some wonderful, usable quilts. And there are some wonderful patterns you can use for quilts in bedsheets from the 1980’s and 1990’s. Note: I always wash anything from a Thrift Store before I use it.
Watch for Fabric Sales and Coupons for Joanns, Hobby Lobby and other Fabric & Craft Stores.
I know some quilters believe that the fabric from Joanns & Hobby Lobby is poor quality but I have not found any bad fabric from these stores. We do not have a “Quilting” store close to me and because I’m handicapped, I will not drive an hour or more just to buy expensive fabric. If I did that, I wouldn’t be able to afford to quilt. I will also buy fabric from Walmart but I am more careful with my selection there as most fabric at Walmart is good but I have had one or two pieces that I felt were poorer quality.
Watch for Fabric Sales and Coupons for your Local Quilt Shop.
Quilt shops will also have occasional sales and/or coupons so if you prefer to shop at these locations take notice of when they have sales. Also ask if they ever give discounts to seniors or military.
Use New or Older Clothing.
I have made a lot of beautiful Memorial Quilts from a loved one’s clothing and T-Shirt quilts. I will use jeans, work shirts, uniforms, flannel, cotton, polyester and even some knits. These can be a little trickier to work with because they are often stretchy fabrics but they will add a wonderful texture and visual variance to your quilts. I recently found a pair of cotton pants with Mickey Mouse on them. I fell in love with them because they were so colorful, and I love bold colors. I found several other cotton fabrics that matched the colors in the Mickey pants and made a bold colorful quilt!
Rethink Your Backing Fabric
No one ever said your quilt backing had to be all New Cotton. You can use Fleece, Flannel or Bed Sheets as well. On many occasions I have found some wonderful fleece blankets on clearance and used these for my quilt backing. Joanns right now has a great clearance sale on Flannel fabric. The best part about using some of these is that you can get then in a wider width so you may be able to make your backing in all one piece instead of 2 or more like when using regular cotton (unless you want your backing to be in various colors/patterns). You can also use new or older cotton bed sheets for a quilt backing. Again, you can make your quilt backing in one solid piece with a sheet!
Check the Clearance Section for Your Favorite On-Line Stores
I have several on-lines stores that I love to shop from (e-Quilter, Missouri Star, etc.) but sometimes they can be expensive so I always check the clearance section of these stores. There are times I will find some beautiful fabrics on clearance so will purchase it then look for matching piece everywhere else so I can get the best deals. Also check for on-line sales from Joanns, Hobby Lobby and other on-lines stores that sell fabric and/or sheets.
Check Out Your Local Garage, Moving and Estate Sales
I have found some of the best deals at moving and estate sales because often the seller is willing to bargain with you. I once found an estate sale where a family was selling off all their mother’s quilting and sewing items because she had passed away and none of then sewed. There was more fabric and notions than I would have used in a year so I found lots of thread and items I purchased at a great price.
Note on Batting
I know that many quilters believe that the only batting you should use is expensive cotton batting. I disagree. There are many forms of batting. Cotton/Poly blends, Polyester, and Fleece. I love cotton batting but cotton will break down quicker than polyester and I want my quilts to last a lifetime so for most of my quilts I actually use Polyester more often than not. I have taken the backing off many older quilts to do repair work and the cotton batting inside was all balled up and a real mess.
Now when I am doing the Quilt-as-you-Go method I use a Fleece batting. The fleece can be cut into smaller pieces, fabric added to the top and then sewn back together to make wonderful quilts. And the batting doesn’t get stuck in my machine.
Shop Around for your batting to find the best deals. Sometimes Joanns has a sale on batting but the best price I have found so far has been Walmart on-line. I can buy a 96” x 9 yard Bolt of Poly Batting for just $30 on Walmart on-line. This bolt will make 4+ quilts depending on the size of the quilt and I will have lots of left overs for smaller projects like pillows, etc. For me the best part is that because it’s 96” wide, I don’t have to piece together my batting before I can sandwich my quilt!
#crafts#gifts#decor#sewing#quilting#briar rose quilts#bedding#shopping#quilters of tumblr#fabric#fabric stash#quilts#fabric art#textile art#clothing#sheets#sales#fleece#cotton#batting
116 notes
·
View notes
Text
My ex’s polyester fleecy “extra-warm” bedsheets were one of the factors that led to me breaking up with her im so serious
24 notes
·
View notes
Note
Hello! I am newer to the sewing craft and hobby. I was wondering if you had any tips or thoughts on your favorite fabrics to use, qualities to look out for, and any other general tips you might want to give to a blooming designer. Most of my work is gonna be more whimsical and less historical, but that doesn't mean I can't use all the help and tips I can get going in! I will write down any valuable information you can give in my notes.
That is a VERY broad question and I don't really know how to answer without knowing more specifically what you're sewing! I do 18th century menswear, and very 18th century inspired everyday clothing, but I have no idea what you're looking to make, so I don't know if we need the same fabrics. Like, when I hear "more whimsical and less historical", for me that would be something like a tailored suit that looks like it's made of leaves, but for someone else it might be a big floofy ballgown.
But to answer the bit about my favourite fabrics - I prefer woven fabrics in natural fibres with no stretch. I use a lot of linen, cotton, wool, and some silk and rayon, with the weight and specific kind of fabric depending on what garment I'm making and what season it's for. Usually they're medium or heavy weight, with the exception of shirts. My favourite thing for nightgowns is thrifted 100% cotton bedsheets, my favourite thing for shirts is lightweight linen, and I like making pants out of heavy cotton and jackets and waistcoats out of wool suiting, but there are lots more materials I've used for these things.
And there are people who like to sew with stretch knits, or who use a lot of shiny synthetics, or lightweight gauzy fabrics! There are tons of different kinds of fabric, and the ones that are best for you will depend on what kind of garments you're making, what kind of wear they'll get, and your budget. (Though I will say that I'm a polyester & acrylic hater. Sometimes synthetics can be nice if you need something sparkly and shiny that can't be done with natural fibres, and I do usually machine sew with poly thread, but polyester fabrics are often a Bad Texture and they don't breathe and I avoid wearing or working with them.)
One thing that might be helpful is going to your nearest fabric store and touching lots of fabric and reading the labels. It's not the same as actually sewing with them, but it should help you get a bit more familiar with the textures of various weaves/how much they fray/etc. (Also looking at the fibre content on the labels of your own clothing, even though these days far too many things are polyester, or some sort of blend, and there are lots of great fabrics people are missing out on.)
I'd also recommend Nicole Rudolph's videos on fabric - she's got ones on wool, silk, linen, cotton, and tailoring supplies, which ought to give you a good idea of the various qualities of those particular natural fibres.
Here's a link to my FAQ, which has some other sewing questions I've answered over the years.
114 notes
·
View notes
Text
I grew up with polyester/synthetic everything and then continued to not be able to afford nicer fabrics and I swear when I started shopping at the vintage second hand store in my old city, it was like the heavens opened & angels started singing.
Since transing my gender I've managed to build myself a pretty decent wardrobe of mostly cotton pieces (thrifted what I could, bought the rest, mostly from outlet stores) and last year, after getting my Christmas bonus, I decided to treat myself to some 100% cotton bedsheets and now I basically can't stand the feeling of most synthetic fabrics on my skin. Especially those really thin, stretchy t-shirts.
So beware, if you go down that path, you might not be able to go back. The fabric snobbery is irreversible I fear.
22 notes
·
View notes
Note
I've just gotten back into sewing. After careful consideration, it turns out it would be somewhat cheaper for me to sew my own clothes than to buy some of the pieces that I adore.
It might be a big ask, but how does one go to making very high quality clothing of their own? I already know all my sewing classics, but I want my clothes to be top-notch and well-made.
First, some resources. I’ve given a link to the old publications by the Women’s Institute of Domestic Arts and Sciences before, and I’ll put it here again, just because I think that they are excellent resources for such a wide range of skills, and when it comes to dressmaking, their tailoring series is particularly good. I’d recommend sticking to extremely old-fashioned, course-type books whenever you can—there are lots available for free on Internet Archive, and I’m happy to try to find scans if there happens to be something you can’t get hold of—and avoiding modern classes, books, and videos if you can, not because I want to make life unnecessarily hard, but because the techniques taught in the past were far more thorough, and far more focused on fit and longevity, than the modern need for speed and quantity allows for. There exist, of course, some truly amazing modern resources, too, but these are, more often than not, highly specialised, expensive and difficult to find, and intended for couturiers, not the amateur seamstress. Older books, on the other hand, are widely available for free online, assume little to no prior knowledge, and teach clearly and with none of the bad habits that arose out of the loss of dressmaking as an everyday and commonplace skill in the light of the garment industry’s expansion.
Second, some recommendations. You don’t need to spend a lot to create a high-quality garment, but you do need to spend wisely. Avoid ‘Fabric Land’–type establishments; buy deadstock, vintage, or secondhand fabric from carboot sales and destash events, and focus on weight and composition over print. Practise with old bedsheets—you can even use old bedsheets and tablecloths to make your clothes, especially if they’re linen; I have a good few dresses and tops that I’ve made from embroidered bedlinen, tablecloths, and napkins, and they’re adorable and so unique. Thread is just as important as fabric, and again, doesn’t need to cost a fortune, but poor-quality thread that snaps or frays ruins all your hard work. I use a lot of secondhand thread given to me or bought from elderly ladies who can’t sew anymore, but if I’m buying new, then I like Moon Thread by Coats; it’s reasonably-priced, and has never let me down quality-wise. (NB. Moon Thread is 100% polyester, which is incredibly strong, but not suitable for dyeing projects, as it doesn’t take to dye.) You also don’t need a top-class machine, just something sturdy and reliable; I have a machine from the ’60s that I have serviced once a year, and it runs like a dream, even without all the fancy computerisation of a more modern machine. I would recommend investing in something simple, sturdy, and all-metal mechanics, and spending your money on its upkeep rather than on a more expensive machine.
Essentially, it’s down to practice—you can only get better at dressmaking through practice—and investing in modest but quality tools. There’s no real shortcut or fancy piece of equipment that will create a truly well-made garment; it’s well-executed technique and high-quality materials. I’m very happy to share more specific tips or resources for certain aspects of dressmaking, if you’d find that useful—just send me an ask whenever you hit a stumbling-block, and I’ll do my best to help set you right again.
14 notes
·
View notes
Text
A loot from kimono heaven
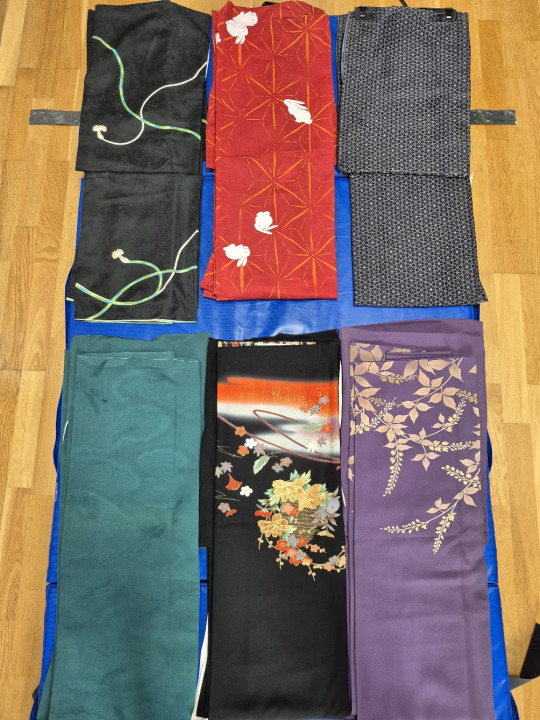
We've been to countless kimono-stores during our latest Japan trip, and returned with 6 kimonos.
I had some colours in my mind I desperately wanted, however, I haven't too big of a variety to choose from, considering my unusual, not-at-all-Japanese body type. This means that even if I found a larger size, there is a great chance the sleeves would still be too short.
Semba Center in Osaka, despite of its vastness and infinite neon lights, had a surprisingly good selection of kimono shops, and since the customers are about 98% locals, the shop assistants are knowledgeable and helpful.
I really wanted to have either a vibrant, royal purple or a subdued greyish purple iromuji as my second piece, but they were all too short, the deep petrol green jacquard, however, was perfect, and it really is my colour, so I bought it without hesitation.
My husband wanted to gift me a very beautiful one for my birthday, and encouraged me to look further for a formal piece. We found a slightly greyish shade of purple houmongi with gold pattern and we bought that too.
Chicago in Kyoto can be good for casual hunting. If you are looking for something to actually wear, like, properly wear, the only sizing guide you can go by is S-M-L, and the styles are separated. Otherwise the shop assistants don't put too much effort in properly packaging them for you. As I didn't have a yukata yet, I wanted to buy a cheap one so I have at least one for occasional summer jobs to wear. As the sizings are not so elaborate here, I mostly rummaged through large sizes until I found something that didn't look like a bedsheet. I am not a huge fan of yukata designs, but I found this cute red one one with the bunnies (top middle). Sleeves are too short, obvi, but it's for summer, so I may get away with it.
The black tsukesage at the top left was too cheap (about 5000 yen) to leave there. I have never seen a black tsukesage before, and I wanted it immediately despite probably never being able to wear it due to its shorter sleeves. This will likely be my practice-piece at home.
I was also influenced to visit a larger recycled kimono shop in Kyoto which mostly specialised in yukata and furisode. Well, I already had the former and I can't have the latter (because I'm married), but I asked the very, very old shop assistant lady if they have komon, and they had a few in the back. To my absolute delight, those were washable, polyester ones which are perfect for our not-so-pristine work environment, e.g. pouring sake all over the place. So I purchased the black one with the geometric asanoha pattern (top right).
At this point I considered the mission to be completed, although I still haven't owned a few styles yet. I haven't found any iro tomesode and a kuro tomesode. Chicago was full of the latter, but not the right size, even some stains in too visible places. I decided those would be for another time.
While roaming the shopping arcades of Kyoto on our last day though, I stumbled upon the shop where I bought my favourite obi two years ago and it was calling to me. I quickly went through the recycled selection with the shop assistant lady as they were all gorgeous. Nothing fit me though except the one thing I didn't expect to: the kuro tomesode. Well, normally I would have let it go, as it is such a high formality kimono that I could easily overdress the Japanese Ambassador herself in it, but if was exactly my size for only 5000 yen, a one of a lifetime bargain, with no visible stains or faults.
So that's how I ended up buying 6 kimono despite wanting only 2.
And I haven't even got into the accessories yet, but that's for another post.
8 notes
·
View notes
Text
@loxare replied to your post “I keep telling myself "ok, storage space is...”:
How are you able to tell what the fabric is? My thrift store doesn't label the fibre content, and I don't think they'd be happy if I started setting loose threads on fire. Is it a feel thing? Is it just experience and knowing how the fabric feels on the fingers?
Yeah, I rub the fabric between my fingers and guess based on how it feels, and sometimes I'm wrong. It's hard to tell with some wool blends just how much is wool and how much isn't, and sometimes a poly/cotton blend tricks me, but you get better at it with practice. I also sometimes pull on a few loose threads to see how easily they break, because a wool or cotton thread snaps a lot more easily than polyester. I do burn tests on everything when I get home.
With thrift store prices it's usually worth the gamble, and I guess correctly most of the time. (It helps that I've been sewing since 2011 and my mother is a textiles teacher and I've taken the 2 year college course she teaches part of, so I've touched a lot of fibres.)
Most of what I get there is the mystery cuts of fabric, but at least the bedsheets have labels!
#loxare#replies#fabric#thrifting#one that really bamboozled me recently was a small piece of glazed polyester#which is a thing I didn't even know existed. I'd only ever seen cotton and the occasional blend#but I can line a bag with it or something#if you've got a variety of fabrics you bought new and know the content of you can fondle them for fibre identification practice
34 notes
·
View notes
Note
hi! if you're comfortable with sharing, i'm curious to know what shops that send lbs of fabric for the cost of shipping you were referring to in your contribution to the sustainable lifestyle post. or were these shops local to you? i'm getting into sewing and textiles to make clothes for myself and to give away to others and i feel this could be a very useful and affordable resource if you believe it possible to share!
A lot are local to me! Many small fabric shops will sell you their remnants in small quantities, sure, but many are also willing to simply sell you that scrap as a random assortment by weight! If they don't say so online, it never hurts to ask in person while you're checking their one-off remannt bins.
That said, more and more companies that have their own internal manufacture "remnant resale" process! So online shops like Quilt N Things, FabCycle, FabScrap, and MuuMuu Outlet will often carry "scrap by weight" purchase options in their shops! Your best bet is going to be finding where the local quilting community shops. These are people who are QUITE accustomed to purchasing fabric in wholesaler quantities with home-maker budgets, and they'll be able to direct you towards the best deals on this stuff.
I will say that it pays to learn how to identify fabrics when you do this, because random means random. I've received freight with scraps of brocade silk, embroidered and beaded fabric, raw muslin, pleather, oilcloth, wool, and so much more. You never know what might find its way into your box, and different fabrics do different things when incorporated into a garment. You can get more or less specific, but generally my biggest questions are always "is this an all-natural fabric or does it include polyester and other synthetic blends?" Because these I'm more likely to use outside as upholstry, garden fabric, or decor. That synthetic ingredient allows it to endure weather and moisture with less degredation, and makes it a worse option (for me due to medical issues) to use close to the skin, although it can be useful as an outer layer on raincoats and pants. Meanwhile, natural fibers like flax or cotton are extremely useful to me as lining fabric for garments, and fibers like wool are great for thermal regulation. My next question is usually about identifying the drape of a fabric, a mixture of understanding fiber content and weave and how that will look in the garment itself. Depending on what you're trying to do, you may have more questions you need to be able to answer, but it's all about your project needs.
Honestly, though, if you're an experimental sewer of any kind (e.g. a beginner still practicing stitching and construction techniques, or a tailor looking to drape a garment), these random assortments are a great way of always having enough fabric on hand that you don't mind sacrificing to the cause. I've found that one of the best ways to really get good at fiber craft is to lower the stakes of perceived failure. If I'm afraid to try something new, I try it on old moth eaten bedsheets I got for a dollar at the thrift shop, or on a 1000yd bundle of the cheapest imagineable yarn. Makes it easier to laugh off the cost of materials if it all goes lopsided. I'm able to get a lot more practice and test out a lot more approaches when it doesn't feel like an expensive waste of resources every time practice turns out....well. like practice!
Another really good option for you might be looking for free clothes being given away on Craigslist. These are most likely going to be mostly clothes not in shape for wearing, or they'd be sold or given to a thrift shop (although gems are always a possibility!). But given a good washing at the laundromat, they're a treasure trove of fabric scrap, and if there are any you like you can deconstruct them for patterning first before deconstructing for fabric purposes after! Voila, now you have 5-15lbs of fabric scrap and new patterns to boot, all for the cost of a laundromat and stock paper for pattern cutting.
Best of luck getting into your sewing! It's great fun, and when you start to get the hang of it, often you open up a whole world of possibilities you may bot otherwise have noticed!
8 notes
·
View notes
Text
fun temperature play ideas for couples this summer:
replace all their bedsheets and clothes with polyester
lock them in a hot car
ice penis
3 notes
·
View notes
Text
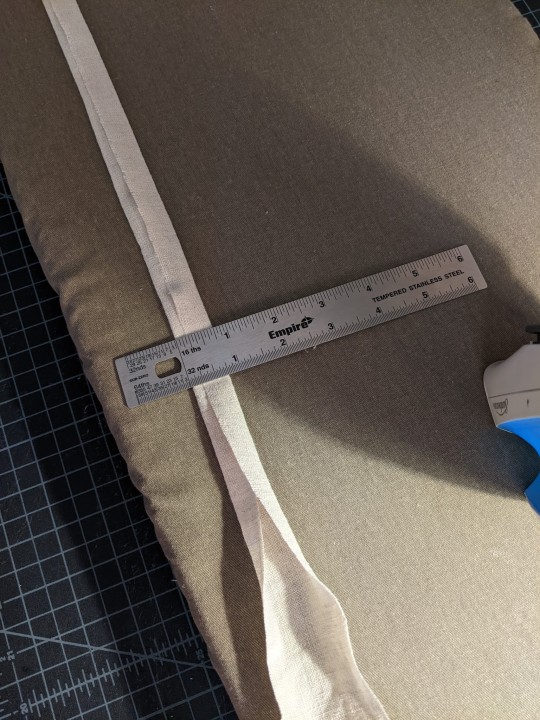
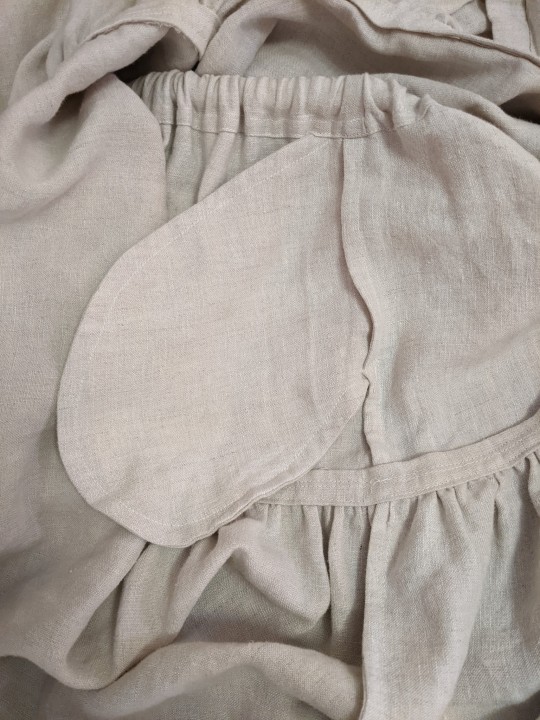
It's been almost two weeks since my last sewing update, but I have been making progress on a couple different projects, thankfully. I mentioned in my last post that I was hesitant to cut into a king-sized 100% linen bedsheet that I've been hoarding for 10+ years. I knew I wanted to make an apron, but I also knew that it wouldn't take up anywhere near the whole sheet, and I had the thought that I might be able to get two projects out of this one sheet (and the remnants of the matching fitted sheet) if I was careful about how I cut out all my pieces. Possibly a gathered tiered skirt/petticoat, along with the apron.
I measured the two long sides of the flat sheet that had identical ~1.25" deep hems, and I found that each side was 112" or just over 3 yards long, not counting the top and bottom hems. That meant if I did side seams, I could get a 6 yard wide bottom tier for the skirt and not have to do a hem at all, just use what was already there. Not the widest hemline on this kind of skirt (I have a purchased skirt with a 25 yard hem, and years ago I made a 26 yard tiered skirt out of muslin), but with this heavy weight linen it felt like 6 yards at the hem would be plenty.
Gathered tiered skirts are really just rectangles and a bit of simple math. Since the sheet's side hem determined the size of the lowest tier at 224", I figured I would do 2-to-1 gathers and make the next tier up 112" wide, and the third tier up 56" wide. A fourth tier at that 2-to-1 gathering ratio would have been only 27" wide, which wouldn't have fit over my hips, so the skirt would have 3 tiers.

I'm a short girl at not quite 5'2" and I like to wear my skirts pretty low on my hips for spoonie comfort issues, so after measuring a purchased skirt whose length I like, I decided that between 30" and 33" inches in total length would be ideal. With three tiers that length could easily be divided into tiers that are each 10"-11" tall. I added a half inch for seam allowance (but no hem allowance on the lowest tier, since I was re-using the existing hem) to get the exact measurements for each of the pieces I needed for the skirt.
I was able to tear most of my pieces, since the linen bedsheet was nicely on the grain and tore relatively cleanly, thus saving my hands from cutting all those long pieces. I had meant to cut the top tier at 14" tall so that I'd have room to turn under a nice thick waistband too -- and then I totally forgot and cut it at 12" just like the middle tier, lol. I was able to get one of the middle tier pieces and both of the top tier pieces out of the remains of the matching fitted sheet, so I only needed one middle and two bottom tiers from the flat sheet. That left me with plenty of flat sheet left over for the apron, but I'll talk more about that in my next sewing post.
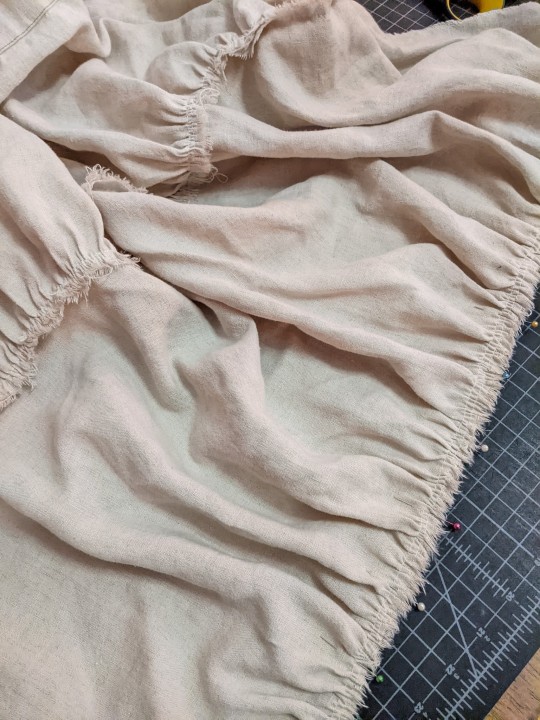
With my pieces all cut out, it was time to start the most annoying part of making a gathered tiered skirt: gathering all those tiers. I'm trying to sew with cotton thread more often these days, but for the gathers I switched back to polyester thread just for the strength. For the two bottom tier and two middle tier pieces I ran two lines of gathering stitches along the top edge, placed pins to divide each panel into quarters, and got to gathering and pinning.
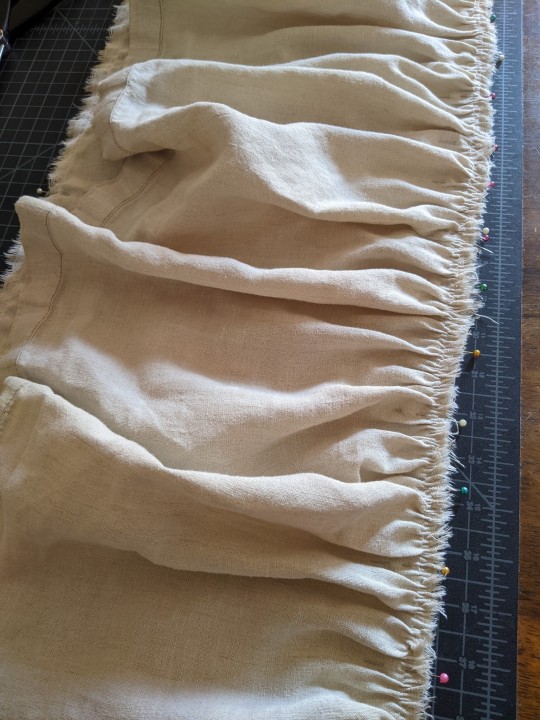
With tiered skirts I really prefer to work from the bottom up, so that I'm always attaching a gathered piece to a completely flat piece of fabric, and save side seams for last. So the bottom tier pieces got gathered up and attached to the middle tier pieces, then the middle tier got gathered up sewn to the top tier.
Since I accidentally cut my top tier pieces shorter than I'd meant to, I did play around with adding a separate waistband for the top tier to be gathered onto. But I couldn't do a full 2-to-1 gather if I wanted the waistband to pull on over my hips, and the waistband made the proportions look weird, like the top tier was too long. So I ended up cutting the waistband off after I sewed it and actually shortening the top tier even a little bit more. After turning under the top edge to enclose the raw ripped edge and then turning under 3cm (~1.2") for a waistband casing, that top tier ended up being about 9" tall, and the proportions of that look much better for some reason.
Before I sewed the side seams, I decided that this skirt needs to have pockets, of course. I knew I was planning to do French seams to protect the raw edges against unraveling, so I put the pockets in with a French seam as well.
With the pockets in place, the next step was to do the side seams (including the pocket bags), being careful to match up the height of the hem and each of the tiers so everything was nice and clean and square. Then I was able to turn under that waistband casing and sew it in place -- my original plan had been put in three separate channels for narrow elastic that would result in a bit of a faux-cartridge pleating look, but actually getting the elastic strung through there turned out to be more of a pain than it was worth, so I ended up picking that out and just using a single 1" wide elastic band in the waistband casing instead.
And with that, the skirt was technically wearable, and with some fabrics I might have been happy to leave it there. But the raw ripped edges at the seams between each of the tiers worried me. I've had well-loved sewing projects just shred after many wears and washes because I left the seams unfinished, figuring I would be the only one to see the inside. Ideally I want this skirt to be in my rotation for years and years, so I decided to make the effort to finish those seams too.
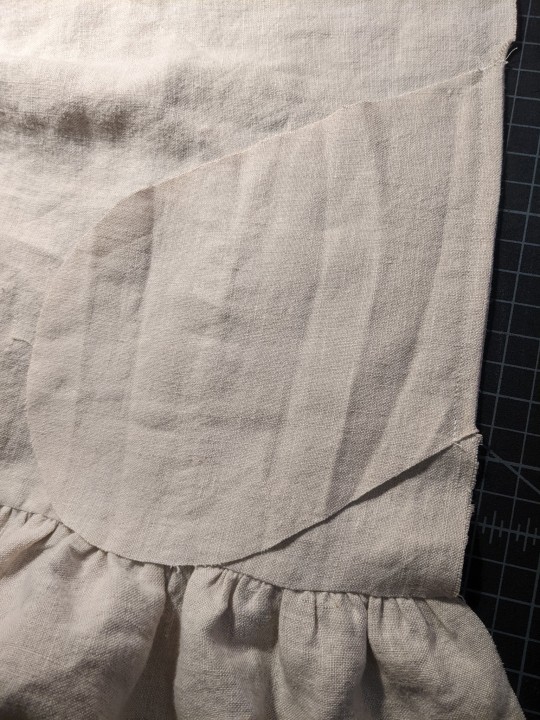
My original plan had been to cover the raw edges inside with 3/4" herringbone twill tape. For some reason I was convinced that I had a bunch of it left over from a Wasteland Weekend project from 2018, only to discover that I actually only had ~3 yards left. So rather than ordering more and waiting for it to arrive (and then inevitably having some of that left over too), I decided to just make some 3/4" tape from the linen sheet itself. Since this whole skirt is rectangles on-grain and the tape wouldn't have to go around any curves, I made the tape from on-grain rectangles too, rather than bothering with proper bias tape.
With the hem and the waistband already cleanly finished, I just needed tape to cover the ~3 yard seam between the bottom and middle tier and the ~1.5 yard seam between the middle and top tier. I tore nice straight strips, trimmed off the frayed edges, and ironed the raw edges under to give me that 3/4" width. It's three layers thick in the middle but only 2 layers thick on the sides, since it isn't a proper double-fold tape.
Then it was just an issue of pinning it over the raw edges inside the skirt -- first from the inside in roughly the right place and then from the outside to make sure it lined up with the seam well.
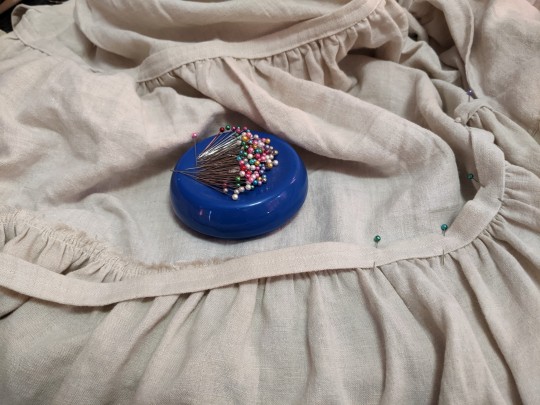
I stitched-in-the-ditch from the outside right where the gathers met the next tier up, and then went back and did another line of stitching just slightly up from that, using the width of my machine foot (~1cm) as a guide. That covered all the raw edges inside and reinforced the seam, and gave it a nice neat appearance from the outside.
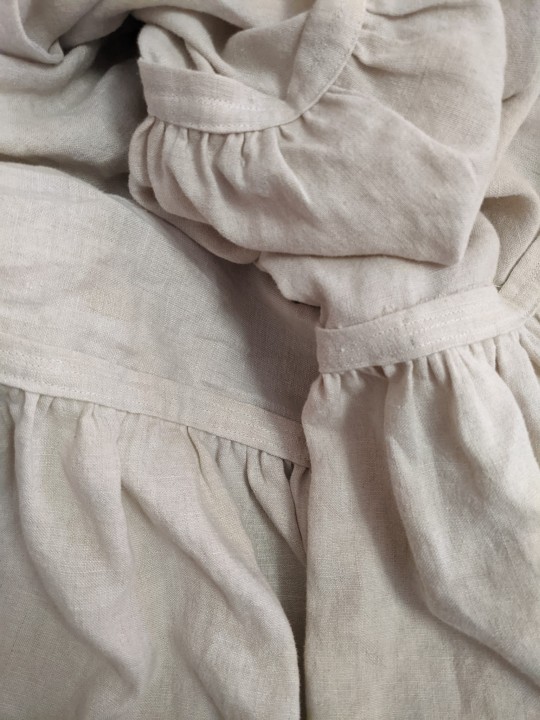
It also had the added benefit of behaving almost like cording on a corded petticoat -- the gathered seems have a lot more body and stiffness now than they did before, which gives the finished skirt a really lovely lofty structure.
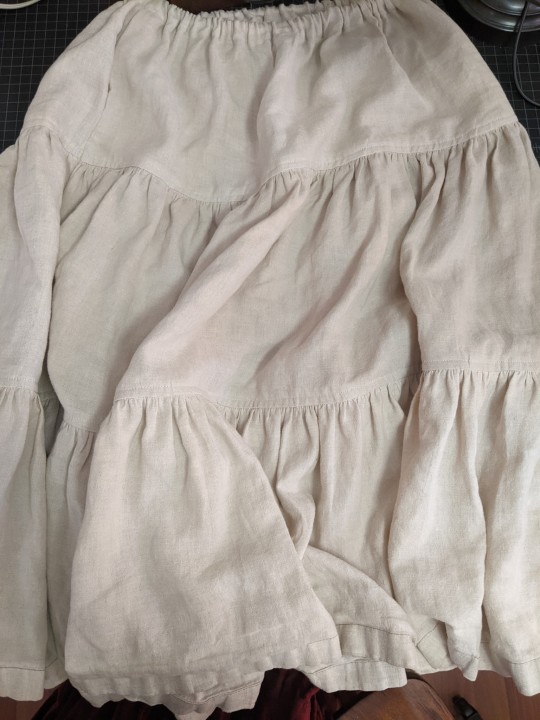
The whole skirt ended up being about 31" long, right in that 30"-33" length I had originally aimed for, and when I wear it low on my hips where it's most comfortable, it just brushes the tops of my feet.
My plan is to wear this mostly under other long skirts and dresses, more as a petticoat than a skirt on its own (tho it is heavy enough and neat enough to be worn on its own, if I want). That lofty structure from the seam finishes adds a lot of floof to my other long skirts, just barely peeking out the bottom of the purchased green skirt I originally measured to figure out the length for this one, and hiding completely under my purchased 25 yard burgundy skirt but giving it enough extra volume that it doesn't drag on the ground quite so badly.
As the colder weather sets in I'm sure this will get a lot of wear under skirts and dresses (including the several dresses I'm still planning to sew in the next couple months!), but even now in the last heat of summer it's quite comfortable to wear, since it's linen. Jack commented that it seemed like a lot of work for a skirt that won't be seen (and it did manage to remind me how much I dislike gathering long lengths of fabric), but as long as it's functional and gets used often, I feel like all the effort was worth it.
While I was putting this together, I also cut out and started assembling the apron project from the same bedsheet. Even with all those pieces cut out, I still have enough linen left over for at least one more, maybe two more projects. Next up I'm going to get to all the finishings on the apron (which will be getting its own post once it's done) and keep trucking along on the handsewn eyelets for the Lengberg Castle Bra-thing. And once those two are done, I think I just might be ready to finally start on all the dresses I want to make with my new fabric.
#sewing#tiered gathered skirt#peasant skirt#bellydance skirt#if you can sew a straight line on a sewing machine you can make this skirt#I wouldn't recommend trying to sew it by hand but it's a good beginner sewist project#the math is really easy and you can work upwards from the hem like I did or downwards from your waist measurement if you want#gathering in a 2-to-1 ratio (so the final piece is half its original width) is pretty standard but you can also do 3-to-1#bedsheets and quilting cotton are excellent options for this kind of skirt#and if you're careful with re-using hems like I did or using the finished selvedge edge of the fabric you can avoid hemming it entirely#long post#my sewing#2024 mood#linen petticoat project#linen apron project#which is actually all assembled and just needs all the hems and finishings. but that'll probably take me most of this next week I think#post on that coming eventually#and then: DRESSES
9 notes
·
View notes
Note
okay now a fabric sustainability question. I get all my fabric second hand, mainly bed sheets and such. I used to only ever get 100% cotton, but made an exception during a bag sewing project and would get some poly cotton blends. Now I'm a little torn on what to do while thrifting fabric going forward since I do prefer all natural fabrics, but also I know so many of these sheets will just get thrown away if theyre not used in something else.. its complicated! All natural is always better in the long run, but these sheets already exist in the world now and could be used again. any thoughts?
Exact same thoughts. Sometimes the 50/50 poly-cotton bedsheets from the 60s - 70s are so cute they need to be used. It’s up to your personal preference in terms of texture i think and whether you want to be touching the polyester but it already exists and turning into something more beautiful and more useable will extend its life instead of it ending up in landfill or what have you if no one buys it at the thrift store. I really prefer natural fibres but if its in a thrift store sometimes you can’t really tell anyway, some poly-cotton blend stuff is really convincing (feels like normal cotton). Also some stuff is actually blends mislabeled as 100% cotton, they are not above lying about fibre content lol. Using the fabric for stuff that you’re not going to wash frequently (quilts or bags or what have you) also helps because less microplastiques in the water uknow, so then you’re not doing much damage (except whatever potential health effects plastics might have on us that we don’t fully comprehend yet but we literally can’t escape plastic its everywhere in our lives so a bit of plastic in second-hand fabric is just a drop in the bucket i suppose)
18 notes
·
View notes