#sandblast sheet
Explore tagged Tumblr posts
Visit Tumblr Blog
Explore Tumblr blogs with no restrictions, modern design and the best experience.
Last Seen Tumblr Blogs


Fun Fact
The “We are the 99%” Tumblr blog became the slogan for the Occupy Wall Street movement.
Text


just a couple of things i'm seeing and hearing:
1970s Michael Heizer waving his sandblasting gun around to make Sandblasted Etched Glass Window: 2003 Pae White pouring solvent on sheets of Plexiglas to make Ghost and Host, among others; and 1970s Warhol and friends pissing on the canvas on the floor to make his oxidation paintings
8 notes
·
View notes
Text
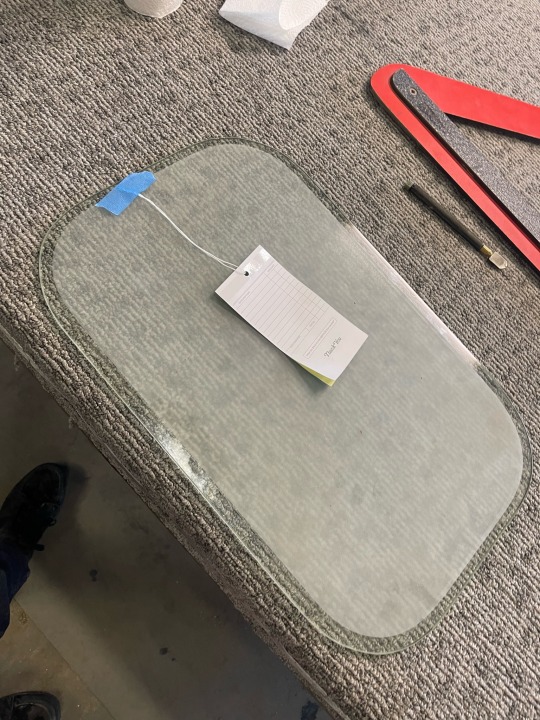
Had a fella come in with a sandblaster shield made of laminate glass that he wanted replicated because he couldn’t see through it anymore. Just thought I’d show yall how we cut a pattern on glass :)
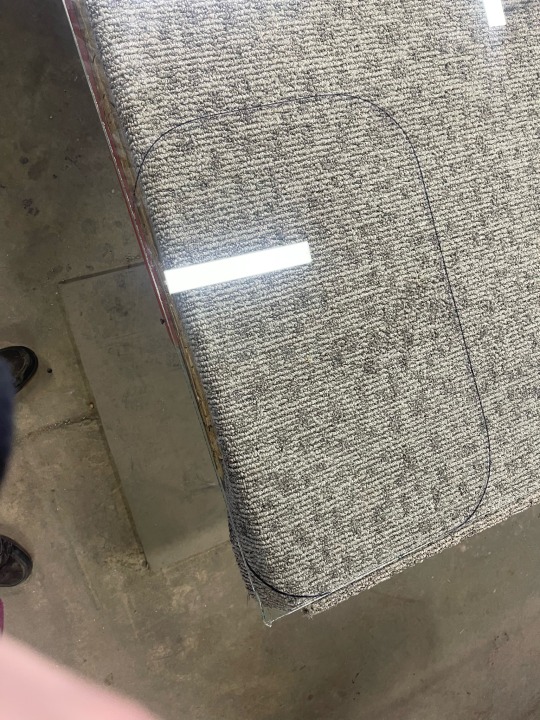
Just trace the old pattern on a new sheet of glass, cut about an 1/8th of an inch inside the lines to make up for the extra space.

Cut the big chunks, save the corners for last, those are the hard part.

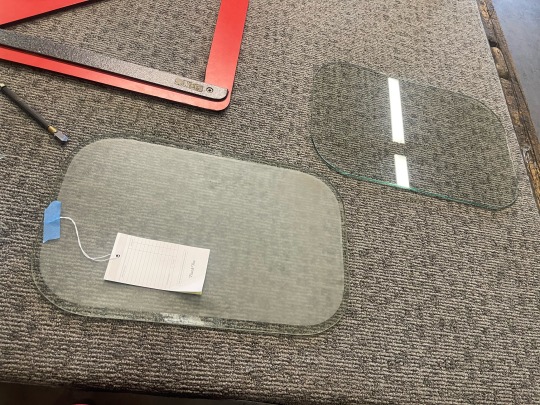
Then seem the edges and clean er up. Bing bang boom glass sand blaster shield. Done in 20 💅🏻
12 notes
·
View notes
Text
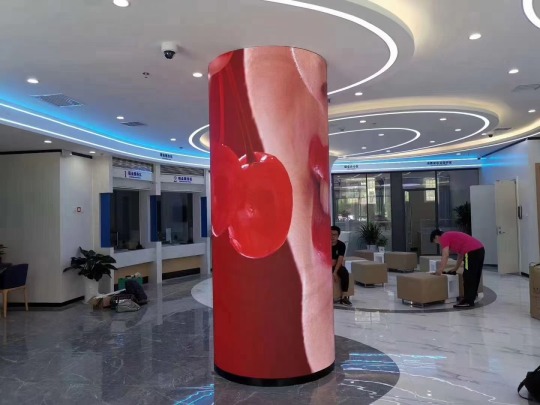
Unleash Creativity with Star Arc Series LED Flexible Module
Revolutionize your visual displays with the Star Arc Series LED Flexible Module! Here are 8 compelling reasons to choose it:
Ultra - thin & Flexible
At just 6.6mm thick, it’s an ultra - thin marvel that saves space. Bend it at will to create any shape your imagination desires. Perfect for crafting unique, eye - catching installations.
Top - notch Quality
Made with high - quality Flexible PCB and silicone back. Precise craftsmanship ensures great flatness and zero color difference. Every module is a testament to excellence.
Creative Freedom
With standardized sizes (320mm×160mm, 250mm×250mm), mix and match for creative designs. Let your ideas flow in solution design.
Easy Installation
Magnetic attachment to the cabinet and quick connectors for signals/power. Set up your display in no time, hassle - free.
Multi - signal Mastery
Supports DP, VGA, DVI, YPbPr, HDMI, SDI, H - SDI. Integrates seamlessly with pro audio - video systems for versatile use.
Energy - smart & Responsive
Low power consumption, high energy efficiency. 5000:1 contrast, ≥3840Hz refresh, 12 - 16bit grayscale. Enjoy zero - delay, smear - free images.
Wide - angle Wonder
Up to 140° viewing angle. Ideal for cylindrical, spiral, wave screens. Shine in museums, galleries, creative centers.
Sturdy Craftsmanship
High - strength sheet metal sandblasted iron cabinet. Segmented splicing cuts screen gaps. Durable and sleek. Elevate your visual projects with the Star Arc Series. Redefine what’s possible in LED displays!
LEDInnovation #StarArcSeries #VisualExcellence
0 notes
Text
Etched in Style: Glass and Mirror Typography Crafts

Okay, typography trailblazer—today we’re turning up the glam and dialing in precision. Welcome to glass and mirror etching, the sleek, sophisticated cousin in the DIY family. Whether it’s a monogram on a wine glass, an inspiring quote on a vanity mirror, or labeled pantry jars with a chic frosted look, etched typography is where elegance meets personalization.
And you don’t need a workshop full of lasers. Just a stencil, some cream, and a bit of boldness.
🧊 What Is Glass Etching?
Glass etching is the process of creating a frosted design on the surface of glass or mirror. It’s done using:
Etching cream (a chemical that lightly corrodes glass)
Or for the pros: sandblasting (we’ll save that for Level: Wizard)
Today’s method? Etching cream—safe for home crafters, totally typography-friendly.
🛠️ What You’ll Need:
Glass surface (jar, mirror, glass frame, tumbler, etc.)
Stencil or vinyl decal of your chosen typography
Etching cream (found in most craft stores)
Painter’s tape
Gloves and safety glasses
Craft stick or small brush
Running water (for rinsing)
🔠 Typography for Etching
Font choice is everything here, because unlike paint or pen, you can’t layer or correct. So choose wisely:
Sans-serif fonts (like Futura or Montserrat) give clean, modern looks.
All caps works great for impact and readability.
Stencil fonts avoid delicate pieces falling out of vinyl stencils.
Avoid: ultra-thin or heavily detailed fonts—they can bleed or get lost.
✂️ How-To: Etch Your Message Like a Pro
Clean the Surface A smudge-free glass is essential. Wash, dry, and wipe with rubbing alcohol.
Apply Your Stencil Use painter’s tape to hold the stencil or vinyl decal in place. Press firmly to prevent etching cream from sneaking underneath.
Glove Up and Apply Cream Using a brush or craft stick, dab a generous layer of etching cream over the open stencil areas. Avoid getting it outside the design.
Wait It Out Let it sit (typically 5–15 minutes—check your product’s label).
Rinse and Reveal Rinse under running water while wearing gloves. Remove the stencil and dry off. Voilà! Your text is now etched into the glass forever.
💡 Typographic Project Ideas
Bathroom Mirror Affirmations Add subtle frosted words like “You Got This” or “Kindness First” to your mirror.
Personalized Glassware Monograms, names, or titles (“Dad Fuel”, “CEO Juice”) on mugs and glasses.
Labeled Pantry Jars Say goodbye to sticky labels and hello to etched elegance: “Flour”, “Sugar”, “Snacks.”
Etched Glass Frame Art Use bold lettering to etch quotes onto glass sheets, then frame them for a floating text effect.
🧠 Unique Fact of the Day:
Did you know the first glass etching dates back to the 1500s? Back then, artisans used acids to create elaborate patterns—today, we’re using it to spell out "Snack Queen" on a cookie jar. Evolution, baby.
🔤 Font Tip of the Day:
Use a bold, stencil-style font when making your own vinyl stencil with a cutting machine. It ensures that all letters are connected and you won’t lose the center of your "O" mid-etch.
🧙 Crafting Wisdom:
Test on scrap glass first—like an old picture frame.
Use mirror backs for dramatic reversed etching effects.
For added flair, combine etched areas with hand-painted accents around the glass.
✍️ Today’s Creative Challenge:
Etch a short motivational word onto a mirror or frame and hang it where you'll see it daily. Or, personalize a glass and gift it to someone who deserves a little stylish shoutout.
https://letterhanna.com/etched-in-style-glass-and-mirror-typography-crafts/
0 notes
Text
A Practical Guide to Removing Car Paint Like a Pro
Thinking about giving your car a fresh new look? Before you grab a spray gun, you’ll need to get rid of the old paint. The most reliable way is a mix of sanding and the right paint remover.
Removing existing layers—especially if they’re chipped, faded, or uneven—is essential to getting that smooth, long-lasting finish. This prep step helps the new paint stick better and look more even.
But there’s no one-size-fits-all method. The best approach depends on what kind of paint you’re dealing with, how thick it is, the material of the car body (metal, fiberglass, etc.), and the tools you have on hand.
Whether you’re prepping for a full respray or doing bodywork repairs, stripping off old paint is a must. In this guide, we’ll walk through your options and explore how chemical paint strippers can make the job easier.
Methods for Car Paint Removal
Car paint removal can be accomplished through three primary methods: mechanical, chemical, and thermal. Each approach is detailed below:
Method 1: Mechanical Approach (Sanding and Sandblasting)
Manual or Machine Sanding: Utilizing sandpaper with various grits (80 to 400) to abrade paint layers. This method is suitable for small areas or localized repairs.
Sandblasting: Projecting abrasive particles (such as aluminum oxide or baking soda) using compressed air to remove paint from extensive surfaces. This technique is applicable for thick metal bodies.
Limitations:
Generates significant dust requiring safety equipment
Risk of dimensional changes or warping of thin metal sheets
Method 2: Chemical Approach (Paint Strippers)
Chemical substances containing powerful solvents like methylene chloride (Dichloromethane) swell and separate paint layers. This method is effective for acrylic or polyurethane-based paints.
Application Process:
Apply gel or spray paint stripper to the surface
Allow 10-30 minutes for penetration into paint layers
Remove paint using plastic scraper or nylon brush
Warning: Using strong paint strippers in enclosed spaces without proper ventilation poses toxicity risks.
Method 3: Thermal Method (Heat-Based Paint Removal)
Employing a heat gun to soften paint layers for removal with a scraper. This method suits single-layer and older paints.
Limitations:
Risk of melting or discoloring surrounding plastics
Potential damage to underlying anti-corrosion layers at temperatures exceeding 150°C

Car Paint Removal Procedure
The automotive paint removal process, particularly using chemical strippers, involves these steps:
Surface Preparation: Thoroughly clean the vehicle surface, removing dust, oil, and contaminants using appropriate cleaning agents.
Protection of Non-metallic Components: Cover plastics, rubber, and glass using masking tape or protective coverings, as strippers can damage these materials.
Safety Compliance: Use safety equipment including chemical-resistant gloves, protective eyewear, and respiratory masks. Working in well-ventilated environments is essential.
Stripper Application: Apply stripper uniformly using brush or spray. Applied layer thickness should be minimum 2-3 millimeters.
Contact Time: Allow stripper to remain on surface for recommended duration (typically 15-30 minutes). During this period, the stripper penetrates and softens paint layers.
Paint Removal: Using plastic or metal scrapers (with caution), separate softened paint from surface. Scraper movements should be directional with consistent pressure.
Process Repetition: Multi-layer or resistant paints may require process repetition.
Final Cleaning: After completion, wash surface with soap and water to eliminate stripper residue.
Alternative methods like sanding or heat application involve different procedures, but preparation and safety principles remain consistent.
Best Strong Car Paint Strippers
Strong automotive paint strippers are products designed for chemical paint removal from metal surfaces. These materials operate using solvents or acidic compounds, with selection depending on paint type and surface material.
Methylene chloride-based strippers are among the most powerful options, recognized for rapid paint decomposition. This substance softens paint layers within minutes but is not recommended for enclosed spaces due to high toxicity.
Another option is automotive acid strippers, which weaken paint bonds by reducing surface pH. This type requires careful application on corrosion-sensitive metals to prevent body damage.
Commercial products like Klean-Strip or Aircraft Remover are examples of strong automotive paint strippers available in the market. These products typically work within 15-30 minutes and are suitable for various paint types, including epoxy and polyurethane.
However, their effectiveness depends on application method and surface type. Older paints may require only mild acids, while modern paints need stronger organic solvents.
Car Paint Stripper Pricing
Costs for paint removal materials and equipment vary by product type and brand:
Chemical Strippers (gel or spray): 150,000 to 500,000 Tomans per liter
Chemical Abrasive Discs: Approximately 300,000 to 1,000,000 Tomans
Professional Sandblasting Service: Between 1,500,000 to 5,000,000 Tomans for a passenger vehicle
Conclusion
The optimal method for car paint removal should be selected considering surface preparation quality for repainting, safety considerations, and economic factors.
Mechanical methods are particularly suitable for detailed, precise projects or edges, while chemical paint strippers can be efficient for larger surfaces and multiple paint layer removal.
It's important to note that using strong strippers, especially methylene chloride-based ones, requires strict adherence to safety guidelines and personal protective equipment to prevent harm to users and vehicle bodies.
We recommend consulting with automotive painting specialists before proceeding and testing the chosen method on a small, inconspicuous area to ensure satisfactory results for repainting.
0 notes
Text
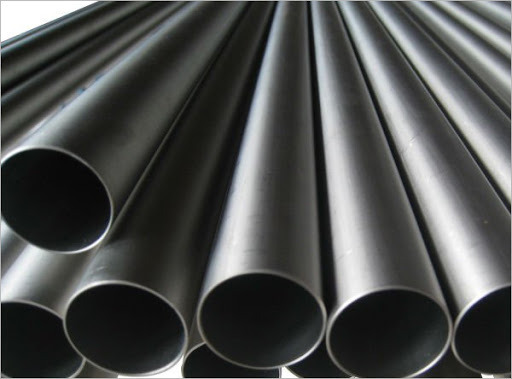
Standard Titanium Co: High-Performance Titanium Tubes and Sheets for Industry Excellence
In industries where durability, corrosion resistance, and lightweight performance matter most, titanium has emerged as a material of choice. Standard Titanium Co stands at the forefront of titanium manufacturing, offering world-class Titanium Tube and Titanium Sheet products trusted by engineers, manufacturers, and innovators worldwide. Whether it’s aerospace, chemical processing, or medical technology, titanium’s strength and reliability make it indispensable—and Standard Titanium Co delivers nothing less than excellence.
What Makes Titanium So Valuable?
Titanium is known for its unique combination of strength, corrosion resistance, and light weight. It's 45% lighter than steel but has comparable strength, making it ideal for high-performance environments.
Key Benefits:
High strength-to-weight ratio
Exceptional corrosion resistance
Biocompatibility for medical use
High melting point (over 1,600°C)
Low thermal expansion
Because of these characteristics, titanium is used extensively in industries such as aerospace, defense, energy, automotive, and medical devices.
Titanium Tube: Versatility and Performance
Titanium tubes from Standard Titanium Co are engineered to meet the rigorous demands of various industries. Whether it's transporting corrosive chemicals or withstanding high pressure in aerospace systems, titanium tubing offers unmatched reliability.
Applications of Titanium Tube:
Aerospace hydraulic systems
Chemical and petrochemical piping
Heat exchangers and condensers
Medical implants and surgical instruments
Seawater desalination systems
Standard Titanium Co provides tubes in multiple grades, including Grade 2 for excellent corrosion resistance and Grade 5 (Ti-6Al-4V) for high strength applications.
Customization Options:
Seamless or welded tubing
Metric and imperial sizes
Surface finishes (pickled, polished, sandblasted)
Cut-to-length services available
All tubes undergo rigorous quality checks to ensure mechanical strength, wall uniformity, and dimensional precision.
Titanium Sheet: Precision for Advanced Fabrication
Titanium sheets are essential in industries that require formable yet high-strength materials. Standard Titanium Co offers precision-cut titanium sheets that meet ASTM and AMS standards for thickness, flatness, and alloy consistency.
Applications of Titanium Sheet:
Aerospace skins and panels
Automotive performance components
Architectural façades
Biomedical implants and devices
Heat shields and cladding
Titanium Sheet Grades Offered:
Grade 1 & 2: Excellent corrosion resistance and workability
Grade 5 (Ti-6Al-4V): Strong and durable, often used in aerospace
Grade 7: Best for harsh chemical environments
Sheets are available in various thicknesses and sizes to meet the specific needs of your project, with quick turnaround times for custom orders.
Why Choose Standard Titanium Co?
Standard Titanium Co isn’t just a titanium supplier—it’s a manufacturing partner that prioritizes quality, precision, and customer service.
Here’s what sets them apart:
SO-Certified Facilities: Ensures consistent product quality
Advanced CNC Cutting and Processing: Precise tolerances for critical applications
Global Shipping Capabilities: Fast and reliable worldwide delivery
Lab-Grade Testing: Full mechanical and chemical analysis available
Custom Orders Welcome: From prototype to full-scale production
With decades of experience in titanium fabrication, Standard Titanium Co is trusted by companies across aerospace, chemical processing, and medical sectors.
Client Testimonials
We’ve sourced titanium tubes from Standard Titanium Co for over five years—they’ve consistently delivered exceptional quality and performance.
Their titanium sheets are flawless, and customer service is top-notch. Highly recommended!
Sustainability and Responsibility
Titanium is a recyclable material, and Standard Titanium Co embraces eco-friendly manufacturing practices. By minimizing waste, recycling scrap, and using energy-efficient production techniques, the company reduces its carbon footprint while delivering high-performance materials.
Getting Started with Standard Titanium Co
Whether you need a small batch of high-grade titanium sheet or kilometers of tubing for a large-scale industrial project, Standard Titanium Co has the inventory, technology, and expertise to meet your needs.
Order Process:
Consultation – Share your requirements with a titanium expert
Quotation – Get a detailed quote with specifications and delivery timelines
Production & QC – Custom fabrication begins, with strict quality checks
Shipping – Your materials are carefully packed and shipped worldwide
Need help selecting the right titanium grade? The team is always ready to assist with technical support and material selection guidance.
Conclusion
Titanium continues to shape the future of engineering and design. With its unmatched performance characteristics, it’s no wonder industries across the globe rely on titanium products for mission-critical applications. Standard Titanium Co provides premium Titanium Tube and Titanium Sheet solutions backed by industry expertise and world-class service.
0 notes
Text
How Mould Cleaning Experts in Gold Coast Tackle Tough Mould Issues
Mould is a persistent problem that can affect homes and businesses in Gold Coast. The region’s warm, humid climate makes it an ideal breeding ground for mould, which thrives in areas with high moisture levels. While many homeowners attempt DIY mould removal, tough mould problems often require professional intervention. This is where mould cleaning experts in Gold Coast come in, offering specialized services to tackle even the most stubborn mould infestations.

Understanding the Mould Problem
Mould is a type of fungus that grows in damp, warm environments. It can appear in various forms and colours, such as black, green, or white, and often appears in hidden or hard-to-reach areas, making it tricky to identify. The Gold Coast’s high humidity levels and regular rainfall make it particularly susceptible to mould growth, especially in areas such as bathrooms, kitchens, and basements. While it may start small, mould can quickly spread, damaging surfaces and affecting indoor air quality. It can cause health problems, including respiratory issues, allergic reactions, and even long-term complications for vulnerable individuals.
The Role of Mould Cleaning Experts
Mould cleaning experts in Gold Coast are equipped with the knowledge, tools, and experience to tackle mould problems effectively. Here’s how they approach tough mould issues:
1. Inspection and Assessment
The first step in any mould cleaning job is a thorough inspection. Mould cleaning experts begin by assessing the extent of the infestation. They identify the areas affected by mould, including hidden or less obvious spaces like behind walls or under carpets. Experts use specialized equipment, such as moisture meters and thermal cameras, to detect moisture levels that could indicate mould growth. This comprehensive assessment helps professionals determine the best course of action and whether there is any underlying issue contributing to the mould problem, such as water leaks or poor ventilation.
2. Containment and Protection
Mould can spread quickly, especially when disturbed. Mould cleaning experts in Gold Coast take necessary precautions to contain the mould and prevent it from spreading to unaffected areas. This is particularly important when dealing with large infestations. Professionals use plastic sheets and negative air pressure systems to isolate the contaminated area. They also wear protective gear, including masks and gloves, to avoid inhaling mould spores and to prevent cross-contamination.
3. Mould Removal and Cleaning
Once the area is contained, experts use industry-grade cleaning solutions and techniques to remove the mould. Depending on the type and extent of the mould, different methods may be used. For example, porous materials like wood or drywall may require more intensive cleaning or even replacement, while non-porous surfaces like tiles or glass can be cleaned using chemical treatments and scrubbing.
For tough mould, professionals may use more advanced techniques such as:
Sandblasting: This involves using a fine abrasive material to remove mould from surfaces like brick or stone.
Ultraviolet (UV) Light: UV light can be used to kill mould spores and prevent further growth in areas that are hard to reach.
Chemical Treatments: Non-toxic mould removers are applied to surfaces to eradicate mould growth, while also sanitizing the area to prevent future infestations.
Mould cleaning experts use eco-friendly products wherever possible, ensuring a safe environment for both the occupants and the environment.
4. Drying and Dehumidification
After the mould has been removed, it’s crucial to address the moisture issue that caused the mould in the first place. Mould cleaning experts in Gold Coast use powerful dehumidifiers and fans to dry out affected areas and reduce the moisture levels. This step is essential in preventing mould from returning. Without proper drying, mould can easily grow back, leading to a recurrence of the problem.
5. Preventative Measures and Repairs
Once the mould is gone, professionals will help you implement measures to prevent future mould growth. This may include:
Fixing Leaks: Experts will check for leaks in plumbing, roofs, or windows that may have contributed to the moisture problem.
Improving Ventilation: Ensuring that your home or business has adequate airflow is crucial in preventing mould. Experts may recommend installing vents, exhaust fans, or improving air circulation.
Moisture Barriers: In some cases, experts might recommend installing moisture barriers in areas prone to high humidity, such as basements or crawl spaces.
Mould cleaning experts will also advise you on ongoing maintenance to keep your property dry and mould-free.
The Benefits of Hiring Mould Cleaning Experts
Hiring mould cleaning experts in Gold Coast offers several advantages over DIY solutions:
Expertise: Mould removal requires specialized knowledge. Professionals are trained to identify and address all aspects of mould infestations, ensuring a thorough and effective solution.
Safety: Mould removal can be hazardous, especially when dealing with toxic black mould. Experts use protective gear and equipment to ensure their safety and yours.
Long-Term Results: While DIY mould removal may offer temporary relief, professionals provide long-term solutions, preventing future mould growth and damage.
Time-Saving: Mould cleaning can be time-consuming and physically demanding. Hiring experts saves you time and effort, allowing you to focus on other important tasks.
Conclusion
Mould is a serious issue that should not be ignored. When dealing with tough mould problems in Gold Coast, it’s essential to call in the experts. Mould cleaning professionals use advanced tools, techniques, and safety measures to tackle mould infestations effectively. By hiring mould cleaning experts, you not only ensure a healthier living environment but also protect your property from long-term damage. If you’re facing a mould problem, don’t wait — contact the mould cleaning experts in Gold Coast today to restore your home to a safe, mould-free space.
0 notes
Text
Is Blast Cleaning Safe for Wood and Delicate Surfaces?

Introduction
Blast cleaning, also known as abrasive blasting, is a powerful method used for cleaning surfaces by propelling fine particles at high speeds. This technique is commonly applied in industrial cleaning, automotive restoration, and surface preparation before painting or coating. However, when it comes to wood and delicate surfaces, concerns arise regarding potential damage.
Is blast cleaning safe for these sensitive materials? This article explores the benefits, risks, and best practices for using blast cleaning on wood and delicate surfaces while ensuring their integrity remains intact.
Understanding Blast Cleaning
Blast cleaning involves different methods, each suited for specific applications. The most common types include:
Sandblasting: Uses sand or silica particles, best for heavy-duty cleaning but too aggressive for delicate surfaces.
Soda Blasting: A gentler alternative using sodium bicarbonate, suitable for wood and fragile materials.
Glass Bead Blasting: Uses fine glass beads to clean without damaging softer surfaces.
Walnut Shell Blasting: A natural and soft abrasive ideal for wooden and antique surfaces.
Dry Ice Blasting: Utilizes CO2 pellets, leaving no residue and ensuring no abrasion.
Understanding which method to use is crucial when dealing with fragile surfaces like wood, soft metals, glass, and antique structures.
Is Blast Cleaning Safe for Wood?
Wood is a porous and relatively soft material, making it vulnerable to damage from high-pressure abrasives. However, when done correctly with the right abrasive media and pressure settings, blast cleaning can be safe and effective for wooden surfaces.
Best Practices for Wood Blasting
✔ Use a Low-Pressure Setting: High pressure can erode wood grain and cause excessive damage. ✔ Choose a Soft Abrasive Medium: Soda, walnut shells, or glass beads are preferred for delicate wood. ✔ Test on a Small Area First: Always conduct a test patch to determine the effects before proceeding. ✔ Maintain Proper Distance: Keeping the nozzle at an optimal distance prevents overexposure to pressure. ✔ Control Angle of Application: A lower angle reduces direct impact, preserving the integrity of the wood.
Applications for Wood Blasting
Furniture Restoration: Gently removes old paint or varnish without sanding.
Log Cabins & Decking: Cleans without damaging the natural grain.
Historical Structures: Preserves architectural details without harsh chemicals.
Is Blast Cleaning Safe for Delicate Surfaces?
Beyond wood, delicate surfaces include glass, plastic, fiberglass, and thin metal sheets, which require careful handling.
Best Practices for Delicate Surfaces
✔ Select the Right Media: Soda, dry ice, and glass beads work best. ✔ Reduce Air Pressure: Lower pressure settings minimize surface damage. ✔ Avoid Harsh Chemicals: Chemical-free options like dry ice prevent unwanted reactions. ✔ Employ an Experienced Operator: Skilled handling is crucial in avoiding unnecessary surface wear.
Common Applications
Antique Restoration: Removing tarnish and corrosion without affecting intricate details.
Car Bodies & Boat Hulls: Prepares surfaces without warping metal or fiberglass.
Glass Etching: Controlled blasting can create custom designs without shattering the glass.
Risks of Using Blast Cleaning on Wood and Delicate Surfaces
While blast cleaning offers many benefits, improper application can lead to damage such as: ❌ Surface Erosion: Too much pressure or the wrong abrasive can wear down material. ❌ Warpage & Cracking: Heat buildup from friction can deform certain surfaces. ❌ Loss of Detail: Excessive blasting can remove fine details from carvings or engravings. ❌ Embedded Abrasive Residue: Some abrasives may embed into soft materials, affecting appearance.
Proper technique and material choice are essential to avoid these issues.
Conclusion
Is blast cleaning safe for wood and delicate surfaces? The answer is yes—if done correctly. Using the right blasting technique, pressure, and abrasive material ensures that fragile surfaces remain undamaged while achieving a clean finish. Whether restoring antiques, prepping a wooden deck, or removing grime from delicate structures, careful blast cleaning can be an effective and safe solution.
For professional results, always consult an expert or conduct a test patch before proceeding with full-scale blasting.
FAQs
1. Can sandblasting be used on wood?
Not recommended. Sand is too aggressive and can damage the wood grain, leading to a rough surface. Instead, opt for soda blasting or walnut shell blasting.
2. What is the safest blast cleaning method for antiques?
Soda blasting and dry ice blasting are the best options as they are non-abrasive and gentle on intricate details.
3. Is blast cleaning better than chemical stripping for wood?
Yes, in most cases. Blast cleaning avoids the use of harsh chemicals, making it environmentally friendly and safer for the material.
4. Will glass bead blasting scratch delicate surfaces?
No, as long as low pressure is used. Glass bead blasting is commonly used for polishing and light cleaning of fragile materials.
5. How do I prevent damage when blast cleaning wood?
Use low pressure, soft abrasives (e.g., soda, walnut shells), and a skilled operator to ensure safe cleaning without damage.
6. Can I DIY blast cleaning on wooden furniture?
It is possible, but professional assistance is recommended for optimal results and to avoid irreversible damage.
0 notes
Text


Unleash Creativity with Star Arc Series LED Flexible Module
Revolutionize your visual displays with the Star Arc Series LED Flexible Module! Here are 8 compelling reasons to choose it:
Ultra - thin & Flexible
At just 6.6mm thick, it’s an ultra - thin marvel that saves space. Bend it at will to create any shape your imagination desires. Perfect for crafting unique, eye - catching installations.
Top - notch Quality
Made with high - quality Flexible PCB and silicone back. Precise craftsmanship ensures great flatness and zero color difference. Every module is a testament to excellence.
Creative Freedom
With standardized sizes (320mm×160mm, 250mm×250mm), mix and match for creative designs. Let your ideas flow in solution design.
Easy Installation
Magnetic attachment to the cabinet and quick connectors for signals/power. Set up your display in no time, hassle - free.
Multi - signal Mastery
Supports DP, VGA, DVI, YPbPr, HDMI, SDI, H - SDI. Integrates seamlessly with pro audio - video systems for versatile use.
Energy - smart & Responsive
Low power consumption, high energy efficiency. 5000:1 contrast, ≥3840Hz refresh, 12 - 16bit grayscale. Enjoy zero - delay, smear - free images.
Wide - angle Wonder
Up to 140° viewing angle. Ideal for cylindrical, spiral, wave screens. Shine in museums, galleries, creative centers.
Sturdy Craftsmanship
High - strength sheet metal sandblasted iron cabinet. Segmented splicing cuts screen gaps. Durable and sleek. Elevate your visual projects with the Star Arc Series. Redefine what’s possible in LED displays!
LEDInnovation #StarArcSeries #VisualExcellence
0 notes
Text
0 notes
Text
How Titanium Plates are Manufactured: From Raw Material to Finished Product
Titanium plates are essential in aerospace, medical, marine, and industrial applications due to their high strength, corrosion resistance, and lightweight properties. But how are these plates manufactured? This guide breaks down the entire process, from raw material extraction to the final product.
1. Titanium Extraction and Processing
The journey of a titanium plate begins with titanium ore, mainly rutile (TiO₂) or ilmenite. These ores undergo the Kroll process, where titanium is extracted using chlorination and reduction with magnesium. This results in titanium sponge, a purified form ready for processing.
2. Melting and Alloying
Once the titanium sponge is obtained, it is melted in a vacuum arc remelting (VAR) or electron beam melting (EBM) furnace to remove impurities. During this stage, alloying elements such as aluminum, vanadium, or molybdenum may be added to enhance properties for aerospace, medical, and industrial-grade titanium plates.
3. Rolling and Forming Titanium Plates
After melting, the titanium ingot is:
Hot Rolled: The ingot is heated and rolled into thinner sheets or plates.
Cold Rolled: For enhanced strength and surface finish, the plates undergo further cold rolling.
Annealed: Heat treatment is applied to relieve stresses and improve ductility.
4. Finishing and Quality Control
Before the titanium plate is ready for distribution, it undergoes several finishing steps:
Surface Finishing: Processes like sandblasting, pickling, and polishing enhance corrosion resistance and smoothness.
Ultrasonic Testing: Ensures there are no internal defects.
Dimensional Inspection: Verifies thickness, width, and flatness as per industry standards.
Mechanical Testing: Checks for tensile strength, yield strength, and hardness.
5. Packaging and Distribution
Once the titanium plate passes quality checks, it is cut to required sizes, packed securely to prevent contamination, and shipped for use in aerospace, marine, medical, and industrial applications.
FAQs on Titanium Plate Manufacturing
1. What are the main grades of titanium plates?
Common grades include Grade 2 (commercially pure titanium) and Grade 5 (Ti-6Al-4V alloy), with the latter being stronger and used in aerospace.
2. What industries use titanium plates?
Titanium plates are widely used in aerospace, medical implants, marine structures, chemical processing, and industrial equipment.
3. How does the Kroll process contribute to titanium plate manufacturing?
The Kroll process extracts pure titanium from ores, which is later melted and rolled into plates.
4. Why are titanium plates better than stainless steel?
Titanium plates offer higher strength-to-weight ratio, better corrosion resistance, and superior durability compared to stainless steel.
5. What is the thickness range for titanium plates?
Titanium plates can range from 0.5mm to over 50mm thick, depending on the application.
Get High-Quality Titanium Plates from Accromet
Looking for premium titanium plates for your next project? Accromet specializes in high-strength, corrosion-resistant titanium plates for aerospace, industrial, and medical applications.
👉 Contact us today for a quote or to discuss your titanium needs!
0 notes
Text
The Ultimate Guide to Sandblasting Cabinets – Steel Blasting Alabama for a Flawless Finish

Browning Enterprises, Inc. is a trusted leader in the steel industry, offering premium portable sandblasters and hand sandblasting services in Alabama. Whether you're tackling a home renovation or need to repaint exterior metal or wood surfaces, investing in a sandblasting booth can be a game-changer. However, steel blasting alabama requires proper technique and preparation to ensure safety and efficiency.
Here’s a step-by-step guide to sandblasting cabinets for a smooth and professional finish:
1. Select a Well-Ventilated Area
Sandblasting creates a fine dust, so it’s crucial to work in an open or well-ventilated space to prevent inhalation risks.
2. Empty the Cabinets
Remove all items from the cabinets, including doors and drawers, for even blasting coverage. This step ensures no damage to stored items.
3. Protect Surrounding Areas
Cover adjacent walls, floors, and furniture with heavy-duty sheets or plastic covers to prevent dust and debris from spreading.
4. Wear Proper Safety Gear
Use protective clothing, including gloves, goggles, and a respirator mask, to shield yourself from airborne particles.
5. Load the Sandblaster
Fill the blast bucket with an appropriate blast media, such as aluminum oxide or silica, and set the pressure to 100 lbs for optimal performance.
6. Maintain Proper Distance
Hold the sandblasting gun at least 5 inches (12.7 cm) from the cabinet surface. Too close can cause uneven blasting, while too far reduces efficiency.
7. Work in Horizontal Strokes
Start from one side and move horizontally across the surface. Maintain consistent pressure to achieve a uniform finish.
8. Clean the Cabinets
After blasting, wipe down all surfaces using a dust cloth to remove residual particles before applying paint or sealant.
9. Sandblast or Hand Sand Difficult Areas
If some sections remain unblasted, use hand sanding for precision or repeat the sandblasting process on tough spots.
10. Remove Protective Sheets & Inspect
Once done, carefully remove the protective sheets and inspect the cabinets for a smooth, professional finish. For more visit https://beial.com/
0 notes
Text
7 Significant Benefits Of UV Window Tinting
Restoring structural integrity in pavements requires a combination of precision, skill, and advanced techniques. Concreters Hobart approach repair tasks methodically, employing strategies that address not only the visible issues but also the root causes. These methods ensure long-lasting results and prevent recurring problems.
This list details the common techniques that professional contractors rely on to achieve durable and effective outcomes for the pavement.
Thorough Assessment and Diagnosis
Before starting any repair work, experts conduct a comprehensive evaluation to determine the extent and nature of the damage. This involves inspecting for cracks, discolouration, uneven surfaces, and signs of structural stress. Additionally, they look for underlying issues such as water intrusion, poor drainage, or material degradation. Advanced tools like thermal imaging cameras, ultrasonic testers, and moisture meters often assist in locating hidden weaknesses. By diagnosing problems accurately, professionals create a tailored repair plan that addresses not just the symptoms but also the root causes. This step ensures that the repair work is both functional and long-lasting.
Surface Preparation for Adhesion
Proper surface preparation is crucial for successful repair. A clean and well-prepared surface allows repair materials to adhere effectively. Experts begin by removing loose debris, dirt, grease, or any contaminants from the damaged area. Techniques such as sandblasting, power washing, or mechanical grinding are often used to achieve a clean and roughened surface, which promotes better bonding. In cases of oil or chemical contamination, specialized cleaning agents may be employed. Ensuring proper surface preparation prevents premature failure of the repair and enhances the overall durability of the work.
Precision in Mixing and Applying Repair Materials
The choice and application of repair materials significantly impact the quality of the repair. Experts use a variety of materials, including epoxy resins, polymer-modified mixtures, and high-performance blocks of cement, depending on the specific requirements of the project. Precision in mixing these materials is critical, as incorrect proportions can compromise strength and bonding. Professionals use calibrated equipment to ensure accuracy in mixing, avoiding errors that could weaken the repair. During application, they use tools like trowels, sprayers, or injection systems to fill cracks, voids, or damaged areas thoroughly. Careful attention is paid to ensure the material penetrates all gaps and creates a seamless bond with the surrounding structure.
Reinforcement Integration
For repairs in areas subjected to heavy loads or stress, reinforcements are often necessary. Professionals embed steel bars, mesh, or fibre reinforcements into the repair material to enhance its strength and durability. This step is particularly important in structural repairs, where the repaired area must support significant weight or withstand environmental forces. Experts carefully position and anchor the reinforcements to ensure they are properly aligned and fully integrated into the repair. This not only improves the load-bearing capacity of the structure but also minimizes the risk of future cracks or failures.
Controlled Curing and Hardening
Curing is one of the most critical stages in any repair project. It allows the repair material to harden and achieve its full strength over time. Experts pay close attention to curing conditions, such as temperature, humidity, and exposure to sunlight, which can all affect the hardening process. To prevent rapid drying, which can lead to cracking, they use techniques like covering the repaired area with wet burlap, plastic sheeting, or curing compounds. Some repairs may require specialized curing chambers or controlled environments to achieve optimal results. Proper curing ensures that the repair material bonds effectively and remains durable under various conditions.
Sealing and Protection
After completing the repair, professionals often apply protective measures to safeguard the area from future damage. Sealants, coatings, or membranes are used to protect against water penetration, chemical exposure, and environmental wear. These protective layers help extend the life of the repair by preventing factors like freeze-thaw cycles or chemical reactions from causing further deterioration. Experts select the appropriate sealant based on the specific conditions the repaired area will face, ensuring it provides adequate protection without compromising functionality. Proper sealing also enhances the appearance of the repaired surface, making it look uniform and well-maintained.
Regular Monitoring and Maintenance
Even the most meticulously executed repairs require ongoing care to remain effective. Experts recommend periodic inspections to identify and address any early signs of wear or damage. Maintenance might include applying additional protective coatings, re-sealing cracks, or cleaning the surface to prevent accumulation of debris. Regular monitoring helps ensure that the repaired area continues to perform as intended and prevents small issues from escalating into major problems. Professionals often provide guidance on maintenance schedules and techniques, empowering property owners to protect their investments.
Repairing structural surfaces is a complex process that demands expertise and attention to detail. From diagnosing damage to ensuring proper curing and maintenance, professionals employ a combination of science and craftsmanship to deliver repairs that last. Each of the techniques discussed above plays a vital role in restoring strength, functionality, and appearance. Whether addressing minor cracks or significant structural issues, these methods highlight the importance of expert involvement. By following these proven practices, repair projects can achieve durable and aesthetically pleasing results, ensuring long-term satisfaction and peace of mind.
0 notes
Text
Research readings 1: Non-visual/auditory Senses Explored through Contemporary Art (expanding on my previous works with smell and touch)
Important Note: A Chain of Experiences
All the senses (vision, hearing, smell, touch, taste and proprioception) are important in perceiving and recognising the world around.
However, it is important to recognise that all senses are associated with - and can trigger - emotions and memories.
Thai artist Kornbongkoch Harnpinijsak (2019): "...it could be understood that sensation is the primary process of receiving the stimuli from the physical world, whereas perception is associated with memory and experiences in a person effecting a higher context of mental exploration."
These relationships may be explained through "experiential chain sequences" (see below).
Sensation and perception of stimuli -> memory (recollection) -> emotional experience
Alternatively: Sensation and perception of stimuli -> emotional experience -> memory (formation)
Remember that these "chains" are experienced differently for people (similar memories may trigger different and/or more intense emotions), and may vary between different contexts.
Multiple sensations (e.g. vision, hearing and smell) may be triggered at the same time, which may also trigger multiple, interconnected emotional experiences associated with one or more memories.
Article below:
Primary Case Study: Smell (Montien Boonma)
Olfactory receptor neurons = cells that facilitate smell
Studies have revealed that olfactory sensory memory (smell) is just as important as auditory sensory memory (hearing) in evoking emotional responses.
Artwork Description (MoMA):
"In House of Hope (1996–97), Montien Boonma invites us into an immersive space filled with thousands of prayer bead strands hanging above a pyramid of painted wooden steps. The surrounding wall painting suggests clouds or incense smoke from Buddhist temples. The artist crafted his pigments and beads from traditional Thai medicinal herbs and spices; the aromatic materials suffuse the gallery with scent. Boonma sought to create an atmosphere of bodily sensation: "When you enter a temple, it makes you warm . . . there’s the feeling that we will be given help—like having a father and mother to protect us." Boonma created this installation after his wife died from cancer in 1995. Her diagnosis the year before led the artist to immerse himself in Buddhist rituals of devotion and healing. "I was asking for a lot," he said. “I was asking for the world to stop." Boonma’s "house" explored the possibility of hope in a time of environmental disaster, industrialisation, and the rise of global epidemics—crises that persist in the present, and that the work allows us to confront in new ways today."


House of Hope (1996-1997, sculptural installation - herbs, spices, natural binders, cotton string, painted wood, and steel)
youtube
Primary Case Study: Touch (Berco Wilsenach)
Pacinian corpuscles, Meissner's corpuscles, Ruffini corpuscles, Merkel disks, and free nerve endings = cells that facilitate different kinds of touch (pressure, vibrations, edges, points, temperature, etc.)
Different textures can elicit different emotional responses (e.g. happiness with soft textures, fear with sharp objects, and disgust with slimy/sticky materials).
Artwork Description (two works from Wilsenach's 2009-2013 Body of Work, The Blind Astronomer - exhibited in MOAD in 2013):
"[In the glass sheets of] Written in the Stars II... Sandblasted circles and ovals represented stars and constellations rendering parts of the night sky both visible and tangible. The meanings of these shapes were explained in Afrikaans Braille in a legend at the bottom of each panel. The sandblasted areas trapped the light that emanated from light-emitting diode (LED) globes attached to the top and bottom of the frames producing a ghostly, glowing, blue-green effect. The panels were placed one behind the other, so that when they were viewed from a central point, the constellations seemed to overlap and create a deep receding space.
[Set in Stone] comprised puzzle pieces that represented a constellation. These puzzle piece constellations were stored in a massive wooden chest of drawers... Each piece could be removed from the drawer and placed in its correct location on a massive table to complete the puzzle – a star chart of the northern and southern hemispheres. ... [The] position [of each stone was] determined via the marked outlines on the table.
Based on eighteenth-century star maps, the rough edges and surfaces of Set in Stone were punctuated with smooth glass beads that each represented a star in that constellation."


Rows 1: Written in the Stars II (2013, sculptural installation - sandblasted glass sheets with LED lights)
Row 2: Set in Stone (2013 , sculptural installation - 95 "puzzle stones" of varying shapes with wooden tables and drawers)
youtube
Combining the senses (including vision and hearing)
Sensory experiences rarely work in isolation.
As stated previously, all of the senses are crucial to both memory and emotional experiences.
Viktor Perrson (2011): "Traditionally the human sensory systems (e.g., vision, audition, and olfaction) have been viewed as separated entities. However, in many everyday situations, the information we take in about a single object often comes from many different senses, and becomes an integrated part of the perceptual experience."
Case study 1: Vision and Smell (David Haines)
Artwork Description 1 (portfolio website): "The Phantom Leaves 1-5 (2010): Five aroma compositions [were paired] with [a series of ] Kirlian Photographs... Mint Glass, Wormwood of the Sea, Violets on Fire, Grass Valley, A Thousand Leaves. All of these were fantasy fragrances based on ideas suggested by the photographs and my first-hand experience of the subject matter."
Artwork Description 2 (portfolio website): "Haines has configured the visual and olfactory elements to set up a recognition system intended to bring visitors into closer proximity to ‘unseen forces’ that lie within and around us... He is drawn to the ghostly qualities of Kirlian photography, a technique for creating contact prints by charging the air around an object, pioneered by Russian electrical engineer Semyon Kirlian and his wife Valentina in the mid-20th century. The photographs, with their connection to ‘spirit photography’, and the fragrance, which is suggestive of the damp earthy smell thrown up by the rain, are intended to evoke a range of associations – fantastical and grounded. Haines embraces his inability to contain the ‘live’ nature of his works. Fragrances, for example, are thermodynamic in their emanations, heading towards equilibrium in any environment and subject to entropy which is why they are refrigerated and stored in coloured glass to protect them from heat and light... As they lodge in the mind as much as the body, any thoughts about ‘what’s inside and outside’ become out-moded and a re-organising of ‘space’ as a continuum within and beyond ourselves is required."


The Phantom Leaves 1-5 (2010, photographic prints accompanied by bottles of fragrances with paper strips)
Case study 2: Vision, Touch, Taste and Smell (Bui Cong Khanh)
NOTE: The sensations of smell and taste go hand-in-hand, especially when it comes to food. In this work, Bui Cong Khanh not only explores the relationship between taste, smell and memory (by cooking and serving his version of Hoi An chicken rice as a performance work), but he also brings the senses of vision and touch together to mimic the experience of smelling/tasting "foods that aren't immediately present" (in the rest of his installation).
Artwork Description (Singapore Art Museum - both installation and cooking performance featured in the 2014 art exhibition Sensorium 360°): "The sense of taste is one almost universally associated with pleasure and worldly indulgence. It is thus easy to forget that taste is also a highly-cultivated and culturally contingent sense, entwined with history, heritage and identity. In [Chicken Rice in the Border (2014)], Khanh investigates the provenance [origin] of Hoi An Chicken Rice, originally brought to Hoi An by Chinese immigrants as Hainanese Chicken Rice, before adaptation and assimilation into Vietnamese food culture resulted in a uniquely local dish. The artist - whose family comes from Hoi An, the province with the largest Chinese community in Vietnam - documents and illustrates the evolution of this singular dish with an interactive installation, which includes an actual food-tasting component at the Food for Thought café. By exploring a much-beloved dish whose variations can taste at once familiar and foreign, Khanh engages with the cultural and historical memory, as well as the legacy, that resides deep within our taste buds and tongue."


Chicken Rice in the Border (2014, multimedia installation - illustrations, photographs, ceramic plates, short film, food in performance work, and short film)
Case study 3: Vision and Touch (Anicka Yi)
NOTE: While Anicka Yi is an artist who typically explores olfactory and visual experiences (sometimes combining them both as is the case with) in her works, here she elevates organic forms to textural and tactile (albeit non-interactive) works.
Artwork Description (Gladstone Gallery): "Similar to the sinuous, polychromatic forms of sea anemones that Yi observed while living in the headlands of California, the rippling surface of [these] sculpture[s] flashes from deep wine, to flaming orange, to a burnished gold. Beyond coastal aquatic life, Yi’s Anemone Panels are also inspired by the concentric, spiky geometries that spontaneously form within magnetised ferrofluid, originally developed at NASA. These ferrofluid structures bear an uncanny resemblance to both sea anemones and flowers, reflecting the tendency of self-organizing phenomena, both living and nonliving, to converge on similar patterns. Through their immaculate surface suggestive of CGI, the panels evoke a frozen feeling, as if stumbling upon a computer rendering suspended in the physical world. With an exquisite swirling core, this central sculpture seems to indicate an undulating cosmos, flickering between the rendered and the real."


Anemone Panels series (2019-2022, 3D-printed resin sculptures with urethane paint and foam)
In order from left to right: Soft Power Narcissist (2022), Perilla Galoxalide (2020), Violence Boiling Over (2019)
Case study 4: Hearing and Smell (Goldie Poblador)
Artwork Description (portfolio website): "An exploration of the phenomenon of synesthesia wherein four musical compositions are translated into scent notes. The glass bottles are installed within a taxonomy of colour to form and interactive chart based on Septimus Piesse’s 18th-century writings on perfumery and sound. The selection and pairing of sound to a scent and scent to colour is based on the phenomenology of synesthesia, a chemical condition in the brain that crosses the perception of the senses. ...
May Puno sa Dibdib ng Kamatayan examines the idea of ‘composition’ as expressed – and experienced – across two senses: that of smell and sound. Despite having no immediate obvious affinity, the olfactory and audio senses employ some similar terminology and language: musical scores and perfumes are described as comprising of high, middle and low notes, where notes are also further structured in chords or accords; moreover, both song and scent are powerful triggers in conjuring feelings and memories. Amongst the senses, smell is especially potent in eliciting emotional memory because the olfactory bulb is intimately linked to the brain’s amygdala and hippocampus, which govern emotion and associative learning respectively.
Here, Goldie Poblador has selected key songs and musical arrangements that hold deep personal and emotional resonance for her, and in certain instances, also collaborated with the musicians. Through the process, she translated sonic notes into olfactory ones, creating scent compositions that synesthetically respond to their musical sources. In the adjoining room, a ‘keyboard’ or ‘palette’ of 30 perfume notes allows visitors to recreate the four scent compositions, or even improvise their own olfactory creations in accordance with their personal choice of song."


May Puno sa Dibdib ng Kamatayan (There is a tree in the heart of death) (2014, glass bottles/tubes of fragrances accompanied by sound playing through headphones)
Case study 5: Smell and Touch (Ernesto Neto)
NOTE: The example pictured here is by no means the only example of Ernesto Neto's works that merge the sensations of smell and touch. Alternatively, his works explore and "recontextualises" these senses separately.
Artwork Description (Neto in a 2010 interview): "I try to create places that are not spaces of resistance, but rather, are areas of insight for people, places where people manage somehow to alienate themselves from the daily life and interact with another existential possibility, but that each person will have a different interpretation. I am not a saint; I do not think that it is going to save the world. My goal is to embrace people, take care of people, carry them as if I were carrying a baby. The space in which I work is pre-language space. It is an area for understanding the physical world, texture, [smell,] weight, colour, temperature, joy, sadness. It is the space of affective relationships with the world."


Body Space Nave Mind (2004 , sculptural installation - lycra, aluminium scaffolds, styrofoam, rice and herbs)
0 notes
Text
Sheet metal coating process
In the field of modern industrial manufacturing, sheet metal coating is a crucial link. It can not only give sheet metal products a beautiful appearance, but also provide good protective performance and extend its service life. The following is a detailed introduction to the sheet metal coating process and related precautions.
Sheet metal coating is mainly divided into 6
Surface pretreatment Degreasing: sheet metal parts in the processing and storage process, the surface is often contaminated with oil. Degreasing is the use of chemical degreasing agents or alkaline cleaning agents to remove these oil stains. Common degreasing methods include soaking method, spray method and ultrasonic degreasing method. Soaking method is to soak sheet metal parts in degreasing agent solution for a certain time, so that the oil is fully dissolved; The spray method is to clean the surface by spraying degreaser under high pressure; Ultrasonic degreasing enhances degreasing effect by using ultrasonic cavitation, and can effectively remove oil stains on complex sheet metal parts. Rust removal: If there is rust on the surface of the sheet metal, remove the rust. Physical rust removal methods include manual grinding, mechanical grinding and sandblasting. Manual grinding is suitable for small areas of rust removal, using sandpaper or file and other tools; Mechanical sanding is more efficient, and an electric or pneumatic sander can be used. Sandblasting is the use of high-speed sand flow impact sheet metal surface, remove rust and oxide. Chemical rust removal is the use of rust remover and rust chemical reaction, to achieve the purpose of rust removal. Phosphating or passivation: Phosphating is the formation of a phosphating film on the surface of the sheet metal, which can improve the adhesion of the coating. Passivation treatment is to form a dense oxide film on the surface of the metal, which plays a role in anti-corrosion.
Primer coating Select primer: Select the appropriate primer according to the material of the sheet metal, the use environment, and the requirements of the subsequent coating. For example, for steel sheet metal parts, the commonly used primers are epoxy primer, alkyd primer, and so on. Epoxy primer has good adhesion and anti-corrosion properties. Alkyd primer price is relatively low, convenient construction. Coating method: The main coating methods of the primer are brush coating, spray and dip coating. Brush coating is suitable for sheet metal parts with small area and complex shape, but the efficiency is low; Spraying is the most commonly used method, which can be divided into air spraying, airless spraying and electrostatic spraying. Air spraying atomizes the paint to the sheet metal surface through compressed air to obtain a uniform coating; Airless spraying efficiency is higher, suitable for large area coating; Electrostatic spraying uses the principle of electrostatic adsorption to make the paint mist uniformly attached to the sheet metal parts, which can reduce the paint mist flying and improve the utilization rate of the paint. Dip coating is to dip sheet metal parts into the primer, then remove and drain, suitable for batch parts with regular shapes.
Putty construction Scraping putty: If the surface of the sheet metal has defects such as dents and holes, you need to scrape putty to fill them. Putty is generally composed of resin, filler, curing agent, etc. When scraping putty, pay attention to the thickness of putty, generally should not be too thick, so as not to affect the quality of the coating. Usually divided into multiple scraping, each scraping to wait for the putty dry curing before the next scraping. Polish putty: After the putty is dry, it needs to be polished to make the surface smooth and smooth. Sanding can be done using sandpaper or a sander, from coarse sandpaper to fine sandpaper, until the putty surface is smooth and smooth, and the surrounding sheet metal surface transition is uniform.
Intermediate paint coating The role of the intermediate paint: the intermediate paint mainly plays the role of increasing the thickness of the coating and improving the shielding performance of the coating. It can fill the tiny pores between the primer and the top paint and improve the overall quality of the coating. The coating method is similar to the primer, and the appropriate coating method can be selected according to the actual situation.
Finish coating Select the top coat: The main role of the top coat is to provide a beautiful appearance and good weather resistance, chemical resistance and other properties. Common topcoats are acrylic topcoats, polyurethane topcoats and so on. Acrylic paint has high gloss and good color retention. Polyurethane topcoats have excellent wear and chemical resistance. Coating method: The same as the primer coating method, but when painting the top paint, pay special attention to environmental conditions, such as temperature, humidity, ventilation, etc. Generally, the ambient temperature is required to be 5-35 ° C and the relative humidity is not higher than 85% to ensure the coating quality of the top paint.
Drying and curing Drying: The coated sheet metal needs to be dried to make the solvent in the paint volatilize and the resin solidify. Drying can use hot air drying, infrared drying and other ways. Hot air drying is to heat sheet metal parts through hot air circulation; Infrared drying is the use of infrared radiation heat, high heating efficiency, can quickly cure the paint. Curing: For some special coatings, such as two-component coatings, a certain curing time and curing conditions are also required to ensure that the coating is fully cured to achieve the best performance.
0 notes
Text
How to Brake Caliper Painting Service: A Comprehensive Guide

When it comes to enhancing the aesthetic appeal of your vehicle, few upgrades are as impactful as brake caliper painting. This service not only elevates the visual appeal of your car but also offers practical benefits that ensure your vehicle stands out on the road. In this detailed guide, we will walk you through everything you need to know about brake caliper painting services, including the process, benefits, and why this might be the right choice for your car.
Why Brake Caliper Painting Matters
The brake caliper is an essential component of your vehicle’s braking system, but it is often overlooked in terms of aesthetics. Typically hidden behind the wheels, calipers accumulate dust, grime, and rust over time, leading to a dull and unsightly appearance. Painting your brake calipers not only rejuvenates their look but also protects them from corrosion and wear, extending their lifespan.
A professionally painted brake caliper adds a touch of personalization and style to your car. Whether you choose a color that matches your vehicle’s paint or opt for a bold, contrasting hue, painted calipers can dramatically enhance the overall look of your wheels.
The Brake Caliper Painting Process
Understanding the caliper painting process is crucial to appreciate the value of this service. The process involves several meticulous steps to ensure a flawless and durable finish. Here’s how professionals typically perform the service:
1. Preparation
The preparation stage is critical for achieving a high-quality finish. First, the car is lifted, and the wheels are removed to expose the brake calipers fully. The calipers are then thoroughly cleaned using specialized degreasers to remove all dirt, dust, and brake fluid residues. In some cases, sandblasting may be necessary to eliminate rust and ensure a smooth surface for the paint to adhere.
2. Masking and Taping
To protect other components from unwanted paint, professionals carefully mask off surrounding areas, including brake discs, pads, and any nearby suspension parts. High-temperature resistant tape and masking sheets are used to ensure precision during the painting process.
3. Priming
Priming is essential to create a base layer that promotes paint adhesion and increases durability. A high-temperature primer is applied evenly to the calipers, ensuring complete coverage. The primer also acts as a barrier, preventing rust from developing beneath the paint.
4. Painting
Once the primer is fully cured, the actual painting begins. High-quality, heat-resistant caliper paint is applied in multiple layers to achieve the desired color and finish. The paint must withstand extreme temperatures generated by the braking system, so using specialized caliper paint is crucial. Whether you choose a glossy, matte, or metallic finish, the result will be a vibrant, long-lasting color that resists fading and chipping.
5. Curing
After the paint is applied, the calipers are allowed to cure thoroughly. This curing process is essential to ensure the paint bonds effectively with the caliper surface and can withstand the harsh conditions it will face during braking.
6. Reassembly
Once the paint has cured, the masking is carefully removed, and the wheels are reinstalled. The final inspection ensures that the calipers have an even, flawless finish, and the car is ready to hit the road with its fresh new look.
Benefits of Brake Caliper Painting
1. Aesthetic Enhancement
One of the most immediate and obvious benefits of brake caliper painting is the dramatic improvement in your vehicle's appearance. Painted calipers add a pop of color and a touch of sophistication, making your car look more polished and customized.
2. Rust and Corrosion Protection
Calipers are constantly exposed to harsh elements, including moisture, salt, and road debris, all of which can lead to rust and corrosion. A professionally applied caliper paint acts as a protective layer, preventing these elements from causing damage and prolonging the lifespan of your calipers.
3. Increased Resale Value
A vehicle with well-maintained and aesthetically pleasing components can command a higher resale value. Potential buyers often appreciate the attention to detail that comes with painted calipers, seeing it as a sign of a well-cared-for vehicle.
4. Personalization
Brake caliper painting offers an easy way to personalize your vehicle. Whether you want to match the calipers to your car's paint or create a bold contrast, the color options are virtually limitless. This level of customization allows you to express your personal style and make your vehicle truly unique.
5. Professional Appearance
For car enthusiasts and owners who take pride in their vehicles, having painted brake calipers adds a touch of professionalism. It’s an upgrade that sets your car apart, making it look like it just rolled out of a showroom.
Choosing the Right Brake Caliper Painting Service
When selecting a brake caliper painting service, it’s essential to choose a provider with expertise and a proven track record. Here are some key factors to consider:
1. Experience and Expertise
Look for a service provider with extensive experience in brake caliper painting. Check their portfolio or ask for before-and-after photos of previous work to ensure they can deliver the quality you expect.
2. Quality of Materials
The longevity and durability of the paint job depend on the quality of the materials used. Ensure that the service provider uses high-temperature, brake-specific paint and primer to achieve the best results.
3. Customer Reviews and Testimonials
Customer feedback can provide valuable insights into the reliability and quality of a service. Look for reviews and testimonials that highlight the provider's attention to detail, professionalism, and customer satisfaction.
4. Warranty and Guarantee
A reputable service provider should offer a warranty or guarantee on their work. This not only gives you peace of mind but also demonstrates their confidence in the quality of their service.
Conclusion
Brake caliper painting is a worthwhile investment for anyone looking to enhance their vehicle's appearance and protect crucial components from wear and tear. By choosing a professional service, you can ensure a flawless finish that not only looks great but also provides long-lasting protection.
0 notes