#show progressbar
Explore tagged Tumblr posts
Visit Tumblr Blog
Explore Tumblr blogs with no restrictions, modern design and the best experience.
Last Seen Tumblr Blogs


Fun Fact
US Tumblr user growth rate is estimated to slow down to 4.1%.
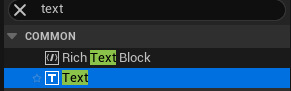
Text
Odoo Kanban Progressbar Tutorial
Odoo Kanban Progressbar tutorial shows you how to add progress indicators in Odoo Kanban Cards for improved clarity. Read our guide now! #Odoo #KanbanProgressbar #OdooDevelopmentTutorial
In this post, we detail how to add a progressbar to Odoo Kanban Cards while following an Odoo Development Tutorial approach. We explain step-by-step how you can enhance your Odoo interface with a progress indicator and meaningful color codes. We also share specific code examples, best practices, and a link to the official Odoo website for further reading. We will discuss the tutorial in detail…
0 notes
Text
Adding a HUD to my 2D Platformer
To add a HUD, we need to add a Widget Blueprint. This blueprint allows me to add text and images to the screen. We add this by selecting 'User Interface' when adding in the content drawer and then selecting 'Widget Blueprint'.
A widget allows us to add a HUD by adding 2D elements to the screen of a normally 3D game. This means I can add things like a health bar, score and inventory slots.

For the widget to actually appear on the screen, I need to add it to my character at the 'Event BeginPlay'.

To begin, I added a canvas panel. This is so that the text and images can be placed in the correct corner of the screen.

Next is adding the text.
To edit the text size, you have to use the 'Appearance' section in details, resizing the box does not change the text's size. Colour, letter spacing and font are also found here.
Next, to add an image. Download the desired image as a PNG and drag it into the content drawer. Apply 2D paper settings to the image if the background needs to be removed. Now the image can be dragged from the content drawer into the canvas.

Now the image can be moved, resized and made less opaque.

For everything added to the canvas panel, make sure to anchor them. This prevents them from warping when the size of the window is changed.

Binding:
To get text on the HUD to provide actual information, it needs to be bound to that info. Next to the text part in details, there is an option called 'Bind'. In this option you can either create a new binding or use any ones previously made for this HUD.
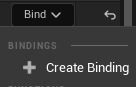
When clicked, the bind will first look like this in the graph.

Score:
Now I want this piece of text to tell the player their score, meaning it needs to be bound to the score. This is done by casting to whatever is storing the score value, in my case that's my game instance. From the cast, both 'Get Game Instance' and 'Get Score' are needed.

Next is making it so there's actual text that shows the score. This is done by connecting the 'Game Inst Score' to an 'Append' action followed by a 'To Text (String)' action. This should then connect up to the Return Node along with the 'Exec' link from 'Cast to MyGameInstant'.

This is what the whole code should look like. The bind should be added to a textbox that is separate to the 'Score:' text

The '0' is a separate piece of text to the 'Score:' so that the bind won't affect the rest of the text.
Health:
For the health, I first started with a copy of the score, using 'Get Health' instead of 'Get Score'.

Now, because we don't need to know the exact health and because I prefer it, I'm going to create a health bar to use rather than the standard numbers. For this we first add a 'ProgressBar' into the HUD.

Next is binding the health bar to the players actual health. This is done in a similar way to before, but now requires the players current health to be divided by their full health so that the amount can be calculated by the bar. It also requires the health integer to be converted into a float so that there is an infinite number of answers and won't end up accidentally giving us 0.

0 notes
Link
#show progressbar#progressdialog#alertdialog#androiddevelopment#android development#mobile application design#mobile app development
1 note
·
View note
Photo

DCL20200827 - Circular progress bar My first ever design made in illustrator. Starting my journey from here. Let's see where it goes. Requesting everyone to please show your love and support during my this journey to endless points in the designing world. Would like. To thanks everyone for visiting and viewing my profile. #design #designer #designinspiration #starting #progressbar #beginner #designlover #designs #graphicdesign https://www.instagram.com/p/CEXQ1oIDCO1/?igshid=1f5edy1s4mp2j
1 note
·
View note
Text
Calculator Dies (Progressbar 1X)
Finally, I got to show you the death of the calculator, which is killed by me! :D
Song: Meganeko - Milkshake
1 note
·
View note
Text
#ai @wired @wireduk .@wired .@california @texas @bbc_whys @bbcr4 @eu_commission @c net @techpowerup @tomshardware @pcwelt @france24 the ai questions and warnings of ca nbe mitigated with the obvious that m a n y ai s are at work: #keypoint these redun dancies can relativate eachother : o n e !?ai? no. many. : thisleads to: mark what i s a i what is not ai: and to: mark w h y this result in ai result: mynewestinvention #keypoint whythis result with progressbar before and after simply shows that ai so rts because ofthis earlier and that later at this why spot #keypoint thehuman must and can decide then if this sorting made sense based onthe most gravitational why spots
#ai @wired @wireduk .@wired .@california @texas @bbc_whys @bbcr4 @eu_commission @cnet @techpowerup @tomshardware @pcwelt @france24 the ai questions and warnings of canbe mitigated with the obvious that m a n y ai s are at work: #keypoint these redundancies can relativate eachother : o n e !?ai? no. many. : thisleads to: mark what i s a i what is not ai: and to: mark w h y this result in ai…
View On WordPress
0 notes
Text
How to use ProgressBar in Android Studio?
Developers are always interested in knowing how to utilize ProgressBar to their advantage in Android Studio. It's a regular part of their life and they have to utilize ProgressBar for their jobs. It's element of their life as well as their work. They have to learn how to utilize ProgressBar inside Android Studio. They will not be able to live without ProgressBar.
The Best Java Books for Beginners in 2022
1. Introduction
ProgressBar is used to display the progress of an procedure or task. This is often useful when the status of the operation is not apparent until the task has been completed. ProgressBar is generally used in conjunction with the ProgressDialog. The ProgressBar can also be useful for animating the progress of a process.
CCNA Routing And Switching All In One Study Guide BOOK
2. How to add ProgressBar
You can use ProgressBar in Android Studio. It will track the progression of your app. You can add a ProgressBar to your activity by following these steps: 1. Add the ProgressBar widget in your layout file. Set the height and width of the widget to your desired values 3. The background color should be set to 4. Add the following line to the XML file < ProgressBar 5. Incorporate the next line into the XML file < ProgressBar 6. Incorporate the next line into the XML file < ProgressBar 7. Incorporate the next line into the XML file < ProgressBar 8. Add the following line to the XML file ProgressBar 9. Incorporate the next line into the XML file < ProgressBar 10. Incorporate the next line into the XML file ProgressBar 11. Add the following line to the XML file: ProgressBar 12. The following lines should be added to the XML file ProgressBar 13. The following lines should be added to the XML file: ProgressBar 14. Include the line below to the XML file
How To Configure EIGRP On Cisco Router Step By Step Guide - 4 Routers
3. How to use ProgressBar
ProgressBar is an extremely useful tool available in Android Studio. It's an excellent tool to help you in the development process. ProgressBar is an application that shows the amount of progress you've made within your project. It is found on the left-hand side of the Android Studio window. It is also possible to include the ProgressBar to your layout file, and it will automatically appear within the windows. You can change the color of the ProgressBar via its Properties menu. You can also change your color for the ProgressBar via the Properties menu.
How To Configure OSPF Single Area On 4 Routers In Cisco Packet Tracer
4. Conclusion.
A method of monitoring the current process of a project is to use the progress bar. These bars show the status of a task the user. The progress bar provides an image representation of the task that has been initiated and is in progress. This can be done by using a progress indicator in Android Studio.
How To Configure EIGRP in Packet Tracer - 3 Routers
0 notes
Text
Audio bar progress math
DOWNLOAD NOW Audio bar progress math
#Audio bar progress math update
Thanks to the just_audio code example for help with the buttons.
#Audio bar progress math update
They aren't hard to build, though, and you can find an example in the GitHub repo. A package provides an easy way to add audio wave bars in Flutter project. You're missing two things - a listener to update the progress bar with the progress of the audio track, and a function to update the audio track currentTime according to your click on the progress bar. You'll probably want to add other buttons like start and pause, but these are not included with this package. Just rebuild the ProgressBar widget with the new Duration states. With this fully digital solution, teachers can: Administer diagnostic assessments to identify learning gaps for individual students. You can use any audio or video player that provides updates about the current play location. The Progress Mathematics Full Access Bundle is designed to identify and resolve students’ learning gaps by assessing their skill levels and prescribing targeted resources from Progress Mathematics. You can get ready-to-use teacher lesson plans, worksheets, and visual organizers for each intervention lesson from this Michigan-based website. It includes not only screening materials but also Tier 2 and Tier 3 intervention tools, all of which are available for free. There is no requirement to use just_audio or even a StreamBuilder, though. This website contains a wealth of fantastic resources. You can check out the GitHub repo for the full example using the just_audio plugin. Once all JiJi lives (usually 2) are lost, the level. 1 - The number of JiJi’s shows how many attempts (JiJi lives) the student has remaining for this level. Clicking on the progress bar gives more information about the student's current game. Final progress = durationState ?.progress ? Duration.zero įinal buffered = durationState ?.buffered ? Duration.zero įinal total = durationState ?.total ? Duration.zero Ĭonst DurationState() The progress bar is in the upper right corner of the student’s screen while they’re playing games.
DOWNLOAD NOW Audio bar progress math
1 note
·
View note
Text
[Media] LDAP Nom Nom
LDAP Nom Nom Anonymously bruteforce Active Directory usernames from Domain Controllers by abusing LDAP Ping requests (cLDAP) ▫️ Autodetects DCs on domain joined machines. A bit moot, as you can just dump usernames with authenticated LDAP, but included for completeness ▫️ Reads usernames to test from stdin or file ▫️ Outputs to stdin or file ▫️ Parallelized, defaults to 8 connections ▫️ Shows progressbar if you're using both input and output files https://github.com/lkarlslund/ldapnomnom

0 notes
Photo

Hey guys, In this post you will learn how to show or implement circular progressbar in your android application. If you like this post then show some love by liking this post. And also follow @its_hilalahmad for more such amazing content. #androidappdevelopment #androiddeveloper #androiddevelopers #androiddevelopment #androidappdev #appdevelopment #appdev #appdevelopers #androiddev #androidappmaker https://www.instagram.com/p/CWqodUlvKTK/?utm_medium=tumblr
#androidappdevelopment#androiddeveloper#androiddevelopers#androiddevelopment#androidappdev#appdevelopment#appdev#appdevelopers#androiddev#androidappmaker
0 notes
Text
Medical Website

This medical website provides you with lots of options and features to craft your medical website efficiently. Likewise, you can use CareMed website in medical and healthcare fields like hospitals, clinic, health NGO, and doctors. It has Bootstrap 4 support which ensures a superb quality.The sticky navigation, followed by a top contact bar, presents a great deal of user experience. Afterward, you can satisfy your visitors with a nice full-width header which includes a warm button with on-hover effect. However, you can add the information for working hours, appointments, and emergency contact on the next section. Let the visitor explore the entire website by utilizing the multi-page facility. Furthermore, there is the feature section designed with custom icons and ready to put special services to check out easily.Then the next section is the about section where you can add full information and details. With the circular progress bar, you can show your organizations achievements. Similarly, a client can add reviews in the testimonial section about the services if they are happy or not. Additionally, descriptive footer, social media icons, on hover buttons and more make this ��website looks stunning. Keep in touch with the patients via the contact page integrated with Google maps.
This medical website provides you with lots of options and features to craft your medical website efficiently. Likewise, you can use CareMed website in medical and healthcare fields like hospitals, clinic, health NGO, and doctors. It has Bootstrap 4 support which ensures a superb quality.
Key Features
Multipage Template
Bootstrap 4 Powered
Sticky Navigation
Device Responsive
Full-screen Header
Custom Medical Icons
On-hover Effect
Contact Form
Google Maps
Descriptive Footer
Social Media Icons
Circular Progress Bar
Pagination In News
Testimonial Section
Our Services
Website Development
Domain, Hosting and Services
Web Application Integration
eCommerce Development
Web Theme Development
Customization
Digital Marketing
In The Package
6 HTML File
15 CSS Files
7 Javascript Files
7 Plugins
Demo Images
Credits
Bootstrap 4
jQuery Easing
Owl Carousel
jQuery v3.2.1
GreenSock
ScrollMagic
scrollTo
Parallax
ProgressBar
0 notes
Note
idk if you have 18 minutes of spare attention for this but I thought it was funny and Rosalina is badass in it: youtube 5juBmmXoW7I
you said Rosalina so i’m interested
ok i dont have the attention span for this but i skipped to where rosalina showed up in the rectangle that appears when you hover over part of the progressbar thing
is she wearing an eye patch to look cooler that’s cool
0 notes
Text
Android - Loading Spinner
08 December 2020
You can show progress of a task in android through loading progress bar. The progress bar comes in two shapes. Loading bar and Loading Spinner. In this chapter we will discuss spinner.
Spinner is used to display progress of those tasks whose total time of completion is unknown. In order to use that, you just need to define it in the xml like this.
<ProgressBar android:id="@+id/progressBar1" style="?android:attr/progressBarStyleLarge" android:layout_width="wrap_content" android:layout_height="wrap_content" android:layout_centerHorizontal="true" />
0 notes
Text
Generating Flexible Random data in MySQL
I was about to benchmark the various compression methods in MySQL ( Via Engines ). But i liked to simulate my own data set similar to a production work load. Well searched for a tool which should be flexible to enough make customised table structure and more. Mysql_random_data_load is a tool from Percona labs used to manipulate random data based on flexible table structure. This seems like a right fit for our benchmarking needs. Let’s explore this tool to work efficiently on it. MySQL Random Data Load : Mysql_random_data_load will load (insert) ‘n’ number of records to the source table and populate it with random data based on data type. So this tool won’t determine the predefined table column or data type like sysbench. It will insert data into the table based on column data type. Thus we can generate random data based on our custom needs. The table can have any number of columns with varied data types, this tool will generate the data based on the data type of the column and insert the data. How it works ? Mysql random data load will load the data based on the table structure mentioned with most of common data type like int, char, text, blob, etc For strings If field size < 10 the program generates a random “first name” If the field size > 10 and < 30 the program generates a random “full name” If the field size > 30 the program generates a “lorem ipsum” paragraph having up to 100 chars. The program can detect if a field accepts NULLs and if it does, it will generate NULLs randomly (~ 10 % of the values). Download :- https://github.com/Percona-Lab/mysql_random_data_load/releases Sample Table structure: I have created a simple table with INT , CHAR , BLOB datatypes for a sample use case. mysql> show create table testG Table: test Create Table: CREATE TABLE test ( id int(11) DEFAULT NULL, name char(11) DEFAULT NULL, desg blob ) ENGINE=InnoDB DEFAULT CHARSET=latin1 1 row in set (0.00 sec) Options: Let us have a view at the few important options. Before diving in –debug : From this debug option we are able to get more details about the data loading. The default bulk size is 1000 rows. We can notice in this example below with additional details. When the –debug mode is enabled the progress is disabled. Example : [root@mydbops11 vagrant]# ./mysql_random_data_load test test 1000000 -u -p --debug DEBU[2019-10-09T07:15:14Z] &tableparser.Table{ Schema: "test", Name: "test", Fields: { { TableCatalog: "def", TableSchema: "test", TableName: "test", ColumnName: "id", OrdinalPosition: 1, ColumnDefault: sql.NullString{}, IsNullable: false, DataType: "int", CharacterMaximumLength: sql.NullInt64{}, CharacterOctetLength: sql.NullInt64{}, NumericPrecision: sql.NullInt64{Int64:10, Valid:true}, NumericScale: sql.NullInt64{Int64:0, Valid:true}, DatetimePrecision: sql.NullInt64{}, CharacterSetName: sql.NullString{}, CollationName: sql.NullString{}, ColumnType: "int(11)", ColumnKey: "", Extra: "", Privileges: "select,insert,update,references", ColumnComment: "", GenerationExpression: "", SetEnumVals: {}, Constraint: (*tableparser.Constraint)(nil), SrsID: sql.NullString{}, }, { TableCatalog: "def", TableSchema: "test", TableName: "test", ColumnName: "name", OrdinalPosition: 2, ColumnDefault: sql.NullString{}, IsNullable: false, DataType: "char", CharacterMaximumLength: sql.NullInt64{Int64:1, Valid:true}, CharacterOctetLength: sql.NullInt64{Int64:4, Valid:true}, NumericPrecision: sql.NullInt64{}, NumericScale: sql.NullInt64{}, DatetimePrecision: sql.NullInt64{}, CharacterSetName: sql.NullString{String:"utf8mb4", Valid:true}, CollationName: sql.NullString{String:"utf8mb4_0900_ai_ci", Valid:true}, ColumnType: "char(11)", ColumnKey: "", Extra: "", Privileges: "select,insert,update,references", ColumnComment: "", GenerationExpression: "", SetEnumVals: {}, Constraint: (*tableparser.Constraint)(nil), SrsID: sql.NullString{}, }, { TableCatalog: "def", TableSchema: "test", TableName: "test", ColumnName: "desg", OrdinalPosition: 3, ColumnDefault: sql.NullString{}, IsNullable: false, DataType: "blob", CharacterMaximumLength: sql.NullInt64{Int64:65535, Valid:true}, CharacterOctetLength: sql.NullInt64{Int64:65535, Valid:true}, NumericPrecision: sql.NullInt64{}, NumericScale: sql.NullInt64{}, DatetimePrecision: sql.NullInt64{}, CharacterSetName: sql.NullString{}, CollationName: sql.NullString{}, ColumnType: "blob", ColumnKey: "", Extra: "", Privileges: "select,insert,update,references", ColumnComment: "", GenerationExpression: "", SetEnumVals: {}, Constraint: (*tableparser.Constraint)(nil), SrsID: sql.NullString{}, }, }, Indexes: { }, Constraints: { }, Triggers: { }, conn: (*sql.DB)(nil), } INFO[2019-10-09T07:15:14Z] Starting DEBU[2019-10-09T07:15:14Z] Must run 1000 bulk inserts having 1000 rows each INFO[2019-10-09T07:16:04Z] 1000000 rows inserted –bulk-size : The bulk size determines the chunk size of rows during bulk loading. In the below example tried a chunk size of 400. Example: [root@mydbops11 vagrant]# ./mysql_random_data_load test test 100000 -u -p --bulk-size 400 --debug ....... INFO[2019-10-09T07:12:18Z] Starting DEBU[2019-10-09T07:12:18Z] Must run 250 bulk inserts having 400 rows each INFO[2019-10-09T07:12:19Z] 100000 rows inserted –no-progressbar By default, it is off. When you enable it. It masks the progress when it is enabled. Disabled ( Default ) : [root@mydbops11 vagrant]# ./mysql_random_data_load test test 1000000 -uroot -pMydbops@11 INFO[2019-10-17T16:28:51Z] Starting 47s [====================================================================] 100% INFO[2019-10-17T16:29:39Z] 1000000 rows inserted [root@mydbops11 vagrant]# Enabled : [root@mydbops11 vagrant]# ./mysql_random_data_load test test 1000000 --no-progress -uroot -pMydbops@11 INFO[2019-10-17T16:39:30Z] Starting INFO[2019-10-17T16:40:19Z] 1000000 rows inserted [root@mydbops11 vagrant]# –print : This print option used to get the insert query instead of inserting the data to the tables. [vagrant@mydbops11 ~]$ ./mysql_random_data_load test test 10 -uroot -pMydbops@11 --print INSERT IGNORE INTO `test`.`test` (`id`,`name`,`desg`) VALUES (583532949, "B", "neque cum voluptas iste maiores est reprehenderit."), (1342458479, "M", "atque sint ratione nisi natus ad assumenda dolor."), (280366509, "M", "voluptates voluptatum quia rerum minus quis."), (1801160058, "S", "modi mollitia eligendi odio accusantium."), (914091476, "T", "aliquam et nam nihil error."), (1022430181, "J", "qui voluptatem sed impedit nesciunt molestias!"), (165910161, "V", "necessitatibus consequuntur id cupiditate."), (1255569388, "B", "voluptate atque consequatur in et."), (1375471152, "P", "sunt odit aperiam quibusdam in iusto."), (1705409249, "K", "aperiam voluptas sapiente culpa a sint dolore."); Now it is time to make the benchmarking test case. I have created two tables with same table structure, with different engines Innodb and Rocksdb respectively. I have chose a longtext and blob data types. mysql>CREATE TABLE test1 ( ID int DEFAULT NULL, Name longtext, Image blob ) ENGINE=InnoDB; 1 row in set (0.16 sec) mysql> CREATE TABLE test2 ( ID int DEFAULT NULL, Name longtext, Image blob ) ENGINE=ROCKSDB; 1 row in set (0.02 sec) Loaded around 100M records using mysql_random_data_load on both those tables. mysql> select count(*) from test1; +-----------+ | count(*) | +-----------+ | 100000000 | +-----------+ 1 row in set (1 min 4.13 sec) mysql> select count(*) from test2; +-----------+ | count(*) | +-----------+ | 100000000 | +-----------+ 1 row in set (8 min 7.25 sec) Now the data is loaded to both the table, let see the size of both the tables on disk. Size of test1 (InnoDB):- [root@mydbops11 db]# du -sh . 12G . Size of test2 (RocksDB):- [root@centos13 .rocksdb]# du -sh .7.5G . I have used the default setting for both InnoDB and RocksDB didn’t do any variable tuning for the max compression. So by default 25% of compression is occurring in RocksDB when compared to InnoDB engine. Now i am ready to test further with various combinations with the help of the customised data set by MySQL Random Data load. This is a very simple example you can make further complex table structures with this tool. This tools any one who like to simulate realtime dataset and in performance related data loading . https://mydbops.wordpress.com/2021/01/07/generating-flexible-random-data-in-mysql/
0 notes
Text
How to use ProgressBar in Android Studio?
Developers are always interested in knowing how to utilize ProgressBar to their advantage in Android Studio. It's a regular part of their life and they have to utilize ProgressBar for their jobs. It's element of their life as well as their work. They have to learn how to utilize ProgressBar inside Android Studio. They will not be able to live without ProgressBar.
The Best Java Books for Beginners in 2022
1. Introduction
ProgressBar is used to display the progress of an procedure or task. This is often useful when the status of the operation is not apparent until the task has been completed. ProgressBar is generally used in conjunction with the ProgressDialog. The ProgressBar can also be useful for animating the progress of a process.
CCNA Routing And Switching All In One Study Guide BOOK
2. How to add ProgressBar
You can use ProgressBar in Android Studio. It will track the progression of your app. You can add a ProgressBar to your activity by following these steps: 1. Add the ProgressBar widget in your layout file. Set the height and width of the widget to your desired values 3. The background color should be set to 4. Add the following line to the XML file < ProgressBar 5. Incorporate the next line into the XML file < ProgressBar 6. Incorporate the next line into the XML file < ProgressBar 7. Incorporate the next line into the XML file < ProgressBar 8. Add the following line to the XML file ProgressBar 9. Incorporate the next line into the XML file < ProgressBar 10. Incorporate the next line into the XML file ProgressBar 11. Add the following line to the XML file: ProgressBar 12. The following lines should be added to the XML file ProgressBar 13. The following lines should be added to the XML file: ProgressBar 14. Include the line below to the XML file
How To Configure EIGRP On Cisco Router Step By Step Guide - 4 Routers
3. How to use ProgressBar
ProgressBar is an extremely useful tool available in Android Studio. It's an excellent tool to help you in the development process. ProgressBar is an application that shows the amount of progress you've made within your project. It is found on the left-hand side of the Android Studio window. It is also possible to include the ProgressBar to your layout file, and it will automatically appear within the windows. You can change the color of the ProgressBar via its Properties menu. You can also change your color for the ProgressBar via the Properties menu.
How To Configure OSPF Single Area On 4 Routers In Cisco Packet Tracer
4. Conclusion.
A method of monitoring the current process of a project is to use the progress bar. These bars show the status of a task the user. The progress bar provides an image representation of the task that has been initiated and is in progress. This can be done by using a progress indicator in Android Studio.
How To Configure EIGRP in Packet Tracer - 3 Routers
0 notes
Text
Spooky House, I'm only using your resources to show what Progressbar 1X looks and sounds like, so that everyone can enjoy these little screens and sounds.
0 notes