#sims 4 guide
Explore tagged Tumblr posts
Visit Tumblr Blog
Explore Tumblr blogs with no restrictions, modern design and the best experience.
Last Seen Tumblr Blogs


Fun Fact
The total number of visits Tumblr.com received during January 2021 is 327 million.
Text
this guide is specifically for my friend mel <3 but of course anyone is free to reference it x
𖡡 you've downloaded the game, played around a little bit, and now you're looking to add mods and custom content (cc) into your game
────୨ৎ────
this game is basically nothing without mod and cc creators, so all credit and love to them ♡
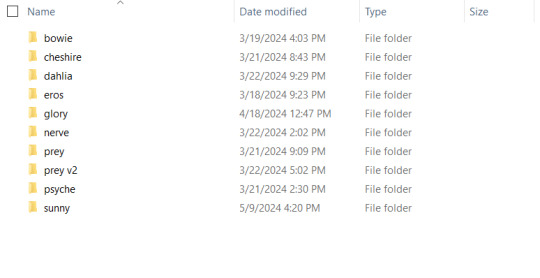
step 01: setting up your mods folder
open file explorer, go to documents, and find the folder labeled electronic arts. then click on the sims 4.
you'll see a folder labeled mods - pin it to quick access [this will make accessing it easier]
step 02: downloading mods and cc
you can find cc and mods so many ways!! tumblr, youtube, pinterest, instagram, etc. there are a lot of blogs on tumblr specifically for cc finds too
make sure you're downloading things from a reliable source. for example - a creator's patreon/tumblr or website, simfileshare.net [often linked as sfs], google docs, curseforge, itch.io, and *unanimously hated* thesimsresource.com → the sims resource is hated because of all of the fucking ads lmaooo
you'll be downloading package files and zip files. you'll find them in your downloads in file explorer
step 03: installing mods and cc
navigate to downloads in file explorer
package files can be simply dragged into the mods folder
zip files need to be extracted, then you can drag and drop the unzipped folder into your mods folder → whatever you put into your mods folder can only be one extra folder deep or it won't show up in your game
when it comes to mods [not cc], creators will often have instructions for you. follow those exactly
step 04: mods + game updates
sometimes mods break when there's a game update. it's just a very annoying part of the game at this point lol
some mods will have a pop-up in the game letting you know it needs to be updated. but if it doesn't and you notice something is fucked up, you can google 'broken mods' and usually someone else will be having the same problem and can let you know to update it
if a mod is broken, remove it from your mods folder and go download the new version from the creator → a lot of mod creators update very quickly [like the same day or within a couple days] but sometimes they don't. just be patient and check for updates periodically
recommended: the sims 4 mod manager // dl here → the mod manager will allow you to see and deactivate or remove mods and cc from your game [it's automatically connected to your mods folder and can be helpful when you can't find broken mods or cc]
gameplay mods i recommend
mccc by @deaderpoolmc // dl here ✧ gives a you a lot of control of your game
tool by @twistedmexi // dl here ✧ place and size things however you want
better build/buy by @twistedmexi // dl here ✧ gives you easier access to things in build/buy that you'd normally have to use cheats for
relationship and pregnancy overhaul by lumpinou // dl here ✧ more realistic gameplay [this one is essential!!]
lgbtqia+ by lumpinou // dl here ✧ gender identity, gender affirmation and transition, self-discovery, coming out, dating apps and lot traits [i love this mod so much!!]
healthcare redux by adeepindigo // dl here ✧ adds illness, injury, chronic conditions, allergies, medical emergencies, etc
childbirth mod by @pandasamacc // dl here ✧ good for family gameplay
snbills by @simrealist // dl here ✧ bank accounts
also want to mention milk thistle & sunblind by @softerhaze ✧ the lighting with these mods is *essential* pls check them out!!
create-a-sim [cas] mods i recommend
cas backgrounds // you can download mine here but i also love vyxated ✧ these are just extra fun!! you can find a lot on tumblr or youtube to download. it's a super easy drag and drop into your mods folder. but when you want to change it, make sure you remove the current one or it won't work!!
gentle cas lighting by northerin siberia winds // dl here ✧ replaces the ea lighting in cas with a softer glow and shadows
any cas lighting by helgatisha // dl here ✧ i like the colors they have!!
custom content [let's make your sims hot!!]
cc creators i love: @kumikya @dogsill @aladdin-the-simmer @arethabee @imvikai @jius-sims @northernsiberiawinds @oakiyo @its-adrienpastel @daylifesims @twisted-cat @madlensims @miikocc @obscurus-sims @evoxyr @powluna @pralinesims @simandy @sentate @simstrouble @christopher067 @aharris00finds @bluecravingcc @crypticsim @gorillax3-cc @gegesimmer @frzrbunny @greenllamas @lisatrait @joshseoh @liyahsim @thatonegreenleaf @trillyke @waterlily0210 @clumsyalienn @johnnysimmer @lamatisse
────୨ৎ────
anyways mel, i really enjoyed making this for you and i hope you enjoy the game!! <3
#sims4guide#sims 4#the sims 4#ts4#gameplay mods#cas mods#create a sim mods#sims 4 mods#sims 4 cc#sims 4 guide#cas#simblr#cc finds#sims 4 game mods#sims 4 beginners guide#ts4 beginner guide#mod tutorial#cc tutorial#sims 4 cc creators#sims 4 mod creators#where can i find sims 4 cc#the sims community#sims community#create a sim#cas lighting#cas backgrounds#lumpinou mods#pandasama mods#adeepindigo mods#mccc
35 notes
·
View notes
Text

What's the best Food in the Sims 4?
After a thorough analysis of all 709 food in the Sims 4, it is proven that Batuu recipe: Braised Roast Shaak is the single best recipe for your Sims.
Here's why:
I refined Carl’s Food Efficiency, with a brand new formula, the ability to take food buffs and food with 0 calories into account, as well as all DLC compatible. The basic idea is to not define efficiency, but consider this instead: After how many in-game minutes will the hunger need decay to the same value. The first part of the formula is hunger value of the food divided by hunger need decay. The hunger value is a modified value due to two reasons: Firstly, It choose the minimal value among hunger value and 150, because it takes 12 in-game hours for a Sim’s hunger motive to decay from full to -50, after that it slows down so Sims don’t starve easily. Most Simmers allow their Sims to eat before this because it makes their Sims uncomfortable, and most Sims have at least two meals a day. As a result, a meal with 200 hunger value is equivalent to a meal with 150 hunger value at most times. Secondly, some highly-skilled, high quality recipes apply a potent buff to Sims so their hunger need decay slows down. An Outstanding Level 8 Gourmet Cooking Lobster Tortellini make their hunger need decay slows down 80% for 6 hours! We calculate those slowed decay as equivalent long-term hunger need gain. Batuu recipes, however, will give Sims the most potent buff despite being Level 1 recipes; 3 Tomarani Entrees grants the second most potent buff. The second part is how long it takes to finish the meal. Each food has a consumption value, which is how many times the eating animation is played. It takes 4 minutes for Sims to eat a turn on average. Sometimes we might also consider the time in-between, so there’s an optional part for that. The third and last part is the calories. Sims grow 1 pound for every 150 calories, and it takes them 13,33 minutes to jog it off. We subtract those time The final formula apply a coefficient to each part, to allow Simmers to count it differently according to their playstyles. (e.g. Only eat when they’re dying, hates gaining weight, has 200G mod so it lags so much between eating animation, etc.)
For a COMPLETE ranking of ALL food in the Sims 4, see this sheet:
For a thorough deduction of the formula, see this video:
吃沙拉也发胖?我找到了《模拟人生4》709个食物里卡路里最高的!|《模以食为天》#1 - YouTube
It's in Chinese though.
10 notes
·
View notes
Text
well hi :3 welcome to deja’s skinblending guide. this is my first full written tutorial so excuse me if its not very good LAWL before we get started, here's the tools i'll be using
sims4studio
tray importer
photoshop 2022 (theres cracked version everywhere on tumblr)
blender 4.1
sims 4 ripper
blender + the ripper aren't required to make skins, plenty of people don't go that extra step, but i love using it for placement help
okay lets fuckin go gamers heres my very in depth process for making my ocs skins
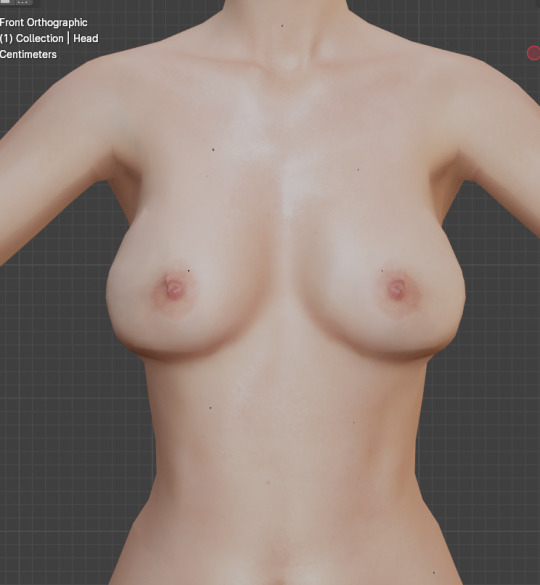
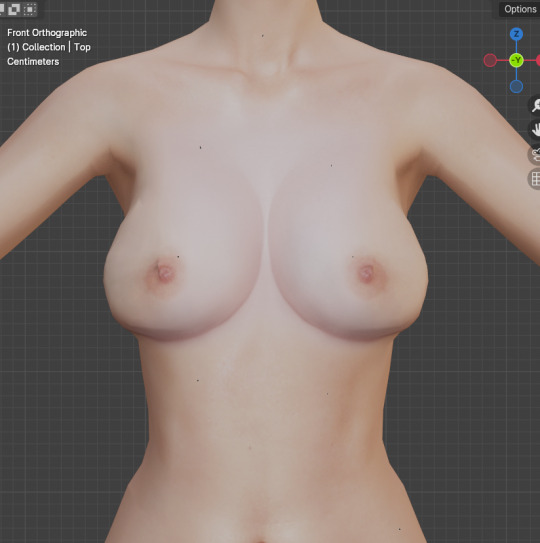
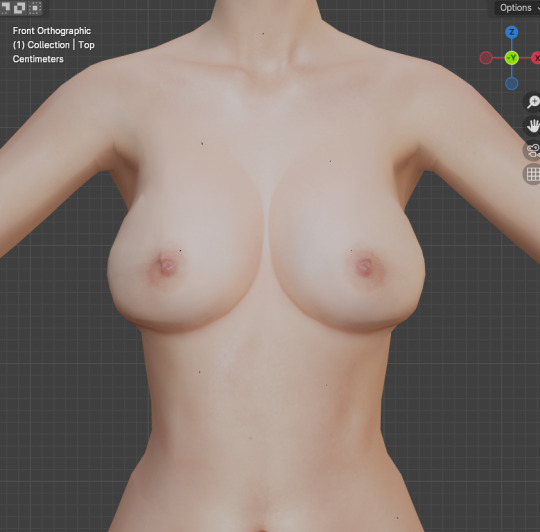
miss dolly is gonna be our model today. she already has a skin but im gonna add some little details for the sake of example + some tats cause ive been meaning to anyway.
so when i first get started on making someone a skin, ill find a good base to use and then add details from other categories like nosemasks, eyebags, contours, etc.
my fav skin creators are @sims3melancholic and @thisisthem. my bases are usually thisisthem, and then i'll pick through a couple s3m skins and make notes on my phone about what parts i wanna take off of them (like, say, i like how a certain s3m skin's nose looks. i'll use that instead of a nosemask)
my goal when im gathering things i wanna add is to free up as many slots as i can. id rather add cheshire's freckles onto her skin than use up the freckle slot in skin details that i could use for something else, yknow?
ill repeat this process for makeup next. obviously im not giving my ocs permanent full glam, but some lipsticks can add better texture, you can get highlights/blush from........the blush section LOL and i love using this obscurus eyeliner at a low-ish opacity
just adds an extra level of detail i love. i think what keeps my sims looking consistent next to each other is that i tend to use some of the same details all across the board
make sure for all makeup/skin detail/tattoo category swatches you use, you make note of what swatch it exactly is. when you go into s4s to export the file, you're gonna have to manually select it and if u cant remember what skintone u chose out it can be annoying :/
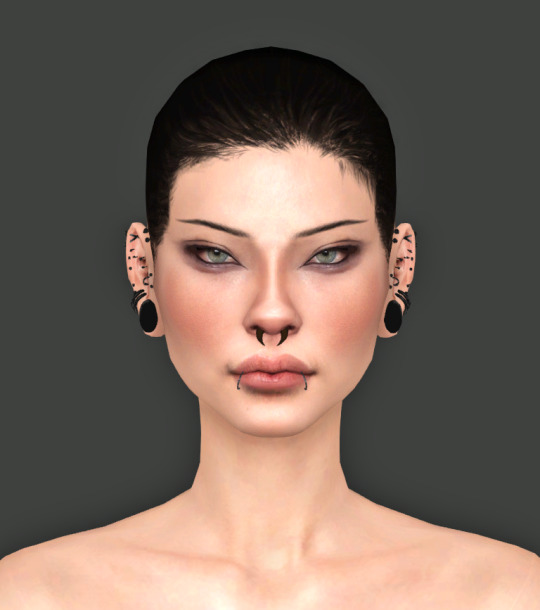
note that she is completely nakey aside from her piercings while i pick what im gonna use for her skin! no clothing but u can keep on their hair. this is so we have a clear view of everything (and i mean EVERYTHING) for blender.
after you make sure u save the sim/household to ur gallery, you can close out of cas and save ur game! i forgot to do this bc im a fucking idiot but its okay bc you will not. its not REALLY necessary to do this as long as you know exactly what packages you need to locate for texture exporting
step one is done!!!! close out ur game
i have a million fucking characters so i made a deja senti skinblending folder to keep it all organized :-)
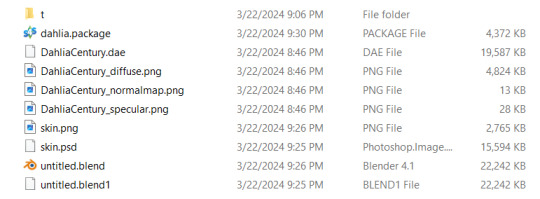
this is what it looks like inside. gives u a pretty good overview of what ur gonna be doing tbh. the 't' folder is all the textures we're about to export
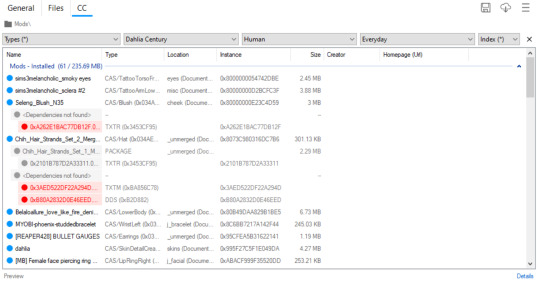
thankfully i do have a version of dahlia saved in my gallery so even tho i didnt go it before i closed my game i can still show u what to do in tray importer lol. i have multiple sims in one household, so i narrowed it down by going up top and selecting dahlia / human / and her everyday outfit.
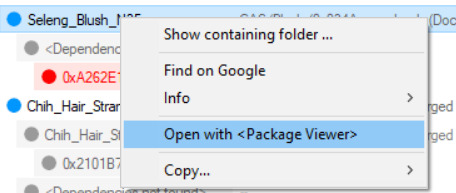
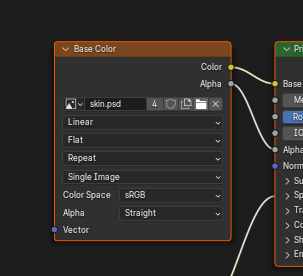
since im gonna give her this blush, i right click and hit open w package viewer so itll find it and open s4s for me
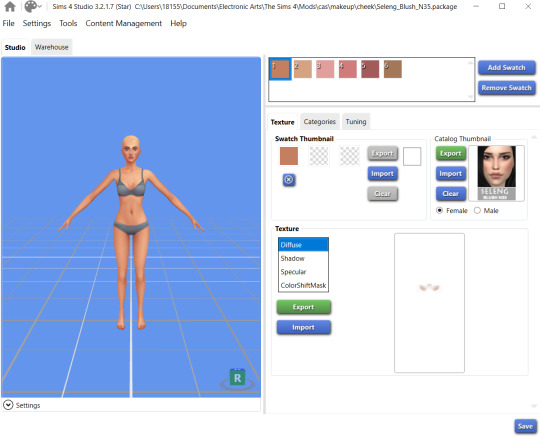
anime wow sound. im gonna change the color manually in photoshop so it doesnt matter to me what swatch i export. hit that green export button under the list of diffuse/shadow/etc (u dont need to worry about all those options, just diffuse) and save it to ur folder!
once ur done gathering ur textures ur good to close out of tray importer and s4s(we'll come back to s4s later tho)
thats step two! the quickest step lawl
this is where i start being a little extra. u dont have to rip ur sim and use blender if u dont want to, but i think it can rly help bc the default sim in s4s doesn't have ur sims facial features and can make ur skins look wonky/wont give an accurate representation of how itll look in game. this cuts out having to go in game/out of game over and over to check
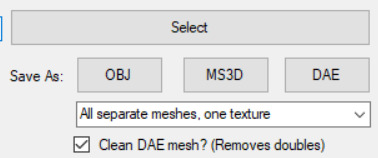
so in simripper once u load up ur sim, the important part is to make sure u have it set to export the dae with separate meshes. once thats done u can import it into blender and there's plenty of other tutorials out there how to use simripper n all that.
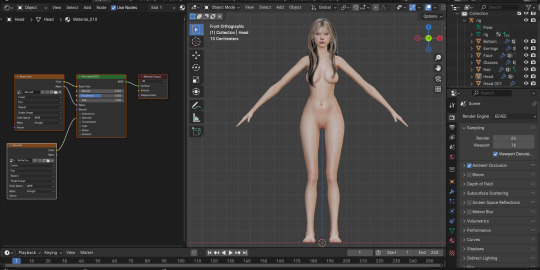
so once u get the dae loaded into blender im gonna send u on a little side quest over to this ask i answered where i explain how i separate eyes from the head mesh. next thing ur gonna open is photoshop! or whatever u have thats similar

say hi to flat dahlia. u should have ur own guy but flat open now too :-) along with everything else ur gonna combine. in my case its blush and a titty mask. im gonna start w the blush so i zoomed into her face in blender. i went into the blush file and copied, then back into my base skin file and pasted into place with crtl+shift+v
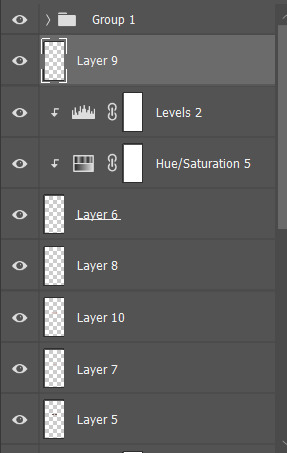
please do not be like me. make sure u rename ur layers as you copy and paste them into the main skin file. do this because it DOES matter what order ur layers are in. u dont want to put ur highlight under ur nose mask cause the nose mask will just cover the highlight etc etc. i already lost what layer the new blush i added is. what is wrong w me
so when u have ur first detail pasted on and in place, ur gonna save the base skin file as a psd. then go into blender, and in the little textures window ur gonna replace the diffuse file ur dae came loaded with with ur new psd file
u should see the change u made but mine was super subtle so im gonna show it to u when i put on the cleavage overlay
when it comes to stuff like this, ur obviously gonna want to pick the closest to ur skintone swatch as u can. i did not do this, because again, im an idiot
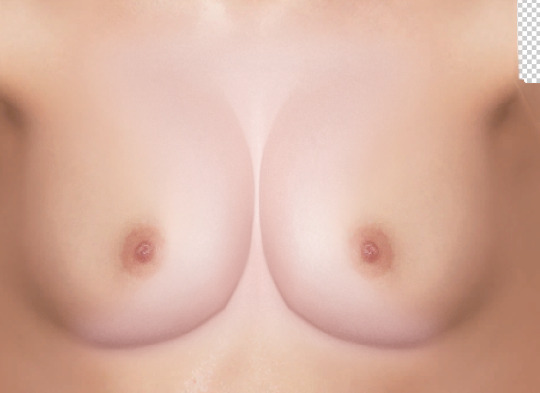
mine is way too pale LAWL whoops. we can fix this tho
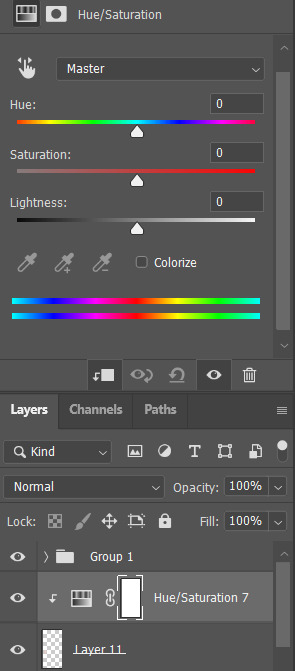
i add a hue/saturation adjustment and make it a clipping mask using that square w the arrow so the adjustment will ONLY affect the mask
from there i just make little adjustments until the color match up is as perfect as i can make it. for example for this, ik that it needs to be a little warmer and a little more saturated, so im gonna bump the hue and saturation sliders to the right and it was pretty much perfect
tiddies with no mask > with mask no adjustments > with mask and adjustments
and ur gonna go ahead and repeat that process with every single thing u wanna add to ur skin.
so as for tattoos! this is another thing ur gonna wanna rename the layers for because depending on how heavily ur sims can be tatted it can get A LOT
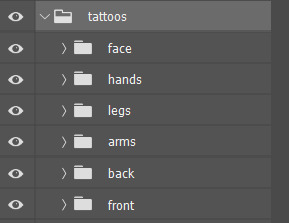
here's psyche's neat little tattoo folder. its separated into where the tattoo is and then
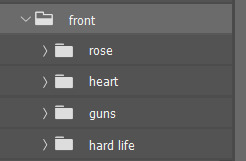
what it is
i find all my tattoo inspo on pinterest using flash sheets/keywords in the search. my ocs usually have sub-boards that i hoard inspo in for them specifically. dahlia doesnt have one bc ive never seen her as the most tattooed person, but i think she'd have some at least
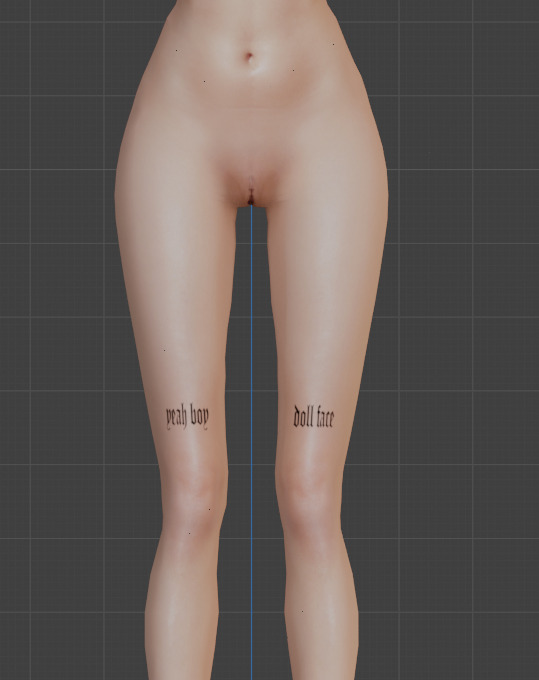
this process is pretty much the same as putting on skin details! its all about adjusting to what u like. for example, i like when my sims tattoos are a little faded and a bit blurred at the edges cause it looks a little more real
when it comes to images i find on pinterest, ill save the image and first try to make it as clean as i can
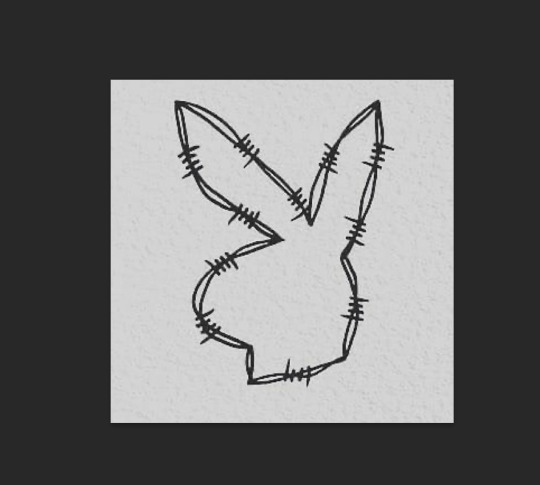
for example, this lil guy
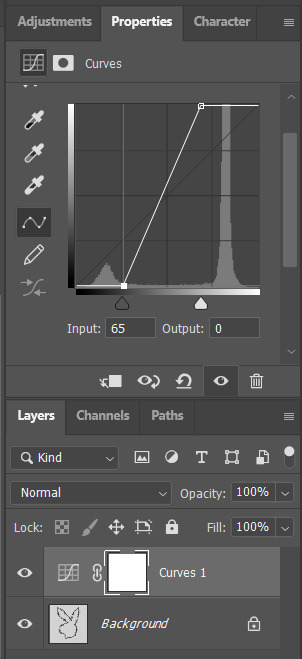
a curve mask made the whites brighter and the blacks darker as u can see. then ill go into filter > reduce noise to soften the harsh edges
then i flatten it, copy and paste to the skin file, n place it wherever i want it to go :-)

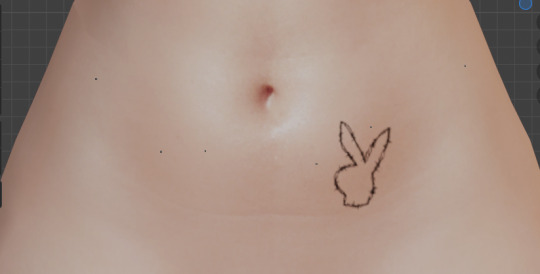
louder anime wow!!!
okay so now ur gonna want to make sure u .psd file is saved (it should be bc we've been checking our progress w blender) and then merge the visible layers (NOT flatten, merge visible. we need the transparency around the skin to be in tact)
ur done in photoshop and blender!!! good job :-)
step whatever number we're on. back into s4s!
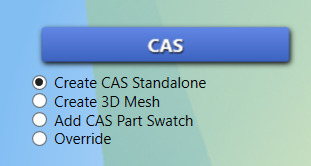
ur focus is over here. make sure the option filled is the top one, and then hit the cas button
this menu will open, ur gonna go up to part type and find the option skin details, forehead. pick the first forehead wrinkle option that appears and hit 'next.' itll prompt you to save ur new file n give it a name, i usually just make it my sim's name cause i have a folder in my mods folder for specifically my cc
remember wayyyy back when we were exporting the skin details? ur gonna go back to that same section and hit 'import' instead of export. select ur skin's .png file, and poof !

ur skin :DD it looks great man good job
this part is EXTREMELY important. go up to the warehouse tab
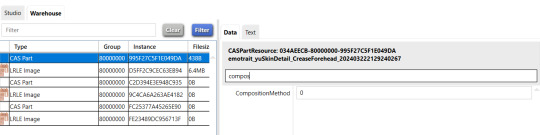
in the 'data' section ur gonna see a box at the top labeled 'filter.' thats where i typed in 'compos' just so it would show me JUST the compositionmethod section since theres a lot of shit in there lawl. yours is initially gonna say '3,' but we're gonna change it to '0' mind you, this is because MY skins are all alpha. maxis match overlays do not show up on my skins because my comp method is set to 0, meaning it has top priority essentially.
after you do that, you can hit save and place that .package file you created into your mods folder!!! and GUESS WHAT BESTIE UR DONE!!!!! U DID IT :DDDD
of course, as always, you can always dm me if youre stuck on anything or need any more clarification. i am always open to help as much as i can. i rly hope this helped :-)
67 notes
·
View notes
Text

detectar mods conflictivos sims 4 | tips, escanea y elimina virus
esta es una guía definitiva de como detectar mods conflictivos, además les compartiré algunos tips para evitar errores en los sims 4 y podrás eliminar los mods dañados de tu juego.
· ver tutorial
*thanks to @twistedmexi for creating the mods*
#the sims 4#los sims 4#sims 4#the sims#sims#ts4#ts4 cc#simmer#simblr#ts4cc#tianaberrie#sims 4 aesthetic#sims 4 mods#sims 4 tutorial#sims 4 guide#mods sims 4#the sims 4 aesthetic#ts4 aesthetic#aesthetic#cottagecore#aesthetic mods#top mods sims 4#ts4 mods#sims 4 better exceptions#sims 4 modguard#twistedmexi#better exceptions
74 notes
·
View notes
Text
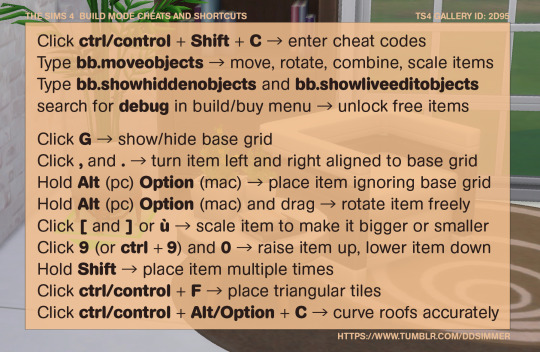
🔨 TS4 Build mode cheat codes & shortcuts guide 🔨
Cheat codes are simple but essential tool to build more freely in The Sims and create detailed and interesting or realistic lots and enhance the overall experience even when playing with base game only. Cheat codes are not CC, therefore your build will appear CC free in the gallery if you're not using any custom content.
Cheat codes and shortcuts guide below
To enter cheats you have to click ctrl/control + ⇧ Shift + C on your keyboard, this will open a typing space on the top left of your screen where you can enter the cheats listed below. To close it simply click ctrl+Shift+C again. For PS4 and Xbox: Press all four bumper buttons.
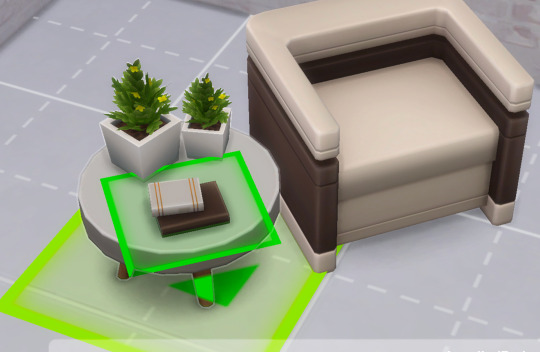
bb.moveobjects (type and hit send key) - if you enable only one cheat let it be this one. This is essential to freely place the objects, scale them, rotate them and combine them.

This means the cheat is up and running - this will not slow down your game.
Now you can do a number of things with your items: If you click , and . you can turn the item left and right keeping it aligned to the base grid. If you want to place the item freely, ignoring the base grid and the regular game rules - that prevent you from placing objects on top of each other or even too close to each other - pick the item up and hold Alt (pc) Option (mac). To rotate the item ignoring the grid, pick up the item, hold Alt (pc) Option (mac) and drag. These shortcuts will allow you to create more interesting and realistic layouts by angling and layering object, and it also allows you to clutter surfaces more.
You can also change the size of the objects by clicking [ and ] (or ù depending on the keyboard).
Another super useful thing you can do is to raise an item after you placed it by clicking 9 (or ctrl + 9 if you don't want the build mode camera to move) and to lower it back by clicking 0. You can do this with mirror as well to change where they sit on the wall, and most importantly you can place clutter where there are no slot by raising the item, clicking Alt/Option ad dragging it in place.
Now that you know how to arrange items in an interesting way, you need items to arrange! You can find a whole catalog of FREE items by using two other cheat codes.
bb.showhiddenobjects and bb.showliveeditobjects - typing these two codes (hit send key after each one) in the cheat bar allows you to use thousands of items that are already in your game but that you can't normally see. To find them you need to search for debug in build/buy menu, and a long list will show up! Have fun!


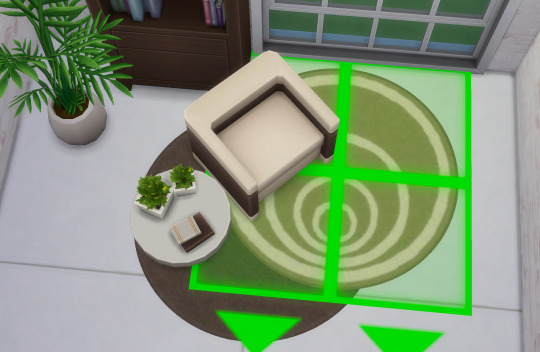
There are two other combinations that you need to know to really master your builds: Clicking ctrl/control + F on your keyboard while you're placing the flooring in your room allows you to place smaller triangular tiles (one quarter of a tile). This is super useful to create interesting patterns on your floors or to make pathways more interesting.

Roofs can be challenging to deal with, but they are also crucial to the final build and can really make a difference. There is a way to unlock more options to curve your roofs by selecting the roof and clicking ctrl/control + Alt/Option + C. You will immediately see more manipulations handles appear, experiment with them!


That's all for now, I hope this guide was useful for someone! Happy simming ✨ Dag Dag!
#sims 4#sims 4 simblr#sims 4 build#the sims 4#ts4#ts4 simblr#ts4 build#ts4 screenshots#ts4 base game#sims 4 base game#sims 4 cheats#sims 4 guide
69 notes
·
View notes
Text
Guide on making custom coat presets. (Allows for better quality custom coats)
31/08/2023: The guide has been updated to reflect a step I missed - when exporting your custom textures, make sure to select "generate mipmaps", the step is reflected in more detail under the appropriate part. Ctrl+f and enter "mipmaps" to skip to it.
16/10/2023: Updated to add more info re: generating hash ID's.
Okay, I decided to throw this together. There's some things I can't figure out still, but oh well, we're just getting through this as we go.
To clarify what I mean - this is not a stencil or a brush.
This will appear here:
To preface this guide though, I cannot, for the life of me, figure out how to make it appear as an individual option in-game, so, these are considered SWATCHES of the original coats.
Okay, with that out of the way.
Things you'll need:
Sims 4 Studio
GIMP
Probably Notepad, but it's optional on how easy it is for you to track things.
Guide:
These are the tools we'll be using in S4S.
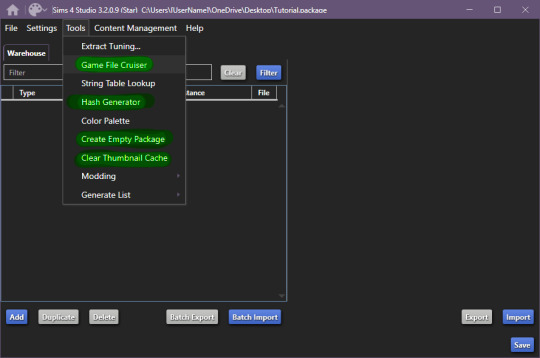
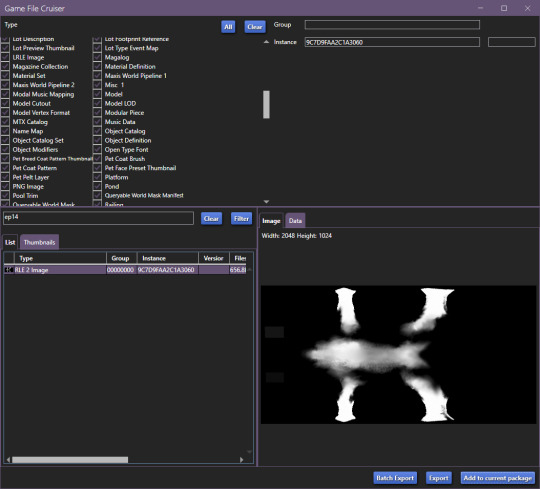
Start by creating your empty package, once you're done, open up Game File Cruiser:
before you do ANYTHING, make absolutely sure that the search bar below the file list has "EP14" in it, otherwise you will 100% end up editing a cat or a dog coat pattern and that's now what we want, at all.
Add the first horse file to your package
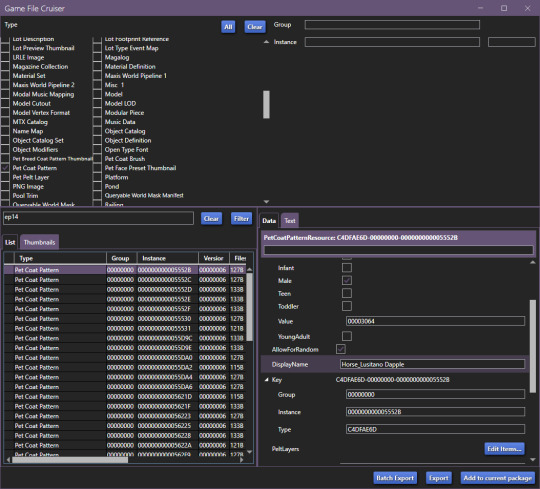
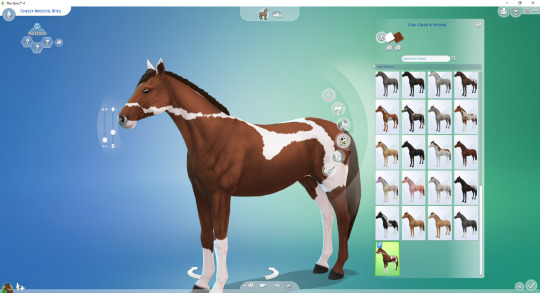
In our case, it's the Lusitano Dapple coat, don't worry, if you're making a breed-specific coat, you can change this later.
Now that it's been added to our package file, it should look like this:

We now have two options, I'll explain this to those who don't care about creating a game-generated thumbnail and want to find it easier.
To make your "test" thumbnail, you'll want to copy the instance ID of the file we just added to our package:
It should look like this, the instance ID should be in 2nd from the top search bar, then, select all and click filter (it just makes life easier than finding the specific file type).

These are the current, in-game CAS thumbnails. We'll add both of them to the package, they're for ponies and adult horses.
Now you can export these two pictures (They need to be saved as .png's), edit them as you'd like and then import them back into the package.
Now, you CAN add up to 5 different pelt layers that can be easily recoloured in-game, however, we'll only be working with two pelt layers in this tutorial, because it's a tutorial and you'll learn how to make more of them anyway.
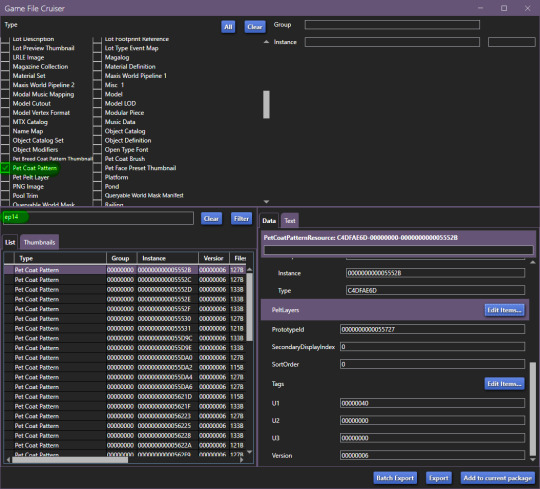
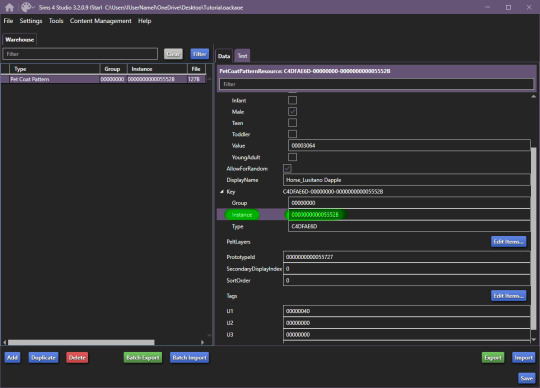
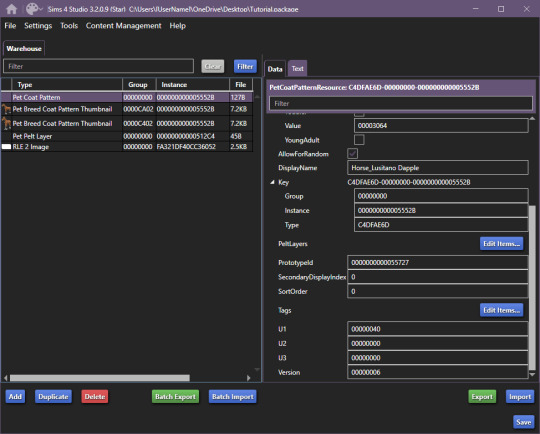
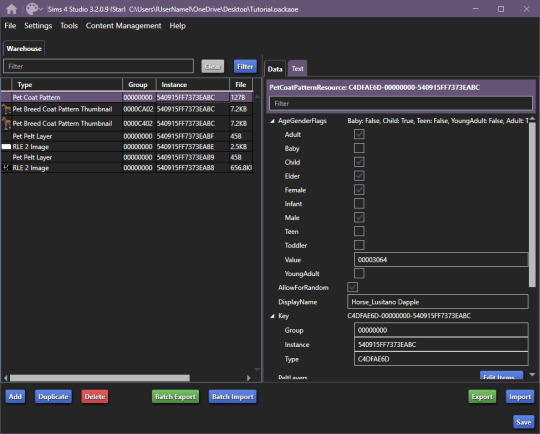
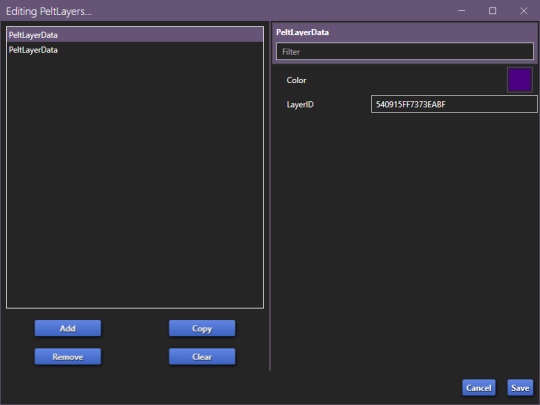
Click on "Pet Coat Pattern" and then look over the data:

From there, Click on "PetPeltLayers":
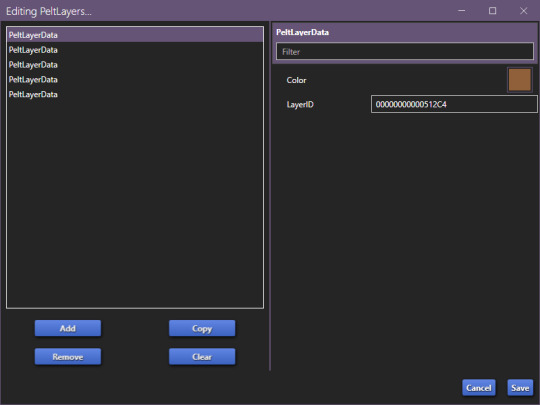
The first pelt layer is ALWAYS a solid colour, we'll begin by copying the LayerID (Instance ID) and going back to game file cruiser.
Just like previously, you should keep EP14 in the search bar and just use the instance ID bar to find things, as that's all we'll be doing.

Add the Pet Pelt Layer to your package file, then, copy the "texture key" from the Pet Pelt Layer:
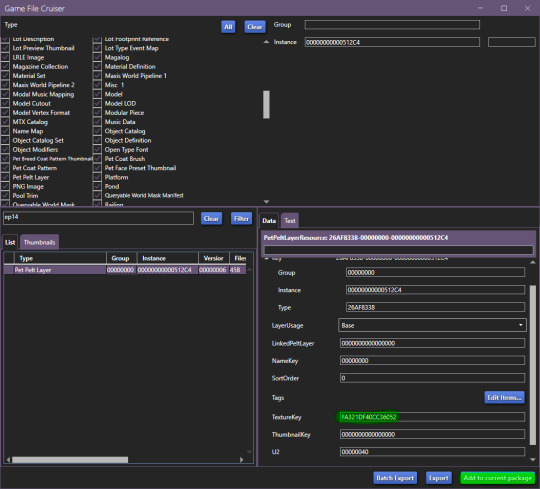
Then find the Texture Key:
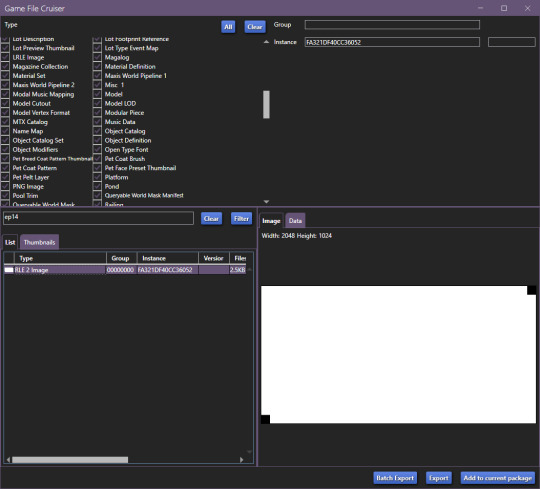
This is the solid colour layer, it HAS to be there as this is what will help you edit your base colour. Add this to your package file.
Now, our package file will look like this:
Unfortunately, we're not done, just yet, we'll want to grab at least the second PetPeltLayer:

Just like before, we're going to copy the ID and find the Pet Pelt Layer + the Texture for this layer:

Now, our package file will look like this:
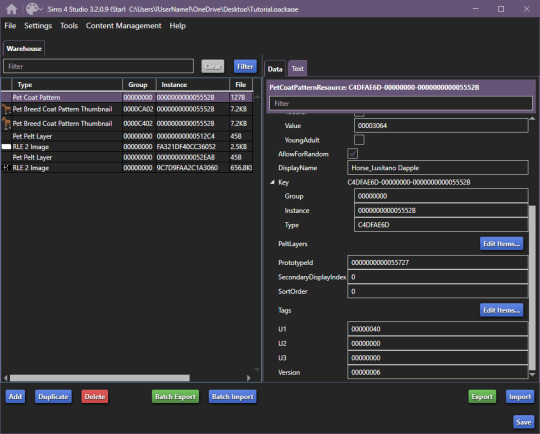
You can now go ahead and close the Game File Cruiser, we won't be using it anymore.
Right now, this is our package file and we need to do some cleanup first.
We'll be opening up the PetPeltLayers once more and we'll remove the last 3 entries:
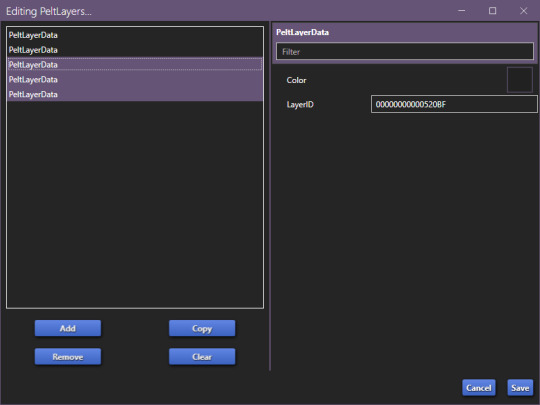
You should be left with only two entries, as that is what we'll be editing (leaving the other 3 will break the preset).
Now, we'll start generating new hash codes for everything:
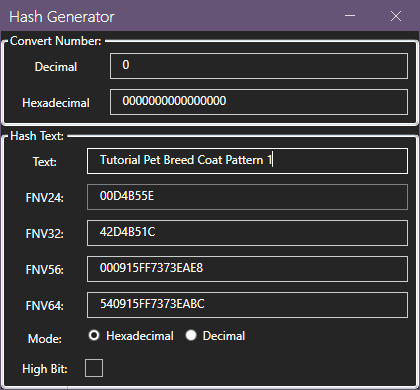
Edited 16/10/2023: When generating your hash ID's, please use your creator name ie.: "[YourCreatorName/Blogname]TutorialPetBreedCoatPattern11", this will give you a more unique hash code than hoping to be as descriptive as possible when generating the hashes (in this case instance ID's).
Thanks to Mizore Yukii for this advice, from Creator's Musings discord.
As in my previous guides, be descriptive with what you're typing there and then just change the last number.
The process is annoying and slow, so bear with the images, and follow along.
The TextureKey coloured in red is the 3rd ID you'll generate, it's what links the texture to the Pet Pelt Layer, which links it to the Pattern we're creating. (Sorry for the squished thumbnail, open it in your browser, I was running out of picture space for the rest of the tutorial lol).
And now we repeat this for the second Pet Pelt Layer.
Now, if you want the game to just generate the thumbnail for you, you can skip this step, if you want to make a custom thumbnail, then copy the Pet Coat Pattern Instance ID into the two Thumbnails we've added to our package file:
This is what the package file has to look like at this point.
Now is the relatively easy part, editing the second RLE 2 Image. We won't touch the base, because it's not necessary.
I recommend using the Horse Diffuse Map as a base when you're drawing your pattern. It'll be easier to see what you're doing. You can download it here: Horse Diffuse Map.
Remember, that your pattern HAS to be white, black space is IGNORED by the game and considered a "transparent" layer, so that you can see the layer beneath the you're working on.
This is my quick, and lazy test one I've made, I use a PNG of the Diffuse Map as a base and on a separate layer I draw with white coloured brushes:
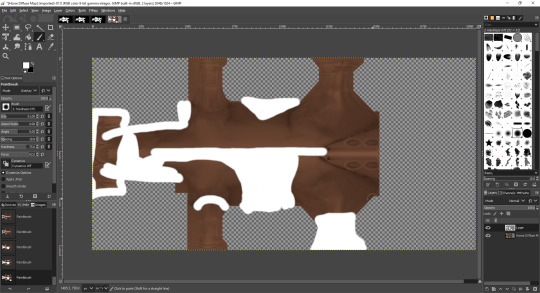
You may notice the very straight lines on the diffuse map - make sure to colour OVER them as if you do not, it will appear in-game because those are the seams where the mesh "meets"
Once you're satisfied with your pattern, you can go to export, just make sure that the white pattern is on a separate layer to the diffuse map. At this point you can add a black background underneath the white and export.
All you have to do is export the RLE2 Image you've edited as a DDS image in the L8 format and (edited 31/08/2023) select "Generate mipmaps" otherwise you will experience a glitch in-game where the coat disappears. You can leave the mipmap options as default, it should work correctly.
Then, we're going to import it into our package and save our package:
Remember to not touch the completely white base coat!
Now that this is over, we'll go back to Pet Coat Pattern and edit some settings.
The first three settings is what I recommend changing around. The first setting changes the breed, the second setting changes how the coat pattern is labeled and the third setting changes the colour it's tagged under.
Only change "TagValue" - it will give you a dropdown menu, don't change anything else. The TagValueNumber changes automatically, so don't worry about it.
EDITED TO ADD:
Additionally, don't forget to go into "PetPeltLayer" and change the colours, this is what will show up as "base" colour that you can change in-game. You can change them for every PeltLayerData file you have.
Now, save and go test it out in game:

Bada bing, bada boom we've got our "custom" coat preset.
If I've forgotten anything, let me know. This took me 2 hours to write, so forgive my typos. If anything is unclear, let me know. I ran into a struggle with the picture limit on Tumblr (found out that it's 30, I should move my guides somewhere else, but where?)
#The Sims 4#Sims 4#The Sims 4 Horses#The Sims 4 Pets#the sims 4 horse ranch#the sims 4 guide#sims 4 guide#sims 4 custom content guide#sims 4 horses guide
146 notes
·
View notes
Text
sims 4 troubleshooting guide
converted and edited from my reddit
are you experiencing game breaking glitches? heres some help!
ive been a simmer for quite some time now, and ive seen several posts on different platforms (this one included) about save files acting weird or bugging out for various reasons! there are several troubleshooting guides on the internet, two i will list below, this is a more time consuming fix that i suggest as a last resort.
also by me: sims 4 modding guide
by u/saveverris on reddit: a helpful guide to using and updating mods
☆☆☆
this was originally posted as a comment by me, ive tweaked it just a bit
PREFACE
this guide is for those who have tried updating their mods, but something still doesnt seem quite right! ive been there, done that! this is a fix that has worked for me and, honestly, it is a bit of a convoluted way to do it!
i want to preface this with this may not be the fix you need or are looking for and that a lot of these steps can be avoided if you simply want to try to update your mods and repair your game! a lot of times, doing those two things will fix it!
if something still isnt quite right, you can try this! tldr: you take your mods & saves out, delete your cache, repair your game, run your game, put your saves and mods back in. heres a step-by-step on how i personally do this
GUIDE STARTS HERE
if youre experiencing a homescreen that says "wwwww..." where the household name should be, try repairing/restoring a previous save before continuing with this guide. as far as im aware, that glitch means your household has been corrupted and therefore lost. the game cannot detect any sims in that household, hence the 'w' where the name should be. you may have to delete that save file, and start fresh.
if you are experiencing ui glitches besides the "www...", try updating all ui mods that you have. this includes but is not limited to: ui cheats, better build buy, more columns in cas, more traits in cas, expanded build buy, custom ui colours, etc.. if the issue persists, make sure your game is updated, sometimes an up-to-date mod and an out-of-date game can cause severe ui glitches. if the issue still persists; follow this guide.
if you are receiving a pop-up that says your game cannot run due to a specific file, remove the file. that error means the file is corrupted. if you recieve the error multiple times with multiple files, follow the steps listed below. if you continue to recieve the error after following the steps below, you will likely need to delete your cc and reinstall it. i understand this is frustrating and will likely take a long time, but sometimes it is unavoidable.
now onto the rest;
first, run your game. make a new save, make sure your current save isnt just a fluke. if it is just your current save, try recovering your save. if it isnt just your current save, do the following:
close your game entirely. even after closing the window, check your task manager to be sure its not open in the background
open your sims 4 game folder. your game path should be one of these:
C:\Users\[user]\Documents\Electronic Arts\The Sims 4\ (Windows)
Documents/Electronic Arts/The Sims 4/ (macOS)
once youve located your game folder, remove your entire save folder and mods folder. put these onto your desktop.
clear you cache (localthumbcache. this can be found directly in The Sims 4 folder. also delete the contents of the folder cachestr)
run your game with nothing in it. if the issue persists, close the game and open up whichever app you use to play it (ea, steam). if the issue doesnt persist, skip to the final steps.
to repair your game, open the app you use to run TS4 and repair your files. typically this is done by clicking the game in your library and clicking the three dots, an option to repair your game should be there- however its been awhile since ive done this so i may be wrong! look it up if you need to! also make sure the game is completely up-to-date. if you cannot repair your game, clear the cache of the app you run it with. if this does not work, uninstall and reinstall the app. if issues persist, check online fourms for help!
if you use the anadius version of the sims 4, make sure you repair and update your game using his launcher, too.
once your game is updated and repaired, run the game with no mods or saves in it once again.
if the game loads and runs fine up till here, create a new save and test it.
if the new save runs fine, add your saves back into the game. do not add back the folder, only the files within the folder. your game should automatically create a new saves folder, as well as a new mods folder.
test the saves, if they work as normal then youre good to move on to the final steps. if they do not work, i suggest doing one of these:
try to recover/restore the save. you can do this by restoring a previous version from the "load save" menu, clicking the floppy-disk will allow you to restore a previous version before the bug happened.
if you cant recover your save but can open the save file without any immediate crashes, try to open cas and save the sims to your gallery.
if neither of those options work, your save may be a lost cause. im so sorry!
if everythings worked up to this point then youre good to do these... final steps
before adding back your mods folder, update all of your mods! (unless you know which mod is causing the issue)
are your mods up to date already? check their compatibility with both the game and other mods! most mod download pages will have a list of what is/is not compatible.
did you install a mod that requires a pack you dont own/have installed? either remove the mod or install the pack! you can check here to see a list of every sims 4 ep/gp/etc. name and number!
did you install a mod that requires a different utility mod that you dont have? either remove said mod or add the utility you need! this often breaks a game! a lot of mods require lumpinous mood pack, i always recommend to check for that first!
readd your mods, use the new mods folder that should have been created! make sure your script files are directly in your mods folder or only one folder deep, no deeper! make sure any other file (package files) are no more than five folders deep. typically, modders will tell you how deep their files can go, but one folder deep is my general reccomendation!
test your game! if it works, then congrats!
if any issues continue to persist, you can send me a message or an ask with the trouble youre having and i will try to help. otherwise, you may need to contact ea. this guide should be able to fix all problems regarding the game, unless the problem stems from a bad mod that you keep readding or game troubles themselves. the sims 4 is very buggy, play it safe, backup your saves!
happy simming! heres a song you can listen to while you troubleshoot!
#sims 4 trouble shooting#sims 4 troubleshoot#sims 4 guide#sims2k troubleshooting guide#sims2k sims 4 troubleshooting guide#the sims 4#simblr#simblur#ts4 simblr#ts4 simblur#simmer#queer simmer#ts4 simmer#sims#the sims#sims 4#the sims four#sims four#simblog#ts4 simblog#the sims 4 simblog#simblogger#the sims 4 bugs#ts4 bugs#Spotify
3 notes
·
View notes
Note
Hi Melsie, I have admired your BACC posts for some time, so much dedication! I'm on year 5 of my BACC save, and just wondering how you manage the growing number of households you have on rotation? At some point do your decide to 'retire' a household from your gameplay, do you reach a point where you think ok that's enough for now?
Hi there! Glad to know I inspired you in some way and you enjoy my content! I'm gonna guess this is for Sims 4, 'cause I got this ask on my main blog. If you play Sims 2, I'm sure this will still help. LOL
So I've never actually gotten to a point where I was overwhelmed by the number, if anything I think my problem is not having enough sims and getting bored of the same old, same old. 🤣 I love the idea of having A LOT of sims running around, causing drama, getting intertwined in each others stories, etc. The more, the merrier!
I think the only way I'd really do population control is if I no longer had lots to place my sims on. At which point, there'd probably be a devastating fire and sims (I'd roll a dice to see which ones, that way I don't just get rid of my least favorite sims) would perish... ☠
If you really don't want to sacrifice some sims for the sake of your sanity, another way is to put sims on birth control/making them unable to get pregnant for a time. You can roll a dice for that too.
I know in Sims 2 some people use aspirations to determine how many babies the sims have. For example, a Family sim might be allowed 4 kids, and a Romance sim might only be allowed 1. You could do something similar for Sims 4, using their traits as a guide.
But yeah, my way of dealing with too many sims (or having a particular sim I don't like playing anymore) would be a fire or some other unfortunate event...
12 notes
·
View notes
Photo
How To Edit Townies In Sims 4
Ever cringe at your Sims 4 townies' wild fashion choices? From socks and sandals to chicken suits, they can sure stand out. Fear not – there's a way to give them the style upgrade they deserve! Want to learn how? Dive into our guide and find out how to customize townies your way. Check it out and let us know your thoughts! Read More At MustHaveMods.com
#ts4#sims 4#the sims 4#sims#the sims#must have mods#best sims 4 mods#ts 4 mods#the sims 4 mods#ts4 mods#sims 4 townies#the sims 4 townies#edit townies sims 4#sims 4 edit townies#sims 4 customization#the sims 4 create a sim#sims 4 fashion#sims 4 mods 2023#sims 4 makeovers#sims 4 gameplay#sims 4 guide#sims 4 tips and tricks
4 notes
·
View notes
Text
Sims 4 festivals Excel sheet
(Sims file share download) -no adfly bs
This is a simple excel sheet I put together showing the marked and unmarked festivals up to and including the life and death expansion. Careers/school/afterschool/organization events not included.
Example:

you do need excel for this- this is not a mod
#ts4#the sims 4#sims 4#sims 4 gameplay#the sims 4 tools#sims 4 guide#the sims 4 tracker#sims 4 tracker
2 notes
·
View notes
Text
How I Eradicated the Ugly Townie Invasion in The Sims 4 – The Ultimate Fix! | Complete MCC guide
Are ugly townies ruining your Sims 4 aesthetic? Say no more! In this video, I’m tackling the ultimate townie glow-up project to finally end the ugly townie plague once and for all. From random generated disasters to jaw-dropping makeovers, I’ll show you how to transform your game into a world full of gorgeous Sims.
Mods mentioned in this video:
MC Command Center by Deaderpool: https://deaderpool-mccc.com/
Srsly's Blank Save: https://www.curseforge.com/sims4/worlds/srslys-blank-save
Lots of love,
The Sim Side of Luca
#sims 4 guide#sims 4 stop random townies#sims 4#sims 4 stop townies#the sims 4#stop townies#the sims 4 better townies#sims 4 ugly townies#sims 4 mc command center#the sims 4 townies#sims 4 townie makeover#sims 4 random townies#sims 4 townies#how to prevent randomly generated outfits in sims 4#make your sims 4 townies dress the way you want to#get rid of randomly generated outfits in sims 4#sims 4 mods#how to get rid of randomly generated outfits in sims 4
2 notes
·
View notes
Text

How to live in any vacation world! Without mods!!
1) Set the lot to "Haunted House Residential" lot type.

2) Click on the lot and chose "Create New Household to Move In".

3) Since you're creating a household, you'll have to bulldoze the lot (don't worry you can cheat funds and place any lot you want later), and then press the check.

4) It will "glitch" out and stay on the "Moving With: [Sim]", but at this point your sim has already locked into the desired lot, so you can just press "x".

5) Enjoy your sim living there with free travel access to the vacation world! :)

The only "issue"problem" I found is that your sim can't visit the vacation world lots via the not currently playing a household world menu, but you can still visit the lots in the vacation world freely via the cell phone and other travel methods. (please message me if you find more problems, so I can update this post)
Other Questions and Comments:
How do I make the lot not haunted?
Sadly there is no way to completely remove the hauntings, but there are ways to reduce the paranormal activity. "Perform Ceremony" on the séance table and smashing any paranormal spawn items will reduce the hauntings. Here's a guide to taming a haunted house:
Can my sim access other lots in the same vacation world?
Yes! The game gives the haunted house the same permissions as a vacation rental, so your sim can travel to other lots in the world freely.
Can I return home whenever?
Of course! Pressing the "Go Home" button works the same as any other home lot.
#sims 4#ts4#sims 4 tips#sims 4 guide#ts4 simblr#the sims 4#sims 4 tutorial#selvadorada#granite falls
13 notes
·
View notes
Text
DLC download guide (EA App)
Having issues downloading the DLC you just bought ? The Download Button seems to not work? You redeemed a code, clicked download and nothing happened?
It's not your fault, and thankfully there's a really simple solution.
1.Open the EA-App
2.Navigate to Library and select the game you're having issues with.
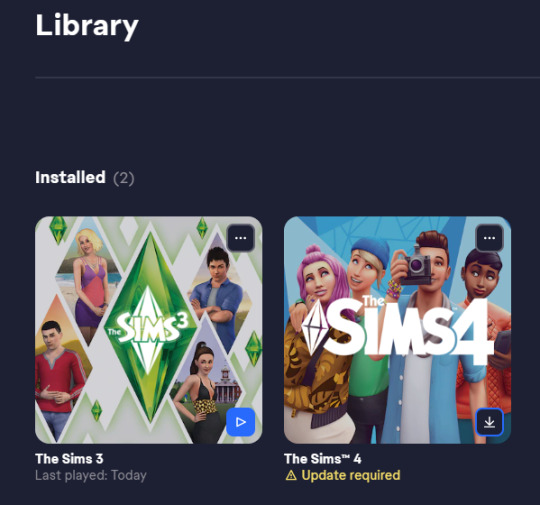
3.Click on the Manage Button and select Manage add-ons.
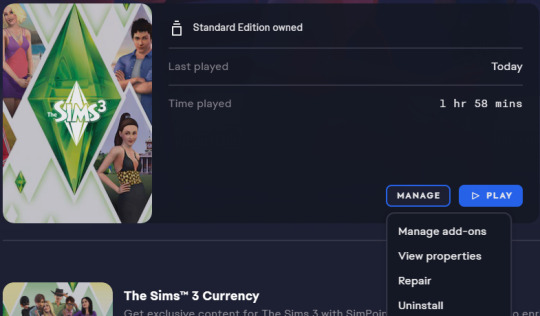
4.A new window should open showing you all the downloadable and installed DLCs. Now simply click the Download Button. If you have multiple DLC you want to install, you have to click Download on every DLC separately.
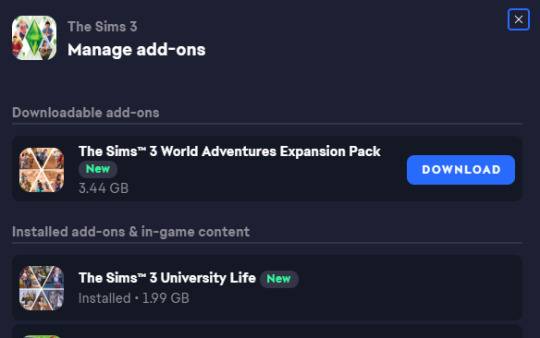
That's it, EA should now start to install the DLC.
You can also click the three dots on the right side of the game cover in your library and access manage addons through there.
Hopefully, this guide will help you or someone else now or in the future.
4 notes
·
View notes
Text
SIMS 4 CHARMER PERMANENT MOODLET GLITCH FIXED!
dude this bug has annoyed the shit out of me and is still in the game after 10 years in 2025 and there doesn't seem to be any fix online for so here is what worked for me:
first let's talk about what glitch I'm referring to. the glitch in question is when you age up a toddler with a negative trait moodlet (ie a sad charmer sim who wants attention) and as an adult they STILL have that negative moodlet!
how to fix it (its super easy!): first hit ctrl + shift + c and type in "testingcheats true" and hit enter (you should get a window that says cheats are now enabled)
step 2: type in "cas.fulleditmode" (no window will pop down now)
step 3: hold shift, click on your glitched sim, and "click modify in cas"
step 4 (now for the easy part): turn your sim back into a toddler and give them the trait causing the negative moodlet (ie charmer in our example). (please note that you can only do this while cas.fulleditmode is active so if your game crashes you'll have to do all of step 1 and 2 again)
step 5: return to gaming mode and do whatever you need to to remove the bad moodlet (hover over it to see whats causing it) in my case I needed an adult to talk to my charmer sim.
step 6: after the moodlet is gone you can re-age them up either through cas or through a cake it really doesn't matter. (just remember that the moodlet has to be GONE for them to not keep it as an adult/child/teen etc.
and thats it! I hope I explained this well enough, I remember being like 12 and having no idea how to do any cheats or fixes and this would've saved my ass a ton back then so I hope it helps yall too!
I will be reposting this onto to reddit etc
#sims 4#sims 4 guide#sims 4 glitches#sims 4 bugs#sims 4 legacy#simblr#sims community#sims content#sims challenge
0 notes
Text

mods aesthetic para mejorar los sims 4 | aesthetic mods for the sims 4
mostraré una guía de como hacer los sims 4 aesthetic, además les compartiré mi gshade preset + cas background.
· ver tutorial + preset download
#the sims 4#los sims 4#sims 4#the sims#sims#ts4#ts4 cc#simmer#simblr#ts4cc#tianaberrie#sims 4 aesthetic#sims 4 mods#sims 4 tutorial#sims 4 guide#mods sims 4#the sims 4 aesthetic#ts4 aesthetic#aesthetic sims#aesthetic#cottagecore#cottage aesthetic#aesthetic mods#gshade preset#reshade preset#sims 4 preset#top mods sims 4#ts4 mods
80 notes
·
View notes
Text
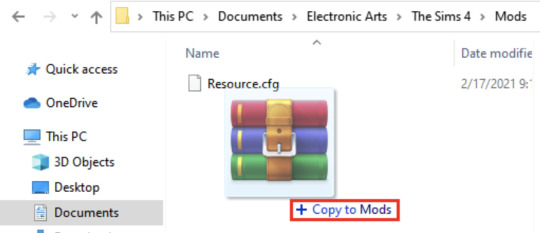
World Map Replacement EASY 4 step walkthrough (PC & Mac)
The Sims 4 Maps are definitely on the minimalistic side, but luckily for us some magic fairies (aka cc creators) made maps replacements that we can freely use.
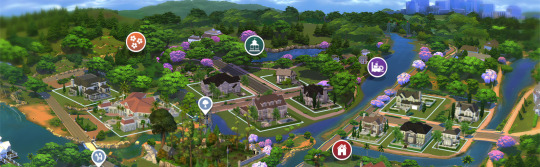
My personal favorite & the one you see featured on this blog, creator 20th Century Plumbob, made for us some amazing map replacements that are mindful of the actual environment features we have in game, and gifts us with a way more immersive experience. The best thing is that this creator keeps updating the maps, so if you have many Sims packs and want consistency you can have it!
Installing them is super super simple, here's what you have to do:
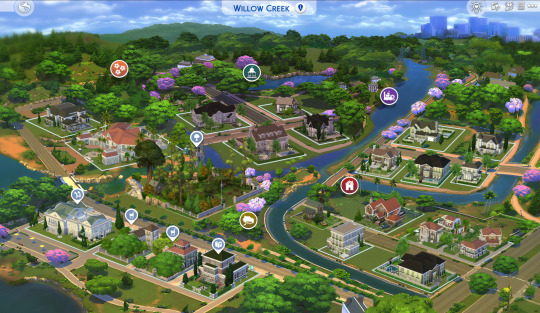
1 - Download the desired world map (here's the basegame ones: Willow Creek | Newcrest | Oasis Spring )
2 - Find the ".package" file in your download folder. These files can't and shouldn't be unzipped.

3 - Locate the Mods folder [ Documents/Electronic Arts/The Sims 4/Mods ] Copy the files inside the Mods folder.
on PC using File Explorer
on MAC using Finder
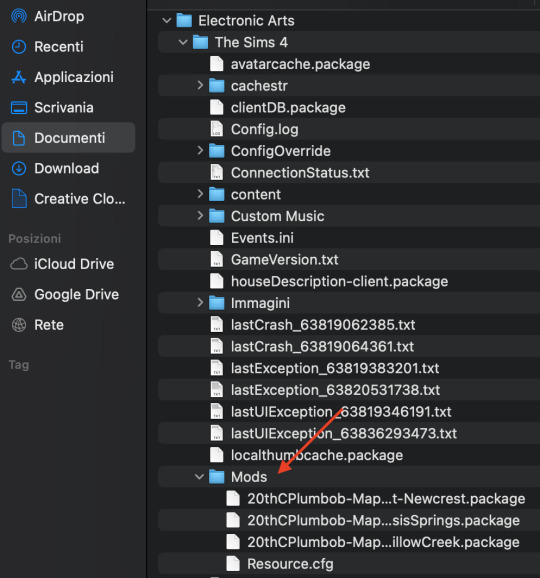
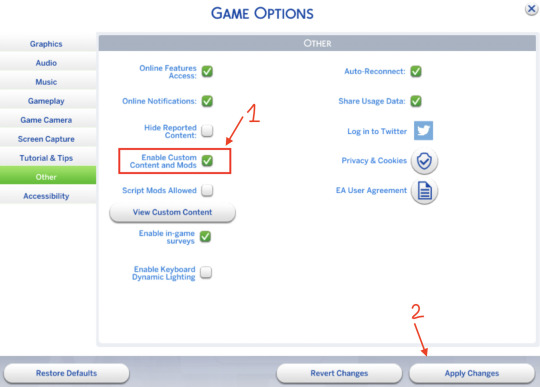
4 - Open your game and enable custom content. [ Game options/Other/Enable Custom Content and Mods ] Restart the game if necessary You're done!
Another honorable mention - that also includes all worlds - are Dershayan Fan Art maps, that are perfect for more aesthetic oriented gameplays and also features some season-specific map replacements. https://dershayan.de/mods-cc/fanart-maps/ https://www.patreon.com/dershayan
☆ Happy simming ☆ Dag Dag
#sims 4#sism 4 cc#sims 4 simblr#sims 4 build#the sims 4#ts4#ts4 simblr#ts4 build#ts4 screenshots#ts4 base game#sims 4 base game#sims 4 cheats#sims 4 guide#sims 4 map replacement
36 notes
·
View notes