#sims3 tutorial
Explore tagged Tumblr posts
Visit Tumblr Blog
Explore Tumblr blogs with no restrictions, modern design and the best experience.
Last Seen Tumblr Blogs


Fun Fact
Tumblr was named as a finalist in Lead411’s New York City Hot 125 in Aug 2010.
Text
How to throw a fancy dinner party in The Sims 3
You will need @flotheory's new dinner mod, download it here. Depending on what you want, choose either
Version 1: limited to 8 sims having dinner and sims will finish what they are doing before going to dinner -> best for family gameplay when you only want your active family to have dinner together
or Version 2: more than 8 sims can have dinner and sims will stop what they are doing and proceed to their chair once you direct them to do so -> best if you also want inactive sims as guests at your dinner party
Step 1: Assign each sim a chair
Click on the chair
Select "Join dinner…"
Select the sim you want to sit in this chair
Repeat for all chairs/sims.
Sims will now proceed to their respective chairs and sit down at the dinner table:

Step 2: Get them to eat dinner together
If you're doing this with more than one table, pause your game!
You will have to repeat these steps for each table! Do not switch to a different table before you have done them all!
Place the group meal in the middle of the table
Click on the group meal
Select "Serve for dinner…"
Click on the table
Select "Eat dinner together…"
Select the sims sitting at this table
Click OK
Without un-pausing the game proceed to the next table and repeat for every table.


Once all tables have been served their dinner and the sims have been directed to dine:

Press play and watch them all eat at the same time!

Additional tips:
I found it is best to place the group meals on the table after all sims have been seated. If you place them before, you run the risk of a hungry sim grabbing a plate and blocking one of the chairs.
Once all sims are seated at the dinner table you can leave them sitting and just chatting for a little bit, but don't wait too long or they will get up again.
If you want more than 8 sims to dine together, you will need either a custom table seating more than 8 sims (don't know if they even exist…?) or you will need to place several tables. If you want to push them together to make a bigger table, use the cheat "moveobjects on". Take care not to push the tables into each other, or sims may not have enough room to sit down. It's best to leave a small gap.
If you want several tables to eat the same food, either prepare the same group meal for each table or use icarus_allsorts mod "Cook with any ingredient" in order to make a group meal with up to 16 servings. When serving several tables from the same group meal you will have to move the group meal to the table you want to serve before repeating step 2!
387 notes
·
View notes
Text
youtube
in case this can help anyone trying to learn how to decimate when converting sims 4 cc to the sims 3 ❤
129 notes
·
View notes
Text
Using NRaas Master Controller's Filters, Skill Stamps and Hot Keys - Part 2
Skill Stamps and Hot Keys
This is part 2 of my NRaas Master Controller tutorial on how I use filters, skill stamps and hot keys! (Tumblr wouldn't let me have my fun and use more than 30 images on one post, so 2 parts it is 🤨)
See also:
Using NRaas Master Controller's Filters, Skill Stamps and Hot Keys - Part 1: Filters
Tutorial under the header!

Mods needed for Filters, Skill Stamps and Hot Keys to show up:
Master Controller v.135
Master Controller Cheats v.134+
(9th Feb 2025 - desiree-uk correction: Additional mods needed for filters and door-locking system (my apologies! 😌) GoHere v.45 Tagger v.5
Skill Stamps:
I use skill stamps to add a whole bunch of skills to a single sim or sims in bulk!
When adding a newly created sim to your town, they may not have any skills yet until you play them, but a skill stamp can quickly add some skills to them as if they were already played for a while.
MC Cheats Interaction: Skill Stamp> Add New Stamp
Allows the user to define a skill set to apply during "Advanced \ Skill Stamp". Once added, selecting one from the listing will allow you to specify the levels for each skill.
I want some sims to be able to have some basic skills such as cooking.
Click on Town Hall/Computer>NRaas>Settings> Skill Stamp
Add New Stamp: name the skill stamp (e.g Basic Skills).


The skill stamp is listed. Click on it and set the cooking level to whatever you want it to be. I have both the regular cooking skill and the hidden child-skill level, just because. I don't know. 😄
I maxed out the child skill to 3 and set the regular skill to 1.

I've set other skill stamps such as ones for artistic sims (painting, photography, writing) and outdoor sims (athletic, waterskiing, gardening, scuba diving, snowboarding, diving, windsurfing)
I also set one for sims who I want to be able to drive! We now have the 'Sims Need Driving Lessons' mod by the awesome Phoebejaysims! All sims (except NPCS) can't drive until they've reached the maximum level of the driving skill.
Of course you'd want some sims to be able to drive in an already established town, right?
I want my adults and elders to at least have the driving skill, even if some don't have a car yet.
Set a skill stamp for driving:
Click on Town Hall/Computer>NRaas>Settings>Skill Stamp
Name the skill to something driving related, e.g Sims With Driving Licence.
Click on the 'Driving' skill.
Max it out to 3.


Adding skill stamps to a sim with no skills:

Click on a single sim: NRaas>MC>Advanced>Skill Stamp


You see the list of my skill stamps. When I click on each one, all the skills under the stamps will be added to the sim all at once (you'll see the notices that appear in the top right hand corner pop up notifying you the sims have the skills.)
Check their skill panel to see all their added skills. The driving skill is hidden, so it won't show on the panel, but you can check the sim has it by checking their skill levels in Sim>MC>Advanced>Skill Level. It should show 'Driving: 3'
To add the skill stamp to multiple adults and elders, I'll use the filter I made earlier in Part 1.
Click on Town Hall/Computer>Sim>Advanced>Skill Stamp
The filter 'AGE: Adults/Elders' is listed.


Click on it to see a list of all the adult and elder sims.
From the list you can select some of the sims who you want to be able to drive or scroll to the top and click 'All'.

The Skill Stamp list will pop up - choose the 'Sims with driving licence' skill stamp. The skill stamp will be applied. As stated before, you won't see the hidden skill in the sims panel, but they'll be able to drive. You can of course check their skill level via MC>Sims>Advanced>Skill Level.
While you're at it, you can edit some of the selected sims driving skill levels according to whether you want them to do a driving test, theory test or have their skill maxed out so they can drive straightaway when you give them a car...
PJsims mod interactions notes:
If they are level -1 or 0, sims can first do their theory test which will increase driving skill to level 1.
Once they are level 2 in driving, they can do their driving test which, if passed, will automatically max out their driving skill.
Now you can make and add as many skill stamps to any single sim or multiple sims in a filter.
~~~~~~~~~~~~~~~~~~~~~~~~~~~~~~~~~~~~~~~~~~~~~~~~~~~~~
Hot Keys:
MC Interaction: Hot Keys
Allows the user to specify which interactions are to be shown directly under the "NRaas" menu
You can add any MC interaction to the uppermost level of the NRaas menu when you click on a sim, household or terrain as short-cuts, especially your most often-used interactions.
I added the 'skill stamp' and other interactions as hot keys so I can easily edit a sim when I click on one.
Click on Town Hall/Computer>Settings>Hot Keys

I added:
* Change Autonomy
* Reset Sim
* Skill Level
* Skill Stamp
Make sure 'True' is next to the interactions you want to see in the NRaas menu:

Click on a sim or the terrain and you'll hopefully see all your created hot keys.
See my screenshot - all 4 are there!

With the skill interactions you can quickly and easily set a sims skill level or add a skill stamp to them when you click on the sim in less clicks than clicking on multiple dialog boxes.
The other two are self explanatory, turn on/off a sim's autonomy and reset a sim.
Note: The more hot keys you add, the slower the pie menu will take to pop up, so keep that in mind.
If you still don't want to click so many times in the menu to find your interactions, you can use Arro's UI Tweaks mod (currently in testing, soon to be released - it's an excellent mod, I highly recommend it! 👍🏾) You can search the menu by clicking on the magnifying glass icon on the menu or press the 'F' key and type the interaction you want, using a full or partial word!


That's it! That's how I use filters, skill stamps and hotkeys. It will become second nature the more you use them and they can be as easy or as complex as you want them.
If you use them already, how do you set them up and in what scenarios? Share in the comments or let me know if I can add or explain anything! :)
Click for part 1:
Using NRaas Master Controller's Filters, Skill Stamps and Hot Keys - Part 1: Filters
#ts3 mod info#ts3 test gameplay#ts3 gameplay#nraas#phoebejaysims#arro#ts3 tutorial#sims3#ts3#ts3 mod
156 notes
·
View notes
Text
How to convert Sims 4 3D CAS Rooms to Sims 3

Disclaimer: If you’re not familiar with Blender/TSRW/UVs then this tutorial may not be for you. If you don’t have Sims 4 Studio which needs the Sims 4 base game (or don’t know how to extract the meshes without it) this tutorial may not be for you. Honestly it’s pretty straight forward, but there’s a lot of trial and error and going in game and out of game checking placement, etc. I use Blender 4.1 for this, but you should still be able to do the same things in the older versions. I'm trying to make this as easy as possible. I’m here to answer any questions though 💕 Tutorial below
Things you’ll need:
Blender (whatever version you prefer)
Sims 4 Studio
TSRW ( I use version 2.0.86)
My Christmas CAS Room here
My TSRW work file here
Tutorial:
Find a Sims 4 CAS room that you like and open it up in Sims4Studio. This is the one I'll be using for the tutorial.

In the Texture tab, export the textures. The only textures that matter are the first 3 diffuse. Go to the Meshes tab and export the mesh, it will save as a .blend file. After that you can close out of Sims4Studio.


Open my Christmas CAS Room in TSRW. You'll get this message. Hit ignore and don't send. We only need this file as a reference to resize the SIms 4 CAS room. Export the mesh as an obj, name it whatever you like. You can close TSRW for now.

Open Blender and open the .blend file you exported from Sims4Studio. Make sure to delete studio_mesh_0 as it's just the shadow map and we don't need that. This is what mine looks like after fixing the textures.

Then import the wavefront obj you just exported from TSRW. Again we're just using this as a size reference.
This is what it looks like after I added the obj. I scaled, moved, and rotated the room to match up as close as I could with my reference mesh. When you have it lined up to your liking you can delete the reference mesh. I usually import the sims 3 body to see where my sim would be in CAS as well so feel free to do that too.

Now we have to separate the objects that use transparency in the scene to their own group. The transparent objects will always be located on studio_mesh_1. I usually do this in UV mode. Make sure UV Sync Selection is on. Where the red arrow is, that's the UV Selection button. It's blue so that means its on.

Tip: If you're using the same Blender version I am (I'm not sure if the older versions below Blender 3.0 do this) you can disconnect the alpha in shader editor and then you can easily see what uses transparency because it has a black background like the plants. Don't worry about the one outside the window as that's on the backdrop image and doesn't show in CAS.
Important: Also, make sure you delete the back of the mirror frame or it will show through the mirror in game. I usually select it in the UV editor as well and delete it.

After selecting all the objects that use transparency, I go to the 3D viewport window and press P, then selection. Now they're on their own layer as you can see. That's a very important step so please don't miss it.

Sims 4 CAS Rooms don't have a closed room like ts3 and if you don't add walls/ceiling with planes you'll be able to see that it in CAS. You can do this in any way you're comfortable with. If you don't understand how to do it feel free to ask me. For this tutorial I will not be doing this perfectly lol I've done enough rooms and I'm just trying to teach here 😩

Okay now last is renaming groups to import into TSRW. Make sure it's in this exact order and uses the exact group numbers.
Group 0 - Mirror
Group 1 - Windows/Curtains
Group 2 - View outside the window
Group 3 - Walls
Group 4 - Objects with transparency
Depending on the CAS Room you convert, yours may not have a mirror you know. You can delete groups in TSRW, experiment, feel free to ask me questions as well.
After renaming the groups, select only the groups you renamed and export as an obj. Make sure that object groups is checked so that they can stay in groups.

Open TSRW and open the testroom_cas.wrk file.
After opening the file you'll see this exact room in this tutorial lol because I had to test some things first 😅

Import the CAS room you converted from ts4. You'll get these two messages. Click yes on the first and no on the second.
Disclaimer: Make sure you reduce polygon sizes or it won't import and give you an error


Import your textures (yours may be different than mine depends on the converter) but most have been the same that I've seen. Group 0 is the mirror it doesn't require a texture. Group 1 and Group 4 usually have the same texture.
Disclaimer: TSRW an be finnicky with textures sizes, I havent gotten any issues since using the 4GB patch, but just in case. Texture sizes from ts4 can run pretty big 4096x2048 even 8196x4096. I would resize to no bigger than 2048x1024 in my opinion, but whatever works for you.
After export to sims3pack or export as package file. Make sure you compress your files and you should be good to test your CAS room in game.

This is the finished product. Should look something like this or better lol considering this was quick 😅
If you would like to make your own from the original ts3 cas room, I would suggest watching this Youtube video (it's for TS4 but it still applies and is helpful) and the link to the original ts3 cas room is here. Since we can convert ts4 to ours you could probably just build your own and go from there as well.
Thanks to @mookymilksims for testing things for me and converting her own. If you would like to try this tutorial out and experiment with room placements using @boringbones Ultra wide CAS mod which changes the field of view in cas so that you can see the whole cas room, it is here. I didn't use it for mine, but that's only because I found out about it after from Mooky lol and I'm tired of converting them 😅 but feel free to ask me any questions if you need help 😊
#ts3#tutorial#sims3#I hope this helped#been procrastinating finishing this 🙃#cas room tutorial#sorry if it's long#tried to be thorough and make sure everything was correct#my tutorials
173 notes
·
View notes
Text
A small but very useful tutorial
written with the help of chatGPT
Why Use Upscayl?
Upscayl is a great tool for improving textures and reference images. Whether you are working on character skins, environmental textures, or UI elements, this program helps to:
Increase image resolution without losing quality
Reduce pixelation and enhance details
Improve the clarity of textures for a more realistic look
How I Use Upscayl (look at the photo)
Finding or Creating a Reference Image I start with an image that I want to enhance. This could be a low-resolution texture or a reference image for a new design.
Adding Noise for Testing To demonstrate how Upscayl improves images, I intentionally added noise to a mask texture. This allows me to compare the before and after results more clearly.
Processing the Image in Upscayl I import the noisy texture into Upscayl and choose an appropriate AI model. The program processes the image, enhancing its details and removing unwanted noise.
Examining the Results After running the texture through Upscayl, the difference is clear: the texture appears sharper, more detailed, and free of noise, making it more suitable for in-game use.
Enhancing Existing Game Textures
Apart from improving references, Upscayl is also useful for enhancing in-game textures, such as character skins. If a skin looks too blurry or low-resolution, running it through Upscayl can significantly improve its appearance without having to manually repaint details.


#sims3#sims#ts3#simblr#s3#sourlemonsimblr#sls#sims4#the sims#sims 2#tutorial#not sims#sims tutorial#cc tutorial
115 notes
·
View notes
Text
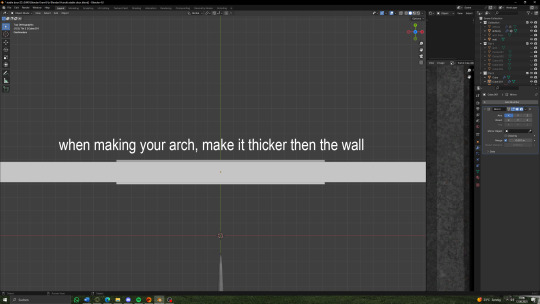
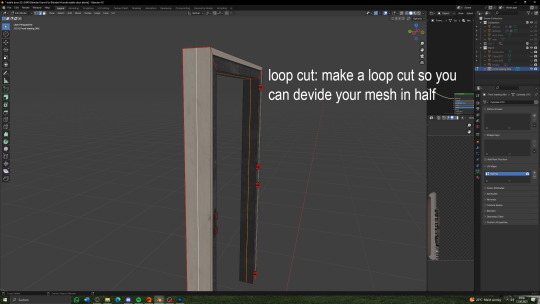
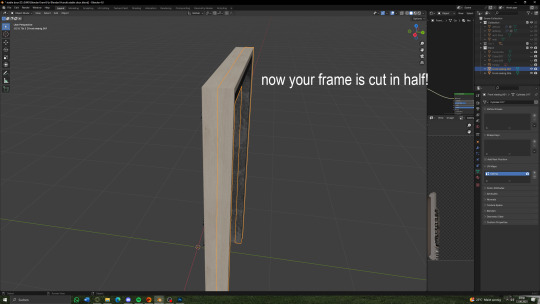
I am here to bless you all with a sims 3 cc tutorial! If you know me from discord, you'd know that I am a CC creator for the equestrian side of sims! Since there are only a hand full of tutorials for creating CC (and most of them are pretty old) I put together some for you! A while back I made a few on different things! Drop by at my website to have a look <3 There are tutorials on how to set up your game to play with horses (RPG) as well as tutorials for making CC objects (both in the older version of blender and for the newer). There are a few more so maybe have a look (they concetrate on the equestrian side of sims). On my webside you can also find my older CC!! Since there was some major cc theft I have decided to publish my cc on discord only, sorry! But maybe I'll be back publishing on my website <3 Okay, back to what I was going to show you-- I have put together on a tutorial for making arches! This should also work for windows, but you'll need to know how to make glass with that too! But, no worries, I will put together a tutorial for that too in the future! Now enjoy the tutorial but please kepp in mind that I am no professional in all of this and this just worked for me but it may not be the perfect way haha <3

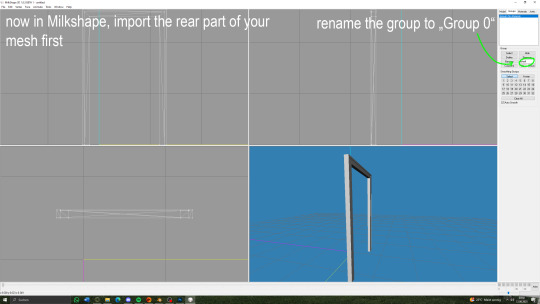
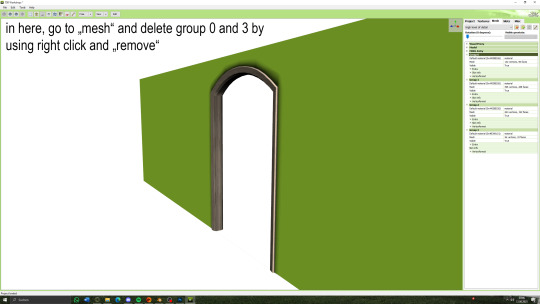
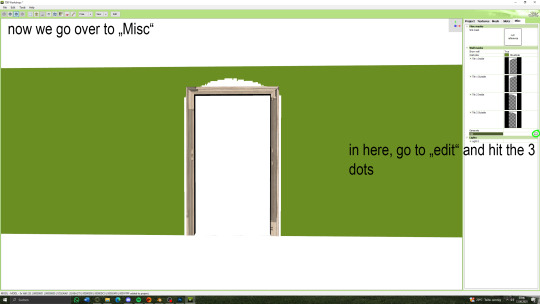
you can export the mesh in TSRW under „mesh“ and then the box with the red arrow. Open it yia Milkshaepe and export as .obj in blender


(there will be a seperate tutorial for the glass!)

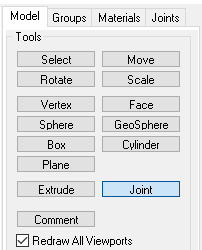
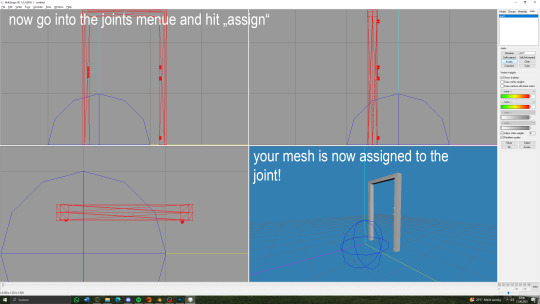
under "model" hit joint


you can now export your mesh to .wso!


62 notes
·
View notes
Text
SIMO tutorial in 4 steps


These outfit files could be used to dress NPCs with the help of a script mod such as @phoebejaysims's Boutique Mod
you need :
S3OC
S3PE and the Additional plugins "Grid" wrapper
SimOutfitter
85 notes
·
View notes
Text
Spreadsheet with tutorials/resources
Hello! I would like to introduce new spreadsheet, where you can find many tutorials. I'll gather them in one place, so you don't have to search a bunch of websites. It's now just a WIP. I'll slowly add more and more tutorials, resources that I'll find. Thanks to all amazing creators who decided to share these tutorials with us. I hope it's okay to collect them in one document! If you have a problem with that, let me know, then I'm going to delete your tutorial from the document! I hope you'll enjoy! ـــــــــــــــــﮩ٨ـ❤️️
Also, don't mind me for adding a tab with my sims/edits/works. I wanted to create something aesthetic...
𓆩💗𓆪 <-- link
26 notes
·
View notes
Text
Chapter One - Intro to CAW functions is live on my Patreon, available to all members of my Patreon. Membership is FREE.
#sims3#sims 3 gameplay#ts3 caw#sims 3 caw#sims 3 tutorial#sims3cawtutorial#ts3cawtutorial#sims 3 simblr#simblr
10 notes
·
View notes
Text
How to Generate Mask with Blender
A quick way to help TS3 creators to arrange the mask with immediate result so they don't have to adjust everything back and forth. Especially useful with mesh of details or complicated structures.
Demo with both Blender 2.78 & 2.90
Please be noted: This video tutorial is not a step by step one. It will only show you how to use the material to generate the mask for recolorable obj. Basically it's similar to the process of baking multiplier with blender, only this time, we bake the "material" (diffuse). I will not introduce or explain RBG mask and how to bake multiplier, or even how to make your cc recolorable in the video.
For the color materials, you can download mine or create on your own. Just make sure the colors are correct.
>>My Mask Group
It's been ages since I release anything. Besides, the video was recorded before my latest hiatus. Please let me know if there's anything wrong.
107 notes
·
View notes
Text
youtube
Será que achei um mod melhor que o CC Magic??
Oi oi oi, muito bom dia, boa tarde, boa noite!
Se você acha que já encontrou o melhor mod do mundo para organizar seus mods no The Sims 3 quando começou a usar o CC Magic e que nada poderia ser mais game changer, prepare-se para uma surpresa! Hoje, vou apresentar o Sims 3 Mod Organizer – um mod que pode revolucionar ainda mais a forma como você gerencia seus conteúdos personalizados, potencializando a performance do seu jogo, identificando conflitos automaticamente e facilitando a compactação dos arquivos.
Neste artigo, vamos explorar em detalhes como instalar, configurar e usar esse mod incrível. Além disso, vou te mostrar como integrá-lo como CC Magic. E claro, não se esqueça de conferir o vídeo que acompanha este tutorial, com mais dicas visuais e práticas. AQUI
Então, se você está pronto para levar sua experiência no The Sims 3 a um novo patamar, venha comigo e descubra se o Sims 3 Mod Organizer é realmente o melhor que já vimos e tenho depoimentos para provar!

Instalando o Sims 3 Mod Organizer
Acesse a página do mod no Mod The Sims AQUI
Navegue até a aba de downloads
Faça o download do arquivo "s3mo v1.0.0.zip"

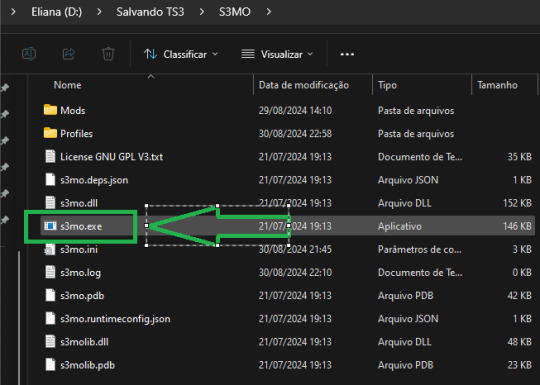
4. Após o download, extraia o arquivo .exe para uma pasta de sua escolha. Podendo ser até em um drive externo. Recomendo criar uma nova pasta dedicada exclusivamente a mods de suporte e, dentro dela, criar uma subpasta chamada "S3MO". Em seguida, extraia todos os arquivos para essa subpasta.

Executando a Primeira Vez
Abra o arquivo s3mo.exe na pasta extraída
Ao executar o mod pela primeira vez, será necessário indicar o local do executável do The Sims 3 (TS3W.exe). Para isso, navegue até a pasta onde o jogo está instalado, que geralmente é:
C:\Arquivos de Programas\EA Games\The Sims 3\Game\Bin.
Configurações Iniciais
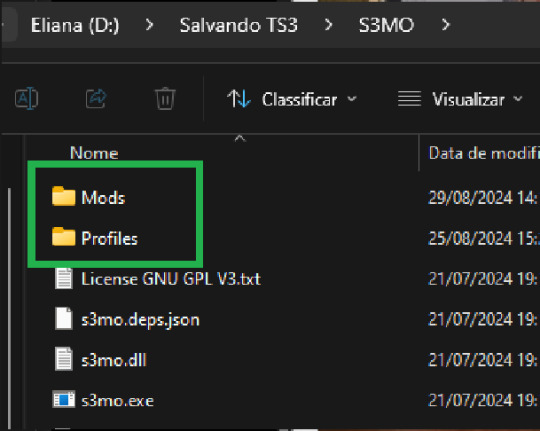
Na primeira execução do Sims 3 Mod Organizer, o mod criará automaticamente duas pastas importantes dentro do diretório onde foi extraído:
Pasta Mods: Esta é a pasta onde todos os seus mods e conteúdos personalizados serão instalados e organizados.
Pasta Profiles: Aqui serão armazenadas as informações dos perfis que você criar, permitindo que você tenha diferentes configurações de mods para diferentes estilos de jogo.
Essas pastas ajudam a manter tudo organizado e facilitam o gerenciamento dos seus conteúdos personalizados no The Sims 3.
Entendendo a Interface do Mod Organizer
A interface do Mod Organizer é simples e prática, com vários botões que você pode usar para gerenciar seus mods:

Info: Botão para acessar informações adicionais sobre o mod.
Install: Não é necessário para o uso diário. Serve caso queira instalar conteúdos que você ainda não colocou diretamente
Settings: Onde você ajusta as preferências do mod.
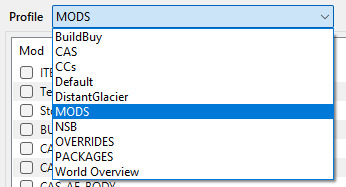
Profiles: Permite criar diferentes perfis de mods, como "Overrides", "Packages", "CAS", etc.
Folder: Possibilita abrir diretamente as pastas do jogo, de documentos e as pastas do mod
Clean: promove a limpeza dos caches e arquivos conforme configurado em Settings
Refresh: Atualiza a visualização das pastas.
Build: Esse botão é essencial, pois sempre que você fizer alterações, será necessário reconstruir sua pasta de mods.
Configurando o Mod Organizer
Configurações Básicas:
Acesse Settings ⚙️ e defina suas preferências
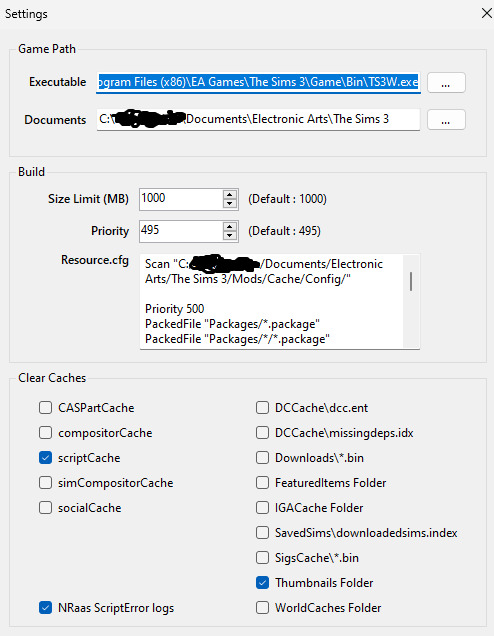
Build:
Size Limite: Tamanho máximo dos arquivos gerados. O padrão é 1000 MB (1 GB).
Priority: Prioridade dos arquivos compactados pelo mod. Por padrão, vem configurado em 495, o que significa que terá uma prioridade inferior às pastas Package e Overrides.
Clear Caches: selecione quais arquivos serão deletados pelo mod quando clicar no botão Clean.
ScriptCache: Recomendo deixar apenas o scriptcache selecionado, pois os caches ajudam o jogo a carregar mais rápido.
NRAAS Script Errors: Também pode ser uma boa ideia selecionar essa opção para remover erros de script específicos do NRAAS.
Use a imagem acima como referência para configurar suas preferências.
Organizando o Conteúdo Dentro do S3MO
Vamos deixar tudo organizadinho dentro do S3MO? 😊
Na pasta "Mods" criada pelo mod e localizada na pasta de instalação dele, você pode criar quantas pastas quiser para armazenar seus conteúdos personalizados. É aqui que você vai organizar seus arquivos, então é importante lembrar da regrinha: as pastas só podem ir um nível abaixo. Isso significa que você deve criar as pastas diretamente na pasta "principal "Mods" e não dentro de outras subpastas.

Ou seja:
👍S3MO\Mods\Sua Pasta
❌S3MO\Mods\Sua Pasta\Subpasta ❌
Depois de criar todas as suas pastas, é só abrir o S3MO ou clicar em Refresh para atualizar. As pastinhas que você criou vão aparecer na área "Mods" na área de trabalho do mod.
Essas pastas são as que você vai associar aos seus perfis, mantendo tudo organizado e fácil de acessar conforme você personaliza o jogo.
Criando Perfis
Uma das funcionalidades mais legais do Sims 3 Mod Organizer é a capacidade de criar perfis personalizados para diferentes configurações de mods. Não há limites para a quantidade de perfis que você pode criar, então sinta-se à vontade para configurar quantos perfis desejar, de acordo com suas necessidades.
Como o próprio g0kur diz: "Different profiles for different mod setup".
Isso significa que você pode criar perfis específicos para cada objetivo que tiver no jogo, por exemplo:
Jogos Diferentes: Crie um perfil para cada desafio ou estilo de jogo, como "NSB" (Not So Berry) ou "Legacy". Assim, você pode habilitar apenas os mods necessários para cada um deles, mantendo seu jogo mais organizado e eficiente.
Mods Específicos: Você pode ter um perfil dedicado a mods de construção, outro para mods de gameplay, outro só para conteúdos personalizados, e assim por diante. Isso facilita o gerenciamento e a ativação de mods específicos conforme o que você pretende fazer em cada sessão de jogo.
A flexibilidade oferecida pelo Mod Organizer permite que você adapte sua experiência no The Sims 3 de maneira personalizada, garantindo que você tenha sempre o ambiente perfeito para o seu estilo de jogo.
Para criar novos perfis, clique no botão Profiles e, em seguida, em Add. Dê um nome ao seu perfil e clique em OK. Pronto! Agora, basta selecionar quais conteúdos serão associados a este perfil.

Associando conteúdos aos Perfis
No menu suspenso, escolha o perfil que você quer configurar.
Depois, é só selecionar as pastas de conteúdos que você quer associar a esse perfil. Isso significa que, toda vez que você estiver usando esse perfil e clicar em "Build", apenas os arquivos das pastas que você escolheu vão ser considerados para análise de conflitos e compactação.
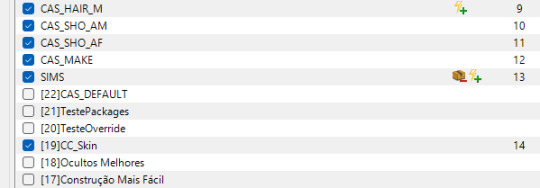
As pastas que estiverem com o quadradinho azul estão selecionadas para esse perfil, enquanto as outras não. Conforme você vai selecionando as pastas, o S3MO vai automaticamente atribuindo prioridades a elas.
Importante: As pastas que estão mais para baixo na lista têm uma prioridade maior sobre as que estão mais em cima. Ou seja, o que estiver mais embaixo vai sobrescrever o que está acima. Pense assim: o que está embaixo (com número de prioridade alto) sobrescreve o que está em cima (com número de prioridade baixo), e tudo vai fazer sentido. E faz mesmo! 😄
Identificando os conflitos
Aqui o negócio começa a ficar legal! Foi exatamente isso que me fez migrar totalmente para o S3MO: identificação de conflitos de uma maneira clara, visual e amigável.
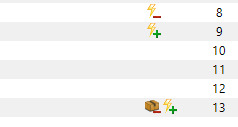
Raio com (+): Isso significa que este mod (ou pasta) está sobrescrevendo outro conteúdo neste perfil. Em outras palavras, o que estiver aqui vai "ganhar" a prioridade e ser usado no jogo.
Raio com (-): Esse símbolo indica que este mod (ou pasta) está sendo sobrescrito por outro conteúdo. Ou seja, ele "perde" a prioridade e não será usado.
Raio com (+/-): Este é um pouco mais complexo, pois significa que parte do conteúdo está sendo sobrescrita e outra parte está sobrescrevendo algo. Então, é um mix dos dois cenários acima.
Caixinha: Quando você vê uma caixinha, isso quer dizer que existe um conflito entre mods dentro da mesma pasta.
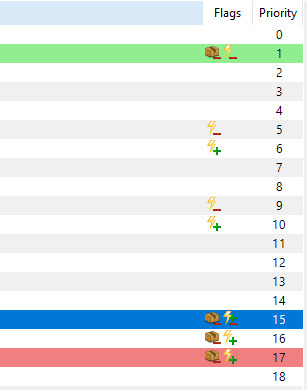
Além disso, quando você seleciona uma dessas linhas marcadas com conflito, o S3MO destaca outras linhas relacionadas, seguindo esta regra:
Vermelho: O mod ou conteúdo que está sobrescrevendo outro (ou seja, é o "vencedor" no conflito).
Verde: O mod ou conteúdo que está sendo sobrescrito (o "perdedor" no conflito).
Se você der um duplo clique na linha marcada com conflito, o S3MO abre uma tela específica para te ajudar a identificar os detalhes do conflito.
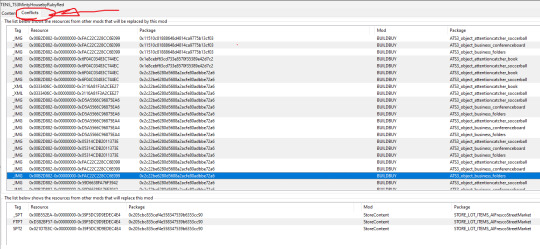
Nessa tela, a parte de cima mostra quais mods estão sendo sobrescritos, e a parte de baixo mostra por qual mod eles estão sendo sobrescritos.
Com essas ferramentas visuais, o S3MO torna muito mais fácil entender e resolver conflitos entre seus mods, garantindo que tudo funcione direitinho no seu jogo. É como ter um assistente pessoal que te alerta sobre qualquer problema e te dá as ferramentas para resolvê-lo rapidinho!
Particularmente, acho essa forma de mostrar os conflitos muito mais amigável que a forma que o Dashboard mostra isso 😅
Compactando TUDO! - Mods inclusive
Para compactar, é super simples: selecione o perfil que você quer e clique no botão "Build"🔨.
Todos os arquivos, mods e conteúdos personalizados vão ser compactados e salvos na pasta:
C:\My Documents\Electronic Arts\The Sims 3\Mods\ModBuilds\
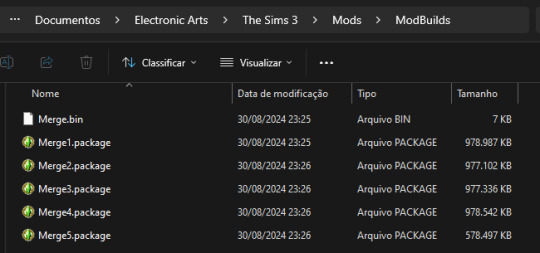
O S3MO cuida de tudo e divide os arquivos em quantos forem necessários, para garantir que nenhum deles ultrapasse o limite configurado (1000Mb). Prático, né?
Adicionando novos mods e Cps
Para adicionar novos conteúdos e mods, uma vez que já tenha conteúdo compactado, basta colocar o conteúdo que deseja adicionar na pasta correta em
Usando o Mod Organizer com CC Magic
Se você já utiliza o CC Magic e depende bastante da funcionalidade de Coleções desse mod, pode não ser interessante migrar completamente para o S3MO. Nesse caso, uma ótima alternativa é usar ambos os mods em conjunto.
Para que essa integração funcione corretamente, é essencial que, ao reconstruir o conteúdo do jogo, tanto o S3MO quanto o CC Magic gerem um arquivo Resource.cfg que permita ao jogo reconhecer e ler os arquivos compactados por ambos os mods.
Em outras palavras, o S3MO precisa incluir as informações do CC Magic, e o CC Magic deve conter as informações do S3MO no arquivo Resource.cfg. Dessa forma, você garante que o jogo funcione corretamente com as configurações de ambos os mods.
Informações a serem acrescentadas no S3MO
Clique no botão Settings.
Na área Build > Resource.cfg, inclua as seguintes linhas:
Scan "C:/My Documents/Electronic Arts/The Sims 3/Mods/Cache/Config/" Priority 500 PackedFile “Packages/*.package” PackedFile “Packages/*/*.package” PackedFile “Packages/*/*/*.package” PackedFile “Packages/*/*/*/*.package” PackedFile “Packages/*/*/*/*/*.package” Priority 500 PackedFile ../Collections/User/*.package
Informações a serem acrescentadas no CC Magic
Navegue até a aba Options.
Em Additional Resource.cfg Entries, inclua as seguintes linhas:
Priority 495 PackedFile "ModBuilds/*.package" Priority 500 PackedFile ../Collections/User/*.package
Pronto! Agora, seu jogo será capaz de ler os arquivos gerados por ambos os mods, bem como as Coleções criadas no CC Magic.
Considerações Finais
Depois de usar o CC Magic por um bom tempo, descobri que o S3MO faz um trabalho muito melhor para o que eu preciso. Aqui estão os principais motivos que me fizeram migrar de vez para o Sims 3 Mod Organizer:
Confiabilidade: Com o S3MO, tudo o que eu compacto aparece no jogo sem problema algum. Diferente do CC Magic, onde eu sempre acabava com conteúdos que não apareciam, mesmo estando habilitados.
Velocidade: O S3MO é bem mais rápido na hora de compactar os arquivos.
Gerenciamento de Conflitos: A interface do S3MO facilita muito a vida na hora de lidar com conflitos entre mods. Isso praticamente me fez abandonar o dashboard.
Perfis Personalizados: A possibilidade de criar perfis para diferentes configurações de mods é uma das coisas que mais gosto no S3MO. Isso me ajuda a manter tudo organizado e fácil de acessar, dependendo do tipo de jogo que eu quero jogar.
Organização e Gerenciamento: O S3MO torna a organização e o gerenciamento dos mods muito mais simples. Tudo fica no lugar certo, sem duplicatas, e meu jogo roda liso.
Esses foram os motivos que me fizeram deixar o CC Magic de lado e migrar de vez para o S3MO. Se você também está procurando uma solução mais completa e prática para gerenciar seus mods, recomendo fortemente dar uma chance ao S3MO. Pode ser o que você estava precisando para transformar sua experiência no The Sims 3!
Eu sei que existe pouquíssimo material referente a este mod, então, qualquer dúvida, pode deixar aqui, ou melhor ainda seria no comentário do meu vídeo, porque é mais fácil de eu ver kkk
Mas é isso, espero que tenha gostado.
Beijos
FUI!
#ts3 mods#the sims 3#ts3 tutorial#sims3 mod organizer#s3mo#melhor que cc magic#better than cc magic#Youtube
12 notes
·
View notes
Text
tutorial
손가락이 부러지는 메쉬 수정하기 Fix broken finger mesh 指が壊れるメッシュを修正する

もうずいぶん昔に友人が探してくれてブックマークしていたチュートリアルです。ポーズを使う時、ポーズを作ってテストする時に、角度をつけたはずの指が伸びたままになっていたりするのは洋服が原因なので(EA服にも指先に影響しているものはあります)指が壊れない洋服に替えてポーズを撮ります。私のポーズは共有することが多いのでやはり、サンプルとしても正しいポーズで撮影したいので、泣く泣く着せたい洋服を諦めることがあります😹
7 notes
·
View notes
Text
Tutorial #7: The Sims 1 / The Sims 3 / The Sims 4
Tutorial #7: Como Jogar em Modo Janela - #2 - The Sims 1 / The Sims 3 / The Sims 4
______________________________________________
Tutorial #7: Como Jogar em Modo Janela - #2 - The Sims 1 / The Sims 3 / The Sims 4:
-> Link do vídeo (Youtube): Tutorial #7 - The Sims 1 / The Sims 3 / The Sims 4
-> Link do vídeo (Dailymotion): Tutorial #7 - The Sims 1 / The Sims 3 / The Sims 4
______________________________________________
=> Link da Playlist (Youtube): Tutoriais - The Sims
=> Link da Playlist (Dailymotion): Tutoriais - The Sims
______________________________________________
-> Minhas Redes Sociais (Jéssica Dias - Games):
=> Blog
=> Youtube
=> Página no Facebook
=> Twitter
=> Instagram
=> Tumblr
=> Dailymotion
______________________________________________
#Downloads&Tutoriais #Tutorial #TutorialSims1 #TutorialSims3 #TutorialSims4 #TheSims1 #TS1 #Sims1 #TheSims3 #TS3 #Sims3 #TheSims4 #TS4 #Sims4
______________________________________________
#Downloads&Tutoriais#Tutorial#TutorialSims1#TutorialSims3#TutorialSims4#TheSims1#TS1#Sims1#TheSims3#TS3#Sims3#TheSims4#TS4#Sims4
4 notes
·
View notes
Text
DXVK Tips and Troubleshooting: Launching The Sims 3 with DXVK
A big thank you to @heldhram for additional information from his recent DXVK/Reshade tutorial! ◀ Depending on how you launch the game to play may affect how DXVK is working.
During my usage and testing of DXVK, I noticed substantial varying of committed and working memory usage and fps rates while monitoring my game with Resource Monitor, especially when launching the game with CCMagic or S3MO compared to launching from TS3W.exe/TS3.exe.
It seems DXVK doesn't work properly - or even at all - when the game is launched with CCM/S3MO instead of TS3W.exe/TS3.exe. I don't know if this is also the case using other launchers from EA/Steam/LD and misc launchers, but it might explain why some players using DXVK don't see any improvement using it.
DXVK injects itself into the game exe, so perhaps using launchers bypasses the injection. From extensive testing, I'm inclined to think this is the case.
Someone recently asked me how do we know DXVK is really working. A very good question! lol. I thought as long as the cache showed up in the bin folder it was working, but that was no guarantee it was injected every single time at startup. Until I saw Heldhram's excellent guide to using DXVK with Reshade DX9, I relied on my gaming instincts and dodgy eyesight to determine if it was. 🤭
Using the environment variable Heldhram referred to in his guide, a DXVK Hud is added to the upper left hand corner of your game screen to show it's injected and working, showing the DXVK version, the graphics card version and driver and fps.

This led me to look further into this and was happy to see that you could add an additional line to the DXVK config file to show this and other relevant information on the HUD such as DXVK version, fps, memory usage, gpu driver and more. So if you want to make sure that DXVK is actually injected, on the config file, add the info starting with:
dxvk.hud =
After '=', add what you want to see. So 'version' (without quotes) shows the DXVK version. dxvk.hud = version

You could just add the fps by adding 'fps' instead of 'version' if you want.

The DXVK Github page lists all the information you could add to the HUD. It accepts a comma-separated list for multiple options:
devinfo: Displays the name of the GPU and the driver version.
fps: Shows the current frame rate.
frametimes: Shows a frame time graph.
submissions: Shows the number of command buffers submitted per frame.
drawcalls: Shows the number of draw calls and render passes per frame.
pipelines: Shows the total number of graphics and compute pipelines.
descriptors: Shows the number of descriptor pools and descriptor sets.
memory: Shows the amount of device memory allocated and used.
allocations: Shows detailed memory chunk suballocation info.
gpuload: Shows estimated GPU load. May be inaccurate.
version: Shows DXVK version.
api: Shows the D3D feature level used by the application.
cs: Shows worker thread statistics.
compiler: Shows shader compiler activity
samplers: Shows the current number of sampler pairs used [D3D9 Only]
ffshaders: Shows the current number of shaders generated from fixed function state [D3D9 Only]
swvp: Shows whether or not the device is running in software vertex processing mode [D3D9 Only]
scale=x: Scales the HUD by a factor of x (e.g. 1.5)
opacity=y: Adjusts the HUD opacity by a factor of y (e.g. 0.5, 1.0 being fully opaque).
Additionally, DXVK_HUD=1 has the same effect as DXVK_HUD=devinfo,fps, and DXVK_HUD=full enables all available HUD elements.
desiree-uk notes: The site is for the latest version of DXVK, so it shows the line typed as 'DXVK_HUD=devinfo,fps' with underscore and no spaces, but this didn't work for me. If it also doesn't work for you, try it in lowercase like this: dxvk.hud = version Make sure there is a space before and after the '=' If adding multiple HUD options, seperate them by a comma such as: dxvk.hud = fps,memory,api,version
The page also shows some other useful information regarding DXVK and it's cache file, it's worth a read. (https://github.com/doitsujin/dxvk)
My config file previously showed the DXVK version but I changed it to only show fps. Whatever it shows, it's telling you DXVK is working! DXVK version:


DXVK FPS:

The HUD is quite noticeable, but it's not too obstructive if you keep the info small. It's only when you enable the full HUD using this line: dxvk.hud = full you'll see it takes up practically half the screen! 😄 Whatever is shown, you can still interact with the screen and sims queue.

So while testing this out I noticed that the HUD wasn't showing up on the screen when launching the game via CCM and S3MO but would always show when clicking TS3W.exe. The results were consistent, with DXVK showing that it was running via TS3W.exe, the commited memory was low and steady, the fps didn't drop and there was no lag or stuttereing. I could spend longer in CAS and in game altogether, longer in my older larger save games and the RAM didn't spike as much when saving the game. Launching via CCM/S3MO, the results were sporadic, very high RAM spikes, stuttering and fps rates jumping up and down. There wasn't much difference from DXVK not being installed at all in my opinion.
You can test this out yourself, first with whatever launcher you use to start your game and then without it, clicking TS3.exe or TS3W.exe, making sure the game is running as admin. See if the HUD shows up or not and keep an eye on the memory usage with Resource Monitor running and you'll see the difference. You can delete the line from the config if you really can't stand the sight of it, but you can be sure DXVK is working when you launch the game straight from it's exe and you see smooth, steady memory usage as you play. Give it a try and add in the comments if it works for you or not and which launcher you use! 😊 Other DXVK information:
Make TS3 Run Smoother with DXVK ◀ - by @criisolate How to Use DXVK with Sims 3 ◀ - guide from @nornities and @desiree-uk
How to run The Sims 3 with DXVK & Reshade (Direct3D 9.0c) ◀ - by @heldhram
DXVK - Github ◀
109 notes
·
View notes
Text
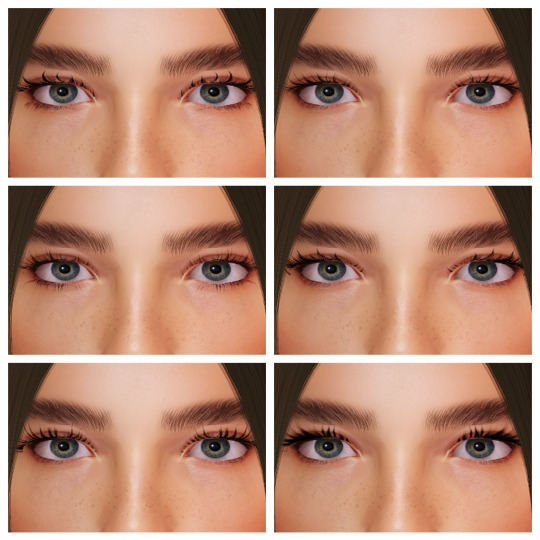
SourLemonSimblr eyelashes set 2
DOWNLOAD SFS
buy me a coffee ☕
6types
2k texture
s-club sliders compatible
category - glasses
sims3!!!!!
credits :mesh by @sclub-privee AND A HUGE THANKS TO @rollo-rolls FOR THE TUTORIAL!!!!
#sims3#sims#ts3#simblr#s3#sourlemonsimblr#sls#s3cc#sims3cc#s3ccfinds#ts3 cc finds#the sims 3 cc#sims 3 download#ts3cc#the sims#sims 3 simblr#the sims 3#my sims#s3lashes#s3eyelashes#ts3ccfinds#sims3ccfinds#ts3 cc#sims 3 cc#ts3 download
2K notes
·
View notes
Text
Blaze Pack (1-5) for Sims4 Horses
These are my first ever made Sims4 Markings. I always created markings for Sims3, but now Intake is going from Sims3 to Sims4 ♥
I went through @h-emera Tutorial for hours xD thanks for that btw <3
I hope ya'll like them
You can find them on my patreon FOR FREE


#sims 4 cc#sims 4#sims 4 gameplay#sims 4 screenshots#thesims4#the sims 4#ts4#sims cc#ts4 custom content
217 notes
·
View notes