#tag header html
Explore tagged Tumblr posts
Visit Tumblr Blog
Explore Tumblr blogs with no restrictions, modern design and the best experience.
Last Seen Tumblr Blogs


Fun Fact
69% of Tumblr users are millennials.
Text


advanced boy commission for @the-void-is-a-disappointment of the gorb napping with dogman and petey, plus all the your flag here commissions for this month! (commissions are closed again for now)
#kirby#request#kofi commission#the-void-is-a-disappointment#ValerieNamuche#(if there's a better username or anything to use for you I will gladly swap out this sort tag!)#plushies#dogman#pride month#daily kirby#my art#digital#hal laboratory#nintendo#(I don't wanna tag all the flags I'm sleepy)#oh also if you look at tumblr on a web browser instead of the app there is now a random button!#next to all the other navigation buttons in the header like the askbox and archive :)#it doesn't differentiate between post types tho so you might get my art or you might get a reblob (or you might get a rare text post)#(it doesn't show up in the app because it's using the custom html)#(which only shows up at url.tumblr.com not at tumblr.com/url)#(and the app essentially uses the tumblr.com/url version)
81 notes
·
View notes
Text
Tags Masterlist on this blog. Click to find posts.
Updated 31 October 2024.
General tags:
themes - patterns - resources - navigation - sidebar - interactive - header - fansite - contained - fandom - tools - tags - pixels - gif - graphics - dividers - pages - all in one - blinkies - code - colours - html - javascript - no javascript - neocities - templates - tutorial -
Specific tags:
kingdom hearts - seashells - splatoon - summer - steven universe - book - cats - colourful - computer - constellation - cute - eyestrain - facebook - fish - hexagon - horizontal - metal gear solid - music player - particles - pokemon - reddit - simple - social media - space - spongebob - tarot - undertale - water - webcore - writing -
You can also search tags by year of creation from 2013 to 2024.
Full masterlist page:
More will be added later. Feel free to suggest anything!
#masterlist#themes#sidebar#fandom#dividers#gif#header#resources#patterns#navigation#interactive#fansite#contained#tools#tags#graphics#music player#pages#html#neocities#blinkies#all in one#code#colours#javascript#no javascript#templates#tutorial
107 notes
·
View notes
Text
this is seriously going to drive me insane so even tho i didnt want to say anything until i was done,,,,,bc i am a strong independent woman (gender unspecified),,,,,,,,anyone out there know html
im makin a neocities. it was going great for like three days! but. uh
#bird noises#neocities#html css#idk how to tag this#it feels like a really silly problem!!#literally all im tryin to do#like. i have two templates bc im Okay at this but im not gonna code from scratch just yet#one of them has a header. one of them does not. one of them has everything sectioned out in neat little boxes. the other one does not#and i want them BOTH on this one pageee i feel like this should not be hard?? but i keep breaking things#there are other smaller problems but tbh i can live with them or work them out later#anyway if there are any neocities people around heyyyyyyyyyyyyy
5 notes
·
View notes
Text

made some changes to the html for my art blog ✌️
#looks very cool#very polished & nice#personal#html stuff#my edits#i updated the tags page and got rid of the header image#also added a cool grid pattern to the header/post background#oh hey the search bar actually works :D#it didn't before and i couldn't figure out why
0 notes
Text
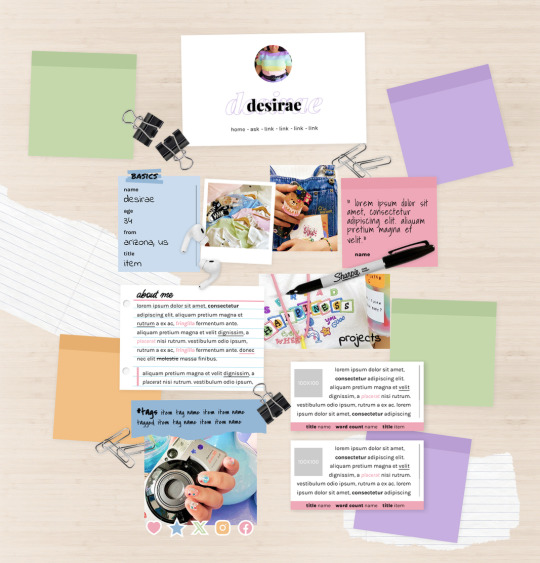
MEL: ABOUT PAGE BY ETHEREAL THEMES
View on payhip ($6.00), check out the preview or support me on patreon for more themes + pages, header templates, coloring psds and more every month!
About Page
Navigation: Home, ask + 4 links (room for more if needed)
**No Javascript Needed**
Color options for: background, links, all content boxes, five accents + more
Sections include:
Profile with avatar, name and links
Basics/info list
Sticky note quote
About me notecard
Tags links
Scrolling Project/WIPs cards
Social media sticker links
Images Include:
100x100 Avatar
170x170 Polaroid
Three additional images
Advanced HTML to edit colors and information as this is only available as an HTML page; box + table size changes not recommended. Let me know if you come across any issues.
101 notes
·
View notes
Note
Hi!! I wanted to say that I loved reading about your journey of creating a personal website. I'm still unsure between Vercel and Netlify. I have a small question to ask. See, one of the reasons I want to make a website is to archive drawings and journal/sketchbook. Would you have any tips for creating an area on my website just for the diary/journal, which has tags, files for each entry, etc.?
Bello!

Really happy to hear about your interest in websites! I want everyone to make their own site so I don't have to log into social media and get instant tummyaches ♥
Vercel vs Netlify: I think I settled on Vercel for absolutely no reason whatsoever. I just made a site on Netlify, then tested on Vercel, and now I have like 5 websites on Vercel so I just kept using it LOL. I'm sure a more tech-savvy person would know the difference - I think they have certain integrations with specific programs.
Creating a diary or journal with tags:
There's a couple of different ways you can do that, with different levels of work needed.
you got me yapping again:
This sadgrl tutorial might be outdated and may or may not work, but explains the process better than I can.
Easiest: make a journal on Dreamwidth, or another blogging site (wordpress??) that allows easy tags and RSS feed, and embed that RSS feed onto your site.
This requires almost no HTML set-up, and the easiest to organize tags, but you don't truly have the data on your own site since it's just embedded.
When I snuck into a web design class at college, this was one of the methods that the professor used for a blog within a portfolio site LOL.
Shit like wordpress is what a LOT of ~professional~ sites do for their blog section. They code it separately from the main site haha. It's the most popular thing, but not necessarily the best. And wait til you read on what the CEO of wordpress has been having meltdowns about... he owns tumblr too!
It's made with a tutorial for Neocities if that's what you use.
Medium: Set up zonelets.
It will require some HTML and JS editing, but will help automate making headers/footers for each page of a blog.
I've never used it myself, but I see other people speak highly of it.
HARD FOR ME CUZ I'M A GORILLA: I believe a lot of professional web devs will slap your face with their coding cock until you use a static site generator (SSG) to make your site.
You will need some coding knowledge to set up the tagging system since it doesn't come with it enabled by default. But it's made explicitly to be an alternative to big Static Site Generators which are...
It requires some more intimidating knowledge, because it's a lot of scripts that turn files that are not HTML/CSS/JS into plain HTML.
Also you have to use the command line, and that doesn't come with buttons that tell you what you can do. You have to copy/paste all that shit or memorize the code to 'dev build astro' and it all looks silly.
I've used Eleventy, and now am using Astro. Other people use Hugo or Jekyll or some other stuff with crazy names like Glup Shitto. I hate all these sites cuz none of the words mean anything to me. This is a common theme for me and tech. I don't know what NODES or CONTENT or ISLANDS are!!!
I had the most success attempting to learn how to use a SSG by downloading a template and altering it with github + VScodium. Here's the template page for Astro. You click on a theme you like, and it takes you to its github page. (If you don't want to use evil Microsoft stuff sorry. Skip this entire section.) Follow the instructions on the page for "forking" the glup shitto. When it tells you to run commands, I run those commands through the terminal window in VScodium. These tutorials never tell you what these commands do cuz they assume you already know. Usually those commands automatically install the files you need onto your computer, and create the final files.
You can see my wip here for a "tag system" that SHOULD show members of a web listing haha but I don't know what I'm doing and I have a reading disorder AND don't know cumputer good.
THEORETICALLY this will be the simplest and easiest way to maintain tags and files, because after you set it up you just have to write the "content" of the blog page. And you don't have to set up the header/footer ever again. I see the vision, and potential, but I am not there yet when it takes me 5 hours a day to figure out what any of the words in the documentation mean and I don't want to ask an actual tech person cuz they will be like 'obviously just press the Blip on the Repository and then Suck My Ass in the command line".
(side note I haven't updated fujofans in like a year cuz I'm struggling with this part to make updating easier).
Con: the final HTML/CSS code is really ugly if it's "minified", and a lot of themes use """"""professional"""""" CSS libraries like Bootstrap and Tailwind that I honestly think are ugly cuz that's what every fuckin' tech website uses to style their pages and make them look Professional and Minimalist with stupid code like style="500-w dark-gray-balls D-cup-bra" on every single element. Even Toyhouse uses Bootstrap. Eugh!
But maybe you're smarter than me and can wrangle these things better!
That was really long. Woops. I hope you can slug through this wall of text and find something helpful. Feel free to email me if you have any more specific questions. I may or may not be helpful.
If someone else sees this and has better suggestions for making BLOGS, please chime in. I'm begging you.
64 notes
·
View notes
Text
Day 7 [Semantics In HTML]
Introduction To HTML
Day 2 [Multimedia Elements In HTML]
Day 3 [Table in HTML]
Day 4 [Link Tag In HTML]
Day 5 [Lists In HTML]
Day 6 [Forms In HTML]
Code:

Line By Line Explanation:
Semantic Tags in HTML give clear meaning to the code. These are tags like:
<header>: Used for the title of the page.
<nav>: Contains navigation links of the website.
<main>: The main part of the page.
<section>: A group of content that is similar.
<article>: A group of content that is an independent piece.
<aside>: Extra info, like side notes.
<footer>: The bottom of the page that contains the copy rights and additional info.
Navigation Tag:
The navigation tag must be within an unordered list tag. And each item of that list must contain the link tag that should have the URL of that specific page.
Comments In HTML:
It is a note in your code that the browser ignores.
It’s just for you to read.
You can use it to explain your code or temporarily hide some code.
Syntax Of A Comment:
<!-- This Is A Comment -- >
Output Of The Code:

Notes: The arrows and the words in red are something I included. It is not included in the code!
______________
Hope This Helps :)
#code#codeblr#css#html#javascript#python#studyblr#progblr#programming#comp sci#web design#web developers#web development#website design#webdev#website#tech#html css#learn to code#school#study motivation#study aesthetic#study blog#student#high school#studying#study tips#studyspo#website development#coding
25 notes
·
View notes
Text
Friday, August 25th, 2023
🌟 New
On /search pages on the web, we moved the search bar from the sidebar to the center/main section of the page.
For folks in the aforementioned reblog header redesign experiment, we added avatars back to posts from group blogs when the option to show author portraits is enabled.
When blocking a blog via a submission in your inbox on the web, you can now block from both your secondary (if it was the recipient) and your primary blog.
On the web, we have made some improvements to localized number formatting across all supported languages.
On the web, logged out users browsing a blog view will sometimes be prompted to log in after scrolling for some time.
We are testing out showing the “You’re all caught up!” carousel to folks with “Best stuff first” enabled.
🛠 Fixed
On the web, we’ve made some improvements to the post header in compact posts (like when they’re displayed in a grid on the Explore page, for example). Long blog names, badges, and the follow button no longer break onto a new line in the middle of a word, and each element remains properly aligned in the header.
We fixed an issue that caused a bullet point to appear next to the Blogs menu item when using Safari.
We’ve made some headway in fixing various issues relating to undo/redo in the post editor on web. You should notice improved stability when using undo and redo in the editor.
On the web, we fixed an issue where avatars from anonymous asks were empty.
On the web, we fixed an issue affecting the HTML and Markdown modes in the post editor where select all would sometimes select text outside of the editor.
We fixed an issue affecting some users where starting a search with a hashtag (#) would return search results instead of results for that tag.
🚧 Ongoing
We are hard at work updating our docs. If you see anything confusing or out-of-date, please send some feedback!
🌱 Upcoming
Nothing to share today.
Experiencing an issue? File a Support Request and we’ll get back to you as soon as we can!
Want to share your feedback about something? Check out our Work in Progress blog and start a discussion with the community.
501 notes
·
View notes
Text
"how do I keep my art from being scraped for AI from now on?"
if you post images online, there's no 100% guaranteed way to prevent this, and you can probably assume that there's no need to remove/edit existing content. you might contest this as a matter of data privacy and workers' rights, but you might also be looking for smaller, more immediate actions to take.
...so I made this list! I can't vouch for the effectiveness of all of these, but I wanted to compile as many options as possible so you can decide what's best for you.
Discouraging data scraping and "opting out"
robots.txt - This is a file placed in a website's home directory to "ask" web crawlers not to access certain parts of a site. If you have your own website, you can edit this yourself, or you can check which crawlers a site disallows by adding /robots.txt at the end of the URL. This article has instructions for blocking some bots that scrape data for AI.
HTML metadata - DeviantArt (i know) has proposed the "noai" and "noimageai" meta tags for opting images out of machine learning datasets, while Mojeek proposed "noml". To use all three, you'd put the following in your webpages' headers:
<meta name="robots" content="noai, noimageai, noml">
Have I Been Trained? - A tool by Spawning to search for images in the LAION-5B and LAION-400M datasets and opt your images and web domain out of future model training. Spawning claims that Stability AI and Hugging Face have agreed to respect these opt-outs. Try searching for usernames!
Kudurru - A tool by Spawning (currently a Wordpress plugin) in closed beta that purportedly blocks/redirects AI scrapers from your website. I don't know much about how this one works.
ai.txt - Similar to robots.txt. A new type of permissions file for AI training proposed by Spawning.
ArtShield Watermarker - Web-based tool to add Stable Diffusion's "invisible watermark" to images, which may cause an image to be recognized as AI-generated and excluded from data scraping and/or model training. Source available on GitHub. Doesn't seem to have updated/posted on social media since last year.
Image processing... things
these are popular now, but there seems to be some confusion regarding the goal of these tools; these aren't meant to "kill" AI art, and they won't affect existing models. they won't magically guarantee full protection, so you probably shouldn't loudly announce that you're using them to try to bait AI users into responding
Glaze - UChicago's tool to add "adversarial noise" to art to disrupt style mimicry. Devs recommend glazing pictures last. Runs on Windows and Mac (Nvidia GPU required)
WebGlaze - Free browser-based Glaze service for those who can't run Glaze locally. Request an invite by following their instructions.
Mist - Another adversarial noise tool, by Psyker Group. Runs on Windows and Linux (Nvidia GPU required) or on web with a Google Colab Notebook.
Nightshade - UChicago's tool to distort AI's recognition of features and "poison" datasets, with the goal of making it inconvenient to use images scraped without consent. The guide recommends that you do not disclose whether your art is nightshaded. Nightshade chooses a tag that's relevant to your image. You should use this word in the image's caption/alt text when you post the image online. This means the alt text will accurately describe what's in the image-- there is no reason to ever write false/mismatched alt text!!! Runs on Windows and Mac (Nvidia GPU required)
Sanative AI - Web-based "anti-AI watermark"-- maybe comparable to Glaze and Mist. I can't find much about this one except that they won a "Responsible AI Challenge" hosted by Mozilla last year.
Just Add A Regular Watermark - It doesn't take a lot of processing power to add a watermark, so why not? Try adding complexities like warping, changes in color/opacity, and blurring to make it more annoying for an AI (or human) to remove. You could even try testing your watermark against an AI watermark remover. (the privacy policy claims that they don't keep or otherwise use your images, but use your own judgment)
given that energy consumption was the focus of some AI art criticism, I'm not sure if the benefits of these GPU-intensive tools outweigh the cost, and I'd like to know more about that. in any case, I thought that people writing alt text/image descriptions more often would've been a neat side effect of Nightshade being used, so I hope to see more of that in the future, at least!
246 notes
·
View notes
Text

— COMO JOGAR PELO TUMBLR MOBILE?
Tutorial básico de como jogar rpg pelo aplicativo mobile do tumblr.

Recebi essa ask aqui me pedindo um guia pra jogar rpg pelo mobile, e como disse, eu nunca joguei pelo celular. Fui dar uma procurada em tutoriais e tentei explorar o app pra jogar, e trago boas e más notícias. A boa notícia é que é possível sim jogar pelo celular, mas além de ser um pouco mais complexo, você precisa usar o navegador pra isso e para formatar, usar o html.
É obrigatório formatar usando html? Não. Eu vou explicar o que eu usei aqui, mas são detalhes opcionais e preferências minhas. Você pode pular essas partes.
Já adianto também que, felizmente, não muda muita coisa entre mobile e desktop, além de alguns detalhes específicos que vou colocar aqui. Então é totalmente possível jogar.
De qualquer forma, se tiverem dúvidas, minha askbox está aberta!
Primeiro, a forma de jogar não vai mudar. Você vai reblogar posts e postar posts, como eu expliquei no primeiro guia de como jogar no tumblr.
Nesse guia, vou repassar as mesmas informações, usando o aplicativo, mas recomendo a leitura do primeiro guia para mais detalhes.
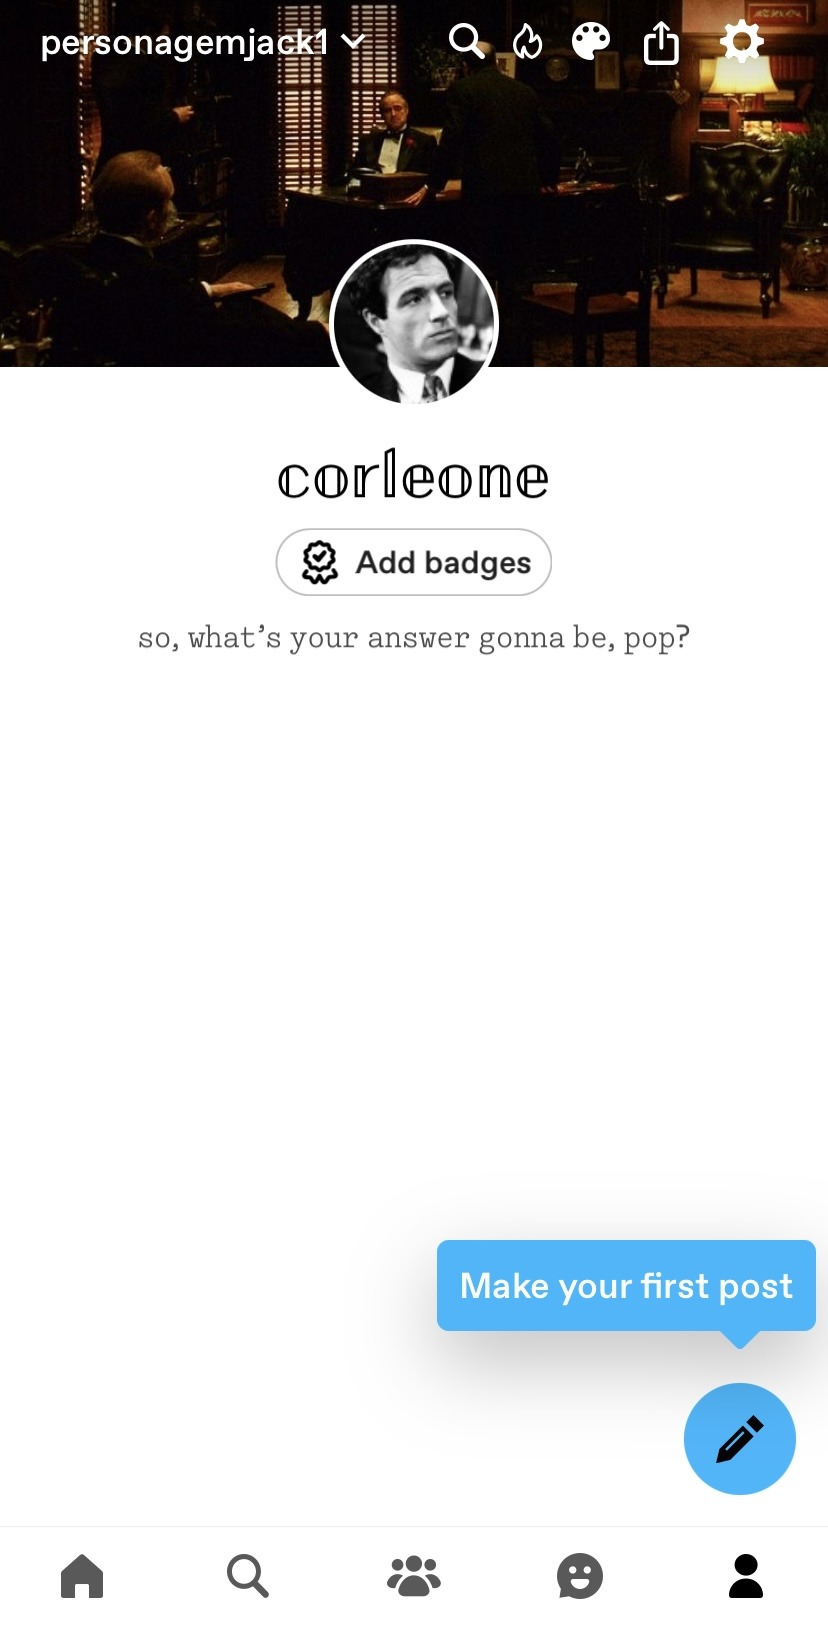
Customização e fixado:
No aplicativo, a opção de customização é diretamente no seu perfil. Você vai entrar no blog, clicar na paleta de tintas e vai abrir a seleção para customização do icon, header, cor de fundo e de realce.
Eu acredito que, quando você cria um tumblr diretamente pelo mobile, a opção de theme customizado já vai estar desativada, então você só precisa customizar normalmente. Eu vou usar o app do pinterest pra buscar as imagens e o lingojam para as fontes.
No final, vou ter algo assim:
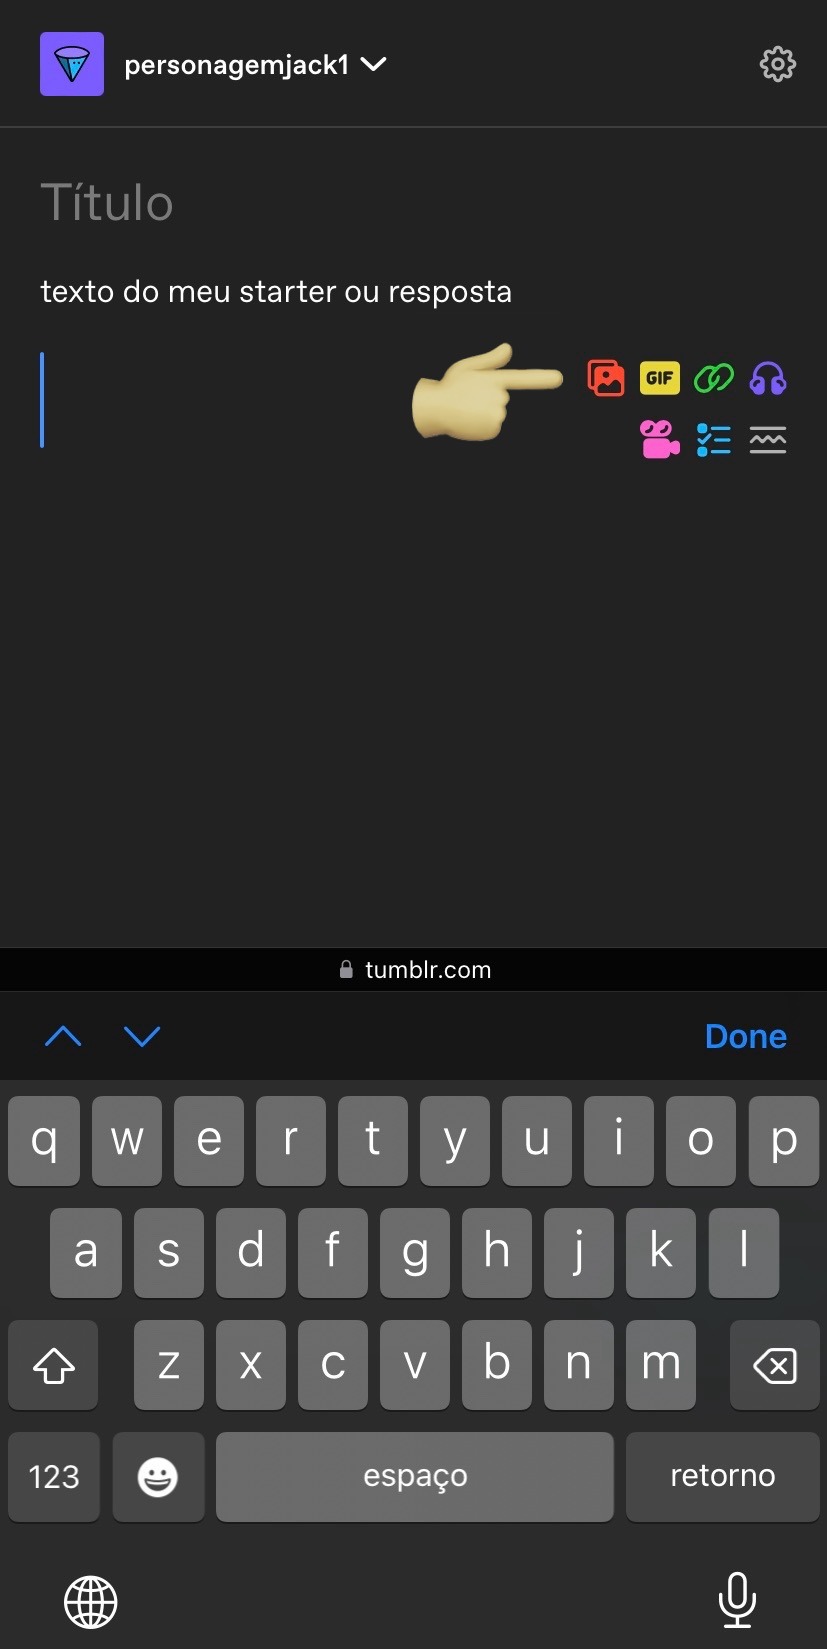
Agora, vamos para o nosso fixado. Para criar posts você vai selecionar o lápis, e para ser um post de imagem, é só selecionar a sua foto de header primeiro, já que o app não permite escolher um formato específico como no desktop.
Feito, vou colocar a minha descrição inicial, e depois o readmore com esse ícone na barra inferior:
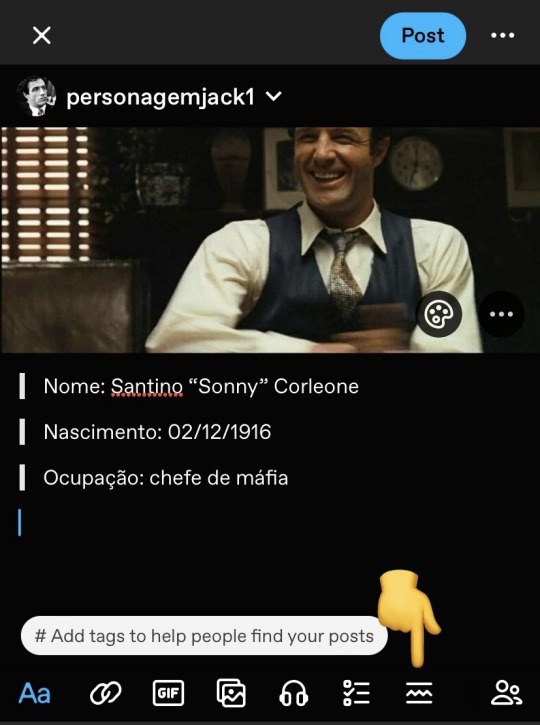
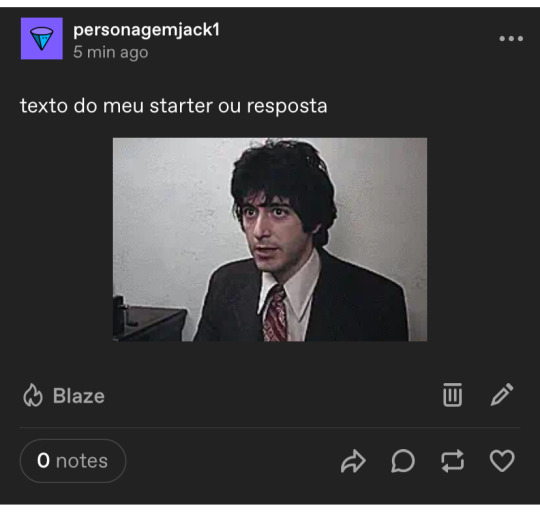
E depois adicionar a bio. Igual ao post no desktop, nós vamos ter algo assim depois de postado:

Você seleciona os três pontos no topo direito, e clica em fixar. Pronto!
Um detalhe: toda vez que você der enter, o app vai iniciar um novo parágrafo, dando espaço entre as duas linhas. Por isso os cortes no recuado.
OPCIONAL: Pra retirar esses espaços, você vai precisar usar o navegador, ir até o post e editar ele. Você entra no menu do canto superior direito, rola até encontrar editor de texto e muda de rich text para html:
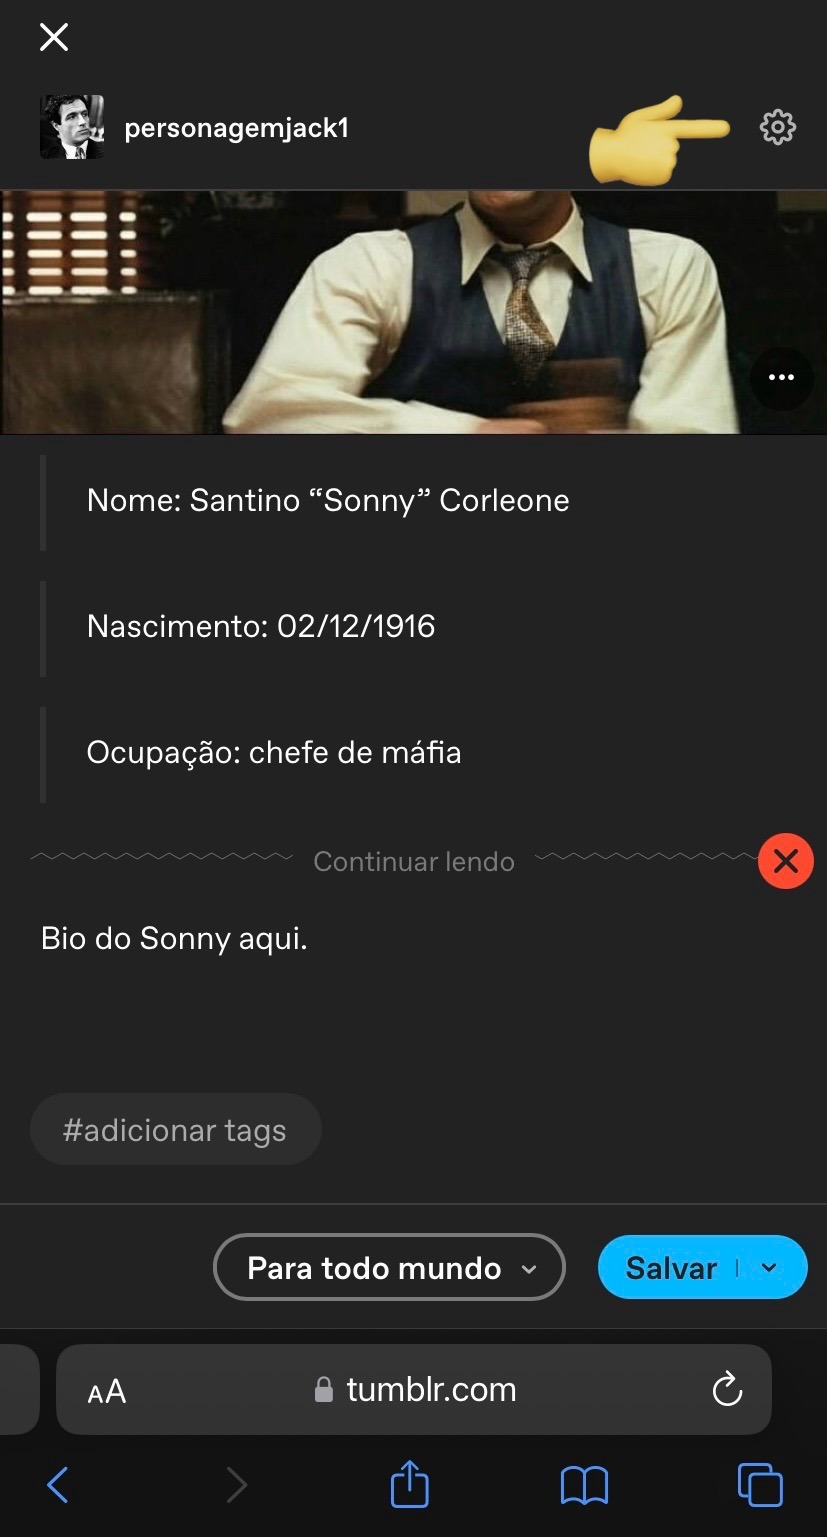

Depois que seu post for transformado em html, você precisa alterar duas coisas: os parágrafos e os blockquotes. Deixei marcado em amarelo o que precisa retirar e mais abaixo vou explicar o que significa:
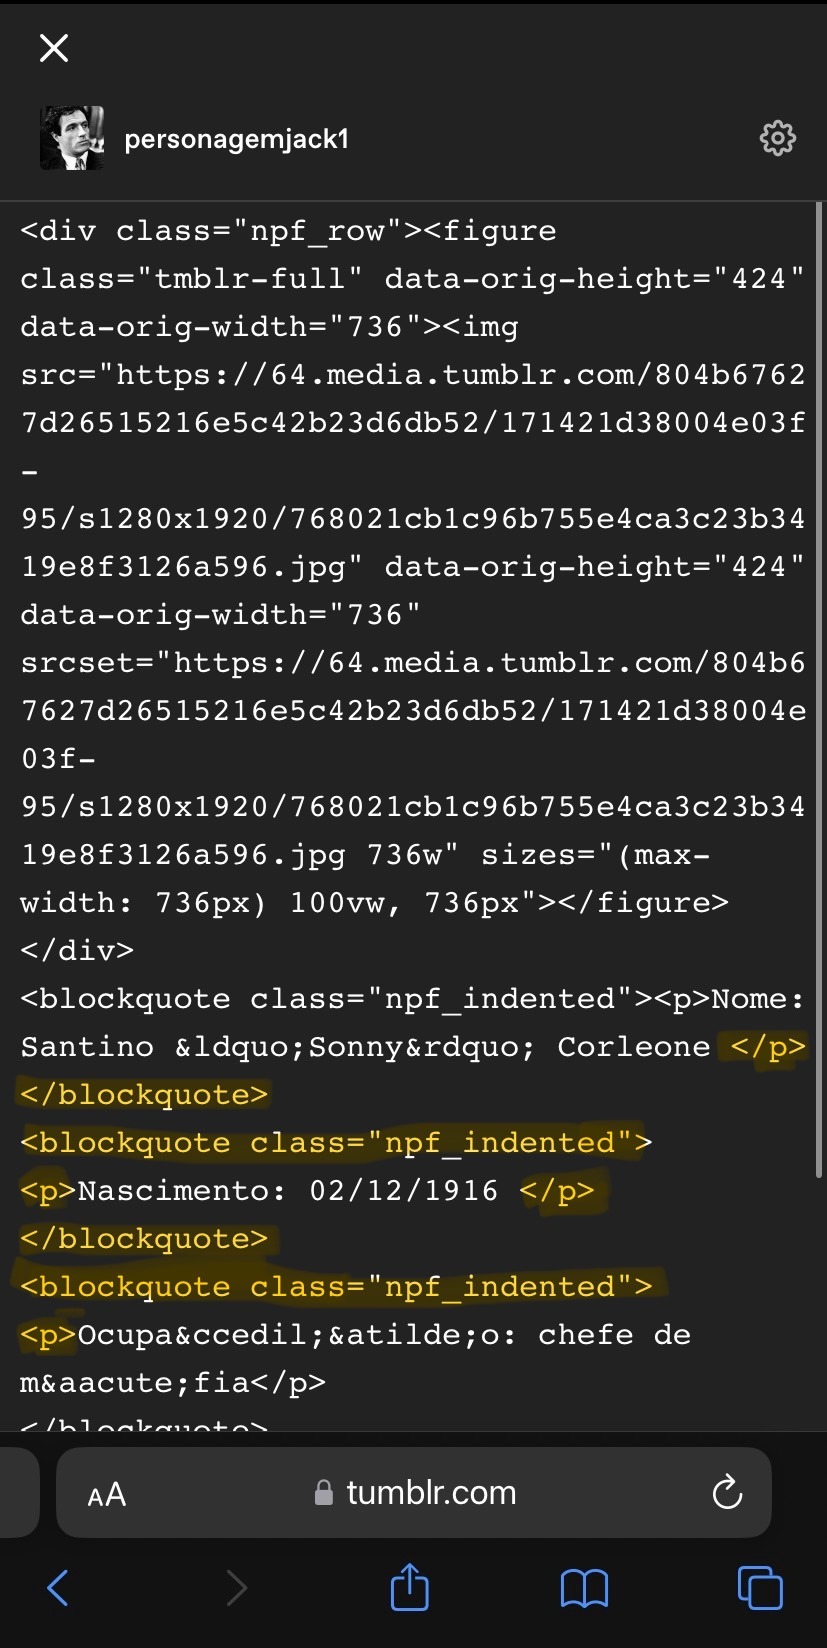
A tag <p> significa o início de um novo parágrafo, e </p> o fim dele. Perceba que no meu post essa tag está entre todas as linhas, justamente porque o app adicionou um novo parágrafo toda vez que eu iniciei uma nova. Primeiro, então, eu preciso retirar as tags de parágrafo, exceto a primeira e a última, e apenas no início das linhas novas eu adiciono a tag <br>, que significa uma quebra de linha.
Agora, <blockquote class="npf_indented"> é onde começa um novo recuado, e </blockquote> é onde finaliza. Da mesma forma que a tag de parágrafo, eu vou retirar todas elas do meio do texto, deixando a primeira e a última.
No final, meu código vai ficar assim:
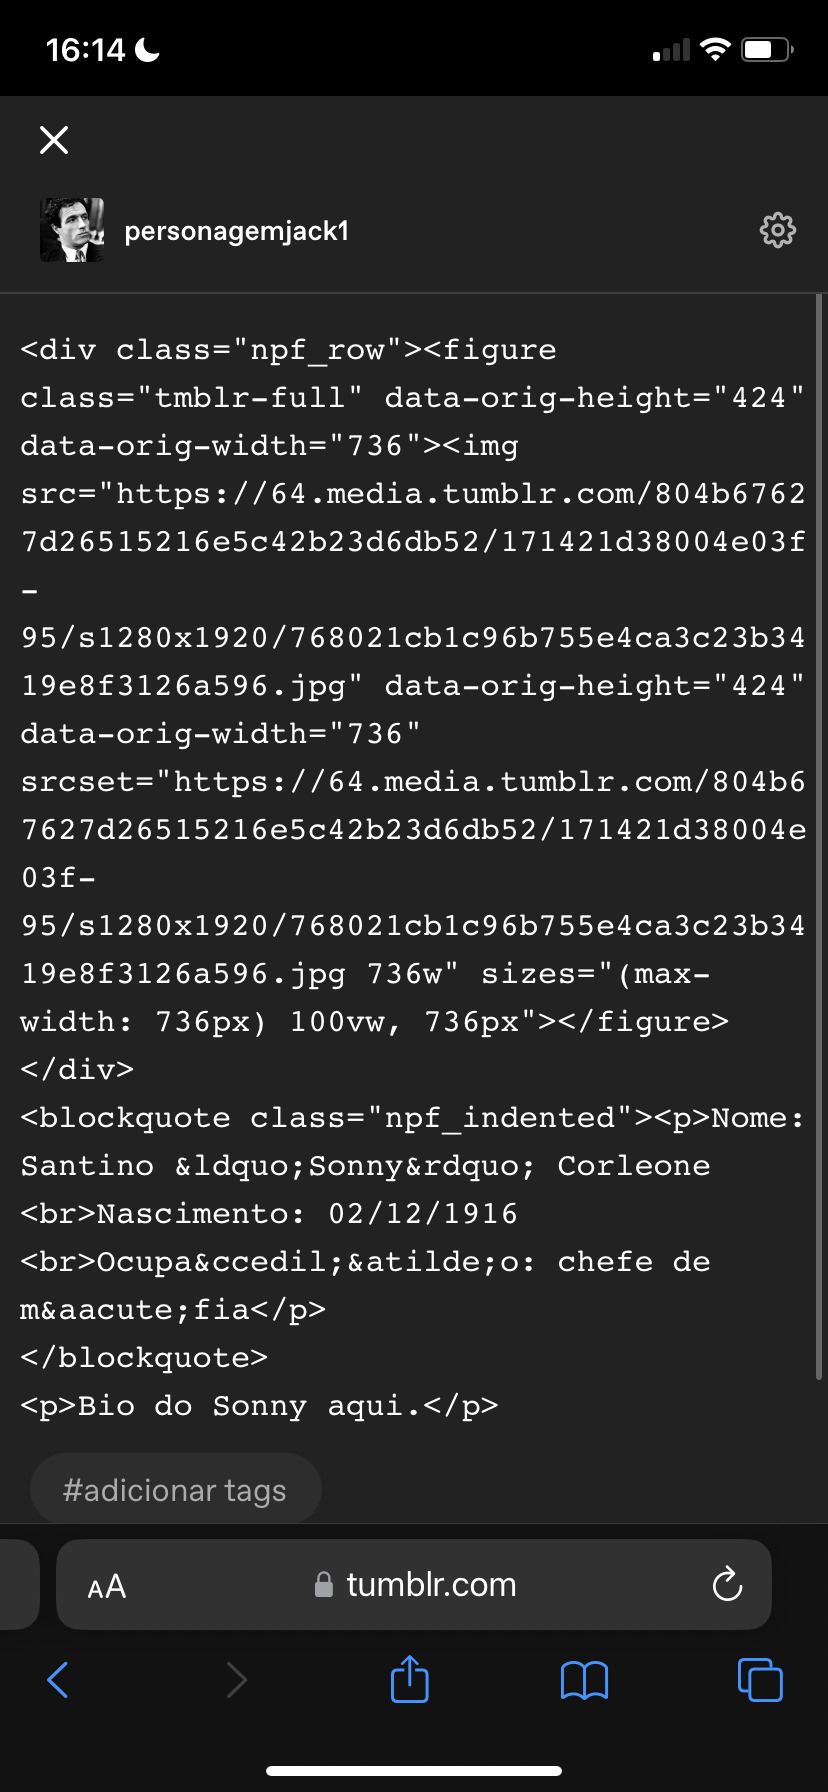
Note a posição do <br> no início de onde quero começar uma nova linha.
Salvo o post assim e volto pro app pra editar o post e adicionar o read more novamente. Se você seguiu esse passo, vai ficar assim:

Tumblr pronto!
Para ilustrar, é assim que os users de desktop vão ver o seu tumblr:
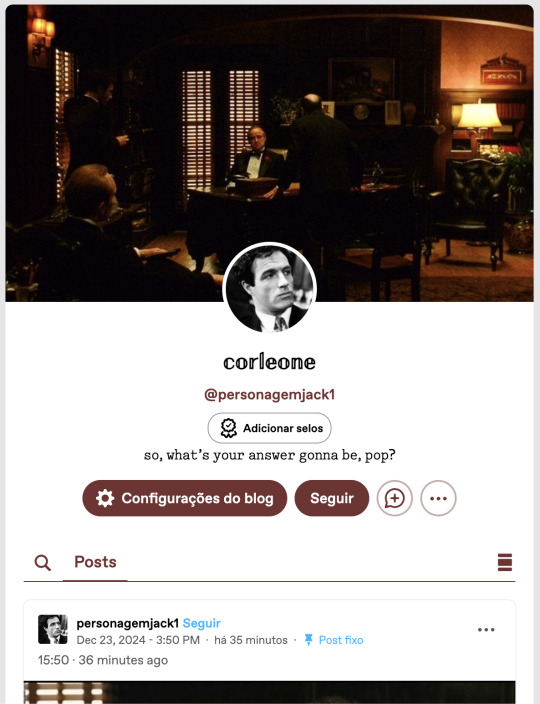

Tudo normal, nenhuma diferença de ter customizado ele pelo mobile.
Como jogar:
O básico continua o mesmo do meu tutorial inicial: posts de textos e reblogs. O tumblr mobile tem as mesmas funções que no desktop quanto a isso, então não tem muito o que explicar. Você vai seguir o padrão do tutorial inicial, mas o detalhe do mobile é que não tem como cortar os posts.
Eu testei vários tutoriais, adicionando código ao link, tentando baixar o firefox e editando no navegador, mas todos os tutoriais tem mais de 2 anos e desde então o tumblr atualizou algumas vezes, e isso não funciona mais.
Portanto, a única opção para os users do mobile é pedir para o seu parceiro de jogos para cortar o post na vez dele. Ninguém vai se incomodar com esse pedido, já que o outro player teria que fazer isso de qualquer forma. Se alguém souber de uma maneira de cortar posts no mobile, por favor me avise que eu incluo aqui.
Depois, é claro, temos o detalhe dos gifs, que também vai ser precisar feito pelo navegador.
Antes de começar, você pode escrever a sua resposta pelo aplicativo e salvar nos rascunhos.
Eu aconselho que você já tenha as suas gifhunts salvas no navegador, então só vai precisar abrir ela quando for editar. Meu exemplo vai ser essa aqui:
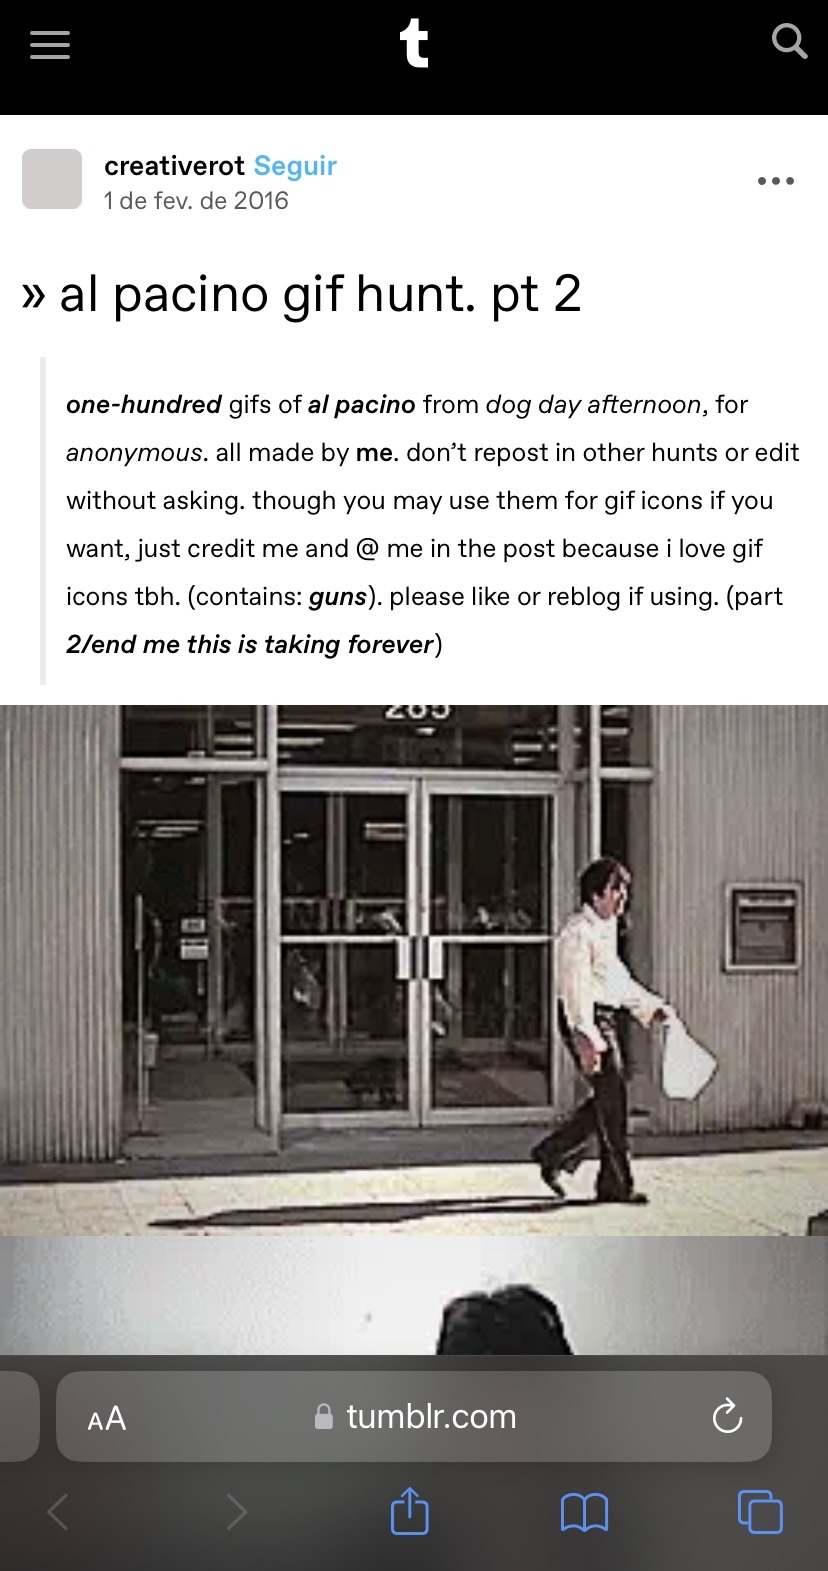
Selecione o gif que vai usar e salve no seu celular. Depois vá até o navegador e abra o post nos rascunhos. Selecione o ícone de foto vermelho, o gif que você salvou da gif hunt e pronto:
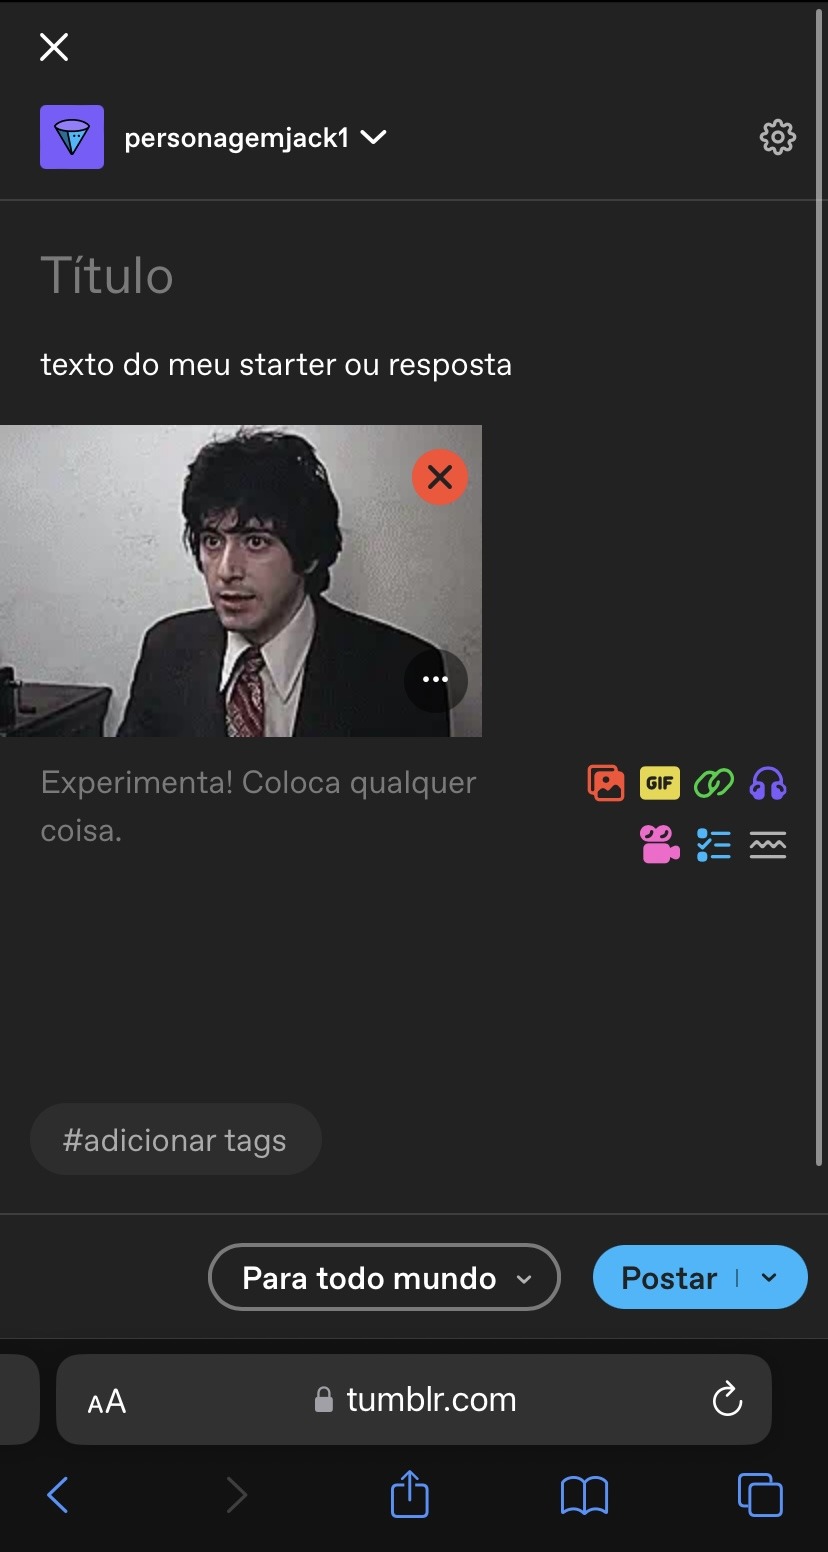
Ele vai ser adicionado no tamanho correto e funcionando. Depois é só salvar, ou postar. Vai ficar assim:
Edição: recebi esse comentário e não precisa salvar o gif! Você pode só copiar e colar o link, como explicado.

"Posso fazer isso pelo app do tumblr?" Não. O gif não abre corretamente, ficando travado no primeiro frame. Aconselho vocês a testarem, mas essa foi a minha experiência tentando adicionar um gif pelo app.
Agora, então, sabemos como reblogar e adicionar gifs. Para entender a dinâmica e tudo mais, recomendo a segunda parte do guia.
Nele eu falei brevemente sobre formatação dos turnos, e o app do tumblr tem as mesmas funções, basta selecionar o texto ou clicar em Aa:
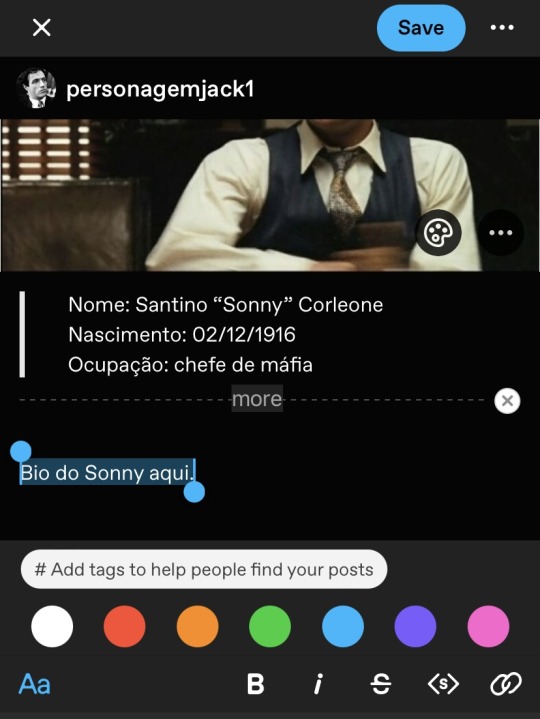
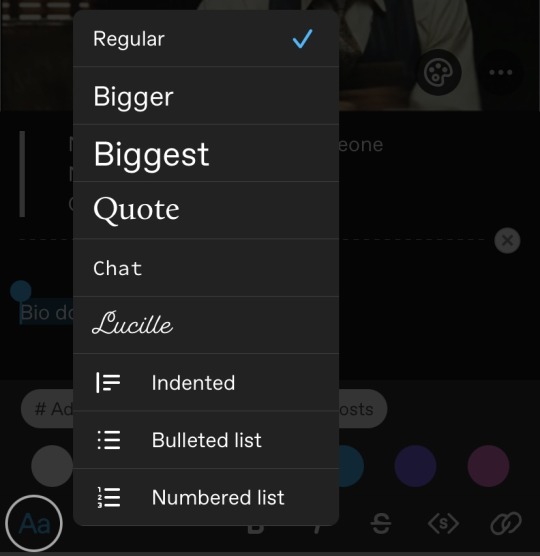
Para deixar as letras pequenas, você seleciona o texto e clica em <s>, da mesma forma que no desktop. E para adicionar o recuo, você vai clicar em Aa e selecionar 'indented', ou em português recuo mesmo.
No geral, as diferenças entre mobile e desktop não são gritantes. Eu pessoalmente acho um tanto inconveniente jogar pelo mobile por ter que ir até o navegador e tudo mais, mas não é algo que me impediria de jogar se fosse a única opção. Além disso, como eu já falei no outro guia, algumas centrais não cobram que você use gif obrigatoriamente, então é só um detalhe também.
A questão de html ali pra retirar os parágrafos é totalmente opcional, e sobre cortar posts, não há problema nenhum em explicar para seus parceiros de jogo que está no mobile e não consegue fazer isso. Eu já fiz algumas vezes no 1x1, por exemplo, e todos compreendem (a não ser que você dê o azar de encontrar algum player babaca, mas nesse caso aconselho até evitar interação em geral).
Espero que esse tutorial tenha ajudado de alguma forma, qualquer dúvida, a inbox está aberta!
29 notes
·
View notes
Note
Do you have any tips or tutorial recommendations for making your own website?
I actually really do like the Wordpress client now I've gotten the hang of it!
I did tell 1000 of my subscribers to kill themselves in an email header by accident, and also battered those poor 1000 people with something like 100 emails in increasingly frantically apologised for errors over the course of the same three days, but that was before I really Got it.
With the above oopsies in mind, if you want to import previous newsletters or posts, for the love of God, do not import your existing newsletter subscribers until after all of your backposts have been imported across. That is the main lesson I have learned.
I had such a vision in mind of a triumphant surprise email going "Hey, look what I did! Surprise! Isn't it sexy?!" and instead everyone got 30 notifications about chapter updates from 2 years ago and an email that said "It's Your Responsibility to Kill Yourself" followed by multiple deranged apologies from me.
So. Don't do that.
Other than that, I'd actually wanted a proper website for quite a few years even before Patreon got so antsy with hiding my content - I tried to set one up a few years back with Wix, and I cannot recommend that less, it's a fucking awful site to use, and it's far less user intuitive than Wordpress.
Part of my issues with Wordpress were actually that a lot of website clients, unless you're building from scratch in HTML/CSS or another code, give you everything in Blocks, and because I remembered like 10 years ago where you didn't have to do that, and you mostly altered everything on the website with like, 10000 options tickboxes and sliders, I was like "wow this is awful". I will admit now, crotchety bastard that I am, that the Blocks system is better and more intuitive once you start to understand it. I just don't always do well thinking of things in three dimensions, so to speak, and I was shooting myself in the foot by going "WELL BACK IN MY DAY--"
Wix doesn't have a very good help section because they want you to talk to their people for help, but most sites for stuff like this do have really robust FAQ and help sections, and obviously, rely on those as much as possible.
At one point I was so upset with my inability to do something that Lorenzo literally came over and told me to leave the apartment (that was the day that I went to Pets at Home and spent a ridiculous amount of money on gifts for the cat), and while I was very grumpy about doing it at the time, taking breaks is crucial, especially if you get as frustrated as I do.
I realise that most of what I have said so far is niche tips for if you're stubborn and mentally ill, so in terms of actual website building, I would say it's important to have an idea of what you want the site to do.
Do you just want a landing page, so that if people search for your name or whatever, that this is the first result? That it links people to your books or your store, your socials? Do you want to have a gallery of work on display, or an archive of writing like I've made? Do you want people to be able to contact you, give tips?
I always wanted a robustly tagged archive with an in-depth tag page like the one I've set up now, and the goal for my Directory of Work on Medium and elsewhere was always that it would later be transferred to my website once it was built.
Then, I have an about page for people who are just curious about who I am and who I look like; commission info and information about booking me for events or inviting me to cons and such; the books I have for sale, publications I've been a part of, interviews and presentations on YouTube; my events calendar with conventions and such; the gallery where I'm showing off both art of my characters and where I'll later show art that I buy for my home and myself, such as the stuff framed in the stairwell or jewellery I buy from makers at markets and such; and then, of course, the subscriber benefits.
All of the above to go my goals which are, in order, to encourage people to read my work and make it easy for them to do so, to pay me money for my existing work or to offer me money for new work, and to show support for other events, artists, friends, and queer creators.
I would definitely advise thinking carefully about how visual or how word-based you want your site to be - I had to look for a recipe blog theme to find one that was stripped back in terms of images. Especially for adult websites, I'd be careful about payment providers and so forth.
Stripe is the default on the site, and I've been very careful about making sure none of my titles or descriptions that the Stripe client will see have words like erotica or adult in them - if someone from Stripe clicks through and sees the site, they might take issue with it, but that's another thing. I do get paid by Stripe through Medium, so I do already use them.
Most payment providers hate any kind of adult content, but are willing to give a tiny bit more wiggle room on erotica, or at least, they just don't notice it in the same way they do Real Porn, but there's nothing I can say other than "be careful and more importantly, be lucky" on that front.
Most of all, I'd say to try to have fun with it and try to enjoy the actual building process if you can - make something pretty and fun to navigate as much as you can, and if you can get some enjoyment out of it, your site users will as well.
18 notes
·
View notes
Text
💾 What is this?
A simple site made to fight ocean destruction.
If you’re 18+ and have access to an AdSense or similar ad platform, you can host this site, earn ad revenue, and donate that money to organizations fighting bottom trawling.
The original creator takes no money—you’re free to host it if you pledge to donate.
⸻
🧰 What You’ll Need:
• A Neocities / Replit / CodeSandbox account
• An AdSense account (or similar)
• Basic ability to copy-paste code
• A willingness to donate at least 50% of earnings to orgs like Sea Shepherd or Oceana
⸻
✅ Hosting Instructions:
1. Copy the code blocks below into files:
• index.html
• watch.html
• about.html
• tracker.html
• organizations.html
• style.css
2. Insert your own AdSense ad code in the watch.html file where it says <!-- INSERT ADSENSE CODE HERE -->
3. Update tracker.html manually with your earnings + receipts (optional but encouraged)
4. Upload to Neocities or any site host
5. Post your version, tag me, and if you’re comfortable, post donation proof (with personal info blurred out!)
⸻
🌐 FULL SITE CODE:
🔷 index.html
<!DOCTYPE html>
<html>
<head>
<meta charset="UTF-8">
<title>The Ocean Can't Scroll</title>
<link rel="stylesheet" href="style.css">
</head>
<body>
<header>
<h1>The Ocean Can't Scroll</h1>
<nav>
<a href="watch.html">Watch</a>
<a href="tracker.html">Tracker</a>
<a href="about.html">About</a>
<a href="organizations.html">Organizations</a>
</nav>
</header>
<main>
<p>The ocean can’t scroll, but you can. The revenue from every ad you watch here is donated to help stop bottom trawling.</p>
<p>(Videos might be added later. For now, it's just ads—but we might build anti-trawling social media too.)</p>
</main>
</body>
</html>
🔷 watch.html
<!DOCTYPE html>
<html>
<head>
<meta charset="UTF-8">
<title>Watch & Support</title>
<link rel="stylesheet" href="style.css">
</head>
<body>
<header>
<h1>Watch to Support</h1>
<nav>
<a href="index.html">Home</a>
<a href="tracker.html">Tracker</a>
<a href="about.html">About</a>
<a href="organizations.html">Organizations</a>
</nav>
</header>
<main>
<p>These ads help raise money for ocean defense. Thank you for watching.</p>
<!-- INSERT ADSENSE CODE HERE -->
<p><em>(If you're hosting this site, insert your ad code here.)</em></p>
</main>
</body>
</html>
🔷 tracker.html
<!DOCTYPE html>
<html>
<head>
<meta charset="UTF-8">
<title>Donation Tracker</title>
<link rel="stylesheet" href="style.css">
</head>
<body>
<header>
<h1>Tracker</h1>
<nav>
<a href="index.html">Home</a>
<a href="watch.html">Watch</a>
<a href="about.html">About</a>
<a href="organizations.html">Organizations</a>
</nav>
</header>
<main>
<h2>Donations Raised</h2>
<p>Total so far: $0.00 (Starter version)</p>
<p>If you're hosting a fork, update this with your earnings and proof of donation!</p>
</main>
</body>
</html>
<!DOCTYPE html>
<html>
<head>
<meta charset="UTF-8">
<title>About</title>
<link rel="stylesheet" href="style.css">
</head>
<body>
<header>
<h1>About This Site</h1>
<nav>
<a href="index.html">Home</a>
<a href="watch.html">Watch</a>
<a href="tracker.html">Tracker</a>
<a href="organizations.html">Organizations</a>
</nav>
</header>
<main>
<p>This site was made to fight bottom trawling—one of the most destructive fishing methods on Earth.</p>
<p>Bottom trawling destroys marine ecosystems, releases huge amounts of CO2, and devastates kelp forests and coral reefs. It contributes more to climate change than all cars in some regions.</p>
<p>Since I’m not 18, I can’t run ads myself. So I made this site free for anyone who is legally allowed to host it, with the agreement that they donate at least 50% of the ad revenue to anti-trawling organizations.</p>
</main>
</body>
</html>
🔷 organizations.html
<!DOCTYPE html>
<html>
<head>
<meta charset="UTF-8">
<title>Organizations</title>
<link rel="stylesheet" href="style.css">
</head>
<body>
<header>
<h1>Organizations We Support</h1>
<nav>
<a href="index.html">Home</a>
<a href="watch.html">Watch</a>
<a href="tracker.html">Tracker</a>
<a href="about.html">About</a>
</nav>
</header>
<main>
<ul>
<li><a href="https://seashepherd.org" target="_blank">Sea Shepherd</a> — direct-action ocean protection</li>
<li><a href="https://oceana.org" target="_blank">Oceana</a> — international policy and science-based campaigns</li>
</ul>
<p>If you're donating from a forked site, send a screenshot of your donation (with your name blurred) and tag the original creator!</p>
</main>
</body>
</html>
8 notes
·
View notes
Text
My Favourite VS Code Extensions
This actually started with a conversation about favourite VS Code themes which got me to thinking. But as always I had to be that little bit extra. So, here are a few of my favourite VS Code extensions that I think would be particularly helpful for new coders or folks just starting with VS Code.
These are in no particular order! I've tried to keep the list to extensions that help read your code and make thinsg pretty. There are hundreds of extensions for almost every type of code, but I wanted focus on ones for beginners. Ones that won't encourage you to become too lazy relying on shortcuts. So, with no further ado, here we go:
Colorize

This extension will highlight any colours (hex, rgb, hsl etc) in your code.
Auto Rename Tag
Okay, this one might make you a little bit lazy. Sometimes you need to switch things up, and that can start to get complicated if you're working on a lot of code. This extension will change the opening or closing tag name paired with the one you manually change. It prevents mispellings that will break your code and makes life easier.
Spellcheck
Ever typed heder instead of header? Or justfy-content instead of justify-content? Well, this extension will help pick up on those typos and keep your code clean (and working!).
Indent Rainbow
This is such a small thing, but possibly one of my favourites on the list. Indent rainbow does pretty much what it says on the tin, adding a coloured line down the lefthand side along the indent of your code. It looks pretty and helps easily keep track of where you are.
Color Picker

Who doesn't love beautiful colours? Colour Picker lets you choose all the beautiful colours you could want without having to leave VS Code.
HTML Checker
This extension helps prevent errors by checking your code against the W3C Markup Validation Service searching for errors. Great of avoiding issues further down the line. Useful for beginners and pros alike to be honest.
Rainbow Brackets
I tend to find this one more useful in javascript, but it's good for everything. I used to use another, also called Rainbow Brackets but that's been depricated, and I like the default colours in this one. There are a few, so shop around.
Prettier
This extension forces a set format on your code, keeping things neat and tidy. It can take a little getting used to but the documentation is pretty good. Helps build good habits, keeping things uniform and easy to read.
These are just a few of the ones I've personally got installed. As I mentioned, there are hundreds of different extensions. Many of which will do the same thing. So, make sure you have a look around and find what works best for you!
Which extension would you recommend for a beginner?
80 notes
·
View notes
Text
i have opinions about how we fanfiction for the internet, and i don't mean literary or aesthetic ones: i mean your experience of writing it!
this is just my markdown manifesto again:
there is no reason to tangle with google or microsoft for writing copy that will ultimately be rendered as HTML on ao3 and tumblr!! rich text editors are slow as hell on desktop and mobile, both in performance and how much time you waste formatting, which takes your hands from the keyboard whether physical or touchscreen. most users end up redoing that formatting entirely in their destination site's embedded rich text editor and inevitably miss things anyway!! google docs and microsoft word and their ilk were made for printed documents no matter how much they try to mutate to stay relevant—i'm side-eying google's "paste markdown" here, nevermind gemini and copilot!
commonmark markdown is quick and easy to learn. enable markdown on tumblr and all you have to do to is copy and paste (only on desktop, unfortunately). if you don't bother with headers or dividers, the most you have to do afterwards is add a "read more" cut. ao3 is less perfect; you might have to ctrl+R formatting marks for the plain text editor and annoyingly add forward slashes to end tags, but there's still explicit fidelity to the formatting you defined while writing that the clipboard cannot lose. yes, i know "paste with formatting" exists, but it's not a problem for me because I live like this. in markdown, your writing isn't tied to any website or service; it's really yours.


that said, you still need a markdown editor, and there are several:
obsidian.md (windows/android/mac/iOS/linux): i used this for more than three years for grad school and writing. i still use its android app since i sync my notes with a git repo instead of the cloud. without paying for obsidian sync, you can keep your vault in your desktop icloud or google drive folder so you can access it from your phone. it's a great way to learn a version of markdown and get comfortable with just how lightweight and portable your drafts can be. this is a good fit if you've ever used and liked notion and want to focus on words
@ellipsus-writes (web app in open beta; no mobile app yet but the mobile site is functional): they don't market themselves as a markdown editor and clearly aim to replicate a gdocs/word-like, mouse-dependent formatting experience, but they support markdown! if you feel trapped by google because of file sync and being able to share docs privately, this is one of your best bets. i haven't tried this, but i think exporting your work from ellipsus as a .md file and then pasting it into tumblr is Great option
i haven't tried these extensively/recently but know they're out there:
simplenote (android/iOS/windows/macOS/linux): i used this forever ago and it looks like it's grown a lot!
bear (macOS/iOS only)
and another thing is: i think it's nice to use different programs for different parts of life. i use google docs for work and yes, using their awful markdown support, but it still makes a difference to write my fanfiction somewhere else (in the terminal, because i'm the most annoying person alive)!! compartmentalize beyond different accounts, don't let the bastards get you down or make you dependent on them
also i'm not gooning for a brand here i personally use neovim
10 notes
·
View notes
Text
i feel the need to mention that for my homework this weekend i had to create a basic website including various basic html things (headers, paragraphs, lists, etc) and most people were taking our teacher’s suggestion of using the lists to list our favorite things, and as a result yes i listed my favorite pokemon and also talked about pokemon horizons on my school project that is visible to my classmates and professor lol
i went kind of overboard for a first assignment even though it only took me a couple hours… we weren’t even required to use any CSS yet, just have an understanding of the most basic of HTML tags… but like i got past that a long time ago so i put some basic effort into making it not look ugly asf and made it mobile responsive LMFAO 😭 it was fun, it felt like building a basic neocities shrine but for school
i am really excited to get to more complex things in the future though dndjkd i do want to actually learn new stuff
11 notes
·
View notes
Text
Day 3 [Table In HTML]
Day 1 [Introduction To HTML]
Day 2 [Multimedia Elements In HTML]

Line by line explanation:
Defines a table,
border : This attribute adds a simple border to the table.
style : Used to add some styling to the webpage. Can be used with any tag.
Border spacing: Adds space between table cells.
Text-align : Aligns the text in the table.
Contains the header section of the table.
Represents a table row
Represents a table column
Holds the body of the table → main data (menu items).
Used for individual data cells in the table.
<table> <thead> <tr> <th> Column Head 1 </th> <th> Column Head 2 </th> </tr> </thead> <tbody> <tr> <td> Row 1 Data = Column 1 </td> <td> Row 1 Data = Column 2 </td> </tr> </tbody> </table>
Final Output

------------------------------
Hope it helps :)
#code#codeblr#css#html#javascript#python#studyblr#progblr#programming#comp sci#web design#web developers#web development#website design#webdev#website#tech#html css#learn to code#school#study motivation#study aesthetic#study blog#student#high school#studying#study tips#studyspo#website development#coding
9 notes
·
View notes