#tmc2209
Explore tagged Tumblr posts
Visit Tumblr Blog
Explore Tumblr blogs with no restrictions, modern design and the best experience.
Last Seen Tumblr Blogs


Fun Fact
The Tumblr office adopted Tommy, an 11-year-old Pomeranian.
Text

Trinamical stepper breakout with TMC2209
About two weeks ago, we designed a breakout for the A4988
https://blog.adafruit.com/2024/11/11/the-a4988-is-a-classic-stepper-driver-in-a-new-fit/
and we're still waiting for those prototype PCBs, but we're not one to wait, because we think that the idea is a good one…so why not design another version? This time with the Trinamic TMC2209
https://www.digikey.com/en/products/detail/analog-devices-inc-maxim-integrated/TMC2209-LA-T/10232491
This is a similar "Step & Dir" type driver, with a wide motor range of 4.75 – 28 Volts and separate 3~5V IO pin. It has a couple nifty upgrades, though: like a diagnostic error output, index out so you know if you dropped a microstep, OTP config memory, and a half-duplex UART pin that you can use to configure and read stats from the chip. We kept the direction/step LEDs and the current-limit-set potentiometer, changed a few pins around, and voila! What do you think?
#steppermotor#tmc2209#electronicsdesign#makerproject#pcbdesign#engineeringlife#trinamic#microcontroller#breakoutboard#diyelectronics#hardwarehacking#iotdesign#robotics#embeddedengineering#hardwaredeveloper#stepperdriver#motordriver#electronicsgeek#circuitdesign#opensourcehardware
12 notes
·
View notes
Text
BTT SB2209 USB – Compact Toolhead Board for Klipper
The Bigtreetech SB2209 USB (RP2040) is a compact and reliable toolhead board designed for Klipper-based 3D printers, especially Voron V2.4, Trident, or custom CoreXY builds. Based on the Raspberry Pi RP2040 microcontroller, it provides powerful, low-latency communication and supports direct USB connection to the host system — ideal for setups without CAN bus.
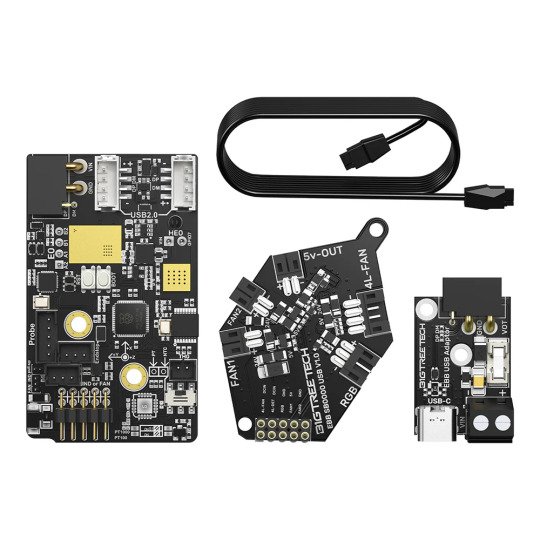
🔧 Key Features
MCU: Raspberry Pi RP2040 dual-core processor @ 133 MHz
Connectivity: USB-C interface (no CAN bus required)
Stepper Driver: 1x TMC2209 integrated (UART mode, up to 2A RMS)
Temperature Inputs: 2x thermistor ports (100K NTC supported)
Fan Outputs:
1x controllable fan output (up to 24V, PWM)
1x always-on fan output
Heater Output: 1x hotend heater (up to 60W at 24V)
Probe Input: Dedicated input for Z probe (including inductive sensors)
Endstops: X and Y endstop inputs
LED Output: Neopixel (WS2812) port for addressable RGB LEDs
Power Input: 24V via VIN or USB only for logic
📦 Typical Use Case
Toolhead board for Voron printers using USB communication instead of CAN
Works well with Stealthburner or Clockwork 2 setups
Simplifies wiring by centralizing toolhead electronics into one board
📐 Dimensions and Mounting
Board Size: 45mm x 40mm
Mounting: Compatible with standard Stealthburner rear mounts
Cooling: Passive (no heatsink needed for typical use) shop.zen3d.eu – BTT SB2209 USB Toolhead Board
1 note
·
View note
Text
Stepper Motors: The Speed Force of Precision
In the lightning-charged labs of Central City, where circuits pulse with the energy of the Speed Force, there exists a hero faster than Barry Allen’s sprint – the Stepper Motor. This unsung champion of micro-steps and torque harnesses the power of precision, outrunning chaos in robotics, 3D printing, and beyond. Let’s race through why steppers are the Flash of the electronics realm!

Chapter 1: Born in the Speed Force
The Stepper Motor is no mere mortal gear. Forged in S.T.A.R. Labs’ Particle Accelerator, it channels three Speed Force virtues:
Lightning Precision: 0.1125° microstepping, quicker than Barry’s time-slashing sprints.
Infinite Stamina: Holding torque grips positions like Reverse-Flash clings to grudges.
Tachyon Efficiency: Open-loop control, trusting steps like Cisco trusts his vibe tech.
Why Gorilla Grodd’s motors fail:
DC Motors: Slow as a meta-dampened Barry, tripping over their own rotations.
Servos: High-maintenance as Iris’s deadlines, needing constant feedback loops.
Chapter 2: The Flash’s Rogues Gallery of Applications
1. 3D Printing (vs. The Turtle): Steppers outpace sludge-speed inaccuracies, extruding layers faster than Barry outruns time paradoxes. “Not fast enough? Try 1/32 microstepping.”
2. Medical Robotics (vs. Dr. Light): Power MRI bed adjustments with precision brighter than Kid Flash’s wit.
3. Camera Gimbals (vs. Mirror Master): Stabilize footage steadier than Barry’s resolve against timeline meddling.
4. CNC Machines (vs. Captain Cold): Carve metals in sub-zero temps, unfazed by Cold’s icy tantrums.

The Speed Force Specs
Microstepping: 256 subdivisions per step – a speed mirage even for Savitar.
Torque: 2.8 N·m holding force, stronger than King Shark’s grip.
Silent Drivers: TMC2209 stealth mode, quieter than Barry’s heartbeat post-revival.
The Reverse-Flash’s Sabotage
Cheap Drivers: Overheat like Thawne’s rage, frying circuits into charred relics.
Ignored Microstepping: Jerky moves, as chaotic as the timeline post-Crisis.
The Prophecy of the Negative Speed Force
Harrison Wells’ Warning: “When the particle accelerator explodes anew, only steppers will harness the chaos. Their steps shall defy entropy, their torque outrun decay.”
Epilogue: Outrun the Chaos To dismiss the stepper is to invite timeline collapse—a realm of spaghetti prints and twitchy robots. Embrace it, and your projects will sprint faster than Barry chasing a time remnant.
References:
S.T.A.R. Labs’ Motor Dynamics (Cisco Ramon’s Engineering Logs)
The Speed Force Codex (Barry Allen’s Time Journal)
0 notes
Photo
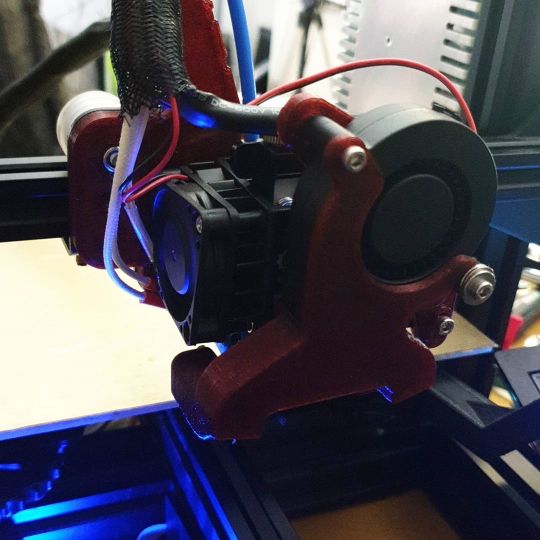
In the process of upgrading my @creality3d #ender3 - The upgrades are @e3donline #hemera and the 32bit #fysetc Cheetah board with #tmc2209 stepper drivers. All printed parts printed in @alienslacker Knight's War Red. Get it at https://Alien3D.us https://www.instagram.com/p/B-e07NBI7qj/?igshid=diqvptnckrsv
0 notes
Text
Can the Ortur Laser Master 3 truly engrave at speeds of 20,000mm/min?
Yes it can! And this was achieved by using 4 main changes in design
First of all, the OLM3 was redesigned to have its mechanical structure center of gravity as low as possible. Ultimately, there is a substantial reduction in the frame harmonic vibrations.
Secondly, the LU2-10A 10W laser module that powers the OLM3 is extremely light. Only 235 grams, maintaining high power delivery and cooling performance.
The OLM3 motherboard and firmware employs G-code streaming optimization, allowing the transfer of data to break the old limitations of 6000mm/min.
TMC2209 stepper driver chips are used on the OLM3. These high performing drivers allow for high torque, silent operation and no switching homing.
0 notes
Text
Top 10 Best auto leveling 3d printer [2022]
Top 10 Best auto leveling 3d printer [2022]
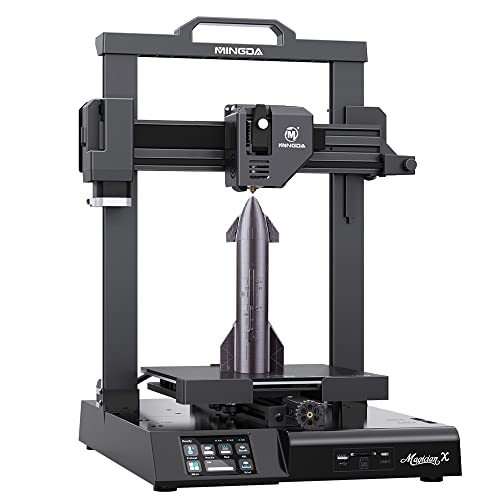
1. MINGDA Magician X 3D Printer, One Touch Smart Auto Leveling FDM 3D Printing Machine Printing Size 230x230x260mm with TMC2209 Silent Motherboard Buy On Amazon Auto Bed Leveling 3D Printer: Equipped with a high-sensitivity sensor, the intelligent leveling system can automatically adjust the uneven hotbed using the matrix 16 point measurement method, the 3D printer will auto-leveling the…
View On WordPress
0 notes
Text
Anycubic Vyper Auto-Leveling 3D Printer Review: Solid Performance for Beginners and Experienced Users Alike
Anycubic Vyper
8.00 / 10
Read Reviews
Read More Reviews
Read More Reviews
Read More Reviews
Read More Reviews
Read More Reviews
Read More Reviews
Read More Reviews
Read More Reviews
Read More Reviews
Read More Reviews
Read More Reviews
Read More Reviews
Read More Reviews
Read More Reviews
Read More Reviews
Read More Reviews
Shop Now
The Anycubic Vyper is an exceptional 3D printer for both beginners and advanced makers. Though calibration and quality control issues may frustrate some users, the prints are impressive once everything is dialed in.
Key Features
16-point auto-leveling
TMC2209 silent stepper driver
4.3-inch touch screen
Heated print bed
32-bit motherboard including Cortex M3 main control chip
Spring steel magnetic platform
Double-gear extrusion system
High-precision double screw design
Specifications
Brand: Anycubic
Build Volume: 245 (L) mm x 245 (W) mm x 260 (H) mm
Printing Accuracy: 0.1 mm
Connectivity: USB, SD-card
Heated Build Plate: Yes
Feed Type: Bowden tube via dual gear extruder
Dimensions: 508mm × 457mm × 516mm
Weight: ~10 kg
Dual-Color Printing: No
Pros
Large print area for sizable prints
Easy assembly
Common-sense interface
Low noise
Auto-leveling is great for novice users
Textured surface resists fingerprints
Included Cura profiles
Wide variety of filament choices
Beautiful prints when dialed-in
Cons
Auto-leveling didn't work on first try
Settings require tweaking to get good prints
Difficult to achieve consistency in models
Magnets installed incorrectly in tool drawer
Hot end components seem inaccessible on our demo model
Buy This Product
Anycubic Vyper other
Shop
// Bottom
When you first see what you can do with 3D printing, it’s hard to keep your imagination from running wild. Your head fills with possibilities, and you start to convince yourself that it wouldn’t take that long to make a full-sized Iron Man costume. But to make those superhero dreams come true, you’ll need a 3D printer.
Anycubic is a company that has been making 3D printers since 2015. Some reviewers have even called the company’s i3 Mega the best 3D printer under $300. But in the world of 3D printing, you have to evolve, or you get left behind.
For Anycubic, this evolution comes in the form of its new Vyper 3D FDM Printer. But is this printer truly an evolution, or is it a step back? Let’s find out.
youtube
Build Quality and Design
Like its namesake, the Vyper is a sleek and relatively silent creature with some killer surprises. The most prominent of which are the new self-leveling and heated bed features. At its core, the Vyper is an FDM 3D extrusion printer built to compete with printers like the Creality CR-6 and the Elegoo Neptune 2. Normally, the Vyper retails for $359, but Anycubic is currently offering an early-bird discount to the first 3000 buyers.

These types of budget-level hobbyist printers are ideal for folks getting started in 3D printing. That said, the Vyper will also work well for more experienced users.

Based on testing, we found it a competent unit once we dialed in all of the settings. We’ll discuss settings in just a moment, but first, let’s talk about some other features.
The Vyper offers a 245 x 245 x 260 mm print area with a removable magnetic build surface. This large-sized surface means that you can print large parts and multiple parts without issues. In addition, the textured build plate is said to be scratch-resistant and is flexible for easy removal of completed prints.

The bed on the unit is also heated. If you’re new to 3D printers, a heated bed helps keep the extruded plastic warm. This warmth allows for better print adhesion of the first layer and better overall print quality. The Vyper also includes a color screen and an easy-to-use software interface.
Related: Everything You Need to Know About 3D Printing
Hot End, Sensors, and Electronics

The Vyper is equipped with an all-metal, volcano-style hot end with what looks like a full aluminum heatsink. Additionally, there are dual cooling fans built into the hot end’s cover that help mitigate heat. Anycubic’s unique double-gear extruder feeds filament into a Bowden tube and down to the .4mm brass nozzle. The Vyper also includes a filament runout sensor.
Underneath the hood of the Vyper is a 32-bit Cortex M3 architecture high-performance main control chip capable of handling resolutions down to .1 mm. As for noise level, to minimize this snake’s hiss, Anycubic has included an integrated TMC2209 silent-stepper driver. Overall, this means the stepper motors are almost silent.
What’s Included in the Box?

Inside the box for the Vyper, you’ll get:
The Vyper base and frame
The display screen
A filament holder
4 x M4 x 45 screws with washers
3 x M5 x 14 screws
A data cable
The power cord
A section of test filament
A replacement nozzle
An SD card and USB SD card reader
An After-Sale service card
A tool kit which includes: a scraper, hex-head wrenches, box-end wrenches, a pair of snips, and a nozzle cleaning tool
The assembly instructions and tips sheet
Assembling the Anycubic Vyper

The Vyper goes together quickly. Four hex-head screws attach the base to the Z-axis frame, which includes the gantry. Three additional bolts connect the screen to the base. Unfortunately, in our demo, one of these bolts was missing, so we only used two. Once you’ve installed these seven bolts, you’ve completed most of the assembly.
After assembling the frame and the screen, you’ll need to plug in the stepper motors and other sensors. But the data cable routes these connections close to each endpoint which makes connecting everything foolproof. Additionally, Anycubic used zip-ties to secure some of the components during shipping, so you’ll also need to remove these. After that, you’ll set the proper voltage coming from your wall outlet, plug the Vyper in, and switch on the unit. It’s that easy.
Leveling and Calibrating the Vyper

As for leveling, one of the most significant selling points that Anycubic boasts is the auto-leveling of this unit. So naturally, leveling the print bed was the next step.
Essentially, you’ll tap the Prepare tile on the LCD screen and then on Leveling > Auto Leveling. Once you start the process, the hot end tracks 16 points on the print bed. This process takes about three minutes, and after leveling, you shouldn’t have to make any Z-axis adjustments.
Unfortunately, this is where hit some teething problems. Once the auto-leveling was complete, we started to print the test file, but the nozzle screeched and gouged the print bed. This was surprising because the auto-leveling showed it had correctly completed, so we adjusted the Z-axis slightly and tried to perform the leveling a second time.
This time, the hot end touched down at the lower-left corner of the print bed, then moved to the lower right corner, touched down, and then beeped three times. From there, the unit’s screen froze.

We were concerned that the scraping of the bed had caused some issues with the nozzle, so we removed the cover for the hot end to check the assembly. Sure enough, when the unit scraped, the metal strain gauge holding the hot end had shifted. We adjusted the strain gauge until the hot end was perfectly level, put everything back together, and restarted the auto-leveling process. This time, everything worked.
For someone without any mechanical experience, this issue may have resulted in a sizable amount of frustration. However, for us, it was only a minor inconvenience that offered some additional insight into how Anycubic constructed the Vyper. That said, it’s important to approach the leveling process cautiously. Don’t walk away from the printer during its first print, and don’t trust the leveling to be perfect without a possible Z-axis adjustment.
You load filament on this unit via the extruder and Bowden tube. Like setup, this was an easy process. You get the hot end up to temperature and feed the filament into the dual-gear extruder. Press a few buttons on the touchscreen, and wait until you see filament oozing out of the nozzle.
Slicer and Onboard User Interface

For the slicer, we used Cura as Anycubic included it with the Vyper’s setup materials. There were also three material-specific Cura profiles on the SD card that came with the printer: one for PLA, ABS, and TPU. The owner’s manual also claims that the Vyper also can print PETG and wood.
You control the printer via a 4.3-inch touch screen that is just a bit smaller than an iPhone. This interface isn’t exactly full color—it’s more of a monochromatic blue. The menus are easy to understand, and everything is nested in a logical order. But, the one area of the interface that was confusing was the lack of nested folder access.
Anycubic included two folders on the SD card, but neither was accessible from the touchscreen interface. If you tapped on the folders in the interface, then nothing happened on the screen.
This limitation means that if you’re using an SD card to print g-code files, you’ll need to have them in the card’s root directory. While this isn’t a massive issue if you’re only printing one or two files, if you want to keep lots of files accessible, you’ll have to ensure you have another system of organization. Folders don’t seem to work.
One of the best features of the included interface is the ability to change settings on the fly. So, for example, if you realize your nozzle is just a bit too high or your temps are too low, you can adjust these items while the print is still going. During testing, this feature saved a couple of prints.
Related: How to 3D Print for First Timers and Beginners
Printing Quality on the Anycubic Vyper

As far as the slicer settings, the included Cura default PLA profile did a decent job of getting passable prints, though there was a bit of banding, and corners weren’t the sharpest. Like many other testers, we used the popular Benchy and calibration cat models available on Thingiverse to dial in the settings. We did find that, like most 3D printers, slower prints resulted in much higher quality. The default printing speed for the Vyper is 80mm/s, which may be a bit too fast, in our opinion.
With the Benchy, hull banding was minimal, though we did get a bit of over extrusion and stringing in a couple of places. We solved this by upping the extruder retraction rate and increasing the retraction speed. And also set the printer profile to print walls before infill, which helped.

There were a few gaps with the default profile settings when bridging, but nothing too extreme. Toying around a bit with infill percentages and print resolutions didn't seem to yield consistent quality results even when using the same model and settings. Some prints came out fantastic, and some had to be stopped because they weren’t going to complete correctly.

If you think that optimization is fun, and it’s interesting to dial in the settings to try and eke out as much quality as possible, then you'll appreciate this quality. But if you don’t like tinkering, you’ll need to consider calibration when looking at the Vyper.
What Do We Love About the Anycubic Vyper 3D Printer?

The novice-friendly setup and interface are two notable features here. While leveling didn’t go right immediately, everything functioned great once we worked the kinks out. We've managed to get through almost an entire roll of filament during testing, with around an 80% success rate.
Additionally, from opening the box to printing your first test print takes less than a half-hour, and if you’ve put together and set up these types of printers before, it may go even faster.
The heated bed and flexible spring-steel build plate are also exceptional on the Vyper. These features make removing projects easy, and the textured surface didn’t seem to pick up any fingerprints.
Noise on the unit measured at around 59 dB while fans were at 100%. Of course, turning the fans down would cut that noise out a bit. But, while the fans may be the noisiest part of the unit, once you leave the room, you can barely hear the Vyper. It's also nice to see a wide variety of filament choices that you can use for this printer.
Finally, once you get the settings dialed in, you can achieve fantastic prints with minimal effort. It's shocking some of the prints you can create without the need for babysitting.
What Could Anycubic Improve?

Because the auto-leveling is the main selling point of the Vyper, it was a bit disappointing for this process to go so wonky at the beginning of our testing. Given that this is a demo unit, we always assume that quality will represent the pinnacle of the specific design. So to have this unit gouge the scratch-resistant plate out of the box makes us a little cautious.
Another thing that was concerning with the Vyper was the lack of accessibility to the hot end components. Customization and 3D printing are almost synonymous, and many makers want easy access to parts like the heater block and thermistor.
For the Vyper, the hot end components were tethered in place by the data cable connection. Even after removing the bolts for the cover, some flexible adhesive had to be picked out of the electrical connector. Without doing so, the data cable would not release, which prevented the removal of the cover.

While this might not be an issue for some, for us, accessing the hot end to diagnose the leveling issue was the difference between a working unit and a non-working unit.
In our opinion, preventing access to the physical elements of a commonly customized component doesn't make much sense. And what if a thermistor dies or a nozzle breaks inside the heating block?
We also had a slight issue with the tool drawer. Two rear magnets hold this drawer in place, and it’s a good storage place for having tools close at hand. But for some reason, on our demo unit, the drawer would not close completely. Instead, it stuck out about a half-inch. After some testing, we found the magnets on the drawer installed opposite of their intended polarity.
So, we used a small screwdriver to remove these magnets from the drawer, then reversed them. Then, the drawer snapped shut. The orientation of these magnets is a minor detail, but again, it reinforces the assumption that quality control might not have been great during factory assembly.
Finally, dialing in this machine was done over several days through trial and error. With Anycubic’s included printer profiles and recommended software, one expects the unit to be almost plug-and-play. Unfortunately, that wasn’t the case here.
Can You Repair the Vyper?

Except for the mainboard and the connector mentioned above on the hot end, all of the components of this printer are easily swappable. None of the motors or switches are concealed. Likewise, the nozzle, extruder, Bowden tube, belts, and plate bearings are all on display if something goes wrong. So yes, knowledgeable 3D printer mechanics can fix things if something happens outside of the 1-year warranty period.
Brave souls could attempt removing the hot end, but you may void the warranty if you open the Vyper up. So, do so at your own risk.
Our Verdict: Should You Buy The Anycubic Vyper 3D Printer?

Yes, but with a few caveats. For a first printer, this unit, like its namesake, might provoke fear unless you’re careful. Be prepared to do some calibration, and don’t expect that you’ll be able to take the unit out of the box as a first-timer and have everything run perfectly. To us, Anycubic designed this printer for those who are comfortable with tuning. That’s not to say that this printer is terrible. It’s terrific, but newbies might not appreciate the steep learning curve here.
On the other hand, once you have adjusted everything the way you like it, the Vyper can generate some genuinely magical prints with a high level of detail. To us, the Vyper would be an excellent fit for a second printer or for someone who would like to add it to an existing farm.
For us, the Vyper is a fine 3D printer with a few kinks that users need to account for. Additionally, Anycubic could improve quality control. Granted, these issues aren’t bad enough missteps to warrant a poor rating. On the whole, the Vyper is a superb printer that might have been perfect if a little more attention was paid to the details.
Anycubic Vyper Auto-Leveling 3D Printer Review: Solid Performance for Beginners and Experienced Users Alike published first on http://droneseco.tumblr.com/
0 notes
Text
TMC2209 stepper motor driver board testing 🤖⚙️🔋
We've been testing the Trinamic/Maxim/Analog/WeylandYutani TMC2209 (https://www.digikey.com/short/8r5m38h8) breakout we designed, and it's working great - the step/dir interface plus the micro-step select allows a microcontroller to control a stepper with just GPIO and true-to-its-name it is a very silent stepper driver, much quieter than the A4988 (https://www.digikey.com/short/tfjt88dd)! There are a few different I/O pins on the TMC: Index tells you when a full step is completed, which is handy to know when you want to change stepper modes on the fly. Diag lets you know when a power or motor failure has occurred. It can also tell when the motor has stalled if it's configured to. Finally, and most interestingly, is the UART interface: this unidirectional pin lets you read and write configuration registers, set 1-128 microsteps, change current limiting, and detect stalls for 'auto homing'. So far, everything works; we're just going to swap the direction of the potentiometer so it twists clockwise to increase the current limit and book PCBs!
#tmc2209#steppermotordriver#silentdriver#steppercontrol#motorcontrol#electronicsengineering#microstepping#diyrobotics#makersgonnamake#electronicsprojects#3dprinterparts#hardwaredesign#uartinterface#indexpin#diagpin#motorfailure#stallsensor#quietmotion#currentlimiting#autohoming#engineeringtools#gpiocontrol#embeddedengineering#pcbdesign#circuits#electronicslab#quietstepper#motioncontrol#openhardware#techinnovation
5 notes
·
View notes
Text
Leviathan Board – The Ultimate Voron Controller by LDO & JNP
The Leviathan Board is the result of a collaboration between JNP (a core member of the Voron community) and LDO Motors, created specifically for high-performance Voron 3D printers. It combines cutting-edge hardware, smart integration, and real-world experience to streamline builds and push the limits of DIY CoreXY machines.

Whether you’re building a compact Micron or a large-format V2, the Leviathan is engineered to make your life easier — while giving your steppers the power they deserve.
What Makes Leviathan Different?
Leviathan isn’t just another 3D printer controller. It’s a purpose-built solution for Voron printers, integrating many features makers typically had to add manually.
Key Highlights:
Onboard Raspberry Pi mount – Fits Pi 3, 4, 5 or Zero 2W
Integrated TMC2209 & TMC5160 drivers – Smooth motion, powerful torque
48V support for A/B steppers – Ideal for fast, high-mass gantries
Reverse polarity protection – Peace of mind for your power wiring
Smart fan and sensor integration – More control, fewer external boards
It’s a refined, all-in-one design that reduces wiring complexity, improves reliability, and saves space in your electronics bay.
Full Technical Features
MCU: STM32F446 @ 180 MHz
Drivers: • 5x TMC2209 (integrated) • 2x TMC5160 (48V rated, integrated)
Power Input Protections: • Reverse polarity protection on main and HV stepper supply
Cooling: Passive cooling for all stepper drivers
Pi Integration: • Mounting space for Pi 3/4/5 or Zero 2W • Dedicated Pi power supply and UART port
Fan Ports: • 4x with flyback protection, 5V/24V selectable, tachometer input
Thermistors: • 4x with 2.2kΩ pull-up resistors
Lighting: • 1x LED strip output (1% flicker-free dimming) • 1x Neopixel port
Heater Outputs: • Hotend: Up to 180W • Heated bed: Up to 240W
Z-Probe Port: • Dedicated input with selectable voltage and diode protection
I/O Ports: • 3x endstop inputs • 1x filament sensor input
Designed for the Voron Ecosystem
Every detail of the Leviathan Board is tuned to the needs of Voron builders:
Compact and elegant electronics layout
Optimized for CoreXY motion systems
Built-in support for sensorless homing and probes
Clean Pi integration with no need for messy cabling or additional breakout boards
Whether you’re upgrading from a standard controller or planning a fresh build, Leviathan gives you the tools to go further — faster. https://shop.zen3d.eu/ldo-voron-leviathan-board
Order the Leviathan Board at shop.zen3d.eu

1 note
·
View note
Photo

BIGTREETECH TMC2209 Stepper Motor Driver as 3D Printer Parts with UART Mode
0 notes
Photo

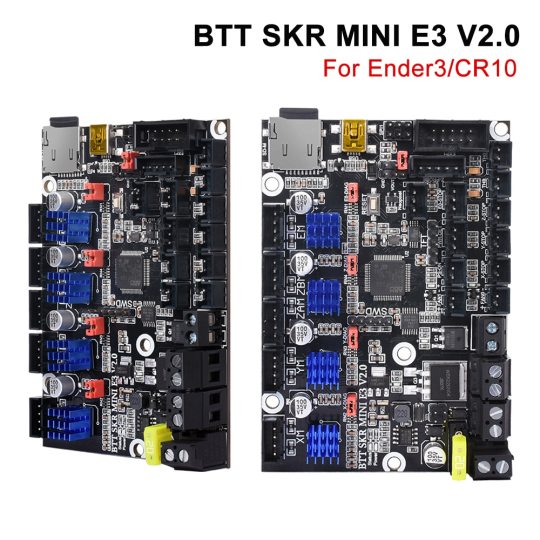
BIGTREETECH SKR MINI E3 V2 32Bit Control Board With TMC2209 UART 3D Printer Parts For Creality Ender 3 Pro Upgrade CR10 Kits (Discount 15 % ) #BIGTREETECH #MINI https://bit.ly/3jJpXRm
0 notes
Photo
BIGTREETECH SKR MINI E3 V2 32Bit Control Board With TMC2209 UART 3D Printer Parts For Creality Ender 3 Pro Upgrade CR10 Kits (Discount 15 % ) #BIGTREETECH #MINI https://bit.ly/2HXLskp
0 notes
Photo

BIGTREETECH SKR MINI E3 V2 32Bit Control Board With TMC2209 UART 3D Printer Parts For Creality Ender 3 Pro Upgrade CR10 Kits (Discount 15 % ) #BIGTREETECH #MINI https://s.click.aliexpress.com/e/_d8uawMr
0 notes
Photo

BIGTREETECH SKR MINI E3 V2 32Bit Control Board With TMC2209 UART 3D Printer Parts For Creality Ender 3 Pro Upgrade CR10 Kits (Discount 15 % ) #BIGTREETECH #MINI https://bit.ly/2G9xPxF
0 notes
Text
BIGTREETECH SKR MINI E3 V2 32Bit Control Board With TMC2209 UART 3D Printer Parts For Creality Ender 3 Pro Upgrade CR10 Kits (Discount 15 % ) #BIGTREETECH #MINI

BIGTREETECH SKR MINI E3 V2 32Bit Control Board With TMC2209 UART 3D Printer Parts For Creality Ender 3 Pro Upgrade CR10 Kits (Discount: 15 % ) US $35.28 (Discount: 15 % ) from Computer - Office my new fed https://s.click.aliexpress.com/e/_dZUdwe3 via BIGTREETECH SKR MINI E3 V2 32Bit Control Board With TMC2209 UART 3D Printer Parts For Creality Ender 3 Pro Upgrade CR10 Kits (Discount 15 % ) #BIGTREETECH #MINI
0 notes
Text
⚡🔋🌟 Discover the newest - Adafruit Sparkle Motion WLED/xLights board, Feather RP2350 with HSTX port and PSRAM, and Raspberry Pi 500 Desktop Kit. Solar charging enclosures, handy breadboard strips, Lightning Bolt LED Filament, and the TMC2209 stepper driver. https://www.adafruit.com/new
#adafruit#sparklemotion#wled#xlights#featherrp2350#hstx#psram#raspberrypi#raspberrypi500#desktopkit#solarcharging#electronics#diyprojects#ledfilament#lightningbolt#tmc2209#stepperdriver#techgadgets#makerspace#breadboardstrips#hardwarehacking#opensourcehardware#diytech#codingprojects#embeddeddesign#robotics#iotdevices#makercommunity#engineeringtools#techinnovation
3 notes
·
View notes