#tp-link router setup
Explore tagged Tumblr posts
Visit Tumblr Blog
Explore Tumblr blogs with no restrictions, modern design and the best experience.
Last Seen Tumblr Blogs


Fun Fact
US Tumblr user growth rate is estimated to slow down to 4.1%.
Video
youtube
TP Link Archer NX200 5G AX1800 WiFi 6 Router Setup
0 notes
Text
TP-Link Archer AX10000 Gaming Router Setup. A Complete Guide Here!
TP-Link Archer AX10000 Gaming Router Setup is a straightforward process. Connect it to your modem via Ethernet, power it on, and use a web browser to access the router's web interface (usually "http://tplinkwifi.net"). Follow the on-screen instructions to create a log in password, set up your Wi-Fi network, and configure advanced settings if needed. Ensure your gaming devices are connected to the high-speed 5GHz band for optimal performance. The Archer AX10000 is designed for gaming with its fast speeds and customizable settings to enhance your gaming experience.
0 notes
Text
Getting Started with Network Design 🧠🌐
#coding#programming#orhanergun#webdev
Are you building a scalable and secure network for the first time? Here's a beginner-friendly guide to get you started with network design fundamentals.
🧩 What Is Network Design? Network design is the process of planning the structure of a computer network—whether it's for a small office, a campus, or a global enterprise. It involves identifying business needs, selecting hardware/software, and defining how devices will communicate.
Think of it as an architect’s blueprint—only for data, not buildings.
🧱 Core Components of a Network Before diving into design, it’s important to know what makes up a network:
Routers: Connect different networks together.
Switches: Connect devices within the same network.
Firewalls: Protect your network from unauthorized access.
Access Points: Allow wireless devices to connect to the network.
Cabling or Wireless Links: Physical or radio-based communication paths.
🗺️ Step-by-Step: Designing a Basic Network Here’s a simplified roadmap to start designing a small to medium-sized network:
Define Requirements Ask:
How many users or devices will connect?
What are the performance needs? (e.g., speed, uptime)
Are there remote or mobile users?
What applications will run on this network?
Create a Network Topology Choose a logical layout:
Star topology: Common and simple (e.g., one central switch).
Mesh topology: High redundancy (used in critical systems).
Hybrid: A mix of both, which is common in larger setups.
Tip: Use tools like draw.io or Cisco Packet Tracer to visualize your design.
Select Hardware and IP Schema Choose devices based on your budget and needs:
Cisco, Juniper, MikroTik (enterprise)
TP-Link, Ubiquiti (SMBs)
Plan IP addressing:
Use private IP ranges (e.g., 192.168.1.0/24)
Avoid IP conflicts using DHCP or static planning.
Add Security Layers Firewalls, VLANs, and ACLs (Access Control Lists)
Enable port security on switches
Use VPNs for remote access
Plan for Scalability and Redundancy Design with future growth in mind
Consider redundant links and failover strategies (e.g., dual routers)
🧪 Test Your Design Use simulation tools:
Cisco Packet Tracer
GNS3
EVE-NG
Before deploying a real network, simulate traffic, check for bottlenecks, and validate security.
🛠️ Tools to Help You Design Tool Purpose Cisco Packet Tracer Network simulation SolarWinds IPAM IP address management Wireshark Network traffic analysis draw.io Network diagrams
📌 Final Thoughts Network design is more than just connecting wires—it's about planning for performance, security, and growth. Whether you’re building a home lab or laying out an enterprise infrastructure, starting with a solid design can save you from major headaches later.
If you're just getting started, experiment, document everything, and stay curious. 💡
3 notes
·
View notes
Text
TP Link Extender Red Light Troubleshooting Tips
Poor router-to-extender connectivity may be the cause of the TP Link extender red light blinking. This frequently occurs when an extension is placed in an area with poor signal strength or when the setup isn't done correctly. First, move the extender into your router's operational range. A stronger connection can be restored by reconnecting the device via WPS or the web-based technique. Additionally, look for any incorrectly setup network credentials in the extender's settings. Until a steady connection is established, the red light on the TP-Link extender may stay on. For a long-term fix, restarting the device and updating the OS are helpful actions. Consistent performance is ensured by positioning equipment optimally.
#tplinkrepeater#tplinkrepeater.net#tp link extender red light#tp link extender red light on wifi#tp link firmware update#tp link extender red light blinking#http tplinkrepeater net#tplinkrepeater net
0 notes
Text
Boost Your Home Wi‑Fi with the 2025 Wirecutter–Approved TP‑Link RE315 Extender
This post contains affiliate links which I may receive compensation for
Experience stronger, wider Wi‑Fi coverage without replacing your router. The TP‑Link AC1200 WiFi Extender RE315 delivers dual‑band, 1.2 Gbps speeds (867 Mbps on 5 GHz + 300 Mbps on 2.4 GHz), covering up to 1,600 sq ft and supporting about 32 devices—making it a top budget pick in 2025 according to Wirecutter .
Why RE315 Stands Out:
Dual‑band coverage & signal indicator make setup fast and effective .
Compatible with EasyMesh for seamless mesh networking .
Built-in 100 Mbps Ethernet port bridges wired devices (note: capped at 100 Mbps) .
Setup is simple via TP‑Link’s Tether app—no tech skills needed .
Real-World Experience:
Users report reliable boosts in apartments and mid‑sized homes, though placement matters—ideally within good router range .
One user noted speed capped at Ethernet port’s limit, but still sufficient for general usage.
Is It Right for You?
Ideal for renters, small-home owners, and anyone with Wi‑Fi dead zones. This is a plug-and-play solution if your internet needs don’t require ultra-high speeds (e.g., 4K streaming across multiple devices).
Buy now

#wifiExtender#TPLINKRE315#AC1200Extender#MeshCompatible#CordlessWifiBooster#TPLinkEasyMesh#HomeNetworkTools#BudgetWifiUpgrade#WifiSignalBooster#DualBandExtender
0 notes
Text
Cách cấu hình router wifi: Hướng dẫn chi tiết tối ưu bảo mật và tốc độ
Trong thời đại số hóa, việc thiết lập và tối ưu hóa mạng wifi tại nhà hay văn phòng đã trở thành nhu cầu thiết yếu để đảm bảo kết nối ổn định, bảo mật và tốc độ cao. Tuy nhiên, không phải ai cũng nắm rõ quy trình cấu hình router wifi một cách hi���u quả, đặc biệt khi phải lựa chọn giữa nhiều thương hiệu và dòng thiết bị khác nhau. Với kinh nghiệm thực tiễn, Chiêm Tài sẽ đồng hành cùng bạn trong bài viết này, giúp bạn hiểu rõ các bước cấu hình router wifi, từ việc đổi mật khẩu, đặt tên mạng (SSID), đến lựa chọn băng tần phù hợp. Ngoài ra, các khái niệm như bảo mật wifi, địa chỉ IP, DHCP, và chuẩn kết nối không dây cũng sẽ được giải thích rõ ràng, giúp bạn chủ động kiểm soát hệ thống mạng của mình.

1. Chuẩn bị trước khi cấu hình: Hiểu về router wifi và các thông số cơ bản
Trước khi bắt đầu cấu hình, bạn cần xác định rõ loại router mình đang sử dụng (TP-Link, Tenda, FPT, Viettel, v.v.) và kiểm tra các thông tin như địa chỉ IP mặc định, tên đăng nhập, mật khẩu quản trị. Thông thường, các thông số này được in ở mặt sau thiết bị. Việc chuẩn bị dây ethernet, nguồn điện ổn định và thiết bị truy cập (máy tính, điện thoại) là điều cần thiết để quá trình cấu hình diễn ra suôn sẻ.
2. Đăng nhập giao diện quản trị và đổi thông tin bảo mật
Để truy cập vào giao diện quản trị router, hãy kết nối thiết bị của bạn với router qua dây mạng hoặc wifi mặc định, sau đó mở trình duyệt và nhập địa chỉ IP (thường là 192.168.1.1 hoặc 192.168.0.1). Đăng nhập bằng tài khoản quản trị (admin/admin hoặc thông tin trên thiết bị) đề cài đặt router wifi. Ngay sau khi đăng nhập, bạn nên đổi mật khẩu quản trị để tăng cường bảo mật, tránh nguy cơ bị truy cập trái phép.


3. Thiết lập tên mạng (SSID) và mật khẩu wifi
Việc đặt lại tên mạng (SSID) không chỉ giúp bạn dễ dàng nhận diện wifi của mình mà còn góp phần bảo vệ thông tin cá nhân. Hãy chọn tên mạng không trùng lặp với các mạng xung quanh và tránh sử dụng thông tin cá nhân. Để đổi SSID, truy cập mục Wireless Settings, nhập tên mới và lưu lại. Đồng thời, hãy thiết lập mật khẩu wifi mạnh tại mục Wireless Security để ngăn chặn truy cập không mong muốn.
4. Cấu hình băng tần, địa chỉ IP và chế độ DHCP
Tùy vào nhu cầu sử dụng, bạn có thể lựa chọn băng tần 2.4GHz (phù hợp cho phạm vi rộng, ít vật cản) hoặc 5GHz (tốc độ cao, phù hợp không gian nhỏ). Để thay đổi băng tần, vào mục Wireless Settings và chọn Channel phù hợp. Ngoài ra, việc thiết lập địa chỉ IP tĩnh hoặc động (Dynamic IP) giúp tránh xung đột địa chỉ khi có nhiều thiết bị kết nối. Hãy bật chế độ DHCP để router tự động cấp phát IP cho các thiết bị, đảm bảo kết nối ổn định.
Ví dụ thực t��: Nếu nhà bạn có nhiều thiết bị thông minh, nên ưu tiên bật DHCP và chọn băng tần kép để tối ưu hiệu suất mạng.
5. Lưu ý khi cấu hình các dòng router phổ biến
TP-Link: Có thể cấu hình dễ dàng qua điện thoại hoặc máy tính, hỗ trợ đổi tên wifi, mật khẩu, cài đặt băng tần và chế độ IP động.
Tenda: Đăng nhập bằng tài khoản “admin”, đổi mật khẩu tại mục Security Key, đặt tên wifi ở Primary SSID.
FPT, Viettel: Cần nhập thông tin PPPoE do nhà mạng cung cấp, bật DHCP, đổi SSID và mật khẩu tại mục Wireless Setup
Việc nắm vững cách cấu hình router wifi không chỉ giúp bạn bảo vệ hệ thống mạng khỏi các rủi ro bảo mật mà còn tối ưu hóa tốc độ truy cập cho mọi thiết bị trong gia đình. Dù bạn sử dụng bất kỳ dòng router nào, hãy luôn chú ý đến việc đổi mật khẩu định kỳ, đặt tên mạng riêng biệt và lựa chọn băng tần phù hợp với nhu cầu. Nếu gặp khó khăn trong quá trình thiết lập, đừng ngần ngại liên hệ với đội ngũ tư vấn của Chiêm Tài để được hỗ trợ chuyên sâu, đảm bảo mạng wifi của bạn luôn an toàn và hiệu quả. Hãy chủ động cập nhật kiến thức công nghệ để tận dụng tối đa tiện ích mà mạng không dây mang lại!
0 notes
Text
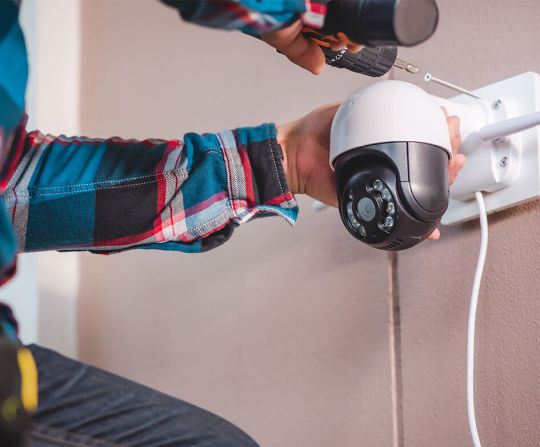
How to Install CCTV Cameras at Home – Step-by-Step Guide for Hyderabad Residents
If you’re a homeowner in Hyderabad concerned about safety, installing a CCTV system is one of the smartest decisions you can make. Whether you live in an independent villa in Kondapur or an apartment in Kukatpally, a well-installed CCTV system acts as your eyes when you’re not around.
In this guide from IPTEC Security Solutions, we’ll walk you through how to install CCTV cameras at home — step-by-step, with tips specific to Hyderabad’s infrastructure and lifestyle.
📌 Why Should You Install CCTV Cameras at Home?
Home security in Hyderabad has become a top priority due to:
Increasing urbanization and population density
Higher rates of burglary and package theft
Need to monitor domestic help, deliveries, and visitors
Gated communities and apartment societies encouraging self-installed systems
🛠️ Step-by-Step Guide to Install CCTV Cameras at Home
1. Choose the Right CCTV System for Home Use
There are two main types:
Wired CCTV systems – Best for permanent homes or large properties
Wireless (Wi-Fi) cameras – Ideal for rented apartments or quick setups
Make sure your cameras have:
Night vision
Motion detection
Remote access via mobile app (very useful if you’re out during Hyderabad summers or traveling during festivals)
Popular brands in Hyderabad include Hikvision, CP Plus, and TP-Link — all available through IPTEC Security Solutions with local support.
2. Select the Ideal Locations for Installation
Install cameras in areas that cover:
Main entrance & back door
Balcony or windows with street view
Living room (especially where valuables are kept)
Parking area or garage
Common areas in independent homes
Avoid placing cameras where privacy laws could be violated (like inside bathrooms or neighbors’ windows).
3. Gather the Necessary Equipment
Basic items you’ll need:
CCTV cameras
DVR or NVR (for recording)
Monitor or smartphone
Power supply cables
Ethernet cables (for wired systems)
Drill machine and mounting kit
Internet router (for remote access)
At IPTEC, we offer home installation kits that include everything — plus professional support.
4. Mount the Cameras
Use wall mounts or ceiling brackets
Drill holes at marked spots
Run cables (if using wired cameras) neatly along baseboards or behind walls
Ensure the camera angle covers a wide area and isn’t easily tampered with
💡 Pro Tip: In areas like Banjara Hills where monsoons hit hard, weatherproof outdoor cameras are a must.
5. Connect Cameras to the Recording Device
For DVR systems: Connect analog cameras via coaxial cables
For NVR systems: Connect IP cameras using Ethernet cables or Wi-Fi
Use HDMI cable to link DVR/NVR to a display screen or monitor

6. Configure the System
Set up your system:
Adjust camera settings (motion alerts, night vision)
Create recording schedules
Connect system to your home Wi-Fi
Install the mobile app for remote access (most brands offer Android & iOS versions)
This lets you watch real-time footage even if you’re out shopping at GVK One or away for the weekend.
7. Test and Secure the System
Check for blind spots
Review video quality (day and night)
Test alerts and notifications
Set strong passwords to prevent unauthorized access
🧠 FAQs – CCTV Installation for Hyderabad Homes
Q. Can I install CCTV without internet in Hyderabad? Yes, CCTV systems with DVR can record locally without internet. However, internet is required for remote viewing or cloud backups.
Q. Is permission required to install CCTV at home? No, but if you live in an apartment, inform the society management. Avoid placing cameras in shared corridors unless authorized.
Q. What’s the cost of CCTV installation in Hyderabad? Basic setups start from ₹6,000–₹10,000. At IPTEC, we provide customized packages including installation across Hyderabad.
🏡 Final Thoughts
DIY CCTV installation is possible, but it takes effort and attention to detail. For long-lasting peace of mind and professional support, it’s best to consult experts. At IPTEC Security Solutions, we offer end-to-end CCTV installation for Hyderabad homes — with free site visits, brand options, and real-time setup.
👉 Need help with home CCTV installation in Hyderabad? Call IPTEC today for a free consultation and same-day installation services.
0 notes
Text
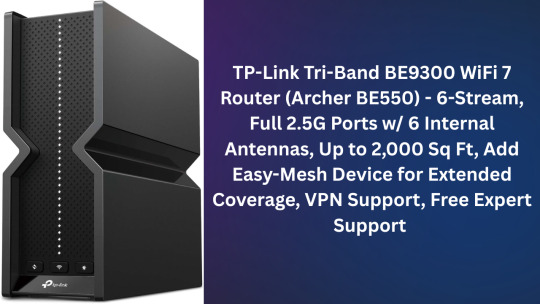
TP-Link Tri-Band BE9300 WiFi 7 Router (Archer BE550) Review (2025): Fast, Future-Ready, and Totally Worth It 🚀
Let’s be real—dealing with spotty Wi-Fi in 2025 feels like using a flip phone in the age of smartphones. Between smart TVs, Zoom calls, and half a dozen streaming devices, our home networks are stretched thin. That’s exactly why I upgraded to the TP-Link Archer BE550 (BE9300)—and honestly, I wish I had done it sooner.
If you're looking for a router that can keep up with your connected life (without costing more than your rent), stick with me. I tested the BE550 across my entire house, loaded it with devices, and pushed it to its limits. Here's what I found.
<< Click Here Get The Product -20% Discount >>
About this item
BE9300 Tri-Band Wi-Fi 7 Speeds: Archer BE550 features Multi-Link Operation, Multi-RUs, 4K-QAM, and 320 MHz channels, providing blazing-fast speeds of 5760 Mbps (6 GHz band), 2880 Mbps (5 GHz band), and 574 Mbps (2.4 GHz band).
Unmatched Performance for Streaming and Gaming: Ensures seamless 4K/8K streaming, engaging AR/VR gaming, and ultra-fast downloads for an optimal user experience.
Extend Your Coverage with EasyMesh: Add EasyMesh-compatible routers, range extenders, and wireless powerline adapters to form a seamless whole-home network that eliminates dead zones while reducing signal drops and lag when moving throughout your home.
Full 2.5G WAN & LAN Ports for Future-Proof Networking: Archer BE550 is equipped with one 2.5G WAN port and four 2.5G LAN ports, enabling peak device performance and offering an ideal solution for future-proofing your home network.
Enhanced Experience with Premium Components: Our proprietary Wi-Fi optimization technology, combined with six strategically positioned antennas and Beamforming, ensures higher capacity, stronger and more reliable connections, and reduced interference.
Buy with confidence - Our highly trained support team is ready to help resolve any setup or WiFi issues at [email protected]
<< Click Here Get The Product -20% Discount >>
Product information
Features & Specs
Other Special Features of the Product QoS, Guest Mode, Access Point Mode, WPS, Remote Access
Frequency Band Class Tri-Band
Compatible Devices Gaming Console, Personal Computer, Tablet, Smart Television, Smartphone
Frequency 6 GHz
Antenna Location Home, Gaming
Connectivity Technology Wi-Fi (802.11ac, 802.11ax, 802.11n, 802.11g, 802.11be), Ethernet, USB
Antenna Type Internal
Operating System IOS, Android, Windows, Mac OS
Security Protocol WPA2, WPA3, WPA/WPA2-Enterprise (802.1x)
Number of Ports 6
Control Method App
Data Transfer Rate 9300 Megabits Per Second
LAN Port Bandwidth 2.5 Gbps
Voltage 12 Volts
Controller Type App Control, Push Button
Maximum Upstream Data Transfer Rate 5760 Megabits Per Second
Number of Antennas 6
Coverage Up to 2000 square feet
Is Modem Compatible Yes
<< Click Here Get The Product -20% Discount >>
Item details
Brand TP-Link
Model Name Archer BE550
Built-In Media Power Adapter, RJ45 Ethernet Cable, Quick Installation Guide, Wi-Fi 7 Router Archer BE550
Model Number Archer BE550
UPC 840030708367
Global Trade Identification Number 00840030708367
Manufacturer TP-Link
Customer Reviews 4.2 4.2 out of 5 stars (5,984) 4.2 out of 5 stars
Best Sellers Rank #20 in Computer Routers
ASIN B0CJSNSVMR
Item Height 7.99 inches
Warranty Description 2 year manufacturer
Measurements
Item Weight 2.5 Pounds
Item Dimensions L x W x H 9.12"L x 2.99"W x 7.99"H
Additional details
Color Black
Warranty & Support
Amazon.com Return Policy:You may return any new computer purchased from Amazon.com that is "dead on arrival," arrives in damaged condition, or is still in unopened boxes, for a full refund within 30 days of purchase. Amazon.com reserves the right to test "dead on arrival" returns and impose a customer fee equal to 15 percent of the product sales price if the customer misrepresents the condition of the product. Any returned computer that is damaged through customer misuse, is missing parts, or is in unsellable condition due to customer tampering will result in the customer being charged a higher restocking fee based on the condition of the product. Amazon.com will not accept returns of any desktop or notebook computer more than 30 days after you receive the shipment. New, used, and refurbished products purchased from Marketplace vendors are subject to the returns policy of the individual vendor. Manufacturer’s warranty can be requested from customer service. Click here to make a request to customer service.
💰 So… Is It Worth the Money?
Absolutely. For under $250, the Archer BE550 gives you:
Future-proof tech
Excellent speeds across all bands
Full multi-gig wired ports
Reliable coverage
Effortless setup
And a clean modern look
Compared to the $400+ premium routers out there, this one hits the sweet spot between price and performance. Unless you absolutely need 10G or enterprise-level features, the BE550 will do everything you need—and then some.
🧭 Final Verdict

👉 Bottom Line:
If you're ready to future-proof your home network, the TP-Link Archer BE550 is a no-brainer. It’s fast, reliable, sleek, and surprisingly affordable for a Wi-Fi 7 router.
You won’t find a better combo of speed, simplicity, and value at this price point. Whether you’re a gamer, streamer, or just tired of laggy Wi-Fi, this router delivers exactly what it promises.
<< Click Here Get The Product -20% Discount >>
#wifi 7 router#tp-link tri-band be9300 wifi 7 router archer be550#best wifi 7 router#tp-link tri-band be9300 wifi 7 router#best wifi 7 routers#wifi 7#tplink wifi 7 router#tri-band router#best wifi router#wifi 7 gaming router#tp-link tri-band be9300#be9300 wifi 7 review#be9300 tri-band wi-fi 7 router#tp link wifi 7#wifi 7 speed test#wifi 7 routers#wifi 7 router review#wifi router#tp-link wifi 7 router#wi-fi 7 router
0 notes
Text
How to Set Up TP-Link WiFi Extender ?
Expanding your Wi-Fi coverage with Tplink extender setup is quite simple. Plug the extender into an outlet within range of your router. You can use the WPS button on both devices for a quick connection, or connect to the extender's Wi-Fi and visit tplinkextender.net in a browser, following the intuitive setup wizard. Boost your wireless signal effortlessly.

0 notes
Video
youtube
TP LINK BE800 AC19000 TriBand WIFI Router setup
0 notes
Text
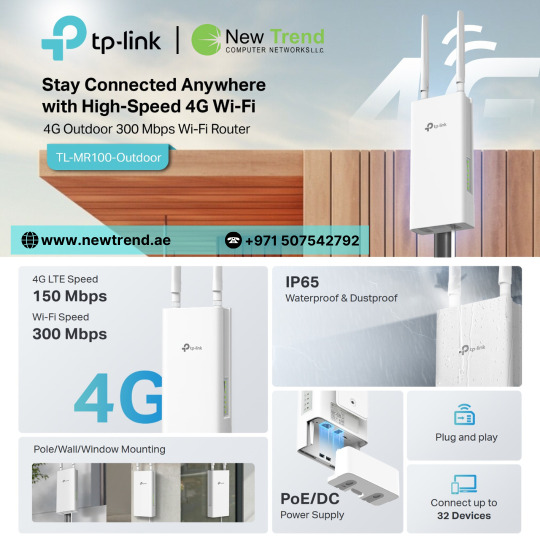
Experience seamless 4G LTE connectivity with the TL-MR100-OUTDOOR – built for reliable performance in harsh outdoor environments. Ideal for remote areas, this rugged router ensures stable internet with weatherproof design, powerful antennas, and plug-and-play setup. Stay connected anywhere, anytime with TP-Link’s trusted outdoor networking solution.
For more information, Visit:https://newtrend.ae/product-category/tplink/ Live chat: +971 507542792
#TPLINK#OutdoorRouter#4GLTE#RuggedConnectivity#RemoteAccess#WeatherproofWiFi#StayConnected#NetworkingSolutions#InternetAnywhere#NewTrendTech
0 notes
Text
TP-Link TL-WA701ND Repeater Setup – Step-by-Step Guide
For your TP-Link TL-WA701ND repeater setup, power on the device and connect it to your computer. Access the web interface by entering tplinkrepeater.net in your browser. Log in with default credentials (admin/admin). Navigate to the setup wizard, select 'Repeater Mode', and follow the prompts to connect to your main router's SSID.Need assistance? Reach out through the chat box below for expert help!
0 notes
Text
Simple Fixes for TP-Link Repeater Login Problems
Resolving tplinkrepeater login problems may cause your extender configuration to be disrupted. First, confirm that your device is linked to the WiFi network of the extender. Next, type http tplinkrepeater net into the address bar of your browser, not the search bar. Try using a different browser, clearing your cache, or using a different device if that doesn't work. Access to your tplinkrepeater may occasionally be blocked by out-of-date firmware or a network configuration error. This is usually fixed with a fast reset. During setup, make sure you are not linked to the main router. You may adjust extender parameters, optimize location, and increase speed with the right login credentials. Fixing login problems guarantees that your extender operates dependably and contributes to uninterrupted internet distribution across your house or place of business.
#tplinkrepeater#tplinkrepeater.net#tp link setup#tplinkrepeater net#http tplinkrepeater net#Tp link repeater login#http //tplinkrepeater.net app
0 notes
Text
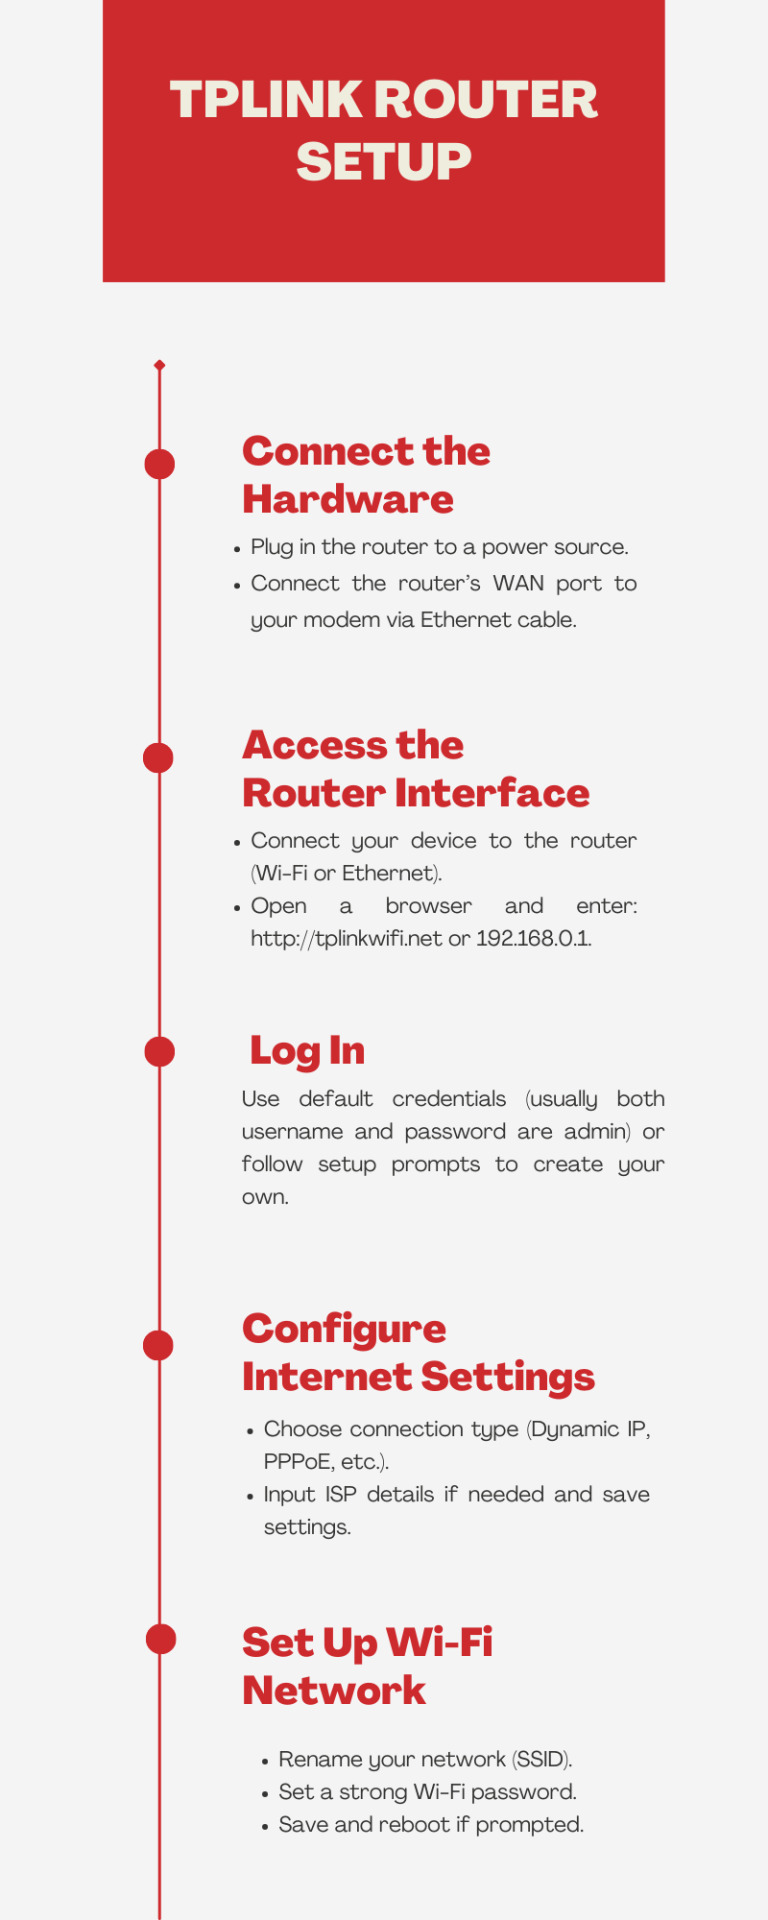
Tplink Router Setup
To perform the tplink router setup, connect the router to your modem and power. Connect your computer or phone to the TP-Link WiFi network and open a web browser. Enter the default IP address (usually 192.168.0.1 or 192.168.1.1) and follow the setup wizard to configure your network.
0 notes
Link
Welcome to TECH LOGICS! In this guide, we’ll walk you through the process of integrating a TP-Link TL-POE10R POE Splitter to power and connect a WiFi router, modem, or access point to a CCTV system’s POE switch. This powerful device simplifies your network setup by delivering both power and data through a single Ethernet cable, making it
0 notes
Photo

🔥 Massive Gaming Week Savings Alert! 🔥 Ready to dazzle your gaming setup without maxing out your budget? Discover unbeatable deals from Amazon and Newegg! Gaming Week has teamed up these retail giants for a whirlwind of discounts on top PC gaming gear. From high-speed routers to all-star gaming PCs, there's something for every budget and tech enthusiast. 🎮 Highlighted Deals: - TP-Link Archer GE800 Router - Nearly half off at $469 CAD. - Corsair K70 Core Keyboard - Now just $94 CAD. - Skytech Chronos Gaming PC - Slash $1,350 CAD! These products feature the latest tech advancements aimed at elevated gaming experiences—making them ideal for competitive gaming or seamless streaming. Leverage these show-stopping discounts to future-proof your gaming station. Why wait when you can upgrade now? What will be your ultimate pick from these incredible offers? Drop it in the comments! 🕹️ #GamingWeek #PCDeals #Amazon #Newegg #PCGamer #TechSavvy #BudgetGaming --- Take advantage of these limited-time offers while they last! Equip yourself with top-tier gaming gear in a flash. Don't let this opportunity pass you by! ⏰
0 notes