#tplink admin setup
Explore tagged Tumblr posts
Visit Tumblr Blog
Explore Tumblr blogs with no restrictions, modern design and the best experience.
Last Seen Tumblr Blogs


Fun Fact
Users from the US are the majority of Tumblr visitors.
Text
Professional guide to the TP-link cpe540 setup!
For an easy TP-Link CPE540 Setup process, open the web browser and type the 192.168.0.254 IP address in the browser bar. Now, enter your admin credentials and you will reach the setup wizard. To configure the other settings, go to the Basic & Advanced settings. For more information, approach us!
0 notes
Text
can you put a vpn on a tplink router
🔒🌍✨ Get 3 Months FREE VPN - Secure & Private Internet Access Worldwide! Click Here ✨🌍🔒
can you put a vpn on a tplink router
VPN setup on TP-Link router
Setting up a VPN on your TP-Link router can enhance your online security and privacy, allowing you to browse the internet anonymously and securely. Follow these steps to configure your TP-Link router with a VPN:
Choose a VPN Provider: Start by selecting a VPN provider that offers router support. Make sure the provider offers detailed instructions for setting up their service on TP-Link routers.
Gather Required Information: Before proceeding, gather the necessary information from your VPN provider, including the server address, username, password, and any encryption settings.
Access Router Settings: Open a web browser on a device connected to your TP-Link router and enter the router's IP address in the address bar. Log in to the router's admin panel using your username and password.
Navigate to VPN Settings: Once logged in, locate the VPN settings section within your router's configuration interface. This may vary depending on the router model, but it's typically found under the "Advanced" or "Security" tab.
Enter VPN Configuration Details: Enter the VPN configuration details provided by your VPN provider into the appropriate fields. This usually includes the server address, username, password, and any additional settings required by your VPN service.
Apply Settings and Reboot Router: After entering the VPN configuration details, apply the settings and reboot your TP-Link router to activate the VPN connection.
Test the VPN Connection: Once the router has rebooted, test the VPN connection to ensure it's working correctly. You can do this by visiting a website that displays your IP address and verifying that it matches the IP address provided by your VPN provider.
Optional: Configure Additional Settings: Depending on your preferences and the features offered by your VPN provider, you may want to explore and configure additional settings such as split tunneling, port forwarding, or DNS settings.
By following these steps, you can easily set up a VPN on your TP-Link router and enjoy the benefits of enhanced online security and privacy for all devices connected to your home network.
TP-Link router VPN configuration
Title: Simplifying Your Online Security: A Guide to TP-Link Router VPN Configuration
In an era where online privacy and security are of paramount importance, setting up a Virtual Private Network (VPN) on your TP-Link router can provide an additional layer of protection for your internet connection. By encrypting your internet traffic and masking your IP address, a VPN ensures that your online activities remain private and secure from prying eyes, whether you're browsing the web, streaming content, or accessing sensitive information.
Configuring a VPN on your TP-Link router is a straightforward process that can be completed in just a few steps. Here's a simple guide to help you get started:
Choose a VPN Service: Before you begin, you'll need to subscribe to a reputable VPN service provider. Make sure to choose a service that offers compatibility with TP-Link routers and provides robust security features.
Access Router Settings: Using a web browser on a device connected to your TP-Link router, access the router's admin panel by entering the router's IP address (typically 192.168.0.1 or 192.168.1.1) into the address bar.
Login and Navigate to VPN Settings: Enter your router's username and password to access the admin panel. Once logged in, navigate to the VPN section in the router settings menu.
Enter VPN Configuration Details: Here, you'll need to enter the configuration details provided by your VPN service provider. This usually includes the VPN server address, VPN protocol (such as OpenVPN or PPTP), and your VPN username and password.
Save Settings and Connect: After entering the VPN configuration details, save the settings and initiate the connection. Your TP-Link router will now establish a secure VPN connection, encrypting all internet traffic passing through it.
Verify Connection: Once connected, verify that your VPN connection is active by checking your IP address using an online tool or the settings in your router's admin panel.
By following these steps, you can enhance your online security and privacy by configuring a VPN on your TP-Link router. Enjoy the peace of mind knowing that your internet connection is encrypted and your data is safe from prying eyes.
Installing VPN on TP-Link router
When it comes to ensuring your online privacy and security, installing a VPN on your TP-Link router can be a great solution. A VPN, or Virtual Private Network, encrypts your internet connection and routes it through a remote server, making it difficult for anyone to track your online activities. By setting up a VPN directly on your router, you can protect all the devices connected to your network, including smartphones, laptops, smart TVs, and more.
To install a VPN on your TP-Link router, you first need to choose a VPN service provider that supports router configurations. Once you have signed up for a VPN service, follow the provider's instructions to configure your TP-Link router. Typically, this involves accessing your router's settings through a web browser, entering the VPN connection details provided by your provider, and saving the settings.
After successfully setting up the VPN on your TP-Link router, all the devices connected to your network will automatically benefit from the VPN protection. This means that your internet traffic will be encrypted, your IP address will be hidden, and your online activities will be secure from prying eyes.
Installing a VPN on your TP-Link router is a straightforward process that can significantly enhance your online security and privacy. By taking this simple step, you can enjoy a safer and more private internet browsing experience for all your connected devices.
TP-Link router VPN compatibility
When it comes to ensuring online privacy and security, using a Virtual Private Network (VPN) is a popular choice among users. VPNs encrypt the internet connection, providing anonymity and protection from potential cyber threats. However, not all routers are compatible with VPN services, which is why it's essential to choose a router that supports VPN setups.
TP-Link routers are known for their reliability and performance, but not all models are VPN-compatible. It's crucial to verify if a TP-Link router supports VPN services before purchasing one.
Some TP-Link routers come with built-in VPN capabilities, allowing users to easily set up and configure VPN connections. These routers offer various VPN protocols, such as PPTP, L2TP, and OpenVPN, making it convenient for users to choose one that best fits their needs.
For routers that do not have built-in VPN support, users can still utilize VPN services by manually configuring the connection settings on the router. This process may vary depending on the router model and the VPN service provider, so it's essential to follow specific instructions provided by both parties.
By using a VPN-compatible TP-Link router, users can secure their internet traffic and protect their online activities from prying eyes. Whether for personal privacy or business security, having a VPN-enabled router adds an extra layer of protection to any network.
Overall, ensuring VPN compatibility when selecting a TP-Link router is crucial for those looking to enhance their online security and privacy effortlessly.
VPN client for TP-Link router
A VPN client for TP-Link routers can enhance your online security and privacy by encrypting your internet connection. With the increasing importance of protecting personal data online, using a VPN client on your TP-Link router is a smart choice.
Setting up a VPN client on a TP-Link router enables all devices connected to the network to benefit from the encrypted connection without needing to install a separate VPN app on each device. This means that your smart TV, gaming console, and even smart home devices can all enjoy the added security and privacy that a VPN provides.
There are various VPN services that offer support for TP-Link routers, making it easy to find one that suits your needs. Once you have chosen a VPN service provider, you can follow the step-by-step instructions provided by the service to set up the VPN client on your TP-Link router.
By using a VPN client on your TP-Link router, you can also bypass geo-restrictions and access content that may be blocked in your region. Additionally, a VPN can help prevent your Internet Service Provider from tracking your online activities and browsing history.
Overall, adding a VPN client to your TP-Link router is a practical way to enhance your online security, privacy, and freedom while ensuring that all devices connected to your network benefit from the added layer of protection.
0 notes
Text
To log into the TP-Link repeater’s user interface, you must have the repeater’s tplinkrepeater login address, and username & password. Using the login address, you can access the TP-Link repeater’s login page and use the default username & password to access the admin panel. Then you can configure its settings accordingly. Need further guidance? Visit our website now.
0 notes
Text
How to Setup the TP-Link Extender?
A weak Wi-Fi network can be really frustrating, mainly when it causes dead zones and slow internet speeds in your home/office. To overcome such challenges, the TP Link Extender Setup acts as an excellent solution. Setting up the TP-Link extender is very easy to conduct, and you can do it very easily.
This blog post includes the complete TP Link Extender Setup through the WPS button, web browser, and the TP-Link Tether app. So read through the following blog post right away.
Steps for Setting Up the TP-Link Extender
Setting up your TP-Link extender is pretty simple and you can easily do it through the following steps:
Tplink Extender Setup through the WPS Button
The first thing you must do is place your extender near the router before you start the setup process.
After that, you need to plug your extender into a nearby power outlet and wait for it to completely power on. If you see the Green LED light, it means that the extender is successfully On.
Consequently, you must locate & hold down the “WPS Button” on your router and release it after a few seconds.
Next, you should also press the WPS button on the TP-Link extender within 2 minutes.
If you see the WPS LED blinking on the extender, you must know that it is successfully connecting to the router.
The WPS LED will become solid green once the connection is established between the extender and the router.
Tplink Extender Setup through the Web Browser
To set up the TP-Link extender through the Web Browser, plug the extender into a power plug in the first place.
After that, you must open a web browser and enter “192.168.0.1” or “tplinkrepeater.net” in the URL bar.
Next, you’ll be prompted to the TP-Link login page where you must enter the admin username & password.
Consequently, click on the “Login” button and choose your desired mode - Range Extender.
After that, the setup wizard will scan and connect to the available Wi-Fi network.
Finally, log into your extended Wi-Fi network and configure the Wi-Fi settings.
After configuring the Wi-Fi settings, you must click on the “Apply” button to save the settings.
Tplink Extender Setup through the “TP-Link Tether” App
To set up the extender through the app, download the “TP-Link Tether” from the Play Store or the App Store.
Next, you must open the app and follow the in-app instructions to create an account, if you don’t have one.
If you already have an account, try logging in to the app using your admin username & password.
After that, you must connect your smartphone to the TP-Link extender’s default network.
Then you must click on the “+” icon, choose the “Range Extender” and follow the on-screen setup wizard.
Finally, the app will guide you through the complete setup process, and customize the extender’s network issues.
Follow the above steps carefully and successfully complete the Tplink extender setup.
Wrapping It Up
With these effective methods, you can set up your TP-Link Extender easily to extend your Wi-Fi network, eliminate all the dead zones, and enjoy the internet experience across your office or home. Choose the appropriate method that befits your desire and prepare to improve your Wi-Fi network with ease.
But if you are unable to conduct the TP Link Extender Setup, feel free to connect with our technical experts. They’ll guide you through the complete setup process and help you resolve the possible setup issues. So, get in touch with our technical experts right away.
0 notes
Text
Tplinkrepeater.net extender setup guide
In this post we are trying to solve Tplinkrepeater.net setup, Tplink extender setup, or installing Tplinkrepeater-net extender. There are very simple and easy methods to tplinkrepeater.net extender setup step by step.firstly you have to check the power supply is working or not, Position of the tplinkrepeater-net in the proper location, close to the router, Using an ethernet cable, connect your device to the tplinkrepeater-net router etc.

If you also have problems like tplinkrepeater.net not connecting, tplinkrepeater extender not login, can't reach tplinkrepeater.net extender admin page, configure tplinkrepeater.net extender, unable to setup tplinkrepeater.net extender. For these issues we refer you to our guide tplinkrepeater.net. On that guide we are solving all your problems related to tplinkrepeater-net Extender.
#tplinkrepeater.net extender setup#tplink extender login#install tplinkrepeater.net#configure tp;inkrepeater-net#tplinkextender admin page#tplinkrepeater.net not connecting
2 notes
·
View notes
Text
How do I fix my modem not connecting to the Internet? Tplinkwifi.net
To reboot your modem: 1. Unplug the power cord from the back of the modem. Check to make sure all the lights on the modem are OFF.
2. Wait one full minute. Plug the power cord back into the modem.
3. Wait for the internet light or main status light to turn green.
4. Now try connecting to the internet again.
Read more at https://www.tplinkwifirouter.net/.
#tplink#tplinkwifi.net#TP-Link Router Setup#Tp-Link Admin Page#tp-link router settings#tplink router login#tplink router setup#How do I fix my modem not connecting to the Internet?#How do I fix my modem not connecting to the Internet? Tplinkwifi.net
2 notes
·
View notes
Text
How to Login Tp-link Router- tplinkwifi.net
Steps for tplinkwifi.net login
Do the following steps to login tp-link router, steps are as follows:
· First and foremost you need to open a web browser.
· Next types, tplinkwifi.net into the address bar and press Enter.
· Now, you can see a login page with TP-Link branding will show on your screen and asking you to enter the login username and password.
· Further, you need to enter the login username and password for the TP-Link router admin panel. Use the default username and password for TP-Link routers is “admin” in lowercase.
· After doing these steps, now you are successfully logged in into the admin panel of TP-Link Wi-Fi.netRouter.
Most probably, tplinkwifi.net login with above steps, if you can’t login then contact us on
+1–801–890–3242 and get the right solution from us.
#tplinkwifi.net#www.tplinkwifi.net#http://tplinkwifi.net#tplink router admin#tplink router setup#tplink router login#tp-link router settings#Tp-Link Admin Page#TP-Link Router Setup#Login Tp-link Router
1 note
·
View note
Link
1 note
·
View note
Link
1 note
·
View note
Text
NETGEAR Router Login | Routerlogin.net | Routerlogin.com
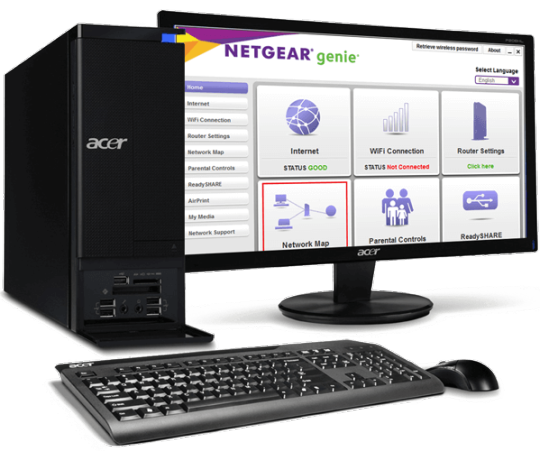
NETGEAR Router Login | Routerlogin.net | Routerlogin.com
Routers admin page of newer Netgear router can be simply accessed using routerlogin.com or routerlogin.net. You don't need to remember the default IP of the Netgear router anymore. The recent range of Netgear routers is configured in such a way that when you go to the www.routerlogin.net login page from your home network, it redirects automatically to the router admin or configuration page.Here in this article, we shall discuss how to access the NETGEAR router login page (www.routerlogin.net or routerlogin.com) and all the problems and their respective solutions you may encounter while logging in to your NETGEAR router, especially for the first time. You may be unable to access the www.routerlogin.net login page because of your router's faulty software. Furthermore, a misconfigured browser cache or mismatched browsers may be to blame for the issue in question. The problem occurs when you, as the afflicted user, attempts to access the router's administration panel through www.routerlogin.net login. The issue then is not limited to a particular operating system or model of NETGEAR router. Some customers face a problem while configuring the router for the first time as well. Before proceeding with the troubleshooting method to log in to the NETGEAR router, ensure that you are using the correct password and user name for the router ("admin" and "password" are the default versions). Disconnect your system from any other wired, wireless, corporate, or VPN connections as well (merely a single connection, whether wireless or wired to the NETGEAR router). Furthermore, deactivate all pop-up blockers and ad-blocking browser add-ons.
How to access the NETGEAR router login page to configure router?
Launch a web browser from any device linked to the network of your router. Type www.routerlogin.net or http://192.168.1.1. in the address bar for login page.The router login screen appears.Enter the router administrator’s username and password.‘admin’ is the user name. The password is the one you entered throughout the setup process. The case of user name and password is essential.If you don’t remember your NETGEAR admin password, read. How do I retrieve my NETGEAR admin password?The BASIC Home screen is visible.Referenced from https://mynetgearrouterlogin.com/ Read the full article
#router#wifi#internet#technology#tplink#network#modem#wireless#networking#vpn#cybersecurity#networkengineer#security#netgear#firewall#routing#wifirouter#ethernet#setup#admin#password
0 notes
Link
To expand the WiFi vary of Associate in a Nursing existing wireless network through Tplinkrepeater.net for any model of Tp-Link extender setup follows the steps given below:-
1. Place your vary extender beside the router and provide power to that by plugging it into Associate in Nursing wall plug.
2. Take Associate in Nursing coaxial cable. Connect the extender and your device by victimization this coaxial cable.
3. Open an internet browser like Microsoft web soul. and sort tplinkrepeater.net within the uniform resource locator bar of the browser window.
4. Window pop-ups before of you soliciting for the username and parole. By default, the username, and parole square measure admin. Confirm you've got entered admin in small letter. Each square measure case sensitive.
5. Click on the short setup then next to start out the setup method.
6. Choose your region and click on next. It’ll begin sorting out the obtainable networks close you.
7. Select the network name of your router that you simply need to increase. Click Next to proceed.
8. The screen asks you to enter the parole for your router's network. Enter an equivalent within the given field and press the next button with the assistance of a mouse.
#tplinkrepeater.net#tplinkrepeater.net setup#tplinkrepeater.net admin#tplink extender setup#tplink setup#tplinkrepeater.net username and password
1 note
·
View note
Link
Get started with tplinkrepeater.net setup to run your Tp-link extender setup or let our experts free install it for you call Toll-Free:- 1-213-283-0893
#tplinkrepeater.net setup#tplinkrepeater.net setup#tplinkrepeater.net#tplink extender setup#tplinkrepeater.net admin#192.168.0.254
1 note
·
View note
Link
Are you facing tplinkrepeater.net not working for you, tplinkrepeater.net not connect, tplinkrepeater.net error, tplinkrepeater.net admin page won’t open, Can't access tplinkrepeater.net, tplinkrepeater.net won’t connect, can’t reach tplinkrepeater.net, tplink extender login page not opening, issue, cant reach tplinkrepeater.net?
#cant access tplinkrepeater.net#tplinkrepeater.net#tplinkrepeater.net not working#tplinkrepeater.net error#tplinkrepeater.net admin page not opening#tplink repeater setup#tplink repeater login#tplink extender login#tplink extender setup#tplink extender login error#tplink extender login page not opening
0 notes
Link
http//tplinkwifi.net
When you are trying to login with the web address i.e. http//tplinkwifi.net and it is not working for you, you can just use the alternate option by using the IP address. The error showing with web address, there might be several reasons responsible for this. The major ones are because of the problem with connectivity and because of browser issues. You can resolve them by yourself with the solution provided by us.
0 notes
Text
Which TP-link Router is Best Among Archer A7 and C7? tplinkwifi.net
If you are looking for a comparison amongst the Tp-link routers A7 and C7; though both of them are equally affordable, reliable with same networking, speed and coverage, let us take a review at the both of its features before concluding which one is the best amongst them.
#tplinkwifi.net#www.tplinkwifi.net#http://tplinkwifi.net#tplink router setup#tplink router#tplink router login#tp-link router settings#Tp-Link Admin Page#TP-Link Router Setup
1 note
·
View note
Text
trying to configure the router? tplinkwifi.net
Manage with TP-Link Tether. Step One : Scan the QR Code and download TP-Link Tether APP from Google Play and Apple Store. Step Two : Enable the TP-Link Tether and find the router in the devices list. Step Three : Click the router, now you can easily manage it. For more solutions, please visit why fail to access tplink wifi router or contact with us at https://tplink-repeater.com/tplinkwifi-net/.
#tplinkwifi.net#tplinkwifi.net login#tplinkwifi.net setup#tplink wifi login#tplink wifi setup#tplink wifi router#http://tplinkwifi.net#www.tplinkwifi.net#tplink router setup#tplink router login#tp-link router settings#Tp-Link Admin Page#TP-Link Router Setup
1 note
·
View note