#tutorial after effect
Explore tagged Tumblr posts
Visit Tumblr Blog
Explore Tumblr blogs with no restrictions, modern design and the best experience.
Last Seen Tumblr Blogs


Fun Fact
Celebrities use Tumblr as well.
Text

'ello folks, my Cleanup tutorial is finally done and out! hope you find it useful
#Animation#Tutorial#Advice#Lesson#The Lion King#simba#animation#Disney#character design#how to#2D#traditional animation#frame by frame#Adobe#Photoshop#Animate#Flash#After Effects#Premiere#Video#Film#Drawing#Tips#Gestures#cleanup#lines#krita#toon boom#procreate#tvpaint
1K notes
·
View notes
Text
Someone has to leave first. This is a very old story. There is no other version of this story
#artists on tumblr#my art#itadori yuuji#yuji itadori#jjk#jjk spoilers#sukuna#jujutsu kaisen fanart#jujutsu kaisen#jujutsu yuji#ryoumen sukuna#I was starting to hate it so I posted it#Wanted to animate it in after effects but we have a tumultuous relationship#that is: i try to follow tutorials but i cant replicate anything and its driving me insane because idk whats different and why#the effects dont work
169 notes
·
View notes
Text
"it's morally okay to pirate adobe products" HOWWWWW. HOW. HOWWWWWWWWWWWWWWWWWWWWWWWW. DO I DO IT.
#watched a whole youtube tutorial where you'd get the torrent from pb wtf#but whatever page i go to the 'magnet' download button isnt there#and also im a piracy noob and have no idea half of what anyone says on reddit#i JUST WANT AFTER EFFECTS AAAAAAAAAAAAAAAAAAAAAAA
114 notes
·
View notes
Note
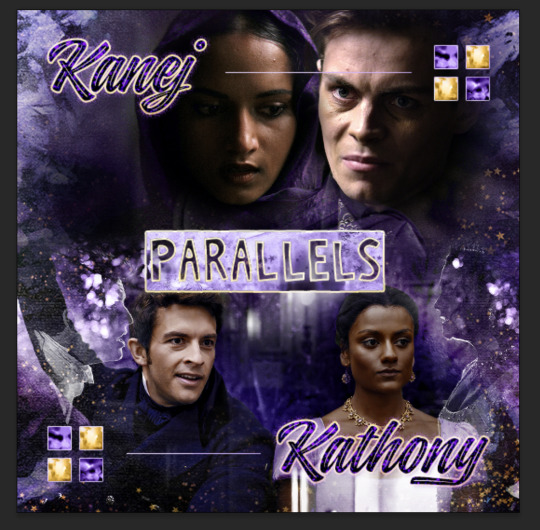
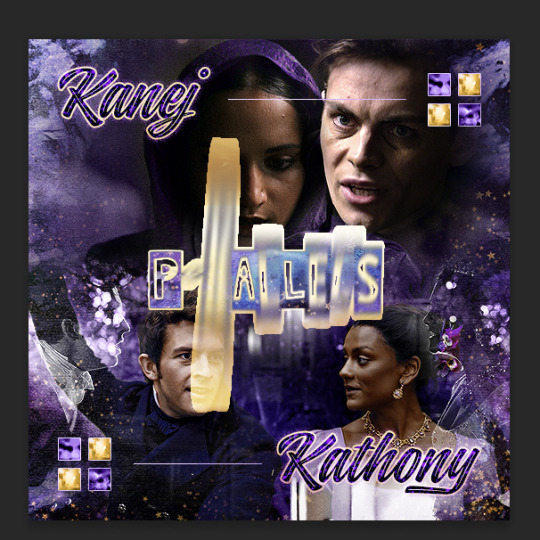
Oh I’m sorry I have GOT to ask! How did you do the text animation in the first gif of 718688291365502976/pscentral-event-15-favourite-ships-kanej?? It’s just. It’s so beautiful
Hi anon! I've used After Effects to create the text animation in the first panel of this post. I'll show you the basic idea of how I've created the animated text effect here :D
What you need:
A cutout font (the font that I've used is Trouble Child Outblack by @justlikethistrain)
Adobe Photoshop with Video Timeline feature
Adobe After Effects
Supplementary files: gif prep action pack / golden outline layer style / assorted textures
Difficulty: advanced; knowledge in gifmaking with the video timeline interface assumed
Note: This tutorial assumes that you're working with all of the composite gifs in a Photoshop composition file and using the video timeline interface
Other useful tutorials to refer to: Text overlay effect / After Effects text animation / clipping mask vs layer mask
Tutorial under the cut. Like / reblog if you find this useful!
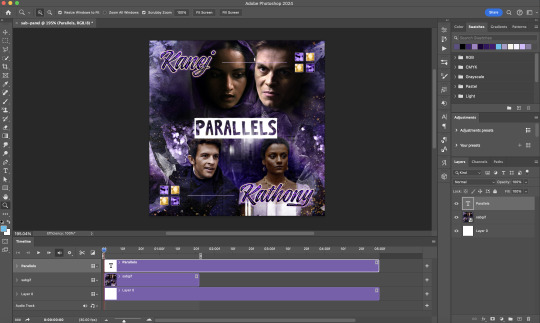
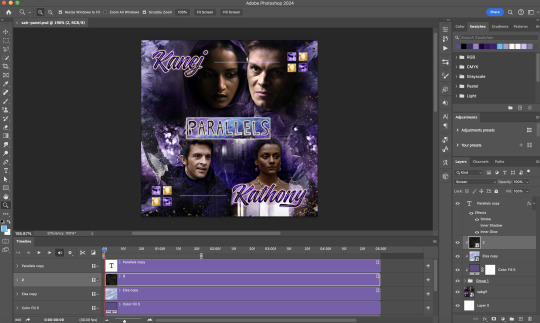
1) Photoshop: Preparing your gif panel
Setting up your PSD composition panel: Create a blank PSD file and set it to Tumblr dimensions (540px x 540px in this particular gifset)
Enable Video Timeline and drag all of the component gifs from your folder to the PSD composition file. Resize / move these gifs around until you're happy with the placements.
Trim the timeline work area so it's the same length as the shortest component gif you've added to the PSD composition file. You can also add some textures & additional adjustment onto this panel.
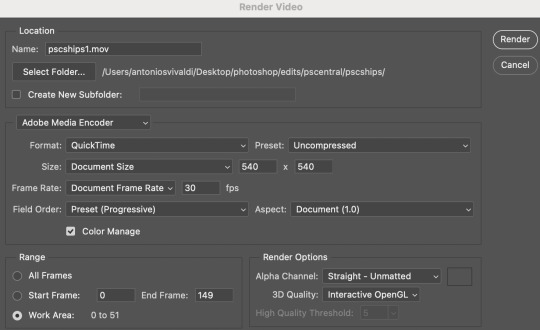
2) Photoshop: Exporting your base gif
I highly recommend exporting the base gif right now, to ensure a smoother experience scrubbing through the video timeline when adding finishing touches later on in the workflow.
My preferred method is to render the composition as a video clip from File > Export > Render video.
To get the optimal export quality, I use the following settings:
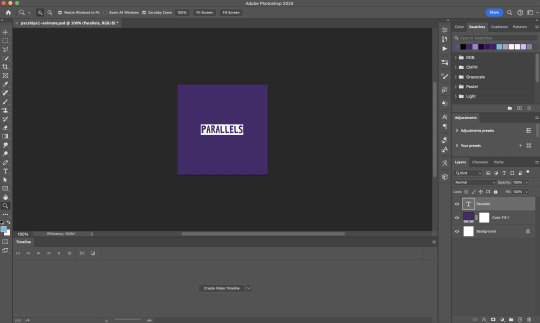
3) Photoshop: Preparing your text layer
Make a new Photoshop composition file of Tumblr dimensions

Drag in the video clip that you've just rendered (the base gif) to this composition file
Add a new text layer in your PSD composition file and set the colour to white then tweak this layer until you're happy with the text placement.
For performance optimisations on After Effects, I duplicate the PSD composition file and delete all other layers. This PSD file contains only the text layer that will be animated.
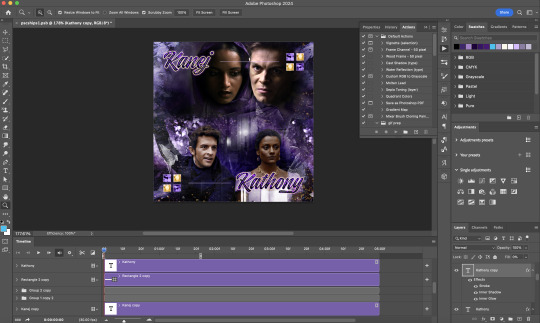
4) Photoshop: Adding overlays & decorations on the text layer
This step allows you to preview the text effect without the animations (i.e. allows you to tweak the texturings & colourings)
Duplicate the text layer. Set the bottom layer's (highlighted in red) blend mode to Exclusion and apply the gold outline layer style to the top layer (highlighted in green). Make sure the Inner Shadow is disabled!
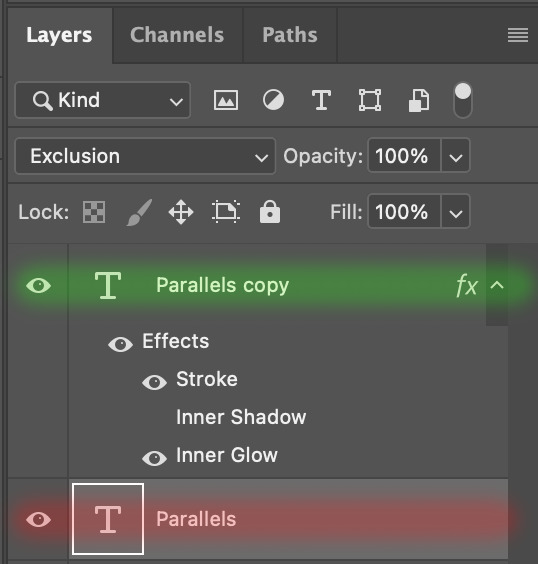
The panel now looks like this
I want to have the liberty to use different colours & textures on the bottom text layer with animation, so the next thing I do is to right click on the bottom text layer and select "Group from Layers"
To change the colour of the filled text layer to purple:
Collapse the Group that you've just created
On top of the collapsed Group a purple Colour Fill layer,
Set the Fill layer's blend mode to "Colour"
Right click on the Fill layer and select "Create Clipping Mask"
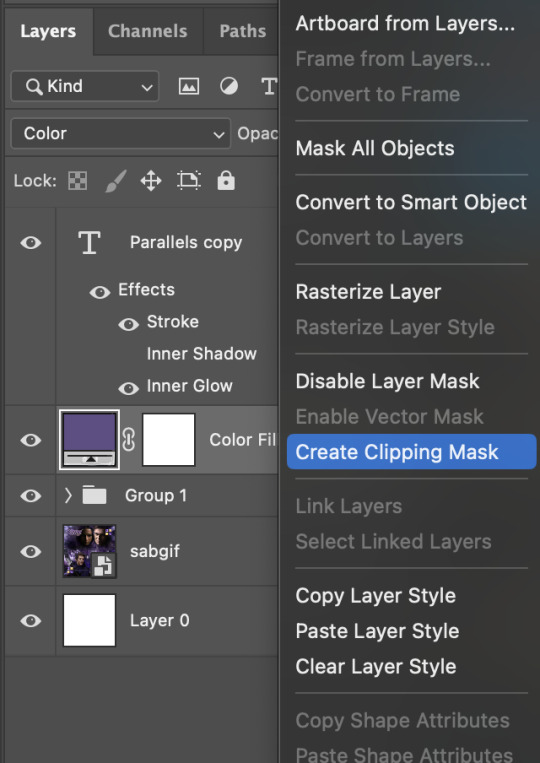
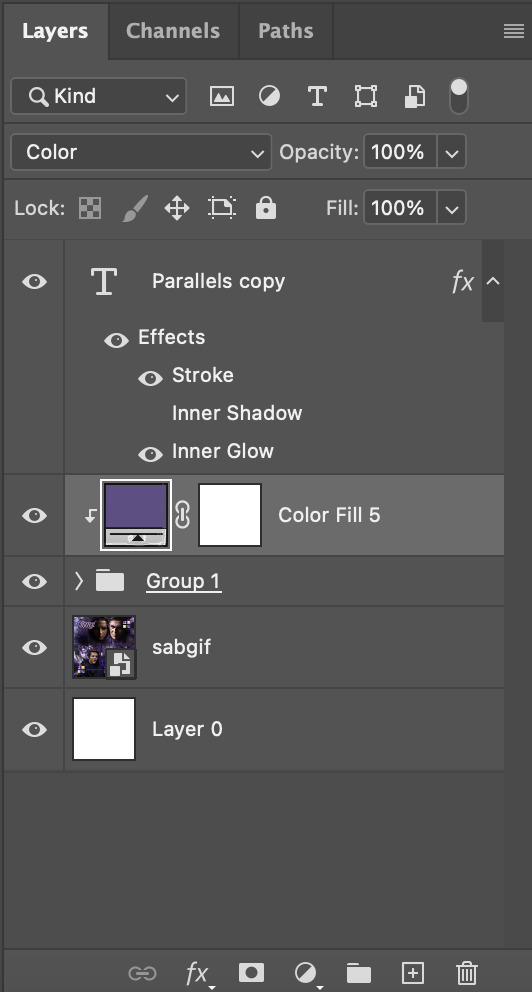
Now the colour of the filled text layer is purple
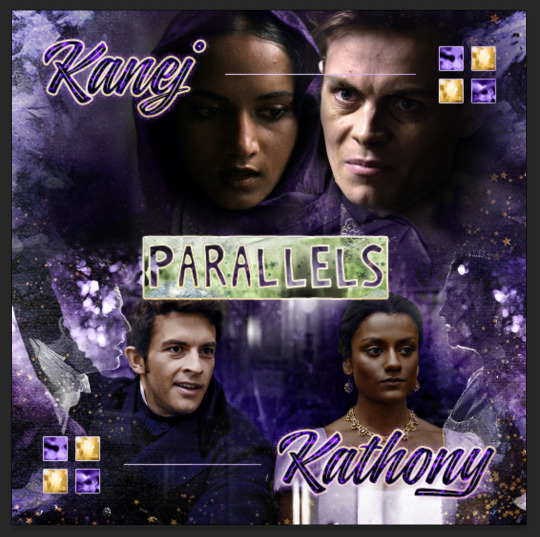
After adding more textures & decorations on the text layer (with photo negative effects) I get the following:
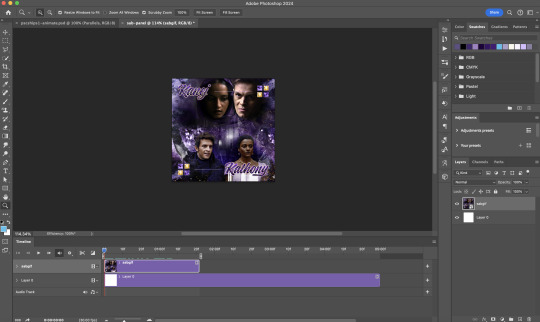
5) Photoshop: Adding overlays & decorations on the text layer
To avoid performance issues on After Effects, I make a new PSD file of the same dimension. With both the PSD files open, I select the text layer (highlighted in red) while holding Shift, I drag this to the blank PSD file (see the green arrow)
Holding Shift ensures that the layer's placement is preserved when it's copied to a separate PSD file.

In the new PSD file, I set the text layer's blend mode to "Normal"
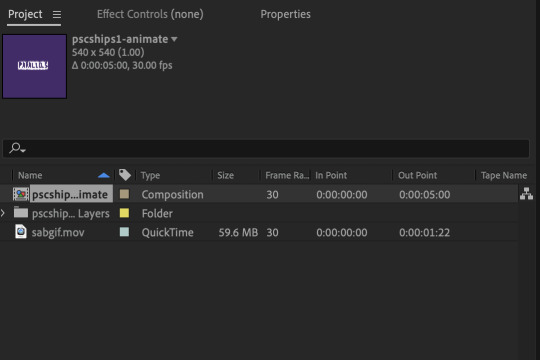
6) After Effects: Animating your text layer
Make a new project on After Effects and drag in the text layer PSD file. Import this file as a Composition

Also drag in the base gif video clip to the AE project.
While we won't be exporting anything with the base gif visible, having this file in the project file is useful if you want to have a better picture of how the animation will look in tandem with the gif.
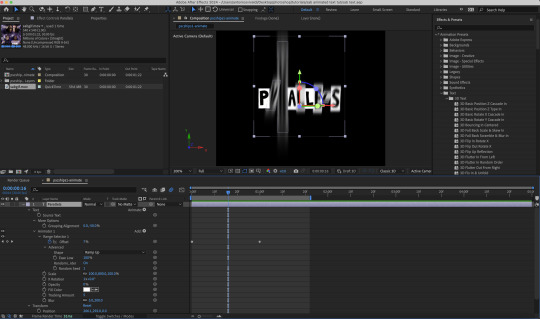
Double click on the composition. Hide the colour fill and background layers. Then right click on the text layer, go to Create > Convert to Editable Text
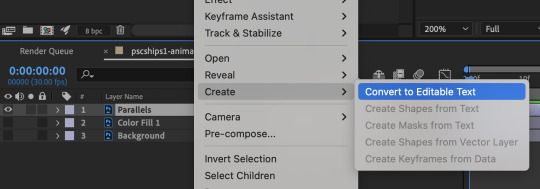
To be able to preview the animation with the base gif, drag the video clip to the composition file and below the text layer. The visibility of the layer can be toggled on / off anytime in the After Effects workflow
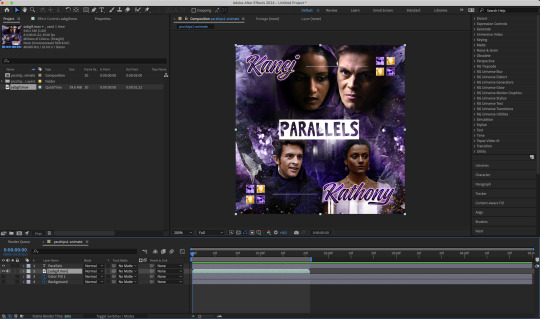
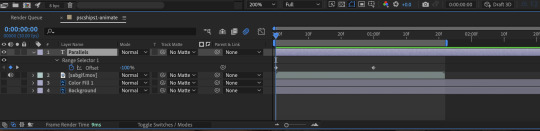
Now we prepare the text layer to be animated. Because the final animated effects is 3D & has motion blur, right click on the text layer and select "3D layer" (highlighted in green) and Switches > Motion Blur (highlighted in red)

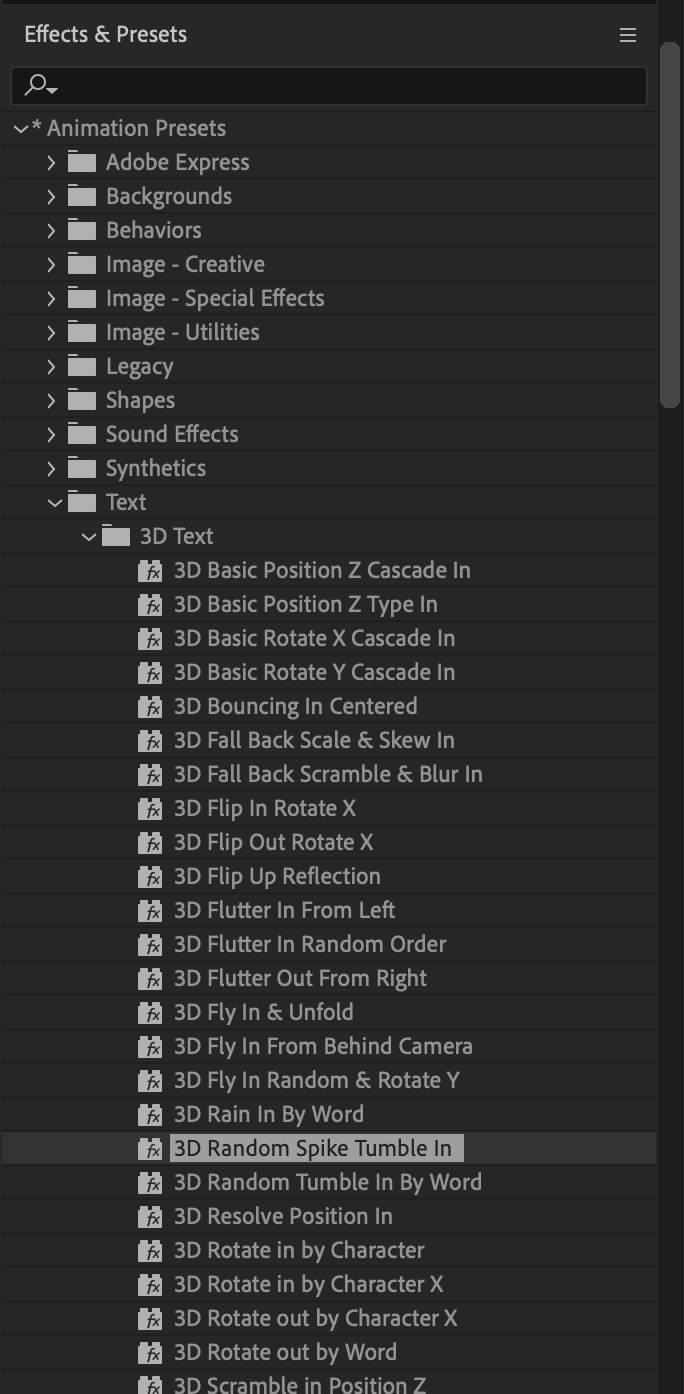
Go to Animation Presets > Text to browse through some presets that you could use to animate the text layer. For this gifset, I've used a preset within the 3D Text folder called "3D Random Spike Tumble in".
While selecting your text layer, press U to view the keyframes and you can adjust the position of these keyframes until you're happy.
For more finishing touches, press U again to tweak more options in this preset. In this case, I do to Animato 1 > Range Selector and changed the Colour Fill to #fff (the default colour is light yellow)
Then do you File > Export > Add to Render Queue
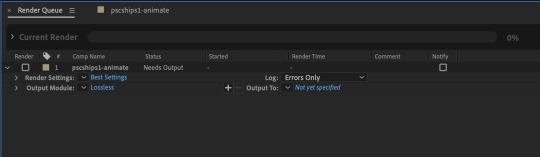
Click on the Output Module and use the following settings to render the text layer as a video file with transparency
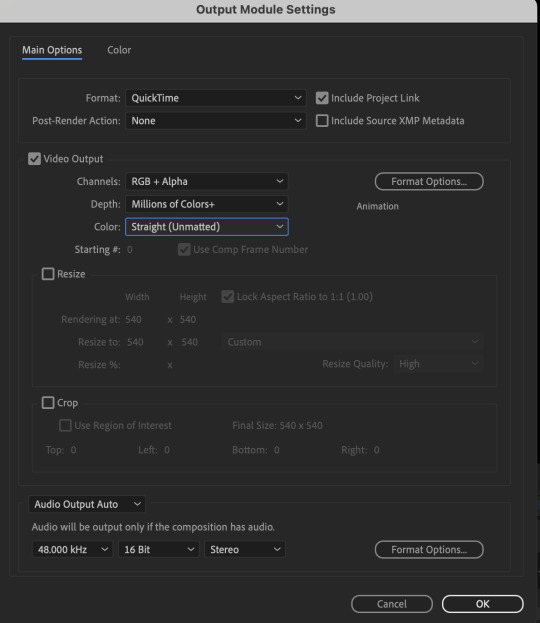
Then after specifying the folder in which you'll export the video to, click "Render" to render the video file containing your animated text layer.

7) Photoshop: Adding the animated text & finishing touches
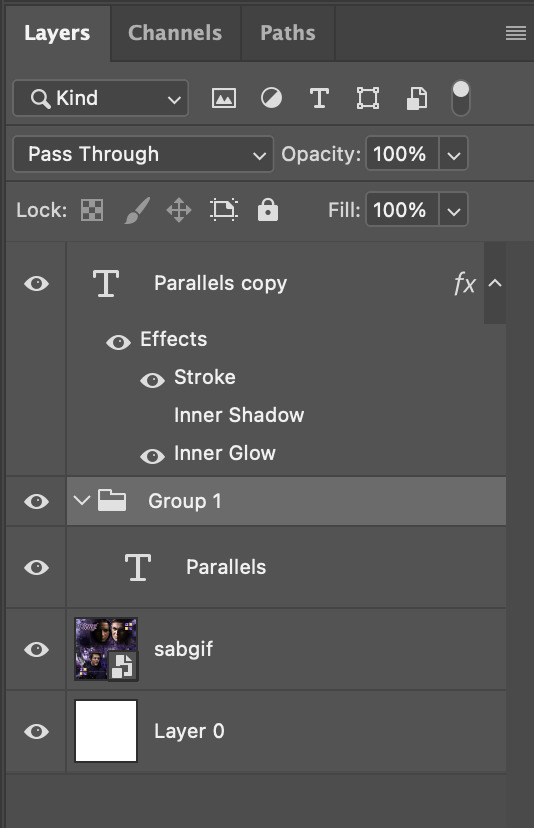
On Photoshop, drag the rendered clip containing animated text, to the PSD composition file with the static text layers.
Duplicate the animated text video layer
Drag one of the layers inside Group 1 and set the blend mode to "Exclusion" (Highlighted in green)
Move the other layer to the top and apply the gold outline layer style with Inner Shadow disabled (highlighted in red)
Hide both text layers (highlighted in yellow)

By scrubbing through the timeline, I've noticed that the animation didn't look clean enough, so I'll add some finishing touches
By selecting the upper text layer containing layer styles, go to the timeline and add opacity keyframes going from opacity 0% to 100% a few frames apart

Once you're happy with the finishing touches, flatten / render your PSD composition file, change the frame delay to 0.05s and export your gif and voila!

I hope this helps 💖
#tutorial#gif tutorial#photoshop tutorial#after effects#chaoticresources#dearindies#userriel#useralien#userraffa#usershreyu#user.tee#useryoshi#usernik#userjoeys#usersole#arthurpendragonns#userhallie#*#my tutorials#my resources
152 notes
·
View notes
Text
& by the way i literally CONSTANTLY think about how loop uses the partys titles to create distance to remind themself that those arent 'their versions' of them. that theyre not loops party anymore. and yet and yet and yet

#talk tag#i think about 'and because of you bonnie was-' DAILYYYYYY#god. god. they care s mcuhghfjkbjkdklj#i think that may be the only time until twohats that they ever use any of the partys names. except! for reminding sif if u get that dialogu#which. im also normal about. clearly obviously absolutely#they create that distance as much as they can and yet. for siffrin.#godddddd i need to be sedated#isat spoilers#okay oh my god i went back to check to make sure i was right and turns out i forgor a couple of times both of which make me even more ill#one is technically under the umbrella of twohats bc its at the very end when loop says theyll need to accept everyones thanks. and they say#-everyones names. and the other is at the very very beginning in the initial battle tutorial they say everyones names + stats#(which btw PROVES MY POINT abt so much of loops help going under the radar bc in any other game itd just be a regular tutorial with no-#-in universe correlation or effect)#but they start with 'heres some basic stats about you and your party members to remember' and i. the. like realistically the explanation-#-for loop using their names instead of titles. is bc adrienne thought using their titles would make it too obvious someone else was talking#since u havent met loop yet at that point and dont know its not a regular tutorial thats only directed at the player and not the character#But Also: heres some things you should remember about your party members [lists their names]#im normal. im fine and normal. prommy#... okay it turns out they also say isabeaus name when giving the paper mache hands tutorial. no idea what to make of that one aklfjdlksjf#and after the change god event when u bring it up they say 'mirabelles statue'#And Thats It. fascinating. what is the logic there#isatposting
33 notes
·
View notes
Text
A little preview of something I’ve been working on ❤️♌️
•
Guess I’ve been feeling nostalgic as I’m redrawing my Legacy of Winx OC’s AND reanimating my Sailor Senshi OC, Leo! I suppose I really meant it when I said I was going to learn OpenToonz since my CSP license is about to expire, I might even fully switch over!
•
Would y’all like to see a process/comparison video? The initial plan was to post a comparison gif like I did in 2019, but I love sharing my processes when it comes to art 🤔🤔🤔
⬇️Comparison gif under the cut anyway ⬇️

#after I finished that Flybeau animation I started watching more OpenToonz tutorials#and came across NobleFrugal’s Texture-in-Color which was the impetus for this project#because my biggest gripe with doing it before was how much labor it was overlaying the moving body texture with the BG#but with the FX nodes in OT and can just key it in and drop in the background!#Also also that retro looks I’ve been struggling to get in Davinci I can fully do in OpenToonz!#I just have to get OUT of the habit of turning off my tablet when I’m done drawing because my phone and tablet screens are more alike#my monitor has blue cast and a slightly lower resolution so the retro effect is dulled when I transfer it over to my phone#my art#digital art#fan art#fan animation#opentoonz#opentoonz animation#digital animation#hobbyist animator#amateur animator#sailor moon#sailor moon oc#sailor senshi#sailor soldier#zodiac soldier: Leo#retro anime#retro anime aesthetic#do NOT ask why I put Leo in the 4th house I don’t remember but it was in the storyboard#music and sound fx sourced from Sailor Moon Classic!#except for 2 specific sounds which come from Tropical Rouge: PreCure ❤️#I’d like to finish this before my birthday#but with less than three weeks before my internship I’d really like to use the rest of June for cosplay and sewing projects#I also have an embroidery commission that I should finish the bulk of before I leave#so this will just have to wait for now
12 notes
·
View notes
Text
(instagram)
Tutorial in After Effects under the cut.
• Create a new composition and call it Split.
• Write your text, pre-comp it, call it Text or whatever you want.
• Create a mask from the center to one side (top/bottom), change anchor point to the top.
• Bring down Scale property and unlink it, keyframe the text to go from 100% to 0% in 1s towards the anchor point.
• Cut the layer at the end.
• Duplicate pre-comp.
• Select the bottom one, click M to bring down mask properties, invert the mask and move anchor point to the bottom (so the text scales to the bottom).
• Duplicate Text pre-comp one more time. Select it, press M and delete the mask, move anchor point to the center. Create new keyframes to scale it from 0 to 100 in 1s (properties unlinked). Select both keyframes and delay it by 1 frame. It makes the text look like it’s scaling from the center.
• Change bottom and top text color by adding Fill effect to the pre-comp.
• Easy ease all keyframes.
• Select all pre-comps and duplicate them, put them at the top and put them at the back to extend your animation (or arrange in your preferred order if you’re doing a phrase like me). So far it should look something like this:
• Create new comp Wave of 10s, add your Split comp.
• Create new Solid layer, call it Map, add Gradient Ramp effect, make white at the left, black at the right and hide the layer.
• Select Split pre-comp, Right-click → Time → Enable Time Remapping and extend the layer to the end.
• Add loopOut() expression to Time Remap.
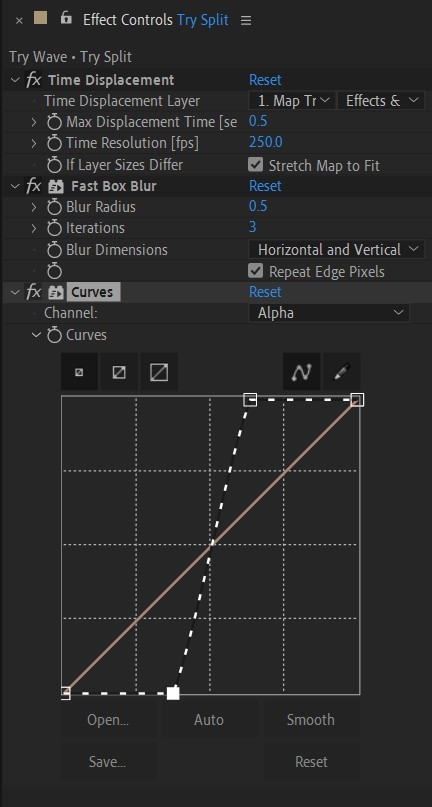
• On Split pre-comp add the effect Time Displacement, on Time Displacement Layer select your Solid layer (Map), and on Source select Effects & Mask.
• Change Time Resolution (fps) to 250-300.
• Add Fast Box Blur effect, change Blur Radius to 0.5.
• To bring back the sharpness add Curves effect, change the Channel to Alpha and change values (see screenshot).
• Play around with Max Displacement Time [sec] on Time Displacement effect depending on the look you’re going for. I set it to 0.5.
• Now this whole animation is driven by our Solid layer (Map) we created. So if you make any changes to it, the animation changes too. For example, you can change Ramp Shape to Radial on Gradient Ramp effect, and see how it changes your animation.
• I additionally added some texture on the text, used Track Matte and added wiggle(5,500) expression to the Rotation property so texture would be constantly moving. Also added some additional effects to the new Adjustment Layer on top such as Roughen edges, Turbulent Displace, Posterize Time and Noise. Let your freak flag fly - it’s a matter of taste and creativity of what you do with it. Your animation should look something like this:
#artists on tumblr#animation#artwork#2d animation#after effects#gif tutorial#art tutorial#art tips and tricks#after effects tutorial#tutorial#art#motion design#tips and tricks#tips#digital art#gif#visual art#loop#learn after effects#illustration#infinite loop#pasta#funny#pasta humor
64 notes
·
View notes
Text

Another iteration, another new color scheme, extract from this one we originally built 6 years ago in the recording of a tutorial
youtube
#after effects#tutorial#spiral#hypnotic#mesmerizing#loop#motion#retro#moodboard#seamless#gif art#animation#trapcode#trapcodeTAO#Youtube
58 notes
·
View notes
Text

Shadow Puppets AU - Daily Quests
#shadow puppets au#philip wittebane#toh collector#emperor belos#some sillies#monster belos#belosfanstakeover#I accidentally got a little experimental with this#I was just playing around with some effects after watching a couple of tutorials#but forgot to save a copy of the original flats#and I didn't feel like starting from scratch#Grimwalker OC#Adam Wittebane
73 notes
·
View notes
Text

blender 4.3 grease pencil is SO AWESOME
#vietnam flashbacks bc doing this in after effects was hell but this was done in literally 10 minutes and 5 of those mins was a tutorial#txt#DRAWING IN IT IS SO FLUID HOOOOOLY SHIT it literally felt better than fawking photoshop
9 notes
·
View notes
Text
Check out my kind of shitty Devil May Cry 3 AMV
#devil may cry#dmc#dante devil may cry#vergil#amv#edit#lady dmc#running on 10 minute tutorial of after effects and a dream
18 notes
·
View notes
Text
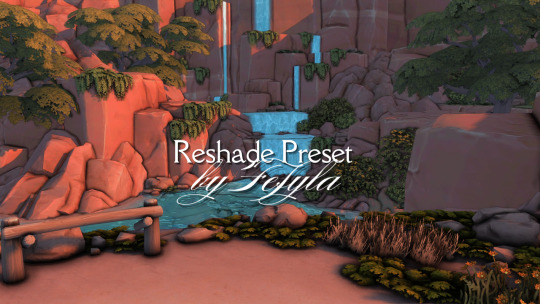
🎨 Why My Presets Are Worth the Investment 🎨
Hey everyone! 💛 I’m thrilled to see how much you love my Presets—and I’d love to share why I’ve chosen to offer them as paid creations while keeping them accessible and fair for you all.
✨ What You’re Getting:
Unique Presets, crafted to stand out from generic filters, with meticulous attention to detail.
Constant Updates, ensuring full compatibility with ReShade and GShade as they evolve.
No Subscriptions Needed: Pay once on my Patreon (for individual presets or a full bundle) and keep them forever—no hidden fees!
🔒 Why Paid? Each preset represents hours of work, testing, and fine-tuning—they’re not just “filters” but a tailored experience for your game. Sadly, renaming a file is all it takes to steal creative work… so this helps protect my effort while letting me keep improving them for you.
💡 Ready to Elevate Your Game? No forced memberships! Find all my presets in my Patreon shop, with the freedom to pick only what you love. It’s a way to support my work without waste—and for me to keep delivering quality content for you.
Huge thanks to everyone who supports and values creativity! 🚀
#The Sims 4#TS4 CC#Sims 4 Mods#ReShade TS4#GShade#PC Gaming#Life Simulation Games#Digital Art#Game Aesthetics#Visual Effects#Color Grading#Virtual Photography#Creative Coding#Tutorial#How To Sims#ReShade Guide#Tech Tutorial#Modding Tutorial#Step by Step#Aesthetic Gaming#Cozy Games#Vintage Games#Dreamy Graphics#Cyberpunk Aesthetic#Fantasy Vibes#Before & After#Satisfying Edit#You Should Know#Pro Tip#Creative Process
3 notes
·
View notes
Text
question for those of you who do lil animated illustrations - how?
#like what program?#aint all of you affording after effects#I wanna learn how#any tips#tutorials?#i will brute force this if not#art help#art#art tips#request pls
6 notes
·
View notes
Text
“You will see to it that they conduct themselves at all times with the utmost orderliness and decorum; I’m placing you in command.” aka another spider-verse crossover edit that no one asked for
#the sound of music#mary poppins#tsomedit#marypoppinsedit#filmedit#fanvid#mine: vid#julie andrews#what a babe#idk if i went overboard with the half tones i was not about to dive back in and try to fix it after working on this for 1.5 months lol#fun with fusion! and resolve!#aka taking tutorials for after effects and photoshop and converting them over to fusion#mine#listen i called this the chaos-verse because they absolutely bring harmony through chaos i will not elaborate further
19 notes
·
View notes
Text
I made a free After Effects tool - The Turbulence Toolbox.
Youtube Tutorial Gumroad Download
2 notes
·
View notes
Text
whyyyy does after effects have to cost money WHYYYYY
#father is going to pay for the student discount for a year#but then what lol#like where do i even pirate it#all the youtube tutorials look fishy asf#and reddit can’t seem to agree whether or not they downloaded viruses#piracy#adobe after effects#adobe piracy#ae#after effects piracy
7 notes
·
View notes