#usual wireless router
Explore tagged Tumblr posts
Visit Tumblr Blog
Explore Tumblr blogs with no restrictions, modern design and the best experience.
Last Seen Tumblr Blogs


Fun Fact
The KCSC sent more than 20K requests to delete posts related to prostitution and porn to Tumblr from January to June 2017.
Text
{i am the caretaker of souls} Update on my internet situation below, but the tl;dr is that it's still essentially unusable. T_T
My internet is still essentially useless. The problem appears to be that download speeds are excellent, and upload speeds are almost zero. I can make a post and write in it, but I can't upload any pictures, can't save it, can't post it, and sometimes if the post/save fails, it dumps the whole post. I spent my whole day trying to get work done too and wasn't able to really get much of any of it completed. I'm writing this post using my phone's data plan, but I'm already getting overage charges and that's not good, so I can't keep using data to post on here.
Around 4:30 PM, everything in the house went dark. The TVs, the wireless on both phones and computers, all the streaming services, totally dead. That lasted about a half hour and then it seemed to come back. We got a call from our ISP saying there was a problem and they fixed it, so we thought oh okay great! Nope. It's... the same as it was before. So unless something changes, I'm not going to be able to get much done on this site at all, for any of my blogs.
I'm angry as hell, because I don't have a lot of free time, so to have it wasted like this is beyond infuriating, but there's really nothing I can do about it except call the ISP, which is what I'm going to do at 8AM tomorrow morning. I'll probably have to sit around all day and wait for some tech guy to come here and tell me it's my fault somehow, but hey, that's all I can think of to do. I've already reset my router and done all other usual quick fixes, to no avail. So.... I'm sorry guys, I thought I was going to get so much done this week and I'm just... not able to.
I'll write offline tonight and just save all my replies and things, but I can't post anything until my internet gets fixed. If it magically comes back, I'll post, but I don't have much hope for tonight. Maybe tomorrow they can fix it, who knows. But yeah, that's where I'm at right now. T_T
#{ i am the caretaker of souls } ᵒᵒᶜ#{this is beyond frustrating i can't even tell you}#{i have so much to do for both writing and work}#{i don't have time for this crap}#{pls send help and chocolate}
6 notes
·
View notes
Text
Deep Dive into Wi-Fi Hacking: How Ethical Hackers Secure Your Wireless Networks

With our hyper-connected world, Wi-Fi is the unseen lifeline keeping us online today. From streaming your favorite shows to managing your smart home devices, Wi-Fi is everywhere. But have you ever stopped to think about just how secure your wireless network really is? What if someone could sneak into your network, steal your data, or even hijack your devices? Scary, right? That’s where ethical hackers come in—the unsung heroes of the digital age who use their skills to protect, not exploit. If you’ve ever been curious about how they do it, or if you’re considering a cybersecurity and ethical hacking course, this blog is for you.
The Dark Side of Wi-Fi: Why It’s a Hacker’s Playground
Well, face it: Wi-Fi networks are a goldmine for cybercriminals. Why? Because they are usually the easiest weakness in our digital defense. It has weak passwords, outdated encryption, and misconfigured routers. That's not to mention stealing your Netflix login. Hackers can use it as an open gateway to access more of your digital life.
Here's your scenario: You're having your favorite coffee at a quaint little café while making use of their free Wi-Fi. Well, a hacker within some tables from you is running Aircrack-ng or Wireshark for quite a bit on your data that's going by. Before you realize it, they have gotten your login credentials, credit card information, or even obtained access to your corporate emails. How scary does that sound?
Enter Ethical Hackers: The Good Guys of Wi-Fi Security
That is when the ethical hackers come in. Cybersecurity professionals use the same hacking tools and techniques as evil hackers, with one difference though: they work for you. Their job is to find a hole before a hacker does so that they may fix it before hackers can gain entry into your network.
How do they go about it? Let's dissect this:
Reconnaissance: Ethical hackers first gather information about the target network. They use tools such as Kismet or NetStumbler to identify the network's SSID, encryption type, and connected devices.
Exploitation: Once they have identified potential weaknesses, they try to exploit them. For example, if the network uses outdated WEP encryption (which is notoriously weak), they might use tools like Aircrack-ng to crack the password.
Post-Exploitation: Having obtained access, the ethical hacker calculates the potential damage that can be done. Could they have accessed sensitive files? Could they have launched a man-in-the-middle attack? This step will give them a sense of real-world impact from the vulnerability.
Reporting and Patching: They finally document their findings and collaborate with the owner of the network to fix the issues. It may involve updating firmware, changing passwords, or enabling stronger encryption like WPA3.
Why You Should Care About Wi-Fi Security
You may be thinking: "I am an average user, so why would somebody even bother with me?" The thing is, hackers don't discriminate. Whether you are just an individual, a small business owner, or part of a large corporation, your Wi-Fi network is a potential target. And with the emergence of IoT devices, such as smart thermostats, security cameras, and voice assistants, the risk is much bigger than ever.
Here's the good news: You don't need to be a tech genius to protect yourself. By learning the basics of Wi-Fi security or even enrolling in a cybersecurity and ethical hacking course, you can take control of your digital safety.
How to Secure Your Wi-Fi Network: Tips from the Pros
Want to make your Wi-Fi network hacker-proof? Here are some practical tips inspired by ethical hackers:
Use Strong Passwords: Avoid using common passwords, such as "admin" or "password123." Instead, use long complex phrase with letters, numbers, and symbols.
Enable WPA3 Encryption: The latest Wi-Fi encryption protocol is WPA3; if your router supports it, switch to WPA3.
Update Your Router's Firmware: Manufacturers in their official websites may have coming updates that address security vulnerabilities. Check and update the firmware on your router to a newer edition.
WPS: Wi-Fi Protected Setup is convenient but highly insecure. Just turn it off to minimize brute-force attacks.
Check Connected Devices: You would be surprised to know which device is connected to your network if you don't check it periodically. If something looks suspicious, investigate immediately.
Ready to Be a Wi-Fi Warrior?
If this deep dive into Wi-Fi hacking has piqued your interest, why not take it further? A cybersecurity and ethical hacking course can teach you the skills you need to protect yourself—and maybe even turn your passion for tech into a rewarding career. Imagine being the person who uncovers vulnerabilities, thwarts cyberattacks, and keeps the digital world safe. Sounds exciting, doesn't it?
Ethical hacking is not the art of hacking into systems, but understanding how they work so that such knowledge can be applied to strengthen their defenses. In a world that is ever changing with threats through cyber, it has never been a better time to learn.
Final Thoughts
It sounds like something out of a spy movie, but the truth is that Wi-Fi hacking is an everyday threat in your life. The good news is that with the right information and tools you can protect yourself and your loved ones from becoming cybercrime victims. However, whether you are a tech enthusiast or a complete beginner, a course in cybersecurity and ethical hacking will empower you to take the lead in digital security.
Remember the next time you connect to a Wi-Fi network: those invisible waves keeping you online can be the doors for hackers. Stay informed and vigilant, and maybe you will end up being that ethical hacker who saves the day.
So, stay safe and happy ethical hacking!
2 notes
·
View notes
Text
Computer Networks: Basics, Types, and Benefits Explained
Computer networks are a big part of today’s highly automated world. They connect people, systems, and devices, making communication and resource sharing effortless. Whether it’s examining the internet, collaborating on projects, or sharing files, computer networks play a vital role in both personal and professional environments. We’ll cover the basics of computer networks, discuss their different types, and see the benefits they deliver.

What is a Computer Network?
A computer network is basically a system where multiple devices are linked together to share resources and exchange data. These devices can include laptops, mobile phones, servers, and networking equipment like routers. Networks enable smooth communication and allow devices to work together efficiently, making everything from browsing the web to managing complex business operations much easier.
Types of Computer Networks
Personal Area Network (PAN):
Personal Area Networks are designed as small networks intended for individual purposes. They usually span a limited distance and link devices such as.
smartphones, laptops, and tablets. For instance, connecting your phone to your computer via Bluetooth forms a simple PAN.
Local Area Network (LAN):
LANs are commonly used in homes, schools, and offices to connect devices within a limited area. For example, to allow employees to share files and printers seamlessly, all the computers in an office might be connected to a LAN.
Wide Area Network (WAN):
A WAN stretches over a significantly larger territory, often connecting devices or LANs across cities, countries, or even continents. The internet is the most well-known example of a WAN, authorized global connectivity.
Metropolitan Area Network (MAN):
Sitting between LANs and WANs, a MAN is typically used to connect networks across a campus or city. Cable TV networks are a common example of a MAN.
Wireless Networks:
Wireless networks use technologies like Bluetooth or Wi-Fi to connect devices without cables. They’re widely used in offices, homes, and public places, offering convenience and mobility.
Key Components of Computer Networks
Devices (Nodes): Servers that interact within the network these include computers and smartphones.
Connections (Links): The physical or wireless pathways that transfer data between devices.
Protocols: These are the rules that control data transmission, such as TCP/IP, to maintain smooth communication.
Switches and Routers: Switches connect devices in a network, while routers link different networks together.
Benefits of Computer Networks
Resource Sharing:
Networks make things easy to share like files, printers, and software applications, reducing the need for duplicate resources.
Seamless Communication:
With instant messaging, email, and video calls, networks ensure quick and authentic communication, no matter how far away are you.
Cost Savings:
By collecting resources and data storage, networks cut down on operational costs, especially for businesses.
Anywhere Access:
Modern networks allow you to access data from any connected device, whether you are at home or on the go.
Scalability:
As your needs develop networks will grow too, by supporting more users and devices over time.
Increased Productivity:
It reduces delays in automated processes and real-time data sharing and streamlines workflows, boosting efficiency.
Why Computer Network Skills Are Crucial for Entry-Level Corporate Roles
For those starting their careers, knowledge of computer networks can be a significant asset:
Essential for Office Environments:
In today's world, most workplaces rely on LANs and WANs for everyday operations. Knowing how these networks function allows employees to balance basic connectivity issues, making sure work stays on track without interruptions.
Supports Collaboration Tools:
Corporate tools like Microsoft Teams, Slack, and cloud-based systems depend heavily on networks. Understanding their underlying principles helps entry-level employees adapt quickly to these platforms.
Enhances Problem-Solving Skills:
Entry-level employees with networking knowledge can help IT, teams, by identifying and resolving minor network problems, exhibiting their value early on.
Boosts Technical Proficiency:
Networking skills indicate a candidate’s technical potential, giving them a head start in industries where tech literacy is required.
Prepares for Future Roles:
As technology makes progress, advanced networking concepts like cybersecurity and IoT integration are becoming integral. Early experience with networks lays a strong beginning for growth in these areas.
Challenges of Computer Networks
Security Risks: Networks are at risk of threats like hacking and malware, requiring robust security measures.
Cost of Setup: High-quality network infrastructure can be costly to install and maintain.
Technical Complexity: Balancing and managing networks frequently need specialized skills.
Conclusion
Computer networks are essential in today’s globalized world. From pushing day-to-day operations in businesses to enabling global communication, their impact is wide-ranging. For aspiring professionals, having computer networking skills can provide a competitive advantage, especially in entry-level corporate roles where technical knowledge is highly valued. By understanding the basics of networks and their benefits, individuals, and organizations can unlock new levels of productiveness and innovation.
I mastered Computer Network at NIPSTec, which is renowned as the best Computer Network institute in Delhi. If you're in Delhi and looking for top-notch training in computer networks, visit NIPSTec for expert guidance and practical learning.
2 notes
·
View notes
Text
Best Partner for Wireless Modules: A Comprehensive Antenna Selection Guide
n the field of wireless communication, antenna selection is crucial. It not only affects the coverage range and transmission quality of signals but also directly relates to the overall performance of the system. Among various wireless modules, finding the right antenna can maximize their potential, ensuring stable and efficient data transmission.
When designing wireless transceiver devices for RF systems, antenna design and selection are essential components. A high-quality antenna system can ensure optimal communication distances. Typically, the size of antennas of the same type is proportional to the wavelength of the RF signal; as signal strength increases, the number of required antennas also grows.
Antennae can be categorized as internal or external based on their installation location. Internal antennas are installed within the device, while external antennas are mounted outside.
In situations where space is limited or there are multiple frequency bands, antenna design becomes more complex. External antennas are usually standard products, allowing users to simply select the required frequency band without needing additional tuning, making them convenient and easy to use.
What are the main types of antennas?
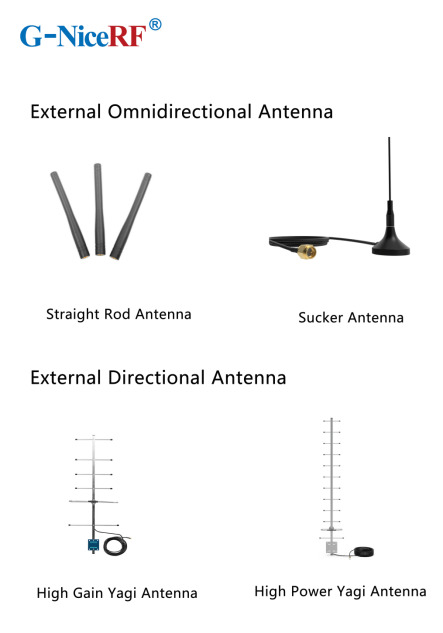
External Antennas: These antennas can be classified into omnidirectional antennas and directional antennas based on the radiation pattern.
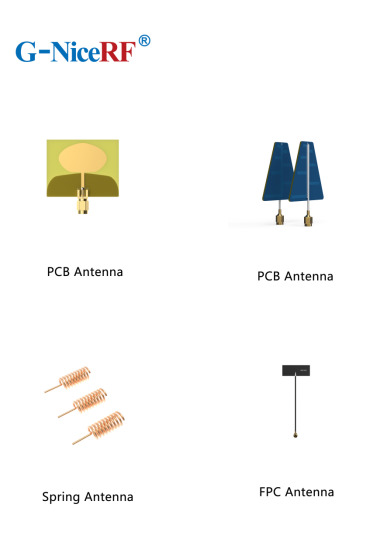
Internal Antennas: These antennas refer to antennas that can be placed inside devices.
Omnidirectional Antennas: These antennas radiate signals uniformly in the horizontal plane, making them suitable for applications that require 360-degree coverage, such as home Wi-Fi routers and mobile devices.
Directional Antennas: These antennas have a high emission and reception strength in one or more specific directions, while the strength is minimal or zero in others. Directional antennas are primarily used to enhance signal strength and improve interference resistance.
PCB Antennas: These antennas are directly printed on the circuit board and are suitable for devices with limited space, commonly used in small wireless modules and IoT devices.
FPC Antennas: FPC antennas are flexible printed circuit antennas that are lightweight, efficient, and easy to integrate.
Concealed Antennas: Designed for aesthetic purposes, concealed antennas can be hidden within devices or disguised as other objects, making them suitable for applications where appearance is important without compromising signal quality.
Antenna Selection Guide
When selecting the appropriate antenna for a communication module, it's essential to first determine whether to use an internal or external antenna based on the module's structure.
External Antennas: These antennas offer high gain, are less affected by the environment, and can save development time, but they may take up space and impact the product's aesthetics.
Internal Antennas: These have relatively high gain and are installed within the device, maintaining a clean and appealing exterior.
Sucker Antennas: These provide high gain and are easy to install and secure.
Copper Rod Sucker Antennas: Made from large-diameter pure copper radiators, these are highly efficient with a wide bandwidth.
Rubber Rod Antennas: Offer moderate gain at a low cost.
Fiberglass Antennas: Suitable for harsh environments and ideal for long-distance signal

External Directional Antennas
Typically used in environments with long communication distances, small signal coverage areas, and high target density.
Panel Antennas have high efficiency, are compact, and easy to install, while considering the impact of gain and radiation area Yagi Antennas offer very high gain, are slightly larger, and have strong directionality, making them suitable for long-distance signal transmission; however, attention must be paid to the antenna's orientation during use
Internal Antenna Selection
Most internal antennas are affected by environmental factors and may require custom design or impedance matching
Spring Antennas are cost-effective but have low gain and narrow bandwidth, often requiring tuning for good matching when installed Ceramic Patch Antennas occupy minimal space and perform well, but have a narrow bandwidth
For details, please click:https://www.nicerf.com/products/ Or click:https://nicerf.en.alibaba.com/productlist.html?spm=a2700.shop_index.88.4.1fec2b006JKUsd For consultation, please contact NiceRF (Email: [email protected]).
2 notes
·
View notes
Text
RF Chambers| Anechoic Chambers | dmcrf

Perfect radio frequency (RF) performance is essential for wireless communication, radar systems, and Internet of Things (IoT) devices in today's hyper-connected world. Ensuring these systems operate without interference requires specialized testing environments—RF chambers. These shielded enclosures, also known as Anechoic Chambers or EMC (Electromagnetic Compatibility) chambers, are critical for industries ranging from defense to telecommunications.
What Are RF Chambers?
An RF Chamber is a controlled environment designed to block external electromagnetic interference (EMI) while allowing precise RF testing. These chambers come in two primary forms:
Shielded Chambers – Block outside RF signals to create an interference-free zone.
Anechoic Chambers – Absorb internal reflections using RF-absorbing materials (ferrite tiles, foam pyramids).
How Do RF Chambers Work?
Faraday Cage Principle: Metal walls (usually steel or aluminum) block external RF signals.
RF Absorbers: Interior linings minimize reflections for accurate antenna and radar testing.
Filtered Ports: Allow power and data cables to enter without leaking interference.
Without RF Chambers, wireless devices could suffer from signal degradation, failed compliance tests, or even security vulnerabilities.
Industries That Rely on RF Chambers
Defense & Aerospace
Radar cross-section testing for stealth aircraft.
Secure communications (TEMPEST certification).
Satellite and avionics testing.
Telecommunications
5G base station validation.
IoT device certification.
Mobile phone RF performance testing.
Automotive
Electric vehicle (EV) EMC compliance.
Autonomous vehicle radar testing.
Medical Devices
Ensuring wireless medical implants (pacemakers) don’t interfere with other devices.
Consumer Electronics
FCC/CE certification for Wi-Fi routers, Bluetooth devices.
Why Choose DMC RF for Your RF Chamber Needs?
DMCRF specializes in custom RF testing solutions, offering:
Tailored chambers for defense, telecom, and automotive sectors.
Global compliance expertise (FCC, CE, MIL-STD).
Cutting-edge absorber technology for accurate measurements.
RF Chambers play a pivotal role in wireless innovation, from 5G deployment to military communications. As technology advances, the demand for more sophisticated, AI-integrated, and sustainable Rf Testing Solutions will grow. Companies like DMCRF are at the fore front, providing the infrastructure needed to keep our connected world running smoothly.
Contact us
Phone Number : +1(613) 915 5533
Website: https://www.dmcrf.com/
0 notes
Text
Troubleshooting Common Issues Through PLDTHomeWiFiSettings

Dealing with internet slowdowns or connectivity issues can be frustrating, especially when you rely heavily on WiFi for work, streaming, and daily communication. Fortunately, many common problems can be resolved using pldthomewifisettings. This guide will walk you through practical troubleshooting tips and tricks using your PLDT router's admin panel.
Understanding PLDTHomeWiFiSettings
The pldthomewifisettings portal is your gateway to diagnosing and solving most network issues at home. From checking signal strength to rebooting your system remotely, it offers a variety of tools to enhance your internet experience.
How to Access PLDTHomeWiFiSettings
Before troubleshooting, you’ll need to access the settings:
Connect your phone or computer to the PLDT Home WiFi.
Open a web browser and type 192.168.1.1 or 192.168.0.1.
Enter login credentials—usually "admin" and "1234" (or "adminpldt" with a specific password).
You’ll now see the pldthomewifisettings dashboard.
Once inside, you’re ready to start troubleshooting.
Problem 1: Slow Internet Speed
If your internet seems slower than expected:
Go to Status > WAN to check the real-time speed.
Run a speed test from your browser and compare it with your subscribed plan.
Use QoS Settings to prioritize work-related devices or apps.
Reduce the number of connected devices by checking the Client List.
Through pldthomewifisettings, you can quickly allocate bandwidth to where it matters most.
Problem 2: Frequent Disconnections
A common issue with wireless connections is frequent drops. Try the following:
Change the WiFi Channel under Wireless Settings. Avoid crowded channels like 1 or 6.
Switch from 2.4GHz to 5GHz if supported. It’s faster and less prone to interference.
Ensure firmware is updated via System > Firmware Upgrade.
If none of these fixes work, a factory reset through pldthomewifisettings might be necessary.
Problem 3: Unauthorized Users on the Network
Are you noticing unfamiliar devices?
Navigate to the Client List in your dashboard.
Block unknown devices using MAC Filtering.
Change your WiFi password under Wireless > Security and re-authenticate trusted devices.
Regularly monitoring your pldthomewifisettings can help you catch freeloaders before they eat up your bandwidth.
Problem 4: Can’t Connect to WiFi
Sometimes your device might not connect at all:
Restart your router using System > Reboot.
Check if the WiFi signal is hidden. Go to Wireless Settings and make sure SSID broadcast is enabled.
Ensure the device isn’t blocked under MAC Filtering.
This is a common situation easily resolved by checking settings via pldthomewifisettings.
Problem 5: WiFi Signal Weak in Certain Areas
Dead zones in your house?
Try changing the transmission power from “Low” to “High” under Wireless > Advanced Settings.
Reposition your router centrally in your home.
Add a WiFi extender or Mesh system and link it via LAN cable.
While pldthomewifisettings can help optimize range, hardware limitations may also need to be addressed.
Problem 6: Can’t Log In to PLDTHomeWiFiSettings
If you can’t even access the admin panel:
Check the IP address. It should be 192.168.1.1 or 192.168.0.1.
Make sure you're connected to the PLDT WiFi, not mobile data.
Reset the router to factory settings using the small reset button at the back.
Access to pldthomewifisettings is crucial for all troubleshooting, so this step is foundational.
Problem 7: Port Forwarding Not Working
Need to open ports for gaming or remote access?
Navigate to NAT > Port Forwarding.
Input the local IP, start/end port, and protocol.
Save and reboot the router.
If port forwarding doesn’t work even after setup, check with PLDT support—some accounts are on CGNAT which restricts this function.
Preventive Maintenance Tips
Log into your pldthomewifisettings weekly to monitor devices.
Change your password monthly.
Keep firmware updated.
Avoid overloading your network with too many devices.
Preventive maintenance reduces the frequency of technical problems and improves long-term performance.
Conclusion
When problems arise with your internet, don’t panic. Many issues—from speed concerns to unknown users—can be resolved by exploring your pldthomewifisettings. By taking the time to understand the control panel, you empower yourself to maintain a fast, secure, and stable network connection without always needing technical support.
FAQs on PLDTHomeWiFiSettings Troubleshooting
Q1. What should I do if my PLDT WiFi keeps disconnecting? Ans. Check for channel interference, update firmware, and limit the number of connected devices using pldthomewifisettings.
Q2. Can I remove a device from my WiFi using PLDTHomeWiFiSettings? Ans. Yes, go to the device list, find the suspicious device, and block it via MAC filtering.
Q3. What if I forget my PLDTHomeWiFi admin password? Ans. You can reset the router to factory settings and log in using default credentials, then reset the password again.
0 notes
Text
How to Send Files to TV: A Complete Guide
How to Send Files to TV: A Complete Guide
In today’s tech-savvy world, smart TVs have transformed the way we consume content. From streaming movies to browsing the web, they’ve become more than just a medium for watching cable TV. One incredibly useful feature of modern TVs is the ability to send files to TV—whether you're transferring photos, videos, documents, or apps. This guide will explain different methods and technologies that help you do just that, using the keyword send files to TV in a meaningful and informative context.
Why Send Files to TV?
Before diving into the how-to, let’s quickly discuss the benefits of sending files to your TV. The larger screen offers a better viewing experience for media files like images and videos. It’s also ideal for presentations, reading documents, or even accessing apps. With smart TVs becoming central media hubs in households, knowing how to send files to TV can greatly enhance usability and convenience.
Popular Methods to Send Files to TV
1. Using Wi-Fi Direct or DLNA
Wi-Fi Direct is a technology that allows devices to connect wirelessly without a router. DLNA (Digital Living Network Alliance) is another standard used for streaming content between devices.
To use this method:
Make sure both your TV and your mobile device or PC support Wi-Fi Direct or DLNA.
Enable Wi-Fi Direct on the TV (usually found in Network Settings).
On your smartphone or PC, select the file you want to share, choose the 'Share' option, and select your TV.
Within seconds, you can send files to TV and watch them in high resolution.
2. Using Screen Mirroring (Miracast or Chromecast)
While technically this is mirroring rather than transferring, screen mirroring is a common way to send files to TV temporarily.
Miracast:
Supported on most Android devices and smart TVs.
Simply enable screen mirroring on both devices and connect.
Chromecast:
Plug the Chromecast device into your TV.
Use the Google Home app to cast content from your phone or PC.
Open the file you want and hit the cast icon to send files to TV effortlessly.
3. USB Drive or External Hard Drive
This is one of the simplest methods:
Transfer files to a USB stick or an external hard drive.
Plug it into the TV’s USB port.
Use the TV’s file browser to navigate and view or play your files.
Though it’s not wireless, it’s a reliable way to send files to TV for offline access.
4. Using Cloud Services
Another excellent option is using cloud services like Google Drive, Dropbox, or OneDrive.
Steps:
Upload your files to the cloud via your smartphone or PC.
Open the cloud app on your smart TV (or use a browser).
Access and download the files directly on your TV.
Cloud-based file sharing is one of the most versatile ways to send files to TV across devices, especially when you're working remotely or collaborating with others.
Special Apps for Sending Files to TV
There are several apps designed specifically to send files to TV. These apps make the process more streamlined and often support multiple file types:
Send Files to TV (SFTTV):
Available on Android, Android TV, and Amazon Fire TV.
Install the app on both devices.
Connect both devices to the same Wi-Fi network.
Open the app, select the file, and send files to TV instantly.
Plex Media Server:
Create a personal media library and stream it to your smart TV.
A great option for managing large collections of videos, music, and photos.
X-Plore File Manager:
Works well for smart TVs with Android OS.
Enables seamless navigation and file transfers between devices.
Things to Consider
When trying to send files to TV, here are a few tips to keep in mind:
File Format Compatibility: Not all TVs support all file formats. MP4 for video, JPG for images, and PDF for documents are the most universally supported.
Internet Speed: If you're using Wi-Fi or cloud-based methods, ensure a strong connection for smooth and fast transfers.
App Compatibility: Ensure your TV has access to the necessary apps or app store (like Google Play on Android TV).
Final Thoughts
The ability to send files to TV adds a whole new level of functionality to your smart home setup. Whether you're showing vacation photos to your family, watching downloaded movies, or conducting a business presentation, the convenience is undeniable. With various methods—from USB and screen mirroring to dedicated apps and cloud services—you can choose the option that works best for your specific needs and devices.
Start exploring the power of your smart TV today, and make the most out of every screen in your home!
0 notes
Text
Interesting Facts About Wireless Mics That Every Performer Should Know
Wireless microphones have completely changed the game for performers. Whether you're a singer, public speaker, theater actor, or stand-up comic, the freedom of movement that wireless mics offer is hard to beat. But while they may seem like just another piece of gear, there's actually a lot going on under the hood. From their techy insides to how they handle interference, wireless mics are full of fascinating details that every performer should know.
Let’s dive into some lesser-known but super interesting facts about wireless microphones that might just help you understand them better—and use them more effectively.
They Don’t Actually Transmit “Sound”
This might sound weird at first, but wireless mics don’t really transmit sound like your voice itself. Instead, they convert the sound into a radio frequency (RF) signal. That signal gets sent to a receiver, which then converts it back into audio. Think of it like the walkie-talkie version of your voice, only more polished.
The key takeaway? Because your voice is being transmitted via RF waves, it’s subject to the same rules as other wireless devices. This includes things like signal interference and range limitations. Which leads us to the next point...
Frequency Matters – A Lot
Wireless microphones operate on specific frequencies that are regulated by government agencies (like the FCC in the U.S.). This means not all mics will work the same in every location. A mic that works perfectly in one city could suddenly have issues in another because of different frequency rules or local interference.
Performers who travel for gigs need to make sure their mics are set to legal and open frequencies in each region. Failing to do so can not only mess up your sound—but also get you fined.

Interference is Real, But Manageable
Have you ever watched a performance where the mic starts popping or cutting out mid-sentence? That’s usually interference. Wireless mics share the airwaves with tons of other devices—Wi-Fi routers, smartphones, even baby monitors.
To reduce the risk, many modern systems offer frequency agility, which means they can scan and select the best frequency automatically. But you can also reduce problems by keeping your mic system away from large metal objects, Wi-Fi routers, or any high-interference zones.
Line of Sight Affects Signal Strength
Here’s a fun fact: your body can block wireless signals. That’s because wireless mics rely on a clear line of sight between the transmitter (usually the mic or belt pack) and the receiver. If something big—or multiple things—are in the way, it can mess with the signal and cause dropouts.
That’s why you’ll often see receivers placed high up on stands or even above the stage. And it’s also a reason why turning your back to the receiver while performing can sometimes cause issues.
Latency Is a Thing (But Not Always Noticeable)
Wireless mics can introduce a tiny delay between when you speak or sing and when the sound comes out of the speakers. This delay is called latency. It’s usually just a few milliseconds, but in high-end live performance setups, even a small delay can throw off timing.
The good news? Most modern systems have incredibly low latency that’s barely noticeable, especially for vocal performances. But for musicians who need ultra-precise timing—like drummers or live loopers—it’s something to keep in mind.
Rechargeable Batteries Are Game-Changers
Older wireless mic systems relied heavily on disposable batteries, which could be wasteful and unreliable. Today, many systems come with rechargeable battery packs that last longer and offer real-time battery monitoring.
This not only helps the environment but also ensures you won’t get that dreaded dead-battery silence mid-performance. Always check battery levels before going on stage—it’s such a simple thing, but it can save your entire show.

Different Types for Different Needs
There are several types of wireless mics, and they’re not one-size-fits-all. The three main styles are:
Handheld wireless mics – Great for vocalists or presenters who want to hold the mic.
Lavalier (lapel) mics – Tiny mics clipped onto clothing, ideal for theater or public speaking.
Headset mics – Worn around the head or ear, perfect for fitness instructors or performers who need to move around a lot.
Choosing the right type can make a big difference in sound quality, freedom of movement, and overall performance comfort.
More Channels, More Mics – But It Gets Tricky
Planning a big stage production with multiple performers? Then you’ll need multiple wireless mics operating simultaneously. But using multiple systems together can be complicated.
Each mic needs its own frequency channel, and these need to be coordinated carefully to avoid cross-talk or interference. This process is called frequency coordination—and yes, it’s as technical as it sounds. Fortunately, many receivers can auto-scan and pair channels for you.
Range Can Surprise You
The range of wireless mics can vary dramatically depending on the environment. Indoors with lots of walls or electronics, your range might shrink. Outdoors or on large stages with line-of-sight? You could get up to 300 feet or more.
If you’re planning on moving around a lot during your performance, it's important to test the range before the actual event. Walk around the venue during soundcheck to spot any weak spots or dead zones.
Professional Shops Make a Big Difference
While online deals can be tempting, buying wireless mics from professional audio shops is always a safer bet. Not only do they offer guidance on which system suits your specific needs, but they can also help with setup, troubleshooting, and future upgrades. Plus, knowing you're using a legit, high-quality product can give you peace of mind on stage.
Wireless microphones offer performers an incredible sense of freedom and professionalism, but there’s more to them than just cutting the cord. From frequency coordination to battery life, understanding how they work can help you avoid technical hiccups and perform with confidence.
So the next time you pick up a wireless mic, you’ll not only appreciate the tech behind it—you’ll also know how to get the best out of it. And that’s the kind of backstage knowledge every performer should have.
#audio#audio gear#music#dj#professional audio#audio shop in brooklyn#brooklyn#musician#dj gears#wireless microphones#microphones#wireless microphone#dj gear#live event#live performance
0 notes
Text
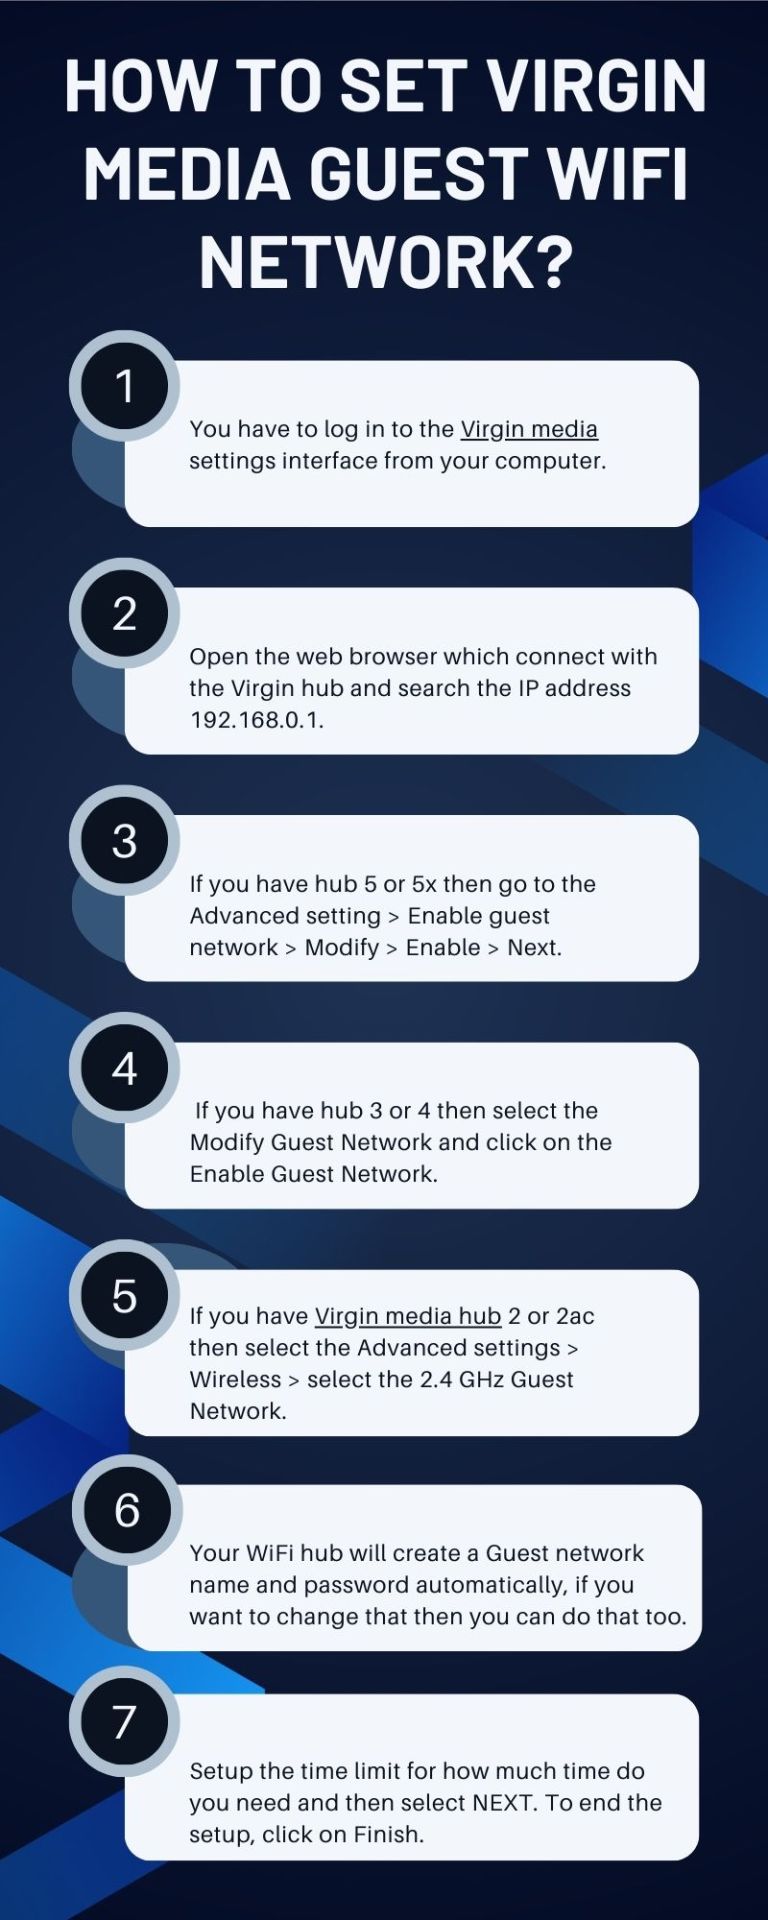
To set up a guest WiFi network on your Virgin Media Hub, start by connecting to your home network and opening a web browser. Type 192.168.0.1 into the address bar to access the router’s settings page. Log in using the admin password, which is usually found on a sticker on the bottom of the Hub. Once logged in, navigate to the Wireless Settings and look for the Guest Network option (the exact location may vary depending on your Hub model). Enable the guest network, then choose a network name (SSID) and create a secure password for your guests to use. Finally, save the settings to activate the guest network. This allows visitors to connect to your WiFi without having access to your main network, keeping your personal devices and data secure.
0 notes
Photo
https://pcport.co.uk/are-ethernet-ports-standard-on-all-computers/ In today's world, Wi-Fi is everywhere. But do all computers have Ethernet ports? Ethernet ports, or LAN ports, are crucial. They link devices like computers, routers, and modems with wires, using RJ-45 connectors. Although we often use wireless, Ethernet is known for being fast, secure, and reliable. It's vital in many tech setups.On desktops, Ethernet ports are common. They provide a steady network link. But, when looking at laptops, things vary. Take the MacBook Air as an example; it usually l
0 notes
Text
How to Set Up Your Macard RE1200 WiFi Extender

Macard Wireless Extender Setup
via WPS
Connect the Macard extender to a power outlet located near your router. Wait until the Power LED turns solid.
Find the WPS button and press it.
This means that the WPS light should begin blinking. The WPS light on the router should start blinking.
Press the WPS button of your Macard extender within 2 minutes after pressing the WPS button of the router.
The WPS light should start blinking on the extender.
The extender should be solid after about 30-60 second, indicating that the connection was successful. You can move the device anywhere within range of your router after the connection.
Via Gomacard.online
Connect the Macard extender to a power outlet close to your router. Wait until the LED becomes stable (this could take a few minutes).
Go to WiFi settings on your computer, tablet or phone.
Connect to the network by searching for its name. There may not be a password required.
Go to gomacard.online in your browser. Log in to the device using the default admin credentials.
Login with the default password
Username : admin
Password : admin
Select "Repeater Mode" from the menu. The app will search for WiFi networks nearby.
Choose your primary WiFi network. Enter the WiFi password for your router.
You can choose to name your extended network or leave it at the default.
Via the 192.168.10.1
Macard WiFi extender should be placed in the middle of your wireless router, and the area you wish to extend Wi-Fi. Connect it to a power outlet, then connect to its WiFi network.
Go to the WiFi settings to connect your computer. The manual of the extender will usually mention this network name (SSID). This initial connection is unlikely to require a password.
Open any browser on the connected device.
Enter 192.168.10.1 into the address bar.
Now you should see the login page for your Macard wifi extender.
Often, the default username and password for both fields is admin.
Click Login and enter your credentials.
A setup wizard will guide you once you log in. Follow the instructions on screen.
Search for Wi-Fi networks nearby. Select the name (SSID), of your home Wi-Fi network.
Enter the password to your home Wi-Fi.
You may be asked to create a new Wi-Fi extended network name (SSID).
You can keep the name of your main network, or you can create a different one so that the extended network is easily identifiable.
When you click Save, the extender will attempt to connect to an existing Wi-Fi network to broadcast your extended network.
Where Should the Extender Be Relocated After Installation?
Connect your device to the newly extended WiFi network by disconnecting it from the setup WiFi network. Use the password that you entered when configuring the extender. To relocate the extender to another location, make sure it is within the range of the main router.
Troubleshooting tips
Rebooting Extender Network
Remove the extension cord from the outlet. Unplug the extender for 15-30 seconds. It will then shut down completely. Reconnect the device to the outlet.
Wait a few moments for the extender's power to come back on, re-establish a connection with your router main and broadcast its expanded network. You will typically see the indicators lights cycle, and then return to their normal state.
Resetting Macard WiFi Extender
Make sure that your Macard WiFi extender has been plugged in and turned on.
Use a paperclip or an object with a thin, pointed tip. Insert the paperclip gently into the reset pinhole. Hold the reset button down for 8-10 seconds. Release the reset button after 8-10 seconds.
Now, the extender will reboot by itself. It may take a couple of minutes for this process to complete. When the indicator lights return to their default settings, you'll know that it's done.
The Summary
It is easy to set up the MACARD RE1200 wifi extender by using IP address or WPS. You have hopefully chosen the correct setup method and installed the device successfully.
FAQs
How do I set up Macard model RE1200 WiFi extender?
Install the device using WPS, IP address or interface. The blog post contains all the instructions for each setup method.
How do I change the password on Macard RE1200 Wireless Extender?
Use the IP or URL address to access the interface of the extender. Select Wireless Settings in the settings. Enter the new WiFi password after selecting SSID. Apply it by saving.
0 notes
Text
Netgear Router Setup Using Nighthawk App: Step By Step
Netgear router devices can easily be set up using the nighthawk app. Now you can manage the network from your smartphone very conveniently. Confused how to do it? Don’t know where to start? No worries, check out the further section of this article to get detailed information about the Netgear Router Setup Using Nighthawk App. Also in the next segment you will get installation information and troubleshoot common errors. Just scroll the page and configure your router now without any technical expertise.
Netgear Router Installation
Installation of the netgear router is a very easy task. First step is unboxing the router. Look for the placement closer to the host modem. Connect the router with the modem using ethernet. Must cut the power of the modem device before connecting the ethernet cable. Make sure the connection is secured. Then connect the modem and the router with the power. Wait for the LED light on the router device to get stable and then proceed with the netgear router setup process as specified below.
Netgear Router Setup
Begin the setup by using a smartphone, modem and working internet connection. Check out the steps you need to follow:
Download The Nighthawk App
Embark with the downloading of the nighthawk app on your smartphone device. You can use either android or iOS system devices. Open the store on your smartphone. Search for the nighthawk app. Then click on the install button and let the application download and install in the smartphone device. Before initiating the download make sure your device is connected with a stable internet connection.
Connect Smartphone With Router
After downloading the app you have to connect the same device with the router’s wireless network. Use the default SSID & password details mentioned on the device label.
First of all you have to go to the settings in your smartphone.
Next, you have to go to the WiFi option and turn it on.
Scan the router’s network name and choose it
Mention the password as on the label of the router.
Click on the connect option.
Let the device connect to the network.
Launch The App
Now, launch the nighthawk app you recently installed and follow the on screen instructions to proceed with the network configuration.
Configure Your Router
Initiate the configuration by choosing the language. After that you have to follow the on screen guide. Create a password for your wireless network. Also perform firmware updates, make additional security settings, and many more. After making all the important changes, submit the changes by clicking the apply option.
Troubleshoot Common Issues
Is your netgear router troubling you? Don’t know what the issue is? Don’t know how to resolve the problem? No worries, just follow the troubleshoot guide mentioned here:
No Internet Connection
One of the most common problems users face with the netgear router is a lack of internet access. If your netgear router is connected to the router but there's no internet then try following troubleshooting:
Restart your router and modem. Unplug both devices from power. Wait for about 30 seconds. Plug the device back again and wait for it to boot up.
Check the ISP connection. Many times the issue lies with your ISP. Try connecting directly via modem to confirm.
Update the firmware. Log in to your router via the Netgear web interface (usually 192.168.1.1) and check for firmware updates under the settings.
Slow Internet Speeds
In case your router network speed is slow then you should try following:
Reposition the router. Place it in a central location away from network troublers including walls, electronics, heavy metal objects etc.
Limit connected devices. Too many devices can strain bandwidth. Disconnect those not in use.
Use the 5GHz band. If your router is dual-band, switch to 5GHz for faster speeds (ideal for streaming or gaming).
Router Keeps Disconnecting
Facing sudden disconnections? Is your router keep disconnecting then follow below troubleshoots:
Check cables and connections. Loose or damaged Ethernet cables can cause drops.
Change the channel. WiFi interference from nearby can cause issue. Login to your router’s admin panel and switch the wireless channels to resolve the issue.
Factory reset. If issues persist, perform a factory reset by pressing and holding the reset button for 10 seconds.
Can't Access Router Login Page
If you are unable to access the router’s login page then follow these instructions:
Check the IP address. The default is often 192.168.1.1 or 192.168.0.1. Confirm it's correct.
Use a wired connection. Sometimes Wi-Fi won't allow access, connect your PC via Ethernet and try again.
Clear browser cache or use a different browser.
Forgot Wi-Fi Password
Lastly if you forgot the password of your wireless network then you can proceed with these troubleshootings:
Login to the router settings using any browser.
Navigate to Wireless Settings and view/change your Wi-Fi credentials.
Conclusion
Hope the above sanctioned information related to the netgear router setup is very useful for you. You can follow the steps to configure your router using the nighthawk app. Also you can easily troubleshoot the common errors by following the above tips.
0 notes
Text
Altice Extender Setup Using WPS or Ethernet
If you're searching for a reliable and straightforward guide to set up your Urant WiFi Extender, you've come to the right place. This article provides clear, step-by-step instructions to help you install and configure your extender effortlessly at home.
Urant WiFi Extender Installation Guide
You can easily install and configure your Urant WiFi Extender without professional assistance. The setup involves connecting the extender to your existing router and configuring it through its web interface.
How to Install the Urant WiFi Extender
Power off your modem and main router before starting.
Place the extender close to your router for a strong connection.
Use an Ethernet cable to link the extender to the router.
Plug the extender into a power outlet.
Turn the modem and router back on.
Once you've completed these steps, proceed to configure the extender through your computer.
Configuring the Extender Using a Computer
Connect your computer to the extender's network, typically named “WiFi-Repeater.”
Open a web browser and enter 192.168.10.1 in the address bar.
When prompted, input the default username and password (these are usually found on a label on the extender).
Click the login button to access the settings dashboard.
Choose "Repeater Mode," select the WiFi network you want to boost, and enter its password.
Click "Apply" and set a password for the extended network.
After completing the setup, relocate the extender to an area where your WiFi signal is weak or doesn't reach well.
Setting Up the Extender Using the WPS Button
If you don’t have an Ethernet cable available, you can connect the extender wirelessly using the WPS (Wi-Fi Protected Setup) method. Both your router and extender must have WPS buttons.
WPS Setup Steps:
Turn on both the router and the Urant WiFi Extender.
Press the WPS button on your router.
Within two minutes, press the WPS button on the extender.
Wait a few seconds for the devices to establish a wireless connection.
Once paired, the extender will use your router’s existing password, allowing you to connect your devices to the extended network seamlessly.
Final Thoughts
This guide has walked you through the entire process of setting up and logging into your Urant WiFi Extender. As you’ve seen, the installation is straightforward and can be completed in just a few minutes, whether through a wired connection or the WPS method.
1 note
·
View note
Text
Buy New SANYO KR1.2SCH-3(RC03911) Battery online
https://uk-online.co.uk/ppimageb/KR1.2SCH-3.jpg
Brand New SANYO KR1.2SCH-3(RC03911) replacement battery for SANYO Devices & Electronics 1200mAh/4.32Wh 3.6V
SPECIFICATIONS:
https://uk-online.co.uk/ppimageb/KR1.2SCH-3.jpg
Other online shop for SANYO KR1.2SCH-3(RC03911)
JP: SANYO KR1.2SCH-3(RC03911) バッテリー FR: SANYO KR1.2SCH-3(RC03911) Batterie ES: SANYO KR1.2SCH-3(RC03911) batería IT: SANYO KR1.2SCH-3(RC03911) batteria PL: SANYO KR1.2SCH-3(RC03911) Zgodna Bateria US: SANYO KR1.2SCH-3(RC03911) battery
High standard SANYO KR1.2SCH-3(RC03911) Battery
Features of Our Rechargeable Battery for SANYO KR1.2SCH-3(RC03911) replacement battery:
1. Each Rechargeable Battery for SANYO KR1.2SCH-3(RC03911) replacement battery is made of high-quality lithium-ion battery, which is longer than the last time.
2. The battery is up to standard and fully compatible with original specifications.
3. All our batteries are certified by CE, UL, ROHS, ISO9001/9002 as safe products.
We specialize in providing high-quality batteries. The Rechargeable Battery for SANYO KR1.2SCH-3(RC03911) has passed tests according to Security Standards to ensure battery's quality. The interface metal and solid insulators of the Rechargeable Battery for SANYO KR1.2SCH-3(RC03911) are made of Premium materials to ensure stable current input and durability. Round-sealed package ,faster delivery and thoughtful after-sales service will make you feel assured to purchase.UK-online.co.uk is the home of British most comprehensive laptop batteries,dell Laptop Battery,and ac adapters website. Wholesale or retail laptop batteries and laptop adapters with high quality & low price. Just enjoy your digital life with a new laptop battery.
Related Products:
Netgear W-8 replacement battery for Netgear Sierra Wireless Router Aircard 308-10004-01, Rating: 2500mAh/9.5WH 3.8V
MORANGE MSC11 replacement battery for Morange M1PRO, Rating: 1000mAh/7.40Wh 7.4V
Panasonic CGA-S007E replacement battery for Panasonic Lumix DMC-TZ1 TZ2 TZ3 TZ4 TZ5, Rating: 1300mAh 3.7V
Kenwood KNB-48L replacement battery for Kenwood NX-200 NX-300 P25 TK5220, Rating: 2600mah 7.4V
iRobot 4409709 replacement battery for iRobot Braava 380 380T Mint 5200 5200B 5200C Floor Mopping Robots, Rating: 2500mAh 7.2V
DJI Avata_2 replacement battery for DJI Avata 2 Intelligent Flight Battery, Rating: 2150mAh 14.76V
YUHUIDA 853065 replacement battery for YUHUIDA Remote-controlled cars, toy guns, bubble machines, model airplanes, Rating: 1500mAh 3.7V
Hypercore XL replacement battery for Hypercore XL, Rating: 293Wh 14.8V
SANYO DB-L20 replacement battery for SANYO Xacti VPC-C4 VPC-C4E VPC-C4EX VPC-C4G VPC-C4S VPC-C4GX VPC-C40, Rating: 900mAh 3.7V
SHARK XB2700 replacement battery for SHARK V2700 V2700Z V2930, Rating: 1000mAh/4.8Wh 4.8V
Why Buy KR1.2SCH-3(RC03911) Battery From Here?
With the international Standard Control from R&D, Manufacturing and test, Our battery for KR1.2SCH-3(RC03911) have passed CE, UL, ROHS, ISO9001,QS9000 and TS16949. At least Save up to 30% from our site battery shopping. We can provide cheap and high quality KR1.2SCH-3(RC03911) batteries to benefit our customers. We provide timely delivery to our customers. We will shipping the battery immediately after got your payment. It is usually take 7-15 business days for you get the replacement KR1.2SCH-3(RC03911) battery.
SANYO Battery (Our Popular Products )
SANYO DB-L20 replacement battery for SANYO Xacti VPC-C4 VPC-C4E VPC-C4EX VPC-C4G VPC-C4S VPC-C4GX VPC-C40, Rating: 900mAh 3.7V, SKU: 19LW045_6_Oth
SANYO DB-L50 replacement battery for SANYO Xacti VPC-FH1A, VPC-TH1, VPC-TH2, VPC-VH1, VPC-WH1, VPC-HD1000, Rating: 2300mAh 3.7V, SKU: 19LW193_Oth
SANYO DB-L40 replacement battery for SANYO DMX-HD1 DMX-HD1A DMX-HD2 DMX-HD700 DMX-800 DMX-E760 DMX-875 DMX-1075, Rating: 1200mAh 3.7V, SKU: 19LW120_Oth
SANYO 3/N-600AAC replacement battery for SANYO 70360 503 513, Rating: 600mAh 3.6V, SKU: 24KK80S7_Oth
Sanyo 5N-700AACL replacement battery for Sanyo Cadnica with white Plug, Rating: 700mAh 6V, SKU: CAD21OT1307_Oth
SANYO DB-L80 replacement battery for SANYO DB-L80 VPC-CS1 CG20 CG88 CG100 CA100 GH1 GH3, Rating: 700mAh/2.6Wh 3.7V, SKU: ECNM10178_Oth
SANYO 6N-600AA replacement battery for SANYO 6N-600AA Cadnica, Rating: 600mAh/4.32Wh 7.2V, SKU: 24KK43B6_Oth
SANYO DB-L20 replacement battery for SANYO Xacti VPC-C5 VPC-C5E VPC-C5EX VPC-C6 VPC-C5GX VPC-CA6 VPC-CA65, Rating: 900mAh 3.7V, SKU: 19LW045_7_Oth
Sanyo 12N-1600SCB replacement battery for Sanyo Cadnica with black Plug, Rating: 1600mAh 14.4V, SKU: CAD21OT1306_Oth
Sanyo UR14500AC replacement battery for Sanyo UR14500AC 14500, Rating: 740mAh 3.7V, SKU: ECN12992_2PCS_Oth
#SANYO#SANYO KR1.2SCH-3(RC03911)#KR1.2SCH-3(RC03911)#SANYO battery#KR1.2SCH-3(RC03911) battery#SANYO Replacement Battery#SANYO KR1.2SCH-3(RC03911) Replacement Battery#SANYO KR1.2SCH-3(RC03911) battery
0 notes
Text
WPC ETA Testing Lab in Noida – Your Trusted Partner for Wireless Equipment Approval

WPC ETA Testing Lab in Noida
Are you looking for a reliable WPC ETA Testing Lab in Noida to get your wireless and RF equipment approved for use in India? You're in the right place. With the rapid advancement in wireless technologies and IoT, ensuring compliance with the regulatory framework is critical. That’s where WPC ETA testing comes into play, and finding the right testing lab in Noida can save you time, cost, and hassle.
In this article, we will explore what WPC ETA certification is, why it's essential, and why our Noida-based lab is the best choice for your testing needs.
What is WPC ETA Certification?
WPC stands for Wireless Planning and Coordination, a wing under the Department of Telecommunications (DoT), Government of India. It regulates and monitors the use of radio frequency (RF) spectrum across the country.
ETA, or Equipment Type Approval, is a mandatory certification for all wireless and RF-based equipment that operates on de-licensed frequency bands (like Wi-Fi, Bluetooth, ZigBee, etc.) before being imported, marketed, or sold in India.
Without ETA, businesses risk regulatory penalties and confiscation of non-compliant devices.
Why Do You Need ETA Testing?
Before applying for ETA from WPC, the equipment must undergo RF testing in a WPC-authorized lab. The testing ensures that the device conforms to prescribed power output, frequency, and bandwidth norms defined by Indian standards.
Here’s why ETA testing is crucial:
✅ Regulatory Compliance: It’s a legal requirement for import and sale.
✅ Market Access: Enables smooth entry into the Indian market.
✅ Customer Confidence: Ensures that your product meets safety and performance standards.
✅ Avoid Penalties: Prevents legal consequences, shipment delays, and import rejections.
Our WPC ETA Testing Lab in Noida
Located in the heart of Noida’s industrial and tech hub, our WPC ETA Testing Lab is a government-recognized facility equipped with cutting-edge testing instruments, experienced RF engineers, and efficient customer support.
We specialize in end-to-end ETA testing and certification services for various wireless products, including:
Wi-Fi Routers
Bluetooth Speakers
Smart Watches
Wireless Earphones
ZigBee & LoRa Devices
RF Modules and Transceivers
IoT and Smart Home Devices
Wireless Surveillance Cameras
Why Choose Our ETA Testing Lab in Noida?
There are several reasons why startups, importers, OEMs, and manufacturers across India and abroad trust us for WPC ETA testing:
1. Accredited & Authorized
Our lab is authorized by the WPC and NABL-accredited (ISO/IEC 17025:2017) for RF testing. That means the results we generate are accepted directly by WPC without additional verification.
2. Fast Turnaround Time
Time is money in business. Our streamlined testing process and in-house certification experts ensure that your ETA application is completed in the shortest time possible – usually within 5–7 working days.
3. Experienced Team
Our engineers have over a decade of hands-on experience in RF testing and WPC compliance. Accuratetestsolutions Whether you’re launching a new product or modifying an existing one, we provide the right guidance at every step.
4. Cost-Effective Packages
We believe in offering value. Our WPC ETA testing packages are competitively priced without compromising on quality or accuracy.
5. Hassle-Free Documentation
From test report preparation to online submission on the Saral Sanchar portal, we handle everything, so you can focus on your core business.
6. Support for Foreign Manufacturers
If you’re a global brand looking to enter the Indian market, we assist in testing and filing ETA on your behalf through an Indian Authorized Representative (IAR).
Step-by-Step ETA Certification Process
Here’s how the typical ETA certification journey works:
🔹 Step 1: Submit Product Details
Share the product datasheet, RF specifications, and internal photos for our evaluation.
🔹 Step 2: Sample Testing
Send your product sample to our Noida lab for testing on designated frequency bands and power limits.
🔹 Step 3: Generate Test Report
We issue an RF test report confirming your device complies with WPC norms.
🔹 Step 4: Online Submission
Our experts submit your application on the Saral Sanchar portal using the official Digital Signature Certificate (DSC).
🔹 Step 5: Get ETA Certificate
Once approved by WPC, your ETA certificate is issued and sent to your registered email.
Devices That Need ETA in India
Here are some common product categories that need ETA certification before entering the Indian market:
Device Type
Example Brands
Wi-Fi Routers
TP-Link, Netgear, Asus
Bluetooth Earbuds
boAt, Sony, OnePlus
Wireless Cameras
Hikvision, Dahua, CP Plus
Smartwatches
Apple, Samsung, Fire-Boltt
Wireless Keyboards
Logitech, Dell, HP
IoT Devices
Google Nest, Amazon Alexa
If your product operates in de-licensed frequency bands (e.g., 2.4 GHz, 5 GHz), WPC ETA is mandatory.
Frequently Asked Questions (FAQs)
Q1. How long does it take to get WPC ETA certification?
Typically, it takes 7–10 working days including testing and approval.
Q2. Do I need ETA if my device has already been certified abroad?
Yes. Even if your product is FCC or CE certified, WPC ETA is still required for use in India.
#WPC ETA Testing Lab in Noida#best WPC ETA Testing Lab in Noida#top WPC ETA Testing Lab in Noida#join WPC ETA Testing Lab in Noida
1 note
·
View note
Text
Information Systems What is a Network? A network is defined in general as a “interconnected system of things or people”, but in electronics is defined as “a system of interconnected electronic components or circuits” (Princeton WordNet).What are the different types of Networks and how many?There are numerous types of networks. The above definition indicates that an individual desktop computer is a “network” of circuits and components like a hard drive, motherboard, etc. There are also information networks, where information itself is being networked. There are ad hoc networks, made and dropped quickly. There are computer networks, both wired and wireless. There are virtual private networks, which are emulations of LANs usually done over the Internet.What is the difference between wired and wireless network?A wired network is one which is connected together by cables, typically coaxial or Ethernet cables (whether they be 10, 100 or 1000 base-T, parallel or serial, etc.) A wireless network is connected by some kind of wireless transmission, usually a wireless router projecting a certain radio frequency. It is important to note that a wired network can have wireless components, say a wireless computer participating or a wireless printer, while a wireless network can and almost always do have wired components, like a final physical throughput (cable, DSL/phone lines, “satellite” - which is effectively a “wired” network for this discussion, etc.)Which frequency do we use for wireless network?What is fiber optics and how does it work?Light is used to encode information and send “bits” the same way a phone line can. They are sent over cables of tightly bound fibers, usually of a kind of fiber-glass, that act as a waveguide, a “light pipe” the same way a metal pipe can be used to act as a guide for water. Fiber optics are immensely fast because they have speed-of-light transmission.What is the difference between AMD and Intel processor?The maker. AMD and Intel have competed for different parts of the processor market over and over and are in a constant arms race for more clock cycles, more Hertz, etc. Their architecture is almost identical: “The nice thing about being computer enthusiast is that right now both AMD and Intel platforms support a lot of cross compatible hardware. Sure the CPU and motherboards are platform specific, but you can share DDR2 memory, videocards and other peripherals easily enough” (PC Stats). The common consensus is that Intel tends to make more expensive but higher quality cards while AMD more readily courts the discount market, but even this is not always true. Why is Intel more popular than AMD? Better brand promotion, marketing and longer reputation. They also tend to court the higher end of the market, which tends to give better market status.Which one came to the market first?Intel was founded in 1968 and created the x86 lines, the most famous of which is undoubtedly the Pentium. AMD was founded in 1969 and got into the semiconductor and processor business somewhat later than Intel.How many pins do we have in the processor?It varies from configuration to configuration. Some pin counts are in the double digits, some the triples, while the LGA Intel Core i7 has more than a thousand!Why does the manufacturer leave the last pin of the processor blank? Its to make sure that there is only one viable direction to put in the socket. Good computer design always is keyed to one orientation.What is the architecture of a databus?A databus transfers data between computer components, either within or among computers. It is thus the “net” of a network, the junctions. They used to be actual electrical buses, but now is any functionally similar system. They can be parallel, serial, self-repairable, etc. They often give better messaging speed at the cost of needing a network scheduling protocol.Works CitedPC Stats. AMD vs. Intel: What to Get? Which is Better? August 31, 2007.Princeton Wordnet. Network. Princeton. Read the full article
0 notes