#uv resin tutorial
Explore tagged Tumblr posts
Visit Tumblr Blog
Explore Tumblr blogs with no restrictions, modern design and the best experience.
Last Seen Tumblr Blogs


Fun Fact
Hackers stole 65M passwords from Tumblr in 2013.
Text
Non-Toxic Polymer Clay Jewelry Business in India
Non-Toxic Polymer Clay Jewelry Business in India Introduction The handicraft world welcomed a brave little thing — polymer clay. Polymer clay is the type of medium that has captured the attention of both the artists and the aspiring entrepreneurs alike, with its versatility and endless possibilities and it is a business in its own right. Using polymer clay to make jewellery, these enterprising…
#apply resin on polymer clay#basic polymer clay tutorial#diy polymer clay earrings#epoxy resin art jewelry#how to apply resin on polymer clay#how to use polymer clay#jewelry#polymer#polymer clay#polymer clay beginners#polymer clay charms#polymer clay diy#polymer clay for beginners#polymer clay jewelry#polymer clay jewelry making#polymer clay tutorial#resin jewelry#small business ideas#small business owner#uv resin jewelry for beginners
0 notes
Text
#ring#resin ring#resin#uv resin ring#flower ring#resin art#ring making#resin tutorial#making resin rings#epoxy resin#resin rings#uv resin#how to make a clear resin ring#diy resin flower ring#wedding ring#pressed flower botanical ring#how to make a resin and rhinestone ring#handmade ring#resin rings with flowers#handcrafted ring#casting a resin ring#glow ring#diy resin and rhinestone ring#how to make a resin ring#resin rhinestone ring#Rounded ring#Pressed flower ring#Resin flower ring#Dried flowers resin#Real flower in resin
0 notes
Text


Managed to track down two of the GoH Cutie Mark Crusaders by finding them in a mixed lot, and I can't get over how cute they are.
Look at them. They're so smol.
They were missing their tails and wings, so I also bought their Funko mini versions, and used those to replace these parts. I used UV resin to add pegs, then painted everything to match, though there's a bit of a gap on Sweetie belle's tail. In hindsight I wish I'd recorded the process and made a tutorial, but I wasn't sure it'd work initially. I'm def going to use this for future customs and repairs though.
Hopefully one day I can also track down Apple Bloom. These are rare, and don't pop up for sale super often.
49 notes
·
View notes
Note
do you have any tuts on how u made those cute little lps keychains?? I only skimmed your page so sorry if u have somthing this posted!!
heyy! sorry i don't have a tutorial since it was just a personal project but i can show u the process :D
i started w a wire and tin foil armature to bulk up the shape and to embed the hook
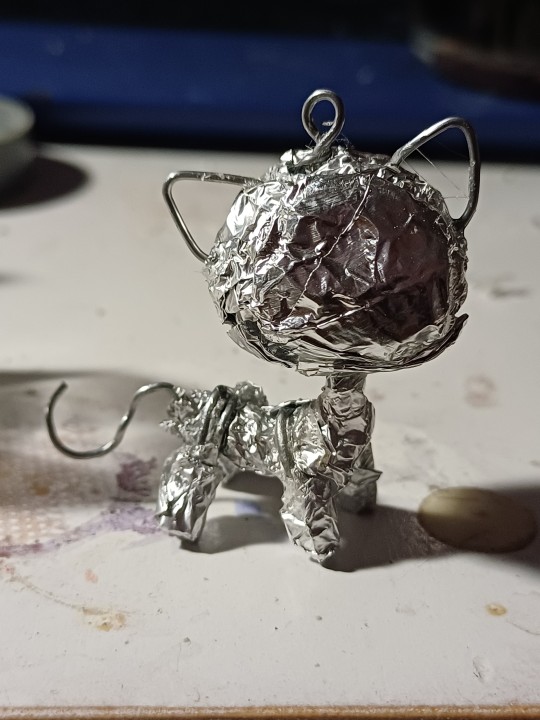
then i started aplying the acrylic in passes just taking it slowly, at this point i also sketched the facial features
in retrospect an epoxy or polymer clay would be much easier to work with but i already had acrylic in hand and since it's pretty durable i just used that :p

it's just a really tedious process of adding and filing down the acrylic and its best to take it slow u_\\ i gotta say having an E file helps to reach tight spaces and add detail so i recomend getting one
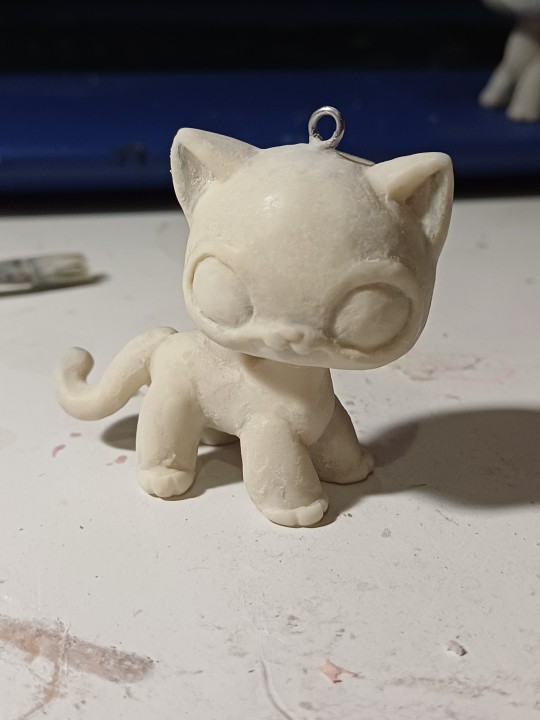
finally i painted the keychain w nail polish lol since it sticks quite well to plastic and used a uv gel topcoat to seal it but maybe it would be better to use a uv resin idk
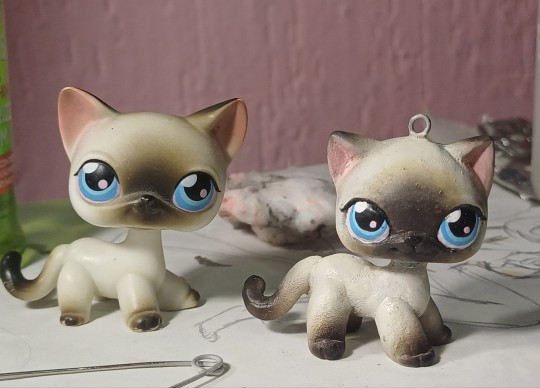
thats basically what i did! i didn't take that many process pics but i hope it helped! ^_^
#ask!!!#lps#littlest pet shop#lps cat#lps art#its quite a long response lol but i figured it would be nice to explain my process :p#ignore my messy desk >_< it's seen many a spill
20 notes
·
View notes
Text
DIY pin tutorial
this is just how i make them :) @boneyardbob I remember you asked for a tutorial awhile back so here you go!

You will need: •Needle nose pliers (or whatever they're called) •a can tab •a bottle cap •a safety pin •paint and sealant (clear nail polish works for me) •glue (optional)

What i like to do is bend my tab a little bit to make it easier to get the safety pin in there.

Then you're gonna want to start bending the edges of the bottle cap inward with the pliers. Make sure you don't do it all the way so you can insert the can tab (if you like the og design on the bottle cap and are making a pin to show it off just be careful because the pliers do take off paint if you aren't really careful)

Insert the tab before the edges are brought in fully

Then just press the edges down (you might have to hold the tab in the middle so its not wonky). The pin will not be a perfect circle (but this is diy so what do you expect.)

Slide your safety pin though the tab [Optional: you can glue it down with hot glue or superglue- i just haven't gotten around to doing it for mine yet]

And there you go! You now have a pin! For painting you can either scratch the cap to make it rough enough for the paint to stick on better or use something textured to apply a base layer of paint :) paint your design on there, let it dry for a day or two, and seal with clear nail polish or a shiny sealant of your choice (uv resin, modge podge, etc).
Happy diy and if you have any questions feel free to ask :>
#porkbundoescrafts#diy#diy projects#diy craft#diy punk#alternative#alternative fashion#idk how to tag this#do it yourself#FUCK
32 notes
·
View notes
Text
@wylanbsoundcloud replied to your post “Sorry I’ve been neglecting tumblr. But check out...”:
These are soooo cool!!! How did you make them?
here is the tutorial i used!
youtube
the only difference is, I didn't use stickers I just printed the pictures out on an inkjet printer and used a glue stick to adhere them to the plastic. i also did both sides of the plastic instead of just one
WORD OF WARNING: i dont remember if they mention this in the video but when working with UV resin make sure to do so in a well ventilated area or with a respirator!
23 notes
·
View notes
Text
Happy (Symbolic) Birthday Amarion!
As you all know, I am very normal about these two characters, so let me show you my little Amari-Mario collection to celebrate! Most of it's hand-made or locally sourced because this woman is BROKE, so keep that in mind. Also is raining outside, so sorry for the photo quality.

Let's start with my little Pripara corner in my Magical Girl cabinet! Here sit my Mario and Amari Plushies. Amari got it for a steal on Zenmarket because the house she came from had cats and that's apparently a reason to mark down the price. Mario was commissioned to my local plush maker and I later added the Full Metal Rabbit buckle myself (Is made out of cardboard, sticker and uv resin.)


I hand made these light sticks after watching a tutorial on instagram! I think is a fun item to have for an idol anime, and they are not particularly hard nor expensive to make.

I also got this broken Candy Alamode pripass for cents on Zenmarket, and I turned it into an Hysteric Bunny one! The design is based on the Hysteric Bunny card. I cleaned up the bunny logo myself, and asked a friend of mine to make it into a phone strap.

At last, here is my pride and joy! This one took months to make! As I said before, I am broke, so I can't really afford to buy badges from japan (They might be cheap by themselves, but the Amari and Mario one's usually don't sell in bulk, so between shipping, taxes and commission it get's out of hand) so instead I spent hours searching and researching to find good quality pics of different badges, edit them and send them to my local print shop to turn them into these monstrosities. is this morally dubious? Yes! But I would never use my editing powers to just resell a replica.

I also added the Pritickets I made because I didn't want it to be an itta bag of just can badges. Oh, by the way, two of them at the top at not official art, but fan arts by あ��る on pixiv.
I hope you liked my little tour. Now, to wait for my scheduled Idol Land playing time to pull for their banner. Because I might be a punk, but I'm a punk with STRUCTURE!
11 notes
·
View notes
Note
How did you make the charms?!? I’ve been wanting to do something like that forEVER but idk how :(
Shrinky Dinks and UV resin!! HERE is the tutorial that spawned my interest in doing it myself, and a little overview from myself below the cut (no pictures sorry, hopefully my words are descriptive enough ^^;). It took me some trial and error but it's a pretty easy craft once you're familiar with how shrinky dinks and uv resin work!
I got my shrinky dink paper from an off-brand online but you can find them in craft stores as well (you'll need the printable kind specifically - white or clear depending on your preference). I used my cricut to print & then cut the character charms, but you can also cut them by hand. Make sure to leave a hole for adding the keychain part tho >.< a hole punch works great if you're cutting by hand.
Once you've shrinked the dinks, just coat the printed side with a layer of resin, cure them until hard, and finally add your keychain & decor!
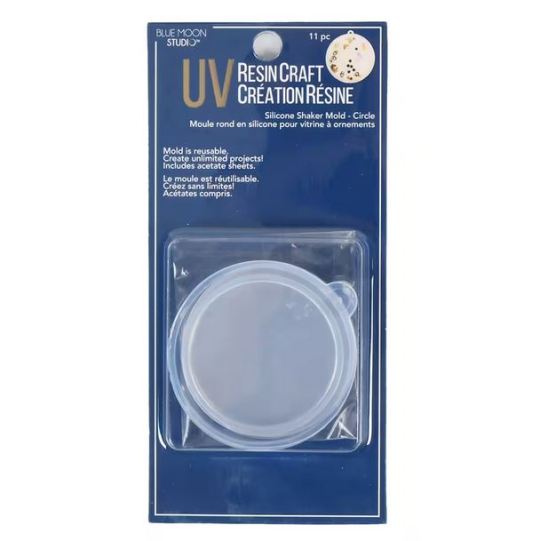
For the shaker charms, I used a mold and just added some color & glitter to the resin. The mold came with acetate sheets that you 'glue' on top with more resin around the rim of the charm after you've put all the shaker bits inside (if you want to make more than 11 charms, trace the acetate sheet before you run out so you have a guide to cut out more later). I used the same method as before for the character charms inside - shrinky dinks with a protective layer of resin on top.
Adding liquid is optional, but I used a pin vice to drill a hole in the side of the charm and a needle-tipped syringe to get the liquid inside. Once full, dab on some resin to seal the hole and you're done! I tried baby oil and distilled water for mine - I recommend the water. More often than not a little bit of liquid would bubble out the hole when I was filling the charm, and let me tell you it is NIGH IMPOSSIBLE to fully clean up baby oil, which made sealing the hole with resin a nightmare. Water is much more friendly.
Also, THIS is the mold I used:
21 notes
·
View notes
Text
Quickly showing off some removable Velcro decos I made for Shaggy:
(The orange pom pom and the heart shaped “Calm” badge)

And if anyone cares, below is a tutorial/record of how I made them:
I used the sticky Velcro dots from stellotape and some of my planner stickers


As the specific sticker I had in mind is bigger than the Velcro patch, first thing I did is to stick it on a piece of paper and cut it off (The only non-brittle paper I had with me is a biscuit memo pad…)


As can be seen, the sticky side of Velcro patch still had quite some empty space after putting the sticker on, so I just slapped on some more stickers beads and plastic jewels

The final product is coated with a layer of clear nail polish, which probably is not a good idea as nail polish erodes plastic. I’m considering UV resin next time


The orange pom pom is simply stuck on a Velcro patch of the same size.
#allfurby#furby 2023#safefurby#furby#furby resources#random rat rattle#I guess this counts as failed craft tutorial
27 notes
·
View notes
Text
making bjd eyes is one of the things i’m THE most passionate about, but i’m struggling a bit finding the best way to make them, both in regards to their longevity, but also my health. im going to talk about it and ask if anybody has any ideas :3
i want to use the least toxic materials i can. i started off using uv resin as everybody seemed to use in their tutorials, and because of that i didn’t know how ridiculously toxic the fumes are. be careful with that stuff!!!!!!!!!! im now using non toxic slow cure resins, which is less convenient, but i’d rather not die for little plastic eyeballs!!!!!! be mindful of your health please!!!!!!
im also worried about the yellowing rates of all materials i could use. i’d like my eyes to hold up for as many years as they can!! for eye bases, im currently experimenting with said non toxic resin that’s also meant to be quite uv stable, combined with titanium dioxide powder for colouring which is also used as an anti uv ingredient in sunscreen…but im not a chemist and don’t know what fumes they make together. the resin on its own can be nontoxic because it doesn’t react with anything but itself, but i don’t know what adding the titanium dioxide will do. so far it’s working okay! i just need to find ways to grind the powder better as it likes to clump (pestle and mortar isn’t working super great for me rn). i did try polymer clay for the bases, but found it really hard to get into all the nooks and crannies so they came out wrong!! as well as it being near impossible for me to keep ALL the dust out. painting over it with acrylic paint made them a bit sticky…and therefore dusty again…
for the irises i use polymer clay! i tried pan pastels, but i can’t get it to look anything but grainy and muddy, so polymer clay is best for me. im currently waiting for some new moulds that should fit the irises, so i can cure them separately and then insert them into the bases. i am NOT !! putting resin in the oven after all that work to detox the process
it’s so difficult!!! but i want to make sure i can deliver the best product i possibly can while keeping myself safe. im so passionate about my craft but it’s so hard to meet problem after problem!!!! and it’s so stressful to see people sell uv resin eyes they didn’t use proper ppe to make!!!! stop that!!!! also while i’m at it, cure your polymer clay inside the resin, the polymers will break down the resin eventually and it’ll just suck and be nasty!!
a lot of my other ideas would be super expensive to set up too, so they’re going on the back burner for now. i hope all this is worth it and people will like my eyes once i figure it all out. im still happy just to make them for myself, but i don’t have enough dolls to justify sitting and making eyes all day for that!! if anybody has any experience or ideas for how to reduce fumes and increase longevity, please tell me!!!! im trying Everything i can get my hands on. sometimes i feel like i’m losing my mind thinking solely of little plastic eyes all day long
~Anonymous
12 notes
·
View notes
Text
FF14 Battle Portrait Magnet tutorial
Hihi~ I'm back with another tutorial! This time it's on how I made the battle portraits into magnets.

If you don't have a 3D printer, I did do a quick experiment on how a similar effect can be done with paper alternative. You can scroll directly to that section.
If you have a 3D printer:
Things you will need:
3D files of the casing you want to print
3D printer
a print out of the character portrait
Paint or Spray paint of the color you want the casing to be
UV resin
Tape
Magnetic Tape (I brought mine from Daiso)
Step 1: Obtain the 3D model of the casing of the character you want to make. Unfortunately there's no easy way around it. You will most likely need to make the 3D model. As for me, I already modeled all the characters I wanted to print. If you want to print any of the ones I already made, the files can be found here (Just a note, I made these really quickly so they're not optimized models at all but will work for printing)
Step 2: Print the Model

Step 3: Spray printed model to whatever casing color you want. In my case, I wanted gold so I spray painted it with Rust-Oleum Specialty Metallic Effects Spray Paint in Gold. Then let the paint dry

Step 4: Print the character portrait at 5.7cm (that's the default size for the 3Dmodels I made) and cut it out.

Step 5: Place the portrait into the casing
Step 6: Find a place you want to work with resin and put down a few pieces of tape with the sticky side up. I used regular painter's tape here
Step 7: Place the casing(with portrait inside) on top of the tape. The reason for this is that the resin might shrink a little when being cured and that may bend the 3D printed casing. The tape is to hold it down.(Also I forgot to take a photo from when I was making Hades so this is from when I was making Hythlodaeus.

Step 8: Pour resin into the casing. If there's bubbles, I just used a toothpick to poke at the bubbles till they are gone.
Step 9: Cure the resin. How to cure it and how long will depend on what it says on the package of the resin you brought. I have a UV lamp and let it sit for 150 seconds.
Step 10: After it's fully cured, remove the portrait from the tape and stick a small piece of magnetic tape at the back and that's it!

Congrats! now you have a character portrait magnet :)

If you don't have a 3D printer:
I have tried making a paper version just to test it out. It worked but it doesn't look as neat as the 3D printed version and has a bigger edge. Tbh that might also simply be the result of me rushing it as I just wanted to test a proof of concept. At the end of the day, it did work so if you want to try it, here are the steps:
Things you will need:
a print out of the character portrait
UV resin
Some kind of paper sealer (I used Rust-Oleum Painter's Touch 2X Ultra Cover Gloss Clear in this example)
Tape
Magnetic Tape (I brought mine from Daiso)
Step 1: Drag and drop your portrait into photoshop/Clip studio or any other art programs.
Step 2: Create a layer above the character portrait and draw an outline around the character portrait as well as an outline slightly away from the portrait. This will be your Magnet casing edge.
Step 3:Create a new document and duplicate the "casing edge" that you created 4 times. Then duplicate the outer edge 3 times. Paste your Character portrait into one of the 3 outer edge images. You should end up with something similar to the image below. (P.S My File here can be printed as it is and be used if you just wanted a Emet one :)

Step 4: Print all the pieces out. Place a piece of tape behind one of the "Outer Edge" pieces. Make sure it covers the whole piece.
Step 5: Cut all the pieces out. Make sure to remove the center of the "Casing Edge" ones
Step 6: Stack and Glue the 4 edges on top of each other
Step 7: Glue the stack from the above step to the "Outer Edge" piece with the portrait image.
Step 8: Glue the 2 outer edge pieces behind the one with the portrait image. Make sure the piece with the tape backing is at the very back. After all that is done, it should look like below

Step 9: Take the entire piece outside and spray it with a sealer. ( I used Rust-Oleum Painter's Touch 2X Ultra Cover Gloss Clear in this example but it doesn't have to be this). Then let the piece dry.

Steps from this point on is the same as the 3D printed version.
Step 10: Find a place you want to work with resin and put down a few pieces of tape with the sticky side up. I used regular painter's tape here.
Step 11: Place the casing(with portrait inside) on top of the tape. The reason for this is that the resin might shrink a little when being cured and that may bend the casing. The tape is to hold it down.
Step 12: Pour resin into the casing. If there's bubbles, I just used a toothpick to poke at the bubbles till they are gone.
Step 13: Cure the resin. How to cure it and how long will depend on what it says on the package of the resin you brought. I have a UV lamp and let it sit for 150 seconds.
Step 14: After it's fully cured, remove the portrait from the tape and stick a small piece of magnetic tape at the back and that's it!

9 notes
·
View notes
Note
your first fabric doll??? thats crazy it looks absolutely gorgeou! how did you make the eyes and do the hair?
Thank you ♡♡♡ I did follow a really good tutorial from this page (it's in Chinese but the video is enough on its own even if you don't understand the language, like me ^^').
Some of the tutorials are about making the hair. I used "chenille yarn" (I think that's the name) and basically, you fold a long piece of yarn in two and sew the middle to the head of your doll and ends up with two "hair". I would recommend to be careful though and not sew too many hair as it bulks out very fast. My doll has only two rows of hair, the front line and close to its nape.
For the eyes, the tutorial used plain buttons but I thought it would be cuter to make eye shaped buttons. I did them using shrinky dinks plastic as a base. Once baked, I covered them in a layer of glittery UV resin to make them all shiny and sparkly.
5 notes
·
View notes
Text
The awaited shrink plastic earring walkthrough (NOT A TUTORIAL!! DO SOME OF YOUR OWN RESEARCH PLEASE)
Hello hi hello! I've made a few pairs of earrings now, and especially on the Black Book pair I've gotten a few folks asking for instructions on how I did it!
The images are sorted by number so I could fit them all in one post. I am also still very much learning as I have only made a few of these myself, so please do your own experimentation and research to better understand the processes!
Let's get right into it !
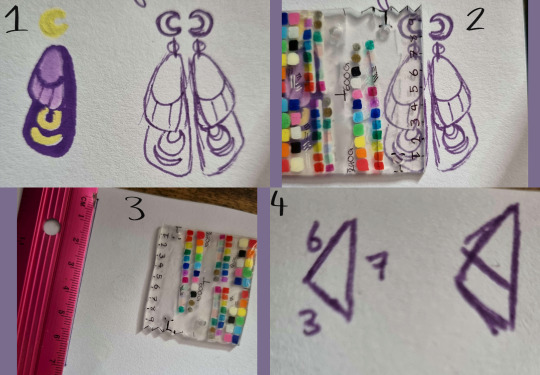
I start by making up the rough idea in the size I would like the finished product. This will be my reference for all measurements.
I then use my shrink ruler (a 10cm by 10cm square with markings, then shrunk for a fairly accurate translation of size) to figure out the rough dimensions of the un-shrunk design.
I use the centimeter measurement to draft the rough size and shape of the design.
Connect the lines together with each measurement.

5. Make the design more fluid/more alike the original design based on the drafted shape.
6. Repeat the same for any extra shapes. The moon circles needed a 2cm diameter.
7. Place the shrink plastic over the design, and trace the rough shape onto it using any form of marker. non-permanent is preferred.
8. Lay out the pieces, and dont forget to flip the designs if applicable.
9. Start transferring the design onto the shrink plastic using the markers of your choice. Hold the cut plastic over the template to get accurate markings.
10. Wait for the marker to dry around the edges of the design before doing the next colour. This applies no matter what sort of marker you are using.
11. To get mirrored designs, finish one and flip it over, then use that as the new template.
12. finish the pieces, and add back designs if applicable. Use a hole punch to make space for the jump rings.
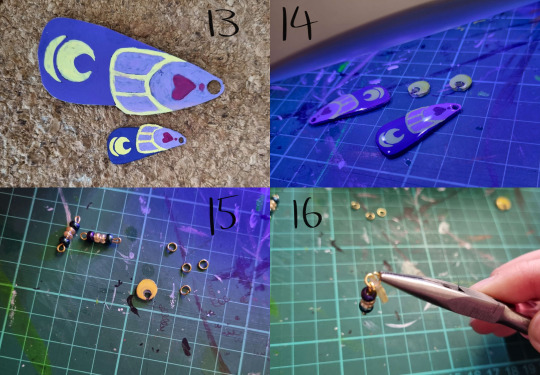
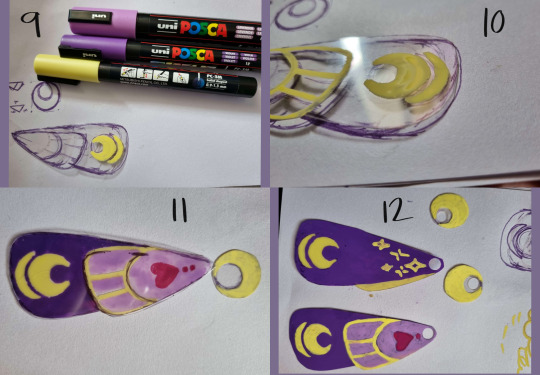
13. Shrinking time! use a heat gun to shrink the plastic according to its attached instructions. Be careful of heating up metal/pliers/tweezers, they get Very Hot Very Quick
14. I use UV resin to set in the design. I use a toothpick to spread the resin, then cure it under the UV light. Refer to individual product instructions for curing time, it varies heavily!
15. Gather and assemble any extra pieces, such as beads, jump rings, earring posts, and base pieces.
16. place two pieces on an opened jump ring, then close it to lock in the positioning. Make sure the pieces are in the right direction!
--Not pictured- Glue the earring posts on the back of the earring. Not applicable with hook earrings

17. do the same for the bottom pieces, once again ensuring they face in the correct direction. Jump rings can be undone, but it weakens the metal to be constantly bent.
18. Display and wear!

And the finished Product!
Once again, do some of your own research, This is mostly just my personal guide for how I make earrings currently! The same logic can be applied to charms.
A few things I have learnt-
Use permanent marker where possible. Paint pens like the ones I have used will shrink unnaturally, and crack on the surface meaning it is even more necessary to seal the design.
Make your own test square- different brands of shrink plastic will shrink differently, at different ratios and sometimes unnaturally. It is also a good opportunity to test how your markers work on the plastic, and which thicknesses are best for fine details.
Don't expect them to turn out the same each time- If you are making multiple of one design, remember that it is by hand and not a perfect manufactured piece. There will always be variations, so go into it with that knowledge.
Use each pair as a learning experience- Now that I've made this design, I know that I would like the wings to be larger by about a centimeter, so I will adjust the template before making a new one. Always learn something new from it!
Feel free to ask any questions, I am more than happy to answer! I do hope to sell some earrings in the future, so keep an eye out for that as well!
REQUESTED TAGS! @im-not-a-l0ser @strangeandinteresting
9 notes
·
View notes
Text
How to Build Your Own 'Augmented Super Wife Supersoldier From The Future' Funko Pop.
A Semi-Coherent Guide By RC.
This is a long one. A loooooooong one.
I meant to do this like two and a half years ago, but in the spirit of keeping this fandom's head above water, and the fact I'm at the hospital (nothing serious!) with nothing to do for the next couple of hours, I'm doing it now.
So if, like me, you are still bitter that Grace and Dani didn't get official Funkos, or official *anything* due to manufacturer short-sightedness, why not say 'fuck it' and build yer own?
This rambling tutorial will attempt to demonstrate how to build Grace from the 'when they start to kill me, run' scene.
Like, literally that bit 😋.
Anywho. Let's do this!
You will need:
- Funko Pop DIY (female)
- Polymer clay (eg. Sculpy, Fimo, CosClay). I'd advise against cheapo no-name alternatives purely because in my experience the baking times/temperatures stated are absolute garbo. Also, polymer clay will give off quite gnarly fumes while curing, so better to use a trusted source. But if cheapo's all ya got, it's all ya got.
Other modeling materials you might consider instead of polymer clay include...
Epoxy clay (eg. Milliput, Apoxie Sculpt, The Army Painter 'Green Stuff', even something like J-B Weld or similar 2 part plumber's/repair putty).
Plain ol' air drying clay (eg. DAS, FimoAir, Gedeo).
You could even whip up a batch of 'cold porcelain', or an oven cure salt dough from ingredients you probably already have at home. Make sure you clear coat any salt dough creations properly after curing as over time ambient moisture may mess with it.
Each option above has its own pros and cons. Do your research if you aren't sure. Me? I used Fimo.
*ahem* Carrying on...
- Masking tape
- Hobby knife
- Pin vice
- Kebab skewer (wooden), or styrene rod
- Paint brushes
- Primer (plus dust mask if you're using a rattle can indoors)
- Sandpaper (around 400 grit oughta do it but you could probably go 200 either side of that and get a good result)
- Acrylic paints (optional: Posca PC-1MR pens in black and white for fine detail).
- Crafter's heat gun, or a hairdryer
- Varnish/clear coat.
Optional extras: Airbrush, spray booth/cardboard box, rotary tool, oven thermometer, artist's/cake decorating turntable, UV resin, silver leafing pen, jeweller's files, jeweller's wire, acetone, superglue or 5 minute epoxy, a lil piece of sponge, pearl mica powder, scavenged Funko Pop head 😈.
Step One: Grab your Funko DIY and separate the head from body using heat to soften the vinyl enough to wangle it off the neck post. Shoving it in a mug of hot water for a few minutes should do the trick. Make sure to dry out the head as much as possible. Last thing you want is mould growing inside it. This is Terminator, not The Last Of Us 😉. Alternatively you could use your heat gun/hairdryer, but I explain in Step Six why the water bath approach is a better option (imho) at this early stage.
(You are giving this entire thing a quick read through before you start, right? I dunno about the rest of you but I like to have at least a basic idea of the work ahead before I get stuck in. Saves finding out you're missing a necessary tool/material at an inopportune moment and all).
Stop rambling, RC. Sorry. It's easier to be succinct when you haven't lost half your photos 🤦♀️. Moving on...
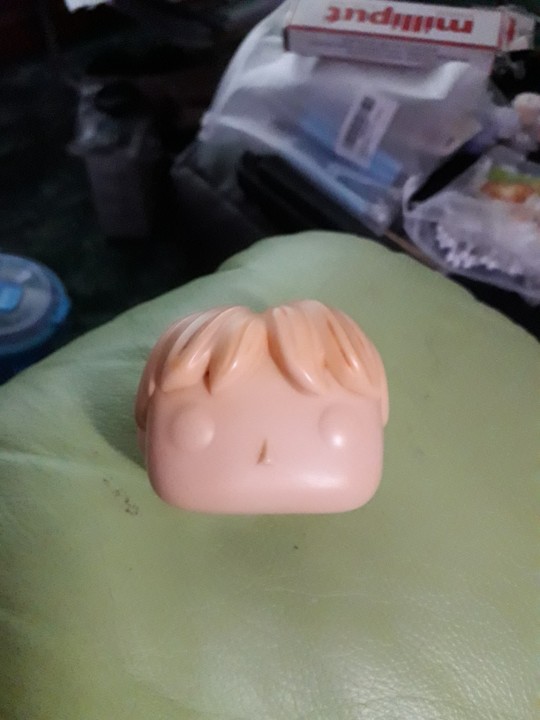
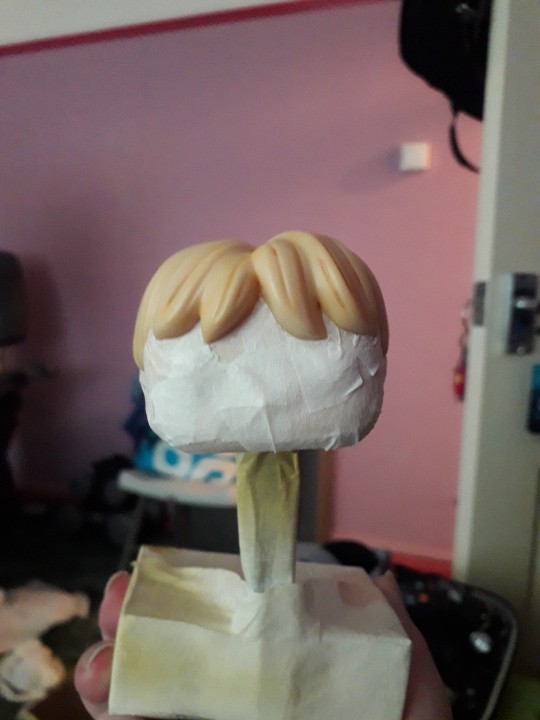
If you don't wanna attempt to sculpt the hair yourself you can, as I did, take a kitbashing approach instead of using the supplied DIY head. Grab one of the many commercially available Funkos with a decent approximation of the hairstyle you want and then go Step One on em. Buy 'pre-loved', buy BNIB, dig one out of a dumpster, steal one from your lil cousin, it doesn't matter. Procure as your time/budget/situation dictates. Improvise where necessary.
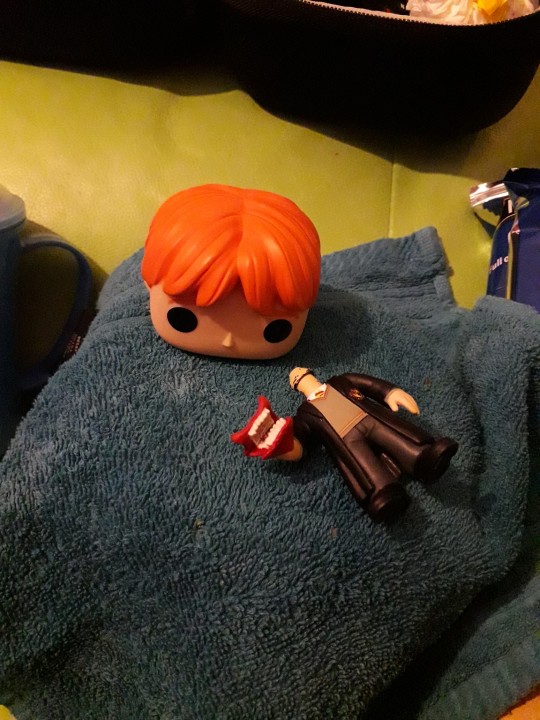
Sorry, Ron. I need your floppy hair. I do not need your clothes.
Or your boots. Or your motorcycle.
...😋
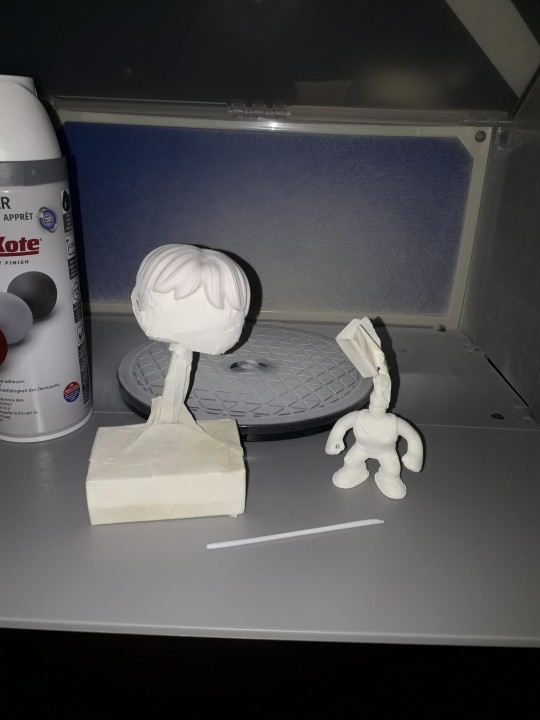
Step Two: Take the body of the Funko DIY and mark out the position of the tank top and the cuffs of the jeans. These will be used as guides for when you add the clay.
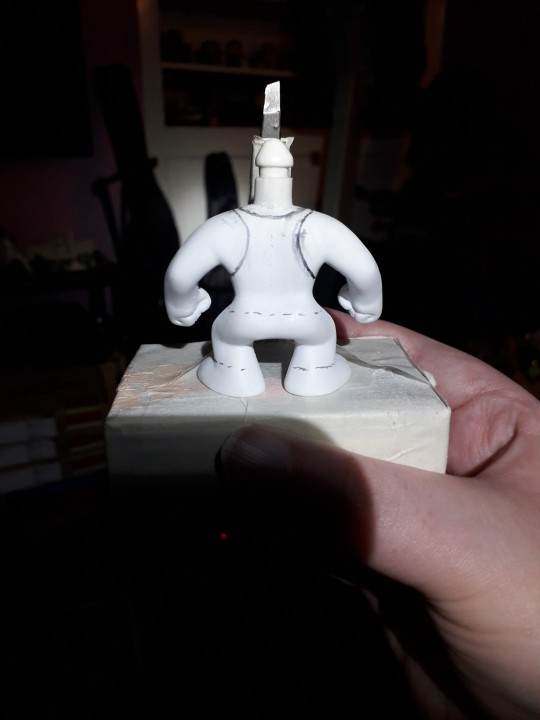
At this point I used a pin vice to drill the hole thru the fist for the rebar. If you're a crazy person you could use a rotary tool with an appropriately sized bit attached.
To make the rebar I fashioned a mould from a drinking straw and filled it with UV resin. Because I'm awkward. A wooden kebab skewer, or some hobbyist's styrene rod (eg. Evergreen Scale Models) would work just as well. Just cut it to size, paint it silver and you're golden. I used a metallic leafing pen. You use whatever you've got handy. Doesn't have to be shiny. A flat grey acrylic would work just fine.
Use jeweller's files and sandpaper to make small adjustments to the hand hole and rebar respectively in order to get a good press fit. There's always glue if you overdo it 😉. But don't add the rebar to the model just yet, as you're gonna need room to manoeuvre for the next bit.
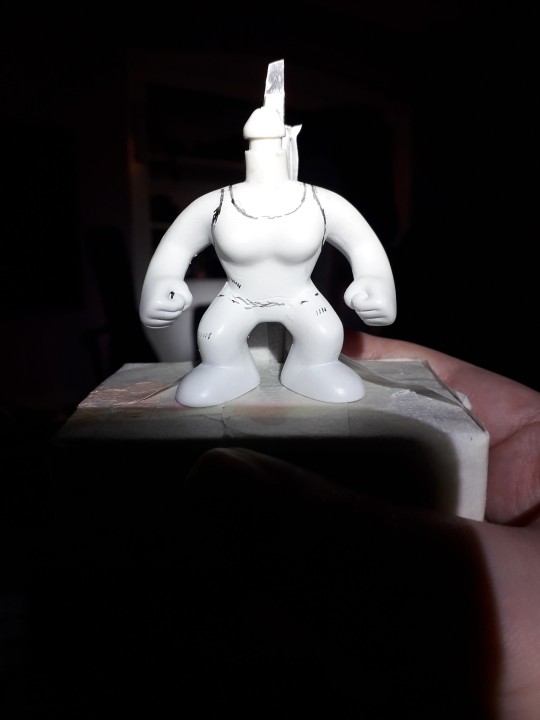
Step Three: How do you make it look like your figure is wearing clothes when you don't have much real estate to work with?
You fake it, that's how.
You do not need to model an entire set of clothes! It's an arse ache, and we're all about working smarter not harder on the RC channel.
So, take your modeling compound of choice, roll a chunk of it out to the desired thickness, and then cut into strips, say 2-3mm wide. Use your best judgement here.
Now, using the jeans as our example, wrap a strip around the bottom of the leg where the cuff would sit. Cut off any excess and blend out the join. Just give it a lil rub and it's like it was never there. Like magic! You should have a nice defined edge at the bottom, just above the foot. Now see the top edge of your lil clay strip? Well, you wanna start pushing and flattening the clay to blend the edge right out so it fades back into the body.
Repeat for the other leg, and the bottom of the tank top. The straps are relatively simple, tho the bits that pass under the arms can be fiddly due to lack of space. Use a hobby knife to shape and crisp up those edges and then blend out the extraneous edge. Same thing with the neckline.
Run a strip around each foot to form the soles of the boots, and a lil 'x' on the top of the feet to give the impression of laces.
For the rips in the clothing you can simply gouge out a little of the clay. If there isn't any on that part of the model (the knee for example) roll out a little wormy dealie (for you North of the Border fans 😉), position it as needed, blend out the edges, then gouge as required.
If you're playing on hardcore mode, this might be the time to start piling clay on the Funko DIY head and sculpting the hair. You may prefer to leave it til the head's re-attached tho. It depends on the material you're using. If you don't think it'll stand up to a bit of manhandling while pushing the head back onto the body, save this step til that bit's done.
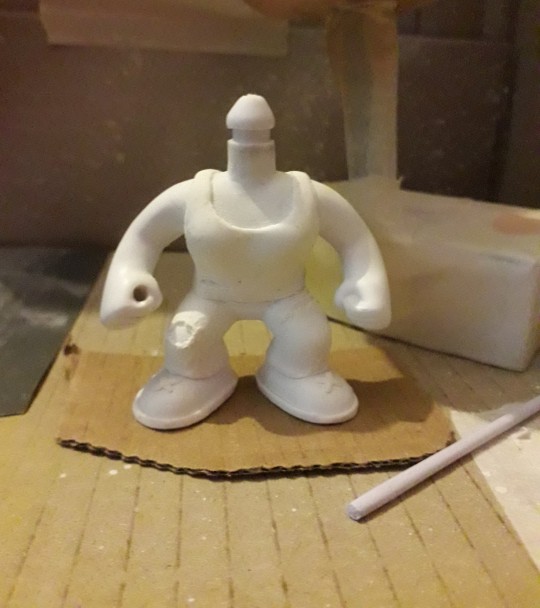
Cure according to the clay manufacturer's instructions. The vinyl will not melt at the temperatures required to cure polymer clay, but if you don't wanna risk it or you don't wanna use your food oven to cook plastic, with all the gnarly fumes and stuff, I've given you plenty of air dry and/or non toxic alternatives. Consistent temperature is key with polymer clay. Undercooked, it's quite brittle. An oven thermometer comes in handy here if you've got one.
Step Four: Primetime!!! Some like to brush on primer, which is fine if you're painting a fence or throwing gesso on a canvas. Not so fine if you're painting a figurine imho. I mean, unless it's Cassandra from Doctor Who. A good rattle can of spray paint is what you want ideally, but again, it's about what you can afford/wangle/manage with your crafting space, so feel free to ignore me and brush away!
First rule of Primer Club: several light coats are better than one heavy coat. Second rule of Primer Club: knock each coat back a lil with sandpaper before applying the next one. Third rule of Primer Club: sit your rattle can in a warm water bath for five minutes before shaking it up to improve flow.
You can get primer specifically for plastics but while I would recommend it, it's not absolutely necessary.
A scavenged head may need masking off if the base colour already matches the skin colour of your character. Save yourself a bit of painting innit. You can get really tight, clean edges against the hairline with a hobby knife. If the hairstyle, hair colour, and skin colour match straight outta the box? Congrats! Why are you even reading this? 😜.
That thing in the background is a portable spray booth (that other thing is a turntable). A cardboard box is also a portable spray booth if you want it to be. Only thing it doesn't have is an extractor fan. So put on a dust mask, and open a window or work outside.
The DIY figure comes primed outta the box, so if you're using the DIY head and are planning on sculpting the hair after re-attachment you don't need to prime it. Unless you want to.
Step Five: Time to paint that shizz. You don't need me to walk you thru this bit, right?
Right?...
Masking is your friend if you don't trust your ability to freehand with a brush. If you're masking over a part you've already painted and are afraid of pulling the paint off, you can knock the level of tack on the tape down by sticking it to yourself (or your clothes) a couple of times before applying it. Some prefer to add a light layer of clear coat to 'lock in' the underlying paint. It's like a real life 'save point'. Some people do both. Some use masking fluid. Some use silly putty/blu-tac/plasticine. Play around, see what works. You do you.
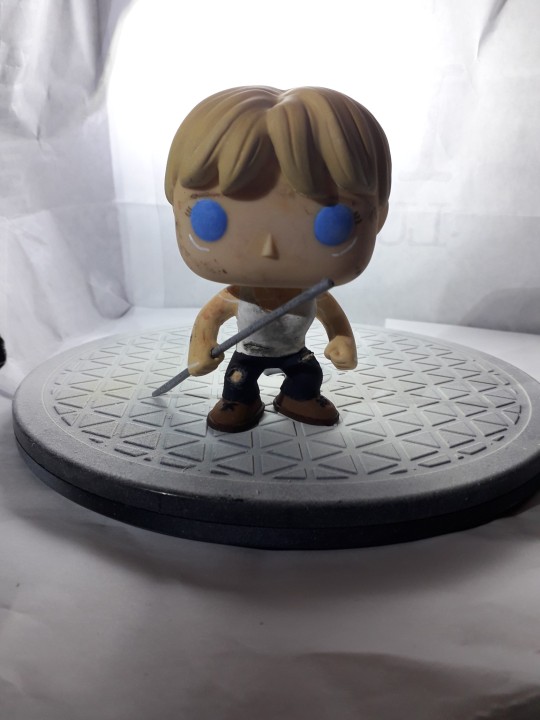
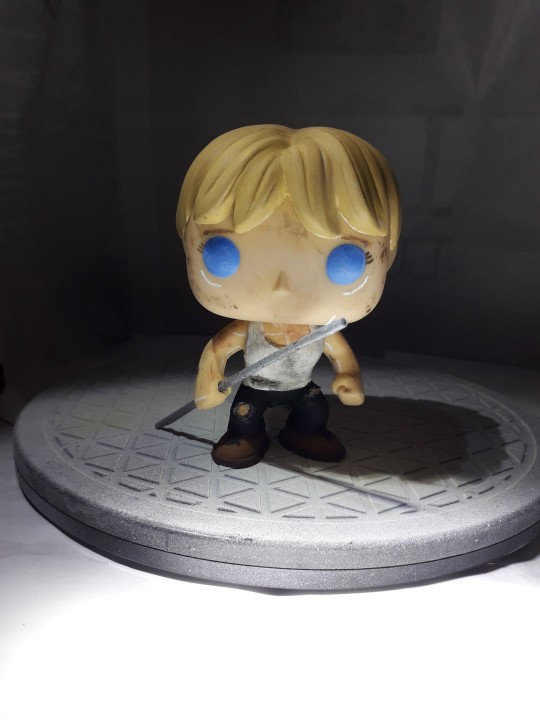
I painted Grace's eyes blue coz Grace is extra and so am I. I threw a lil bit of pearl powder in there to add a subtle shimmer, as I thought going full metallic blue might be a bit too extra.
Lady Funkos have eyelashes. Don't forget the eyelashes.
(I nearly forgot the eyelashes).
A fine tipped Posca pen comes in handy here if you've got one.
Ditto the eyebrows, tho those aren't just for the ladies obvs.
For Grace's augmentation scars, again I recommend a Posca pen but a brush will do.
DO NOT PAINT THE NECK POST. Don't even varnish the neck post. Keep that bitch masked up until you're ready to reattach the head. Like, you can get away with painting the very bottom if you're worried the bare plastic will show even with the head attached, but that's it. Any more will be making a rod for your own back.
You have a choice now. Whether to weather your figure. I chose to add that extra level of detail as it made sense to me. Use a combination of dark washes, dry brushing, and/or sponge stipling to add dirt, blood etc. If ya want.
When you're happy with your paint job, give everything (except the neck post!!!!) a couple of layers of clear coat.
Step Six: When it comes to reattaching the head you probably don't wanna be dunking anything in water by this point, just in case. So we're gonna soften the neck post (and around the base of the head if necessary) with hot air instead. Use a hairdryer if you don't have a heat gun. DO NOT use an industrial or decorator's heat gun for the love o' god. That shit's meant for stripping paint, not gently warming vinyl figurines. It'd be like using a nuke to shake a cherry tree, and you'd likely burn yourself. A hairdryer is more than capable of doing the job.
Why did we not use the hairdryer for Step One? To be honest there's nothing stopping you if that's what you wanna do, but as you don't have direct access to the bits that need softening at that point you will have to wait for the heat to penetrate. You could be doing other things in that time by letting a water bath do the work for you.
Now, however, you do have direct access, so you'll probably find you only need to blast the hot air for 10 seconds or so.
Step Seven: So, you've got the head re-attached, and your paint job is finished and clear coated. That means it's time to add the rebar. If you went a bit too far with the drilling or sanding now's the time to get your glue on. As an final extra touch you can spiral some thin jeweller's wire around the length of the rebar to make it look more rebar-y. I didn't do this bit as the wire I had in my possession at the time was too thick for my tastes.
But whether you opt for that or not, congratulations on making your very own Grace Funko Pop!
I'm still planning on making security guard and future war versions of Grace, and at least one version of Dani. Yeah, I've been saying that for the last two years, but it's still absolutely happening, trust me.
Anyway. That'll do it. If you have any questions, or you need further explanations or recommendations etc. y'all know where to find me.
8 notes
·
View notes
Note
hello! i’ve been following you for quite a while now, i’d just like to say it’s been such a treat to watch you go along!! your designs are so beautiful and elegant, it’s just perfect! hope you’re feeling better from the burnout, please rest as much as you can <33
i’ve always wanted to begin trying my hand at the kind of jewelry that you make because of you, i hope that’s okay to say! would it be alright to ask what kind of work it’s called? so far i’ve only seen wire and uv resin jewelry, but i saw on your twitter you use epoxy! are there different terms for it? if it’s not too much of a bother, would it be alright to ask for tutorials from youtube (or any other source) that got you started? you’re an inspiration <3 have a good day, bili ka halo-halo ang inet sa pinas 😭
Hello hello! I'm so sorry it took me so long to answer this 😭 and as for the tutorial thing, I had to develop my method on my own because I only have access to epoxy resin and it's the easiest way for me personally to do my art!! Idk yet if I will make a tutorial but I'll be thinking about it since it's a very tedious process. And yes ampota tanginang inet dito stay hydrated ka rin anon!!
2 notes
·
View notes
Text
going to be autistic on here abt bjd eyes
i’ve been experimenting w trying to make bjd eyes for years at this point and im like confident in my skills but i’m struggling to find the right materials. i watch a lot of various eye makers’ tutorials to see what they use but the problem i always find is that most of them don’t seem to worry abt how the eyes will hold up longterm, which is smth i rly want for mine. like using uv resin for the base will yellow so bad….not to mention the health effects
so it’s like health + longevity that bothers me. i don’t want to use toxic materials for my eyes and risk my health for it. stop using resin without proper ventilation and shit inside your home. please.
my best bet rn is polymer clay for the bases and it works great but the major problem i have is dust in the pure white of the eyes…gonna try some ways of minimising this but i also can’t spend all my energy trying to reduce dust in my environment bcuz it’ll give me a heart attack from the stress. plus i can’t seem to get it to smoosh perfectly in the silicone molds…it’s always got some dents. that’s probably just practice though
so for the dust my thinking was maybe i’d just cover it in acrylic paint after, but acrylic paint stays a bit sticky and attracts dust anyway so. it kinda cancels out. i’ve thought about other materials to use as a base but it always comes back to yellowing. i wondered whether maybe thermoplastic could work but i couldn’t find anything about the yellowing rates so, maybe i’ll try it and leave it sometime but i don’t have high hopes
but then ofc there’s the problem of The Oven. i make the irises out of polymer clay bcuz that’s what works best for me. i’ve never been able to use pastels for my colours bcuz it just looks gross and grainy and muddy no matter what i do, so polymer clay is pretty non negotiable. which means whatever i use for the bases has to be oven safe
and the bubbles in the domes as well…it’d be good to get a pressure chamber someday but that’s a more serious piece of kit than i have room for rn. laeli suggested trying a vibrator to agitate the bubbles which i wanna try so bad lol. but i need to get the resin first….i wanna try art resin cuz it’s supposed to be non toxic so i could use it indoors. and i saw some tests where it was super resistant to yellowing as well. so it sounds perfect but since it’s 2 part resin i’d have to have a lot of eyes prepped beforehand so i don’t waste it all as it’s not cheap !!
im thinking about seeing if i could do the bases with art resin as well but since it’s only non toxic on its own cuz it doesn’t react with anything else in the air, i don’t know what pigments i could use if any. apparently their pigments they make are kinda ass and i’d need it to be a really solid white. they also don’t sell the pigments individually afaik. i’d like to try a white gel pigment but again !! i don’t know how it’ll react. it’d probably be fine but i wish i had the info…..plus i don’t know if it would just melt in the oven. you shouldn’t really put resin in the oven. and if it worked i’d definitely want to get my own little oven sooner as i’m just experimenting w the kitchen one first….bcuz it comes back to the toxic fumes. but even if i did that’s also. having the space for it
UAGH !! you see why i am going round in circles….i wish i could be one of those girlies that just fucks up their lungs and makes eyes that go yellow in 2 years and be happy but unfortunately i care for both myself and my product. i think i’m gonna have to just work on making my space dust free for the white polymer clay but I DONT WANNAAAAAA
4 notes
·
View notes