#vncviewer
Explore tagged Tumblr posts
Visit Tumblr Blog
Explore Tumblr blogs with no restrictions, modern design and the best experience.
Last Seen Tumblr Blogs


Fun Fact
Tumblr has 411 employees.
Text
Raspberry Pi per VNC fernsteuern: Desktopzugriff unter Windows leicht gemacht

Wenn du deinen Raspberry Pi komfortabel mit Maus und Tastatur bedienen möchtest, brauchst du mehr als nur den Zugriff über das Terminal. Zwar ist das Tool PuTTY ideal, um per SSH auf die Kommandozeile des Raspberry Pi zuzugreifen – doch wer grafische Anwendungen oder die Desktopoberfläche nutzen will, stößt hier schnell an Grenzen. Terminal-Tools erlauben nämlich keinen Zugriff auf Fenstertools oder grafische Benutzeroberflächen. https://youtu.be/mc8qa8dutNk In diesem Beitrag zeige ich dir Schritt für Schritt, wie du VNC auf deinem Raspberry Pi einrichtest und von einem Windows-PC aus eine Verbindung zur grafischen Oberfläche herstellst. Damit kannst du den Pi ganz bequem fernsteuern, als säßest du direkt davor – inklusive Desktop, Maus und Tastatur. Besonders ab dem Raspberry Pi 4B, auf dem sich die Desktop-Version von Raspberry Pi OS flüssig nutzen lässt, wird diese Methode richtig komfortabel.
Was heißt VNC?
VNC steht für Virtual Network Computing und ermöglicht die Fernsteuerung eines Computers über ein Netzwerk – inklusive grafischer Benutzeroberfläche. Anders als bei einem reinen SSH-Zugriff (z. B. über PuTTY), bei dem man nur die Kommandozeile sieht, kannst du mit VNC den kompletten Desktop deines Raspberry Pi auf einem anderen Gerät anzeigen lassen. Maus- und Tastatureingaben werden dabei in Echtzeit übertragen. VNC ist ideal, wenn du Anwendungen mit Fenstern und grafischen Elementen nutzen möchtest – etwa einen Webbrowser, ein Konfigurationstool oder die grafische Entwicklungsumgebung auf dem Raspberry Pi.
VNC auf dem Raspberry Pi aktivieren
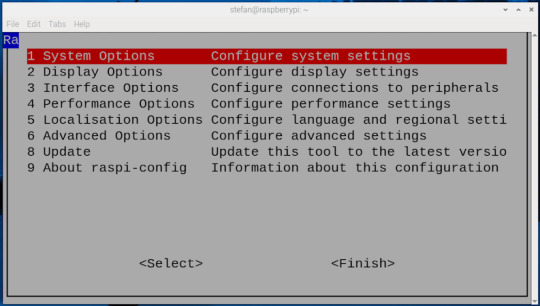
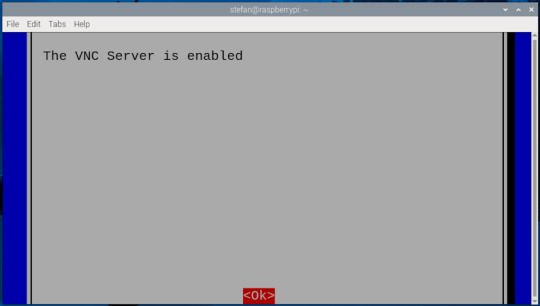
Bevor du dich per VNC mit dem Raspberry Pi verbinden kannst, muss die Funktion zunächst aktiviert werden. Das lässt sich auf zwei Arten erledigen – je nachdem, ob du bereits Zugriff auf die grafische Oberfläche des Pi hast oder lieber über die Kommandozeile arbeitest: Methode 1: Aktivierung über die grafische Oberfläche Wenn du einen Monitor, Maus und Tastatur direkt am Raspberry Pi angeschlossen hast, kannst du VNC ganz bequem über das Tool "Raspberry Pi Configuration" aktivieren. Dort findest du die Option unter dem Reiter "Interfaces", wo du den VNC-Server mit einem Klick einschalten kannst.

öffnen der Konfiguration über das Startmenü - Step1

aktivieren des Schalters VNC in der Konfiguration - Step 2 Methode 2: Aktivierung über die Kommandozeile Alternativ lässt sich VNC auch per Terminal aktivieren – z. B. über eine SSH-Verbindung mit PuTTY. Gib dazu einfach folgenden Befehl ein: sudo raspi-config


Die IP-Adresse des Raspberry Pi herausfinden
Damit du dich per VNC mit deinem Raspberry Pi verbinden kannst, musst du seine IP-Adresse im Heimnetzwerk kennen. Es gibt mehrere Möglichkeiten, diese zu ermitteln: - Über den Router: In der Geräte- oder Netzwerkübersicht deines Routers (z. B. Fritz!Box) findest du alle verbundenen Geräte samt IP-Adressen.

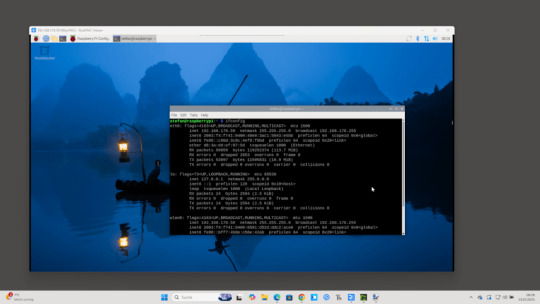
- Über die grafische Oberfläche: Bewege deine Maus über das Netzwerksymbol oben rechts neben der Uhr auf dem Desktop.
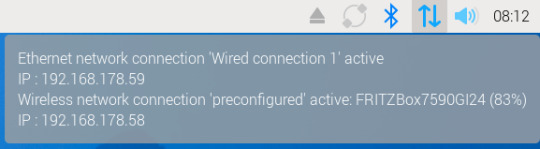
- Über das Terminal: Der schnellste Weg – besonders, wenn du direkt am Pi arbeitest oder per SSH verbunden bist – ist der Befehl: bashKopierenBearbeitenifconfig In der Ausgabe findest du unter dem Abschnitt wlan0 (WLAN) oder eth0 (LAN) die Zeile inet, z. B.: inet 192.168.178.59 – das ist deine IP-Adresse im Heimnetz.

Ich persönlich finde den Weg über ifconfig am einfachsten und zuverlässigsten.
VNC-Verbindung unter Windows 11 mit RealVNC Viewer herstellen
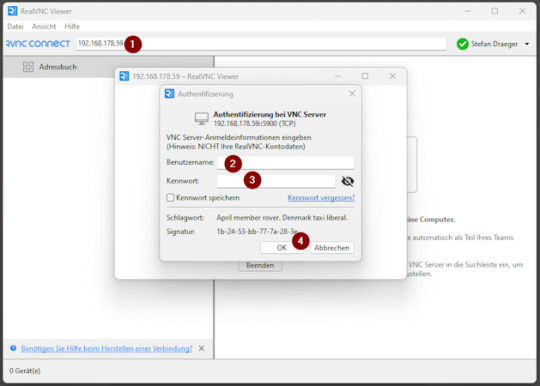
Um vom Windows-PC aus auf die grafische Oberfläche deines Raspberry Pi zuzugreifen, benötigst du einen VNC-Client. Eine der bekanntesten Lösungen ist der RealVNC Viewer, der einfach zu bedienen ist und gut mit Raspberry Pi OS harmoniert. Schritt 1: RealVNC Viewer herunterladen Lade dir den RealVNC Viewer über die offizielle Webseite herunter: 👉 https://www.realvnc.com/de/viewer/ ⚠️ Wichtig: Der RealVNC Viewer ist in der aktuellen Version nur als 14-tägige Testversion verfügbar. Danach ist eine kostenpflichtige Lizenz erforderlich, um alle Funktionen weiterhin nutzen zu können. Schritt 2: RealVNC Viewer installieren Nach dem Download führst du die Installationsdatei aus und folgst den Anweisungen. Die Installation dauert nur wenige Sekunden. Schritt 3: Verbindung zum Raspberry Pi herstellen - Öffne den RealVNC Viewer. - Gib in das Eingabefeld (1) oben die IP-Adresse deines Raspberry Pi ein (z. B. 192.168.178.59) und bestätige mit Enter. - Beim ersten Verbindungsaufbau erscheint ein Sicherheitsdialog – diesen kannst du bestätigen. - Melde dich mit den Zugangsdaten deines Raspberry Pi an (Standard: Benutzername (2) pi, Passwort (3) raspberry, sofern nicht geändert). - Nach dem Login (4) erscheint die Desktopoberfläche des Raspberry Pi in einem Fenster – fertig!
Verbindung erfolgreich hergestellt
Sobald die Verbindung steht, öffnet sich die Desktopoberfläche deines Raspberry Pi in einem neuen Fenster auf deinem Windows-PC. Du kannst dich nun ganz normal mit der Maus und Tastatur bewegen und den Pi bedienen, als würdest du direkt davor sitzen – inklusive aller grafischen Anwendungen und Tools.
In meinem Fall habe ich den Raspberry Pi über ein LAN-Kabel direkt mit dem Router verbunden, was eine deutlich stabilere und schnellere Verbindung ermöglicht als über WLAN. Gerade bei der Fernsteuerung mit VNC sorgt das für ein flüssigeres Nutzererlebnis ohne Verzögerungen oder Verbindungsabbrüche. Read the full article
0 notes
Video
youtube
How secure is VNC?
YouTube video: https://youtu.be/IaUTKxPpygU
0 notes
Link
0 notes


Text
Okay I’m being practical now somehow, instead of setting up a whole new system I literally just got VNCviewer going again and installed all the vscode plugins. So I have no more excuses for anything. I’m kind of excited.
I do want to get vscode set up somehow so that I can just use it from anywhere, like all the settings are saved and it saves everything to OneDrive but since I’m only using one computer right now I don’t really feel the need to get that done immediately
0 notes
Text
Ubuntu install tigervnc server

#UBUNTU INSTALL TIGERVNC SERVER HOW TO#
#UBUNTU INSTALL TIGERVNC SERVER INSTALL#
#UBUNTU INSTALL TIGERVNC SERVER SOFTWARE#
The VNC server allows you to connect from the desktop as well as in the server.
#UBUNTU INSTALL TIGERVNC SERVER INSTALL#
Next, run apt command to install and configure the TigerVNC server. As long as the SSH port has been opened, you shouldn’t have to configure anything else (e.g. The procedure to install and configure TigerVNC on Ubuntu Linux can be described via:Login to the remote Ubuntu server via SSH:Install and configure the desktop environment, including Gnome or XFCE4. Remmina is convenient because it handles the SSH tunnel.
#UBUNTU INSTALL TIGERVNC SERVER SOFTWARE#
Enter the SSH settings under the SSH Tunnel tab. VNC is open-source client-server software that allows you to see the screen of the server computer and control it on one or more client computers no matter what. COMPUTERNAME.local:1, :1 corresponds to the display number above). Enter the VNC connection settings under the basic tab (e.g. If using Ubuntu 20.04 as the client machine, Remmina (a VNC client) is installed by default. Sudo systemctl enable systemctl start systemctl status Connect Using Remmina VNC Client Login to remote Ubuntu server using ssh command Install the desktop environment such as Gnome or XFCE4 using apt command Install and configure the TigerVNC. sudo mkdir /etc/vncĮxecStart=/usr/bin/vncserver -fg -depth 24 -geometry 1920x1200 -localhost no :%i This will create the typical Ubuntu desktop. & xrdb $HOME/.Xresources chmod 755 xstartupĬreate /etc/vnc/xstartup, edit the file, make executable. The fix comes from this post.Ĭreate ~/.vnc/xstartup, edit the file, make executable cd ~/.vnc Instructions found in other tutorials might work if you manually start the VNC server, but you will get a black screen if starting it as a service with GNOME (although it works with XFCE4). We want to run the VNC server as a system service (starts at boot), using GNOME (i.e. Vncserver -kill :1 Configure the VNC Server Test the installation by starting and then killing the server. TigerVNC supports virtual displays, is an active successor to TIghtVNC, and is easy to install from the Ubuntu repositories sudo apt install tigervnc-standalone-server Others can support virtual (remote) displays that are truly headless. controlling the visible logged-in desktop). Some VNC servers only support local VNC sessions (i.e. It was easy to set up a local VNC session, but going headless without a dummy adapter AND with the GNOME desktop was a challenge. no monitor plugged in) for Ubuntu 20.04 using GNOME was harder than anticipated. Install the OpenSSH server on the remote Ubuntu server that you want to access. Those who want to access their remote system securely over ssh, they can follow the given steps. Update apt database with apt-get using the following command.Creating a headless virtual VNC session (i.e. Enter the IP address along with port 5901 of the remote Ubuntu system where the VNC server is running. Install tigervnc-standalone-server Using apt-get In the following sections we will describe each method. There are three ways to install tigervnc-standalone-server on Ubuntu 20.04. This viewer may also be on a computer running other operating Note: This server does not need a display. The server generates a display that can be viewed with a vncviewer. This package provides a standalone VNC server to which clients can connect. Internet and from a wide variety of machine architectures. Not only on the machine where it is running, but from anywhere on the It is, in essence, a remoteĭisplay system which allows you to view a computing `desktop’ environment VNC stands for Virtual Network Computing.
#UBUNTU INSTALL TIGERVNC SERVER HOW TO#
In this tutorial we learn how to install tigervnc-standalone-server on Ubuntu 20.04. tigervnc-standalone-server is Standalone virtual network computing server Introduction
1 note
·
View note
Text
CVE-2022-23967 In #TightVNC 1.3.10, there is an integer signedness error and resultant heap-based...
CVE-2022-23967 In #TightVNC 1.3.10, there is an integer signedness error and resultant heap-based buffer overflow in InitialiseRFB Connection in rfbproto.c (for the vncviewer component). There is no check on the size given to malloc, e.g., -1 is accepted. This allocates a chunk of size zero, which will give a heap pointer. However, one can send 0xffffffff bytes of data, which can have a DoS impact or lead to remote code execution. https://github.com/MaherAzzouzi/CVE-2022-23967 #cybersecurity #infosec #exploit #pentesting #bugbounty #redteam #hackers

GitHub - MaherAzzouzi/CVE-2022-23967: TightVNC Vulnerability. - GitHub TightVNC Vulnerability. Contribute to MaherAzzouzi/CVE-2022-23967 development by creating an account on GitHub.
0 notes
Text
Konfiguracja VPS ( Instalowanie GUI, VNC, Chrome)
Poradnik pisany oryginalnie na serwerze discord przez moją osobę.
pominę etap wybierania hostingu, płatności.
(polecam ovh)
Rozdział 1 - Logowanie do serwera
w moim przypadku na ovh.pl mam dostęp w przeglądarce do "zdalnego pulpitu" ale opiszę sposób zrobienia tego "na około" aby ten poradnik był zgodny z każdym hostingiem
1. Uruchamiamy program putty , wpisujemy IP serwera po czym klikamy "Open" i logujemy się do systemu (dane powinny przyjść mailem, lub są podane w panelu Hostingu)

2. Na początek zmienimy hasło na takie które będziemy pamiętać w tym celu wpisujemy komendę
passwd
wpisujemy stare hasło po czym 2 razy nowe hasło.
Rozdział 2 - Instalacja GUI
1. uruchamiamy zestaw komend
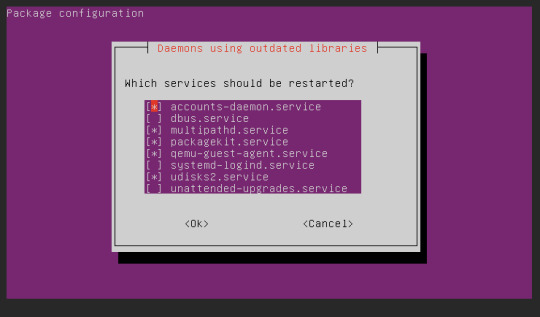
sudo apt-get update && sudo apt-get upgrade
jeśli pojawi się okno z restartem to walimy pięścią w klawisz ENTER
2. Teraz zainstalujemy manager logowania(?) Slim
sudo apt-get install slim

jeśli wyskoczy nam pytanie Do you want to continue?
to wpisujemy Y (lub T jeśli system jest po polsku)
i klikamy ENTER
3. Pora na właściwą instalację GUI
Wpisujemy komendę
sudo apt-get install tasksel
albo
sudo apt install ubuntu-desktop
po czym uruchamiamy
sudo tasksel

zaznaczamy strzałkami i spacją "ubuntu desktop" i klikamy enter
no i w tym miejscu się zatrzymałem, potrzebuje VNC aby połączyć się z pulpitem ale zapomnialem jak go zainstalowalem dlatego tworzę poradnik aby drugim razem nie zapomnieć XD
część 2 - po roku
gnome mi nie działa na innym vps więc dalsza część poradnika będzie od nowa pod xfce
sudo apt-get update && sudo apt-get upgrade
sudo apt-get install xfce4
sudo apt-get install -y xfce4-goodies
sudo apt install tightvncserver
vncserver
wpisujemy haslo 2 razy jesli nas poprosi
vncserver -kill :1
nano ~/.vnc/xstartup
#!/bin/bash
xrdb $HOME/.Xresources
startxfce4 &
wklejamy te 3 linijki, kasujac poprzednie wpisy.
zapisujemy ctrl+O i klikamy enter
vncserver
gotowe. łączymy sie przez vncviewer IP:5901
[ jak pokazuje sie ze nie mozna zainstalowac firefoxa bo snap zablokowany to tu instrukcja jak zainstalowac ]
sudo apt install software-properties-common
sudo apt-add-repository "deb http://ppa.launchpad.net/ubuntu-mozilla-security/ppa/ubuntu focal main"
echo ' Package: * > Pin: release o=LP-PPA-mozillateam> Pin-Priority: 1001 ' | sudo tee /etc/apt/preferences.d/mozilla-firefox>
echo 'Unattended-Upgrade::Allowed-Origins:: "LP-PPA-mozillateam:${distro_codename}";' | sudo tee /etc/apt/apt.conf.d/51unattended-upgrades-firefox
sudo apt update
sudo apt install firefox
How to Install a Desktop (GUI) on an Ubuntu Server (phoenixnap.com)
0 notes
Text
Configure the VNC viewer on Redhat Linux in Azure cloud.
Configure the VNC viewer on Redhat Linux in Azure cloud.
Login in Azure and create a VM machine having OS Redhat Linux. I created my machine with username and password. Creating VM in Azure choose Password 2. Connect the virtual machine by choose ssh for linux. 3. Following SSH window will open with all connectivity detail 3. Install the PUTTY for connectivity and VNCVIEWER for gui mode. 4. Open the Putty app and connect with VM. Enter Password on…

View On WordPress
0 notes
Text
Problema para conectar por VNC a Ubuntu
Problema para conectar por VNC a #Linux #Ubuntu
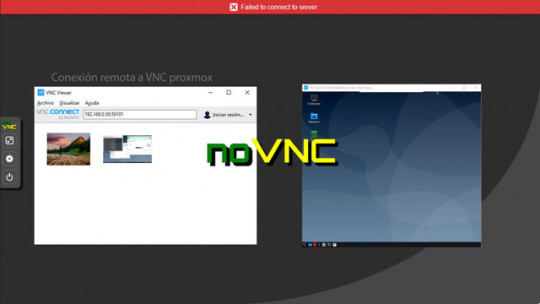
He compartido el escritorio en Ubuntu 20.04 y al intentar conectarme desde un vncviewer en Windows me aparece un mensaje que no fue posible conectar debido a un tema nivel de encriptamiento, la solución la encontré en un foro y es hacer lo siguiente en el equipo Ubuntu. Ejecuta el siguiente comando desde una pantalla de Terminal sin sudo.

View On WordPress
0 notes
Photo

Dozens of Severe Flaws Found in 4 Popular Open Source VNC Software #cybersecurity #hackingnews #remotecodeexecution #serversecurity #virtualnetworkcomputing #vncprotocol #vncviewer #vulnerability #hacking #hacker #cybersecurity #hack #ethicalhacking #hacknews
0 notes
Photo
Cómo conectar a KVM en Proxmox con clientes VNC externos [VNCviewer, tigerVNC, ultraVNC…] http://bit.ly/30fpCRE
0 notes
Text
VNC Viewer Connection Setup for Safe/Reliable Oracle Patching by Ankesh Asati
VNC Viewer Connection Setup for Safe/Reliable Oracle Patching by Ankesh Asati
· Download VNC Server to the device you want to control. By default it is installed in Oracle cloud SOACS & DBS machine. Simple run vncviewer command to verify vnc server installation by login into maching using putty.
· Make sure you’ve installed VNC Viewer Client on the personal computer
· Verify "ssh" command running in windows command prompt. If not found then install Cygwin by running…
View On WordPress
0 notes
Text
Original Post from Security Affairs Author: Pierluigi Paganini
Gamaredon continues to target Ukraine, Yoroi-Cybaze ZLab spotted a new suspicious activity potentially linked to the popular APT group
Introduction
The Gamaredon attacks against Ukraine don’t seem to have stopped. After a month since our last report we spotted a new suspicious email potentially linked to the Gamaredon group. The group was first discovered by Symantec and TrendMicro in 2015 but evidence of its activities has been dated back to 2013. During recent times, Gamaredon is targeting the Ukrainian military and law enforcement sectors too, as officially stated by the CERT-UA.
Cybaze-Yoroi ZLAB team dissected the artifact recovered from their latest attack to figure out evolution or changes in the threat actor TTPs.
Technical Analysis
Figure 1. Malicious e-mail
The infection chain is composed by different stages of password protected SFX (self extracting archive), each containing vbs or batch scripts.
At the final stage of this malicious chain, we found a customized version of UltraVNC, a well known off-the-shelf tool for remote administration, modified by the Group and configured to connect to their command and control infrastructure. Despite its apparent triviality, the Matryoshka of SFX archives reached a low detection rate, making it effective.
Stage 1
Hash 5555a3292bc6b6e7cb61bc8748b21c475b560635d8b0cc9686b319736c1d828e Threat Gamaredon Pteranodon implant Brief Description SFX file Ssdeep 24576:PXwOrRsTyuURQFsVhIe74lpyevrM4vZxn6k1gQ Guo:PgwRAyuURQ2/1YpyeT7ok8
Table 1. Information about initial SFX file
The mail attachment is a RAR archive containing a folder named “suspected” in Ukrainan and a single suspicious file with “.scr” extension. At first glance, it is possible to notice the PowerPoint icon associated to the file, normally not belonging to .scr files.
Figure 2. Content of malicious e-mail
Figure 3. Low AV detection of SFX malware
The file has a very low detection rate on VirusTotal platform: only four AV engines are able to identify it as malicious and only on engine understands it may be associated to the Gamaredon implant.
After a quick analysis, the real nature of the .scr file emerges: it is a Self Extracting Archive containing all the files in Figure 4.
They are extracted into “%TEMP%7ZipSfx.000” and the first command to be executed is “15003.cmd”, which firstly checks for the presence of malware analysis tools. If it detects the presence of Wireshark or Procexp tools, it kill itself. Otherwise, it copies:
Figure 4. Content of SFX
the “11439” file in “%USERNAME%winupd.exe”
the “28509” file in “%APPDATA%MicrosoftWindowsStart MenuProgramsStartupwinupd.lnk” pointing to the previous executable and granting persistence to machine reboot
the “20261” file in “%TEMP%7ZipSfx.000Document.docx”
Figure 5. Script content in “15003.cmd” file
At the same time, the extracted document will be shown in order to divert the user attention and to continue the infection unnoticed. This document, written in Ukraine language, contains information about a criminal charge.
Figure 6. Fake document to divert attention on malware execution
Figure 7. Execution of “winupd.exe” (SFX) and relative password (uyjqystgblfhs)
Instead, exploring the LNK file is possible to see it’s able to start the “winupd.exe” file, with a particular parameter: %USERPROFILE%winupd.exe -puyjqystgblfhs. This behavior indicates the “winupd.exe” executable is another Self Extracting Archive, but this time it is password protected.
Stage 2
Hash fd59b1a991df0a9abf75470aad6e2fcd67c070bfccde9b4304301bc4992f678e Threat Gamaredon Pteranodon implant Brief Description SFX file Ssdeep 24576:bGKUQ8Lj7S6Jr1ye4SM4vzxn3k1jQ GujR:biJr1yeNxJkro
Table 2. Information about second SFX file
When launched, it extracts its content in “%TEMP%RarSFX0”, then executes the “setup.vbs” script, which contains only two code lines. So, the execution flow moves on “1106.cmd”.
Figure 8. Content of “setup.vbs” script
Figure 9. Content of “%APPDATA%LocalTempRarSFX0” after “winupd.exe” (SFX) extraction
The source code of “1106.cmd” is full of junk instructions. However, in the end it performs a simple action: it writes a new VBS script in “%APPDATA%MicrosoftSystemCertificatesMyCertificates” . This script tries to download another malicious file from “http://bitvers.ddns%5B.net/{USERNAME}/{DATE}/index.html”. Performing many researches abot this server we noticed the continuously modification of associated records. Indeed, the attacker has changed many time the domain names in the latest period. Moreover, querying the services behind the latest associated DNS record the host responds with “403 Forbidden” message too, indicating the infrastructure may still be operative.
Figure 10. Information about C2 and relative DNS
The scripts creates a new scheduled task in order to periodically execute (every 20 mins) the previous VBS script.
Figure 11. POST request sent to C2 with victim machine information
Also, it collects all the information about the victim’s system using the legit “systeminfo” Microsoft tool and sends them to the remote server through a POST request using the “MicrosoftCreate.exe” file, which actually is the legit “wget” utility. The response body will contain a new executable file, named “jasfix.exe”, representing the new stage.
Stage 3
Hash c479d82a010884a8fde0d9dcfdf92ba9b5f4125fac1d26a2e36549d8b6b4d205 Threat Gamaredon Pteranodon implant Brief Description SFX file Ssdeep 24576:Gfxwgmyg5EOJ+IIpBz2GAROm560XVEC1Ng MdfaQbhUfEIg+m:GJpgIdPzeRBJVEC1CMd
Table 3. Information about third SFX file
After few researches, we were able to retrieve the “jasfix.exe” file, the next stage of the infection chain. After downloading it, we notice that it is another SFX archive other files.
Figure 12. Content of “jasfix.exe” (SFX) downloaded from the C2
The first file to be executed is “20387.cmd” that renames the “win.jpg” into “win.exe”, another password protected SFX.
Stage 4
Hash 28eff088a729874a611ca4781a45b070b46302e494bc0dd53cbaf598da9a6773 Threat Gamaredon Pteranodon implant Brief Description SFX file Ssdeep 24576:9GKUQ8vCTAaaJVssTk3OwO+vl+3yt6Xf IAR:9vaJes2Ocl7t9S
Table 4. Information about fourth SFX file
This latest SFX archive follows the typical pattern of the Gamaredon archives Matryoshka, where the “.cmd” file is in designed to decrypt and run next stage. This time using the string “gblfhs” as password.
Figure 13. Script to rename “win.jpg” into “win.exe”, decrypt and run next stage
Figure 14. Content of “win.exe” (last SFX of infection)
However, the file named “win32.sys” is particularly interesting: it actually is a PE32 executable file. Exploring the “.rsrc” section of the PE32 executable, we noticed different “.class” files. Two of them are named “VncCanvas” and “VncViewer”. These files are part of a legit Remote Administration Tool (RAT) named UltraVNC, available at this link.
Figure 15. Content of “win32.sys”
The “win.exe” SFX archive contains other interesting files too: one of them is an “.ini” configuration file containing all the parameters and the password used by the UltraVNC tool.
Figure 16. Configuration file used by “win32.sys” (Custom ultraVNC)
Finally, the RAT tries to establish a connection to the “torrent-vnc[.ddns[.net” domain, headed to an endpoint reachable on 195.88.208.51, a VPS hosted by the Russian provider IPServer.
Figure 17. C2 and relative port used by RAT
Conclusion
This recent attack campaign shows the Gamaredon operation are still ongoing and confirms the potential Russian interest about infiltrating the East European ecosystem, especially the Ukranian one. The techniques and the infection patterns the Group is using is extremely similar to the other attacks spotted in the past months of 2019, showing the Matryoshka structure to chain SFX archives, typical of their implant, but still effective and not easily detectable by several antivirus engines.
Also, digging into this infection chain, we noticed the come back of third party RATs as payload, a Gamaredon old habit that the usage of the custom-made Pterodo backdoor replaced few times ago.
Acknowledgement: special thanks to @JAMESWT_MHT for info and samples.
Technical details, including IoCs and Yara Rules, are available in the analysis published in the Yoroi blog.
https://blog.yoroi.company/research/the-russian-shadow-in-eastern-europe-a-month-later/
window._mNHandle = window._mNHandle || {}; window._mNHandle.queue = window._mNHandle.queue || []; medianet_versionId = "3121199";
try { window._mNHandle.queue.push(function () { window._mNDetails.loadTag("762221962", "300x250", "762221962"); }); } catch (error) {}
Pierluigi Paganini
(SecurityAffairs – Gamaredon, state-sponsored hacking)
The post A month later Gamaredon is still active in Eastern Europe appeared first on Security Affairs.
#gallery-0-6 { margin: auto; } #gallery-0-6 .gallery-item { float: left; margin-top: 10px; text-align: center; width: 33%; } #gallery-0-6 img { border: 2px solid #cfcfcf; } #gallery-0-6 .gallery-caption { margin-left: 0; } /* see gallery_shortcode() in wp-includes/media.php */
Go to Source Author: Pierluigi Paganini A month later Gamaredon is still active in Eastern Europe Original Post from Security Affairs Author: Pierluigi Paganini Gamaredon continues to target Ukraine, Yoroi-Cybaze ZLab spotted a new suspicious activity potentially linked to the popular APT group…
0 notes
Text
Splashtop un pabucunu dama atan uygulama #VNCViewer #RemoteDesktop RealVNC https://t.co/00GHxChEPK https://t.co/09yzWXW7h3
0 notes
Photo

Weekend Worker #1
Implementing an automatic backup system
Hello and Welcome, This is the first installment of "Weekend Worker" series. Today as a Weekend Worker i'll be implementing an automatic backup system to backup each individual client website. We'll be using the following technologies : Linux cron job Bash Ansible Docker AWS ECS VNC server And we'll setup our dev environment on our home Windows desktop with the following tools: Ansible for Windows (to launch dev tests) Visual Studio Code (for editing and pushing updates) Git (so our remote prod server can grab the code updates) VNCviewer (to access prod remotely) Bitbucket (for source control) Preparing the Env: Download Visual Studio Code Download Git Bash from git-scm Use terminal window within Visual Studio Code, travel to repository location and initiate git & pull from master. (not within scope of this document) at same location, we need Ansible-playbook to work so we will get Ansible for Windows. On second thought, we won't install Ansible for Windows. We will just run the Ansible-playbook on our remote system - after we push and pull the updates from source control. We can use the --check flag or dev inventory for testing. Starting the Work: Currently, my client's websites exist within a docker container per website. The plan is to have a cron job to run an ansible-playbook which will create a Docker Image out of each customer's Docker Container. The Docker Image will be pushed to AWS ECS Docker Registry regularly. We will have a loop in our Ansible scripts so the backup is individually applied to each website in our Inventory file for each ansible-playbook run. Cron will with the bash script to initiate the ansible-playbook run. First we will follow this document to allow Ansible to prepare our connectivity and authenticate with AWS ECS https://dedisource.com/docs/display/Public/Ansible+amazon-ecr-credential-helper+module Then, we will need to convert these steps to Ansible script actions using the Ansible Command module https://dedisource.com/docs/display/Public/Backup+container+to+registry Lastly, when we have the Ansible Scripts working to Enable Connection to ECS , Package Docker Container to Image , Tag Image and Push to AWS ECS registry We will Set Cron Job for Shell Script to run once per day. We will have the Bash Shell Script to Launch Ansible Playbook And that will about do it for us today. Thanks
- Ryan Rosado Read post
0 notes