#web page void linux
Explore tagged Tumblr posts
Visit Tumblr Blog
Explore Tumblr blogs with no restrictions, modern design and the best experience.
Last Seen Tumblr Blogs


Fun Fact
25% of US internet users with an annual income of $80-100K use Tumblr.
Text
Getting Started with Selenium Software Testing: Tools, Tips, and Tricks
Introduction: Why Selenium Software Testing is in Demand Today
Imagine launching a new web application. Everything looks perfect until users discover bugs that slow them down or block their tasks. It’s a developer’s nightmare and a business risk no one wants. This is where Selenium software testing steps in as a game-changer.
Selenium is one of the most popular tools for automated software testing. It helps teams test web applications quickly, catch bugs early, and release reliable products. According to a recent survey by Stack Overflow, Selenium ranks among the top five automation testing tools used by professionals worldwide. Whether you are a beginner or an experienced tester, learning Selenium can open doors to high-paying jobs and career growth.
If you are thinking about kickstarting a career in Selenium automation testing, or want to upskill, this guide covers everything you need to know. We will explore Selenium tools, tips, and tricks to help you get started. By the end, you’ll see why enrolling in a Selenium training course can give you an edge.
What is Selenium Software Testing?
A Simple Explanation
Selenium is an open-source tool for automating web browsers. It allows testers to write scripts that automatically interact with web elements like buttons, forms, and links—just like a user would. These automated tests help find errors, check functionality, and ensure the web application works across different browsers.
Why Selenium?
Free and Open-Source: No licensing costs.
Cross-Browser Support: Works on Chrome, Firefox, Safari, and more.
Cross-Platform: Supports Windows, Mac, and Linux.
Multiple Programming Languages: Works with Java, Python, C#, and others.
Large Community Support: Easy to find help, tutorials, and tools.
Components of Selenium: Understanding the Tools
1. Selenium WebDriver
Directly interacts with the browser.
Used for writing test cases that mimic real user actions.
Supports multiple programming languages.
2. Selenium IDE (Integrated Development Environment)
A browser extension that records and plays back test scripts.
Ideal for beginners due to its simple, no-coding approach.
3. Selenium Grid
Enables parallel test execution on multiple machines and browsers.
Saves time by running multiple tests at the same time.
Benefits of Selenium Automation Testing
Industry-Relevant Advantages
Speed and Efficiency: Automated tests are faster than manual testing.
Accuracy: Reduces human error.
Reusability: Test scripts can be reused across projects.
Scalability: Selenium Grid makes it easy to scale testing for large applications.
Real-World Example
A leading e-commerce company reduced its testing time by 60% after implementing Selenium Grid. Automated tests ran across browsers and devices, ensuring the site worked flawlessly during a major product launch.
Getting Started: How to Learn Selenium Step-by-Step
Step 1: Learn the Basics of Software Testing
Before diving into Selenium, understand manual testing concepts like test cases, test plans, and bug tracking.
Step 2: Set Up Your Selenium Environment
Install Java or Python (commonly used with Selenium).
Download and install Eclipse IDE or any code editor of your choice.
Download the Selenium WebDriver for your browser.
Example Setup (Java + Selenium)
java
import org.openqa.selenium.WebDriver;
import org.openqa.selenium.chrome.ChromeDriver;
public class FirstSeleniumTest {
public static void main(String[] args) {
System.setProperty("webdriver.chrome.driver", "path_to_chromedriver");
WebDriver driver = new ChromeDriver();
driver.get("https://www.google.com");
driver.quit();
}
}
Step 3: Write Your First Automation Script
Start with simple actions:
Open a website
Click a button
Fill a form
Verify text on a page
Step 4: Practice More Complex Scenarios
Handle pop-ups and alerts.
Automate file uploads/downloads.
Work with dynamic web elements.
Step 5: Learn Selenium Grid
Practice running tests on multiple browsers and machines in parallel.
Tips for Mastering Selenium Automation Testing
Start Simple, Then Go Complex
Begin with basic scripts before moving to advanced testing frameworks like TestNG.
Understand XPath and CSS Selectors
They are essential for locating elements on a web page.
Learn TestNG or JUnit
These frameworks make it easier to manage your Selenium test cases.
Use Explicit Waits
Handle dynamic page elements that take time to load.
java WebDriverWait wait = new WebDriverWait(driver, 10);
wait.until(ExpectedConditions.visibilityOfElementLocated(By.id("elementID")));
Keep Your Scripts Modular
Create reusable functions to avoid repeating code.
Version Control with Git
Manage your codebase efficiently by using Git for version control.
Stay Updated
Selenium frequently updates; stay informed about the latest versions and features.
Tricks That Make a Big Difference
Use Browser Developer Tools
Inspect elements directly and quickly find XPath or CSS Selectors.
Take Screenshots for Reporting
Capture screenshots when a test fails. It helps in debugging and reporting.
java
File screenshot = ((TakesScreenshot) driver).getScreenshotAs(OutputType.FILE);
FileUtils.copyFile(screenshot, new File("screenshot.png"));
Parallel Testing with Selenium Grid
Run multiple tests simultaneously, reducing the overall test execution time by half.
Handle Captcha with Manual Intervention
Automate everything else but leave Captcha handling to a manual step or use third-party services (if allowed).
Common Challenges in Selenium and How to Overcome Them
Challenge
Solution
Dynamic Elements
Use dynamic XPath and wait commands.
Handling Pop-ups and Alerts
Use driver.switchTo().alert() to handle browser alerts.
Synchronization Issues
Use implicit and explicit waits to manage timing problems.
CAPTCHA Handling
Perform manual intervention or skip test cases.
Why Selenium Certification Training Matters
Industry Demand for Certified Selenium Testers
Reports show that certified automation testers earn 20% more on average compared to their non-certified peers. Employers often look for Selenium certification training as proof of your skills.
Benefits of Selenium Certification
Validates your expertise.
Enhances your resume.
Increases job opportunities.
Builds confidence in handling real-world projects.
What You Learn in H2K Infosys Selenium Certification Course
Hands-on Selenium WebDriver training.
TestNG and advanced frameworks.
Real-world project experience.
Interview preparation and placement support.
Why Choose H2K Infosys for Selenium Training?
At H2K Infosys, our Selenium training online is designed for both beginners and experienced professionals. We offer:
Live instructor-led classes.
Hands-on projects and assignments.
Flexible schedules for working professionals.
Comprehensive curriculum covering Selenium WebDriver, Grid, and frameworks.
Placement assistance to help you land your dream job.
Key Takeaways
Selenium is the most popular tool for automated web application testing.
Mastering Selenium requires practice, the right tools, and guided learning.
Selenium certification improves job prospects and salary potential.
H2K Infosys offers Selenium training courses that are practical, flexible, and career-focused.
Conclusion
Ready to take the next step? Enroll in H2K Infosys’ Selenium course online for hands-on training and expert guidance. Boost your testing career with skills that employers are looking for!
#Selenium Training#Selenium Training online#Selenium certification#Selenium certification training#Selenium certification course#Selenium course#Selenium course online#Selenium course training#selenium automation testing#selenium software testing
0 notes
Text
Unlocking Automation: Mastering Selenium Webdriver for Seamless Testing
In today’s fast-paced tech-driven world, software applications need to deliver seamless experiences to users. A major part of this process involves testing—ensuring the app functions flawlessly. That’s where Selenium Webdriver steps in as a game-changer. If you’re curious about making your mark in automation testing or looking for a hands-on way to level up your skills, this guide will show you how Selenium Webdriver can make testing smarter and easier.
What is Selenium Webdriver?
Selenium Webdriver is an open-source framework designed to automate web applications for testing purposes. It allows testers to write scripts in programming languages like Java, Python, C#, and more to simulate user actions in a browser. Unlike traditional manual testing, where testers click through each scenario, Selenium Webdriver executes these actions automatically, saving time and reducing errors.
Whether it’s filling out forms, clicking buttons, or verifying page content, Selenium Webdriver has the tools to replicate any real-world scenario.
Why Learn Selenium Webdriver?
If you're asking yourself, "Why should I invest time in learning Selenium Webdriver?" here are some convincing reasons:
Wide Browser Support: Whether you’re testing on Chrome, Firefox, Safari, or Edge, Selenium works seamlessly.
Cross-Platform Functionality: Develop scripts on one platform (like Windows) and execute them on others (like Mac or Linux).
Open Source and Free: No license fees mean more accessibility for learners and professionals.
Integration with Test Frameworks: Tools like JUnit, TestNG, and Cucumber pair beautifully with Selenium to enhance reporting and test management.
Real-World Applications: From startups to global corporations, Selenium Webdriver is used to ensure their websites run flawlessly.
Getting Started with Selenium Webdriver
Prerequisites
To begin your journey, you’ll need:
A basic understanding of programming languages like Java or Python.
A browser and driver for the browser you’ll test on (e.g., ChromeDriver for Chrome).
A testing environment (use an IDE like Eclipse or PyCharm).
Installation Steps
Download Selenium Webdriver: Visit selenium.dev to get the latest version.
Install Browser Drivers: Ensure compatibility by downloading drivers like geckodriver (Firefox) or chromedriver (Chrome).
Set Up an IDE: Install a development environment like Eclipse for Java or PyCharm for Python.
Install Language Bindings: For Java, import Selenium libraries via Maven or Gradle. For Python, use the pip install selenium command.
Writing Your First Selenium Webdriver Script
Here’s a simple Java-based Selenium Webdriver example:
java
Copy code
import org.openqa.selenium.WebDriver;
import org.openqa.selenium.chrome.ChromeDriver;
public class FirstTest {
public static void main(String[] args) {
// Set the path to Chromedriver
System.setProperty("webdriver.chrome.driver", "path/to/chromedriver");
// Create a new ChromeDriver instance
WebDriver driver = new ChromeDriver();
// Open a website
driver.get("https://www.google.com");
// Print the title of the webpage
System.out.println("Page title is: " + driver.getTitle());
// Close the browser
driver.quit();
}
}
Key Features of Selenium Webdriver
1. Script Once, Run Anywhere
Scripts created using Selenium Webdriver can be executed across different browsers and operating systems without modification.
2. Support for Multiple Programming Languages
Whether you’re fluent in Python, Java, or C#, Selenium offers bindings for multiple languages, making it versatile.
3. Handling Dynamic Elements
Web apps often have dynamic components (like AJAX calls). Selenium's robust locators like XPath, CSS selectors, and ID can target even these elements.
Selenium Webdriver Best Practices
1. Use Explicit Waits
Avoid flaky tests by waiting for elements to load properly before performing actions.
java
Copy code
WebDriverWait wait = new WebDriverWait(driver, Duration.ofSeconds(10));
WebElement element = wait.until(ExpectedConditions.visibilityOfElementLocated(By.id("exampleId")));
2. Follow Naming Conventions
Maintain readable and maintainable scripts by using meaningful variable and method names.
3. Integrate with CI/CD Pipelines
Use tools like Jenkins to run Selenium tests automatically during code deployment.
Real-World Applications of Selenium Webdriver
E-commerce: Testing shopping cart functionalities, payment gateways, and search results.
Banking: Ensuring secure login pages and transactions function flawlessly.
Healthcare: Verifying data integrity in patient portals and appointment booking systems.
Travel: Testing booking engines, flight searches, and user dashboards.
How to Troubleshoot Common Issues
Element Not Found Exception
Ensure your locators are correct (use tools like the browser's developer console).
Wait for elements to load using explicit waits.
Browser Compatibility Issues
Update both the browser and Webdriver to the latest versions.
Timeout Errors
Check network speed or increase timeout duration for loading pages.
Alternatives to Selenium Webdriver
While Selenium Webdriver is a leader in automation testing, there are alternatives:
Cypress: Focused on JavaScript and faster execution.
Playwright: Developed by Microsoft, it offers rich debugging tools.
Appium: Ideal for mobile application testing.
However, Selenium Webdriver remains unmatched for its versatility and community support.
Future of Selenium Webdriver
With the introduction of Selenium 4, there are exciting updates like:
W3C WebDriver Protocol: Improved browser automation.
Relative Locators: Simplified element identification.
Better Grid Functionality: For parallel test execution.
These updates ensure that Selenium Webdriver remains relevant and powerful for years to come.
Conclusion
Mastering Selenium Webdriver opens doors to countless opportunities in automation testing. Its ability to mimic user actions and streamline workflows makes it indispensable for businesses of all sizes.
Whether you're new to the testing field or an experienced developer looking to enhance your skill set, investing in Selenium Webdriver is a decision that pays off. Dive in, experiment with scripts, and watch your testing process transform!
Ready to take the leap into automation testing? Let Selenium Webdriver guide your journey. Happy coding
0 notes
Text
Slack Web

Download Slack
Slack Webinar
Slack Web App
Slack Webex
The @slack/web-api package contains a simple, convenient, and configurable HTTP client for making requests to Slack’sWeb API. Use it in your app to call any of the over 130methods, and let it handle formatting, queuing, retrying, pagination, and more.
Installation
Initialize the client
You’re invited to join the discussion about all things related to Amazon Web Services on Slack. Click here to get started. You will be asked for your email address and will be sent an invite. Once there, choose your channel. Our #general channel is for anyone keen to discuss AWS related topics. The Slack Web API is an interface for querying information from and enacting change in a Slack workspace. Use it on the fly for ad-hoc queries, or as part of a more complex tapestry of platform features in a Slack app. What can you do with the Web API? Web Client The Slack Web API allows you to build applications that interact with Slack in more complex ways than the integrations we provide out of the box. Access Slack’s API methods requires an OAuth token – see the Tokens & Authentication section for more on how Slack uses OAuth tokens as well as best practices. Slack provides mobile apps for iOS and Android in addition to their Web browser client and desktop clients for macOS, Windows (with versions available from the company's website and through the Windows Store), and Linux (beta). Slack is also available for the Apple Watch, allowing users to send direct messages, see mentions, and make simple replies.
The package exports a WebClient class. All you need to do is instantiate it, and you’re ready to go. You’ll typicallyinitialize it with a token, so that you don’t have to provide the token each time you call a method. A token usuallybegins with xoxb or xoxp. You get them from each workspace an app is installed onto. The app configuration pageshelp you get your first token for your development workspace.
Initializing without a token
Alternatively, you can create a client without an token, and use it with multiple workspaces as long as you supply atoken when you call a method.
Call a method
The client instance has a named method for each of the public methods in the Web API. The most popular one iscalled chat.postMessage, and its used to send a message to a conversation. For every method, you pass arguments asproperties of an options object. This helps with the readablility of your code since every argument has a name. Allnamed methods return a Promise which resolves with the response data, or rejects with an error.
Hint: If you’re using an editor that supports TypeScript, even if you’re not using TypeScript to write your code,you’ll get hints for all the arguments each method supports. This helps you save time by reducing the number oftimes you need to pop out to a webpage to check the reference. There’s more information about usingTypeScript with this package in the documentation website.
Note: Use the Block Kit Builder for a playgroundwhere you can prototype your message’s look and feel.
Using a dynamic method name
If you want to provide the method name as a string, so that you can decide which method to call dynamically, or to calla method that might not be available in your version of the client, use the WebClient.apiCall(methodName, (options))method. The API method call above can also be written as follows:
Handle errors
Errors can happen for many reasons: maybe the token doesn’t have the proper scopes tocall a method, maybe its been revoked by a user, or maybe you just used a bad argument. In these cases, the returnedPromise will reject with an Error. You should catch the error and use the information it contains to decide how yourapp can proceed.
Each error contains a code property, which you can check against the ErrorCode export to understand the kind oferror you’re dealing with. For example, when Slack responds to your app with an error, that is anErrorCode.PlatformError. These types of errors provide Slack’s response body as the data property.
More error types
There are a few more types of errors that you might encounter, each with one of these codes:
ErrorCode.RequestError: A request could not be sent. A common reason for this is that your network connection isnot available, or api.slack.com could not be reached. This error has an original property with more details.
ErrorCode.RateLimitedError: The Web API cannot fulfill the API method call because your app has made too manyrequests too quickly. This error has a retryAfter property with the number of seconds you should wait before tryingagain. See the documentation on rate limit handling tounderstand how the client will automatically deal with these problems for you.
ErrorCode.HTTPError: The HTTP response contained an unfamiliar status code. The Web API only responds with 200(yes, even for errors) or 429 (rate limiting). If you receive this error, its likely due to a problem with a proxy,a custom TLS configuration, or a custom API URL. This error has the statusCode, statusMessage, headers, andbody properties containing more details.
Pagination
Many of the Web API’s methods returnlists of objects, and are known to be cursor-paginated. The result of calling these methods will contain a part ofthe list, or a page, and also provide you with information on how to continue to the next page on a subsequent API call.Instead of calling many times manually, the WebClient can manage getting each page, allowing you to determine when tostop, and help you process the results.
The process of retrieving multiple pages from Slack’s API can be described as asynchronous iteration, which meansyou’re processing items in a collection, but getting each item is an asynchronous operation. Fortunately, JavaScripthas this concept built in, and in newer versions of the language there’s syntax to make it even simpler:for await..of.
The for await..of syntax is available in Node v10.0.0 and above. If you’re using an older version of Node, seefunctional iteration below.
Using functional iteration
The .paginate() method can accept up to two additional parameters. The third parameter, stopFn, is a function thatis called once for each page of the result, and should return true when the app no longer needs to get another page.The fourth parameter is reducerFn, which is a function that gets called once for each page of the result, but canbe used to aggregate a result. The value it returns is used to call it the next time as the accumulator. The firsttime it gets called, the accumulator is undefined.
The returned value is a Promise, but what it resolves to depends on whether or not you include the fourth (optional)parameter. If you don’t include it, the resolved value is always undefined. In this case, its used for control flowpurposes (resuming the rest of your program), and the function in the third parameter is used to capture a result. Ifyou do include the fourth parameter, then the resolved value is the value of the accumulator. This is a familiarpattern for people that use functional programming.
Opening modals
Modals can be created by calling the views.open method. The method requires you to pass a valid view payload in addition to a trigger_id, which can be obtained when a user invokes your app using a slash command, clicking a button, or using another interactive action.
Dynamically updating a modal
After the modal is opened, you can update it dynamically by calling views.update with the view ID returned in the views.open result.
Logging
The WebClient will log interesting information to the console by default. You can use the logLevel to decide howmuch information, or how interesting the information needs to be, in order for it to be output. Mac lip pencil in soar. There are a few possiblelog levels, which you can find in the LogLevel export. By default, the value is set to LogLevel.INFO. While you’rein development, its sometimes helpful to set this to the most verbose: LogLevel.DEBUG.
All the log levels, in order of most to least information are: DEBUG, INFO, WARN, and ERROR.
Sending log output somewhere besides the console
You can also choose to have logs sent to a custom logger using the logger option. A custom logger needs to implementspecific methods (known as the Logger interface):
MethodParametersReturn typesetLevel()level: LogLevelvoidsetName()name: stringvoiddebug()..msgs: any()voidinfo()..msgs: any()voidwarn()..msgs: any()voiderror()..msgs: any()void
A very simple custom logger might ignore the name and level, and write all messages to a file.
Automatic retries
In production systems, you want your app to be resilient to short hiccups and temporary outages. Solving for thisproblem usually involves building a queuing system that handles retrying failed tasks. The WebClient comes with thisqueuing system out of the box, and its on by default! The client will retry a failed API method call up to 10 times,spaced out over about 30 minutes. If the request doesn’t succeed in that time, then the returned Promise will reject.You can observe each of the retries in your logs by setting the log level to DEBUG. Try running thefollowing code with your network disconnected, and then re-connect after you see a couple of log messages:
Shortly after re-connecting your network, you should see the Done! message. Did you notice the program doesn’t use avalid token? The client is doing something clever and helpful here. It knows the difference between an error such as notbeing able to reach api.slack.com and an error in the response from Slack about an invalid token. The former issomething that can be resolved with a retry, so it was retried. The invalid token error means that the call isn’t goingto succeed until your app does something differently, so it stops attempting retries.
You might not think 10 reties in 30 minutes is a good policy for your app. No problem, you can set the retryConfig toone that works better for you. The retryPolicies export contains a few well known options, and you can always writeyour own.
Here are some other values that you might want to use for retryConfig:
retryConfigDescriptionretryPolicies.tenRetriesInAboutThirtyMinutes(default)retryPolicies.fiveRetriesInFiveMinutesFive attempts in five minutesretryPolicies.rapidRetryPolicyUsed to keep tests running fast( retries: 0 )No retries (other options)
Note: If an API call results in a rate limit being exceeded, you might still notice the client automaticallyretrying the API call. If you’d like to opt out of that behavior, set the rejectRateLimitedCalls option to true.
Upload a file
A couple methods, files.upload and users.setPhoto, allow you to upload a file over the API. In Node, there are a fewways you might be dealing with files, or more generally, binary data. When you have the whole file in memory (like whenyou’ve just generated or processed an image), then in Node you’d have a Buffer that contains that binary data. Or,when you are reading the file from disk or a network (like when you have a path to file name), then you’d typically havea ReadableStream. The client can handle both of these binary data types for you, and it looks like any other API call.
The following example shows how you can use files.upload to upload afile that is read from disk (as a ReadableStream).
In the example above, you could also use a Buffer object as the value for the file property of the options object.
Proxy requests with a custom agent
The client allows you to customize the HTTPAgent used to create the connection to Slack.Using this option is the best way to make all requests from your app through a proxy, which is a common requirement inmany corporate settings.

In order to create an Agent from some proxy information (such as a host, port, username, and password), you can useone of many npm packages. We recommend https-proxy-agent. Startby installing this package and saving it to your package.json.
Import the HttpsProxyAgent class, and create an instance that can be used as the agent option of the WebClient.
Rate limits
When your app calls API methods too frequently, Slack will politely ask (by returning an error) the app to slow down,and also let your app know how many seconds later it should try again. This is called rate limiting and theWebClient handles it for your app with grace. The client will understand these rate limiting errors, wait theappropriate amount of time, and then retry the request without any changes in your code. The Promise returned onlyresolves when Slack has given your app a real response.
It’s a good idea to know when you’re bumping up against these limits, so thatyou might be able to change the behavior of your app to hit them less often. Your users would surely appreciate gettingthings done without the delay. Each time a rate limit related error occurs, the WebClient instance emits an event:WebClientEvent.RATE_LIMITED. We recommend that you use the event to inform users when something might take longer thanexpected, or just log it for later.
Download Slack
You might not want to the WebClient to handle rate limits in this way. Perhaps the operation was time sensitive, andit won’t be useful by the time Slack is ready for another request. Or, you have a more sophisticated approach. In thesecases, you can set the rejectRateLimitedCalls option on the client to true. Once you set this option, method callscan fail with rate limiting related errors. These errors have a code property set to ErrorCode.RateLimitedError. Seeerror handling for more details.
Request concurrency
Each of the API method calls the client starts are happening concurrently, or at the same time. If your app triesto perform a lot of method calls, let’s say 100 of them, at the same time, each one of them would be competing for thesame network resources (such as bandwidth). By competing, they might negatively affect the performance of all the rest,and therefore negatively affect the performance of your app. This is one of the reasons why the WebClient limits theconcurrency of requests by default to ten, which means it keeps track of how many requests are waiting, and onlystarts an eleventh request when one of them completes. The exact number of requests the client allows at the same timecan be set using the maxRequestConcurrency option.
The lower you set the maxRequestConcurrency, the less parallelism you’ll have in your app. Imagine setting theconcurrency to 1. Each of the method calls would have to wait for the previous method call to complete before it caneven be started. This could slow down your app significantly. So its best not to set this number too low.
Another reason, besides competing for resources, that you might limit the request concurrency is to minimize theamount of state in your app. Each request that hasn’t completed is in some ways a piece of state that hasn’t yet beenstored anywhere except the memory of your program. In the scenario where you had 100 method calls waiting, and yourprogram unexpectedly crashes, you’ve lost information about 100 different things going on in the app. But by limitingthe concurrency to a smaller number, you can minimize this risk. So its best not to set this number too high.
Custom TLS configuration
Each connection to Slack starts with a handshake that allows your app to trust that it is actually Slack you areconnecting to. The system for establishing this trust is called TLS. In order for TLS to work, the host running your appkeeps a list of trusted certificate authorities, that it can use to verify a signature Slack produces. You don’tusually see this list, its usually a part of the operating system you’re running on. In very special cases, like certaintesting techniques, you might want to send a request to another party that doesn’t have a valid TLS signature that yourcertificate authority would verify. In these cases, you can provide alternative TLS settings, in order to change how theoperating system might determine whether the signature is valid. You can use the tls option to describe the settingsyou want (these settings are the most common and useful from the standard NodeAPI).
tls propertyDescriptioncaOptionally override the trusted CA certificates. Any string or Buffer can contain multiple PEM CAs concatenated together.keyPrivate keys in PEM format. PEM allows the option of private keys being encrypted. Encrypted keys will be decrypted with passphrase.certCert chains in PEM format. One cert chain should be provided per private key.pfxPFX or PKCS12 encoded private key and certificate chain. pfx is an alternative to providing key and cert individually. PFX is usually encrypted, if it is, passphrase will be used to decrypt it.passphraseShared passphrase used for a single private key and/or a PFX.
Slack Webinar
Custom API URL
The URLs for method calls to Slack’s Web API always begin with https://slack.com/api/. In very special cases, such ascertain testing techniques, you might want to send these requests to a different URL. The slackApiUrl option allowsyou to replace this prefix with another.
Exchange an OAuth grant for a token
There’s one method in the Slack Web API that doesn’t requires a token, because its the method that gets a token! Thismethod is called oauth.v2.access. It’s used as part of the OAuth2.0 process that users initiate when installing your app into a workspace. In thelast step of this process, your app has received an authorization grant called code which it needs to exchange foran access token (token). You can use an instance of the WebClient that has no token to easily complete thisexchange.
Note: If you’re looking for a more complete solution that handles more of the OAuth process for your app, take alook at the @aoberoi/passport-slack Passport Strategy.
The Slack platform offers several APIs to build apps. Each Slack API delivers part of the capabilities from theplatform, so that you can pick just those that fit for your needs. This SDK offers a corresponding package for each ofSlack’s APIs. They are small and powerful when used independently, and work seamlessly when used together, too.
Just starting out? The Getting Started tutorial willwalk you through building your first Slack app using Node.js.
Slack APIWhat its forNPM PackageWeb APISend data to or query data from Slack using any of over 130 methods.@slack/web-apiEvents APIListen for incoming messages and many other events happening in Slack, using a URL.@slack/events-apiInteractive MessagesRespond to button clicks, dialogs, and other interactions with messages.@slack/interactive-messagesOAuthSetup the authentication flow using V2 OAuth for Slack apps as well as V1 OAuth for classic Slack apps.@slack/oauthRTM APIListen for incoming messages and a limited set of events happening in Slack, using websockets.@slack/rtm-apiIncoming WebhooksSend notifications to a single channel which the user picks on installation.@slack/webhook
Not sure about which APIs are right for your app? Read our blogpost that explains the options.If you’re still not sure, reach out for help and our community can guide you.
If you’re looking for an all-in-one solution that hides the underlying Slack APIs, but simplifies building a bot-styleapp inside Slack, try the Hubot Slack adapter. Hubot is a popular frameworkfor internal apps that automate workflows, perform ChatOps, or just generate silly memes.
Installation
Question symbol copy. Use your favorite package manager to install any of the packages and save to your package.json:
Requirements
This package supports Node v8 LTS and higher. It’s highly recommended to use the latest LTS version ofnode, and the documentation is written using syntax and featuresfrom that version.
Slack Web App
Getting Help
If you get stuck, we’re here to help. The following are the best ways to get assistance working through your issue:
Slack Webex
Issue Tracker for questions, featurerequests, bug reports and general discussion related to this package.
Email us in Slack developer support: [email protected]
Bot Developers Hangout: a Slack community for developersbuilding all types of bots. You can find the maintainers and users of this package in #sdk-node-slack-sdk.
0 notes
Text
How to root Android phones and tablets and unroot them
Android rooting is the perfect way to gain more control over your smartphone, and open up a world of unknown, yet important, possibilities.

Root Android phones and tablets and unroot them
Rooting isn't without its risks - and if something goes wrong, it could void the warranty, leave you a broken smartphone or tablet, or worse.
Before continuing, it is important to understand that rooting is not always a straightforward process, and you may experience hiccups along the way. If you decide that you should root your Android device then continue below, but know that this is not for the faint of heart or tech geek.
Manufacturers and vectors will discourage you from taking root, and they're not just a freak out of fear. If you don't follow the instructions properly, the worst-case scenario could damage your device irreparably, but many people find the potential benefits worth it. With a rooted phone, you can remove bloatware, speed up your processor, and customize every element of your phone's software appearance.
This guide will guide you on how to root Android phones through the steps to root your device. While we can reach some phones within minutes, others will require more research. But one thing is clear: Rooting your phone is one of the best ways to harness the true potential of your Android device.
What is rooting?
Rooting an Android phone or tablet is like jailbreaking an iPhone - it essentially lets you dive deeper into the phone's subsystem. Once the rooting process is complete, you have access to the entire operating system to customize almost everything on your Android device, and you can bypass any restrictions that your manufacturer or carrier might have imposed.
Rooting is best done with caution. You must back up your phone's software before installing - or "flashing" in terms of root - a custom ROM (modified version of Android).
Why should you root?
One of the biggest incentives in rooting your Android phone is to allow you to remove bloatware that cannot be uninstalled otherwise (although you can sometimes turn it off - see our guide on disabling bloatware). On some devices, rooting will enable settings that were previously disabled, such as wireless tethering. Additional features include the ability to install specialized tools and dedicated flash ROMs, each of which can add additional features and improve the performance of your phone or tablet.
There aren't many root apps to have, but there are enough of them to make them worth it. Certaines applications vous permettront de sauvegarder automatiquement toutes vos applications et données dans le cloud, de bloquer les publicités Web et intégrées aux applications, de créer des tunnels sécurisés verses Internet, d'overclocker votre processeur ou de faire de votre appareil un point d'accès cellular. Take a look at the best root accessed apps for devices to get a better idea of what is possible.
Why shouldn’t you root?
I am a fixture on non-influencing abilities based on the Android voting system.
Voiding Your Warranty: Some manufacturers or carriers will void your warranty if you root your device, so it should be borne in mind that you can always unroot. If you need to return the device for repair, all you need to do is flash the software backup you made and it will be like new.
Brick your phone: choose If something goes wrong during the rooting process, you risk breaking - i.e. corrupting - your device. The easiest way to appear to happen is to follow the media carefully. Make sure that the guide you are following is up to date and that the custom ROM you are flashing is specifically for your phone. If you do your research, you won't have to worry about bricking your smartphone.
Security Risks: Rooting presents some security risks. Depending on the services or apps you use on your device, this could create a security hole. And I have seen malicious elements that play a big role in data protection, the combination of malicious and invented launchers and made available from devices inaccessible through the annoying web.
Disabled apps: a few apps and services: Security-conscious doesn't work on rooted devices - financial platforms like Google Pay and Barclays Mobile Banking don't support them. Popular apps for human rights-protected TV works and movies, like Sky Go and Virgin TV Anywhere, won't start on rooted devices either - and neither will Netflix.
How to prepare your Android device for rooting
One of the easiest ways to root an Android device is through an app, and several rooting apps have received attention over the years - Framaroot, Firmware.mobi, Kingo Root, BaiduRoot, One Click Root, SuperSU, and Root Master are among the most reliable.
Typically, these services root your device during the time you spend brushing your teeth. But some of them only support devices running older versions of Android, so you might need to do some research to find a device that works with your device. If you are looking to root an older device, you may need to check out Firmware. Mobi.
Previously, root Android versions of Android 7.0 Nougat was more difficult. The certified startup service will check the integrity of the device's encryption to detect if your device's system files have been compromised, preventing legitimate root applications. Thankfully, I faced the curve root apps and it became much easier to root newer versions of Android than before.
If your phone is not compatible with the one-click rooting app, then you need to spend some time looking for alternatives in Android forums. A great place to start is the XDA Developers Forum. Look for a thread on your phone or tablet and you'll likely find a way.
Preparing for rooting
Back up anything you can't live without before you start. You should always back up your current ROM to your phone before flashing a new one. You'll also need to make sure your device is fully charged before you begin.
You will need to turn on USB Debugging and OEM Unlocking. Do this by opening Settings on your device. If you do not see Developer Options toward the bottom of the Settings screen, follow these steps to activate it.
Tap on About Phone and find the Build Number. The exact path depends on your phone, but it’ll usually be found with other software information.
Tap on the Build Number seven times, and the Developer Options will appear on the Settings main page. You may need to confirm your security passcode to enable this.
Tap on the Back key to see your new developer options.
Tap Developer Options.
Check to enable USB Debugging.
Check to enable OEM Unlocking.
Installing the Android SDK Platform Tools
Previously rooting included downloading the entire Android SDK from Google. Thankfully, this is no longer the case, and all you need is the Android SDK platform tools.
Download and install the Android SDK Platform Tools from Google's developer site. There are options for Windows, Mac, and Linux systems. These are instructions for Windows devices. Extract zip files. When asked to select the directory where you want to install the program, we recommend that you set it to C: android-SDK. If you've chosen a different site, be sure to remember this.
Installing device drivers
To ensure that your computer can properly communicate with your smartphone or tablet, you will need to install the correct USB driver.
Devices from some manufacturers come with drivers included in the phone software, so all you need to do to install the correct USB driver is to connect your phone to your computer with a USB cable. OnePlus is an example, but it's worth connecting your phone first to see if the USB drivers will be installed automatically.
Other than that, here is a list of the most popular manufacturers' drivers:
Asus
Acer
Alcatel
Coolpad
Google / Nexus / Pixel
HTC
Huawei / Honor
Lenovo / Motorola
LG
Samsung
Sony
Xiaomi
Follow the installer’s instructions. Once the drivers are installed, proceed to the next step.
Unlock your bootloader
Before you begin, you need to unlock your device's bootloader. Bootloader, in simple terms, is the program that loads a device's operating system. Identifies the apps that run during the booting process of your phone or tablet.
Some manufacturers require you to have a key to unlock the bootloader. Motorola, HTC, LG, and Sony provide step-by-step instructions on how to do this, but a word of caution: it requires you to sign up for a developer account.
Unfortunately for Huawei and Honor device users, it is no longer possible to unlock the boot chargers on these phones. Huawei revoked the ability to request unlock codes in July 2018. If you still want to root a Huawei or Honor device, you need to use a third-party service like DC-Unlocker.
Once you follow these steps, you can start the unlocking process. You will need to put your device in fast boot mode. It's different for each phone, but on most devices, restarting the device and holding the Power and Volume Down buttons for 10 seconds does the trick (HTC phones require you to press the Volume Down button and press the Power button to select it).
Once Fastboot starts up, head to the folder where you previously unzipped the Android SDK files. Next, open the command prompt on your computer by pressing Shift + right-click and choosing Open Command Prompt here. If your device requires a passcode, you'll get a long string of characters. Paste it in the box on the manufacturer's website for your device, then submit the form and wait for an email with a key, file, and additional instructions.
Unlock the bootloader of your device by connecting it to your computer and returning it to Fastboot Mode. Open a command prompt by typing cmd into the start menu.
For Google Nexus and Pixel devices, the commands are easy:
Nexus phones: Type “fast-boot OEM unlock” (without quotes) and hit Enter.
Pixel phones: Type “fast-boot flashing unlock” (without quotes) and hit Enter.
It’s the same for Samsung devices:
Samsung phones: Type “fast-boot flashing unlock” (without quotes) and hit Enter.
Motorola’s command is a little different:
Type “OEM unlock UNIQUE_KEY” (without quotes), replacing “UNIQUE KEY” with the code you received
So is HTC’s:
Type “unlock token Unlock_code.bin” (without quotes), replacing “Unlock_code.bin” with the file you received.
Confirm the unlock, and you’re one step closer to rooting your Android device.
Some manufacturers and carriers don’t sanction bootloader unlocking, but that doesn’t mean it can’t be done. Try searching the XDA Developers forum for workarounds and unofficial solutions.
How to root Android phones and tablets and unroot them How to root Android phones, HOWTO, one click root, root Android phone, root android phones, root my android, root my device, root my phone, rooting definition, unroot android phone, What is rooting via exercisesfatburnig.blogspot.com https://ift.tt/3mJ1MWf
0 notes
Text
AlmaLinux Released As a Stable RHEL Clone For Those Who Liked CentOS
Long-time Slashdot reader xiando quotes the backstory from LinuxReviews.org: CentOS used to be the go-to alternative for those who wanted to use Red Hat Enterprise Linux (RHEL) without having to pay RedHat to use it. It was a almost 1:1 clone until RedHat took control of it and turned it into what is now a RHEL beta-version, not a stable RHEL release without the branding. Almalinux is one of several projects that have made their own RHEL forks in response. The first Almalinux version is now released. ZDNet notes that CentOS co-founder Gregory Kurtzer has announced his own RHEL clone and CentOS replacement named Rocky Linux. But they offer this report on AlmaLinux: CloudLinux — which was founded in 2009 to provide a customized, high-performance, lightweight RHEL/CentOS server clone for multitenancy web and server hosting companies — came ready to deliver. The new free AlmaLinux is now stable and ready for production workloads. The company also announced the formation of a non-profit organization: AlmaLinux Open Source Foundation. This group will take over managing the AlmaLinux project going forward. CloudLinux has committed a $1 million annual endowment to support the project. Jack Aboutboul, former Red Hat and Fedora engineer and architect, will be AlmaLinux's community manager. Altogether, Aboutboul brings over 20 years of experience in open-source communities as a participant, manager, and evangelist... "In an effort to fill the void soon to be left by the demise of CentOS as a stable release, AlmaLinux has been developed in close collaboration with the Linux community," said Aboutaboul in a statement. "These efforts resulted in a production-ready alternative to CentOS that is supported by community members...." In talking with CentOS business users, who deployed CentOS on web and host servers, I found many of them to be very hopeful about AlmaLinux. One from a mid-Atlantic-based Linux hosting company said, "What we want is a stable Linux that our customers can rely on from year to year. Since CentOS Stream can't deliver that, we think — hope — that AlmaLinux can do it for us and our users instead...." This first release of AlmaLinux is a one-to-one binary compatible fork of RHEL 8.3. Looking ahead, AlmaLinux will seek to keep step-in-step with future RHEL releases... The GitHub page has already been published and the completed source code has been published in the main download repository. The CloudLinux engineering team has also published FAQ on AlmaLinux Wiki. "The sudden shift in direction for CentOS that was announced in December created a big void for millions of CentOS users," said Simon Phipps, open source advocate and a former president of the Open Source Initiative who is on the governing board of the AlmaLinux project. In a statement, Phipps said that "As a drop-in open-source replacement, AlmaLinux provides those users with continuity and new opportunity to be part of a vibrant community built around creating and supporting this new Linux distribution under non-profit governance. "I give a lot of credit to CloudLinux for stepping in to offer CentOS users a lifeline to continue with AlmaLinux."


Read more of this story at Slashdot.
from Slashdot https://ift.tt/31HkgwL
0 notes
Text
Flutter Crash Course for JavaScript Developers

Welcome! I’m glad you’re here again for some more Dart and Flutter magic.
✨ In the previous episode of this series, we looked at Dart and went from basically zero to hero with all those types, classes and asynchrony. I hope you had enough practice on Dart because today, we’ll move forward to Flutter. Let’s get started!
Quick heads up: the “👉” emoji will compare JS and React with Dart and Flutter language examples as of now. Just like in the previous episode,, the left side will be the JS/React, and the right side will be the Dart/Flutter equivalent, e.g. console.log("hi!"); 👉 print("hello!");
What is Flutter, and why we’ll use it
Flutter and Dart are both made by Google. While Dart is a programming language, Flutter is a UI toolkit that can compile to native Android and iOS code. Flutter has experimental web and desktop app support, and it’s the native framework for building apps for Google’s Fuchsia OS.
This means that you don’t need to worry about the platform, and you can focus on the product itself. The compiled app is always native code as Dart compiles to ARM, hence providing you the best cross-platform performance you can get right now with over 60 fps.
Flutter also helps the fast development cycle with stateful hot reload, which we’ll make use of mostly in the last episode of this series.
Intro to the Flutter CLI
When building apps with Flutter, one of the main tools on your belt is the Flutter CLI. With the CLI, you can create new Flutter projects, run tests on them, build them, and run them on your simulators or emulators. The CLI is available on Windows, Linux, macOS and x64-based ChromeOS systems.
Once you have the CLI installed, you’ll also need either Android Studio, Xcode, or both, depending on your desired target platform(s).
(Flutter is also available on the web and for desktop, but they are still experimental, so this tutorial will only cover the Android and iOS related parts).
If you don’t wish to use Android Studio for development, I recommend VSCode. You can also install the Dart and Flutter plugins for Visual Studio Code.
Once you’re all set with all these new software, you should be able to run flutter doctor. This utility will check if everything is working properly on your machine. At the time of writing, Flutter printed this into the console for me:
[✓] Flutter (Channel stable, v1.17.4, on Mac OS X 10.15.4 19E287, locale en-HU) [✓] Android toolchain - develop for Android devices (Android SDK version 29.0.2) [✓] Xcode - develop for iOS and macOS (Xcode 11.5) [!] Android Studio (version 3.5) ✗ Flutter plugin not installed; this adds Flutter specific functionality. ✗ Dart plugin not installed; this adds Dart specific functionality. [✓] VS Code (version 1.46.1) [!] Connected device ! No devices available
You should get similar results for at least for the Flutter part too. Everything else depends on your desired target platforms and your preferred IDEs like Android Studio or VS Code. If you get an X for something, check again if everything is set up properly.
Only move forward in this tutorial if everything works properly.
To create a new Flutter project, cd into your preferred working directory, and run flutter create <projectname>. The CLI will create a directory and place the project files in there. If you use VS Code on macOS with an iOS target, you can use this little snippet to speed up your development process:
# Create a new project flutter create <projectname> # move there cd projectname # open VS code editor code . # open iOS Simulator - be patient, it may take a while open -a Simulator.app # start running the app flutter run
And boom, you’re all set! 💅
If you don’t wish to use the iOS simulator, you can always spin up your Android Studio emulator. Use Genymotion (or any other Android emulation software), or even connect a real device to your machine. This is a slower and more error-prone solution, so I recommend to only test on real devices when necessary.
Once they have booted, you can run flutter doctor again and see if Flutter sees the connected device. You should get an output something just like this:
... [✓] Connected device (1 available) ...
If you got this output - congratulations! 🎉 You’re all set to move on with this tutorial. If, for some reason Flutter didn’t recognize your device, please go back and check everything again as you won’t be able to follow the instructions from now on.
Hello world! 🌍
If you didn’t run the magic snippet previously, run these commands now:
# Create a new project flutter create <projectname> # move there cd projectname # open VS code editor (optional if you use Studio) code . # start running the app flutter run
This will spin up the Flutter development server with stateful hot reload and a lot more for you. You’ll see, that by default, Flutter creates a project with a floating action button and a counter:
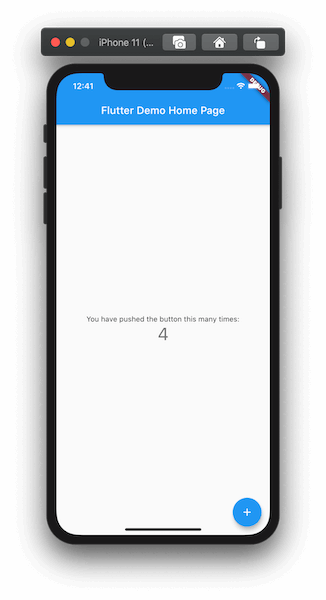
Once you’re finished with playing around the counter, let’s dig into the code! 👨💻
Flutter project structure
Before we dig right into the code, let’s take a look at the project structure of our Flutter app for a moment:
├── README.md ├── android │ └── ton of stuff going on here... ├── build │ └── ton of stuff going on here... ├── ios │ └── ton of stuff going on here... ├── lib │ └── main.dart ├── pubspec.lock ├── pubspec.yaml └── test └── widget_test.dart
We have a few platform-specific directories: android and ios. These contain the necessary stuff for building, like the AndroidManifest, build.gradle, or your xcodeproj.
At this moment, we don’t need to modify the contents of these directories so we’ll ignore them for now. We’ll also ignore the test directory as we won’t cover testing Flutter in this series (but we may look into it later if there’s interest 👀), so that only leaves us to these:
├── lib │ └── main.dart ├── pubspec.lock ├── pubspec.yaml
And this is where the magic happens. Inside the lib directory, you have the main.dart: that’s where all the code lives right now. We’ll peek into it later, but let’s just have a look at the pubspec.yaml and pubspec.lock.
What are those?

Package management in Flutter - pub.dev
When building a project with JavaScript, we often use third party components, modules, packages, libraries, and frameworks so that we don’t have to reinvent the wheel. The JavaScript ecosystem has npm and yarn to provide you with all those spicy zeroes and ones, and they also handle the dependencies inside your project.
In the Dart ecosystem, this is all handled by pub.dev.
So, just a few quick facts: npm 👉 pub.dev package.json 👉 pubspec.yaml package-lock.json 👉 pubspec.lock
We’ll look into installing packages and importing them into our app in the last episode of this series, in which we’ll create a fun mini-game.
Digging into the Dart code
The only thing left from the file tree is main.dart. main is the heart of our app, it’s like the index.js of most JS-based projects. By default, when creating a project with flutter create, you’ll get a very well documented code with a StatelessWidget, a StatefulWidget, and its State.
So instead of observing the demo code line by line together, I encourage you to read the generated code and comments by yourself and come back here later.
In the next part, we’ll look into what are widgets and the build method.
We’ll learn why it is @overrided, and what’s the difference between stateful and stateless widgets. Then we’ll delete all the code from main.dart and create a Hello world app by ourselves so that you can get the hang of writing declarative UI code in Flutter.
Go ahead, read the generated code and the documentation now! 👀
In Flutter, everything is a widget!
As you have been reading the code, you may have noticed a few things. The first thing after importing Flutter is the entry method I have been talking about in the previous episode:
void main() { runApp(MyApp()); }
And then, you could see all those classes and OOP stuff come back with the line class MyApp extends StatelessWidget.
First things first: in Flutter, everything is a widget! Oh, and speaking of widgets. Components 👉 Widgets!
The StatelessWidget is a class from the Flutter framework, and it’s a type of widget. Another kind of widget is StatefulWidget and we’ll look into the difference between those and how to use them later.
We can create our reusable widget by extending the base class StatelessWidget with our own build method. (By the way, render in ReactJS 👉 build in Flutter). We can see that the build returns a Widget because the return type is defined, and we can see an odd keyword in the previous line: @override.
It’s needed because the StatelessWidget class has a definition for build by default, but we want to replace it (or override it) with our own implementation - hence the keyword @override. Before we dig further into the code, let’s have a peek at using widgets in Flutter:
// using a React component <button onClick={() => console.log(‘clicked!’)}>Hi, I’m a button</button>
// using a Flutter widget RawMaterialButton( onPressed: () { print("hi, i'm pressed"); }, child: Text("press me!"), ),
You can see that Flutter has a different approach with declarative UI code.
Instead of wrapping children between ><s and passing props next to the component name (e.g. <button onClick ...), everything is treated as a property. This enables Flutter to create more flexible and well-typed widgets: we’ll always know if a child is supposed to be a standalone widget or if it can accept multiple widgets as a property, for example. This will come in handy later when we’ll build layouts with Rows and Columns.
Now that we know a bit more about widgets in Flutter, let’s take a look at the generated code again:
@override Widget build(BuildContext context) { return MaterialApp( title: 'Flutter Demo', theme: ThemeData( primarySwatch: Colors.blue, ), home: MyHomePage(title: 'Flutter Demo Home Page'), ); }
The build method returns a MaterialApp that has a type of Widget and - unsurprisingly - comes from Flutter. This MaterialApp widget is a skeleton for your Flutter app. It contains all the routes, theme data, metadata, locales, and other app-level black magic you want to have set up. 🧙
You can see the MyHomePage class being referenced as the home screen. It also has a property, title, set up. MyHomePage is also a widget, and we can confirm that by looking at the definition of this class.
Quick tip: if you are using VSCode as your editor, hold Command and hover or click on the class reference and you’ll be directed to the code of the class.
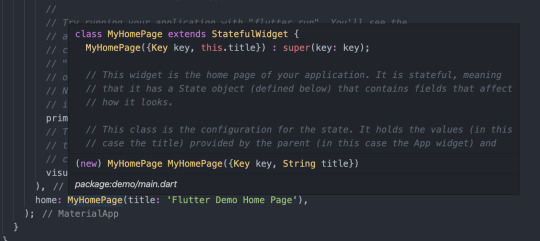
We can see that MyHomePage extends a StatefulWidget. However, the structure of the code itself is a bit squiggly and weird. What’s this MyHomePage({Key key, this.title}) : super(key: key); syntax? Why doesn’t this widget have a build method? What’s a State? What is createState?
To answer these questions, we’ll have to look into one of the more hard-code topics in Flutter: state management.
Local state management in Flutter: StatefulWidgets
I previously talked about the two main types of widgets in Flutter: StatelessWidgets and StatefulWidgets. StatelessWidgets are pretty straightforward: a snippet of code that returns a Widget, maybe some properties are being passed around, but that’s all complexity.
However, we don’t want to write applications that just display stuff! We want to add interactivity! And most interactions come with some state, whether it’s the data stored in an input field or some basic counter somewhere in your app. And once the state is updated, we want to re-render the affected widgets in our app - so that the new data is being displayed for the user.
Think of state management in React: it has the very same purpose with the goal of being as efficient as possible. It’s no different in Flutter: we want to have some very simple widgets (or StatelessWidgets), and some widgets with a bit of complexity and interactivity (or StatefulWidgets).
Let’s dive into the code: a StatefulWidget consists of two main components:
a StatefulWidget (that is called MyHomePage in our case)
a typed State object (that is called _MyHomePageState in this example)
We’ll call these “widget” and “state” (respectively) for the sake of simplicity. The widget itself contains all the props, and a createState overridden method. As you can see, the prop is marked with a final - that’s because you cannot change the prop from within the widget. When you modify a prop of a widget, Flutter throws the current instance away and creates a brand new StatefulWidget.
Note that changing either the prop or the state will trigger a rebuild in Flutter - the key difference between the two is that changing the state can be initiated from within the widget while changing a prop is initiated by the parent widget.
Props help you pass data from parent to children. State helps you handle data change inside the children.
Now, let’s look into changing the state: inside the widget, we have a createState method that only returns the state, _MyHomePageState(). When modifying the state with the setState method, this createState method gets called and returns a new instance of your state. The old instance gets thrown away, and a new instance of your widget will be inserted into the widget tree.
(Sidenote: the widget tree is only a blueprint of your app, the element tree is the one that gets rendered for the user. It’s a bit more advanced, under-the-hood topic, so it won’t be covered in this series - however, I’ll link some video resources later on that will help you understand how Flutter works and what’s the deal with the widget tree and the element tree.)
The _MyHomePageState class has a type of State, typed with MyHomePage.
This is needed so that you can access the properties set in the MyHomePage instance with the widget keyword - for example, to access the title prop, write widget.title. Inside the state, you have an overridden build method, just like you’d see in a typical StatelessWidget. This method returns a widget that renders some nice data, both from props (widget.title) and from the state (_counter).
Notice that you don’t need to type in anything before the _counter. No this.state._counter, no State.of(context)._counter, just a plain old _counter. That’s because from the perspective of the code, this variable is declared just like any other would be:
int _counter = 0;
However, when modifying this variable, we need to wrap our code in setState, like this:
setState(() { _counter++; });
This will tell Flutter that “Hey! It’s time to re-render me!”.
The framework will call the previously discussed createState method; a new instance of your state gets created; built; rendered; and boom! 💥 The new data is now on-screen.
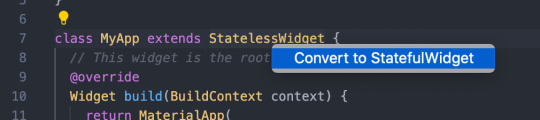
It may seem a bit complicated or seem like you have to write a lot of boilerplate code to get this running. But don’t worry! With VS Code, you can refactor any StatelessWidget into a stateful one with just one click:
And that’s it for managing your widget’s state! It may be a lot at first, but you’ll get used to it after building a few widgets.
A few notes about global state management in Flutter
Right now, we only looked at working with local state in Flutter - handling app-level, or global state is a bit more complex. There are, just like in JS, tons of solutions, ranging from the built-in InheritedWidget to a number of third-party state management libraries. Some of those may already be familiar, for example, there is RxDart and Redux, just to name a few. To learn more about the most popular solutions, and which one to choose for your project, I suggest you watch this awesome video about global state management in Flutter by Fireship.
Widgets, widgets, and widgets
I already talked about how everything is a widget in Flutter - however, I didn’t really introduce you to some of the most useful and popular widgets in Flutter, so let’s have a look at them before we move on!
Flutter has widgets for displaying texts, buttons, native controls like switches and sliders (cupertino for iOS and material for Android style widgets), layout widgets like Stack, Row, Column and more. There are literally hundreds of widgets that are available for you out of the box, and the list keeps growing.
The whole widget library can be found here in the Widget Catalog, and the Flutter team is also working on a very nice video series with new episodes being released weekly. This series is called Flutter Widget of the Week, and they introduce you to a Flutter widget, it’s use cases, show you code examples and more, in just about one minute! It’s really binge-worthy if you want to get to know some useful Flutter widgets, tips, and tricks.
Here a link for the whole series playlist, and here is the intro episode.
Some useful widgets in Flutter
As you’ll work with Flutter, you’ll explore more and more widgets, but there are some basic Flutter widgets you’ll absolutely need to build your first application. (We’ll probably use most of them in the next and last episode of this series, so stay tuned!)
First and foremost: Text.
The Text widget delivers what its name promises: you can display strings with it. You can also style or format your text and even make multiline texts. (There’s are a lot of line of text-related widgets available, covering your needs from displaying rich text fields to creating selectable texts.)
An example Text widget in Flutter:
Text('hello world!'),
Adding buttons to your Flutter app is also easy as one two three. There are numerous button-related widgets available for you ranging from RawMaterialButton to FlatButton, IconButton, and RaisedButton, and there are also specific widgets for creating FloatingActionButtons and OutlineButtons. I randomly picked 🎲 the RaisedButton for us so that we can have a peek at how easy it is to add a nice, stylish button into our app:
RaisedButton( onPressed: () { print( "hi! it's me, the button, speaking via the console. over.", ); }, child: Text("press meeeeeee"), ),
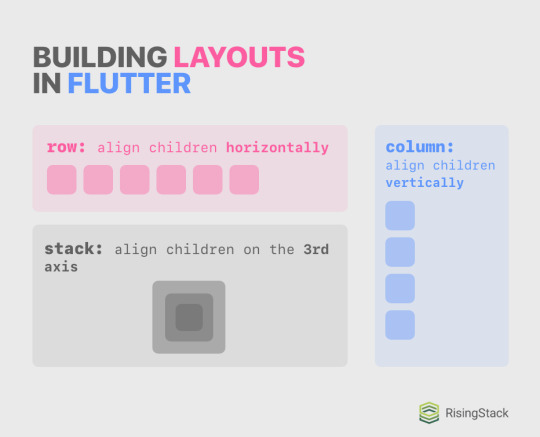
Building layouts in Flutter
When building flexible and complex layouts on the web and in React-Native, the most important tool you used was flexbox. While Flutter isn’t a web-based UI library and hence lacks flexbox, the main concept of using flexible containers with directions and whatnot is implemented and preferred in Flutter. It can be achieved by using Rows and Columns, and you can stack widgets on each other by using Stacks.
Consider the following cheatsheet I made:
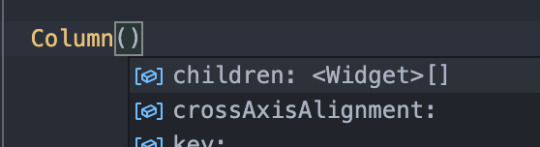
Remember how I previously praised typing the props of a widget and how it’s one of the best tools in Flutter’s declarative UI pattern? The Row, Column and Stack widgets all have a children property that want an array of widgets, or [Widget]. Lucky for you, the VS Code automatically completes the code for you once you start working with these widgets:
Just hit tab to let Code complete the code for you! Maybe in the future, you won’t need to write code at all, Flutter will just suck out the app idea out of your brain and compile that - but until then, get used to hitting tab.
Let’s look at an example where we display some names underneath each other:
Column( children: <Widget>[ Text("Mark"), Text("Imola"), Text("Martin"), Text("Zoe"), ], ),
You can see that you create a typed list with the <Widget>[] syntax, you pass it as a prop for the Column, create some amazing widgets inside the list, and boom! The children will be displayed underneath each other. Don’t believe me? Believe this amazing screenshot. 📸

Alignment
The real power of Columns and Rows isn’t just placing stuff next to each other, just like flexbox isn’t only about flex-direction either. In Flutter, you can align the children of a Column and Row on two axes, mainAxis and crossAxis.
These two properties are contextual: whilst in a Row, the main axis would be horizontal, and the crossing axis would be vertical, it would be switched in a Column. To help you better understand this axis concept, I created a handy cheat sheet with code examples and more.
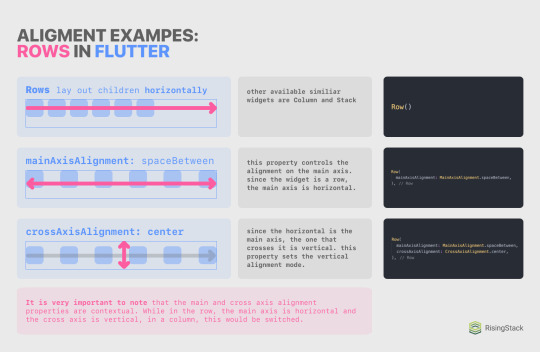
So, for example, if you want to perfectly center something, you’d want to use either the Center widget; or a Row or Column with both mainAxisAlignment and crossAxisAlignment set to .center; or a Row and Column with their mainAxisAlignments set to .center. The possibilities are basically endless with these widgets! ✨
Rendering lists (FlatLists 👉 ListViews)
Whilst thinking about possible use cases for columns, you may have wondered about creating scrollable, dynamic, reorderable, or endless lists.
While these features could be achieved by using Columns, it would take a lot of effort to do so, not even mentioning updating your list data or lazy rendering widgets when there’s a crapton of data. Lucky you, Flutter has a class for rendering lists of data, and it’s called a ListView!
There are several ways to use a ListView, but the most important ones are the ListView(...) widget and the ListView.builder method. Both of them achieve the very same functionality from the perspective of the user, but programmatically, they differ big time.
First, let’s look into the ListView(..) widget. Syntactically, they are very similar to a Column except that they lack the main and cross-axis alignment properties. To continue on with our previous example for columns when we placed names under each other, I’ll display the very same column converted into a ListView:
ListView( children: <Widget>[ Text("Mark"), Text("Imola"), Text("Martin"), Text("Zoe"), ], ),
Tada! 🎉 Your first ListView in Flutter! When refreshing or rebuilding the app (by either pressing a small or capital R in the Flutter CLI), you’ll see the very same thing you saw previously.
However, if you try to drag it, you are now able to scroll inside the container! Note that when a Column has bigger children than its bounds, it will overflow, but a ListView will be scrollable.
ListView builder
While the ListView widget is cool and good, it may not be suitable for every use case. For example, when displaying a list of tasks in a todo app, you won’t exactly know the number of items in your list while writing the code, and it may even change over time. Sure, you are able to run .map on the data source, return widgets as results, and then spread it with the ... operator, but that obviously wouldn’t be performant, nor is it a good practice for long lists. Instead, Flutter provides us a really nice ListView builder.
Sidenote: while working with Flutter, you’ll see the word “builder” a lot. For example, in places like FutureBuilder, StreamBuilder, AnimatedBuilder, the build method, the ListView builder, and more. It’s just a fancy word for methods that return a Widget or [Widget], don’t let this word intimidate or confuse you!
So how do we work with this awesome method? First, you should have an array or list that the builder can iterate over. I’ll quickly define an array with some names in it:
final List<String> source = ["Sarah", "Mac", "Jane", "Daniel"];
And then, somewhere in your widget tree, you should be able to call the ListView.builder method, provide some properties, and you’ll be good to go:
ListView.builder( itemCount: source.length, itemBuilder: (BuildContext context, int i) => Text(source[i]), ),
Oh, and notice how I was able to use an arrow function, just like in JavaScript!
The itemCount parameter is not required, but it’s recommended. Flutter will be able to optimize your app better if you provide this parameter. You can also limit the maximum number of rendered items by providing a number smaller than the length of your data source.
When in doubt, you can always have a peek at the documentation of a class, method, or widget by hovering over its name in your editor:

And that sums up the layout and list-related part of this episode. We’ll look into providing “stylesheets” (or theme data) for your app, look at some basic routing (or navigation) methods, and fetch some data from the interwebs with HTTP requests.
Theming in Flutter
While building larger applications with custom UI components, you may want to create stylesheets. In Flutter, they are called Themes, and they can be used in a lot of places. For example, you can set a default app color, and then the selected texts, buttons, ripple animations, and more will follow this color. You can also set up text styles (like headings and more), and you’ll be able to access these styles across the app.
To do so, you should provide a theme property for your MaterialApp at the root level of the application. Here’s an example:
return MaterialApp( title: 'RisingStack Flutter Demo', theme: ThemeData( // Define the default brightness and colors. brightness: Brightness.light, primaryColor: Colors.green[300], accentColor: Colors.green, // Define button theme buttonTheme: ButtonThemeData( buttonColor: Colors.green, shape: CircleBorder(), ), // Define the default font family // (this won’t work as we won’t have this font asset yet) fontFamily: 'Montserrat', // Define the default TextTheme. Use this to specify the default // text styling for headlines, titles, bodies of text, and more. textTheme: TextTheme( headline1: TextStyle(fontSize: 72.0, fontWeight: FontWeight.bold), headline6: TextStyle(fontSize: 36.0, fontStyle: FontStyle.italic), bodyText2: TextStyle(fontSize: 14.0, fontFamily: 'Muli'), ), ), home: Scaffold(...), );
These colors will be used throughout our app, and accessing the text themes is also simple as a pickle! I added a RaisedButton on top of the app so that we can see the new ButtonThemeData being applied to it:

It’s ugly and all, but it’s ours! 🍋 Applying the text style won’t be automatic, though. As we previously discussed, Flutter can’t really read your mind, so you explicitly need to tag Text widgets as a headline1 or bodyText2, for example.
To do so, you’ll use the Theme.of(context) method. This will look up the widget tree for the nearest Theme providing widget (and note that you can create custom or local themes for subparts of your app with the Theme widget!) and return that theme. Let’s look at an example:
Text( "cool names", style: Theme.of(context).textTheme.headline6, ),
You can see that we are accessing the theme with the Theme.of(context) method, and then we are just accessing properties like it’s an object. This is all you need to know about theming a Flutter app as it really isn’t a complex topic!
Designing mobile navigation experiences
On the web, when managing different screens of the app, we used paths (e.g. fancysite.com/registration) and routing (e.g., react-router) to handle navigating back and forth the app. In a mobile app, it works a bit differently, so I’ll first introduce you to navigation on mobile, and then we’ll look into implementing it in Flutter.
Mobile navigation differs from the web in a lot of ways. Gestures and animations play a very heavy role in structuring out the hierarchy of the app for your user. For example, when a user navigates to a new screen, and it slides in from the right side of the screen, the user will expect to be able to move back with a slide from the left. Users also don’t expect flashy loadings and empty screens when navigating - and even though there are advancements on the web in this segment (e.g. PWAs), it’s by far not the default experience when using websites.
There are also different hierarchies when designing mobile apps. The three main groups are:
Hierarchical Navigation (e.g. the Settings app on iOS)
New screens slide in from left to right. The expected behavior for navigating back is with a back button on the upper left corner and by swiping from the left edge of the screen to the right.
Flat Navigation (e.g. the Apple Music app)
The default behavior for this hierarchy is a tab bar on the bottom.
Tabs should always preserve location (e.g. if you navigate to a subscreen inside on tab one, switch to tab two and switch back to tab one, you’d expect to be on the subscreen, not on the root level screen.)
Swiping between tabs is optional. It isn’t the default behavior and it may conflict with other gestures on the screen itself - be cautious and think twice before implementing swipeable tab bars.
Custom, content-driven, or experimental navigation (Games, books and other content)
When making experimental navigation, always try to be sane with the navigation. The user should always be able to navigate back and undo stuff.
I created a handy cheat sheet for you that will remind you of the most important things when in doubt:
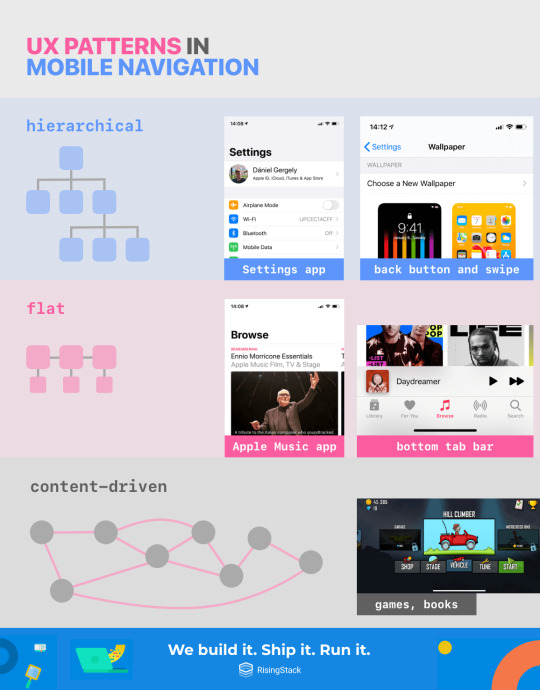
Also, all of these can be mixed together, and other screens like modals can be added to the stack. Always try to KISS and make sure that the user can always navigate back and undo things. Don’t try to reinvent the wheel with navigation (e.g., reverse the direction of opening up a new screen) as it will just confuse the user.
Also, always indicate where the user is in the hierarchy (e.g., with labeling buttons, app title bar, coloring the bottom bar icons, showing little dots, etc.). If you want to know more about designing mobile navigation experiences and implementing them in a way that feels natural to the user, check out Apple’s Human Interface Guideline’s related articles.

Navigation in Flutter
When routing on the web with React or React-Native, you had to depend on third-party libraries to get the dirty work done for you (e.g. react-router). Luckily, Flutter has native navigation capabilities out of the box, and they cover every need of most of the apps, and they are provided to you via the Navigator API.
The applications of this API and the possibilities to play around with navigation are endless. You can, for example, animate a widget between screens; build a bottom navigation bar or a hamburger menu; pass arguments; or send data back and forth. You can explore every navigation-related Flutter cookbook here. In this series, we’ll only look into initializing two screens, navigating between them, and sharing some widgets between them.
To get started with navigation, let’s create two widgets that we’ll use as screens and pass the first into a MaterialApp as the home property:
import 'package:flutter/material.dart'; void main() { runApp(MyApp()); } class MyApp extends StatelessWidget { @override Widget build(BuildContext context) { return MaterialApp( title: 'Flutter Demo', home: ScreenOne(), ); } } class ScreenOne extends StatelessWidget { @override Widget build(BuildContext context) { return Scaffold( body: Center( child: Text("hey! 👋"), ), ); } } class ScreenTwo extends StatelessWidget { @override Widget build(BuildContext context) { return Scaffold( body: Center( child: Text("hi! 👋👋"), ), ); } }
This was easy as a breeze. If you run this app in a simulator, you’ll see “hey! 👋” on the center of the screen. Now, inside the MaterialApp, we can define our routes:
return MaterialApp( title: 'Flutter Demo', home: ScreenOne(), routes: <String, WidgetBuilder>{ '/hey': (BuildContext context) => ScreenOne(), '/hi': (BuildContext context) => ScreenTwo(), }, );
Then, we’ll need something that will trigger the navigation. I’ll add a RaisedButton to the ScreenOne:
return Scaffold( body: Column( mainAxisAlignment: MainAxisAlignment.center, crossAxisAlignment: CrossAxisAlignment.center, children: <Widget>[ Text("hey! 👋"), RaisedButton( child: Text("take me there"), onPressed: () { print("hi!"); }, ), ], ), );
And now, we can navigate the user to the next screen when the button is pressed. Notice that I replaced the Center with a Column with both its main and cross axises centered. This was required because I wanted to have two children underneath each other: a Text and a RaisedButton. Inside the RaisedButton, we only have to push the route to the stack and let Flutter handle the routing and animation:
Navigator.pushNamed(context, '/hi');
By default, we can navigate back to the previous screen by swiping from the left edge of the screen. This is the expected behavior, and we don’t intend to change it, so we’ll leave it as it is. If you want to add a button on the second screen to navigate back to the first screen, you can use Navigator.pop(); method.
Don’t ever push to the same screen the user is on, nor the previous screen. Always use pop when navigating backward.
This will be just enough to cover your basic navigation needs. Don’t forget, if you want to check out more advanced navigation features such as animating widgets between screens or passing data back and forth, check out the related Flutter cookbooks.
Networking, HTTP requests
Now that you can build widgets, layouts, display lists, and you can navigate between screens with Flutter, there’s only one thing left: communicating with your backend API. One of the most popular BaaS providers for mobile and Flutter is Firebase by Google. It allows you to use real-time databases, push notifications, crash reporting, app analytics, and a lot more out of the box. You can find the Flutter Firebase packages on pub.dev or you can follow this step-by-step tutorial.
If you are a more experienced developer and you have a complex project with a custom backend in mind, or if you are just genuinely looking forward to using your own selection of backend APIs - Firebase just won’t suit your needs.
That’s where the http package comes in handy.
Just add it into your dependency list inside the pubspec.yaml, wait until flutter pub get finishes (VSCode automatically runs it for you if it detects changes in the pubspec.yaml), and then continue reading:
dependencies: flutter: sdk: flutter http: any
http is a Future-based library for making HTTP requests. To get started with it, just import it:
import 'package:http/http.dart' as http;
And then, you can start making requests with top-level methods like http.post or http.get. To help you experiment with making HTTP requests in Flutter, I have made a demo API that you can GET on. It will return some names and ages. You can access it here (https://demo-flutter-api.herokuapp.com/people).
Parsing JSON data in Flutter and Dart
After making your GET request on the API, you’ll be able to get data out of it by accessing properties like this:
void request() async { final response = await http.get("https://demo-flutter-api.herokuapp.com/people"); print(response.body); // => [{"name":"Leo","age":17},{"name":"Isabella","age":30},{"name":"Michael","age":23},{"name":"Sarah","age":12}] print(json.decode(response.body)[0]["name"]); // => Leo }
However, this solution should not be used in production. Not only it lacks automatic code completion and developer tooling, but it’s very error-prone and not really well documented. It’s just straight-up crap coding. 💩
Instead, you should always create a Dart class with the desired data structure for your response object and then process the raw body into a native Dart object. Since we are receiving an array of objects, in Dart, we’ll create a typed List with a custom class. I’ll name the class Person, and it will have two properties: a name (with a type of String) and age (int). I’ll also want to define a .fromJson constructor on it so that we can set up our class to be able to construct itself from a raw JSON string.
First, you’ll want to import dart:convert to access native JSON-related methods like a JSON encoder and decoder:
import 'dart:convert';
Create our very basic class:
class Person { String name; int age; }
Extend it with a simple constructor:
Person({this.name, this.age});
And add in the .fromJson method, tagged with the factory keyword. This keyword informs the compiler that this isn’t a method on the class instance itself. Instead, it will return a new instance of our class:
factory Person.fromJson(String str) => Person.fromMap(json.decode(str)); factory Person.fromMap(Map<String, dynamic> json) => new Person( name: json["name"], age: json["age"], );
Notice that I created two separate methods: a fromMap and a fromJson. The fromMap method itself does the dirty work by deconstructing the received Map. The fromJson just parses our JSON string and passes it into the fromMap factory method.
Now, we should just map over our raw response, use the .fromMap factory method, and expect everything to go just fine:
List<Person> listOfPeople = json .decode(response.body) .map<Person>((i) => Person.fromMap(i)) .toList(); print(listOfPeople[0].name); // => Leo
Sidenote: I didn’t use the .fromJson method because we already parsed the body before mapping over it, hence it’s unneeded right now.
There is a lot to unwrap in these few lines! First, we define a typed list and decode the response.body. Then, we map over it, and we throw in the return type <Person> to the map so that Dart will know that we expect to see a Person as a result of the map function. Then, we convert it to a List as otherwise it would be an MappedListIterable.
Rendering the parsed JSON: FutureBuilder and ListView.builder
Now that we have our app up and running with our basic backend, it’s time to render our data. We already discussed the ListView.builder API, so we’ll just work with that.
But before we get into rendering the list itself, we want to handle some state changes: the response may be undefined at the moment of rendering (because it is still loading), and we may get an error as a response. There are several great approaches to wrap your head around handling these states, but we’ll use FutureBuilder now for the sake of practicing using new Flutter widgets.
FutureBuilder is a Flutter widget that takes a Future and a builder as a property. This builder will return the widget we want to render on the different states as the Future progresses.
Note that FutureBuilder handles state changes inside the widget itself, so you can still use it in a StatelessWidget! Since the http package is Future-based, we can just use the http.get method as the Future for our FutureBuilder:
@override Widget build(BuildContext context) { return Scaffold( body: FutureBuilder( future: http.get("https://demo-flutter-api.herokuapp.com/people"), ), ); }
And we should also pass a builder. This builder should be able to respond to three states: loading, done and error. At first, I’ll just throw in a centered CircularProgressIndicator() to see that our app renders something:
return Scaffold( body: FutureBuilder( future: http.get("https://demo-flutter-api.herokuapp.com/people"), builder: (BuildContext context, AsyncSnapshot<http.Response> response) { return Center( child: CircularProgressIndicator(), ); }, ), );
If you run this app, you’ll see a progress indicator in the center of the screen running indefinitely. We can get the state of the response by the response.hasData property:
builder: (BuildContext context, AsyncSnapshot<http.Response> response) { if (response.hasData) { // loaded! } else if (response.hasError) { // error! return Center( child: Text("error!"), ); } else { // loading... return Center( child: CircularProgressIndicator(), ); } },
And now, we can be sure that nothing comes between us and processing, then rendering the data, so inside the response.hasData block, we’ll process the raw response with previously discussed parsing and mapping method, then return a ListView.builder:
// loaded! List<Person> listOfPeople = json .decode(response.data.body) .map<Person>((i) => Person.fromMap(i)) .toList(); return ListView.builder( itemCount: listOfPeople.length, itemBuilder: (BuildContext context, int i) => Text( "${listOfPeople[i].name} (${listOfPeople[i].age})", ), );
And that’s it! 🎉 If you run this snippet right now, it will render four names and their corresponding ages next to them. Isn’t this amazing? It may have seemed like a lot of work for a simple list like this, but don’t forget that we created a whole-blown class, parsed JSON, and converted it into class instances, and we even handled loading and error states.
Summing it all up
Congratulations on making it this far into the course! You have learned a lot and came along a long way since we started in the previous episode.
You went from zero to hero both with Dart (types, control flow statements, data structures, OOP, and asynchrony) and Flutter (CLI, widgets, alignment, lists, themes, navigation and networking).
This really has been a lot of work, and you’ll still have to learn a lot until you get fluent in Flutter, but in the end, the only thing that will matter is the result of your hard work. And that’s what we’re going to harvest in the next and last episode of this Flutter series: we’ll build a fun mini-game with Flutter! 🎲
I’m really looking forward to seeing you here next week. Until then, stay tuned, and happy Fluttering! ✌️
All the bests, 🍻 Daniel from RisingStack
Flutter Crash Course for JavaScript Developers published first on https://koresolpage.tumblr.com/
0 notes
Text
Web Design – A Quick Guide for Beginners
So you're pondering getting more into the entire website composition schtick? All things considered, it's very worth Digital Marketing Agencies Sheffield reconsidering a portion of the nuts and bolts before you choose to make a plunge. Have no dread, in any case, in light of the fact that in this blog entry I will translate all the fundamental necessities you have to remember when planning your site.
Arrangement, Margins and Rules
So how about we bounce straight in. In the event that you've at any point done any website architecture work whatsoever, at that point you'll know wireframes are an absolute necessity. They help you portray where the substance goes and how the general site structure will look. Well that is all okay, yet is there anything to consider if it's simply wireframes? That is to say, there's not actually much as far as configuration is there?
Be that as it may, while making a site, having a solid arrangement is essential. Why? Indeed, that is on the grounds that it makes content simpler for individuals to peruse and makes more harmony among substance and blank area.
So how would I do that? Indeed, I'm happy you inquired. It's in every case great to set some type of rules set up to guarantee all your substance is kept spotless, organized, and attractive. In the mockup beneath, you can see the network lines used to help recognize the edge of the site.
wireframes
Presently, it is not necessarily the case that everything ought to consistently be kept in the edges. This is even more a format to help make your structure look neater. Things, for example, foundation shapes, pictures, and pennants can be somewhat overlooked as these components are a greater amount of an emphasize to the plan, not an auxiliary component. There are different aides you can download for both Sketch and Photoshop which I assurance will support any learner. Here are a couple of rule bundles:
Void area
I'm beginning this area by expressing the self-evident. Void area doesn't really mean a space which is white.
Blank area is something that can be genuinely emotional. Some may state you can never have enough blank area, while others state it makes your site look plain. All things considered, I for one trust you can never have excessively. Long story short, blank area is a decent method of inciting more thoughtfulness regarding your picked component and making more significance to it. Investigate this model from Squarespace.
white spaceThis screen capture gives a solid, away from of how whitespace can be utilized to cause to notice the picked segment and propose more significance to it. Here are a couple of other genuine instances of blank area utilization.
Substance, and How To Keep Things Simple
Since we've secured the blank area, it's presumably worth referencing duplicate. Duplicate is essentially another term for the substance composed on the page. Furthermore, in spite of the fact that it might appear as though that has nothing to do with the architect, it really does.
Having an excess of duplicate in one region can make the page look jumbled and indistinguishable. On the off chance that you need your area to stick out, it's important that a little passage of text can fill precisely the same need as a large portion of a book of text.
Investigate the screen capture from Squarespace once more. Notice how there are just three lines of passage text spent? That is on the grounds that they need to incite a message through a fast, straightforward section so the client essentially doesn't get exhausted. So long story short, keep your substance little.
Stages – Expectations versus Reality
Right, how about we proceed onward to a portion of the limitations you may confront. Presently, in case you're a planner as of now and you've had the advantage of utilizing WordPress, or some other CMS so far as that is concerned, at that point you most likely know there are a reasonable not many limitations. Notwithstanding, for those uncultured in the CMS world, it's important that not all that you need to remember for your plan is really conceivable.
WordPress, for instance, is an incredible stage to use for building any site. It offers a crazy number of various highlights, subjects, modules, and substantially more. Be that as it may, it's not generally as exact as you might want it to be. Things like foundation components and site structure can shift contingent upon the subject you're utilizing, so I enthusiastically suggest taking a gander at what framework you will use before you jump into the plan work.
I've really composed a blog entry about utilizing WordPress for amateurs on the off chance that you need to look at it.
The good to this story is to consistently check what subject you will use before you plunge into the structure segment. The quantity of issues you could confront when attempting to execute unthinkable highlights on a site is going to cause you much more work, significantly more pressure, and significantly additional time. So be accommodating.
As a matter of fact, while we're on the point, here are two or three sweet subjects for WordPress that are entirely acceptable with regards to customisation. In any case, as usual, on the off chance that you need quality, it includes some major disadvantages.
Photoshop and Sketch – Which Design Software to Use?
Sketch
How about we start with the newcomer. Sketch is generally new in the structure business. As indicated by Sketch's site, the main update of Sketch was discharged fourteenth April 2014, yet different sources state it was discharged seventh September 2010. Be that as it may, don't be tricked by its age, it's still genuinely pressing some punch.
Sketch is ideal for introducing structures. With the capacity to see in HTML position, you can see a live see of the webpage in a program window, permitting you to see to a greater extent a continuous look of the site.
Furthermore, Sketch can likewise be considered as a speedier stage for structure as it permits you to make custom formats for your site. So as opposed to replicating your "Header-1" record from report to archive as you do in Photoshop, you can essentially add a custom layout to drop into any artboard you please.
So what else does Sketch bring to the table? All things considered, in case you're a first-time fashioner, view yourself as favored. The (UI) is very easy to utilize. I can hand on heart state it took me around two days to feel sure with it. Just as this, you can likewise discover moving from Photoshop to Sketch incredibly simple as both UIs have a ton of similitudes, which is a saucy little reward.
Notwithstanding, this product has one colossal disadvantage that all you Apple haters won't be excessively satisfied about, and at this point I can envision you definitely recognize what it is. That's right, it's for Mac OS as it were. No Windows, no Linux, just Mac OS.
As per Sketch themselves, they expressed they aren't anticipating supporting some other working framework separated from Mac OS due to the "advances and structures restrictive to OS X". Along these lines, just clients with an Apple figuring item can download the application, which is presumably the greatest downside for any product ever. Yet, hello, such is reality.
Photoshop
Presently, how about we view the granddad of plan. Since the get-go itself (1990), one programming has consistently been available (not so much). Photoshop. This product has been utilized for as long as 28 years in the plan business. Also, it's quite evident why. Truly anything should be possible in Photoshop. Website architecture, application plan, banner structure, marking, photograph altering, everything.
So let me know, why use something else to Photoshop? All things considered, that is altogether down to you. On the off chance that you like Photoshop and you're glad utilizing it, at that point carry on as you seem to be. Photoshop is an awesome stage for configuration, offering components including different changing strategies and 3D creation instruments that you most likely didn't have any acquaintance with it had.
As far as highlights, Photoshop commands the market by storm. Since this product is an inside and out plan stage, you can make essentially anything in it. This makes it ideal for website architecture as it offers all that you requirement for a strong plan, to say the very least. You can make the ideal structure of your site, sprinkle it with typography, include some photograph altering, and slap a spoonful of illustrations you drew up on there and blast, new web composition.
Presently, there's nothing saying you can't do precisely the same thing with Sketch, yet toward the day's end, the stage is absolutely down to client inclination. I'll by and by be adhering to PhotoShop (on the grounds that I have windows yeehaw), yet we additionally use Sketch at Bowler Hat, so there's no genuine set in stone with this one.
Marking Guidelines
OK, so now the entirety of that is off the beaten path, we should concentrate on marking rules. Any business will have some type of marking or brand rules. You may have been sent from God him/herself, and have just a couple of marking hues. Bangin'.
Then again, you may have numerous brand hues and concluding how you will consolidate each of the 612 distinct varieties of pink and red into your structure will be a test (simply remember that these ought to be highlight hues).
Fundamentally, don't go slapping a splendid pink foundation on your site with lime green accents completely through. Keep things straightforward. Have a white foundation and set one as a feature shading and the different as an emphasize. We utilize different hues quite well at Bowler Hat to help recognize each assistance, so in the event that you need motivation, simply fly over to our landing page.
Read Also:- “Domain name scam”, what is it, and how it works?

End
Right, how about we have a speedy recap: arrangement is vital, blank area is vital, keep your duplicate basic, recollect what CMS you're utilizing (in the event that you are utilizing one), choose what stage you're planning on, follow brand rules, and, for the good of god, don't utilize Comic Sans (I'm imploring you). One thing to consistently remember, in any case, is that your structure is never going to be ideal the first run through around and changing the entire plan after some time is totally typical for any planner.
Ideally, this blog gave you some understanding into the entire website composition thing, however for more assistance, download our site arranging guide for a more intensive glance at Digital Marketing Company in Sheffield all that you have to consider when arranging a site, or connect today to get familiar with our web architecture administrations and let us do the hard structure work for you.
Follow US:- Facebook, Twitter, LinkedIn , YouTube
0 notes
Text
Updating an ASP.NET Core 2.2 Web Site to .NET Core 3.1 LTS
Now that .NET Core 3.1 is out jus this last week and it is a "LTS" or Long Term Support version, I thought it'd be a good time to update my main site and my podcast to .NET 3.1. You can read about what LTS means but quite simply it's that "LTS releases are supported for three years after the initial release."
I'm not sure about you, but for me, when I don't look at some code for a few months - in this case because it's working just fine - it takes some time for the context switch back in. For my podcast site and main site I honestly have forgotten what version of .NET they are running on.
Updating my site to .NET Core 3.1
First, it seems my main homepage is NET Core 2.2. I can tell because the csproj has a "TargetFramework" of netcoreapp2.2. So I'll start at the migration docs here to go from 2.2 to 3.0. .NET Core 2.2 reaches "end of life" (support) this month so it's a good time to update to the 3.1 version that will be supported for 3 years.
Here's my original csproj
<Project Sdk="Microsoft.NET.Sdk.Web"> <PropertyGroup> <TargetFramework>netcoreapp2.2</TargetFramework> <AspNetCoreHostingModel>InProcess</AspNetCoreHostingModel> <RootNamespace>hanselman_core</RootNamespace> </PropertyGroup> <ItemGroup> <PackageReference Include="Microsoft.AspNetCore.App" /> <PackageReference Include="Microsoft.AspNetCore.Razor.Design" Version="2.2.0" PrivateAssets="All" /> <PackageReference Include="Microsoft.VisualStudio.Web.CodeGeneration.Design" Version="2.2.3" /> </ItemGroup> <ItemGroup> <None Update="IISUrlRewrite.xml"> <CopyToOutputDirectory>PreserveNewest</CopyToOutputDirectory> </None> </ItemGroup> </Project>
and my 3.0 updated csproj. You'll note that most of it is deletions. Also note that I have a custom IISUrlRewrite.xml that I want to make sure gets to a specific place. You'll likely not have anything like this, but be aware.
<Project Sdk="Microsoft.NET.Sdk.Web"> <PropertyGroup> <TargetFramework>netcoreapp3.1</TargetFramework> <RootNamespace>hanselman_core</RootNamespace> </PropertyGroup> <ItemGroup> <None Update="IISUrlRewrite.xml"> <CopyToOutputDirectory>PreserveNewest</CopyToOutputDirectory> </None> </ItemGroup> </Project>
Some folks are more little methodical about this, upgrading first to 3.0 and then to 3.1. You can feel free to jump all the way if you want. In this case the main breaking changes are from 2.x to 3.x so I'll upgrade the whole thing all in one step.
I compile and run and get an error "InvalidOperationException: Endpoint Routing does not support 'IApplicationBuilder.UseMvc(...)'. To use 'IApplicationBuilder.UseMvc' set 'MvcOptions.EnableEndpointRouting = false' inside 'ConfigureServices(...)." so I'll keep moving through the migration guide, as things change in major versions.
Per the docs, I can remove using Microsoft.AspNetCore.Mvc; and add using Microsoft.Extensions.Hosting; as IHostingEnvironment becomes IWebHostEnvironment. Since my app is a Razor Pages app I'll add a call to servicesAddRazorPages(); as well as calls to UseRouting, UseAuthorization (if needed) and most importantly, moving to endpoint routing like this in my Configure() call.
app.UseRouting(); app.UseEndpoints(endpoints => { endpoints.MapRazorPages(); });
I also decide that I wanted to see what version I was running on, on the page, so I'd be able to better remember it. I added this call in my _layout.cshtml to output the version of .NET Core I'm using at runtime.
<div class="copyright">© Copyright @DateTime.Now.Year, Powered by @System.Runtime.InteropServices.RuntimeInformation.FrameworkDescription</div>
In order versions of .NET, you couldn't get exactly what you wanted from RuntimeInformation.FrameworkDescription, but it works fine in 3.x so it's perfect for my needs.
Finally, I notice that I was using my 15 year old IIS Rewrite Rules (because they work great) but I was configuring them like this:
using (StreamReader iisUrlRewriteStreamReader = File.OpenText(Path.Combine(env.ContentRootPath, "IISUrlRewrite.xml"))) { var options = new RewriteOptions() .AddIISUrlRewrite(iisUrlRewriteStreamReader); app.UseRewriter(options); }
And that smells weird to me. Turns out there's an overload on AddIISUrlRewrite that might be better. I don't want to be manually opening up a text file and streaming it like that, so I'll use an IFileProvider instead. This is a lot cleaner and I can remove a using System.IO;
var options = new RewriteOptions() .AddIISUrlRewrite(env.ContentRootFileProvider, "IISUrlRewrite.xml"); app.UseRewriter(options);
I also did a little "Remove and Sort Usings" refactoring and tidied up both Program.cs and Startup.cs to the minimum and here's my final complete Startup.cs.
using Microsoft.AspNetCore.Builder; using Microsoft.AspNetCore.Hosting; using Microsoft.AspNetCore.Rewrite; using Microsoft.Extensions.Configuration; using Microsoft.Extensions.DependencyInjection; using Microsoft.Extensions.Hosting; namespace hanselman_core { public class Startup { public Startup(IConfiguration configuration) { Configuration = configuration; } public IConfiguration Configuration { get; } // This method gets called by the runtime. Use this method to add services to the container. public void ConfigureServices(IServiceCollection services) { services.AddHealthChecks(); services.AddRazorPages().AddRazorPagesOptions(options => { options.Conventions.AddPageRoute("/robotstxt", "/Robots.Txt"); }); services.AddMemoryCache(); } // This method gets called by the runtime. Use this method to configure the HTTP request pipeline. public void Configure(IApplicationBuilder app, IWebHostEnvironment env) { if (env.IsDevelopment()) { app.UseDeveloperExceptionPage(); } else { app.UseExceptionHandler("/Error"); app.UseHsts(); } app.UseHealthChecks("/healthcheck"); var options = new RewriteOptions() .AddIISUrlRewrite(env.ContentRootFileProvider, "IISUrlRewrite.xml"); app.UseRewriter(options); app.UseHttpsRedirection(); app.UseDefaultFiles(); app.UseStaticFiles(); app.UseRouting(); app.UseEndpoints(endpoints => { endpoints.MapRazorPages(); }); } } }
And that's it. Followed the migration, changed a few methods and interfaces, and ended up removing a half dozen lines of code and in fact ended up with a simpler system. Here's the modified files for my update:
❯ git status On branch main Your branch is up to date with 'origin/main'. Changes not staged for commit: (use "git add <file>..." to update what will be committed) (use "git restore <file>..." to discard changes in working directory) modified: Pages/Index.cshtml.cs modified: Pages/Shared/_Layout.cshtml modified: Program.cs modified: Startup.cs modified: hanselman-core.csproj
Updating the Web Site in Azure App Service and Azure DevOps
That all works locally, so I'll check in in and double check my Azure App Service Plan and Azure DevOps Pipeline to make sure that the staging - and then production - sites are updated.
ASP.NET Core apps can rely on a runtime that is already installed in the Azure App Service or one can do a "self contained" install. My web site needs .NET Core 3.1 (LTS) so ideally I'd change this dropdown in General Settings to get LTS and get 3.1. However, this only works if the latest stuff is installed on Azure App Service. At some point soon in the future .NET Core 3.1 will be on Azure App Service for Linux but it might be a week or so. At the time of this writing LTS is still 2.2.7 so I'll do a self-contained install which will take up more disk space but will be more reliable for my needs and will allow me full controll over versions.
I am running this on Azure App Service for Linux so it's running in a container. It didn't startup so I checked the logs at startup via the Log Stream and it says that the app isn't listening on Port 8080 - or at least it didn't answer an HTTP GET ping.
I wonder why? Well, I scrolled up higher in the logs and noted this error:
2019-12-10T18:21:25.138713683Z The specified framework 'Microsoft.AspNetCore.App', version '3.0.0' was not found.
Oops! Did I make sure that my csproj was 3.1? Turns out I put in netcoreapp3.0 even though I was thinking 3.1! I updated and redeployed.
It's important to make sure that your SDK - the thing that builds - lines up with the the runtime version. I have an Azure DevOps pipeline that is doing the building so I added a "use .NET Core SDK" task that asked for 3.1.100 explicitly.
Again, I need to make sure that my Pipeline includes that self-contained publish with a -r linux-x64 parameter indicating this is the runtime needed for a self-contained install.
Now my CI/CD pipeline is building for 3.1 and I've set my App Service to run on 3.1 by shipping 3.1 with my publish artifact. When .NET Core 3.1 LTS is released on App Service I can remove this extra argument and rely on the Azure App Service to manage the runtime.
All in all, this took about an hour and a half. Figure a day for your larger apps. Now I'll spend another hour (likely less) to update my podcast site.
Sponsor: Like C#? We do too! That’s why we've developed a fast, smart, cross-platform .NET IDE which gives you even more coding power. Clever code analysis, rich code completion, instant search and navigation, an advanced debugger... With JetBrains Rider, everything you need is at your fingertips. Code C# at the speed of thought on Linux, Mac, or Windows. Try JetBrains Rider today!
© 2019 Scott Hanselman. All rights reserved.


Updating an ASP.NET Core 2.2 Web Site to .NET Core 3.1 LTS published first on https://deskbysnafu.tumblr.com/
0 notes
Text
Updating an ASP.NET Core 2.2 Web Site to .NET Core 3.1 LTS
Now that .NET Core 3.1 is out jus this last week and it is a "LTS" or Long Term Support version, I thought it'd be a good time to update my main site and my podcast to .NET 3.1. You can read about what LTS means but quite simply it's that "LTS releases are supported for three years after the initial release."
I'm not sure about you, but for me, when I don't look at some code for a few months - in this case because it's working just fine - it takes some time for the context switch back in. For my podcast site and main site I honestly have forgotten what version of .NET they are running on.
Updating my site to .NET Core 3.1
First, it seems my main homepage is NET Core 2.2. I can tell because the csproj has a "TargetFramework" of netcoreapp2.2. So I'll start at the migration docs here to go from 2.2 to 3.0. .NET Core 2.2 reaches "end of life" (support) this month so it's a good time to update to the 3.1 version that will be supported for 3 years.
Here's my original csproj
<Project Sdk="Microsoft.NET.Sdk.Web"> <PropertyGroup> <TargetFramework>netcoreapp2.2</TargetFramework> <AspNetCoreHostingModel>InProcess</AspNetCoreHostingModel> <RootNamespace>hanselman_core</RootNamespace> </PropertyGroup> <ItemGroup> <PackageReference Include="Microsoft.AspNetCore.App" /> <PackageReference Include="Microsoft.AspNetCore.Razor.Design" Version="2.2.0" PrivateAssets="All" /> <PackageReference Include="Microsoft.VisualStudio.Web.CodeGeneration.Design" Version="2.2.3" /> </ItemGroup> <ItemGroup> <None Update="IISUrlRewrite.xml"> <CopyToOutputDirectory>PreserveNewest</CopyToOutputDirectory> </None> </ItemGroup> </Project>
and my 3.0 updated csproj. You'll note that most of it is deletions. Also note that I have a custom IISUrlRewrite.xml that I want to make sure gets to a specific place. You'll likely not have anything like this, but be aware.
<Project Sdk="Microsoft.NET.Sdk.Web"> <PropertyGroup> <TargetFramework>netcoreapp3.1</TargetFramework> <RootNamespace>hanselman_core</RootNamespace> </PropertyGroup> <ItemGroup> <None Update="IISUrlRewrite.xml"> <CopyToOutputDirectory>PreserveNewest</CopyToOutputDirectory> </None> </ItemGroup> </Project>
Some folks are more little methodical about this, upgrading first to 3.0 and then to 3.1. You can feel free to jump all the way if you want. In this case the main breaking changes are from 2.x to 3.x so I'll upgrade the whole thing all in one step.
I compile and run and get an error "InvalidOperationException: Endpoint Routing does not support 'IApplicationBuilder.UseMvc(...)'. To use 'IApplicationBuilder.UseMvc' set 'MvcOptions.EnableEndpointRouting = false' inside 'ConfigureServices(...)." so I'll keep moving through the migration guide, as things change in major versions.
Per the docs, I can remove using Microsoft.AspNetCore.Mvc; and add using Microsoft.Extensions.Hosting; as IHostingEnvironment becomes IWebHostEnvironment. Since my app is a Razor Pages app I'll add a call to servicesAddRazorPages(); as well as calls to UseRouting, UseAuthorization (if needed) and most importantly, moving to endpoint routing like this in my Configure() call.
app.UseRouting(); app.UseEndpoints(endpoints => { endpoints.MapRazorPages(); });
I also decide that I wanted to see what version I was running on, on the page, so I'd be able to better remember it. I added this call in my _layout.cshtml to output the version of .NET Core I'm using at runtime.
<div class="copyright">© Copyright @DateTime.Now.Year, Powered by @System.Runtime.InteropServices.RuntimeInformation.FrameworkDescription</div>
In order versions of .NET, you couldn't get exactly what you wanted from RuntimeInformation.FrameworkDescription, but it works fine in 3.x so it's perfect for my needs.
Finally, I notice that I was using my 15 year old IIS Rewrite Rules (because they work great) but I was configuring them like this:
using (StreamReader iisUrlRewriteStreamReader = File.OpenText(Path.Combine(env.ContentRootPath, "IISUrlRewrite.xml"))) { var options = new RewriteOptions() .AddIISUrlRewrite(iisUrlRewriteStreamReader); app.UseRewriter(options); }
And that smells weird to me. Turns out there's an overload on AddIISUrlRewrite that might be better. I don't want to be manually opening up a text file and streaming it like that, so I'll use an IFileProvider instead. This is a lot cleaner and I can remove a using System.IO;
var options = new RewriteOptions() .AddIISUrlRewrite(env.ContentRootFileProvider, "IISUrlRewrite.xml"); app.UseRewriter(options);
I also did a little "Remove and Sort Usings" refactoring and tidied up both Program.cs and Startup.cs to the minimum and here's my final complete Startup.cs.
using Microsoft.AspNetCore.Builder; using Microsoft.AspNetCore.Hosting; using Microsoft.AspNetCore.Rewrite; using Microsoft.Extensions.Configuration; using Microsoft.Extensions.DependencyInjection; using Microsoft.Extensions.Hosting; namespace hanselman_core { public class Startup { public Startup(IConfiguration configuration) { Configuration = configuration; } public IConfiguration Configuration { get; } // This method gets called by the runtime. Use this method to add services to the container. public void ConfigureServices(IServiceCollection services) { services.AddHealthChecks(); services.AddRazorPages().AddRazorPagesOptions(options => { options.Conventions.AddPageRoute("/robotstxt", "/Robots.Txt"); }); services.AddMemoryCache(); } // This method gets called by the runtime. Use this method to configure the HTTP request pipeline. public void Configure(IApplicationBuilder app, IWebHostEnvironment env) { if (env.IsDevelopment()) { app.UseDeveloperExceptionPage(); } else { app.UseExceptionHandler("/Error"); app.UseHsts(); } app.UseHealthChecks("/healthcheck"); var options = new RewriteOptions() .AddIISUrlRewrite(env.ContentRootFileProvider, "IISUrlRewrite.xml"); app.UseRewriter(options); app.UseHttpsRedirection(); app.UseDefaultFiles(); app.UseStaticFiles(); app.UseRouting(); app.UseEndpoints(endpoints => { endpoints.MapRazorPages(); }); } } }
And that's it. Followed the migration, changed a few methods and interfaces, and ended up removing a half dozen lines of code and in fact ended up with a simpler system. Here's the modified files for my update:
❯ git status On branch main Your branch is up to date with 'origin/main'. Changes not staged for commit: (use "git add <file>..." to update what will be committed) (use "git restore <file>..." to discard changes in working directory) modified: Pages/Index.cshtml.cs modified: Pages/Shared/_Layout.cshtml modified: Program.cs modified: Startup.cs modified: hanselman-core.csproj
Updating the Web Site in Azure App Service and Azure DevOps
That all works locally, so I'll check in in and double check my Azure App Service Plan and Azure DevOps Pipeline to make sure that the staging - and then production - sites are updated.
ASP.NET Core apps can rely on a runtime that is already installed in the Azure App Service or one can do a "self contained" install. My web site needs .NET Core 3.1 (LTS) so ideally I'd change this dropdown in General Settings to get LTS and get 3.1. However, this only works if the latest stuff is installed on Azure App Service. At some point soon in the future .NET Core 3.1 will be on Azure App Service for Linux but it might be a week or so. At the time of this writing LTS is still 2.2.7 so I'll do a self-contained install which will take up more disk space but will be more reliable for my needs and will allow me full controll over versions.
I am running this on Azure App Service for Linux so it's running in a container. It didn't startup so I checked the logs at startup via the Log Stream and it says that the app isn't listening on Port 8080 - or at least it didn't answer an HTTP GET ping.
I wonder why? Well, I scrolled up higher in the logs and noted this error:
2019-12-10T18:21:25.138713683Z The specified framework 'Microsoft.AspNetCore.App', version '3.0.0' was not found.
Oops! Did I make sure that my csproj was 3.1? Turns out I put in netcoreapp3.0 even though I was thinking 3.1! I updated and redeployed.
It's important to make sure that your SDK - the thing that builds - lines up with the the runtime version. I have an Azure DevOps pipeline that is doing the building so I added a "use .NET Core SDK" task that asked for 3.1.100 explicitly.
Again, I need to make sure that my Pipeline includes that self-contained publish with a -r linux-x64 parameter indicating this is the runtime needed for a self-contained install.
Now my CI/CD pipeline is building for 3.1 and I've set my App Service to run on 3.1 by shipping 3.1 with my publish artifact. When .NET Core 3.1 LTS is released on App Service I can remove this extra argument and rely on the Azure App Service to manage the runtime.
All in all, this took about an hour and a half. Figure a day for your larger apps. Now I'll spend another hour (likely less) to update my podcast site.
Sponsor: Like C#? We do too! That’s why we've developed a fast, smart, cross-platform .NET IDE which gives you even more coding power. Clever code analysis, rich code completion, instant search and navigation, an advanced debugger... With JetBrains Rider, everything you need is at your fingertips. Code C# at the speed of thought on Linux, Mac, or Windows. Try JetBrains Rider today!
© 2019 Scott Hanselman. All rights reserved.


Updating an ASP.NET Core 2.2 Web Site to .NET Core 3.1 LTS published first on http://7elementswd.tumblr.com/
0 notes
Text
Tutorial:Asp.Net Core Razor Pages
New Post has been published on https://is.gd/KExn2W
Tutorial:Asp.Net Core Razor Pages

Asp.Net Core Razor Pages
What are Asp.Net Core Razor Pages in asp.net core?
Asp razor pages are page focused framework for building a dynamic data-driven application. These razor pages are built on top of asp.net core framework so it is cross-platform.
The asp.net core razor pages are the recommended framework for building cross-platform server-side Html. It uses the C# programming language.
As razor pages cross-platform support you can develop anywhere and can be published on Unix, Mac, and Linux also.
Asp.Net Core Razor Pages who will use?
It is for beginner level developers to enterprize level applications also. It is mainly page centric development model, which means it offerenig some familiar experience to a developer who already works PHP, classic asp and JSP developers, asp.net webform developers. It is also very easy to learn for beginners.
Asp.Net Core Razor Pages Project Selection:
Use Visual Studio 2019 Community edition – https://visualstudio.microsoft.com/vs/community/
To install use this link and download setup and install on your machine.
After opening this use below image to select the asp.net core project.

Asp.Net Core Web Application – 1

Asp.Net Core Web Application – 2

Asp.Net Core Web Application – 3
This template is to create an asp.net application using Razor pages. For this, do not select an authentication method.

Asp.Net Core Web Application – 4
The primary difference between MVC project structure and Razor pages structure is that in Razor pages we don’t have Model-View-Controller folders like regular MVC application.
First Run of the project looks like below

Asp.Net Core Web Application-run project – 1
The arrow we marked, when you click on this link highlighted pages are served.
Razor page has page extension cshtml and the first cs is for C# as a programming language and for Html is Html.
Razor Pages are a combination of 2 files. It will show.
A page with .cshtml extension- this file means display template
Second file is .cshtml.cs file which is code file

razor page structure
A file with .cshtml extension
If you see this file it is not very different from asp.net core view file but there is one difference which makes this page different is @page directive at starting of this page.
This @page directive tells that it is razor page.

cshtml in razor page
After this directive, we have a @model directive as the name implies IndexModel is model for that page.

page model in razor page
This IndexModel is corresponding page model class which resides in .cshtml.cs file. The name of the class is the same name as given in the razor page index.

model binding in razor pages
Now we can see the IndexModel cs file, below is auto-generated code for this file in which logging service is injected in a class by using dependency injection(constructor injection). Also in this class other features of MVC like model binding, model validation also supported.
using Microsoft.AspNetCore.Mvc.RazorPages; using Microsoft.Extensions.Logging; namespace asprazorpage.Pages public class IndexModel : PageModel private readonly ILogger<IndexModel> _logger; public IndexModel(ILogger<IndexModel> logger) _logger = logger; public void OnGet()

logging service dependency injection
In the above code or image, you can see the OnGet method. This OnGet method is called when we issued a Get request to that page OnGet Method is called. Means OnGet method handles https get requests.
How to use property declared in cs file in cshtml page in asp razor pages?
See below image we create a public property in IndexModel class and by using @Model.Message you can access this. In this Message is our property name and by using @Model you are able to access in .cshtml page also.

Property of model class bind to cshtml view in razor pages
Key Points To Remember About Asp.Net Core Razor Pages
In MVC we have model-view-controller and in razor pages, we only have 2 component one is .cshtml which display template and another is page model class. The page model class working as both controller and model. To elaborate this we have the public void OnGet() method which is worked as controller action and property in that classwork as a model.
This is new technology, which is used to build a page focus web application quickly.
Asp razor pages are lightweight, flexible and by using this you can build websites more quickly because it provides full control over Html to Developer.
In the primary point of view, asp razor pages are similar to asp.net webforms.
Microsoft suggests that for building API use MVC and for web UI use razor pages.
0 notes
Text
JAVA Interview Questions and Answers
java interview questions for freshers experienced developers
1. What is Java? Java is a object-oriented programming language originally developed by Sun Micro systems and released in 1995. Java runs on a variety of platforms, such as Windows, Mac OS, and the various versions of UNIX. 2. What are the supported platforms by Java Programming Language? Java runs on a variety of platforms, such as Windows, Mac OS, and the various versions of UNIX/Linux like HP-Unix, Sun Solaris, Red hat Linux, Ubuntu, Cent OS, etc. 3. List any five features of Java? Some features include Object Oriented Platform Independent Robust Interpreted Multi-threaded 4. Why is Java Architectural Neutral? It’s compiler generates an architecture-neutral object file format, which makes the compiled code to be executable on many processors, with the presence of Java runtime system. 5. What is a singleton class? Give a practical example of its usage. A singleton class in java can have only one instance and hence all its methods and variables belong to just one instance. Singleton class concept is useful for the situations when there is a need to limit the number of objects for a class. The best example of singleton usage scenario is when there is a limit of having only one connection to a database due to some driver limitations or because of any licensing issues. 6. What are the access modifiers in Java? There are 3 access modifiers. Public, protected and private, and the default one if no identifier is specified is called friendly, but programmer cannot specify the friendly identifier explicitly. 7. What is are packages? A package is a collection of related classes and interfaces providing access protection and namespace management. 8. What is meant by Inheritance and What are its advantages? Inheritance is the process of inheriting all the features from a class. The advantages of inheritance are reusability of code and accessibility of variables and methods of the super class by subclasses. 9. What is the difference between superclass and subclass? A super class is a class that is inherited whereas sub class is a class that does the inheriting. 10. What is an abstract class? An abstract class is a class designed with implementation gaps for subclasses to fill in and is deliberately incomplete.

JAVA Interview Questions 11. What are the states associated in the thread? Thread contains ready, running, waiting and dead states. 12. What is synchronization? Synchronization is the mechanism that ensures that only one thread is accessed the resources at a time. 13. What is deadlock? When two threads are waiting each other and can’t precede the program is said to be deadlock. 14. What is an applet? Applet is a dynamic and interactive program that runs inside a web page displayed by a java capable browser 15. What is the lifecycle of an applet? init() method - Can be called when an applet is first loaded start() method - Can be called each time an applet is started. paint() method - Can be called when the applet is minimized or maximized. stop() method - Can be used when the browser moves off the applet’s page. destroy() method - Can be called when the browser is finished with the applet. 16. Define How do you set security in applets? using setSecurityManager() method 17. What is a layout manager and What are different types of layout managers available in java AWT? A layout manager is an object that is used to organize components in a container. The different layouts are available are FlowLayout, BorderLayout, CardLayout, GridLayout and GridBagLayout 18. What is JDBC? JDBC is a set of Java API for executing SQL statements. This API consists of a set of classes and interfaces to enable programs to write pure Java Database applications. 19. What are drivers available? JDBC-ODBC Bridge driver Native API Partly-Java driver JDBC-Net Pure Java driver Native-Protocol Pure Java driver 20. What is stored procedure? Stored procedure is a group of SQL statements that forms a logical unit and performs a particular task. Stored Procedures are used to encapsulate a set of operations or queries to execute on database. Stored procedures can be compiled and executed with different parameters and results and may have any combination of input/output parameters. 21. What is the Java API? The Java API is a large collection of ready-made software components that provide many useful capabilities, such as graphical user interface (GUI) widgets. 22. Why there are no global variables in Java? Global variables are globally accessible. Java does not support globally accessible variables due to following reasons: The global variables breaks the referential transparency Global variables creates collisions in namespace. 23. What are Encapsulation, Inheritance and Polymorphism? Encapsulation is the mechanism that binds together code and data it manipulates and keeps both safe from outside interference and misuse. Inheritance is the process by which one object acquires the properties of another object. Polymorphism is the feature that allows one interface to be used for general class actions. 24. What is the use of bin and lib in JDK? Bin contains all tools such as javac, appletviewer, awt tool, etc., whereas lib contains API and all packages. 25. What is method overloading and method overriding? Method overloading: When a method in a class having the same method name with different arguments is said to be method overloading. Method overriding : When a method in a class having the same method name with same arguments is said to be method overriding. 26. What is the difference between this() and super()? this() can be used to invoke a constructor of the same class whereas super() can be used to invoke a super class constructor. 27. What is Domain Naming Service(DNS)? It is very difficult to remember a set of numbers(IP address) to connect to the Internet. The Domain Naming Service(DNS) is used to overcome this problem. It maps one particular IP address to a string of characters. For example, www. mascom. com implies com is the domain name reserved for US commercial sites, moscom is the name of the company and www is the name of the specific computer, which is mascom’s server. 28. What is URL? URL stands for Uniform Resource Locator and it points to resource files on the Internet. URL has four components: http://www. address. com:80/index.html, where http - protocol name, address - IP address or host name, 80 - port number and index.html - file path. 29. What is RMI and steps involved in developing an RMI object? Remote Method Invocation (RMI) allows java object that executes on one machine and to invoke the method of a Java object to execute on another machine. The steps involved in developing an RMI object are: a) Define the interfaces b) Implementing these interfaces c) Compile the interfaces and their implementations with the java compiler d) Compile the server implementation with RMI compiler e) Run the RMI registry f) Run the application. 30. What is RMI architecture? RMI architecture consists of four layers and each layer performs specific functions: a) Application layer - contains the actual object definition. b) Proxy layer - consists of stub and skeleton. c) Remote Reference layer - gets the stream of bytes from the transport layer and sends it to the proxy layer. d) Transportation layer - responsible for handling the actual machine-to-machine communication. 31. What is a Java Bean? A Java Bean is a software component that has been designed to be reusable in a variety of different environments. 32. What are checked exceptions? Checked exception are those which the Java compiler forces you to catch. e.g. IOException are checked Exceptions. 33. What are runtime exceptions? Runtime exceptions are those exceptions that are thrown at runtime because of either wrong input data or because of wrong business logic etc. These are not checked by the compiler at compile time. 34. What is the difference between error and an exception? An error is an irrecoverable condition occurring at runtime. Such as OutOfMemory error. These JVM errors and you can not repair them at runtime. While exceptions are conditions that occur because of bad input etc. e.g. FileNotFoundException will be thrown if the specified file does not exist. Or a NullPointerException will take place if you try using a null reference. In most of the cases it is possible to recover from an exception (probably by giving user a feedback for entering proper values etc.). 35. What is the purpose of finalization? The purpose of finalization is to give an unreachable object the opportunity to perform any cleanup processing before the object is garbage collected. For example, closing a opened file, closing a opened database Connection. 36. What is the difference between yielding and sleeping? When a task invokes its yield() method, it returns to the ready state. When a task invokes its sleep() method, it returns to the waiting state. 37. What is the difference between preemptive scheduling and time slicing? Under preemptive scheduling, the highest priority task executes until it enters the waiting or dead states or a higher priority task comes into existence. Under time slicing, a task executes for a predefined slice of time and then reenters the pool of ready tasks. The scheduler then determines which task should execute next, based on priority and other factors. 38. What is mutable object and immutable object? If a object value is changeable then we can call it as Mutable object. (Ex., StringBuffer, …) If you are not allowed to change the value of an object, it is immutable object. (Ex., String, Integer, Float, …) 39. What is the purpose of Void class? The Void class is an uninstantiable placeholder class to hold a reference to the Class object representing the primitive Java type void. 40. What is JIT and its use? Really, just a very fast compiler… In this incarnation, pretty much a one-pass compiler — no offline computations. So you can’t look at the whole method, rank the expressions according to which ones are re-used the most, and then generate code. In theory terms, it’s an on-line problem. 41. What is nested class? If all the methods of a inner class is static then it is a nested class. 42. What is HashMap and Map? Map is Interface and Hashmap is class that implements that. 43. What are different types of access modifiers? public: Any thing declared as public can be accessed from anywhere. private: Any thing declared as private can’t be seen outside of its class. protected: Any thing declared as protected can be accessed by classes in the same package and subclasses in the other packages. default modifier : Can be accessed only to classes in the same package. 44. What is the difference between Reader/Writer and InputStream/Output Stream? The Reader/Writer class is character-oriented and the InputStream/OutputStream class is byte-oriented. 45. What is servlet? Servlets are modules that extend request/response-oriented servers, such as java-enabled web servers. For example, a servlet might be responsible for taking data in an HTML order-entry form and applying the business logic used to update a company’s order database. 46. What is Constructor? A constructor is a special method whose task is to initialize the object of its class. It is special because its name is the same as the class name. They do not have return types, not even void and therefore they cannot return values. They cannot be inherited, though a derived class can call the base class constructor. Constructor is invoked whenever an object of its associated class is created. 47. What is an Iterator ? The Iterator interface is used to step through the elements of a Collection. Iterators let you process each element of a Collection. Iterators are a generic way to go through all the elements of a Collection no matter Define How it is organized. Iterator is an Interface implemented a different way for every Collection. 48. What is the List interface? The List interface provides support for ordered collections of objects. Lists may contain duplicate elements. 49. What is memory leak? A memory leak is where an unreferenced object that will never be used again still hangs around in memory and doesnt get garbage collected. 50. What is the difference between the prefix and postfix forms of the ++ operator? The prefix form performs the increment operation and returns the value of the increment operation. The postfix form returns the current value all of the expression and then performs the increment operation on that value. 51. What is the difference between a constructor and a method? A constructor is a member function of a class that is used to create objects of that class. It has the same name as the class itself, has no return type, and is invoked using the new operator. A method is an ordinary member function of a class. It has its own name, a return type (which may be void), and is invoked using the dot operator. 52. What will happen to the Exception object after exception handling? Exception object will be garbage collected. 53. Difference between static and dynamic class loading. Static class loading: The process of loading a class using new operator is called static class loading. Dynamic class loading: The process of loading a class at runtime is called dynamic class loading. Dynamic class loading can be done by using Class.forName(….).newInstance(). 54. Explain the Common use of EJB The EJBs can be used to incorporate business logic in a web-centric application. The EJBs can be used to integrate business processes in Business-to-business (B2B) e-commerce applications.In Enterprise Application Integration applications, EJBs can be used to house processing and mapping between different applications. 55. What is JSP? JSP is a technology that returns dynamic content to the Web client using HTML, XML and JAVA elements. JSP page looks like a HTML page but is a servlet. It contains Presentation logic and business logic of a web application. 56. What is the purpose of apache tomcat? Apache server is a standalone server that is used to test servlets and create JSP pages. It is free and open source that is integrated in the Apache web server. It is fast, reliable server to configure the applications but it is hard to install. It is a servlet container that includes tools to configure and manage the server to run the applications. It can also be configured by editing XML configuration files. 57. Where pragma is used? Pragma is used inside the servlets in the header with a certain value. The value is of no-cache that tells that a servlets is acting as a proxy and it has to forward request. Pragma directives allow the compiler to use machine and operating system features while keeping the overall functionality with the Java language. These are different for different compilers. 58. Briefly explain daemon thread. Daemon thread is a low priority thread which runs in the background performs garbage collection operation for the java runtime system. 59. What is a native method? A native method is a method that is implemented in a language other than Java. 60. Explain different way of using thread? A Java thread could be implemented by using Runnable interface or by extending the Thread class. The Runnable is more advantageous, when you are going for multiple inheritance. 61. What are the two major components of JDBC? One implementation interface for database manufacturers, the other implementation interface for application and applet writers. 62. What kind of thread is the Garbage collector thread? It is a daemon thread. 63. What are the different ways to handle exceptions? There are two ways to handle exceptions, By wrapping the desired code in a try block followed by a catch block to catch the exceptions. and List the desired exceptions in the throws clause of the method and let the caller of the method handle those exceptions. 64. Define How many objects are created in the following piece of code? MyClass c1, c2, c3; c1 = new MyClass (); c3 = new MyClass (); Answer: Only 2 objects are created, c1 and c3. The reference c2 is only declared and not initialized. 65.What is UNICODE? Unicode is used for internal representation of characters and strings and it uses 16 bits to represent each other. 66. Can a constructor have different name than a Class name in Java? Constructor in Java must have same name as the class name and if the name is different, it doesn’t act as a constructor and compiler thinks of it as a normal method. 67. What will be the output of Round(3.7) and Ceil(3.7)? Round(3.7) returns 4 and Ceil(3.7) returns 4. 68: Can we use goto in Java to go to a particular line? In Java, there is not goto keyword and java doesn’t support this feature of going to a particular labeled line. 69. Can a dead thread be started again? In java, a thread which is in dead state can’t be started again. There is no way to restart a dead thread. 70. Is the following class declaration correct? public abstract final class testClass { // Class methods and variables } The above class declaration is incorrect as an abstract class can’t be declared as Final. 71. Is JDK required on each machine to run a Java program? JDK is development Kit of Java and is required for development only and to run a Java program on a machine, JDK isn’t required. Only JRE is required. 72. Which object oriented Concept is achieved by using overloading and overriding? Polymorphism 73. Is it possible to define a method in Java class but provide it’s implementation in the code of another language like C? Yes, we can do this by use of native methods. In case of native method based development, we define public static methods in our Java class without its implementation and then implementation is done in another language like C separately. 74. Define How destructors are defined in Java? In Java, there are no destructors defined in the class as there is no need to do so. Java has its own garbage collection mechanism which does the job automatically by destroying the objects when no longer referenced. 75. Can a variable be local and static at the same time? No a variable can’t be static as well as local at the same time. Defining a local variable as static gives compilation error. 76. Can we have static methods in an Interface? Static methods can’t be overridden in any class while any methods in an interface are by default abstract and are supposed to be implemented in the classes being implementing the interface. So it makes no sense to have static methods in an interface in Java. 77. In a class implementing an interface, can we change the value of any variable defined in the interface? No, we can’t change the value of any variable of an interface in the implementing class as all variables defined in the interface are by default public, static and Final and final variables are like constants which can’t be changed later. 78. Is it correct to say that due to garbage collection feature in Java, a java program never goes out of memory? Even though automatic garbage collection is provided by Java, it doesn’t ensure that a Java program will not go out of memory as there is a possibility that creation of Java objects is being done at a faster pace compared to garbage collection resulting in filling of all the available memory resources. So, garbage collection helps in reducing the chances of a program going out of memory but it doesn’t ensure that. 79. Can we have any other return type than void for main method? No, Java class main method can have only void return type for the program to get successfully executed. Nonetheless , if you absolutely must return a value to at the completion of main method , you can use System.exit(int status) 80. I want to re-reach and use an object once it has been garbage collected. Define How it’s possible? Once an object has been destroyed by garbage collector, it no longer exists on the heap and it can’t be accessed again. There is no way to reference it again. 81. In Java thread programming, which method is a must implementation for all threads? Run() is a method of Runnable interface that must be implemented by all threads. 82. I want to control database connections in my program and want that only one thread should be able to make database connection at a time. Define How can I implement this logic? This can be implemented by use of the concept of synchronization. Database related code can be placed in a method which hs synchronized keyword so that only one thread can access it at a time. 83. Can an Interface extend another Interface? Yes an Interface can inherit another Interface, for that matter an Interface can extend more than one Interface. 84. I want my class to be developed in such a way that no other class (even derived class) can create its objects. Define How can I do so? If we declare the constructor of a class as private, it will not be accessible by any other class and hence, no other class will be able to instantiate it and formation of its object will be limited to itself only. 85. Define How objects are stored in Java? In java, each object when created gets a memory space from a heap. When an object is destroyed by a garbage collector, the space allocated to it from the heap is re-allocated to the heap and becomes available for any new objects. 86. Define How can we find the actual size of an object on the heap? In java, there is no way to find out the exact size of an object on the heap. 87. Which of the following classes will have more memory allocated? Class Three methods, four variables, no object Class B: Five methods, three variables, no object Memory isn’t allocated before creation of objects. Since for both classes, there are no objects created so no memory is allocated on heap for any class. 88. What happens if an exception is not handled in a program? If an exception is not handled in a program using try catch blocks, program gets aborted and no statement executes after the statement which caused exception throwing. 89. I have multiple constructors defined in a class. Is it possible to call a constructor from another constructor’s body? If a class has multiple constructors, it’s possible to call one constructor from the body of another one using this(). 90. What’s meant by anonymous class? An anonymous class is a class defined without any name in a single line of code using new keyword. For example, in below code we have defined an anonymous class in one line of code: public java.util.Enumeration testMethod() { return new java.util.Enumeration() { @Override public boolean hasMoreElements() { // TODO Auto-generated method stub return false; } @Override public Object nextElement() { // TODO Auto-generated method stub return null; } 91. Is there a way to increase the size of an array after its declaration? Arrays are static and once we have specified its size, we can’t change it. If we want to use such collections where we may require a change of size ( no of items), we should prefer vector over array. 92. If an application has multiple classes in it, is it okay to have a main method in more than one class? If there is main method in more than one classes in a java application, it won’t cause any issue as entry point for any application will be a specific class and code will start from the main method of that particular class only. 93. I want to persist data of objects for later use. What’s the best approach to do so? The best way to persist data for future use is to use the concept of serialization. 94. What is a Local class in Java? In Java, if we define a new class inside a particular block, it’s called a local class. Such a class has local scope and isn’t usable outside the block where its defined. 95. String and StringBuffer both represent String objects. Can we compare String and StringBuffer in Java? Although String and StringBuffer both represent String objects, we can’t compare them with each other and if we try to compare them, we get an error. 96. Which API is provided by Java for operations on set of objects? Java provides a Collection API which provides many useful methods which can be applied on a set of objects. Some of the important classes provided by Collection API include ArrayList, HashMap, TreeSet and TreeMap. 97. Can we cast any other type to Boolean Type with type casting? No, we can neither cast any other primitive type to Boolean data type nor can cast Boolean data type to any other primitive data type. 98. What are synchronized methods and synchronized statements? Synchronized methods are methods that are used to control access to an object. A synchronized statement can only be executed after a thread has acquired the lock for the object or class referenced in the synchronized statement. 99. Define How does a try statement determine which catch clause should be used to handle an exception? When an exception is thrown within the body of a try statement, the catch clauses of the try statement are examined in the order in which they appear. The first catch clause that is capable of handling the exception is executed. The remaining catch clauses are ignored. 100. What will be the default values of all the elements of an array defined as an instance variable? If the array is an array of primitive types, then all the elements of the array will be initialized to the default value corresponding to that primitive type. Basic JAVA Questions with Answers pdf download 101. What is the difference between static and non-static variables? A static variable is associated with the class as a whole rather than with specific instances of a class. Non-static variables take on unique values with each object instance. 102. What is Serialization and deserialization? Serialization is the process of writing the state of an object to a byte stream. Deserialization is the process of restoring these objects. 103. What are use cases? It is part of the analysis of a program and describes a situation that a program might encounter and what behavior the program should exhibit in that circumstance. 104. Explain the use of sublass in a Java program? Sub class inherits all the public and protected methods and the implementation. It also inherits all the default modifier methods and their implementation. 105. How to add menushortcut to menu item? If there is a button instance called b1, you may add menu short cut by calling b1.setMnemonic('F'), so the user may be able to use Alt+F to click the button. 106. Can you write a Java class that could be used both as an applet as well as an application? Yes, just add a main() method to the applet. 107. What is the difference between Swing and AWT components? AWT components are heavy-weight, whereas Swing components are lightweight. Heavy weight components depend on the local windowing toolkit. For example, java.awt.Button is a heavy weight component, when it is running on the Java platform for Unix platform, it maps to a real Motif button. 108. What's the difference between constructors and other methods? Constructors must have the same name as the class and can not return a value. They are only called once while regular methods could be called many times. 109. Is there any limitation of using Inheritance? Yes, since inheritance inherits everything from the super class and interface, it may make the subclass too clustering and sometimes error-prone when dynamic overriding or dynamic overloading in some situation. 109. When is the ArrayStoreException thrown? When copying elements between different arrays, if the source or destination arguments are not arrays or their types are not compatible, an ArrayStoreException will be thrown. 110. Can you call one constructor from another if a class has multiple constructors? Yes, use this() syntax. 111. What's the difference between the methods sleep() and wait()? The code sleep(2000); puts thread aside for exactly two seconds. The code wait(2000), causes a wait of up to two second. A thread could stop waiting earlier if it receives the notify() or notifyAll() call. The method wait() is defined in the class Object and the method sleep() is defined in the class Thread. 112. When ArithmeticException is thrown? The ArithmeticException is thrown when integer is divided by zero or taking the remainder of a number by zero. It is never thrown in floating-point operations. 113. What is a transient variable? A transient variable is a variable that may not be serialized during Serialization and which is initialized by its default value during de-serialization, 114. What is synchronization? Synchronization is the capability to control the access of multiple threads to shared resources. synchronized keyword in java provides locking which ensures mutual exclusive access of shared resource and prevent data race. 115. What is the Collections API? The Collections API is a set of classes and interfaces that support operations on collections of objects. 116. Does garbage collection guarantee that a program will not run out of memory? Garbage collection does not guarantee that a program will not run out of memory. It is possible for programs to use up memory resources faster than they are garbage collected. It is also possible for programs to create objects that are not subject to garbage collection. 117. The immediate super class of the Applet class? Panel is the immediate super class. A panel provides space in which an application can attach any other component, including other panels. 118. Which Java operator is right associative? The = operator is right associative. 119. What is the difference between a break statement and a continue statement? A break statement results in the termination of the statement to which it applies (switch, for, do, or while). A continue statement is used to end the current loop iteration and return control to the loop statement. 120. If a variable is declared as private, where may the variable be accessed? A private variable may only be accessed within the class in which it is declared. 121. What is the purpose of the System class? The purpose of the System class is to provide access to system resources. 122. List primitive Java types? The eight primitive types are byte, char, short, int, long, float, double, and boolean. 123. What is the relationship between clipping and repainting under AWT? When a window is repainted by the AWT painting thread, it sets the clipping regions to the area of the window that requires repainting. 124. Which class is the immediate superclass of the Container class? Component class is the immediate super class. 125. What class of exceptions are generated by the Java run-time system? The Java runtime system generates RuntimeException and Error exceptions. 126. Under what conditions is an object's finalize() method invoked by the garbage collector? The garbage collector invokes an object's finalize() method when it detects that the object has become unreachable. 127. How can a dead thread be restarted? A dead thread cannot be restarted. 128. Which arithmetic operations can result in the throwing of an ArithmeticException? Integer / and % can result in the throwing of an ArithmeticException. 129. Variable of the boolean type is automatically initialized as? The default value of the boolean type is false. 130. What are ClassLoaders? A class loader is an object that is responsible for loading classes. The class ClassLoader is an abstract class. 131. What is the difference between an Interface and an Abstract class? An abstract class can have instance methods that implement a default behavior. An Interface can only declare constants and instance methods, but cannot implement default behavior and all methods are implicitly abstract. An interface has all public members and no implementation. 132. What will happen if static modifier is removed from the signature of the main method? Program throws "NoSuchMethodError" error at runtime . 133. Can try statements be nested? Yes 134. What is the default value of an object reference declared as an instance variable? Null, unless it is defined explicitly. 135. Can a top level class be private or protected? No, a top level class can not be private or protected. It can have either "public" or no modifier. 136. Why do we need wrapper classes? We can pass them around as method parameters where a method expects an object. It also provides utility methods. 137. What is the difference between error and an exception? An error is an irrecoverable condition occurring at runtime. Such as OutOfMemory error. Exceptions are conditions that occur because of bad input etc. e.g. FileNotFoundException will be thrown if the specified file does not exist. 138. Is it necessary that each try block must be followed by a catch block? It is not necessary that each try block must be followed by a catch block. It should be followed by either a catch block or a finally block. 139. When a thread is created and started, what is its initial state? A thread is in the ready state as initial state after it has been created and started. 140. What is the Locale class? The Locale class is used to tailor program output to the conventions of a particular geographic, political, or cultural region. 141. What are synchronized methods and synchronized statements? Synchronized methods are methods that are used to control access to an object. A synchronized statement can only be executed after a thread has acquired the lock for the object or class referenced in the synchronized statement. 142. What is runtime polymorphism or dynamic method dispatch? Runtime polymorphism or dynamic method dispatch is a process in which a call to an overridden method is resolved at runtime rather than at compile-time. In this process, an overridden method is called through the reference variable of a superclass. 143. What is Dynamic Binding(late binding)? Binding refers to the linking of a procedure call to the code to be executed in response to the call. Dynamic binding means that the code associated with a given procedure call is not known until the time of the call at run-time. 144. Can constructor be inherited? No, constructor cannot be inherited. 145. What are the advantages of ArrayList over arrays? ArrayList can grow dynamically and provides more powerful insertion and search mechanisms than arrays. 146. Why deletion in LinkedList is fast than ArrayList? Deletion in linked list is fast because it involves only updating the next pointer in the node before the deleted node and updating the previous pointer in the node after the deleted node. 147. How do you decide when to use ArrayList and LinkedList? If you need to frequently add and remove elements from the middle of the list and only access the list elements sequentially, then LinkedList should be used. If you need to support random access, without inserting or removing elements from any place other than the end, then ArrayList should be used. 148. What is a Values Collection View ? It is a collection returned by the values() method of the Map Interface, It contains all the objects present as values in the map. 149. What is dot operator? The dot operator(.) is used to access the instance variables and methods of class objects.It is also used to access classes and sub-packages from a package. 150. Where and how can you use a private constructor? Private constructor is used if you do not want other classes to instantiate the object and to prevent subclassing.T 151. What is type casting? Type casting means treating a variable of one type as though it is another type. Q: Describe life cycle of thread? A thread is a execution in a program. The life cycle of a thread include:Newborn state Runnable state Running state Blocked state Dead state 152. What is the difference between the >> and >>> operators? The >> operator carries the sign bit when shifting right. The >>> zero-fills bits that have been shifted out. 153. Which method of the Component class is used to set the position and size of a component? setBounds() method is used for this purpose. 154. What is the range of the short type? The range of the short type is -(2^15) to 2^15 - 1. 155. What is the immediate superclass of Menu? MenuItem class 156. Does Java allow Default Arguments? No, Java does not allow Default Arguments. 157. Which number is denoted by leading zero in java? Octal Numbers are denoted by leading zero in java, example: 06 158. Which number is denoted by leading 0x or 0X in java? Hexadecimal Numbers are denoted by leading 0x or 0X in java, example: 0XF 159. Break statement can be used as labels in Java? Yes, an example can be break one; 160. Where import statement is used in a Java program? Import statement is allowed at the beginning of the program file after package statement. 161. Explain suspend() method under Thread class> It is used to pause or temporarily stop the execution of the thread. 162. Explain isAlive() method under Thread class? It is used to find out whether a thread is still running or not. 163. What is currentThread()? It is a public static method used to obtain a reference to the current thread. 164. Explain main thread under Thread class execution? The main thread is created automatically and it begins to execute immediately when a program starts. It ia thread from which all other child threads originate. 165. Life cycle of an applet includes which steps? Life cycle involves the following steps: Initialization Starting Stopping Destroying Painting 166. Why is the role of init() method under applets? It initializes the applet and is the first method to be called. 167. Which method is called by Applet class to load an image? getImage(URL object, filename) is used for this purpose. 168. Define code as an attribute of Applet? It is used to specify the name of the applet class. 169. Define canvas? It is a simple drawing surface which are used for painting images or to perform other graphical operations. 170. Define Network Programming? It refers to writing programs that execute across multiple devices (computers), in which the devices are all connected to each other using a network. 171. What is a Socket? Sockets provide the communication mechanism between two computers using TCP. A client program creates a socket on its end of the communication and attempts to connect that socket to a server. 172. Advantages of Java Sockets? Sockets are flexible and sufficient. Efficient socket based programming can be easily implemented for general communications. It cause low network traffic. 173. Disadvantages of Java Sockets? Socket based communications allows only to send packets of raw data between applications. Both the client-side and server-side have to provide mechanisms to make the data useful in any way. 174. Which class is used by server applications to obtain a port and listen for client requests? java.net.ServerSocket class is used by server applications to obtain a port and listen for client requests 175. Which class represents the socket that both the client and server use to communicate with each other? java.net.Socket class represents the socket that both the client and server use to communicate with each other. 176. Why Generics are used in Java? Generics provide compile-time type safety that allows programmers to catch invalid types at compile time. Java Generic methods and generic classes enable programmers to specify, with a single method declaration, a set of related methods or, with a single class declaration, a set of related types. 177. What environment variables do I need to set on my machine in order to be able to run Java programs? CLASSPATH and PATH are the two variables. 178. Is there any need to import java.lang package? No, there is no need to import this package. It is by default loaded internally by the JVM. 179. What is Nested top-level class? If a class is declared within a class and specify the static modifier, the compiler treats the class just like any other top-level class. Nested top-level class is an Inner class. 180. What is Externalizable interface? Externalizable is an interface which contains two methods readExternal and writeExternal. These methods give you a control over the serialization mechanism. 181. If System.exit (0); is written at the end of the try block, will the finally block still execute? No in this case the finally block will not execute because when you say System.exit (0); the control immediately goes out of the program, and thus finally never executes. 182. What is daemon thread? Daemon thread is a low priority thread, which runs intermittently in the back ground doing the garbage collection operation for the java runtime system. 183. Which method is used to create the daemon thread? setDaemon method is used to create a daemon thread. 184. Which method must be implemented by all threads? All tasks must implement the run() method 185. What is the GregorianCalendar class? The GregorianCalendar provides support for traditional Western calendars 186. What is the SimpleTimeZone class? The SimpleTimeZone class provides support for a Gregorian calendar . 187. What is the difference between the size and capacity of a Vector? The size is the number of elements actually stored in the vector, while capacity is the maximum number of elements it can store at a given instance of time. 188. Can a vector contain heterogenous objects? Yes a Vector can contain heterogenous objects. Because a Vector stores everything in terms of Object. 189. What is an enumeration? An enumeration is an interface containing methods for accessing the underlying data structure from which the enumeration is obtained. It allows sequential access to all the elements stored in the collection. 190. What is difference between Path and Classpath? Path and Classpath are operating system level environment variales. Path is defines where the system can find the executables(.exe) files and classpath is used to specify the location of .class files. 191. Can a class declared as private be accessed outside it's package? No, it's not possible to accessed outside it's package. 192. What are the restriction imposed on a static method or a static block of code? A static method should not refer to instance variables without creating an instance and cannot use "this" operator to refer the instance. 240. Can an Interface extend another Interface? Yes an Interface can inherit another Interface, for that matter an Interface can extend more than one Interface. 241. Which object oriented Concept is achieved by using overloading and overriding? Polymorphism 242. What is an object's lock and which object's have locks? An object's lock is a mechanism that is used by multiple threads to obtain synchronized access to the object. A thread may execute a synchronized method of an object only after it has acquired the object's lock. 243. What is Downcasting? It is the casting from a general to a more specific type, i.e. casting down the hierarchy. 244. What are order of precedence and associativity and how are they used? Order of precedence determines the order in which operators are evaluated in expressions. Associatity determines whether an expression is evaluated left-to-right or right-to-left. 245. If a method is declared as protected, where may the method be accessed? A protected method may only be accessed by classes or interfaces of the same package or by subclasses of the class in which it is declared. 246. What is the difference between inner class and nested class? When a class is defined within a scope of another class, then it becomes inner class. If the access modifier of the inner class is static, then it becomes nested class. 247. What restrictions are placed on method overriding? Overridden methods must have the same name, argument list, and return type. The overriding method may not limit the access of the method it overrides. 248. What is constructor chaining and how is it achieved in Java? A child object constructor always first needs to construct its parent. In Java it is done via an implicit call to the no-args constructor as the first statement. 249. Can a double value be cast to a byte? Yes, a double value can be cast to a byte. 250. How does a try statement determine which catch clause should be used to handle an exception? When an exception is thrown within the body of a try statement, the catch clauses of the try statement are examined in the order in which they appear. The first catch clause that is capable of handling the exception is executed. The remaining catch clauses are ignored. Core Java Interview Questions JAVA Online Test Java Interview Questions for Freshers & Experienced #java interview questions for experienced #java interview questions pdf #java interview questions and answers for freshers #java interview questions geeksforgeeks #java interview questions for experienced professionals #java interview questions for 5 years experience #java interview questions and answers for freshers pdf Read the full article
0 notes
Text
10 Undeniable Reasons People Hate Free Amazon Gift Card
EU About Amazon Homepage
Turn your downtime into cost-free Amazon.com present cards. There are lots of offers, promo codes, and price cut that will assist you save large on 2019 vacation gifts. There will certainly likewise be deals on phones, Televisions, games consoles as well as home appliances however we have actually assembled the Black Friday deals thus far including dishwashing machines, washing equipments and TVs.
Bear in mind, lots of gift cards are multi-use and also you can keep utilizing them up until the credit is consumed. 22 - that's the Friday prior to Thanksgiving, one week prior to Black Friday correct. Use our Amazon.com discount code to avail this offer.

To acquire as well as print an Amazon.com present card, you need to most likely to and click on the "Gift Cards" web link on top of the home page. Gift cards resemble cash as they can be used to get virtually anything with little constraint, and can be combined with various other offers and also coupon codes.
You spend the present card like cash, minimizing every purchase. In previous years, Apple has offered gift cards instead of cut rates, whereas shops as well as online retailers run offers as well as offers. . However I found a couple of significant non-Amazon deals also, so check those out, too.

Occasionally we are sent out a link to an internet site to fetch a card which is good, however if the link calls for a kind to be finished and also an email to be obtained, we will certainly not be able to refine it, so ensure its straightforward as well as clear. Gift cards offered in quantities of $9.99 for 1 month to $59.99 for twelve month.
It has to be complete: Missing out on, void or insufficient codes will certainly result in cards being noted as invalid. A.: Amazon Prime Instant Video is available on Computers, Macs and Linux computers, along with all last-gen as well as modern-day video game gaming consoles.
Cardyard is the UK's only gift-card exchange business setup to provide you money and save you money. The recipient of the present card can retrieve the present on The equilibrium of the card will instantly be applied to his account as well as will certainly be made use of to pay for any kind of future items acquired on Amazon.
To print a present card from Amazon.com, you have to have access to a printer. In current days, Mr. de Blasio had actually attempted to get to Jeff Bezos, Amazon.com's chief executive, according to one authorities. Enter very early as well as register to its email listing to find out about the bargains as they drop (or inspect back here!).
The average annual Amazon buying expenditure of Amazon Prime members was located to be 1,400 UNITED STATE dollars on the on the internet purchasing platform every year, compared to 600 UNITED STATE bucks costs of non-Prime participants. Prime participants get special offers and coupons through Amazon.com Family, consisting of up to 20% off subscriptions to baby diapers, child food, and various other family-oriented products.
A.: Prime members save $2 monthly on this membership solution that supplies countless publications, films, TELEVISION shows, educational applications as well as games for children ages 3 to ten years old. Cardyard is the secure, secure location to amazon gift card code buy discounted gift cards, to get money for an unwanted gift card, or to trade one gift card for an additional.
You can save money at Amazon.com by utilizing among the present Amazon vouchers from Slickdeals. The AirPods sold well last year, and also Amazon.com ran a couple of offers on Apple items like the Watch. We'll likewise be adding the most effective bargains to this web page, so remember to check back in the lead up to Black Friday.

0 notes
Photo

V8 Lite, accurate timing in JavaScript, and generating a million digits of Pi
#454 — September 13, 2019
Read on the Web
JavaScript Weekly

V8's Work on a Lighter V8 — V8 Lite has been a project aimed at reducing V8’s memory usage. Initially it was going to be a separate mode of V8 but many improvements have been able to come over to regular V8 too. Here’s a look at some of the key optimizations and the actual benefits to real workloads.
Mythri Alle, Dan Elphick, and Ross McIlroy (V8)
Moving Your JavaScript Development to the Terminal on Windows — If you’ve recently taken a look at Windows after becoming comfortable with macOS or Linux, this is for you. It’s a very detailed look at creating a powerful and elegant terminal-based development experience on Windows 10 using WSL and more.
Burke Holland
All-In-One Visual Testing and Review Platform — Replace time-consuming manual QA to catch visual UI bugs automatically. With Percy, you can test your UI across browsers and responsive widths on every pull request for continuous visual coverage.
Percy sponsor
Metronomes in JavaScript — An interesting experiment in comparing the efficacy of async functions, Web Workers, and using the Web Audio API’s clock for scheduling things precisely.
Monica Dinculescu
Lists of New ECMAScript Features by Version — This is pretty neat. Short and sweet lists of new ES features (with basic examples) that were introduced in ES2015 (a.k.a. ES6), ES2016, ES2017 and so on.
Dietmar Aumann
Immer 4.0: A Way to Work with Immutable State in JS — A popular package for working with immutable state in a convenient way. You apply changes to a draft state object and the mutations are applied to a state resulting in a new one.
immer
💻 Jobs
Full Stack Engineer — Expensify seeks a self-driven individual passionate about making code effective, with an understanding of algorithms and design patterns.
Expensify
Find a JavaScript job through Vettery — Make a free profile, name your salary, and connect with hiring managers from top employers.
Vettery
📘 Articles & Tutorials
Let's Generate a Million Digits of Pi in 9 Lines of JavaScript — BigInt support makes this possible.
Andrew Jennings
A Re-Introduction to Destructuring Assignment — Destructuring assignment, introduced in ES6, provides an interesting way to dig into arrays and other objects to withdraw values more directly.
Laurie Barth
A Much Faster Way to Debug Code Than with Breakpoints or console.log — Wallaby catches errors in your tests and code and displays them right in your editor as you type, making your development feedback loop more productive.
Wallaby.js sponsor
Using void in JavaScript and TypeScript — void means rather different things in JS and TypeScript and does some things I hadn’t expected too.
Stefan Baumgartner
The 5 Big Features of TypeScript 3.7 and How to Use Them — It’s due in early November.
Tim Perry
▶ A 6 Hour React Native 'Crash Course' for Beginners — It’s slow going at first, but that’s because it’s truly aimed at beginners. It’s amazing how much is included here, though, and it’s well recorded too.
Maximilian Schwarzmüller
It’s Not Wrong That "🤦🏼♂️".length == 7 — The underlying ‘length’ of an emoji character is a complicated thing.. not just in JavaScript but in other languages too.
Henri Sivonen
X3D: Declarative 3D for the Modern Web — A look at X3D and how it offers a simple declarative approach for including 3D visualizations into web pages.
Adrian Sureshkumar
How Taiko Compares to Other Browser Automation Tools
ThoughtWorks - Taiko sponsor
Angular Dependency Injection Tips
Armen Vardanyan
▶ 11 Talks from JSFoo VueDay 2019 — Talks from a Vue conference that took place in India two weeks ago.
YouTube
🔧 Code & Tools
nanoSQL 2: A Universal 'Database Layer' for Client, Server and Mobile — Basically an abstraction for any JavaScript developers who want a database in their app. It can use numerous actual databases behind the scenes, including localStorage, IndexedDB, RocksDB, Redis, DynamoDB, ScyllaDB and SQLite. It claims to be like “Lego™ for databases”.
Scott Lott
React Suite 4.0: A Suite of 'Sensible' UI Components — A set of components that’s been under active development for a couple of years now. Supports React 16+, uses TypeScript, and they work on all major browsers. Components include things like buttons, modals, drawers, navigation bars, form input fields, tables, calendars, and more. GitHub repo.
HYPERS
Spacekit: A Library for Creating 3D Visualizations of Space — Here’s an example.
Ian Webster
Headroom.js: Hides Your Page Header Until Needed — A pure JS widget for hiding elements until needed (for example, show your page header when scrolling up).
Nick Williams
Automated Code Reviews for JavaScript — Set standards on coverage, duplication, complexity, and style issues and see real-time feedback in your Git workflow.
Codacy sponsor
Storytime: Tell Stories About Pieces of Code — This is hard to explain without a demo, so check out this explain demonstrating how React Fiber works.
Storytime
Emoji Button: A Vanilla JavaScript Emoji Picker — Turns a button element into an emoji picker (similar to that some operating systems provide).
Joe Attardi
Filesize.js: A Library to Create Human Readable File Size Strings — For example: filesize(265318) returns 259.1 KB.
Jason Mulligan
⚡️ Quick Releases
Babel 7.6.0 (and 7.6.1) — Popular JavaScript transpiler.
mustache.js 3.1 — Logic-less JavaScript templating.
Bootstrap-Vue 2.0 — Plugins and components bringing Bootstrap to Vue.js.
🐦 An interesting Twitter thread...

Kyle Simpson, the author of YDKJS, has been thinking about some pain points when using asynchronous functions, particularly in relation to being able to cancel their execution when circumstances change. The whole thread is an interesting read, complete with people making suggestions of their workarounds.
We'd be pretty keen to link to any articles or opinion pieces covering this topic if you have any spare time this weekend ;-)
by via JavaScript Weekly https://ift.tt/2Q8xQWM
0 notes
Text
What is Blazor and what is Razor Components?
I've blogged a little about Blazor, showing examples like Compiling C# to WASM with Mono and Blazor then Debugging .NET Source with Remote Debugging in Chrome DevTools as well as very early on asking questions like .NET and WebAssembly - Is this the future of the front-end?
Let's back up and level-set.
What is Blazor?
Blazor is a single-page app framework for building interactive client-side Web apps with .NET. Blazor uses open web standards without plugins or code transpilation. Blazor works in all modern web browsers, including mobile browsers.
You write C# in case of JavaScript, and you can use most of the .NET ecosystem of open source libraries. For the most part, if it's .NET Standard, it'll run in the browser. (Of course if you called a Windows API or a Linux specific API and it didn't exist in the client-side browser S world, it's not gonna work, but you get the idea).
The .NET code runs inside the context of WebAssembly. You're running "a .NET" inside your browser on the client-side with no plugins, no Silverlight, Java, Flash, just open web standards.
WebAssembly is a compact bytecode format optimized for fast download and maximum execution speed.
Here's a great diagram from the Blazor docs.
Here's where it could get a little confusing. Blazor is the client-side hosting model for Razor Components. I can write Razor Components. I can host them on the server or host them on the client with Blazor.
You may have written Razor in the past in .cshtml files, or more recently in .razor files. You can create and share components using Razor - which is a mix of standard C# and standard HTML, and you can host these Razor Components on either the client or the server.
In this diagram from the docs you can see that the Razor Components are running on the Server and SignalR (over Web Sockets, etc) is remoting them and updating the DOM on the client. This doesn't require Web Assembly on the client, the .NET code runs in the .NET Core CLR (Common Language Runtime) and has full compatibility - you can do anything you'd like as you are not longer limited by the browser's sandbox.
Per the docs:
Razor Components decouples component rendering logic from how UI updates are applied. ASP.NET Core Razor Components in .NET Core 3.0 adds support for hosting Razor Components on the server in an ASP.NET Core app. UI updates are handled over a SignalR connection.
Here's the canonical "click a button update some HTML" example.
@page "/counter" <h1>Counter</h1> <p>Current count: @currentCount</p> <button class="btn btn-primary" onclick="@IncrementCount">Click me</button> @functions { int currentCount = 0; void IncrementCount() { currentCount++; } }
You can see this running entirely in the browser, with the C# .NET code running on the client side. .NET DLLs (assemblies) are downloaded and executed by the CLR that's been compiled into WASM and running entirely in the context of the browser.
Note also that I'm stopped at a BREAKPOINT in C# code, except the code is running in the browser and mapped back into JS/WASM world.
But if I host my app on the server as hosted Razor Components, the C# code runs entirely on the Server-side and the client-side DOM is updated over a SignalR link. Here I've clicked the button on the client side and hit the breakpoint on the server-side in Visual Studio. No there's no POST and no POST-back. This isn't WebForms - It's Razor Components. It's a SPA app written in C#, not JavaScript, and I can change the locations of the running logic, while the UI remains always standard HTML and CSS.
Looking at how Razor Components and now Phoenix LiveView are offering a new way to manage JavaScript-free stateful server-rendered apps has me realizing it’s the best parts of WebForms where the postback is now a persistent websockets tunnel to the backend and only diffs are sent
— Scott Hanselman (@shanselman) March 16, 2019
It's a pretty exciting time on the open web. There's a lot of great work happening in this space and I'm very interesting to see how frameworks like Razor Components/Blazor and Phoenix LiveView change (or don't) how we write apps for the web.
Sponsor: Manage GitHub Pull Requests right from the IDE with the latest JetBrains Rider. An integrated performance profiler on Windows comes to the rescue as well.
© 2018 Scott Hanselman. All rights reserved.


0 notes
Text
FREE COURSE GIVEAWAY: Certified NEM Blockchain Developer and Cache Token
NullTX is offering our readers FREE access to premium blockchain elearning courses from Devslopes over the next few weeks. The Devslopes team currently runs a leading developer education platform with 300,000+ active students. Devslopes is producing high quality premium developer education focused primarily on blockchain. There is a massive shortage of blockchain developer training resources and the Devslopes is filling this void in the marketplace.
There are 7,913 job postings on LinkedIn for blockchain developers globally. And this number will grow massively over the next several years.
The time is now to learn cutting edge training from Devslopes’ world-class blockchain developers.
Here is some more info about this course:
Many consider NEM to be a sleeping giant. The high performance Blockchain has a unified vision and community behind it with a very developer friendly Blockchain platform. They provide a top notch platform to manage almost any kind of asset: cryptocurrencies, supply chains, notarizations, ownership records etc. From Dapps, to ICOs, to Fintech, NEM has it all. This program is a comprehensive training on the NEM blockchain. You’ll go from knowing absolutely nothing about NEM to becoming an advanced developer on the NEM blockchain.
What you will learn:
What is NEM?
NEM Architecture
Proof of importance
Harvesting (mining)
NEM use cases
NEM for app developers
Launching your own cryptocurrency
NEM for enterprise & fintech
Public & private NEM blockchains
Coding an ICO
Security on the NEM blockchain
Multisig accounts (smart contracts)
NEM tooling & testing
Building Dapps in any programming language
Architecting production ready products on NEM
Who is this for:
This training program is designed to take developers from beginner to advanced knowledge on developing for the NEM blockchain. If you are considering launching an ICO, creating a Dapp, or creating secure private blockchains for fintech or enterprise you should take this program.
Prerequisites:
To take this training program you will need to have competence in any programming language such as Javascript, Java, C#, Swift, Python, etc. You must own a Mac, PC with Windows 8+ or Linux. Beginner Blockchain & Architecture is a recommended pre-requisite.
Here are the redemption instructions:
Go to this link: https://www.devslopes.com/blockchain/
Click “Buy Now” on your course
Enter the code: NEM_COURSE_06PBLF
Create a Devslopes account and click “Submit”
Scroll down the page
Enter the redemption code below in the “Coupon Code (Optional)” field
Agree to the “Terms of Use”
Click “Buy Now”
Devslopes just launched their own token, Cache. Cache is a cryptocurrency that will empower developers to easily work with blockchain technology and create and manage digital assets with ease. The cryptocurrency, built upon the NEM blockchain, will power the Blockstart and Cacheout platforms.
Blockstart allows developers and businesses to deploy their own blockchain in minutes, create digital assets in one click, set up transaction management systems, and interface with their blockchain through easy-to-use SDKs for iOS, Android, and Unity. An analytics dashboard will allow users to view network status, transactions, fees collected, active users, active nodes, and more.
Developers and low-budget startups have a lot of the same issues that larger businesses might have in that choosing the right blockchain is very difficult, and then learning how to develop blockchain applications is quite complex. Developers and startups also need low-cost on demand blockchain services so they can figure out their monetization models as they grow their apps and companies. The Blockstart public blockchain is the perfect solution for these developers and startups. Developers will create domains to manage their projects. Domains are similar to web domains in that they are unique to the entire blockchain network. Developers can then create assets and cryptocurrencies within that domain. Developers pay fees to launch new domains, assets, and currencies. All fees are paid in Cache. As Developers onboard users into their apps, those users will make transactions with the developer’s assets and cryptocurrencies. All end-user transactions also have associated fees in Cache. Developers can elect to pay for their user’s fees for a seamless experience, or they can have the users pay Cache in association with the developer’s assets/currencies. Developers can also elect to use Cache as their primary token within their applications and for their users
Cacheout will be a currency-backed regulated economy where developers can ask and answer questions. Users will be able to post a question and a bounty using Cache tokens (CHE). The user along with the community chooses the best answer and the bounty is awarded automatically.
The token sale will last until August 31, with the goal of raising $10 million.
This is a sponsored press release and does not necessarily reflect the opinions or views held by any employees of NullTX. This is not investment, trading, or gambling advice. Always conduct your own independent research.
FREE COURSE GIVEAWAY: Certified NEM Blockchain Developer and Cache Token published first on https://medium.com/@smartoptions
0 notes
Text
2018-03-25 21 TECH now
TECH
Ars Techica
Facebook scraped call, text message data for years from Android phones
Sea of Thieves makes a weak, meandering first impression
Sticking to your diet? This tooth-mounted food sensor could transmit the truth
NBA Jam, Sonic 1, Ultima Online remembered with rare stories, concept art
The Mac gaming console time has forgot
Buzzfeed Tech
The #DeleteFacebook Hashtag Is Being Targeted By Bots, Porn Accounts, And Cryptocurrency Hustlers
A UK Privacy Watchdog Is Searching Cambridge Analytica's Office As Its Scandal Fallout Deepens
Why Nothing Is Going To Happen To Facebook Or Mark Zuckerberg
Craigslist Just Took Personal Ads Offline Because Of A New Anti-Sex Trafficking Law
Apple Just Proposed 13 New Emojis With Disabilities
CNet
2018 Range Rover P400e: The pinnacle of luxury SUVs, now quieter - Roadshow
AirPower: All we know about Apple’s wireless charging pad - CNET
Vegas Esports Arena gives hard-core gaming a glitzy stage - CNET
China's uncontrolled space station could crash to Earth soon - CNET
Elon Musk deletes SpaceX, Tesla Facebook pages - CNET
Clean Technica
StorEn Technology’s Vanadium Flow Battery Prototype Outpacing Expectations
Franz von Holzhausen Talks Tesla Model 3’s Award-Winning Design & Minimalism
TRIPL: A Funky Urban Electric Scooter … With Cargo
Renting Out Private EV Charging Stations
Nissan LEAF Jumps To #2 In France — February 2018 France Electric Car Sales Report
Hacker News
The Muse (YC W12) Is Hiring a QA Lead – Help People Find Their Purpose
KDE Plasma Voted Best Desktop Environment in Linux Journal Readers Choice Awards
Thoughts on Embracing the Social Internet Over Social Media
Void Linux: Into the Void
Facebook scraped call, text message data for years from Android phones
Mashable
4 reasons Javascript is still a programming language you need to learn
5 multi-port charging devices on sale right now
Exercise literally anywhere with this little device that can fit in your pocket
Here's what the March For Our Lives in D.C. looked like from space
March For Our Lives crowd estimates trump Trump's inauguration
Motherboard
State Department Seemingly Buys $15,000 iPhone Cracking Tech GrayKey
This Politician Wants New Yorkers to Have the 'Right to Disconnect'
Tired of Sucking in 'Overwatch?' Try Cognitive-Behavioral Therapy
A Brief History of Elon Musk and Mark Zuckerberg Publicly Beefing
Elon Musk: 'What's Facebook?'
New York Times Technology
Dropbox Shares Leap in I.P.O., and Silicon Valley Smiles
How Calls for Privacy May Upend Business for Facebook and Google
Opinion: Are You Really in Love if It’s Not on Instagram?
Opinion: Don’t Delete Facebook. Do Something About It.
Timeline: Facebook and Google Under Regulators’ Glare
Recode
March for Our Lives protest draws hundreds of thousands of students calling for gun control
Uber says a single metric isn’t a clear indication of an autonomous car’s safety
Limebike, the dockless bike-share startup, wants to pay people to charge its scooters
Dropbox shares jumped nearly 40 percent on the first day of trading
Calls for Mark Zuckerberg to testify before Congress are getting louder
Reddit Technology
The people owned the web, tech giants stole it. This is how we take it back
Facebook scraped call, text message data for years from Android phones | Ars Technica
Cambridge Analytica's Real Business Isn't Data: The firm is part of a secretive political consulting industry that helps make fake elections look legitimate.
All the URLs you need to block to *actually* stop using Facebook
I warned Mark Zuckerberg about the Cambridge Analytica-type flaw in April 2005. He ignored me.
Reuters Technology
Uber to sell Southeast operations to Grab, get stake in combined business: source
Facebook's Zuckerberg says sorry to Britons with newspaper apology ads
Waymo CEO says its tech would have handled Uber self-driving incident safely
Indian agency denies reported security lapse in ID card project
#DeleteFacebook? Privacy proves hard to protect online
Slashdot
UK High Court 'Perma-Bans' Efforts to Extradite Lauri Love to the US
Hilarious (and Terrifying?) Ways Algorithms Have Outsmarted Their Creators
Ask Slashdot: Is There a Good Alternative to Facebook?
Shodan Search Exposes Thousands of Servers Hosting Passwords and Keys
World Cities Go Dark For 'Earth Hour' Climate Campaign
TechCrunch
Monarch is a new platform from surgical robot pioneer Frederic Moll
Facebook was warned about app permissions in 2011
JASK and the future of autonomous cybersecurity
Hip hop finds its beat in the startup scene
‘Black Panther’ just became North America’s highest-grossing superhero movie
The Next Web
More landing page optimization tips than you can handle! (45, to be precise)
Zimbabwe will use fingerprint ID technology for its 2018 general elections
You can’t learn design online
Need an existential reason for ditching Alexa? Here are a few
PRINCE2 will have you leading and managing any project like a boss for only $19
The Verge
NBA testing 99-cent stream that lets you watch the final quarter of a live game
Morehshin Allahyari’s 3D-printed project pushes back against ‘digital colonialism’
Tim Cook wants ‘well-crafted’ privacy regulations after latest Facebook scandal
This week in tech, 20 years ago
9 new trailers you should watch this week
WSJ Tech
Apple's Cook to Trump: Embrace Open Trade
Waymo Chief Confident Tech Could Avoid Uber-like Incident
How Facebook's Past Data Policies Led to Its Current Crisis
New FCC Rule Would Step Up U.S. Fight Against China's Huawei
My Electronic Devices Are Laughing at Me
Wired
‘The Sky Is Yours’ Combines Dragons and YouTube
The Uber Crash
The Universe Is Basically a Hippie’s Pipe Dream
Raise Your Glasses
Don’t Do Drugs and Watch ‘Annihilation’
0 notes