
Don't wanna be here? Send us removal request.
Statistics
We looked inside some of the posts by wiliamsons and here's what we found interesting.
Average Info
Notes Per Post
0
Likes Per Post
0
Reblog Per Post
0
Reply Per Post
0
Time Between Posts
2 days
Number of Posts By Type
Text
17
Last Seen Tumblr Blogs


Fun Fact
When “GIF” was named word of the year in 2012, Oxford Dictionaries U.S.A. credited Tumblr for pushing the word.
Text
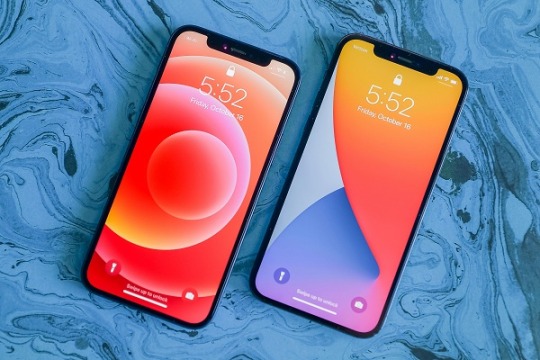
BOUGHT A NEW IPHONE? DON’T FORGET TO INSTALL THESE APPS
It’s quite hard to decide which apps you should be using on your iPhone, it’s obvious because there are tons of options available. In this article, I will share with you some fantastic and useful apps that you can install and use on your iPhone. Let’s take a look at them.
1Password
1Password is an excellent password manager app that helps you create complex passwords. The app is even capable to fill in passwords automatically in various places. Despite this, it even lets you authenticate with Face ID or Touch ID. The app has support for multiple platforms and you can get its monthly subscription for $2.99. It even offers a family subscription plan that will cost you $2.99 per month, and it will give access to up to 5 members. Well, 1Password offers a 30-day free trial as well, you can try it before buying its subscription.
Carrot Weather
Carrot Weather is a fantastic weather app that provides you with a straightforward user interface and various customization options. Additionally, the app boasts a straightforward user interface, a home screen widget, weather alerts, and various other useful tools. You can use it for free, but if you want to get access to the app’s advanced features, you will have to buy its premium version that will cost you $4.99 for a year.
Overcast
Overcast is a pretty amazing podcast app that provides you with a nicer user interface, various tools to boost voice and adjust playback speed, and many more. The app even supports Apple Watch and CarPlay. It’s available for free to use with ads, but there is a premium version of Overcast also available that will cost you $9.99 for a year. The Overcast’s premium version removes ads from the app and adds some advanced features as well.
MyFitnessPal
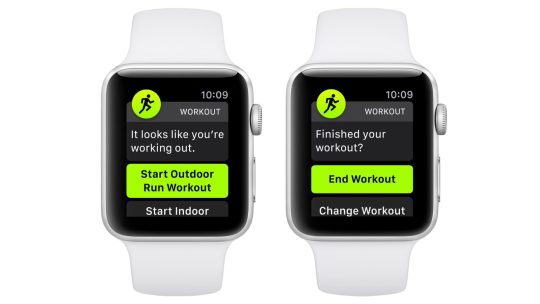
MyFitnessPal is a pretty amazing fitness tracker app that can help you lose weight and get in shape. The app features a calorie counter, a huge database of food, analytics, a step counter, and many more. It even tracks what you eat and drink. The app is available for free to use with in-app purchases.
Things
Things is a fantastic task manager app that helps you track your various tasks. The app features a straightforward user interface, home screen widgets, Siri shortcuts, dynamic notifications, and various other tools. It even has an alert tool that keeps remind you about your upcoming tasks. It works fantastically and is available for $9.99.
All the above-mentioned apps work fantastically and in my opinion, they are all very useful. I strongly recommend you install these apps on your iPhone. That’s all for this article. Thank you!
Source- BOUGHT A NEW IPHONE? DON’T FORGET TO INSTALL THESE APPS
0 notes
Text
Boost Your Productivity with These Stupendous Web Design Software
Web design software can help you be more productive and creative. You can use web design software to review your toolkit, make improvements to your website, and do a variety of other things. In this article, we will share some stupendous web design software that will save your time as well as money if you use them. So without wasting much more, let’s have a look at the software. Here we go!

Wix
Wix is an excellent web design software that provides you with a variety of free templates, a straightforward user interface, 500MB of storage, 1GB of bandwidth, up to 500 different templates, and a few other stuff. Additionally, The software boasts an image editing tool, multiple backgrounds, various social media elements, and animation. It is available for free to use, but it contains ads and has limited features. But you can remove ads from the software and even get advanced features by taking its subscription plan that will cost you between $3.54 and $23 per month.
Weebly
Weebly a fantastic web design software and even easier to use than Wix. Well, mostly It works like Wix, but there are some significant differences between them; Weebly offers you fewer features compared to Wix. Besides that, Weebly features drag-and-drop components that you can use to create a website in an easy way. Additionally, the software includes various customizable layouts, sharing features, a good-looking user interface, a bunch of free themes, build framework options, and a few other stuff. Weebly offers a free as well as premium version. The premium version of the software will cost you between $5 and $25 per month completely based on which plan you are taking.
WordPress.org
WordPress.org is another fantastic web design software that provides you with various customizable options, great security, multiple templates, a decent interface, support for plugins, and several powerful tools to make your work easier and attractive. Additionally, it offers you a very flexible and customizable content management system. It’s quite tricky to use, so initially, you might face a bit of difficulty in understanding the software. But once, you understand how to use the software, you will be able to create a great website and do a variety of other productivity stuff. It’s open-source, so you won’t even have to spend a single penny to use this software. Keep in mind that both WordPress.org and WordPress.com are different, the former one is open source, not the second one. So don’t get confused between them.
PageSpeed Insights
PageSpeed Insights is basically not a web design software, but a website speed tester developed by Google itself. It helps you check how fast your website is running. As we all know that it doesn’t matter how good your website looks or what’s in there, if it doesn’t load fast, the viewer will leave it immediately and go somewhere else’s. In this case, PageSpeed Insights can be a lifesaver tool for your website. The software analyses your website and provides you with a detailed report on how it is performing on different platforms. It also makes suggestions about how you can make your website run faster. PageSpeed Insights is very easy to use, and you should try it.
Sublime Text 3
Sublime Text 3 is a pretty amazing code editor software that provides you with a straightforward user interface and is quite responsive. You can use this software to write code on your website, it responses in a fraction of a second. Additionally, it features a huge range of plugins support. The software is suitable for any kind of web designer or web project. Sublime Text 3 is available for $80, but it also offers a free trial that you can use before buying its license.
These are all the web design software that we recommend you to use for your website. I hope you liked the article. Thank you for reading it. Have a great day!
Source- Boost Your Productivity with These Stupendous Web Design Software
0 notes
Text
BOSE SPORT EARBUDS: A COMPLETE REVIEW
Bose Sport Earbuds are very comfortable workout earbuds that come with an IPX4 rating. The IPX4 rating assures that the earbuds are safe even if it comes in light water exposure. The earbuds offer you great build and sound quality along with the ergonomic design. There is a lot to know about these earbuds, such as the device’s battery life, connectivity, performance, and a few other things. So without wasting much more time, let’s take a detailed overview of the earbuds. Here we go!

Design
These earbuds come with plastic bodies that keep them lightweight and they are durable too. The earbuds look very modern as well as premium. They don’t have any rough edges or corners and they don’t even come out from their ears. Both the earbuds don’t include any buttons, but they have touch panels on the outside that help you control the earbuds. Overall, the Bose Sport Earbuds look fantastic.
How to Use Bose Sport Earbuds
These earbuds are quite easy to use, you just need to remember a few things, but before sharing how to control earbuds, I would like to tell you that only the right earbud has automatic ear detection. This means you can’t use the left earbud for mono listening or mono playback, you will have to use the right earbud for it. Now let’s see how we can control these earbuds using touch panels.
You can simply skip songs by double-tapping the left earbud, and if you do the same with the right earbud, it will pause or play the music. You can access the smart assistant by holding your finger to the right earbud. You can volume up or down by swiping the right earbud. Additionally, when you remove the right earbud, it will automatically pause music, and when you insert the right earbud to your ear, it will do the opposite. The left earbud can’t pause or play music as it does not have automatic ear detection.
Bose Music App
Luckily, you won’t need the Bose Music app, until or unless you want to program your controls or need firmware updates. The app can even help you swap between connected devices, but you can use your phone’s Bluetooth as well for this purpose if you want to. Additionally, the app can help you manage Bose’s voice prompts, get a clearer picture of the battery life of the earbuds, and rename the earbuds.
Battery Life
Well, this pair of earbuds can last up to 5 hours 20 minutes on a single charge, which is a decent battery backup. The Bose Sport Earbuds take around 2 hours to get fully charged, and the case takes approximately 3 hours to get fully charged. However, if you need quick charging, charge these earbuds for 15 minutes and you will be ready to use them for two hours.
Performance
Bose Sport Earbuds allow you to emphasize bass along with upper mid-range notes. The earbuds can produce vocals as well as instruments accurately, and they are quite loud too. The earbuds are very comfortable, but they don’t isolate you entirely from the world which may benefit you in the gym. Additionally, the earbuds feature four microphones that are capable enough to reduce background sounds. You can even use Bose Sport Earbuds for phone calls. Overall, the performance of the earbuds is great.
Conclusion
If you are looking for very comfortable workout earbuds, then I will definitely recommend you to buy Bose’s Sport Earbuds. But if you want a pair of earbuds that are loaded with a bunch of features and even have some advanced features, such as a custom EQ and more, then you should look for another option.
Source- BOSE SPORT EARBUDS: A COMPLETE REVIEW
0 notes
Text
5 BEST TVS FOR PS5 YOU CAN BUY TODAY
Gaming is real fun, and a gaming TV enhances the gaming experience drastically. Now, Sony has already launched its PlayStation 5, which is one of the most advanced and latest gaming consoles available in the market on today’s date. So, it is equally important to get a gaming TV that runs the next generation console up to its best abilities. As compared to the previous version of the PS5, it supports 4K gaming at the frame rate of 120 frames per second. There are various companies that manufacture a variety of 4K gaming TVs that are compatible and best work with the next-gen PS5. You have to choose the best TV according to your requirements and budget. In this article, we have listed some of the best televisions for PS5 that you can consider buying this year.

LG CX OLED
LG CX OLED is an excellent gaming TV from LG that delivers stunning performance and is highly suitable for the ongoing latest gaming console PS5. It is a premium 4K TV that comes with an OLED panel and outstanding picture quality. Its OLED panel has the ability to turn off the pixels individually. This is why it features an infinite contrast ratio. It also comes with four HDMI 2.1 ports that support the 4K resolution at 120Hz.
Samsung Q80/Q80T QLED
Samsung Q80/Q80T QLED is another excellent 4K gaming TV from Samsung that is highly compatible with the newly launched PS5. It can deliver outstanding performance with its mind-blowing picture quality. It comes with superb QLED technology, which makes this gaming TV the unique one. It allows you to watch the content in different viewing angles because of the “Ultra Viewing Angle” layer from Samsung. When it comes to the best gaming experience, one of the best features of this TV is that it produces deep blacks for darkroom games for a more enhanced and precise gaming experience.
SONY X900H
SONY X900H is one of the best 4K gaming TVs that is entirely compatible with the latest PlayStation 5 and available in the market on today’s date. Also, if you are running low on your budget, you can definitely consider this TV as you can get this at a very affordable price. This TV is well suited for dark rooms and has the ability to adapt automatically according to environmental conditions. It also has two HDMI 2.1 inputs. It is a great alternative to Samsung Q80/Q80T QLED if you have less budget.
Vizio P Series Quantum 2020
Vizio P Series Quantum 2020 is another budget-friendly 4K gaming TV that can be easily connected to PS5 and will make great use of the recently launched gaming console. It also delivers stunning performance and comes with a wide variety of features, such as a BFI feature that helps in reduced motion blur and a quick response time. It also features great brightness and a fantastic color gamut in order to provide the best HDR experience.
HISENSE H8G
HISENSE H8G is one of the brighter 4K gaming TVs, which is the least expensive, and you can get it at a very affordable price. It is highly compatible with the latest PlayStation 5 and delivers great performance. It is best suited for well-lit rooms. However, it does not have VRR support, but it gets enough brighter. It is another gaming TV that can provide you 4K resolution under such a low budget that you must consider if you are looking to buy a 4K gaming TV for your PlayStation 5.
This article concludes the five best 4K gaming TVs that deliver excellent performance and are highly compatible with the recently arrived Sony PS5.
Source- 5 BEST TVS FOR PS5 YOU CAN BUY TODAY
0 notes
Text
5 BEST TRAVEL HEADPHONES YOU CAN BUY TODAY
Listening to your favorite track makes your traveling experience amazing and easy. Travel headphones play a vital role in killing your monotonous traveling hours. To make your travel more comfortable and enjoyable, you can opt for various noise-cancellation headphones available in the market. There are various companies that manufacture a number of travel headphones. You have to choose the best travel headphones by keeping various factors in mind such as their battery life, active noise cancelation quality in order to prevent the external noises of engines, trains, buses, crowds, and more while traveling. In this article, we have listed some of the best noise-canceling earbuds and headphones that you can buy today if you are planning for a trip.

Sony WH-1000XM4 Wireless
Sony WH-1000XM4 Wireless is an excellent pair of wireless headphones that provides stunning audio quality and comes with a wide range of features. These are over-ear headphones and also features great active noise cancelation. These are very comfortable to wear and have been designed beautifully by Sony. They also come with a massive battery life of up to 37 hours of continuous playback time. It also offers your favorite tracks with much improved and thumping bass. It also allows you to customize your listening experience according to your priority with its in-built graphic WQ and presets. However, these headphones have a bulky body, but they can be folded into a very compact way.
BOSE QUIETCOMFORT 35 II/QC35 II WIRELESS 2018
Bose Quietcomfort 35 II/QC35 II Wireless is one of the most comfortable wireless headphones available in the market on today’s date. These are also over-ear wireless headphones that come with a feature of active noise-cancelation. These headphones have been designed in a very beautiful way and are very comfortable to wear because of their incredibly well-padded design. They also come with a massive battery life of up to 20 hours of continuous playback time that provides you extra time to listen to your favorite tracks while you are traveling. However, their noise-cancellation feature is not that efficient, but it is enough to block the vehicle noises and many other noises.
Apple AirPods Pro Truly Wireless
Apple AirPods Pro can be considered as one of the most premium and excellent in-ear headphones from Apple that provides you stunning listening experience. They come with the most powerful active noise-cancellation feature on today’s date. So, you can consider them as one of the perfect headphones to carry along with you while going traveling. They are well-balanced and offer an excellent listening experience on-the-go. They come with a decent battery life that can run for approximately 5 hours of continuous playback time. They are truly wireless earbuds and are a bit expensive, but looking towards their list of features they possess, they are worth buying.
Razer Opus Wireless
Razer Opus Wireless is one of the cheapest wireless headphones available in the market that delivers decent listening quality while you are traveling. These are over-ear headphones with a great noise-cancelation feature. These headphones are available in the market at a very affordable price, and you can grab these headphones for under $200 only. Though Razer Opus Wireless headphones are the least expensive headphones, they provide a great listening experience and a massive battery that can last for more than 32 hours of continuous playback. They are very comfortable to wear and very durable. These headphones have been designed beautifully and also comes with easy-to-use physical buttons. They also allow you to customize your listening priorities with the help of a graphic EQ.
ANKER SOUNDCORE LIFE Q30 WIRELESS
Anker Soundcore Life Q30 Wireless is another least expensive and cheaper alternative in the world of wireless headphones. If you are running low on your budget and want to purchase the best wireless headphones for traveling purposes at a very affordable price, Anker Soundcore Life Q30 Wireless is a great choice. They also offer a great noise-cancelation feature that makes them suitable and ideal for traveling purposes. These headphones are one of the best wireless over-ear headphones if you are looking to buy under a low budget.
This article concludes with some of the best wireless headphones that are ideal for traveling purposes, and you can consider any of the above-listed headphones according to your requirement, priority, and budget.
Source- BEST TRAVEL HEADPHONES YOU CAN BUY TODAY
0 notes
Text
5 Best Studio Headphones For Mixing And Recording
The studio headphones for mixing and recording play an essential role in elevating the productions while using them in studios. If you are looking to buy a pair of the best studio headphones, you must find the correct option that satisfies your needs and budget. In order to monitor the live recording, you must look for closed-back headphones so that the sound would not leak into the microphone. As you have to spend hours in the studio recording the right track, so the headphones must be comfortable as well. There are various companies that manufacture several headphones that can be used for studio recordings. You need to choose the right one wisely. In this article, we have listed some of the best studio headphones that can be used for recordings and mixing at studios.

Audio-Technica ATH-M50x
Audio-Technica ATH-M50x is an excellent pair of headphones that have been designed especially for mixing and recording purposes at studios. It has a lot of impressive features and delivers stunning sound quality. They are wired over-ear headphones that are well-known for their recording abilities. They are well-built and very comfortable to wear. They are a good choice for mixing, recording, and mastering at studios.
AKG K371
AKG K371 is another excellent pair of headphones for mixing and recordings. They offer great listening and recording experiences and provides stunning sound quality. They come with a wide range of features that are necessary for a pair of studio headphones whose function is to provide better performance in recording and to mix at studios. They are very comfortable to wear and a bit underemphasized in the treble range.
TIN AUDIO T3
TIN AUDIO T3 is one of the best pair of in-ear headphones that have been designed especially for studio purposes and offer great performance while mixing and recording audios at studios. They have a lot of impressive features and come with a dynamic transducer. They are also very comfortable to wear, and because of their in-ear design, you can also experience reduced ambient sound. They are a great choice for a neutral sound profile.
Sennheiser HD 800 S
Sennheiser HD 800 S is a fantastic pair of over-ear headphones that provide extra comfort and an excellent recording experience while recording at studios. They also come with various useful features and are very comfortable to wear. These headphones are well-built and well-suited for mixing audio content. They offer a well-balanced mid-range, clear, and accurate sound. They also allow you to connect them to a mixer with the help of a 1/4″ TRS cable that you will get along with these headphones.
SENNHEISER HD 560S
SENNHEISER HD 560S is one of the cheapest and best pair of headphones that you can consider buying this year. If you are running low on your budget and looking to buy a pair of budget-friendly studio headphones that can provide better performance while mixing and recording audio content, SENNHEISER HD 560S is a perfect choice for you. They come at a very affordable cost and possess various impressive features. It is a pair of over-ear headphones and highly recommendable if you are looking to buy the best studio headphones under such a low budget.
This article concludes with some of the best studio headphones for mixing and recording audio content that you can consider buying on today’s date according to your choice, priority, and budget.
Source- Best Studio Headphones For Mixing And Recording
0 notes
Text
5 BEST TVS FOR THE XBOX SERIES X YOU CAN BUY IN 2021
Gaming is real fun, and playing games on an enhanced and compatible television makes your game-playing experience more stunning and impressive. However, there are various devices such as tablets, smartphones with a bigger screen, gaming monitors, and more, but the most amazing experience of playing games comes when you play them on a high-quality possessing gaming television. If you have an Xbox Series X, you may need a new compatible TV. There are a number of companies that manufacture various gaming TVs that are compatible and most suitable for Xbox Series X. In order to make the highlights pop, you must look for a TV with a nice HDR color gamut so that it can produce a higher brightness and rich colors. In this article, we have listed some of the best TVs for the Xbox Series X that you can buy in 2021.

LG CX OLED
LG CX OLED is one of the best OLED TVs for Xbox Series X available in the market on today’s date. It has the ability to produce great brightness and rich colors. It delivers stunning performance and offers an amazing gaming experience. LG CX OLED TV has a 4K resolution and an OLED panel that delivers outstanding picture quality for almost every type of content. It also features an infinite contrast ratio in order to provide you with perfect blacks. It is the kind of gaming TV that every gamer would desire if they have Xbox Series X.
Samsung Q80/Q80T QLED
Samsung Q80/Q80T QLED is an excellent QLED TV for Xbox Series X that delivers stunning performance and offers a great gaming experience. It comes with a wide variety of impressive features. This TV has an LED panel that delivers mind-blowing picture quality and is capable enough to take all the advantages of the Xbox Series X. The VA panel produces deep blacks and makes this TV an amazing choice for darker rooms. It also possesses higher brightness and unique reflection handling in order to provide great visibility in well-lit rooms.
VIZIO P SERIES QUANTUM 2020
If you have an Xbox Series X and you are planning to buy a 4K gaming TV for your home at an affordable cost, VIZIO P SERIES QUANTUM 2020 is one of the cheapest and affordable 4K gaming TV that you can consider. It delivers a fantastic gaming experience and delivers a great performance. This TV comes in two bigger screen sizes – 65-inch and 75-inch. It also comes with a VA panel that is well-suited for darker rooms. In order to produce rich colors in HDR content, this TV comes with an amazing color gamut. It has a refresh rate of 120Hz and a great response time. It also supports FreeSync. It is the highly recommended 4K TV that you can consider for your Xbox Series X if you are running low on your budget.
Vizio M7 Series Quantum 2020
Vizio M7 Series Quantum 2020 is another excellent 4K gaming TV from Vizio that delivers stunning performance while playing games on your Xbox Series X and comes under a low budget. Although this TV is a cheaper alternative to many other 4K TVs compatible with Xbox Series X, it possesses a lot of impressive features. It is also a very budget-friendly TV that comes with almost all the required features for an Xbox Series X under a low budget. It comes with a 60Hz panel that allows you to play games of up to 60 frames per second only. It also comes with an appreciable low input lag, a feature of Black Frame Insertion, and a great response time.
HISENSE H8G
HISENSE H8G is an excellent 4K gaming TV for your Xbox Series X and can be considered as one of the brighter alternatives available in the market on today’s date. It is a 4K resolution TV and comes with a wide variety of features. It is also available in various screen sizes and also supports VRR. It is also very suitable for brighter rooms because of its peak brightness. It is also a highly recommendable 4K gaming TV for your Xbox Series X if you are running low on your budget.
This article concludes with some of the best TVs for Xbox Series X that you can consider buying if you are planning to purchase a new TV for an immersive gaming experience.
Source- 5 BEST TVS FOR THE XBOX SERIES X YOU CAN BUY IN 2021
0 notes
Text
HOW TO UNINSTALL MICROSOFT EDGE ON WINDOWS 10
If you don’t like Microsoft Edge on your Windows 10 computer, you can uninstall it and say goodbye. We are going to illustrate everything it takes to remove it from your PC.

No doubt that Microsoft Edge is a good internet browser as it does have some remarkable features. However, some people don’t like using it as they are used to with the most popular and efficient web browser, Google Chrome. We also love Google Chrome instead of Edge since it provides far more convenient and better browsing features. Since most of the people in the world use the Google search engine, they surf the internet via Chrome for a better user experience.
In the latest Windows 10 update, Edge has become the default internet browser. However, there is a method to remove it safely. Let’s learn that.
Removing Microsoft Edge from Windows 10
There are several benefits of completely deleting the Edge browser from your PC. By removing it, you can actually free up some space in your system partition and hard drive. It will also improve your computer’s performance by reducing the load on your processor and RAM. Here are some ways to remove it:
Via Recommended Method
You can uninstall this software on your computer using the standard uninstallation process. Here is how to make it happen:
First of all, hit the Start button on your keyboard.
This will open the start menu.
Now please search for Microsoft Edge.
As the browser appears in the start menu search results, please perform a right-click on it.
Find and tap the Uninstall option from the dropdown.
When the confirmation prompt appears, please select Yes.
Follow the instructions on your screen to remove it.
After the successful uninstallation process, click on the Power button inside the start menu.
Select the Restart option to reboot your computer.
Check if you have completely removed the Edge browser from your PC or not. Keep in mind that this process will only remove Microsoft Edge from your computer. However, it will not wipe out the residual files of the browser. Do not worry as they won’t consume much space on your computer drive.
Using a Third-Party Utility
There are some popular Windows 10 third party uninstaller applications available. In this method, we are going to use one of them. We are about to use Revo Uninstaller, a third-party utility, to remove apps from Windows 10. Let’s do this together:
First of all, open the Google Chrome web browser on your computer and then search for Revo Uninstaller.
Select the first result and download the Revo Uninstaller to your computer.
After that, open the downloaded Revo Uninstaller file.
Ensure that you have close all other applications on your computer, including Microsoft Edge.
In the Revo Uninstaller window, find and select the Microsoft Edge application.
Organize a restore point and then continue to the process.
Now please install the application using the instructions on your screen.
After the process completes, please restart your computer as well.
There are countless benefits of using Revo Uninstaller. One such benefit is that it also removes leftover and residual data of the apps that you uninstall.
Now that you have uninstalled Edge from your computer, you can use your favorite internet browser to surf the internet. No doubt that most people love Google Chrome, but Opera Mini also provides comparable features. So you can also check out Opera Mini and other popular browsers to know which one is best for you.
We hope the information we have given you in this article was helpful and informative. Thank you.
Source- HOW TO UNINSTALL MICROSOFT EDGE ON WINDOWS 10
0 notes
Text
HOW TO UNINSTALL MEET NOW FROM WINDOWS 10
In this article, we have discussed the ways you can use to uninstall Met Now from your Windows 10 PC. Microsoft has made a vast number of changes to its operating system after the May 2020 update, and these changes have not gone well with most of the users. It has changed the working of the Alt+Tab switcher alongside the size and appearance of the tasks appearing in the overview menu. Now, users are facing another issue, i.e., Meet Now will now be seen permanently on Taskbar on the Windows 10 PCs and laptops, and it’s something that individuals haven’t even asked for. So, if you are among the individuals who want to clear out Meet Now from your Windows 10 PC or laptop, follow the steps mentioned below:

Permanently Uninstall Meet Now from Windows 10
Below are the steps that you can use to uninstall Meet Now from your Windows 10 PC:
The method mentioned below uses Group Policy Editor to permanently uninstall Meet Now from your Windows 10 PC. However, due to the unavailability of the Group Policy Editor on the Windows 10 Home, we have mentioned a workaround that you can use to enable it. So, proceed further to enable the Group Policy Editor on your Windows 10 Home. In case you are an Enterprise, Windows 10 Pro, or any other edition user, you need to head over to the next step, straightforward.
After doing that, tap on Windows and further search for “gpedit.”
Then, tap on the “Edit group policy.”
Now, you need to head over to Administrative Templates under the User Configuration section. Further click on Start Menu and Taskbar.
Now, scroll below and search for “Remove the Meet Now icon.”
Then, double-tap on the option and choose “Enabled.” Further, tap on “OK.”
Now, you need to restart your PC, and you will notice Meet Now removed completely from your Windows 10 PC. That’s it.
If you want to Meet Now to be enabled, then follow the similar steps as mentioned above and select “Not Configured” in step #5. You are done.
So, these were the steps following which the users can disable Meet Now from their Taskbar area on their Windows 10 PC. Following the steps mentioned above, the users won’t need to bother about Meet Now on any of their accounts on PC. This also means that your PC will be very much responsive every time you reboot it, thereby reducing the startup process.
Source- HOW TO UNINSTALL MEET NOW FROM WINDOWS 10
0 notes
Text
How to Turn On and Turn Off Windows 10 Xbox Game Bar
Windows 10 is an operating system that has many user-friendly and highly practical features. For example, it has a built in game mode or Xbox game bar, enabling users to optimize their computer while playing games. This game bar also has many other exciting features, such as you can record your game, broadcast your gameplay, and narrate while playing. Many users love this option on Windows 10 computers. However, some people don’t like it since it sometimes accidentally triggers when users press particular keys simultaneously.

There are dozens of benefits of it on Windows 10, but you will need help to make this happen if you wish to get rid of it. In this guide, we are going to illustrate how you can turn it off or turn it on when needed.
Disabling Xbox Game Bar on Windows 10
Here is the in-depth detail that you need to disable the Xbox game bar on your computer safely:
First of all, you have to turn on your computer on which you wish to disable the Xbox game bar.
After turning on the computer, please navigate to the Windows settings. You can do that by opening the start menu and then clicking the cog like button. You can also open the settings by just pressing the Windows + I keys on your computer keyboard. We highly recommend using the Windows + I keys method to open the windows settings since it will save you time.
Once you are in the settings window, you need to find and select the Gaming section.
Under that section, find and select the ‘Enable Xbox game bar’ option.
Now make sure this option is disabled. If it is enabled, then please click on the switch to turn it off.
Now restart your computer to let the computer make changes accordingly to your settings.
Congratulations, you have successfully disabled the Xbox game bar on your Windows 10 computer. Now you can use your computer without worrying about it at all. Keep in mind that it won’t appear on your computer until you enable it again. Thanks to Microsoft, it has provided its users with absolute control over the Microsoft game bar.
Enabling Xbox Game Bar on Windows 10
If you wish to enable the same, then you will need to follow the instructions that we are giving you down here:
First of all, find your way to the settings of your computer. You can either press Windows + I keys on your keyboard or manually access it using the start menu.
As the settings app opens on your screen, find and select the Gaming section as we did earlier.
After that, find the option that reads ‘Enable Xbox game bar.’
Now please make sure it is enabled. You can switch the toggle button to enable it.
Restart your computer and experience the changes that you made recently.
Congratulations, you have successfully enabled the Microsoft game bar on your Windows 10 computer. Now, whenever you press Windows + G keys on your keyboard, you will access Windows 10 Xbox game bar.
This game bar is full of useful features. You can record your computer screen, gameplay, and other things using it.
If you have found this article helpful and informative, then it is a pleasure for us. We are happy to have you on our website.
Source- How to Turn On and Turn Off Windows 10 Xbox Game Bar
0 notes
Text
HOW TO USE CLIPS ON YOUTUBE TO CREATE SHORT VIDEO CLIPS
In this article, we have discussed the ways following which you can use Clips on YouTube to create short video clips. YouTube has recently initiated the process for testing Clips. It’s the most recent feature; the company has introduced. It lets the userscreate short clips from live streams and videos. Using this addition, individuals can conveniently share interesting moments from a videohassle-free. The clips generated can be of duration between 5 seconds and 60 seconds. This article discusses how users can make useof the new Clips feature on YouTube to make short video clips.

Use Clips on YouTube
YouTube states that Clip is currently in limited alpha, and therefore not every channel supports the Clip feature. Meanwhile, YouTube has also selectively made this feature available for a certain set of channels.Considering thislimitation of YouTube, we have also introduced a third-party solution later in this article that replicates the functionality of Clips. You can use this as a solution if Clips is not supported by your set of channels.
Clips on YouTube Web
Below are the steps mentioned with the help of which you can create clips on YouTube Web:
In the web interface of YouTube, you will observe arecently introduced ‘Clip’ button. Please do remember, this button will appear only when the feature would be available on the channel. Once you have located the button, you need to press it and further wait till the clip creation prompt appears. Meanwhile, you need to ensure that you are logged in to YouTube; otherwise, the ‘Clip’ button won’t appear on your screen.
Further, you need to set the exact duration using the preview window. Set the desired duration between 5 to 60 seconds for the clip. Do note that the exact timings can be specified under the timestamp box appearing just above the preview window. Just to recall, clips can be given a duration from 5 seconds to 60 seconds.
Proceed further by adding a title to your obtained clip, and now, press the “Share Clip” button in order to share the clip with your friends. Meanwhile, you can also share the clip directly to the social media platforms like Twitter, Facebook, Twitter, Reddit, KakaoTalk, Odnoklassniki, VK, LinkedIn,Pinterest, Mix, Tumblr, and even email by clicking on the link.
You can then send the generated video clip to your colleagues. On accessing the video, your friendswill be able to see just the highlighted portion of the video. In addition to that, the highlighted portion will continue to play in a loop until the userpressesthe “Watch Full video” button, which will redirect them to the entire video.Also, the recipient will be able to see the title of the clip.
Clips on YouTube Mobile
At present, Clips is limited to only the Android platform only. However, we will the company will launch the iOS version of this feature in the upcoming future. With that said, let’s proceed further to the steps tocreate clips on YouTube mobile.
Launch the YouTube app and press the ‘Clip’ button.
Now, you will be redirected to the interface of clip creation. On the YouTube mobile app, you won’t be able to specify the time duration in a timestamp box. Rather, you will be given the slider as an option to pick the accurate time. After finalizing the duration, click on the option “Share Clip” to share the specific portion of that video.
Theshare sheet of Android will appearready to help share the clip quickly among your friends. Meanwhile, you can click on the option “Copy link”in order to copy the clip’s link to your clipboard.
Third-Party Solution to Clip Videos
Being still on alpha, Clips does not have support for a vast number of YouTube channels out there. So, we have come up with a workaroundso that you can get the replicated functionality of Clips until it gets added to YouTube, officially. The method discussed here varies primarily according to which, aspect of Clips interests most of the users.
If you are among the users who want to share specific moments from a YouTube video, it can be done using the timestamps. The below-mentioned steps will help you do the same:
Play a YouTube video and tap on the option “Share.”
Further, checkmark the option “Start at <duration>” from the Share page in order to play thevideo from a specific timestamp. With this way, your colleague will be redirected to the specific timestamp that has been set by you whenever the video is opened.
However, if you are planning to make use of Clips in order toloopa few particular portions of any of your videos, you can get your hands on a specific Google Chrome extension named “Looper.”Using this extension, you will be able to loop a specific portion of a video with minimal effort. Once you have downloaded it, you will observe a new“Loop” button appearing on the interface, offering you access to a neat slider that you can use for controlling the durationof the loop.
So, these were the instructions using which you can try YouTube Clips tosharehighlights. With “Clips,” YouTube has succeeded in bringing the clipping feature to the platform. This feature is, however,already available to use on several other live streaming platforms like Twitch and more. With that said, let’s see if the implementation of Clips by YouTube emerges out to become an instant hit for sharing crucial moments in a video or not. This is something we all need to wait for as the results can only be finalized when “Clips” get rolled out to all the channels by YouTube.
That’s all from us for this article. Please do let us know what are your opinions on “Clips” in the comment section below:
Source- HOW TO USE CLIPS ON YOUTUBE TO CREATE SHORT VIDEO CLIPS
0 notes
Text
WILLIAM EUBANK WILL BRING BACK “PARANORMAL ACTIVITY” FRANCHISE
The director of the “Underwater” film, William Eubank, is looking forward to bringing back the fan-favorite horror franchise titled “Paranormal Activity.”
The reboot will mark the return of Jason Blum and Oren Peli as producers. We should remind ourselves that Oren Peli is the creator of the franchise, and Blum is a veteran producer.

The reboot will also see William Eubank collaborating with the director of the 2017 black comedy thriller film “Happy Death Day,” Christopher Landon. A new report published by reliable sources like AV Club and The Hollywood Reporter alludes to the fact that William Eubank and Christopher Landon are working hard to bring the fan-favorite franchise “Paranormal Activity” back to life.
William Eubank, who has recently made a considerable name for himself for the film “Underwater,” is set to play a pivotal part in the development of the reboot. He will direct the film, and Christopher Landon, who is a veteran writer of the “Paranormal Activity,” having been involved in the writer’s team of the last four installments, is set to write a story for the film.
Of course, the producers could have turned to Landon to direct the film as he has earned a considerable amount of fame for his direction capabilities.
Paramount will oversee the development of the film along with distributing it.
Oren Peli, who is widely regarded as the mastermind behind the franchise, will be back as a producer in the production team. Jason Blum will also play a pivotal role in the production team under the banner of his production company “Blumhouse.” Alongside writing, Christopher Landon will also be involved as the executive producer alongside Steven Schneider.
The franchise “Paranormal Activity” is the brainchild of Oren Peli, who is renowned for producing, writing, and shooting the first iteration. The franchise is a collection of anthological horror films that commonly follows a specific family being terrorized by an entity. The film commonly follows a CCTV camera found footage mode of storytelling, which has become a trademark of the franchise.
The films have earned accolades for their creative use of CCTV cameras and cell phones and have been highly credited for setting up new trends in the style of jump scares.
The “Paranormal Activity” movies have been considered one of the best horror films made in modern times, and their high credibility relies on them being made on a smaller budget and giving colossal affluence in returns. The first “Paranormal Activity” film written and directed by Oren Peli has been widely considered to be one of the profitable horror movies ever made. Let me throw you some statistics. It was made on a meager sum of $15000 and managed to earn a massive sum of almost $200 million.
If it is a Paranormal Activity film, then we can anticipate that the film will most likely be relayed in a found-footage mode.
The latest Paranormal Activity film has a scheduled release date of March the 4th, 2022. Before he directed “Underwater,” William Eubank earned a lot of praise for his work in the film “The Signal.”
Christopher Landon has also tasted success recently with “Freaky,” which was a comedy thriller and starred Vince Vaughn and Kathryn Newton in the leading roles.
Source- WILLIAM EUBANK WILL BRING BACK “PARANORMAL ACTIVITY” FRANCHISE
0 notes
Text
THE UNEXPLORED ZACK SNYDER MOVIE WHICH WOULD HAVE SHED SOME LIGHT ON THE TRUE EVIL NATURE OF JOKER
Zack Snyder had high ambitions for the DCEU when life hit him so hard that he got stuck up in his own personal tragedy. However, now he is back to release his version of Justice League and revealing details about his plans for different characters, which is unlikely to ever manifest on screen.

Zack Snyder had a very interesting idea about a Batman-Joker film, which would have showcased the death of Batman’s son, Robin, and would have explored a complex relationship between him and his archrival, Joker.
Regardless of the fact that he is unlikely to ever make such a film, Zack Snyder has revealed in his interview with Vanity Fair that he always had this great desire to cinematically show the death of Batman’s son Joker. Zack Snyder gave the interview as a promotional effort for his upcoming four-hour-long film “Zack Snyder’s Justice League,” which is going to be released on HBO Max in March.
Snyder explained in the interview that if he gets to direct a Batman solo film, which of course, he will not get, then he would love to explore the death of Robin. The unexplored Zack Snyder directed Batman film would have followed Joker in his killing of Robin and how he had burnt the Wayne Manor to the ground.
After Christopher Nolan directed the 2008 venture The Dark Knight, we haven’t had a single Batman-Joker theatrical adaptation, and Zack Snyder now reveals that his film would have shed light on Batman’s complex relationship with Joker in a bit more detail.
Zack Snyder had given some foreshadowing in his 2016 film, which probably was one of the best parts of the entire film. He had included a scene in which the Batman looks over the filthy Robin suit with graffiti in front, possibly made by Joker, to mock Batman.
Actually, the graffiti was “Joke’s on You Batman,” and it was a quiet reference to one of the most famous Batman novels of all time. Yes, it was a slight tribute to the 1998 comic run titled “A Death in the Family.”
In the comics, Robin, a superhero himself, gets abducted and brutally murdered by Batman’s oldest nemesis, Joker.
At that time, DC Comics had asked for public opinion on whether they want Jason Todd (another iteration of Robin) to live or die. However, Zack Snyder’s idea looks a little different because of his plans to let Joker burn down the Wayne Manor. It could also be a slight reference to the 2008 film The Dark Knight, in which Alfred alludes to the fact that men like Joker want nothing, but the destruction of the world, which was also seen in the 2019 film “Joker.”
While you may never get to see Snyder’s onscreen interpretation of Robin’s death, you can rest assured that he is about to release his 4-hour long film “Zack Snyder’s Justice League” soon on HBO Max. Some reports have suggested that in the film, Ben Affleck’s Batman does have a scene with Jared Leto’s Joker, which can make things interesting.
Source - THE UNEXPLORED ZACK SNYDER MOVIE WHICH WOULD HAVE SHED SOME LIGHT ON THE TRUE EVIL NATURE OF JOKER
0 notes
Text
Shelley Duvall Introspects on the Tough Work She Did on the Production Sets of “The Shining”
In a scarce instance, the actress Shelley Duvall has sat down for an interview with “The Hollywood Reporter,” and has introspected on her work life and especially her time during the filming of the cult classic “The Shining.” She had also shed some light on her well-debated interview with Dr. Phill in 2016 and why she decided to part ways with the Hollywood industry.

All the fans of the film “The Shining” have wondered over the years why the actress Shelley Duvall decided to leave the spotlight world altogether. They have questioned whether Stanley Kubrick’s harsh behavior had played a part in her turning her relationship with the industry sour. However, the actress has recently sat down for an interview with “The Hollywood Reporter” and has shared some things, which the public did not know about previously.
Shelley Duval has appeared for an interview after many years and has shared that working with Stanley Kubrick was not easy for her. She introspected on his working method and said that the veteran director never used to be done with a scene up until the actors have taken part in at least 35 takes, and that is what used to make things difficult for her on the set. She added that 35 takes means she had to cry and carry a boy for the whole day, and that does not include the rehearsals. It was quite strenuous and mentally challenging.
She refrained from saying that Kubrick caused her to hate acting altogether, but she did add that his modus operandi would sometimes use to bring out her rebellious nature. She did not forget to add that there was a side of Stanley Kubrick, which was kind and considerate towards her; however, she felt a violent and aggressive side of him on the set.
She shared the fact in her interview with the Hollywood Reporter that eventually, a time came when her body couldn’t tolerate the emotional torment any further.
She shared that there were days and weeks where she would wake up and cry just to think about the whole working day where she would just get to walk around with a kid feeling afraid and tortured.
However, she is quite proud that she overcame all challenges and did her job on the sets of “The Shining.”
But, she wonders how she found her strength and courage to be able to do what she did with her character in “The Shining.”
She stated that even her co-star Jack Nicholson expressed his disbelief over the emotional content of the entire story.
Anjelica Huston, who was Nicholson’s partner at that time and is Duvall’s longtime friend, has also revealed in her piece that she had an idea that Duvall is not pretty happy with the film.
Huston also said that people on the set needed to be a bit more caring towards her, and though she might have misinterpreted the whole situation, she sensed a little apathy in Kubrick and Nicholson towards Shelley Duvall.
Shelley Duvall also praised Nicholson for his extraordinary acting, and the scene where he chases her with the bat really took a toll on her. She wondered in the interview how many women in the world actually go through with all of this on a daily basis.
Source- Shelley Duvall Introspects on the Tough Work She Did on the Production Sets of “The Shining”
0 notes
Text
ROBIN WRIGHT TALKS ABOUT HER FILM “LAND” AMONG OTHER THINGS
The actress has recently given an interview to “LIVE with Kelly and Ryan,” the actress renowned for her performance in the film “Forrest Gump,” has talked about her latest film “Land” and has shared her thoughts on producing the film in Remote Alberta situated in Canada to make the story look more real.

It is a well-documented fact that Robin did really work hard to get the filming of “Land” done. Not only, she had to go to the jungle to film it; she also had to call “bear whisperer” to keep all the cast and crew completely safe from any danger from the wild animals.
Robin Wright, also famous for her role of President Claire Underwood in Season 6 of House of Cards, is playing the double role of director and the lead actress in the film “Land.” The film explores her character “Edee Mathis” as she moves to a small cabin in the forest battling depression and suicidal tendencies. However, the kindness of the local stranger soon teaches her how to lead her life and gives her a new way and purpose.
However, as she filmed in the locality of Alberta (situated in Canada), she had to take care of the fact that the pet bear of the production team does not get taken away by the local grizzlies, who were taking quite a liking for the animal.
She explained that the team had to do a scene for the film where the pet bear gets eaten by another bear, and it was difficult to keep pet bears on the set because the team had wild bears roaming around the production set all day long.
She explained in her interview to “LIVE With Kelly and Ryan” that her team had to hire a bear whisperer to keep wild beers away because the set did become a little unsafe for everyone present there.
However, Robin Wright has explained that she has no regrets about shooting in the Alberta area of Canada. She explained in the interview that the team had to go there to shoot the scenes in a really authentic way.
She also added that being out there in the wild felt like medicine for her. It is nice to get the city away from your lungs, and she shared that it was a nice feeling for the whole crew to be out there and hear birds and the ruffling of leaves instead of the noise and horns of trains.
In one of her other interviews about the movie, she explained that she was a little reluctant and under-confident about directing the movie. However, she assured herself that she could do it. She had shared that she needed to tell herself that she had to be committed to her confidence and her skills to make it done.
Robin Wright also has experience of directing other independent films and few episodes of House of Cards.
Recently, she has been a pivotal feature of films like Blade Runner 2049, Wonder Woman, and The Dark of Night.
Source- ROBIN WRIGHT TALKS ABOUT HER FILM “LAND” AMONG OTHER THINGS
0 notes
Text
HOW TO DISABLE AUTO-PLAY IMESSAGE EFFECTS ON APPLE WATCH
In this article, we have discussed the ways using which you can disable AutoPlay iMessage effects on your Apple Watch. It’s easy and fun to use iMessage effects like confetti, lasers, and celebration. They are as pretty exciting as the hilarious Animoji and Memoji stickers that hardly fail to lose their charm. Even though we appreciate everything about the screen and bubble effects, disablingtheir auto-play in between the chat threads is highly recommendedto prevent battery drain issues. So, we have come up with the detailed instruction on how you can disable auto-play of the iMessage effects on an Apple Watch in a way similar to your iOS devices.
Turn on/off Auto-Play iMessage Auto Effects on Apple Watch
It would have been pretty much easier if the toggle to enable or disable theiMessage auto-effects ofwatchOSif it would have been inside the Messages app setting; rather, you’ll find it underthe Accessibility setting on both watchOS and iOS, and this is the main reason why most of the individuals don’t know how to stop the effects from getting played automatically in the chat threads on their Apple Watch. Some of us might already be wondering if they can get the option to control these effects. With that said, let’s proceed further to the steps on how to disable auto-play iMessage auto effects.
On your Apple Watch-paired iPhone, you need to launch the Watch app.
Further, you need to make sure that the My Watch tab is selected. Further, tap on the Accessibility option.
Now, click on the option “Reduce Motion.” This feature is designed in order to restrict automatic resizing and animation of the user interface on the home screen of anApple Watch.
Further, disable the switch appearing immediately next to Auto-Play Message Effects to prevent the full-screen effects from getting played automatically within the Messages app.
Once you have followed the above-mentioned steps, the iMessage effects won’t get played automatically. Further,if you ever need to check them, clicking on the Replay button would work well and good. However, if you want them to appear in full glory again, head over to the same settings and enable the toggle appearing right-next to the Auto-Play Message Effects.
In case you want to turn-off the auto-playing of the message effects on your iOS device, proceed to the Settings app, further click Accessibility, and then on Motion. Then, disable the Auto-play Messages Effects toggle.
So, these were the steps using which you can turn off the iMessage effects from getting auto-played on watchOS. Disabling this feature would help prevent the battery drain issues of your device.With a vast number ofimpressive features like handwash detection, sleep tracking, and battery health, watchOS 7 is a significant upgrade. Do let us know in the comment section which feature has impressed you the most.It would be great to have your thoughts in the comments section below.
Source- HOW TO DISABLE AUTO-PLAY IMESSAGE EFFECTS ON APPLE WATCH
0 notes
Text
HOW TO CUSTOMIZE AN APPLE WATCH BEGINNERS GUIDE
Do you wish to customize your Apple Watch as per your requirements and preferences? If yes, then you have arrived on the right website. We will try to give our best knowledge of how you can manipulate your Apple Watch as per your routine and choice. Let’s get started.

Customizing Apple Watch
While the Apple Watches are pretty good in terms of quality and style, they lack when it comes to customization compare with other smartwatches. However, you can customize your Apple Watch using some particular settings on it. We are going to share everything that you can change on it to make it your own. Google’s Wear OS is a far better operating system for smartwatches in customization and user preferences. Watches that run on Wear OS are highly customizable, and you can almost change everything on them.
Customization options are a little limited in watchOS, but that doesn’t mean you cannot customize it at all. There are some options to change its appearance, styling, and other things.
When your Apple Watch connects to your iPhone, you can use the watch app on your iPhone to customize it.
All you have to do is open the watch app on iPhone, click on App View and then select how you want your App Menu to appear on your watch. You can select whether you wish to see a grid view or a list of apps. So it is a good example of Apple Watch customization options. There are plenty of other ways to edit the items and other things on your watch.
Here are the main items that you can edit:
Watch Faces
What kind of dial do you want to see on your Apple Watch screen? Apple allows its users to select and use different watch faces on their Apple Watches. If you wish to apply a new watch face on your device, simply swipe right or left on the screen of your watch. You have to slide the screen when the current watch face appears.
If you have recently bought your watch, you may not see various watch faces by swiping right or left on your watch’s current face. You will have to first set up the alternate faces for the Apple Watch. To do so simply, swipe right or left and then select the New button. You will see a bunch of different dials for your watch. You can choose any that you like to apply. To see other faces, simply swipe up or down to see the whole list of watch faces. That’s how simple it is to apply a new watch face on your Apple wearable.
You can also set a different dial for your watch using your iPhone. Just navigate to the Watch app on your iPhone and then select the Face Gallery option. Here you will see even more options to select than what you see on the watch. If you find any watch face interesting, just click it and then select the color you want to choose for it. See, you can even change the color of your watch face if you customize it using the iPhone.
Display and Brightness Settings
Besides changing your watch faces, you can also customize the settings. Open the watch application on your iPhone and then navigate to Display and Brightness. There you can change the brightness level of your watch. You can also change your watch’s text size to adjust the text size as per your eye vision. You can also select whether you wish to keep the clock always on or off. If you choose to keep your device always on, the battery will drain faster. You can also make the text bold to make it easier for you to read them. You can also access these settings through your watch without touching your iPhone.
Another good thing that we liked about these devices is that you can also apply a photo as a watch face from your gallery. To do so, simply navigate to the Photos app on your watch. Open the picture that you wish to set and then click the small watch button on the bottom left corner. This will help you apply the photo as a background on your watch. Some users love this feature so much as they can set up any of their favorite photos as a watch face on their wearable.
However, you have to be very careful about the image dimension while applying an image as a background on it. If you use an incorrect image size to use as a background for your watch, you will end up with a cropped photo. You can carefully edit the image on your computer if you wish to apply it to your wearable background.
We hope you have liked this article and found it entertaining.
Source- HOW TO CUSTOMIZE AN APPLE WATCH BEGINNERS GUIDE
0 notes