
bumblebeesky
DIY *nix Tutorials
Hello, I'm Utkarsh Anand. I was a third year BS Physics student at Indian Institute of Technology, Kanpur. I've set this blog up for DIY Linux and NetBSD tutorials. Some of the blog posts were created to share my experience with The NetBSD Foundation during GSoC 2017.
9 posts
Don't wanna be here? Send us removal request.
Last Seen Blogs

clambake-67
Profondo Grafo

gluxliteled
Gluxlite Automotive L.E.D.

seisyl-lestrange
Scott Le Faye

lightyaoigami
we share the same fate

lady-sugar-nee
✩Lucida Lyrae✩
Link
1 note
·
View note
Link
Initial GUI setup with #FreeBSD can sometimes be troublesome for beginners. Here’s a quick guide.
0 notes
Text
Wrapping Things Up
It has been a wonderful journey so far. I feel blessed to have worked with such experienced people at The NetBSD Foundation. I would like to thank all the people I’ve interacted to during the entire period for helping me out and teaching me wonderful new things about how the release engineering team operates and how important the automation process is.

This post pretty much wraps everything up and contains all the relevant links related to the project. Here’s a list:
Here’s a link to my clone of the original anita repository. It contains two main branches.
The master branch is for testing an my own bookkeeping purposes. It contains many commits that were later reverted.
The origin/Merge-safe branch is the one that is regularly being merged to the master of the the original anita repository. It basically contains squashed commits of the finalised changes that are ready to be merged.
Here’s a link to the pull requests created by me in the original anita repository. As of now, all, but the last one have been accepted. The last one is still pending, as the owner of the repository is travelling and is on a rather tight schedule. Do note that, it shows that two of these were closed, but they were actually merged. This is because the owner had done it from the command line and for some reason github didn’t reflect the desired status.
Here’s a link to the documentation for anita. A part of it has been written by me.
Here’s a link the The NetBSD release engineering page. I feel really honoured to know that my work is already being utilised by The NetBSD Foundation.
Here’s a link to the official anita website, just in case you’d like to know a bit more about it. I’ve written a lot about it in my earlier blog posts. The two blog posts prior to this one have are related to this project.

Finally, to conclude, I would like to let you know that we have successfully added support for the following ports to anita:
NetBSD/pmax
NetBSD/hpcmips
NetBSD/evbarm
NetBSD/landisk
NetBSD/sparc64
NetBSD/vax
With this, we have achieved what we had planned when we started off. Since, we had enough time to spare in the end, we decided to try out another one, NetBSD/amiga, which is almost about to be merged. The only thing left as of now is the structure of the functions involved for adding support and this will be looked into, after Andreas, the owner of original anita repository, is free. Everything else has been tested and rectified to make the procedure suitable to be used by anita.

Most of the things that we have done, that is testing and debugging, cannot be linked as I didn’t have commit rights to any of those repositories. Thus, only the links associated to anita have been provided.
I’ll continue to contribute to NetBSD and anita in any way possible.

0 notes
Text
From CATS to evbarm-earmv7hf: How we got our fisrt arm port supported on Anita

When I started the GSoC project, we had almost nothing to begin with. Most of the ports either required manual installation (without sysinst) or didn’t even boot. So, we decided to test as many ports as possible and get at least one port per architecture supported in anita. After about a couple of weeks of building releases and testing them, we finally decided on getting CATS as our first supported port in anita. But, there were a few major issues that needed to be fixed before I could start working on the anita library (and the controlling script).
The Problem

sysinst not working: sysinst, the menu-driven NetBSD installation tool, was not working for CATS. Everything went fine until it started decompressing sets (compressed files that contain parts of the NetBSD operating system). It used to crash randomly while doing that and we were clueless as to what was happening. So, we decided to try out manual installation.
Manual installation not working: For manual installation, what we basically did was, made (or downloaded/built) an ISO out of the sets and created a raw disk image for installing the system on. Then, we attached it to the Virtual Machine. Then we used issue a ‘newfs’ command to create partitions on the raw disk image. Sometimes we also needed ‘disklabel’ for labeling the disks. Then we used to mount the ISO and migrate to the folder containing the sets and issue a command to decompress all the sets onto the required disk image followed by making device nodes and editing a few mandatory configuration files. Now, this went as expected until we again hit the point where we decompress the sets. It got stuck again, and it used to get stuck randomly at anywhere while decompressing. We were quite puzzled as to what was actually happening.
The ‘not so jaw-dropping’ Solution

While my mentor, Christos Zoulas, was experimenting with the port, he found out that we didn’t have enough RAM attached to the virtual machine. After adding enough RAM to the Virtual Machine, we were finally able to install the system. Sounds cool? Not yet! We failed to boot it using the GENERIC kernel on subsequent reboots! Turns out the kernel couldn’t find the path to init. init, as you might be knowing is the first process to be started. From here on, the normal boot process into the user-space starts. We were startled by the fact that although, we had init present on the disk, the kernel was still unable to find it. Later on, we found out that many of the files on the disk were filled with trash and no useful information was contained in them. This was a huge disappointment.
Our final attempt at ‘Trying to bell the CATS’

Now that we were unable to figure out what was going wrong, or where the problem was, the Virtual Machine System or NetBSD port, we finally decided to conduct a Git bisect session. We were quite optimistic as our last bisect session for NetBSD/pmax was successful and we were able to fix it. After hours of building and testing, we failed to spot the error, and nothing seemed to be working.
Jared, the saviour

While we were busy trying to get CATS working, another member of The NetBSD Foundation, Jared McNeill, who happens to be an expert of IPTV platforms, was working on NetBSD/evbarm-earmv7hf port, trying to get the VEXPRESS_A15 kernel working. Since I wasn’t involved in this process, I decided to contact Jared himself to enlighten us on this issue. Quoting his own words,
“Ok, so in the start, there was a VEXPRESS_A15 kernel that didn't boot. There were two problems to start:
1. Hang at boot related to IRQ configuration in ethernet driver. The incorrect values were used for IRQ polarity and buffer type.
2. The MMC driver didn't work. The issue was that the kernel will send up to 65536-byte transfer requests, but the controller can only do up to 65535-byte transfers! This meant that small transfers worked (read disklabel etc) but once you tried to boot later it would fail.”
As you can see, although, the problem was not an easy one to solve, nonetheless, he decided to give it a shot.
“So I fixed these along with porting the board's kernel from a static configuration to use a flattened device tree (FDT) based configuration. This makes it easier to add new devices in the future. This was a good test for the FDT code as the vexpress-a15 device tree is quite complex. Lots of fixes as a result.”
Earlier, the attached device information was embedded into the kernel, he decided to have a separate Device Tree Blob passed to the kernel at boot providing the required device information. This helps in adding other devices that may come with future revisions of the hardware.
“Added support for resetting the kernel -- only a few register writes but it took a bit of time to find the right way to do it. It looks like on a real board there are a few options (different watchdog timers etc) but QEMU doesn't implement them.
Next up, added SMP support! The firmware starts the CPUs and has them wait for an interrupt. When they are woken by the interrupt, they read a start vector from a register named SYS_FLAGS and jump to it. We write the address of the "cortex_mpstart" function to this register, setup the GIC distributor, issue an SGI (software generated interrupt) to all application processors, then wait for them to start. Finally we disable the GIC distributor, as it will be enabled again later on. This is also part of the platform code.”
For an ARM machine SMP boot works the way Jared has explained. While one core (you may call it primary/boot CPU) starts a reset vector which points to the memory location where the boot monitor program is stored, others (application processors) are in a Wait For Interrupt (WFI) state. When an SGI is passed through the GIC distributor registor, GICD_SGIR, by writing to it, all the other cores wake up.
“Next up, we want to support poweroff to shutdown QEMU properly from the guest. This uses the same register set as "reboot", so pretty easy to add a driver for this.
Now on to device drivers. Added framebuffer (sys/arch/arm/fdt/plfb_fdt.c), keyboard/mouse, audio codec, and real-time clock drivers.
Finally, we imported Linux .dts (device tree source) files into the tree and use them to generate .dtb (device tree blob) files. The dtb is passed to the kernel to describe the hardware.”
As you can see, finally he filled all the gaps and got it working like magic. I’m thankful to Jared for getting us out of trouble and clearing the path ahead, for us.

0 notes
Text
My experience with The NetBSD Foundation as a part of Google Summer of Code, 2017

As the first evaluation is approaching, I’d like to share my experience, so far, with The NetBSD Foundation. My project is related to adding support for other virtual machine systems, like GXemul, Virtualbox etc. to Anita (a tool for automated testing of NetBSD installations on various platforms.) as well as integrating support for cpu architectures it doesn’t currently support.
Anita is a set of a library and a few scripts. Although, its main purpose is to test sysinst installation procedure and quickly detecting the errors encountered in the process, it is also used for testing the whole NetBSD system by running ATF test suite. In future, we also have plans for supporting kyua, which would ultimately replace ATF. The problem with kyua right now is that it doesn’t get installed properly when a NetBSD release is built with MKKYUA=yes build option. Although, it can be installed manually, that’s not really what Anita should be doing. Both, the library part and the controlling script for Anita are written in python. Additionally the package includes a bourne shell script for testing older NetBSD releases too. This has been done to ensure back compatibility.
So far, throughout the coding period, I have build lots of realeases (and fixed many of them), done lots of testing and also contributed to the Anita library and the controlling script.
Building releases

Building releases is as easy as cloning the repository and executing build.sh in the root of source directory along with all the options. However, it takes a lot of time for the build process to complete. On a laptop with intel core-i5 6300hq, building the amd64 release takes about an hour and ten minutes with all the 4 cores enabled. (On a laptop that was purchased for web browsing and using spreadsheet, this will take much much longer than that.) This may look like an easy task and you might be thinking “Bro! I’ll just let it build for an hour, leave it like that and enjoy all this while”, but it’s not that easy. While testing random realeses or trying to get a build to work, it will fail to compile several times. Let’s suppose, it fails 5 times, just when the build was about to complete. On my system, you’d end up wasting 5 hours building and let’s say, an hour, in total, fixing the errors. So, that’s a solid 6 hours. Not only that, while all this is happening, you’ll get up and leave several times and wouldn’t know that the build has failed. This will lead to extra loss of time. The only way to stop this is to keep sitting in front of your screen.

Let’s add up an hour for it too. So now, it’s 7 hours. This was just for one release. While trying to figure out which release broke the build process, you’ll have to test multiple releases. In my case, this was almost always 15 – 16 releases. So lets multiply that too. 7*16 = 112 hours. Now imagine, on a machine running exactly 4 times slower, how long would it take? 112*4 = 448 hours. Now let’s suppose, you work for 10 hours a day. In my case, it would take me just 11.2 days to finish off the work whereas on a 4X slower machine, it’ll take 44.8 days. I hope you got the point! And mind you, the entire calculation assumes that you’ll be using your processor to the fullest possible extent, so don’t expect a long battery life. It’ll probably get reduced to 1/3rd or 1/4th. So even if you get 5 hours of extra usage with a slower machine, the difference will now be merely 1 hour 15 minutes.
The system libraries a generally written in C and sometimes in assembly language. So, you need have at least basic debugging skills for C. Although, the system files are quite long (in length) and contain a lot of macros and pointer usage etc. that a regular college student might not be familiar with, you won’t face any difficulty in debugging them if you are good at understanding what the code is trying to do, i.e. your skill for interpreting new code base is strong enough.
Testing
The testing part is actually a bit better than the building part. All you need is a virtual machine system, like GXemul, an empty (or populated with a working filesystem) raw disk image. In some cases, it requires us to have a kernel and an iso image for the first boot too. Basically, you just need to be familiar with the command line for that particular virtual machine system. The main objective of testing is to make sure there are no errors during the boot process and you’re able to log in and then halt the system properly. In case of any errors, you’ll have to fix that and go through the build process once again.
Apart from that, the entire NetBSD system can be tested with ATF test suite and kyua. But, that is not really a part of my project. Anita does that for me.
Contribution to Anita library

This is something that required the least amount of effort until now. Now that we have a few more ports working (by going through the build process, testing and then fixing errors.), the code contribution to this and possibly the controlling script is going to increase. A special emphasis was given on finding the simplest possible solution with least amount of additional code. I ensured that I took full advantage of the classes and funtions that already existed in the library. Of course, this means that I had to go through lots of code muliple number of times. The Anita library was already over 1700 lines of code, when I started.

Currently, we’re working on adding support for NetBSD/evbearmv7hf-el. Now this port contains a lot of kernels. The first kernel to be supported would be VEXPRESS_A15.
Future plans
In future (during the GSoC period), we may even have a working NetBSD/macppc. This is yet to be tested successfully.

Work is already on for getting a mips port supported on Anita. I (with the help of my mentors and various other members of The NetBSD Foundation) have succesfully tested the NetBSD/pmax port. If time permits, we will likely have more arm and mips ports supported on Anita.

Conclusion
For me, Google Summer of Code was the single best experience I’ve had in years. Until now, it has been quite adventurous and I’ve learnt a lot more than any college could have taught me.
1 note
·
View note
Text
Setting up Ubuntu 17.04 on a laptop with hybrid graphics with full 2D/3D acceleration
Hello everybody. I’ve written a couple of blogs on “how to set up linux on a laptop with hybrid graphics”. In both of those blogs I had used fedora. So, this time I’m going to change it. Let’s get it running with ubuntu 17.04. For those who prefer to stick to the LTS (Long term support) releases, or any other older release, I’d recommed you to upgrade. Sticking to an older version makes it difficult for the developers to cater to the needs of consumer. This leads to fragmentation. This is why many companies like Apple forces its users to upgrade. While upgrading might seem like a “pain in the @$$”, it’s also important to maintain the quality and uniformity of software available. Many of the newer technologies which were not present, say, a year or two ago are not supported on these older platforms. For utilising the full potential of the hardware, the kernel developers keep optimizing the kernels. While building your own kernel for older operating system is possible, do remember that it’s more of a problem than a solution, for the average consumer. Unless, the data on your system is extremely important or confidential (as is the case with many enterprises and military), I won’t recommend sticking to an older OS. If documentation is your concern, then do note that most of the things are just the same for newer versions too and they are mostly just copied over.
Anyways, let’s get back to our objective i.e. setting up Ubuntu 17.04 on a laptop with hybrid graphics. While changing the OS of choice from fedora to Ubuntu might not seem to be as big a change, there’s something more this time. With the earlier setups, we didn’t have 2D/3D acceleration available. Well this time, we do have it. This means, smooth transitions and desktop effects and no more screen tearing in high resolution videos (Yippie :) ). I’ll be using MSI GP62 6QE Leopard pro for this.
So, here’s the step by step procedure:
Part 1: Installing it on your laptop.
Boot from the live DVD or USB stick.
As soon as you get to the bootloader, press F6.
Enter the following in the boot options: “idle=nomwait nouveau.blacklist=1 nomodeset”
This should be enough to get you to the live session.
Proceed with the installation procedure as you would, otherwise.
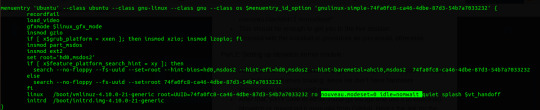
Part 2: Setting up bbswitch kernel module.
After you reboot your device, and get to the login screen, you’ll probably see individual frames loading, since we don’t have hardware acceleration available until now.
After that, you’ll have to either install git via apt and use it to download bbswitch or download it manually from GitHub. Here’s the link for the repository: bbswitch
After you’re done, open up a terminal and change your directory to the downloaded one.
Set it up using dkms, so that you don’t have to set it up again and again.
# make -f Makefile.dkms
Open /boot/grub/grub.cfg in your preferred text editor and remove “nomodeset” from the entries that you are actually going to use (this will probably be the first entry) and add “nouveau.modeset=0” to it. (idle=nomwait should already be present, if not, add it).
Part 3: Loading the module:
On the next reboot, the system should be working fine, but, you still need to load the module for switching.
Type these as root:
# modprobe bbswitch
# tee /proc/acpi/bbswitch <<<OFF
If you want to automate the this procedure, have a look at my earlier blog
Here’s a link to the Switcher repository (this script helps you to set everything up automatically, provided you follow the instructions in the Readme): Switcher
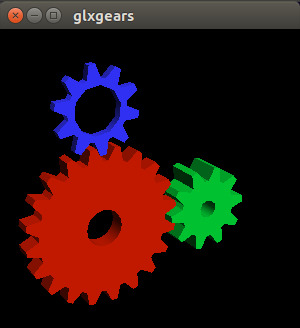
Part 4: Testing
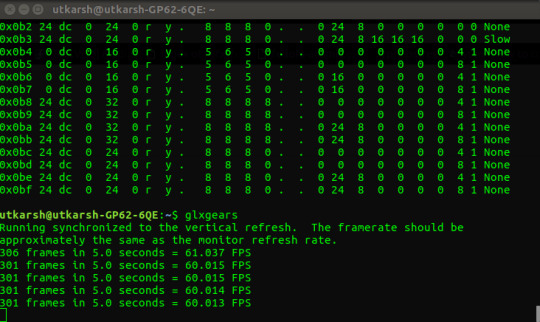
Once you’re done setting it up, you can test it by running the following two commands: glxinfo and glxgears. Here’s a screenshot of glxgears running.
0 notes