
Last Seen Blogs

dinosaursatdowntonbbey-blog
Kandis Craigmiles

lea-labryssal
Lea, Labryssal Cephaliarch

poptrashh
crack in his chassis

quiet-pond-blog
hello!

guragura000
endonuts
Text
Week 10 Studio activity/reflection


I feel as though this course has broadened my knowledge of presentation of work as well as heightening the importance of the design process. This course was mentally challenging, in that I knew time was an important factor as sometimes I found myself was afraid to start and make mistakes. However, I did find a sense of satisfaction in making mistakes and repeating it, as I improved and learned. This was especially evident in the engineering drawing tasks where every time, it would look way more professional.
I really enjoyed the 3D model making as we got to work with our hands much more than before. My least favourite task had to be the perspective drawing as it was very frustrating to do and understand. If I were to do it differently, I would have liked to communicate with my classmates and teachers more to get help when I needed it.
A few things I learnt through the tasks was that nothing is perfected on the first go, everything comes with practice. I also learned about model making and understanding low-fidelity and high-fidelity. In that not all models need high costs and time and that it depends on the aspect of the design is being testes. I understood this through making models, that sometimes it’s important to only create models that are needed as it will save time in the process.
This course also made me more attentive to detail in communicating my work. Wether it was photographing, modelling and even curating my work. As every step of the way, effective communication is vital throughout our whole design experience.
0 notes
Text
Week 9 Studio Activities
This task I’ve achieved my objectives for this week by developing practical skills utilising mesh modelling as a tool for manipulating a digital version of a design concept in a fast and effective way.
3D Max produced many challenges. Looking at the software, it looked very complex. After working with the sphere, I had a better understanding of all the workspace, tools and modifiers.

Working with the bottle was different to the sphere as some of the modifier didn’t work. Overall I did have fun with this task however I think I would need more time to understand 3D max’s abilities.

For the 3D print, I used my fusion 360 model as I did not know how long it would take to print and wanted to make sure I acquired it in time for week 10.

0 notes
Text
Week 8 Studio Activities
Andrew Simpson Razor video: In terms of low fidelity and hi-fidelity, I think Andrew was expressing how exact a model is to what we are intending to make. In choosing the fidelity of the model depends on the aspect of the design that you are focusing on.
Week 8 Studio Activities were to turn our model concepts into digital models in Fusion360. This task deemed frustrating and challenging but was a very impactful task in my skills in digital rendering.
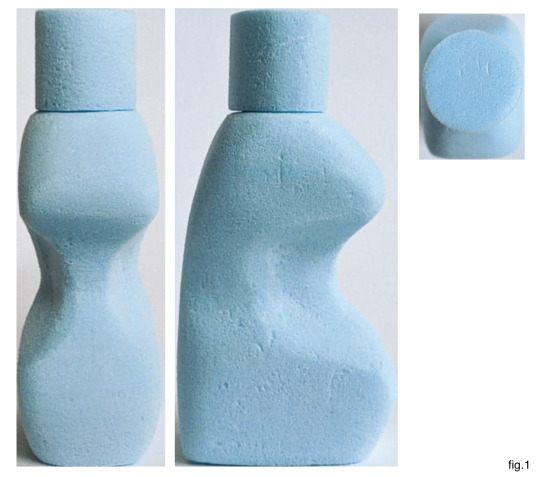
Firstly, the photos were easily produced. [fig.1] However, next time I would make the edges more defined to make it easer to see when referencing it in fusion360. I could have done this by changing the position of the lighting or fixed it in the editing process. I also realised cropping the photos was very important as it made it easier to calibrate the images. This part of the task expressed what Andrew Simpson said in which the models were used in order to “check different aspects of the design”. The low- fidelity blue foam model was was a constant reference in understanding the curves and overall shape and size.
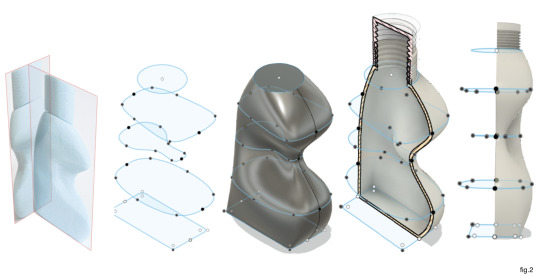
The pre-class activities were extremely helpful as fusion 360 skills are very limited and it taught me insightful techniques very clearly. I mainly focused on the technique used for the whiskey bottle, lofting. [fig.2] . As my model’s structure was organic, curved and not symmetrical throughout, lofting was the only method I researched and practiced that could successfully produce this shape.
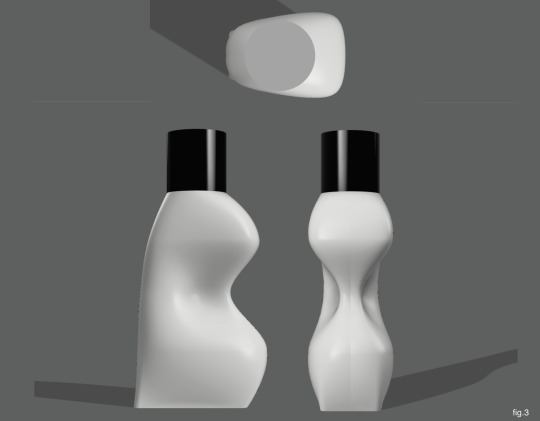
In order to achieve my final results, I had to go through multiple attempts to figure out a methodical and strategic procedure. Overall I am very satisfied with my final results. [fig.3] Not only because it took a long time, but I think the digital reinterpretation turned out quite similar to my model concept. I think incorporating the appearance of a real Olay bottle, completed and refined the digital model. Where I could have improved was making the indents more refined but I am unsure how to do that. I also learned that SAVING your work is very vital. 😅
From the beginning, I knew my model was going to be very difficult a part of me didn’t want to start the task. Although it was very challenging, I feel like having a difficult task improved my skills in fusion 360 immensely and I definitely know a lot more than when I started this task.

11 notes
·
View notes
Text
Week 7 Studio Activities
This week we focused on foam model making. This task has been one of my favourites because it gave us hands on experience in creating a 3 dimension model.
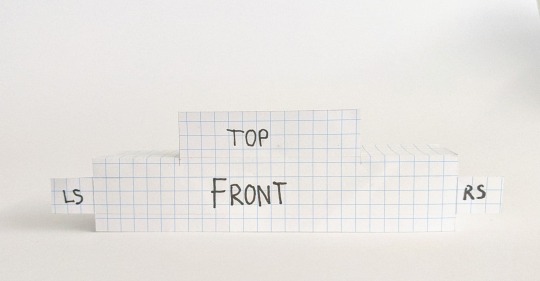
[fig.1] shows my setup. I decided to do it outside setup knowing there was alot of dust. I also had a vacuum at hand to make sure to keep my workspace clean.
Whilst making my model I completely forgot to document my process as I was so engrossed in the model itself and making it perfect. However, my process was basically the instructions given in the exercise. The methodical procedure deemed very effective in order to achieve successful results. [fig.4] I found that shaping each side to look like each template first and then carving the edges allowed me to maintain the shape and create refined curved edges. I did start working by eye in order to achieve a desired curve.
The tools I used
blade to cut the block i was going to used
attaching sand paper to woodblocks, rulers and a pencil. I didn’t need a rasp because I cut the. block to 65x40x100 (shape of initial olay bottle) to minimise the amount of carving and wastage.
as well as using the sandpaper on it own to refine the curves and give it a smooth finish.
I made templates by cutting out the orthographic drawing we made. [fig.2] I think I should have made the templates out of thicker card instead of thin grid paper to act as a stronger resistance for the sanding process. This would have made sharper indents in my design.
Making the 3d model allowed me to understand the way light hit the model, how it felt when holding it and its overall 3 dimensional shape. There were a few adjustments I would make to this model, that if I were to make another foam model, I would know what I would change to refine it. Hence, this task taught me the importance of model making in the design process in which it allowed me to to understand my design 3 dimensionally and visually see areas in which I could improve.


8 notes
·
View notes
Text
Week 6 Studio Activity
Andrew Simpson Reflection
Model making plays an important role in the physical and visual aspect of the design process. It is a designer’s choice in how they communicate or create a design. Model making allows them to thoroughly understand and ‘inform’ their design through rough or more refined models. It is vital for designers to constantly make models to confirm certain aspects such as shape, visual properties, scale, form, material capabilities and risks of the a design. Moreover, a model can be used for multiple purposes. It may be to study the market reaction or simply convey form material capabilities. Depending on the purpose of the model measures how much money and effort is put into it. It is also a way to save time and expenses during the design process in order to de-risk final prototypes.
Home Maker Space

I didn’t realise how messy this course would make my room and house so I had to dedicate a room as a home studio.
Fig. 1.1 Storage is very important for me. Organising everything so its clean and everything is easy to find.
- The big flat cardboard box on the left hand side holds all my large paper and cardboard which not only stores it but protects it.
- I also like working near a window because it allows me to work with natural light which I prefer as sometimes the ceiling lights cast unwanted shadows while I work.

Fig 1.2 This drawer from Kmart is so convenient as it also has wheels. Again I like to organise everything so its easy to find such. I used jars, jar lids, boxes, plastic containers. These things I bought at a 2 dollar shop for cheap.
Also in regards to equipment, I tried to save money by asking a few friends who did Design Tech in high school for equipment that they may not need anymore.

Fig 1.3 As we are quarantined at home, I’ve been accumulating some recycled materials that may come in handy. However the pile is becoming quite large. In the Design Futures Lab Making videos, they cut pieces to what might be used. This is my next project to save some space.
Model Making Task
Eric Strebel Cube was laborious task. I failed multiple times in the construction of the squares, making them uneven. In the video, Eric stresses in having a sharp blade in order to get accurate cuts, which proved true when I was cutting everything. Especially the 45 degree angled cuts, I changed blades so many times as each time my blade became blunt the edge would be jagged. Eventually, I ran out of foam core, that I had to use what I had made.


The cube wasn’t perfect. The biggest problem was some 45 degree angled edges weren’t accurate. I used the Elmers Glue which took almost 2hrs to dry. Also, the masking tape to hold it together ripped the foamcore. Despite these issues, the cube, itself was nicely fitted.


If I were to do it again I would:
- concentrate especially on the 45 degree angle which will make the cube flawless
- maybe use weights instead of tape
- use a stronger PVA glue
8 notes
·
View notes
Text
Week 4 Studio Activity
Part 1:

Since perspective drawing is new to me, I found this task difficult to try to wrap my head around. The hardest part for me was the the placement of the SP, LVP/RVP, EL/HL and GL. After multiple attempt and research I learned that
- stationary point is me and where i’m positioned in relation to the object and that it can be placed anywhere
- the LVP and RVP is placed parallel to the top view edges
After that, the construction lines and its meaning in terms of perspective became logical.
My chamfered box turned out pretty accurate. I think my estimation of the EL to GL could have been shorter in order to look more similar to the angled shot in week 3 as the front is a bit elongated.
Part 2:

Fig: 1. Shows the box positioned further away. I did this by moving the top view further away from the PP. However, I just assumed that this was the way to move an object further away. It affected the the mode by making it thinner and longer.

Fig: 2. I added a left box. This box was larger, longer and distorted compared to the original.

Fig.4 The top box seems smaller than the original. Whilst the right box similar to the left box however 1 side was not visible, this visually did not look correct to me. I may have constructed it wrong, however, I imagined placing myself as the stationary point and realised I wouldn’t see that side.
Overall, part 2 could have been improved with more accurate line work and a more organised planning in order to not get confused with the construction lines
Part 3:

Fig.5 is my attempt at ellipses. The ellipses were very difficult to visualise and draw as well as trace in pen. This activity, with more practice could improve. Moreover, I learned that the minor line is the shortest length of the perspective square and the major is the longest. When I constructed the major line 90 degrees to the minor is was the diagonal. Although I do not know if this is correct. ERROR. The colours on the top view should be swapped around.
2 notes
·
View notes
Text
Week 5 Studio Tutorial – Sketching Workshop
This week was really valuable in setting a foundation for different approaches to design sketches whether via hand or digital.
Part 1 Although not perfect I had fun with this task, The freehand exercises released any tension and restraint when drawing and overthinking my sketches. It also improved my control and hand-eye coordination when drawing. These exercises is something I will definitely continue in order to improve my sketching skills.
Important things I learnt that I kept in mind was
- control from the shoulder and keep the wrist stiff
- imagine where your line goes before drawing it


Part 2 of this week was quite exciting and challenging. Lacking equipment such as a stylist did make this task difficult. I also struggled as I realised I had the 2017 Photoshop version in which did not include the smoothing tool as well as the symmetrical tool. However I researched, experimented different ways and tried to my best to achieve similar results. This not only limited me to certain designs but made my my sketches less aesthetically pleasing. In saying this, I am very happy with the end results. Some things I would change would be the lighting. Visually imagining where the light would hit was a struggle. I think I should have hand sketched it first to understand where the light would hit. I also think this skill comes with more time and practice. Furthermore, I would include more detail to give more dimension to the shapes.


fig.4 inspired by Rob’s tutorial

fig.5 inspired by an example in the lecture presentation that I really stood out to me
Things I would do for next time:
- Buy Photoshop 2020
- practice and learn more freehand exercises
- try different mediums
practice more digital sketching
10 notes
·
View notes
Text
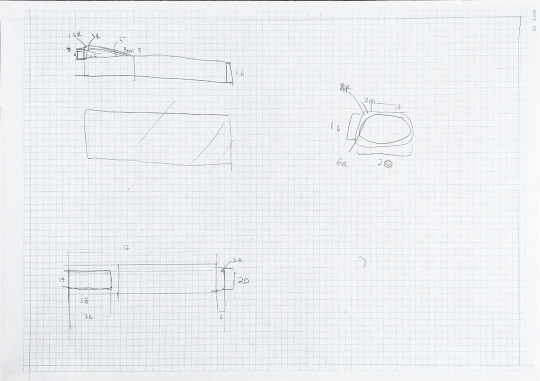
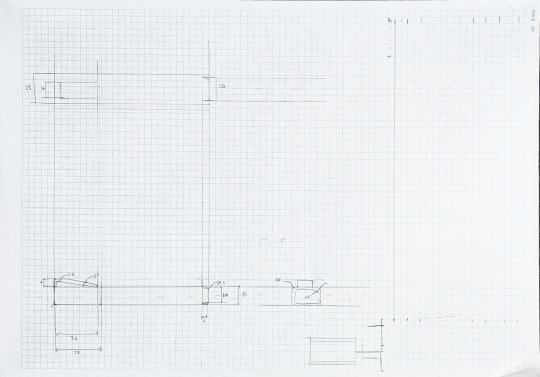
Week 3 Studio Activities Part 2
This activity was quite difficult to grasp.
Firstly, I made the box first using the template in the answers as I struggled to comprehend the primary auxiliary angle. Thus I constructed a 3D model to visualise what I was drawing in 2D.
Secondly, figuring out the true size of the triangle was especially hard. After reading another classmates reflection to read slide 25 of the resource powerpoint, the use of perspective lines began to make a lot of sense. I learned so much in this activity. It helped me to understand the use of guide lines instead of physically measuring the shape to get accurate dimensions and angles.
What I would like to learn for next time is how to
- properly represent the angles using AS 1100 standards
- how to produce proper and neat dimension arrows

4 notes
·
View notes
Text
Week 3 Studio Activities Part 1
This weeks activities focused on third angle orthographic projection, section views and auxiliary views, AS1100 drafting standards, hand sketching and using your drafting equipment.
Figure 1 I figured out each dimension and shape of all the views from the isometric view. I also understood the placement of each shape spread across A3 paper.
Figure 2 was intended to be my final drawing but I made a few mistakes outlining. However this allowed me to clearly see each view and dimensions.
Figure 3 Is my final drawing. I was much happier with my drawings this week as compared to last weeks. It was much easier to compose as it was constructed all with straight lines. I also learned from my mistakes fro previous weeks. Some details I would change next time is the placement of the dimension to make it easier to understand and neatly spaced on the page. I also outlined the object line with a 0.5 pen and the dimensions with 0.2. But to me, they seem to look the same width. This might be from ink bleeding on the paper. Next time, I will try using a thinner pen for the dimensions.
This activity I noticed improvement in my accuracy and precision of measuring and outlining. I also have a better understanding of different views and visualising different orientations.


Things to consider next time engineering drawing:
- Try outlining the object with pen in the draft to see the shape clearly
- Experiment with the dimensions of object and dimension lines
4 notes
·
View notes
Text
Week 2
This weeks studio activities focused on the fundamental aspects of third angle orthographic projection drawings. Learning from last week I tried to be as pedantic as possible knowing. These activities required patience and concentration to achieve perfection. Some useful information I took away from the lectures was the use of flipping the set square and the pen, the sharpening of the mechanical pencil, taping my work to the table and to be calm and steady with your work.
Task 1 The object I chose was a highlighter. Although this task was quite simple, this actually took a couple of attempts as I did not look at the example diagram in detail. When I was cutting it out, I kept cutting the wrong lines or I was drew out the wrong dimensions. But in the end, after multiple attempts I was happy with my box. However through my struggle I noticed that through repetition, my skills with drafting tools such as the T square improved.

Task 2 I found this task very important for drafting my final drawing. It provided all the measurements and placement and spacing of each angle. This helped in order to create and neat and mistake ridden final work.
Task 3 This task was not perfect. I made a few mistakes - drawing dimension lines in the wrong place, drawing up the table wrong, pen smudges. The main cause for these mistakes was that I drew some of the dimension lines in pen without drafting in pencil first. My drawings could also be more accurate. Especially the side view which was derived from the other drawings. Besides the few mistakes, I think my drawings are quite neat and easy to understand. I tried to make sure I followed all the guidelines from the lecture. It definitely improved my understanding of third angle projection.

What I would take away from these activities:
-rub out any mistakes and unnecessary lines to avoid using them
- always draft with pencil first
- make sure to FOCUS
- planning is important
6 notes
·
View notes
Text
Week 1 Studio activities
This weeks studio activities focused on engineering drawing and drafting tools. Image 1 shows the tools I used - set squares, t-square, compass, circle template, mechanical pencil.
I found the studio activities difficult having never done engineering drawing before. I had trouble drawing straight and perfectly intersecting lines. However researching how to use a T-square and the set squares properly, I slowly began develop my skills.
Activity 1 was difficult in trying to choose which tools to use and how to strategically construct lines in order to make it accurately. In the end the shape turned out quite accurate and I was happy with the results.
In activity 2, the construction was easier to plan however I struggled to precisely outline the curved lines freehand. I also misread the circle dimensions the first time. Thus, the second time I attempted it in image 5 and 6, I tried to improve the precision of the outline. It improved however was still not perfect.
Activity 3 taught me perfection is vital in engineering drawing as even the slightest mistake can affect the whole shape. As evident in image 7 where there is a gap in the puzzle. Thus, further along, I began spending more time and becoming more pedantic about each measurement.
To improve my work for next time, I would double check every measurement to ensure every one is exact to the point. And learn how to use all the drafting equipment effectively so that my work is as accurate as possible.
Overall, even though it was tough, I enjoyed this activity and am excited knowing that with a lot more practice, my engineering drawing skills will progressively develop. :))


3 notes
·
View notes
Text
Intro
Hey there i’m Czarina and i’m an Industrial design student. I love to take photos and in my spare time I like to bake :)
1 note
·
View note