
david5277227
IDES1262 - Communications 2: Sketch Modelling Portfolio
12 posts
Don't wanna be here? Send us removal request.
Last Seen Blogs


Text
Week 10 Studio Tutorial – Model Finishing
Part 1: Preparation
This part took time, trimming all the edges and surfaces to constant patience. It was truly diferent than smothing something else like blue foam.


Part 2: Priming
This was fairly enjoyable. What this part required was box that I preciously built and I way to hold the 3D Bottle. This was achieved through passing a piece of wire through a hole on the top and then haging it to the bottles cap.


Part 3: Topcoat
This part was a little bit more challenging. After applying the indercoat I realized that the paint I purchased did not require one, so when I applied the color I wished for, It seemed a bit overcoated, non the less the result was to my liking.


Part 5: Photography
I felt a new emotion when finishing this work, I felt as I finally managed to complete a project I had long worked for. I can see that it was not easy, but this project will how a long standing memory in my life.


Course Overall Reflection:
This has truly been an eye opening course for me.
It really allowed me to dive into the workspace and midset of an industrial designer in their everyday work.
I enjoyed this course from its just sketching to its blie foam modeling. I realized that every step is important in its own way.
Sketching allows you to envision your idea, make a concept of your product.
Technical drawing is where you really see the technicalities that your product needs. All the specifics and scales that can communicate to other people.
The blue foam step I found extra crucial. That really makes the product come to life of what you might want.
The digital drawing and 3d rendering is were you feel the closest to your goal.
All these steps helped me learn. Now I know what i need to take in consideration when designing. From scale of the model to its convenience.
I might have struguled in places, but through it all I learned. And I feel that still there is more to come and that has made me hopeful and excited of the future.
4 notes
·
View notes
Text
Week 9 Studio Tutorial – Digital Iteration & 3d Printing
Part 1: In Fusion 360
Transferring this model to an stl file was pretty standard, however, I was exited to move it to other programs and see how it would react or behave.

Part 2. In 3ds Max
I must admit, even though 3d Max looks very intimidating at the beginning, it is actually a very intuitive program. It will truly not cause you any trouble if you maintain you work organized. Also, being able to work with multiple perspectives of my bottle was incredibly helpful, thanks to the multiple screens.
I believe the part that most interested em was being able to morph my object so easily and with such precision. Being able to have the measurementes of the angles was especially helpful.


I had no trouble importing my bottle to 3d max. I am way more comfortable at the use of this program than fusion 360. My bottle already had my specifications, however I wanted to give it a more slick shape. A more seamless curve. And as you will be able to see. Its shape is a lot more elegant.


Part 3. In Cura
This was truly the part that worried me most. I was afraid of screwing up my document when I sent it to print. However, this was the moment when I was the most amazed. Printing instructions by the Futures Lab were very easy to follow and very thorough. I was following a organized printing guide that honestly, if my document doesn't print, the it mus really be bad luck.
Regarding the bottle, it was really easy to transfer this same model between programs. It really shows the uniqueness and usefulness of every program, and how they are also meant to work together for a pristine result.

6 notes
·
View notes
Text
Week 8 Studio Tutorial – Digital Models Week 8
Part 1: Photograph your canvas images
This was by far the easiest and the most fun part of the task. The use of Adobe Camera Light room really helped get both the perceptive and contrasts just right. Light room is also incredibly important, after taking pictures with makeshift laps and cardboard, It looked as if I had a mini studio in my room.


Part 2: Prepare your canvas images
Making the canvas was easy enough. As long as you fulfill the first part of the task with efficiency and care, you wont have to repeat any work. I was relieved to know that reference images in fusion 360 was possible, and I was really exited in fact. I believed that this would be an easy enough task.

Part 3. Model your bottle concept
I have to admit, this task was particularly challenging. I was to the brink of defeat, and one hour away of giving up. I think this is one of the shortfalls of having tutorial classes online, especially in design, we are not able to get immediate feedback when we encounter a problem that could affect the whole design. The whole time I wished for someone just to come and help me. Even after watching all the videos and different sources. I was still, so confused. I tried to search for solutions, however I did not know which questions to ask online. I found myself starting from zero multiple times, lines did not go into the right layers, pieces did not match perfectly, didn't new how to make flat lines into curved 3D spaces and anchor points acted irrationally.
Also a problem I faced was managing to store all the programs in my computer, however this is mostly a factor of me not being familiar with CAD programs. I found myself reorganizing and optimizing hard drives during most of the week.
It wasn't until my 5th try that I finally had a result with which I was satisfied. However, even after all this time consuming problems. I learned appropriate use of Fusion 360, I am not the best by far, but at least it is familiar to me. And I was so happy having my own design rendered, that all that discomfort and pain, did not matter in the end. It also taught me that even though I should be prepared to make mistakes, that does not mean I should go in with the mentality that all mistakes can be later fixed. Most of the times little mistakes where the culprits of 3D shapes not rendering, or of pieces not fitting. One should always approach their project with the intention of doing their best work.
I wish to learn this program to it fullest potential. I honestly never want to be stuck not knowing again, because I wish to render bigger, more complex and even more exciting.


5 notes
·
View notes
Text
Week 7 Studio Tutorial – Physical Model Making (foam)
Part 1: Construct your profile templates

Part 2. Cut out blocks of foam blocks (blanks) from which to sculpt your bottle

Part 3. Rough-in your bottle form
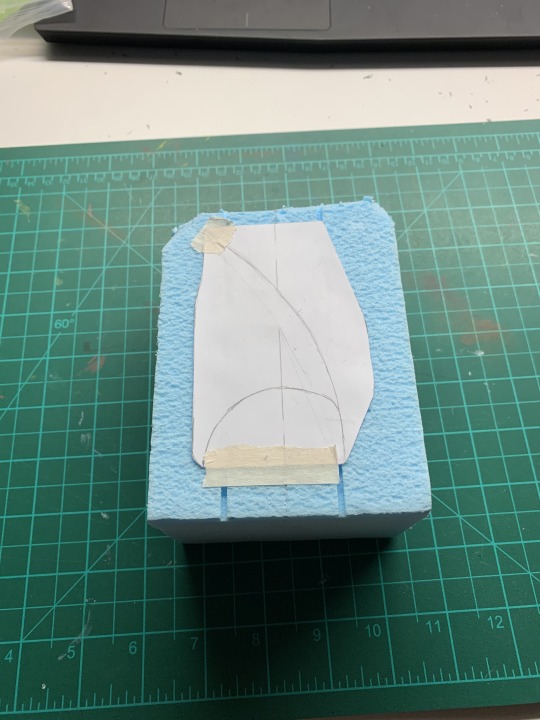
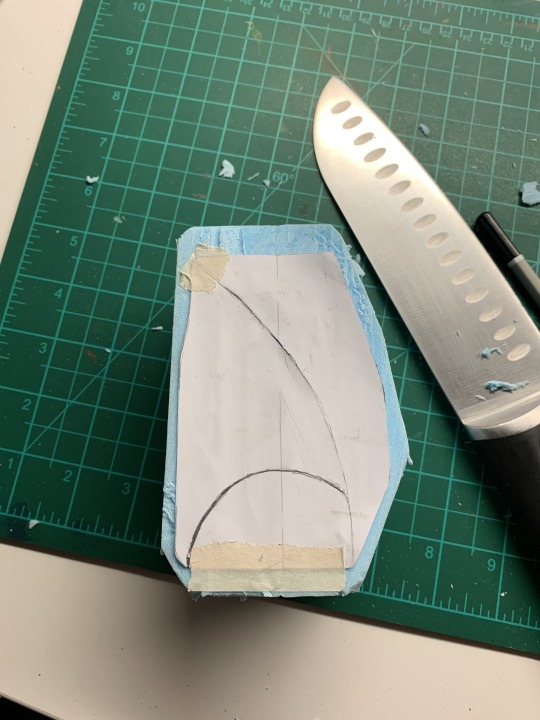
Part 4. Refine your bottle form
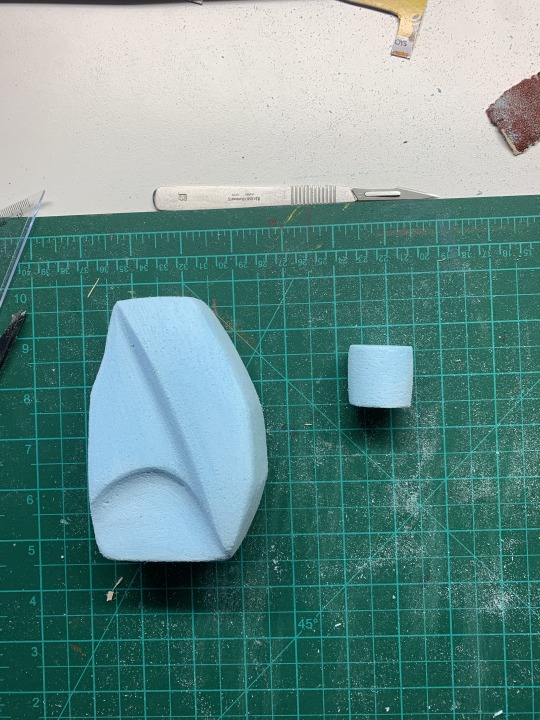
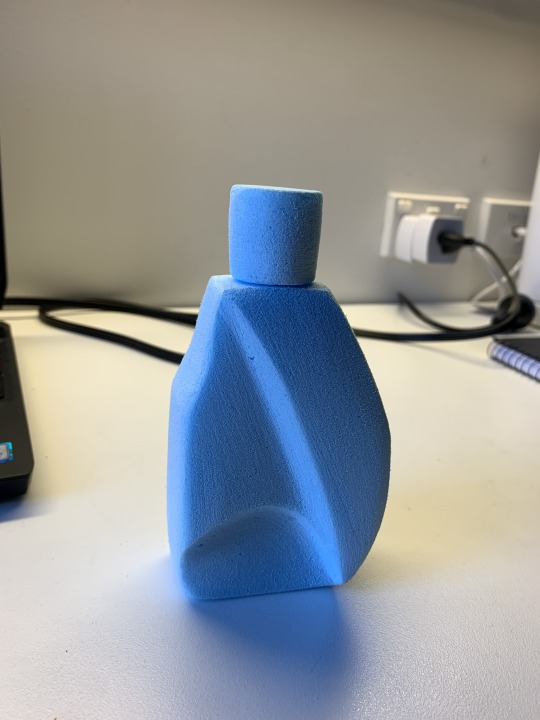
I enjoyed this particular task. From the sketching phase to finally having a real life model in my hands. Templates were a huge help, they prevented the final product from being an inconsistent mess. One thing I truly regret though was not working outside. I have cleaned my room three times an I still find foam particles in my room from the time I sanded it.
Sanding paper was incredibly malleable in way. Whenever I needed a tool for an specific shape, I could just create it.
Managing to have the model in my hands truly made me realize the importance of having a 3D model. While creating it, my perspective of it changed while I hold it. It saw how I could improve it, and I believe that only sketching would not have allowed me to see things in a different perspective.
I think that this is okay for my first model, but next I wish to create with more skill, less time and more accuracy.
14 notes
·
View notes
Text
Week 6 Non-Teaching Week
Part 1: Set up your own making space at home


I live in a UNSW accommodation, so the aim is to not cause any damage to the surfaces, otherwise I will have to pay them myself. I mainly work in the cleft corner of my desk. Usually this space is reserved for crafting and drawing. The right side is used for all computer related jobs.Next to me are cardboard paper, trashcan and toolkit. and on top notebooks, sketchbooks and regular paper.
I keep paper on top so it is not at risk of getting damaged when I draw, paint or craft. I try to keep this space always clean, since working on a clean surface is a good beginning to any task.
When it come to spray paint, inside is not an option since I may cause at best staining of surfaces an rug or at worst the accidental triggering of the fire alarm. So I usually have spray painting those outside.
have tools you use at display before working, that way you can be organized and keep tabs of what you need.
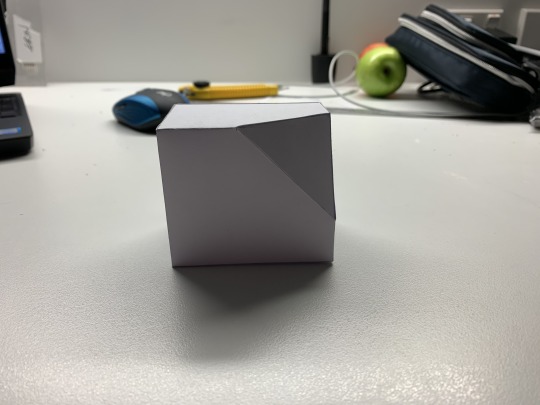
Part 2: Model making task
Complications:
As you can see images 3 and 4. The blade on my scalpel was really dull. Which prevented me for having those nice clean cuts that one would should be able to achieve. I wanted to replace the blades on my scalpel, however, I failed to find a medical supply center near my area, thus I was stuck with this blade.


Results of Perseverance:
I found that even with dull tools, sometimes skill or perseverance can help you a long way. My scalped did dull cuts, however, if i keep a constant slow back and forward motion, I was able to make way better cuts to make them fit. If you are gonna do 45 degree edge cuts, use a scalpel or small sharp blade. Bigger blades will only worsen your situation and accuracy.


Final Results:


it is not perfect, but It came a long way. what i realized making this cube, is that even though I could overcome my tool malfunction, using that blade to something far more valuable, time. Damaged tools will not only affect your work, but will inevitably delay you. If you are like me and could not find stores which sell Scalpel Blades n.11, you can find them on eBay in packages for pretty nice prices. These are the ones I ordered for my next project are these: https://www.ebay.com.au/itm/10pc-Carbon-Steel-No-11-Sealed-Sterile-Surgical-Scalpel-Blades-for-Handle-3-5/151146116558?ssPageName=STRK%3AMEBIDX%3AIT&_trksid=p2060353.m2749.l2649
Reflection:
Looking at the video by Andrew Simpson I see the importance of model making. Not only as a way to improve the process of synthesizing ideas, but also as a way to have a hands-on feeling of what you want to make. It is a fundamental part of prototyping, since every model can vary from the technique applied to make it, to the material you add or remove.
I my opinion, what it is most interesting is that it shows you all its real life aspects, giving you the chance to analyse not only is aesthetic components but also whether physical or safety issues may arise from prototype to prototype.
7 notes
·
View notes
Text
Week 5 Studio Tutorial – Sketching Workshop
Part 1: Freehand sketching
In this weeks exercise we began with free hand sketching. Must admit, it was pretty fun to just draw and get the wrist lose. However it was also pretty irritating not being able to do prefect circles or lines in the begging. Many useful tips also came up, like drawing this kind of shapes from the shoulder, not the wrist, this really helped my sketches seem more consistent. So by Image 3, my hands where ready for sketching. Something that I was glad I finally had gotten hang of was perspective with the cubes and shadows. Now it seemed effortless to create them form certain angles.
The final sketched was the one I found more interesting. I love the fact that sometimes with little effort you can give shape a sense of volume from the inside.


Part 2: Digital Rendering Demonstration / Workshop
Part 2 of this assignment was definitely more challenging than I had hoped for. I had fun sketching different kind of concept bottles, but when it came time to use them in Photoshop I had a real challenge. I must admit the lecture was a gigantic help. Term one was my first time using Photoshop ever, so I am less tan experienced when it comes to working with it. I found myself learning from scratch everything, and also committing many mistakes like forgetting to change layers when drawing, figuring out how brushes work, and sometimes forgetting pretty basic shortcuts. So I took an afternoon to myself just to mess around with it and discover some thing on my own, trying to get a feel of things. That is when I finally managed to get comfortable with Photoshop enough to complete my task.
Part 2 has given me a new Interest for Photoshop that I believe I will keep revisiting in my free time, or when I feel like creating something with a more professional finish.


10 notes
·
View notes
Text
Week 4 Studio Tutorial – Perspective Drawing
i have to say this project was the most challenging one yet.
During part one I had trouble imagining and locating lines like horizon lines and station point correctly. I went through a few pages trying to make the figures look nice. However, after a couple hours I started to get the hang of it by viewing the previous lecture and trying to imagine the horizon with a ruler, and finally had I product i was proud of.
Part 2 seemed like it was gonna be more challenging, however what I found is that once you get a hold of the concept, it really becomes second nature. Like this will have a smaller scale the farther. Also replicating the boxes didn't seem so hard once the projection lines where drawn, even did an extra one to see how it would look.
For Part 3, the cube was just appliance of previous tasks, however, the ellipse was hard to do free-hand, no matter how much I tried, I realized that I would look a lot better with th appropriate tool to sketch it with.
Part 1: Construct a 2 point perspective view of your chamfered box

Image 1

Image 2

Image 3

Image 4
Part 2. Extending a box in perspective

Image 5

Image 6

Image 7
Part 3. Drawing circles in perspective

Image 8

Image 9
7 notes
·
View notes
Text
Week 3 Studio Tutorial (Part 2) - Secondary Auxiliary Views
The secondary task of week 3 was particularly challenging. Not only did we have to make 2 auxiliary views, but also had to create a live model of it.
One problem I came across instantaneously was how to get the views right and from which perspective. I went through many hand made attempts but could accomplish a fulfilling angle.
It was then that I realized of the extreme importance of imagining a rotation of the object. After just calming down and reading past content. A shape in my head finally clicked, and form then I was in sense of focus I could not describe.
Sometimes just relaxing and thinking freely can give you that answer you look for.
Process:
Image 1

Image 2
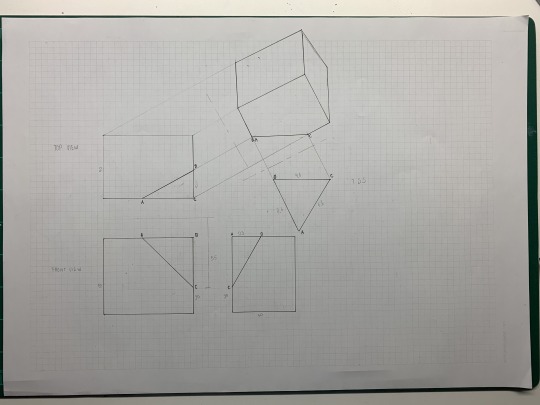
Image 3
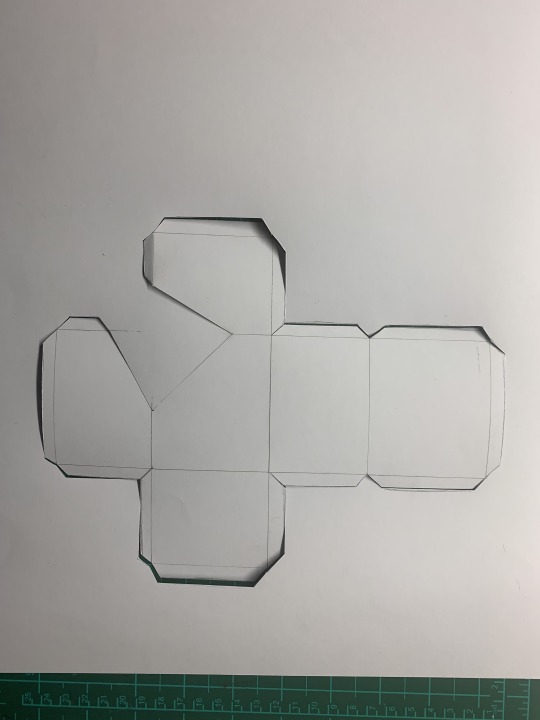
Image 4

Final Results:
Image 5
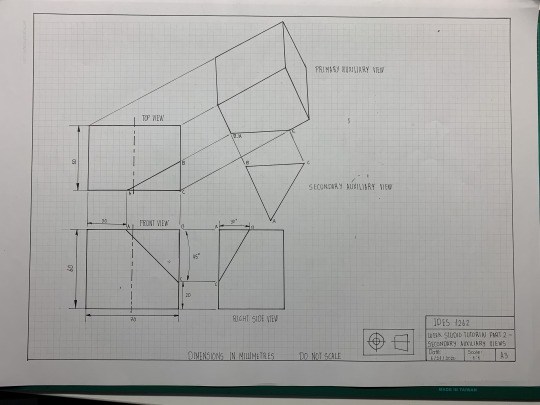
Image 6
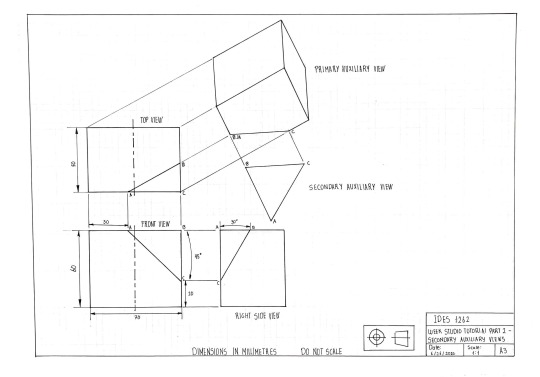
Image 7
8 notes
·
View notes
Text
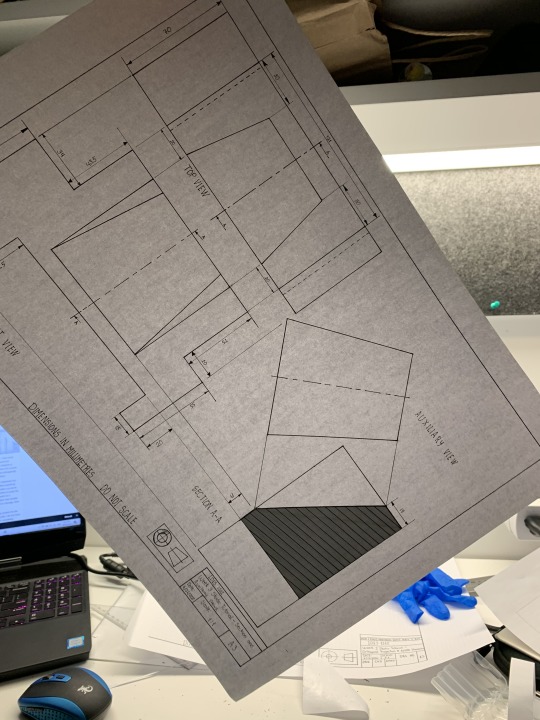
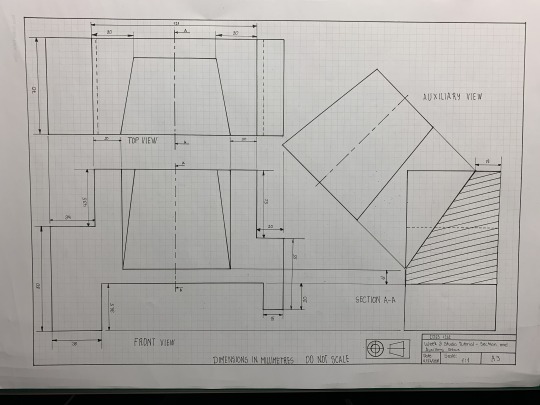
Week 3 Studio Tutorial – Section and Auxiliary Views
This weeks task was the hardest one yet in my opinion. Not only because it required to work precisely and cleanly, but also because in made use of ingenuity to know where to put the auxiliary view. It also allowed me to fix some problems creatively and make my work the best it could.
One part that I liked was using different thicknesses of pens for different lines. At the begging noticing the distinction might be hard, but as you are completing the sketch, you can see how each line represents perfectly different angles and dimensions.
A clearly challenging pat was fitting everything into an A3 paper. It seemed that nothing wanted to fit, especially the auxiliary view. In the first few attempts it didn't work, however by playing with different sketches, everything seemed to fall into place.
However, something tragic happened to my work. Near the end, after measuring, passing sketch lines with pen and writing some measurements neatly. I realized that one of the lines of the section views was of by 1cm. My first reaction was exhaustion that I would need to do it all over again. My second though was fixing it after taking the picture, but that seemed like an easy way out. Finally I though of a more on hands solution, since I had made everything with perfect measurements, I would only need to cut in a different piece of paper that exact portion and glue it in, and since it would be perfectly measured, it would be seamless. I applied my solution and what would you now, it saved me a hole days work.
A guess working accurately can save a lot of time if you do it rigth.
Sketching


Fixing a problem

Final Results

10 notes
·
View notes
Text
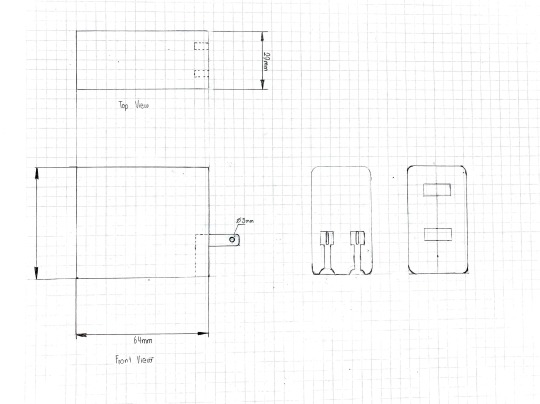
Week 2 Studio Tutorial – Orthogonal Projection & AS1100 Standards
Weeks two orthographic drawing was the first time I have ever done drawings up to such strict regulations, and I must say it came with fun experiences and hardships.
During Part 1 I must say this was the easiest part of the assignment, since it only required me to make superficial measurements of my desired object. Making this kind of guiding paper box, while simple, it was extremely useful to know which side my object was facing.
Next in Part 2, the sketching while not very precise, allowed me to get an idea of where all my components should be. It was a fundamental step towards my final product.
Finally Part 3 was the hardest and time consuming. Getting precise measurements of such a small object was tedious to say the least, and to figure out where to put each line so it would not affect the interpretation was hard on itself. The line drawing in different sizes worried me from time to time, since if I made a single mistake, my work would look awful.
One part I disliked was measuring, since my object was sort of old and wore down, all measurement where sometimes not consistent, which made it a pain to notice when you are working in millimetres,
However, even after all the hardships , I was surprised and happy of seeing my work on paper. Looking at everything fit so precisely and be at scale, brought a weird sense of satisfaction and pride in my own work. It is a sense that I would not mind feeling every day.
Part 1

Part 2
Part 3

11 notes
·
View notes
Text
Week 1 Studio Tutorial – Drawing Instrument Exercises
This was a task that I personally was exited about, since it required accurate measurements and multiple faces. However it was still challenging in its own way.
First of all let me start describing what a found interesting about the task. First of all, both part one and two have on-scale measurements and understandable drawing which to follow. My only requirement was to figure out which tools and which techniques would help me accomplish a neat task. Using tool like compass. protractor, ruler and sometimes coins, really makes you use each tool creatively and efficiently. For example, in Image 2, you will see that it was erased, this is because at the beginning I did not measure my triangles with a protractor and attempted to do it with a ruler. this gave me inadequate measurements, which at the beginning produced a wither set of triangles. this shows that each tool must be used to have an optimal drawing.
Now to the challenges. In this task I realized that everything has to be precise. Even missing a millimetre on a line can result in your whole drawing not fitting. An example of this is Image 3, in which every triangle had to fit. Even missing the angle in one corner would show a significant gap. Some also showed to be time consuming. Lets take Image 3 again. Having to draw each triangle can get quite tedious. However this task also let you use you ingenuity, like Image 3.2, in which the same required shape was accomplished, but with fewer strokes.
As for some tools that could and would help, I believe a technical drawing board would go a long way. A recurrent problem of mine was that my ruler keep moving and i spent a lot of time re-adjusting them. A drawing board would keep the paper and rulers in place.
Final Part 1 and Part 2

Part 1

Part 2. - Tessellating Pattern

3 notes
·
View notes
Text
Hi There!!!!
Hello, my name is David Nicolas Carrion Crespo, but I go by Nico. I am an international student from Ecuador. This is my first time traveling on my own so far from my home. I am very excited for this course since I always liked technical drawing. I am fairly new to drawing and sketching overall so I am very excited to see what will happen in this term. During quarantine I have tried to improve my drawing technique, as well as of playing classical guitar again.
4 notes
·
View notes