Text
Reflection - IDES 1262
I have really enjoyed the format of the IDES 1262, learning content, immediately putting it into practise and interacting with other peoples work was a really nice way to learn. I have learnt a lot of really valuable lessons this term that will be very transferrable in the coming years, specifically practical skills in engineering drawing, a digital rendering a fusion. I feel I have gained a really well rounded understanding of the design process, and has really opened my eyes to the value of each step within the process of design.
The engineering drawing portion of the class is surprisingly what enjoyed the most this term. It was a good challenge and was really satisfying upon completion. I struggled the most with the later portion of the course, specifically with Fusion 360 and 3DS Max. I think the challenge with these, and other software, is that you cant just jump straight into them. Its was a process of becoming familiar with the interface, practising and then applying to the task, which sometimes was pretty difficult to get done over the weekend.
If I had my time again, I would’ve committed to getting the work done by the Monday of each week, and not letting it build up on me. In terms of the work, I would've spent more time exploring and understanding the digital software we used, as I still feel I have a huge amount to learn.
In terms of my personal growth throughout this class, I think I’ve developed a greater capacity to find workarounds when thing are not working, either digitally of in the engineering drawings. I also learnt the value of collaborative learning, referring to, and have my work critiqued really improved the quality of my blog posts.
I’ve gained insight into the worth of valuing my time in the design process, utilising both high a low fidelity models, and ensuring there is a very intentional reason for making a model in the first place. Viewing some of the videos made on Andrew Simpson was great, and I think I learnt a huge amount from them after seeing the results in my own work.
Rob and Miles have been great, IDES 1262 feels like the only class that was actually meant to be online. The lectures were engaging and interesting, and the studio class was really well structured. It was really nice to see how prompt they were to responding to emails, its really hard when we don’t have access to face to face learning, so it was nice that they made themselves available.
0 notes
Text
Week 10 – Model Finishing
Preparation- Sadly, for or a number of reasons I was unable to go to UNSW to collect my 3D print, however I have applied the same practices to my blue foam model in an attempt to learn and gain insight for next time I have access to 3D printed models. I prepared a small spray booth for this task using cardboard. I would recommend this as is it really easy to pick up and throw away, avoiding mess and saving time.

Final Finished Model- One thing I would do differently if I were to do this task again would be to make sure the base putty coat is evenly applied. Mine was not, and created small yet annoying imperfections in the final Model. Additionally, seeing it in colour, I don’t think the lid design really suits the bottle, and I would make more alteration to that to make it small and more round.
Finishing this model was really good fun and was a great way to end the term. Seeing the bottle come full circle from a simple sketch to a fulling completed physical model has been really interesting, and taught me a lot.

Olay Shampoo Bottle Development- I been a invaluable learning opportunity to take a product from a basic hand sketch through to a physical 3d printed model. Below is a very summarised vision of this process.

7 notes
·
View notes
Text
Week 9 - Digital Iteration & 3D Printing
3DS Max Modelling:
My Advice to anyone who has not yet completed this task is to really understand the software, before using it. I have realised that there a huge amount of functions and possibilities and it would be a shame only to utilise only 20% of them because you weren't aware of the rest.
3D MAX Experimentation- It was a really valuable learning experience for me to me to experiment with the 3D Max software before I used it on my shampoo bottle design. I found this software difficult to navigate and understand, however after going over the class recording and notes, it was much easier to complete. I can already see a lot of opportunity in this software to open up new ideas that I may not have though of in the past.

Design Iterations- One thing I found really difficult about this was finding the right modifier for the job, as I would have a good idea, but not be able to make changes because I didn't know which modifier correlated with the changes I wanted to make. I’m sure over time I will develop this knowledge, and over the break I will practise using this software to improve.
In 2.2, I attempted to make the bottom half of the bottle wider as I feel It might be easier to hold, however it ended up looking like a weird shaped egg. 2.3 is more experimental as I squashed the bottle segment, again not turning out very well. 2.4 worked really well, twisting the bottle segment gave the design more depth and made it more interesting, and slightly increasing the size of the hole will make it easier for the user to hold the bottle.


Ultimaker Cura:
Cura is a really simple but well put together application, and is the first software i’ve used in this class where i didn't have to refer to the class resources and google for help. I found it interesting how through changing the setting you can drastically change the print time (and therefore quality). This could be linked to the idea of high and low fidelity model making referred to by Andrew Simpson.

2 notes
·
View notes
Text
Week 8 - Digital Models
Andrew Simpson: Razor Handle (Reflection)
This video was really interesting to me and once again, solidified the importance of model making in the design process. Andrew Simpson and his team created a huge amount on models, predominantly using 3D printing, meaning he could make very minor adjustments digitally and within a short period of time had physical access to these changes, testing ergonomics weight etc.
In terms of low and high fidelity, Andrew is referring to low-fidelity models as being cheaper to produce, and therefore the quality and detail in lacking. These models are useful in the initial stages of the design process, exploring things like form and feel. High-fidelity refers to a higher cost model, allowing for greater quality, and is used for final iterations and more intricate or important details of a design.
Fusion 360 Digital Model Making:
This week was a very challenging but overall a beneficial week for me. I really found working on fusion difficult (detailed below), but through a combination of trial and error, and online resources, I development the ability to organically find workarounds for different issues, which is a really great result.
Process Screenshots- Whilst not photographed, I had huge difficulty navigating fusion to create my shampoo bottle. The struggle was achieving the egg like shape of the bottle. I tried many methods, including the revolve tool, creating the shape entirely in the form section and just trying to fillet the whole thing. This really didn't achieve an accurate result, or any result at all. After numerous google searches I found that cant directly sketch on a curved face, and that by using an off-set plane, I could workaround this issue. This now seems really obvious to me and could have saved me a huge amount of time.
What I learnt from this process is that I shouldn't guess or ‘wing it’ on fusion as there are so many different prompts and settings you can go through, and it is more worthwhile spending my time on google trying to figure it out than guessing on fusion. Linked below are youtube videos i used to help me in this task.
https://www.youtube.com/watch?v=HVEaYfdsgXc
https://www.youtube.com/watch?time_continue=179&v=TOedgF0n4yQ&feature=emb_logo

Process Video- My advice to anyone yet to complete this task is to take the time to become familiar with the fusion 360 interface, as you will have a greater capacity to find workarounds to issues without referring to other resources.
youtube
Final Model- I’m quite pleased with the final model, and I think i’ve learnt a lot from this weeks task. My biggest takeaway was how easy fusion can be once you get the hang of it, and its value to a designer within the design process. Specifically, being able to quickly create an accurate representation of a design, and then have to opportunity to make small incremental changes without having to make an entirely new model, saving time and money.


0 notes
Text
Week 7 - Physical Model Making
Pre-Class Activities:
The sanding blocks were relatively simple to make, however I did have some trouble with the dowel, specifically getting the sand paper to stick. I found that using spray adhesive glue and rubber bands (to hold the paper in place) was really useful to resolve this.
Making an orthographic drawing was really great in preparing myself and having a clear understanding of what the design actually is. Further, using this drawing to make positive and negative templates was really helpful, and assisted in making an accurate final product.


Class Activity - Foam Model Making
Process Screenshots- The most important advice I would give to anyone doing this task is the let the sand paper do the work. This is especially the case when trying to reach a smooth finish towards the end. I found that i was using too much force when sanding my model, and quickly result in some very large and ugly chuck that came out. When it came time to smooth these out with finer sanding paper, the damage was somewhat already done.

Process Video- This video didn't turn out as well as I had hoped as I didn't manage to get the placement of the camera right, however I think its still valuable, showing both the things I did well, and the mistakes I made.
youtube
Final Model- I learn’t a lot from this task, and enjoyed converting previous weeks knowledge into something physical. One of the biggest lessons I learnt following the completion of the stage was that it is invaluable for a designer to have the ability to hold and see their designs. With my design, I found that for future iterations I should make to hole in the middle larger to make it easier for a hand to fit in. I realise these kind of lessons are the whole reason that model making exists, and shows just how important it is in the process of an industrial designer.
If I was to do this task again, I would take more time with it in the later stages. Whilst early on it was ok to be brutal with it to remove material, I think I need to place more importance on the refinement of the model. This is really important for me in gaining a true physical representation of a design concept, and will only help me producing a quality final design.

Post-Class Activity:
I used no more gaps to finish my blue foam model, and a number of issues arose from this. The issue was that I used too much, which meant that I had a much bigger sanding job to do with much finer sandpaper. Furthermore, I started sanding too early and the no more gaps had not set, it resulted in a somewhat messy final result. Despite this I have learnt a lot from these mistakes and will apply them to future models.

8 notes
·
View notes
Text
Week 6 - Non-teaching Week Tasks
1. Video Reflection
Andrews video was really interesting for me, in particular how he talks about the process of model making being very intentional, and yet through the design process there is still the capacity for changes to be made. I also picked up that there is no rule as to when model making enters the design process. I really like this, as physical making isn't being approached as a formality but is utilised to inform the design process, resulting in a better outcome for the designer.
I also found it interesting how there is a growing integration of different techniques like 3D printing and low pressure moulding to best test an element or mechanism of a design. This has really broadened my view of the design process, through refining ideas and experimenting with different concepts , model making is clearly a vital step for designers.
Video Link: https://www.youtube.com/watch?time_continue=381&v=f3wlp2G5DtM&feature=emb_logo
2. Home Maker Space:
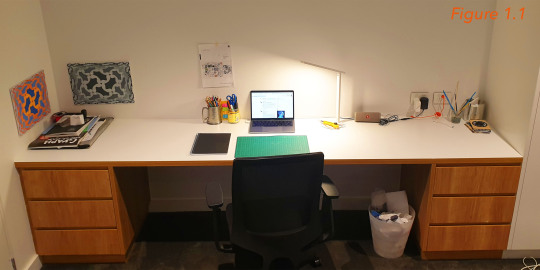
Maker Space 1- The good thing about this space is that there is a significant amount of storage options which means that I can keep the desk tidy and can carry out my work efficiently. Conveniently, the drawers can hold A3 paper, so I usually keep my finished sketches, and general important work in one of these drawers. The rest of the storage space is broken up in different uses (sketching equipment, paper etc) which is great as its very easy to keep track of where things are. I try to use this space as often as possible for non-workshop tasks as it is susceptible to damage from more hand on work.
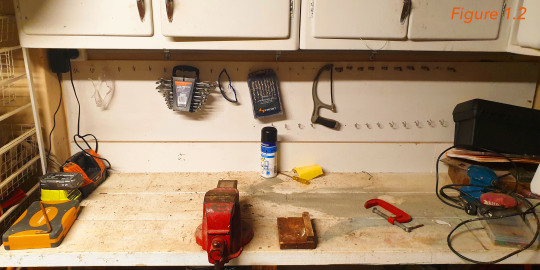
I have made the mistake in the past of attempting to apply spay adhesive glue. which clearly should have been done in space shown in figure 1.2, and highlights the importance of understanding the limitations of home maker spaces whilst we don’t have the luxury of working at UNSW.
Maker Space 2- I am quite lucky to have this work bench in my garage, especially since we don’t have access to the UNSW workshop. Whilst is hasn't been utilised in IDES1262 yet, It’s great for things that will make a mess like sanding, spray painting etc. I can recommend finding a place like this in your home, even if its just a sheet of ply on a table outside, as it gives piece of mind when carrying out tasks that really should be done in a proper workshop.
3. Model Making:
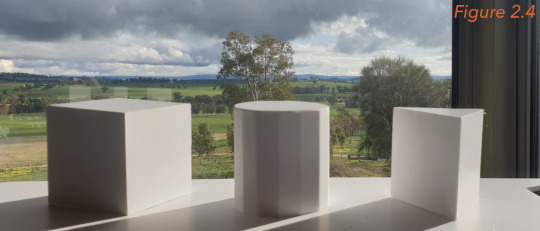
Model 2.1- The use of PVA glue was the most difficult element of the construction for this model, and as a result I had a couple of tries before I got it right. Patience and accuracy were really important, however I found that there were two techniques that would ensure success.
The first was the ensure that the angle of the cuts are correct and clean. It meant that the panels would sit square and not need much support to stay together, only requiring a small piece of tape whilst waiting for the glue to dry. I did this by using a new blade on a scalpel, and a steel ruler which kept the cuts straight and consistent on all sides.
The second was not to use too much glue. Using a minimal amount of glue was important so it dried faster, and would have less chance of leaking excess glue. I did this by using a brush to apply the glue, which was far more effective than straight out of the bottle.

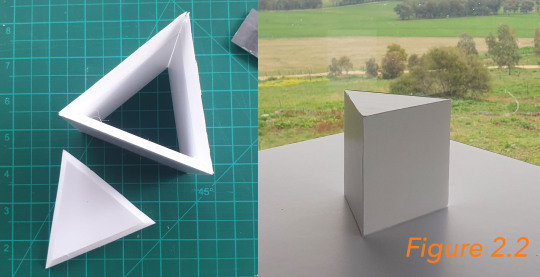
Model 2.2- In the reference video, the presenter said how hot glue was not appropriate to use in this kind of model making however from past experiences I found this to be a bit of an exaggeration. I used hot glue in model 2.2 to test this. Its really important to not use a large amount of hot glue, and again, get the angle cut correctly, if you achieve this, there will be no need to cut away excess glue, and I found that it looked just as neat as Model 2.1 whilst taking half the time.
Model 2.3- This was easily the most difficult for me as I was hoping to have an even and perfect circle, however this obviously was not achieved. If I did this again I would space the slits closer together and measure it our prior to cutting. Despite this not being successful it was a good learning experience as I now know what not to do, and I know how to improve in the future.

Final- My advice to anyone doing this task is to practise your angled cuts on a scrap piece prior to committing to the real thing. Sometimes its hard to visualise what angle is needed, and I found it very valuable to double check. This is essentially a warm up for the real thing, and helps to avoid finding mistakes later in the construction process that would force you to start over.
17 notes
·
View notes
Text
Week 5 - Sketching Workshop
Week 5 has been a really interesting yet challenging week as we were introduced to digital rendering. Whilst I had difficulties, I gained a lot from both the lectures and the studio task.
Part 1: Freehand Sketching
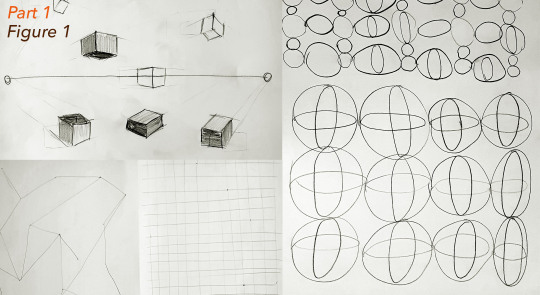
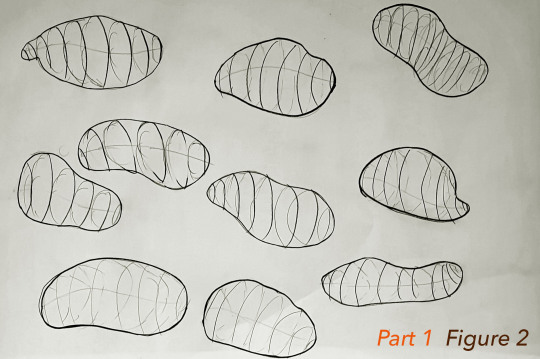
Part 1 was surprisingly useful, I didn’t realise that it would be beneficial or even necessary to warm up for sketches, and by the end of the process, I felt that my sketches were more accurate and intentional. I learnt that its really important not to rush into sketching without being appropriately warmed up, it prepares you both physically and mentally and results in a better standard of work.
Ellipses are something that is going to take some time and practise to get right, (see Fig. 5) as such I will need to work on this in my spare time. Overall I am glad that we were introduced to these techniques and I would recommend them to anyone attempting to sketch in the future.
Part 2: Digital Rendering
I felt I learnt a lot from completing the digital rendering task this week, and I enjoyed the opportunity to translate some previous experience using photoshop into this task.
Sketches:
The purpose of these sketches was just to get my thought process going prior to beginning the digital rendering. Whilst I didn't use all them, I learnt that it was actually a really good thing to do as it helped me establish what might look good and what will not.
If I did this again, I might try to complete these initial sketches to a higher standard, so there is less design decisions to be made when the sketches are translated to photoshop.

Process Video:
The video below shows my process from start to finish during the digital rendering task. Overall, I found it really challenging, many portions of this video see me going back on mistakes and completely changing elements of the composition. I struggled with understanding the layering and masking and the overall complexity of this. I overcame this partly through re-watching the recording of the week 5 lecture.
Despite reviewing the lecture, I still struggled, partly due to the quality of the recording, but also I would do the same thing as Rob, however it would result in a different outcome. This was highly frustrating and took a lot of perseverance and help from resources like Graphics Wizardry and Michael DiTullo on youtube to overcome. In the end I managed to find workarounds for the issues I was having, and I am reasonably pleased with he result.
My advice to anyone trying to do this task is again to ensure that the foundations are correct. It was very easy for me once I had the correct layers and masks to edit and play around with designs, however when the masking and layers were wrong, nothing would really go as planned. This says a lot about setting yourself up for success right from the start, and I will do my best to achieve this in the future.
youtube
Final Composition:
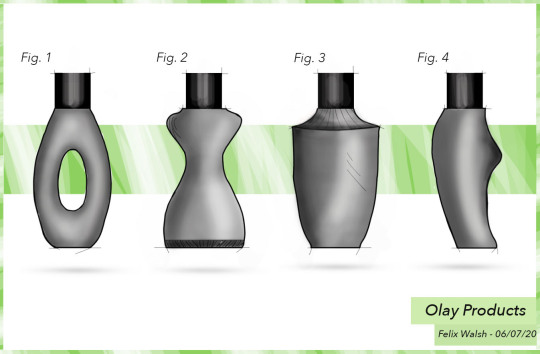
Overall, I am happy with the result, however if I were to do it again, I would I put more time into the shadowing as it isn't as effective as I thought it was going to be. I chose to use green for the background as it is a neutral colour that represents health and good luck, and as this is intended for presentation, I thought it may help the customers remember my design as positive. I considered putting notes or centre lines on this composition, but in the end it felt unnecessary for such simple products, and might have cluttered the page.
4 notes
·
View notes
Text
Week 4 - Perspective Drawing
Over the past few weeks in IDES 1262, I have come to the realisation that the skill I lack the most is the ability to visualise an object for drawing. With simple objects, this has been manageable however I’m going to have to work on this in my spare time in order to achieve a a higher more detailed standard of work.
Part 1: 2 point perspective of a chamfered box
Part 1 was deceivingly simple, and as such I initially approached it with some very unwarranted confidence. The placement of things like the LVP, RVP, SP etc was difficult for me to visualise and get proportionally correct. I learnt a lot from referring to the presentation slides and resources, specifically the process needed to complete a perspective drawing to standard. The drawing matches the image in the week 3 exercise which is good to see. I think it turned out reasonably well, however if I did it again I would make more of and effort to show construction lines as it would add a lot of value to the image.

Part 2: Extending a box in perspective
The most important thing I learnt from this section is the importance of the LVP and RVP in relation to the object. Part 2 was really just a case of drawing out the guidance lines to create another box. This really secured my understanding of basic perspective drawing as it reiterated the skills learnt from part 1. However, I found the top box really confusing, specifically trying to give the impression that its being being viewed straight on. After referring to other peoples work on Moodle I found a solution, however i’m still not certain I got this correct. If any one has any advice on this it would be great to hear from you in the comments.

Part 3: Drawing circles in perspective
Part three was also reasonably challenging with the incorporation of ellipses into a perspective drawings. I clearly have made a mistake in terms of the quality of work in part 3. I traced over the boxes in pen without using a ruler, which is a pretty clear indicator that I was rushing through this task and is something I defiantly will not do again. This task was a great for practising ellipses, and I learnt a lot about my own technique and preferences, specifically I prefer doing the whole ellipse in one go rather than in sections. One interesting thing I found was that it was a lot more difficult for me to draw ellipses in pencil than in pen. I’m not 100% sure if I got my major and minor axis’ correct so I will go back and see if there was anything thing I can fix for next time.
(Orange = Major axis / Blue = Minor Axis)

After reviewing other people's work, I realised that my previous part 3 was not up to standard, as such I re-did the task. Most importantly was that the boxes are accurate and in perspective, which they were not in the previous image. I should’ve just done it properly in the first place and saved myself time... lesson learnt... again.

Process videos - Part 1, 2 & 3:
Based off my experiences this week, my advice to others is to stress the importance of getting the basic foundations right before beginning the bulk of a drawing. It may take a little more time, but it will ensure there are no underlying issues with the final drawing, and in general just make the whole process much easier.
youtube
0 notes
Text
Week 3 (Part 2) - Secondary Auxiliary Views
It has been really satisfying to approach this task with a greater confidence and ability in engineering drawings.
One area which I struggled with this week was the secondary auxiliary view, specifically visualising it in relation to the Primary Auxiliary View. I ended up referring to other peoples work and found their process images really helpful. Furthermore, I turned to my peers for advice. This was successful as they were straight to the point and related their advice to the actual task, whereas sourcing help from the internet is often unreliable and unclear. It really showed me the value of working with others, and is something I will strive to do in the future, ensuring that both mine and my peers work is to the best standard.
Process Video:
youtube
Paper Reference Model:
I made a paper model prior to starting my final drawing. Whilst the dimensions weren’t correct, this was integral in helping my visualise the auxiliary views. I know this isn't realistic for every Engineering drawing, but as this was my first time attempting a secondary Aux view, I thought it was a good way to build my understanding.

Final drawing:
The biggest thing I learnt from this week was how important it is to have the distance between the front, top and auxiliary views equal, in order to complete the drawing correctly. I made a small error as you can see on the final drawing by not matching the top and primary aux views with the front view distance. This wasn't a significant error and I will be sure to do the correctly in the future.
Based off my own experiences this week, if I had any advice for others, it would be to ensure that you understand and can visualise what perspective you are drawing. I found that I didn't actually know exactly what I was drawing in my layout page, and it wasn't until i made a paper model that I was able to picture how each view fits within another.

Overall I am happy with what I produced this week, the drawing is neat and tidy and I feel that I have got the dimensioning right, making sure not to double up like in previous weeks.
3 notes
·
View notes
Text
Week 3 (Part 1) - Section & Auxiliary Views
Week 3 was quite challenging for me with the task of completing a third angle drawing with a partial auxiliary view and a section view for the first time. Once again the process of completing a freehand layout sketch was really useful as it helped me visualise what needed to be done, and prevented any errors when completing the actual drawing. Essentially this step is necessary in sorting out any problems without the pressure of needing to be 100% accurate.
One thing that I struggled with this week was visualising the partial auxiliary view which took me a few tries to understand and get right in my layout page. I also learnt this week how important the front view is in a third angle drawing, as it is the base that ensures the rest of the drawing is to the correct scale. I made a couple of errors early on in my layout page which had a knock-on effect for the rest of the sketch.
Process Video:
Below is a video of my drawing process this week. Its a very basic video but I thought it was a neater and clearer way to present the process images without taking away from the importance of the final drawing.
undefined
youtube
Final Drawing:
Based on my mistakes from last week, I really put a lot of effort into making sure I didn’t double up or include unnecessary dimensions, and I hope that this has come out well. Further, I ensured there was a clear stroke difference between dimension lines and actual part lines. This has made the drawing much clearer, however it still isn't as obvious as I would like. I also need to make the actual numbers larger in size as they again have not photographed well. One other change I made from last week was using a lighter grade pencil before I traced over with pen. This made it easier to erase mistakes and helped in showing the difference in line strokes.

If I did this task again, I would make the boarder slightly smaller to really put the emphasis on the drawing. Further, I need to work to making the dimensions clearer and easier to view.
Overall, i’m happy with the work this week and enjoyed the studio and lecture sessions. I think my confidence in my ability to produce these kind of drawings is building each week.
10 notes
·
View notes
Text
Week 2 - Orthogonal Projection & AS1100 Standard
As touched on at the beginning of the class, one big takeaway from week 2 for me was slowing down and taking care with my work. I think the idea that small errors quickly compound into big errors is very true, and by taking time with a drawing, these errors can be avoided altogether.
This week in IDES 1262, we explored in greater detail engineering drawings, specifically, third angle drawings that adhere to AS1100 Standards.
Part one was relatively simple, and involved the construction of a 5 sided box to fit over the chosen object, in my case a tape dispenser. At first I thought this task was basic and unnecessary, but upon beginning part two I realised it was useful for reference, especially because this was my first attempt at this format of drawing.
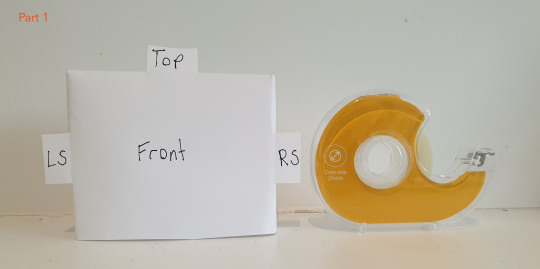
Part Two was especially useful in helping my gain an understanding of the concept behind third angle drawings, specifically, lining up the key points to maintain the correct scale. I used part two as a rough sketch to help me visualise how the layout works, and to get my dimensions and technique correct. This part was a very useful step.
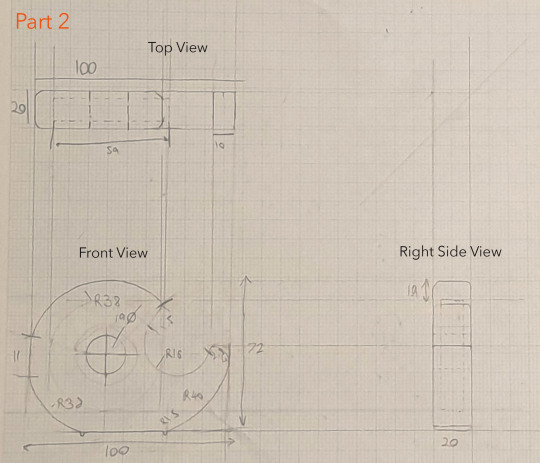
Finally, Part 3 was time consuming, however I am reasonably happy with the results. One mistake I made was not creating the boarder and title block before I began the drawing. As a result the drawings are slightly too close to the boarder, and I will ensure this doesn't happen in the future. Further, in the future I will make the dimension markings clearer and larger as it did not turn out well in photography.
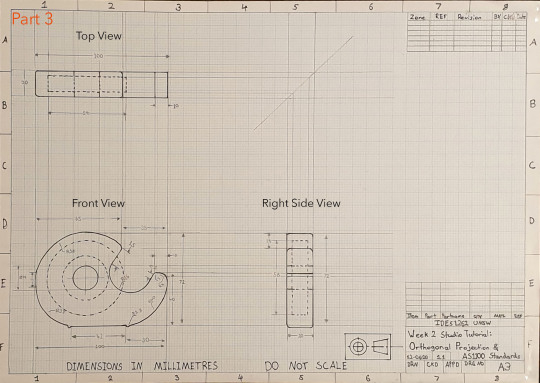
If I were to do this task again, I would put a lot of time ensuring I don’t double up on dimensions. This error has made my drawing slightly confusing and cluttered and doesn't adhere to the standards.
Overall, I am happy with the way week two went in IDES1262, the lectures were informative and engaging and I enjoyed the studio task assigned to us.
10 notes
·
View notes
Text
Week 1 - Drawing Instrument Exercises
Week one in IDES1262 was an introduction into the term ahead, including the procedures and expectations of the class.
Figure one was relatively simple once I utilised the compass and the angle of the set squares to set out the points of the triangles. This made the whole process much quicker than I originally thought, as it was just a case of connecting the points and erasing the necessary sections to complete the shape. I already have noticed that there are techniques that can be used to really simplify the process of engineering drawings. I also found that going over the markings with a pen really defines the line work for photography.

Figure two was slightly more challenging with the addition of curved lines which presented a few issues for me. Using a compass and set square was helpful, as well as a circle stencil template which I used to achieve to correct radiuses for the inside curves. Overall this was successful, until I traced over the shape with a pen to define the line work, this made the shape slightly messy and made the small curves look incorrect, as seen in figure 2.2. In the future I will use the compass pen attachment to ensure perfect line work.

Figure three could have been photographed better, I didn't align the pieces up very well as seen in figure 3.2. In the future I should take more care when documenting my work. Despite this, the task was relatively simple. I found that once first shape was measured it was just a case of ensuring my cutting was done correctly with a Stanley knife and cutting mat. Turns out this was actually quire important... Probably should've used a steel ruler.

Overall this task took me awhile to get correct but was useful in introducing me to the different pieces of equipment I will need to create engineering drawings in the future.
13 notes
·
View notes
Text
Introduction
Hi, I’m Felix from Sydney and i’m a first year studying Industrial Design. I took a GAP year in 2019 to travel and work in a UK boarding school, which turned out to be great timing #corona. I chose Industrial Design as I really engaged with this kind of work whilst at school through the design technology class, and figured that this was the logical next step. I’ve really enjoyed the industrial design course so far, and am looking forward to advancing my ability in IDES1262.
0 notes