
flooferpoofer
the floofer
drawing whatever that comes to mind
27 posts
Don't wanna be here? Send us removal request.
Last Seen Blogs

mothering-silence
Mothering Silence

mlp-regression
My Little Pony Age Regression Community

borders67
Untitled

maruses
film & cats.

another-look-another-level
Another Look Another Level
Text
A dazai reaction to accompany it cuz why not lol


I've been really busy with school but finally found some time to draw again :")
I actually suck at drawing mouths and noses so this is kind of a practice and who else better to practice it on than Chuuya? Hehe
#had to decide if i wanted to colour his hair brown or not#clearly put more effort in the chuuya one lmao but it's 3am now and i wanna sleep :")#dazai osamu#bsd#bungo stray dogs
17 notes
·
View notes
Text
I've been really busy with school but finally found some time to draw again :")
I actually suck at drawing mouths and noses so this is kind of a practice and who else better to practice it on than Chuuya? Hehe
#i kind of drew chuuya from memory so his features aren't exactly the most accurate#chuuya nakahara#bsd#bungo stray dogs#reference from @ma2_siva on twitter cuz i'm not good enough at mouths to draw without one
17 notes
·
View notes
Text
Shoma's Dancing On My Own was beautiful as always ♡
26 notes
·
View notes
Text
Just watched the Men's FS stream just now and is it just me or has Nathan's interpretation and performance improved? He seems to connect more with the music now than before
16 notes
·
View notes
Text
Edit: fixed the colours to fit the original a little better!


Hit an art block so just redrew my favourite panel from Tamen De Gushi in my art style~
371 notes
·
View notes
Text
Hit an art block so just redrew my favourite panel from Tamen De Gushi in my art style~
#didn't get the lighting entirely right but i tried 🙃#i love qiu tong and sun jing's relationship#they're so adorable ♡#tamen de gushi#pls update soon 😭#my art#my first art post that isn't a sketch haha
371 notes
·
View notes
Text

A study of Chuuya's ass
#i may or may not have more of these sketches#no im not obsessed#i think#chuuya nakahara#bsd#bungo stray dogs
35 notes
·
View notes
Text


Not sure which version looks better so here's both hehe
#i have a thing for soukoku in casual wear#this looks kinda messy 💀#another quick procrastination sketch#bungo stray dogs#soukoku#bsd#chuuya nakahara#dazai osamu#i clearly went too far with the highlights on dazai's hair
86 notes
·
View notes
Text

Soukoku in a car... probably
#it was supposed to be a quick sketch#how did it end up being 7 hours#took some liberties with their designs hehe#soukoku#dazai osamu#chuuya nakahara#bungo stray dogs#bsd#my art hehe
62 notes
·
View notes
Text

I can see University AU Chuuya in a band and contemporary dance while doing a degree in Literature with Dazai, and Dazai tags along to all of Chuuya's after school activities -- annoying him the entire way
(I may or may not be coming up with a University AU soukoku fic in my head)
#follow up from my prev dazai post hehe#chuuya with the guitar was drawn from referencing a manga panel in Pink Heart Jam!#chuuya nakahara#bungo stray dogs#soukoku#planning to make this a soukoku thing haha#bsd
101 notes
·
View notes
Text
skk :D
chuuya: you're so annoying
dazai: then stop holding my hand
chuuya:
chuuya: no
180 notes
·
View notes
Text

University AU Dazai has been plaguing my mind for a while so I had to sketch him haha
#my art#my first public art post! pls be kind to me ♡#chuuya's up next!#feel free to repost but pls credit me!#artists on tumblr#dazai#dazai osamu#soukoku
69 notes
·
View notes
Text
Dazai: At my funeral, take the bouquet off my coffin and throw it into the crowd to see who's next.
819 notes
·
View notes
Photo

Crotch and Buttocks Anatomy by NemoNova
4K notes
·
View notes
Text
Layout Background Exercise
For Gobelins’ entering contest, one of the request is background skills, and the ability, with a pen, to visualize yourself in a 3D space.
So I gaved myself an exercice than can be similar to what you can have during the contest, and which are the steps I’m going through :
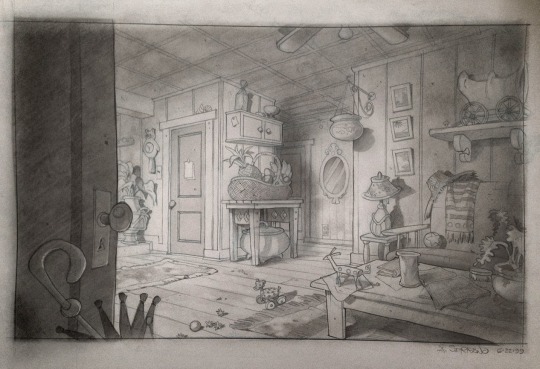
Here is a background concept done by Armand Serrano, for the movie Lilo and Stitch.
Let’s put the following consign : try to draw the “against field” of this place (it mean, as in cinema, shooting in the opposite direction to another shot)
For this, we must be aware to :
- Place our virtual camera correctly
- respect perspective rules
-placing correctly our objects in the space (what does make the “link” between the two shots)
- Keep a cool composition
-respect the design
-use our imagination to field the empty space
So, let’s do this !
1. Making a Map and a good thumbnail
-It’s a good exercise to try put everything in a map, including the camera (CAM1) and visualize what we know and what we have to imagine ; not very easy, but it’s making win a lot of time for after !
- Then I just had to place the other camera (CAM2) on the other side, and begin to think about what would be in the room on the other side.
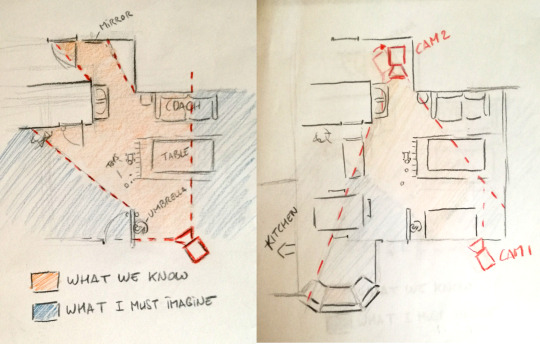
- When I did the map, I was working in the same time with a thumbnail of my scene (note : thumbnail is a very small drawing. Good to remember : small drawings for big ideas ! ) ; like this I could think about having a cool composition and match with the background in the same time. That’s why (as you might see) I decided to tilt a bit my CAM2, because I felt it more interesting for the composition.
2. Ruff drawing
- So here begin the interesting part :) it’s importent to begin by placing the horizon line, the vanishing points (in this case, two) and a perspective grid, all of this being sure it’s mathching with your thumbnail.
-Then, I built every objects, being sure it’s on the perspective, and puting all my ideas.
note : I was always thinking : this is a place where people are living, we have to FEEL It. It’s passing by using the props and the randomness of their position to suggest this idea.
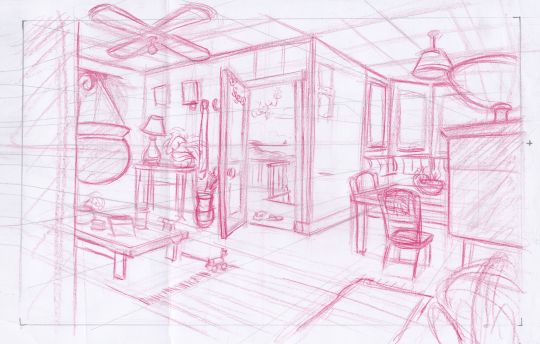
3. Line Up
- On this part I was always trying to be careful about keeping the style of the artist, about props design, and the way of working the line.

4. (Bonus) Shadows
- Personnaly, I wanted to try making she shadows on a traditionnal way, as they where doing before at Disney. For this I first scanned my drawing (to have a backup in case), then I used carbon powder, I was putting stronger at some places, using an eraser to have my lights, and my pencil to go into the detail in the lighting.
-It’s important, when doing lighting, to know where the light come from, and what you want to show. Contrast is the master word ; with the light and shadow, you can choose to show more one thing than an other (for example, I chosen to show less the left part, and put on the light the right part)

My drawing could be better, about the choice of props and the angle, but I hope this tutorial helped you to see better the process to draw an “against field” from an existing layout, hope you enjoyed :)
Be free to comment, cheers !
11K notes
·
View notes
Photo


Various arm studies implementing simplified muscle structures for better understanding and quick-hand methods. Arms with an “o” near them were done with minimal to no reference.
12K notes
·
View notes
Text
What ARE Vanishing Points?
So I feel like a lot of confusion with drawing in perspective is because people are not taught the absolute basics properly? So let’s do that.
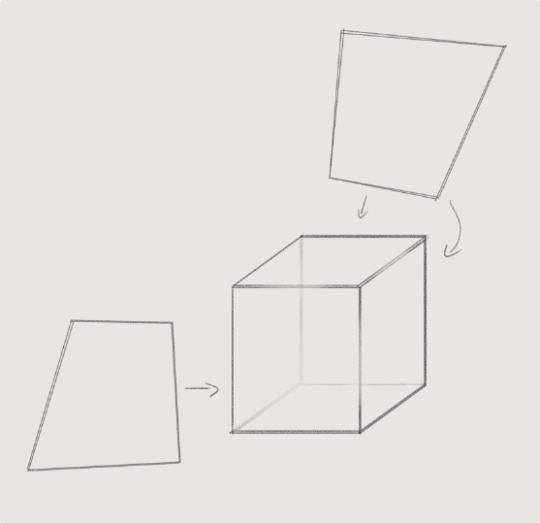
Let’s say we have a cube.
Now, a cube we know is made out of 6 squares or rectangles, and every edge is at a 90 degree angle.
so every opposite edge of a cube is exactly parallel, right?
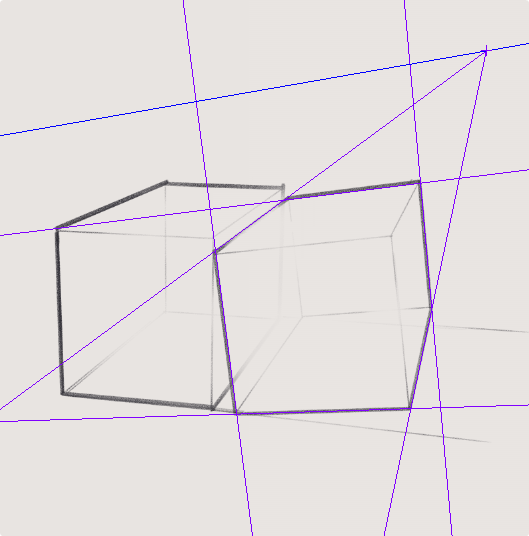
but let’s say we draw a cube using only parallel lines:
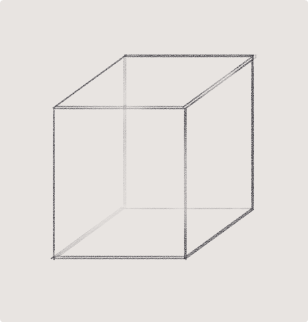
this looks a little weird, you know? Like if i try think of this as an object in 3d space and i look at it for too long, the faces start to look really warped - with like the back looking bigger than the front as if its been made out of weird wonky trapeziums
so what’s going on here? if all those edges are exactly parallel, why does it look weird?
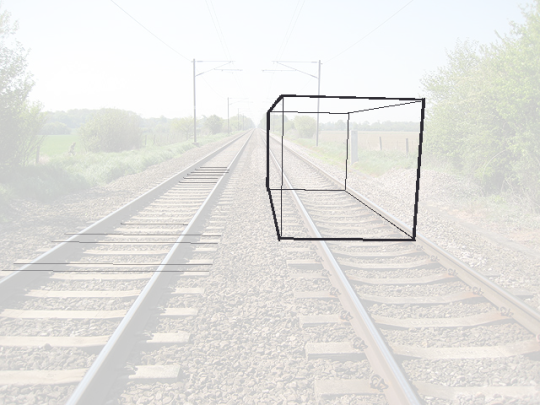
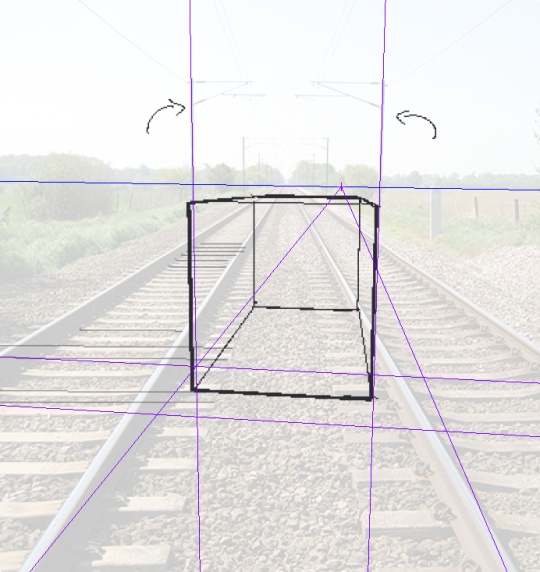
lets take a look at this photo of a railway track

Now we know that the rails on a track are always going to be parallel, they have to be the same distance apart so the train can stay on the track yeah?
But we can very clearly see that these tracks are converging to a single point in the photo.
So what does this tell us, exactly? That our view of the world is naturally warped, and that lines that are physically parallel when drawn in perspective will converge to a single point.
Now, I could call this image “one point perspective” - but that’s not really true,

if these lines are also parallel, then they must also converge to a single point in perspective, right? so lets add another point

clip studio paint automatically adjusts the horizon line to fit the new points you add to your perspective…. notice how the horizon line actually fits the photo better now?
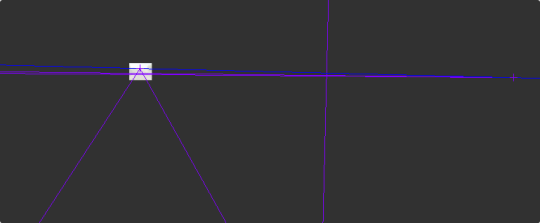
our new point is a very very long way away, so we don’t notice a lot of difference in the angle between lines, but the point that i’m trying to make here is:
Drawing with perspective guides is not about choosing one, two, three point perspective etc. those are just quick ways to set up a certain viewing angle
What you are doing when you use these guides is making your parallel lines converge to a point.
So, if you want to draw a big ol’ cube that’s aligned to be parallel with these railroad tracks, then you can do that with the same point as the tracks - because it’s parallel. It’s on the same axis!
but what if you want to draw a cube that’s rotated, and isn’t parallel to the tracks?
well that’s not too difficult to do if you know that every point represents one set of parallel lines.
If these lines aren’t parallel to the ones you already have, then clearly you just need new points.
We’re not planning to tilt this cube up into the air, or rotate it onto its side, so we’re going to leave the vertical axis alone, and just move our horizontal points to a different place on the horizon line
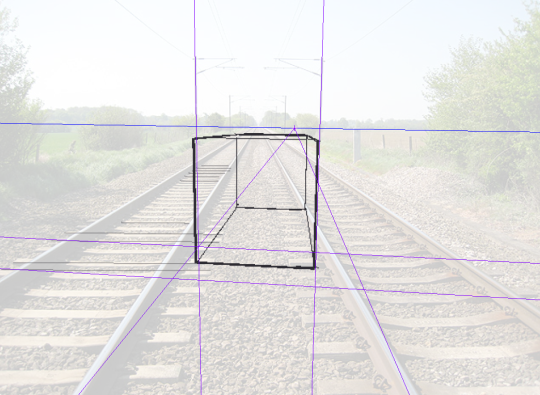
But speaking of the vertical axis - the only points that will be on your horizon line are the ones that are flat on the ground. But you can still have points that are not on the horizon line!
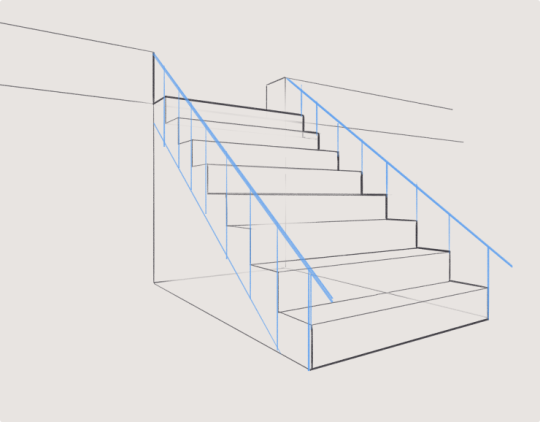
This is important to remember because if you’re trying to draw something like a slope or stairs, something that has an incline, it’s not going to be level with your horizon.
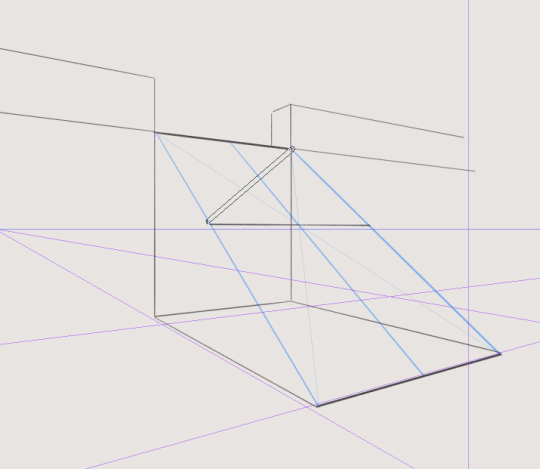
Let’s draw some stairs as an example.
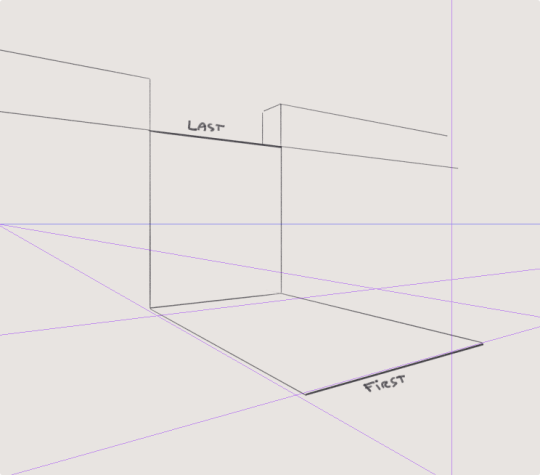
This is actually pretty simple - first draw where your slope starts and ends by drawing a big L shape.
this will give you some parallel corners, which you can then connect to make a new point for your slope

And with this you can then find the centre and divide that up into equal parts to make your stairs (http://lesbianlinkle.tumblr.com/post/176704472820)
So lets go back to our original cube, with the knowledge that our parallel lines should all converge to a point and draw it again
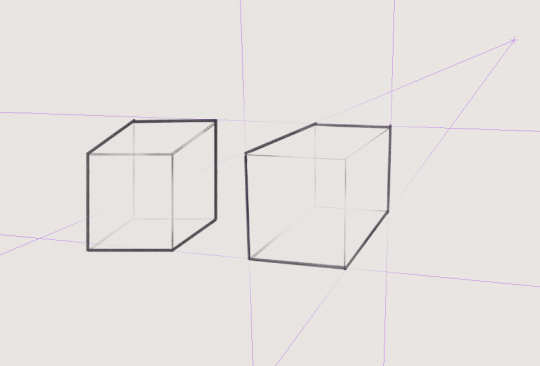
well, doesn’t that look better!
but also, now you know how to make a cube lean against its buddy like this

because we just make new points for the new parallel lines
Anyway I hope that clears some things up, and makes perspective easier to understand!
Also if these tutorials have been helpful and you’d like to support me, I do have a patreon & a ko-fi you can donate to :^)
10K notes
·
View notes